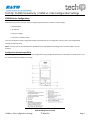
1
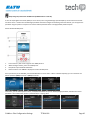
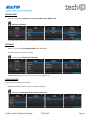
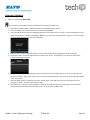
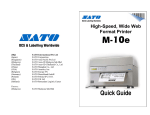
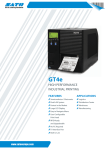
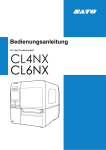
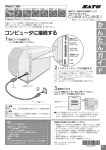
TechTip: CL4NX Connectivity | CL4NX vs. CL4e Configuration Settings CL4NX Printer Configuration SATO CL4e series printers have four ways of configuring the operational parameters printer settings: • potentiometers • dip switches • LCD menu settings • commands in the data stream. The host commands to modify configuration settings will modify the current configuration values as if the user changed them manually on the front panel. NOTE: To access menus, place CL4NX printer OFFLINE and press the ENTER key to Settings menu. Based on CL4NX 1.2.0-‐r16 firmware. Configuration Setting Compatibility The following sections list the SATO CL4NX series configuration setting along with a description of its behavior on SATO printers, and the corresponding SATO CL4NX menu setting. SATO CL4NX Operator’s Panel CL4NX vs. CL4e Configuration Settings TT2014-‐001 Page 1 Potentiometers • SATO “e” series setting: PRINT Potentiometer on legacy “e” series print models to adjust print darkness. CL4NX setting: Settings/Printing/Advanced/Adjustments/Darkness Adjust (0-‐99 / Default:50) • SATO “e” series setting: OFFSET Potentiometer to adjust the stop position by either increasing/decreasing amount of forward/backward feed distance (+/-‐ 3.75 mm) used for tear-‐off/cutter/dispense position. CL4NX setting: Settings/Printing/Advanced/Adjustments/Offset (units in dots based on dpmm of print head installed) • SATO “e” series setting: PITCH Potentiometer to adjust the leading edge position of the label (+/-‐3.75 mm). Affects physical start position of label under print head in the feed direction, thusly vertical print position. CL4NX setting: Settings/Printing/Advanced/Adjustments/Offset (units in dots based on dpmm of print head installed) CL4NX vs. CL4e Configuration Settings TT2014-‐001 Page 2 DIP Switches • SATO ‘e” series setting: DSW1 (RS232C Plug-‐in Interface NOTE: DB25 for “e” series / DB9 for CL4NX) Serial Port Settings CL4NX setting: Settings/Interface/RS-‐232C (Baud Rate/Parameters/Flow Control) • SATO “e” series setting: DSW2-‐1 Print Mode Selection. Selects between Direct Thermal printing on thermally sensitive paper or Thermal Transfer printing using a ribbon. CL4NX setting: Settings/Printing/Ribbon (check box) • SATO “e” series setting: DSW2-‐2 Sensor Type Selection. Selects between the use of a label gap or a reflective Eye-‐Mark detector. CL4NX: setting: Settings/Printing/Sensor Type The selection is based on Auto-‐mode setting (checked by default) – NONE will not be visible if Print Mode is not set to Continuous -‐ see DSW3-‐3 for specific changes CL4NX vs. CL4e Configuration Settings TT2014-‐001 Page 3 DIP Switches (continued) • SATO “e” series setting: DSW2-‐3 Head Check CL4NX setting: Settings/Printing/Advanced/Head Check • SATO “e” series setting: DSW2-‐4 Hex Dump Selection. Selects Hex Dump Mode. CL4NX setting: Settings/Tools/ HEX-‐Dump/Hex Dump Mode/Enable (Default: Disabled) To perform Hex Dump using CL4NX, you will first have to Enable Hex Dump Mode – once enabled, place the CL4NX printer online and send data via any of the connected interfaces. Unlike “e” series hex dump, printing of datastream may occur if data commands are able to be processed. To view captured datastream, you will need to Disable Hex Dump Mode in Tools menu and select Log Files to be able to Copy (if USB flash drive installed to USB port in CL4NX), Remove or Print selected hex dump information captured from corresponding interface. The screenshots above is example of copying datastream captured from LAN interface via Hex dump with USB Flash Drive inserted into CL4NX (filename will prefixed with interface data was received and enumerate for each file captured on corresponding interface name). To copy the selected file(s), use the directional arrows and press 8 ENTER button to select/de-‐select check box and then press ü button to confirm action. Selecting Print in Log Files menu will be similar to “e” series hex dump where data is printed on labels. It is recommended to Remove the files once they have been examined. CL4NX vs. CL4e Configuration Settings TT2014-‐001 Page 4 DIP Switches (continued) • SATO “e” Series setting: DSW2-‐5 Receive Buffer NOTE: There isn’t a single-‐item mode on SATO CL4NX printer – it is always in Multi-‐Buffer; you can only change the Status response type for the selected interface type CL4NX setting: Settings/Interface/interface type/Flow Control • SATO “e” series setting: DSW2-‐6 Firmware Download. Places the printer in the Firmware Download mode for downloading new firmware into flash ROM. CL4NX setting: Firmware download is performed using All-‐in-‐One Tool or via package file copied on USB Flash drive • SATO “e” series setting: DSW2-‐7 Protocol Code Selection. Selects the Standard or Non-‐Standard command codes used for protocol control character. CL4NX setting: Settings/Applications/SBPL/Standard Code With Standard Code checked, the SBPL command prefix character using the <ESC> (1BH) character and with Standard Code not checked, the SBPL command prefix character using the ^ (5EH) character (non-‐Standard). CL4NX vs. CL4e Configuration Settings TT2014-‐001 Page 5 DIP Switches (continued) • SATO setting: DSW3-‐1, DSW3-‐2 Media Handling Operation Possible modes are Continuous, Tear-‐Off, Dispenser*, Cutter* CL4NX setting: Settings/Printing/Auto Mode (Default:Enabled) With Auto-‐mode Enabled, the SATO CL4NX will automatically detect/set operational mode based on media handling option installed (e,g, Continuous*/Tear-‐off/Cutter/Dispenser). To manually control the operation method, you will first Disable Auto-‐mode checkbox and then Print Mode menu will provide applicable selection. NOTE: when selecting Continuous, the leading edge of label is positioned under the print head to image label – subsequently additional label(s) will have to be fed in order to remove from printer and thus Tear-‐off is recommended or unless using a rewinder or continuous media. * Dispenser or Cutter option must be installed • SATO setting: DSW3-‐3 Label Sensor Selection. Enables or disables the Label Sensor – typically used for Continuous media (no Gap/Eye-‐Mark). CL4NX setting: Settings/Printing/Print Mode – Sensor Type With Auto-‐mode DISABLED (unchecked), select Print Mode to choose Continuous. Once Print Mode is set to Continuous, change Sensor Type to None CL4NX vs. CL4e Configuration Settings TT2014-‐001 Page 6 DIP Switches (continued) • SATO setting: DSW3-‐4 Back-‐Feed Selection. When Back-‐Feed is enabled, the printer positions the last printed label for tear-‐off/dispenser/cutter and wait before it retracts to print head position to print the next label. CL4NX setting: Settings/Printing/Backfeed • SATO setting: DSW3-‐5 EXT Print Start Signal Selection. Allows an external device to initiate a label print for synchronization, such as an applicator. CL4NX setting: Settings/Interface/EXT I/O (Default:Disabled) •SATO setting: DSW3-‐6, DSW3-‐7 and DSW3-‐8 These dipswitch settings determine operational signals used by External I/O port for both the polarity/signal type for DSW3-‐6&3-‐7 (level or pulse) and the use of EXT I/O Reprint (DSW3-‐8). Refer to Section 7.7.6 External Signal Interface (EXT) in the SATO CL4NX Operator’s manual for the signal reference information. CL4NX setting: Settings/Interface/EXT I/O/Signals* (Default:Disabled) *Option/Selection becomes available when External I/O is Enabled. See DSW3-‐5 for steps to enable EXT I/O port. You can enable/disable the EXT I/O Reprint option for controlling reprint signal via EXT I/O port (DSW3-‐8). CL4NX vs. CL4e Configuration Settings TT2014-‐001 Page 7 LCD Panel, Normal Mode • SATO setting: PRINT DARKNESS Used to adjust the amount of heat (i.e. power) applied to the head for printing. CL4NX setting: Settings/Printing/Darkness Range is 1 (lightest) -‐10 (darkest). Default is 5. Software commands (<ESC>#E) will override LCD setting. •SATO setting: PRINT SPEED Sets the print speed in inch/second. CL4NX setting: Settings/Printing/Speed Speed is dependent on DPI of print head installed (203dpi:10ips / 305dpi: 8ips / 609dpi: 6ips). Software commands (<ESC>CS) will override LCD setting. • SATO setting: CANCEL PRINT JOB If the printer has print job(s) in memory, there will be a quantity (QTY) displayed in LCD -‐ selecting CANCEL Ï button will cause the job(s) to be cleared. NOTE: You will not be able to access the Settings menu with print job in buffer – pressing the 8 ENTER button will make the Adjustments menu appear – adjustments/changes will affect print image on subsequent labels -‐ press the BACK button to return to OFFLINE on LCD CL4NX setting: Place printer OFFLINE – Press CANCEL Ï button to cancel print job(s). CL4NX vs. CL4e Configuration Settings TT2014-‐001 Page 8 • SATO setting: PRINT OFFSET V PRINT OFFSET H This setting changes the base reference point for all subsequent label jobs. Its effect is identical to the <ESC>A3 Base Reference point command. CL4NX setting: Settings/Printing/Imaging • SATO “e” series setting: Service Mode/PRIORITY SETTING This selection allows the user to assign a priority for CS (Print Speed), #E (Print Darkness), A3 (Base Reference Point), IG (Sensor Type), PM (Print Mode), and PH (Print Type). If LCD is selected, the setting established via the LCD display/menu system is used for incoming label job, regardless of any different command settings. If Command is selected, any software commands in the label job takes precedence and is used for printing the job. The LCD display reflects the new setting. Settings/Printing/Advanced/Prioritize CL4NX vs. CL4e Configuration Settings TT2014-‐001 Page 9 Steps to bypass password on CL4NX menu (CL4NX firmware 1.2.0-‐r16) If user has set/forgotten the Level1 (0310) to access menus) then using the Manager password (6677) can be entered to override and access menu. If both Level1 and Manager passwords have been changed to something other than default, you can bypass the password using the power on sequence and use the default password values to change/disable password option Power off SATO CL4NX printer 1. Press and hold (Left-‐arrow + Right-‐arrow + BACK) buttons 2. While holding 3 buttons, power on CL4NX printer 3. Keep buttons pressed while LED flashes 4. Release buttons once ONLINE is displayed in LCD on CL4NX printer Once you take the printer OFFLINE, press the ENTER button to access menu -‐ When at Password prompt, you can now enter the default password (0310) for Level1 or (6677) for Service. From there, you can select System in menu, scroll/select Password and you can disable/change password, otherwise the stored password is still in effect when printer is powered off/on or exiting menu. CL4NX vs. CL4e Configuration Settings TT2014-‐001 Page 10 FACTORY RESET • SATO “e” series setting: DSW2-‐4 ON / Power ON+LINE+FEED / DSW2-‐4 OFF Settings/Tools/Reset The CL4NX printer will be reset to FACTORY DEFAULT settings and the Startup Guide will appear as it would when first used. TEST PRINT • SATO “e” series setting: TEST PRINT MODE (Power ON+FEED) This option allows you to print a test label. CL4NX setting: Settings/Tools/Test Print To stop the test print, first pause the print and then press the BACK button CLEAR COUNTERS • SATO setting: LCD Panel, Counter Mode HD:Head Counter (should be reset when printhead is replaced). CL4NX setting: Settings/Tools/Service/Reset/Counters CL4NX vs. CL4e Configuration Settings TT2014-‐001 Page 11 DOWNLOAD FIRMWARE • SATO “e” series setting: DSW2-‐6 ON You can easily use the USB thumb drive to download the firmware to CL4NX printer 1. 2. 3. 4. 5. 6. 7. 8. Save/copy the CL4NX firmware package-‐file (.PKG) to the USB thumb drive memory. Power the CL4NX printer and wait for printer to become ready/ONLINE. Insert the USB thumb drive with the updated package-‐file into the USB connector (Type A). The Install package screen will appear prompting you to install the package-‐file. Note: You can use either the USB connector (Type A) in front or the USB connector (Type A) at the one in the rear of the printer. Press the press ü button (right soft button) to confirm and start downloading/installing the firmware package. The printer starts to prepare and download the firmware to the printer. The Updating screen shows the status of the process of installing package file When the printer finished downloading, the printer reboots and starts the update process. This process takes about 10 minutes to complete. After printer reboots, you can remove the USB thumb drive and insert into another CL4NX to update in the same manner. After the update process is completed, the printer reboots again. If the USB was removed in step 6 above. No more messages are shown. The printer goes to online mode. If the USB is still in the printer and the firmware is updated, the Install package screen shows again. Press the left soft button and remove the USB memory from the printer. The printer goes to offline mode. CL4NX vs. CL4e Configuration Settings TT2014-‐001 Page 12 Refer to the SATO CL4NX Operator Manual for more information on menus and navigation tree: You can make changes to the settings via the LCD panel, web browser interface, or via the AIOT (All-‐In-‐One Tool) utility. Visit www.satoamerica.com/CL4NX for the latest information regarding the SATO CL4NX printer. If you need further assistance, please contact SAI Tech Support: Telephone: (704) 644-‐1660 | Email: [email protected] CL4NX vs. CL4e Configuration Settings TT2014-‐001 Page 13