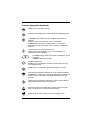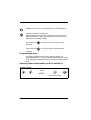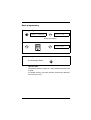
1
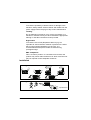
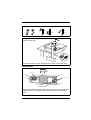
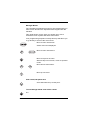
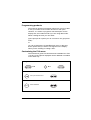
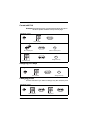
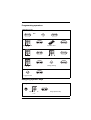
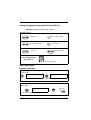
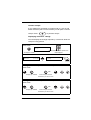
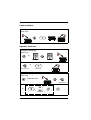
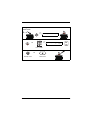
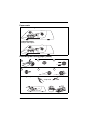
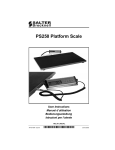
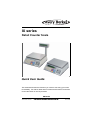
IX series Retail Counter Scale Quick User Guide This booklet describes the functions you need to start using your scale immediately. For further detail and more advanced functions consult the User Instructions on the CD provided. ENGLISH 76103-832 Issue 02 C 07.07.2004 ©Avery Berkel Limited 2003. All rights reserved. The information contained herein is the property of Avery Berkel Limited and is supplied without liability for errors or omissions. No part may be reproduced or used except as authorised by contract or other written permission. The copyright and the foregoing restriction on reproduction and use extend to all media in which the information may be embodied. IMPORTANT When programming or configuring the equipment you must ensure that you comply with all relevant standards and legislation. The example settings given in this book may not be legal for trade with the public. Declaration of Conformity Manufacturer Avery Berkel Type IX series No. of EC type approval certificate UK2708 corresponds to the requirements of the following EC directives: Non–Automatic Weighing Instruments Directive 90/384/EEC 1 EMC Directive EMC 89/336/EEC Low Voltage Directive LVD 73/23/EEC The applicable harmonised standards are: EN60950, EN50081–1, EN50082–1 Note 1 : This declaration is only valid if the non–automatic weighing instrument was verified by the manufacturer or with a certificate of conformity issued by a notified body. A copy of the original signed declaration for this instrument is available from: Avery Berkel Limited, Foundry Lane, Smethwick, West Midlands B66 2LP England Safe installation For your protection, all mains (110V or 230V) equipment used where damp or wet conditions may occur, must be supplied from a correctly fused source and protected by an approved RCD to BS7071 or BS7288 or IEC1008-2-2 BS EN 61008:1995. The mains plug must be inserted into a socket outlet with a protective earth contact. The electrical supply at the socket outlet must provide over-current protection of an appropriate rating. Pluggable equipment must be installed near an easily accessible socket outlet. Permanently connected equipment must have a readily accessible disconnect device incorporated in the fixed wiring. To avoid the possibility of electric shock or damage to the machine, always switch off the machine and isolate from the power supply before carrying out any routine maintenance. To avoid the risk of the machine falling, where applicable, ensure that it is placed securely on a flat and level surface. Safe use Caution - Cleaning the machine Harsh abrasives, solvents, scouring cleaners and alkaline cleaning solutions, such as washing soda, should not be used especially on the display windows. Under no circumstances should you attempt to wipe the inside of the machine. The outside of standard products may be wiped down with a clean cloth moistened with water containing a small amount of washing up liquid. Safety For your protection, all mains (110V or 230V) equipment used where damp or wet conditions may occur, must be supplied from a correctly fused source and protected by an approved RCD to BS7071 or BS7288 or IEC1008-2-2 BS EN 61008:1995. IF IN DOUBT SEEK ADVICE FROM A QUALIFIED ELECTRICIAN. IX series Quick User Guide 4 To avoid the possibility of electric shock or damage to the machine, always switch off the machine and isolate from the power supply before carrying out any routine maintenance. Training Do not attempt to operate or carry out any procedure on a machine or network unless you have received the appropriate training or read the instructions books provided. Ergonomics To avoid the risk of RSI (Repetitive Strain Injury) it is important to ensure that the machine is placed on a surface that is ergonomically satisfactory to the user. It is recommended that frequent breaks are taken during prolonged usage. EMC compliance This is a class A product. In a domestic environment, this product may cause radio interference in which case the user may be required to take adequate measures. Installation Handling n n n Levelling n 5 Adjustable feet IX series Quick User Guide Legal requirements 8 +40°C 84 8 -10°C 4 +40°C -10°C Fitting the tower display (IX202/IX212) Remove weigh pan Ensure that cables are not trapped when screwing down the plate. Connections Voltage selector View in direction of arrow Power cable Fuse holder Cash drawer Network connections Internal battery On/Off switch (optional) Serial port External battery connection(optional) Ensure that cables are held in place using the clips on the base of the machine and are not trapped under the feet as this could damage them IX series Quick User Guide 6 External battery If your machine is powered from an external battery, you must connect the battery to switch on the machine and disconnect it to switch off using the battery cable supplied. Check that the red lead goes to the positive terminal and the black lead goes to the negative terminal. Internal battery backup (optional) The internal battery provides short term protection in the event of a power supply failure. The change over to battery power supply is completely automatic as long as the separate On/Off switch for the internal battery is set to ON. This switch should be ON at all times while the machine is connected to the mains power supply. If the machine is not connected to a mains power supply the battery switch must be OFF Before you begin You can find comprehensive instructions for using your machine in `User Instructions’ on the CD that accompanies the machine. The instruction books include all the functions available across the range of IX machines. This means that some of the functions may not be available at your machine. You should ignore those sections which do not apply. Keyboard overlay Your machine is fitted with a reversible keyboard overlay. You need to display the manager overlay in order to program the machine. 7 1. Hold the overlay by the tab and slide it down to remove it from behind the clear protective cover. 2. Reverse the overlay to reveal the programming side. 3. Slide the top edge of the overlay up under the protective cover until the bottom edge rests on the supports. IX series Quick User Guide Function keys (sales keyboard) Resets an out of balance scale. Subtracts the weight of the container when weighing goods. In receipt mode, retains the PLU until the transaction is entered. Retains a tare, if in operation, until it is cancelled. In label mode, the PLU is retained until it is cancelled. Sets the machine to pre-pack if the machine configuration allows it. Cancels a PLU or hand entered price. Depending on the function in use, clears messages or characters from the display. In receipt mode, when the subtotal is displayed, prints a receipt. In label mode, prints a label. Confirms data entry. Enables you to change the number of items when serving non-weighed items. Enables you to change the programmed price of a PLU. Cancels an unwanted transaction from an operator subtotal. In label mode, when set to print totals labels only for ADD key transactions, it cancels an unwanted transaction from the subtotal. Depending on machine configuration, allows totals labels or totals and individual labels to be printed. Selects the other price base when entering the price of an open, weighed PLU or a hand entered pricee Enables you to enter the price of a non weighed item. IX series Quick User Guide 8 Switches the scale to or from hand price or PLU operation. Initiates a display test sequence. Pressed again during the test sequence prints a test report. Press operator key and type in PIN during test sequence to gain access to Manager Mode. Press and hold for three seconds to switch on the machine. Press and hold for three seconds to switch off the machine. Programmable keys The white, numbered, keys on the sales keyboard are programmable keys. You may assign dedicated keys such as PLU, Operator and Payment keys to any of the programmable keys. Selecting label/receipt mode (not IX110 and IX212) Operator mode Label or Receipt 9 Select other mode IX series Quick User Guide Basic programming Entering manager mode 2SHUDWRU1XP During test display 0DQDJHU0RGH PIN Exiting manager mode To exit Manager Mode: Operator PIN The default operator number is 1 and the default operator PIN is 4296. For added security, give each operator a PIN that is different from the one set up. IX series Quick User Guide 10 Manager Menus The complete programming menus for the IX model that you have can be found on the separate sheet supplied with the machine. This guide shows you the keys you should use to move around the menu system and select menu items. Your programming keyboard overlay has keys that allow you to go directly to some of the menu items. Move to menu item below. Select menu item displayed. Move to menu item above. Move to top level of menu. When at top level of menu, return to operator mode. Move across menu items. Move up one level. PLU Create/edit quick save Save data entered up to this point. To exit Manager Mode from within a menu X2 11 IX series Quick User Guide Programming products The minimum product information required for you to be able to use your scale is PLU number and unit or item price. However, it is useful to program a brief description for the display text, and a label format if you are using label mode. When creating the PLU you can either: ignore prompts for options you do not wish to use (just press enter) or: you can customise the Create/Edit PLU menu so that only those options that you want to use appear on the display when you are creating or editing a PLU. Customising the PLU menu The instructions given here describe how to disable PLU Text 1 but any of the options displayed can be disabled or enabled in the same way. Manager mode X3 X4 Until you see PLU Text 1 Select Disabled IX series Quick User Guide 12 Create/edit PLU Example:Programming PLU record with description and price. All other options disabled. See previous page. Manager mode PLU number PLU display text Select unit/item price PLU ? Assign PLU key Unit/item price Assigning PLU keys Manager mode PLU ? PLU number Assign PLU key Changing prices Use this function if you want to change only the unit/item price . Manager mode PLU number 13 New price IX series Quick User Guide Programming operators Manager mode X2 Operator number 0-8 Operator name PIN Re-enter PIN Security level 0-2 Trading/Training Logged On/Off Assigning operator keys Manager mode Operator number 0-8 IX series Quick User Guide Assign Operator Key 14 Assigning payment keys (not IX110 and IX212) Example:Assigning payment key 1 (cash) Manager mode X3 System Data X2 Machine Setup ECR Assign Standard Assign Payment Payment Key No. Enter required payment key number (1) 1-5 Assign payment key Basic operations Receipt machines Assigning transactions Sales mode NJ r1 Operato a Mari 0DULD Assign transaction Printing receipts Sales mode r1 Operato a Mari 0DULD £ To display sub-total 15 IX series Quick User Guide Counter receipts If your machine is operating in receipt mode (e.g. IX110 and IX212 machines) but not in PoS mode you can print a counter receipt. Press . to print the receipt. Displaying customers’ change You can display the change required by a customer while the receipt is being printed. Sales mode r1 Operato a Mari 0DULD Amount tendered while operator subtotal displayed To display sub-total $PRXQW &KDQJH £ Voiding a transaction (not IX110 andIX212) Sales mode r1 Operato Maria r1 Operato Maria Display op. subtotal Press until you see the transaction you want to void X? Voiding last transaction (IX110 and IX212) Sales mode r1 Operato Maria r1 Operato Maria Display op. subtotal Press until you see the transaction you want to void IX series Quick User Guide X? 16 Label machines Printing labels Sales mode Operator functions Using the overide key Sales mode or PLU number r1 Operato Maria New price or Receipt mode Label mode Using the FIX key Sales mode PLU and/or Tare r1 Operato ri a M a Receipt mode or Label mode 17 IX series Quick User Guide Using a tare Sales mode Zero Net NJ Zero Net or NJ PLU number r1 Operato a Mari or Receipt mode IX series Quick User Guide Label mode 18 Paper route Labels with backing rewound Continuous paper Receipts and reports Rewinding the backing paper (labels) 1 2 3 4 5 6 Clean regularly snap swab 19 IX series Quick User Guide This document contains a general guide only of the product and shall not form part of any contract unless specifically agreed by Avery Berkel Limited in writing in each case on the Order Acknowledgement. The specification of the products described herein may vary from time to time and may be altered without notice. )RXQGU\/DQH 6PHWKZLFN :HVW0LGODQGV (PDLO ,QWHUQHW (QJODQG%/3 LQIR#DYHU\EHUNHOFRP KWWSZZZDYHU\EHUNHOFRP 7HO)D[