1
®
®
SAPPHIRE 2
4 Wheel Scooter
EN
G
LI
S
H
Owner’s Manual
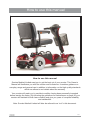
How to use this manual
How to use this manual
Sunrise Medical Limited want you to get the best out of your scooter. This Owner’s
Manual will familiarise you with the scooter and its features. It contains guidance on
everyday usage and general care in addition to information on the high quality standards
which we adhere to and details about the warranty.
Your scooter will reach you in excellent condition having been personally inspected
before leaving the factory. By following the guidelines for maintenance on page 30 your
VFRRWHUZLOOPDLQWDLQLWV¿UVWFODVVFRQGLWLRQDQGJLYH\RX\HDUVRIFRPSOHWHUHOLDELOLW\
and satisfaction.
Note: Sunrise Medical Limited will later be referred to as “we” in this document.
Iss 1
Contents
Introduction
page 1
General Warnings
page 2
Quick Start Guide
page 3 - 4
Features
page 5
Getting On and Off your Scooter
page 6
Tiller Control Functions
page 7 - 8
Freewheel Mechanism
page 9
Seat Removal and Adjustment
page 10
Tiller Adjustment and Battery Removal
page 11
Batteries and Charging
page 12 - 13
Transportation
page 14
Guidance for Safe Operation and Use
page 15 - 19
Battery and Charging Information
page 20 - 22
General Warnings
page 23 - 26
EMC (EMI) Warnings
page 27 - 28
6SHFL¿FDWLRQV
SDJH
Routine Maintenance
page 30
Service History
page 31
Trouble Shooting Guide
page 32 - 33
Guarantee
page 34
5
Iss 1
Introduction
With over 30 years experience, we are one of the longest established mobility equipment
manufacturers in the UK. All of our Scooters, Wheelchairs and Power Chairs undergo
rigorous tests to ensure they meet our requirements for comfort, safety and durability.
Our success is based on the strong traditions of quality, value for money and genuinely
caring for our customers. We pride ourselves not only on designing and building the
most innovative products, but also on our commitment to offer an excellent standard of
customer service both during and after sale.
Before using your scooter please read this manual carefully. It will provide you with
all the information you will require. However, if you have any queries about the use,
maintenance or safety of your scooter, please contact your local dealer. If you have any
other questions please write to the address below.
7KHVFRRWHULVFODVVL¿HGDVDFDWHJRU\%YHKLFOHXQGHUWKH(XURSHDQZKHHOFKDLU
standard EN 12184.
,WLVLQWHQGHGIRUWKHXVHRISHRSOHRIDOODJHVZKRPD\KDYHGLI¿FXOW\ZDONLQJGLVWDQFHVRU
IRUSHULRGVRIWLPH,WLVLGHDOIRURXWGRRUXVHDQGVXLWDEOHIRUXVHUVXSWRNJLQZHLJKW
330lbs. Differing user weights can cause performance variation. Maximum user weight
WHVWHGXVLQJDNJWHVWGXPP\
The scooter is designed to be driven on footpaths and to cross roads.
It has been manufactured to comply with the requirements of the
Medical Device Directive 93/42/EEC, the radio interference requirements of EEC
Directive 89/336/EEC and the battery charger requirements of EEC Directive 73/23/EEC
and
((&(OHFWUR0DJQHWLF¿HOGVVXFKDVWKRVHHPLWWHGE\VKRSDODUPVPD\EH
disturbed by use of the scooter. The function of the scooter may also be disturbed by
(OHFWUR0DJQHWLF¿HOGVHPLWWHGE\VKRSDODUPV
We are dedicated to providing products of exacting quality that conform fully and reliably
to the requirements of their intended use. We are BS/EN ISO 9001 accredited which is
the internationally recognised standard for quality management systems. This approval
HQVXUHVZHSURYLGHTXDOLW\LQDOODUHDVRIRXUEXVLQHVVIURPGHYHORSPHQWWKURXJKWR¿QDO
delivery. Should you require any further assistance then please contact your local dealer.
CUSTOMER SERVICES
SUNRISE MEDICAL LIMITED
SUNRISE BUSINESS PARK
HIGH STREET WOLLASTON
WEST MIDLANDS DY8 4PS
ENGLAND
Intern. Telephone +44 1384 44 66 22 Fax +44 1384 44 66 44
(0DLOVXQPDLO#VXQPHGFRXN
1
Iss 1
GENERAL WARNINGS
DO NOT OPERATE THE SCOOTER BEFORE READING AND UNDERSTANDING
THIS INSTRUCTION MANUAL.
IF YOU ARE IN DOUBT ABOUT THE MEANING OF THESE INSTRUCTIONS, OR ANY
OF THE CAUTIONS AND WARNINGS, PLEASE CONSULT YOUR HEALTHCARE
PROFESSIONAL, DEALER OR RELEVANT TECHNICAL PERSONNEL.
FAILURE TO FULLY UNDERSTAND THE SCOOTER OPERATION MAY RESULT
IN AN UNEXPECTED RESPONSE FROM THE EQUIPMENT WHICH CAN IN TURN
LEAD TO POSSIBLE INJURY OR DAMAGE.
NOTES
Warning and Caution notices used in this manual, apply to hazards and unsafe practices
that could result in personal injury or damage to property.
WARNING
We supply an extensive range of mobility scooters to meet the varying needs of
individual users. It is the responsibility of the individual user and their healthcare advisor
TXDOL¿HGLQPDNLQJVXFKFKRLFHVWRGHFLGHZKLFKVFRRWHULVVXLWDEOHIRUWKHXVHU¶V
intended purpose.
With regards to restraints, seat positioning straps, posture correction or other positional
DLGVDQGDFFHVVRULHVLWLVWKHREOLJDWLRQRIWKHTXDOL¿HGKHDOWKFDUHSURIHVVLRQDOLQ
conjunction with the dealer to ensure the suitability of such equipment for the safe
operation of the scooter.
Serious injury can occur in the event of a fall from a mobility scooter.
We DO NOT RECOMMEND that a scooter user is transported in any type of vehicle
when seated in the scooter.
At this time, there are no approved Tie-down Systems for the transportation of a user in
ANY moving vehicle whilst seated in a scooter.
It is our opinion that users of mobility scooters should be transferred into the appropriate
vehicle seating system and use should be made of the restraints available to the auto
industry.
2
Iss 1
4XLFN6WDUW*XLGH
Assembly
:KHQOLIWLQJDOZD\VNHHSWKHEDFNVWUDLJKWEHQGWKHNQHHVDQGXVHWKHOLIWLQJKDQGOHV
provided.
(QVXUH\RXUUHDUGULYHXQLWLVORFNHGLQSRVLWLRQE\FKHFNLQJWKHUHDUGRFNLQJKDQGOH
EDFNOLJKWEUDFNHWLVIXOO\HQJDJHG
6HWWKHWLOOHUE\KROGLQJWKH7LOOHU$GMXVWPHQW/HYHUFORFNZLVHZKLOHPRYLQJWKHWLOOHU
XSZDUGV5HPRYHWKHEDVNHWIURPWKHIRRWERDUGDQGSODFHRQWKHEUDFNHWORFDWHGRQ
the front of the tiller.
/LIWEDWWHU\³%´LQWRWKHEDWWHU\WUD\PDUNHG³%,QVHUW)LUVW´WKHQOLIWEDWWHU\³$´LQWR
WKHEDWWHU\WUD\PDUNHG³$,QVHUW/DVW´(QVXUHEDWWHU\³$´LVORFDWHGRQWRWKHORFNLQJ
SRVWWKHQORZHURQWRWKHFRQWDFWV,QVHUWWKH%DWWHU\/RFNLQJ3LQLQWRWKHORFNLQJKROH
located at the rear of Battery “A”.
1RWH:KHQ¿WWLQJWKHEDWWHULHVSXWWKHODUJHUKDQGOHWRZDUGVWKHIURQWRIWKH
scooter.
Lift the seat onto the seat post and press down to ensure it is fully engaged.
Battery Charging
7KHEDWWHU\0867EHFKDUJHGIRUKRXUVEHIRUH¿UVWXVH'RQRWEHWHPSWHGWRXVH
the scooter unless the battery has been fully charged as failure to do this will result in
battery damage.
&RQQHFWWKHEDWWHU\FKDUJHUWRWKHPDLQVVXSSO\DQGWKHFKDUJLQJVRFNHWORFDWHGRQ
the left hand side of the tiller fascia panel. Switch on the mains supply and then switch
on the battery charger. RED light = Power On, YELLOW Light = Charging and GREEN
Light = Charge Complete. Charge the scooter overnight after each use to maintain
EDWWHU\FRQGLWLRQ$SSUR[FRVWHXURVSHQFH
If you are in any doubt then please turn to pages 12 and 13 of this manual.
Typical Use
Designed for use on footpaths, for crossing roads and shopping. It should not be
driven through mud, water, snow, sand, loose gravel, long grass or any other unsound
surfaces.
3
Iss 1
4XLFN6WDUW*XLGH
Control Functions
Your scooter is equipped with the following features that can be found on the tiller
fascia panel:
2Q2II6ZLWFK%DWWHU\*DXJH%DWWHU\&KDUJLQJ6RFNHW6SHHG&RQWURO³0LQWR0D[´
Front / Rear Light, Horn and Directional Control Levers.
If you have previously used or owned a scooter before you MUST still read the
Owners Manual carefully to fully understand the controls and safety warnings.
If you are in any doubt of their functions then please turn to pages 7 and 8 of this
manual.
Transporting
<RXUVFRRWHUPD\EHGLVDVVHPEOHGTXLFNO\DQGVLPSO\IRUWUDQVSRUWDWLRQ
/LIWRIIWKHIURQWEDVNHW
2. Remove the seat, leaving the seat stem in position.
5HPRYHWKHEDWWHU\ORFNLQJSLQDQGEDWWHULHV³$´WKHQ³%´
3ODFHWKHEDVNHWLQWKHEDWWHU\ZHOOV
/RZHUWKHWLOOHUXVLQJWKHDGMXVWPHQWOHYHUWRLWVORZHVWVHWWLQJORFNLQJLQWKHEDVNHW
This will stop the tiller from moving during lifting operations and transportation.
'HGRFNWKHUHDUGULYHXQLWE\OLIWLQJWKHGRFNLQJKDQGOHUHDUOLJKWDQGPRYLQJWKH
front frame forwards. Note: Batteries MUST be removed before the scooter can be
GHGRFNHG
7. Using the lifting handles provided carefully lift the scooter safely and securely into the
luggage compartment of the vehicle.
TIP:
/LIWWKHIURQWZKHHOVLQ¿UVWDQGXVHWKHVHWRUROOWKHIUDPHDORQJ8VHWKHVWHSDWWKH
boot opening to rest parts if required.
To reassemble the scooter reverse the sequence above.
Important:
When reassembling the scooter, remember to insert the battery locking pin,
because failure to do so may result in the batteries disengaging during use.
Always secure your scooter parts before transportation. Remember to engage
the drive unit by pushing the freewheel lever forwards to stop the scooter from
moving.
4
Iss 1
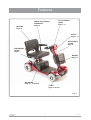
Features
SEATING
Page 10
WIDTH ADJUSTABLE
ARMRESTS
Page 10
TILLER FASCIA
PANEL
Page 7 - 8
LIGHTS
Page 7 - 8
ADJUSTABLE
TILLER
Page 11
FREEWHEEL
LEVER
Page 9
BASKET
Page 14
BATTERIES
Page 12 - 13 & 20-22
TYRES
Page 19 and 30
Fig. 1
5
Iss 1
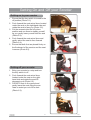
Getting On and Off your Scooter
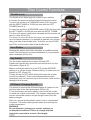
Getting on to your scooter
Photo 6.1
(QVXUHWKDWWKHNH\VZLWFKLVWXUQHGWRWKH
RIISRVLWLRQ3KRWR
2. Push forward the seat swivel lever located
under the seat on the right-hand side and
URWDWHWKHVHDWWRIDFH\RX3KRWR
3. Put the armrests into the fully down
position and use them to steady yourself
as you gently lower yourself into the seat
3KRWR
4. Push forward the seat swivel lever and
gently swivel the seat to face forward
3KRWR
(QVXUHWKDWERWKIHHWDUHSODFHG¿UPO\RQ
WKHÀRRUERDUGRIWKHVFRRWHUDQGWKHVHDW
LVVHFXUH3KRWR
Photo 6.2
Photo 6.3
Getting off your scooter
1. Bring your scooter to a stop and turn
WKHNH\VZLWFKWRRII
2. Push forward the seat swivel lever
located under the seat on the righthand side and rotate the seat 90
GHJUHHVWRH[LW3KRWR
3. Put BOTH feet on the ground and
gently leave the seat using the arm
rests to assist you out of the chair
3KRWR
Photo 6.4
Photo 6.5
6
Iss 1
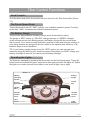
Tiller Control Functions
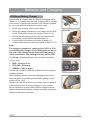
Hand Controls
All of the drive controls for the scooter are to be found on the Tiller Control Box (Photo
The Preset Speed Knob
7XUQLQJWKLVNQREWRWKHOHIW³0,1´UHGXFHV\RXUDYDLODEOHPD[LPXPVSHHG7XUQLQJLW
to the right, “MAX”, increases the available maximum speed.
The Battery Gauge
This gives an approximation of battery charge and is illuminated for clarity.
The gauge is “RED” empty, to “YELLOW” charge required, to “GREEN” charged.
As the scooter moves over differing terrain, the Battery Gauge will dip up and down,
this is normal. For a more accurate indication, stop the scooter and note the reading. In
FROGGDPSZHDWKHUWKHJDXJHZLOOGLSPRUHRIWHQDVWKHFDSDFLW\DQGHI¿FLHQF\RIDOO
batteries drops in such conditions.
TIP: If your battery gauge has gone into the “RED” section you can increase your
remaining range by reducing your maximum speed. Remember you MUST charge your
battery overnight as soon as you can to prevent battery damage.
Operating the Lights
The lights are operated by pressing the blue button on the front fascia panel. Press the
button once to illuminate the lights, press the button again to switch the lights off. Switch
WKHOLJKWVRQWRPDNH\RXUVHOIPRUHYLVLEOHLQORZOHYHOVRIOLJKWGD\RUQLJKW
Photo 7.1
Battery
Charging
Socket
Battery
Gauge
Pre-set
Speed Knob
On-Off
Key
Handle
Bars
Throttle
Control
Lever
Throttle
Throttle
Control
Lever
Lever
Control
Horn
Button
Light
Switch
7
Iss 1
Tiller Control Functions
Throttle Lever
7KHWKURWWOHOHYHURIIHUV¿QJHUWLSFRQWURORI\RXUVFRRWHU
It controls the speed as well as forward and reverse motion.
To move the scooter in a FORWARD motion PULL the lever
with the RIGHT HAND or PUSH the lever with the LEFT
7+80%3KRWR
To move the scooter in a REVERSE motion PULL the lever with
the LEFT HAND or PUSH the lever with the RIGHT THUMB.
The lever will return by itself when released and the scooter will
VORZWRDVWRS3KRWR
The more you move the lever, the more your speed increases
up to its preset maximum. It is possible to operate your scooter
using one side of the throttle lever. To do this you must PUSH
and PULL on the chosen side of the throttle lever.
Photo 8.1
Photo 8.2
Horn Button
Pressing the yellow horn button operates an audible warning
sound. Use this function to warn pedestrians of your presence
ZKHQQHFHVVDU\3KRWR
Key Switch
Photo 8.3
Photo 8.4
7KHNH\VZLWFKVZLWFKHVWKHVFRRWHU21DQG2))
3OHDVHQRWHWKDWWKHNH\FDQQRWEHUHPRYHGZKHQLWLVLQWKH
21SRVLWLRQ3KRWR
0DNHVXUHWKDWWKLVVZLWFKLVLQWKH2))SRVLWLRQ%()25(
JHWWLQJRQRURIIWKHVFRRWHU5HPRYHWKHNH\WRPDNHVXUHWKH
VFRRWHULV2))3KRWR
Photo 8.5
8.5
Photo
7XUQLQJWKHNH\WR2))ZKLOVWGULYLQJZLOOFDXVHWKHVFRRWHU
to stop very abruptly. This is not recommended except in
emergency stop, as continual use of this function could result in
damage to the scooter.
Off Board Charging Socket
7KHVRFNHWWRFRQQHFWWKHRIIERDUGFKDUJHULVORFDWHGRQWKH
OHIWKDQGVLGHRIWKHWLOOHUIDVFLDSDQHO3KRWR
7RXVHWKHVRFNHWVZLYHOWKHSODVWLFFRYHUWRWKHOHIWRUULJKW
WRUHYHDOWKHVRFNHWFRQQHFWLRQV7KHFKDUJHURXWSXWSOXJFDQ
now be connected ready to accept charge current from the
battery charger.
$IWHUXVHHQVXUHWKDWWKHSODVWLFVZLYHOFRYHULVURWDWHGEDFN
into place. This action helps prevent water from entering the
VRFNHWFRQQHFWLRQV
WARNING.
Do not attempt to charge your scooter outdoors or
in damp/wet conditions. Failure to comply with this
LQVWUXFWLRQPD\OHDGWRDVKRFN¿UHKD]DUG
8
Photo 8.6
Iss 1
Freewheel Mechanism
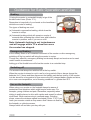
Freewheel mechanism
A freewheel device disengages the power drive
to allow manual operation (i.e. the scooter can be
SXVKHGDWDZDONLQJSDFH
Photo 9.1
The freewheel is selected by pushing BACKWARD
the lever that is located on the left hand side of
the scooter rear panel. Once freewheel has been
selected, the electronic drive control system is
disabled to prevent driving. This is a safety feature
WRSUHYHQW\RXGULYLQJWKHVFRRWHUZLWKWKHSDUNLQJ
EUDNHGLVHQJDJHG3KRWR
To turn off the freewheel and engage the motor,
VLPSO\SXVKWKHOHYHU)25:$5'63KRWR
Photo 9.2
WARNING:
Use extreme caution in the freewheel mode
especially on slopes/inclines. Letting go of
your scooter whilst it is in freewheel, can
cause the scooter to roll unexpectedly.
ALWAYS re-engage the freewheel device after use,
failure to do so may result in injury.
9
Iss 1
Seat Removal and Adjustment
Removing the Seat
Photo 10.1
Please note that these instructions are to be
used as a guide only.
1. Lift armrests upwards for ease of access (Photo
6WDQGEHKLQGWKHVHDWDQGIROGWKHEDFNUHVWGRZQ
3KRWR
Photo 10.2
*UDVSWKHVHDWEDVHDQGNHHSLQJD¿UPJULSOLIW
WKHVHDWYHUWLFDOO\NHHSLQJ\RXUEDFNVWUDLJKW
%HQGNQHHVLIUHTXLUHG3KRWR
4. Place seat at desired location for stowage,
NHHSLQJEDFNSRVWXUHVWUDLJKWDWDOOWLPHVEHQG
NQHHVZKHUHUHTXLUHG3KRWR
Photo 10.3
Note: Exercise caution when lifting the seat.
Seat Adjustment
1. To adjust seat height, remove the seat as
GHVFULEHG3KRWR
0RYHWKHVHDWSRVWWRWKHQHZSRVLWLRQDQGUH¿W
WKHVHDWSLQ3KRWR
5H¿WWKHVHDW
Photo 10.4
Photo 10.5
Armrest Adjustment
The width of the armrests can be adjusted by
ORRVHQLQJWKHWZRWKXPEZKHHONQREVORFDWHGXQGHU
the seat base, moving the armrests to the desired
SRVLWLRQDQGUHWLJKWHQLQJWKHWKXPEZKHHONQREV
3KRWR
Photo 10.6
Photo 10.7
10
Iss 1
Tiller Adjustment and Battery Removal
Tiller Adjustment
Photo 11.1
7KHVFRRWHUIHDWXUHVDQLQ¿QLWHO\DGMXVWDEOHWLOOHUZKLFK
DOORZV\RXWRORFNWKHWLOOHULQWKHPRVWFRPIRUWDEOH
driving position. This feature also lets you fold the tiller
down fully, for transportation and stowage.
The tiller adjusting lever is located on the driver’s side
of the tiller.
1. Support the tiller with your right hand.
5RWDWHWKHDGMXVWLQJOHYHUFORFNZLVHWRUHOHDVHWKH
DGMXVWPHQWPHFKDQLVP3KRWR
3. Move the tiller to the desired location.
4. Release the adjusting lever to the vertical position
3KRWR
Photo 11.2
Photo 11.3
Battery Removal
,WLVLPSRUWDQWWRUHPRYHWKHVHDW¿UVWWRDOORZEHWWHU
access to the batteries.
5HPRYHWKHEDWWHU\ORFNLQJSLQIURPWKHUHDURI
EDWWHU\SDFN³$´3KRWR.
)LWWKHEDWWHU\ORFNLQJSLQLQWRWKHVHDWVWHPIRU
VWRUDJH3KRWR
3. Lift battery “A” vertically out of its battery tray using
the 2 handles provided 3KRWR.
4. Lift battery “B” vertically out of its battery tray using
the 2 handles provided 3KRWR.
5HPHPEHUWRNHHSWKHNQHHVEHQWDQGWKHEDFN
straight.
Photo 11.4
Photo 11.5
Battery Replacement
To replace the batteries reverse the sequence above
SODFLQJEDWWHU\³%´RQWRWKHVFRRWHU¿UVWIROORZHGE\
EDWWHU\³$´WKHQLQVHUWWKHEDWWHU\ORFNLQJSLQEDFN
into battery “A”.
Important:
Photo 11.6
When reassembling the scooter, remember to insert
WKHEDWWHU\ORFNLQJSLQEHFDXVHIDLOXUHWRGRVRPD\
result in the batteries disengaging during use.
Ensure the battery wells are free from dirt and
grit - this will affect the performance of the battery
contacts.
11
Iss 1
Batteries and Charging
Off-Board Battery Charger
Photo 12.1
Your scooter is supplied with an off-board charging facility
3KRWR3OHDVHQRWHWKDWRQO\FKDUJHUVZLWKDFDSDFLW\
of minimum 3.0 Amps and maximum of 6.0 Amps supplied
by your local authorised dealer should be used.
6ZLWFK\RXUVFRRWHURIIDWWKHNH\VZLWFK
2. Swivel the charge connector cover located on the Tiller
)DVFLD3DQHODQGFRQQHFWWKHFKDUJHU3KRWR
Photo 12.2
3. Ensure that the charger plug is dry and intact before
connecting it to the mains and switching it on.
4. A reset button is located on the side of battery “A”.
3OHDVHFKHFNWKDWWKHEXWWRQLVSUHVVHGLQ3KRWR
Photo 12.3
Note:
The charger is capable of charging from 230V or 110V
by switching the charger off and sliding the red tab on
the end of the charger to the required setting using a
small screwdriver. This setting is factory set to 230V.
The 5 Amp, off-board charger has 3 possible indications
3KRWR:
Photo 12.4
1. RED = Charger is on.
2. YELLOW = Charging.
3. GREEN = Fully charged.
Ensure the scooter is switched off before commencing the
charging process.
$IWHUFKDUJLQJDOZD\VVZLYHOWKHFKDUJLQJVRFNHWFRYHU
EDFNLQWRSODFH7KLVKHOSVSUHYHQWZDWHUJHWWLQJLQWRWKH
VRFNHW3KRWR.
Please note that the scooter has a safety circuit to prevent
it from being driven off during charging. If your scooter
fails to respond to normal control after a charging period,
SOHDVHFKHFNWKDWWKHEDWWHU\FKDUJHUKDVEHHQFRPSOHWHO\
disconnected from the scooter.
12
Photo 12.5
Iss 1
Batteries and Charging
7KHRIIERDUGFKDUJHUPXVWEHNHSWGU\LQWHPSHUDWXUHVEHWZHHQ&DQG
&DQGQRWEHVXEMHFWHGWRPHFKDQLFDOGDPDJH
In all cases, the charger must only be repaired by an authorised dealer.
WARNING !
NO SMOKING OR NAKED FLAMES WHEN CHARGING BATTERIES.
DO NOT TOUCH BATTERY PACK TERMINALS WITH METAL OBJECTS.
ONLY USE APPROVED REPLACEMENT BATTERIES.
IF DAMAGE TO BATTERIES OR BATTERY BOXES IS EVIDENT,
CONTACT YOUR LOCAL DEALER IMMEDIATELY - DO NOT ATTEMPT
TO SERVICE THE BATTERIES.
DEALER WARNING !
REMOVE METALLIC JEWELLERY WHEN WORKING WITH BATTERIES.
WEAR GLOVES AND GOGGLES IF MOVING LEAKING BATTERIES.
REPLACE DAMAGED OR LEAKING BATTERIES IMMEDIATELY.
Fuses
There is a reset button as described previously. If a fault occurs, the button
will pop out. Switch the scooter off, press the button in and switch the
VFRRWHUEDFNRQ
7KHUHLVD$IXVH¿WWHGWRWKHSRVLWLYHWHUPLQDORIHDFKEDWWHU\7KHVH
fuses must be replaced by an authorised service agent.
7KHUHLVDOVRD$FDUWLGJHIXVH¿WWHGRQWKHFKDUJHUDQGDIXVHLQWKH
mains plug of the battery charger. If this blows, switch off at the mains,
remove the plug and replace the blown fuse with a new fuse of the same
YDOXH3KRWR
Photo 13.1
13
Iss 1
Transportation
Transportation
Photo 14.1
<RXUVFRRWHUPD\EHGLVDVVHPEOHGTXLFNO\
and simply for transportation.
1. Engage the drive unit by pushing the
freewheel lever forwards to stop the
VFRRWHUIURPPRYLQJGXULQJGRFNLQJDQG
transportation.
/LIWRIIWKHIURQWEDVNHW
3. Remove the seat, leaving the seat stem in
position.
4. Remove the batteries “A” then “B”
Transport batteries in the upright position.
3ODFHWKHEDVNHWLQWKHEDWWHU\ZHOOV
6. Lower the tiller, using the adjustment lever
WRLWVORZHVWVHWWLQJORFNLQJLQWKHEDVNHW
3KRWR
'HGRFNWKHUHDUGULYHXQLWE\OLIWLQJWKH
GRFNLQJKDQGOHUHDUOLJKWDQGPRYLQJ
the front frame forwards. Note: Batteries
MUST be removed before the scooter can
EHGHGRFNHG3KRWR
8. Using the lifting handles provided carefully
lift the scooter safely and securely into
the luggage compartment of the vehicle
3KRWR
TIP:
/LIWWKHIURQWZKHHOVLQ¿UVWDQGXVHWKHVHWR
roll the frame along. Use the step at the boot
RSHQLQJWRUHVWSDUWVLIUHTXLUHG3KRWR
Photo 14.2
Photo 14.3
To reassemble the scooter reverse the
sequence above.
Photo 14.4
Important:
When reassembling the scooter,
UHPHPEHUWRLQVHUWWKHEDWWHU\ORFNLQJ
pin, because failure to do so may result
in the batteries disengaging during use.
Always secure your scooter parts before
transportation. Do not sit on your scooter
whilst it is being transported in or on
another vehicle.
14
Iss 1
Guidance for Safe Operation and Use
Basic Driving
Caution!
,WLVDGYLVDEOHGXULQJWKH¿UVWIHZVHVVLRQVRIRSHUDWLQJ\RXUVFRRWHUWKDWWKHDUHD
around you is clear of obstacles and pedestrians.
Before operating your scooter, ensure the seat height and position has been adjusted to
your satisfaction and the tiller angle has been set for optimum safety and comfort.
Please see the “General Warnings”, “Getting on Your Scooter” and “Tiller Adjustment”
VHFWLRQVLQWKLVKDQGERRN
0DNHVXUH\RXDUHSURSHUO\VHDWHGRQWKHVFRRWHUDQGWKDWWKHVSHHGFRQWURONQRELV
turned fully to the left, towards “MIN”.
7XUQWKHNH\VZLWFKWRWKH³21´SRVLWLRQ
3. On the tiller, use the throttle lever as described earlier. You will gently accelerate.
Release and you will gently stop. Practice these two basic functions until you get
used to them.
4. Steering the scooter is easy and logical. Be sure to remember to allow enough
clearance when turning corners so that the rear wheels clear any obstacle.
6KRUWFXWWLQJDSDYHPHQWFRUQHUFDQFDXVHWKHEDFNZKHHOWRJRRIIWKHSDYHPHQW
causing problems if the corner is very rough. Avoid this at all times by steering an
exaggerated curve around the obstacle.
6. When steering in a tight spot, such as entering a doorway or when turning around,
stop the scooter and then turn the handlebar to where you want to go, then apply
SRZHUJHQWO\7KLVZLOOPDNHWKHVFRRWHUWXUQYHU\VKDUSO\,WLVDOVRUHFRPPHQGHG
that the preset speed is set to a slower setting to aid control in tight spots.
7. Reversing requires attention - exercise caution when reversing especially down
slopes.
When reversing, always turn the handlebars in the opposite direction to the way you
want to go.
The more you operate the throttle lever, the faster you will go.
Reverse speed is 50% slower than forward speed. If the scooter does not move
LQUHYHUVHFDUHIXOO\WXUQWKHVSHHGFRQWURONQREFORFNZLVHXQWLOWKHVFRRWHUPRYHV
JHQWO\EDFNZDUGV
Important:
To preserve battery power there is a “sleep timer” feature built into the controller.
Should the scooter be left ON, but not operated for 15 minutes the scooter will go
into “sleep mode”. To reset this, switch the scooter OFF and then back ON again.
15
Iss 1
Guidance for Safe Operation and Use
Hill climbing
Photo 16.1
This scooter has been tested to climb
an incline of no more than 10° with a
maximum user weight of up to 150kg
(330 lbs) (Photo 16.1). Do not attempt to
climb inclines in excess of this.
Always reduce your speed when
reversing on slopes. Do not reverse
down hills in excess of 8° and always use
extreme caution when reversing down
hills.
Do not attempt to drive along with the
wheels at different levels, e.g. along the
footpath and road simultaneously.
Hill climbing capability and distance
travelled between battery charges will be
adversely affected by such things as:
1. The weight of the user.
7HUUDLQHJJUDVVRUJUDYHO
3. Steepness of hills.
4. Level of charge and the age of the
batteries.
5. Extremes of temperature.
6. Use and weight of accessories.
Please note that lap belts must
RQO\EHREWDLQHGDQG¿WWHGE\
an authorised dealer and used
according to the advice of your
healthcare professional.
Photo 16.2
Travelling across slopes
&DUHVKRXOGEHWDNHQWUDYHUVLQJDFURVV
a slope, always reduce your speed. Do
not traverse across the face of a slope in
excess of 10° (Photo 16.2).
Note: Where possible always travel
up or down hills or ramps
directly facing the slope of the
hill.
Do not traverse across the
face of a slope in excess of
10°. Disregard of this advice
could result in your scooter
tipping.
16
Iss 1
Guidance for Safe Operation and Use
Braking
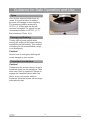
To bring the scooter to a standstill simply let go of the
WKURWWOHFRQWUROOHYHU3KRWR
Photo 17.1
5HPHPEHUWRNHHSERWKRI\RXUKDQGVRQWKHKDQGOHEDUV
ZKLOVWWKHVFRRWHULVEUDNLQJ
7ZRW\SHVRIEUDNLQJDUHXVHG
D $XWRPDWLFUHJHQHUDWLYHEUDNLQJZKLFKVORZVWKH
scooter to a stop.
E $XWRPDWLFEUDNLQJZKLFKZLOORSHUDWHDFRXSOHRI
seconds after releasing the control lever and holds the
scooter in position, even if you are on a hill.
Note: Automatic braking is not instantaneous
and will engage within 1/2 a wheel turn once
the scooter has stopped.
Emergency Braking
,QWKHXQOLNHO\HYHQWRIDQXQZDQWHGPRYHPHQWRIWKHVFRRWHURURWKHUHPHUJHQF\
VZLWFKLQJRIIWKHNH\VZLWFKZLOOEULQJWKHVFRRWHUWRDVWRS
7KRXJKYHU\HIIHFWLYHHPHUJHQF\EUDNLQJLVH[WUHPHO\DEUXSWDQGPXVWQHYHUEHXVHG
under normal circumstances.
Letting go of the throttle lever will slow the scooter to a controlled stop.
Switching off
7KHVFRRWHUPXVWDOZD\VEHVZLWFKHGRIIDWWKHNH\VZLWFK
When the scooter is stowed or not in use for a long period of time, always charge the
EDWWHULHVIRUKRXUVDQGWKHQGLVFRQQHFWWKHEDWWHU\SDFNEHIRUHVWRULQJ,IWKHVFRRWHU
LVWREHVWRUHGIRUDORQJSHULRGRIWLPHUHPRYHWKHIXOO\FKDUJHGEDWWHU\SDFNVDQGVWRUH
DWRUQHDUURRPWHPSHUDWXUHRXWRIIUHH]LQJFRQGLWLRQVLHJUHDWHUWKDQ&
Use on the footpath
When using your scooter on the footpath always be aware of
pedestrians and situations which might require extra care. For
Photo 17.2
example, young children and pets. Remember, especially when
driving in public places, to drive with caution and regard for others
DWDOOWLPHV:KHQPDQRHXYULQJLQFRQ¿QHGDUHDVLQFOXGLQJ
shops, ensure the minimum speed is selected 3KRWR. If you
leave your scooter outside a shop ensure that it does not obstruct
the footpath or vehicular access.
$OZD\VVZLWFKRIIDQGWDNH\RXUNH\ZLWK\RX
17
Iss 1
Guidance for Safe Operation and Use
Crossing roads
Photo 18.1
Your scooter is not capable of mounting
DQGGLVPRXQWLQJNHUEVDQGRWKHU
REVWDFOHVLQH[FHVVRI´PP3KRWR
$OZD\VXVHSHGHVWULDQFURVVLQJV
or drop downs. Be aware that some drop
downs may be entrances to driveways.
Use caution if this is the case.
Remember before crossing the road,
drive forwards and position the scooter
DWWRWKHURDGVWRSSLQJDERXW
FPIHHWDZD\IURPWKHHGJHRI
WKHIRRWSDWK3KRWR&KHFNWKDWLWLV
clear to cross. Select a medium to high
speed setting and when safe to do so,
drive across without stopping.
Note:
Heavier users will require
higher speed settings.
Note:
Low speed settings are
recommended when travelling
down hill, particularly in
reverse. Also, reduce your
speed when turning corners.
7KHDQWLWLSGHYLFHV¿WWHG
to the scooter must not be
removed.
Turning corners
Always reduce your speed when
turning corners, particularly when
travelling downhill. Disregard of this
advice could lead to your scooter
tipping over.
Use of mobile phones
Mobile telephones or two way radio
devices must not be used while operating
the vehicle.
Use of mobile phones or two way
radios can cause excessively strong
HOHFWURPDJQHWLF¿HOGV7KLVPD\LQWHUIHUH
with the vehicle’s electronic systems.
Photo 18.2
If mobile phones or mobile radios are
required to be used, the vehicle must be
brought to a halt and the power turned off
before any such device is used.
18
Iss 1
Guidance for Safe Operation and Use
Tyres
Photo 19.1
Your scooter has pneumatic tyres all
round. It is good practice to inspect
the tyres for damage or wear regularly.
7KHPD[LPXPLQÀDWLRQSUHVVXUHLV
36,%DUDQGWKLVVKRXOG
never be exceeded. For typical use we
UHFRPPHQGLQÀDWLRQWR36,
%DUPD[LPXP3KRWR
Emergency Braking
Turning off the power switch whilst
moving will switch off the power causing
LPPHGLDWHDQGIXOOEUDNLQJ7KLVPHWKRG
of stopping is not recommended except
in an emergency.
Caution!
5RXWLQHXVHRIHPHUJHQF\EUDNLQJZLOO
cause damage to your scooter.
Freewheel mechanism
Caution!
Transporting the scooter along a slope in
IUHHZKHHOPRGHFDQEHGDQJHURXV7DNH
extra care if this is necessary. Always reengage the freewheel device after use.
Never sit on your scooter whilst in
freewheel since the scooter will no longer
automatically stop.
19
Iss 1
Battery and Charging Information
General information
Please do not dispose of batteries
in normal waste, always recycle in
Batteries are the power source for almost
all of the modern mobility products
available today. The design of batteries
XVHGLQPRELOLW\SURGXFWVLVVLJQL¿FDQWO\
different from the batteries used to start
a car for example. Car batteries are
designed to release a large amount
of power over a short period of time,
whilst mobility batteries (commonly
FDOOHGGHHSF\FOHEDWWHULHVUHOHDVHWKHLU
power evenly over a long period of time.
Therefore, due to the lower production
volumes and increased technological
requirements, mobility batteries are
typically more expensive. Commonly two
12 volt batteries are used together in a
mobility product giving a total voltage of
24 volts. The size of the battery (e.g. its
DYDLODEOHSRZHULVH[SUHVVHGLQDPSV
SHUKRXUHJDPSKU7KHKLJKHU
the number, the bigger the battery size,
weight and, potentially, the greater the
distance you can travel.
accordance with local laws.
Maintenance free
This is the type of battery used in the
EDWWHU\SDFN,WXVHV*(/HOHFWURO\WH
which is totally sealed within the battery’s
outer case. As the name implies, no
maintenance is required other than
regular charging. As the battery case
is sealed, you can safely transport
this type of battery without fear of acid
spilling. Furthermore, they are approved
for transportation on aircraft, boats and
trains.
It is recommended that the batteries are
always transported and stored upright.
Only use batteries supplied by an
authorised dealer.
Battery care
We have set out a battery care plan for
maintenance free batteries. If a different
care plan is followed, this may result in
lower than expected performance from
your mobility vehicle.
Batteries
YRXUVFRRWHULV¿WWHGZLWKEDWWHULHVWKDW
require no maintenance, other than
regular charging.
If a battery is physically damaged, please
use extreme caution when handling it.
Beware! EDWWHU\ÀXLGVDUHFRUURVLYH
DQGFDUHVKRXOGEHWDNHQDWDOOWLPHV
to avoid contact with it. If it comes into
FRQWDFWZLWKWKHVNLQRUFORWKLQJZDVK
immediately with soap and water. If
it comes into contact with the eye,
LPPHGLDWHO\ÀRRGWKHH\HZLWKUXQQLQJ
cold water for at least 10 minutes and
VHHNPHGLFDODWWHQWLRQ
Note: Do not expose any part
of the battery to direct heat and
when charging always place on a
hard surface in a room with good
ventilation. You should not charge
the batteries in outdoor conditions.
Do not smoke when in the vicinity
of charging batteries. Exclude all
QDNHGÀDPHVIURPWKHDUHD
'RQRWDOORZWKHEDWWHULHVWRIUHH]H
In such an event, call your local dealer for
assistance.
20
Iss 1
Battery and Charging Information
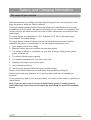
Battery pack care plan
7KHEDWWHULHVQHHGWREHFKHFNHG
regularly for signs of damage. If any
damage is apparent, contact your
local mobility dealer immediately.
1. Only use the approved battery
charger compatible with the vehicle to
be charged.
2. Charge your batteries over night,
regardless of the amount of use your
mobility device has had during the
day.
Caution!
Take care not to short circuit the
battery terminals. Remove all
conductive jewellery (e.g. watches,
necklaces etc.) before checking
the batteries.
3. Do not interrupt the charging cycle.
4. If your mobility device is not required
for use, it should remain on charge.
This will not damage the batteries, so
ORQJDVWKHPDLQVVRFNHWSOXJLVOHIW
switched on.
9. Following all the eight points above
should result in a healthier battery,
greater range for the vehicle user and
a longer life for your batteries.
Do not leave the charger still
connected to the batteries when
the mains has been switched off.
This will eventually deplete the
battery charge.
5. If you leave your vehicle for an
extended period (more than
GD\V¿UVWFKDUJH\RXUEDWWHULHV
for 12 hours, then remove charger
and ensure the batteries are
disconnected.
6. Failure to allow for full recharge will
damage the batteries and can lead to
shortened distances and permanent
failure.
7. Do not top up the charge of your
batteries during the day except in an
emergency. Wait until the evening for
a full overnight charge.
Caution
Remember to remove the plug
from your scooter when charger is
off, to prevent driving away whilst
attached.
The scooter cannot be operated
when being charged.
21
Iss 1
Battery and Charging Information
The range of your vehicle
Most manufacturers of mobility products state the range of their vehicles either in the
sales literature or within the Owner’s Manual.
The range stated sometimes differs from manufacturer to manufacturer even though
the battery size is the same. We measure the range of our vehicles in a consistent and
XQLIRUPPDQQHUEXWYDULDQFHVVWLOORFFXUGXHWRPRWRUHI¿FLHQFLHVDQGRYHUDOOSURGXFW
load weight.
7KHUDQJH¿JXUHVDUHFDOFXODWHGWR,626WDQGDUG3DUW6FRRWHU(QHUJ\
Consumption Theoretical Range.
7KHUDQJH¿JXUHVVWDWHGVKRXOGEHVHHQDVDWKHRUHWLFDOPD[LPXPDQGFRXOGEH
reduced if any single, or combination, of the following circumstances occur:
8VHUZHLJKWKHDYLHUWKDQNJ
2. Batteries whose age and condition are less than perfect.
7KHWHUUDLQLVGLI¿FXOWRUXQVXLWDEOHHJYHU\KLOO\VORSLQJPXGG\JURXQGJUDYHO
grass, snow and ice.
4. The vehicle climbs ramps regularly.
5. The ambient temperature is very hot or very cold.
6. Damage occurring to one or more tyres.
7. Lots of start/stop driving.
$OVRWKLFNSLOHFDUSHWVZLWKLQWKHKRPHFDQDIIHFWUDQJH
$OZD\VFKHFNWKDWWKHEDWWHULHVDUHVXI¿FLHQWO\FKDUJHGEHIRUHVHWWLQJRII
$OZD\VHQVXUHWKDW\RXUEDWWHULHVDUHLQJRRGFRQGLWLRQDQGWKDWQROHDNDJHKDV
occurred.
'RQRWH[SRVHDQ\SDUWRI\RXUFKDUJHUEDWWHU\RUVFRRWHUWRGLUHFWKHDWLHJDV¿UHVRU
QDNHGÀDPH
Note: If you are out on your scooter and the battery gauge is reading low the
remaining range can be increased slightly by decreasing the maximum available
speed.
22
Iss 1
GENERAL WARNINGS
PERSONAL & OPERATIONAL GUIDELINES
'ULYHSUR¿OHVVKRXOGRQO\EHDGMXVWHGE\KHDOWKFDUHSURIHVVLRQDOVDQGDSSURYHG
agents/dealers, who are totally conversant with the process. They must also fully
understand the user’s capabilities and the user’s ability to operate the scooter safely.
Incorrect settings may cause injury or damage to the user, bystanders, the scooter and/
or nearby property.
To determine personal mobility limitations, practice combinations of bending, reaching,
mount and dismount techniques, whilst in the presence of a healthcare professional.
Practice the above techniques BEFORE actively using the scooter.
For users with balance problems, practice the above techniques with the aid of an
assistant, in the presence of a healthcare professional.
DO NOT DWWHPSWWRSLFNXSREMHFWVWKDWFDXVH\RXWRVKLIW\RXUZHLJKWLQWKHVHDWRU
require you to bend excessively in any direction. Such action may result in the scooter
tipping over, or in injury to the person or both.
DO NOT XVHDQHVFDODWRUWRPRYHWKHPRELOLW\VFRRWHUEHWZHHQÀRRUVDVVHULRXVERGLO\
injury could arise from such actions.
DO NOT drive on the road, dual carriageways or motorways.
DO NOT drive up, down or across inclines that have water, ice, oil or any other slippery
substance on the surface. Failure to note the above conditions could cause loss of
control.
DO NOT DWWHPSWWRGULYHRYHUNHUEVRUREVWDFOHVLQH[FHVVRI´PP'LVUHJDUGLQJ
this warning could cause the mobility scooter to tip resulting in possible bodily harm.
DO NOTPDNHVKDUSWXUQVLQIRUZDUGRUUHYHUVHDWKLJKVSHHGV
DO NOT lift the mobility scooter by its Tiller, Seat, Body Panels or by any detachable
assemblies. Always disassemble the scooter into its stowable parts and then lift each
assembly one at a time.
DO NOT carry passengers on your scooter.
DO NOT attempt to tow another vehicle.
DO NOT RSHUDWHWKHPRELOLW\VFRRWHUZLWKRXW¿UVWFKHFNLQJWKDWLWLVVDIHWRGRVR
Always be aware of your surroundings.
DO NOTDWWHPSWWRXVH\RXUPRELOLW\VFRRWHUZLWKRXW¿UVWFKHFNLQJWKDWDOOZLULQJ
harnesses are connected and all detachable parts/assemblies are correctly aligned and
¿UPO\¿[HGLQSODFH
DO NOT use your mobility scooter without the anti-tipper wheels attached.
DO NOT DWWHPSWWR¿WSDUWVDFFHVVRULHVRUDGDSWHUVWKDWDUHQRWDXWKRULVHG
23
Iss 1
GENERAL WARNINGS
PERSONAL & OPERATIONAL GUIDELINES
DO NOT PRXQWRUGLVPRXQW\RXUPRELOLW\VFRRWHUZLWKRXW¿UVWZLWKGUDZLQJWKHLJQLWLRQ
NH\7KLVZLOOHQVXUHWKDWWKHSRZHULVRIIDQGWKHVFRRWHUFDQQRWPRYHXQH[SHFWHGO\
DO NOTOHDYHWKHLJQLWLRQNH\LQ\RXUVFRRWHUZKLOVWLWLVXQDWWHQGHG&KLOGUHQRU
inexperienced people may attempt to drive your scooter which may result in damage or
personal injury.
DO NOT connect any medical device, such as a ventilator, life support machine etc.
to the scooter’s electrical system. Failure of the equipment may result from such
connections.
DO NOT RSHUDWH\RXUPRELOLW\VFRRWHUZKLOVWXQGHUWKHLQÀXHQFHRIDOFRKROGUXJVRU
prescription medication that may impair judgement.
DO NOT operate your mobility scooter if you feel acutely unwell.
DO NOT operate your mobility scooter if your vision is seriously impaired.
If you have any doubts about medical conditions, health problems or treatments
that may affect your ability to operate the mobility scooter safely, please consult
your healthcare professional.
:HVSHFL¿FDOO\GLVFODLPUHVSRQVLELOLW\WRDOOSHUVRQDOLQMXU\DQGSURSHUW\GDPDJH
that may occur during use which does not comply with the relevant national or
local statutes.
Do not attempt to operate your scooter whilst standing next to it.
Always ensure that you are able to operate all the controls from a seated position, that
WKHUHDUYLHZPLUURULI¿WWHGLVVHWFRUUHFWO\DQGWKDWWKHVHDWLVVHFXUHO\ORFNHGLQWR
place.
$WWHQWLRQ6ZLWFKRQWKHVFRRWHUOLJKWVLI¿WWHGWRPDNH\RXUVHOIYLVLEOHZKHQ
there are low levels of light, day or night.
7KHUHDUERG\SDQHOZKHUH¿WWHGLVGHVLJQHGWRFRYHUWKH'ULYH$VVHPEO\:LULQJ
Harness and Electrical Connectors.
DO NOT stand on any of the body panels, only the footboard.
DO NOT stand on the scooter seat.
DO NOT DWWHPSWWRWUDQVIHULQWRRURXWRIWKHVFRRWHUVHDWZLWKRXW¿UVWFKHFNLQJWKDWLW
is LOCKED into position. Attempting unsafe transfers can result in bodily injury and/or
damage.
DO NOT drive your scooter if the seat is not LOCKED in the FORWARD position.
The seat must be secured in the FORWARD facing position BEFORE and DURING
operation of the scooter. Attempting to operate the scooter with the seat not secured in
the front facing position, could result in damage and/or bodily injury.
24
Iss 1
GENERAL WARNINGS
PERSONAL & OPERATIONAL GUIDELINES
DO NOT operate the scooter without ensuring that the Tiller is properly adjusted and
VHFXUHG$IWHUPDNLQJDQ\DGMXVWPHQWWRWKH7LOOHUSRVLWLRQ\RXPXVWFKHFNWKDWWKH7LOOHU
LVORFNHGDQGVHFXUHGLQWRSRVLWLRQ%()25(GULYLQJ7RFKHFNJHQWO\SXVKDQGSXOOWKH
7LOOHUWRPDNHVXUHLWLVVHFXUHG
An unsecured Tiller could result in damage and/or bodily injury.
DO NOT attempt to climb, ascend, or descend ramps greater than 10 degrees, or
transverse slopes with a gradient greater than 10 degrees.
DO NOT attempt to reverse down slopes in excess of 8 degrees.
:KHQQHJRWLDWLQJUDPSVRULQFOLQHVLIWKHWKURWWOHOHYHULVUHOHDVHGDUROOEDFNZLOORFFXU
In FORWARD or REVERSE motion the scooter will ROLLBACK approximately 30cms.
IWEHIRUHWKHEUDNHHQJDJHV
&KHFNWKDWDOOHOHFWULFDOFRQQHFWLRQVDUHVHFXUHEHIRUHXVLQJ\RXUVFRRWHU
DO NOT under any circumstances, disconnect, cut, extend or otherwise modify ANY of
the wiring harnesses installed within or connected to your mobility scooter.
DO NOT under any circumstances, disconnect, cut, extend or otherwise modify ANY
of the wiring harnesses installed within or connected to your mobility scooter battery
charger.
It is important that your mobility scooter battery charger is connected to a properly
LQVWDOOHGHOHFWULFDOVRFNHWZLWKDQHDUWKHGRXWOHW
Failure to comply with the above requirements could result in a possible SHOCK
HAZARD.
DO NOT use any batteries that are not DEEP CYCLE GEL, AGM or SEALED LEADACID type. Other types of batteries are NOT SUITABLE.
Please read battery/battery charger information before installation.
This scooter has been tested to ISO 7176 Part 9 “Climatic Tests for Electric
Wheelchairs.”
7KHWHVWSURYLGHVWKHVFRRWHUXVHURUWKHLUDWWHQGDQWVXI¿FLHQWWLPHWRUHPRYHWKH
mobility scooter from a rain storm, whilst retaining normal operation of the mobility
scooter.
DO NOT operate your mobility scooter during an electrical storm.
DO NOT OHDYH\RXUPRELOLW\VFRRWHULQDUDLQVWRUPRIDQ\NLQG
DO NOT use your mobility scooter in a shower or leave it in a damp bathroom or sauna.
DO NOT leave your mobility scooter in a damp area for any length of time.
DO NOT Jet wash, hose down, or use an automated car-wash on your mobility scooter.
25
Iss 1
GENERAL WARNINGS
PERSONAL & OPERATIONAL GUIDELINES
Direct exposure to rain, sea spray or moisture could cause the mobility scooter to
malfunction electrically and mechanically and may cause rusting.
Maximum User Weight Limitations.
6$33+,5(ð .JOEV
)URQWEDVNHW .JOEV
DISPOSAL
The symbol above means that in accordance with local laws and regulations your
product should be disposed of separately from household waste. When this product
UHDFKHVWKHHQGRILWVOLIHWDNHLWWRWKHFROOHFWLRQSRLQWGHVLJQDWHGE\ORFDODXWKRULWLHV
The separate collection and recycling of your product at the time of disposal will help
conserve natural resources and ensure that it is recycled in a manner that protects the
environment.
Ensure you are the legal owner of the product prior to arranging for the product disposal
in accordance with the above recommendations.
26
Iss 1
(0&(0,:$51,1*6
CAUTION:
IT IS VERY IMPORTANT THAT YOU READ THIS INFORMATION REGARDING THE
POSSIBLE EFFECTS OF ELECTRO MAGNETIC CONTAMINATION, (EMC) ON YOUR
MOBILITY SCOOTER. SOMETIMES THIS EFFECT IS ALSO KNOWN AS ELECTRO
MAGNETIC INTERFERENCE (EMI).
EMC (EMI) FROM RADIO-WAVE SOURCES.
Mobility scooters may be susceptible to EMC, which is interference from electromagnetic
HQHUJ\(0HPLWWHGIURPVRXUFHVVXFKDVUDGLRVWDWLRQV79VWDWLRQVDPDWHXU+$0
radio transmitters, two way radios and mobile phones. The interference (from radio
VRXUFHVFDQFDXVHWKHPRELOLW\VFRRWHUWRUHOHDVHLWVEUDNHVPRYHE\LWVHOIRUPRYH
in an unintended way. Permanent damage can also be done to the mobility scooter’s
control system.
7KHLQWHQVLW\RIWKHLQWHUIHULQJ(0HQHUJ\FDQEHPHDVXUHGLQYROWVSHUPHWHU9P
Each mobility scooter can resist EMC up to a certain intensity.
7KLVLVNQRZQDVWKHVFRRWHU¶V³LPPXQLW\OHYHO´
The higher the immunity level, the greater the protection.
Current technology offers useful protection of at least 20 V/m. which provides protection
from the more common sources of radiated EMC.
7KHUHDUHDQXPEHURIUHODWLYHO\VWURQJHOHFWURPDJQHWLF¿HOGVSUHVHQWLQWKHHYHU\GD\
environment. Most of these sources are obvious and easy to avoid, others are not so
obvious and can be unavoidable.
%\IROORZLQJWKHZDUQLQJVOLVWHG\RXUULVNRIH[SRVXUHWR(0&ZLOOEHPLQLPLVHG
(0&VRXUFHVFDQEHEURDGO\FODVVL¿HGLQWRWKUHHW\SHV
+DQGKHOGSRUWDEOHWUDQVFHLYHUVWUDQVPLWWHUUHFHLYHUVZLWKRQERDUGDQWHQQD
([DPSOHVDUH:DONLH7DONLH&%5DGLRVHFXULW\HPHUJHQF\VHUYLFHV0RELOH
phones. Note that some cellular phones can transmit signals while they are switched
on but not being used.
2. Medium range mobile transmitters such as those used on emergency services
vehicles, taxis etc. These usually have antennae mounted on the outside of the
vehicle.
3. Long-range transmitters and transceivers, such as commercial broadcast
WUDQVPLWWHUVUDGLRDQG79EURDGFDVWDQWHQQDWRZHUVDQGDPDWHXU+$0UDGLRV
Note:
Other types of hand-held devices such as cordless phones, laptop
computers, AM/FM radios, TV sets, CD players, cassette players and
small appliances, such as electric shavers and hair dryers, are not
likely to cause any EMC problems to your mobility scooter.
27
Iss 1
(0&(0,:$51,1*6
Mobility scooter electromagnetic contamination (EMC).
(0HQHUJ\UDSLGO\LQWHQVL¿HVWKHFORVHURQHPRYHVWRWKHWUDQVPLWWLQJDQWHQQDWKH
VRXUFH%HFDXVHRIWKLVLWLVSRVVLEOHWREULQJVWURQJ(0¿HOGVXQLQWHQWLRQDOO\FORVHWR
your mobility scooter’s control system. Mobile hand-held radio type transceivers are of
particular concern.
Whilst such devices are in use, it is possible that the EM radiation can affect the mobility
VFRRWHU¶VPRYHPHQWDQGEUDNLQJ
The following warnings are recommended to help prevent possible interference with
your mobility scooter’s control system.
1. Do not operate hand-held transceivers, such as CB radio or turn ON cellular phones,
whilst your mobility scooter is turned ON.
2. Be aware of nearby radio or television transmitters and try to avoid coming too close
to them.
,I\RXH[SHULHQFHXQLQWHQGHGPRYHPHQWRUEUDNHUHOHDVHVZLWFK\RXUVFRRWHU2))
as soon as it is safe to do so.
4. Adding accessories, components or modifying the mobility scooter, may increase
VXVFHSWLELOLW\WR(0&(0,
Note:
7KHUHLVQRHDV\ZD\RIDVVHVVLQJWKHHIIHFWRIDQ\PRGL¿FDWLRQRQDVFRRWHU¶V
EM immunity.
,I\RXH[SHULHQFHDQ\(0&(0,UHODWHGLQFLGHQWVSOHDVHUHSRUWWKHPWR\RXU
dealer, noting if there is a possible source of EM transmission nearby.
28
Iss 1
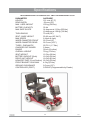
6SHFL¿FDWLRQV
MEASUREMENTS ARE FOR GUIDANCE ONLY. SMALL DIFFERENCES MAY OCCUR
PARAMETER
/(1*7+
5($5:,'7+
0$;86(5:(,*+7
BATTERY CAPACITY
0$;6$)(6/23(
78515$',86
6($7%$6(+(,*+7
0$;63(('
:+((/',$0(7(5)5217
:+((/',$0(7(55($5
7<5(631(80$7,&
CHARGER OFF-BOARD
5$1*(
29(5$//:(,*+7
6($7:(,*+7
%$77(5<:(,*+7(DFK
'5,9(81,7:(,*+7
+($9,(673$57)URQW6HFWLRQ
)5217%$6.(7/2$'0$;
*5281'&/($5$1&(
&21752//(53*'7
SAPPHIRE²
FPV´
FPV´
NJOEV
35 Ah
GHJUHHVDWNJOEV
GHJUHHVDWNJOEV
FPV´
FPV´´
NSKPSK
FPV´
FPV´
36,%DU
5 Amps
NPPLOHV
NJOEV
NJOEV
NJOEV
NJOEV
NJOEV
NJOEV
FPV´
6'5,9(3URJUDPPDEOHE\'HDOHU
29
Iss 1
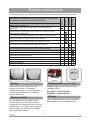
Routine maintenance
Annually
Quarterly
The checks below can be carried out by the user
Weekly
There is no service manual available.
0DLQWHQDQFHIDXOW¿QGLQJDQGVHUYLFLQJVKRXOGEHFDUULHGRXWE\
DQDXWKRULVHGGHDOHUXQOHVVRWKHUZLVHLQGLFDWHG
Daily
7KHIROORZLQJWDEOHJLYHVDQLQGLFDWLRQDVWRZKHQURXWLQHPDLQWHQDQFHFKHFNVVKRXOGEHPDGH
Battery charge check (Fig. D)
/RRNDWEDWWHU\FKDUJHLQGLFDWRURQWLOOHUEHIRUHXVHWRHQVXUHEDWWHULHVDUH
fully charged.
Inspection of connectors (Fig. C)
Remove batteries and rear drive unit and ensure all connectors are secure.
Wipe over with a damp cloth
Use a damp soft cloth and mild detergent on panels, battery wells, tiller and seat.
Check tyres & tyre pressures, (25 P.S.I., 1.71 Bar)
Each tyre should be free of debris, oil, deep cuts or distortion.
Long overnight battery charge
Please ensure that the batteries are charged for a minimum of 8 hours.
Check tyres for wear (See Fig. A and Fig. B)
/RRNDWWKHW\UHVWRHQVXUHWKDWWKHWUHDGLVYLVLEOHDQGFRQWLQXRXV
The checks below must be carried out by an authorised dealer
6HDWVZLYHOVHDWVOLGHZKHUH¿WWHG
,QVSHFWLRQRIZLULQJDQGFRQQHFWRUVIRUFKD¿QJDQGZHDU
Battery terminals
Clean and protect with petroleum jelly.
(QVXUHSDUNLQJEUDNHZKHUH¿WWHGLVFRUUHFWO\DGMXVWHG
Check stabiliser wheels for wear
Inspect motor brushes
Full service by dealer
Fig. A
Fig. B
Fig. C
Storage
Fig. D
Replacing LED`sZKHUH¿WWHG
When storing your scooter for long
SHULRGVLQH[FHVVRIRQHZHHN
charge batteries for 12 hours and then
disconnect the batteries to minimise
battery discharge.
Caution! Disconnect batteries before
changing LED`s.
Rear light - Contact Dealer
Headlight - Contact Dealer
Wheels
Electronic faults
Note: Wheels should only be removed
DQGUH¿WWHGE\DQDXWKRULVHGGHDOHU
Do not attempt to investigate faults
in the control box, the control pod or
charger as the design and set up of the
electronics is of a safety critical nature.
Spare parts and service are available
from authorised dealers.
30
Iss 1
Service history
7KLVVHFWLRQLVGHVLJQHGWRDVVLVW\RXLQNHHSLQJDUHFRUGRIDQ\VHUYLFHDQGUHSDLUVWR\RXUVFRRWHU6KRXOG
you decide to sell or exchange your vehicle in the future, this will prove most helpful to you. Your Service Agent
ZLOODOVREHQH¿WIURPDGRFXPHQWHGUHFRUGDQGWKLVPDQXDOVKRXOGDFFRPSDQ\WKHVFRRWHUZKHQVHUYLFHRU
UHSDLUZRUNLVFDUULHGRXW7KH6HUYLFH$JHQWZLOOFRPSOHWHWKLVVHFWLRQDQGUHWXUQWKHPDQXDOWR\RX
Customer Name.
Date scooter purchased
Address
Model
Colour
Serial No.
Postcode
YEAR
Service dates
Controller
On/off switch
Output plug
Operation
'\QDPLFEUDNLQJ
Programmable
settings
Batteries
Levels
Connections
Discharge test
Wheels/tyres
Wear
Pressure
Bearings
Wheel nuts
Motors
Wiring
Noise
Connections
%UDNH
Brushes
Chassis
Condition
Steering
1
2
3
4
YEAR
1
2
3
Service dates
Upholstery
Seat
%DFN
Armrests
Electrics
Condition
of loom
Connections
Lights
ZKHUH¿WWHG
Test run
Forwards
Reverse
Emergency
stop
Left turn
Right turn
Up/down slope
Over obstacle
3DUNLQJEUDNH
ZKHUH¿WWHG
List items repaired/adjusted
Dealer stamp
Date:
Dealer stamp
Signed:
Date:
Dealer stamp
Date:
4
Signed:
Dealer stamp
Signed:
Date:
31
Signed:
Iss 1
Trouble Shooting Guide
SYMPTON
Shortened range
POSSIBLE CAUSE
Batteries not charged for
long enough
%DWWHULHVZHDNDQG
cannot hold charge
%DWWHU\SDFNQRWFKDUJLQJ %DWWHU\SDFNIDXOW
or
Charge fault
battery gauge shows
Charger loom or plug
empty after charging
damaged
Loose connection
No output from wall outlet
Battery charging current
high
No drive
Fuse in charger mains
plug blown
%XWWRQRQEDWWHU\SDFN
has popped out
Output fuse in charger
blown
Faulty batteries
Scooter switched on
during charging
%UDNHUHOHDVHOHYHU
disengaged
Flat batteries
Scooter is not switched on
ZLWKNH\
%DWWHU\SDFNQRWHQJDJHG
properly
Charger plugged in
%XWWRQRQEDWWHU\SDFN
popped out
Disconnected loom or
plugs
Control system fault
Motor runs irregularly and/ Electrical malfunction
or noisily
Control system fault
SOLUTION
Charge batteries for eight
hours or more
5HSODFHEDWWHU\SDFN
5HSODFHEDWWHU\SDFN
Replace charger
Contact local mobility
dealer
&KHFNSOXJVDQGORRPV
7U\DZDOOVRFNHWLQD
different room
Unplug from wall &
change fuse
Switch off and press
EXWWRQEDFNLQ
Unplug from wall and
contact dealer
5HSODFHEDWWHU\SDFN
Turn Scooter off
(QJDJHEUDNHUHOHDVH
lever
&KDUJHEDWWHU\SDFN
(QVXUHWKHNH\LV
switched on
&KHFNEDWWHU\SDFNLVIXOO\
engaged onto connectors
Unplug charger
5HVHWFLUFXLWEUHDNHU
button
&KHFNDOOSOXJVORRPV
Contact dealer
Contact dealer
Contact dealer
DO NOT ATTEMPT TO OPEN ANY PARTS OF THE SCOOTER CONTROL SYSTEM,
BATTERY PACK, LOOMS, PLUGS OR BATTERY CHARGER.
THE CONTROL SYSTEM IS SAFETY CRITICAL AND THERE ARE NO USER
SERVICEABLE PARTS
32
Iss 1
Trouble Shooting Guide
<RXUVFRRWHULV¿WWHGZLWKDVHOIGLDJQRVWLFFRQWUROOHUWKDWZLOOJLYHDVHTXHQFHRI
audible beeps when an error is detected to help you, or the authorised service
agent, determine the drive electronics fault.
Should you switch on the scooter and hear the beeps note the number of beeps,
separated by a short delay between each sequence, and refer to the table below.
NUMBER POSSIBLE CAUSE
OF BEEPS
1
Low battery voltage
2
Motor disconnected
3
Motor wiring trip
4
Freewheel switch trip
5
6
Not used
Charger Connected
7
Throttle trip
8
9
Possible control system
trip
6ROHQRLGEUDNHWULS
10
High battery voltage
SOLUTION
The battery needs charging or there is
DEDGFRQQHFWLRQRQWKHEDWWHU\&KHFN
the connections to the battery. If the
connections are good, try charging the
battery.
The motor has a bad connection.
&KHFNDOOWKHFRQQHFWLRQVDQGOHDGV
EHWZHHQWKHPRWRUDQG6'ULYH&KHFN
the position of the freewheel lever.
The motor has a short circuit to the
EDWWHU\&KHFNDOOWKHFRQQHFWLRQVDQG
leads between the motor and the battery.
The freewheel switch is activated or
WKHPDQXDOEUDNHGLVHQJDJHPHQW
PHFKDQLVPLVRSHUDWHG&KHFNWKH
position of the switch or lever and all
connections between the switch and
the S-drive.
The S-drive is being inhibited from driving. This may be because the battery
charger is connected.
$WKURWWOHWULSLVLQGLFDWHG0DNHVXUH
that the throttle is in the neutral position before switching on the scooter.
$FRQWUROV\VWHPWULSLVLQGLFDWHG0DNH
sure that all connections are secure.
7KHSDUNLQJEUDNHVKDYHDEDGFRQQHFWLRQ&KHFNWKHSDUNLQJEUDNHDQG
PRWRUFRQQHFWLRQV0DNHVXUHDOOWKH
system connections are secure.
An excessive voltage has been applied
to the S-drive. This is usually caused
E\DSRRUEDWWHU\FRQQHFWLRQ&KHFN
the battery connections.
33
Iss 1
Guarantee
Warranty condition
1
The repair or replacement will be carried out by an
authorised Sunrise Medical Dealer/Service Agent.
7
The above warranty conditions apply to all scooter parts
for models purchased at full retail price.
2
To apply the warranty conditions should your scooter
require attention under these arrangements, notify the
designated Sunrise Medical Service Agent immediately
JLYLQJIXOOLQIRUPDWLRQDERXWWKHQDWXUHRIWKHGLI¿FXOW\
Should you be operating the scooter away from the
locality of the designated Sunrise Medical Service
$JHQWZRUNXQGHUWKH³:DUUDQW\&RQGLWLRQV´ZLOOEH
carried out by any other service agent designated by
the manufacturer.
8
Under normal circumstances, no responsibility will be
accepted where the scooter has required repair or
replacement as a direct result of:
L 7KHVFRRWHURUSDUWQRWKDYLQJEHHQPDLQWDLQHGLQ
accordance with the manufacturer’s recommendations,
where such exist. Or failing WRXVHRQO\WKHVSHFL¿HG
original equipment parts.
LL 7KHVFRRWHURUSDUWKDYLQJEHHQGDPDJHGE\QHJOHFW
accident or improper use.
3 Should any part or parts of the scooter require repair or
UHSODFHPHQWDVDUHVXOWRIDVSHFL¿FPDQXIDFWXULQJRU
material defect within two years from the date on which
the possession of the scooter was transferred to the
original purchaser, and subject to it remaining within
that ownership, then the part or parts will be repaired
or replaced completely free of charge if returned to the
authorised service agent.
LLL7KHVFRRWHURUSDUWKDYLQJEHHQDOWHUHGIURPWKH
PDQXIDFWXUHU¶VVSHFL¿FDWLRQVRUUHSDLUVKDYLQJEHHQ
DWWHPSWHGSULRUWRWKH6HUYLFH$JHQWEHLQJQRWL¿HG
3OHDVHNHHSDQRWHRI\RXUORFDO6HUYLFH$JHQW¶VDGGUHVV
and telephone number in the space provided. In the event
RIDEUHDNGRZQFRQWDFWWKHPDQGWU\WRJLYHDOOUHOHYDQW
GHWDLOVVRWKH\FDQKHOS\RXTXLFNO\
The scooter shown and described in this manual may
not be exactly the same in every detail as your own
model. However, all instructions are still entirely relevant,
irrespective of detail differences.
Note: This guarantee is not transferable.
$Q\UHSDLUHGRUUHSODFHGSDUWZLOOEHQH¿WIURPWKHVH
arrangements for the balance of the warranty period
applicable to the scooter.
5
Parts replaced after the original warranty has expired
are covered for a further three months.
6
Items of a consumable nature will not generally be
covered during the normal warranty period unless such
items have clearly suffered undue wear as a direct
result of an original manufacturing defect. These items
include amongst others upholstery, tyres, inner tubes,
batteries, armpads, hand grips and other similar parts.
The manufacturer reserves the right to alter without notice
any weights, measurements, or other technical data shown
LQWKLVPDQXDO$OO¿JXUHVPHDVXUHPHQWVDQGFDSDFLWLHV
shown in this manual are approximate, and do not
FRQVWLWXWHVSHFL¿FDWLRQ
THIS IN NO WAY AFFECTS YOUR STATUTORY RIGHTS.
Your local service agent:
Your local service agent:
Sunrise Medical Limited
6XQULVH%XVLQHVV3DUN+LJK6WUHHW:ROODVWRQ:HVW0LGODQGV
DY8 4PS England
Tel 01384 44 66 22 Fax 01384 44 66 44
(PDLOVXQPDLO#VXQPHGFRXN
www.sunrisemedical.com
Sunrise Medical Limited UHFRPPHQGWKDW\RXGRQRWXQGHUWDNHPDLQWHQDQFHWDVNVRWKHUWKDQWKRVH
explained in this manual. Your local authorised Sunrise Medical service agent is fully trained by Sunrise
Medical to carry out detailed maintenance as and when required. Use only genuine Sunrise Medical
replacement parts.
34
Iss 1
Sunrise Medical Limited
6XQULVH%XVLQHVV3DUN+LJK6WUHHW:ROODVWRQ:HVW0LGODQGV
DY8 4PS England
Tel 01384 44 66 22 Fax 01384 44 66 44
(0DLOVXQPDLO#VXQPHGFRXN
www.sunrisemedical.com
© 2007 Sunrise Medical
35
Iss 1