1
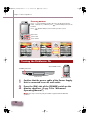
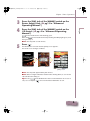
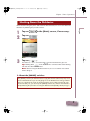
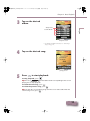
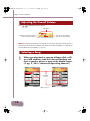
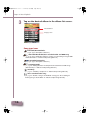
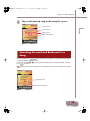
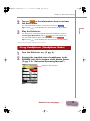
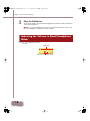
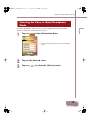
QuickGuide_EnFrGeSpIt.book 1 ページ 2010年1月22日 金曜日 午前11時47分
English
QuickGuide_EnFrGeSpIt.book 2 ページ 2010年1月22日 金曜日 午前11時47分
Table of Contents
Chapter 1
Basic Operations
Operating the Pocket Controller
Turning the Disklavier On
Turning the Disklavier Off (Standby Mode)
Shutting Down the Disklavier
3
3
4
6
7
Chapter 2
Basic Playback
Types of Playable Software
Song Libraries and Their Contents
Playing Back the Sample Songs in the Song Library
Adjusting the Overall Volume
Selecting a Song
Searching Forward and Backward in a Song
8
8
9
10
12
12
15
Chapter 3
Basic Piano Playing
Playing the Acoustic Piano (Acoustic Mode)
Playing the Digital Piano (Quiet Mode)
Using Headphones (Headphone Mode)
Adjusting the Volume in Quiet/Headphone Mode
Selecting the Voice in Quiet/Headphone Mode
2
16
16
16
17
18
19
QuickGuide_EnFrGeSpIt.book 3 ページ 2010年1月22日 金曜日 午前11時47分
Chapter 1
Basic Operations
Before operating the Disklavier
Be sure to set up the Disklavier and the Pocket Controller. ( pg. 11 “Setting Up the
Disklavier” and pg. 15 “Preparing the Pocket Controller” in “Advanced Operating
Manual”)
Convention
In the following procedures, the buttons and controls mentioned are of the Pocket
Controller unless otherwise noted.
Operating the Pocket Controller
You can operate the Pocket Controller by either tapping items on the touch screen with
the supplied stylus pen, or by pressing the buttons on the Pocket Controller.
Tapping with the stylus pen
Touch an item (application icon, button, control, etc.) on the touch screen once to execute
its function.
Stylus pen
Pocket Controller
3
QuickGuide_EnFrGeSpIt.book 4 ページ 2010年1月22日 金曜日 午前11時47分
Chapter 1: Basic Operations
LNK PWR
Pressing buttons
Press
(cursor buttons) to move the focus on the desired icon,
button, control, etc., and then press
(select button) to execute its
function.
Press
(back button) to return to the previous screen.
Back button
Select button
Cursor buttons
Turning the Disklavier On
ON/STANDBY button
STANDBY/ON button
Media Center
Pocket Controller
1
Confirm that the power cable of the Power Supply
Unit is connected to an AC wall outlet.
2
Press the [ON] side of the [POWER] switch on the
Monitor speakers. ( pg. 10 in “Advanced
Operating Manual”)
Note: This step is necessary only for models supplied with the Monitor
speakers.
4
QuickGuide_EnFrGeSpIt.book 5 ページ 2010年1月22日 金曜日 午前11時47分
Chapter 1: Basic Operations
4
Press the [ON] side of the [MAINS] switch on the
I/O Center. ( pg. 4 in “Advanced Operating
Manual”)
English
3
Press the [ON] side of the [MAINS] switch on the
Power Supply Unit. ( pg. 5 in “Advanced
Operating Manual”)
on the Media Center starts flashing green.
Wait until
on the Media Center stops flashing and dimly lights green, and
then go to step 5.
Note: This may take several minutes.
5
Press
.
The Disklavier is turned on and the [Main] screen appears.
The touch screen changes as follows:
[Main] screen
Note: This may take approximately two minutes.
Note: When turning the Disklavier back on after shutting down, be sure to wait
10 seconds before doing so.
Tip: Pressing
on the Media Center also turns the Disklavier on. In such a
case, be sure to press
to turn on the Pocket Controller as well.
5
QuickGuide_EnFrGeSpIt.book 6 ページ 2010年1月22日 金曜日 午前11時47分
Chapter 1: Basic Operations
Turning the Disklavier Off (Standby Mode)
After daily use, be sure to turn the Disklavier off by following the procedure below. In
Standby mode, the piano is in effect turned off. However, electrically it is in a state in
which a small quantity of power is being consumed.
1
Tap on
repeatedly in the [Main] screen until
the following screen appears.
The [Main] screen consists of three screens. Tap on
or
to switch the screen.
Tip: To return to the [Main] screen, press
repeatedly until the [Main] screen
appears.
2
Tap on
.
The Pocket Controller is turned off and
green.
Tip: Pressing
on the Media Center lights dimly
on the Media Center also turns the Disklavier off.
Note: Be sure NOT to disconnect the power cable from the AC wall outlet in
standby mode.
6
QuickGuide_EnFrGeSpIt.book 7 ページ 2010年1月22日 金曜日 午前11時47分
Chapter 1: Basic Operations
Shutting Down the Disklavier
Before disconnecting the power cable from the AC wall outlet, be sure to shut down the
Disklavier by following the procedure below.
in the [Main] screen, if necessary.
2
Tap on
.
3
Tap on
.
The Pocket Controller turns off and
English
1
Tap on
on the Media Center goes out.
Tip: Holding down
on the Media Center until the button starts flashing
will also shut down the Disklavier.
Note: When turning the Disklavier back on, be sure to wait for 10 seconds
before doing so.
About the [MAINS] switches
The [MAINS] switches (on both the Power Supply Unit and the I/O Center) only need
to be switched off when you are not going to use the Disklavier for a long period of
time. It is effectively the same as disconnecting the power cable from the AC wall
outlet. For daily use, you can keep the [MAINS] switches on, and turn the Disklavier
off by following the procedure “Turning the Disklavier Off (Standby mode)” on pg. 6.
7
QuickGuide_EnFrGeSpIt.book 8 ページ 2010年1月22日 金曜日 午前11時47分
Chapter 2
Basic Playback
The Disklavier can play back piano songs contained in PianoSoft, PianoSoft·Plus,
PianoSoft·PlusAudio, and PianoSoft·PlusGraphics software. Furthermore, audio/MIDI
CDs of other manufacturer’s and standard audio CDs, as well as piano songs that you
recorded in the song library* of the Disklavier can be played back.
* For details on organizing songs with the internal song libraries, see “Song Libraries and Their
Contents” on pg. 9.
Note: PianoSoft·PlusAudio CDs may not be available in some countries.
Types of Playable Software
PianoSoft and PianoSoft·Plus floppy disks
When piano songs such as those contained in PianoSoft and
PianoSoft·Plus floppy disks are played back on the Disklavier, the
piano parts are actually played by the Disklavier keyboard, and the
keys move up and down as though they were being played by an invisible performer. The
ensemble parts, (contained in PianoSoft·Plus software), are played by the internal XG
tone generator and are heard from the Monitor speakers**.
PianoSoft·PlusAudio and audio/MIDI CDs of
other manufacturer’s
PianoSoft·PlusAudio songs and other manufacturer’s audio/MIDI songs are recorded
using two channels, an analog MIDI channel for the piano parts and an audio channel
for instrumentals and vocals. When they are played back on the Disklavier, the piano
parts are played by the Disklavier keyboard as with PianoSoft and PianoSoft·Plus songs,
and all other instrumental and vocal parts are heard from the Monitor speakers** just
like a normal stereo system.
PianoSoft·PlusGraphics software
When piano songs contained in PianoSoft·PlusGraphics software are
played back on the Disklavier, piano parts are actually played by the
Disklavier keyboard, and the ensemble parts are played by the internal XG tone
generator and are heard from the Monitor speakers**. Furthermore, synchronized
pictures and text information are also output from the VIDEO OUT jack on the I/O
Center. To play back a PianoSoft·PlusGraphics song, select the song with
in the
song list screen.
8
QuickGuide_EnFrGeSpIt.book 9 ページ 2010年1月22日 金曜日 午前11時47分
Chapter 2: Basic Playback
SmartPianoSoft disks and CDs
For details, see “Adding Disklavier Accompaniment to Commercial CD
Songs (PianoSmart)“ on pg. 38 in “Advanced Operating Manual“.
Standard audio CDs
English
Standard audio CDs contain two audio channels (R and L), and are both heard
from the Monitor speakers** just like a normal stereo system. In other words, the
Disklavier can be used to play CDs in place of a stereo system.
** Only for models supplied with the Monitor speakers.
Song Libraries and Their Contents
Songs contained in software floppy disks/CDs, or those you have recorded on the
Disklavier, purchased from DisklavierMusicStore, or copied from a personal computer
can be copied into the internal song library (named [PianoSoft Library], [User Library],
[CD Library], [Download Library], and [From/To PC]) eliminating the trouble of changing
pg. 61
floppy disks/CDs each time you want to listen to songs on a different disk. (
“Creating a Song Library” in “Advanced Operating Manual”)
Song libraries on the
[Main] screens
Prepared for piano songs that are copied from PianoSoft/
PianoSoft·Plus software floppy disks, PianoSoft·PlusAudio CDs,
PianoSoft·PlusGraphics, or SmartPianoSoft.
Prepared for piano songs that are recorded on the Disklavier.
Prepared for songs that are copied from removable media or
other libraries to playback in your desired order.
Prepared for songs that are copied from standard audio CDs.
Prepared for songs purchased from DisklavierMusicStore.
Prepared for songs copied from a personal computer.
9
QuickGuide_EnFrGeSpIt.book 10 ページ 2010年1月22日 金曜日 午前11時47分
Chapter 2: Basic Playback
Playing Back the Sample Songs in the Song
Library
1
Turn the Disklavier on. (
pg. 4)
[Main] screen
2
Tap on
in the
[Main] screen.
Albums in the
current source*
Album list screen
* For details on source selection, see “Selecting a
Song” ( pg. 12).
10
QuickGuide_EnFrGeSpIt.book 11 ページ 2010年1月22日 金曜日 午前11時47分
Chapter 2: Basic Playback
3
Tap on the desired
album.
English
Songs in the
current album*
Song list screen
* For details on album selection, see “Selecting a
Song” ( pg. 12).
4
Tap on the desired song.
[Song] screen
5
Press
to start playback.
To stop playback, press
.
Tip: Pressing
on the Media Center corresponding to the current
playing source stops playback.
To select the next song, press
.
To select the previous song, press
.
Tip: To show the current playing song when the screen shows other than the
current song screen, press
.
11
QuickGuide_EnFrGeSpIt.book 12 ページ 2010年1月22日 金曜日 午前11時47分
Chapter 2: Basic Playback
Adjusting the Overall Volume
Press
to adjust the overall volume.
Volume bar
Minimum volume indication
(only for Acoustic mode)
Value of the adjusted volume
The volume at recording
(only for Acoustic mode)
Note: During Acoustic mode, the overall volume cannot be effectively turned down less
than the minimum volume indication. For details of the Acoustic Mode, see “Playing the
Acoustic Piano (Acoustic Mode)” ( pg. 16).
Selecting a Song
1
When you play back a song on a floppy disk, a CD,
or a USB medium, load the relevant medium into
their respective drives or port on the Media Center.
( pg. 2, 20 in “Advanced Operating Manual”)
Selectable
sources
[Main] screens
12
QuickGuide_EnFrGeSpIt.book 13 ページ 2010年1月22日 金曜日 午前11時47分
Chapter 2: Basic Playback
2
Tap on the desired source* in the [Main] screen.
* In this manual, we call each removable medium (floppy disk, CD, and USB flash memory,
etc.) and the internal song library as “source”.
English
Selected source
Appears when there are more albums not shown in
the screen. In such a case, tap on either end of the
bar to show the hidden albums.
Album list screen
Tip: Pressing
then starts playback.
on the Media Center also selects the source, and
Continue to next page . . .
13
QuickGuide.fm 14 ページ 1904年1月7日 木曜日 午後12時37分
Chapter 2: Basic Playback
3
Tap on the desired album in the album list screen.
Selected album
Song type icon
Song list screen
Song type icons
: PianoSoft/PianoSoft·Plus
( pg. 8 “Types of Playable Software”)
: PianoSoft·PlusAudio/User recorded audio and MIDI song
( pg. 8 “Types of Playable Software” and pg. 57 “Recording a Song as MIDI
and Audio Data” in “Advanced Operating Manual”)
(
: PianoSoft·PlusGraphics
pg. 8 “Types of Playable Software”)
: SmartPianoSoft
( pg. 38 “Adding Disklavier Accompaniment to Commercial CD Songs
(PianoSmart)” in “Aadvanced Operating Manual”)
: SmartKey
( pg. 37 “SmartKey™ Playback” in “Advanced Operating Manual”)
: User recorded audio song
( pg. 56 “Record a Song as Audio Data” and pg. 59 “Re-recording an
Existing Song as Audio Data” in “Advanced Operating Manual”)
14
QuickGuide_EnFrGeSpIt.book 15 ページ 2010年1月22日 金曜日 午前11時47分
Chapter 2: Basic Playback
4
Tap on the desired song in the song list screen.
Selected source
English
Selected album
Selected song
Elapsed playing time
Song screen
Searching Forward and Backward in a
Song
During playback, hold
down until the desired point in a song is located, and then
release the button. Playback starts.
In stop mode, hold
down until the desired point in a song is located, and then
press
. Playback starts.
Tip: Tapping on the desired point on the playback status bar starts playback from that
point.
Playback point
Playback status bar
15
QuickGuide_EnFrGeSpIt.book 16 ページ 2010年1月22日 金曜日 午前11時47分
Chapter 3
Basic Piano Playing
The Disklavier is a versatile instrument offering various functions that integrate
innovative technologies, but let’s start with the most basic use of the piano: playing the
keyboard.
Playing the Acoustic Piano (Acoustic Mode)
Play the keyboard as you would play any acoustic piano. You do not need to “turn the
Disklavier on.”
Playing the Digital Piano (Quiet Mode)
Put the Disklavier in Quiet Mode when you want to play the keyboard more quietly or
more privately than on the acoustic piano. When Quiet Mode is activated, you are
essentially playing the digital piano. Since the played sound is heard from the Monitor
speakers*, you can adjust the volume to your preference.
1
Turn the Disklavier on. (
pg. 4)
Information Area
Volume bar
16
QuickGuide_EnFrGeSpIt.book 17 ページ 2010年1月22日 金曜日 午前11時47分
Chapter 3: Basic Piano Playing
2
Tap on
in the Information Area to activate
the Quiet Mode.
The color of the button and the volume bar turns to blue (
Tip: Pressing
on the Media Center also activates the Quiet Mode.
English
3
QUIET
).
Play the Disklavier.
You will hear the sound of the digital piano from the Monitor speakers*.
To disengage Quiet Mode, tap on
in the Information Area.
The color of the button and the volume bar turns to red (
).
Tip: Pressing
QUIET
on the Media Center also inactivates the Quiet Mode.
* Only for models supplied with the Monitor speakers.
Using Headphones (Headphone Mode)
pg. 4)
1
Turn the Disklavier on. (
2
Connect the supplied stereo headphones to the
PHONES jack on the bottom of the Media Center.
( pg. 2 in “Advanced Operating Manual”)
Headphone mode indication
Continue to next page . . .
17
QuickGuide_EnFrGeSpIt.book 18 ページ 2010年1月22日 金曜日 午前11時47分
Chapter 3: Basic Piano Playing
3
Play the Disklavier.
The Acoustic mode is silenced and the digital piano sound is heard only from the
connected headphones.
Note: Two sets of headphones can be connected simultaneously. In this case,
the two headphones should be the same model.
Adjusting the Volume in Quiet/Headphone
Mode
Press
to adjust the volume.
Volume bar
Value of the adjusted volume
18
QuickGuide_EnFrGeSpIt.book 19 ページ 2010年1月22日 金曜日 午前11時47分
Chapter 3: Basic Piano Playing
Selecting the Voice in Quiet/Headphone
Mode
1
Tap on
English
In Quiet or Headphone mode, you can select the digital piano sound (voice) that
expresses various instruments to your preference.
in the Information Area.
Tap on the either end of the bar to show the hidden
voices.
[Voice] screen
2
3
Tap on the desired voice.
Tap on
to clear the [Voice] screen.
19
QuickGuide_EnFrGeSpIt.book 20 ページ 2010年1月22日 金曜日 午前11時47分
MEMO
2010