1
001-Caution.fm Page -i Monday, June 2, 2008 2:01 PM
SPECIAL MESSAGE SECTION
PRODUCT SAFETY MARKINGS: Yamaha electronic products may have either labels similar to the graphics
shown below or molded/stamped facsimiles of these
graphics on the enclosure. The explanation of these
graphics appears on this page. Please observe all cautions indicated on this page and those indicated on the
safety instruction section.
SEE BOTTOM OF ENCLOSURE OR LOWER FRONT
PANEL FOR GRAPHIC SYMBOL MARKINGS
The exclamation point within the equilateral triangle is intended to alert the
user to the presence of important operating and maintainance (servicing) instructions in the literature accompanying the
product.
The lightning flash with arrowhead
symbol within the equilateral triangle
is intended to alert the user to the presence of uninsulated “dangerous voltage” within the product’s enclosure
that may be of sufficient magnitude to
constitute a risk of electrical shock.
IMPORTANT NOTICE: All Yamaha electronic products are tested and approved by an independent safety
testing laboratory in order that you may be sure that
when it is properly installed and used in its normal and
customary manner, all foreseeable risks have been eliminated. DO NOT modify this unit or commission others
to do so unless specifically authorized by Yamaha. Product performance and/or safety standards may be diminished. Claims filed under the expressed warranty may be
denied if the unit is/has been modified. Implied warranties may also be affected.
SPECIFICATIONS SUBJECT TO CHANGE: The
information contained in this manual is believed to be
correct at the time of printing. However, Yamaha reserves the right to change or modify any of the specifications without notice or obligation to update existing
units.
92-469
1
ENVIRONMENTAL ISSUES: Yamaha strives to produce products that are both user safe and environmentally friendly. We sincerely believe that our products and
the production methods used to produce them, meet
these goals. In keeping with both the letter and the spirit
of the law, we want you to be aware of the following:
Battery Notice: This product MAY contain a small nonrechargeable battery which (if applicable) is soldered in
place. The average life span of this type of battery is approximately five years. When replacement becomes neccessary, contact a qualified service representative to
perform the replacement.
Warning: Do not attempt to recharge, disassemble, or
incinerate this type of battery. Keep all batteries away
from children. Dispose of used batteries promptly and as
regulated by applicable laws. Note: In some areas, the
servicer is required by law to return the defective parts.
However, you do have the option of having the servicer
dispose of these parts for you.
Disposal Notice: Should this product become damaged
beyond repair, or for some reason its useful life is considered to be at an end, please observe all local, state,
and federal regulations that relate to the disposal of products that contain lead, batteries, plastics, etc.
NOTICE: Service charges incurred due to lack of
knowledge relating to how a function or effect works
(when the unit is operating as designed) are not covered
by the manufacturer’s warranty, and are therefore the
owners responsibility. Please study this manual carefully
and consult your dealer before requesting service.
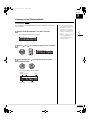
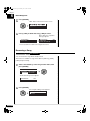
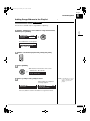
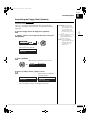
NAME PLATE LOCATION: The graphic below indicates the location of the name plate. The model number,
serial number, power requirements, etc., are located on
this plate. You should record the model number, serial
number, and the date of purchase in the spaces provided
below and retain this manual as a permanent record of
your purchase.
HS
YAMAHA CORPORATION MADE IN JAPAN
PATENTS
Model _________________________________________
Serial No. ______________________________________
Purchase Date __________________________________
001-Caution.fm Page 0 Monday, June 2, 2008 2:01 PM
SECTION DE MESSAGE SPÉCIAL
INSCRIPTIONS DE SÉCURITÉ DU PRODUIT: Les
produits électroniques Yamaha peuvent comporter des
étiquettes semblables aux représentations graphiques indiquées ci-dessous ou fac-similés moulés/estampés de
ces représentations graphiques sur l’encoffrement. L’explication de ces représentations graphiques apparaît à
cette page. Veuillez respecter toutes les précautions indiquées à cette page et celles indiquées dans la section
des directives de sécurité.
VOIR SOUS L’ENCOFFREMENT OU EN BAS DU
PANNEAU FRONTAL EN CE QUI CONCERNE LES
INSCRIPTIONS DE SYMBOLE GRAPHIQUES
Le point d’exclamation placé dans un triangle équilatéral est destiné à alerter
l’utilisateur de la présence de directives
importantes sur l’utilisation et l’entretien
(dépannage) dans la documentation qui
accompagne le produit.
L’éclair de foudre avec le symbole en
pointe de flèche dans un triangle équilatéral est destiné à alerter l’utilisateur
de la présence d’une “tension dangereuse” non isolée circulant dans
l’encoffrement du produit et qui peut
avoir une puissance suffisante pour
constituer un risque d’électrocution.
NOTIFICATION IMPORTANTE: Tous les produits
électroniques Yamaha sont vérifiés et approuvés par un
laboratoire de contrôle de sécurité indépendant pour que
vous puissiez être sûr que quand il est correctement installé et utilisé de façon normale et habituelle, tous les
risques prévisibles ont été éliminés. NE modifiez PAS
cet appareil ni déléguez d’autres personnes à le faire à
moins d’être autorisé spécifiquement par Yamaha à le
faire. Les performances de ce produit et/ou les normes
de sécurité peuvent être diminuées. Les réclamations
soumises sous les termes de la garantie exprimée peuvent être refusées si l’appareil est ou a été modifié. Des
garanties implicites peuvent également être affectées.
PUBLICATION SUR L’ENVIRONNEMENT: Yamaha s’efforce de produire des appareils qui réunissent à la
fois la sécurité à utilisateur et constituent un environnement
convivial. Nous croyons sincèrement que nos produits et
les méthodes de production les produisaient, atteignent ces
buts. En accord avec la lettre et l’esprit de la loi, nous voulons que vous vous rendiez compte de ce qui suit :
Notification relative à la batterie: Ce produit PEUT contenir une petite batterie non-rechargeable qui (quand ceci
est applicable) est soudée en place. La durée moyenne de
ce type de batterie est approximativement de cinq ans.
Quand le remplacement devient nécessaire, prenez contact
avec un technicien qualifié pour exécuter le remplacement.
Avertissement: N’essayez pas de recharger, démonter
ou incinérer ce type de batterie. Maintenez toutes les batteries hors de la portée des enfants. Mettez les batteries
usées au rebut et promptement conformément aux obligations imposées par les lois applicables. Remarque:
Dans certains secteurs, il est exigé par la loi que le préposé à l’entretien renvoie les pièces défectueuses.
Cependant, vous avez l’option que le préposé à l’entretien mette ces pièces au rebut pour vous.
Notification de mise au rebut: Si ce produit était endommagé au delà de la possibilité du dépannage, ou
pour quelque raison si sa durée de vie utile est considérée comme arrivant à terme, veuillez respecter la réglementations d’état, locale et fédérale et qui est
associée à la mise au rebut des produits qui contiennent
du plomb, des batteries, des plastiques, etc.
NOTIFICATION: Les frais administratifs encourus en
raison d’un manque de connaissance concernant la façon
dont une fonction ou des effets réagissent (quand l’appareil est utilisé comme conçu) ne sont pas couverts par la
garantie du constructeur, et incombent pour cette raison
la responsabilité des propriétaires. Veuillez étudier attentivement ce manuel et consultez votre distributeur
avant de demander un dépannage.
EMPLACEMENT DE LA PLAQUE SIGNALÉTIQUE: La représentation graphique ci-dessous indique
l’emplacement de la plaque signalétique. Le numéro de
modèle, le numéro de série, les conditions d’alimentation électrique, etc., sont mentionnées sur cette plaque.
Vous devriez enregistrer le numéro de modèle, le
numéro de série et la date de l’achat dans les espaces
fournis ci-dessous et conserver ce manuel comme relevé
permanent de votre achat.
HS
YAMAHA CORPORATION MADE IN JAPAN
PATENTS
CARACTÉRISTIQUES SUJETTES À MODIFICATION: On pense que les informations contenues dans ce
manuel sont correctes au moment de l’impression.
Cependant, Yamaha se réserve le droit de changer ou de
modifier toute caractéristique sans avis préalable ni obligation de mettre à jour les appareils existants.
Modèle ________________________________________
Numéro de série ________________________________
Date d’achat ____________________________________
92-469
1
001-Caution.fm Page i Monday, June 2, 2008 2:01 PM
IMPORTANT SAFETY INSTRUCTIONS
WARNING — When using any electrical or electronic
product, basic precautions should always be followed. These
precautions include, but are not limited to, the following:
1.
2.
3.
4.
5.
6.
7.
Read these instructions.
8.
Do not install near any heat sources such as radiators, heat registers, stoves, or other apparatus (including amplifiers) that produce heat.
9.
Do not defeat the safety purpose of the polarized or
grounding-type plug. A polarized plug has two
blades with one wider than the other. A grounding
type plug has two blades and a third grounding
prong. The wide blade or the third prong are provided for your safety. If the provided plug does not
fit into your outlet, consult an electrician for replacement of the obsolete outlet.
Keep these instructions.
Heed all warnings.
Follow all instructions.
Do not use this apparatus near water.
Clean only with dry cloth.
Do not block any ventilation openings. Install in accordance with the manufacturer’s instructions.
the power cord from being walked on or
10. Protect
pinched particularly at plugs, convenience receptacles, and the point where they exit from the apparatus.
use attachments/accessories specified by the
11. Only
manufacturer.
Use only with the cart, stand, tripod, bracket, or table specified by
the manufacturer, or sold with the
apparatus. When a cart is used, use
caution when moving the cart/apparatus combination to avoid injury
from tip-over.
12.
this apparatus during lightning storms or
13. Unplug
when unused for long periods of time.
all servicing to qualified service personnel.
14. Refer
Servicing is required when the apparatus has been
damaged in any way, such as power-supply cord or
plug is damaged, liquid has been spilled or objects
have fallen into the apparatus, the apparatus has
been exposed to rain or moisture, does not operate
normally, has been dropped.
product shall not be exposed to dripping or
15. This
splashing and that no objects filled with liquids,
such as vases, shall be placed on the apparatus.
92-469-DK
2
not place this product or any other objects on
16. Do
the power cord or place it in a position where anyone could walk on, trip over, or roll anything over
power or connecting cords of any kind. The use of
an extension cord is not recommended! If you must
use an extension cord, the minimum wire size for a
25’ cord (or less) is 18 AWG. NOTE: The smaller
the AWG number, the larger the current handling
capacity. For longer extension cords, consult a local
electrician.
— To reduce the risk of fire or electric
17. WARNING
shock, do not expose this apparatus to rain or moisture.
should be taken that objects do not fall and liq18. Care
uids are not spilled into the enclosure through any
openings that may exist.
product, either alone or in combination with an
19. This
amplifier and headphones or speaker/s, may be capable of producing sound levels that could cause
permanent hearing loss. DO NOT operate for a long
period of time at a high volume level or at a level
that is uncomfortable. If you experience any hearing loss or ringing in the ears, you should consult an
audiologist. IMPORTANT: The louder the sound,
the shorter the time period before damage occurs.
Yamaha products may have benches and/or
20. Some
accessory mounting fixtures that are either supplied
as a part or the product or as optional accessories.
Some of these items are designed to be dealer assembled or installed. Please make sure that benches
are stable and any optional fixtures (where applicable) are well secured BEFORE using. Benches supplied by Yamaha are designed for seating only. No
other uses are recommended.
product shall be connected to a MAINS socket
21. This
outlet with a protective earthing connection.
product has a power switch for shutting off all
22. This
system. The switch is located on the Power Supply
Unit nearby the entrance of the AC cord. Note that
the switch on the Controller does not shutdown all
system.
sure that the plug of the Power Supply Unit’s
23. Make
power cable can easily be disconnected from the
AC outlet as a measure of precaution.
Battery
– Danger of explosion if battery incorrectly replaced.
Replace only with the same type.
Outlets for Speakers
– Connect speakers of 2A or less of totals. Do not connect other products except speakers.
– Consult Yamaha service technician when using the
outlets outside the purchased area.
PLEASE KEEP THIS MANUAL
001-Caution.fm Page ii Monday, June 2, 2008 2:01 PM
INSTRUCTIONS DE SÉCURITÉ IMPORTANTES
AVERTISSEMENT — Lors de l’utilisation de n’importe
quel appareil électrique ou électronique, les précautions
fondamentales devraient toujours être suivies. Ces précautions comprennent, mais ne sont pas limitées à, ce qui suit:
placez ce produit ni aucun autre objet sur le cordon
16. Ne
d’alimentation secteur ou ne le placez pas dans une position où n’importe qui pourrait marcher dessus,
trébucher dedans ou faire rouler n’importe quoi sur les
cordons d’alimentation en aucune manière. L’utilisation d’un cordon prolongateur n’est pas recommandée
! Si vous devez utiliser un cordon prolongateur, la taille
minimum du calibre de fil du cordon pour un cordon de
25 pouces (ou moins) est de 18 du calibrage américain
normalisé. REMARQUE: Plus le numéro du calibrage
américain normalisé est petit, plus la capacité de gestion de l’intensité est grande. Pour de plus longs cordons prolongateurs, consultez un électricien local.
1.
2.
3.
4.
5.
6.
7.
Lisez ces directives.
8.
N’installez près d’aucune source de chaleur telle que
des radiateurs, des registres de chaleur, des appareils
de chauffage ou d’autres appareils (amplificateurs y
compris) qui produisent de la chaleur.
soin tout particulier devrait être pris pour qu’aucun
18. Un
objet ne tombe et que des liquides ne soient renversés
N’asservissez pas l’objectif de sécurité de la prise de
type polarisée ou de mise à la terre. Une prise polarisée a deux lames avec une plus large que l’autre. Une
prise de type à mise à la terre a deux lames et une
troisième lame de mise à la terre. La lame large ou la
troisième lame est prévue pour votre sécurité. Si la
prise fournie ne s’ajuste pas dans votre prise secteur,
consultez un électricien pour le remplacement de l’ancien modèle de prise.
produit, individuel ou en combinaison avec un am19. Ce
plificateur et des écouteurs ou le ou les haut-parleurs,
9.
Conservez ces directives.
Observez tous les avertissements.
Suivez toutes les directives.
N’utilisez pas cet appareil près de l’eau.
Nettoyez seulement avec un tissu sec.
Ne bloquez aucune des ouvertures de ventilation. Installez conformément aux directives du constructeur.
le cordon d’alimentation de secteur afin que
10. Protégez
personne ne puisse marcher ni le pincer en particulier
les prises, les prises de courant et la position où il quitte de l’appareil.
seulement les équipements ou accessoires in11. Utilisez
diqués par le constructeur.
Utilisez seulement avec le chariot, le
support, le trépied, la platine de fixation ou la table indiquée par le constructeur, ou vendue avec l’appareil.
Quand un chariot est utilisé, faites attention en déplaçant la combinaison
chariot/appareil pour éviter de se
blesser en renversant l’appareil.
12.
cet appareil pendant les orages et la fou13. Débranchez
dre ou s’il est inutilisé pendant de longues périodes.
14.
Confiez toutes les opérations d’entretien au personnel
de service qualifié. L’entretien est exigé quand l’appareil a été endommagé de quelque façon que ce soit,
comme par exemple l’endommagement du cordon ou
de la prise d’alimentation secteur, quand du liquide a
été renversé ou que des objets sont tombés dans l’appareil, l’appareil a été exposé à la pluie ou à l’humidité, ne fonctionne pas normalement, est tombé par
terre.
produit ne doit pas être exposé à un suintement ou
15. Ce
des éclaboussures et aucun objet rempli de liquide, tels
que des vases, ne doit être mis sur l’appareil.
— Pour réduire les risques d’in17. AVERTISSEMENT
cendie ou de décharge électrique, n’exposez pas cet
appareil à la pluie ou à l’humidité.
dans l’encoffrement par aucune des ouvertures qui
peuvent exister.
risque de produire des niveaux sonores qui pourraient
causer une perte d’auditive permanente. NE PAS
mettre en service pendant une longue période à un
niveau de volume élevé ou à un niveau qui est inconfortable. Si vous éprouvez n’importe quelle sorte de
perte auditive ou de sonnerie dans les oreilles, vous
devriez consulter un audiologiste. IMPORTANT :
Plus le son est fort, plus la période de temps avant que
les dégâts se produisent est courte.
produits Yamaha peuvent avoir des supports et/
20. Certains
ou des accessoires d’installation complémentaires qui
sont fournis comme partie du produit ou en tant qu’accessoires optionnels. Certains de ces articles sont conçus
pour être montés ou installés par le distributeur. Veuillez
vous assurer que les supports sont stables et que tous les
accessoires optionnels (quand ceci est applicable) sont
bien fixés AVANT l’utilisation. Les supports fournis
par Yamaha sont conçus pour un positionnement seulement. Aucune autre utilisation n’est recommandée.
produit doit être connecté à une prise de sortie secteur
21. Ce
munie d’une connexion protectrice par la mise à la terre.
produit est muni d’un interrupteur d’alimentation
22. Ce
permettant de couper l’alimentation de tout le
système. L’interrupteur d’alimentation est installé sur
le bloc d’alimentation tout près l’entrée du cordon
d’alimentation secteur. Notez que l’interrupteur d’alimentation sur le contrôleur n’arrête tout le système.
que la prise du cordon d’alimentation
23. Assurez-vous
électrique du bloc d’alimentation peut facilement être
débranchée de la prise de sortie secteur comme mesure
de précaution.
Batterie
– Risque d’explosion si la batterie n’est pas remplacée comme
il faut. Remplacez seulement par le même type de batterie.
Prises de sortie pour des haut-parleurs
– Connectez des haut-parleurs de 2A ou moins au total. Ne
connectez aucun autre produit excepté des haut-parleurs.
– Consultez le technicien de service Yamaha quand des
prises sont utilisées en dehors du secteur d’achet.
92-469-DK
2
VEUILLEZ CONSERVER CE MANUEL
001-Caution.fm Page iii Monday, June 2, 2008 2:01 PM
IMPORTANT NOTICE FOR THE UNITED KINGDOM
Apply for Grand Pianos
Connecting the Plug and Cord
IMPORTANT: The wires in mains lead are coloured in accordance
with the following code:
GREEN-AND-YELLOW : EARTH
BLUE
: NEUTRAL
BROWN
: LIVE
As the colours of the wires in the mains lead of this apparatus may
not correspond with the coloured markings identifying the
terminals in your plug, proceed as follows:
The wire which is coloured GREEN and YELLOW must be
connected to the terminal in the plug which is marked by the letter
E or by the safety earth symbol or coloured GREEN and
YELLOW.
The wire which is coloured BLUE must be connected to the
terminal which is marked with the letter N or coloured BLACK.
The wire which is coloured BROWN must be connected to the
terminal which is marked with the letter L or coloured RED.
The control unit is classified as a Class 1 laser product. One of the
labels below is located on the inside of the CD drive unit.
L’unité de commande est classée produit laser de Classe 1. Une des
étiquettes ci-dessous ou une étiquette similaire se trouve à l’intérieur
du lecteur de CD.
CLASS 1 LASER PRODUCT
LASER KLASSE 1
LUOKAN 1 LASERLAITE
KLASS 1 LASER APPARAT
APAREIL A LASER DE CLASSE 1
EN60825
CLASS 1 LASER PRODUCT
LASER KLASSE 1
Laser Diode Properties
* Material: GaAIAs
* Wavelength: 790 nm
* Laser Output Power at the lens of the Laser Pick Up Unit: max.
0.2 mW
Propriétés de la diode à semi-conducteur
* Matériau : GaAlAs
* Longueur d’ondes : 790 nm
* Puissance de sortie laser à la lentille du capteur laser : 0.2 mW
max.
CAUTION—Use of controls or adjustments or performance of
procedures other than those specified herein may result in
hazardous radiation exposure.
ATTENTION—L’utilisation de commandes ou de réglages, ou
l’exécution de procédures, autres que celles qui sont spécifiées ici
peuvent conduire à une exposition à des rayonnements dangereux.
001-Caution.fm Page iv Monday, June 2, 2008 2:01 PM
Information for Users on Collection and Disposal of Old Equipment and used Batteries
These symbols on the products, packaging, and/or accompanying documents mean that used electrical and electronic
products and batteries should not be mixed with general household waste.
For proper treatment, recovery and recycling of old products and used batteries, please take them to applicable
collection points, in accordance with your national legislation and the Directives 2002/96/EC and 2006/66/EC.
By disposing of these products and batteries correctly, you will help to save valuable resources and prevent any
potential negative effects on human health and the environment which could otherwise arise from inappropriate
waste handling.
For more information about collection and recycling of old products and batteries, please contact your local
municipality, your waste disposal service or the point of sale where you purchased the items.
[For business users in the European Union]
If you wish to discard electrical and electronic equipment, please contact your dealer or supplier for further
information.
[Information on Disposal in other Countries outside the European Union]
These symbols are only valid in the European Union. If you wish to discard these items, please contact your local
authorities or dealer and ask for the correct method of disposal.
Note for the battery symbol (bottom two symbol examples):
This symbol might be used in combination with a chemical symbol. In this case it complies with the requirement set
by the Directive for the chemical involved.
Information concernant la Collecte et le Traitement des piles usagées
et des déchets d’équipements électriques et électroniques
Les symboles sur les produits, l’emballage et/ou les documents joints signifient que les produits électriques ou
électroniques usagés ainsi que les piles ne doivent pas être mélangés avec les déchets domestiques habituels.
Pour un traitement, une récupération et un recyclage appropriés des déchets d’équipements électriques et
électroniques et des piles usagées, veuillez les déposer aux points de collecte prévus à cet effet, conformément à la
réglementation nationale et aux Directives 2002/96/EC et 2006/66/EC.
En vous débarrassant correctement des déchets d’équipements électriques et électroniques et des piles usagées, vous
contribuerez à la sauvegarde de précieuses ressources et à la prévention de potentiels effets négatifs sur la santé
humaine qui pourraient advenir lors d’un traitement inapproprié des déchets.
Pour plus d’informations à propos de la collecte et du recyclage des déchets d’équipements électriques et
électroniques et des piles usagées, veuillez contacter votre municipalité, votre service de traitement des déchets ou le
point de vente où vous avez acheté les produits.
[Pour les professionnels dans l’Union Européenne]
Si vous souhaitez vous débarrasser des déchets d’équipements électriques et électroniques veuillez contacter votre
vendeur ou fournisseur pour plus d’informations.
[Information sur le traitement dans d’autres pays en dehors de l’Union Européenne]
Ces symboles sont seulement valables dans l’Union Européenne. Si vous souhaitez vous débarrasser de déchets
d’équipements électriques et électroniques ou de piles usagées, veuillez contacter les autorités locales ou votre
fournisseur et demander la méthode de traitement appropriée.
Note pour le symbole « pile » (deux exemples de symbole ci-dessous) :
Ce symbole peut être utilisé en combinaison avec un symbole chimique. Dans ce cas il respecte les exigences établies
par la Directive pour le produit chimique en question.
001-Caution.fm Page v Monday, June 2, 2008 2:01 PM
COMPLIANCE INFORMATION STATEMENT
(DECLARATION OF CONFORMITY PROCEDURE)
Responsible Party
Address
Telephone
Fax
Type of Equipment
Model Name
: Yamaha Corporation of America
: 6600 Orangethorpe Avenue, Buena Park, CA 90620 USA
: 1-714-522-9011
: 1-714-522-9301
: Player Piano
: Disklavier E3
This device complies with Part 15 of the FCC Rules.
Operation is subjected to the following conditions;
1) this device may not cause harmful interference, and
2) this device must accept any interference received including interference that may cause undesigned operation.
See user manual instructions if interference to radio reception is suspected.
The above statements apply ONLY to those products distributed by Yamaha Corporation of America or its subsidiaries.
FCC INFORMATION (U.S.A.)
1. IMPORTANT NOTICE: DO NOT MODIFY THIS UNIT!
This product, when installed as indicated in the instructions contained in this manual, meets FCC requirements. Modifications not expressly
approved by Yamaha may void your authority, granted by the FCC, to use the product.
2. IMPORTANT: When connecting this product to accessories and/or another product use only high quality shielded cables. Cable/s supplied
with this product MUST be used. Follow all installation instructions. Failure to follow instructions could void your FCC authorization to use
this product in the USA.
3. NOTE: This product has been tested and found to comply with the requirements listed in FCC Regulations, Part 15 for Class “B” digital
devices. Compliance with these requirements provides a reasonable level of assurance that your use of this product in a residential
environment will not result in harmful interference with other electronic devices. This equipment generates/uses radio frequencies and, if not
installed and used according to the instructions found in the users manual, may cause interference harmful to the operation of other electronic
devices. Compliance with FCC regulations does not guarantee that interference will not occur in all installations. If this product is found to be
the source of interference, which can be determined by turning the unit “OFF” and “ON”, please try to eliminate the problem by using one of
the following measures:
Relocate either this product or the device that is being affected by the interference.
Utilize power outlets that are on different branch (circuit breaker or fuse) circuits or install AC line filter/s.
In the case of radio or TV interference, relocate/reorient the antenna. If the antenna lead-in is 300 ohm ribbon lead, change the lead-in to
coaxial type cable.
If these corrective measures do not produce satisfactory results, please contact the local retailer authorized to distribute this type of product. If
you can not locate the appropriate retailer, please contact Yamaha Corporation of America, Electronic Service Division, 6600 Orangethorpe
Ave, Buena Park, CA 90620
The above statements apply ONLY to those products distributed by Yamaha Corporation of America or its subsidiaries.
001-Caution.fm Page vi Monday, June 2, 2008 5:31 PM
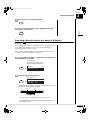
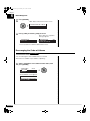
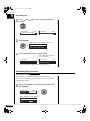
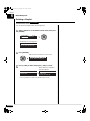
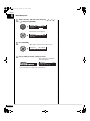
Mounting the Control Unit to the Grand Piano
Installation du boîtier de commande sur un piano à queue
(1)
(2)
(3)
Leave 5 mm of
the shank
(1) Remove the four screws from the sides of the
control unit.
(1) Retirer les quatre vis sur les côtés du boîtier de
commande.
(2) Place the metal suspension bracket, included
with the Disklavier grand model, over the
control unit, then secure the metal suspension
bracket to the control unit using the same
screws.
(2) Placer le support métallique (fourni avec le
Disklavier pour piano à queue) sur le boîtier de
commande, puis fixer le support métallique au
boîtier de commande en utilisant les quatre vis
à tête conique.
(3) Insert the three restraining screws (attached)
into the marked nuts underneath the bass side
key bed, then tighten the screws, leaving a gap
of about 5 mm between head of the screw and
piano body.
(3) Introduire les trois vis de fixation dans les
écrous marqués sous le clavier du côtés des
aigus, puis serrer les vis en laissant un espace
d’environ 5 mm entre la tête de la vis et le corps
du piano.
Notes:
1) Handle the metal suspension bracket and the
control unit carefully to avoid scratches.
2) Screws;
Restraining screws:
Bind head (5 × 12) × 3
BWH screws:
Flat head (4 × 10) × 4
3) When mounted correctly, the control unit is
angled approximately 18° above horizontal.
Remarques:
1) Manipuler soigneusement le support
métallique et le boîtier de commande pour
éviter les rayures.
2) Vis :
Vis de retenue (5 × 12) 3 Vis BWH (4 × 4) 4
3) Lorsqu’il est monté correctement, le boîtier
de commande est incliné d’environ 18° sur
l’horizontale.
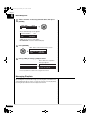
001-Caution.fm Page vii Monday, June 2, 2008 5:28 PM
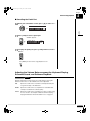
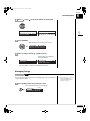
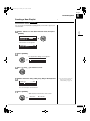
(4) (5)
(6)
(4) Fit the “slots” of the metal suspension bracket
containing the control unit to the screws
mentioned in step (3).
(4) Glisser les “fentes” du support métallique
contenant le boîtier de commande sur les vis
mentionnées à l’étape (3).
(5) After mounting the control unit, push the
control unit back as far as it will go and then
tighten the three screws to secure the bracket.
(5) Après avoir installé le boîtier de commande,
l’enfoncer jusqu’à l’extrémité et serrer les trois
vis pour fixer le support.
(6) Insert the coaxial cable into the TO PIANO
connector on the rear panel of the control unit,
then securely tighten the two screws attached to
the connector.
(6) Raccorder le câble de commande au connecteur
D-SUB situé au dos du boîtier de commande,
puis serrer correctement les deux vis du
connecteur. Prendre soin de vérifier
l’orientation du connecteur D-SUB en
raccordant le câble.
100-EN_.book Page 0 Monday, June 2, 2008 2:54 PM
English
E3 Series
Operation Manual
100-EN_.book Page i Monday, June 2, 2008 2:54 PM
Welcome to the Yamaha DisklavierTM!
Thank you for purchasing the Yamaha Disklavier piano!
The Disklavier is a fascinating instrument that integrates a classic Yamaha acoustic piano with innovative
electronics to suit your entertainment, educational, and creative needs, while retaining the tone, touch and
long-term value that have long made Yamaha pianos the world’s finest.
Before using your Disklavier piano, please read this manual thoroughly and retain it for future reference.
■ Notes on Source Code Distribution
For three years after the factory shipment, you may request from Yamaha the source code for any portions
of the product which are licensed under the GNU General Public License by writing to the following address:
1480 Ryoke, Kakegawa, Shizuoka, 436-0038, JAPAN
Piano International Sales Division, YAMAHA Corporation
The source code will be provided at no charge; however, we may require you to reimburse Yamaha for the
cost of delivering the source code to you.
The source code download is also available on the following website:
http://www.global.yamaha.com/download/disklavier_e3/
• Note that we shall bear no responsibility whatsoever for any damage arising from changes (additions/
deletions) made to the software for this product by a third party other than Yamaha (or party authorized by
Yamaha).
• Note that re-use of source code released to the public domain by Yamaha is unguaranteed, and Yamaha
shall not bear any responsibility whatsoever for the source code.
■ Trademarks & Copyrights
• Yamaha, Disklavier, Silent, PianoSoft, PianoSoft·Plus, PianoSoft·PlusAudio, PianoSmart, and
SmartPianoSoft are trademarks of Yamaha Corporation.
• SmartKey, CueTIME, and You Are The Artist are trademarks of Yamaha Corporation or Yamaha
Corporation of America.
• Disklavier E3 software, Copyright © 2008 YAMAHA CORPORATION.
• This contains programs licensed under the GNU General Public License, GNU Lesser General Public
License, the BSD Copyright, the Artistic License, and the others.
• Windows is a registered trademark of Microsoft Corporation in the United States and other countries.
• Macintosh and Mac OS are trademarks of Apple Inc., registered in the U.S. and other countries.
i
100-EN_.book Page ii Monday, June 2, 2008 2:54 PM
Important Precautions
Read the following before operating the Disklavier.
■ Cautions
• Do not locate the Disklavier in a place subject to
excessive heat, low temperatures, or direct
sunlight. This could be a fire hazard and may
damage the finish and internal parts.
• Turn off all audio devices when connecting to
the Disklavier. Refer to the user’s guide for each
device. Use the correct cables and connect as
specified.
• Excessive humidity or dust can lead to fire or
electric shock.
• Set the volume level on all the devices to
minimum before applying power.
• Connect the plug on the Disklavier power cable
to a compatible AC outlet. Failure to do so will
present a fire and electric shock hazard. If the
power cable plug is not compatible with your AC
outlet, consult your dealer.
• Do not play the Disklavier at a high volume for
extended periods; you may damage your
hearing. This is especially important when using
headphones. If you think your hearing ability is
impaired, consult your doctor.
• Do not plug several devices into the same AC
outlet. This can overload the AC outlet, and lead
to fire and electric shock hazard. It may also
affect the performance of some devices.
• If the Disklavier is worked extremely hard —that
is, prolonged playback of very “busy” songs —
the Disklavier’s thermal relay may trip. The
thermal relay will automatically reset when the
Disklavier has cooled down.
• Do not place heavy objects on the power cable.
A damaged power cable is a potential fire and
electric shock hazard. If the power cable runs
under a carpet, make sure heavy objects,
including the Disklavier, are not placed on top of
the cable.
• If the power cable is damaged (i.e. cut or a bare
wire is exposed), ask your dealer for a
replacement. Using the Disklavier in this
condition is a fire and shock hazard.
• When disconnecting the power cable from an
AC outlet, always pull from the plug. Never pull
the cable. Damaging the cable in this way is a
potential fire and electric shock hazard.
• If you notice any abnormality — such as smoke,
odor, or noise — turn off the Disklavier
immediately, and remove the power plug from
the AC outlet. Consult your dealer for repair.
• If a foreign object or water gets inside the
Disklavier turn it off immediately, and remove
the power plug from the AC outlet. Consult your
dealer.
• If you plan not to use the Disklavier for a long
period of time (such as when you are on
vacation), disconnect the electrical mains.
• The cover of the unit should be removed only by
qualified service technicians.
• Always remove the power plug from the AC
outlet before cleaning the Disklavier. Leaving the
power plug connected presents a risk of electric
shock.
• Do not place liquid containers such as vases,
potted plants, glasses, cosmetic bottles,
medicines, etc., on top of the Disklavier.
• Do not use benzene, thinner, cleaning
detergent, or a chemical cloth to clean the
Disklavier.
• Do not try to modify the Disklavier, as this could
lead to fire or electric shock hazard.
• Do not place metal objects with rubber feet on
top of the Disklavier. The color and finish of the
Disklavier can be damaged.
• When moving the Disklavier to another location,
turn off the power, remove the power plug from
the AC outlet, and remove all cables connected
to external devices.
English
■ Warnings
• Do not place heavy objects on the Disklavier.
Doing so can damage the Disklavier.
• Use a soft, dry cloth to clean the Disklavier.
However, if you discover a stain, carefully use a
soft damp cloth to remove it.
ii
100-EN_.book Page iii Monday, June 2, 2008 2:54 PM
■ Interference
• The Disklavier uses high-frequency digital
circuits that may cause interference to radios
and TVs placed close to it. If interference does
occur, relocate the affected equipment.
■ Handling Batteries
The remote control of this unit is powered by dry
batteries. Improper use or misuse of the dry
batteries can cause the dry batteries to heat up,
leak electrolyte or burst which in turn may result in
a fire, damage to equipment and/or nearby objects
or in burns, injury or other bodily harm. Read
through and familiarize yourself with the following
safety precautions prior to use to ensure correct
usage.
• Do not directly touch the chemicals (electrolyte)
which have leaked from dry batteries.
1. If electrolyte from dry batteries has made
contact with your eyes, rinse your eyes
thoroughly with clean water and seek medical
treatment from a physician immediately.
2. If electrolyte from dry batteries has touched
your skin or clothing, rinse it off immediately
with clean water.
3. If electrolyte from dry batteries has found its
way inside your mouth, gargle immediately
and consult a physician.
• Do not install the dry batteries with the “+” and
“–” poles reversed. Misaligning the poles of dry
batteries can lead the dry batteries to be
charged or shorted or it can cause them to heat
up, leak electrolyte or burst which in turn may
result in a fire, damage to nearby objects or in
burns, injury or other bodily harm.
• Use only the designated batteries. Do not use
used batteries with unused batteries or different
types of batteries together. This can cause them
to heat up, leak electrolyte or burst which in turn
may result in a fire or in burns, injury or other
bodily harm. Replace all the dry batteries at the
same time. Do not use new and old dry batteries
together. Do not use different types of batteries
(alkaline and manganese batteries, batteries
made by different manufacturers or different
battery products made by the same
manufacturer) together: this can cause them to
heat up, ignite or leak electrolyte.
• When the battery-powered unit is not going to be
used for a prolonged period of time, remove the
dry batteries from the unit. Otherwise the
batteries will run down and their electrolyte may
leak, resulting in damage to the unit.
• Remove spent batteries immediately from
equipment. Otherwise, batteries will
overdischarge, causing them to heat up, leak
electrolyte or burst which in turn may result in
damage to nearby objects or in burns, injury or
other bodily harm.
• Dispose of batteries in accordance with the
applicable regulations and ordinances.
Please keep this manual for future reference.
iii
100-EN_.book Page iv Monday, June 2, 2008 2:54 PM
Table of Contents
Chapter 1
Introduction
Adjusting the Pitch of Audio ................................ 33
Adjusting the L/R Balance of Audio..................... 34
Items supplied with the Disklavier ..........................1
Using Timer Play ................................................. 34
Names of Parts and Their Functions......................2
Skipping the Blank Part at the Beginning of a
Basic Disklavier Terminology .................................7
Song .................................................................... 37
English
Features .................................................................1
Adding Disklavier Accompaniment to Commercial
Chapter 2
Getting Started
CD Songs (PianoSmart™ Playback)................... 38
Connecting the Control Unit ...................................8
SmartKey™ Playback ......................................... 39
Connecting the AC Power Cable ...........................8
Using the Remote Control......................................9
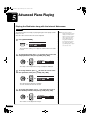
Chapter 5
Advanced Piano Playing
Turning On the Disklavier.....................................10
Playing the Disklavier along with the Internal
Setting the Internal Calendar ...............................11
Metronome .......................................................... 40
Turning Off the Disklavier (Standby Mode) ..........13
Playing the Disklavier with an Ensemble Voice... 41
Shutting Down the Disklavier ...............................14
Compatible Media Format for the Removable
Chapter 6
Basic Recording
Media ...................................................................14
Recording a New Song ....................................... 42
Compatible File Format........................................15
Titling a Song ...................................................... 43
Basic Precautions for Using CDs .........................15
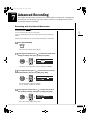
Chapter 7
Chapter 3
Basic Song Playback
Advanced Recording
Recording with the Internal Metronome .............. 45
Types of Playable Software .................................16
Recording the Left and Right Parts Separately ... 47
Selecting Medium and Their Contents .................17
Recording the Left and Right Parts Together
Selecting Albums/Songs with the Number
(Setting a Split Point)........................................... 49
Keypad .................................................................20
Re-Recording One Part....................................... 51
Starting Playback .................................................20
Changing the Default Tempo .............................. 52
Stopping Playback ...............................................21
CD Synchronized Recording ............................... 54
Pausing Playback.................................................21
Fast Preview & Review ........................................22
Chapter 8
Fast Forward & Reverse ......................................23
Media Management
Managing Albums................................................ 55
Searching a Specific Section of a Song ...............24
Making Copies of Albums.................................... 55
Listening to the DisklavierRadio...........................25
Deleting Albums .................................................. 57
Adjusting the Volume ...........................................26
Creating a New Album ........................................ 58
Renaming an Album............................................ 59
Chapter 4
Advanced Song Playback
Rearranging the Order of Albums ....................... 60
Changing the Playback Tempo ............................27
Managing Songs ................................................. 61
Playing Back Songs in a Different Key
Making Copies of Songs ..................................... 62
(Transposition) .....................................................27
Deleting Songs .................................................... 63
Repeating Song Playback....................................28
Renaming a Song................................................ 64
Repeating a Specific Section of a Song
Rearranging the Order of Songs ......................... 65
(A~B Repeat) .......................................................29
Converting Song Format ..................................... 66
Playing Back Only the Desired Piano Part...........30
Changing the Counter Display ............................ 67
Adjusting the Volume Balance among the
Managing Playlists .............................................. 68
Keyboard Playing, Ensemble Sound, and Software
Adding Songs/Albums to the Playlist................... 69
Playback...............................................................31
Deleting a Playlist................................................ 70
iv
100-EN_.book Page v Monday, June 2, 2008 2:54 PM
Creating a New Playlist ........................................71
Chapter 11 Other Settings
Renaming a Playlist .............................................72
Tuning the Tone Generator (TG Master Tune) ... 98
Managing Media ..................................................73
Resetting the Disklavier ...................................... 99
Making Copies of the Entire Contents in a
Diagnosing the Disklavier
Medium ................................................................74
(Maintenance Mode) ......................................... 100
Deleting the Entire Contents in a Medium ...........75
Updating the Disklavier ..................................... 101
Copying Song File from a Personal Computer to
Refreshing the Contents in [FromToPC] ..............78
Chapter 12 Internal Tone Generator
Voices
Formatting the Floppy Disk (Optional) .................79
Internal GM/XG Tone Generator Basic Voice
Making Backups of Songs ...................................80
List..................................................................... 103
Restoring the Backups.........................................81
Internal TG3 Tone Generator Basic Voice
the Disklavier .......................................................76
Chapter 9
Internet Direct Connection
(IDC) Service
List..................................................................... 106
Chapter 13 Troubleshooting .................. 108
What is Internet Direct Connection (IDC)?...........83
Obtaining an ID and Password for the IDC Service
Chapter 14 Error Messages ................... 111
(IDC Registration) ................................................83
Connecting the Disklavier to the Internet .............83
Chapter 15 Glossary ................................. 112
Setting the Disklavier for the Internet Settings .....85
Accessing the Internet .........................................87
Checking Your Account Information ....................88
Logging out from the IDC Service ........................88
Updating the Disklavier Using the Internet...........89
Initializing Internet Settings ..................................89
Chapter 10 Enhancing the Disklavier by
Hooking Up Other Devices
Hooking Up AV Equipment ..................................90
Setting Up the Disklavier for Audio Data
Reception/Transmission ......................................91
Hooking Up MIDI Devices ....................................93
Setting Up the Disklavier for MIDI Data
Reception .............................................................93
Setting Up the Disklavier for MIDI Data
Transmission........................................................95
Setting Up the Disklavier for Keyboard Playing
Data Transmission ...............................................96
v
Chapter 16 Specifications ...................... 115
100-EN_.book Page 1 Monday, June 2, 2008 2:54 PM
Chapter
1
Introduction
Features
English
The Disklavier E3 offers the valuable features that open up your musical possibility to explore. Here are brief
explanations of such features:
Advanced Features for Your Listening Pleasure
• Special music CDs, contain over 20 hours of fantastic music, let you start listening on the day the
Disklavier E3 arrives at your home.
• DisklavierRadio; you can listen to over 11 music channel by streaming broadcasts over the Internet.
Convenient Recording Features to Preserve Your Musical Memories
• Total 128 megabytes of internal memory comes with the Disklavier E3 to preserve your valuable data.
• Connecting external USB devices to the Disklavier E3 allows you to record your performance directly onto
them, or even make backups of your valuable data in the internal memory.
Simple and Easy-to-use Features Enhancing Your Performance
• The remote control, with clear and logical layout of buttons, lets you quickly enjoy the features of the
Disklavier E3.
• The display on the front panel employs an organic electro-luminescent display which makes it brighter
and more easily readable than ever.
Items supplied with the Disklavier
Check that the following items are supplied with your Disklavier:
• 1 Control unit
• 1 Control unit suspension bracket
• 2 Monitor speakers*
• 1 Monitor speaker installation kit*
• 2 Speaker cords*
• 1 Remote control
• 2 Batteries for remote control
• 2 Sample PianoSoft CD software
• 1 Quick reference
• 1 Operation manual
* Only for models supplied with the monitor speakers
1
100-EN_.book Page 2 Monday, June 2, 2008 2:54 PM
Chapter
1
Introduction
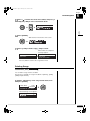
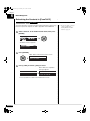
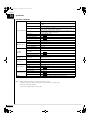
Names of Parts and Their Functions
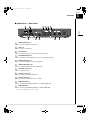
■ Control Unit — Front Panel
4
1
2
3
5
6
7
8
9
10
11
12
[ON/OFF] button
Turns on or shuts down the Disklavier. Press once to turn it on, and once again to shut it down.
1
2
USB port
Used to connect a USB flash memory, etc.
Remote control sensor
When using the remote control, point it toward this sensor.
3
CD drive
Insert a PianoSoft·PlusAudio or other audio or audio/MIDI CD here.
4
CD eject button
Used to open the CD drive.
5
6
[PLAY/PAUSE] button
Used to start and pause playback.
[STOP] button
Used to stop playback and recording.
7
[RECORD] button
Used to engage the record standby mode before recording starts.
8
[SELECT] button
Used to select media.
9
10
Cursor/[ENTER] buttons
Cursor: Used to select options and parameters.
[ENTER]: Used to execute the selection.
Display
Shows various information.
11
Dial
Used to adjust the volume, and to set parameter values.
12
2
100-EN_.book Page 3 Monday, June 2, 2008 2:54 PM
Chapter
Introduction
1
■ Control Unit — Rear Panel
1
2
3
4
5
6
English
7
8
9
10
11
1
USB TO DEVICE port
Used to connect a USB flash memory, etc.
LAN port
Used to connect to the Internet.
2
OUTPUT jacks
Used to connect the speaker cord from the monitor speakers*
3
ANALOG MIDI IN jacks
Used to connect the audio equipment such as an external CD changer.
4
5
OMNI (SYNC) IN jacks
Used to connect the output of the audio equipment.
OMNI (SYNC) OUT jacks
Used to connect the input of the audio equipment.
6
TO PIANO connectors
Used to connect the piano.
7
DC-IN 12V connector
Used to connect to the power supply unit.
8
9
USB TO HOST port
Used to connect the USB cable from a computer.
MIDI OUT terminal
Used to connect external MIDI equipment for outputting MIDI data.
10
MIDI IN terminal
Used to connect external MIDI equipment for inputting MIDI data.
11
* Only for models supplied with the monitor speakers.
3
100-EN_.book Page 4 Monday, June 2, 2008 2:54 PM
Chapter
1
■ Remote Control
1
13
2
14
15
16
3
17
4
18
5
19
20
6
21
7
22
8
23
9
24
25
10
26
11
12
27
[ON/STANDBY] button
Turns on the Disklavier or puts it in the standby
mode.
[RECORD] button
Used to engage the record standby mode before
recording starts.
Number keypad
Used for direct album/song selection and to enter a
start time for song playback.
[PLAY] button
Used to start playback.
1
2
5
6
[REVERSE]/[FORWARD] buttons
In the play mode: used to fast preview and review.
In the pause mode: used to fast forward and
reverse.
7
[SYSTEM] button
Used to access the system menu.
3
4
[VOICE] button
Used to access the voice function.
4
Cursor buttons
Used to select options and parameters.
8
100-EN_.book Page 5 Monday, June 2, 2008 2:54 PM
Chapter
1
[BACK] button
Cancels the selection, and returns to the previous
screen.
9
[VOLUME] buttons
Used to adjust the volume.
[–] lowers the volume, [+] raises the volume.
10
[TEMPO] buttons
Used to change the playback tempo.
[–] decreases the tempo, [+] increases the tempo,
and [0] resets the tempo to 00.
[PAUSE] button
Used to pause playback.
20
21
[STOP] button
Used to stop playback and recording.
[ENTER] button
Used to execute the selection.
22
[TRANSPOSE] buttons
Used to transpose song playback.
[–] transposes down, [+] transposes up, and [0]
resets the transposition value to 00.
12
[FUNC.] button
Used to access the function menu.
23
[SELECT] button
Used to select media.
24
25
[+/YES]/[–/NO] buttons
Used to select options and parameters.
[INTERNET] button
Used to access the Internet menu.
[BALANCE] button
Used to adjust the TG, audio and voice balance.
[SEARCH] button
Used to access the search function.
Color buttons
For future use.
13
14
English
11
26
27
[SETUP] button
Used to access the setup menu.
15
16
[METRONOME] button
Used to access the metronome function.
[REPEAT] button
Used to select one of the repeat modes: ALL, RPT,
RND, or OFF.
17
[A-B] button
Used to enter A and B points for the A~B repeat
mode.
18
[PART SELECT] buttons
For L/R and ensemble songs, these buttons are
used to choose which part will play: left-hand part,
right-hand part, or both parts.
They are also used to select a part for recording.
19
5
100-EN_.book Page 6 Monday, June 2, 2008 2:54 PM
Chapter
1
■ monitor Speaker
LOW
1
2
LINE
2
3
1
LOW/HIGH volume controls
Adjust the base/treble sound volume.
3
LINE1/2 volume controls
Adjust the sound volume for each line input.
Power indicator
Lights up while the speaker is turned on.
Note: For normal use, turn down the LINE1 volume completely,
and turn up the LINE2 volume at the three o’clock
position.
2
6
1
HIGH
100-EN_.book Page 7 Monday, June 2, 2008 2:54 PM
Chapter
1
Basic Disklavier Terminology
The following is a list of several basic Disklavier
words that you may need to know before
proceeding with operational procedures in this
manual. For additional Disklavier terminology, see
the glossary provided in Chapter 15.
PianoSoft·Plus
English
PianoSoft·Plus software contains prerecorded
ensemble songs featuring instrumental
accompaniment that can be played back on the
Disklavier. See your Disklavier dealer for a
PianoSoft catalog.
Ensemble Song
An ensemble song contains the same left- and
right-hand parts as an L/R song, and extra tracks
that are played by the internal XG tone generator.
Accompanying tracks can include acoustic bass,
drums, strings, vibes, etc.
PianoSoft·PlusAudio
CD software made by Yamaha containing audio
and MIDI signals for playing back on the Disklavier.
L/R Song
SmartPianoSoft
In a L/R song, the left-hand piano part is stored on
track 1 (L) and the right-hand piano part is stored
on track 2 (R). During playback you can cancel
either part, and practice that part yourself. When
recording an L/R song, you can record the two
parts simultaneously or separately.
Software made by Yamaha containing MIDI signals
for playing back along with standard audio CDs.
Memory Disk
The Disklavier has a total of 128 megabytes of
internal flash memory named Memory Disks that
allow you to store song data without a floppy disk.
MIDI
An acronym for Musical Instrument Digital
Interface. MIDI allows electronic musical
instruments to communicate with each other.
PianoSoft
The PianoSoft Disk Collection is a library of
prerecorded song disks made by Yamaha for use
with the Disklavier series. Many titles are available,
and among the many musical styles included are
classical, jazz, and popular. The disk includes
songs for listening enjoyment, piano study disks for
the piano student, and accompaniment disks for
vocal and instrumental practice. PianoSoft is
sometimes used as a generic term for PianoSoft
and PianoSoft·Plus.
Song
A “song” usually means a short piece of music with
lyrics. However, in the Disklavier manuals the term
“song” is used to refer to any piece of music.
Tone Generator
An electronic device that generates instrument
voices. The Disklavier has an internal XG tone
generator that can produce nearly 700 instrumental
and percussion voices.
Voice
The sounds produced by a tone generator
expressing various instruments.
XG
Yamaha XG is an extension of the GM (General
MIDI) format. With greater polyphony, more voice,
and effects, it improves song compatibility between
MIDI devices. When a song in the Yamaha XG
format is played on another XG compatible tone
generator or synthesizer, it will play and sound as
the original composer/creator intended.
7
100-EN_.book Page 8 Monday, June 2, 2008 2:54 PM
Chapter
2
Getting Started
Connecting the Control Unit
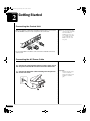
Make sure that the coaxial cable extending from the piano is connected to
the TO PIANO connector on the rear panel of the control unit.
Note: The coaxial cable should be
connected to the control unit
when the Disklavier is
installed. If, however, it is
not, carefully connect them
to the control unit’s TO
PIANO connector on the
rear panel.
It is recommended to mount the control unit to the underside of the bass
side key bed.
Connecting the AC Power Cable
8
1
Connect the cord extending from the power supply unit of
the piano to the DC-IN 12V connector of the control unit.
2
Connect the AC power cable extending from the piano to
the AC wall outlet.
Important:
Make sure that the voltage
of the AC wall outlet
matches that marked on the
Disklavier’s Serial No.
plate.
102-EN_CH02.fm Page 9 Monday, June 2, 2008 4:28 PM
Chapter
Getting Started
2
Using the Remote Control
The Disklavier is equipped with a remote control which allows convenient
control from almost anywhere in the room. This chapter provides notes on
handling the remote control.
English
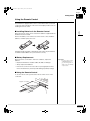
■ Installing Batteries in the Remote Control
Before the remote control can be used, the two batteries supplied with the
Disklavier must be installed.
Remove the battery cover from the rear of the remote control, install the
batteries, and then replace the cover.
A diagram inside the battery compartment shows which way the batteries
should be installed. Make sure you insert them correctly.
■ Battery Replacement
When the remote control fails to work from a distance, replace the
batteries.
• Replacement batteries should be UM-3, AA, R6P, or LR6 type.
• Always replace both batteries.
Important:
Be sure to read the section
on Handling Batteries on
page iii of “Important” for
details on the safe handling
of dry batteries.
• If the remote control is not to be used for a prolonged period of time,
remove the batteries to prevent possible damage by battery leakage.
■ Using the Remote Control
To use the remote control, point it at the remote control sensor on the
control unit.
Approx. 5 m (16 ft.)
30˚
30˚
9
102-EN_CH02.fm Page 10 Monday, June 2, 2008 4:30 PM
Chapter
2
Getting Started
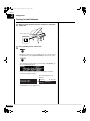
Turning On the Disklavier
1
Make sure that the main switch is turned on in the power
supply unit.
Power supply unit
2
Press [ON/OFF] on the control unit.
ON/OFF
While the control unit is in the standby mode, you can also turn on
the Disklavier by pressing [ON/STANDBY] on the remote control.
The following message appears on the display, and [ON/OFF] on
the control unit lights green.
In a lot of seconds, the loading screen will appear, and latest
selected song will be loaded.
The song playback screen
appears.
PLEASE WAIT
=Memory=
A01-001
<00:00>
Your Disklavier is now ready for use.
10
LR SO V+00
Openig 1
100-EN_.book Page 11 Monday, June 2, 2008 2:54 PM
Chapter
Getting Started
2
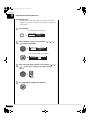
Setting the Internal Calendar
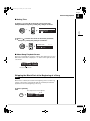
[SYSTEM]
The Disklavier has an internal calendar that can be set from 1/1/1985
00:00:00 to 12/31/2084 23:59:59. Set the calendar accurately so that the
Disklavier displays the correct current time during the stop mode.
English
Setting the correct time is also important for engaging timer-controlled
programs (see Chapter 4 “Advanced Song Playback – Using Timer Play”
on page 34).
Time is displayed in 24-hour format.
■ Calendar
1
Press [SYSTEM].
The system menu screen appears.
(1/2)]
=SYTEM MENU=
*Clock Adj. *TimeZone
*Backup
*Restore
2
Select “Clock Adj.” with the cursor buttons ([
[ ]), then press [ENTER].
][
][
]
(1/2)]
=SYTEM MENU=
*Clock Adj. *TimeZone
*Backup
*Restore
The current date and time appear.
ENT
=Clock Adjust=
2007/10/17 13:54:30
3
Press [ENTER].
=Clock Adjust= _]-+ENT
2007/10/17 13:54:30
The time setup screen appears with the cursor flashing on the
hours display.
11
100-EN_.book Page 12 Monday, June 2, 2008 2:54 PM
Chapter
2
Getting Started
4
Select year, month, date, hours, minutes, and seconds
with the cursor buttons ([ ] [ ]), then press [+/YES] and
[–/NO] to set a value.
=Clock Adjust= _]-+ENT
2007/10/17 14:54:30
5
Press [ENTER].
The date and time are stored in the internal calendar, and the
display returns to the current time screen.
Press [BACK] to return to the system menu screen, then proceed to
the time zone setting.
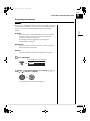
■ Time Zone
1
Select “TimeZone” with the cursor buttons ([
[ ]), then press [ENTER].
][
(1/2)]
=SYTEM MENU=
*Clock Adj. *TimeZone
*Backup
*Restore
The time zone setup screen appears.
=Time Zone=
=?-+ENT
Area=America
City=Los_Angeles
12
][
]
100-EN_.book Page 13 Monday, June 2, 2008 2:54 PM
Chapter
Getting Started
2
2
Press [+/YES] and [–/NO] to change the time zone.
=Time Zone=
Area=America
City=New_York
=?-+ENT
Setting
Actual Time Zone
GMT-10
Hawaii-Aleutian Standard Time
GMT-9
Alaska Standard Time (AKST)
GMT-8
Alaska Daylight Time (AKDT)
Note: The time zone listed above
should be used only as a
guide. For more details,
contact your local
observatories.
English
Examples of Time Zone
The chart below shows the correspondence between the time zone
setting on the Disklavier and actual time zone used in the U.S. and
Canada.
Pacific Standard Time (PST)
GMT-7
Pacific Daylight Time (PDT)
Mountain Standard Time (MST)
GMT-6
Mountain Daylight Time (MDT)
Central Standard Time (CST)
GMT-5
Central Daylight Time (CDT)
Eastern Standard Time (EST)
GMT-4
3
Eastern Daylight Time (EDT)
Press [ENTER].
The time zone is set, and the display returns to the system menu.
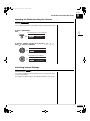
Turning Off the Disklavier (Standby Mode)
Press [ON/STANDBY] on the remote control.
See you again
The ending screen appears, and the [ON/OFF] on the control unit
lights red.
13
100-EN_.book Page 14 Monday, June 2, 2008 2:54 PM
Chapter
2
Getting Started
Shutting Down the Disklavier
Press [ON/OFF] on the control unit.
ON/OFF
Note: When turning the Disklavier
back on, be sure to wait for 5
seconds before doing so.
The ending screen appears, and the [ON/OFF] on the control unit
turns off.
Compatible Media Format for the Removable Media
Compact Disc
The Disklavier can play songs on commercial audio CDs and data CDs
(such as PianoSoft·PlusAudio).
• The audio CDs should be formatted in ISO 9660.
• The data CDs should be formatted in ISO 9660 Level 1.
USB Flash Memory
You can use commercially available USB flash memories to store song
data. The USB flash memory should be formatted in FAT16 or FAT32 file
system.
USB Hard Disk
You can use commercially available USB hard disk drives to store song
data or make a backup of song data. The USB hard disk drive should be
formatted in FAT32 file system.
Floppy Disk (Optional)
With the optional USB floppy disk drive, you can use 3.5” 2DD or 2HD
floppy disks to store song data. The floppy disk should be formatted in MSDOS.
14
Note: Yamaha does not assure the
operation of commercially
available USB flash
memories or USB hard disk
drives. For a list of
compatible products, please
visit: www.yamaha.com/
disklavier.
102-EN_CH02.fm Page 15 Monday, June 2, 2008 4:27 PM
Chapter
Getting Started
2
Compatible File Format
The Disklavier can handle these three types of file format:
SMF0
Standard MIDI file format 0 for playback and recording. The name of the
file should have an extension as “.MID” or “.mid.”
English
SMF1
Standard MIDI file format 1 for playback only. The name of the file should
have an extension as “.MID” or “.mid.”
E-SEQ
Format developed by Yamaha, for playback and overwrite recording. The
name of the file should have an extension as “.FIL” or “.fil.”
Basic Precautions for Using CDs
■ Handling CDs
In order to protect data stored on compact discs from damage or loss,
handle them with care, and observe the following precautions.
• Do not touch the surface of a CD.
• Do not expose CDs to extreme temperatures or humidity. The working
temperature range is between 4°C and 52°C (40°F and 125°F).
• Wipe CDs with a clean, dry cloth before playback.
• Remove the CD from the CD drive before turning off the Disklavier.
■ Loading a CD
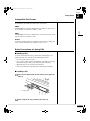
1
Press the CD eject button on the control unit to open the
CD tray.
CD
CD eject button
2
Place a CD on the tray, and then close the tray.
15
100-EN_.book Page 16 Monday, June 2, 2008 2:54 PM
Chapter
3
Basic Song Playback
Types of Playable Software
PianoSoft and PianoSoft·Plus
When piano songs such as those contained in PianoSoft and
PianoSoft·Plus software are played back on the Disklavier, the piano parts
are actually played by the Disklavier keyboard, and the keys move up and
down as though they were being played by an invisible performer. The
ensemble parts (contained in PianoSoft·Plus software) are played by the
internal tone generator and are heard from the monitor speakers*.
PianoSoft·PlusAudio
PianoSoft·PlusAudio songs are recorded using two channels, an analog
MIDI channel for the piano parts and an audio channel for instrumentals
and vocals. When they are played back on the Disklavier, the piano parts
area played by the Disklavier keyboard as with PianoSoft and
PianoSoft·Plus songs, and all other instrumental and vocal parts are heard
from the monitor speakers* just like a normal stereo system.
SmartPianoSoft
SmartPianoSoft contains a recorded piano accompaniment to the
commercial CDs, and the acoustic accompaniment will play back matching
with the commercial CD. You can also record your own accompaniment for
your favorite commercial CDs at home; play your Disklavier as you listen to
a CD, and SmartPiano·Soft will match the music together during playback,
essentially adding you to famous performances.
Standard Audio CDs
Standard audio CDs contain two audio channels (L and R), and are both
heard from the monitor speakers* just like a normal stereo system. In other
words, the Disklavier can be used to play CDs in place of a stereo system.
16
* Only for models supplied with
the monitor speaker.
100-EN_.book Page 17 Monday, June 2, 2008 2:54 PM
Chapter
Basic Song Playback
3
Selecting Medium and Their Contents
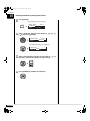
[SELECT]
1
Press [SELECT].
Memory
CD
?]
English
=MEDIA SELECT=
The media selection screen appears with the current selected
medium highlighted.
2
Select a desired medium with the cursor buttons ([
[ ]).
]
The following media are available:
3
Medium
Description
Memory
Internal flash memory
CD
Audio CD or data CD
USB1,
USB2
USB flash memory or USB HDD (USB1 indicates
the first inserted one, and USB2 indicates the
second.)
Playlist
Playlist in the internal flash memory
D-Radio
DisklavierRadio
FromToPC
FromToPC folder in the internal flash memory.
See Chapter 8 “Media Management – Copying
Song File from a Personal Computer to the
Disklavier” on page 76.
Press [ENTER] or [
].
The album selection screen
appears.
or
][{
17
100-EN_.book Page 18 Monday, June 2, 2008 2:54 PM
Chapter
3
Basic Song Playback
4
Select a desired album with the cursor buttons ([
][
]).
][{
Album number
Album title
To return to the media selection screen, press [
5
Press [ENTER] or [
Note: You can also select albums
directly using the number
keypad on the remote
control. See “Selecting
Albums/Songs with the
Number Keypad” on
page 20.
].
].
The song selection screen
appears.
=SONG SELECT=
or
6
001:Get Ready
Select a desired song with the cursor buttons ([
=SONG SELECT=
001:Get Ready
Song number
Press [ENTER].
The selected song is loaded.
18
=]
Song title
To return to the album selection screen, press [
7
=]
].
][
]).
Note: You can also select songs
directly using the number
keypad on the remote
control. See “Selecting
Albums/Songs with the
Number Keypad” on
page 20.
100-EN_.book Page 19 Monday, June 2, 2008 2:54 PM
Chapter
3
■ Song Playback Screen
Here are a few things that you will often see during playback.
1
2
3
4
=Memory=
A02-001
<00:00>
5
6
LR SO V+00
Piano Sonate
English
7
Media
The selected medium is displayed here.
1
Album/Song Number
The number of the selected album and song is
displayed here.
2
Display
Description
Axx-yyy
xx: album number (01 to 99)
yyy: song number (001 to 999)
Pxx-yyy
xx: playlist number (01 to 99)
yyy: song number (001 to 999)
Counter
Playing time is indicated in one of two formats.
3
Display
Description
xx:yy
Minutes (xx) and seconds (yy)
xxx-y
Measures (xxx) and beats (y)
Song Format
The format of the selected song is displayed here.
5
Display
Description
S0
Standard MIDI File format 0
S1
Standard MIDI File format 1
ES
E-SEQ format
Volume
The current volume setting is displayed here.
6
Song Title
The title of the selected song is displayed here. If
the title is long, it scrolls across the display.
7
Song Type
The type of the selected songs is displayed here.
4
Display
Description
LR
PianoSoft
PS
SmartPianoSoft
SK
SmartKey
YM
PianoSoft·PlusAudio
AU
Stereo audio
19
103-EN_CH03_3.fm Page 20 Monday, June 2, 2008 5:24 PM
Chapter
3
Selecting Albums/Songs with the Number Keypad
Album Selection Screen
Number button
You can also select albums or songs directly with the number keypad on
the remote control.
Press the corresponding number button, then press
[ENTER].
For example, to select number 5, simply press [5], then [ENTER].
=ALBUM SELECT= 0-9/ENT
05:
To select number 36, first press [3], then [6], then [ENTER].
=ALBUM SELECT= 0-9/ENT
36:
Starting Playback
Song Playback Screen
[PLAY]
Press [PLAY/PAUSE] on the control unit or [PLAY] on the
remote control.
or
Control unit
Remote control
=Memory=
A02-001
<00:01>
LR SO V+00
Piano Sonate
The [PLAY/PAUSE] on the control unit lights green, and the
numerical value of the counter advances.
At the end of the song, the Disklavier selects the next song
automatically and continues playback.
After playback the last song in the album, playback stops.
20
Note: If you enter a number higher
than the existed, the last
album or song appears.
100-EN_.book Page 21 Monday, June 2, 2008 2:54 PM
Chapter
3
Stopping Playback
During Playback
[STOP]
Press [STOP].
or
Remote control
English
Control unit
Playback stops, and the song returns to the beginning.
The [PLAY/PAUSE] on the control unit turns off, and the counter is
reset to “00:00” or “001-1.”
Pausing Playback
During Playback
1
[PAUSE]
Press [PLAY/PAUSE] on the control unit, or [PAUSE] on
the remote control.
or
Control unit
Remote control
Playback pauses.
The [PLAY/PAUSE] on the control unit flashes, and the counter
stops counting.
2
Press [PLAY/PAUSE] on the control unit or [PLAY] on the
remote control to continue playback.
or
Control unit
Remote control
21
100-EN_.book Page 22 Monday, June 2, 2008 2:54 PM
Chapter
3
Fast Preview & Review
During Playback
[FORWARD] or [REVERSE]
During playback, fast preview and review allow you to quickly search
through a song while listening to the sound. This is useful for locating a
desired position within a song.
■ Fast Preview
1
To preview, hold [ ] on the control unit or press
[FORWARD] on the remote control.
or
Control unit
2
Remote control
Release [ ] on the control unit, or press [FORWARD] on
the remote control again to return to normal playback.
If a song is previewed all the way to the end, it will be paused at the
end of the song.
■ Fast Review
1
To review, hold [ ] on the control unit or press
[REVERSE] on the remote control.
or
Control unit
2
Remote control
Release [ ] on the control unit, or press [REVERSE] on
the remote control again to return to normal playback.
If a song is reviewed all the way to the beginning, it will be paused
at the beginning of the song.
22
Note: No sound is produced by the
piano when fast-previewing
or reviewing
PianoSoft·PlusAudio CDs.
100-EN_.book Page 23 Monday, June 2, 2008 2:54 PM
Chapter
3
Fast Forward & Reverse
Stop or Pause Mode
[FORWARD] or [REVERSE]
In the stop or pause mode, fast forward and reverse allow you to quickly
locate a desired position in a song.
English
Reverse can also be used to return a song to the beginning, ready to play
again.
■ Fast Forward
1
In the stop or pause mode, hold [ ] on the control unit or
press [FORWARD] on the remote control.
=Memory=
or
Control unit
Remote control
LR SO V+00
<00:15> FORWARD
The [PLAY/PAUSE] on the control unit flashes quickly and the
counter shows the current position.
2
Release [ ] on the control unit, or press [FORWARD] on
the remote control again to return to the pause mode.
If you fast forward a song all the way to the end, it will be paused at
the end of the song.
■ Fast Reverse
1
In the stop or pause mode, hold [ ] on the control unit or
press [REVERSE] on the remote control.
=Memory=
or
Control unit
Remote control
LR SO V+00
<02:22> REWIND
The [PLAY/PAUSE] on the control unit flashes quickly and the
counter shows the current position.
2
Release [ ] on the control unit, or press [REVERSE] on
the remote control again to return to the pause mode.
If you reverse a song all the way to the beginning, it will be paused
at the beginning of the song.
23
100-EN_.book Page 24 Monday, June 2, 2008 2:54 PM
Chapter
3
Searching a Specific Section of a Song
During Playback or Stop/Pause Mode
[SEARCH]
Playback can be started from a specified point in a song. Instead of using
fast forward or preview, you can use this function to go directly to a desired
point within a song.
If the current song uses the minutes and seconds time format, you specify
the point in minutes and seconds. If it uses the measures and beats time
format, you specify the point in measures and beats.
1
Press [SEARCH].
The song will be paused at the exact point as you press [SEARCH].
The song search screen appears with the counter flashing.
=Memory=
A02-001
<00:00>
0-9/SEARCH
Piano Sonate
2
Enter the time that you want to search for with the number
keypad.
=Memory=
A02-001
<00:12>
0-9/SEARCH
Piano Sonate
For example, to search for 2:56, first press [2], then [5], then [6].
If you enter a value higher than the entire song time, the search
goes to the end of the song.
3
Press [SEARCH] again.
The position of the song goes to the specified point, then will be
paused.
24
100-EN_.book Page 25 Monday, June 2, 2008 2:54 PM
Chapter
3
Listening to the DisklavierRadio
Media Selection Screen
D-Radio
You can listen to streaming broadcasts of music, with many channels of
music contents.
Select the DisklavierRadio in the media selection.
) To select a medium, see Chapter
The channel selection screen appears.
=RADIO SELECT=
3 “Basic Song Playback –
Selecting Medium and Their
Contents” on page 17.
?=]
01:Introduction Ch
2
Press [
] or [
] or [+/YES] or [–/NO] to select a channel.
=RADIO SELECT=
or
3
first you need the connection to
the Internet. See Chapter 9
“Internet Direct Connection
(IDC) Service – Connecting the
Disklavier to the Internet” on
page 83.
English
1
) To enjoy the DisklavierRadio,
?=]
02:Classic Channel
Press [ENTER] or [
selected channel.
], to begin the broadcast of the
or
The DisklavierRadio screen appears.
Channel
Number Medium
Volume
=D-Radio=
CH-03:
Jazz
V+00
My Funny Val
Channel Title
Song Title
25
100-EN_.book Page 26 Monday, June 2, 2008 2:54 PM
Chapter
3
■ Muting the Sound
1
Press [PAUSE] or [STOP].
=D-Radio=
CH-03:
Jazz
MUTE
My Funny Val
or
“MUTE” appears on the upper right of the screen.
2
Press [PAUSE] or [STOP] again to release muting.
or
Adjusting the Volume
[VOLUME +] or [VOLUME –]
You can adjust volume with the control unit or with the remote control as
described below. Since all piano songs are recorded at the maximum
volume level of 0, volume can be decreased down to –10, the softest
volume at which the piano can play.
For ensemble songs, the volume of the piano and internal XG tone
generator are adjusted simultaneously, so it is a good idea to first balance
the volume of the piano and XG tone generator.
For songs on PianoSoft·PlusAudio, you should first balance the volume of
the MIDI piano and audio parts.
1
Press [VOLUME +] or [VOLUME –] on the remote control.
The main volume setting screen appears.
=BALANCE=
VOLUME-/+
MAIN VOLUME -01
2
Press [VOLUME +] or [VOLUME –] to adjust the volume.
Volume
=Memory=
A02-001
<00:00>
LR SO V-01
Piano Sonate
The current volume level appears on the upper right of the screen.
26
) See Chapter 4 “Advanced Song
Playback – Adjusting the
Volume Balance among the
Keyboard Playing, Ensemble
Sound, and Software Playback”
on page 31.
) See Chapter 4 “Advanced Song
Playback – Adjusting the
Volume Balance among the
Keyboard Playing, Ensemble
Sound, and Software Playback”
on page 31.
Note: This setting does not affect
manual playing.
Note: When the volume is set to –
10, there may be a slight
delay in sound production
following key strokes, and
the Disklavier may skip
some notes. Furthermore, at
this volume setting, touch
strength does not affect note
dynamics.
Note: You can also use the dial on
the control unit to adjust the
volume.
100-EN_.book Page 27 Monday, June 2, 2008 2:54 PM
Chapter
4
Advanced Song Playback
Changing the Playback Tempo
[TEMPO –] or [TEMPO +]
Note: You cannot change the
playback tempo of songs on
CDs.
These tempo settings remain in effect until recording is started, another
medium or album is selected, or the Disklavier is turned off.
) Tempo changes to songs that
1
Press [TEMPO –] or [TEMPO +] on the remote control.
English
You can speed up or slow down the playback tempo. Slowing down the
playback tempo can be useful when practicing a difficult piano part.
you have recorded yourself can
be made permanent. See
Chapter 7 “Advanced Recording
– Changing the Default Tempo”
on page 52.
The tempo setting screen appears.
=Memory=
TEMPO-/0/+
TEMPO +01%
2
Press [TEMPO –] or [TEMPO +] to adjust the tempo.
Note: You can also use the dial on
the control unit to adjust the
tempo.
Playback tempo can be adjusted from –50% to +50% in 1%
increments.
Press [TEMPO 0] to set to the original tempo.
Playing Back Songs in a Different Key (Transposition)
[TRANSPOSE –] or [TRANSPOSE +]
Playback can be transposed up or down by up to two octaves. This is
useful, for example, when you want to sing along (karaoke) in a different
key from the original recording.
Note: This function cannot be used
to transpose songs from
external devices connected
to the OMNI IN jacks.
Transposition changes remain in effect until recording is started, another
medium or album is selected, or the Disklavier is turned off.
27
100-EN_.book Page 28 Monday, June 2, 2008 2:54 PM
Chapter
4
Advanced Song Playback
1
Press [TRANSPOSE –] or [TRANSPOSE +] on the remote
control.
The transposition setting screen
appears.
=Memory=
TRANS-/0/+
TRANS +01key
2
Press [TRANSPOSE –] or [TRANSPOSE +] to change the
key.
Playback can be transposed in half-step increments up or down
two octaves (–24 key to +24 key)
Press [TRANSPOSE 0] to set to the original key.
Repeating Song Playback
Song Playback Screen
[REPEAT]
There are three repeat modes (ALL, RPT, RND) as described below. You
can use these functions for entertainment or study purpose.
1
Press [REPEAT] on the remote control.
The repeat setting screen appears.
=Memory=
REPEAT ALL
2
REPEAT
Press [REPEAT] to select repeat modes.
The following options are available:
28
Option
Description
ALL
Repeats all songs on the selected album.
RPT
Repeats selected song.
RND
Shuffles the order of songs on the selected album and
repeats the cycle.
OFF
Plays Back songs normally.
Note: You can also use the dial on
the control unit to adjust the
tempo.
104-EN_CH04.fm Page 29 Monday, June 2, 2008 4:50 PM
Chapter
Advanced Song Playback
3
Press [PLAY] to start repeat playback.
4
To cancel the repeat mode, press [REPEAT] until “OFF”
appears on the screen.
4
English
Repeating a Specific Section of a Song (A~B Repeat)
During Playback
[A-B]
In the A~B repeat, playback is repeated between two specified points in a
song: point A and point B. This function is useful when practicing or
memorizing a difficult section of a song.
Once specified, points A and B are saved until another song is selected,
recording is started, or the Disklavier is turned off.
1
To set point A, play back a song and press [A-B] when the
desired point is reached.
Point A is set.
The A~B repeat setting screen
appears with the “B” flashing.
=Memory=
A-B
<01:11> A-B
2
To set point B, press [A-B] again.
Point B is set.
=Memory=
<02:22> A-B
A-B
Playback starts from point A, continues up to point B and, returns to
point A and playback starts repeatedly.
Point B
Point A
SONG 1
SONG 2
SONG 3
Start
Cycle
You cannot set point B that is beyond the selected song.
Pressing [BACK] also cancels the point setting, and returns to the
song playback screen.
29
104-EN_CH04.fm Page 30 Monday, June 2, 2008 4:50 PM
Chapter
4
Advanced Song Playback
3
To cancel the A-B repeat, press [A-B] so that “OFF”
flashes on the screen.
=Memory=
<01:38> OFF
A-B
To return to the playback screen, press [BACK].
Playing Back Only the Desired Piano Part
Song Playback Screen
[PART SELECT L] or [PART SELECT R]
This could be useful, for example, when listening carefully to one part, and
also when you practice only the left- or right-hand part while the Disklavier
plays the other.
■ Cancelling the Piano Part
1
Select the desired song.
2
Press [PART SELECT L] or [PART SELECT R] on the
remote control to cancel a part.
=Piano Part=
L/R
L=ON R=OFF P=ON
The part cancellation screen appears with the corresponding part
canceled.
Notes of displays:
L:
Left hand part
R:
Right hand part
P:
Pedal part
ON: Plays part
OFF: Cancels part
G:
Plays part with guide (only for SmartKey song)
---:
No plays on part
3
To replay the cancelled part, press [PART SELECT L] or
[PART SELECT R] again so that “ON” appears on the
screen.
=Piano Part=
L/R
L=ON R=ON P=ON
Press [BACK] to return to the song playback screen.
30
Note: For the SmartKey song,
“ON”, “OFF” and “G”
appear sequentially each
time you press [PART
SELECT L] or [PART
SELECT R].
100-EN_.book Page 31 Monday, June 2, 2008 2:54 PM
Chapter
Advanced Song Playback
4
■ Cancelling the Pedal Part
1
On the part cancellation screen, press [
=Piano Part=
] to select “P=.”
L/R
L=ON R=OFF P=ON
English
2
Press [–/NO] to cancel a pedal part.
“P=OFF” appears.
=Piano Part=
L/R
L=ON R=OFF P=OFF
3
To replay the pedal part, press [+/YES] with the cursor is
on “P=.”
Press [BACK] to return to the song playback screen.
Adjusting the Volume Balance among the Keyboard Playing,
Ensemble Sound, and Software Playback
Song Playback Screen
[BALANCE]
Besides adjusting the overall volume, the volume balance among the
different sound sources as described below can be adjustable.
TG:
Adjusts the volume of the ensemble sound reproduced by the
tone generator (TG) of the Disklavier.
Audio:
Adjusts the volume of the accompaniment or standard audio
sound pre-recorded in the software (CDs).
Voice:
Adjusts the volume of the ensemble voice when you play using
the voice function. See Chapter 5 “Advanced Piano Playing –
Playing the Disklavier with an Ensemble Voice” on page 41.
31
100-EN_.book Page 32 Monday, June 2, 2008 2:54 PM
Chapter
4
Advanced Song Playback
■ Adjusting the TG Balance
1
Press [BALANCE] on the remote control.
=BALANCE=
TG BALANCE 100
-+
The TG balance setting screen appears with the “TG BALANCE
xxx” flashing.
2
Press [+/YES] and [–/NO] to adjust the volume of the tone
generator.
Note: You can also use the dial on
the control unit to adjust the
volume.
Tone generator volume can be adjusted in a range of 10 to 127.
■ Adjusting the Audio Balance
1
Press [BALANCE] twice on the remote control.
=BALANCE=
×2
-+
AUDIO BALANCE 100
The audio balance setting screen appears with the “AUDIO
BALANCE xxx” flashing.
2
Press [+/YES] and [–/NO] to adjust the volume of the
audio.
Audio volume can be adjusted in a range of 10 to 127.
32
Note: You can also use the dial on
the control unit to adjust the
volume.
100-EN_.book Page 33 Monday, June 2, 2008 2:54 PM
Chapter
Advanced Song Playback
4
■ Adjusting the Voice Balance
1
Press [BALANCE] three times on the remote control.
=BALANCE=
-+
VOICE BALANCE 100
×3
English
The voice balance setting screen appears with the “VOICE
BALANCE xxx” flashing.
2
Press [+/YES] and [–/NO] to adjust the volume of the voice.
Note: You can also use the dial on
the control unit to adjust the
volume.
Voice volume can be adjusted in a range of 0 to 127.
Adjusting the Pitch of Audio
During Playback
[FUNC.]
You can temporarily adjust the pitch of the song contains audio
(PianoSoft·PlusAudio, SmartPianoSoft) or an audio CD for your listening
pleasure.
Pitch adjustments are effective until another medium or album is selected,
recording is started, or the Disklavier is turned off.
1
Note: This function cannot be used
to adjust the pitch of
external audio CDs
connected to the OMNI IN
jacks.
During the song playback, press [FUNC.].
=CD=
-+ENT
AudioPitch=+00cent
The audio pitch setting screen appears with the
“AudioPitch=xxxcent” flashing.
2
Press [+/YES] and [–/NO] to change the audio pitch.
=CD=
-+ENT
AudioPitch=+01cent
Audio pitch can be adjusted in a range of –50 cent to +50 cent.
33
100-EN_.book Page 34 Monday, June 2, 2008 2:54 PM
Chapter
4
Advanced Song Playback
Adjusting the L/R Balance of Audio
During Playback
[FUNC.]
You can temporarily adjust the L/R balance of an audio CD.
Balance adjustments are effective until another song is selected, recording
is started, or the Disklavier is turned off.
1
During the song playback, press [FUNC.] several times.
=CD=
-+ENT
AudioPan=Center
The audio pan setting screen appears with the “AudioPan=xxxxxx”
flashing.
2
Press [+/YES] and [–/NO] to change the audio pan.
=CD=
-+ENT
AudioPan=Left
The following pan settings are available:
Option
Description
Left
Audio of the L channel is output to both of the L and R
channels.
Center
Audio of the L channel is output to the L channel, and
the R channel is output to the R channel.
Right
Audio of the R channel is output to both of the L and R
channels.
Using Timer Play
[SETUP]
You can program your Disklavier to start or stop playback of a song at
various specified times. All you need to do is register up to a maximum of
99 timer settings, and your Disklavier will perform them unattended. This
function is called “timer play.”
Important:The control unit must
be turned on in advance in
order for the timer play to
function. The timer play
cannot turn on/off the
control unit.
Note: Prolonged playback may
cause your piano to
overheat. Insert sufficient
breaks between continuous
song playback.
34
100-EN_.book Page 35 Monday, June 2, 2008 2:54 PM
Chapter
Advanced Song Playback
4
■ Setting the Timer Play
1
Press [SETUP].
The setup menu screen appears.
(1/2)]
=SETUP MENU=
*TimerPlay *AudioI/O
*MIDI
*M-Tune
English
2
Select “TimerPlay” with the cursor buttons ([
[ ]), then press [ENTER].
][
][
]
The timer play setting screen appears.
Timer
switch
=TIMER PLAY=
>TimerPlay=OFF
01[##:## ----
_?]-+
]
Program Time Function Album
number
selection
List of the parameters
Item
Option
Description
Timer
switch
ON, OFF
Enables or disables the timer play function.
Program
number
01 - 99
Indicate the number of a program. Only program
numbers with programs are displayed.
Time
##:##
No set.
00:00 23:59
Indicates the time at which a function is to be
performed.
----
No set.
PLAY
The function to be performed at the specified time.
STOP
Stops the timer play.
-----
Playbacks the current selected song.
Mem01 Mem99
Album numbers in the memory disk.
Lst01 Lst99
List numbers in the playlist.
Function
Album
selection
35
100-EN_.book Page 36 Monday, June 2, 2008 2:54 PM
Chapter
4
Advanced Song Playback
■ Switching ON and OFF
To switch ON and OFF, press [ ] to move the cursor to
the timer switch, then press [+/YES] and [–/NO].
=TIMER PLAY=
_?]-+
>TimerPlay=ON
01[##:## ---- -----]
■ Moving Program Number
Press [
] and [
] to go to the program number.
The cursor moves to the function parameter.
■ Setting Function
To switch the function parameter, press [ ] and [ ] to
move the cursor to the function parameter, then press [+/
YES] and [–/NO].
“PLAY” and “STOP” change
sequentially.
=TIMER PLAY=
_?=]-+
>TimerPlay=ON
01[##:## PLAY -----]
When “PLAY” is selected, the album selection parameter appears.
■ Selecting Album
Press [ ] to move the cursor to the album selection
parameter, then press [+/YES] and [–/NO] to select the
album.
=TIMER PLAY=
_?=]-+
>TimerPlay=ON
01[08:15 PLAY Mem01]
36
100-EN_.book Page 37 Monday, June 2, 2008 2:54 PM
Chapter
Advanced Song Playback
4
■ Setting Time
1
Press [ ] and [ ] to move the cursor to the hour
parameter, then press [+/YES] and [–/NO] to set hours.
2
English
=TIMER PLAY=
_?=]-+
>TimerPlay=ON
01[08:00 PLAY -----]
×2
Press [ ] to move the cursor to the minute parameter,
then press [+/YES] and [–/NO] to set minutes.
=TIMER PLAY=
_?=]-+
>TimerPlay=ON
01[08:15 PLAY -----]
■ About Song Playback Screen
When the song playback is stopped — with the timer play function is set to
ON and the current time is displayed — “T” flashes to the right side of the
current time.
=Memory=
A02-001
12:00T
LR SO V+00
Piano Sonate
Indicates the timer play ON.
Skipping the Blank Part at the Beginning of a Song
[SETUP]
When there is a blank part created at the beginning of the recorded song,
turning on this function automatically skips the unwanted part and starts
playback from the actual beginning of the song.
1
Press [SETUP].
The setup menu screen appears.
=SETUP MENU=
_(2/2)
*Network
*Playback
*Reverb
*Reset
37
100-EN_.book Page 38 Monday, June 2, 2008 2:54 PM
Chapter
4
Advanced Song Playback
2
Select “Playback” with the cursor buttons ([
[ ]), then press [ENTER].
][
][
]
=SETUP MENU=
_(2/2)
*Network
*Playback
*Reverb
*Reset
The playback setting screen appears with the cursor flashing.
-+
=Playback=
>SkipSpace=ON
3
Press [+/YES] and [–/NO] to switch ON and OFF.
4
Press [ENTER] to return to the setup menu.
Adding Disklavier Accompaniment to Commercial CD Songs
(PianoSmart™ Playback)
Insert a CD
[PLAY]
You can add a Disklavier piano performance you recorded or on
commercially available SmartPianoSoft software to the playback of songs
on your favorite CDs.
1
Insert a desired CD that you want to synchronize with the
SmartPianoSoft song.
2
Select a desired SmartPianoSoft song.
3
Press [PLAY].
Playback begins with the CD playback.
=Memory=
A01-038
<00:03>
(SPS)V+00
PIANO038.MID
38
) To record the piano
performance to add, see Chapter
7 “Advanced Recording – CD
Synchronized Recording” on
page 54.
100-EN_.book Page 39 Monday, June 2, 2008 2:54 PM
Chapter
Advanced Song Playback
4
SmartKey™ Playback
Select a SmartKey Song
[PLAY]
1
Select a desired SmartKey song.
2
Press [PLAY].
English
Special SmartKey software uses all the “SmartKey” features to create an
exciting way in which no-players can learn to play simple melodies, one
note at a time, without the need for written music. SmartKey software does
this by partially depressing the piano key to signal which note should be
played. The Disklavier then waits for you to press this key before it
continues to the next note in the melody (If you miss the movement of the
key, the Disklavier will repeat the movement until you press the key).
When you press the key, the Disklavier will reward you with ear tickling
phrases, incredible harmonies, and lush arpeggios to give you the aural
and visual image of a complete high-quality performance. In short, it
SHOWS you which key to play, WAITS for you to play that key before it
continues, and REWARDS you with music. It is like having an eternally
patient music teacher showing your fingers which notes to play.
) To select a song, see Chapter 3
“Basic Song Playback –
Selecting Medium and Their
Contents” on page 17.
Playback stops, and the key to play next moves slightly.
The key to play flashes in the
counter.
Key moves slightly
3
Pachelbel=s
Play the key that the keyboard indicates.
This will continue until the song is finished. Notice that the
Disklavier patiently waits for you to play the right key before
proceeding to the next key. Also, notice that if you happen to miss
the cue, it will gently remind you what the key is every few seconds
until you play the right key.
■ Key notation
As a reference, “C3” is middle “C”, which means “C4” is an octave above
middle “C” and so on.
C 2D 2
F 2G 2 A 2
C 3D 3
F 3G 3A 3 C 4
C2 D2 E2 F2 G2 A2 B2 C3 D3 E3 F3 G3 A3 B3 C4
Middle C
39
105-EN_CH05.fm Page 40 Monday, June 2, 2008 4:33 PM
Chapter
5
Advanced Piano Playing
Playing the Disklavier along with the Internal Metronome
[METRONOME]
The internal metronome helps you playing along the meter (beat) and the
tempo you set.
Also the volume of the metronome can be adjusted.
1
Press [METRONOME].
=METRONOME=
_]-+
TEMPO=117bpm =4/4
VOLUME=****
The metronome setting screen appears and the metronome starts
to click.
2
To change the tempo, press [ ] to move the cursor to the
tempo parameter, then press [+/YES] and [–/NO].
=METRONOME=
_]-+
TEMPO=125bpm =4/4
VOLUME=****
The tempo can be adjusted in a range of 30 bpm to 400 bpm.
3
To change the beat, press [ ] to move the cursor to the
beat parameter, then press [+/YES] and [–/NO].
=METRONOME=
_]-+
TEMPO=125bpm =3/4
VOLUME=****
The following beat setting are available:
1/4, 2/4, 3/4, 4/4, 5/4, 6/4, 7/4, 8/4, 9/4.
4
To change the volume, press [ ] to move the cursor to
the volume parameter, then press [+/YES] and [–/NO].
=METRONOME=
_]-+
TEMPO=125bpm =3/4
VOLUME=***&
The volume can be adjusted in 4 steps.
40
Note: The tempo parameter
displayed on the metronome
setting screen indicates the
number of beats in a minute,
and one beat represents a
quarter. When you play a
song written in different
measure unit from quarter
note, change the setting
(e.g.When playing a song in
3/2, set beat to 6/4).
105-EN_CH05.fm Page 41 Monday, June 2, 2008 4:33 PM
Chapter
Advanced Piano Playing
5
Playing the Disklavier with an Ensemble Voice
[VOICE]
The internal XG tone generator offers 676 instrumental voices and 21
drum kits for playing the keyboard.
1
English
The Disklavier’s [VOICE] lets you assign a voice from the internal XG tone
generator to accompany the piano while you play. You will hear in unison
the piano sound coming from the Disklavier and an ensemble voice
produced by the internal XG tone generator. This is sometimes referred to
as voice layering or unison.
Press [VOICE].
The voice selection screen appears.
}{
2
Press [+/YES] and [–/NO] to select a voice group.
=VOICE=
_]-+
Group=02<ChromaticPerc>
Voice=040<Celesta >[XG
Changing the voice group displays the top voice of that group in the
voice parameters.
3
To change the voice, press [ ] to move the cursor to the
voice parameter, then press [+/YES] and [–/NO].
}{
If necessary, adjust the volume of the voice in the voice balance
setting screen. See Chapter 4 “Advanced Song Playback –
Adjusting the Volume Balance among the Keyboard Playing,
Ensemble Sound, and Software Playback” on page 31.
4
To cancel this function, press [VOICE] again.
41
100-EN_.book Page 42 Monday, June 2, 2008 2:54 PM
Chapter
6
Basic Recording
A song that you play on the Disklavier can be recorded and the recorded song can be easily
saved for the selected medium. Furthermore, you can title your new recording for simple
distinguish before recording.
Recording a New Song
Song Playback Screen
[RECORD]
You can save a new song that you play for an album.
1
Select a destination medium and album.
2
Press [RECORD].
=RECORD=
A01-039
<00:00>
*_ LR 99%
(New Song)
The recording standby screen appears, and [RECORD] on the
control unit lights red and [PLAY/PAUSE] flashes in green.
The level appears in the format section as soon as you play a
keyboard or press a pedal.
3
Press [PLAY].
[PLAY/PAUSE] stops flashing.
The Disklavier is now ready for you to play.
4
Start playing your song.
Recording will start as soon as you touch a key. The counter starts
to advance.
=RECORD=
A01-039
<00:01>
*_ LR 99%
(New Song)
5
Press [STOP] when you finish playing your song.
The recorded song is loaded.
42
) To select a medium and album,
see Chapter 3 “Basic Song
Playback – Selecting Medium
and Their Contents” on page 17.
100-EN_.book Page 43 Monday, June 2, 2008 2:54 PM
Chapter
Basic Recording
6
Titling a Song
Song Playback Screen
[RECORD]
[FUNC.]×2
Title a new song before you start recording.
Press [FUNC.] twice in the recording standby screen.
English
1
The song title editing screen appears.
_]-+
=RECORD=
×2
2
Use [
3
Select characters with [+/YES] and [–/NO] or the keyboard.
] and [
] to move the cursor.
=RECORD=
Chopin
) To enter characters using the
keyboard, see “Keyboard
Characters Map” on next page.
_]-+
You can enter up to 32 characters.
4
Press [PLAY] after title determined.
Recording begins.
43
100-EN_.book Page 44 Monday, June 2, 2008 2:54 PM
Chapter
6
Basic Recording
Keyboard Characters
The following table shows which characters are available.
Space
A
B
C
D
E
F
G
H
I
J
K
L
M
N
O
P
Q
R
S
T
U
V
W
X
Y
Z
a
b
c
d
e
f
g
h
i
j
k
l
m
n
o
p
q
r
s
t
u
v
w
x
y
z
!
“
#
$
%
&
’
(
)
*
+
,
–
.
/
:
;
<
=
>
?
0
1
2
3
4
5
6
7
8
9
Keyboard Character Map
The Disklavier keyboard can also be used to enter characters when titling songs and disks.
Note: Not all characters that the Disklavier provides are available from the keyboard. Certain punctuation must be input from the
Control Unit. See the character table above.
Cursor
back
Space
Numbers
1
1
2
3
4
5 6 7
8
2
3 4
5
6
7 8
9
0
–
·
a bc d e f
9 10 11 12 13 14 15 16 17 18 19 20 21 22 23 24 25 26 27 28 29 30 31 32 33 34 35 36 37 38 39 40 41 42 43 44 45
Upper case/
Lower case
Letters
f g h i j k l m n o p q
Cursor
forward
r s t u v w x y z
11 45 46 47 48 49 50 51 52 53 54 55 56 57 58 59 60 61 62 63 64 65 66 67 68 69 70 71 72 73 74 75 76 77 78 79 80 81 82 83 84 85 86 87 88
44
100-EN_.book Page 45 Monday, June 2, 2008 2:54 PM
Chapter
7
Advanced Recording
This chapter describes further functions for the advanced piano recording such as playing and
measuring the current playing song tempo with the metronome, recording the left-hand part
and the right-hand part separately.
Recording with the Internal Metronome
Metronome setting screen
[RECORD]
English
You can use the metronome to record songs.
Songs recorded with the metronome will be in the measures and beats
format.
All metronome parameters are reset when the Disklavier is switched off.
1
Press [METRONOME].
The metronome setting screen appears.
2
To change the tempo, press [ ] to move the cursor to the
tempo parameter, then press [+/YES] and [–/NO].
=METRONOME=
_]-+
TEMPO=125bpm =4/4
VOLUME=****
The tempo can be adjusted in a range of 30 bpm to 400 bpm.
3
To change the beat, press [ ] to move the cursor to the
beat parameter, then press [+/YES] and [–/NO].
=METRONOME=
_]-+
TEMPO=125bpm =3/4
VOLUME=****
The following beat setting are available:
1/4, 2/4, 3/4, 4/4, 5/4, 6/4, 7/4, 8/4, 9/4.
4
To change the volume, press [ ] to move the cursor to
the volume parameter, then press [+/YES] and [–/NO].
=METRONOME=
_]-+
TEMPO=125bpm =3/4
VOLUME=***&
The volume can be adjusted in 4 steps.
45
100-EN_.book Page 46 Monday, June 2, 2008 2:54 PM
Chapter
7
Advanced Recording
5
Press [RECORD] in the metronome setting screen.
The metronome recording setting screen appears.
=METRONOME=
_]-+
TEMPO=117bpm =4/4
VOLUME=****
6
Press [PLAY]
The metronome starts and recording begins immediately.
The indicators flash to show the beat and the beat counter starts
counting (001-1). The display will cycle as shown below in the first
measure.
LR 99%
=RECORD=
A01-039 ****************
<001-1> ****************
=RECORD=
A01-039
<001-2>
LR 99%
********
********
LR 99%
=RECORD=
A01-039 ********
<001-3> ********
The display will return to the normal recording screen after counting
for the first measure.
7
Start playing your song.
8
Press [STOP] when you finish playing your song.
The recorded song is loaded.
46
100-EN_.book Page 47 Monday, June 2, 2008 2:54 PM
Chapter
Advanced Recording
7
Recording the Left and Right Parts Separately
Album Selection Screen
[RECORD]
[FUNC.]
When recording an L/R song, the left- and right-hand parts can be
recorded separately. Either part can be recorded first, and the pedals can
be recorded with the first part.
English
While you record the second part, the first part will play back for
monitoring.
If the left-hand or right-hand part is difficult to play at normal speed, the first
part can be recorded at a slow tempo, and then the tempo changed
afterwards to record the second part at the normal song speed.
This section describes how to record the left-hand part first then the
right-hand part second.
■ Recording the Left-Hand Part
1
Select a destination medium and album.
2
Press [RECORD].
3
Press [FUNC.] in the recording standby screen.
L=REC R=OFF
4
see Chapter 3 “Basic Song
Playback – Selecting Medium
and Their Contents” on page 17.
) In the case you want to title your
The part selection screen appears.
=RECORD=
) To select a medium and album,
LR
new song before recording, see
Chapter 6 “Basic Recording –
Titling a Song” on page 43, to
rename the title after recording,
see Chapter 8 “Media
Management – Renaming a
Song” on page 64.
) If you want to record your L/R
song using the metronome, see
Chapter 7 “Advanced Recording
– Recording with the Internal
Metronome” on page 45.
Make sure that the left-hand part is set to be recorded
(“L=REC”), then press [PLAY].
This Disklavier is now ready for you to play the left-hand part.
5
Start playing your song.
Recording will start as soon as you touch a key.
6
Press [STOP] when you finish playing your song.
The L/R song with the left-hand part recorded is saved onto the
selected album.
47
100-EN_.book Page 48 Monday, June 2, 2008 2:54 PM
Chapter
7
Advanced Recording
■ Recording the Right-Hand Part
1
Press [RECORD].
2
Press [ ] and [ ] to select the L/R song with the lefthand part that you have just recorded.
3
Press [FUNC.] in the recording standby screen.
The part selection screen appears.
=RECORD=
LR
L=PLY R=OFF
The part that has already been recorded is displayed as “L=PLY.”
4
Press [PART SELECT R] to record the right-hand part.
The part set to “REC” will be recorded.
=RECORD=
LR
L=PLY R=REC
5
Press [PLAY].
Playback of the left-hand recorded part starts immediately, so be
sure that you are ready to play the right-hand part along with it.
48
100-EN_.book Page 49 Monday, June 2, 2008 2:54 PM
Chapter
Advanced Recording
6
7
Press [STOP] when you finish playing your song.
The following screen appears.
=RECORD=
_]ENT
Save to Disk?
*SAVE *NEW *CANCEL
The following table gives a description of each of the options.
Description
SAVE
The second part is saved with the first part under the
current song number.
NEW
The second part is saved under a new song number.
The first part is kept under the previous song number.
English
Option
CANCEL The second part is discarded. The first part is kept
under the previous song number.
7
Press [ ] and [
[ENTER].
] to select an option, then press
The right-hand part is saved as indicated or canceled.
Recording the Left and Right Parts Together (Setting a Split Point)
Album Selection Screen
[RECORD]
[FUNC.]
You can also record an L/R song by playing the left- and right-hand parts
simultaneously. In this case, a keyboard split point is set, and the notes
played on the left-hand side of the split point are saved as the left-hand
part, and notes played on the right-hand side of the split point are saved as
the right-hand part.
1
Select a destination medium and album.
2
Press [RECORD].
3
Press [FUNC.] in the recording standby screen.
L=REC R=OFF
see Chapter 3 “Basic Song
Playback – Selecting Medium
and Their Contents” on page 17.
) In the case you want to title your
The recording part menu appears.
=RECORD=
) To select a medium or album,
LR
)
new song before recording see
Chapter 6 “Basic Recording –
Titling a Song” on page 43, to
rename the title after recording,
see Chapter 8 “Media
Management – Renaming a
Song” on page 64.
If you want to record your L/R
song using the metronome, see
Chapter 7 “Advanced Recording
– Recording with the Internal
Metronome” on page 45.
49
100-EN_.book Page 50 Monday, June 2, 2008 2:54 PM
Chapter
7
Advanced Recording
4
Press [PART SELECT R] to set both parts to record.
The split point setting screen appears.
=RECORD=
-+
LR=REC SPLIT=C3
The above display shows that the default keyboard split point is
note C3, or middle C. In this case, note C3 and notes below are
saved as the left-hand part and note C3 and above are saved as
the right-hand part, as shown in the following figure.
Left-hand part
5
C3
Right-hand part
To change the split point, press a key on the keyboard or
[+/YES] and [–/NO] to select a different key.
or
The split point can be set from note A-1 to note C7.
6
Press [PLAY].
The Disklavier is now ready for you to play.
7
Starts playing your song with the left- and right-hand parts
and the pedal part simultaneously.
Recording will start as soon as you touch a key.
8
Press [STOP] when you finish playing your song.
The recorded song is loaded.
50
100-EN_.book Page 51 Monday, June 2, 2008 2:54 PM
Chapter
Advanced Recording
7
Re-Recording One Part
Album Selection Screen
[RECORD]
Select the L/R song
[PART SELECT L] or [PART SELECT R]
You can re-record the only one part left-hand or the right-hand of the
existing L/R song.
Select a desired medium and album.
2
Press [RECORD].
3
Press [ ] and [
re-record.
4
Press [PART SELECT L] or [PART SELECT R] to select the
part to re-record.
) To select a medium and album,
see Chapter 3 “Basic Song
Playback – Selecting Medium
and Their Contents” on page 17.
English
1
] to select the L/R song that you want to
The part set to “REC” will be re-recorded.
5
Press [PLAY].
Recording will start immediately, so be sure that you are ready to
play the part.
6
Press [STOP] when you finish playing your song.
The following screen appears.
=RECORD=
_]ENT
Save to Disk?
*SAVE *NEW *CANCEL
51
100-EN_.book Page 52 Monday, June 2, 2008 2:54 PM
Chapter
7
Advanced Recording
The following table gives a description of each of the options.
Option
Description
SAVE
The re-recorded part is saved with the other existing
part under the current song number.
NEW
The re-recorded part is saved under a new song
number. The existing parts are kept under the current
song number.
CANCEL The re-recorded part is discarded. The existing parts
are kept under the current song number.
7
Press [ ] and [
[ENTER].
] to select an option, then press
The re-recorded part is saved as indicated or canceled.
Changing the Default Tempo
Album Selection Screen
[RECORD]
Select the song
[FUNC.]×3
This function allows you to change the default tempo of a song and save
the change. It should not be confused with the playback tempo function
described in Chapter 4 “Advanced Song Playback – Changing the
Playback Tempo” in which tempo changes are lost when the Disklavier is
turned off.
The tempo of a song can be changed many times. This function can be
used when recording a very complex song that is difficult to play at a fast
tempo. First, record the song at a tempo you can manage, then change the
tempo afterwards. For example, you could record a difficult left-hand part
at a slow tempo, use this function to change the tempo, then record the
right-hand part at the normal tempo.
If a song’s time format is minutes and seconds, tempo changes are
specified as a percentage of the original tempo.
If a song’s time format is measures and beats, tempo changes are
specified in beats per minute.
52
1
Select a desired medium and album.
2
Press [RECORD].
) To select a medium or album,
see Chapter 3 “Basic Song
Playback – Selecting Medium
and Their Contents” on page 17.
100-EN_.book Page 53 Monday, June 2, 2008 2:54 PM
Chapter
Advanced Recording
Press [ ] and [ ] to select the song in which you want
to change the tempo.
4
Press [FUNC.] three times.
English
3
7
×3
For measures and beats, the current song tempo (bpm) is shown.
=RECORD=
_]-+
TEMPO=117bpm =4/4
VOLUME=****
For minutes and seconds, the current song tempo is shown as
“000%.”
=RECORD=
TEMPO=+000%
5
-+
Press [+/YES] and [–/NO] to change the tempo.
[+/YES] increases the tempo, and [–/NO] decreases the tempo.
For measure and beats, the tempo range is from 30 bpm to 400
bpm.
For minutes and seconds, the tempo range is from –75% to
+242%.
6
Press [STOP] to save the tempo change.
The following screen appears.
=RECORD=
_]ENT
Save to Disk?
*SAVE *NEW *CANCEL
The following table gives a description of each of the options.
Option
Description
SAVE
The song is saved at its new tempo under the current
song title.
NEW
The song is saved at its new tempo under a new song
number. The original song is kept under the previous
song number.
CANCEL The song with a new tempo is discarded. The original
song is kept under the previous song number.
53
100-EN_.book Page 54 Monday, June 2, 2008 2:54 PM
Chapter
7
Advanced Recording
7
Press [
] and [
] to select an option, then press [ENTER].
To change the tempo again or to reset the original tempo, repeat
steps 1 to 6.
CD Synchronized Recording
Album Selection Screen
Insert an audio CD
[RECORD]
You can record a Disklavier piano performance along with the playback of
songs on commercial CDs.
1
Select a destination medium and album.
2
Insert an audio CD and select the song that you want to
synchronize with.
3
Press [RECORD].
=RECORD=(SPS)
A01-038
<00:00>
) To select a medium and album,
see Chapter 3 “Basic Song
Playback – Selecting Medium
and Their Contents” on page 17.
LR 99%
(New Song)
The SPS recording standby screen appears, and [RECORD] on the
control unit lights red, and [PLAY/PAUSE] flashes in green.
4
Select the desired part of a song, then press [PLAY] to
start synchronizing.
Recording begins with the CD playback.
5
Start playing the Disklavier along with the CD playback.
6
Press [STOP] to stop recording.
The recorded song is loaded.
54
) To play back the performance
recorded with this feature, see
Chapter 4 “Advanced Song
Playback – Adding Disklavier
Accompaniment to Commercial
CD Songs” on page 38.
100-EN_.book Page 55 Monday, June 2, 2008 2:54 PM
Chapter
8
Media Management
This chapter describes how to manage contents inside the media, such as managing albums,
songs and playlists.
Managing Albums
Album Selection Screen
[FUNC.]
1
) To select a album, see Chapter 3
“Basic Song Playback –
Selecting Medium and Their
Contents” on page 17.
English
You can use the album function menu for creating, deleting and copying
albums inside a medium.
Press [FUNC.] in the album selection screen.
The album function menu screen appears.
(1/2)]
=ALBUM MENU=
*CopyAlbum *DeleteAlbum
*NewAlbum *RenameAlbum
2
Select a desired function with the cursor buttons ([
[ ] [ ] [ ]), then press [ENTER].
]
(1/2)]
=ALBUM MENU=
*CopyAlbum *DeleteAlbum
*NewAlbum *RenameAlbum
) About playlists, see Chapter 8
“Media Management –
Managing Playlists” on page 68.
Note: Available functions vary
depending on the medium
you selected.
The following functions are available:
- CopyAlbum
- DeleteAlbum
- NewAlbum
- RenameAlbum
- SortAlbum
- AddToPList
- DeleteList
- NewList
- RenameList
Making Copies of Albums
Album Selection Screen
[FUNC.]
Select “CopyAlbum”
You can make copies of the album to the different medium.
This function is available for albums on [Memory], [CD](CD-ROM), [USB1],
[USB2] and [FromToPC].
55
100-EN_.book Page 56 Monday, June 2, 2008 2:54 PM
Chapter
8
Media Management
1
Select “CopyAlbum” in the album function menu, then
press [ENTER].
(1/2)]
=ALBUM MENU=
*CopyAlbum *DeleteAlbum
*NewAlbum *RenameAlbum
The CopyAlbum screen appears.
-+ENT
=CopyAlbum=
01:Beatles Selection
]Memory >(NewAlbum)
2
Select a destination medium with [+/YES] and [–/NO].
-+ENT
=CopyAlbum=
01:Beatles Selection
]USB1
>(NewAlbum)
3a To copy to the new album, press [ENTER].
“OK?” flashes in the first line of the screen.
=CopyAlbum= OK? YES/NO
01:Beatles Selection
]USB1
>07:/Album07/
3b To add to the existing album, press [
] to move the
cursor to the album, and press [+/YES] and [–/NO] to
select the album, then press [ENTER].
-+ENT
=CopyAlbum=
01:Beatles Selection
]USB1
>07:/Album07/
“OK?” flashes in the first line of the screen.
=CopyAlbum= OK? YES/NO
01:Beatles Selection
]USB1
>07:/Album07/
56
100-EN_.book Page 57 Monday, June 2, 2008 2:54 PM
Chapter
Media Management
4
8
Press [+/YES] to make a copy, [–/NO] to cancel.
After a while, the completion
message appears.
=CopyAlbum=
Executing...
=CopyAlbum=
Completed.
Press any button.
ANY
English
Press any button to return to the album function menu.
Deleting Albums
Album Selection Screen
[FUNC.]
Select “DeleteAlbum”
You can delete the albums.
This function is available for albums on [Memory], [USB1], [USB2] and
[FromToPC].
1
Select “DeleteAlbum” in the album function menu, then
press [ENTER].
(1/2)]
=ALBUM MENU=
*CopyAlbum *DeleteAlbum
*NewAlbum *RenameAlbum
The DeleteAlbum screen appears.
ENT
=DeleteAlbum=
01:Beatles Selection
2
Press [ENTER].
“OK?” flashes in the first line of the screen.
=DeleteAlbum=OK? YES/NO
01:Beatles Selection
3
Press [+/YES] to delete the album, [–/NO] to cancel.
After a while, the completion
message appears.
=DeleteAlbum=
Executing...
=DeleteAlbum=
Completed.
Press any button.
ANY
Press any button to return to the album function menu.
57
100-EN_.book Page 58 Monday, June 2, 2008 2:54 PM
Chapter
8
Media Management
Creating a New Album
Album Selection Screen
[FUNC.]
Select “NewAlbum”
You can create a new album into the selected medium.
This function is available for albums on [Memory], [USB1] and [USB2].
1
Select the “NewAlbum” in the album function menu, then
press [ENTER].
Note: Up to 99 albums can be
created. If [USB1], [USB2]
or [FromToPC] is specified,
you cannot create the same
titled album as the existed
one.
(1/2)]
=ALBUM MENU=
*CopyAlbum *DeleteAlbum
*NewAlbum *RenameAlbum
The NewAlbum screen appears.
=NewAlbum=
03:(no title)
2
ENT
Press [ENTER].
The album title editing screen appears.
=NewAlbum=
_]-+ENT
3
Use [
4
Select characters with [+/YES] and [–/NO] or the keyboard.
] and [
=NewAlbum=
Beatles
] to move the cursor.
_]-+ENT
You can enter up to 64 characters.
5
Press [ENTER].
“OK?” flashes in the first line of the screen.
=NewAlbum= OK? YES/NO
03:Beatles Selection
58
) To enter characters using the
keyboard, see “Keyboard
Character Map” on page 44.
100-EN_.book Page 59 Monday, June 2, 2008 2:54 PM
Chapter
Media Management
6
8
Press [+/YES] to create a new album, [–/NO] to cancel.
After a while, the completion
message appears.
=NewAlbum=
Executing...
=NewAlbum=
Completed.
Press any button.
ANY
English
Press any button to return to the album function menu.
Renaming an Album
Album Selection Screen
[FUNC.]
Select “RenameAlbum”
You can rename the albums which already named.
This function is available only for albums on [Memory].
1
Select “RenameAlbum” in the album function menu, then
press [ENTER].
(1/2)]
=ALBUM MENU=
*CopyAlbum *DeleteAlbum
*NewAlbum *RenameAlbum
The RenameAlbum screen appears.
ENT
=RenameAlbum=
01:Beatles Selection
2
Press [ENTER].
The album title editing screen appears.
=RenameAlbum= _]-+ENT
Beatles Selection
3
Use [
4
Select characters with [+/YES] and [–/NO] or the keyboard.
] and [
] to move the cursor.
=RenameAlbum= _]-+ENT
Monkeys Selection
) To enter characters using the
keyboard, see “Keyboard
Character Map” on page 44.
You can enter up to 64 characters.
59
100-EN_.book Page 60 Monday, June 2, 2008 2:54 PM
Chapter
8
Media Management
5
Press [ENTER].
“OK?” flashes in the first line of the screen.
=RenameAlbum=OK? YES/NO
01:Monkeys Selection
6
Press [+/YES] to rename, [–/NO] to cancel.
After a while, the completion
message appears.
=RenameAlbum=
Executing...
=RenameAlbum=
Completed.
Press any button.
ANY
Press any button to return the album function menu.
Rearranging the Order of Albums
Album Selection Screen
[FUNC.]
Select “SortAlbum”
You can rearrange the order of albums that you selected.
This function is available only for albums on [Memory].
1
Select “SortAlbum” in the album function menu, then
press [ENTER].
=ALBUM MENU=
_(2/2)
*SortAlbum *AddToPList
*Convert
The SortAlbum screen appears.
=SortAlbum=
?=ENT
06:Favorite Latin Select
07:Free Flight
60
100-EN_.book Page 61 Monday, June 2, 2008 2:54 PM
Chapter
Media Management
2
Press [ ] and [
position.
] to move the albums to the desired
English
=SortAlbum=
?=ENT
06:Favorite Latin Select
07:Free Flight
3
8
=SortAlbum=
?=ENT
07:Free Flight
06:Favorite Latin Select
Press [ENTER].
“OK?” flashes in the first line of the screen.
=SortAlbum= OK? YES/NO
08:Mike Garson Trio-Live
06:Favorite Latin Select
4
Press [+/YES] to rearrange, [–/NO] to cancel.
After a while, the completion
message appears.
=SortAlbum=
Executing...
=SortAlbum=
Completed.
Press any button.
ANY
Press any button to return to the album function menu.
Managing Songs
Song Selection Screen
[FUNC.]
You can use the song function menu for managing the copy or the deletion
songs inside the album.
1
) To select the song, see Chapter
3 “Basic Song Playback –
Selecting Medium and Their
Contents” on page 17.
Press [FUNC.] in the song selection screen.
The song function menu screen appears.
(1/2)]
=SONG MENU=
*CopySong *DeleteSong
*RenameSong *SortSong
61
100-EN_.book Page 62 Monday, June 2, 2008 2:54 PM
Chapter
8
Media Management
2
Select a desired function with the cursor buttons ([
[ ] [ ] [ ]), then press [ENTER].
]
(1/2)]
=SONG MENU=
*CopySong *DeleteSong
*RenameSong *SortSong
) About playlists, see Chapter 8
“Media Management –
Managing Playlists” on page 68.
Note: Available functions vary
depending on the medium
you selected.
Note: If there is no available
function or no song, the
song function menu screen
does not appear although
pressing [FUNC.].
The following functions are available:
- CopySong
- DeleteSong
- RenameSong
- SortSong
- AddToPList
- ConvertSong
- Counter
Making Copies of Songs
Song Selection Screen
[FUNC.]
Select “CopySong”
You can copy songs stored on an album to another.
This function is available for song in the album on [Memory], [CD](CDROM), [USB1], [USB2] and [FromToPC].
1
Select “CopySong” in the song function menu, then press
[ENTER].
(1/2)]
=SONG MENU=
*CopySong *DeleteSong
*RenameSong *SortSong
The CopySong screen appears.
}{
a
{
2
Select a destination medium with [+/YES] and [–/NO].
}{
a
{
62
Note: Copy-protected songs, such
as PianoSoft songs, cannot
be copied to a removable
medium.
108-EN_CH08.fm Page 63 Monday, June 2, 2008 4:55 PM
Chapter
Media Management
3
8
Press [ ] to move the cursor to the album, and press [+/
YES] and [–/NO] to select a destination album.
}{-+ENT
=CopySong=
001:MoaArt
{USB1
>02:MyFolder
English
4
Press [ENTER].
“OK?” flashes in the first line of the screen.
a
{
5
Press [+/YES] to make a copy, [–/NO] to cancel.
After a while, the completion
message appears.
=CopySong=
Executing...
=CopySong=
Completed.
Press any button.
ANY
Press any button to return to the song function menu.
Deleting Songs
Song Selection Screen
[FUNC.]
Select “DeleteSong”
You can delete songs stored on an album.
This function is available for songs in the album on [Memory], [USB1],
[USB2] and [FromToPC].
1
Select “DeleteSong” in the song function menu, then
press [ENTER].
(1/2)]
=SONG MENU=
*CopySong *DeleteSong
*RenameSong *SortSong
The DeleteSong screen appears.
=DeleteSong=
001:Mo=Art
ENT
63
100-EN_.book Page 64 Monday, June 2, 2008 2:54 PM
Chapter
8
Media Management
2
Press [ENTER].
“OK?” flashes in the first line of the screen.
=
3
Press [+/YES] to delete the song, [–/NO] to cancel.
After a while, the completion
message appears.
=DeleteSong=
Executing...
=DeleteSong=
Completed.
Press any button.
ANY
Press any button to return to the song function menu.
Renaming a Song
Song Selection Screen
[FUNC.]
Select “RenameSong”
You can rename the songs which already named.
This function is available for songs in the album on [Memory], [USB1],
[USB2] and [FromToPC].
1
Select “RenameSong” in the song function menu, then
press [ENTER].
(1/2)]
=SONG MENU=
*CopySong *DeleteSong
*RenameSong *SortSong
The RenameSong screen appears.
=RenameSong=
006:Toccata
2
ENT
Press [ENTER].
The song title editing screen appears.
=RenameSong=
Toccata
64
_]-+ENT
100-EN_.book Page 65 Monday, June 2, 2008 2:54 PM
Chapter
Media Management
3
Use [
4
Select characters with [+/YES] and [–/NO] or the keyboard.
] and [
8
] to move the cursor.
keyboard, see “Keyboard
Character Map” on page 44.
English
_]-+ENT
=RenameSong=
Toccata and Fugue
) To enter characters using the
You can enter up to 32 characters.
5
Press [ENTER].
“OK?” flashes in the first line of the screen.
=RenameSong= OK? YES/NO
006:Toccata and Fugue
6
Press [+/YES] to rename, [–/NO] to cancel.
After a while, the completion
message appears.
=RenameSong=
Executing...
=RenameSong=
Completed.
Press any button.
ANY
Press any button to return to the song function menu.
Rearranging the Order of Songs
Song Selection Screen
[FUNC.]
Select “SortSong”
You can rearrange the order of songs in an album.
This function is available only for songs in the album on [Memory].
1
Select “SortSong” in the song function menu, then press
[ENTER].
(1/2)]
=SONG MENU=
*CopySong *DeleteSong
*RenameSong *SortSong
The SortSong screen appears.
=SortSong=
?=ENT
006:Toccata and Fugue
007:Admiration
65
100-EN_.book Page 66 Monday, June 2, 2008 2:54 PM
Chapter
8
Media Management
2
Press [ ] and [
position.
] to move the songs to the desired
=SortSong=
?=ENT
006:Toccata and Fugue
007:Admiration
3
=SortSong=
?=ENT
007:Admiration
006:Toccata and Fugue
Press [ENTER].
“OK?” flashes in the first line of the screen.
=SortSong= OK? YES/NO
008:Interaction
006:Toccata and Fugue
4
Press [+/YES] to rearrange, [–/NO] to cancel.
After a while, the completion
message appears.
=SortSong=
Executing...
=SortSong=
Completed.
Press any button.
ANY
Press any button to return to the song function menu.
Converting Song Format
Song Selection Screen
[FUNC.]
Select “ConvertSong”
SMF songs can be converted to E-SEQ songs and vice versa.
This function is available for songs in the album on [Memory], [USB1],
[USB2] and [FromToPC].
1
Select “ConvertSong” in the song function menu, then
press [ENTER].
=SONG MENU=
_(2/2)
*AddToPList *ConvertSong
*Counter
The ConvertSong screen appears.
-+ENT
=ConvertSong=
001:Song For Students
SMF0
]E-SEQ
66
100-EN_.book Page 67 Monday, June 2, 2008 2:54 PM
Chapter
Media Management
2
8
Press [+/YES] and [–/NO] to select a song format.
-+ENT
=ConvertSong=
001:Song For Students
SMF0
]Piano1
3
English
This following options are available:
Option
Song Format
E-SEQ
E-SEQ format
SMF0
Standard MIDI File format 0
SMF1
Standard MIDI File format 1
Piano1
Format to play on all Disklavier in correct tempo
Press [ENTER].
“OK?” flashes in the first line of the screen.
=ConvertSong=OK? YES/NO
001:Song For Students
SMF0
]Piano1
4
Press [+/YES] to convert, [–/NO] to cancel.
After a while, the completion
message appears.
=ConvertSong=
Executing...
=ConvertSong=
Completed.
Press any button.
ANY
Press any button to return to the song function menu.
Changing the Counter Display
Song Selection Screen
[FUNC.]
Select “Counter”
The counter display of a song can be changed from “measures and
beats”(metronome) to “minutes and seconds” or vice versa.
This function is available for songs in the album on [Memory], [USB1],
[USB2] and [FromToPC].
67
100-EN_.book Page 68 Monday, June 2, 2008 2:54 PM
Chapter
8
Media Management
1
Select “Counter” in the song function menu, then press
[ENTER].
=SONG MENU=
_(2/2)
*AddToPList *ConvertSong
*Counter
The CounterChange screen appears.
ENT
=CounterChange=
001:Song For Students
TIME
]METRONOME
TIME: minutes and seconds display
METRONOME: measures and beats display
2
Press [ENTER].
“OK?” flashes in the first line of the screen.
=CounterChange=OK?YES/NO
001:Song For Students
TIME
]METRONOME
3
Press [+/YES] to change, [–/NO] to cancel.
After a while, the completion
message appears.
=CounterChange=
Executing...
=CounterChange=
Completed.
Press any button.
ANY
Press any button to return to the song function menu.
Managing Playlists
By creating lists of your favorite songs, you can program your Disklavier to
automatically play back a series of songs. First create your own playlist by
following the procedures below, then play back that list.
68
100-EN_.book Page 69 Monday, June 2, 2008 2:54 PM
Chapter
Media Management
8
Adding Songs/Albums to the Playlist
Album or Song Selection Screen
[FUNC.]
Select “AddToPList”
This function is available only for songs/albums on [Memory].
Select “AddToPList” in the album or song function menu,
then press [ENTER].
English
1
=ALBUM MENU=
_(2/2)
*SortAlbum *AddToPList
*Convert
The AddToPList screen appears.
-+ENT
=AddToPList=
01:Beatles Selection
](New Playlist)
2
Select a destination playlist with [+/YES] and [–/NO].
3
Press [ENTER].
“OK?” flashes in the first line of the screen.
=AddToPList= OK? YES/NO
01:Beatles Selection
]01:My Favorites
4
Press [+/YES] to add, [–/NO] to cancel.
After a while, the completion
message appears.
=AddToPList=
Executing...
=AddToPList=
Completed.
Press any button.
Note: If “NewPlaylist” is selected
in step 2, the title of added
album is copied to that
playlist.
ANY
Press any button to return to the album or song function menu.
69
100-EN_.book Page 70 Monday, June 2, 2008 2:54 PM
Chapter
8
Media Management
Deleting a Playlist
Album Selection Screen
[FUNC.]
Select “DeleteList”
You can delete the playlists which already registered.
1
Select “DeleteList” in the album function menu, then press
[ENTER].
(1/1)
=ALBUM MENU=
*DeleteList *NewList
*RenameList
The DeleteList screen appears.
ENT
=DeleteList=
02:My Best Collection
2
Press [ENTER].
OK?” flashes in the first line of the screen.
=DeleteList= OK? YES/NO
02:My Best Collection
3
Press [+/YES] to delete the playlist, [–/NO] to cancel.
After a while, the completion
message appears.
=DeleteList=
Executing...
=DeleteList=
Completed.
Press any button.
Press any button to return to the album function menu.
70
ANY
100-EN_.book Page 71 Monday, June 2, 2008 2:54 PM
Chapter
Media Management
8
Creating a New Playlist
Album Selection Screen
[FUNC.]
Select “NewList”
You can create a new playlist for playing back your favorite songs in your
selected order.
English
1
Select “NewList” in the album function menu, then press
[ENTER].
(1/1)
=ALBUM MENU=
*DeleteList *NewList
*RenameList
The NewList screen appears.
=NewList=
03:(no title)
2
ENT
Press [ENTER].
The playlist title editing screen appears.
=NewList=
_]-+ENT
3
Use [
4
Select characters with [+/YES] and [–/NO] or the keyboard.
] and [
=NewList=
My Best
] to move the cursor.
_]-+ENT
) To enter characters using the
keyboard, see “Keyboard
Character Map” on page 44.
You can enter up to 64 characters.
5
Press [ENTER].
“OK?” flashes in the first line of the screen.
=NewList=
OK? YES/NO
03:My Best Collection
71
100-EN_.book Page 72 Monday, June 2, 2008 2:54 PM
Chapter
8
Media Management
6
Press [+/YES] to create a new playlist, [–/NO] to cancel.
After a while, the completion
message appears.
=NewList=
Executing...
=NewList=
Completed.
Press any button.
ANY
Press any button to return to the album function menu.
Renaming a Playlist
Album Selection Screen
[FUNC.]
Select “RenameList”
You can rename a playlist which already registered.
1
Select “RenameList” in the album function menu, then
press [ENTER].
(1/1)
=ALBUM MENU=
*DeleteList *NewList
*RenameList
The RenameList screen appears.
ENT
=RenameList=
My Best Collection
2
Press [ENTER].
The playlist title editing screen appears.
_]-+ENT
=RenameList=
My Best Collection
3
Use [
4
Select characters with [+/YES] and [–/NO] or the keyboard.
] and [
] to move the cursor.
_]-+ENT
=RenameList=
My Best Hit Collection
You can enter up to 64 characters.
72
) To enter characters using the
keyboard, see “Keyboard
Character Map” on page 44.
100-EN_.book Page 73 Monday, June 2, 2008 2:54 PM
Chapter
Media Management
5
8
Press [ENTER].
“OK?” flashes in the first line of the screen.
=RenameList= OK? YES/NO
My Best Hit Collection
English
6
Press [+/YES] to rename, [–/NO] to cancel.
After a while, the completion
message appears.
=RenameList=
Executing...
=RenameList=
Completed.
Press any button.
ANY
Press any button to return to the album function menu.
Managing Media
Media Selection Screen
[FUNC.]
) To select a media, see Chapter 3
You can use the media function menu for copying or deleting entire
contents inside the media.
1
“Basic Song Playback –
Selecting Medium and Their
Contents” on page 17.
Press [FUNC.] in the media selection screen.
The media function menu screen appears.
=MEDIA MENU=
*CopyAll
*DeleteAll
2
Select a desired function with the cursor buttons ([
[ ] [ ] [ ]), then press [ENTER].
=MEDIA MENU=
*CopyAll
*DeleteAll
]
Note: Available functions vary
depending on the medium
you selected.
Note: If there is no available
functions, the media
function menu screen does
not appears although
pressing [FUNC.].
The following functions are available:
- CopyAll
- DeleteAll
- Format
- Refresh
73
100-EN_.book Page 74 Monday, June 2, 2008 2:54 PM
Chapter
8
Media Management
Making Copies of the Entire Contents in a Medium
Media Selection Screen
[FUNC.]
Select “CopyAll”
You can copy the entire contents in a medium to the another medium.
The function is available for [Memory], [CD](CD-ROM), [USB1], [USB2],
then [FromToPC].
1
Select “CopyAll” in the media function menu, then press
[ENTER].
=MEDIA MENU=
*CopyAll
*DeleteAll
The CopyAll screen appears.
=CopyAll=
USB1
]Memory
2
-+ENT
Select a destination medium with [+/YES] and [–/NO].
=CopyAll=
USB1
]Memory
3
-+ENT
Press [ENTER].
“OK?” flashes in the first line of the screen.
=CopyAll=
OK? YES/NO
USB1
]Memory
4
Press [+/YES] to make a copy, [–/NO] to cancel.
After a while, the completion
message appears.
=CopyAll=
Executing...
=CopyAll=
Completed.
Press any button.
Press any button to return to the media function menu.
74
ANY
) To select a medium, see Chapter
3 “Basic Song Playback –
Selecting Medium and Their
Contents” on page 17.
100-EN_.book Page 75 Monday, June 2, 2008 2:54 PM
Chapter
Media Management
8
Deleting the Entire Contents in a Medium
Media Selection Screen
[FUNC.]
Select “DeleteAll”
) To select a medium, see Chapter
You can delete the entire contents in a medium.
This function is available for [Memory], [USB1], [USB2] and [FromToPC].
Select “DeleteAll” in the media function menu, then press
[ENTER].
English
1
3 “Basic Song Playback –
Selecting Medium and Their
Contents” on page 17.
=MEDIA MENU=
*CopyAll
*DeleteAll
The DeleteAll screen appears.
=DeleteAll=
Media=Memory
2
ENT
Press [ENTER].
“OK?” flashes in the first line of the screen.
=DeleteAll= OK? YES/NO
Media=Memory
3
Press [+/YES] to delete, [–/NO] to cancel.
After a while, the completion
message appears.
=DeleteAll=
Executing...
=DeleteAll=
Completed.
Press any button.
ANY
Press any button to return to the media function menu.
75
100-EN_.book Page 76 Monday, June 2, 2008 2:54 PM
Chapter
8
Media Management
Copying Song File from a Personal Computer to the Disklavier
You can copy song files from a Windows or Macintosh computer to a
special folder on the Disklavier called [FromToPC] and then play them on
the Disklavier.
1
Connect the control unit to a LAN (local area network) to
which a personal computer with a song file is also
connected.
Personal computer
Router/hub
LAN
Note: Copy-protected files, such
as PianoSoft and
PianoSoft·Plus songs,
cannot be copied to the
[FromToPC] folder.
Note: Do not copy the files other
than Disklavier song files.
Note: It is necessary to configure
the Disklavier properly for
network communications by
enabling it to get a DHCP IP
address automatically
(recommended) or by
assigning an appropriate
address manually. The
procedure is the same as the
one used for setting up the
Disklavier for Internet
communications. Please
follow the instructions on
page 85 for “Setting the
Disklavier for the Internet
Settings.”
Note: For information about
configuring a personal
computer for network
communications, please
refer to the documentation
that came with the
computer.
Control unit
For Windows
2
On the computer screen, click [Start] and then open [My
Network Places].
3
Open [Dkv******] and confirm that the [FromToPC] folder is
shown under that.
4
76
Copy the desired song files to the [FromToPC] folder.
Note: [Dkv******] differs
depending on the model.
Note: The folder or icon name
differs depending on the
version of your operating
system.
100-EN_.book Page 77 Monday, June 2, 2008 2:54 PM
Chapter
Media Management
8
For Mac OS X 10.3 or later
2
Click the [Finder] icon in the dock and then open
[Network].
3
Connect the computer to the Disklavier.
Note: [Dkv******] differs
depending on the model.
English
Open [Dkv] and click the [Dkv******] icon inside to start the
connection process. In the first window that comes up, select
[FromToPC] from the mini-menu within the window and click [OK].
Click [OK] in the next window that comes up to complete the
connection process. At this point, there should be the [FromToPC]
icon on the left side of the window (beneath [Network]).
4
Copy the desired song files to the [FromToPC] folder on
the left side of the finder window.
5
Refresh the contents in the folder.
See Chapter 8 “Media Management – Refreshing the Contents in
[FromToPC]” on page 78.
Note: If the user ID and password
are required during the
process, enter any name for
the ID and leave the space
for the password blank.
Note: Do not access the
[FromToPC] folder while
the Disklavier is engaged in
another operation (such as
file copying or deleting).
■ For Windows only
In case that you cannot find the [Dkv******] icon
1. Click [Entire Network] under [Other Places] in the left side menu
of the [My Network Places] window.
2. Double-click the [Microsoft Windows Network] icon to open it.
3. Double-click the [Dkv] icon to open it.
4. Double-click the [Disklavier ******] icon to open it and confirm
that the [FromToPC] folder is shown under that.
5. Copy the desired song files to the [FromToPC] folder.
77
100-EN_.book Page 78 Monday, June 2, 2008 2:54 PM
Chapter
8
Media Management
Refreshing the Contents in [FromToPC]
Select the [FromToPC]
[FUNC.]
Select “Refresh”
You must refresh the contents in the [FromToPC] folder after copying song
files from a personal computer, in order to play them on the Disklavier.
1
Select “Refresh” in the media function menu, then press
[ENTER].
The Refresh screen appears.
=Refresh=
Media=FromToPC
2
ENT
Press [ENTER].
“OK?” flashes in the first line of the screen.
=Refresh=
OK? YES/NO
Media=FromToPC
3
Press [+/YES] to refresh, [–/NO] to cancel.
After a while, the completion
message appears.
=Refresh=
Executing...
=Refresh=
Completed.
Press any button.
Press any button to return to the media function menu.
78
ANY
) To select a medium, see Chapter
3 “Basic Song Playback –
Selecting Medium and Their
Contents” on page 17.
100-EN_.book Page 79 Monday, June 2, 2008 2:54 PM
Chapter
Media Management
8
Formatting the Floppy Disk (Optional)
Select the [FD]
[FUNC.]
Select “Format”
In the case of using the unformatted floppy disk on the floppy drive
(optional) or deleting the entire contents on the floppy disk, format the
floppy disk.
Insert a floppy disk to the floppy drive (optional).
2
Select “Format” in the media function menu, then press
[ENTER].
English
1
Important:Formatting a floppy
disk erases all data that
stored in the disk, so make
sure that the disk you are
going to format does not
contain the data you want to
keep.
) To select a medium, see Chapter
3 “Basic Song Playback –
Selecting Medium and Their
Contents” on page 17.
Note: If you are formatting a
floppy disk, make sure that
the floppy disk’s erasure
protection tab is set to
“unprotected.”
The Format screen appears.
=Format=
Media=FD
3
ENT
Press [ENTER].
“OK?” flashes in the first line of the screen.
=Format=
Media=FD
4
OK? YES/NO
Press [+/YES] to format, [–/NO] to cancel.
After a while, the completion
message appears.
=Format=
Executing...
=Format=
Completed.
Press any button.
ANY
Press any button to return to the media function menu.
79
100-EN_.book Page 80 Monday, June 2, 2008 2:54 PM
Chapter
8
Media Management
■ Floppy Disk Accidental Erasure Protection
Floppy disks have an erasure protection tab located on the reverse side of
the disk in the bottom right-hand corner. When formatting a disk, make
sure that its erasure protection tab is set to “unprotected.”
Protected
When the tab window is open,
formatting and recording are
not possible.
Unprotected
When the tab window is closed,
formatting and recording are
possible.
Making Backups of Songs
[SYSTEM]
Select “Backup”
You can make a backup copy of the songs and playlists. In order to protect
your valuable music data, Yamaha strongly recommends that you backup
your memory on regular basis.
1
Connect an external USB HDD to the USB port on the
control unit.
2
Press [SYSTEM].
The system menu screen appears.
(1/2)]
=SYTEM MENU=
*Clock Adj. *TimeZone
*Backup
*Restore
80
Note: Be sure to use a USB HDD
formatted in FAT32 file
system in the following
procedure.
Note: Make sure that the USB
HDD has enough space to
save the backup data.
100-EN_.book Page 81 Monday, June 2, 2008 2:54 PM
Chapter
Media Management
3
Select “Backup” with the cursor buttons ([
[ ]), then press [ENTER].
][
][
8
]
(1/2)]
=SYTEM MENU=
*Clock Adj. *TimeZone
*Backup
*Restore
English
The Backup screen appears.
ENT
=Backup=
Make a backup copy to
an external USB HDD.
4
Press [ENTER].
“OK?” flashes in the first line of the screen.
=Backup=
OK? YES/NO
Backup song data?
5
Press [+/YES] to make a backup, [–/NO] to cancel.
After a while, the completion
message appears.
= =Backup=
Completed.
Press any button.
ANY
Press any button to return to the system menu.
Restoring the Backups
[SYSTEM]
Select “Restore”
You can restore the current condition of the internal memory to the
previous condition that you made a backup copy.
1
Connect an external USB HDD which you made backup
last time to the USB port on the control unit.
2
Press [SYSTEM].
) To make a backup, see Chapter
8 “Media Management –
Making Backups of Songs” on
page 80.
The system menu screen appears.
(1/2)]
=SYTEM MENU=
*Clock Adj. *TimeZone
*Backup
*Restore
81
100-EN_.book Page 82 Monday, June 2, 2008 2:54 PM
Chapter
8
Media Management
3
Select “Restore” with the cursor buttons ([
[ ]), then press [ENTER].
][
][
]
(1/2)]
=SYTEM MENU=
*Clock Adj. *TimeZone
*Backup
*Restore
The Restore screen appears.
ENT
=Restore=
Restore song data from
USB HDD.
4
Press [ENTER].
“OK?” flashes in the first line of the screen.
=Restore=
OK? YES/NO
Restore this data?
Date:2007-10-22 15:42:00
5
Press [+/YES] to restore, [–/NO] to cancel.
After a while, the completion
message appears.
= =Restore=
Completed.
Press any button.
Press any button to return to the system menu.
82
ANY
100-EN_.book Page 83 Monday, June 2, 2008 2:54 PM
Chapter
9
Internet Direct Connection (IDC)
Service
What is Internet Direct Connection (IDC)?
English
Internet Direct Connection (IDC) is a feature that allows you to connect
your Disklavier directly to the Internet. Internet Direct Connection users are
able to listen to a streaming broadcast (DisklavierRadio), and receive
valuable information such as product updates (Network Update). Your
Disklavier can be upgraded remotely as new technologies and services
are developed through the IDC service.
Obtaining an ID and Password for the IDC Service
(IDC Registration)
To use the IDC service, initial registration is required using an Internetconnected computer.
Please register at the following website: https:// music.yamaha.com/
serviceRegistration.html
Note: If you have already
registered for the IDC
service with any other
instrument (such as the
Clavinova), you do not need
to register again. You can
use your ID and password
obtained through that
registration.
Connecting the Disklavier to the Internet
You can connect the Disklavier to a full-time online Internet connection
(ADSL, optical fiber, cable Internet, etc.) via a router or a modem equipped
with a router.
■ Preparations
• To use the Internet connection, you will first need to subscribe to an
Internet service or provider.
• Use a computer to obtain and configure Internet service. You cannot
obtain Internet service or configure router settings on a local area
network using the Disklavier itself.
• Before connecting the LAN cable, make sure to turn off (or shut down)
the Disklavier.
83
109-EN_CH09.fm Page 84 Monday, June 2, 2008 4:35 PM
Chapter
9
Internet Direct Connection (IDC) Service
■ Connecting the I/O Center to the Internet
Connection example 1:
Using a modem with router function
Modem
(with router function)
Other device
(such as computer)
LAN
cable
Control unit
Connection example 2:
Using a modem without router function
Modem
(without router
function)
Router/hub
Other device
(such as computer)
LAN
cable
Control unit
84
Note: Depending on the contract
with your Internet provider,
you may not be able to
connect two or more devices
(for example, a computer
and the Disklavier) to the
Internet. Please check your
contract or contact your
Internet provider for further
information.
Note: Some types of modems
(such as ADSL modems or
cable modems) have
multiple ports for
connecting two or more
devices (such as computer,
musical instrument, etc.). If
your modems have only one
port, an optional router or
hub is required in order to
connect several devices
simultaneously.
100-EN_.book Page 85 Monday, June 2, 2008 2:54 PM
Chapter
Internet Direct Connection (IDC) Service
9
For further information on the Internet connection (only a wired LAN
connection is supported), visit the Yamaha Disklavier website:
http://www.yamaha.com/disklavier/
(for US customers)
http://www.yamaha.ca/content/piano/products/disklavierpianos/
(for Canadian customers)
English
http://www.yamaha-europe.com/yamaha_europe/english_master/
(for European customers; Check the Disklavier website)
http://www.yamaha.com.au/au/
(for Australian customers; Check the Disklavier website)
■ Notes on Network Security
The Disklavier E3 attempts to achieve a balance between security and
usability in its network implementation. However, a determined hacker may
be able to defeat these security measures and utilize the network of the
purchaser in an unauthorized manner. Since each network is different,
only the purchaser can determine whether the security measures
discussed here will adequately protect their network.
The purchaser acknowledges that connection to the Internet and use of the
Disklavier E3 Internet features is done at the risk of the purchaser. In no
event shall Yamaha, its subsidiaries or Yamaha’s and/or its subsidiaries’
directors, officers, or employees be responsible for unauthorized access,
loss or alteration of the data of the purchaser or be liable for any damage
from intrusions.
Setting the Disklavier for the Internet Settings
[SETUP]
Select “Network”
You can change various settings related to the Internet connection. In most
cases, you do not have to change the default factory settings.
Use DHCP:
Select the method to determine several addresses. If your router
has DHCP server function, we recommend that you to select
“DHCP” or “DHCP+DNS.”
) To use the Internet connection,
inquire of your Internet service
provider.
Note: For information about DNS
server address, IP address,
subnet mask and gateway
server address, inquire of
your internet service
provider.
DNS1/DNS2:
Enter the address of the primary and secondary DNS server. These
settings must be made when Use DHCP is set to “DHCP+DNS” or
“MANUAL.”
IPAddr./SubMask/Gateway:
Enter the address of the I/O Center, subnet mask and gateway
server. These settings must be made when Use DHCP is set to
“MANUAL.”
85
100-EN_.book Page 86 Monday, June 2, 2008 2:54 PM
Chapter
9
Internet Direct Connection (IDC) Service
Proxy/Proxy Port:
Enter the name and the port number for the proxy server. These
settings are necessary only when a proxy server is located in your
local network.
1
Press [SETUP].
The setup menu screen appears.
(1/2)]
=SETUP MENU=
*TimerPlay *AudioI/O
*MIDI
*M-tune
2
Select “Network” with the cursor buttons ([
[ ]), then press [ENTER].
][
][
]
=SETUP MENU=
_(2/2)
*Network
*Playback
*Reverb
*Reset
The network setting screen appears.
=Network=
>Use DHCP =DHCP
86
? -+
3
Select a desired option with the cursor buttons ([ ] [
[ ] [ ]), then press [+/YES] and [–/NO] to change
setting.
4
Press [ENTER] to complete the operation.
]
100-EN_.book Page 87 Monday, June 2, 2008 2:54 PM
Chapter
Internet Direct Connection (IDC) Service
9
Accessing the Internet
[INTERNET]
Once you have established an IDC account and successfully connected
your Disklavier to the internet, you can access a special Disklavier website
where you can access the DisklavierRadio, and download software
updates.
English
D-Radio:
Select this to listen to streaming broadcasts of music, with many
channels of music content. You can enjoy listening to piano
performances that play continuously.
See Chapter 3 “Basic Song Playback – Listening to the
DisklavierRadio” on page 25.
MyAccount:
Select this to log in to the IDC service. You can also refer to the
help information from this option.
Update:
Select this to update the Disklavier using Internet connection.
1
Press [INTERNET].
The Internet menu screen appears.
(1/1)
=INTERNET=
*D-Radio
*MyAccount
*Update
2
Select a desired menu with the cursor buttons ([
[ ] [ ]), then press [ENTER].
][
]
Perform operations on the screen that appears.
87
100-EN_.book Page 88 Monday, June 2, 2008 2:54 PM
Chapter
9
Internet Direct Connection (IDC) Service
Checking Your Account Information
[INTERNET]
Select “MyAccount”
You can confirm your current account information of IDC service.
1
Press [INTERNET].
The Internet menu screen appears.
=Internet=
(1/1)
*D-Radio
*MyAccount
*Update
2
Select “MyAccount” with the cursor buttons ([
[ ] [ ]), then press [ENTER].
][
]
(1/1)
=INTERNET=
*D-Radio
*MyAccount
*Update
The my account screen appears.
=MyAccount=
*Login
*Help
?=ENT
Logging out from the IDC Service
XXXXXXXXXXXXXXXXX
XXXXXXX
If you wish to use another IDC account or prevent the current account from
being used by others, you must first log out from the IDC service.
88
100-EN_.book Page 89 Monday, June 2, 2008 2:54 PM
Chapter
Internet Direct Connection (IDC) Service
9
Updating the Disklavier Using the Internet
[INTERNET]
Select “Update”
You can download and then install update firmware using the IDC service.
Press [INTERNET].
English
1
The Internet menu screen appears.
(1/1)
=INTERNET=
*D-Radio
*MyAccount
*Update
2
Select “Update” with the cursor buttons ([
[ ]), then press [ENTER].
][
][
]
(1/1)
=INTERNET=
*D-Radio
*MyAccount
*Update
The update screen appears.
=Update=
?=ENT
] V1.01
V1.00
*Update *ReleaseNote]
Initializing Internet Settings
XXXXXXXXXXXXXXXXX
XXXXXXX
If you want to initialize the Internet settings, first you must reset the whole
system of the Disklavier.
(See Chapter 11 “Other Settings – Resetting the Disklavier” on page 99.)
89
100-EN_.book Page 90 Monday, June 2, 2008 2:54 PM
Chapter
10
Enhancing the Disklavier by Hooking
Up Other Devices
Hooking Up AV Equipment
If you connect the Disklavier to an audio system, you can hear the sound
played/played back on the Disklavier from the connected audio system,
and the sound played back on the connected audio system from the
Disklavier.
AV amplifier
To audio
inputs
PCA cord
(not supplied)
CD player, etc.
To audio
outputs
PCA cord
(not supplied)
Control unit
90
100-EN_.book Page 91 Monday, June 2, 2008 2:54 PM
Chapter
Enhancing the Disklavier by Hooking Up Other Devices
10
Setting Up the Disklavier for Audio Data Reception/Transmission
[SETUP]
Select “Audio I/O”
You can select the kind of the incoming/going out audio signals. The
following options should be set up in advance.
English
OMNI IN
Selects the appropriate option to match the incoming data input to the
OMNI (SYNC) IN jacks.
Audio:
Select this when you play back an audio software on the
connected CD player, etc. and reproduce the sound from the
monitor speakers*.
* Only for models supplied with
the monitor speakers.
Analog MIDI:
Select this when you play back PianoSoft·PlusAudio song.
OFF:
Select this when you cancel the data reception from the OMNI
(SYNC) IN jacks.
■ OMNI IN Vol
Adjust the volume of the incoming audio signals to the OMNI (SYNC) IN
jacks. The volume can be set in a range of 000 to 127.
■ OMNI OUT
Selects the desired data to be output from the OMNI (SYNC) OUT jacks.
Output:
Select this when you output the same audio signals as the
ones for the monitor speakers*.
OFF:
Select this when you cancel the data transmission from the
OMNI (SYNC) OUT jacks.
* Only for models supplied with
the monitor speakers.
■ OMNI OUT Vol
Adjust the volume of the outgoing audio signals to the OMNI (SYNC) OUT
jacks. The volume can be set in a range of 000 to 127, or to “M-Volume.”
When you set to “M-Volume”, the OMNI OUT volume works with the main
volume.
Note: In the OMNI OUT volume
parameter, the following of
127 is “M-Volume.”
OMNI OUT
volume parameter
[+/YES]
Adjust the volume of the incoming audio signals to the ANALOG MIDI IN
jacks. The volume can be set in a range of 000 to 127.
~
■ ANALOG MIDI IN Vol
000
127
[–/NO]
M-Volume
91
100-EN_.book Page 92 Monday, June 2, 2008 2:54 PM
Chapter
10
Enhancing the Disklavier by Hooking Up Other Devices
1
Press [SETUP].
The setup menu screen appears.
(1/2)]
=SETUP MENU=
*TimerPlay *AudioI/O
*MIDI
*M-tune
2
Select “Audio I/O” with the cursor buttons ([
[ ]), then press [ENTER].
][
][
]
][
]),
(1/2)]
=SETUP MENU=
*TimerPlay *AudioI/O
*MIDI
*M-tune
The audio I/O setting screen appears.
=AudioI/O=
>OMNI IN=Audio
>OMNI IN VOL=064
92
? -+
3
Select a desired option with the cursor buttons ([
then press [+/YES] and [–/NO] to change setting.
4
Press [ENTER] to complete the operation.
110-EN_CH10.fm Page 93 Monday, June 2, 2008 4:37 PM
Chapter
Enhancing the Disklavier by Hooking Up Other Devices
10
Hooking Up MIDI Devices
MIDI (an acronym for Musical Instrument Digital Interface) allows
electronic device (synthesizers, etc.) to interact and work in
synchronization with other MIDI compatible device. The Disklavier enables
you to enjoy a variety of MIDI features by connecting a MIDI device or
computer to the Disklavier’s control unit.
To USB
port
USB cable
(not supplied)
To MIDI
input
English
MIDI device (sequencer, synthesizer, etc.) or computer
Note: When you use the USB
connection, it is required to
install the USB driver to the
connected device. In such a
case, visit the following
website and download the
driver.
http://www.global.yamaha.
com/download/usb_midi/
Note: Be sure to use the
commercially available
MIDI cable with the Lshaped connector on the
control unit end.
To MIDI
output
MIDI cable
(not supplied)
Control unit
Setting Up the Disklavier for MIDI Data Reception
[SETUP]
Select “MIDI”
The Disklavier can play back the MIDI data being received from the
connected MIDI device as well as the software loaded or stored in the
Disklavier itself. The following options should be set up in advance.
■ MIDI IN Port
Selects the terminal/port used for the data reception.
MIDI:
Select this when the MIDI device is connected to MIDI IN
terminal.
USB:
Select this when the MIDI device is connected to USB port.
93
100-EN_.book Page 94 Monday, June 2, 2008 2:54 PM
Chapter
10
Enhancing the Disklavier by Hooking Up Other Devices
■ Piano Rcv Ch
The MIDI data consists of multi channels that are respectively assigned to
a certain instrument’s part. This option assigns the desired channel(s) to
the piano part(s) that is (are) played back on the Disklavier’s keyboard.
01 thru 16: Select the desired channel to which you assign the piano part.
1+2:
Select this when the “01” and “02” channels are assigned to the
piano parts.
Prg:
Select the smallest number channel assigned to the piano
group voice (see page 00) to be played on the Disklavier.
Prg(All):
Select all channels assigned to the piano group voice (see
page 00) to be played on the Disklavier.
■ MIDI IN Delay
When the Disklavier receives two kinds of data (strong and weak note) at
the same time, the weak note sounds a little bit later than the strong one
due to the characteristics of the Disklavier’s mechanism. To eliminate this
delay in the sound reproduction and the notes are sounded in accurate
timing at 500 millisecond after the data reception, usually a delay is applied
to the incoming MIDI data.
ON:
Select this when you apply this delay to the incoming MIDI
data.
OFF:
Select this when you do not apply this delay.
1
Press [SETUP].
The setup menu screen appears.
(1/2)]
=SETUP MENU=
*TimerPlay *AudioI/O
*MIDI
*M-tune
2
Select “MIDI” with the cursor buttons ([
then press [ENTER].
][
(1/2)]
=SETUP MENU=
*TimerPlay *AudioI/O
*MIDI
*M-tune
The MIDI setting screen appears.
=MIDI=
>MIDI IN Port=USB
>Piano Rcv Ch=01
94
] -+
][
][
]),
100-EN_.book Page 95 Monday, June 2, 2008 2:54 PM
Chapter
Enhancing the Disklavier by Hooking Up Other Devices
Select a desired option with the cursor buttons ([
then press [+/YES] and [–/NO] to change setting.
4
Press [ENTER] to complete the operation.
][
]),
English
3
10
Setting Up the Disklavier for MIDI Data Transmission
[SETUP]
Select “MIDI”
The Disklavier can transmit the information of piano playing/ensemble part
playback on the Disklavier as the MIDI data to the connected MIDI device
to reproduce the sound with its sound generator, etc. or to record the MIDI
data. The following options should be set up in advance.
■ MIDI OUT Port
Selects the terminal/port used for the data transmission.
MIDI:
Select this when the MIDI device is connected to MIDI OUT
terminal.
USB:
Select this when the MIDI device is connected to USB port.
■ MIDI OUT
Selects one of the following parts to be transmitted to the connected MIDI
device.
ESBL Out: Select this when you transmit the ensemble part played back
on the Disklavier.
KBD Out: Select this when you transmit the piano part played on the
Disklavier.
1
Press [SETUP].
The setup menu screen appears.
(1/2)]
=SETUP MENU=
*TimerPlay *AudioI/O
*MIDI
*M-tune
95
100-EN_.book Page 96 Monday, June 2, 2008 2:54 PM
Chapter
10
Enhancing the Disklavier by Hooking Up Other Devices
2
Select “MIDI” with the cursor buttons ([
then press [ENTER].
][
][
][
]),
3
Select a desired option with the cursor buttons ([
then press [+/YES] and [–/NO] to change setting.
][
]),
4
Press [ENTER] to complete the operation.
(1/2)]
=SETUP MENU=
*TimerPlay *AudioI/O
*MIDI
*M-tune
The MIDI setting screen appears.
=MIDI=
>MIDI IN Port=USB
>Piano Rcv Ch=01
] -+
Setting Up the Disklavier for Keyboard Playing Data Transmission
[SETUP]
Select “MIDI”
Besides the MIDI OUT options, more detailed setups for the keyboard
playing data transmission are available. The following options should be
set up in advance.
■ KBD OUT CH
Assigns the piano part to the desired channels.
01 thru 16: Select the desired channel to which you assign the piano part.
96
100-EN_.book Page 97 Monday, June 2, 2008 2:54 PM
Chapter
Enhancing the Disklavier by Hooking Up Other Devices
10
■ Local
Selects whether you reproduce or not the piano part playing with the
Disklavier’s internal tone generator.
Select this when you reproduce the piano part with the
Disklavier’s internal tone generator.
OFF:
Select this when you reproduce the song (played on the
Disklavier) on the external MIDI device. This option inactivates
the internal tone generator to prevent both the internal and
external tone generator sound at the same time.
1
English
ON:
Press [SETUP].
The setup menu screen appears.
(1/2)]
=SETUP MENU=
*TimerPlay *AudioI/O
*MIDI
*M-tune
2
Select “MIDI” with the cursor buttons ([
then press [ENTER].
][
][
][
]),
3
Select a desired option with the cursor buttons ([
then press [+/YES] and [–/NO] to change setting.
][
]),
4
Press [ENTER] to complete the operation.
(1/2)]
=SETUP MENU=
*TimerPlay *AudioI/O
*MIDI
*M-tune
The MIDI setting screen appears.
=MIDI=
>MIDI IN Port=USB
>Piano Rcv Ch=01
] -+
97
100-EN_.book Page 98 Monday, June 2, 2008 2:54 PM
Chapter
11
Other Settings
Tuning the Tone Generator (TG Master Tune)
[SETUP]
Select “M–Tune”
The internal XG tone generator has already been tuned to match the
acoustic piano (A3=440 Hz). However, you can re-tune the internal XG
tone generator in accordance with the pitch of the acoustic piano by
following the procedure below.
1
Press [SETUP].
The setup menu screen appears.
(1/2)]
=SETUP MENU=
*TimerPlay *AudioI/O
*MIDI
*M-tune
2
Select “M–Tune” with the cursor buttons ([
[ ]), then press [ENTER].
][
][
]
(1/2)]
=SETUP MENU=
*TimerPlay *AudioI/O
*MIDI
*M-tune
The TG Master Tune setting screen appears.
=TG Master Tune=
>Tune= 000cent
3
-+
Playing the keyboard, press [+/YES] and [–/NO] to tune the
pitch of the internal XG tone generator.
The same note will sound simultaneously on the XG tone
generator’s digital piano and on the acoustic piano as soon as you
play the keyboard.
The pitch of the internal XG tone generator can be adjusted in a
range of –50 cent to +50 cent.
98
111-EN_CH11.fm Page 99 Monday, June 2, 2008 4:42 PM
Chapter
Other Settings
4
Note: To reset to the default
factory pitch settings, see
Chapter 11 “Other Settings
– Resetting the Disklavier”
on page 99.
Press [ENTER] to complete the operation.
English
Resetting the Disklavier
[SETUP]
Select “Reset”
If you want to return your Disklavier to its initial factory, follow the
procedure below.
1
Important:
If you reset your Disklavier,
depends upon the option
what you select, you may
lose all parameters or all
data in the internal memory,
or both of these. For normal
use, you do not have to
reset. Necessarily case you
have to reset your
Disklavier, Yamaha strongly
recommends that you
backup your songs in the
internal memory. However,
you cannot backup your
various parameter settings.
Press [SETUP].
The setup menu screen appears.
(1/2)]
=SETUP MENU=
*TimerPlay *AudioI/O
*MIDI
*M-tune
2
Select “Reset” with the cursor buttons ([
[ ]), then press [ENTER].
][
][
]
=SETUP MENU=
_(2/2)
*Network
*Playback
*Reverb
*Reset
The reset screen appears.
-+ENT
=Reset=
>Reset=Parameter
3
11
)
To make a backup copy of
the songs which are in the
internal memory, see
Chapter 8 “Media
Management – Making
Backups of Songs” on
page 80.
Note: The parameters contain the
metronome setting, the
clock setting, the timer play
setting and the Internet
setting.
Press [+/YES] and [–/NO] to select the option that you
want to reset.
Option
Description
Parameter
Reset all parameters.
Memory
Reset the internal memory.
Factory Init.
Reset the Disklavier to its initial factory setting.
99
111-EN_CH11.fm Page 100 Monday, June 2, 2008 4:42 PM
Chapter
11
Other Settings
4
Press [ENTER].
“OK?” flashes in the first line of the screen.
=Reset=
OK? YES/NO
>Reset=Factory Init.
5
Press [+/YES] to reset, [–/NO] to cancel.
After a while, the completion
message appears.
=Reset=
Executing...
ANY
=Reset=
Completed.
Press any button.
Press any button to return to the system menu screen.
Diagnosing the Disklavier (Maintenance Mode)
[SYSTEM]
Select “Maintenance”
The piano diagnostics may be required as the occasion demands. In such
a case, follow the instructions of your Yamaha dealer and perform the
following procedure.
1
Press [SYSTEM].
The system menu screen appears.
(1/2)]
=SYTEM MENU=
*Clock Adj. *TimeZone
*Backup
*Restore
2
Select “Maintenance” with the cursor buttons ([
[ ] [ ]), then press [ENTER].
=SYSTEM MENU=
*Maintenance
_(2/2)
The maintenance screen appears.
Maintenance Mode
(ENTER)
100
][
]
111-EN_CH11.fm Page 101 Monday, June 2, 2008 4:42 PM
Chapter
Other Settings
3
11
Press [ENTER].
The maintenance options appears.
1.Post Delivery Check
2.Program Versions
3.Pedal Calibration
Select a desired option with the cursor buttons ([
then press [ENTER].
][
English
4
]),
The selected option is executed.
5
Press [STOP] to complete the operation.
Updating the Disklavier
Shut Down the Disklavier
Holding [PLAY/PAUSE] and [ON/OFF]
You can update the Disklavier firmware from CD-ROM.
) For this operation you have to
insert the update CD-ROM and
shut down the Disklavier.
1
Make sure that Disklavier is shut down.
2
Holding [PLAY/PAUSE] on the control unit, press [ON/OFF].
ON/OFF
+
Hold
=Updater=
CTRL system V1.00
*UPDATE
(ENT)
The current version information of each module appears one after
the other.
101
111-EN_CH11.fm Page 102 Monday, June 2, 2008 4:42 PM
Chapter
11
Other Settings
3
Make sure that the update CD-ROM inserted, then press
[ENTER].
The starting screen appears.
=Updater=
REWRITE SYSTEM PROGRAM
(ENT)
After a while, the update confirmation message of each module
appears.
=Updater=
] V1.01
V1.00
CTRL-SURE? (PLAY,STOP)
4
Press [PLAY/PAUSE] to update, [STOP] to skip to the next
module.
Update
Skip
or
=Updater=
]V1.01
V1.00
DO NOT REMOVE DISK! 3500
The closing screen appears when the update for all modules
completes.
=Updater=
COMPLETE
Turn OFF,Turn ON again!
5
102
Restart the Disklavier.
100-EN_.book Page 103 Monday, June 2, 2008 2:54 PM
Chapter
12
Internal Tone Generator Voices
The following table lists the basic voices for the internal GM/XG and TG3 tone generator.
These voices are available on any GM/XG and TG3 compatible generator or synthesizer.
Internal GM/XG Tone Generator Basic Voice List
Display Name
01 Piano
Voice #
Display Name
Voice #
043
Orgel
086
Display Name
OrgFlute
001
GrandPno
044
Vibes
087
TrmOrgFl
002
GrandPnoK
045
VibesK
088
ReedOrgn
003
MelloGrP
046
HardVibe
089
Puff Org
004
PianoStr
047
MarimbaK
090
Acordion
005
Dream
048
MarimbaK
091
Accordlt
006
BritePno
049
SineMrmb
092
Harmnica
007
BritPnoK
050
Balafon2
093
Harmo 2
008
E.Grand
051
Log Drum
094
TangoAcd
009
EIGrPnoK
052
Xylophon
095
TngoAcd2
010
Det.CP80
053
TubulBel
04 Guitar
011
ElGrPno1
054
ChrchBel
096
NylonGtr
012
ElGrPno2
055
Carillon
097
NylonGt2
013
HnkyTonk
056
Dulcimer
098
NylonGt3
014
HnkyTnkK
057
Dulcimr2
099
VelGtHrm
015
E.Piano1
058
Cimbalom
100
Ukulele
016
El.Pno1K
059
Santur
101
SteelGtr
017
MelloEP1
03 Organ
102
SteelGt2
018
Chor.EP1
060
DrawOrgn
103
12StrGtr
019
HardEl.P
061
DetDrwOr
104
Nyln&Stl
020
VX El.P1
062
60sDrOr1
105
Stl&Body
021
60sEl.P
063
60sDrOr2
106
Mandolin
022
E.Piano2
064
70sDrOr1
107
Jazz Gtr
023
El.Pno2K
065
DrawOrg2
108
MelloGtr
024
Chor.EP2
066
60sDrOr3
109
JazzAmp
025
DX Hard
067
EvenBar
110
CleanGtr
026
DXLegend
068
16+2”2/3
111
ChorusGt
027
DX Phase
069
Organ Ba
112
Mute.Gtr
028
DX+Analg
070
70sDrOr2
113
FunkGtr1
029
DXKotoEP
071
CheezOrg
114
MuteStlG
030
VX El.P2
072
DrawOrg3
115
FunkGtr2
031
Harpsi.
073
PercOrgn
116
Jazz Man
032
Harpsi.K
074
70sPcOr1
117
Ovrdrive
033
Harpsi.2
075
DetPrcOr
118
Gt.Pinch
034
Harpsi.3
076
LiteOrg
119
Dist.Gtr
035
Clavi.
077
PercOrg2
120
FeedbkGt
036
Clavi.K
078
RockOrgn
121
FeedbGt2
037
ClaciWah
079
RotaryOr
122
GtrHarmo
038
PulseClv
080
SloRotar
123
GtFeedbk
039
PierceCl
081
FstRotar
124
GtrHrmo2
02 ChromaticPerc
082
ChrchOrg
Celesta
083
ChurOrg3
125
Aco.Bass
041
Glocken
084
ChurOrg2
126
JazzRthm
042
MusicBox
085
NotreDam
127
VXUprght
040
English
Voice #
05 Bass
103
100-EN_.book Page 104 Monday, June 2, 2008 2:54 PM
Chapter
12
Internal Tone Generator Voices
Voice #
104
Display Name
Voice #
178
Display Name
Timpani
Voice #
Display Name
128
FngrBass
129
FingrDrk
130
FlangeBa
179
Strings1
229
HiBrass
131
Ba&DstEG
180
S.Strngs
230
MelloBrs
132
FngrSlap
181
SlowStr
231
SynBras1
133
FngBass2
182
ArcoStr
232
QuackBr
134
ModAlem
183
60sStrng
233
RezSynBr
135
PickBass
184
Orchestr
234
PolyBrss
136
MutePkBa
185
Orchstr2
235
SynBras3
137
Fretless
186
TremOrch
236
JumpBrss
138
Fretles2
187
VeloStr
237
AnaVelBr
139
Fretles3
188
Strings2
238
AnaBrss1
140
Fretles4
189
S.SlwStr
239
SynBras2
141
SynFretl
190
LegatoSt
240
Soft Brs
142
Smooth
191
Warm Str
241
SynBras4
143
SlapBas1
192
Kingdom
242
ChorBrss
144
ResoSlap
193
70s Str
243
VelBras2
145
PunchThm
194
Str Ens3
244
AnaBras2
146
SlapBas2
195
Syn.Str1
147
VeloSlap
196
ResoStr
245
148
SynBass1
197
Syn Str4
246
Alto Sax
149
SynBa1Dk
198
SS Str
247
Sax Sect
150
FastResB
199
Syn.Str2
248
HyprAlto
151
AcidBass
200
ChoirAah
249
TenorSax
152
Clv Bass
201
S.Choir
250
BrthTnSx
153
TeknoBa
202
Ch.Aahs2
251
SoftTenr
154
Oscar
203
MelChoir
252
TnrSax 2
155
SqrBass
204
ChoirStr
253
Bari.Sax
156
RubberBa
205
VoiceOch
254
Oboe
157
Hammer
206
SynVoice
255
Eng.Horn
158
SynBass2
207
SynVox2
256
Bassoon
159
MelloSB1
208
Choral
257
Clarinet
160
Seq Bass
209
AnaVoice
161
ClkSynBa
210
Orch.Hit
258
Piccolo
162
SynBa2Dk
211
OrchHit2
259
Flute
163
SmthBa 2
212
Impact
260
Recorder
164
ModulrBa
08 Brass
261
PanFlute
165
DX Bass
213
Trumpet
262
Bottle
166
X WireBa
214
Trumpet2
263
Shakhchi
06 Strings
215
BriteTrp
264
Whistle
167
Violin
216
WarmTrp
265
Ocarina
168
SlowVin
217
Trombone
169
Viola
218
Trmbone2
266
170
Cello
219
Tuba
267
Square 2
171
Contrabs
220
Tuba 2
268
LMSquare
172
Trem.Str
221
Mute.Trp
269
Hollow
173
SlwTrStr
222
Fr.Horn
270
Shmoog
174
Susp Str
223
FrHrSolo
271
Mellow
175
Pizz.Str
224
FrHorn2
272
SoloSine
176
Harp
225
HornOrch
273
SineLead
177
YangChin
226
BrasSect
274
Saw.Lead
07 Ensemble
227
Tp&TbSec
228
BrssSec2
09 Reed
SprnoSax
10 Pipe
11 Synth Lead
SquareLd
100-EN_.book Page 105 Monday, June 2, 2008 2:54 PM
Chapter
Internal Tone Generator Voices
Voice #
Display Name
Voice #
Display Name
Voice #
Display Name
Saw 2
325
Halo Pad
375
BelChoir
276
ThickSaw
326
SweepPad
376
Echoes
277
DynaSaw
327
Shwimmer
377
EchoPad2
278
DigiSaw
328
Converge
378
Echo Pan
279
Big Lead
329
PolarPad
379
EchoBell
280
HeavySyn
330
Celstial
380
Big Pan
281
WaspySyn
13 Synth Effects
381
SynPiano
282
PulseSaw
331
Rain
382
Creation
283
Dr. Lead
332
ClaviPad
383
Stardust
284
VeloLead
333
HrmoRain
384
Reso Pan
285
Seq Ana
334
AfrcnWnd
385
Sci-Fi
286
CaliopLd
335
Caribean
386
Starz
287
Pure Pad
336
SoundTrk
14 Ethnic
288
Chiff Ld
337
Prologue
387
Sitar
289
Rubby
338
Ancestrl
388
DetSitar
290
CharanLd
339
Crystal
389
Sitar 2
291
DistLead
340
SynDrCmp
390
Tambra
292
WireLead
341
Popcorn
391
Tamboura
293
Voice Ld
342
TinyBell
392
Banjo
294
SynthAah
343
RndGlock
393
MuteBnjo
295
VoxLead
344
GlockChi
394
Rabab
296
Fifth Ld
345
ClearBel
395
Gopichnt
297
Big Five
346
ChorBell
396
Oud
298
Bass &Ld
347
SynMalet
397
Shamisen
299
Big&Low
348
SftCryst
398
Koto
300
Fat&Prky
349
LoudGlok
399
T.Koto
301
SoftWurl
350
XmasBell
400
Kanoon
351
VibeBell
401
Kalimba
NewAgePd
352
DigiBell
402
Bagpipe
303
Fantasy2
353
AirBells
403
Fiddle
304
Warm Pad
354
BellHarp
404
Shanai
305
ThickPad
355
Gamelmba
405
Shanai2
306
Soft Pad
356
Atmosphr
406
Pungi
307
SinePad
357
WarmAtms
407
Hichriki
308
Horn Pad
358
HollwRls
309
RotarStr
359
NylonEP
408
TnklBell
310
PolySyPd
360
NylnHarp
409
Bonang
311
PolyPd80
361
Harp Vox
410
Gender
312
ClickPad
362
AtmosPad
411
Gamelan
313
Ana Pad
363
Planet
412
S.Gamlan
314
SquarPad
364
Bright
413
Rama Cym
315
ChoirPad
365
FantaBel
414
AsianBel
316
Heaven2
366
Smokey
415
Agogo
317
ltopia
367
Goblins
416
SteelDrm
318
CC Pad
368
GobSyn
417
GlasPerc
319
BowedPad
369
50sSciFi
418
ThaiBell
320
Glacier
370
Ring Pad
419
WoodBlok
321
GlassPad
371
Ritual
420
Castanet
322
MetalPad
372
ToHeaven
421
TaikoDrm
323
Tine Pad
373
Night
422
Gr.Cassa
324
Pan Pad
374
Glisten
423
MelodTom
302
English
275
12 Synth Pad
12
15 Percussive
105
100-EN_.book Page 106 Monday, June 2, 2008 2:54 PM
Chapter
12
Internal Tone Generator Voices
Voice #
Display Name
Voice #
Display Name
Voice #
Display Name
424
Mel Tom2
459
Feed
485
Punch
425
Real Tom
460
Dog
486
Heart
426
Rock Tom
461
Horse
487
FootStep
427
Syn.Drum
462
Bird
488
MchinGun
428
Ana Tom
463
Ghost
489
LaserGun
429
ElecPerc
464
Maou
490
Xplosion
430
RevCymbl
465
Tel.Dial
491
FireWork
16 Sound Effects
466
DoorSqek
FretNoiz
467
DoorSlam
432
BrthNoiz
468
Scratch
433
Seashore
469
Scratch2
434
Tweet
470
WindChm
435
Telphone
471
Telphon2
436
Helicptr
472
CarEngin
437
Applause
473
Car Stop
438
Gunshot
474
Car Pass
475
CarCrash
431
18 SFX Voice
450
CuttngNz
476
Siren
451
CttngNz2
477
Train
452
Str Slap
478
Jetplane
453
Fl.KClik
479
Starship
454
Rain
480
Burst
455
Thunder
481
Coaster
456
Wind
482
SbMarine
457
Stream
483
Laughing
458
Bubble
484
Scream
Internal GM/XG Tone
Generator Drum Voice
List
Voice #
Display Name
17 Drum Kit
439
StandKit
440
Stnd2Kit
441
Room Kit
442
Rock Kit
443
ElectKit
444
AnalgKit
445
Jazz Kit
446
BrushKit
447
ClascKit
448
SFX Kit1
449
SFX Kit2
Internal TG3 Tone Generator Basic Voice List
Voice #
Display Name
Display Name
Dulcimer
03 Organ
Voice #
Display Name
031
Dist.Gtr
032
GtrHarmo
001
GrandPno
002
BritePno
017
003
E.Grand
018
PercOrgn
033
Aco.Bass
004
HnkyTonk
019
RockOrgn
034
FngrBass
005
E.Piano1
020
ChrchOrg
035
PickBass
006
E.Piano2
021
ReedOrgn
036
Fretless
007
Harpsi.
022
Acordion
037
SlapBas1
008
Clavi.
023
Harmnica
038
SlapBas2
024
TangoAcd
039
SynBass1
040
SynBass2
02 ChromaticPerc
106
Voice #
016
01 Piano
DrawOrgn
05 Bass
009
Celesta
04 Guitar
010
Glocken
025
NylonGtr
06 Strings
011
MusicBox
026
SteelGtr
041
012
Vibes
027
Jazz Gtr
042
Viola
013
Marimba
028
CleanGtr
043
Cello
014
Xylophon
029
Mute.Gtr
044
Contrabs
015
TubulBel
030
Ovrdrive
045
Trem.Str
Violin
100-EN_.book Page 107 Monday, June 2, 2008 2:54 PM
Chapter
Internal Tone Generator Voices
Voice #
Display Name
Voice #
Display Name
046
Pizz.Str
091
PolySyPd
047
Harp
092
ChoirPad
048
Timpani
093
BowedPad
094
MetalPad
07 Ensemble
Strings1
095
Halo Pad
050
Strings2
096
SweepPad
051
Syn.Str1
13 Synth Effects
052
Syn.Str2
097
Rain
053
ChoirAah
098
SoundTrk
054
VoiceOoh
099
Crystal
055
SynVoice
100
Atmosphr
056
Orch.Hit
101
Bright
102
Goblins
103
Echoes
104
Sci-Fi
057
Trumpet
058
Trombone
059
Tuba
060
Mute.Trp
105
Sitar
061
Fr.Horn
106
Banjo
062
BrasSect
107
Shamisen
063
SynBras1
108
Koto
064
SynBras2
109
Kalimba
110
Bagpipe
111
Fiddle
112
Shanai
09 Reed
065
SprnoSax
066
Alto Sax
067
TenorSax
14 Ethnic
15 Percussive
068
Bari.Sax
113
TnklBell
069
Oboe
114
Agogo
070
Eng.Horn
115
SteelDrm
071
Bassoon
116
WoodBlok
072
Clarinet
117
TaikoDrm
118
MelodTom
119
Syn.Drum
120
RevCymbl
10 Pipe
073
Piccolo
074
Flute
075
Recorder
16 Sound Effects
076
PanFlute
121
FretNoiz
077
Bottle
122
BrthNoiz
078
Shakhchi
123
Seashore
079
Whistle
124
Tweet
080
Ocarina
125
Telphone
11 Synth Lead
126
Helicptr
SquareLd
127
Applause
082
Saw.Lead
128
Gunshot
083
CaliopLd
084
Chiff Ld
085
CharanLd
081
086
Voice Ld
087
Fifth Ld
088
Bass &Ld
12 Synth Pad
089
NewAgePd
090
Warm Pad
English
049
08 Brass
12
Internal TG3 Tone
Generator Drum Voice
List
Voice #
Display Name
17 Drum Kit
129
StandKit
107
100-EN_.book Page 108 Monday, June 2, 2008 2:54 PM
Chapter
13
Troubleshooting
If you are having difficulty operating the Disklavier, see if any of the symptoms listed below
apply to your problem and follow the recommended remedy.
Power
Symptom
The Diskalvier does not turn on.
Remedy
Make sure that the power cord is securely connected to
a suitable AC wall outlet.
If the Disklavier still cannot be turned on, disconnect it
from the AC wall outlet, and consult your Disklavier
dealer.
Control Unit
Symptom
The control unit does not appear to work correctly.
The control unit becomes hot.
Remedy
Turn off the control unit, wait 5 seconds, then turn it
back on. If the problem continues, consult your
Disklavier dealer.
Although the chassis of the control unit may become
hot while the Disklavier is turned on (also in the standby
mode), this is not a malfunction.
Remote Control
Symptom
You cannot control the Disklavier using the remote
control.
Remedy
Make sure that you are pointing the remote control at
the control unit’s remote control sensor.
Make sure that you are within the remote control’s
specified operating range (approx. 5 m (16.4 ft)).
Make sure that the remote control’s batteries have
been installed correctly.
Check the condition of the remote control’s batteries.
Monitor Speakers*
Symptom
No sound is heard from the monitor speakers.
* Only for models supplied with the monitor speakers.
108
Remedy
Make sure that the POWER switches on both monitor
speakers are turned on.
Make sure that the monitor speakers are connected to
the OUTPUT jacks on the control unit with the supplied
speaker cords.
Make sure that the overall volume is adequately turned
up.
Make sure that the volume of the internal tone
generator, audio and voice are adequately turned up.
Certain model does not come with the monitor
speakers. In such a case, prepare active speakers
equivalent to the monitor speakers.
100-EN_.book Page 109 Monday, June 2, 2008 2:54 PM
Chapter
Troubleshooting
13
Playback
Symptom
None of the playback functions can be used.
The Disklavier does not read a song file.
Songs are not played back in the normal song order.
The playback order differs from the order on another
device.
When selecting a song using the remote control’s
number keypad, but the last song on the album is
selected.
When specifying a search time using the remote
control’s number keypad, but the end of the song is
selected.
If a time value higher than the total length of the song is
specified, the end of the song will be selected.
Some notes drop out during playback.
When a piano song is played back at a low volume,
complex note trills and faint pianissimo passages
sometimes drop out. In such case, increase the
Disklavier’s volume level.
PianoSmart™ playback cannot be performed.
Make sure that an appropriate SmartPianoSoft song,
which is paired with the song on commercial CDs, is
selected.
The pedals do not operate during playback.
Make sure that the pedal part is not canceled.
English
Songs are played back at the wrong tempo or in the
wrong key.
Remedy
Insert a medium that contains songs into the Disklavier.
The maximum number of the readable files in an album
is 999.
Make sure that the name of the SMF song has an
extension as “.MID” or “.mid” and the E-SEQ song has
“.FIL” or “.fil.”
Reset the tempo or transposition changes. Once the
tempo or transposition have been changed, they will
affect playback of all songs on an album, until another
medium or album is selected, the recording standby
mode is engaged, the Disklavier is turned off, or they
are reset.
Make sure that the random repeat mode is off.
The playback order depends on the recording software
or other factors. Naming the file starting from numbers
such as 01, 02, etc. may solve the problem.
If a song number higher than the last song number on
the album is specified, the last song will be selected.
Tone Generator
Symptom
The ensemble parts cannot be heard during ensemble
song playback.
The pitch of the Disklavier and the internal tone
generator do not match.
Remedy
Make sure that the TG balance is set to an appropriate
level and readjust it.
Use the TG Master Tune function to tune the internal
tone generator.
Recording
Symptom
You cannot re-record.
Remedy
Re-recording is not possible on protected songs such
as PianoSoft and PianoSoft·Plus songs.
109
100-EN_.book Page 110 Monday, June 2, 2008 2:54 PM
Chapter
13
Troubleshooting
Media
Symptom
The Disklavier does not recognize a USB flash
memory.
Remedy
The Disklavier restricts the usage of the USB flash
memories to seven identical ones by recognizing the ID
information of the memories that have been inserted to
the USB port. If you use USB flash memories other
than the ones already recognized, shut down the
Disklavier once before using them.
Certain USB storage devices may not function properly
with the Disklavier. For a list of compatible products,
please visit: www.yamaha.com/disklavier.
The Disklavier does not read a CD-R/RW disc.
The audio CD should be formatted in ISO 9600, and
the data CD in ISO 9600 Level1. The Disklavier may
not read a CD-R/RW disc other than this format.
Connection with External Devices
Symptom
The Disklavier cannot send or receive MIDI data with
other MIDI instruments.
A MIDI loop was accidentally created when you
connected a computer to the MIDI OUT terminal on
your Disklavier, so that song data is sent back and forth
between the computer and the Disklavier.
110
Remedy
Make sure that the MIDI cables are connected properly.
Configure the setting for the MIDI OUT terminal to
“KBD OUT.”
100-EN_.book Page 111 Monday, June 2, 2008 2:54 PM
Chapter
14
Error Messages
While operating your Disklavier, an error message may appear in the display. If an error
message appears, refer to the table below for an explanation of the message.
Note: This table does not explain every error messages.
Situation
Remedy
SELECT REC TRACK!
You tried to start recording with no
part selected.
Select the part to record before starting
recording.
CANNOT RECORD NO PIANO
PART
You tried to start recording to the
track with no piano part.
You cannot record to the track with no piano part.
CANNOT EXECUTE
NO DESTINATION MEDIUM
You selected the destination
medium that has not been inserted
when copying the album.
Insert the destination medium and select it.
CANNOT EXECUTE TO DELETE
1ST ALBUM
You tried to delete the first album in
a medium.
You cannot delete the first album in a medium.
CANNOT EXECUTE TO CREATE
MORE THAN 99 ALBUMS
You tried to create a new album on
the medium that already contains
99 albums.
No more than 99 albums can be created on the
medium.
CANNOT EXECUTE//SAME TITLE
EXISTS
You tried to create a new album
titled as same as the album that
already exists.
Enter the different title to a new album.
CANNOT EXECUTE
PROTECTED FILE
You tried to copy the protected
song file to the removable medium
such as a USB flash memory.
You cannot copy the protected song file to the
removable medium.
PLAYLIST NOT FOUND
You tried to delete the playlist, but
no playlist exists.
Please connect an USB
HDD to USB port.
You tried to add songs to the
playlist, but no playlist exists.
First, you must create a new playlist, and then
add songs to it.
You tried to make a backup without
connecting an external USB HDD.
Connect an external USB HDD before making a
backup.
You tried to restore a backup
without connecting an external
USB HDD.
Connect the external USB HDD that contains a
backup data.
English
Error Messages
111
100-EN_.book Page 112 Monday, June 2, 2008 2:54 PM
Chapter
15
Glossary
This glossary provides basic definitions of terms used frequently in Disklavier manuals.
Clavinova™
General MIDI (GM)
A series of Yamaha digital pianos.
An addition to the MIDI standard that simplifies the
transfer of MIDI song files between instruments of
different manufacturers. A MIDI song recorded
using a GM compatible tone generator should play
back correctly when used with any GM compatible
tone generator. The standard specifies that a GM
compatible tone generator must support 24-note
polyphony, 16 parts, and 128 standard voices.
Continuous Pedal
See “Incremental Pedal.”
DHCP
This is a standard or protocol by which IP
addresses and other low-level network
configuration information can be dynamically and
automatically assigned each time a connection is
made to the Internet.
See “Incremental Pedal.”
DNS
Incremental Pedal
A system that translates names of computers
connected to a network to their corresponding IP
addresses.
Piano pedals are not always completely up or down
and may be held somewhere in-between. Using
incremental pedal data (also called continuous or
half pedal data) the Disklavier precisely records the
up and down movement of the piano pedals.
Ensemble Song
A song which contains piano parts and
accompanying instrumental voices. An ensemble
song contains the same left- and right-hand parts
as an L/R song, and in addition, up to 13
accompanying instrument tracks. These extra
tracks are played by the internal XG tone
generator. The accompanying tracks may be used
for acoustic bass, drums, strings, vibes, etc.
Internet
A huge network made up of networks, the Internet
allows high-speed data transfer among computers,
mobile phones and other devices.
IP Address
E-SEQ Song Format
A string of numbers assigned to each computer
connected to a network, and indicating the device’s
location on the network.
A song file format developed by Yamaha for saving
songs.
LAN
Floppy Disk
The magnetic storage medium that the Disklavier
uses to save songs. The Disklavier uses the 3.5
inch 2DD and 2HD floppy disks commonly used for
computers.
Gateway
A system which links different networks or systems,
and makes possible data transfer and conversion
despite differing communications standards.
112
Half Pedal
Short for Local Area Network, this is a data-transfer
network that connects a group of computers at a
single location (such as an office or home) by
means of a special cable.
L/R Song
In a L/R song, the left-hand piano part is stored on
track 1 (L) and the right-hand piano part is stored
on track 2 (R). During playback you can cancel
either part, and then play that part yourself. When
recording an L/R song, you can record the two
parts simultaneously or separately.
100-EN_.book Page 113 Monday, June 2, 2008 2:54 PM
Chapter
Glossary
MIDI
Router
An acronym for Musical Instrument Digital
Interface. MIDI allows electronic musical
instruments to communicate with each other.
A device for connecting multiple computer
networks. For example, a router is necessary when
connecting several computers in a house or office,
to allow all of them access the Internet and share
data. A router is usually connected between a
modem and a computer, although some modems
have a built-in router.
Modem
Sequencer
English
A device which connects and allows data transfer
between a conventional telephone line and a
computer. It converts the digital signals from the
computer to analog audio for sending over the
phone line, and vice versa.
15
A sequencer can be used with the Disklavier to play
back and record MIDI data.
Piano Parts
Refer to the left- and right-hand piano parts of a
song. The left-hand piano part is recorded onto
track 1 and the right-hand piano part is recorded
onto track 2. These track assignments are the
default settings and can be changed.
Server
A hardware system or computer used as a central
point for a network, providing access to files and
services.
SmartPianoSoft™
PianoSoft™
The PianoSoft Disk Collection is a library of
prerecorded song disks made by Yamaha
specifically for use with the Disklavier.
Software made by Yamaha containing MIDI signals
for playing back along with standard audio CDs.
SMF
Abbreviation for Standard MIDI File.
PianoSoft·Plus™
PianoSoft·Plus disks contain Ensemble songs that
can be played on the Disklavier.
SMF Song Format
A song file format supported by MIDI sequencers
and music software.
Polyphony
The maximum number of voices (or sounds) that
can be produced at a time from MIDI instruments.
Provider
A communications business that offers Internet
connection services. In order to connect to the
Internet, it is necessary to contract to a provider.
Song
Normally, a short piece of music with lyrics.
However, for clarity in Disklavier manuals, the term
is used to refer to any piece of music of any genre.
Standard MIDI File (SMF)
A file of MIDI data that can be read and used by a
number of different MIDI devices and computers.
Proxy
A proxy server is a server that all computers on a
local network have to go through before accessing
information on the Internet. It intercepts all or
designated requests to the real server to see if it
can fulfill the requests itself. If not, it forwards the
request to the real server. Proxy servers are used
to improve performance and speed, and to filter
requests, usually for security and to prevent
unauthorized access to an internal network.
Subnet Mask
A setting used to divide a large-scale network into
several smaller networks.
TG Master Tune
The function that allows you to tune the internal XG
tone generator, and if connected, an external tone
generator simultaneously so that their tunings
match that of the Disklavier.
113
100-EN_.book Page 114 Monday, June 2, 2008 2:54 PM
Chapter
15
Glossary
Tone Generator
An electronic device that can generate tones or
instrument voices.
Transpose
Changing the key of a song. For example, a song in
the key of C is transposed to the key of D when it is
moved up two semitones.
USB
An interface for connecting an external device with
plug and play. The Disklavier supplies with 2 TO
DEVICE terminal with USB 1.1 standard and 1 TO
HOST terminal. You can use as the external
memory media if connected a USB flash memory or
a USB hard disk to TO DEVICE terminal. Also the
Disklavier enables you to enjoy a variety of MIDI
features by connecting a computer to TO HOST
terminal.
Velocity
Because the loudness of a piano note is
determined by the speed (velocity) with which a
string is struck by a hammer, note loudness is
referred to as velocity.
Voice
The sounds produced by a tone generator
expressing various instruments.
Web Page
Refers to each individual page that makes up a
website.
Website
This refers to the group of web pages that are
opened together. For example, the collection of
web pages whose addresses begin with “http://
www.yamaha.com/” is referred to as the Yamaha
site.
XG
Yamaha XG is an extension of the GM (General
MIDI) format. Its greater polyphony, more voices,
and use of effects enhances the compatibility
between MIDI devices. When a song in the
Yamaha XG format is played on another XGcompatible tone generator or synthesizer, it plays
and sounds as the original composer/creator
intended.
114
100-EN_.book Page 115 Monday, June 2, 2008 2:54 PM
Chapter
16
Specifications
General
Drive System
Data Storage
Noncontact optical fiber/grayscale shutter sensing system for 88 keys
(senses the key position, keying velocity, and key releasing velocity)
Hammer Sensors*1
Noncontact optical fiber/grayscale shutter sensing system.
Pedal Sensors
Noncontact digital optical sensing system (senses the pedal position*2)
Keys
DSP servo drive system (high-power servocontrolled solenoids)
Pedals
DSP servo drive system (servocontrolled solenoids)
Internal Memory
128 MB
Compact Disc
Audio CD (ISO 9600-compliant), Data CD (ISO 9600 Level1-compliant)
USB Flash Memory
Yamaha does not assure the operation of the commercially available
USB flash memories. For a list of compatible products, please visit:
www.yamaha.com/disklavier.
USB Hard Disk
FAT32 format
Yamaha does not assure the operation of the commercially available
USB hard disks.
Floppy Disk
3.5” 2DD (720 KB) or 2HD (1.44 MB) floppy disk*3
Removable Media
File Format
Standard MIDI File (SMF) FORMAT 0, Standard MIDI File (SMF)
FORMAT 1, E-SEQ
Song Format
PianoSoft (Solo), PianoSoft·Plus, PianoSoft·PlusAudio,
SmartPianoSoft, SmartKey (CueTIME)
Control Unit
Drive
CD (read only)
Dimensions (W × H × D)
292 × 49 × 216 mm (11-1/2” × 1-15/16” × 8-1/2”)
English
Sensor System
Key Sensors
Weight
Rated Power Output
Monitor Speaker*4
Drivers
Dimensions (W × H × D)
Weight
Connectors
MIDI
MIDI IN, MIDI OUT
Audio
OUTPUT, ANALOG MIDI IN (Yamaha format), OMNI IN, OMNI OUT
Others
LAN, USB (1 × TO HOST, 2 × TO DEVICE), TO PIANO (2 × S/P DIF, 1
× D-SUB)
Pitch Control
Ensemble Tone
Set at A=440 Hz, tunable -50 to +50 cents in 1 cent increment
Type
Advanced Wave Memory 2 (AWM2)
Polyphony
32 notes (max.)
Ensemble Parts
16 parts
Voice Module Modes
XG, GM
Normal Voices
676
Drum Voices
21 kits
Power Source
Local AC current, 100 to 240V, 50/60 Hz
Supplied Accessories
Control unit (1), control unit suspension bracket (1)*5, monitor speaker
(2)*4, monitor speaker installation kit (1)*4, speaker cord (2)*4, remote
control (1), battery for remote control (2), sample PianoSoft CD software
(2), quick reference (1), operation manual (1)
Optional Accessories
USB floppy disk drive
115
100-EN_.book Page 116 Monday, June 2, 2008 2:54 PM
Chapter
16
Specifications
Function & Controls
Playback Functions
Playback Controls
Recording
Functions
Piano Playing
Functions
Metronome
Utility Functions
Media Select
Internal memory, CD, USB media (including floppy disk)
Song Select
Cursor buttons (control unit), cursor buttons/numeric section (remote
control)
Basic Functions
Play, stop, pause
Song Search
Reverse/forward w/sound (MIDI songs), reverse/forward w/o sound
(audio songs), directly by time or measure.
Repeat
ALL (all songs in current album), RPT (current song), RND (all songs in
current album in random order), A-B
Part Cancel
L (left), R (right), pedal
Timer Playback
See page 00.
SmartKey™ Playback
See page 00.
PianoSmart™ Playback
See page 00.
Polyphony
16 notes (acoustic piano)
Volume
11 levels (–10 to 0)
Tempo
–50 to 50% in 1% increment
Transposition
–24 to +24 semitones (2 octaves) in 1 semitone increment
Balance (TG, Audio)
10 to 127
Piano Part Recording
L/R overwrite, split
Metronome Mode
Recording
See page 00.
Tempo Changing
See page 00.
Audio CD Synchronization
See page 00.
XG Voices
Approx. 500 voices
Range
30 to 400 beats per minute
Time Signatures
1/4, 2/4, 3/4, 4/4, 5/4, 6/4, 7/4, 8/4, 9/4
Volume
Controllable
Song
Copy, delete, sort, type convert, time format convert
Album
Copy, delete, sort
Backup/Restore
Floppy Disk
*3
DisklavierRadio
Network Functions
See page 00.
Format
See page 00.
FromToPC
See page 00.
Network Update
See page 00.
Update
Firmware update with the update CD or via the Internet
Specifications are subject to change without prior notice.
Note:
116
*1
Equipped with the C3 grand piano or higher specification model only.
*2
Continuous sensing for the damper and soft pedals, and on/off sensing for the sostenuto pedal.
*3
Possible for optional floppy disk drive.
*4
Only for models supplied with the monitor speakers.
117-H3.fm Page -i Monday, June 2, 2008 12:51 PM
YAMAHA [Disklavier]
Model: E3 Series
MIDI IMPLEMENTATION CHART
Function...
Transmitted
Recognized
Basic
Default
1-16
1-16
Channel
Changed
1-16
1-16
Default
3
3
Messages
×
3, 4 (m=1)
Altered
****************
×
0-127
0-127
****************
0-127
Mode
Note
Number
: True voice
Velocity
Note ON
9nH, v=1-127
Date: XX-xxx-2008
Version: 1.00
Remarks
Memorized
*2, *3
v=1-127
Note OFF
After
Key s
Touch
Ch s
Pitch
Bend
*5
×
*1, *2
×
0-24 semi
*1, *2
0, 32
*1, *2
7, 11
*1
1, 5, 10
×
*1, *2
6, 38
×
*2
64
Control
65
Change
67
×
*2
*4
*2
×
Sostenuto
*2
91, 93, 94
×
*2
96-101
×
*1,*2
0-127
: True #
Portament
Soft (Shift) Pedal
Prog
Change
Data Entry
Hold1 (Sustain)
66
71-74, 84
Bank Select
0-127
Effect Depth
*2
****************
System Exclusive
Common
: Song Pos
×
×
: Song Sel
×
×
: Tune
×
×
System
: Clock
×
×
Real Time
: Commands
×
×
Aux
: All Sound OFF
(120, 126, 127)
: Reset All Cntrls
×
: Local ON/OFF
×
(121)
: All Notes OFF
Messages
: Reset
Notes
(123-125)
: Active Sense
×
×
*1 = Received (transmitted) if switch is on.
*5 = Applying further pressure on the key does not output key
*2 = Only ESBL Part can recognized.
aftertouch information. Instead, key position is
*3 = m is always treated as 1 regardless of its value.
transmitted as additional information.
*4 = Transmit if this model has a Sostenuto Pedal.
Mode 1 : OMNI ON. POLY
Mode 3 : OMNI OFF. POLY
Mode 2 : OMNI ON. MONO
Mode 4 : OMNI OFF. MONO
: YES
× : NO