1
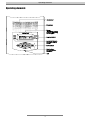
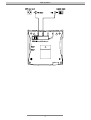
Operating Instructions
Professional Answering Machine
with telephone number display
and message transfer
Retell 332 clip
(UK)
Safety information
Safety information
When installing, connecting and operating the Retell 332 clip, please make sure that the following is taken into consideration:
•
Connect the connecting cables only to the provided receptacles.
•
Please take care that the cables do not lead to any danger of stumbling and avoid folding, pushing and pressing of the cables.
•
Avoid installing the device near electrical interference sources.
•
Only connect approved accessory for this device.
•
Never open the device. Do not touch the plug contacts with sharp or metal objects.
•
Only use a soft, slightly moist cloth to clean your Retell 332 clip. Do not use chemicals or abrasive cleaning products.
•
Avoid operating your Retell 332 clip in damp or dusty rooms and keep the device away from liquids and steam or smoke.
•
Do not install the device where it is exposed to direct sunlight.
•
Do not operate the device in areas with danger of explosions.
•
Only use the original Retell AC adapter and the original Retell telephone connecting cable.
3
Button assignment
Button assignment
Playback: Starts the playback of new and not yet played back incoming
messages. Allows the repetition of the last 3 seconds when being pressed
during playback.
2 sec.
Playback button pressed 2 seconds: Starts the playback of all incoming
messages. The playback starts with the oldest and ends with the latest
message.
Stop: Stops a function that is currently being executed and serves to exit an
open menu.
Answering mode: Activates or deactivates the answering mode.
Outgoing message (OGM): When pressed briefly, starts the playback of the
current outgoing message. When you press the button and keep it pressed, you
can start the recording of the currently set outgoing message.
Recording: Starts the recording of a personal information (dictate). When
pressed during a phone conversation, starts the two-way conversation
recording.
or
Arrow buttons (up/down): Are used to open the call list and to navigate and
make settings in the set-up menu.
or
Arrow buttons (left/right): Are used to change the volume and to move the
cursor to the left or right side.
Selection button: This button serves to select entry fields and functions which
are shown in the display next to the corresponding button.
and
and
Stop and Answering mode pressed at the same time: Opens the set-up menu.
Answering mode and Playback pressed at the same time: Activates or
deactivates the message transfer function.
4
Operating elements
Operating elements
5
Table of contents
Table of contents
Safety information ...........................................................................................
3
Button assignment ..........................................................................................
4
Operating elements .........................................................................................
5
Table of contents .............................................................................................
6
Initial operation ................................................................................................
Scope of supply ........................................................................................
Installation .................................................................................................
Connection ................................................................................................
8
8
8
8
Settings .............................................................................................................
Programmable parameters .......................................................................
Set-up menu .............................................................................................
Volume adjustment ...................................................................................
10
10
10
11
Outgoing messages (OGMs) ...........................................................................
General information ..................................................................................
Examples of outgoing messages ..............................................................
Recording outgoing messages ..................................................................
Testing the outgoing messages ................................................................
Erasing outgoing messages ......................................................................
12
12
12
12
13
13
Answering mode ..............................................................................................
14
Play back and erasing incoming messages (ICMs) ......................................
Playback of new incoming messages .......................................................
Playback of all incoming messages ..........................................................
Repetition ..................................................................................................
Interrupting the playback ...........................................................................
Search (Skip) ............................................................................................
Erasing individual incoming messages .....................................................
Erasing all incoming messages .................................................................
Direct connection to the caller ...................................................................
15
15
15
15
15
15
15
16
16
Two-way conversation recording / Personal information (dictate) .............
Two-way conversation recording of telephone calls ..................................
Personal information (dictate) ...................................................................
17
17
17
Message transfer .............................................................................................
Setting the destination number .................................................................
Activating the message transfer ................................................................
19
19
19
Call list ..............................................................................................................
General information ..................................................................................
Browse through the call list .......................................................................
Call back from the call list .........................................................................
20
20
20
20
Message function .............................................................................................
22
Remote control .................................................................................................
Remote operation .....................................................................................
Remote control functions ..........................................................................
Remote activation of the answering mode ................................................
23
23
23
25
Appendix ..........................................................................................................
26
Service ...................................................................................................... Error! Bookmark not defined.
Guarantee .................................................................................................
26
CE sign ..................................................................................................... Error! Bookmark not defined.
Ecological information ............................................................................... Error! Bookmark not defined.
Malfunctions and Troubleshooting ............................................................
28
Factory pre-set ..........................................................................................
29
Technical data ...........................................................................................
29
Index .................................................................................................................
6
30
Table of contents
Brief operating instructions ............................................................................
7
31
Initial operation
Initial operation
Scope of supply
In the packaging carton of your Retell 332 clip you will find:
•
Retell 332 clip
•
telephone connecting cable
•
AC adapter 11.5 V / 350 mA
•
operating instructions with removable short operating instructions and operation instruction card for the remote control
Installation
Your Retell 332 clip was designed for normal use conditions. Solvents in some furniture lacquers or furniture cleaning products
may attack the rubber at the feet of the device and thus cause patches.
In such cases, especially with new or recently treated furniture, please use a non-slip pad under the device.
Connection
Before you can take your Retell 332 clip into operation, you need to connect all necessary cables.
1
Plug the small plug of the AC adapter in the “POWER” jack and plug the AC adapter in a 230 V power outlet.
2
Plug one end of the telephone connecting cable in the “LINE” jack. Plug the other end in the telephone socket.
8
Initial operation
9
Settings
Settings
Programmable parameters
Language .............................. German, English, French, Italian or Dutch.
Time ...................................... Here, you can set the time.
Date ....................................... Here, you can set the date (day, month, year).
Length of incoming .............. 1 to 5 minutes or endless. Here, you can limit the time
messages
a caller has at his disposal to speak a message.
Recording quality ................. Level 1 or 2, whereas level 2 has the highest recording quality. An increasing recording quality
means a decrease of available recording time. Level 1 corresponds to about 50 minutes and level
2 about 25 minutes recording time.
Ringing tones ....................... 2 to 9 ringing tones. This is to set the number of ringing tones until the answering machine picks
up.
Remote control code ........... The remote control code consists of 1 to 4 digits ranging from 0 to 9999. The code “-” is used to
deactivate the remote control.
Remote pre-interrogation .... Yes or no. If you selected “yes”, and new incoming messages exist, your Retell 332 clip will pick
up after 2 ringing tones (regardless of your settings for the number of ringing tones). If no new
incoming messages exist, the device picks up after the number of ringing tones according to your
settings. Thus, you can identify whether new messages have been recorded or not and whether a
remote interrogation needs to be performed or not.
Message code ...................... The message code is a 1 to 4 digit number ranging from 0 to 9999. The code “–” is used to turn
the message function off.
Exchange identification ....... Here, you enter the identification code (only for telecode
phone systems) to access the public exchange (e. g.
0). This number will then always be dialled automatically before the telephone number. The code “–”
is used to turn this function off.
Display contrast ................... 15 levels are available to set the display contrast.
Destination phone number .. Here, you enter the phone number for the message transfer (for example your mobile number). A
set number can be deleted by pressing the selection button next to “X”.
Factory pre-set ..................... Provided that you confirm the corresponding question with “yes”, the device will resume the
factory pre-set parameters and all incoming messages and settings will be deleted.
Set-up menu
+
Press Stop and Answering mode at
the same time.
The display shows the set-up menu.
Use the arrow buttons (up/down) to
view the available setting parameters.
The display shows all available setting
parameters.
Press the selection button next to the
setting to be changed until the
desired setting option is being
displayed.
The display shows the current setting.
or
10
Settings
When entering numbers, press the
selection button next to the corresponding line.
The cursor blinks. As for several setting
options, the current setting will be deleted.
Use the arrow buttons (up/down) to
change the setting.
The display counts up and down.
As for settings with more than one
digit or character, you can move the
cursor by pressing the arrow buttons
(left/right).
The selected cursor position blinks.
To complete the entry of numbers,
press the selection button next to the
corresponding line again.
The cursor stops blinking.
To complete the entry, press the stop
button several times.
The display resumes the initial state.
Volume adjustment
The volume can be adjusted when the device is in the idle state or during playback.
Press the arrow buttons (left/right) to
adjust the volume.
The current volume is displayed with the
digits 0 – 8.
11
Outgoing messages (OGMs)
Outgoing messages (OGMs)
General information
Your Retell 332 clip provides of 3 individual outgoing messages (OGM 1-3) and one pre-recorded outgoing message (OGM 4).
You can exchange the outgoing messages by pressing the lower selection button. OGM 4 cannot be individually changed. The
duration of an OGM can be between 3 seconds and 3 minutes. Generally, two different kinds of outgoing messages are
distinguished, i. e. OGMs with incoming recording and OGMs without incoming recording. In the case of an OGM with incoming
recording, the caller has the option to leave a message after the outgoing message. An OGM without incoming recording
(announcement only) is just used for information purposes – without giving the caller the option to leave a message.
Examples of outgoing messages
OGM with incoming recording
Hello, this is the answering machine of ........ (name) in ........(town). I am currently out for seeing customers and will be available in
the office at approx. ..........o’clock. You can call me between ....... o’clock and ...... o’clock under the telephone number ....... If you
prefer, you can leave your name and number. I will ring you as soon as I am back. Please speak after the beep.
OGM without incoming recording (announcement only)
Hello, this is ........(name), Sales Representative of ........... (name of the company). My office is temporarily closed due to illness
(holidays etc.). Please call my deputy, Mr. ......... in ......... . His telephone number is .......... He will assist you. Many thanks for your
call.
Recording outgoing messages
Select the desired OGM by pressing
the lower selection button.
The selected OGM is shown at the bottom
right side of the display.
Press the OGM button and keep it
pressed.
Wait, you will hear a brief tone, the display
shows “Recording”.
Start speaking your outgoing
message (keep a distance of about
15 cm from the microphone).
The display shows the current duration of
your recording in minutes and seconds.
×
Release the OGM button to interrupt
the recording.
The display shows “Answer mode” and
“Answer only mode”.
Ø
To continue recording your outgoing
message, press the OGM button
again and keep it pressed.
The recording is being continued.
Ø
12
Outgoing messages (OGMs)
Press the stop button to stop the
recording without saving.
The OGM recording is stopped.
Use the selection button next to the
corresponding line to determine
whether the OGM shall be with or
without an option for an incoming
message recording.
The recording is complete and will be
played back for test purposes. An OGM
with incoming recording option is indicated
by just 1 signal tone at the end. An OGM
without incoming recording is indicated by
2 signal tones.
If you record OGM 3 as outgoing message without incoming recording (announcement only), your Retell 332 clip will
) automatically
switch to this OGM as soon as the recording capacity will be exhausted.
Testing the outgoing messages
Select the desired OGM by pressing
the lower selection button.
The selected OGM is shown at the bottom
right side of the display.
Press the OGM button briefly.
The OGM is being played back. The
display shows “Playback”, the current
duration and the OGM number.
You can adjust the volume by
pressing the arrow buttons (left/right).
Erasing outgoing messages
Press the selection button next to the
“delete” symbol during playback.
The currently played back outgoing
message is erased.
13
Answering mode
Answering mode
) Take care that enough recording capacity for incoming messages is available. If required, you should erase individual or all
recorded messages.
Select the desired OGM by pressing
the lower selection button.
The selected OGM is shown at the bottom
right side of the display.
Press the answering mode button.
The LED is lit. If you selected an OGM
“without incoming recording”, two lines are
shown instead of the number of messages.
The number of calls shown in the display
blinks when the Retell 332 clip picks up an
incoming call.
If the caller's telephone number is being
transfered during a call, the display will
show this telephone number instead.
Use the arrow buttons (left/right) to
adjust the volume.
Call screening is possible for incoming
messages. If you decide to answer the call
personally, you can do so at any time, by
just picking up the handset. If new
incoming messages exist, the LED will
blink.
Press the answering mode button
again to deactivate the answering
mode.
Further incoming calls will not be
answered. The display resumes the initial
state. The LED blinks as long as the
recorded messages have not been played
back.
) If the recording capacity is exhausted, your Retell 332 clip automatically switches to OGM 3, provided that OGM 3 is an OGM
without incoming recording (announcement only). Otherwise, the device will switch the answering mode off and no further
incoming calls will be answered.
14
Play back and erasing incoming messages (ICMs)
Play back and erasing incoming messages (ICMs)
Playback of new incoming messages
Press the playback button.
The playback of new and not yet played
back incoming messages starts. The
display shows the number of the currently
played back ICM as well as the caller‘s
telephone number. At the end of an ICM
you hear date and time of the call.
Use the arrow buttons (left/right) to
adjust the volume.
Playback of all incoming messages
2 sec.
Press the playback button and keep it
pressed for 2 seconds.
The playback starts with the first incoming
message.
Press the playback button during
playback.
The last 3 seconds will be repeated.
Repetition
Interrupting the playback
Press the stop button.
The playback is stopped.
Press the playback button.
The playback is continued.
Search (Skip)
Press the arrow buttons (up/down).
The incoming message that is currently
being played back is skipped or repeated.
Erasing individual incoming messages
Press the selection button next to the
“delete” symbol during playback.
The current incoming message is erased.
All remaining ICMs will automatically get a
new number and move up in the list.
15
Play back and erasing incoming messages (ICMs)
Erasing all incoming messages
Press the stop button.
2 sec. Press the selection button next to the
delete symbol and keep it pressed for
2 seconds.
The display shows either the initial state or
the answering mode state.
All incoming messages are erased.
Direct connection to the caller
Press the selection button next to the
caller’s telephone number during
playback.
The telephone number is being dialled.
You can listen to the dialling process via
the integrated loudspeaker.
After the dialling process, the call can
be taken over by picking up the
handset.
The display shows a stop-watch indicating
the duration of the call.
) The handset may not be picked up during the dialling process, as otherwise errors might occur.
16
Two-way conversation recording / Personal information (dictate)
Two-way conversation recording / Personal information (dictate)
Two-way conversation recording of telephone calls
You have the option to record important conversations. A record must have a duration of 3 seconds at a minimum.
Press the recording button during a
telephone conversation.
The device starts recording. The display
shows “Monitoring” and the duration of the
current recording.
To end the recording, press the stop
button or replace the handset.
The display resumes the idle state. If the
answering mode was active before the
two-line conversation recording, this will be
resumed.
) A two-line recording is stored as any other recording (incoming or outgoing message) and can be played back at any time.
Personal information (dictate)
Personal information can be dictated directly via the integrated microphone. The duration of a record must be 3 seconds at a
minimum.
Press the recording button.
Wait, you hear a brief tone and the display
shows “Recording”.
Start speaking your dictate or
personal information (keep a distance
of about 15 cm to the microphone).
The display shows the duration of your
recording in minutes and seconds.
Press the stop button to end the
recording.
The recording is stopped. The LED blinks
to indicate a new message. If the
answering mode was active before
recording the dictate, the counter is
increased by one.
) You also have the option to record a personal information while the device is in the answering mode. Other people then have
the possibility to retrieve this information using the remote control code.
17
Two-way conversation recording / Personal information (dictate)
18
Message transfer
Message transfer
In the answering mode with message transfer on, your Retell 332 clip dials a pre-programmed destination phone number after an
incoming message has been recorded. When the handset of the programmed destination number is picked up, the following
announcement is heard:
“Automatic call, … please perform a remote interrogation. … I repeat, …automatic call, … please perform a remote interrogation.
… The unit disconnects now. Good bye.”
During the announcement, there is the option to start the remote interrogation of the recorded incoming message(s). If the
destination number is busy, the device will redial the number up to three times every three minutes.
Setting the destination number
Please enter the destination number as described in the chapter “Settings”.
For telephone systems, the following special characters are available:
P = 3 seconds pause / wait for dialling tone
i = internal (within telephone systems)
F = flash (short, 90 ms)
H = hook-flash (long, 240 ms)
In the case of telephone systems, the exchange identification code is automatically dialled before each telephone number (see
chapter “Settings / Exchange identification code“). In order to avoid this for internal extension numbers, you need to dial “i” before
any internal destination number.
Examples:
subscriber’s main station
normal subscriber
mobile phone
02102123456
01701234567
telephone systems
from extension to extension
to the public exchange (exchange identification code has been set)
to the public exchange (no exchange identification code has been set)
i 269
02102123456
0 P 02102123456
Activating the message transfer
+
Press Answering mode and Playback
at the same time to activate the
message transfer.
The display shows the symbol (double
arrow) for message transfer.
+
To deactivate the message transfer,
press Answering mode and Playback
at the same time again.
The symbol for message transfer (double
arrow) disappears.
) During the transfer of a message, the symbol for message transfer (double arrow) blinks.
19
Call list
Call list
General information
The last 30 incoming calls together with information on date and time of the calls are stored in the call list. If the caller’s telephone
number has been transferred during a call, this is also displayed. You have the option to dial any telephone number from the call
list directly – by just pressing a button. Individual entries from the list or even the entire list can be erased.
Browse through the call list
Press the arrow button (up) or
(down).
The display shows the latest entry from the
call list.
Use the arrow buttons (up/down) in
order to browse through the entire
list.
To erase an entry, press the selection button next to the delete
symbol.
2 sec. To erase the entire call list, press the
selection button next to the delete
symbol and keep it pressed for 2
seconds.
To exit the list, press the stop button.
The entry is erased.
The entire call list is erased.
The display resumes the initial state.
Call back from the call list
Use the arrow buttons (up / down) in
order to browse through the list and
select the desired entry (see “Browse
through the call list”).
Press the selection button next to the
desired telephone number.
The telephone number is being dialled.
You can listen to the dialling process via
the integrated loudspeaker.
After the dialling process, the call can
be taken over by picking up the
handset.
The display shows a stop-watch
indicating the duration of the call.
20
Call list
) The handset may not be picked up during the dialling process, as otherwise errors might occur.
21
Message function
Message function
The message function allows a caller to whom the message code is known – to leave a message on your answering machine
even if your Retell 332 clip only plays back an OGM without incoming recording. As for an OGM with incoming recording, the
message function allows to skip the OGM.
You can set your personal message code as described under “Settings”.
#
Call your Retell 332 clip.
You hear the outgoing message.
Enter the message code via the
telephone keypad. If you entered a
wrong number by mistake, you can
erase your entry by pressing the star
button and start again.
After each number, a voice
acknowledgement is given.
Press the rhombus button to confirm
your entry.
The device asks you to speak your
message. If a wrong code has been
entered, your Retell 322 clip will disconnect
the line immediately.
Speak your message and replace the
handset afterwards.
) The telephone to be used for the execution of the message function must be set to the tone dialling method (MFV).
22
Remote control
Remote control
You have the option to remote control your Retell 332 clip via the numeric keypad of any tone dialling telephone – world-wide. In
order to perform a remote control, you need your personal remote control code. You can set your personal remote control code
individually as described on page 10 “Settings”.
Remote operation
Call your Retell 322 clip.
You hear the current outgoing message.
Enter the remote control code via the
telephone keypad. If you entered a
wrong number by mistake, you can
erase your entry by pressing the star
button and start again.
After each number, a voice acknowledgement is given.
After having entered the complete
code, press the rhombus button.
If the code was identified to be correct,
your Retell 322 clip answers with a voice
message. If a wrong code has been
entered, the device will disconnect the line.
Start the desired function by entering
the corresponding function code
number.
If new incoming messages exist, the
playback will start automatically.
8
To end a function, press “8”.
The current function is being interrupted.
∗ #
Press the star and the rhombus
button consecutively to end the
remote control.
#
To make sure that you are still on the line, your Retell 322 clip emits a voice confirmation request “please confirm” if no
) button
has been pressed during the remote operation for about 180 seconds. You have to confirm this request by pressing
any button within 8 seconds. Otherwise, the device will disconnect the line.
Remote control functions
Playback
3
Playback of all incoming messages
Press “3”.
The playback starts with the first incoming
message.
2
Playback of new incoming messages
Press “2”.
The playback of the new, not yet played
back incoming messages begins.
5
Repetition
Press “5” during playback.
The last 3 seconds are repeated.
8
Interrupting the playback
Press “8”.
The playback is interrupted.
5
Continuing the playback
Press “5”.
The playback is resumed at the position
where it was interrupted earlier (e. g. after a
confirmation request).
46
Search (skip)
During the playback, press “4” to search
backwards or press “6” to search
forwards.
The currently played back message is
repeated or skipped.
7
Erasing the current incoming
message
The current incoming message is erased.
23
Remote control
Press “7” during playback.
∗7
Erasing all incoming messages
Press “star” and “7” consecutively.
All incoming messages are erased.
Room monitoring / Room speaking
1
Room monitoring/room speaking
Press “1”.
The microphone turns on and you can listen
to what is happening in the surroundings of
your Retell 322 clip.
1
Press “1” again.
The devices switches to the room speaking
function. Persons present in the room can
hear you through the loudspeaker.
Activating / Deactivating functions
∗4
Activation or deactivation of the
message transfer
Press star and “4” consecutively.
You are informed on the current status “ON”
or “OFF” by voice message.
7
Switching between OGMs
Press “7” and the number of the desired
OGM (1 … 4) consecutively.
The selected OGM is played back for
verification purposes. When the device
answers the next incoming call, the new
OGM will be played back.
1 ... 4
Changing the OGM
9
1 ... 3
Changing the OGM
Press “9” and the number of the OGM to
be changed (1 … 3) consecutively.
Your Retell 322 clip asks you to record your
new outgoing message.
Speak your OGM.
8
For an OGM with incoming recording:
Press “8” after having spoken your OGM.
The OGM is played back for verification
purposes. At the end of the recording, you
will hear one signal tone.
For an OGM without incoming recording
(announcement only): Press # after
having spoken your OGM.
The OGM is played back for verification
purposes. At the end of the recording, you
will hear two signal tones.
or
#
Deactivation of the answering mode
∗ 0
Remote deactivation of the answering
mode
Press star and “0” consecutively.
Your Retell 322 clip disconnects the line and
will not answer further incoming calls.
24
Remote control
Remote activation of the answering mode
Call your Retell 322 clip.
After 50 seconds, the device picks up and
a signal tone is heard.
Enter the remote control code via the
telephone keypad and complete your
entry by pressing the # button.
The OGM is played back for verification
purposes. The device can now be operated
remotely (e. g. for recording a new OGM).
After completion of the remote operation,
your Retell 322 clip resumes the answering
mode and continues to answer incoming
calls.
25
Appendix
Appendix
Legality of Call Recording in the UK
Oftel says that you should make every reasonable effort to inform all parties that they may or will be recorded, silently
monitored or intruded into. They say that it is up to you how you do this and that acceptable options depending on
circumstances might include warning tones, pre recorded messages, spoken warnings by the operator, or written
warnings included in publicity material, telephone directories, contracts, terms of business, staff notices etc. Oftel
says that it may not be possible to warn first time callers with whom you have had no previous contact but what is
important is that you have a systematic procedure in place that provides the necessary information where it is a realistic possibility. For further information please contact Oftel, 50 Ludgate Hill,London, EC4M 7JJ, Tel 0345 145
000.Additional information can be obtained in relation to the Data Protection Act and call recording from Communications and Information Industries Directorate, Department of Trade and Industry, 151 Buckingham Palace Road, London, SW1W 9SS. Check www.retellrecorders .co.uk for information on recording staff or individuals.
Guarantee
Retell undertakes to repair or replace (at Retell’s option) the equipment supplied that develops a fault within 1 year of
the date of purchase subject to the following conditions:
1. The equipment has not been subject to misuse, liquid damage, accidental breakage, neglect or any other
use other than for the purposes of recording conversations or memo’s
2. The equipment has not been tampered with or adjusted internally by anyone other than Retell or their appointed agents.
If a defect occurs the equipment should be returned to your supplier in the first instance. Alternatively you can return
it pre-paid to Retell in protective packaging containing a full explanation of the fault and proof of purchase. Retell
does not accept liability for damage in transit and we strongly suggest using Recorded Delivery to prove receipt.
This guarantee does not affect your statutory rights. Retells full terms and conditions are available upon request.
Liability
RETELL EXPRESSLY EXCLUDES TO THE EXTENT PERMITTED BY LAW LIABILTY FOR ANY CONSEQUENTIAL LOSS, DAMAGE OR INJURY ARISING FROM OR IN CONNECTION WITH ANY RETELL PRODUCT. NO LIABILITY CAN BE ACCEPTED FOR ANY LOSS OF DATA OR RECORDINGS OR FALIURE TO RECORD OR
CONSEQUENCES OF SUCH LOSS.
R&TTE Directive
We hereby declare that this product complies with the essential requirements of directive 99/05 (the R&TTE directive).
To obtain a full copy of the declaration associated with this product then please contact Retell at the address below
Retell, 53 Thames Street, Sunbury on Thames, Middlesex, TW16 5QH
Tel 01932 779755
Fax 01932 780383
E-mail [email protected]
Website www.retellrecorders.co.uk
Support
If you should require help setting up or operating your equipment then you can contact Retell by any of the following ways:
E-mail: [email protected]
Phone: 0871 872 4257
Fax: +44(0) 1932 780 383
Post: Retell, 53 Thames Street, Sunbury on Thames, Middlesex TW16 5QH ENGLAND
26
Appendix
Customer Comments
Retell aims to continually improve instructions. Please e-mail your comments to [email protected]
27
Appendix
Malfunctions and Troubleshooting
In case of malfunctions, first try to find the possible cause and to solve the problem according to the following table.
Power failure
The device cannot be operated in the case of a power failure. The internal watch will stop. All other settings are retained so that
the former state is resumed as soon as power is supplied again. You will then only have to set the watch again (see page 10).
Problem
Possible cause
Solution / recommendation
No display.
AC adapter not plugged in.
Check all cables and
connections. Check the device
at another power outlet.
Display is weak or too dark.
Display contrast setting
changed.
Adjust the display contrast.
No tone.
Volume set to “0”.
Adjust the volume.
OGM symbol blinks.
No OGM recorded.
Record an OGM.
No answering of calls, no 2-way
conversation recording.
Connecting cable has no
contact.
Check all cables and
connections.
No answering of calls if operated with a telephone system.
No ringing signal set.
Check the telephone system's
programming parameters.
Humming sounds or other
interferences during playback.
Interference source nearby the
device, e. g. a cordless
telephone, monitor or similar.
Install in a different place.
No incoming message
recording.
You have selected an OGM
without incoming recording
(announcement only).
Select another OGM or record
new OGM.
No answering of calls, no
function of a post-connected
telephone.
Wrong connecting cable, wrong
wiring of the junction box.
Only use original cables, check
junction boxes (possibly ask an
expert for support).
Wrong or no connection when
operated with a telephone
system.
You have not entered the
exchange identification code,
the telephone system does not
support tone dialling.
Enter exchange identification
code.
Problem
Possible cause
Solution / recommendation
No telephone number is being
displayed for an incoming call.
Your telecommunications
provider or telephone system
does not support this function or
the function is not released.
Ask your telecommunications
provider or your telephone
system manufacturer whether
the function is possible or needs
to be released.
The caller has restricted the
presentation of his telephone
number or has a secret number.
The call comes from a public
telephone.
The call comes via a telephone
network that does not support
the transfer of the caller's
telephone number.
28
Appendix
Factory pre-set
In the following table, you can see the factory pre-set parameters or values for your Retell 332 clip. You can change all these
parameters individually. You can easily reset the device to the factory pre-set parameters via the “set-up menu”.
Language
(D)
Recording length
2 minutes
Recording quality (maximum)
2
Number of ringing tones until call pick-up
2
Remote control code
-
Remote pre-interrogation
no
Message code
-
Exchange identification code (telephone systems)
-
Display contrast (medium)
8
Message transfer
off
Destination number for message transfer
-
Outgoing message
4 (pre-recorded)
Answering mode
off
Technical data
Dimensions (W x H x D)
Retell 332 clip
AC adapter
180 x 50 x 190 mm
53 x 68 x 44 mm
Weight
Retell 332 clip
AC adapter
400 g
270 g
Operating voltage
AC adapter
Power consumption in the idle state
230 V / 50 Hz
<2W
Ambient temperature
0 – 40 °C
Outgoing messages (OGMs)
Number of OGMs
Length of OGMs
4
3 sec. - 3 min.
Recordings
Recording procedure
Scanning frequency
Total recording capacity
Number of all messages
ADPCM 32 / 64 kBit/s
8 kHz / 16 kHz
approx. 50 min. / 25 min.
max. 99
Clip
Display of phone number
Dualmode DTMF / FSK
Call list
30 entries
Data retention after power failure
> 10 years
Display
alphanumeric LCD 2 x 16 dots
29
Index
Index
Repetition ................................ 17
Ringing tones ............................ 10
Room monitoring ........................ 28
AC adapter ............................. 3, 8
Answering mode ......................... 16
Brief operating instructions ........... 37
Browse through the call list ........... 24
Button assignment ....................... 4
Safety information ....................... 3
Scope of supply .......................... 8
Search (skip) ........................ 18, 28
Service .................................... 31
Call back from the call list ............ 25
Call list ................................... 24
Caller's telephone number ............ 16f
CE sign .................................... 32
Confirmation request ................... 27
Connection ................................ 8
Date .......................................
Destination phone number ....... 11,
Direct connection to the caller .......
Display contrast .........................
10
22
19
11
Ecological information .................
Erasing all incoming messages ........
Erasing individual incoming messages
Erasing outgoing messages ............
Errors .....................................
Examples of outgoing messages ......
Exchange identification code .........
32
18
18
15
19
13
11
Table of contents ........................ 6
Technical data .......................... 35
Telephone connecting cable ........... 8
Telephone systems ..................... 22
Testing the outgoing messages ....... 15
Time ...................................... 10
Troubleshooting ......................... 33
Two-way conversation recording ..... 20
Volume adjustment .................... 12
Factory pre-set ..................... 11, 34
Guarantee ................................ 31
Installation ............................. 3, 8
Interrupting the playback .............. 18
Language ................................. 10
Length of incoming messages ......... 10
Main station .............................. 22
Malfunctions ............................. 33
Message code ....................... 10, 26
Message function ........................ 26
Message transfer ........................ 22
Operating elements ...................... 5
Outgoing message with
incoming recording .............. 13, 29
Outgoing message without
incoming recording .............. 13, 29
Packaging carton ......................... 8
Packaging materials .................... 32
Personal information ................... 21
Playback of all incoming messages ... 17
Playback of new incoming messages . 17
Power failure ............................ 33
Programmable parameters ............ 10
Recording outgoing messages ......... 14
Recording quality ....................... 10
Remote activation of the answering
mode ................................... 30
Remote control .......................... 27
Remote control code .............. 10, 27
Remote control functions .............. 28
Remote erase ............................ 28
Remote operation ....................... 27
Remote pre-interrogation ............. 10
30
Brief operating instructions
Brief operating instructions
Outgoing message recording
Ø
Press selection
button to choose the
OGM
×
Press OGM and
keep it pressed
Start speaking your
OGM
Release OGM
Testing your outgoing messages
or
Press selection
button to choose the
OGM
Press OGM briefly
Set the desired
volume
Press the selection
button to erase the
OGM
Playback of incoming messages
or
2 sec.
Press playback briefly to start
playback of new ICMs
Keep playback pressed for 2 sec.
to start playback of all ICMs
Set the desired volume
Erasing incoming messages
or
Press the selection button during playback to
erase the current ICM
Keep the selection button pressed for
2 seconds to erase all ICMs
Answering mode
Press to activate the answering mode
Press to deactivate the answering mode
Dialling from the call list
Use arrow buttons to open the call
list and to search for an entry
Press the selection button next to
the desired telephone number
After the dialling process, pick up
the handset and hold your
telephone conversation
31
Press selection
button to set the
type of OGM
Brief operating instructions
32
Brief operating instructions
RETELL AG
Halskestr. 1
D – 40880 Ratingen
phone: +49 2102 428 – 189
fax:
+49 2102 428 – 180
e-mail: [email protected]
Internet: www.Retell.net
(UK) 10/2002
EDV 4932938


![lincoln log oct 10[2].pub](http://vs1.manualzilla.com/store/data/005855077_1-2c0fc504936f7d4b0b051d0e2d4edff8-150x150.png)