1
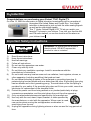
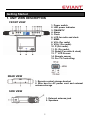
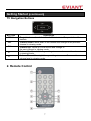
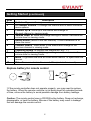
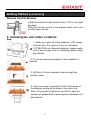
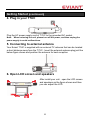
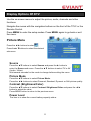
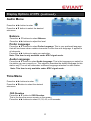
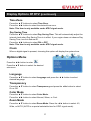
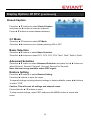
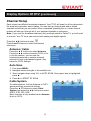
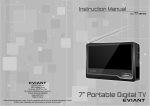
FM /AM
TV
ALARM
CLOCK
P
P
Introduction
Congratulations on purchasing your Eviant T7UC Digital TV.
On June 12, 2009 the conversion to digital television broadcasting will be complete all
throughout the United States and Puerto Rico. Your digital
television is designed to pick up both the older analog signals
as well as the new digital signals.
This 7" Under-Cabinet Digital LCD TV lets you watch your
favorite TV shows in your kitchen. Tune into your favorite AM
and FM radio stations, or use the clock to set the alarm as
your kitchen timer.
Important Safety Instructions
WARNING: To reduce the risk of fire or
electric shock. DO NOT expose this
product to rain or moisture.
1)
2)
3)
4)
5)
6)
7)
8)
9)
10)
11)
12)
13)
Read these instructions.
Keep these instructions.
Heed all warnings.
Follow all instructions.
Do not use this apparatus near water.
Clean only with dry cloth.
Do not block any ventilation openings. Install in accordance with the
manufacturer’s instructions.
Do not install near any heat sources such as radiators, heat registers, stoves, or
other apparatus (including amplifiers) that produce heat.
Do not defeat the safety purpose of the polarized or grounding-type plug. A
polarized plug has two blades with one wider than the other. A grounding type plug
has two blades and a third grounding prong. The wide blade or the third prong is
provided for your safety. If the provided plug does not fit into your outlet, consult an
electrician for replacement of the obsolete outlet.
Protect the power cord from being walked on or pinched particularly at plugs,
convenience receptacles, and the point where they exit from the apparatus.
Only use attachments/accessories specified by the manufacturer.
Use only with the cart, stand, tripod, bracket, or table specified by
the manufacturer, or sold with the apparatus. When a cart is used,
use caution when moving the cart/apparatus combination to
avoid injury from tip-over.
Unplug this apparatus during lightning storms or when unused for long periods of
time.
1
14)
15)
16)
17)
18)
19)
20)
Refer all servicing to qualified service personnel. Servicing is required when the
apparatus has been damaged in any way, such as power-supply cord or plug is
damaged, liquid has been spilled or objects have fallen into the apparatus, the
apparatus has been exposed to rain or moisture, does not operate normally, or has
been dropped.
Apparatus shall not be exposed to dripping or splashing and no objects filled with
liquids, such as vases, shall be placed on the apparatus.
CAUTION: Danger of explosion if battery is incorrectly replaced. Replace only with
the same or equivalent type.
Warning: the battery pack or batteries installed shall not be exposed to excessive
heat such as sunshine, fire or the like.
Install in accordance with the manufacture’s instructions, Do not use any cover
over the TV, or enclose the AC/DC adapter, with any objects like a cloth or box
which blocks the vents, This will cause the TV to overheat and present a fire
hazard, Always leave sufficient space around the product for ventilation.
Apparatus does not have wall/ceiling mount function.
Warning: Changes or modifications to this unit not expressly approved by the party
responsible for compliance could void the user’s authority to operate the equipment.
The MAINS plug or an appliance coupler is used as the disconnect device, the
disconnect device shall remain readily operable.
WARNING
The apparatus shall not be exposed to dripping or splashing and that no objects filled
with liquids, such as vases, shall be placed on the apparatus.
The lightning flash with arrowhead symbol, within an equilateral triangle, is
intended to alert the user to the presence of un-insulated “dangerous
voltage” within the product’s enclosure that may be of sufficient magnitude to
constitute a risk of electric to persons.
The exclamation point within an equilateral triangle is intended to alert the
user to the presence of important operating and maintenance (servicing)
instructions in the literature accompanying the appliance.
CAUTION: These servicing instructions are for use by qualified service personnel only.
To reduce the risk of electric shock, do not perform any servicing other than that
contained in the operating instructions unless you are qualified to do so.
Refer to service manual for servicing instructions. To reduce the risk of fire or electric
shock, do not expose this apparatus to rain or moisture.
The images in this manual are only for reference and they may be different from
the actual ones.
2
FCC Compliance
This device complies with part 15 of the FCC Rules. Operation is subject to the
following two conditions:
This device may not cause harmful interference.
This device must accept any interference received, including
interference that may cause undesired operation.
This equipment has been tested and found to comply with limits for Class B digital
device, pursuant to part 15 of the FCC Rules. These limits are designed to provide
reasonable protection against harmful interference in a residential installation. This
equipment generates uses and can radiate radio frequency energy and, if not
installed and used in accordance with the instructions, may cause harmful
interference to radio or television reception, which can be determined by turning
the equipment off and on. The user is encouraged to try to correct the interference
by one or more of the following measures:
Reorient or relocate the receiving antenna on the affected receiver.
Increase the separation between this device and the receiver.
Connect this device into an outlet on a circuit different from that to
which the receiver is connected.
Consult the dealer or an experienced radio/TV technician for help.
This Class B digital apparatus complies with Canadian ICES-003.
Accessories
The Following Items Are Included With Your TV.
1.
2.
3.
4.
5.
6.
7.
Main Unit
External Antenna
Remote Control
Screws
Mount Spacer
Mounting Template
Documentation
3
Table of Contents
Introduction
Important Safety Information ................................1
FCC Compliance..................................................3
Accessories..........................................................3
Getting Started
Unit view description ..........................................5
Remote control ...................................................7
Installing the unit under a cabinet.........................9
Plug in your T7UC...............................................10
Connecting to external antenna ..........................10
Open LCD screen and speakers .........................10
Display Options of DTV
Picture Menu .......................................................11
Audio Menu .........................................................12
Time Menu ..........................................................12
Options Menu......................................................13
Channel Setup ....................................................15
Setting of FM/AM radio ........................................17
Setting of Alarm ......................................................17
Service & Support
Troubleshooting ..................................................18
Specifications ......................................................19
4
Getting Started
1. UNIT VIEW DESCRIPTION
FRONT VIEW
1. Power switch
2. LED power indicator
3. FM/AM/TV
4. Alarm
5. Clock
6. LCD for radio and clock
7. MEM.
8. VOL-(For radio)
9. VOL+ (For radio)
10. P-(For radio)
11. P+ (For radio)
12. Reset (For radio & clock)
13. 7” LCD Screen
14. Remote sensor
15. For TV Controlling:
REAR VIEW
1. Remote control storage bracket
2. Wire box for AC power cord and external
antenna storage
SIDE VIEW
1. External antenna jack
2. Speakers
5
Getting Started(continued)
Control Buttons Menu(for radio only)
BUTTON
FM/AM/TV
ALARM
CLOCK
MEM.
VOLVOL+
PP+
Description
FM/AM/TV Mode Switch.
ALARM Mode
CLOCK Mode
Start for scanning/Confirm the setting.
Volume Down ◄: Decrease the volume level in FM/AM mode.
Volume Up ►: Increase the volume level in FM/AM mode.
Channel Down▼: Move down the parameters and switch to the
previous channel in FM/AM mode.
Channel Up ▲: Move up the parameters and switch to the next
channel in FM/AM mode.
Stature View Panel
Item
1
2
3
4
5
6
7
Description
TV/FM/AM mode shown
Clock Mode: AM/PM display
Current setting saved display
Setting the time or alarm
Alarm setting display
Time/Alarm/Frequency value display
Frequency unit display
6
Getting Started(continued)
TV Navigation Buttons
BUTTON
MENU
Description
To go back one level at a time within menus. To open/close the
menus.
CH-
Channel Down: Move down in the menus and change to the previous
channel in viewing mode.
CH+
Channel Up : Move up in the menus and change to
the next channel in viewing mode.
Volume Up: Move left/change settings in menus. Increase the volume level
in viewing mode.
Volume Down: Move right/change settings in menus. Decrease the
volume level in viewing mode.
>
<
2. Remote Control
7
Getting Started(continued)
NUM
1
2
3
4
5
6
7
8
9
10
Description
Unit standby or wakes up.
0-9 Number buttons: To change the channel and to select individual
menu options.
Channel Up ▲: Move up in the menus and change to
the next channel in viewing mode.
Volume Down ◄: Move left/change settings in menus. Decrease the
volume level in viewing mode.
Return button (return to the last channel): To exit a selection or to
close the menu.
Channel Down▼: Move down in the menus and change to the
previous channel in viewing mode.
Character button: to connect the channel no. e.g.: 1-1
Volume Up ►: Move right/change settings in menus. Increase the
volume level in viewing mode.
Menu: To go back one level at a time within menus. To open/close the
menus.
Mute: Press once to turn the sound off/on (mute/active sound).
Replace battery for remote control
OPEN
PUSH
! If the remote controller does not operate properly, you may need to replace
the battery. When the remote controller is not being used for extended periods
of time, remove the battery to avoid possible damage from battery leakage.
Caution: The remote control uses a CR2025 button battery. Does not recharge,
disassemble, or heat the battery. Misuse of the battery may result in leakage
that will damage the remote control.
8
Getting Started(continued)
Remote Control Bracket
Install the bracket on the bottom of the T7UC in the slots
provided.
Slide the remote control in the bracket when not in use
just like figure shows.
3. Installing the unit under a cabinet
Step:
1. When you open all of the speakers, LCD screen
and wire box, the volume of the unit will reach
470*285*220 mm. Before installation, please make
sure it has enough room for operating where under
the cabinet.
2. Fix up the mounting template to the soleplate of
cabinet.
3. Drill four 5.5-6mm diameter holes through the
location holes.
4. Use the screws to install the unit to the bottom of
the cabinet, aiming at the holes in the top of unit.
Note: If the board of cabinet is too thick to tight the
screws up, please add 4 mount spacers between unit
and cabinet.
9
Getting Started(continued)
4. Plug in your T7UC
Plug the AC power supply cord of T7UC to the grounded AC socket.
Note: When not using the unit, please turn off the power, and then unplug the
power supply to avoid malfunctions.
5. Connecting to external antenna
Your Eviant T7UC is supplied with an external TV antenna that can be located
a short distance away from the T7UC。Insert the external antenna plug just like
below figure shows and position the antenna for best reception.
6. Open LCD screen and speakers
After install your unit,open the LCD screen
and speakers as the figure shown and then
you can adjust the LCD.
180°
90°
10
Display Options Of DTV
Use the on-screen menus to adjust the picture, audio, channels and other
functions.
Navigate the menus with the navigation buttons on the front of the T7UC or the
Remote Control.
Press MENU to enter the setup modes. Press MENU again to go back or exit
the menu.
Picture Menu
Press the ◄ ► buttons to select
.
Press the▲ ▼buttons to select the desired
sub-menu.
Source
Press the ▲▼ buttons to select Source and press the ► button to
enter the Source sub-menu. Press the ▲▼ buttons to select TV or AV
(Audio / Video).
Wait several seconds for the mode to change before exiting the menu.
Picture Mode
Press the ▲▼ buttons to select Picture Mode.
Press the ◄ ► buttons to select Personal, Standard, Dynamic or Soft picture quality.
Contrast (Brightness/Color)
Press the ▲▼ buttons to select Contrast / Brightness/Color and press the ◄ ►
button to adjust the value.
Press MENU button to return to the previous menu.
Power Level
The item is to show the current battery capacity status
11
Display Options of DTV(continued)
Audio Menu
Press the ◄ ► button to select
.
Press the ▲▼ button to select the desired
sub-menu.
Balance
Press the ▲ ▼ buttons to select Balance.
Press the ◄ ► buttons to adjust the level.
Prefer Language
Press the ▲ ▼ buttons to select Prefer Language. This is your preferred language
that will be chosen when a station transmits in more than one language. It applies to
all channels.
Press the ◄ ► buttons to make your selection.
Note: This item is only available under ATSC signal mode.
Audio Language
Press the ▲ ▼ button to select Audio Language. This is the language you select for
the station you are currently on. This selection overrides the default language for this
station only. The unit will remember a different language selection for each station.
Note: This item is only available under ATSC signal mode.
Time Menu
Press the ◄ ► buttons to select
.
Press the ▲▼button to select the desired
sub-menu.
OSD Duration
Press the ▲ ▼ button to OSD Duration.
This is the time the menus remain on the screen.
Press the ◄ ► buttons to select 15, 30, 45, or 60 seconds.
12
Display Options Of DTV(continued)
Time Zone
Press the ▲ ▼ buttons to select Time Zone.
Press the ◄ ► button to select the desired time zone.
Note: This item is only available under ATSC signal mode.
Day Saving Time
Press the ▲ ▼ buttons to select Day Saving Time. This will automatically adjust the
internal clock when Day Saving Time is in effect. If your region does not observe Day
Saving Time, turn this feature off.
Press the ◄ ► buttons to select ON or OFF.
Note: This item is only available under ATSC signal mode.
Clock
When a digital signal is present, choosing this option will display the system time.
Options Menu
Press the ◄ ► button to select
.
Press the ▲▼ button to select the desired
sub-menu.
Language
Press the ▲ ▼ button to select Language and press the ◄ ► button to select
desired language.
Transparency
Press the ▲ ▼ button to select Transparency and press the ◄ ► button to select
On or Off.
Color Mode
Press the ▲ ▼ button to select Color Mode.
Press the ◄ ► button to select Normal, Warm, or Cool.
Zoom Mode
Press the ▲ ▼ button to select Zoom Mode. Press the ◄ ► button to select 4:3,
Wide, or AUTO (AUTO is a special selectable item for ATSC signal mode).
13
Display Options Of DTV(continued)
Closed Caption
Press the ▲ ▼ buttons to select Closed Caption
and press the ► button to enter the submenu.
Press ▲ ▼ buttons to select desired submenu.
CC Mode
Press the ▲ ▼ buttons to select CC Mode.
Press the ◄ ► buttons to turn closed captioning ON or OFF.
Basic Selection
Press the ▲▼ buttons to select Basic Selection.
Press the ◄ ► buttons to select CC1, CC2, CC3, CC4, Text1, Text2, Text3 or Text4.
Advanced Selection
Press the ▲▼ button to select Advanced Selection and press the ◄ ► buttons to
select Service1, Service2, Service3, Service4, Service5 or Service6.
Note: the item is only available under ATSC signal.
Restore Setting
Press the ▲▼ buttons to select Restore Setting.
Press the ► buttons to enter the menu.
To reset all settings including channel settings to factory defaults, press ◄ ► buttons
to select “YES”
Caution: This will erase all settings and channel scans.
Press either the ▲ ▼ buttons to reset.
To keep current settings, select “NO” and press the MENU button to cancel and
return.
14
Display Options Of DTV(continued)
Channel Setup
Each region has different broadcast channels. Your T7UC will scan for all the channels in
the area and remember each location. You can then go through and add or delete
channels individually as you prefer. When completed, pressing the up / down channel
buttons will take you through all of your selected channels in sequence.
Note: If you scan for broadcast channels (Air) and then switch to Cable TV, you will need
to re-scan. Your TV tuner can receive both analog and digital signals.
Press the ◄ ► buttons to select .
Press the▲▼ buttons to select the desired
sub-menu.
Antenna / Cable
Press the ▲ ▼ buttons to select Antenna
Press the ◄ ► buttons to select CATV or Air.
In the Air position, you can use the
telescoping antenna or another external
antenna to pick up broadcast signals. See
below for CATV settings.
Auto Scan
1. First press MENU.
2. Navigate across using ► to the satellite icon.
3. Next navigate down using CH- to AUTO SCAN. Once green box is highlighted,
press ►.
4. Press ► to START TO SCAN.
Cable System
For cable stations, first set Antenna to CATV
above and then proceed as follows:
Press the ▲ ▼ buttons to select Cable
System and press the ◄ ► buttons to select
AUTO, STD, IRC, HRC.
Note: this item is only enabled when Antenna
is set to CATV.
15
Display Options Of DTV(continued)
Start to Scan
Press the ▲ ▼ button to select Start to Scan.
Press the ► button to start scan.
The unit will automatically memorize the
available channels in sequence. When
completed, the unit will tune the first scanned
channel. To stop scanning, press Menu.
Auto Scan Add CH
Press the ▲ ▼ button to select Auto Scan
Add CH. This will search for any new channels that were not previously found.
Press the ► button to enter the menu (refer to the item “Auto Scan”)
Channel Skip
To delete channels, follow these steps:
Press the ▲ ▼ buttons to select Channel
Skip and press the ► button to enter the
menu as shown right:
Within this menu, press the ▲ ▼ buttons to
select the channel you want to skip and press
the ◄ ► button to select On or Off.
Press the MENU button to return to the
previous menu.
Channel No.
Press the ▲ ▼ button to select Channel No. and press the ◄► button to select
channel number. You can now customize the label for this channel as shown below.
Channel Label
Press the ▲ ▼ button to select Channel
Label.
Press the ► button to enter the menu.
Within this menu, press the ◄ ► button to
highlight position and press the ▲ ▼ button to
select the desired character or symbol to edit
the Channel name.
Press the MENU button to return to the
previous menu.
16
Setting of FM/AM radio
Press FM/AM/TV button to FM or AM radio mode. In radio mode, the TV will be shut
down.
Use P- button to switch to the previous channel. Use P+ button to switch to the next
channel. Use VOL- and VOL+ buttons to adjust the volume.
The first time when you enter FM or AM radio mode, please set the radio programs by
AUTO scan or Manual scan:
AUTO scan
Long press MEM. button to enter Auto scan mode of radio, it will scan FM or AM
radio programs and save 20 channels automatically. When scanning, press MEM.
button again to exit.
Manual scan
Press MEM. button to enter Manual scan mode of radio, the frequency information
will flash on LCD. Press P- or P+ buttons to adjust frequency.
If you want to lock the frequency and storage as a channel, press MEM. button and
then press P- or P+ buttons to select a channel NO. Press MEM. button again to save
it.
Setting of Alarm
Press ALARM button to set the timer. Use P- and P+ buttons to set the countdown value
from off to 60 minutes. Default setting is off .Press ALARM button again to save setting
and start the timer. When timer arrive the setting value, the buzzer will ring out.
Setting of Clock
Press CLOCK button to set clock. First enter the hour setting, use P- and P+ buttons to
adjust the clock value, press CLOCK button again to switch to minute setting. At last,
press CLOCK button to save settings and exit.
17
Troubleshooting
Before contacting customer service, review the steps below to solve simple problems. If
you still suspect something wrong with this unit, immediately turn the power off,
disconnect the power connector from the unit, and contact Eviant Customer Service.
Never try to repair the unit yourself.
Problem
No Signal
No Sound
Remote Control
Does Not Work
No Display
Possible Cause
Possible Solution
No broadcast signals in
the area or signals too
weak
Try a more powerful antenna
Unit set to receive CATV
signal
Check antenna selection.
See page 15
Unit is in motion or
handheld
Place unit on a stationary
surface.
Signal is obstructed by
buildings or other
materials
Antenna orientation
Channel selected is
unavailable
Change Channel
See Page 16
Volume is turned down
Check volume
Audio language setting is
not correct
Check audio language.
Remote Control is out of
range
Point Remote directly at front
of TV no more than 15 feet
away
Weak battery
Replace CR2025 battery
Power switch is off or
power adapter is not
connected properly
Check power switch and
power adapter connection
Weak battery
Charge battery with power
adapter
Other possibilities
Static or other external interference may cause the unit to function abnormally. In order to
reset normal status, turn off the unit and unplug the power supply and try again. If the
problem is still present, turn off the unit, disconnect the power supply and consult a
qualified technician.
18
Specifications
TFT screen size ............................ 7 inches
Active area…………………….………154.08.0(W)*86.58(H) mm
Resolution…………………………... 480*3(RGB)*234
Receiving systems…………………..ATSC, NTSC
TV Full Frequency Range…………..54MHz ~ 863MHz
FM band support……………………. 76-108MHz
AM band support…………………… 520-1710 kHz
Design and specifications are subject to change without notice.
All products distributed by Eviant Inc. unless otherwise indicated
©2009-2010 Quatto Management
Limited. Eviant is a trademark and
service mark of Quatto Management
Limited. All other brand, trademarks
and service marks are property of their
owners.
Eviant
1661 Fairplex Drive
La Verne, CA 91750
USA
Made in China
www.eviant.com
We are seriously concerned about environmental protection, and we hope that
you share our concern as well. For more information regarding our recycling
program, please visit us at http://www.eviant.com/green or call us at
1-866-935-4396.
7TH01
19