1
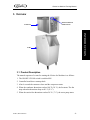
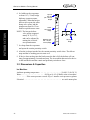
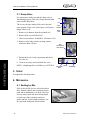
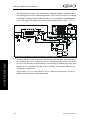
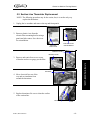
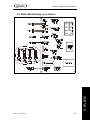
I-SERIES ICE MACHINE
TRAINING MANUAL
Distributed By:
Commercial Refrigeration Service, Inc.
IOXIDE
WWW.IceCubes.NET
WWW.CorneliusParts.COM
(866) 423-6253
ONCENTRATE
(623) 869-8881
CARBON D
WATER
SYRUP/C
MECHANICAL
REFRIGERATION
CONTROLS & ELECTRICAL
Blank Page
Distributed By:
Commercial Refrigeration Service, Inc.
WWW.IceCubes.NET
WWW.CorneliusParts.COM
(866) 423-6253
(623) 869-8881
I-Series Ice Machine Training Manual
I-Series Ice Machine
Training Manual
The products, technical information, and instructions contained in this manual are subject
to change without notice. These instructions are not intended to cover all details or variations of the equipment, nor to provide for every possible contingency in the installation,
operation or maintenance of this equipment. This manual assumes that the person(s) working on the equipment have been trained and are skilled in working with electrical, plumbing, pneumatic, mechanical, and refrigeration equipment. It is assumed that appropriate
safety precautions are taken and that all local safety and construction requirements are
being met, in addition to the information contained in this manual.
To inquire about current revisions of this and other documentation or for assistance with
any Cornelius product contact:
IMI Cornelius Inc.
Corporate Headquarters
One Cornelius Place
Anoka, MN 55303-6234
U.S.A.
Internet:
www.cornelius.com
In the U.S.A.:
Outside the U.S.A.:
phone: 763-421-6120
800-238-3600
FAX:
800-535-4231
phone: 763-421-6120
FAX:
763-422-3297
Email:
[email protected]
Trademarks and copyrights:
Aurora, Cornelius, Decade, Hydro Boost, Sitco, Spirit, UF-1, Vanguard, Venture, Olympus, and Vista are registered trademarks of IMI Cornelius Inc.
Optifill trademark is pending.
This document contains proprietary information and it may not be
reproduced in any way without permission from Cornelius.
Printed in U.S.A.
Copyright © 2001, All Rights Reserved, IMI Cornelius Inc.
I-Series Ice Machine Training Manual
NOTES:
_______________________________________________________________________
_______________________________________________________________________
_______________________________________________________________________
_______________________________________________________________________
_______________________________________________________________________
_______________________________________________________________________
_______________________________________________________________________
_______________________________________________________________________
_______________________________________________________________________
_______________________________________________________________________
_______________________________________________________________________
_______________________________________________________________________
_______________________________________________________________________
_______________________________________________________________________
_______________________________________________________________________
_______________________________________________________________________
_______________________________________________________________________
_______________________________________________________________________
_______________________________________________________________________
_______________________________________________________________________
_______________________________________________________________________
_______________________________________________________________________
TABLE OF CONTENTS
TABLE OF CONTENTS - - - - - - - - - - - - - - - - - - - - - - - - - - - - - - - - - - - - - - - - - - 1
INTRODUCTION - - - - - - - - - - - - - - - - - - - - - - - - - - - - - - - - - - - - - - - - - - - - - - 3
Preview Questions - - - - - - - - - - - - - - - - - - - - - - - - - - - - - - - - - - - - - - - - - - - - - 3
Key Things To Know / Do - - - - - - - - - - - - - - - - - - - - - - - - - - - - - - - - - - - - - - - 4
Overview - - - - - - - - - - - - - - - - - - - - - - - - - - - - - - - - - - - - - - - - - - - - - - - - - - - 5
Product Description - - - - - - - - - - - - - - - - - - - - - - - - - - - - - - - - - - - - - - - - - 5
Dimensions & Capacities - - - - - - - - - - - - - - - - - - - - - - - - - - - - - - - - - - - - - - 6
Ice Machine: - - - - - - - - - - - - - - - - - - - - - - - - - - - - - - - - - - - - - - - - - - - - 6
SYSTEM DETAILS - - - - - - - - - - - - - - - - - - - - - - - - - - - - - - - - - - - - - - - - - - - - - 7
Carbon Dioxide/Air - - - - - - - - - - - - - - - - - - - - - - - - - - - - - - - - - - - - - - - - - - - - 7
Water - - - - - - - - - - - - - - - - - - - - - - - - - - - - - - - - - - - - - - - - - - - - - - - - - - - - - 7
Dump Valve - - - - - - - - - - - - - - - - - - - - - - - - - - - - - - - - - - - - - - - - - - - - - - 8
Syrup - - - - - - - - - - - - - - - - - - - - - - - - - - - - - - - - - - - - - - - - - - - - - - - - - - - - - - 8
Mechanical - - - - - - - - - - - - - - - - - - - - - - - - - - - - - - - - - - - - - - - - - - - - - - - - - - 8
Sealing Ice Bin - - - - - - - - - - - - - - - - - - - - - - - - - - - - - - - - - - - - - - - - - - - - 8
Refrigeration - - - - - - - - - - - - - - - - - - - - - - - - - - - - - - - - - - - - - - - - - - - - - - - - 9
Air Cooled Condensers - - - - - - - - - - - - - - - - - - - - - - - - - - - - - - - - - - - - - - - 9
Water Cooled Condensers - - - - - - - - - - - - - - - - - - - - - - - - - - - - - - - - - - - - - 9
Water Regulating Valve - - - - - - - - - - - - - - - - - - - - - - - - - - - - - - - - - - - 10
Remote Cooled Ice Machines - - - - - - - - - - - - - - - - - - - - - - - - - - - - - - - - - - 11
Refrigeration System - - - - - - - - - - - - - - - - - - - - - - - - - - - - - - - - - - - - - - - 11
Expansion Valve - - - - - - - - - - - - - - - - - - - - - - - - - - - - - - - - - - - - - - - - 11
Low Refrigerant- - - - - - - - - - - - - - - - - - - - - - - - - - - - - - - - - - - - - - - - - 11
Refrigerant Charge/Recharge - - - - - - - - - - - - - - - - - - - - - - - - - - - - - - - - 12
Thermal Expansion Valve (TXV) - - - - - - - - - - - - - - - - - - - - - - - - - - - - - 12
Hot Gas Defrost Valve - - - - - - - - - - - - - - - - - - - - - - - - - - - - - - - - - - - - 12
Compressor Start Windings - - - - - - - - - - - - - - - - - - - - - - - - - - - - - - - - - 13
Thermal Overload Protector- - - - - - - - - - - - - - - - - - - - - - - - - - - - - - - - - 13
Head Pressure Control - - - - - - - - - - - - - - - - - - - - - - - - - - - - - - - - - - - - 13
Suction Line Thermistor Replacement - - - - - - - - - - - - - - - - - - - - - - - - - - - - 15
Controls and Electrical - - - - - - - - - - - - - - - - - - - - - - - - - - - - - - - - - - - - - - - - - 16
Controls Board Features - - - - - - - - - - - - - - - - - - - - - - - - - - - - - - - - - - - - - 16
TROUBLE SHOOTING - - - - - - - - - - - - - - - - - - - - - - - - - - - - - - - - - - - - - - - - - 17
Issues Affecting All Circuit Boards - - - - - - - - - - - - - - - - - - - - - - - - - - - - - - - - 17
Reset Operation - - - - - - - - - - - - - - - - - - - - - - - - - - - - - - - - - - - - - - - - - - - 17
Evaporator Proximity Switches - - - - - - - - - - - - - - - - - - - - - - - - - - - - - - - - - 17
TABLE OF CONTENTS
I-Series Ice Machine Training Manual
TABLE OF CONTENTS
I-Series Ice Machine Training Manual
Harvest Safety Termination - - - - - - - - - - - - - - - - - - - - - - - - - - - - - - - - - - - 17
Stacking Cable - - - - - - - - - - - - - - - - - - - - - - - - - - - - - - - - - - - - - - - - - - - - 17
Ice Bridge Thickness Adjustment - - - - - - - - - - - - - - - - - - - - - - - - - - - - - - - 17
Condenser Fan Cycling Control - - - - - - - - - - - - - - - - - - - - - - - - - - - - - - - - 18
Sensor - - - - - - - - - - - - - - - - - - - - - - - - - - - - - - - - - - - - - - - - - - - - - - - - - 18
Circuit Board Overview (red & yellow boards) - - - - - - - - - - - - - - - - - - - - - - - - 19
Sensors - - - - - - - - - - - - - - - - - - - - - - - - - - - - - - - - - - - - - - - - - - - - - - - - - 19
Red & Yellow Boards (LEDs) Descriptions - - - - - - - - - - - - - - - - - - - - - - - - 20
Red & Yellow Board Diagnostics - - - - - - - - - - - - - - - - - - - - - - - - - - - - - - - - - 22
Check Circuit Board - - - - - - - - - - - - - - - - - - - - - - - - - - - - - - - - - - - - - - - - 23
Check Thermistor Sensor(s) - - - - - - - - - - - - - - - - - - - - - - - - - - - - - - - - - - - 23
Green Circuit Board Overview - - - - - - - - - - - - - - - - - - - - - - - - - - - - - - - - - - - 24
Green Board Test Plug - - - - - - - - - - - - - - - - - - - - - - - - - - - - - - - - - - - - - - 24
Green Board Sensors - - - - - - - - - - - - - - - - - - - - - - - - - - - - - - - - - - - - - - - 25
Green Board Voltage Check - - - - - - - - - - - - - - - - - - - - - - - - - - - - - - - - - - - 25
Green Board Voltage Selector Switch - - - - - - - - - - - - - - - - - - - - - - - - - - - - 25
Green Board Ice Bridge Thickness Potentiometer (POT) Factory Reset - - - - - 25
Green Board Dump Cycle Options - - - - - - - - - - - - - - - - - - - - - - - - - - - - - - 26
Green Board Thermistor Sensor Diagnostics - - - - - - - - - - - - - - - - - - - - - - - - 27
Check Circuit Board - - - - - - - - - - - - - - - - - - - - - - - - - - - - - - - - - - - - - - 27
Check Thermistor Sensor(s)- - - - - - - - - - - - - - - - - - - - - - - - - - - - - - - - - 27
Green Board Diagnostics - - - - - - - - - - - - - - - - - - - - - - - - - - - - - - - - - - - - - 28
Erratic Component Operation- - - - - - - - - - - - - - - - - - - - - - - - - - - - - - - - 28
Check Circuit Board - - - - - - - - - - - - - - - - - - - - - - - - - - - - - - - - - - - - - - 28
APPENDIX - - - - - - - - - - - - - - - - - - - - - - - - - - - - - - - - - - - - - - - - - - - - - - - - - - 29
Appendix A — Service Tips - - - - - - - - - - - - - - - - - - - - - - - - - - - - - - - - - - - - 29
Appendix B — Installation Tips - - - - - - - - - - - - - - - - - - - - - - - - - - - - - - - - - - 29
REVIEW - - - - - - - - - - - - - - - - - - - - - - - - - - - - - - - - - - - - - - - - - - - - - - - - - - - - 30
-2-
© 2001, IMI Cornelius Inc.
I-Series Ice Machine Training Manual
INTRODUCTION
1. PREVIEW QUESTIONS
Check your current knowledge by taking a few minutes to answer the following questions:
1. Does the ice machine need to be level?
_____ No?
2. What is the recomended clearance for a air cooled machine? ____________________
____________________________________________________________________
____________________________________________________________________
3. What kind of cleaner should be used when cleaning this ice machine? _____________
____________________________________________________________________
____________________________________________________________________
4. Water filters are required in most installations.
_____ True
_____ False?
5. Water regulators are required in most installations.
_____ True
_____ False?
© 2001, IMI Cornelius Inc.
-3-
INTRODUCTION
_____ Yes
I-Series Ice Machine Training Manual
2. KEY THINGS TO KNOW / DO
INTRODUCTION
• The sealant should be added before the unit is placed on the dispenser on
bin. Always seal the ice maker to the bin (with a gasket or food grade
sealant). Sealing prevents melted ice from running out the joint between
the ice machines!
• Choose the proper condenser for the application:
Air — with sufficient clean air circulation
Water — high ambient temperature or dusty environment, restricted air
flow, or where extra BTUs are unwanted
Remote — when heat or noise are a problem!
• Always refer to serial plate for electrical power requirements and refrigeration charge and type of refrigerant!
Note serial plate locations. Lower lefthand corner of cabinet inside the
unit, on the bulkhead between the evaporator and the compressor.
• Always use proper size and type of water conditioning equipment (filter,
chlorine, etc.)!
• Do NOT use softened or reverse osmosis water!
• Premature harvest is normally caused by a defect in suction line sensors!
“I” series units only.
• Installation of a bin thermostat control is required in some installations,
such as ice drink dispensers or ice drink units!
• Bin stat is available to lower ice level! Part No. 630000-408
-4-
© 2001, IMI Cornelius Inc.
I-Series Ice Machine Training Manual
3. OVERVIEW
Ice Machine
ON/OFF/CLEAN and
DUMP switches
INTRODUCTION
Ice Bin
3.1 Product Description
The normal sequence of events for starting the I-Series Ice Machine is as follows:
1. The ON-OFF-CLEAN switch is switched ON.
2. Controller board does a startup check.
3. After 4 seconds the contactor closes and the compressor starts.
4. When the condenser thermistor reaches 100° F (38° C), the fan starts. The fan
stops when the thermistor drops to 88° F (31° C).
5. When the suction line thermistor reaches 20° F (-7° C), the water pump starts.
© 2001, IMI Cornelius Inc.
-5-
I-Series Ice Machine Training Manual
6. Ice builds on the evaporator
to about 1/8” (.32cm) bridge
thickness (center measure,
adjustable). When the hot-gas
defrost valve opens, the water
dump valve opens, and the
pump motor runs for 15 seconds to expel the waste water.
INTRODUCTION
NOTE: The hot-gas defrost
valve opens at approximately 0° F (-18° C),
and can be adjusted by
turning the ice thickness potentiometer.
Top row
3/8 - 5/8”
(.95 - 1.59 cm)
dimple
Ice slab
Center
1/8”(.32 cm)
bridge
Bottom 2 rows
3/16 - 1/4”(.48 .64 cm) bridge
1/8”(.32 cm)
bridge
7. Ice drops from the evaporator
and opens the curtain proximity switch.
8. After the ice drops into the bin, the curtain proximity switch close. The defrost
stops and the ice making process starts over.
9. If the ice does not drop into the bin because the bin is full, the defrost will continue for approximately 8 seconds and stop. The ice machine then waits for the ice
to fall into the bin and the curtain and proximity switches to close.
3.2 Dimensions & Capacities
Ice Machine:
Ambient operating temperature:- - - - - - - - - - - - - - - 50-100° F (10-38° C)
Water: - - - - - - - - - - - - - - - - 20-50 psi (1.4-3.45 BAR) at the ice machine.
- - - - - - If the water pressure exceeds 50 p.s.i. install a water pressure regulator
Electrical: - - - - - - - - - - - - - - - - - - - - - - - - - see unit’s name plate
-6-
© 2001, IMI Cornelius Inc.
I-Series Ice Machine Training Manual
SYSTEM DETAILS
1. CARBON DIOXIDE/AIR
Not applicable for this product.
2. WATER
+
NOTE: Water related issues are the cause of the
majority of ice maker problems.
NOTE: Always use the proper type and size of water filter
Inlet pressure should be 20 to 50 psi (1.4-3.45 BAR) at the
ice machine.
Water
strainer
Water goes first to a strainer. The strainer screen should be
removed and cleaned at least once per year.
Flow
control
SYSTEM DETAILS
There is a rubber flow control washer in the base of the
float valve. This flow control can be become plugged or
deteriorated by chloramine. It should be checked at least
once per year, and replaced if necessary. Be sure to install
the flow control washer flat side up.
NOTE: The flow control should be removed when the
water pressure is below 20 psi (1.4 BAR).
NOTE: If water pressure is above 50 psi (3.45 BAR) add a pressure regulator.
The operating water level can be changed by bending the
float arm.
NOTE: Make sure the float moves up and down freely
after it has been reinstalled.
Float
arm
A splash shield has been installed above the float on all
machines built since June of 1998. A splash shield kit is available for older machines (part
number for 1 evaporator = 630000234, 2 evap. = 630000232, 4 evap. = 630000233). See
Service Bulletin # TB97108 for additional information.
© 2001, IMI Cornelius Inc.
-7-
I-Series Ice Machine Training Manual
2.1 Dump Valve
It is important to make sure that the dump valve is
functioning properly. This valve dumps mineral laden
water out the dump hose.
The ice may become mushy if the valve does not
open properly. If the valve sticks open, it will cause a
longer freeze cycle.
1. Remove wire harness from the solenoid coil.
Cap
Coil
Wire
harness
Dump
hose
2. Remove blue cap and lift coil off.
3. Check coil resistance. It should be 140 ohms ± 10%.
4. Remove valve body stem by twisting counterclockwise about 1/8 turn.
Twist
counterclock
wise 1/8 turn
SYSTEM DETAILS
5. Disassemble valve body components and check
for scale, etc.
6. Clean as necessary and reassemble the valve.
NOTE: A diaphragm kit is available, p/n 165637018.
Valve Body Spring
Stem
Diaphragm
3. SYRUP
Not applicable for this product.
4. MECHANICAL
4.1 Sealing Ice Bin
If the ice bin is full, new ice will not be able to
drop. Instead it blocks the evaporator curtain
open and no additional ice is made. This new
ice may start to melt and the resulting liquid
can leak out of the joint between the ice
maker and bin. To prevent this problem, seal
the joint with food grade silicon sealant.
-8-
© 2001, IMI Cornelius Inc.
I-Series Ice Machine Training Manual
NOTE: A bin thermostat is recommended for dispenser applications. When the bin
thermostat is satisfied, the ice maker will finish the cycle it is in and shutdown. Part No. bin stat 630000-413
5. REFRIGERATION
5.1 Air Cooled Condensers
Air cooled ice machines add heat to the surrounding environment. In some situations
this may over tax the air conditioning system or cause other problems.
Adequate air flow is necessary, including 6 inches (15.2 cm) clearance on the right
side and back.
A louvered front and top panel is available for special applications.
Name
Top Panel
Front Panel
322/522
164874-016
164873-022
330/530
630200-614
164873-019
630/830
630200-614
164873-020
1030/1230
630200-614
164873-021
A louvered front and top panel is available for special applications.Air cooled ice
machines are not a good choice for industrial applications, or in greasy or dusty environments that could lead to plugged condensers.
On some ice machines a condenser filter is available to trap airborne particles.
Water cooled condensers will significantly increase water and sewer costs.
Water cooled condensers require a dedicated water line with 3/8” (.95 cm) i.d. inlet
supplying 20-50 psi (1.4-3.45 BAR) at the ice machine. There should be dedicated
water lines for the ice machine and the condenser. These lines should not be teed off
of one line..
Manual Disconnect Switch
Electrical Service Line
Shut-Off Valve
Water Filter
Strain Relief
must be used
Dump Valve
Drain Tube
Floor Drain
Bin Drain
Tube
© 2001, IMI Cornelius Inc.
Electrical Service
Line
Manual Disconnect Switch
Shut-Off Valve
Water Filter
Shut-Off Valve
Condenser Water Inlet
Strain Relief
must be used
Dump Valve
Drain Tube
Condenser Water
Drain Tube
Floor Drain
Bin Drain Tube
-9-
SYSTEM DETAILS
5.2 Water Cooled Condensers
I-Series Ice Machine Training Manual
Use separate lines for the bin drain and the dump valve drain.
It is usually not necessary to filter incoming condenser water.
Follow standard procedures for cleaning condenser lines of scale and deposits.
Water Regulating Valve
The water regulating valve is used on water-cooled ice machines only. The
valve is installed in the condenser outlet water line. Its function is to control the proper operating head pressure by regulating the amount of water
flowing through the condenser. The valve is adjustable and factory set to
maintain condenser discharge water temperature at 108/112° F (42 - 44°
C). Setting the water regulating valve to maintain discharge water temperature eliminates the need to enter the sealed refrigeration system. When
checking the valve, the water temperature should be taken as close to the
condenser discharged as possible. The water temperature will equate to
operating head pressure of approximately 275 psi (19.0 BAR).
SYSTEM DETAILS
Should adjustment be required, the valve has an adjustment stem on the
top. After allowing the ice machine to operate for 10 minutes in the ice
making mode to balance the system, turning the adjustment stem clockwise
will increase the discharge water temperature, and counterclockwise will
decrease the discharge water temperature.
The water regulating valve must close off condenser water flow completely during the hot gas harvest cycle. There should be no discharge
water flowing out of the condenser during the harvest cycle. Should the
valve fail to close during the harvest mode, the condenser will continue to
condense the compressor discharge vapor needed for the harvest cycle, and
this will result in long harvest times.
Leaking (bypassing) water regulating valves are normally the result of
scale buildup on the valve diaphragm. The valve should be flushed, not
replaced. To flush the valve, open the adjusting stem fully counterclockwise (or force the valve spring up with a screwdriver) and open and close
the water supply to the condenser, resulting in the flushing action. Should
this not correct the problem, replace the valve diaphragm. This should be
done without entering the sealed refrigeration system.
Damage to the water regulating valve may also be caused by a water hammer. Water hammering will result from the condenser inlet and outlet water
lines being reversed or defective valve stops in the water supply line.
Proper installation of water cooled equipment should always include an
anti-water hammer standpipe in the supply inlet line, as close to the ice
machine as possible.
- 10 -
© 2001, IMI Cornelius Inc.
I-Series Ice Machine Training Manual
5.3 Remote Cooled Ice Machines
Refer to I Series Ice Cube Machine Service Manual & Maintenance Guide for
remote condenser installation information and correct refrigeration procedures.
NOTE: When installing a remote ice maker, always open the receiver valve after
connecting refrigerant lines.
5.4 Refrigeration System
Expansion Valve
The expansion valve is factory set at 6° F (-14° C) superheat (difference between
evaporator inlet and outlet). It is non-adjustable. DO NOT REPLACE WITH AN
ADJUSTABLE VALVE.
Low Refrigerant
Observe ice production. If the
refrigerant is low, some of the
top evaporator rows do not form
ice and freeze times are longer.
Ice slab
Center
1/8”(.32 cm)
bridge
It is normal for the ice slab to be
Bottom 2 rows
1/8”(.32 cm)
slightly thicker at the bottom and
3/16 - 1/4”(.48 bridge
taper off in a slight wedge pat.64 cm) bridge
tern at the top. The top row of
cubes must have a complete pattern of ice on all four sides and the back wall. Remember, when you operate the
product with the panels off during testing the additional heat at the top of the evaporator will cause thinner ice at the top.
Should a different thickness of the bridge be desired, it will be required to adjust the
potentiometer (POT), located on the circuit board.
1. Thinner Bridge - turn the ice thickness POT adjustment screw clockwise one full
turn. Allow two cycles before determining if additional adjustments are required.
2. Thicker Bridge - turn the ice thickness POT adjusting screw counterclockwise
one full turn. Allow two cycles before determining if additional adjustments are
required.
© 2001, IMI Cornelius Inc.
- 11 -
SYSTEM DETAILS
For optimum ice production and
maximum cube separation, the
ice connecting the individual
cubes should be a minimum of
1/8 inch (.32cm) thick at the center area of the evaporator.
Top row
3/8 - 5/8”
(.95 - 1.59 cm)
dimple
I-Series Ice Machine Training Manual
NOTE: Never judge the thickness of the ice from the first batch of the ice produced — the first cycle is a balance cycle. Always wait for the second
cycle before making any adjustments.
Refrigerant Charge/Recharge
The refrigeration system is critically charged to within ± 1/2 ounces (14.8 ml), and
does not use an accumulator. DO NOT use gauges until all other tests have been performed. Time the freeze cycle and refer to the charts in the I Series Ice Cube Machine
Service Manual & Maintenance Guide.
NOTE: If water is leaking from the dump valve, warm water is introduced which will
increase freeze time.
After conducting all other tests attach gauges and
check head and suction pressures.
Test
ports
The ice machine should freeze within ± 10% of the
times indicated in the service guide. If the times are
longer, find and fix the leak. Then evacuate and
recharge the system BY WEIGHT.
SYSTEM DETAILS
NOTE: The R404A refrigerant used in the I-Series ice machines is a blend of several
refrigerants. These can fractionate in the refrigeration system. This is why it
is so important to completely evacuate the system before recharging.
NOTE: Always recharge R404A systems in a liquid state (not in a gas state).
NOTE: ALWAYS install a new dryer whenever the refrigeration system has been
opened (replace with an EK 404A dryer).
Thermal Expansion Valve (TXV)
Check the TXV by disconnecting the capillary valve
from the suction line. Warm the bulb in your hand
and watch to see that the valve opens and the suction
pressure gauge increases. Cooling the bulb closes the
valve.
Bulb
Thermal Expansion Valve
Hot Gas Defrost Valve
Check that the Hot Gas Defrost Valve is not leaking
during the freeze cycle.
Hot gas
defrost
valve
NOTE: The best way to detect a small weeping hotgas valve, use an electronic sight glass.
Alternately, touch the outlet line. If it is warm/hot, it is leaking.
- 12 -
© 2001, IMI Cornelius Inc.
I-Series Ice Machine Training Manual
Compressor Start Windings
Check the compressor start windings.
1. With the power disconnected use an ohm meter to
check each pair of terminals. There should NOT
be an open circuit.
2. Take an amp reading from the red wire during
defrost mode. The amps should match those on the
name plate. Low amps indicate low refrigerant.
Terminals
Red wire
3. Check the voltage at the compressor terminals while the compressor is trying to
start. The voltage should be at least 90% of line voltage.
4. Refer to the I Series Ice Cube Machine Service Manual & Maintenance Guide for
additional compressor starting tests.
Thermal Overload Protector
Check the Thermal Overload Protector by disconnecting one of the wires and checking for continuity
(make sure the compressor has cooled).
Thermal overload protector
SYSTEM DETAILS
Head Pressure Control
The Cornelius "I" series
remote systems use an Alco
Head Pressure Control, normally referred to as a headmaster. This control is
mounted in the remote condenser with a fan cycling
control switch. Using both
these controls gives the system positive operation under a wide range of condensing temperatures.
The normal flow pattern through the headmaster is from the condenser port to the
receiver port. When this flow pattern is unable to maintain a receiver outlet pressure
equal to or above the dome pressure setting of the valve, the dome pressure will force
the valve port to change, closing the condenser port and opening the bypass port
from the compressor discharge line. This allows the high pressure vapor from the
discharge port to "buck" the receiver pressure back up. With the condenser port
closed, the refrigerant is backed up in the condenser, basically reducing the condenser size, assisting in maintaining the discharge port flow, and increasing the head
pressure.
© 2001, IMI Cornelius Inc.
- 13 -
I-Series Ice Machine Training Manual
The head pressure control valve (headmaster) maintains adequate condensing pressure during periods of low ambient temperature. The I-Series ice makers are charged
with R404A refrigerant. The headmaster valve is set to maintain a condensing pressure of 200 psig (13.8 BAR) down to an operating temperature of -20°F (-6.7° C).
SYSTEM DETAILS
Touching the lines of the headmaster will determine the flow path the headmaster is
in; condenser to receive, or bypass to receiver. Installing a gauge at the receiver outlet valve will determine if the headmaster is functioning to maintain the proper operating pressure. It should be less than 15 psi (1.0 BAR). Less pressure indicates low
refrigerant or kinked lines.
Refer to the I Series Ice Cube Machine Service Manual & Maintenance Guide for
additional head pressure control information.
- 14 -
© 2001, IMI Cornelius Inc.
I-Series Ice Machine Training Manual
5.5 Suction Line Thermistor Replacement
NOTE: The following procedure may be the easiest, but, it is not the only way
replace the thermistor.
1. Unplug the ice machine and remove the top and front panels.
2. Remove plastic rivets from the
electrical box mounting bracket using a
punch and side cutters. Save the rivets
for reinstallation.
Punch thru
center of rivet
Side cutters to lift
rivets Do Not Cut
Remove 2 screws
Remove 4 screws
3. Remove and retain four screws on top
of bracket and two on gauge port bracket.
SYSTEM DETAILS
Thermistor
4. Move electrical box out of the
way and cut insulation from
around the thermistor.
5. Replace thermistor. Be sure to clean the surface
of the suction line.
Thermistor
© 2001, IMI Cornelius Inc.
Groove
in line
- 15 -
I-Series Ice Machine Training Manual
6. Reassemble, making sure the new thermistor is in the proper location. Replace the
insulation around the thermistor or the ice machine will not function properly.
6. CONTROLS AND ELECTRICAL
6.1 Controls Board Features (Red and Yellow Boards)
SYSTEM DETAILS
• 4 second power-up sequence, adjusts board to correct voltage and Hertz before
the compressor starts
• Push button test mode
• 8 inline power connectors
• Bridge adjustment range indicator
• Dip switch selectors for curtain switches 1-4
• Dip switch selector for dump cycles
• Circuit board will retrofit for service replacements
- 16 -
© 2001, IMI Cornelius Inc.
I-Series Ice Machine Training Manual
TROUBLE SHOOTING
1. ISSUES AFFECTING ALL CIRCUIT BOARDS
1.1 Reset Operation
When ice machine is shutdown and Error-LED is operational, the ice machine power
switch must be turned OFF for approximately 5 seconds and returned to the ON position to reset the circuit board and allow the ice machine to restart operation.
1.2 Evaporator Proximity Switches
Proximity switches are mounted to the evaporator and the magnet is mounted to
water curtain.
Switch Notes:
• Manually holding the curtain open for approximately 5 seconds during freeze
mode will shut the ice machine down.
• With dual-evaporator machines, both right hand and left hand switches must
open and reset to start the next freeze cycle.
1.3 Harvest Safety Termination (Red and Yellow Boards)
After 4 minutes in harvest mode, the safety timer in the circuit board will terminate
the harvest mode and place the ice machine in freeze mode. This safety cycle will
protect the evaporator, etc. should the harvest mode not terminate. Three consecutively failed harvests will result in a solid red Error-LED, which requires a manual
reset.
1.4 Stacking Cable
When two I-series ice machines are stacked, a cable is used to connect their circuit
boards. This allows the bottom unit to be shut down on a Full Bin Signal (or other
error code). The top unit will finish the cycle it is in, and shut down.
The circuit board stacking connection can be used for the stacking cable or for a bin
thermostat, but not for both.
1.5 Ice Bridge Thickness Adjustment
1. Thinner Bridge - turn the ice thickness POT adjustment screw clockwise one full
turn. Allow two cycles before determining if additional adjustments are required.
© 2001, IMI Cornelius Inc.
- 17 -
SERVICE
The I-series machines should never be stacked more than two high.
I-Series Ice Machine Training Manual
2. Thicker Bridge - turn the ice thickness POT adjusting screw counterclockwise
one full turn. Allow two cycles before determining if additional adjustments are
required.
NOTE: Never judge the thickness of the ice from the first batch of the ice produced — the first cycle is a balance cycle. Always wait for the second
cycle before making any adjustments.
1.6 Condenser Fan Cycling Control
The condenser fan on air cooled ice machines is cycled by the circuit board. The condenser sensor signals the circuit board when the condenser temperature reaches 100°
F (38° C). The fan starts and continues to run until the temperature is reduced to 88°
F (31° C).
NOTE: Integral condenser ice machines do not use pressure to cycle the condenser
fan motor.
NOTE: Remote condenser units use a fan cycling pressure switch. “ON” 280 PSI
(19.3 BAR), “OFF” 230 PSI (15.9 BAR).
1.7 Sensor
Premature harvest is normally caused by a defect in suction line sensors!
SERVICE
If the ice machine will not go into harvest, the suction line temperature must be
checked (approximately 0° F (-18° C)!
- 18 -
© 2001, IMI Cornelius Inc.
I-Series Ice Machine Training Manual
2. CIRCUIT BOARD OVERVIEW (RED & YELLOW BOARDS)
115V
#7 YL Water Pump
#6 BK Condenser Fan
#5 BL P.S.
#4 BL
#3 RD Hot Gas
#2 WH L2
#1 BR L1
230V
#7 YL Water Pump
#6 BK Condenser Fan
#5 BL P.S.
#4 BL
#3 RD Hot Gas
#2 RD L2
#1 BR L1
#7 YL Water Pump
One Curtain Switch Must Be
the second can be connected J5
SW4-1 OFF
SW4-2 ON
SW4-3 ON
SERVICE
© 2001, IMI Cornelius Inc.
- 19 -
I-Series Ice Machine Training Manual
2.1 Red & Yellow Boards (LEDs) Descriptions
Status Indicators
D1-2
D3-4
Yellow
LED
Water curtain(s) dip switch can be set for 1, 2, or 4
evaporator machines
D9
Red LED
D12
Green LED
Hot gas valve(s)
D13
Green LED
Condenser fan
D14
Green LED
Water pump
D15
Green LED
Compressor contactor
D16
Green LED
Dump valve
Error
Water Curtain(s) Open
D1-2
Yellow
LED
ON
Curtain(s) closed
D3-4
Yellow
LED
OFF
Curtain(s) open
Water curtain(s) closed
Pre-Chill Mode
D1-2
D3-4
Yellow
LED
ON
D13
Green LED
ON or
OFF
D15
Green LED
ON
Contactor closed
Water curtain(s) closed
Condenser fan cycles on and off depending
on condenser temperature
SERVICE
Ice Making Mode
D1-2
D3-4
Yellow
LED
ON
D13
Green LED
ON or
OFF
Condenser fan cycles on and off depending
on condenser temperature
D14
Green LED
ON
Water pump actives when the evaporator is
at 20° F (-7° C) or lower, except during
dump cycle
D15
Green LED
ON
Compressor contactor closed
ON
Water curtain(s) closed
Harvest Mode
D1-2
D3-4
- 20 -
Yellow
LED
© 2001, IMI Cornelius Inc.
I-Series Ice Machine Training Manual
D14
Green LED
ON 15
seconds
D15
Green LED
ON
D16
Green LED
ON 15
seconds
Water pump active for 15 sec., then inactive
Compressor contactor closed (compressor
active)
Dump valve active 15 sec.
Error-LEDs
D9
Red LED
D9
Red LED
Turns on when the system is shutdown
ON or
flashing
Assists to indicate where the error may be
and or what may have caused the error
D9
Red LED
ON
Evaporator temp. drops below -25° F
(-32° C) – the system will shutdown for 30
min’s and attempt to restart 2 times before
shutting down
D9
Red LED
ON
Open thermistor circuit – thermistor open/
broken or wire/poor connector
Red LED
ON
D9
Red LED
ON
3 failed harvest cycles (when no ice drops)
Red LED
Flashing
1/2 sec.
ON, 1/2
sec. OFF
Open sensor or high temperature shutdown
– condenser temp. exceeds 150° F +2°, -6°
(66° C +1°, -3°) – the system will shutdown
for 30 min’s and attempt to restart 2 times
before shutting down
Red LED
Flashing
1/4 sec.
ON, 1/4
sec. OFF,
1 sec.
delay,
then
repeat
Low temperature shutdown – condenser
temp. drops to 36° F ±2° (2° C ±1°) – the
ice machine will restart if temp. rises to
40° F ±2° F (1° C)
Red LED
Flashing
1/4 sec.
ON, 1/4
sec. OFF,
Within one turn of either end of the potentiometer range
D9
D9
D9
© 2001, IMI Cornelius Inc.
- 21 -
SERVICE
D9
High evaporator temperature – evaporator
does not fall below 40° F (4° C) within 6
minutes into freeze cycle – requires manual
reset
I-Series Ice Machine Training Manual
3. RED & YELLOW BOARD DIAGNOSTICS
With ice machine in freeze cycle, push and hold the Hot Gas Manual Harvest/Defrost Button until circuit board goes into diagnostic mode (about 3 seconds). The ice machine starts
to cycle these five components:
1. Hot Gas Solenoid
2. Water Pump
3. Contactor
4. Fan Motor
5. Dump Valve.
Check to make sure the proximity switch lights are on.
When replacing the circuit board make sure the dip switches are set correctly.
230V
115V
#7 YL Water Pump
#6 BK Condenser Fan
#5 BL P.S.
#4 BL
#3 RD Hot Gas
#2 WH L2
#1 BR L1
#7 YL Water Pump
#6 BK Condenser Fan
#5 BL P.S.
#4 BL
#3 RD Hot Gas
#2 RD L2
#1 BR L1
SERVICE
#7 YL Water Pump
One Curtain Switch Must Be
the second can be connected J5
SW4-1 OFF
SW4-2 ON
SW4-3 ON
- 22 -
© 2001, IMI Cornelius Inc.
I-Series Ice Machine Training Manual
3.1 Sensors
The suction line sensor (blue) is a thermistor rated at 2815 ohm ± 5%, at 32° F (0° C). This
sensor controls the ice bridge thickness by measuring the suction line temperature and
sending it to the circuit board. The circuit board controls the compressor.
If the suction line temperature does not drop to 40° F (4.4° C) in 6 minutes, the ice
machine goes into a safety shutdown mode. A manual reset must be performed.
3.2 Check Circuit Board Output
1. Turn ice machine power switch OFF. Disconnect sensor plug from board.
2. Turn power switched ON.
3. Use digital multimeter set for DC voltage. Connect leads of meter across the two
pins of the sensor being checked.
4. Meter should read 4.5–5.0 VDC. If voltage is not correct, replace the circuit
board.
Note: This also applys to the proximity switch
3.3 Check Thermistor Sensor(s)
1. Disconnect the suction line sensor from the control board.
2. Install a special test cord (p/n 164984009) to the controller board.
3. Reinstall the suction line sensor.
4. Set the multimeter for DC-volts and connect it to the special test cord leads.
5. Operate the ice machine in freeze cycle.
6. As the suction line temperature decreases the volt reading should increase.
• If the multimeter reading remains steady and does not increase, it indicates a
shorted sensor. Replace the sensor and check again.
• If the multimeter reading is 4.5 – 5.0 VDC it indicates an open sensor. Replace
the sensor and check again.
SERVICE
© 2001, IMI Cornelius Inc.
- 23 -
I-Series Ice Machine Training Manual
4. GREEN CIRCUIT BOARD OVERVIEW
4.1 GREEN BOARD Test Plug
SERVICE
This plug is primarily for the manufacture’s use.
- 24 -
© 2001, IMI Cornelius Inc.
I-Series Ice Machine Training Manual
4.2 GREEN BOARD Sensors
Condenser sensor and suction line sensor are thermistors rated at 2815 ohms ± 5% at
32° F (0° C).
Condenser Sensor signals the circuit board for fan cycling, and serves as the hightemperature safety shutdown. The Error-LED will flash once a second during high
temperature safety shutdown. Manual reset must be performed to restart “ON” at
100°F, “OFF” at 88°F
Suction Line Sensor signals the circuit board about the suction line temperature.
This controls the ice bridge thickness. The ice machine has 6 minutes to reduce suction line temperature to 40° F (4.4° C) in the freeze mode (Error-LED is ON) before
a safety shutdown. Manual reset must be performed to restart at 150°F.
4.3 GREEN BOARD Voltage Check
1. Turn ice machine power switch OFF.
2. Disconnect proximity switch plugs from the control board.
3. Set the multimeter for DC volts and connect leads to the top 2 pins of the right
hand and left hand evaporator.
4. Turn ice machine power switch ON.
5. Meter should read 5 VDC ± .2 VDC. If not, replace circuit board.
4.4 GREEN BOARD Thermistor Sensor Diagnostics
Check Circuit Board
1. Turn ice machine power switch OFF. Disconnect sensor plug from board.
2. Use digital multimeter set for DC voltage. Connect leads of meter across the two
test plug pins of the sensor being checked.
3. Turn power switched ON.
4. Meter should read 2.5 ± .2 VDC. If voltage is not correct, replace the circuit
board.
Check Thermistor Sensor(s)
1. Disconnect the suction line sensor (brown) from the control board.
3. Reinstall the suction line sensor.
4. Set the multimeter for milli-volts DC and connect it to the special test cord leads.
5. Operate the ice machine in freeze cycle.
© 2001, IMI Cornelius Inc.
- 25 -
SERVICE
2. Install a special test cord (p/n 164984009) to the controller board.
I-Series Ice Machine Training Manual
6. As the suction line temperature decreases the milli-volt reading should increase.
• If the multimeter reading remains steady and does not increase, it indicates a
shorted sensor. Replace the sensor and check again.
• If the multimeter reading is 2.5 VDC it indicates an open sensor. Replace the
sensor and check again.
4.5 Sensors
The suction line sensor is a thermistor rated at 2815 ohm ± 5%, at 32° F (0° C). This sensor controls the ice bridge thickness by measuring the suction line temperature and sending it to the circuit board. The circuit board controls the compressor.
If the suction line temperature does not drop to 40° F (4.4° C) in 6 minutes, the ice
machine goes into a safety shutdown mode. A manual reset must be performed
4.6 GREEN BOARD Voltage Selector Switch
• Selector bar in CENTER position- - - switch is OPEN (ice machine is
inoperative)
• Selector bar DOWN - - - - - - - - - 115 VAC selected
• Selector bar UP - - - - - - - - - - - 230 VAC selected
4.7 GREEN BOARD Ice Bridge Thickness Potentiometer (POT)
Factory Reset
1. Turn voltage selector switch OFF (center position).
2. Unplug proximity switches and thermistor(s) from circuit board.
3. Turn voltage selector switch ON.
4. Momentarily short across the bottom two pins of the test plug with a wire jumper
or screw driver.
SERVICE
• If the POT is within the factory setting the D-5 LED will flash continuously.
• If the POT is NOT within the factory setting the D-5 LED will NOT light.
5. If the D-5 LED is not lit, slowly turn the adjuster clockwise until it lights. If the
LED does not light after 10 turns, turn the adjuster counterclockwise until it
lights.
- 26 -
© 2001, IMI Cornelius Inc.
I-Series Ice Machine Training Manual
4.8 GREEN BOARD Dump Cycle Options
SERVICE
© 2001, IMI Cornelius Inc.
- 27 -
I-Series Ice Machine Training Manual
4.9 GREEN BOARD Diagnostics
Erratic Component Operation
Erratic component operation (water pump, condenser fan, hot gas valve, etc.) are
often the result of a poor connection to the 8-pin connector. Before performing diagnostics on the circuit board, make sure the 8-pin connector is securely in place.
Check Circuit Board
1. Turn the power switch ON. The D-5 Error-LED indicator will be illuminated for
2 seconds.
2. After the D-5 Error-LED goes out, momentarily short across the bottom two terminals out of the test plug with a jumper wire or screwdriver. Then remove the
jumper. The circuit board is now in test mode.
3. One of these two conditions will exist:
• If the ice thickness potentiometer is within the factory setting, the Error-LED
will flash continuously.
• If the ice thickness potentiometer is not within the factory setting, the ErrorLED will not be lit.
4. In either case, the green LED indicators will illuminate for 2 seconds in the
sequence shown below. They will continue to sequence until the power is turned
off. Failure of the green LEDs to cycle in this sequence indicates a defective circuit board. Replace the board.
Status Indicators
Green LED
Fan
D11
Green LED
Hot gas valve(s)
D12
Green LED
Water pump
D14
Green LED
Contactor
D15
Green LED
Dump valve
SERVICE
D6
- 28 -
© 2001, IMI Cornelius Inc.
I-Series Ice Machine Training Manual
APPENDIX
APPENDIX
APPENDIX A — SERVICE TIPS
• Use nickel safe cleaner when cleaning evaporators.
• Use only Cornelius parts in servicing ice makers.
APPENDIX B — INSTALLATION TIPS
• Purge water lines.
• Level the ice machine.
• Seal the ice maker to the bin or dispenser.
• Use a dedicated electrical circuit with proper sized wire and breaker.
• Provide adequate clearance.
• Fasten the ice maker to the bin or adapter.
© 2001, IMI Cornelius Inc.
- 29 -
I-Series Ice Machine Training Manual
REVIEW
DATE: _______________________________________________
NAME: _______________________________________________
REVIEW
LOCATION: __________________________________________
General Ice Maker Installation
The following questions summarize important points in this training lesson
1. What is the minimum and maximum ambient temperatures for a ice maker installation.
___A. 25° F to 60° F
___B. 50° F to 100° F
___C. 72° F ±10° F
___D. Ice machines can be successfully installed in any ambient.
2. Inlet water pressures
___A. Are not important since the float can accomodate any municipal water pressure.
___B. Should not exceed 50 PSI.
___C. Can be maintained with a water pressure regulator.
___D. B and C.
3. Sealing the ice maker head to the ice bin or dispenser with approved sealant is
___A. Necessary only in areas subject to high humidity.
___B. The approved method od sealing the ice machine to the bin or dispenser.
___C. Required to meet sanitation codes.
___D. To eliminate leaks.
___E. C and D.
4. Proper air circulation is provided with a minimum clearance of
___A. 6 inches minimum
___B. 9 inches minimum
___C. 2.5 inches minimum
- 30 -
© 2001, IMI Cornelius Inc.
Ice Cuber Operation
5. What refrigerant is used in the “I” series cube ice maker
___A. R404a
___B. R22
___C. R12
___D. HP62
6. On a air cooled cuber, thermistors are located at the following locations:
___A. Evaporator, condenser, and suction line.
___B. Condenser and suction line.
___C. Dump valve, hot gas valve, and evaporator.
7. The thermostatic expansion valve is
___A. Nonadjustable.
___B. Internally adjustable.
___C. Externally adjustable.
___D. automatically adjustable.
8. Circuit board problem diagnosis (check all that are true)
___A. Circuit boards cannot be diagnosed and must be replaced.
___B. Circuit board failure will automatically illuminate error LED.
___C. Circuit board is self correcting.
___D. Can be checked by the self-diagnostics built into the board.
___E. B and D.
9. Ice bridge thickness should be checked at
___A. The top of evaporator.
___B. The bottom of evaporator.
___C. The center of evaporator.
___D. Anywhere in the evaporator.
10. Which component(s) could be checked if the machine fails to shut off when the bin is
full?
___A. The evaporator sensor.
___B. The bin thermostat.
___C. The proximity switch
___D. All of the above.
11. When the evaporator curtain is moved away from the evaporator
___A. The machine will return to the freeze cycle if the bin is not full.
___B. The machine will shut down.
___C. A malfunction of the curtain is indicated and it must be replaced.
___D. Both A and B.
12. When the machine enters the defrost cycle, which components are energized?
___A. Compressor, condenser fan, and the hot gas solenoid.
___B. Hot gas solenoid and the dump valve only.
___C. Only the hot gas solenoid.
___D. Compressor, hot gas solenoid, and the dump valve.
13. An air cooled condenser
___A. Is self cleaning.
___B. Must be kept clean.
___C. Cleaning can be reduced if filter is installed.
___D. Both B and C.
14. The three basic circuits of the ice machine are
___A. Air, water and refrigeration.
___B. Mechanical, electrical and plumbing
___C. Water, electrical and refrigeration.
15. If the unit is shut down and the red error light is flashing,
___A. The unit is off because the evaporator curtain is open.
___B. The unit is off because the suction temperature is below 40° F.
___C. The unit is off because the condenser temperature is above 150° F.
___D. The unit is off because of high amp. draw on the compressor.
16. Most problems encountered on an ice machine are caused by
___A. Refrigeration leaks.
___B. Improper installation.
___C. Lack of periodic maintenance.
___D. Defective component parts
___E. Both A and E.
17. Proper sanitation procedures for cleaning of the storage bin requires all ice to be
removed from the storage bin.
___A. True.
___B. False.
I-Series Ice Machine Training Manual
18. When the cuber is shut down and the red LED is illuminated, to reset
___A. Push the reset button.
___B. Close the proximity switch.
___C. Turn the power switch off at least 5 seconds.
___D. The board automatically resets after 2 minutes.
19. To test the board for proper proximity switch operation, the voltage reading across the
switch terminal is
___A. 2.5VDC
___B. 2.5VAC
___C. 5VDC
___D. 5VAC
© 2001, IMI Cornelius Inc.
- 33 -
- 34 50
70
70
80
70
70
80
90
90
100
27
21
32
38
21
27
21
10
21
32
WATER
TEMP ° C
AMBIENT
TEMP° C
SI Units
WATER
TEMP ° F
AMBIENT
TEMP° F
IP Units
2062
1862
1841
1572
1379
47
45
44
42
39
SUCTION
PRESSURE
Psig
324
310
303
290
269
SUCTION
PRESSURE
kPa
FREEZE CYCLE
HEAD PRESSURE kPa
299
270
267
228
200
HEAD PRESSURE Psig
FREEZE CYCLE
19:8
15:1
14:3
12:4
9:5
CYCLE
TIME
Min:Sec
19:8
15:1
14:3
12:4
9:5
CYCLE
TIME
Min:Sec
142
130
133
110
105
SUCTION
PRESSURE
Psig
1372
1248
1262
1103
1034
SURE kPa
HEAD PRES-
979
896
917
758
724
kPa
SUCTION
PRESSURE
0:6
0:7
0:7
0:9
1:1
CYCLE
TIME
Min:Sec
0:6
0:7
0:7
0:9
1:1
CYCLE
TIME
Min:Sec
HARVEST CYCLE
199
181
183
160
150
HEAD PRESSURE Psig
HARVEST CYCLE
1.3
1.1
1.1
1.1
1.1
AVERAGE
ICE WEIGHT
kg/Cycle
2.8
2.4
2.5
2.4
2.4
AVERAGE
ICE WEIGHT
lb/Cycle
91
100
109
118
147
AVERAGE
ICE WEIGHT
kg/Day
200
220
240
260
325
AVERAGE
ICE WEIGHT
lb/Day
I-Series Ice Machine Training Manual
AVERAGE OPERATING CHARACTERISTICS IACS 227/IAC 322/IAC 330
© 2001, IMI Cornelius Inc.
© 2001, IMI Cornelius Inc.
50
70
70
80
70
70
80
90
90
100
WATER
TEMP ° C
10
21
21
27
21
AMBIENT
TEMP° C
21
27
32
32
38
SI Units
WATER
TEMP ° F
AMBIENT
TEMP° F
IP Units
2068
2089
2068
2068
2068
44
44
43
42
40
SUCTION
PRESSURE
Psig
303
303
296
290
276
SUCTION
PRESSURE
kPa
FREEZE CYCLE
HEAD PRESSURE kPa
300
303
300
300
300
HEAD PRESSURE Psig
FREEZE CYCLE
16:3
16:4
16:2
15:3
12:1
CYCLE
TIME
Min:Sec
16:3
16:4
16:2
15:3
12:1
CYCLE
TIME
Min:Sec
117
120
118
116
103
SUCTION
PRESSURE
Psig
1103
1193
1103
1103
986
SURE kPa
HEAD PRES-
807
827
814
800
710
kPa
SUCTION
PRESSURE
1:3
1:1
1:2
1:1
0:9
CYCLE
TIME
Min:Sec
1:3
1:1
1:2
1:1
0:9
CYCLE
TIME
Min:Sec
HARVEST CYCLE
160
173
160
160
143
HEAD PRESSURE Psig
HARVEST CYCLE
1.2
1.3
1.3
1.3
1.3
AVERAGE
ICE WEIGHT
kg/Cycle
2.6
2.8
2.9
2.8
2.8
AVERAGE
ICE WEIGHT
lb/Cycle
98
104
109
111
141
AVERAGE
ICE WEIGHT
kg/Day
215
230
240
245
310
AVERAGE
ICE WEIGHT
lb/Day
I-Series Ice Machine Training Manual
AVERAGE OPERATING CHARACTERISTICS IWCS 227/IWC 322/IWC 330
- 35 -
- 36 50
70
70
80
70
70
80
90
90
100
27
21
32
38
21
27
21
10
21
32
WATER
TEMP ° C
AMBIENT
TEMP° C
SI Units
WATER
TEMP ° F
AMBIENT
TEMP° F
IP Units
2206
1999
1896
1724
1517
46
45
41
42
38
SUCTION
PRESSURE
Psig
317
310
283
290
262
SUCTION
PRESSURE
kPa
FREEZE CYCLE
HEAD PRESSURE kPa
320
290
275
250
220
HEAD PRESSURE Psig
FREEZE CYCLE
20:9
17:9
17:4
14:6
12:5
CYCLE
TIME
Min:Sec
20:9
17:9
17:4
14:6
12:5
CYCLE
TIME
Min:Sec
120
120
120
111
95
SUCTION
PRESSURE
Psig
1517
1379
1344
1207
1069
SURE kPa
HEAD PRES-
827
827
827
765
655
kPa
SUCTION
PRESSURE
0:6
0:6
0:7
0:9
1:0
CYCLE
TIME
Min:Sec
0:6
0:6
0:7
0:9
1:0
CYCLE
TIME
Min:Sec
HARVEST CYCLE
220
200
195
175
155
HEAD PRESSURE Psig
HARVEST CYCLE
2.4
2.3
2.3
2.2
2.3
AVERAGE
ICE WEIGHT
kg/Cycle
5.2
5.0
5.1
4.8
5.1
AVERAGE
ICE WEIGHT
lb/Cycle
159
176
184
204
245
AVERAGE
ICE WEIGHT
kg/Day
350
387
405
450
540
AVERAGE
ICE WEIGHT
lb/Day
I-Series Ice Machine Training Manual
AVERAGE OPERATING CHARACTERISTICS IAC 522/IAC 530
© 2001, IMI Cornelius Inc.
© 2001, IMI Cornelius Inc.
50
70
70
80
70
70
80
90
90
100
WATER
TEMP ° C
10
21
21
27
21
AMBIENT
TEMP° C
21
27
32
32
38
SI Units
WATER
TEMP ° F
AMBIENT
TEMP° F
IP Units
2255
2261
2248
2255
2227
45
47
45
45
44
SUCTION
PRESSURE
Psig
310
324
310
310
303
SUCTION
PRESSURE
kPa
FREEZE CYCLE
HEAD PRESSURE kPa
327
328
326
327
323
HEAD PRESSURE Psig
FREEZE CYCLE
13:9
15:2
13:8
13:7
11:3
CYCLE
TIME
Min:Sec
13:9
15:2
13:8
13:7
11:3
CYCLE
TIME
Min:Sec
119
127
117
115
106
SUCTION
PRESSURE
Psig
1207
1269
1193
1158
1076
SURE kPa
HEAD PRES-
820
876
807
793
731
kPa
SUCTION
PRESSURE
1:1
1:1
1:1
1:2
1:3
CYCLE
TIME
Min:Sec
1:1
1:1
1:1
1:2
1:3
CYCLE
TIME
Min:Sec
HARVEST CYCLE
175
184
173
168
156
HEAD PRESSURE Psig
HARVEST CYCLE
2.0
2.0
2.0
2.0
1.9
AVERAGE
ICE WEIGHT
kg/Cycle
4.3
4.3
4.3
4.4
4.3
AVERAGE
ICE WEIGHT
lb/Cycle
188
174
191
193
222
AVERAGE
ICE WEIGHT
kg/Day
415
384
420
425
490
AVERAGE
ICE WEIGHT
lb/Day
I-Series Ice Machine Training Manual
AVERAGE OPERATING CHARACTERISTICS IWC 522/IWC 530
- 37 -
- 38 50
70
70
80
70
70
80
90
90
100
27
21
32
38
21
27
21
10
21
32
WATER
TEMP ° C
AMBIENT
TEMP° C
SI Units
WATER
TEMP ° F
AMBIENT
TEMP° F
IP Units
2296
2048
2041
1800
1551
43
40
40
37
34
SUCTION
PRESSURE
Psig
296
276
276
255
234
SUCTION
PRESSURE
kPa
FREEZE CYCLE
HEAD PRESSURE kPa
333
297
296
261
225
HEAD PRESSURE Psig
FREEZE CYCLE
17:1
13:2
12:6
11:3
8:4
CYCLE
TIME
Min:Sec
17:1
13:2
12:6
11:3
8:4
CYCLE
TIME
Min:Sec
125
113
113
101
88
SUCTION
PRESSURE
Psig
1379
1269
1262
1145
1020
SURE kPa
HEAD PRES-
862
779
779
696
607
kPa
SUCTION
PRESSURE
1:1
1:0
1:1
1:2
1:5
CYCLE
TIME
Min:Sec
1:1
1:0
1:1
1:2
1:5
CYCLE
TIME
Min:Sec
HARVEST CYCLE
200
184
183
166
148
HEAD PRESSURE Psig
HARVEST CYCLE
2.7
2.5
2.6
2.5
2.4
AVERAGE
ICE WEIGHT
kg/Cycle
6.0
5.5
5.6
5.6
5.4
AVERAGE
ICE WEIGHT
lb/Cycle
215
254
268
290
342
AVERAGE
ICE WEIGHT
kg/Day
475
560
590
640
755
AVERAGE
ICE WEIGHT
lb/Day
I-Series Ice Machine Training Manual
AVERAGE OPERATING CHARACTERISTICS IAC 630
© 2001, IMI Cornelius Inc.
© 2001, IMI Cornelius Inc.
50
70
70
80
70
70
80
90
90
100
WATER
TEMP ° C
10
21
21
27
21
AMBIENT
TEMP° C
21
27
32
32
38
SI Units
WATER
TEMP ° F
AMBIENT
TEMP° F
IP Units
2068
2096
2068
2062
2062
38
39
38
38
35
SUCTION
PRESSURE
Psig
262
269
262
262
241
SUCTION
PRESSURE
kPa
FREEZE CYCLE
HEAD PRESSURE kPa
300
304
300
299
299
HEAD PRESSURE Psig
FREEZE CYCLE
12:2
14:0
12:3
12:4
10:1
CYCLE
TIME
Min:Sec
12:2
14:0
12:3
12:4
10:1
CYCLE
TIME
Min:Sec
93
100
93
92
86
SUCTION
PRESSURE
Psig
1048
1145
1055
1048
986
SURE kPa
HEAD PRES-
641
689
641
634
593
kPa
SUCTION
PRESSURE
1:4
1:2
1:4
1:4
1:6
CYCLE
TIME
Min:Sec
1:4
1:2
1:4
1:4
1:6
CYCLE
TIME
Min:Sec
HARVEST CYCLE
152
166
153
152
143
HEAD PRESSURE Psig
HARVEST CYCLE
2.6
2.7
2.7
2.7
2.6
AVERAGE
ICE WEIGHT
kg/Cycle
5.8
6.0
5.9
6.0
5.8
AVERAGE
ICE WEIGHT
lb/Cycle
279
259
281
282
324
AVERAGE
ICE WEIGHT
kg/Day
615
570
620
622
715
AVERAGE
ICE WEIGHT
lb/Day
I-Series Ice Machine Training Manual
AVERAGE OPERATING CHARACTERISTICS IWC 630
- 39 -
- 40 50
70
70
80
70
70
80
90
90
100
27
21
32
38
21
27
21
10
21
32
WATER
TEMP ° C
AMBIENT
TEMP° C
SI Units
WATER
TEMP ° F
AMBIENT
TEMP° F
IP Units
2296
2048
2041
1800
1551
43
40
40
37
34
SUCTION
PRESSURE
Psig
296
276
276
255
234
SUCTION
PRESSURE
kPa
FREEZE CYCLE
HEAD PRESSURE kPa
333
297
296
261
225
HEAD PRESSURE Psig
FREEZE CYCLE
17:1
13:2
12:6
11:3
8:4
CYCLE
TIME
Min:Sec
17:1
13:2
12:6
11:3
8:4
CYCLE
TIME
Min:Sec
125
113
113
101
88
SUCTION
PRESSURE
Psig
1379
1269
1262
1145
1020
SURE kPa
HEAD PRES-
862
779
779
696
607
kPa
SUCTION
PRESSURE
1:1
1:0
1:1
1:2
1:5
CYCLE
TIME
Min:Sec
1:1
1:0
1:1
1:2
1:5
CYCLE
TIME
Min:Sec
HARVEST CYCLE
200
184
183
166
148
HEAD PRESSURE Psig
HARVEST CYCLE
2.7
2.5
2.6
2.5
2.4
AVERAGE
ICE WEIGHT
kg/Cycle
6.0
5.5
5.6
5.6
5.2
AVERAGE
ICE WEIGHT
lb/Cycle
215
254
268
290
342
AVERAGE
ICE WEIGHT
kg/Day
475
560
590
640
755
AVERAGE
ICE WEIGHT
lb/Day
I-Series Ice Machine Training Manual
AVERAGE OPERATING CHARACTERISTICS IRC 630
© 2001, IMI Cornelius Inc.
© 2001, IMI Cornelius Inc.
50
70
70
80
70
70
80
90
90
100
WATER
TEMP ° C
10
21
21
27
21
AMBIENT
TEMP° C
21
27
32
32
38
SI Units
WATER
TEMP ° F
AMBIENT
TEMP° F
IP Units
2613
2337
2310
2020
1744
40
37
36
33
29
SUCTION
PRESSURE
Psig
276
255
248
228
200
SUCTION
PRESSURE
kPa
FREEZE CYCLE
HEAD PRESSURE kPa
379
339
335
293
253
HEAD PRESSURE Psig
FREEZE CYCLE
13:8
12:5
11:5
9:0
7:6
CYCLE
TIME
Min:Sec
13:8
12:0
11:5
9:0
7:6
CYCLE
TIME
Min:Sec
126
111
111
97
83
SUCTION
PRESSURE
Psig
1600
1441
1448
1289
1124
SURE kPa
HEAD PRES-
869
765
765
669
572
kPa
SUCTION
PRESSURE
0:8
0:9
0:9
1:0
1:5
CYCLE
TIME
Min:Sec
0:8
0:9
0:9
1:0
1:5
CYCLE
TIME
Min:Sec
HARVEST CYCLE
232
209
210
187
163
HEAD PRESSURE Psig
HARVEST CYCLE
2.7
2.6
2.7
2.3
2.4
AVERAGE
ICE WEIGHT
kg/Cycle
6.0
5.8
5.8
5.2
5.3
AVERAGE
ICE WEIGHT
lb/Cycle
270
293
308
338
381
AVERAGE
ICE WEIGHT
kg/Day
595
645
680
745
840
AVERAGE
ICE WEIGHT
lb/Day
I-Series Ice Machine Training Manual
AVERAGE OPERATING CHARACTERISTICS IAC 830
- 41 -
- 42 50
70
70
80
70
70
80
90
90
100
27
21
32
38
21
27
21
10
21
32
WATER
TEMP ° C
AMBIENT
TEMP° C
SI Units
WATER
TEMP ° F
AMBIENT
TEMP° F
IP Units
2034
2055
2034
2041
2055
34
37
34
34
32
SUCTION
PRESSURE
Psig
234
255
234
234
221
SUCTION
PRESSURE
kPa
FREEZE CYCLE
HEAD PRESSURE kPa
295
298
295
296
298
HEAD PRESSURE Psig
FREEZE CYCLE
11:1
12:1
10:7
10:2
8:6
CYCLE
TIME
Min:Sec
11:1
12:1
10:7
10:2
8:6
CYCLE
TIME
Min:Sec
93
88
87
86
81
SUCTION
PRESSURE
Psig
1207
1145
1131
1124
1062
SURE kPa
HEAD PRES-
641
607
600
593
558
kPa
SUCTION
PRESSURE
1:3
1:2
1:3
1:3
1:5
CYCLE
TIME
Min:Sec
1:3
1:2
1:3
1:3
1:5
CYCLE
TIME
Min:Sec
HARVEST CYCLE
175
166
164
163
154
HEAD PRESSURE Psig
HARVEST CYCLE
2.7
2.6
2.7
2.6
2.5
AVERAGE
ICE WEIGHT
kg/Cycle
5.9
6.0
5.9
5.7
5.6
AVERAGE
ICE WEIGHT
lb/Cycle
313
295
322
324
361
AVERAGE
ICE WEIGHT
kg/Day
690
650
710
715
795
AVERAGE
ICE WEIGHT
lb/Day
I-Series Ice Machine Training Manual
AVERAGE OPERATING CHARACTERISTICS IWC 830
© 2001, IMI Cornelius Inc.
© 2001, IMI Cornelius Inc.
50
70
70
80
70
70
80
90
90
100
WATER
TEMP ° C
10
21
21
27
21
AMBIENT
TEMP° C
21
27
32
32
38
SI Units
WATER
TEMP ° F
AMBIENT
TEMP° F
IP Units
2613
2337
2310
2020
1744
40
37
36
33
29
SUCTION
PRESSURE
Psig
276
255
248
228
200
SUCTION
PRESSURE
kPa
FREEZE CYCLE
HEAD PRESSURE kPa
379
339
335
293
253
HEAD PRESSURE Psig
FREEZE CYCLE
13:8
12:0
11:5
9:0
7:6
CYCLE
TIME
Min:Sec
13:8
12:0
11:5
9:0
7:6
CYCLE
TIME
Min:Sec
126
111
111
97
83
SUCTION
PRESSURE
Psig
1600
1441
1448
1289
1124
HEAD PRESSURE kPa
869
765
765
669
572
SUCTION
PRESSURE
kPa
0:8
0:9
0:9
1:0
1:5
CYCLE
TIME
Min:Sec
0:8
0:9
0:9
1:0
1:5
CYCLE
TIME
Min:Sec
HARVEST CYCLE
232
209
210
187
163
HEAD PRESSURE Psig
HARVEST CYCLE
2.7
2.6
2.7
2.3
2.4
AVERAGE
ICE WEIGHT
kg/Cycle
6.0
5.8
5.8
5.2
5.3
AVERAGE
ICE WEIGHT
lb/Cycle
270
293
308
338
381
AVERAGE
ICE WEIGHT
kg/Day
595
645
680
745
840
AVERAGE
ICE WEIGHT
lb/Day
I-Series Ice Machine Training Manual
AVERAGE OPERATING CHARACTERISTICS IRC 830
- 43 -
- 44 50
70
70
80
70
70
80
90
90
100
27
21
32
38
21
27
21
10
21
32
WATER
TEMP ° C
AMBIENT
TEMP° C
SI Units
WATER
TEMP ° F
AMBIENT
TEMP° F
IP Units
2406
2158
2151
1903
1655
41
38
38
36
33
SUCTION
PRESSURE
Psig
283
262
262
248
228
SUCTION
PRESSURE
kPa
FREEZE CYCLE
HEAD PRESSURE kPa
349
313
312
276
240
HEAD PRESSURE Psig
FREEZE CYCLE
18:7
16:8
15:9
14:2
13:5
CYCLE
TIME
Min:Sec
18:7
16:8
15:9
14:2
13:5
CYCLE
TIME
Min:Sec
100
91
91
83
75
SUCTION
PRESSURE
Psig
1482
1365
1351
1220
1131
SURE kPa
HEAD PRES-
689
627
627
572
517
kPa
SUCTION
PRESSURE
1:0
1:1
1:1
1:4
1:7
CYCLE
TIME
Min:Sec
1:0
1:1
1:1
1:4
1:7
CYCLE
TIME
Min:Sec
HARVEST CYCLE
215
198
196
177
164
HEAD PRESSURE Psig
HARVEST CYCLE
4.9
4.7
4.8
4.8
5.3
AVERAGE
ICE WEIGHT
kg/Cycle
10.8
10.5
10.5
10.5
11.6
AVERAGE
ICE WEIGHT
lb/Cycle
360
381
404
440
499
AVERAGE
ICE WEIGHT
kg/Day
793
840
890
969
1101
AVERAGE
ICE WEIGHT
lb/Day
I-Series Ice Machine Training Manual
AVERAGE OPERATING CHARACTERISTICS IAC 1030
© 2001, IMI Cornelius Inc.
© 2001, IMI Cornelius Inc.
50
70
70
80
70
70
80
90
90
100
WATER
TEMP ° C
10
21
21
27
21
AMBIENT
TEMP° C
21
27
32
32
38
SI Units
WATER
TEMP ° F
AMBIENT
TEMP° F
IP Units
2048
2068
2048
2048
2041
36
36
36
35
34
SUCTION
PRESSURE
Psig
248
248
248
241
234
SUCTION
PRESSURE
kPa
FREEZE CYCLE
HEAD PRESSURE kPa
297
300
297
297
296
HEAD PRESSURE Psig
FREEZE CYCLE
15:8
17:9
15:7
15:3
13:0
CYCLE
TIME
Min:Sec
15:8
17:9
15:7
15:3
13:0
CYCLE
TIME
Min:Sec
77
81
77
75
73
SUCTION
PRESSURE
Psig
1131
1207
1110
1110
1069
SURE kPa
HEAD PRES-
531
558
531
517
503
kPa
SUCTION
PRESSURE
1:5
1:4
1:5
1:7
1:8
CYCLE
TIME
Min:Sec
1:5
1:4
1:5
1:7
1:8
CYCLE
TIME
Min:Sec
HARVEST CYCLE
164
175
161
161
155
HEAD PRESSURE Psig
HARVEST CYCLE
5.0
5.0
5.0
4.9
4.9
AVERAGE
ICE WEIGHT
kg/Cycle
11.0
11.0
11.0
10.9
10.7
AVERAGE
ICE WEIGHT
lb/Cycle
415
373
417
420
474
AVERAGE
ICE WEIGHT
kg/Day
915
823
920
925
1046
AVERAGE
ICE WEIGHT
lb/Day
I-Series Ice Machine Training Manual
AVERAGE OPERATING CHARACTERISTICS IWC 1030
- 45 -
- 46 50
70
70
80
70
70
80
90
90
100
27
21
32
38
21
27
21
10
21
32
WATER
TEMP ° C
AMBIENT
TEMP° C
SI Units
WATER
TEMP ° F
AMBIENT
TEMP° F
IP Units
2406
2158
2151
1903
1655
40
38
38
36
33
SUCTION
PRESSURE
Psig
283
262
262
248
228
SUCTION
PRESSURE
kPa
FREEZE CYCLE
HEAD PRESSURE kPa
349
313
312
276
240
HEAD PRESSURE Psig
FREEZE CYCLE
18:7
16:8
15:9
14:2
13:5
CYCLE
TIME
Min:Sec
18:7
16:8
15:9
14:2
13:5
CYCLE
TIME
Min:Sec
100
91
91
83
75
SUCTION
PRESSURE
Psig
1482
1365
1351
1220
11131
SURE kPa
HEAD PRES-
689
627
627
572
517
kPa
SUCTION
PRESSURE
1:0
1:1
1:1
1:4
1:7
CYCLE
TIME
Min:Sec
1:0
1:1
1:1
1:4
1:7
CYCLE
TIME
Min:Sec
HARVEST CYCLE
215
198
196
177
164
HEAD PRESSURE Psig
HARVEST CYCLE
4.9
4.7
4.8
4.8
5.3
AVERAGE
ICE WEIGHT
kg/Cycle
10.8
10.5
10.5
10.5
11.6
AVERAGE
ICE WEIGHT
lb/Cycle
360
381
404
440
499
AVERAGE
ICE WEIGHT
kg/Day
793
840
890
969
1101
AVERAGE
ICE WEIGHT
lb/Day
I-Series Ice Machine Training Manual
AVERAGE OPERATING CHARACTERISTICS IRC 1030
© 2001, IMI Cornelius Inc.
© 2001, IMI Cornelius Inc.
50
70
70
80
70
70
80
90
90
100
WATER
TEMP ° C
10
21
21
27
21
AMBIENT
TEMP° C
21
27
32
32
38
SI Units
WATER
TEMP ° F
AMBIENT
TEMP° F
IP Units
2282
2034
2041
1834
1593
38
36
35
33
30
SUCTION
PRESSURE
Psig
262
248
241
228
207
SUCTION
PRESSURE
kPa
FREEZE CYCLE
HEAD PRESSURE kPa
331
295
296
266
231
HEAD PRESSURE Psig
FREEZE CYCLE
16:3
14:5
13:6
11:4
8:8
CYCLE
TIME
Min:Sec
16:3
14:5
13:6
11:4
8:8
CYCLE
TIME
Min:Sec
105
93
95
84
75
SUCTION
PRESSURE
Psig
1600
1455
1455
1317
1207
SURE kPa
HEAD PRES-
724
641
655
579
517
kPa
SUCTION
PRESSURE
0:9
0:9
1:0
1:1
1:5
CYCLE
TIME
Min:Sec
0:9
0:9
1:0
1:1
1:5
CYCLE
TIME
Min:Sec
HARVEST CYCLE
232
211
211
191
175
HEAD PRESSURE Psig
HARVEST CYCLE
4.7
4.6
4.6
4.3
4.1
AVERAGE
ICE WEIGHT
kg/Cycle
10.3
10.1
10.1
9.5
8.9
AVERAGE
ICE WEIGHT
lb/Cycle
392
430
454
494
567
AVERAGE
ICE WEIGHT
kg/Day
865
948
1000
1090
1249
AVERAGE
ICE WEIGHT
lb/Day
I-Series Ice Machine Training Manual
AVERAGE OPERATING CHARACTERISTICS IAC 1230
- 47 -
- 48 50
70
70
80
70
70
80
90
90
100
27
21
32
38
21
27
21
10
21
32
WATER
TEMP ° C
AMBIENT
TEMP° C
SI Units
WATER
TEMP ° F
AMBIENT
TEMP° F
IP Units
2234
2227
2275
2234
2317
30
32
33
30
30
SUCTION
PRESSURE
Psig
207
221
228
207
207
SUCTION
PRESSURE
kPa
FREEZE CYCLE
HEAD PRESSURE kPa
324
323
330
324
336
HEAD PRESSURE Psig
FREEZE CYCLE
14:0
14:8
14:0
13:2
10:1
CYCLE
TIME
Min:Sec
14:0
14:8
14:0
13:2
10:1
CYCLE
TIME
Min:Sec
76
78
76
76
73
SUCTION
PRESSURE
Psig
1241
1241
1241
1220
1289
SURE kPa
HEAD PRES-
524
538
524
524
503
kPa
SUCTION
PRESSURE
1:3
1:3
1:3
1:3
1:4
CYCLE
TIME
Min:Sec
1:3
1:3
1:3
1:3
1:4
CYCLE
TIME
Min:Sec
HARVEST CYCLE
180
180
180
177
187
HEAD PRESSURE Psig
HARVEST CYCLE
4.9
4.9
5.0
4.9
4.4
AVERAGE
ICE WEIGHT
kg/Cycle
10.9
10.9
10.9
10.7
9.8
AVERAGE
ICE WEIGHT
lb/Cycle
465
441
467
483
554
AVERAGE
ICE WEIGHT
kg/Day
1025
973
1030
1065
1221
AVERAGE
ICE WEIGHT
lb/Day
I-Series Ice Machine Training Manual
AVERAGE OPERATING CHARACTERISTICS IWC 1230
© 2001, IMI Cornelius Inc.
© 2001, IMI Cornelius Inc.
50
70
70
80
70
70
80
90
90
100
WATER
TEMP ° C
10
21
21
27
21
AMBIENT
TEMP° C
21
27
32
32
38
SI Units
WATER
TEMP ° F
AMBIENT
TEMP° F
IP Units
2282
2034
2041
1834
1593
38
36
35
33
30
SUCTION
PRESSURE
Psig
262
248
241
228
207
SUCTION
PRESSURE
kPa
FREEZE CYCLE
HEAD PRESSURE kPa
331
295
296
266
231
HEAD PRESSURE Psig
FREEZE CYCLE
16:3
14:5
13:6
11:4
8:8
CYCLE
TIME
Min:Sec
16:3
14:5
13:6
11:4
8:8
CYCLE
TIME
Min:Sec
105
93
95
84
75
SUCTION
PRESSURE
Psig
1600
1455
1455
1317
1207
SURE kPa
HEAD PRES-
724
641
655
579
517
kPa
SUCTION
PRESSURE
0:9
0:9
1:0
1:1
1:5
CYCLE
TIME
Min:Sec
0:9
0:9
1:0
1:1
1:5
CYCLE
TIME
Min:Sec
HARVEST CYCLE
232
211
211
191
175
HEAD PRESSURE Psig
HARVEST CYCLE
4.7
4.6
4.6
4.3
4.1
AVERAGE
ICE WEIGHT
kg/Cycle
10.3
10.1
10.1
9.5
8.9
AVERAGE
ICE WEIGHT
lb/Cycle
392
430
454
494
567
AVERAGE
ICE WEIGHT
kg/Day
865
948
1000
1090
1249
AVERAGE
ICE WEIGHT
lb/Day
I-Series Ice Machine Training Manual
AVERAGE OPERATING CHARACTERISTICS IRC 1230
- 49 -
- 50 50
70
70
80
70
70
80
90
90
100
27
21
32
38
21
27
21
10
21
32
WATER
TEMP ° C
AMBIENT
TEMP° C
SI Units
WATER
TEMP ° F
AMBIENT
TEMP° F
IP Units
2427
2186
2172
1931
1696
38
37
35
34
31
SUCTION
PRESSURE
Psig
262
255
241
234
214
SUCTION
PRESSURE
kPa
FREEZE CYCLE
HEAD PRESSURE kPa
352
317
315
280
246
HEAD PRESSURE Psig
FREEZE CYCLE
15:8
13:7
13:2
11:8
10:1
CYCLE
TIME
Min:Sec
15:8
13:7
13:2
11:8
10:1
CYCLE
TIME
Min:Sec
106
98
97
88
79
SUCTION
PRESSURE
Psig
1669
1531
1517
1386
1276
SURE kPa
HEAD PRES-
731
676
669
607
545
kPa
SUCTION
PRESSURE
0:8
1:1
1:1
1:3
1:3
CYCLE
TIME
Min:Sec
0:8
1:1
1:1
1:3
1:3
CYCLE
TIME
Min:Sec
HARVEST CYCLE
242
222
220
201
185
HEAD PRESSURE Psig
HARVEST CYCLE
6.0
5.6
5.7
5.6
5.5
AVERAGE
ICE WEIGHT
kg/Cycle
13.1
12.4
12.6
12.3
12.1
AVERAGE
ICE WEIGHT
lb/Cycle
517
547
578
615
692
AVERAGE
ICE WEIGHT
kg/Day
1140
1205
1275
1355
1525
AVERAGE
ICE WEIGHT
lb/Day
I-Series Ice Machine Training Manual
AVERAGE OPERATING CHARACTERISTICS IAC 1448
© 2001, IMI Cornelius Inc.
© 2001, IMI Cornelius Inc.
50
70
70
80
70
70
80
90
90
100
WATER
TEMP ° C
10
21
21
27
21
AMBIENT
TEMP° C
21
27
32
32
38
SI Units
WATER
TEMP ° F
AMBIENT
TEMP° F
IP Units
2179
2186
2193
2193
2179
36
37
36
35
32
SUCTION
PRESSURE
Psig
248
255
248
241
221
SUCTION
PRESSURE
kPa
FREEZE CYCLE
HEAD PRESSURE kPa
316
317
318
318
316
HEAD PRESSURE Psig
FREEZE CYCLE
12:7
13:0
12:2
11:9
9:9
CYCLE
TIME
Min:Sec
12:7
13:0
12:2
11:9
9:9
CYCLE
TIME
Min:Sec
77
80
78
77
73
SUCTION
PRESSURE
Psig
1303
1338
1310
1296
1241
SURE kPa
HEAD PRES-
531
552
538
531
503
kPa
SUCTION
PRESSURE
1:4
1:3
1:3
1:4
1:7
CYCLE
TIME
Min:Sec
1:4
1:3
1:3
1:4
1:7
CYCLE
TIME
Min:Sec
HARVEST CYCLE
189
194
190
188
180
HEAD PRESSURE Psig
HARVEST CYCLE
5.9
5.7
5.8
5.8
5.5
AVERAGE
ICE WEIGHT
kg/Cycle
13.1
12.6
12.8
12.7
12.1
AVERAGE
ICE WEIGHT
lb/Cycle
606
576
617
621
683
AVERAGE
ICE WEIGHT
kg/Day
1335
1270
1360
1370
1505
AVERAGE
ICE WEIGHT
lb/Day
I-Series Ice Machine Training Manual
AVERAGE OPERATING CHARACTERISTICS IWC 1448
- 51 -
- 52 50
70
70
80
70
70
80
90
90
100
27
21
32
38
21
27
21
10
21
32
WATER
TEMP ° C
AMBIENT
TEMP° C
SI Units
WATER
TEMP ° F
AMBIENT
TEMP° F
IP Units
2427
2186
2172
1931
1696
38
37
35
34
31
SUCTION
PRESSURE
Psig
262
255
241
234
214
SUCTION
PRESSURE
kPa
FREEZE CYCLE
HEAD PRESSURE kPa
352
317
315
280
246
HEAD PRESSURE Psig
FREEZE CYCLE
15:8
13:7
13:2
11:8
10:1
CYCLE
TIME
Min:Sec
15:8
13:7
13:2
11:8
10:1
CYCLE
TIME
Min:Sec
106
98
97
88
79
SUCTION
PRESSURE
Psig
1669
1531
1517
1386
1276
SURE kPa
HEAD PRES-
731
676
669
607
545
kPa
SUCTION
PRESSURE
0:8
1:1
1:1
1:3
1:3
CYCLE
TIME
Min:Sec
0:8
1:1
1:1
1:3
1:3
CYCLE
TIME
Min:Sec
HARVEST CYCLE
242
222
220
201
185
HEAD PRESSURE Psig
HARVEST CYCLE
6.0
5.7
5.8
5.6
5.5
AVERAGE
ICE WEIGHT
kg/Cycle
13.3
12.5
12.7
12.4
12.1
AVERAGE
ICE WEIGHT
lb/Cycle
522
551
583
619
696
AVERAGE
ICE WEIGHT
kg/Day
1150
1215
1285
1365
1535
AVERAGE
ICE WEIGHT
lb/Day
I-Series Ice Machine Training Manual
AVERAGE OPERATING CHARACTERISTICS IRC 1448
© 2001, IMI Cornelius Inc.
I-Series Ice Machine Training Manual
IMI Cornelius Inc.
One Cornelius Place
Anoka, MN 55303-6234
U.S.A.
Part No. TP00919
May 8, 2001
© 2001, IMI Cornelius Inc.
- 53 -
I-Series Ice Machine Training Manual
- 54 -
© 2001, IMI Cornelius Inc.