1
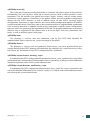
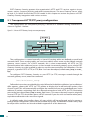
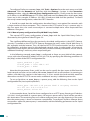
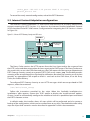
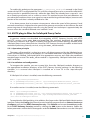
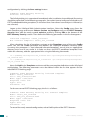
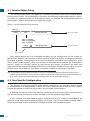
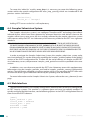
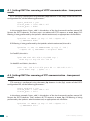
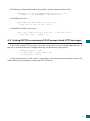
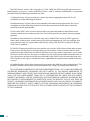
ESET Gateway Security
Installation Manual
and User Guide
Table of contents
1. Introduction .......................................................................................... 3
2. Terminology and abbreviations..........................................................5
3. Installation.............................................................................................. 9
4. Architecture Overview.......................................................................11
5.Integration with Internet Gateway services...................................15
5.1. Transparent HTTP/FTP proxy configuration........................................16
5.2. Manual HTTP/FTP proxy configuration................................................ 17
5.2.1. Manual proxy configuration of Mozilla Firefox.............................17
5.2.2. Manual proxy configuration of Squid Web Proxy Cache............18
5.3. Internet Content Adaptation configuration.......................................19
5.4. Large HTTP Objects Handling..................................................................20
5.4.1. Method of deferred scan........................................................................ 20
5.4.2. Partial scan technique............................................................................. 20
5.5. ESETS plug-in filter for SafeSquid Proxy Cache.................................21
5.5.1. Operation principle..................................................................................21
5.5.2. Installation and configuration..............................................................21
ESET Gateway Security
Copyright © 2009 ESET, spol. s r.o.
ESET Gateway Security was developed
by ESET, spol. s r.o. For more
information visit www.eset.com.
All rights reserved. No part of this
documentation may be reproduced,
stored in a retrieval system or
transmitted in any form or by any
means, electronic, mechanical,
photocopying, recording, scanning,
or otherwise without a permission in
writing from the author.
ESET, spol. s r.o. reserves the right
to change any of the described
application software without prior
notice.
This product includes PHP software,
freely available from http://www.php.
net/software/.
6. Important ESET Gateway Security mechanisms...........................23
6.1. Handle Object Policy................................................................................... 24
6.2. User Specific Configuration...................................................................... 24
6.3. Black-list and white-list..............................................................................25
6.4. Samples Submission System.................................................................... 26
6.5. World WideWeb Interface..........................................................................26
6.6. Remote Administration..............................................................................27
7. ESET Security system update............................................................29
7.1. ESETS update utility.................................................................................... 30
7.2. ESETS update process description......................................................... 30
7.3. ESETS mirror http daemon........................................................................31
8. Let us know...........................................................................................33
A. ESETS setup process description.....................................................35
A.1. Setting ESETS for scanning of HTTP communication transparent mode................................................................................................36
A.2. Setting ESETS for scanning of FTP communication - transparent
mode.........................................................................................................................36
A.3. Setting ESETS for scanning of ICAP encapsulated HTTP
messages.................................................................................................................37
Appendix A. PHP License......................................................................39
REV.20090811-010
2
ESET Gateway Security
Chapter 1:
Introduction
Dear user, you have acquired ESET Gateway Security - the premier security system running
under the Linux/BSD/Solaris OS. As you will soon find out, ESET's state-of-the-art scanning engine
has unsurpassed scanning speed and detection rates combined with a very small footprint that
makes it the ideal choice for any Linux/BSD/Solaris OS server.
Key features of the system:
•The ESET antivirus scanning engine algorithms provide the highest detection rate and the
fastest scanning times.
•The ESET Gateway Security is developed to run on single-processor as well as on multiprocessor units.
•It includes unique advanced heuristics for Win32 worms and back-doors.
•Built-in archivers unpack archived objects without the need for any external programs.
•To increase the speed and efficiency of the system, its architecture is based on the running
daemon (resident program) where all scanning requests are sent.
•All executive daemons (except esets_dac) run under non-privileged user account to
enhance security.
•The system supports selective configuration based on the user or client/server.
•Multiple logging levels can be configured to get information about system activity and
infiltrations.
•Configuration, administration and license management are offered through an intuitive and
user-friendly World Wide Web Interface.
•The system supports ESET Remote Administration for management in large computer
networks.
•The ESET Gateway Security installation does not require external libraries or programs
except for LIBC.
•The system can be configured to notify specific users in the event of a detected infiltration
or other important events.
To run efficiently, ESET Gateway Security requires just 16MB of hard-disk space and 32MB of
RAM. It runs smoothly under the 2.2.x, 2.4.x and 2.6.x Linux OS kernel versions as well as under
5.x, 6.x FreeBSD OS kernel versions.
From lower-powered, small office servers to enterprise-class ISP servers with thousands of
users, ESET Gateway Security delivers the performance and scalability you expect from a UNIX
based solution, in addition to the unequaled security of ESET products.
4
ESET Gateway Security
Chapter 2:
Terminology
and abbreviations
In this section we will review the terms and abbreviations used in this document. Note that
a boldface font is reserved for product component names and also for newly defined terms and
abbreviations. Terms and abbreviations defined in this chapter are expanded upon later in this
document.
ESETS
ESET Security is a standard acronym for all security products developed by ESET, spol. s r.o. for
Linux, BSD and Solaris operating systems. It is also the name (or its part) of the software package
containing the products.
RSR
Abbreviation for ‘RedHat/Novell(SuSE) Ready’. Note that we also support RedHat Ready
and Novell(SuSE) Ready variations of the product. The RSR package differs from the “standard”
Linux version in that it meets the FHS (File-system Hierarchy Standard defined as a part of
Linux Standard Base) criteria required by the RedHat Ready and Novell(SuSE) Ready certificate.
This means that the RSR package is installed as an add-on application–the primary installation
directory is ’/opt/eset/esets’.
ESETS daemon
The main ESETS system control and scanning daemon: esets_daemon.
ESETS base directory
The directory where ESETS loadable modules containing the virus signature database
are stored. The abbreviation @BASEDIR@ will be used for future references to this
directory. The @BASEDIR@ value for the following Operating Systems is listed below:
Linux: /var/lib/esets
Linux RSR: /var/opt/eset/esets/lib
FreeBSD: /var/lib/esets
NetBSD: /var/lib/esets
Solaris: /var/opt/esets/lib
ESETS configuration directory
The directory where all files related to the ESET Gateway Security configuration are stored.
The abbreviation @ETCDIR@ will be used for future references to this directory. The @ETCDIR@
value for the following Operating Systems is listed below:
Linux: /etc/esets
Linux RSR: /etc/opt/eset/esets
FreeBSD: /usr/local/etc/esets
NetBSD: /usr/pkg/etc/esets
Solaris: /etc/opt/esets
ESETS configuration file
Main ESET Gateway Security configuration file. The absolute path of the file is as follows:
@ETCDIR@/esets.cfg
ESETS binary files directory
The directory where the relevant ESET Gateway Security binary files are stored. The
6
ESET Gateway Security
abbreviation @BINDIR@ will be used for future references to this directory. The @BINDIR@ value
for the following Operating Systems is listed below:
Linux: /usr/bin
Linux RSR: /opt/eset/esets/bin
FreeBSD: /usr/local/bin
NetBSD: /usr/pkg/bin
Solaris: /opt/esets/bin
ESETS system binary files directory
The directory where the relevant ESET Gateway Security system binary files are stored. The
abbreviation @SBINDIR@ will be used for future references to this directory. The @SBINDIR@
value for the following Operating Systems is listed below:
Linux: /usr/sbin
Linux RSR: /opt/eset/esets/sbin
FreeBSD: /usr/local/sbin
NetBSD: /usr/pkg/sbin
Solaris: /opt/esets/sbin
ESETS object files directory
The directory where the relevant ESET Gateway Security object files and libraries are stored.
The abbreviation @LIBDIR@ will be used for future references to this directory. The @LIBDIR@
value for the following Operating Systems is listed below:
Linux: /usr/lib/esets
Linux RSR: /opt/eset/esets/lib
FreeBSD: /usr/local/lib/esets
NetBSD: /usr/pkg/lib/esets
Solaris: /opt/esets/lib
chapter 2 Terminology and abbreviations
7
Chapter 3:
Installation
After purchasing ESET Gateway Security, you will receive your authorization data (username/
password and license key). This data is necessary for both identifying you as our customer and
allowing you to download updates for ESET Gateway Security. The username/password data is
also required for downloading the initial installation package from our web site. ESET Gateway
Security is distributed as a binary file:
esets.i386.ext.bin
In the binary file shown above, ‘ext’ is a Linux/BSD/Solaris OS distribution dependent suffix,
i.e., ‘deb’ for Debian, ‘rpm’ for RedHat and SuSE, ‘tgz’ for other Linux OS distributions, ‘fbs5.tgz’ for
FreeBSD 5.xx, ‘fbs6.tgz‘ for FreeBSD 6.xx, ‘nbs4.tgz‘ for NetBSD 4.xx and ‘sol10.pkg.gz‘ for Solaris
10.
Note that the Linux RSR binary file format is:
esets-rsr.i386.rpm.bin
To install or upgrade the product, use the following command:
sh ./esets.i386.ext.bin
For the Linux RSR variation of the product, use the command:
sh ./esets-rsr.i386.rpm.bin
to display the product’s User License Acceptance Agreement. Once you have confirmed the
Acceptance Agreement, the installation package is placed into the current working directory and
relevant information regarding the package’s installation, un-installation or upgrade is displayed
onscreen.
Once the package is installed, you can verify that the main ESETS service is running by using
the following command:
Linux OS:
ps -C esets_daemon
BSD OS:
ps -ax | grep esets_daemon
Solaris:
ps -A | grep esets_daemon
After pressing ENTER, you should see the following (or similar) message:
PID TTY TIME CMD
2226 ? 00:00:00 esets_daemon
2229 ? 00:00:00 esets_daemon
At least two ESETS daemon processes are running in the background. The first PID represents
the process and threads manager of the system. The other represents the ESETS scanning
process.
10
ESET Gateway Security
Chapter 4:
Architecture Overview
Once ESET Gateway Security is successfully installed, you should become familiar with its
architecture.
Figure 4-1. Structure of ESET Gateway Security.
WWW INTERFACE
CONFIGURATION
esets.cfg
license
AGENTS
UTILITIES
scripts
esets_lic
esets_ftp
esets_http
esets_icap
esets_ssfi.so
CORE
system
service
esets_quar
scanning
engine
esets_setup
esets_update
The structure of ESET Gateway Security is shown in Figure 4-1. The system is comprised of
the following parts:
CORE
The Core of ESET Gateway Security is the ESETS daemon (esets_daemon). The daemon uses
ESETS API library libesets.so and ESETS loading modules em00X_xx.dat to provide base system
tasks such as scanning, maintenance of the agent daemon processes, maintenance of the
samples submission system, logging, notification, etc. Please refer to the esets_daemon (8) man
page for details.
AGENTS
The purpose of ESETS agent modules is to integrate ESETS with the Linux/BSD/Solaris Server
environment.
UTILITIES
The utility modules provide simple and effective management of the system. They are
responsible for relevant system tasks such as license management, quarantine management,
system setup and update.
CONFIGURATION
Proper configuration is the most important aspect of a smooth-running security system–
the remainder of this chapter is dedicated to explaining all related components. A thorough
understanding of the esets.cfg file (page 6) is also highly recommended, as this file contains
information essential to the configuration of ESET Gateway Security.
After the product is successfully installed, all its configuration components are stored in the
ESETS configuration directory. The directory consists of the following files:
12
ESET Gateway Security
@ETCDIR@/esets.cfg
This is the most important configuration file, as it controls all major aspects of the product‘s
functionality. The esets.cfg file is made up of several sections, each of which contains various
parameters. The file contains one global and several "agent“ sections, with all section names
enclosed in square brackets. Parameters in the global section are used to define configuration
options for the ESETS daemon as well as default values for the ESETS scanning engine
configuration. Parameters in agent sections are used to define configuration options of modules
used to intercept various data flow types in the computer and/or its neighborhood, and prepare
it for scanning. Note that in addition to the various parameters used for system configuration,
there are also rules governing the organization of the file. For detailed information on the most
effective way to organize this file, please refer to the esets.cfg(5) and esets_daemon(8) man
pages, as well as relevant agents‘ man pages.
@ETCDIR@/certs
This directory is used to store the certificates used by the ESETS Web Interface for
authentication. Please see the esets_wwwi man page (8) for details.
@ETCDIR@/license
This directory is used to store the product(s) license key(s) you have acquired from your
vendor. Note that the ESETS daemon will check only this directory for a valid license key, unless
the ‘license_dir‘ parameter in the ESETS configuration file is redefined.
@ETCDIR@/scripts/license_warning_script
If enabled by the ESETS configuration file parameter ‘license_warn_enabled’, this script will be
executed 30 days (once per day) before product license expiration, sending an email notification
about the expiration status to the system administrator.
@ETCDIR@/scripts/daemon_notification_script
If enabled by the ESETS configuration file parameter ‘exec_script‘, this script is executed in the
event of a detected infiltration by the antivirus system. It is used to send email notification about
the event to the system administrator.
chapter 4 Product’s Roadmap
13
Chapter 5:
Integration with Internet
Gateway services
ESET Gateway Security protects the organization’s HTTP and FTP services against viruses,
worms, trojans, spyware, phishing and other internet threats. The term 'Gateway Server' refers
to layer 3, or 'router' level of the ISO/OSI model. In this chapter we review the process of ESET
Gateway Security integration with various services.
5.1. Transparent HTTP/FTP proxy configuration
The configuration for transparent proxying is based on a standard routing mechanism as
shown in Figure 5-1 below:
Figure 5-1. Scheme of ESET Gateway Security as a transparent proxy
INTERNET
Eset Gateway Security
Router
User Agent
Client
User Agent
Client
User Agent
Client
Local Network
The configuration is created naturally as kernel IP routing tables are defined on each local
network client. These routing tables are used to establish static routes to the default network
gateway server (router). On a DHCP network, this is done automatically. All HTTP (or FTP)
communication with outbound servers is then routed via network gateway server, where ESET
Gateway Security must be installed in order to scan the communication for infiltrations. For this
purpose, a generic ESETS HTTP (or FTP) filter has been developed, called esets_http (or esets_
ftp).
To configure ESET Gateway Security to scan HTTP (or FTP) messages routed through the
network gateway server, enter the command:
/usr/sbin/esets_setup
Follow the instructions provided by the script. When the‘Available installations/un-installations’
offer appears, choose the ‘HTTP’ (or FTP) option to display the ‘install/uninstall’ options, then
choose ‘install’. This will automatically configure the module to listen on a predefined port. It also
redirects IP packets originating from the selected network and with HTTP (or FTP) destination
port to the port where esets_http (or esets_ftp) listens. This means that only requests originally
sent to HTTP (or FTP) destination ports will be scanned. If you also wish to monitor other ports,
equivalent redirection rules must be assigned.
In default mode, the installer shows all steps which will be performed and also creates a
backup of the configuration, which can be restored at any time. The detailed installer utility steps
for all possible scenarios are also described in appendix A of this document.
16
ESET Gateway Security
5.2. Manual HTTP/FTP proxy configuration
The manual proxy configuration (see Figure 5-2) is characterized by explicitly configuring the
proxied user agent to listen on a specific port and address of the parent proxy.
Figure 5-2. Scheme of ESET Gateway Security as a manual proxy
INTERNET
Eset Gateway security
Proxy Cache
Gateway
User Agent
Client
User Agent
Client
User Agent
Client
Local Network
With this configuration, the proxy server usually modifies transferred requests and/or
responses, i.e., non-transparent mode. The manual proxying functionality of esets_http has been
tested with a wide range of common user agents (i.e., proxy caches) such as Squid Proxy Cache
and SafeSquid, as well as web browsers such as Mozilla Firefox, Opera, Netscape, and Konqueror.
In general, any HTTP user agent which supports manual parent proxy settings will cooperate
with the esets_http module. In the next section, we describe the manual proxy configuration
setting of esets_http with Mozilla Firefox and Squid Web Proxy Cache, as these are the most
common HTTP user agent applications.
5.2.1. Manual proxy configuration of Mozilla Firefox
The manual HTTP/FTP proxy configuration of esets_http with Mozilla Firefox is illustrated by
the left hand side of Figure 5-2.
This configuration allows ESET Gateway Security to be installed anywhere within the local
network, including the gateway server and the user agent’s computer.
In the example below, esets_http is configured to listen on port 8080 of a computer with local
network IP address 192.168.1.10, by specifying the following parameters in the [http] section of
the ESETS configuration file:
agent_enabled=yes
listen_addr=”192.168.1.10”
listen_port=8080
The parameter ‘listen_addr’ can also be the host name which is visible from the local
network.
chapter 5 Integration with Internet Gateway services
17
To configure Firefox to use esets_http, click Tools > Options from the main menu, and click
Advanced. Click the Network tab and then click the Settings... button. In the Connection
Settings window, select the Manual Proxy Configuration option. Finally, enter the host name
or IP address in the HTTP Proxy (or FTP Proxy) field, and enter the Port values which esets_http
listens on (in this example, IP address 192.168.1.10 and port 8080 shall be specified). To reread
the newly created configuration, reload the ESETS daemon.
It should be noted that the configuration described here is not optimal for networks with
a large number of client computers. This is because the HTTP cache (if any) is present only in
the user agent–thus, the same source object is scanned multiple times when requested from
different user agents.
5.2.2. Manual proxy configuration of Squid Web Proxy Cache
The manual HTTP proxy configuration of esets_http with the Squid Web Proxy Cache is
illustrated by the right hand side of Figure 5-2.
The significant difference from the previously described configuration is that ESET Gateway
Security is installed on the HTTP/FTP Gateway between the proxy cache (Squid Web Proxy in
this example) and the Internet. Thus, all inbound HTTP/FTP communications are first scanned
for infiltrations and then stored in the dedicated network cache. In other words, all previously
requested source objects present within the proxy cache are already checked for viruses and no
additional checking is necessary when requested again.
In the following example, esets_http is configured to listen on port 8080 of the gateway
server, with a local network IP address of 192.168.1.10, by specifying the following parameters in
the [http] section of the ESETS configuration file:
agent_enabled = yes
listen_addr = ”192.168.1.10”
listen_port = 8080
Note that the parameter ‘listen_addr’ can be used to specify the host name visible from the
local network and also can be used to allow esets_http to listen to all interfaces, by entering an
address of 0.0.0.0. Use caution in the latter case, as users outside the local network would be
allowed to use the HTTP/FTP scanner unless additional security is added to prevent this.
To set up Squid to use esets_http as a parent proxy, add the following lines to the Squid
configuration file (/etc/squid/squid.conf ):
cache_peer 192.168.1.10 parent 8080 0 no-query default
acl all src 0.0.0.0/0.0.0.0
never_direct allow all
In the example above, Squid has been configured to use HTTP proxy listening at IP address
192.168.1.10 on port 8080 as a parent proxy. All requests processed by Squid will be passed to
this destination. The remaining lines are used to configure error message reporting in the event
that the parent proxy is down or becomes unreachable. To configure Squid to attempt direct
connections when the parent proxy is unreachable, add the following parameters to the Squid
configuration file:
18
ESET Gateway Security
cache_peer192.168.1.10parent80800no-query
prefer_directoff
To reread the newly created configuration, reload the ESETS daemon.
5.3. Internet Content Adaptation configuration
The Internet Content Adaptation is a well known method aimed at providing object-based
content vectoring for HTTP services. It is based on the Internet Content Adaptation Protocol
(ICAP) described in the RFC-3507 memo. Configuration for integrating the ICAP services is shown
in Figure 5-3:
Figure 5-3. Scheme of ESET Gateway Security as a ICAP server.
INTERNET
Proxy
Cache
ICAP
client
ESET Gateway
Security
Gateway
User Agent
Client
User Agent
Client
User Agent
Client
Local Network
The Proxy Cache receives the HTTP request from the User Agent and/or the response from
the HTTP server and then encapsulates the message into the ICAP request. The Proxy Cache must
also work in this case as the ICAP client and pass the ICAP request for the message adaptation to
ESET Gateway Security, namely to a generic ESETS ICAP server - esets_icap. The module provides
scanning of the encapsulated message body for infiltration. Based on the scanning result, it then
provides an appropriate ICAP response which is sent back to the ICAP client, or to the Proxy
Cache, for further delivery.
To configure ESET Gateway Security to scan HTTP messages which are encapsulated in ICAP
requests, enter the command:
/usr/sbin/esets_setup
Follow the instructions provided by the script. When the 'Available installations/uninstallations' offer appears, choose the 'ICAP' option to display the ‘install/uninstall’ options.
Choose ‘install’ to automatically configure the module to listen on a predefined port and reload
the ESETS daemon service.
In default mode, the installer shows all steps which will be performed and also creates a
backup of the configuration, which can be restored later at any time. The detailed installer utility
steps for all possible scenarios are also described in appendix A of this documentation.
chapter 5 Integration with Internet Gateway services
19
The second step of the ICAP configuration method is activating the ICAP client functionality
within the Proxy Cache. The ICAP client must be configured in order to properly request the
esets_icap for the infiltration scanning service. The initial request line of the ICAP request must
be entered as follows:
METHOD icap://server/av_scan ICAP/1.0
In the above example, METHOD is the ICAP method used, 'server' is the server name (or IP
address), and /av_scan is the esets_icap infiltrations scanning service identifier.
5.4. Large HTTP Objects Handling
Under normal conditions, objects are first transferred from the HTTP server (or client) to
esets_http, scanned for infiltrations and then transferred to the HTTP client (or server). For
large files (the large objects whose transfer time is larger than the timeout defined by the
parameter lo_timeout) this is not an optimal scenario–the user agent's timeout setting or the
user’s impatience can cause interrupts or even canceling of the object transfer. Therefore, other
methods of processing large objects must be implemented. These are described in the following
two sections.
5.4.1. Method of deferred scan
With esets_http, a technique known as the ‘deferred scan’ method of handling large files can
be employed. This means that if the object transferred becomes too large, esets_http will begin
to send the object transparently to an awaiting HTTP end-point, such as a client or server. After
the last part of the object has arrived, the object is scanned for infiltrations. If the object has been
found as infected, the last part of the object (last 4KB of object’s data) is not sent to the awaiting
end-point and the connection to the end-point is then dropped. Meanwhile, an email message
containing details about the dangerous file transfer is sent to the Gateway administrator. This
email notification is sent only in a server-to-client data transfer. Additionally, the URL of the
source object is stored in the esets_http cache in order to block the source transfer if requested
again.
Be aware that the ‘deferred scan’ technique described above presents a potential risk to the
computer requesting the infected file for the first time. This is because some parts of the already
transferred data can contain executable, dangerous code. For this reason, ESET developed a
modified version of the ‘deferred scan’ technique, known as the ‘partial scan’ technique.
5.4.2. Partial scan technique
The ‘partial scan’ technique has been developed as an additional safeguard to the ‘deferred
scan’ method. The principle of the ‘partial scan’ technique is based on the idea that the scanning
time of a large object is negligible compared to the overall processing time of the object. This
concept is especially evident with large object HTTP transfers, as significantly more time is needed
to transfer the object than to scan it for infiltrations. This assumption allows us to perform more
than one scan during a large object transfer.
20
ESET Gateway Security
To enable this technique, the parameter lo_partscan_enabled is entered in the [http]
section of the ESETS configuration file. This will cause large objects to be scanned for infiltrations
during transfer in predefined intervals, while the data which has already been scanned is sent
to an awaiting end-point such as a client or server. This method ensures that no infiltrations are
passed to the computer whose user agent has requested the large infected object, because each
portion of the sent data is already verified to be safe.
It has been proven that in common circumstances where the speed of the gateway's local
network connection is higher than the speed of the gateway connection to the Internet, the total
processing time of a large object transfer using the ‘partial scan’ technique is approximately the
same as when the standard ‘deferred scan’ method is used.
5.5. ESETS plug-in filter for SafeSquid Proxy Cache
In previous sections we described the integration of ESET Gateway Security with HTTP
and FTP services using esets_http and esets_ftp. The methods described are applicable
for the most common user agents, including the well known content filtering internet proxy
SafeSquid (http://www.safesquid.com). However, ESET Gateway Security also offers an alternative
method of protecting Gateway services, using the esets_ssfi.so module.
5.5.1. Operation principle
The esets_ssfi.so module is a plug-in to access all objects processed by the SafeSquid proxy
cache. Once the plug-in accesses the object, it is scanned for infiltrations using the ESETS daemon.
If the object is infected, SafeSquid blocks the appropriate resource and sends the predefined
template page instead. The esets_ssfi.so module is supported by SafeSquid Advanced version
4.0.4.2 and later.
5.5.2. Installation and configuration
To integrate the module, you must create links from the SafeSquid modules directory to
the appropriate installation locations of the ESET Gateway Security package. In the following
examples, it is assumed that SafeSquid is installed on a Linux OS in the ‘/opt/safesquid‘
directory.
If SafeSquid 4.2 or later is installed, enter the following commands:
mkdir /opt/safesquid/modules
ln -s @LIBDIR@/ssfi/esets_ssfi.so /opt/safesquid/modules/esets_ssfi.so
ln -s @LIBDIR@/ssfi/esets_ssfi.xml /opt/safesquid/modules/esets_ssfi.xml
If an earlier version is installed, enter the following commands:
mkdir /opt/safesquid/modules
ln -s @LIBDIR@/ssfi/esets_ssfi.so /opt/safesquid/modules/esets_ssfi.gcc295.so
ln -s @LIBDIR@/ssfi/esets_ssfi.xml /opt/safesquid/modules/esets_ssfi.xml
/etc/init.d/safesquid restart
To complete the SafeSquid plug-in installation, first logon to the SafeSquid Web Administration
Interface. Select the Config menu from the main interface page and browse Select a Section to
Configure until you find ESET Gateway Security. Click Submit and create the antivirus profile
for the ESET Gateway Security section by clicking the Add button at the bottom. Define the
below parameters within the list that appears and click Submit. Remember to save the Safesquid
chapter 5 Integration with Internet Gateway services
21
configuration by clicking the Save settings button.
Comment: ESET Gateway Security
Profiles: antivirus
The SafeSquid plug-in is operational immediately after installation, but additional fine tuning
should be performed. In the following paragraphs, we explain how to configure SafeSquid to use
ESETS predefined blocking templates, in the event that a transferred source object is infected (or
not scanned).
Logon to the SafeSquid Web Administration Interface. Select the Config menu from the
main interface page and browse Select a Section to Configure until you find ESET Gateway
Security. Next, edit the newly created antivirus profile by clicking Edit at the bottom of the
ESET Gateway Security section. Then define the following parameters in the list that appears:
Infected template: esets_infected
Not scanned template: esets_not_scanned
After submitting the list of templates, navigate to the Templates page of the main Config
menu. You will see a Path parameter that defines the SafeSquid templates directory path.
Assuming the parameter is ‘/opt/safesquid/safesquid/templates‘, ensure that an appropriate
directory exists and if not, create it. In order to access the ESETS predefined templates from
within this directory, add the appropriate links using the following commands:
ln -s @LIBDIR@/ssfi/templates/ssfi_infected.html /opt/safesquid/safesquid/templates/
ssfi_infected.html
ln -s @LIBDIR@/ssfi/templates/ssfi_not_scanned.html /opt/safesquid/safesquid/templates/
ssfi_not_scanned.html
Next, click Add in the Templates section to add the new template definitions to the SafeSquid
configuration. The following parameters must be defined within the list that appears for the
infected ESETS blocking page:
Comment: ESET Gateway Security infected template
Name: esets_infected
File: ssfi_infected.html
Mime type: text/html
Response code: 200
Type: File
Parsable: Yes
For the unscanned ESETS blocking page, the list is as follows:
Comment: ESET Gateway Security not scanned template
Name: esets_not_scanned
File: ssfi_not_scanned.html
Mime type: text/html
Response code: 200
Type: File
Parsable: Yes
To reread the newly created configuration, reload SafeSquid and the ESETS daemon.
22
ESET Gateway Security
Chapter 6:
Important ESET Gateway
Security mechanisms
6.1. Handle Object Policy
The Handle Object Policy (see figure 6-1) mechanism provides filtering of scanned objects
based on their status. This functionality is based on the following configuration options: ‘action_
av‘, ‘action_av_infected‘, ‘action_av_notscanned‘, ‘action_av_deleted‘. For detailed information on
these options, please refer to the esets.cfg(5) man page.
Figure 6-1. Scheme of Handle Object Policy mechanism.
action_av
accept
scan
defer, discard, reject
object not accepted
defer, discard, reject
object not accepted
action_av_infected
action_av_notscanned
action_av_deleted
accept
object accepted
Every object processed is first handled according to the configuration of the ‘action_av‘
option. If this option is set to ‘accept‘ (or ‘defer‘, ‘discard‘, ‘reject‘) the object is accepted (or deferred,
discarded, rejected). If the option is set to ‘scan‘ the object is scanned for virus infiltrations, and if
the ‘av_clean_mode‘ option is set to 'yes', the object is also cleaned. In addition, the configuration
options ‘action_av_infected‘, ‘action_av_notscanned‘ and ‘action_av_deleted‘ are taken into
account to further evaluate handling of the object. If an ‘accept‘ action has been taken as a result
of these three action options, the object is accepted. Otherwise, the object is blocked.
NOTE: Some modules have been written to integrate ESETS into an environment which does not allow scanned objects to be
modified. Thus the modification of scanned objects is disabled in such modules and the value of the configuration option 'av_
clean_mode' is ignored. For detailed information on this topic refer to the relevant modules‘ man pages.
6.2. User Specific Configuration
The purpose of the User Specific Configuration mechanism is to provide a higher degree
of customization and functionality. It allows the sytem administrator to define ESETS antivirus
scanner parameters based on the user who is accessing file system objects.
A detailed description of this functionality can be found in the esets.cfg(5) manual page; in
this section we will provide only a short example of a user-specific configuration.
In this example, the esets_http module is used to control HTTP traffic on port 8080 of the
gateway server, with a local network IP address of 192.168.1.10. The functionality of esets_http is
based on the [http] section of the ESETS configuration file. See the following lines:
24
ESET Gateway Security
[http]
agent_enabled = yes
listen_addr = ”192.168.1.10”
listen_port = 8080
action_av = ”scan”
To provide individual parameter settings, define the ‘user_config’ parameter with the path to
the special configuration file where the individual setting will be stored. In the next example, we
create a reference to the special configuration file ‘esets_http_spec.cfg’, which is located in the
ESETS configuration directory. See below:
[http]
agent_enabled = yes
listen_addr = ”192.168.1.10”
listen_port = 8080
action_av = ”scan”
user_config = ”esets_http_spec.cfg”
Once the special configuration file is referenced from within the [http] section, create the
esets_http_spec.cfg file in the ESETS configuration directory and add the appropriate individual
settings. The next example shows the individual setting for parameter ‘action_av’, for the client
computer with IP address 192.168.1.40. See below:
[|192.168.1.40]
action_av = ”reject”
Note that the section header identifies the HTTP client for which the individual settings have
been created, and the section body contains individual parameters for that HTTP client. With
this special configuration, HTTP traffic for all local network clients will be processed normally, i.e.
scanned for infiltrations. However, access for the HTTP client with the IP address 192.168.1.40 will
be rejected (blocked).
6.3. Blacklist and whitelist
In the following example we demonstrate blacklist and whitelist creation for the esets_http
configured as an HTTP proxy scanner. Note that the configuration described in the previous
section is used for this purpose.
To create a blacklist used by esets_http, create the following group section within the special
configuration file ‘esets_http_spec.cfg’, introduced in the previous section. See below:
[black-list]
action_av = ”reject”
Next, add the HTTP server to the ‘black-list’ group. To do this, the following special section
must be created:
[aaa.bbb.ccc.ddd]
parent_id = ”black-list”
In the example above, ‘aaa.bbb.ccc.ddd’ is the IP address of the server added to the ‘blacklist’. All HTTP traffic related to the specified server will now be rejected, i.e. the server will be
blocked.
chapter 6 Important ESET Gateway Security mechanisms
25
To create the ‘white-list’ used by esets_http it is necessary to create the following group
section within the special configuration file ‘esets_http_spec.cfg’ which was introduced in the
previous section. See below:
[white-list]
action_av = ”accept”
Adding HTTP servers to the list is self-explanatory.
6.4. Samples Submission System
The Samples submission system is an intelligent ThreatSense.NET technology that collects
infected objects which have been detected by advanced heuristics and delivers them to the
samples submission system server. All virus samples collected by the sample submission system
will be processed by the ESET virus laboratory and if necessary, added to the ESET virus signature
database.
NOTE: ACCORDING TO OUR LICENSE AGREEMENT, BY ENABLING SAMPLE SUBMISSION SYSTEM YOU ARE AGREEING TO ALLOW
THE COMPUTER AND/OR PLATFORM ON WHICH THE ESETS_DAEMON IS INSTALLED TO COLLECT DATA (WHICH MAY INCLUDE
PERSONAL INFORMATION ABOUT YOU AND/OR THE USER OF THE COMPUTER) AND SAMPLES OF NEWLY DETECTED VIRUSES OR
OTHER THREATS AND SEND THEM TO OUR VIRUS LAB. THIS FEATURE IS TURNED OFF BY DEFAULT. ALL INFORMATION COLLECTED
WILL BE USED ONLY TO ANALYZE NEW THREATS AND WILL NOT BE USED FOR ANY OTHER PURPOSE.
In order to activate the Samples Submission System, the samples submission system cache
must be initialized. This can be achieved by enabling the ‘samples_enabled’ option in the [global]
section of the ESETS configuration file. To allow for the actual delivery of samples to the ESET
virus laboratory servers, the parameter ‘samples_send_period’ must also be specified in the same
section.
In addition, users can choose to provide the ESET virus laboratory team with supplementary
information using the ‘samples_provider_mail’ and/or ‘samples_provider_country’ configuration
options. The information collected using these options will assist in providing the ESET team with
an overview about a given infiltration which may be spreading over the Internet.
For more information on the Samples Submission System, refer to the esets_daemon (8) man
page.
6.5. Web Interface
The Web Interface allows user-friendly configuration, administration and license management
of ESET Security systems. This module is a separate agent and must be explicitly enabled. To
quickly configure the Web Interface, set the following options in the ESETS configuration file and
then restart the ESETS daemon:
[wwwi]
agent_enabled = yes
listen_addr = address
listen_port = port
username = name
password = pass
26
ESET Gateway Security
Substitute your own values for the parameters in italics and direct your browser to ’https://
address:port’ (note the https). Login with ’name/pass’. Basic usage instructions can be found on
the help page and technical details about esets_wwwi can be found on the esets_wwwi (1)
man page.
6.6 Remote Administration
ESETS supports ESET Remote Administration for file security management in large computer
networks. For more information, please read the ESET Remote Administrator Manual. This manual
is located on our web site, here:
http://download.eset.com/manuals/ESET_ERA_User_Guide_EN.pdf
The ESETS Remote Administration Client is part of the main ESETS daemon. For basic set up,
specify the address of your ERA Server using the ‘racl_server_addr‘ parameter in the [global]
section of the ESETS configuration file. If an ERA Console password has been established, the
‘racl_password‘ parameter must be defined. All ERA Client variables are listed in the esets_
daemon (8) man page.
The Unix ESETS ERA Client performs the following functions:
• Communicates with the ERA Server and provides System Information, Configuration,
Protection Status and Features
• Allows client configurations to be viewed/modified using the ESET Configuration Editor and
applied with a Configuration Task
• Performs On-demand scan and Update Now Tasks as requested, and sends the Scan Logs back
to the ERA Server
• Sends notable scans performed by the ESETS daemon to the Threat Log
• Sends all non-debug messages to the Event Log
These functions are not supported:
• Firewall Log
• Remote installation
chapter 6 Important ESET Gateway Security mechanisms
27
Chapter 7:
ESET Security system update
7.1. ESETS update utility
To maintain the effectiveness of ESET Gateway Security, the virus signature database must
be kept up to date. The esets_update utility has been developed for this purpose (see the
esets_update (8) man page for details). To launch an update, the configuration options ‘av_
update_username‘ and ‘av_update_password‘ must be defined in the [global] section of the
ESETS configuration file. In the event that your server accesses the Internet via HTTP proxy, the
additional configuration options ‘proxy_addr‘, ‘proxy_port‘ must be defined. If access to the HTTP
proxy requires a username and password, the ‘proxy_username‘ and ‘proxy_password‘ options
must also be defined in this section. To initiate an update, enter the following command:
@SBINDIR@/esets_update
To provide the highest possible security for the end user, the ESET team continuously collects
virus definitions from all over the world–new patterns are added to the virus signature database
in very short intervals. For this reason, we recommend that updates be initiated on a regular
basis. To specify the update frequency, the ‘av_update_period‘ option must be defined in the
[global] section of the ESETS configuration file. The ESETS daemon must be up and running in
order to successfully update the virus signature database.
7.2. ESETS update process description
The update process consists of two stages: First, the precompiled update modules are
downloaded from the ESET server. If the option ‘av_mirror_enabled‘ is set to ´yes´ in the [global]
section of the ESETS configuration file, copies (or mirror) of these update modules are created in
the following directory:
@BASEDIR@/mirror
If desired, the Mirror directory path can be redefined using the ‘av_mirror_dir‘ option in the
[global] section of the ESETS configuration file. The newly created Mirror can then serve as a fully
functional update server and can be used to create lower (child) Mirror servers. See section 7.3
for details.
The second stage of the update process is the compilation of modules loadable by the ESET
Gateway Security scanner from those stored in the local mirror. Typically, the following ESETS
loading modules are created: loader module (em000.dat), scanner module (em001.dat), virus
signature database module (em002.dat), archives support module (em003.dat), advanced
heuristics module (em004.dat), etc. The modules are created in the following directory:
@BASEDIR@
This is the directory where the ESETS daemon loads modules from and thus can be redefined
using the ‘base_dir‘ option in the [global] section of the ESETS configuration file.
30
ESET Gateway Security
7.3. ESETS mirror http daemon
ESETS mirror http daemon is installed automatically with ESET Gateway Security. The http
mirror daemon starts if the option 'av_mirror_httpd_enabled' in the [global] section of the ESETS
configuration file is set to 'yes' and the Mirror is enabled.
Options 'av_mirror_httpd_port' and ´av_mirror_httpd_addr´ define the port (default 2221)
and address (default: all local tcp addresses) where the http server listens.
The option 'av_mirror_httpd_auth_mode' allows access authentication (default: none) to be
changed to basic. The options 'av_mirror_httpd_username' and 'av_mirror_httpd_password'
allow an administrator to define the login and password used to access the Mirror.
31
Chapter 8:
Let us know
Dear user, we hope this Guide has provided you with a thorough understanding of the
requirements for ESET Gateway Security installation, configuration and maintenance. However,
our goal is to continually improve the quality and effectiveness of our documentation. If you
feel that any sections in this Guide are unclear or incomplete, please let us know by contacting
Customer Care:
http://www.eset.com/support
or use directly the support form:
http://www.eset.eu/support/form
We are dedicated to provide the highest level of support and look forward to helping you
should you experience any problems concerning this product.
34
ESET Gateway Security
Appendix A. ESETS setup
process description
A.1. Setting ESETS for scanning of HTTP communication - transparent
mode
HTTP scanning is performed using the esets_http daemon. In the [http] section of the ESETS
configuration file, set the following parameters:
agent_enabled = yes
listen_addr = ”192.168.1.10”
listen_port = 8080
In the example above, ‘listen_addr’ is the address of the local network interface named if0.
Restart the ESETS daemon. The next step is to redirect all HTTP requests to esets_http. If IPfiltering is being performed by the ipchains administration tool, an appropriate rule would be:
ipchains -A INPUT -p tcp -i if0 --dport 80 \
-j REDIRECT 8080
If IP-filtering is being performed by the iptables administration tool, the rule is:
iptables -t nat -A PREROUTING -p tcp -i if0 \
--dport 80 -j REDIRECT --to-ports 8080
On FreeBSD, the rule is:
ipfw add fwd 192.168.1.10,8080 tcp \
from any to any 80 via if0 in
On NetBSD and Solaris, the rule is:
echo 'rdr if0 0.0.0.0/0 port 80 -> 192.168.1.10 \
port 8080 tcp' | ipnat -f -
A.2. Setting ESETS for scanning of FTP communication - transparent
mode
FTP scanning is performed using the esets_ftp daemon. In the [ftp] section of the ESETS
configuration file, set the following parameters:
agent_enabled = yes
listen_addr = ”192.168.1.10”
listen_port = 2121
In the above example, ‘listen_addr’ is the address of the local network interface named if0.
Restart the ESETS daemon. Then, redirect all FTP requests to esets_ftp. If IP-filtering is being
performed by the ipchains administration tool, an appropriate rule would be:
36
ipchains -A INPUT -p tcp -i if0 --dport 21 \
-j REDIRECT 2121
ESET Gateway Security
If IP-filtering is being performed by the iptables administration tool, the rule is:
iptables -t nat -A PREROUTING -p tcp -i if0 \
--dport 21 -j REDIRECT --to-ports 2121
On FreeBSD, the rule is:
ipfw add fwd 192.168.1.10,2121 tcp \
from any to any 21 via if0 in
On NetBSD and Solaris, the rule is:
echo 'rdr if0 0.0.0.0/0 port 21 -> 192.168.1.10 \
port 2121 tcp' | ipnat -f -
A.3. Setting ESETS for scanning of ICAP encapsulated HTTP messages
ICAP encapsulated HTTP message scanning is performed using the esets_icap daemon. In
the [icap] section of the ESETS configuration file, set the following parameters:
agent_enabled = yes
listen_addr = "192.168.1.10"
listen_port = 1344
In the example above, 'listen_addr' is the address of the local network interface named if0.
After adding these parameters, restart the ESETS daemon.
37
Appendix B. PHP License
The PHP License, version 3.01 Copyright (c) 1999 - 2006 The PHP Group. All rights reserved.
Redistribution and use in source and binary forms, with or without modification, is permitted
provided that the following conditions are met:
1. Redistributions of source code must retain the above copyright notice, this list of
conditions and the following disclaimer.
2. Redistributions in binary form must reproduce the above copyright notice, this list of
conditions and the following disclaimer in the documentation and/or other materials
provided with the distribution.
3. The name “PHP” must not be used to endorse or promote products derived from this
software without prior written permission. For written permission, please contact group@
php.net.
4. Products derived from this software may not be called “PHP”, nor may “PHP” appear in
their name, without prior written permission from [email protected]. You may indicate that
your software works in conjunction with PHP by saying “Foo for PHP” instead of calling it
“PHP Foo” or “phpfoo”
5. The PHP Group may publish revised and/or new versions of the license from time to time.
Each version will be given a distinguishing version number. Once covered code has been
published under a particular version of the license, you may always continue to use it under
the terms of that version. You may also choose to use such covered code under the terms of
any subsequent version of the license published by the PHP Group. No one other than the
PHP Group has the right to modify the terms applicable to covered code created under this
License.
6. Redistributions of any form whatsoever must retain the following acknowledgment: “This
product includes PHP software, freely available from <http://www.php.net/software/>”.
THIS SOFTWARE IS PROVIDED BY THE PHP DEVELOPMENT TEAM ``AS IS’’ AND ANY EXPRESSED
OR IMPLIED WARRANTIES, INCLUDING, BUT NOT LIMITED TO, THE IMPLIED WARRANTIES OF
MERCHANTABILITY AND FITNESS FOR A PARTICULAR PURPOSE ARE DISCLAIMED. IN NO EVENT
SHALL THE PHP DEVELOPMENT TEAM OR ITS CONTRIBUTORS BE LIABLE FOR ANY DIRECT,
INDIRECT, INCIDENTAL, SPECIAL, EXEMPLARY, OR CONSEQUENTIAL DAMAGES (INCLUDING, BUT
NOT LIMITED TO, PROCUREMENT OF SUBSTITUTE GOODS OR SERVICES; LOSS OF USE, DATA, OR
PROFITS; OR BUSINESS INTERRUPTION) HOWEVER CAUSED AND ON ANY THEORY OF LIABILITY,
WHETHER IN CONTRACT, STRICT LIABILITY, OR TORT (INCLUDING NEGLIGENCE OR OTHERWISE)
ARISING IN ANY WAY OUT OF THE USE OF THIS SOFTWARE, EVEN IF ADVISED OF THE POSSIBILITY
OF SUCH DAMAGE.
40
ESET Gateway Security