1
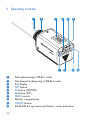
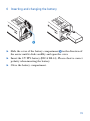
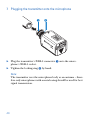
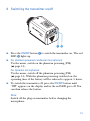
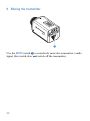
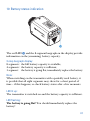
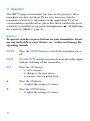
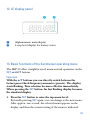
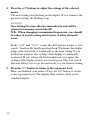
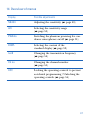
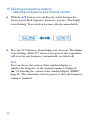
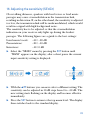
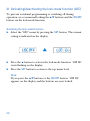
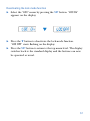
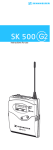
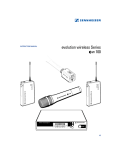
INSTRUCTION MANUAL
SKP 30
33
Contents
1
2
3
4
5
6
7
8
9
10
11
12
13
14
15
16
17
18
19
20
21
22
23
24
25
26
Short description ............................................................................................. 35
Special features ................................................................................................ 36
Areas of application ........................................................................................ 36
HiDyn plus noise reduction ............................................................................. 37
Operating controls .......................................................................................... 38
Inserting and changing the battery ................................................................ 39
Plugging the transmitter onto the microphone .............................................. 40
Switching the transmitter on/off ..................................................................... 41
Muting the transmitter ................................................................................... 42
Battery status indication ................................................................................. 43
Operation ........................................................................................................ 44
LC display panel ............................................................................................. 45
Basic funtions of the Sennheiser operating menu ......................................... 45
Overview of menus ........................................................................................ 47
Selecting a frequency memory ....................................................................... 48
Adjusting the sensitivity (SEnSit) ................................................................... 49
Selecting the sensitivity range (Att) ................................................................ 50
Switching the phantom powering on/off (PHAnto) ...................................... 51
Selecting the content of the standard display (DiSPL) .................................. 52
Configuring a frequency memory ................................................................. 53
Setting a frequency (tunE) ....................................................................... 54
Assigning a channel number (Ch no) ...................................................... 55
Activating/deactivating the lock-mode function (LOC) ................................ 56
Error checklist ................................................................................................. 58
Tips for optimum reception ........................................................................... 59
Safety instructions ........................................................................................... 59
Specifications ................................................................................................... 60
EC Certificate of Conformity ........................................................................ 62
Thank you for choosing Sennheiser!
We have designed this product to give you reliable operation over many
years.
Please take a few moments to read these instructions carefully, as we want you
to enjoy your new Sennheiser product quickly and to the full.
34
1 Short description
The SKP 30 transmitter permits wireless transmission with studioquality sound. The use of further optimised PLL and microprocessor
technology and the HiDyn plus noise reduction system ensure
interference-free transmission.
The transmitter can be supplied in nine frequency ranges within the
UHF band. (Please note: Frequency usage is different for each
country. Your Sennheiser agent will have all the necessary details on
the available legal frequencies for your area.)
Range A:
Range B:
Range C:
Range D:
Range E:
Range F:
Range G:
Range H:
Range I:
518 – 550 MHz,
630 – 662 MHz,
740 – 772 MHz,
790 – 822 MHz,
838 – 870 MHz,
560 – 592 MHz,
576 – 608 MHz,
674 – 706 MHz,
696 – 728 MHz.
The SKP 30 is 16-channel switchable, i.e. it has 16 frequency
memories to store up to 16 transmission frequencies. The frequencies
are selectable in 25-kHz steps, giving a selection of 1,280 frequencies
within the preset 32 MHz frequency range.
The transmitter has 16 factory-preset, intermodulation-free
frequencies, so that it is ready for immediate use after switch-on.
However, all frequency settings can be changed to your individual
needs, if required.
35
2 Special features
•
Diecast metal casing
•
State-of-the-art PLL technology, 16 switchable channels
•
HiDyn plus noise reduction system
•
Signal-to-noise ratio > 114 dB(A)
•
Battery status indication with “LowBat” warning on the
transmitter and transmission of “LowBat” warning to suitable
receivers
•
Switchable 48 V phantom powering for powering condenser
microphones
•
Balanced microphone input
3 Areas of application
•
Suitable for a wide variety of applications
•
Converts any wired microphone to wireless
36
4 HiDyn plus noise reduction
“
“
Progress you can hear:
This transmitter is equipped with HiDyn plus, the Sennheiser noise
reduction system that reduces RF interference. It increases the signalto-noise radio in wireless audio transmission to up to 114 dB.
HiDyn plus is a wideband compander system which compresses the
audio signal in the transmitter in a ratio of 2:1 (related to dB). In the
receiver the signal is expanded in an identical and opposite way in a
1:2 ratio to restore the original signal. HiDyn plus has been specially
developed for high quality radiomicrophone systems.
Note:
Only transmitters and receivers that are equipped with HiDyn plus
can work correctly with each other. If non HiDyn plus equipment was
mixed with HiDyn plus, the dynamic range would be drastically
reduced and the transmission would sound blunt and flat. HiDyn plus
is permanently active and cannot be switched off.
37
5 Operating controls
38
Microphone input, XLR-3 socket
Mechanical locking ring of XLR-3 socket
LC display
SET button
button (DOWN)
button (UP)
MUTE switch
Battery compartment
ON/OFF button
Red LED for operation and battery status indication
6 Inserting and changing the battery
Slide the cover of the battery compartment in the direction of
the arrow until it clicks audibly and open the cover.
Insert the 9 V PP3 battery (IEC 6 LR 61). Please observe correct
polarity when inserting the battery.
Close the battery compartment.
39
7 Plugging the transmitter onto the microphone
Plug the transmitter’s XLR-3 connector onto the micro-
phone’s XLR-3 socket.
Tighten the locking ring by hand.
Note:
The transmitter uses the microphone body as an antenna – therefore only microphones with a metal casing should be used for best
signal transmission.
40
8 Switching the transmitter on/off
Press the ON/OFF button to switch the transmitter on. The red
LED lights up.
For phantom powered condenser microphones:
Via the menu, switch on the phantom powering (P48)
( page 51).
For dynamic microphones:
Via the menu, switch off the phantom powering (P48)
( page 51). With the phantom powering switched on, the
operating time of the battery will be reduced to approx. 5 hours.
To switch the transmitter off, press the ON/OFF button until
“OFF” appears on the display and/or the red LED goes off. You
can then release the button.
Note:
Switch off the plug-on transmitter before changing the
microphone.
41
9 Muting the transmitter
Use the MUTE switch to noiselessly mute the transmitter’s audio
signal (this switch does not switch off the transmitter).
42
10 Battery status indication
The red LED and the 8-segment bargraph on the display provide
information on the (remaining) battery capacity.
3-step bargraph display:
8 segments: the full battery capacity is available,
4 segments: the battery capacity is sufficient,
1 segment: the battery is going flat, immediately replace the battery.
Note:
When switching on the transmitter with a partially used battery, it
is possible that all eight segments may show for a short period of
time – if this happens, re-check battery status after a few moments.
LED lit up:
The transmitter is switched on and the battery capacity is sufficient.
LED flashing:
The battery is going flat! You should immediately replace the
battery!
43
11 Operation
The SKP 30 plug-on transmitter has been factory-preset to allow
immediate use after switch-on. Please note, however, that the
transmitter sensitivity is dependent on the application. To avoid
overmodulation and distortion, please first check whether the preset
sensitivity is suitable for your particular application ( “16 Adjusting
the sensitivity (SEnSit)”, page 49).
Attention:
To operate switches or press buttons on your transmitter, do not
use any tools such as screw drivers, etc., as this can damage the
operating controls.
ON/OFF
Press the ON/OFF button to switch the transmitter on or
off.
MUTE
Use the MUTE switch to noiselessly mute the audio signal
without switching off the transmitter.
SET
Press the SET button
— to select a menu,
— to change to the next menu,
— to return to the top menu level.
Press the UP button
— to adjust the setting of a menu.
Press the DOWN button
— to adjust the setting of a menu.
44
12 LC display panel
Alphanumeric main display
3-step level display for battery status
13 Basic functions of the Sennheiser operating menu
The SKP 30 offers straightforward, menu-assisted operation via the
SET, and buttons.
Important:
With the / buttons you can directly switch between the
factory-preset fixed frequency memories (presets). The display
starts flashing. Your selection becomes effective immediately.
When pressing the SET button, the last flashing display becomes
the standard display.
1. Press the SET button to enter the top menu level:
By briefly pressing SET again, you can change to the next menu.
After approx. one second, the selected menu appears on the
display and then the current setting of the menu is indicated.
45
2. Press the / buttons to adjust the settings of the selected
menu:
The new setting starts flashing on the display. If you return to the
previous setting, the flashing stops.
Important:
New settings become effective immediately and will be
retained in memory on switch-off!
N.B.: When changing transmission frequencies, care should
be taken to avoid causing interference to other channels/
users.
In the “tunE” and “Ch no” menu, the / buttons feature a “fast
search” function. By briefly pressing the / buttons, the display
jumps either forwards or backwards to the next setting. If you
hold down a button, the cycling of the display is continously
accelerted. If you release the button and start over again, the
cycling of the display restarts at normal speed. The “fast search”
function allows you to get fast and easily to your desired setting.
3. Press the SET button to return to the top menu level:
Have you finished your entries? Press the SET button to return
to the top menu level. The display then switches back to the
standard display.
46
14 Overview of menus
Display
Possible adjustments
SEnSit
Adjusting the sensitivity ( page 49)
Att
Selecting the sensitivity range
( page 50)
PHAnto
Switching the phantom powering for condenser microphones on/off ( page 51)
DiSPL
Selecting the content of the
standard display ( page 52)
tunE
Changing the transmission frequency
( page 54)
Ch no
Changing the channel number
( page 55)
LOC
Locking the operating controls to prevent
accidental programming / Unlocking the
operating controls ( page 56)
47
15 Selecting a frequency memory
– selecting a frequency and channel number
With the / buttons you can directly switch between the
factory-preset fixed frequency memories (presets). The display
starts flashing. Your selection becomes effective immediately.
Press the SET button to acknowledge your selection. The display
stops flashing. (If the SET button is not pressed, the transmitter
will store the new frequency automatically on switch-off).
Note:
You can choose the content of the standard display i.e.
whether the frequency or the channel number is displayed
( “19 Selecting the content of the standard display (DiSPL)”,
page 52). The transmitter is factory-preset to show the frequency
setting as standard.
48
16 Adjusting the sensitivity (SEnSit)
Close talking distances, speakers with loud voices or loud music
passages may cause overmodulation in the transmission link,
resulting in distortion. If, on the other hand, the sensitivity is adjusted
too low, the transmission link will be undermodulated, which would
result in a signal with high background noise.
The sensitivity has to be adjusted so that the overmodulation
indication on your receiver only lights up during the loudest
passages. The following figures are a guide to the best settings:
Loud music/vocals:
Presentations:
Interviews:
–30 / –20 dB
–20 / –10 dB
–10 / 0 dB
Select the “SEnSit” menu by pressing the SET button until
“SEnSit” appears on the display; after a short pause the current
input sensitivity setting is displayed.
With the / buttons you can now select a different setting. The
sensitivity can be adjusted in 10-dB steps from 0 to –30 dB. The
new setting starts flashing on the display and becomes effective
immediately.
Press the SET button to return to the top menu level. The display
then switches back to the standard display.
49
17 Selecting the sensitivity range (Att)
Condenser microphones and dynamic microphones require different
sensitivity settings. The SKP 30 is therefore equipped with two
different with sensitivity ranges tailored for each type of microphone.
This function switches in a 20 dB attenuation for condenser
microphones.
Select the “Att” menu by pressing the SET button until “Att”
appears on the display; after a short pause the current setting –
i.e. “Att OFF” or “Att On” – is displayed.
With the / buttons you can now switch between two
different sensitivity ranges.
: Sensitivity range 1 for dynamic microphones
– “Att OFF” flashes on the display
: Sensitivity range 2 for condenser microphones
– “Att On” flashes on the display.
Press the SET button to return to the top menu level. The display
then switches back to the standard display.
50
18 Switching the phantom powering on/off (PHAnto)
The SKP 30 transmitter can supply condenser microphones with
48 V phantom powering (P48). Please note: Dynamic microphones
can be operated in phantom powering mode without harm.
However, if no condenser microphone is being used, you should
switch off the phantom powering. With the phantom powering
switched on, the operating time of the battery will be reduced to
approx. 5 hours.
The phantom powering can be switched on or off via the operating
menu:
Select the “PHAnto” menu by pressing the SET button until
“PHAnto” appears on the display; after a short pause the current
setting is displayed.
Press the button to switch the phantom powering on – if you
press the button, the phantom powering is switched off. The
new setting – i.e. “On” or “OFF” – starts flashing on the display.
Press the SET button to return to the top menu level. The display
then switches back to the standard display.
51
19 Selecting the content of the standard display (DiSPL)
You can choose the content of the standard display i.e. whether the
frequency or the channel number is displayed.
Select the “DiSPL” menu by pressing the SET button until “DiSPL”
appears on the display; after a short pause the current setting is
displayed.
With the / buttons you can now choose between:
Frequency:
“FrEqu”
Channel number: “ChAnnL”
The new setting for the standard display starts flashing on the
display.
Press the SET button to return to the top menu level. The display
then switches back to the standard display.
52
20 Configuring a frequency memory
The SKP 30 transmitter has 16 switchable frequency memories
(presets) to store up to 16 transmission frequencies with their
respective channel numbers (from 0 to 255).
You can directly switch between the fixed frequency memories
(presets) ( “15 Selecting a frequency memory – selecting a
frequency and channel number”, page 48).
/
/
/
tune
tune
tune
tune
Frequency
Frequency
Frequency
Frequency
Ch no
Ch no
Ch no
Channel No.
Channel No.
Channel No.
1
2
3
Ch no
Channel No.
...
16
53
Setting a frequency (tunE)
Transmission frequencies are tunable in 25-kHz steps within a
switching bandwidth of 32 MHz max.
Note:
Detailed information on multi-channel operation is given in the
planning brochure “Practical Applications in RF Technology” which
your local Sennheiser agent has in stock or will be pleased to order
for you from Sennheiser.
Select the frequency memory for which you wish to set a
frequency ( “15 Selecting a frequency memory – selecting a
frequency and channel number”, page 48).
Select the “tunE” menu by pressing the SET button until “tunE”
appears on the display; after a short pause the currently set
frequency is displayed.
With the / buttons you can now select a different frequency.
The frequencies are tunable in 25-kHz steps. The new frequency
starts flashing on the display and becomes effective immediately.
Press the SET button to return to the top menu level. The display
then switches back to the standard display.
54
Assigning a channel number (Ch no)
You can now assign each frequency memory a channel number
(from 0 to 255). With larger systems, we recommend using the same
channel numbers for both transmitters and receivers in order to
provide for simpler monitoring of the system.
Select the frequency memory for which you wish to assign a
channel number ( “15 Selecting a frequency memory – selecting a frequency and channel number”, page 48).
Select the “Ch no” menu by pressing the SET button until “Ch no”
appears on the display; after a short pause the currently assigned
channel number is displayed.
With the / buttons you can now select a different channel
number. The new channel number starts flashing on the display
and becomes effective immediately.
Note:
Channel numbers which have already been assigned to a fixed
frequency memory are skipped!
Press the SET button to return to the top menu level. The display
then switches back to the standard display.
55
21 Activating/deactivating the lock-mode function (LOC)
To prevent accidental programming or switching off during
operation, we recommend locking the / buttons and the ON/OFF
button via the lock-mode function.
Activating the lock-mode function
Select the “LOC” menu by pressing the SET button. The current
setting is indicated on the display.
Press the button to activate the lock-mode function. “LOC On”
starts flashing on the display.
Press the SET button to return to the top menu level.
Note:
If you press the / buttons or the ON/OFF button, “LOC On”
appears on the display and the buttons are now locked.
56
Deactivating the lock-mode function
Select the “LOC” menu by pressing the SET button. “LOC On”
appears on the display.
Press the button to deactivate the lock-mode function.
“LOC OFF” starts flashing on the display.
Press the SET button to return to the top menu level. The display
switches back to the standard display and the buttons can now
be operated as usual.
57
22 Error checklist
Problem
Possible cause
No operation indication
Battery is flat
No RF signal
Transmission frequency is not the same
as the receivng frequency
Transmitter is out of range
RF signal available but
no audio signal
Transmitter is muted (“MUTE”)
Receiver’s squelch threshold adjusted
too high
Transmitter does not supply phantom
powering to condenser microphone
( “18 Switching the phantom
powering on/off (PHAnto)”, page 51)
Audio signal noisy
Transmitter sensitivity adjusted too
low
Receiver’s AF output level adjusted too
low
Audio signal distorted
Transmitter sensitivity adjusted too
high
Receiver’s AF output level adjusted too
high
If problems occur that are not listed in the above table, please
contact your local Sennheiser agent for assistance.
58
23 Tips for optimum reception
•
Transmission range depends to a large extent on location and
can vary from about 10 m to about 150 m. There should be a
“free line of sight” between transmitter and receiving antenna.
•
To avoid overmodulating the receiver, observe a minimum
distance of 5 m between transmitter and receiving antenna.
24 Safety instructions
•
Never open the unit! If the unit is opened by customers in
breach of this instruction, this will invalidate the warranty.
•
Keep the unit away from central heating radiators and electric
heaters. Never expose it to direct sunlight.
•
Use a damp cloth for cleaning the unit. Do not use any cleansing
agents or solvents.
59
25 Specifications
Modulation
wideband FM
Frequency ranges
Range A:
Range B:
Range C:
Range D:
Range E:
Range F:
Range G:
Range H:
Range I:
Transmission frequencies
1,280, tunable in steps of 25 kHz
(16 switchable fixed frequency
preset memories)
Switching bandwidth
32 MHz
Nominal / peak deviation
± 40 kHz / ± 56 kHz
Frequency deviation
≤ ± 10 kHz
RF output power
typ. 30 mW
Noise reduction system
Sennheiser HiDyn plus
AF frequency response
60 – 18,000 Hz
S/R ratio at peak deviation,
HiDyn plus
≥ 114 dB(A)
Nominal input sensitivity
(without attenuator at nom.
deviation and 1 kHz)
–30 dB, 700 mV
–20 dB, 220 mV
–10 dB, 70 mV
0 dB, 22 mV
60
518 – 550 MHz,
630 – 662 MHz,
740 – 772 MHz,
790 – 822 MHz,
838 – 870 MHz,
560 – 592 MHz,
576 – 608 MHz,
674 – 706 MHz,
696 – 728 MHz.
THD
(without attenuator at nom.
deviation and 1 kHz)
≤ 0.5 %
Headroom (THD ≤ 3 %)
6 dB
Input attenuator
20 dB, switchable
Max. input voltage
2.8 Vrms
(do not exceed even with the
input attenuator switched on)
Input resistance
≥ 10 kΩ
Temperature range
–10°C to +55°C
Power supply
9 V PP3 alkaline battery
(IEC 6 LR 61)
Max. power consumption at ≤ 60 mA
nom. voltage (with phantom
powering switched off)
Operating time
> 8 h (with P48 > 5 h)
Dimensions [mm]
105 x 43 x 43
Weight (without battery)
approx. 195 g
In compliance with
ETS 300 422,
ETS 300 445 (CE),
FCC
61
26 EC Certificate of Conformity
SENNHEISER electronic GmbH & Co. KG,
Am Labor 1, D-30900 Wedemark
declare that the product
Plug-on transmitter SKP 30
conforms to the basic requirements of EEC Directive 89/336/EEC.
To effect correct application of the requirements stated in the EEC directives the following standards were consulted:
ETS 300 445
ETS 300 422
Wedemark, 03.01.2001
Important:
Before putting the transmitter into operation, please observe the
respective country-specific regulations!
62