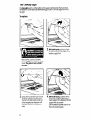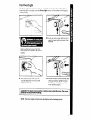
1
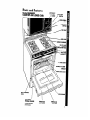
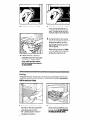
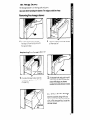
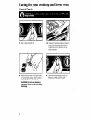
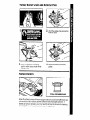
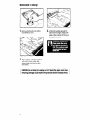
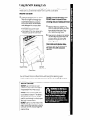
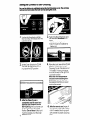
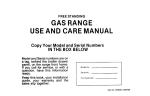
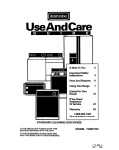
)GAS COOKTOP
AND LOWER
OVEN
Model SM988PEP
wave
Ovens
Trash Cwac~ors
Room Air Condltloners
Oehumldlflers.
Automatic
Washers
Clothes
Dryers.
Freezers
Refrigerator-Freezer
Contents
Before You Use Your Range,
Important
Safety Instructions
Parts and Features
Using Your Range
Using the Surface Burners
Using the Lower Oven
Baking or Roasting
Broiling
Using the Automatrc
MEALTIMER’ Clock
OvenVent
Storage Drawer
::::
Caring for Your Cooktop
and
lower Oven.
Page
-2
3
5
6
6
7
7
B
9
10
11
Control Panels ............
Surface Burner Grates and
Reflector Pans. ..........
Surface Burners ...........
Removable
Cooktop ......
Using the Self-Cleaning
Cycle ....................
Cleaning Chart ...........
Cooktop Light. ............
Oven Light ................
If You Need Service or
Assistance.
.................
Page
12
13
13
14
15
::
21
22
12
L
01985 Whirlpool
Corporation
‘Tm
Before you use your range
Read and carefully follow the ‘61NSTALLATIONINSTRUCTIONS”
packed with your range.
Read this “Use & Care Guide” and your “Cooking Guide” carefully for important
use and safety information. Store these with the Upper Microwave
Oven literature
in the Range Literature Pat for future use.
You are personally
responsible
for:
l Reading
and following all safety precautions
in this Use & Care Guide and the
Cooking Guide.
l Having
your range Installed by a qualified installer.
l Installing
the range where it is protected
from the elements, and on a level floor
strong enough to hold its weight
l Having
your range properly connected
to electrlcal
supply and grounded.
(See “Installation
Instructions:‘)
l Having
your range properly connected
to the proper gas supply and
checked
for leaks. (See “Installation
Instructions:‘)
l Making
sure the range is not used by children or anyone unable to operate it
properly
. Properly maintaining
your range.
l Using the range
only for jobs expected
of a home range.
See your “Cooking
Guide” and “Upper Microwave
Oven Use & Care Guide”
for additional
safety and use information.
IMPORTANT
SAFETY INSTRUCTIONS
1.
DO NOT allow
play with any
or leave them
It They could
injured
children to use or
part of the range,
unattended
near
be burned or
6.
KEEP pan handles turned in, but
not over another surface burner
to prevent burns, injury and to
help prevent the utensil from
being pushed off the cooktop.
2. DO NOT store things children
might want above the range.
Children could be burned or
injured while climbing
on it.
7. DO NOT use water on grease
fires. The fire will spread. Cover
fire with large lid or smother with
baking soda or salt.
3. DO NOT allow anyone to touch a
hot surface burner, oven burner
or areas around them. They
could be hot enough to burn
severely.
8.
4. KEEP children away from the
range when it is on. The cooktop,
oven walls, racks and door can
be hot enough to cause burns.
9. DO NOT heat unopened
containers. They could explode. The
hot contents could burn and
container particles could cause
injury
5. DO NOT use a range to heat a
room. Persons in the room could
be burned or injured, or a fire
could start
10.
DO NOT wear loose or hanging
garments when using the range.
They could ignite if they touch a
hot burner or surrounding area
and you could be burned.
When adding or removing
food, MAKE SURE to open the
oven door all the way to
prevent burns.
continued
on next page
3
12.
MAKE SURE ‘t-8~ -I~J’:: 15yo<~ JS!
[Ire large e Tc\i~ii;J’ fc ,:ontcin
‘ooc! arid aic~c c,i)ii avers 3176
hp’llovers T’;I~ vy1’1Reip preven“uzara3us
?L,ld ,p; af toca
Heai’b :,plaier nq 31 >pII/o4ers
ep on CI rar ge Z.IV gnlte (jnd
:)tirn LCU P[IQ siz<z 15espec!nllv
rnportcint 111deeC fct fryIn
14. GREASE ,s FlammaDle ano
ihc3clid De nandled carefully Let
*,a+coo1 Defore attempting
?o
,;ondle It Do not allow grease
to collect
around range or
in vents. Wipe spillovers
mmedlately
15. NEVER use a match or other
‘lome to look for a gas leak
Explosion and Injury couid resuit
16.
13. DO NOT let ve su”a~e btiriers
,)n hlgF heel’ .,eI%;:gs Bo~i cvers
and greas) spIIlovers could
,:uuse steair! SrncKe and could
gnlte end l>urp vsu
DO NOT repair or replace any
Darts tinless specifically
recommended in this manual All other
;ervlclng should be referred to a
z~~cllf~ed sewIce technIcIan
l FOR YOUR SAFETY l
DO NOT STORE OR USE GASOLINE OR OTHER FLAMMABLE VAPORS AND LIQUIDS
IN THE VICINITY OF THIS OR ANY OTHER APPLIANCE. THEY COULD IGNITE
CAUSING EXPLOSION AND/OR FIRE.
- SAVE THESE INSTRUCTIONS
-
Copy your Jlodel and Serial Numbers here...
If you need
service
or call with a question
1. Complete
Model and Serial
Numbers (from the plate
located behind the mlcrowave
oven door]
2. Purchase Gate from sales slip
Copy this Information in these
spaces Keep this book
your
warranty and sales slip together in
the Literature Pat
There IS no warranty registration to
return Proof-of-purchase
IS all that IS
required for In-warranty service
nave
Model
Number
Serial
Number
Purchase
Service
this information
ready
Date
Company/Phone
Number
Parts and features
Model
SM988PEP
-
TOP LIGHT
SWITCH
TOP LIGHT
OVEN VENT
I
LOCK LEVER
SELF-t XEiNING
OVEN
REMOVABLE
STORAGE DRAWER
LITERATURE PAC
Inot show-t
.“,
I
--‘-7
DOOD
\
FIBERGLASS
“L.W JLAL
m-1,
“S-8
Using your range
OVEN
SELECTOR
I
OVEN
TEMPERATURE
CONTROL
LEFI FRONT /
CONTROL KNOB
LER IAR
CONTROL
KNOB
vP(GHT
SURFACE
BURNER
INDICATORS
REAR
~G~YT
FRONT
CONTROL KNOB
CONTROL KNOB
Using the Surface
Burners
Surface
Burner Indicators
The solid dot in the surface burner indicator shows which surface burner is
turned on by that knob.
Control knobs must be pushed in,
then turned to the LITE position. The
clicking sound is the ignition
sparking.
To stop the clicking sound after the
burner lights, turn the control knob
back to a desired setting. The control
knob has stops for HI, MED and LOW,
however if can be set anywhere
between HI and OFF. Do not cook with
the control in the LITE position.
In Case of a Prolonged
Power Failure
Surface burners can be manually
lighted. Hold a lighted match near a burner
and turn the control to the LITE position. After the burner lights, turn the control to
the desired setting
See the “Cooking
Guide” for important
utensil information.
Until you get used to the settings, use the following as a guide:
Use LITE to light
the burner. After
the burner lights,
turn control
back to a desired setting to
stop the clicking
of the ignition
Do not cook
with the control
in the LITE position.
lking
Use HI to start
foods cooking
or to bring liqulds to a boil
Use MED to contlnue cooking or
to fry chicken or
pancakes;
for
gravy, puddings
and icing or to
cook large
amounts of vegetables.
Use LOW to
keep foods
warm until
ready to seme
the lower oven
The lower oven IS always set with two knobs
-The Oven Selector
- The Oven Temperature Control
Both must be on a setting for the oven to heat.
Baking or roasting
Rack(s) should be placed so the
top of the food will be centered
In the oven. Always leave at least
I~z to 2 inches (4-5 cm] between
the sides of the pan and the oven
walls and other pans For more
Information. see the “Cooking
Guide”
1.
Position the rack(s) properly
before turning on the oven. To
change rack position, pull rack
out to stop, raise front edge and
lift out
2. Set the Oven Selector
on BAKE
3. Set the Oven Temperature Control
to the baking temperature
you
want. The oven burner will automatically
light in 50-60 seconds.
5. During baking, the oven burner
will turn on and off to maintain the
temperature
setting. The Oven
Signal Light will turn on and off
with the burner.
When baking is done, turn both
the Oven Selector and the Oven
Temperature Control to OFF:
4. Preheat the oven.
preheated
when
Light first goes off
racks, walls and
hot. Do not place
on oven bottom.
The oven is
the Oven Signal
Note: Oven
door will be
food directly
Broiling
The Blanket-O-Flame’
Broiler uses rnfra-red rays to cook the food. Infra-red rays
create fast, searing heat and consume most smoke and spatters. Always broil
with the oven door closed.
1.
8
Position the rack before turning
the oven on. See rack placement
chart and broiling chart in
the “Cooking Guide” for recommended rack positions
2. Put the broiler pan and food on
the rack and completely
close
the oven door. DO NOT PREHEAT
THE BROILER BEFORE USING.
3. Set the Oven Selector and the
Oven Temperature
Control to
BROIL. The broiler WIII automatltally light In 50-60 seconds.
4. When brofling is done, turn both
the Oven Selector and the Oven
Temperature Control to OFF
DO NOT PREHEAT THE BROILER BEFORE USING. CLOSE OVEN DOOR
DURING BROILING.
Using the Automatic MEALTIMER”
Clock
The automatrc MEALTIMER’ Clock IS designed to turn the oven on and off at times
you set. even when you are not around
Automatic
baking IS Ideal for foods which do not require a preheated
oven such
as meats and casseroles
Do not use the automatic
cycle for cakes, cookies,
etc...undercooking
will result.
To start and stop baking automatically:
1.
Posrtion the oven rack[s) properly,
and place the food In the oven
3. Push in and turn the Start Time
Knob clockwise
to the time you
want bakrng to start
2. Turn the Set Time Knob until the
Start and Stop Time Dials show the
correct time of day.
4. Push in and turn the Stop Time
Knob clockwise
to the time you
want the oven to shut off
5. Set the Oven Selector
BAKE
To start baking
1. Posttron rack(s)
on TIMED
6. Set the Oven Temperature
Control on the baking temperature
you want The oven WIII now start
and stop automatically
After baking is done or to stop
the oven before preset time, turn
both the Oven Selector and ihe
Oven Temperature
Control to OFF
now and stop automatically:
properly,
and place
the food In the oven
2. Turn the Set Time Knob until the Start and Stop Time Dials show the right
time of day
3. Push In and turn the Stop Time Knob clockwise
to the time you want the oven
to shut off
4. Set the Oven Selector
on TIMED BAKE
5. Set the Oven Temperature
6.
Control on the bakrng
The Oven Vent
Hot air and moisture escape from
the oven through a vent just under
the cooktop light. Do not block
vent. Poor baking will result.
OVEN VENT
10
temperature
you want
After baking is done or to stop the oven before the preset time, turn both
the Oven Selector and the Oven Temperature Control to OFF
The Storage Drawer
The storage
drawer
IS for storing pots and pans
Use care when handling
Removing
1.
the storage
The edges
the storage
could
be sharp.
drawer
Pull drawer straight out to the
first stop Loftfront and pull out to
the second stop
Replacing
1.
the drawer.
2. Loftback slightly and slide drawer
all the way out
dkuwer
Fit ends of drawer slide rails into
the drawer guides on both sides
of opening
2. Lift drawer front and push in until
white stops on drawer slide rails
clear white stops on drawer
guides, then slide drawer closed.
Use & Care Guide storage
Store this booklet, along with your
“Cooking Guide:’ sales slip and warranty in the Literature Pac. inside the
storage drawer.
Caring for your cooktop and lower oven
Control Panels
1.
Pull knobs straight off
3. Wash knobs in warm soapy water
or use baking soda and a damp,
soft cloth. Rinse well and dry.
CAUTION: Do not use abrasive
cleansers.
They could rub off the
markings.
12
2. Use warm soapy water or baking
soda and a damp soft cloth to
wipe the control panels. Rinse
and wipe dry
4. Push the knobs straight back on
Make sure they point to OFF
Surface Burner Grates and Reflector Pans
2. Lift off the grates and remove
reflector pans.
3. Wash the grates and reflector
pans in warm soapy wafer. Rinse
and dry well.
4. Replace
grates.
reflector
the
pans and
Surface Burners
TYPICAL TOP BURNER FLAME
Wipe off surface burners with warm soapy
Occasionally
check surface burner flames
flames do not burn properly, you may need
[see pagel9],
or call a qualified technician
water and a soft cloth after each use
for size and shape as shown. If
to remove the burners for cleaning
for adjustment.
I
Removable Cooktop
1.
Remove Surface Burner Grates
and Reflector Pans
2. Lift front of cooktop enough to
clear front of range. Grasp both
sides of the cooktop. lift and pull
forward to remove.
3. Wipe surface under the cooktop
with warm soapy water Use
soapy steel-wool pad on stubborn spots.
CAUTION:
removing.
14
Do not drop the cooktop
or let it bump the upper oven when
Damage could result to the porcelain
and the cooktop
frame.
Using the Self-Cleaning
Cycle
The self-cleaning
cycle uses very high heat to burn away solI. Before you start
make sure you understand
exactly how to use the cycle safely.
Before You Start
1. Clean the shaded
areas bv hand
They do not get hot enough during the Self-Cleaning
cycle for
soil to burn away. Use hot water
and detergent or a soapy steel
wool pad on.
l
the frame around the oven
. the rnsrde of the door, especrally
the part outside the oven seal
DO NOT clean the fiberglass
seal.
0
DO NOT move it or bend it. Poor
El
cleaning
and poor baking will result.
2. Remove the racks, broiler pan
and any pots and pans you may
have stored in the oven. They
can’t stand the high heat.
3.
Wipe out any loose soil or grease.
This will help reduce smoke and
possible flare-ups during the
cleaning
cycle.
Oven racks and chrome reflector pans must not be cleaned
in
the oven. They will warp and
discolor.
I
Clean
.
I!
Clean
Seal
Door
Turn on the vent hood or other kttchen vent during the cleaning
cycle
This will help remove smoke. odor and heat that are normal during the cycle
SPECIAL CAUTIONS:
DO NOT use commercial
oven
cleaners In your oven. Damage
ihe porcelain
finish may occur
to
DO NOT force the Lock Lever, you
could bend or break it The lever IS
designed
to stay locked until the
oven is cool enough to safely open
Wait until it moves freely
DO NOT use foil or other liners in the
oven During the cleaning
cycle foil
can burn or melt and damage
the
oven surface
Setting the Controls
for Self-Cleaning
Be sure the kitchen is ventilated
during the Self-Cleaning
remove heat and odors that are normal during the cycle.
1.
Turn the Set Time Knob until the
Start and Stop Time Dials show the
right time of Dav.
cycle.
This will help
2. Push in the Stop Time Knob and
turn the hand clockwise
2-2’/2
hours.
l Use 2 hours for light soil.
l Use 21%hours for moderate
to
heavy soil.
I
3. Set the Oven Selector to CLEAN
The Oven Temperature
Control
must be in the OFF position.
5. After the Clean Cycle is
completed
and the oven temperature has dropped
below
500°F (260X), the Lock Lever can
be moved back to the COOK
Position. Do not force it. Wait until
it will move easily. Turn the Oven
,6 Selector to OFF
4. Move the Lock Lever to the CLEAN
position. This will start the SelfCleaning Cycle. If the door is not
completely
closed or the lever
IS not all the way to the right, the
cycle will not start
When the oven temperature
exceeds
normal baking temperatures,
the oven door can’t
be opened and the Lock Lever
must not be moved.
6. After the oven is cool, wipe off
any residue or ash with a damp
cloth. If needed, touch up spots
with cleaner or plastic scouring
pad.
Special
Tips
Keep the kitchen well ventilated
during the cleaning cycle to
help get rid of normal heat and
odors.
To stop the cleaning
time:
cycle
at any
1. Push in and turn the Stop Time
Knob clockwise
until it points to
the right time of day.
Clean the oven before it gets
heavily soiled. A heavily soiled
oven takes longer to clean and
might not get as clean as you
would like.
2. Turn the Oven Selector to OFF,
When the oven temperature
drops below 500°F (260°C) the
Lock Lever can be moved to the
COOK Position. Do not force it.
Wait until it moves easily.
How It Works
During the self-cleaning
or brorlrng
approxrmately
burns It off
cycle,
the oven
gets much
hotter
breaks
875 F (468 C] This heat
The graph
shows approximate
cycle
for 2% hours.
temperatures
SELF-CLEANING
(Approximate
and
times
than it does for baking
up grease
and soil and
during
a self-cleaning
CYCLE - 2% HOUR SElllNG
Temperotures
ond Times]
538°C
1000°F
800°F
427°C
600°F
316°C
400°F
204°C
200°F
93°C
START
Notice
longer
12 hr
1 hr
llz hrs
2
hrs
that the heating
stops when the 2% hour setting
for the oven to cool down enough
to unlock.
2+2
hrs
3
hrs STOP
is up, but that it takes
Cleaning Chart
PART
WHAT TO USE
cooktop
and lower
oven exterior
Soft cloth and warm soapy
water or baking soda.
Nylon or plastic scrubbing
pad for stubborn spots.
HOW TO CLEAN
l
l
l
Surface
grates
burner
Automatic
dishwasher
or
warm soapy water and
plostrc scrubbing
pad
l
l
l
Chrome
reflector
18
pans
Automatic
dishwasher
or
warm soapy water and
plastic scrubbing
pad.
l
l
Wipe off regularly
when cooktop and lower oven are cool
Do not allow food containing
acids (such as vinegar, tomato,
lemon juice or milk) to remain on
surface. Acids will remove the
glossy finish.
Do not use abrasive
or harsh
cleansers.
Wash with other cooking
utensils.
Dry completely.
Do not place in Self-Cleaning
Oven.
Wash with other cooking
utensils.
Do not place in Self-Cleaning
Oven.
PART
Surface
HOW TO CLEAN
WHAT TO USE
burners
Broiler pan
and grld
Warm soapy water, a
plastic scrubbing
pad,
dishwashing
detergent
or a solution of 1 quart
of boiling hot water
and 2 tablespoons
of DIP IT.5
Warm soapy water and
plastic scrubbing
pod.
Remove cooktop, see page 14.
Wipe off spills immediately
after burner has cooled.
In case of stubborn stalns:
l Remove
burner from manifold
with phillips screwdriver.
l Soak
in warm soapy water and
wipe with plastic scrubbing
pad
and dishwashing
detergent.
If
staln Is still there, soak 20 mlnutes In bolllng water and DIP IT”
solutton. Be sure the solutlon
covers the whole burner.
l Rinse and
dry well.
l
If ports are clogged,
clean with
o straight pin. Do not enlarge or
dlstort ports. Do not use a
wooden toothplck.
l Do not clean
surface burner in
dlshwasher.
l
l
l
l
Control
Control
knobs
panels
Oven racks
Warm soapy
soft cloth.
water
and
Warm soapy water or
baking soda, soft cloth
and sproy gloss cleaner.
Warm soapy water and
plastic scrubbing
pad.
l
l
l
l
l
l
Lower
glass
oven door
Spray glass cleaner;
warm
soapy water and soft cloth.
l
l
l
Self-Cleanlng
Oven
For areas outside SelfCleaning
area use warm
soapy water or plastic
scrubbing
pad.
Wash with other cooking
utensils.
Do not place In Self-Cleanlng
Oven.
Wash, rinse and dry well.
Do not soak.
Wash, rinse and dry well.
Follow directions
provided
cleaner.
with
Wash, rinse and dry well. Use
plastic scrubbing
pad for stubborn areas.
Do not place In Selt-Cleanlng
Oven. The Intense heat could
warp them.
sure oven is cool.
Follow directions
provided
cleaner.
Wash, rinse and dry well.
Make
with
* Follow directions
starting on
page 15. “Using the SelfCleaning
Cycle:’
l Do not use commercial
oven
cleaners.
l Do not use foil to llne the bottom of your Self-Cleanlng
Oven.
CAUTION: Do not attempt to push any obJect Into the openlngs
of the protective
shield surroundlng
the Ignftor toll that Is located
at the top of the oven. The toll
could be damaged.
The Cooktop Light
The Top Light switch is at the bottom of the upper control panel. Push and hold
the button for Q few seconds before letting go to turn it ON. Push again to turn off
the light.
To replace:
2. With both hands, pull top of light
cover towards you and lift it out of
bottom support trim.
Remove the screws and metal
trim that supports the top of the light
cover. The glass is heavy. Hold it
securely.
3. Grasp the fluorescent tube at both
ends. Roll bottom of tube toward
the front until both ends come out
of the receptacles.
Replace with
a 20-w&t cool-white fluorescent
tube.
20
4. With both hands, carefully fit the
gloss light cover into the bottom
metal support trim. Replace the top
support trim and screw.
Turn the electric power bock on at
the main power supply.
The Oven Light
The Oven Light WIII come on when you open the oven door. To turn the light on
when the door is closed, push the Oven Light switch on the bottom of the upper
control panel.
2. Push up bulb cover, retainer and
seal to clear bottom screws, then
remove
Remove the top screws from the
bulb cover and loosen the bottom
screws.
3. Remove the light bulb from its
socket Replace with a 40-watt
applrance
bulb
4. Replace bulb cover, retainer, seal
and top screws. Tlghten screws.
Turn the power back on at the
main power supply.
CAUTION: The bulb cover must be in place
protects the bulb from breaking.
NOTE: The Oven Light will not work during
when using the oven. The cover
the self-cleaning
cycle.
I
I
If you need service or assistance,
we suggest you follow these four steps:
1. Before calling for
assistance...
Performance
problems often result
from little things you can fix yourself
without tools of any kind.
If nothing operates:
l Is the range
properly connected
to gas and electrical
supplies?
[See “Installation
Instructlonsl’)
l Have
you checked
the main fuse or
circuit breaker box?
l Is the flow of combustion
and/or
ventilation air to the range
blocked?
Do not block the air
flow to and around the range.
If the oven will not operate:
l Is the Oven
Selector turned to a
setting [BAKE or BROIL, but not TIMED
BAKE]?
l Is the Oven Temperature
Control
turned to a temperature
setting?
If burner fails to light:
l Is the range
connected
to electrical power?
l Have
you checked
the main fuse or
circuit breaker box?
l Are burner
ports clogged?
[See page 19.1
If burner flames are uneven:
l Are burner
ports clogged?
(See page 19.)
If burner flames lift off ports, are
yellow, or are noisy when turned off:
. The air gas mixture may be incorrect. [Cal! for service.)
If burner makes a popping
noise
when ON:
l Is the burner
wet from washing?
Let dry.
If control knob(s) will not turn:
l Did you push In before
trying to
turn?
22
If the Self-Cleaning
Cycle will not
operate:
l Is the Oven Selector
set on CLEAN
and the Oven Temperature
Control
set on OFF?
l Does the Start Time Dial show the
correct time of day?
l Is the Stop Time Dial set ahead
to the time you want the cleaning
cycle to stop?
. Is the Lock Lever all the way to the
right?
If cooking results aren’t what you
expected:
l Is the range
level?
l Are you using pans
recommended
in the Cooking Guide?
l Does the flame
size fit the cooking
utensil being used? (See the Cooking Guide.)
l If baking,
have you allowed75
to 2
inches (4-5 cm) on all sides of the
pans for air circulation?
l Have you preheated
the oven before
cooking?
l Are the pans the size called
for in
the recipe?
l Are you following
a tested recipe
from a reliable source?
l If broiling,
have you completely
closed the oven door? Blanket-OFlame” Broiler provides best cooking results with the oven door
closed.
l Do the cooking
utensils have
smooth, flat bottoms?
See the Cooking Guide for more
information on cooking problems
and how to solve them.
2. If you need assistance?..
Call Whirlpool
COOL-LINE i service
assistance
telephone
number. Dial
free from:
Continental
U.S. . . (800) 253-1301
Michigan
. . . . . . . (800) 632-2243
Alaska & Hawaii
. (800) 253-1121
and talk with one of our trained Consultants The Consultants can instruct
you In how to obtain satisfactory operation from your appliance
or, if serv.
recommend
a
ice IS necessary.
quaIlfled
service company
in your
area
If you have a
problem?..
4.
Call our COOL-LINEservice assistance
telephone
number (see Step 2) and
talk with one Of our COnSUkX7b
or if
you prefer, write to:
Mr. Stephen E. Upton
Senior Vice President
Whirlpool Corporation
Administrative Center
2000 US-33 North
Benton Harbor, MI 49022
‘If you must call or write, please provide: model number, serial number,
date
3.
If you need service?..
Whirlpool
has
a natIonwIde
network of franchased
TECHCARE. Service
Companies
TECK-CARE
TECH-CARE servFRANCHISED
SERVICE
Ice technicians
are trained to fulfill the product warranty and provide
after-warranty
service, anywhere
in the United States
To locate TECH-CARE service in your
area, call our COOL-LINE service assistance telephone
number (see Step
2) or look in your telephone
directory
Yellow Pages under,
of purchase,
description
information
better
and a complete
of the problem. This
is needed in order to
respond
to your request
for
assistance.
FSP IS a regIstered
trademark
of Whirlpool
Corporatlor
for
quallty parts Look for this
symbol of quality whenever
FSP
you need a replacement
pari
8
for your WhIrlpool
appliance
FSP replacement
parts
w111fit right and work right. because
they are
made to the same exacting
speclflcatlons
used
to build every new Whirlpool
appliance
0
23
Whirlpool
Home
A /Apphances
Maklng your world a httle easier
Part No. 36-062036-03-O/786299 Rev.A
0985 Whirlpool Corporation
matIc
Washers,
Clothes
Dryers.
Freezers
Relrigeralor-Freezers
Ice Makers
Printed in USA
bshwashers
Built-In
Ovens
and Surface
Units.
Ranges
MIC