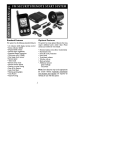
1
Start The display will show START to
indicate the ignition is turned
on and the engine is going to
crank.
Clock Set When entering the Clock Set
mode, the display will show
CLOCK then switch to the hour
and minute setting.
Engine Run When the engine starts and
continues to run, the ENGINE
RUN will be displayed, and the
icon will remain on.
Alarm Clock Set When entering the Alarm Clock
Set mode, the display will also
show the
icon to indicate
the Alarm Clock is on.
Valet mode The display will show VALET and
the icon to confirm entering
the Valet mode.
Start Timer Set When entering the Start Timer
Set mode, the display will show
the
icon while setting the
Start Time. Once the Start time
is set, the
icon is displayed
indicating the vehicle will start
at the programmed time.
Lock (Valet) If the doors are locked with the
transmitter in Valet mode, the
display will show VALET and the
icon to confirm locking.
Unlock (Valet) If the doors are unlocked with
the transmitter in Valet mode,
the display will show VALET and
the
icon to confirm locking.
Transmitter Paging When the Call function is
activated from the vehicle, the
display will show
.
Chirp Delete When Chirp Delete is selected
using the transmitter, the display
will show CHIRP and the
icon
to confirm silent operation.
Confirmation Beep When the transmitter's
confirmation beep is turned on
or off, the the display will show
the
or
icon to indicate
the new setting.
Low Battery When the transmitter battery
needs replacement, the display
will flash the icon.
© DLC, Inc.
8
65-FM250GEN Rev. 1, 04/02
OWNERS MANUAL
Transmitter Indications Continued
FM SECURITY/REMOTE START SYSTEM
Standard Features
Optional Features
The system has the following standard features:
• (1) 3-button remote control w/ LCD text
display and background illumination
• Status indicator (LED)
• Program/Valet switch
• Remote Start capabilities
• Extended Range Transceiver
• Multi-tone siren (120dB)
• Dual stage shock sensor
• Remote panic
• Valet mode
• Remote chirp mute
• Remote sensor bypass
• Passive or active arming
• Stop & Go Feature
• Auto Cold Start
• 24 Hour Timer Start
• Flashing parking lights
• Auto Rearm
• Passive Arming
The system has many optional features that may
require additional parts and/or labor. Please
contact your dealer for more details.
•
•
•
•
•
•
•
•
Remote keyless entry (Door lock/unlock)
Illuminated entry
Hood & trunk protection
Horn honk
Trunk/hatch release
Window roll-up
Back up battery
Additional sensors
glass breakage
microwave
Note: Some features may not be appropriate
for certain vehicles. Automatic transmission
and electronic fuel injection are required on
vehicles for use with this system.
1
Security System Operation
AUTO REARM FEATURE
The Auto Rearm feature allows the system to
automatically re-arm itself in the event the
system is disarmed and a door is not opened
within 30 seconds. This feature may be disabled
during installation.
NOTE: To completely disable the Auto Rearm
feature, the Passive Arming feature must also be
disabled. The Auto Rearm feature will not work on
vehicles with the illuminated entry feature enabled.
ARMING OPERATION
To arm the system press transmitter button 1:
• The siren will chirp once.
• The parking lights will flash once.
• The doors will lock*.
• The L.E.D. will turn solid for 2 seconds
then start flashing slowly. After 10
seconds the system is armed.
* If Installed
PASSIVE ARMING
The passive arming feature allows the system to
arm automatically without any user
intervention. This feature must be programmed
during installation.
CHIRP DELETE
For full time silent operation, the ARM/
DISARM chirps can be permanently disabled.
This feature must be programmed during
installation.
To arm the system passively:
1. Turn the ignition key off.
2. Close all doors.
• The LED will start flashing rapidly to
indicate that the system is preparing to
arm. The system can be armed at any
time by pressing transmitter button 1.
• The siren will chirp 30 seconds after
the last door is closed to indicate the
system is now armed*.
• The doors will lock**.
IGNITION LOCK
The ignition locking feature allows the doors to
automatically lock when the ignition key is
turned on, and automatically unlock when the
ignition key is turned off. This feature may be
disabled during installation.
*
**
VALET MODE
When the system is placed into the Valet Mode,
both the remote starting feature and the
security system will be disabled. However, the
keyless entry and trunk release features will still
function. While in the Valet Mode, the Valet icon
will be displayed and LOCK or UNLOCK will
replace the ARM and DISARM indications when
button 1 is pressed.
As an option, the passive arming chirps can be
eliminated during programming.
If Passive Locking is programmed during installation.
DISARMING OPERATION
To disarm the system press transmitter button 1.
• The siren will chirp twice.*
• The parking lights will flash twice.
• The doors will unlock.
• The optional illuminated entry feature will
turn on the dome light for 30 seconds.
*
To enter the Valet Mode:
1. Be sure the system is disarmed.
2. Turn the ignition key on.
3. Press and hold the valet/service mode
switch for 3 seconds.
• The LED will turn on solid indicating
the system is in Valet Mode.
In the event the alarm was triggered while away, the
system will respond with 3 chirps/3 parking light flashes.
2
FM 2-WAY SYSTEM w/ TEXT DISPLAY
Transmitter Operation
Button
UNLOCK
I
O.K.
LOCK
Start
Arm Confirm
Operation
ARM/DISARM/PANIC Button - To arm or disarm the
system, press button 1. To activate the panic feature, press button
1 and hold for three seconds.
START Button - To start the vehicle, press and hold button 2
II
for two seconds. To shut down the vehicle, press and hold button
2 for two seconds.
CONFIRMATION Button - To check current status of the
III
system, press button 3. The current status of the system will be
displayed on the transmitter.
III + Hold TRUNK Button - To activate the trunk output, press and
hold button 3 for two seconds.
II + III
PROGRAMMING Mode - To activate the trunk output, press
and hold button 3 for two seconds.
Transmitter Indications
LOCK
UNLOCK
Arm The display will show ARM and
the animated
icon to confirm
arming.
Shock/Page The display will show Shock
and flash the animated
icon
to indicate shock sensor
triggering.
Disarm The display will show DISARM
and the animated
to confirm
disarming.
Door If a door is opened while the
system is armed, the display will
show DOOR, and the door
frame will animate.
Trunk The display will show TRUNK
and flash the
icon opening
to confirm
Hood If the hood or trunk is opened
while the system is armed, the
display will show HOOD and
the
icon will be displayed.
Warn Away The display will show WARN if
the warning stage is triggered,
the
icon will flash.
Panic The display will show PANIC
when the Arm/Disarm button
is held to enter the Panic mode.
7
3 until the transmitter beeps five times
and CHIRP is displayed.
2. Release the transmitter buttons.
• The display will show ON or OFF to
indicate the chirp status.
• The parking lights will flash once to
indicate silent operation.
• The siren will chirp and the parking
lights will flash to indicate normal
operation.
To exit Valet Mode:
1. Turn the ignition key on.
2. Press and hold the valet/service mode
switch for 3 seconds.
• The LED will turn off.
• The Siren will chirp 2 times.
EMERGENCY OVERRIDE
If the transmitter becomes lost or fails to
operate, the system can be disarmed by using
the emergency override feature.
TRUNK DISARM FEATURE
The trunk disarm feature allows the alarm to
disarm automatically when transmitter button
3 is used to activate the trunk release. This
eliminates having to first disarm the alarm
before activating the trunk release. This feature
must be programmed during installation.
CONFIRMATION BEEP
To turn the transmitter’s confirmation tones on
or off:
1. Press and hold transmitter buttons 2 and
3 until the transmitter beeps six times and
SOUND is displayed.
2. Release the transmitter buttons.
• The display will show ON or OFF when
to indicate the beep status.
To override the system:
1. Enter the vehicle.
• Because the system is armed, the siren
will sound.
2. Turn on the ignition key.
3. Press the Valet/Service Mode switch.
• The siren will stop sounding.
CAR LOCATOR FEATURE
The Car Locator feature allows the parking
lights to stay on for 30 seconds instead of
flashing when the alarm is disarmed. This feature
must be programmed during installation and is not
recommended for vehicles with additional
aftermarket or auxiliary lighting.
REMOTE PANIC
In the event of an emergency (PANIC)
situation, the system’s siren can be triggered to
attract attention.To activate the Panic Feature,
press transmitter button 1 for 3 seconds:
• The siren will sound .
• The parking lights will flash.
Remote Start Operation
NOTE: Pressing transmitter button 2 during a
confirmation tone will immediately mute the tone.
BACKGROUND ILLUMINATION
To turn on the LCD background illumination
press transmitter button 2.
SYSTEM REFERENCE INDICATORS
STATUS INDICATOR (LED) FUNCTIONS
PARKING LIGHTS FUNCTIONS
On Solid = Vehicle Remote Starting
Flash 1x = Doors Locked
Flash 2x = Doors Unlocked
Flash 3x = Open Zone Indication (after arming)
Flash 5x = Auto Cold Start Engaged
On Solid = Valet Mode
Slow Flash = System Armed
Rapid Flash = Passive Arming
Flash 2x = Remote Start
Flash 3x = Stop and Go Mode
Flash 5x = Cold Start Mode
6
TRUNK RELEASE
Press button 3 for approximately 2 seconds to
open the trunk.
Important: The system should be placed
into the valet mode when parked inside a
garage or being left for service. Only start
the vehicle in a well ventilated area. Do not
use in a closed garage or indoors. Be sure to
familiarize yourself with all features prior to
using this product.
The Panic mode will run for 45 seconds, or
until transmitter button 1 is pressed again.
The Panic Feature will not operate when the
ignition is on. Also, if the vehicle is Remote
Started, activating the Panic Feature will shut
down the Remote Start.
REMOTE STARTING THE VEHICLE
To remote start the vehicle:
Press and hold transmitter button 2 for two
seconds.
• The siren will chirp 3 times.
• The parking lights will turn on.
• The engine will crank.
• Once the car has started, the heater or air
conditioner will turn on and run for the
preprogrammed time (15 or 25 minutes).
If the engine fails to start on the first
STATUS CONFIRMATION
To confirm the system’s current status (Armed,
Disarmed, Started, etc.) press transmitter
Button 3. The transmitter will beep, and the
LCD will provide a text display of the current
condition of the system. See Transmitter
Indications.
3
attempt, it will repeat the starting
procedure 2 more times.
Disengaging the Auto Cold Start feature:
The Auto Cold Start feature can be deactivated
in one of three ways:
• Press the brake pedal.
• Turn on the ignition.
• Remote start the vehicle using the
transmitter.
Driving vehicle after Remote Starting:
Unlock the door by pressing button 1 on the
remote transmitter. Enter vehicle, turn ignition
key to the on position (Note: Do not turn the
key all the way to the start position as you may
damage the starter).
STOP AND GO
The Stop and Go feature allows the vehicle to
remain running without use of the ignition key
during short stops.
Once the ignition key is turned to the on
position, press the brake pedal and shift the car
into the proper gear and you may now drive
the vehicle (Note: If brake pedal is pressed prior
to turning on ignition, engine will turn off).
To activate the Stop and Go feature:
1. Press and hold the brake pedal.
2. While pressing the brake pedal, push
transmitter button 1.
• The LED will flash rapidly.
• The parking lights will turn on.
3. Release the brake pedal.
4. Remove the key from the ignition switch.
5. Exit the vehicle and lock the doors
manually or using transmitter button 1*.
To resume driver control:
1. Unlock the doors manually or by pressing
transmitter button 1.*
2. Turn on the ignition.
3. Press the brake pedal.
• The vehicle resumes driver control.
• The LED will turn off.
REMOTE ENGINE SHUTDOWN
If the vehicle has been remotely started and
you desire to turn the vehicle off, simply press
button 2 on the remote transmitter. After the
motor has turned off the doors will relock
(optional).
AUTO COLD START
Cold start feature allows the remote starter to
start and run the vehicle every one or two
hours (selectable by your installer) for a period
of 24 hours.This allows the engine to remain at
an operational temperature in extremely cold
weather. Auto Cold Start must be enabled during
installation or it cannot be engaged.
*If optional keyless entry feature is installed.
Engaging the Auto Cold Start feature:
To turn Auto Cold Start on:
While holding the brake pedal down, push the
program switch and transmitter button 2 for
two seconds.
• The parking lights will flash five times.
• The siren will chirp three times.
• The engine will start and run for thirty
seconds to indicate the Cold Start feature
is engaged.
SAFETY FEATURES
The system will not start the vehicle if the
brake pedal is pressed or the hood is open.
Also, if the brake is pressed or the hood is
opened while remote running, the remote start
will shut down.
4
ADDING A REMOTE CONTROL
When you enter the code learning mode, the
system will learn new remotes and automatically
delete all other remotes that were previously
operating the system.
NOTE: You must code all desired remotes at
this time.The BWFM250 can learn a maximum
of two transmitters.
To enter Code Learning Mode:
1. Turn ignition key on, off, on, off, and leave
on within 5 seconds.
• The parking lights will flash once.
2. Press and hold program switch for 2
seconds.
• The LED and parking lights will flash
once.The siren will give a series of chirps
(as long as arming chirps are on).
3. Release the program switch.
4. Program all desired remotes by pressing
button #1 on each of the transmitters.
• The siren will chirp after the system has
learned each remote control.
5. Turn ignition key off.
• The remotes are now programmed to
the system.
SETTING THE ALARM CLOCK
To set the Alarm Clock:
1. Press and hold transmitter buttons 2 and
3 until the transmitter beeps three times
and the alarm clock icon appears.
2. Set the alarm time the same way as setting
the clock.
• The display will show ON and the alarm
clock icon when finished.
To turn off the Alarm Clock:
1. Press and hold transmitter buttons 2 and 3
until the transmitter beeps three times and
the alarm clock icon appears.
2. Press transmitter button 1.
• The display will show OFF and the
alarm clock icon will no longer be
displayed.
SETTING THE START TIMER
To set the Start timer:
1. Press and hold transmitter buttons 2 and
3 until the transmitter beeps four times
and the fan icon appears.
2. Set the start timer the same way as setting
the clock.
• The display will show ON and the fan
icon when finished.
Transmitter Features
SETTING THE CLOCK
To set the Clock:
1. Press and hold transmitter buttons 2 and
3 for 2 seconds.
• The transmitter will beep twice and the
display will show CLOCK, then change
to the hour and minute display.
2. Press button 2 to set the hour.
3. Press button 3 to set the minute.
4. Press button 1 store the new setting.
• The display will show ON and the
transmitter will play a tune to indicate
new time is set.
To turn off the Start Timer:
1. Press and hold transmitter buttons 2 and 3
until the transmitter beeps four times and
the alarm clock icon appears.
2. Press transmitter button 1.
• The display will show OFF and the
alarm clock icon will no longer be
displayed.
CHIRP DELETE
To turn the arm/disarm chirps on or off:
1. Press and hold transmitter buttons 2 and
5