1
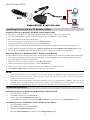
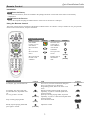
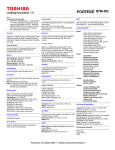
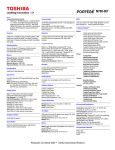
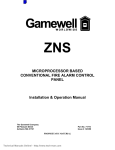
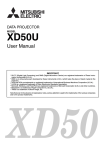
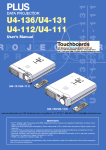
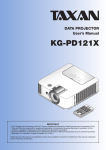
Quick Installation Guide
Package Contents
AVerTV Combo PCI-E
Quick Installation
Guide
Composite Input
Adaptor
TV IN
ANT IN
AUDIO
Data converter cable
S-VIDEO
Windows MCE USB IR Blaster
& Receiver
Remote Control
(Batteries included)
Installation CD
Low profile PCI short
bracket
8-pin to 10-pin cable
System Requirements
System requirements are described in detail on the package box. Before installing the TV tuner card and software, verify that
your PC meets the described requirements.
Hardware Installation
Step 1. Installing the TV Tuner Card
1.
2.
3.
4.
Turn off the PC.
Remove the cover.
Insert the tuner card into an empty PCI-E expansion slot on the motherboard.
Replace the cover back.
Step 2. Making the Connections
1
AVerTV Combo PCI-E
Installing Drivers and the TV Software Utility
Installing Drivers in Windows XP Media Center Edition 2005
To install drivers, users need to exit and switch to Windows mode if they are in Media Center Edition mode.
1. The “Found New Hardware Wizard” dialog box will appear. Just click Cancel to skip the Wizard.
2. Place the installation CD into the CD-ROM drive.
3. When the “AutoPlay” dialog box appears, select Run Autorun.exe.
4. When the installation main screen appears, choose Install driver.
5. If you didn’t install a Windows XP Media Center Edition certificated DVD Decoder, please install it after restarting [**].
6. To Start Windows XP Media Center Edition, click StartÆProgramsÆAccessoriesÆMedia CenterÆMedia Center. In the
MCE mode, select Settings Æ TV, and then follow the on-screen instructions to complete the configuration.
Installing Drivers in Windows Vista™ Media Center Edition
To install the drivers or the softwares, users need to exit and switch to Windows mode if they are in Media Center Edition mode.
1. The “Found New Hardware Wizard” dialog box will appear. Just click Cancel to skip the Wizard installation procedures.
2. Place the installation CD into the CD-ROM drive.
3. When the “AutoPlay” dialog box appears, select Run Autorun.exe.
4. When the installation main screen appears, choose Install driver.
5. If the “User Account Control” dialog box appears, select Allow to continue the process.
6. Start Windows Media Center, and then follow instruction on Setup Wizard.
NOTE:
1.
2.
If DirectX 9.0 or above is not installed in your system, usually the installation CD will automatically install it
during the process of installation. Make sure your system has DirectX 9.0 or above installed so that the TV
software utility can function properly.
The product does not come with a software DVD decoder. If users can playback DVD or MPEG-2 video files on the
computer, there is no need to install a DVD decoder. However, if the Decoded Error message appears on the screen,
please install the compatible DVD decoder via the Windows® XP Media Center Edition Partners site.
Uninstalling Drivers
Uninstalling Drivers in Windows XP Media Center Edition 2005
1.
Go to the Windows mode first.
2.
Click Start and then click on Control Panel.
3.
Double-click on the Add/Remove Programs icon.
4.
In the Add/Remove program list, select AVerMedia M780 Driver and then click on the Change/Remove button.
Uninstalling Drivers in Windows Vista™ Media Center Edition
1.
Go to the Windows mode first.
2.
Click Start and then click on Control Panel.
3.
Double-click Programs and Features icon.
4.
Select AVerMedia M780 Driver and click on the Uninstall/Change button.
2
Quick Installation Guide
Remote Control
Installation
Step 1. Insert the Battery
Use the two AA batteries, which are included in the package and insert it at the back of the remote control battery
compartment.
Step 2. Connect the Receiver
Turn on the computer and plug the USB connector of the receiver into the PC’s USB port.
Using the Remote Control
The remote control supports with most of the features in Media Center. No software or setup is needed. To use, just point the
remote control at the receiver, and press the button.
Navigation Buttons
Task
Start Media
Center, or go to
Start menu.
Move the item
up.
Control
Task
Move the item
to the right or
enter submenu.
Activate the
command.
Move the item
down.
Go to previous
screen.
Move the item to
the left or exit
submenu.
Display info of
the selected
item.
Control
(BACK)
(MORE)
Playback Buttons
Task
For Playlist, play the selected item.
For Playlist, skip to the next item.
For Recorded TV, skip ahead of 29
sec.
For TV, go back 5 seconds.
Control
(SKIP)
(REPLAY)
Stop currently playing media.
Task
For Live TV, save the current show and press
twice to record series. For Electronic
Programming Guide, Record TV show or TV
series
Rewind currently playing media; if pressed
repeatedly, it cycles to 3 rewind speeds from
slowest to fastest
Speed up currently playing media; if pressed
repeatedly, it cycles to 3 fast forward speeds from
slowest to fastest
Turn off/on the sound.
(STOP)
Briefly stop the playing media and
press again to resume
Control
(RECORD)
(REW)
(FWD)
(MUTE)
Adjust the volume
(PAUSE)
(VOL)
3
AVerTV Combo PCI-E
AV and Power Buttons
Task
Adjust the volume
Control
Task
Go to the Recorded TV page
(RECORDE
D TV)
(VOL)
Change the channel
Control
Go to Electronic Programming Guide.
(GUIDE)
(CH/PG)
Turn off/on the sound.
(MUTE)
Command assigned to it. This button
can “learn” to turn on the TV.
(TV)
Switch to live TV if TV is off. If TV is paused,
resume to real time TV programming.
If the computer is on, put the computer in standby
mode. Press the PC button again to bring the
computer out of standby and return to the desktop
(LIVE TV)
(PC)
Numeric Keypad
The numeric keypad consists of numbers from 0 through 9 and two other keys: ENTER and CLEAR. You can use the numeric
keypad to enter TV channels.
Teletext Buttons (option)
To display Page 100 (Teletext home page):
Press the TELETEXT button. Page 100 will appear in a few seconds and completely replace the TV picture, but it will not
affect the TV sound.
To access Teletext pages:
Enter the 3-digit number of the page you want to display by using the numeric keypad. For example, enter 300 to access the AZ Teletext Index.
To navigate between Teletext pages:
Press the UP and DOWN buttons on your remote control to navigate between Next and Previous pages.
To use the Fastext buttons:
The red, green, yellow, and blue buttons on your remote control correspond to the same colored buttons on your TV. Press a
colored button on your remote control to go to a preset page.
Battery Safety Information:
-
Store the batteries in a cool dry place.
Do not dispose of used batteries in domestic waste. Dispose of batteries at special collection points or return to point of
sale if applies.
Remove the batteries during long periods of non-use. Always remove exhausted batteries from the remote control.
Battery leakage and corrosion can damage this remote control, dispose of batteries safely.
Do not mix old and new batteries.
Do not mix different types of batteries: alkaline, standard (carbon-zinc) or rechargeable (nickel-cadmium).
Do not dispose of batteries in a fire. The batteries may explode or leak.
Never short circuit the battery terminals.
4
Quick Installation Guide
FCC NOTICE (Class B)
This device complies with Part 15 of the FCC Rules. Operation is subject to the following two conditions: (1)
this device may not cause harmful interference, and (2) this device must accept any interference received,
including interference that may cause undesired operation.
Federal Communications Commission Statement
NOTE- This equipment has been tested and found to comply with the limits for a Class B digital device,
pursuant to Part 15 of the FCC Rules. These limits are designed to provide reasonable protection against harmful interference
in a residential installation. This equipment generates, uses and can radiate radio frequency energy and, if not installed and
used in accordance with the instructions, may cause harmful interference to radio communications. However, there is no
guarantee that interference will not occur in a particular installation. If this equipment does cause harmful interference to radio
or television reception, which can be determined by tuning the equipment off and on, the user is encouraged to try to correct
the interference by one or more of the following measures:
‧ Reorient or relocate the receiving antenna.
‧ Increase the separation between the equipment and receiver.
‧ Connect the equipment into an outlet on a circuit different from that to which the receiver is connected.
‧ Consult the dealer or an experienced radio/television technician for help.
CAUTION ON MODIFICATIONS
To comply with the limits for the Class B digital device, pursuant to Part 15 of the FCC Rules, this device must be installed in
computer equipment certified to comply with the Class B limits. All cables used to connect the computer and peripherals must
be shielded and grounded. Operation with non-certified computers or non-shielded cables may result in interference to radio or
television reception.
Changes and modifications not expressly approved by the manufacturer could void the user’s authority to operate this
equipment.
DISCLAIMER
No warranty or representation, either expressed or implied, is made with respect to the contents of this documentation, its
quality, performance, merchantability, or fitness for a particular purpose. Information presented in this documentation has been
carefully checked for reliability; however, no responsibility is assumed for inaccuracies. The information contained in this
documentation is subject to change without notice.
In no event will AVerMedia be liable for direct, indirect, special, incidental, or consequential damages arising out of the use or
inability to use this product or documentation, even if advised of the possibility of such damages.
TRADEMARKS
AVerMedia is registered trademarks of AVerMedia TECHNOLOGIES, Inc. IBM PC is a registered trademark of International
Business Machines Corporation. Macintosh is a registered trademark of Apple Computer, Inc. Microsoft is a registered
trademark and Windows is a trademark of Microsoft Corporation. All other products or corporate names mentioned in this
documentation are for identification and explanation purposes only, and may be trademarks or registered trademarks of their
respective owners.
COPYRIGHT
© 2007 by AVerMedia TECHNOLOGIES, Inc. All rights reserved. No part of this publication may be reproduced, transmitted,
transcribed, stored in a retrieval system, or translated into any language in any form by any means without the written
permission of AVerMedia TECHNOLOGIES, Inc.
THE MARK OF CROSSED-OUT WHEELED BIN INDICATES THAT THIS PRODUCT MUST NOT BE
DISPOSED OF WITH YOUR OTHER HOUSEHOLD WASTE. INSTEAD, YOU NEED TO DISPOSE OF THE
WASTE EQUIPMENT BY HANDING IT OVER TO A DESIGNATED COLLECTION POINT FOR THE
RECYCLING OF WASTE ELECTRICAL AND ELECTRONIC EQUIPMENT. FOR MORE INFORMATION
ABOUT WHERE TO DROP OFF YOUR WASTE EQUIPMENT FOR RECYCLING, PLEASE CONTACT YOUR
HOUSEHOLD WASTE DISPOSAL SERVICE OR THE SHOP WHERE YOU PURCHASED THE PRODUCT.
5
AVerTV Combo PCI-E
(Media Center Upgrade Kit)
Quick Installation Guide
P/N 300AACFS
Made in Taiwan