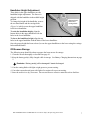
1
DR
®
®
CORDLESS Electric Mower
Safety & Operating Instructions
MODEL: CEM1000
Please read through these Operating Instructions and become familiar with the basic features of the
DR® WHISPER LITE® CORDLESS Electric Mower before operating it.
i
Important Safety Instructions
! WARNING: We want you to enjoy years of safe and productive use from your DR® WHISPER
LITE® CORDLESS Electric Mower. We don’t want you to get injured, so please take a few
moments to read the following guidelines for safely operating your new machine.
READ THESE INSTRUCTIONS
Protect those around you
·
·
Do not allow children, other bystanders or pets in your work area when the mower is being
operated.
Only adults and teenagers with a thorough understanding of these instructions should operate the
mower.
Preparation
·
·
·
·
·
·
·
·
Use safety glasses. Always use a face or dust mask if operating in dusty conditions.
Dress appropriately. Always wear substantial footwear and long pants. Do not wear loose
clothing or jewelry. They can get caught in the moving parts.
Be thoroughly familiar with the controls and proper use of the DR® WHISPER LITE®.
Do not operate the mower without the proper side chute or mulch cover in place. Use of
accessories not recommended in the manual may increase the risk of injury.
Never operate the DR® WHISPER LITE® mower without the proper guards, safety switches or
other safety protective devices in place and properly connected. Inspect to determine that these
safety devices are properly installed, in good repair, and operate properly. If the condition or
operation of these devices is questionable, they must be repaired or replaced before using the
mower.
Objects struck by the lawn mower blade can cause severe injuries. Thoroughly inspect the area
where the mower is to be used and remove all stones, sticks, wire, dog bones, pet supplies or
lawn toys, and other foreign objects which could be thrown by the mower blade. Also note the
location of holes, stumps and other possible hazards.
Mow only in daylight or in good artificial light.
Never operate the mower in wet grass or in the rain. Wet conditions can be slippery.
Operation
·
·
·
·
·
The length of time that a battery can hold its charge while mowing a lawn depends upon lawn
conditions; tall, thick, or wet grass make the mower work harder and the battery discharge faster.
Before starting the mower, adjust the cutting height to cut 1" to 2" of grass at a time. Cut thicker
grass at a greater cutting height, or cut a narrower swath. Do not force the lawn mower forward
in thick grass. The DR® WHISPER LITE® will do a better and safer job when cutting at a steady
rate.
Stop the blade whenever you leave the operating position (behind the handlebar) for any reason,
including clearing grass and making any adjustments, repairs or inspections to the mower.
Before cleaning, repairing, inspecting, adjusting the height of the cut, or exchanging the
mulching cover and side discharge chute, remove the battery pack and make certain the blade has
stopped.
Look behind you before pulling the mower backwards to avoid falling.
DR® WHISPER LITE® CORDLESS Electric Mower Safety & Operating Instructions
i
(Operation, continued)
· Mow across slopes, never up and down. Exercise caution when changing directions on slopes.
Do not mow steep slopes or other areas where stability or traction is in doubt.
· Do not put your hands and feet near or under rotating parts. Keep clear of the discharge area
while the motor is running.
· Stop the blade when crossing over loose materials such as gravel drives, walks or roads. Objects
discharged by the mower can be hazardous.
· Do not use the DR® WHISPER LITE® for any job other than those for which it is intended.
· Do not overreach—keep proper footing and balance at all times.
· After striking a foreign object or if mower vibrates abnormally, stop the blade and remove the
battery pack. Inspect the mower for any damage and repair the damage before restarting and
operating the lawn mower. Vibration is generally a sign of trouble.
· Stay alert and watch what you are doing. Do not operate the lawn mower when you are tired or
under the influence of drugs or alcohol.
Maintenance and Storage
·
·
·
·
·
·
·
Maintain the lawn mower with care—keep cutting edges sharp and clean for the best and safest
performance. Be sure the mower is in safe operating condition. Keep all nuts, bolts and screws
tight. Follow the instructions in this manual for changing accessories.
When not in use, store the lawn mower indoors in a dry place and out of the reach of children.
Keep mower handlebars dry and free from oil and grease.
To reduce fire hazard, keep mower free of grass, leaves or excessive grease.
Use identical replacement blades only. Check the blade and motor mounting bolts at frequent
intervals for proper tightness.
Have your mower inspected and serviced each year by an authorized Briggs & Stratton service
center. Please call Country Home Products® and we will pre-arrange a visit to an authorized
service center. Not all Briggs and Stratton service centers are knowledgeable about this mower.
You can also send the mower to the Service Department at Country Home Products® for the
above mentioned service.
Factory specified Briggs & Stratton replacement parts should be used to assure adequate
protection against injury (available from COUNTRY HOME PRODUCTS®).
Battery Safety
·
·
·
·
·
ii
Use only part #CEP1003 replacement battery pack (available from Country Home Products ®).
Do not charge the lawn mower battery in the rain or in wet locations.
Exercise care in handling the batteries in order not to short the battery with conducting materials
such as rings, bracelets and keys. The battery or conductor may overheat and cause burns.
Do not attempt to replace individual batteries inside the battery pack. Mixing fresh and
discharged batteries could increase internal cell pressure and rupture the discharged battery.
Improper wiring within the battery pack could result in leakage or explosion.
Batteries that can no longer accept a charge should be returned to an authorized Briggs &
Stratton service center or a local recycling center. Do not dispose of batteries in a fire: the
battery cells may explode. Do not open or mutilate the batteries. Released electrolyte (battery
acid) is corrosive and will cause damage to eyes, skin or clothes. Battery acid is toxic if
swallowed or if the fumes are inhaled.
SAVE THESE INSTRUCTIONS
DR® WHISPER LITE® CORDLESS Electric Mower Safety & Operating Instructions
And congratulations on your purchase of a new DR® WHISPER LITE®
CORDLESS Electric Mower!
We have done our utmost to ensure that your DR® WHISPER LITE® will be one
of the most trouble-free and satisfying pieces of equipment you have ever owned.
Please let us know of any questions or problems you may have. We want to
answer or correct them as quickly as possible. (When you do call or write, please
have your order number handy—it will speed things up!) We also hope to hear
from you on how much you like your new helper.
And, please tell your friends about your new DR® WHISPER LITE®! Having
DR® Owners spread the word about our products and our way of doing business is
the best advertising we can have, and the best way to help us provide even better
service in the years to come.
Thanks once again!
for all of us at...
COUNTRY HOME PRODUCTS®
For future reference when dealing with your warranty, please fill out the information below and keep in
a safe place.
Name Purchased Under: ____________________________________________________________
Order Number: ___________________________________________________________________
Date of Purchase ______ / ______ / ______Important
DR® WHISPER LITE® CORDLESS Electric Mower Safety & Operating Instructions
iii
Table of Contents
CONTROLS & FEATURES.................................................................................................. 1
SET-UP INSTRUCTIONS..................................................................................................... 2
HOW TO SET-UP YOUR LAWN MOWER ..............................................................................................2
OPERATING INSTRUCTIONS............................................................................................. 3
PRE-START CHECKS ............................................................................................................................3
TO START MOTOR AND ENGAGE BLADE .............................................................................................4
TO STOP MOTOR AND BLADE .............................................................................................................4
BATTERY CHARGING INSTRUCTIONS ...................................................................................................5
ELECTRONIC CUT-OUT SWITCHES.......................................................................................................6
CIRCUIT BREAKER ...................................................................................................................................... 6
LOW-VOLTAGE CUT-OUT SWITCH.............................................................................................................. 6
CUTTING HEIGHT ADJUSTMENT ..........................................................................................................6
HANDLEBAR HEIGHT ADJUSTMENT ....................................................................................................7
OFF-SEASON STORAGE .......................................................................................................................7
FOLDING THE HANDLEBARS ................................................................................................................8
LAWN CARE TIPS ............................................................................................................... 9
MAINTENANCE ................................................................................................................. 10
SERVICE ASSISTANCE & REPLACEMENT PARTS ................................................................................10
CLEANING .........................................................................................................................................10
CUTTING BLADE ...............................................................................................................................10
TO SHARPEN THE BLADE ..................................................................................................................11
TO BALANCE THE BLADE ..................................................................................................................11
TROUBLESHOOTING ....................................................................................................... 12
PARTS LIST....................................................................................................................... 14
SCHEMATIC DRAWING .................................................................................................... 15
BRIGGS & STRATTON MOTOR AND BATTERY PACK SYSTEM WARRANTY ...... BACK COVER
iv
DR® WHISPER LITE® CORDLESS Electric Mower Safety & Operating Instructions
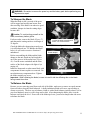
Controls & Features
Make yourself, and any other operators, familiar with the controls, parts and operation of the DR®
WHISPER LITE® CORDLESS Electric Mower before using it.
Blade Control
Lever
Upper Handlebar
Upper Handlebar Knobs
Lower Handlebar
Blade Control
Button
Power Key
(Switch Slots not shown)
Reset Button (hidden)
Cutting Height
Adjustment Handle
Battery Pack
Mulching Cover
(Discharge Chute not shown)
Lower
Handlebar
Knob
Plastic Nuts
Figure 1
DR® WHISPER LITE® CORDLESS Electric Mower Safety & Operating Instructions
1
Set-Up Instructions
How To Set-Up Your Lawn Mower
1. Open the top flaps of the carton and remove the inserts. Remove the loose parts, including the
side discharge chute, battery pack, battery charger, battery charger lead and power key (Figure 1,
page 1).
2. Lift the mower from the carton.
3. Pull up and back on the upper handlebar to raise the packing material between the upper and
lower handlebars.
4. Tighten the four hand knobs on the sides of the
lower and upper handlebars.
Note: Your mower is shipped with the handlebar
in the middle height position. To raise or lower
the handlebar, refer to page 7.
5. Place the battery pack into the opening provided
on top of the mower (Figure 2). Push firmly into
place; it will fit in only one position.
6. Make certain all nuts, bolts and screws are
tightened securely.
!
Push down firmly to seat battery pack.
Figure 2
WARNING: Always remove the power key and
battery pack before exchanging the mulching cover and side discharge chute.
7. Your mower has been shipped as a mulcher. To convert your mower from a mulcher to a side
discharge mower, remove the two plastic nuts from the right side of the mower (Figures 3 & 4).
Remove the mulching cover and place the side discharge chute over the two studs. Secure the
chute firmly with the two plastic nuts.
Mulching
cover
Discharge
chute
Figure 3
2
Secure plastic nuts firmly
Figure 4
DR® WHISPER LITE® CORDLESS Electric Mower Safety & Operating Instructions
(How to Set Up Your Lawn Mower—continued)
Note: The mower will not operate without the discharge chute or the mulching cover installed
because of the magnet built into each (Figures 5 and 6). Make sure the magnet is clean and
free of debris. Also, make sure these covers are always firmly screwed down on the machine,
or the lawn mower will not operate.
Magnet
in chute
Figure 5
Close-up of magnet in the discharge chute.
A magnet is also in the mulching cover.
Figure 6
Important: Make sure your battery is fully charged before operating your mower. Refer to the
charging instructions on page 4.
Operating Instructions
Pre-Start Checks
Þ Check to make sure the mulching cover or side discharge chute is in its proper place and securely
tightened. The mower will not operate unless the mulching cover or side discharge chute is
installed.
Þ Check the external surfaces of the mower and remove any accumulation of dirt, dust or dried
grass clippings.
Þ Cut 1" to 2" of grass at a time. Check the cutting height and readjust to the desired height before
starting the lawn mower. Use a greater height for cutting tall grass. Refer to Cutting Height
Adjustment on page 6 for instructions.
Note: The lawn mower battery pack has been fully charged at the factory. However, since
batteries self-discharge over time, you must recharge the battery pack to a full charge
before using your mower for the first time.
✦ Reminder: To reduce the risk of injury, the mower will not run unless the discharge chute or
the mulching cover is installed. The magnet on the discharge chute or the mulching cover
must have clean contact with the mower.
✦ Reminder: The length of time that a battery can hold its charge while mowing a lawn depends
upon lawn conditions; tall, thick, or wet grass make the mower work harder and cause the
battery to discharge faster.
DR® WHISPER LITE® CORDLESS Electric Mower Safety & Operating Instructions
3
To Start Motor and Engage Blade
1. To start, insert the power key into the switch slots
located behind the battery pack (Figure 7).
2. Depress the button on the blade control switch
(Figure 8) and pull the blade control lever firmly to
the handlebar (Figure 9). Release the push button.
!
WARNING: This blade control is a safety
device. Do not tamper with or bypass.
To Stop Motor and Blade
1. To stop, release the blade control lever (Figure 8).
!
Power key
WARNING: The blade continues to rotate for a
few seconds after the motor is shut off.
Figure 7
Blade control lever
Blade control button
Þ Remove the power key when the equipment is
unattended and the motor is shut off.
Þ For easier starting, move the mower to an area
where the grass is short enough not to interfere
with the rotation of the cutting blade. Before
starting (especially for the first time), know how to
stop the motor quickly in the event of an
emergency. To stop the motor, release the blade
control lever.
Blade control switch
Figure 8
Blade control lever
Figure 9
4
DR® WHISPER LITE® CORDLESS Electric Mower Safety & Operating Instructions
Battery Charging Instructions
!
WARNING: The battery contains corrosive fluid and toxic material. Handle with care. Keep
away from children. Do not puncture, disassemble, mutilate or incinerate. Explosive gases
could be vented during charging or discharging. Use in a well ventilated area, away from
sources of ignition.
Charge the battery pack(s) indoors or in a dry area
out of the weather. Use only the battery charger
provided with the mower (Briggs & Stratton part
number 497400). First plug the battery charger lead
into the battery (Figure 10), then plug the charger
into any standard 110/120 volt household electrical
outlet. If you have a dual or "Y" lead, you can use
the other lead to charge another battery pack at the
same time, though charging will take longer (Figure
11).
If an extension cord is required, use one rated for
outdoor use that is at least wire size 16 AWG.
Connect the extension cord to the charger before
plugging the extension cord into the electrical
outlet. Make sure to recharge the battery packs
fully when your finished using the mower. It takes
at least 16 hours to recharge a completely
discharged battery, and at least 24 hours to recharge
two battery packs at once. The red light on the
battery charger indicates that the battery charger is
plugged into an electrical outlet; the green light
indicates that the battery is fully charged.
The battery should be charged every 30 to 60 days
if the mower is not used. Charge the battery for a
maximum of 48 hours only.
Figure 10
Figure 11
Important: Always disconnect the battery charger
(or the extension cord, if used) from both the electrical outlet and the battery pack, or the battery
may discharge itself back into the charger. Be sure that the battery is disconnected from BOTH of
these!
✦ Reminder: The length of time that a battery can hold its charge while mowing a lawn depends
upon lawn conditions; tall, thick, or wet grass make the mower work harder and the battery
discharge faster.
DR® WHISPER LITE® CORDLESS Electric Mower Safety & Operating Instructions
5
Electronic Cut-Out Switches
Circuit Breaker
A circuit breaker is located to the left of the power
key on top of the mower. This breaker may trip
when cutting heavy or thick grass, or when a wire
short-circuits. You know the circuit breaker has
tripped if the mower will not run and the white
circuit breaker reset button is projecting up into the
transparent rubber boot. If this happens, reset the
breaker by depressing the reset button (Figure 12).
If the circuit breaker does not reset or if it trips
repeatedly under normal cutting conditions, call one
of our Customer Service Representatives TOLLFREE 1(800) DR-OWNER(376-9637).
Circuit breaker
Power key
Figure 12
Note: If the circuit breaker trips during the operation of the mower, allow the electric motor to cool
for at least one minute before resetting the breaker.
Low-Voltage Cut-Out Switch
The motor is equipped with an electronic cut-out switch. This device stops the mower if the battery
charge becomes excessively low and the blade speed becomes slow after an extended period of
mowing. Before restarting the mower, replace the battery pack with a fully charged battery pack (the
discharged battery pack should be recharged immediately to avoid damage).
Cutting Height Adjustment
Adjust cutting height to cut 1" to 2" of grass at a
time. The cutting height adjustment handle is
located on the right side of the deck (Figure 13).
The handle may be placed in one of five cutting
height positions. Pull the handle toward the wheel
and then either push it forward to raise the cutting
height or pull it back to lower the cutting height.
For rough or uneven lawns, move the height
adjustment handle to a greater cutting height.
Height adjustment
handle
Figure 13
6
DR® WHISPER LITE® CORDLESS Electric Mower Safety & Operating Instructions
Handlebar Height Adjustment
Three holes in the upper handlebar provide
handlebar height adjustment. The mower is
shipped with the handlebar in the middle height
position.
To change the height of the handlebar, remove
the two hand knobs and the carriage bolts
(Figure 14) which secure the upper handlebar
to the lower handlebar.
To raise the handlebar height, align the
bottom holes in the upper handlebar with the
holes in the lower handlebar.
Remove hand
knobs and
carriage bolts
Figure 14
To lower the handlebar height, align the top
holes in the upper handlebar with the holes in the lower handlebar.
Once the proper height has been selected, secure the upper handlebars to the lower using the carriage
bolts and hand knobs.
Off-Season Storage
The following steps should be taken to prepare the lawn mower for storage:
1. Clean the mower thoroughly as described on page 10.
2. Keep the battery pack(s) fully charged while in storage. See Battery Charging Instructions on page
5.
✦ Reminder: Battery pack(s) will be damaged if stored discharged.
3. Coat the cutting blade with light weight grease to prevent rusting.
4. Coat other exposed metal parts with light oil or engine oil to prevent rusting.
5. Store the mower in a dry, clean area. Do not store next to corrosive materials such as fertilizer.
DR® WHISPER LITE® CORDLESS Electric Mower Safety & Operating Instructions
7
Folding the Handlebars
1. The handlebar assembly can be folded in half,
or completely folded away for storage. To
fold the handlebars in half, loosen the upper
handlebar knobs and fold the upper handlebar
forward onto the machine (Figure 15).
2. To fold the handlebar assembly away for
storage, loosen the hand knobs which secure
the lower handlebar to the deck (see Figure 1
on page 1). Fold the entire handlebar
assembly forward and down over the mower
until the grips are resting on the ground. Then
loosen the knobs which secure the upper
handlebar to the lower handlebar and fold the
upper handlebar backward until it rests on top of the mower.
Loosen the
handlebar knobs
Figure 15
Important: Be careful not to kink the cable at any time; this could damage the unit and render
the controls inoperative.
To place the handlebar assembly in the operating position, pull up and back on the upper handlebar
until it is raised to the operating position and tighten the hand knobs securely. Be careful not to
pinch the cable when unfolding the handlebars.
8
DR® WHISPER LITE® CORDLESS Electric Mower Safety & Operating Instructions
Lawn Care Tips
·
·
·
·
·
·
·
·
Mow your lawn as often as necessary.
Never remove more than one third of the leaf blade during any one mowing session. When more
than one third of the blade is removed, the grass plant produces less food for itself and therefore
becomes weaker and more susceptible to disease and insect damage.
Grass that is allowed to get taller will have a stronger, larger root system that will better
withstand dry periods.
Depending on the health of your lawn and the weather, it may be necessary to mow your lawn
twice a week during the fast growing periods to avoid taking off more than one third of the leaf
blade.
Your lawn will benefit more if you leave the clippings right where they are. When left in place,
grass clippings shade the soil surface and reduce moisture loss. Grass clippings also add organic
matter to help improve the soil by returning valuable nutrients to the soil such as nitrogen,
phosphorous, and potassium when they decompose.
The only time it is absolutely necessary to remove grass clippings is when they accumulate in a
thick layer that smothers the lawn and doesn't decompose quickly.
Keep your mower blade sharp! A sharp mower blade cuts the grass quickly and cleanly, using
less of the mower's power, which conserves battery life. For best results, inspect the blade often
and have an extra, sharp blade ready to as a replacement while the dull blade is being sharpened.
Alternate the mowing pattern on your lawn frequently. By changing the pattern and direction of
the cut, you'll improve the health and appearance of your lawn. Following the same mowing
pattern causes soil compaction and turf wear from the mower wheels.
DR® WHISPER LITE® CORDLESS Electric Mower Safety & Operating Instructions
9
Maintenance
!
WARNING: Be certain to remove the power key and the battery pack before performing any
adjustment or repair.
Service Assistance & Replacement Parts
To maintain the original quality of your mower, use genuine Briggs & Stratton replacement parts
only. To obtain the correct part for your particular mower, always specify the model number (found
on the name plate). Contact one of our Customer Service Representatives Toll-Free 1(800)DROWNER (376-9637) for parts and service assistance. We recommend taking your mower to a
Briggs & Stratton authorized service center once each year for inspection and addition of any new
devices which might upgrade the safety of your mower. Please call Country Home Products® and we
will pre-arrange a visit to an authorized service center. Not all Briggs and Stratton service centers are
knowledgeable about this mower. You can also send the mower to the Service Department at
Country Home Products® for service.
Cleaning
1. Remove the power key.
2. Wipe the mower clean with a dry cloth.
Periodically remove the battery pack and wipe
the battery cavity clean (do not use water).
3. To prolong the life and efficiency of your
mower, clean the underside of the mower deck
after each use. Tilt the mower forward or on
its side and scrape the underside clean (make
certain the power key and the battery have been
removed).
A New Blade
B Wear Limit
Cutting Blade
Replace Blade
CHECK at frequent intervals to make sure the
blade is securely tightened and that it is in good
condition.
REPLACE the blade if it's badly chipped, bent, out
of balance, or as soon as a notch starts wearing in
the tip between the flat surface and upturned lift
(Figure 16, view B). This type of wear pattern
occurs more rapidly in sandy soil conditions.
!
10
C
Dangerous
Do not use
Figure 16
WARNING: Never operate the mower with the blade worn to the extent depicted in view C of
Figure 16 as the tip could fly off, and cause personal injury or property damage.
DR® WHISPER LITE® CORDLESS Electric Mower Safety & Operating Instructions
!
WARNING: Be certain to remove the power key and the battery pack before performing any
adjustment or repair.
To Sharpen the Blade
When the blade is dull, cut ends of the grass
will be ragged and usually turn brown soon
after mowing. If the blade is in otherwise good
condition, sharpen it when the cutting edges
become dull.
!
Caution: To avoid cutting yourself on the
blade, wear heavy leather gloves.
For best results, remove the blade (Figure 17)
and sharpen the cutting surfaces at an angle of
25 degrees.
Check the blade after sharpening to make sure
it is still balanced (see "To Balance the Blade"
below). It will cause excessive vibration if
unbalanced.
Before reassembling the blade and the blade
adapter to the unit, brush any built up debris
out of the grooves of the motor base (Figure
18). Coat the motor crankshaft and the inner
surface of the blade adapter with light oil (or
engine oil).
Install the sharpened or replacement blade with
components in same sequence as removed. Do
not substitute any components here. Tighten
the blade retaining cap screw.
Loosen the blade mounting bolt
with a 1/2" socket wrench
Figure 17
Blade adapter
Clean grooves in the motor base
Figure 18
Important: When replacing the blade, be sure to install it with the stiffening ribs on the blade
facing toward the mower.
To Balance the Blade
Because you are removing metal from each side of the blade, make sure to remove an equal amount
from each side to keep the blade balanced. A badly imbalanced blade will cause your machine to
vibrate excessively. The best way to balance a blade is with a blade balancer (usually about $3.00 at
your local hardware store) or with a large nail or bolt. After sharpening the blade, place it on the
balancer and check the level. If one side of the blade tips lower, you need to sharpen that side more
to balance the blade.
DR® WHISPER LITE® CORDLESS Electric Mower Safety & Operating Instructions
11
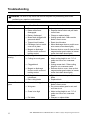
Troubleshooting
!
WARNING: Be sure to stop motor and remove the power key and battery pack before
performing any repairs or maintenance.
Problem
Motor fails to start
Possible Causes
Corrective Action
Þ Power key not inserted
Þ Blade control lever
disengaged
Þ Battery discharged
Þ Mower deck clogged with
grass and debris
Þ Tripped circuit breaker
Þ Discharge chute or mulch
cover not in place
Þ Magnet on discharge
chute or mulch cover not
making contact
Þ Insert power key
Þ Depress starter button and pull blade
control lever
Þ Charge or replace battery
Þ Unclog mower deck. Make certain
blade is free to move
Þ Reset circuit breaker
Þ Mount discharge chute or mulch cover
onto mower, screw down tightly
Þ Remove chute or cover & clean so that
magnet makes good contact w/ mower,
screw chute back down tightly
Þ Discharged battery
Þ Cutting too much grass
Þ Magnet on discharge
chute or mulch cover not
making contact
Þ Charge or replace battery
Þ Adjust cutting height to cut 1"-2" of
grass at a time or cut a narrower
swath.
Þ Unclog mower deck. Raise cutting
height or cut a narrower swath
Þ Remove chute or cover, clean so that
magnet makes good contact w/ mower,
screw chute back down tightly
Excessive vibration
Þ Cutting blade loose or
unbalanced
Þ Bent cutting blade
Þ Tighten blade and adapter. Balance
blade
Þ Replace blade
Mower will not mulch
grass
Þ Mower deck clogged
Þ Unclog mower deck. Make certain
blade is free to move
Þ Do not mow when grass is wet; wait
until later to cut
Þ Adjust cutting height to cut 1"-2" of
grass at a time or cut a narrower
swath.
Þ Sharpen or replace blade
Mower stops while
mowing
Þ Clogged deck
Þ Wet grass
Þ Grass is too high
Þ Dull blade
12
DR® WHISPER LITE® CORDLESS Electric Mower Safety & Operating Instructions
Uneven cut
Þ Dull blade
Þ Grass is too high or too
thick
Þ Sharpen or replace blade
Þ Adjust cutting height to cut 1"-2" of
grass at a time or cut a narrower
swath.
Battery looses its
charge quickly
Þ Battery was not fully
charged
Þ Grass is too high or too
thick
Þ Charge battery fully
Þ Adjust cutting height to cut 1" to 2" of
grass at a time or cut a narrower
swath.
Note: For repairs beyond the minor adjustments listed above, contact one of our Customer
Service Representatives Toll-Free 1(800)DR-OWNER (376-9637).
DR® WHISPER LITE® CORDLESS Electric Mower Safety & Operating Instructions
13
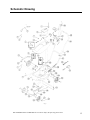
Parts List
Please refer to the schematic drawing on page 15.
Item
1
2
3
4
5
6
7
8
9
10
11
12
13
14
15
16
17
18
19
20
21
22
23
24
14
Part No. Description
102141 Key Assembly
102061 Discharge Chute
101961 Battery Pack Assembly
101941 Interlock Switch Assembly
102191 Magnet
102271 Screw
102031 Cord Clip
101951 Circuit Board Wire
Assem
bly
102121 Wiring Harness
102041 Mower Cover
102311 Solenoid
102151 Knob
102201 Motor
102081 Height Adjuster Handle
102001 Mulching Cover
102321 Chute Stud
102241 Interlock Retainer
102051 Mower Deck
101911 Height Adjuster Front
101991 Bolt, Motor
101901 Blade Adapter
102381 Blade
102221 Axle Retainer
102271 Screw
25
Item
26
27
28
29
30
31
32
33
34
35
36
37
38
39
40
41
42
43
44
45
46
47
48
49
102361 Front Wheel
Part No. Description
102131 Hubcap
102261 Wheel Retainer
102181 Height Adjuster Link
102391 Blade Mounting Bolt
102351 Washer, Split Ring
102301 Trailing Shield
101981 Lower Handlebar Bolt
102371 Rear Wheel
101921 Height Adjuster, Rear
102251 Link Retainer
102231 Bolt Retainer
102401 Battery Charger
130021 Handlebar Knob
102011 Solenoid Clamp
102111 Battery Charger Harness
("Y" Lead--optional)
102091 Lower Handlebar
130021 Handlebar Knob
101971 Handlebar Bolt
102171 Circuit Breaker Label/Boot
102281 Handlebar Screw
102101 Upper Handlebar
102411 Motor Control
102071 Foam Handle Grip
101931 Blade Control Assembly
DR® WHISPER LITE® CORDLESS Electric Mower Safety & Operating Instructions
Schematic Drawing
DR® WHISPER LITE® CORDLESS Electric Mower Safety & Operating Instructions
15
13
We Want You to be Totally Satisfied
The DR® WHISPER LITE® CORDLESS Electric Mower is designed to provide years of trouble-free
performance. To ensure that you are totally satisfied with this important purchase, we offer the following
three-part Assurance of Satisfaction:
1. The DR® WHISPER LITE® is GUARANTEED FOR ONE FULL YEAR against defects in materials and
workmanship when in consumer use. If you believe that a part is defective, please write or call
immediately. We will do our best to remedy the problem, including repairing or replacing defective parts
as quickly as possible. The Power Train Elements and Battery Pack System are guaranteed separately by
Briggs & Stratton (see below).
2. IF WITHIN THE FIRST 30 DAYS of actual hands-on use you have questions or you are less than 100%
satisfied with your DR® WHISPER LITE®, please write or call us TOLL-FREE 1(800)DR-OWNER
(376-9637). We will do everything possible to answer your questions or make things right—even if it
means that you return your DR® WHISPER LITE® for a full refund of its purchase price, shipping costs
included. (Refund on shipping is for standard method, and applies to the contiguous United States and
Canada only.)
3. We operate, for our Owners, a 7-Days-a-Week Customer Service Department with well-trained and
friendly folks whose sole job is to ensure that you get any help you need…parts that need to be
replaced…or questions answered courteously and as promptly as possible.
Briggs & Stratton Motor and Battery Pack System Warranty
Effective January 1, 1995, Limited Warranty
“Briggs & Stratton Corporation will repair or replace, free of charge, any part or parts of the Battery Pack
System that are defective in material or workmanship or both. This warranty is effective for the time periods
and subject to the conditions provided for in this policy. For warranty service contact COUNTRY HOME
PRODUCTS® and we will pre-arrange a visit to an authorized service dealer in your area. THERE IS NO
OTHER EXPRESS WARRANTY. IMPLIED WARRANTIES, INCLUDING THOSE OF
MERCHANTABILITY AND FITNESS FOR A PARTICULAR PURPOSE ARE LIMITED TO ONE YEAR
FROM PURCHASE, OR TO THE EXTENT PERMITTED BY LAW ANY AND ALL IMPLIED
WARRANTIES ARE EXCLUDED. LIABILITY FOR CONSEQUENTIAL DAMAGES UNDER ANY
AND ALL WARRANTIES ARE EXCLUDED TO THE EXTENT EXCLUSION IS PERMITTED BY
LAW. Some states do not allow limitations on how long an implied warranty lasts. And some states do not
allow the exclusion or limitation of incidental or consequential damages, so the above limitation and
exclusion may not apply to you. This warranty gives you specific legal rights and you may also have other
rights which vary from state to state.”
COMPONENT
WARRANTY PERIOD
Mainframe and Deck
5 years
Power Train Elements (including: motor,
circuit board, key, charger, and switch)
2 years
Battery Pack
1 year
This warranty shall only apply to “consumer user” which means personal residential household use by the
original retail consumer.
NO WARRANTY REGISTRATION CARD IS NECESSARY TO OBTAIN WARRANTY ON A BRIGGS
& STRATTON BATTERY PACK SYSTEM. YOU MUST SAVE THE PURCHASE RECEIPT. A PROOF
OF PURCHASE DATE WILL BE REQUIRED TO OBTAIN WARRANTY.
COUNTRY HOME PRODUCTS®, Inc.
Meigs Road, P.O. Box 25, Vergennes, Vermont 05491
CODE: 30166X
©1999 CHP, Inc. CEM 138011
14
DR® WHISPER LITE® CORDLESS Electric Mower Safety & Operating Instructions