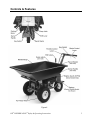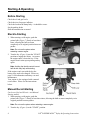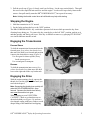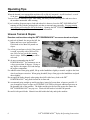
1
®
DR POWERWAGON
™
Safety & Operating Instructions
Model: SUBURBAN™
These Safety & Operating Instructions as well as the engine manufacturer's
owner's manual contain important information concerning safety, operating
procedures, maintenance, troubleshooting and assembly tips. Everyone who
operates the DR® POWERWAGON™ should read these instructions and be
thoroughly familiar with them.
And congratulations on your purchase of a new
DR POWERWAGON™!
We have done our utmost to ensure that your DR®
POWERWAGON™ will be one of the most trouble-free
and satisfying pieces of equipment you have ever
owned. Please let us know of any questions or
problems you may have. We want to answer or correct
them as quickly as possible. (When you do call or
write, please have your serial number and/or order
number handy—it will speed things up!) We also hope
to hear from you on how much you like your new
helper.
And, please tell your friends about your new DR®
POWERWAGON™! Having DR® Owners spread the
word about our products and our way of doing business
is the best advertising we can have, and the best way to
help us provide even better service in the years to come.
®
Thanks once again!
for all of us at...
COUNTRY HOME PRODUCTS®
Safety Information
We want you to enjoy years of productive use from your DR® POWERWAGON™. We don't want
you to get injured, so please take a few moments to read the following guidelines for safely
operating your new machine.
Dress Appropriately
• Wear shoes with non-slip treads when using your DR® POWERWAGON™. If you have safety
shoes, we recommend that you wear them. Do not use the machine while barefoot or wearing
open sandals.
• Use ear muffs or ear plugs to protect your valuable hearing.
• Wear gloves to protect your hands, as well as to provide additional comfort and support.
Preparation
• Read these Safety & Operating Instructions as well as the engine manufacturer's owner's manual
before you use the DR® POWERWAGON™. Become familiar with the controls, engine and
service recommendations to ensure the best performance from your machine.
• Inspect the area you'll be working in BEFORE using the DR® POWERWAGON™. Remove any
obstacles and avoid areas with poor footing.
Be sure the machine is in NEUTRAL and the brake is set before attempting to start the engine.
Fill the gasoline tank outdoors. Avoid spilling gasoline and don't fill the tank while the engine is
running or if you are smoking.
Remember: The gas fill on the DR® POWERWAGON™ is located beneath the dump body. Keep
this in mind as you work to avoid running out of gas with a full load. On average, the DR®
POWERWAGON™ will run continuously for about 45 minutes. This running time will vary
depending on the speeds used, loads carried and terrain covered.
Operating the Machine Safely
Unless there is very good artificial light, only use the DR® POWERWAGON™ during the daylight
hours.
Always operate the DR® POWERWAGON™ from behind the handlebars, never from the side.
Operating the DR® POWERWAGON™ in wet grass could increase the danger of your slipping,
falling and being injured. Use extra CAUTION in wet areas.
When operating over uneven terrain and slopes, use EXTREME CAUTION and make sure of solid
and firm footing at all times. THINK SAFETY! Loads should be less than 300 pounds on
slopes. The steeper the slope, the lighter the load.
Never allow children to operate the DR® POWERWAGON™. Never carry children, adults or pets in
the body of the DR® POWERWAGON™.
Give complete and undivided attention to the job at hand, and be sure you know how to stop the
DR® POWERWAGON™ at a moment's notice. Use caution when another person approaches.
Keep hands away from belts and pulleys when the engine is running.
DR® POWERWAGON™ Safety & Operating Instructions
i
DO NOT OVERLOAD THE DR® POWERWAGON™! Loads should be less than 400 pounds on
the level and 300 pounds on slopes. Be careful of top heavy loads—especially in the back
corners of the molded body. The higher the load, the more chance the machine may tip. Also,
loads may shift during operation, so even out loads when possible to be safe.
When shifting to reverse, be careful of tipping as the caster wheel changes direction.
Don't rev the engine. Excessive speed or tampering with the governor can be dangerous. Operate
the engine at the slowest speed that is satisfactory for the task at hand.
While using the DR® POWERWAGON™, don't hurry or take things for granted. When in doubt
about the equipment or surroundings, stop the machine and take time to look things over. Make
sure you have 100% control of the machine at all times.
Built-in safety features are effective only when maintained and kept in place. DO NOT, under any
conditions, remove, cut, bend, weld or change standard parts on the DR® POWERWAGON™. A
change made on your own can make the equipment unsafe and may void your warranty.
• Some state and local regulations require the use of a spark arrester on gasoline powered
engines. Contact your local fire marshal or forest service for specific information
pertaining to your area. If you are required to use a spark arrester, please contact one of
our Customer Service Representatives TOLL FREE 1(800)DR-OWNER(376-9637) for
assistance in obtaining and installing one.
Warning to All California and Other Users
Under California law, and the laws of some other states, you are not permitted to operate an internal
combustion engine using hydrocarbon fuels without an engine spark arrester. All DR®
POWERWAGONS shipped to California and Washington state are provided with spark arresters.
Failure of the owner/operator to maintain this equipment in compliance with state regulations is a
misdemeanor under California law and may be in violation of other state and/or federal regulations.
Contact your local fire marshal or forest service for specific information in your area.
ii
DR® POWERWAGON™ Safety & Operating Instructions
We Want You to be Totally Satisfied
The DR® POWERWAGON™ is designed to provide year after year of trouble-free performance. To
ensure that you are totally satisfied with this important purchase, we offer the following three-part
Assurance of Satisfaction:
1. DR® POWERWAGON™ is GUARANTEED FOR ONE FULL YEAR against defects in
materials and workmanship in consumer use. In rental and commercial use the machine is
guaranteed for 90 days. If you believe that a part is defective, please write or call us
immediately. We will do our best to remedy the problem, including repairing or replacing
defective parts as quickly as possible. The engine and transmission are guaranteed separately by
the manufacturers for two years in consumer use and 1 year in commercial use.
2. IF WITHIN THE FIRST 30 DAYS of actual hands-on use you have questions or you are less
than 100% satisfied with your DR® POWERWAGON™, please write or call us at 1(800)DROWNER(376-9637). We'll do everything possible to answer your questions or make things
right—even if it means that you return your DR® POWERWAGON™ for a full refund of its
purchase price, shipping costs included. (Refund on shipping is for standard method, and applies
to the contiguous United States, U.S. Territories and Canada only.)
3. We operate, for our Owners, a 7-Day-a-Week Customer Service Department with well-trained
and friendly folks whose sole job it is to ensure that you get any help you need...parts that need
to be replaced...or questions answered courteously and as promptly as possible.
For future reference when dealing with your warranty, save the packing list from the outside of
the DR® POWERWAGON™ box and keep it in a safe place. Also, please fill out the information
below.
Name Purchased Under: _____________________________________________
Order Number: __________________ Serial Number: ____________________
Date Purchased: _____/_____/_____
DR® POWERWAGON™ Safety & Operating Instructions
iii
Table of Contents
SAFETY INFORMATION ................................................................................................................................................I
DRESS APPROPRIATELY .................................................................................................................................................... I
PREPARATION ................................................................................................................................................................... I
OPERATING THE MACHINE SAFELY................................................................................................................................... I
WARNING TO ALL CALIFORNIA AND OTHER USERS......................................................................................................... II
ASSEMBLY........................................................................................................................................................................ 1
INSTALL THE UPPER HANDLEBARS .................................................................................................................................. 1
CONNECT THE BATTERY WIRES ....................................................................................................................................... 2
FILL THE MACHINE WITH OIL AND GAS ........................................................................................................................... 2
CHECK THE TIRE PRESSURE ............................................................................................................................................. 2
CONTROLS & FEATURES............................................................................................................................................. 3
STARTING & OPERATING ........................................................................................................................................... 4
BEFORE STARTING ........................................................................................................................................................... 4
ELECTRIC-STARTING........................................................................................................................................................ 4
MANUAL RECOIL-STARTING ............................................................................................................................................ 4
STOPPING THE ENGINE ..................................................................................................................................................... 5
ENGAGING THE TRANSMISSION ........................................................................................................................................ 5
ENGAGING THE DRIVE ..................................................................................................................................................... 5
OPERATING TIPS............................................................................................................................................................ 6
UNEVEN TERRAIN & SLOPES ........................................................................................................................................... 6
LOADING .......................................................................................................................................................................... 7
DUMPING ......................................................................................................................................................................... 7
CHANGING BODIES .......................................................................................................................................................... 8
USING THE OPTIONAL STAKE BODY ................................................................................................................................ 9
MAINTENANCE ............................................................................................................................................................. 10
BATTERY ....................................................................................................................................................................... 10
CHANGING THE OIL...................................................................... PLEASE SEE ENGINE MANUFACTURER'S OWNER'S MANUAL
CLEANING/REPLACING THE CARTRIDGE AIR CLEANER ............... PLEASE SEE ENGINE MANUFACTURER'S OWNER'S MANUAL
CLEANING THE STATIC GUARD & COOLING SYSTEM ................... PLEASE SEE ENGINE MANUFACTURER'S OWNER'S MANUAL
CLEANING/REPLACING THE SPARK PLUG .................................... PLEASE SEE ENGINE MANUFACTURER'S OWNER'S MANUAL
LUBRICATION ................................................................................................................................................................. 12
ADJUSTING THE BRAKE.................................................................................................................................................. 14
REPLACING THE BRAKE PADS ........................................................................................................................................ 15
REMOVING THE FRONT WHEELS .................................................................................................................................... 16
ADJUSTING THE SHIFT LEVER ........................................................................................................................................ 16
END OF SEASON & STORAGE ................................................................................................................................... 17
TROUBLESHOOTING .................................................................................................................................................. 18
PARTS LIST .................................................................................................................................................................... 20
MAIN FRAME ASSEMBLY .......................................................................................................................................... 22
HANDLEBAR/CONTROLS ASSEMBLY .................................................................................................................... 23
AXLE ASSEMBLY.......................................................................................................................................................... 24
MOLDED BODY ASSEMBLY ...................................................................................................................................... 25
STAKE BODY ASSEMBLY........................................................................................................................................... 26
DAILY CHECK LIST FOR THE DR® POWERWAGON™ .................................................................BACK COVER
iv
DR® POWERWAGON™ Safety & Operating Instructions
Assembly
The DR® POWERWAGON™ is shipped almost completely assembled. Please read the
following instructions before removing the machine from the crate and completing the
assembly.
Parts Bag Contents:
(1) 5/16" x 1-1/2" Bolt for the Handlebar
(1) 5/16" Lock Nut for the Handlebar
(1) Cable Tie for the Cable Assembly
WARNING!
The DR® POWERWAGON™ is shipped
without gas and oil. DO NOT attempt to
start your DR® POWERWAGON™ until
assembly is complete, and you've added
the correct amounts of gas and oil.
Install the Upper Handlebars
Tools Needed:
(2) 1/2" or adjustable wrenches
1. Position the cable assembly on the right
side of the frame (when standing in the
operating position). Secure the cable
assembly to the frame with the cable tie
provided (Figure 1).
Figure 1
2. Position the upper handlebar inside the
lower handlebar, mount the 5/16" x 1-1/2"
bolt and secure it with the 5/16" lock nut
(Figure 2). You may adjust the handlebar
height at any time by removing the bolt
and repositioning the upper handlebar in a
different hole.
Figure 2
DR® POWERWAGON™ Safety & Operating Instructions
1
Connect the Battery Wires
Electric-Starting Model: Connect the red wire
from the battery to the red wire on the wiring
harness (Figure 3).
Figure 3
Fill the Machine with Oil and
Gas
1. Put the recommended amount of SAE30
detergent oil into the oil reservoir (Figure
4). Fill the oil to the level indicated on the
dipstick.
Note: There may be some oil in the
reservoir from factory testing. Check the
dipstick frequently as you fill to avoid
overfilling.
Please refer to your engine manufacturer's
owner's manual for more detailed oil
information.
2. Fill the gas tank (Figure 4) with fresh
unleaded gas to within 1/4" of the top to
Figure 4
allow for fuel expansion. Please refer to
your engine manufacturer's owner's manual for more specific fuel recommendations.
Check the Tire Pressure
Recommended tire pressures are listed below.
Tire Pressure
Standard Tires 14-20 lbs. psi
All-Terrain Tires 14-20 lbs. psi
Caster Wheel 50 lbs. psi
Please Note: The heavier the load the higher
the tire pressure should be. However, do not
exceed the maximum recommended load or
pressure.
2
®
Figure 5
™
DR POWERWAGON Safety & Operating Instructions
Controls & Features
Figure 6
DR® POWERWAGON™ Safety & Operating Instructions
3
Starting & Operating
Before Starting
Check the oil and gas levels.
Check the tires for proper inflation.
Check the latch on the dump body—it should be secure.
Set the parking brake.
Shift the transmission to neutral.
Electric-Starting
1. When starting a cold engine, push the
primer bulb (Figure 7) firmly at least three
times, allowing the bulb to return
completely to its original position between
pushes.
Note: Do not use the primer when
restarting a warm engine.
2. Turn the key (Figure 8) past the "START"
position to engage the starter. As soon as
the engine starts, release the key. If the
engine doesn't start repeat priming and try
again.
Note: Holding the throttle control lever at
half throttle may help with starting.
Figure 7
If the engine won't start with the key the
battery may need to be charged. Please see
page 10 for information on battery care and
maintenance.
Your engine is also equipped with a manual
recoil starter. Please see the instructions
below.
Manual Recoil-Starting
Can be used for both Electric- and ManualStarting models.
Figure 8
1. When starting a cold engine, push the
primer bulb (Figure 7) firmly at least three times, allowing the bulb to return completely to its
original position between pushes.
Note: Do not use the primer when restarting a warm engine.
2. Turn the key (Figure 8) to the "START" position.
4
DR® POWERWAGON™ Safety & Operating Instructions
3. Pull the recoil rope (Figure 8) slowly, until you feel drag. Let the rope rewind slowly. Then pull
the recoil with a rapid full arm stroke to start the engine. Let the recoil rope slowly return to the
starter. One pull usually starts the DR® POWERWAGON™, but repeat if necessary.
Note: Holding the throttle control lever at half throttle may help with starting.
Stopping the Engine
1. Shift the transmission to "N" neutral.
2. Set the brake and turn the key to the "OFF" position.
The DR® POWERWAGON™ key switch has a pressure lock insert which prevents the key from
vibrating loose during use. To remove the key, turn the key to the left "OFF" position, push in on it
and then quickly and firmly pull it out. If the key is difficult to remove, try spraying FLUID FILM™
or a similar lubricant into the switch.
Engaging the Transmission
Forward Gears
To shift the transmission from neutral into the
forward gears, first release the throttle lever
then move the shift lever forward and position
it next to the desired drive range (Figure 9).
Use first gear for slower speeds, heavy
loads or more power.
Use second gear for transport.
Reverse
To shift the transmission into reverse, first
release the throttle lever then move the shift
lever to the right and all the way backwards.
Figure 9
Engaging the Drive
With the engine running, slowly squeeze the
throttle lever on the right handlebar until you
reach desired speed.
Note: Squeezing the throttle lever quickly will
make the DR® POWERWAGON™ jump
forward. Squeeze the throttle lever slowly
and ease the machine into gear.
When engaging reverse USE EXTRA
CAUTION. Check to see that there are no
obstacles behind you (Figure 10), and use a
slow throttle setting with heavy loads to avoid
abrupt lifting of the handlebars and tipping.
Figure 10
DR® POWERWAGON™ Safety & Operating Instructions
5
Operating Tips
When the throttle is not engaged the machine will act like it's in neutral—it will freewheel—even if
it's in gear. Always have the throttle engaged or the brake on for control.
You can leave the machine in gear while idling, but always use the parking brake and never leave
the machine unattended while running.
If you're making frequent stops to load and unload it is better to leave the DR® POWERWAGON™
running (on idle with the parking brake on) than to start and stop repeatedly. Frequent starting
and stopping will reduce the life of the battery. Running the DR® POWERWAGON™ recharges
the battery. See page 10 for more battery care information.
Uneven Terrain & Slopes
Exercise caution when using the DR® POWERWAGON™ on uneven terrain or slopes.
A good rule of thumb: the steeper the hill, the
lighter and lower your load should be.
Limit loads to less than 300 pounds on
slopes.
Use a first gear and move slowly if the ground
is rough, especially with a full load. Be
sure you're in low gear before starting
down a slope. Shifting mid-slope can be
awkward.
We do not recommend using the DR®
POWERWAGON™ for continuous use on
a slope greater than 20 degrees. Doing so
may deprive the engine of oil and damage
Figure 11
the engine components.
For added traction when going uphill, lift up on the handlebars slightly to transfer weight to the front
wheels and improve traction. When going downhill, keep a firm grip on the handlebars and push
down slightly.
Do not apply the brake abruptly when going down hill with a heavy load or the DR®
POWERWAGON™ may pitch forward on its front end.
We recommend going straight up and down slopes, instead of across them, whenever possible. If
you do maneuver across a slope use EXTREME CAUTION as this puts additional pressure on
the downhill side of the machine. The higher and heavier the load, the greater the chance the
DR® POWERWAGON™ may tip over. Limit side hill loads to less than 300 pounds.
Be careful with partial loads. Material can shift within the body and tip the machine.
6
DR® POWERWAGON™ Safety & Operating Instructions
Loading
! WARNING: The recommended load limit for the DR® POWERWAGON™ is
400 lbs on level ground and 300 pounds on slopes. Placing more weight in
the body may be dangerous, and can permanently damage the machine.
Please follow these important guidelines when loading your DR® POWERWAGON™:
Always distribute the load evenly so that your DR®
POWERWAGON™ will be as stable as possible (Figure 12). Do
not pile heavy loads, such as rocks or gravel, to a height that will
make the DR® POWERWAGON™ top-heavy and susceptible to
tipping over.
Keep the load balanced, and don't pile material too high in the front
or back corners of the molded body. Instead, take the time to
divide your load and make several lighter trips.
On a slope, a heavy load will tend to shift to the downhill side of
the body. Again, it is safer to make several smaller, lighter trips.
Reminder: The gas fill is located below the dump body. Plan your
work accordingly, so you won't run out of gas with a full load.
Dumping
To dump, stand at the rear of the machine and unlatch the dump
body from the bracket (Figure 13). Pull up on the
dump handle or the back of the body to tip it forward
(Figure 14). After unloading, push the dump body
back down into place by hand. Be sure the latch fits
securely into the bracket on the dump body.
Figure 12
Note: You must lift the latch handle and position it
in the bracket. Simply pushing the dump body back
into place will not make it latch.
For safety reasons, the DR® POWERWAGON™
body is designed to not dump automatically once the
dump latch is released. You must lift the dump
handle or the back of the body to cause it to tilt
forward.
DR® POWERWAGON™ Safety & Operating Instructions
Figure 13
7
Because of the way the DR® POWERWAGON™
body is balanced, you may find that you won't be
able to lift the body to dump it if you are
carrying a very heavy load. In this case, you'll
need to manually unload part of what you are
hauling from the back of the bed, until the load is
light enough to allow the bed to tilt forward
when you lift up on the dump handle or back of
the body.
If you have the wooden stake body you can
remove the front panel for easy dumping. See
page 9 for more information on using the
optional stake body.
Figure 14
Changing Bodies
If you've purchased the optional stake body with your DR® POWERWAGON™ you'll find it's quite
simple to change bodies.
To change from the molded body to the stake body, you simply release the dump latch, tilt the
molded body forward and lift it off the mainframe. Allow the pivot bushings to slide out of the pivot
brackets as you lift the body up (Figure 15).
When placing the stake body on the frame, set
the pivot bushings into the brackets and slide
the body in place. Be sure the dump latch is
secure before operating the machine.
Figure 15
8
DR® POWERWAGON™ Safety & Operating Instructions
Using the Optional Stake Body
Removing the front panel for easier
dumping
When moving loose materials such as gravel,
mulch and topsoil, simply lift and remove the
front panel of the stake body for easier
dumping (Figure 16).
Removing the front and side panels for
oversized loads
For oversized loads such as fencing,
gardening tools, tree limbs, rocks, etc. you can
remove the front and two side panels on the
stake body (Figure 17).
Figure 16
Reversing the front panel for
controlled dumping
If you're spreading gravel or mulch over a
large area you can reverse the front panel of
the stake body for more controlled dumping.
Lift and remove the front panel, turn it around
and mount it backwards. Then raise or lower
it depending on how much material you want
to spread as you move (Figures 18 & 19).
Figure 17
Figure 18
Figure 19
DR® POWERWAGON™ Safety & Operating Instructions
9
Maintenance
For Engine Maintenance, Please Refer to the Engine
Manufacturer's Owner's Manual.
Regular maintenance is the way to ensure the best performance from your machine. Follow the
instructions below, and those in the engine manufacturer's owner's manual to keep your DR®
POWERWAGON™ in top condition.
Always Remove the Spark Plug Wire Before Doing Any
Adjustments or Maintenance
Before doing any adjustments or maintenance on your DR® POWERWAGON™ you should always
disconnect the spark plug wire and mount it on the retaining post (Figures 20 & 21).
Figure 21
Figure 20
Battery
Electric-Starting Models
Proper care can lengthen the life of a battery. Follow these recommendations to ensure your
battery's best performance and long life:
• Do not allow the battery charge to get too low. If the machine is not used, the battery should be
charged at least every four to six weeks.
• Store an unused battery in a dry area that does not freeze.
• Do not charge an already charged battery. In theory, our battery cannot be overcharged with a
trickle charger; however, when a battery is fully charged and plugged into a charger, it generates
heat that could be harmful to the battery. A fully charged battery will read 12.5V-13.5VDC with
a voltmeter.
• Do not continue to crank your engine with a low battery.
10
DR® POWERWAGON™ Safety & Operating Instructions
Charging the Battery
If the battery loses its charge, you'll need to use a trickle charger (like the DR® Battery Charger) to
recharge it. The charger should have an output of 12 volts at no more than 2 amps.
• At 1 amp the battery may need to be charged for as much as 48 hours.
• At 2 amps the battery may need to be charged for as much as 24 hours.
Note: Using the recoil starter and then running the engine will not recharge a dead battery.
Changing the Oil
Please refer to your engine manufacturer's owner's manual.
Cleaning/Replacing the Cartridge Air Cleaner
Please refer to your engine manufacturer's owner's manual.
Cleaning the Static Guard & Cooling System
Please refer to your engine manufacturer's owner's manual.
Cleaning/Replacing the Spark Plug
Please refer to your engine manufacturer's owner's manual.
DR® POWERWAGON™ Safety & Operating Instructions
11
Lubrication
Tools & Supplies Needed:
• flexible hose grease gun
• lithium grease
• FLUID FILM® or similar lubricant
!
WARNING: Always disconnect the spark plug wire before servicing your machine.
1. There is a grease zerk above the caster
wheel (Figure 22). Grease it occasionally
to keep the caster swiveling freely.
Figure 22
2. There is also a grease zerk on the caster
wheel (Figure 23). Grease it occasionally
to keep the wheel spinning freely.
Figure 23
12
DR® POWERWAGON™ Safety & Operating Instructions
3. Lubricate the upper brake cable with
FLUID FILM™ or similar lubricant
(Figure 24).
Figure 24
4. Lubricate the lower brake cable with
FLUID FILM™ or similar lubricant
(Figure 25). The lower brake cable is
located on the right side of the machine
just behind the front wheel.
Figure 25
5. Lubricate the throttle cable with FLUID
FILM™ or similar lubricant (Figure 26).
The throttle cable is located on the right
side of the machine, just above the primer
bulb.
Figure 26
DR® POWERWAGON™ Safety & Operating Instructions
13
Adjusting the Brake
If the DR® POWERWAGON™ rolls on slopes when the parking brake is set, or you
can't get the parking brake to set, the brake needs to be adjusted.
Tool Needed:
• 1/2" wrench
!
WARNING: Always disconnect the
spark plug wire before servicing your
machine.
1. With the machine on a level surface, set
the parking brake.
2. Put the transmission in Neutral.
3. Test the brake: Try to roll the machine. It
should not move forward or back with the
parking brake set.
4. If the machine does move, turn the nut on
the transaxle (Figures 27 & 28) 1/4 turn
clockwise to tighten the brake. Repeat
Steps 1-3 and readjust if needed.
Figure 27
Note: Turn the nut only 1/4 turn at a time,
then test the brake to see if further
adjustment is needed.
If you can't get the parking brake to release,
turn the nut on the transaxle (Figures 27 &
28) 1/4 turn counterclockwise to loosen the
brake. Repeat Steps 1-3 and readjust if
needed.
Figure 28
Brake Cable Adjustment
The brake cable is factory-set (Figure 29). If
you think the brake cable needs to be adjusted,
you may actually need to replace the brake
pads. Please see page 15 for instructions.
Figure 29
14
®
™
DR POWERWAGON Safety & Operating Instructions
Replacing the Brake Pads
If the DR® POWERWAGON™ rolls on slopes when the brake is set, and you have tried
adjusting the brake (page 14), the brake pads probably need to be replaced.
Tools needed:
• 1/2" or adjustable wrench
• (2) 3/8" box, open-end or socket wrenches
• Allen wrench set
• brake pads, set of two (part #110801)
!
WARNING: Always disconnect the spark plug wire before servicing your machine.
1. Find a level area to work. The parking brake should NOT be engaged. Chock the wheels so the
machine can not move.
2. Locate the brake caliper at the right front
of the machine (Figures 27 & 30).
Remove the two mounting bolts on the
caliper with a 3/8" wrench (Figure 30),
then carefully remove the caliper
(Figure 31).
Note: The caliper contains four small
parts: the brake pad, the backing plate
and two small actuator pins. As you let
the caliper hang from its attaching
hardware, keep track of these parts—they
could fall out.
Clean away any debris from the caliper
Figure 30
and associated parts.
3. Pull the brake disk off the spline shaft and
remove the old brake pad from behind the
disk (Figure 31). Replace it with one of
the new pads, then reinstall the brake disk.
4. Put the second new brake pad on the
caliper, then reinstall the assembly. Make
sure the brake arm is in the upright
position and the recessed cut-out on the
caliper is facing up with the nameplate to
the front. Reinstall the two caliper bolts
being careful not to over tighten them.
5. Test the brake: With the machine on a
level surface, set the parking brake and put
Figure 31
the machine in neutral. If the brake does
not engage or hold, tighten the brake adjustment nut 1/4 turn with a 1/2" wrench (see page 14).
Note: Check the parking brake periodically and adjust as needed.
DR® POWERWAGON™ Safety & Operating Instructions
15
Removing the Front Wheels
Tools & Supplies Needed:
• (2) 7/16" wrenches
• block to raise machine off ground
!
WARNING: Always disconnect the
spark plug wire before servicing your
machine.
1. Block the machine so the wheel is an inch
or two off the ground.
2. Using (2) 7/16" wrenches, loosen the bolt
(Figure 32) and slide the wheel off the
axle.
Figure 32
Adjusting the Shift Lever
If you are unable to shift into reverse or 2nd gear, the shift lever and tie rod need to
be adjusted.
Tools needed:
• (2) 1/2" open-end, adjustable or socket
wrenches
!
WARNING: Always disconnect the
spark plug wire before servicing your
machine.
1. Remove the dump body.
2. Move the shift lever into the reverse
position.
3. Loosen and remove the tie rod nut and
bolt from the transmission arm (Figure
33). Unhook the tie rod from the
transmission arm.
4. Fully extend the transmission arm toward
the rear of the DR® POWERWAGON™,
this will put it in reverse gear.
5. Loosen the lock nut on the eye bolt
(Figure 34), and turn the eye bolt one turn
at a time to take up slack in the tie rod.
Place the tie rod back on the transmission
arm, insert the nut and bolt and retighten.
This should enable you to engage the full
range of gears.
Figure 33
Figure 34
16
®
™
DR POWERWAGON Safety & Operating Instructions
End of Season & Storage
!
WARNING: Always disconnect the spark plug wire before servicing your machine.
Please refer to your engine manufacturer's owner's manual for engine-specific procedures.
If your DR®POWERWAGON™ will be idle for more than 30 days, we recommend using a gas
stabilizer. This will prevent the carburetor from gumming up. Inspect the gas tank. If there is
dirt or moisture in the gas, remove it by draining the tank. Completely fill the tank with fresh,
unleaded gas and add the appropriate amount of stabilizer or gasoline additive. Run the engine
for a short time to allow the additive to circulate.
Change the oil. Please refer to your engine manufacturer's owner's manual for additional
information.
Remove the spark plug and pour about 1 ounce of motor oil into the cylinder hole. Pull the recoil
starter rope until you feel strong resistance. This will coat the piston and seat the valves to
prevent moisture buildup.
Replace the air filters. Please refer to your engine manufacturer's owner's manual for additional
information.
Clean dirt and debris from the cylinder head cooling fins, blower housing, debris screen and muffler
area of the engine. Please refer to your engine manufacturer's owner's manual for additional
information.
If your machine is electric-starting, store the battery in a dry area that does not freeze. When storing
the machine with the battery mounted, we recommend disconnecting the red wire between the
battery and the wiring harness for safety and to prevent accidental discharge of the battery. If the
machine is not used over a long period, the battery should be charged every four to six weeks.
See page 10.
Check to make sure that the operator controls are moving freely. Lubricate them with FLUID
FILM™ or similar lubricant if necessary.
DR® POWERWAGON™ Safety & Operating Instructions
17
Troubleshooting
!
WARNING: Always disconnect the spark plug wire before servicing your machine.
Please refer to your engine manufacturer's owner's manual for additional engine troubleshooting
information.
Engine
Engine won't start
Ö Check for adequate fresh fuel.
Also check to see that the fuel line
isn't obstructed and that the air cleaner is free of dirt and debris.
Ö If the Electric-Starting Model won't start with the key, try starting the
engine with the recoil starter. If the engine starts, the battery may
simply be low on charge, it could be dead, or a connection may be
loose. See below for battery maintenance. Also, check the wiring
connections to the battery.
Ö The spark plug may be fouled.
In this case, replace it. See your
engine manufacturer's owner's manual for more information.
Engine lacks power
Ö Check to make sure that your engine has proper the amount of oil.
Ö Check the air intake holes on top of the engine. They should be
free and clear of debris. If they get clogged, the engine may be
damaged by overheating.
Ö Check the air cleaner, and carburetor as described in your engine
manufacturer's owner's manual. If the carburetor needs adjusting,
call us at 1(800)DR-OWNER(376-9637) so we can recommend a
DR® Friendly Service Center in your area.
Battery
Engine won't start with key
Ö If the Electric-Start model won't start with the key, try starting the
engine with the recoil starter. If the engine starts, the battery may
need to be charged.
Ö A connection may be loose.
Check the wiring connections to the
battery.
Battery is low on charge
Ö The battery may need to be charged.
Please see page 10 for more
information.
Ö If your battery still does not hold a charge, please contact us and we
will arrange to have a new one shipped to you. (Batteries covered
under the 1-Year Warranty will be replaced free of charge; see
Parts Order Form in your Product Package or call for ordering
information.)
18
DR® POWERWAGON™ Safety & Operating Instructions
Alternator isn't recharging the
battery
Ö Have alternator checked by an authorized engine service center.
The alternator should be checked with a fully charged battery and
should put out 12 to 13.5 volts (1.5 to 2 amps).
Shifting
Won't shift into reverse or high
gears
Ö Shift lever needs adjusting.
Adjust tie rod eye bolt. Please see
page 16 for additional information.
Wheels
Lacks traction
Ö Try to even out load and add more weight to bed.
Ö Lift up slightly on the handlebars to transfer weight to the front
wheels.
Dump Bed
Unable to dump load
Ö You may need to manually unload part of what you are hauling from
back of dump bed until load is light enough to allow bed to tiltl
forward when you lift up on back of it. Please see page 7for
additional information.
DR® POWERWAGON™ Safety & Operating Instructions
19
Parts List
Please refer to the numbered drawings on pages 22-26.
Note: Not all parts numbers listed appear on the drawings.
Ref#
1
2
3
4
Part #
108921
108931
131191
135101
5
113051
6
7
8
9
10
11
12
13
14
15
16
17
18
19
20
21
23
24
25
26
27
28
29
30
109041
109071
110051
112141
109131
110281
109441
109591
110891
110921
109371
110491
112411
112371
112381
109831
110251
110211
109241
110731
110681
110231
110761
110781
31
32
33
110751
110571
111081
34
35
36
109251
111281
110971
20
Description
Ball Bearing, 2-Hole Flanges
Ball Bearing, 3/4" Bore
Battery (Electric-Starting)
Battery Clamp (ElectricStarting)
Battery Pad (ElectricStarting)
Boards 5/4" x 4"
Boards 5/4" x 6"
5/8" Plywood PT
Cable Tie
Carriage Bolt 5/16" x 1-1/2"
Brake Handle
Brake Cable w/ spring
Clevis
Clevis Pin
Cotter Pin
Bushing for Brake Lever
Woodruff Key
Flat Washer 5/16" (3/8" ID)
Flat Washer 3/16" (1/4" ID)
Flat Washer 1/4" (5/16" ID)
Parking Brake Latch Decal
Handle grip 1"
Dump Handle Grip 4" x 1-1/4"
Left Corner Bracket
Nylon Lock Nut 1/4"
Nut 10-32
Handle Grip 1" x 1/4" x 4"
Nylon Lock Nut 5/16"
Nut for Tie Rod Ends 5/16" 24
Nylon Lock Nut 3/8"
Parking Brake Latch
Plugs for 1" 14 GA. Square
Tubing
Right Corner Bracket
Rod Ends 5/16"-24 Male
Roll Pin for Brake 3/16" x 13/4"
Ref#
37
38
39
40
41
42
43
44
45
46
Part #
110961
114701
111481
111501
109121
134431
111581
111591
111421
111701
47
111641
48
111651
49
50
51
52
53
54
55
56
58
59
60
61
112581
108791
113071
123441
110951
110941
119831
110771
110131
110121
110331
110641
62
63
64
65
109221
110851
109871
109601
66
111191
67
68
69
70
108991
131091
110601
111951
71
110461
Description
Roll Pin 3/16" x 1"
Bolt 1/4" x 1/2"
Bolt 1/4" x 1-3/4"
Allen HD Bolt 1/4" -28 x 3/4"
Carriage Bolt 1/4" x 3/4"
Bolt 5/16" x 1-1/2"
Bolt 5/16" x 1"
Bolt 5/16" x 2-1/2"
Bolt 5/16" x 3/4"
Screw for Spring Bracket 1032 x 1/2"
Screw #10 x 1-1/4" Self- tap
drill/Plywood
Screw, Self- tap for Sides #12
x 1-1/2"
Caster Wheel 410/350 x 4
Shift Lever Arm
Pulley-Flat 2-1/4"
Flat Bed Frame
Flat Bed Pin 8"
Flat Bed Pin 12"
Bolt 1/4" x 20 x 3/4"
T Nut for Latch Hook 1/4" x 20
Frame for Molded Body
Main Frame
Handlebar
Handlebar Mount & Body
Support
Brake Bracket
Control Panel
Differential
V-Belt Pulley & Centrifugal
Clutch
Pulley 6"-5/8" incl. Set Screw
5/16" x 1/4"
V-Belt 38"-4L380
Drive Chain #41, w/ Link
#41 Drive Chain Master Link
Drive Chain Sprocket, 40Tooth
Drive Chain Idler, 10-Tooth
DR® POWERWAGON™ Safety & Operating Instructions
Ref#
72
Part #
112061
73
112051
75
76
77
78
79
80
109461
111611
111341
110201
124341
124331
81
82
83
84
85
86-87
88
91
92
93
97
98
99
112481
127371
109841
111311
110191
105031
111871
109281
132341
106381
110591
111901
109641
100
109651
101
110391
103
105
111941
111631
106
111731
Description
Key Switch w/ Hardware &
Key for Recoil-Start
Key Switch w/ Hardware &
Key for Electric-Start
Throttle Cable
Screw 3/8" x 2-3/4"
Screw 7/16" Fine x 3/4"
Gear Box (Transmission)
4.5 HP Centura E/S Engine
4.5 HP Centura Manual-Start
Engine
Star Lock Washer 1/4"
Decal for Control Panel
Decal for Shift Gate
Shift, Tie Rod
Shift Gate
Shift Lever, One Piece
Spacer 1/4" x 1"
Throttle Spring Bracket
Cap Screw 5/16" x 2"
Flat Key 3/16" Sq. x 1-1/2"
#41Drive Chain, Half Link
Spacer for Belt Idler 3/8" x 1"
Flexible Conduit-Black 1/4"
ID-30" per
Split Flexible Conduit 7/16"40" per
Wire Harness for ManualStarting Model
Throttle Return Spring
Screw for Throttle Handle 1032 x 1-1/2"
Thread Rolling Screw 5/16" x
1/2"
Ref#
107
108
Part #
112431
110421
109
110
111
112
113
112171
112031
109381
109361
114
115
116
117
118
119
120
121
122
124
130
131
109481
109491
112361
110441
109261
109231
110271
129331
111511
110731
123401
111241
132
111891
133
111881
135
136
137
138
139
140
141
111491
110691
112501
112521
112391
109321
109331
DR® POWERWAGON™ Safety & Operating Instructions
Description
Lock Washer 5/16" split
Wire Harness for ElectricStarting Model
110291
Dump Handle
A/T Tire/Wheel 13 x 500-6
Support for Bed Frames
Bed Support Pivot Bushing
Bumper Strip/Flat Bed 1-1/2"
x 7-1/2"
Cap for 1" Round Tubing
Cap for 3/4" Round Tubing
Wheel 13 x 5.00 - 6 Turf-Tire
Latch Hook
Latch Hook Bracket
Chain Tension Bracket
Chain Guard
Large Molded Body
3/8" x 1-1/2" Large Bolt
1/4" x 2-1/2" Cap Screw
Air Filter Centura Engine
Snap Ring 5/8" Short
Diameter
1" x 3/4" ID 1" OD Axle
Spacer
1-1/4" x 3/4" ID 1" OD Axle
Spacer
1/4" x 1" Cap Screw
5/16" -18 Nut
5/16" Star Lock Washer
Nylon Shim Washer
3/8" Flat Washer
Rubber Bumper
Bumper Mount Screw
21
Main Frame Assembly
22
Figure 35
DR® POWERWAGON™ Safety & Operating Instructions
Handlebar/Controls Assembly
Figure 35
DR® POWERWAGON™ Safety & Operating Instructions
23
Axle Assembly
Figure 36
24
DR® POWERWAGON™ Safety & Operating Instructions
Molded Body Assembly
Figure 37
DR® POWERWAGON™ Safety & Operating Instructions
25
Stake Body Assembly
Figure 38
26
DR® POWERWAGON™ Safety & Operating Instructions
Notes
DR® POWERWAGON™ Safety & Operating Instructions
27
Notes
28
DR® POWERWAGON™ Safety & Operating Instructions
DR® POWERWAGON™ Safety & Operating Instructions
29
Daily Check List for the DR® POWERWAGON™
! WARNING: Always disconnect the spark plug wire before servicing your machine.
9
OIL: With the DR® POWERWAGON™ on a level surface, lift the
dump body, remove the oil fill cap and check the oil level. Fill the
reservoir with SAE30 detergent motor oil. Be sure to check the
dipstick as you fill and do not overfill.
9
GAS: Fill the gas tank with clean, fresh unleaded gasoline. If the gas
in the machine is more than 30 days old, drain and replace it.
9
TIRES: Check the tires for wear and proper inflation. See the chart
on page 2 for proper air pressure.
9
AIR FILTER: A clean air filter will mean a much easier starting and
cooler running engine. Please refer to your engine manufacturer's
owner's manual for instructions on cleaning and/or replacing the air
filter.
9
ENGINE: It is very important to keep the engine clean. Remove
debris and other build-up from the engine cooling fins and brush off
any chaff from the recoil start debris guard as you use your DR®
POWERWAGON™. A dirty engine retains heat and can cause damage
to the internal engine parts. Please refer to your engine manufacturer's
owner's manual for further instructions on cleaning the engine parts.
COUNTRY HOME PRODUCTS®
Meigs Road, P.O. Box 25, Vergennes, Vermont 05491
1-800-DR-OWNER(376-9637)
©1999 CHP, Inc. 138121
30
DR® POWERWAGON™ Safety & Operating Instructions