1
Duplicator 4/4x
Desktop 3D Printer
--------------------------- USER MANUAL ---------------------------
TABLE OF CONTENTS
-----------------------------------------------------------------------------------------------------------------------------------------A. WELCOME LET'S GET STARTED --------------------------------------------------------- 3-6
Specifications --------------------------------------------------------------------------------------- 5
How does it work --------------------------------------------------------------------------------- 6
B. SETTING UP YOUR WANHAO DUPLICATOR 4/4x DESKTOP
3D PRINTER ---------------------------------------------------------------------------------------------What's in the box -------------------------------------------------------------------------------WANHAO Duplicator 4 Diagram -------------------------------------------------------Unpacking your Wanhao Duplicator -------------------------------------------------Installing Building Plate ---------------------------------------------------------------------Installing Filament Guide Tube and Spool Holder ----------------------------Mounting Filament Spool and Atttaching USB cable -----------------------Attaching Power Cable and Powering On ------------------------------------------
7-16
9
10
11-12
13
14
15
16
C. STARTUP PORCESS: LEVELING, LOADING, TESTING --------------------Leveling the Build Plate ----------------------------------------------------------------------Loading Duplicator ABS and PLA filament ----------------------------------------Unloading Duplicator ABS and PLA filament ------------------------------------Making a Test Object from the SD Card ---------------------------------------------
17-29
18-23
23-28
28
29
D. MAKING AN OBJECT WITH WANHAO REPLICATOR G ---------------Download and Install WanHao Replicator G. -------------------------------------Download an Object From WanHao Thingshares ------------------------------Open WanHao Replicator G ---------------------------------------------------------------
30-37
31-32
33
34-37
E. TROUBLESHOOTING, DIAGNOTSTICS, AND MAINTANCE -----------Troubleshooting ---------------------------------------------------------------------------------Diagnostics -----------------------------------------------------------------------------------------LCD Panel/ Top-level Menu ---------------------------------------------------------------LCD Panel/ Utility Menu ---------------------------------------------------------------------LCD Panel/ Info and Setting Menu ----------------------------------------------------Maintenance ---------------------------------------------------------------------------------------Lubricating the threaded Rod and the X-Axis Idler Pulley ----------------Cleaning the Drive Gear ---------------------------------------------------------------------Glossary of Terms -------------------------------------------------------------------------------Contact ------------------------------------------------------------------------------------------------
38-46
39
40
41
41
42
42
42
43
44-45
46
TABLE OF CONTENTS
--------
----------------------------------------------------------------------------------------------------------------------------------------02
WANHAO
WELCOME
Let's get started
This User Guide is designed to start your journey with the
WANHAO Duplicator 4/4x Desktop 3D Printer in the right direction.
Even if you are familiar with earlier WANHAO machines. it is
essential that you read through this guide, as there are several
important and exciting updates with the WANHAO Duplicator 4/4x.
In chapter A and B, you will learn the basics of the WANHAO
Duplicator 4/4x, how to unbox safely,and how to get set up.
Chapters C~E will take you though leveling, printing, maintenance,
and troubleshooting,
WANHAO is excited to welcome you to the world of the WANHO
Duplicator 4/4x. Following this guide will help ensure that you are
getting the most out of your machine, and that you continue to
make amazing things,
WARNING: The WANHAO Duplicator 4/4x generates high temperatures and
includes moving parts that can cause injury. Never reach inside the WANHAO
Duplicator 4/4x while it is in operation. Always allow the WANHAO Duplicator 4/4x
to cool down before reaching inside.
WARNNING: Do not leave the WANHAO Duplicator 4/4x unattended during
operation.
CAUTION: If opening the WANHAO Duplicator 4/4x for service, ensure that the
power supply is turned off and the cord is disconnected.
A WELCOME, LET'S STARTED
--------
-----------------------------------------------------------------------------------------------------------------------------------------04
SPECIFICATIONS
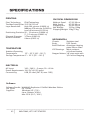
-------------------------------------------------------------------------------------------------------------------------------------------PRINTING
PHYSICAL DIMENSIONS
Print Technology:
FDM Technology
The Max Printing Size: 22.5*14.5*15cm
Layer Resolution:
High 100 microns {0.0039 in}
Medium 270 microns {0.0106 in}
Low 340 microns {0.0133 in}
Positioning Precision: XY : 11 microns {0.0004 in}
Z:2.5 microns {0.0001 in}
Filament Diameter: 1.75mm {0.069 in}
Nozzle Diameter:
0.4mm {0.015 in}
Without Spool:
With Spool:
Shipping Box:
Net Weight:
Shipping Weight:
TEMPERATURE
Ambient Operating
Temperature:
15° – 32° C [60° – 90° F]
Storage Temperature: 0° – 32° C [32° – 90° F]
47*32*38 cm
47*32*38 cm
59*43*54 cm
11.5kg /19kg
15kg/ 21kg
MECHANICAL
Chassis:
Stainless steel
Body:
DPP Panels
Build Platform: Aluminium Heating
plate/ Silicon Glass
XYZ Bearings: Wear-resistant,
oil-infused bronze
Stepper Motors: 1.8° step angle with
1/16 micro-stepping
ELECTRICAL
AC Input:
100 – 240 V, ~2 amps, 50 – 60 Hz
Power Requirements: 24 V DC @ 6.25 amps
Connectivity:
USB, SD card [FAT 16, max. 2GB]
Software
Software Bundle : WANHAO Replicator G Sailfish WanHao Edition
File Types:
.stl, .Gcode
Supports:
Windows (XP / 7/8 )
Linux (Ubuntu 10.04+)
Mac OS X (10.7 / 10.8 )
--------
------------------------------------------------------------------------------------------------------------------------------------------05
WELCOME, LET'S GET STARTED
HOW DOES IT WORK
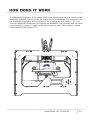
-------------------------------------------------------------------------------------------------------------------------------------------The WANHAO Duplicator 4/4x makes solid, three-dimensional objects out of melted
WANHAO PLA/ABS Filament. Your 3D design files are translated into instructions for
the WANHAO Duplicator 4/4X and sent to the machine via USB cable or SD Card.
Then the WANHAO Duplicator 4/4X heats the WANHAO PLA Filament and squeezes
it out through a nozzle to make a solid object layer by layer. This method is called
Fused Filament Fabrication [FFF].
A WELCOME, LET'S STARTED
--------
----------------------------------------------------------------------------------------------------------------------------------------06
WANHAO
Setting UP Your
WANHAO Duplicator 4/4x
Desktop 3D Printer
When you set up your WANHAO Duplicator 4/4X Desktop 3D Printer,
remember that it was build and packaged very carefully at the
WANHAO factory. We hope you’ll take your time and be just
as careful unpacking it and getting it set up.
NOTE: Do not force or tear anything during unpacking
and set up.This may damage the WANHAO Duplicator 4/4X
Desktop 3D Printer.SETTING UP YOUR WANHAO
DUPLICATOR 4/4X DESKTOP 3D PRINTER
A WELCOME, LET'S STARTED
--------
-----------------------------------------------------------------------------------------------------------------------------------------08
WHAT’S IN THE BOX
-----------------------------------------------------------------------------------------------------------------------------------------------
WANHAO ABS PLA
Filaments (2KG)
Hex wrenches
Build plate
2pc Filament guide tube
1pc SD card
1 PC 3M tape
P ower cord
2pc Spool holder
USB cable
1 PC glass with clips
09
--------
-------------------------------------------------------------------------------------------------------------------------------------SETTING UP YOUR WANHAO DUPLICATOR 4/4X DESKTOP 3D PRINTER
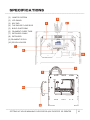
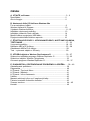
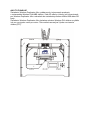
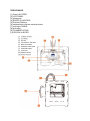
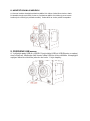
SPECIFICATIONS
---------------------------------------------------------------------------------------------------------------------------------------------[1] GANTRY SYSTEM
8
[2] LCD PANEL
[3] KEY PAD
1
[4] THE EADED Z-AXIS ROD
2
[5] BUILD PLATFORM
[6] FILAMENT GUIDE TUBE
[7] EXTRUDER CABLE
[8] EXTRUDER
[9] FILAMENT SPOOL
[10] SPOOL HOLDER
5
4
3
6
7
10
9
SETTING UP YOUR WANHAO DUPLICATOR 4/4X DESKTOP 3D PRINTER
--------
-----------------------------------------------------------------------------------------------------------------------------------------10
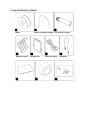
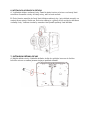
UNPACKING YOUR WANHAO DUPLICATOR 4/4x
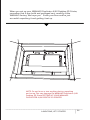
------------------------------------------------------------------------------------------------------------------------------------------1. Opening the Box
A. Place the WANHAO Duplicator 4/4X
box on the ground. Open the
box and remove the top
cardboard sheet.
B. Remove the WANHAO Duplicator 4/
4X User Manual.We recommend that
you use the manual to guide you
though the setup process and
keep it at hand as you unpack the
contents of the box. If you find
that anything described in the
manual is missing, email us
at support@wanhao3dprinter com.
C. Remove the layer of foam and the
sheet of cardboard underneath.
D. Remove the two protective bumper
box pieces form the side of the
Duplicator 4/4X.
11
--------
--------------------------------------------------------------------------------------------------------------------------------------SETTING UP YOUR WANHAO DUPLICATOR 4/4X DESKTOP 3D PRINTER
UNPACKING YOUR WANHAO DUPLICATOR 4/4x
--------------------------------------------------------------------------------------------------------------------------------------------
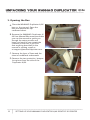
2. Removing the WANHAO Duplicator 4/4x from the Box
A. Open the plastic covering and
firmly grasp the frame of the
WANHAO Duplicator 4/4x from
the outside. Lift it out of the
box and place it on a stable
surface.
NOTE: The black cable is not a
handle. Do not pull or twist the
black cable at any time.
3. Removing the Accessory Box
A. Remove the two remaining
protective foam pieces
from the bottom of the
Duplicator 4/4x’s box.
B. Pull out the accessory box.
This box contain the
remaining items from the
“What’s in the Box”section.
NOTE: Your WANHAO Duplicator 4/4x should now be fully unpacked.
We recommend that you keep the box and foam inserts in case you
need to transport your WANHAO Duplicator 4 in the future.
SETTING UP YOUR WANHAO DUPLICATOR 4/4x DESKTOP 3D PRINTER
--------
----------------------------------------------------------------------------------------------------------------------------------------12
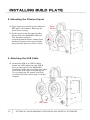
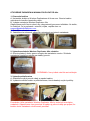
INSTALLING BUILD PLATE
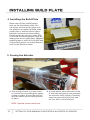
-------------------------------------------------------------------------------------------------------------------------------------------4. Installing the Build Plate
Never tear off the yellow kapton
tape on the aluminium plate. You
can either put the silicon glass onto
the platform to make the build plate
perfect flat or without silicon glass
plate(for freshman recommended).
Please adjust the 4 knobs under HBP
to re-level the heating plate if you are
adding the silicon glass plate. Wanhao
masking tape is used for both ABS and
PLA printing which can make filament
stick to the platform easier.
5. Freeing the Extruder
A. Use strong scissors or a wire cutter
to cut the zip ties holding the gantry
system in place. Discard the zip ties
and the plastic pieces holding them
in place.
B. A small plastic piece attached to the
X-axis belt and gantry rods prevents
the extruder form moving. Carefully
snap the piece off of the rods and
tilt it to slide if off of the belt.
NOTE: Operate scissors with care.
13
--------
--------------------------------------------------------------------------------------------------------------------------------------SETTING UP YOUR WANHAO DUPLICATOR 4/4x DESKTOP 3D PRINTER
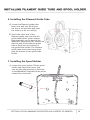
INSTALLING FILAMENT GUIDE TUBE AND SPOOL HOLDER
--------------------------------------------------------------------------------------------------------------------------------------------6. Installing the Filament Guide Tube
A. Locate the filament guide tube.
Insert one end into the hole at
the top of the extruder and push
the tube in as far as it will go.
B. Insert the other end of the
filament guide tube into the left
guide tube holder (when viewed
from the back) on the back of the
WANHAO Duplicator 4/4x. Make sure
that the end of the filament guide
tube is flush with the bottom of
the guide tube holder. The filament
guide tube should not hang down
past the bottom of the guide tube
holder.
7. Installing the Spool Holder
A. Locate the spool holder. Tilt the spool
holder and insert the round end
into the left side opening on the back
of the WANHAO Duplicator 4/4x (when
viewed from the back).
SETTING UP YOUR WANHAO DUPLICATOR 4/4x DESKTOP 3D PRINTER
--------
----------------------------------------------------------------------------------------------------------------------------------------14
INSTALLING BUILD PLATE
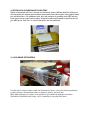
-----------------------------------------------------------------------------------------------------------------------------------------------8. Mounting the Filament Spool
A. Open the box containing the WANHAO
ABS and PLA Filament. Remove the
spool from its bag.
Spool
Holder
B. Fit the spool onto the spool holder.
Ensure that the WANHAO ABS and
PLA filament unwinds
counterclockwise(when viewed form
the back).Squeeze the spool holder
and push the spool on until it locks.
9. Attaching the USB Cable
A. Locate the USB-A to USB-B cable.
Insert the USB cable into the USB-B
Port on the back of the WANHAO
Duplicator 4/4x. Do not attach the other
end of the USB cable to anything yet.
Do not plug the AC power cord into
an electrical outlet until step 11 of this
chapter.
USB cable
15
--------
--------------------------------------------------------------------------------------------------------------------------------------SETTING UP YOUR WANHAO DUPLICATOR 4/4x DESKTOP 3D PRINTER
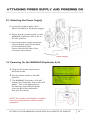
ATTACHING POWER SUPPLY AND POWERING ON
--------------------------------------------------------------------------------------------------------------------------------------------
10. Attaching the Power Supply
A. Locate the power supply cable.
Attach the cable to the power supply.
B. Ensure that the power switch on the
WANHAO Duplicator 4/4x is set to
the OFF position.
C. Insert the power supply connector
into the power input on the back
of the Duplicator 4/4x.
Ensure that the flat side of the
connector faces down.
Power Supply
11. Powering On the WANHAO Duplicator 4/4x
A. Plug the AC power cord into an
electrical outlet.
B. Set the power switch to the ON
position.
C. The WANHAO Duplicator 4/4x will
display The Duplicator text on the LCD
panel. This is the beginning of
the startup script that will guide
you through initial calibration
and your first build.
NOTE: The socket-outlet shall be installed
near the equipment and shall be easily
accessible.
SETTING UP YOUR WANHAO DUPLICATOR 4/4x DESKTOP 3D PRINTER
--------
-----------------------------------------------------------------------------------------------------------------------------------------16
Startup Process:
Leveling,
Loading,
Testing
After you power on the WANHAO DUPLICATOR Desktop 3D Printer, the
LCD panel will light up and display text. The LCD panel will now run the
Startup Script. The Startup Script will guide you through leveling the
build plate, loading WANHAO PLA Filament, and creating your first build.
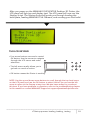
THE LCD KEYPAD
• Four arrow buttons surround a central
OK button. Use the arrows to navigate
through the LCD menus and make
selections.
• The left arrow usually allows you to
go back or cancel an action.
• OK button means the Printer is working.
NOTE: Use the up and down arrow buttons to scroll through the top-level menu
on the LCD panel, and use the OK button to select Utlities. You can use the left
arrow to return to the Startup at any time. We also have vedios for you about
this item. If you have problems or questions, refer to the troubleshooting chapter
in this manual or contact WANHAO Support at [email protected].
C Startup process: leveling, loading , testing
--------
-----------------------------------------------------------------------------------------------------------------------------------------18
INSTALLING BUILD PLATE
-------------------------------------------------------------------------------------------------------------------------------------------After the initial welcome message, the LCD will display the fillowings:
1. Start printer the LCD display the items
for operating.
2. Navigate to Utility and press OK.
3. Choose this item to start platform leveling.
!
Why Leveling Is Important
• If the build platform is too far from the extruder nozzle, or if one part of
the plate is farther away from the nozzle than another part, your builds
might not stick to the build plate.
• If the build platform is too close to the extruder nozzle, the build plate
can block the Printer PLA Filament from extruding from the nozzle.
This can also scratch the build plate.
• Leveling your build plate often will help ensure that objects adhere well
to the plate.
* How to Level the Build Plate
To level the build plate, you must adjust the four knobs which under the build
platform. These four knobs lower and raise the build plate.
• Tightening the knobs [turning them to the right] moves the build plate away
from the extruder nozzle.
• Loosening the knobs [turning them to the left] moves the build plate closer to
the extruder nozzle.
• The distance between the extruder nozzle and the build plate should be about
the thickness of the A4 paper.
--------
--------------------------------------------------------------------------------------------------------------------------------------19
C Startup process: leveling, loading , testing
LEVELING THE BUILD PLATE
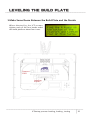
-----------------------------------------------------------------------------------------------------------------------------------------------1.Make Some Room Between the Build Plate and the Nozzle
When directed by the LCD screen,
tighten each of the four knobs under
the build platform about four turns.
Support
Card
Leveling
Knobs
C Startup process: leveling, loading , testing
--------
-----------------------------------------------------------------------------------------------------------------------------------------20
LEVELING THE BUILD PLATE
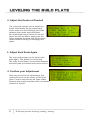
-------------------------------------------------------------------------------------------------------------------------------------------2. Adjust the Knobs as Directed
The script will prompt you to adjust the
knobs individually. As you adjust each
knob, make sure the A4 Paper just slides
between the nozzle and build plate.
You should feel some friction on the A4
Paper but still be able to easily pass the
Paper between the plate and the extruder
nozzle without tearing or damaging the
paper.
3. Adjust Each Knob Again
The script will prompt you to adjust each
knob again. This allows for fine tuning.
This time, the A4 Paper should slide between
the build plate and nozzle with more friction.
4. Confirm your Adjustment
After the second set of adjustments, the
nozzle will move to the center of the build
plate. Confirm that the the A4 Paper slides
between the nozzle and plate with a moderate
amount of friction.
21
--------
--------------------------------------------------------------------------------------------------------------------------------------C Startup process: leveling, loading , testing
LEVELING THE BUILD PLATE
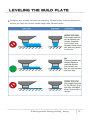
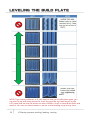
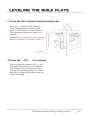
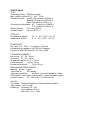
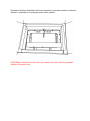
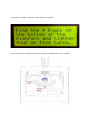
---------------------------------------------------------------------------------------------------------------------------------------------5.Compare your printed raft with the following
Nozzle height checking diagram to
ensure you have the correct nozzle height and filament width.
C Startup process: leveling, loading , testing
--------
--------------------------------------------------------------------------------------------------------------------------------------22
LEVELING THE BUILD PLATE
--------------------------------------------------------------------------------------------------------------------------------------------
NOTE: If you have problems, or if you need to level your build plate again, you
can use the up and down arrows to scroll through the top-level menu on the
LCD panel and use the OK button to select Utilities. Scroll to Level Build Plate and
select it. You can use these menus to return to the leveling script at any time.
--------
-----------------------------------------------------------------------------------------------------------------------------------------23
C Startup process: leveling, loading , testing
Loading PLA Filament
-------------------------------------------------------------------------------------------------------------------------------------------When you have completed the initial leveling tasks, the LCD menu will display the
following text: “I am Ready”. Before building, youmust load the PLA Filament
into the extruder. The extruder will heat the PLA Filament and use the melted
material to build things.
* What You Will Do
• Remove the end of the
filament guide tube
from the hole in the top
of the extruder.
Filament
Guide Tube
• Feed the free end of the
PLA Filament from the
spool into the end of
the filament guide tube
where it attaches to the
back of the Printer
• Push the PLA Filament
all the way through the
filament guide tube.
extruder
• Wait for the PLA
Filament to heat and
extrude.
Filament Spool
C Startup process: leveling, loading , testing
--------
-----------------------------------------------------------------------------------------------------------------------------------------24
Loading
PLA Filament
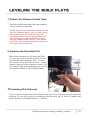
-------------------------------------------------------------------------------------------------------------------------------------------1. Detach the Filament Guide Tube
re
l he
Pul
Locate where the filament guide tube
attaches to the top of the extruder.
You must remove the filament guide
tube from the extruder. To remove the
tube, gently pull it out of the hole in
the top of the extruder.
2. Feed the Filament Through the Filament Guide Tube
Free the end of the PLA Filament
from the filament spool. With a pair
of scissors, cut a clean edge. Feed
the end of the PLA Filament into the
end of the guide tube where it
attaches to the back of the Printer.
Feed the PLA Filament through the
guide tube until it emerges from
the other end of the tube.
NOTE: To avoid filament jams,
ensure that the PLA Filament
feeds from the bottom of the
spool toward the top of the spool.
Put the right filament iinto the
left filament tube. Put the left
filament into the right filament
tube.
25
--------
--------------------------------------------------------------------------------------------------------------------------------------C Startup process : leveling, loading , testing
LEVELING THE BUILD PLATE
-------------------------------------------------------------------------------------------------------------------------------------------3. Press the OK to Begin Heating the Extruder
After you’ve fed the PLA Filament
all the way through the guide tube,
press the OK button on the LCD menu.
The Duplicator will start to heat your
extruder.
WARNING: Do not touch the extruder
while it is heating — it heats to 220° C.
Press the ok
4. Press the "OK" to Continue
After the extruder reaches 220° C, the
LCD panel will prompt you to load the
PLA Filament into the extruder. Click
through the message until your Printer
asks you to press the OK when you see
plastic extruding.
C Startup process: leveling, loading , testing
--------
-----------------------------------------------------------------------------------------------------------------------------------------26
LEVELING THE BUILD PLATE
-------------------------------------------------------------------------------------------------------------------------------------------5. Push the Filament into the Extruder
To use one hand to push the loading
button down and Take the end of the PLA
Filament closest to the extruder and firmly
push it into the hole in the top of the
extruder.Ensure that the filament goes
into the center of the opening and doesn’t
get caught at the edge of the opening.
Maintain pressure on the filament and
continue pushing it into the opening.
After about five seconds, you should
begin to feel the motor pulling in the
filament. Maintain pressure for another
five seconds and then let go.
6. Stop Extrusion
Watch the extruder nozzle. After a few
moments, you should see a thin string of
the PLA Filament that you loaded come
out of the nozzle. Press the OK button to
stop extrusion.
N OT E : D o n ’ t b e s u r p r i s e d i f t h e
filament that initially comes out of the
nozzle is not the color you expected.
There’s probably some filament inside
the extruder left over from our testing
process in factory. Wait until you see the
color that you loaded come out of the
nozzle before you press the OK button.
27
--------
--------------------------------------------------------------------------------------------------------------------------------------C Startup process: leveling, loading , testing
LEVELING THE BUILD PLATE
--------------------------------------------------------------------------------------------------------------------------------------------7. Return the Filament Guide Tube
Push the guide tube back into the opening
on the top of the extruder.
NOTE: If you have problems or need to load
the PLA Filament again, you can use the up
and down arrows to scroll through the
top-level menu on the LCD panel and use
the OK button to select Utilities. Scroll to
Change Filament and select it. Then select
Load. You can use these menus to return to
the load script at any time.
8. Remove the Extruded PLA
Wait a few minutes for the extruded PLA
to cool, then pull it off the nozzle. You can
discard this extra filament. Don’t touch
the nozzle; it may still be hot. Don’t leave
plastic clinging to the extruder nozzle. This
can cause newly extruded plastic to stick to
the nozzle instead of the build platform.
*Unloading PLA Filament
If you need to unload the PLA Filament, the LCD menu will walk you through the
process. To run the script for unloading the filament, go to the LCD panel and
select Utilities >Filament Options > Unload.
C Startup process: leveling, loading , testing
--------
-----------------------------------------------------------------------------------------------------------------------------------------28
MAKING A TEST OBJECT FROM THE SD CARD
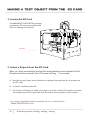
---------------------------------------------------------------------------------------------------------------------------------------------1. Locate the SD Card
The WANHAO DUPLICATOR package
includes an SD card pre-loaded with
files for making test objects.
SD Card
2. Select a Project from the SD Card
After you have successfully leveled the build platform and loaded the PLA
Filament into the extruder, the LCD panel will say: “I am ready”
A:Use the up and down arrow buttons to navigate through the list of models on
the SD card.
B:To select a model, press OK.
C:The Printer will begin to build your object. You can use the LCD panel to monitor
the temperature of the extruder and the status and progress of your object.
more object availiable please download from our websiteShare
: WWW.THINGSHARES.com
29
--------
--------------------------------------------------------------------------------------------------------------------------------------C Startup process: leveling, loading , testing
Making an Object with
WanHao ReplicatorG
How to make an object using a computer and WanHao Replicator G
Making an object with WanHao Replicator G
31
--------
------------------------------------------------------------------------------------------------------------------------------------------D Making an Object with Wanhao Replicator G
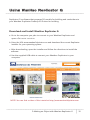
Using WanHao Replicator G
-------------------------------------------------------------------------------------------------------------------------------------------Replicator G is software that prepares 3D models for building and sends them to
your WanHao Duplicator Desktop 3D Printer for building.
Download and Install WanHao Replicator G.
a. Go to the computer you plan to connect to your WanHao Duplicator and
open a browser session.
b. Enter the URL www.wanhao3dprinter.com and download the correct Replicator
installer for your operating system.
c. After downloading, open the installer and follow the directions to install the
software.
d. Use the supplied USB cable to connect your WanHao Duplicator to your
computer.
NOTE: You can find a video of this tutorial at http://www.wanhao3dprinter.com
D Making an Object with Wanhao Replicator G
--------
-----------------------------------------------------------------------------------------------------------------------------------------32
USING WANHAO REPLICATORG
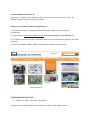
-------------------------------------------------------------------------------------------------------------------------------------------2. Download an Object From WanHao Thingshares
Thingshares is a website where WanHao users and others can share design files.
ThingShares
A. Open a browser session and go
to www.thingshares.com. Use
the search field at the upper
middle to search for
“what files you want” .
Your search results should
include that. Click on the link.
B. At the left of the page you will
see a button that says
“Download”Click this button
to open the Downloads window.
--------
-----------------------------------------------------------------------------------------------------------------------------------------33
D Making an Object with Wanhao Replicator G
USING WANHAO REPLICATORG
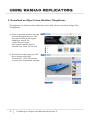
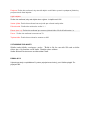
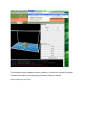
-------------------------------------------------------------------------------------------------------------------------------------------3. Open WanHao Replicator G
[1] Zoom in and out: You can also
use the scroll wheel on your mouse
to zoom in and out.
[2] View: Click the View button to
go into View mode. In this mode,
click and drag with your mouse to
rotate the plate and the object.
[3] Move : Click the Move button to
go into Move mode. In this mode,
click and drag with your mouse to
to move an object around the plate.
[4] Rotate: Click the Rotate button
to go into Turn mode. In this mode,
click and drag with your mouse to
rotate the object in all directions.
[5] Mirror: Click the Mirror button
to go into Mirror mode. In this
mode, click the buttons at the upper
side of the right to reflect the object
in X, Y, Z respectively.
[6] Scale : Click the Scale button to
go into Scale mode. In this mode,
click and drag with your mouse to
to enlarge or shrink your object. Use
the bottons at the upper side of the
Scale button to open the Change
Dimensions submenu and scale
by a percentage or to a specific
measurement.
[7] Generate GCode: Click this
button to open the Generate GCode
dialog, where you can specify print
resolution and other options and
click Generate GCode for building.
[8]Click the "gcode" at the forth
Status Bars and adjust the HBP
printing temperature based on
your printing material (see FAQ on
www.wanhao3dprinter.com). After
adjustment, choose printing. ABS
HBP printing temperature: 110 ℃ ;
PLA HBP printing temperature:
60℃
D Making an Object with Wanhao Replicator G
--------
-----------------------------------------------------------------------------------------------------------------------------------------34
USING WANHAO REPLICATORG
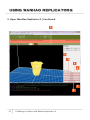
-------------------------------------------------------------------------------------------------------------------------------------------3. Open WanHao Replicator G | Continued
8
5
4
3
2
7
6
--------
--------------------------------------------------------------------------------------------------------------------------------------35
D Making an Object with Wanhao Replicator G
USING WANHAO REPLICATORG
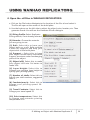
--------------------------------------------------------------------------------------------------------------------------------------------4. Open the .stl files in WANHAO REPLICATORG
a. Click on the File button.Navigate to the location of the file .stl and select it.
The file will open at the center of the build plate.
b. Use the buttons on the left side to adjust the object's size, location, etc. Then
generate Gcode. You will see the Generate GCode dialogue:
[1] Slicing Profile: Select Replicator
slicing default, if not already selected.
[2] Extruder: Choose the extruder
you are going to use.
[3] Raft: Select this to have your
object built on a raft. Rafts provide
a base for supports and help your
object stick to the build plate.
[4] Support : Select this to have
your object include easily removable
support structures under overhanging
parts of the object.
[5] Object infill: Select this to make
your object infill rate. It's better to
make 10%
[6] Layer Height: Select this to
change your printing layer height to
specify your printing quality.
[7] Number of shells: Select this to
specify you shell numbers, suggested
data: 1
[8] Feedrate(mm/s): Select this to
change your printing speed: 3080mm/s
[9] Travel Feedrate: Select this to
change your travel speed:70
[10] Print temperature: Select this
to change your extruder printing
temperature: 220
D Making an Object with Wanhao Replicator G
--------
-----------------------------------------------------------------------------------------------------------------------------------------36
USING WANHAO REPLICATORG
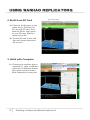
-------------------------------------------------------------------------------------------------------------------------------------------4. Build from SD Card
SD Card printing
4a. Press the third button in the
green bar to "Build to File
for use with SD card" And
save the file as .x3g format
to your SD card. Specify a
name for the file.
4b. Put the SD card to the card
slot and choose the saved
file to print.
5. Build with Computer
4c. Choose your machine type in
replicator G , then connection
serial port in Machine button.
Then press connect button.
After connection, press print.
--------
----------------------------------------------------------------------------------------------------------------------------------------37
D Making an Object with Wanhao Replicator G
Troubleshooting,
Diagnostics, and
Maintenance
This chapter describes basic troubleshooting and maintenance tasks
for your WANHAO Duplicator4 Desktop 3D Printer. For details on
more advanced troubleshooting and m aintenance tasks, go to
wanhao3dprinter.com/FAQ.
39
--------
-------------------------------------------------------------------------------------------------------------------------------------------E Troubleshooting , Diagnostics , and Maintenance
USING WANHAO REPLICATORG
------------------------------------------------------------------------------------------------------------------------------------------SOLUTION
PROBLEM
1. Can't load WanHao
Filament into the
extruder
----------------------------------------------------------------------------------------------------
-------------------------------------------------------------------------------Make a fresh cut at the end of the Filament.
Cut the Filament at an angle—a narrow tip
will help with loading.
Use more force when pushing the Filament into
the extruder. Grasp the filament firmly and push it
into the middle of the hole on top of the extruder.
Ensure that you insert the Filament straight down
into the extruder, not diagonally.
After you feel the motor grab the filament,
continue to maintain pressure on the filament for
another five seconds.
-------------------------------------------------------------------------------2. Object is stuck to
build plate
Wait for the object to cool down. Objects will
detach more easily after they have cooled.
If the object is still stuck, take a thin metal craft
spatula and carefully work the blade under the
edge of the object. When the blade is most of the
way under the object, twist the handle slightly. The
object should come free.
-------------------------------------------------------------------------------3. Can't remove the
Filament from extruder
Run the filament load script in the onboard Utilities
menu and let the filament advance for about five
seconds. Then run the unload script again.
E Troubleshooting , Diagnostics , and Maintenance
--------
-----------------------------------------------------------------------------------------------------------------------------------------40
Build from SD
----------------------------
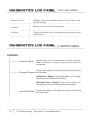
DIAGNOSTICS LCD PANEL | TOP-LEVEL MENU
--------------------------------------------------------------------------------------------------------------------------------------------Displays the list of models on the SD card. Select one
to start a build
-------------------------------------------------------------------------------Preheat
Allows you to preheat the extruder.
-------------------------------------------------------------------------------Utilities
Tools that allow you to configure and maintain your
Duplicator 4.
--------------------------------------------------------------------------------
DIAGNOSTICS LCD PANEL | UTILITIES MENU
-----------------------------------------------------------------------------------------------------------------------------------------UTILITIES
--------------------------------------------------------------------------------
---------------- Monitor Mode
Displays the current temperature of the extruder.
When making an object, displays the percent
completed.
Scripts that walk you through tasks associated with
---------------- Change Filament the Filament.
LOAD(Left / Right): Script that walks you through
the process of loading the Filament.
UNLOAD(Left / Right): Script that walks you
through the process of unloading the Filament.
Level Build Plate Script that walks you through the process of leveling
the build plate.
41
--------
----------------------------------------------------------------------------------------------------------------------------------------E Troubleshooting , Diagnostics , and Maintenance
LCD PANEL | INFO AND SETTINGS MENU
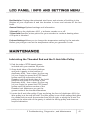
------------------------------------------------------------------------------------------------------------------------------------------Bot Statistics: Displays the estimated total hours and minutes of building in the
lifetime of your duplicator 4 and the duration in hours and minutes of the last
build.
General Settings:Optional settings and information
1,Sound:Turns the duplicator 4/4X’s indicator sounds on or off.
2,Heat hold:Specifies a time period for your extruder to continue heating when
a 3D print is canceled
Preheat Settings:Allows you to change the temperature setting for the extruder.
Before you print,you can set the temperature when you generate G code.
MAINTENANCE
------------------------------------------------------------------------------------------------------------------------------------------Lubricating the Threaded Rod and the X-Axis Idler Pulley
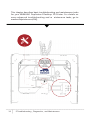
1. Find the tube of PTFE-based grease,
included with your wanhao 3d printer.
2. Grasp both sides of the build platform
and push it gently to the bottom of
duplicator 4/4X,Use a clean, lint-free rag
[or your finger],to spread the PTFE-based
grease onto the top section of the
threaded rod.Grasp both sides of the build
platform and move it to the top of the
duplicator 4/4X,Use a clean, lint-free rag
[or your finger] to spread the PTFE-based
grease onto the bottom section of the
threaded rod. Make sure you get the
grease inside of the threads themselves
3. Locate the X-axis idler pulley. If you are,facing the front of duplicator 4/4X, the
idler pulley is at the top left side. The idler pulley is one of the pulleys that allow
the rubber belt to move the extruder from left to right, or along the X-axis.The
pulley at the other side of the gantry is called the timing pulley and does not
require lubrication.
E Troubleshooting , Diagnostics , and Maintenance
--------
-----------------------------------------------------------------------------------------------------------------------------------------42
Cleaning the Drive Gear
-------------------------------------------------------------------------------------------------------------------------------------------
The drive gear is the part of the extruder that pushes filament through the
extruder. When you make things with your wanhao 3d printer , small pieces of
hardened PLA/ABS can stick to the drive gear. If you are having problems with
your extruder, cleaning the drive gear might help.
1. Unload the wanhao PLA/ABS Filament from the extruder. To start the script for
unloading the wanhao PLA/ABS Filament, go to the LCD panel and select Utilities
> Filament Options > Unload.
2. Unscrew the two bolts at the lower corners of the fan guard using the 2.5 mm
hex key included with your duplicator 4/4X .As one piece, remove the fan guard,
the fan, the heat sink, and spacers. Keep these pieces together and set them aside.
3. Unclip the motor wires.
4. Pull the motor assembly out.
5. Find the drive gear on the motor shaft.Using a small instrument like a makeup
brush, toothbrush or toothpick, remove all the pieces of filament stuck to the
drive gear.
6. Reseat the motor assembly.
7. Plug in the motor wires
8. Add the fan guard, the fan, the heat sink, and spacers to the front of the
extruder and bolt them on.
9. Reload the wanhao PLA/ABS Filament. To do this, go to the LCD panel and
select Utilities > Filament Options > Load.
43
--------
-----------------------------------------------------------------------------------------------------------------------------------------E Troubleshooting , Diagnostics , and Maintenance
Glossary Of Terms
-------------------------------------------------------------------------------------------------------------------------------------------
24V fan : The fan that cools the wanhao Filament as it extrudes.
Yellow Tape: Yellow masking tape that makes a great build surface for objects
printed with wanhao Filament. You can find yellow tape at any hardware store.
Build plate : The acrylic surface on which the Duplicator 4/4X builds an object.
Drive gear: The gear that drives the Wanhao Filament into the heater
Extruder: The assembly that draws the filament from the spool, melts it , and
pushes it through the nozzle onto the build plate.
Filament guide tube: The plastic tube that guides the wanhao Filament from the
filament spool to the extruder.
FIRMWARE: The software that runs on your wanhao 3d printer
GANTRY : The metal rods that allows the duplicator 4/4X’s extruder to move on
the X and Y axes.
GCode: The computer language used to describe the toolpath your wanhao 3d
printer will use to build an object. GCode is converted to .x3g before being sent
to your machine.
LCD control panel : The display at the front lower right corner of the wanhao
duplicator 4/4X. This control panel provides status information about the wanhao
duplicator 4/4X and includes control menus and diagnostics。
Wanhao ABS/PLA Filament: ABS/ PLA is a renewable bioplastic. Wanhao ABS/
PLA Filament is the source material from which you make objects on the wanhao
duplicator 4/4X.
Replicator G: Free software created by wanhao that allows you to load, rotate,
scale and move 3D models and send them to the wanhao duplicator 4/4X for
building.
Motor assembly: The stepper motor and the drive block that push filament into
the extruder.
E Troubleshooting , Diagnostics , and Maintenance
--------
--------------------------------------------------------------------------------------------------------------------------------------44
Motor wires : The bundle of electrical wires that provide power to the motor.
Nozzle: The opening on the end of the extruder from which heated wanhao
Filament emerges to be spread onto the build plate。
Plunger: A part of the extruder assembly. The MK9 plunger pushes the wanhao
Filament against the drive gear.
Power supply: The power supply for the wanhao duplicator 4/4X. It includes a
block and two plugs.
SD Card: Secure Digital memory card that can store digital data and be read by
duplicator 4/4X and has a maximum capacity of 2GB.
Spacers: The plastic pieces that keep the extruder fan and heat sink secure and in
place.
Spool holder: The plastic piece that attaches to the back of wanhao duplicator
4/4X and holds the spool of wanhao Filament. The spool holder ensures that the
Filament is fed evenly to the extruder.
Thingshares: A website for uploading and downloading 3D model files for use
with the wanhao duplicator 4/4X.
Threaded rod: The long rod behind the build platform that is threaded along its
entire length. This rod allows the build platform to move up and down, or along
the Z-axis.
.stl : A widely used file format for 3D models.
USB cable : The cable that allows the wanhao duplicator 4/4X to communicate
with a computer using the USB interface on the computer.
.X3G: A compact format for describing the toolpath your wanhao duplicator 4/4X
will use to build an object.
--------
-------------------------------------------------------------------------------------------------------------------------------------45
E Troubleshooting , Diagnostics , and Maintenance
CONTACT US
-------------------------------------------------------------------------------------------------------------------------------------------
-------------------------------------------------------------------
SUPPORT
www.wanhao3dprinter.com
Our website has extensive documentation and
troubleshooting information about your wanhao
duplicator 4/4X Desktop 3D Printer. It’s a great
resource when you want to try to solve issues quickly
on your own.
[email protected]
If you ever need help resolving an issue with your
wanhao 3d printer, send an email to the address
above to open a ticket with the wanhao Support
Team. To help us understand your problem from the
start, it is very helpful to include pictures or a video
as attachments with your email
--------------------------------------------------------------------SALES
[email protected]
To learn about other wanhao products, including
wanhao Filament, please email the address above,
or call our Sales Team at +86-579-82346658
--------------------------------------------------------------------FORUM
Wanhao has create one google forum to help customer
to improve their printing skills and share their experience.
FORUM:https://groups.google.com/forum/#!forum/
wanhao-printer-3d
E Troubleshooting , Diagnostics , and Maintenance
--------
--------------------------------------------------------------------------------------------------------------------------------------46
WANHAO ®
Made in China
[email protected]
+86-579-82346658
www.wanhao3Dprinter.com
NÁVOD NA POUŽÍVANIE
OBSAH
A. VITAJTE, začíname ........................................................................3 - 6
Špecifikácie ........................................................................................ 5
Ako to funguje .................................................................................... 6
B. Nastavenie Vašej 3D tlačiarne Wanhao 4/4x
Čo sa nachádza v krabici ................................................................... 9
Wanhao tlačiareň 4 Diagram ............................................................. 10
Vybalenie Wanhao tlačiarne .............................................................. 11 - 12
Inštalácia vyhrievanej podložky.......................................................... 13
Inštalácia vodiacich rúrok a držiaku .................................................. 14
Montáž vlákna a pripojenie USB káblu ............................................. 15
Pripojenie elektrického kábla a zapnutie .......................................... 16
C. ŠTARTOVACIE POVELY: VYROVNANIE DOSKY, NAČÍTANIE VKLÁKNA,
TESTOVANIE ..................................................................................... 17 - 29
Vyrovnanie podložky ........................................................................... 18 - 23
Načítanie ABS a PLA vlákna ............................................................... 23 - 28
Odstránenie ABS a PLA vlákien .......................................................... 28
Test – vytvorenie objektu z SD karty ................................................... 29
D. VÝROBA objektu s Wanhao Replicatorom G ............................. 30 - 37
Stiahnutie a inštalácia programu Wanhao Replicator G ...................... 31 - 32
Stiahnite si objekt z Wanhao Thingshares ........................................... 33
Otvorenie programu Wanhao Replicator G .......................................... 34 - 37
E. DIAGNOSTIKA, ODSTRAŇOVANIE PROBLÉMOV A ÚDRŽBA ..... 38 – 46
Odstraňovanie problémov ..................................................................... 39
Diagnostika ........................................................................................... 40
LCD panel / Top-level Menu ................................................................. 41
LCD panel / Nástroje ............................................................................ 41
LCD panel / Info a nastavenia .............................................................. 42
Údržba .................................................................................................. 42
Mazanie závitovej tyče a os X napínacej kladky .................................. 42
Čistenie hnacieho ozubeného kolieska ................................................ 43
Zoznam termínov ................................................................................. 44 – 45
Kontakt .................................................................................................. 46
Táto používateľská príručka je určená ako návod pre správne používanie Wanhao
Duplicator 4/4x 3D tlačiarne. Dokonca aj keď ste oboznámení s predchádzajúcimi
strojmi Wanhao, je dôležité, aby ste si prečítali tento manuál, pretože existuje
niekoľko dôležitých a aktualizácií pri Wanhao Duplicator 4/4x.
V kapitole A a B sa oboznámite so základmi 3D tlačiarne Wanhao Duplicator 4/4x,
ako ju bezpečne vybaliť a ako nastaviť.
Kapitoly C - E Vás prevedú krok za krokom cez vyrovnanie dosky, tlač, údržbu a
riešenie problémov.
Spoločnosť Wanhao sa teší, že Vás môže privítať vo svete 3D tlačiarní Wanhao
Duplicator 4/4x.
Prečítanie tejto príručky vám pomôže zabezpečiť získanie čo najväčšieho využitia
Vášho zariadenia.
VAROVANIE: Wanhao Duplicator 4/4x produkuje vysoké teploty a obsahuje
pohyblivé časti, ktoré môžu spôsobiť zranenie. Nikdy nesiahajte dovnútra
Wanhao
Duplicatora 4/4x, keď je v prevádzke.
Vždy umožnite zariadeniu Wanhao Duplicator 4/4x vychladnúť.
VAROVANIE: Nenechávajte zariadenie Wanhao Duplicator 4/4x bez dozoru
počas
prevádzky.
VAROVANIE: Ak potrebujete otvoreniť zariadenie Wanhao Duplicator 4/4x kvôli
servisu, skontrolujte, či je vypnuté a napájací kábel je odpojený z elektriny.
ŠPECIFIKÁCIE
TLAČ
Technológia tlače: FDM technológia
Max. veľkosť potlače: 22,5 * 14,5 * 15 cm
Rozlíšenie vrstva: Vysoké 100 mikrónov {0,0039 v}
Stredná 270 mikrónov {0,0106 v}
Nízke 340 mikrónov {0,0133 v}
Presnosťou polohovania: XY: 11 mikrónov {0,0004 v}
Z: 2.5 mikrónov {0,0001 v}
Vlákno Priemer:
1,75 mm {0,069 v}
Tryska Priemer:
0,4 mm {0,015 v}
TEPLOTA
Prevádzková teplota:
Skladovacia teplota:
15 ° C - 32 ° C [60 ° - 90 ° F]
0 ° C - 32 ° C [32 ° - 90 ° F]
ELEKTRICKÉ
AC Vstup: 100 - 240 V, ~ 2 ampérov, 50-60 Hz
Požiadavky na napájanie: 24 V DC @ 6,25amper
Pripojenie: USB, SD karty [FAT 16, max. 2GB]
FYZIKÁLNE ROZMERY:
Bez cievky: 47 * 32 * 38 cm
S cievkou: 47 * 32 * 38 cm
Prepravná krabica: 59 * 43 * 54 cm
Čistá hmotnosť:
11,5 kg / 19 kg
Prepravná hmotnosť:
15 kg / 21 kg
MECHANICKÉ ŠPECIFIKÁCIE:
Materiál - spodok: nerez
Telo tlačiarne:
DPP panely
Vyhrievaná podložka:
hliníková vyhrievaná podložka / silikón
XYZ ložiská: odolné proti opotrebovaniu / olejom napustený bronz
Krokové motory:
1,8 ° uhol kroku, 1/16 mikro-kroky
SOFTVÉR
Typ softvŕu: Wanhao Replicator G Sailfish Wanhao Edition
Typy súborov: .stl., G code
Podporuje: Windows (XP / 7/8)
Linux (Ubuntu 10.04+)
Mac OS X (10.7 / 10.8)
AKO TO FUNGUJE
Zariadenie Wanhao Duplicator 4/4x vyrába pevné, trojrozmerné predmety
z roztaveného Wanhao PLA/ABS vlákien. Vaše 3D návrhy (súbory) sú konvertované
pre Wanhao Duplicator 4/4x a odoslané do zariadenia pomocou kábla USB alebo SD
karty.
Zariadenie Wanhao Duplicator 4/4x následne zohrieva Wanhao PLA vlákna a vytláča
ich von cez trysku vrstvu po vrstve. Táto metóda sa nazýva Výroba cez tavenie
vlákien [FFF].
Zariadenie Wanhao Duplicator 4/4x bolo starostlivo vytvorené zabalené výrobcom
Wanhao. Vybalujte ho a nastavujte preto veľmi opatrne.
POZNÁMKA: Netlačte ani trhať niečo pri rozbaľovaní nasilu. Môže to poškodiť
Wanhao Duplicator 4/4x.
ČO SA NACHÁDZA V KRABICI
Náplň
Imbusové kľúče
Cievka na vedenie náplne 2 ks držiak na cievku
1 ks SD karta
Vyhrievaná podložka
3m pásky
Elektrický kábel
USB kábel
1 ks sklo s klipmi
ŠPECIFIKÁCIE
[1] Gantry SYSTÉM
[2] LCD PANEL
[3] klávesnice
[4] EADED Z-AXIS ROD
[5] Zostaviť Platform
[6] nekonečných vlákien vodiacej trubke
[7] extrúdery CABLE
[8] extrudéry
[9] FILAMENT SPOOL
[10] SPOOL HOLDER
OTVORENIE ZARIADENIA WANHAO DUPLICATOR 4/4x
1. Otvorenie krabice
A. Umiestnite krabicu s Wanhao Duplicatorom 4/4x na zem. Otvorte krabicu
odstránením horného lepenkého obalu.
B. Vyberte zariadenie Wanhao Duplicator 4/4x
Odporúčame použiť tento návod, aby vás previedol procesom inštalácie. Ak zistíte,
že čokoľvek, čo je popísané v manuáli, chýba, napíšte nám na
[email protected].
C. Odstráňte ochrannú vrstvu peny.
D. Odstráňte dva ochranné nárazníky umiestnené na bokoch zariadenia.
2. Vybratie zariadenia Wanhao Duplicator 4/4x z krabice
A. Otvorte plastový obal a pevne uchopte rám zariadenia zvonku. Zdvihnite
zariadenie z krabice a položte na stabilný povrch.
POZNÁMKA: čierny kábel nekrúťte ani neťahajte.
3. Vybratie príslušenstva
A. Odstráňte zvyšné penové obaly zo spodu krabice.
B. Vytiahnite menšiu krabicu s príslušenstvom, ktorá obsahuje zvyšné položky.
Poznámka: Vaše zariadenie Wanhao Duplicator 4/4x by malo byť teraz úplne
rozbalené. Odporúčame vám ponechať si krabicu aj penové obaly pre prípad, že
budete chcieť zariadenie v budúcnosti prevážať.
4. INŠTALÁCIA VYHRIEVANEJ PODLOŽKY
Nikdy nestrhávajte žltú foliu, ktorá je na hliníkovej doske. Môžete buď dať silikonové
sklo na platformu tavana platna dobre sadla alebo bez silikonoveho skla (odporúčané
pre začiatočníkov). Ak pridávate silik. sklo tak nastavte 4 gombíky pod HBP tak aby
bola nad urovňou vykurovacej dosky. Wanhao maskovacia páska sa používa ako aj
pre ABS aj pre PLA tlač, čo umožňuje lahšiu tlač na platforme.
5. UVOĽNENIE EXTRUDÉRU
Použite silné nožnice alebo rezač na odstránenie zipsu, ktorý drží pokope portálový
systém pokope. Rozstrihnite pásku a plastové kúsky, ktoré sú tam.
Malý plast pripojený k X-pásu a na portálovú tyč zabraňuje pohybu extrudéra.
Starostlivo odstráňte tieto kúsky z tyčí a nakloňte ju tak aby skĺzli dolu.
6. INŠTALÁCIA VODIACICH CIEVOK
A. Vyhľadajte vlákno vodiacej rúrky. Zasuňte jeden koniec od otvoru na hornej časti
extrudéra a zasuňte cievky do takej miery, ako to bude možné.
B. Druhý koniec zasuňte do ľavej časti držiaka vodiacej rúry ( pri pohľade zozadu) na
zadnej strane stroja. Uistite sa, že koniec vlákna je v jednej rovine s dolným držiakom
vodiacej rúrky. Vodiaca cievka by nemala visieť pozdĺž spodnej časti držiaka.
7. INŠTALÁCIA DRŽIAKA CIEVKY
A. Nájdite držiak cievky. Nakloňte držiak a vložte ho guľatým koncom do ľavého
bočného otvoru na zadnej strane stroja pri pohľade zozadu.
8. MONTÁŽ VLÁKNA S NÁPLŇOU
A. Otvorte krabicu obsahujúcu Wanhao ABS a PLA vlákna. Odstráňte cievku z obalu.
B. Nasaďte cievku na držiak. Uistite sa, že Wanhao ABS A PLA vlákno je proti smere
hodinových ručičiek (pri pohľade zozadu). Treba tlačiť na cievku pokiaľ nezapadne.
9. PRIPOJENIE USB KÁBLA
A. Vyhľadajte porty USB-A a USB-B. Pripojte kábel USB do USB-B portu na zadnej
strane Wanhao. Nedávajte ďalší koniec kábla USB do ničoho ďalšieho. Nezapájajte
napájací kábel do elektrickej zásuvku do kroku 11 tejto kapitoly.
10. PRIPOJENIE ZDROJA NAPÁJANIA
A. Vyhľadajte napájací kábel. Pripojte kábel ku zdroju napájania.
B. Skontrolujte, či je vypínač na Wanhao Duplicator 4/4x nastavená na hodnotu
pozície OFF.
C. Pripojte napájací konektor do príkonu na zadnej strane z zariadenia.Uistite sa, že
plochá strana konektora je smerom dole.
11. ZAPNUTIE ZARIADENIA
A. Pripojte napájací kábel do elektrickej zásuvky.
B. Nastavte vypínač do polohy ON
C. Wanhao Duplicator 4/4x bude zobrazovať textu na LCD displeji. To je začiatok
spúšťacieho skriptu, ktorým sa budete riadiť počas kalibrácie a prvého výtlačku.
ŠTARTOVACIE POVELY: VYROVNANIE DOSKY, NAČÍTANIE VKLÁKNA, TESTOVANIE
Potom, čo zapojíte Wanhao kopírku Desktop Printer na LCD paneli sa rozsvieti a zobrazí
text. LCD panel spustí štartovacie povely. Startup Script vás prevedie cez vyrovnanie
dosky, načítanie Wanhao PLA vlákna, a vytvorenie prvého výtlačku.
LCD klávesnica
• 4 tlačidlá so šípkami obklopujú centrálne tlačidlo OK. Navigovať a zadávať výber môžete
pomocou šípok cez LCD menu.
Šípka vľavo zvyčajne umožňuje vrátiť alebo zrušiť akciu.
• Tlačidlo OK znamená, že tlačiareň pracuje.
Po počiatočnej uvítacej správe na displeji LCD sa zobrazí nasledovné:
1. Display ukazuje na možnosť tlače
2. Prejdite na Utility a stlačte tlačidlo OK.
3. Zvoľte túto položku pre spustenie vyrovnania platformy.
Prečo vyrovnávanie je dôležité
• Ak je zostavenie platformy príliš ďaleko od extruderu trysky, alebo ak jedna časť
dosky je vo väčšej vzdialenosti od dýzy, než iné časti, vaš výtlačok nemusí presne držať na
doske.
• Ak je zostavenie platformy príliš blízko k extruderu trysky, doska môže blokovať PLA
vlákno z vytláčania z trysky a môže tiež poškriabať dosku.
• Vyrovnanie dosky často pomôže zabezpečiť, že objekty budú dobre fixované na doske.
Ako vyrovnať vyhrievanú dosku
Pre vyrovnanie dosky, musíte nastaviť štyri gombíky, ktoré sú pod platformou. Tieto štyri
gombíky znížia a zvýšia dosku.
• Uťahovaním gombíkov [otáčania je vpravo] sa presunie build doska od trysky k extruderu.
• Uvoľňovaním gombíkov otáčania je vľavo] sa presunie doska bližšie.
• Vzdialenosť medzi vytlačovaciou trysko a dosky by mala byť v hrúbke papiera A4.
1.Vytvorenie určitého priestoru medzi doskou a tryskami
Ak sa toto zobrazí na displeji tak utiahnite 4 3róby pod platformou cca o 4 otáčky.
Nastavte šróby podľa pokynov
Návod vás vyzve na nastavenie šróbov individuálne. Keď nastavujete každý
šrób, uistite sa, že sa medzi trysky a dosku vmestí papier formátu A4
Mali by ste cítiť nejaké trenie na A4 papier, ale stále má vôľu prejsť pomedzi ne bez
znehodnotenia.
Nastavenie šróbu ešte raz
Skript vás vyzve na nastavenie každého šróbu znova. To umožňuje jemné doladenie.
Tentoraz A4 Papier by mal kĺzať medzi doskou a tryskou s viac citlivejším trením.
Potvrďte svoju Nastavenie
Po druhej úprave sa tryska presunie do stredu platne. Uistite sa, že sú diapozitívy, A4
papiera medzi tryskou a doskou s miernym množstvom na trenie.
Kontrola výšky trysky podľa diagramu:
1.
2.
3.
= tryska príliš vysoko
= OK
= tryska je príliš nízko
Načítanie PLA vlákna
Keď ste dokončili začiatočné úlohy , LCD displej zobrazí nasledujúci text: "Som pripravený."
Pred začatím výstavby - tlače, musíte načítať PLA vlákno
do extruderu. Extrudér bude ohrievať PLA vlákno a používať roztavený
materiál.
Čo budete robiť
Odstráňte koniec vlákna vodiacej rúrky z otvoru v hornej časti extrudéra.
Pretiahnite voľný koniec PLA vlákna z cievky do konca vodidla vlákna kde sa pripojí k
zadnej strane tlačiarne
• Zatlačte PLA po celej časti cez vlákno vodiacej rúrky.
• Počkajte kým sa vlákno nahreje a vysunie.
Odpojenie vlákien
Vyhľadajte kde sa viaže vodiaca rúrka vlákna v hornej časti extrudéra.
Musíte odstrániť vodítko vlákna z extrudéra. Ak chcete odstrániť rúrku, jemne ju vytiahnite z
otvoru v hornej časti extrudéra.
Zasuňte vlákno prostredníctvom vlákien vodiace rúrky
Uvoľnite koniec PLA z vlákna cievky. S párom nožníc, odrežte čistý okraj. Zasuňte
koniec vlákna PLA do konca vodiacej trubice, ktorá je pripojená k zadnej časti tlačiarne.
Zasuňte PLA vlákno cez vodiacu rúrku, až kým nevystúpi z druhého konca rúrky.
Stlačte tlačidlo OK pre začatie Kúrenie extrudéra
Potom, čo ste zasunuli PLA vlákno skrz vodiacu rúrku, stlačte tlačidlo OK v ponuke LCD.
Kopírka začne ohrievať extrudér.
Stlačte tlačidlo "OK" pre pokračovanie
Keď extrudér dosiahne 220 ° C,naLCD paneli sa zobrazí výzva na vloženie
PLA vlákien do extrudéra. Kliknite na tlačidlo na ktoré vás vyzve správa vašej tlačiarne , aby
ste stlačili tlačidlo OK, keď sa zobrazí plast pretláčanie.
Zatlačte vlákno do extrudéra
Použite jednu ruku, aby ste zasadili zaťaženie tlačidla nadol a koniec PLA
vlákna čo najbližšie k extrudéru a pevne ju zasuňte do otvoru v hornej časti
extrudéra. Uistite sa, že vlákno ide do stredu otvoru a nie je na okraji otvoru.
Udržujte tlak vlákna a naďalej tlačte do otvoru.Po piatich sekundách, by ste mali
cítiť ťahanie motora. Udržujte tlak po ďalších päť sekúnd a potom pustiť.
Zastaviť Vytláčanie
Pozrite sa na vytlačovaciu trysku. Po niekoľkých momentoch, mali by ste vidieť tenký reťazec
vlákna PLA, ktorý sa načítal z trysky. Stlačte tlačidlo OK pre zastavenie tlače.
Vráťte vlákno
Zasuňte vodiaci rúrku do otvoru na hornej strane extruderu.
Odstráňte PLA
Počkajte niekoľko minút, než sa PLA vlákno vychladne, potom ho vytiahnite z trysky. môžete
zničiť toto zvláštne vlákno. Nedotýkajte sa trysky; môže byť ešte horúca. Nenechávajte plast
na extruderu trysky. Ten môže spôsobiť zlepenie kntryske namiesto vytvorenia.
TEST Z SD KARTY
KOPÍRKA WANHAO obsahuje SD kartu pre výrobu testu zadaného objektu.
Vyberte projekt z SD karty
Potom, čo ste úspešne zostavili Platformu a naložili PLA Filament do extruderu, panel LCD
bude hovoriť: Som pripravený
A: Pomocou tlačidiel so šípkami nahor a nadol prechádzajte zoznam modelov na SD card
B: Ak chcete vybrať model, stlačte OK.
C: Tlačiareň začne budovať svoj objekt. Môžete použiť LCD panel na monitorovanie teploty
extrudéra a stav a priebeh vášho objectu
C: spustenie
Použitie Wanhao Replicator G
Replicator G je softvér, ktorý pripravuje 3D modely pre vytváranie a posiela ich do 3D
Wanhao kopírky Desktop Printer pre výtlačok.
Stiahnuť a nainštalovať WanHao Replicator G.
A: V počítači, na ktorý je napojený Wanhao Duplicator chodte do sekcie browser –
vyhladavanie.
B: Z tejto stránky www.wanhao3dprinter.com si stiahnite program a nainstalujte ho .
C: Po stiahnutí otvorte program a nasledujte inštrukcie na nainštalovanie programu do vášho
počítača.
D: Pomocou dodaného kábla USB pripojte WanHao kopírku na vaš počítač.
POUŽÍVANIE REPLIKÁTORA
2. Stiahnite si objekt z Wanhao Thingshares
Thingshares je webová stránka, kde WanHao užívatelia môžu zdieľať súbory
Otvorte prehliadač, a zadajte www.thingshares.com. Pomocou vyhľadávacieho poľa na
vyhľadáte súbory, ktoré chcete .
V ľavej časti stránky vidíte tlačidlo, ktoré hovorí stiahni, kliknite naň pre stiahnutie.
Otvorte WanHao Replicator G
Priblíženie a oddialenie: Pomocou kolieska na myške môžete približovať a oddialiť obrázok.
Zobraziť: Kliknite na tlačidlo Zobraziť aby ste sa dostali do režimu zobrazenia. V tomto
režime, kliknite na tlačidlo a ťahaním myši rotujete dosku a objekt.
Presun: Kliknite na tlačidlo Presunúť Togo do režimu Presunúť. V tomto režime, kliknite a
ťahajte myšou objekt tak aby ste ho mohli presunúť okolo dosky.
Otočiť: Kliknite na tlačidlo Otočiť prejsť do režimu obrátiť. V tomto režime, kliknite a ťahajte
myšou pre otáčanie objektu vo všetkých smeroch.
Zrkadlo: Kliknite na zrkadlo možnosť aby ste prejšli do režimu Mirror.Tu kliknite na tlačidlá
na hornej strane kde máte možnosť obraciať v „reflektore“ X, Y, Z.
Mierka: Kliknite na tlačidlo Mierka. V tomto režime, kliknite a ťahajte myšou pre zväčšiť alebo
zmenšiť váš objekt. Použite na hornej strane tlačidla the Scale otvorte podmenu
ChangeDimensions a môžete meniť percento alebo špecifické úpravy.
Generovanie gcode: Kliknite na tlačidlo otvoriť generovať GCodedialog, v ktorom môžete
určiť záver tlače a ďalšie možnosti, kliknite na fenerovať gcode pre stavbu.
Kliknite na "gcodeje to 4 možnosť v ponuke a nastavte teplotu HBP tlače na základe vášho
tlačového materiálu.
Pozri otázky a odpovede na www.wanhao3dprinter.com.
Po nastavení, vyberte tlač. ABS HBP tlač teplota: 110; PLA HBP teplota tlač 60
Otvorte .stl súbory v Wanhao REPLICATORG
Kliknite na file. Uložte Nájdite súbor .stl a vyberte túto možnosť. Obrázok sa otvorí v strede
zostavenie dosky.
Pomocou tlačidiel na ľavej strane nastavujete veľkosti objektu, umiestnenie, atď Potom
vygenerujte gcode. Uvidíte generovať gcode dialóg:
Krájanie Profilu: Vyberte Replicatorslicing predvolené, ak už nie je vybratá
Extrudér: Vyberte extruder, ktorý sa chystáte použiť.
Raft: Zvoľte túto možnosť aby bol váš objekt postavený na rafte.
Podpora: Zvoľte túto možnosť, aby ste váš objekt mohli ľahko vymenit v podpornej štruktúry
pod previsnutú častí objektu.
Výplň objektu:
Zvoľte túto možnosť, aby mal objekt mieru výplne. Je lepšie mať 10%.
Vrstva výška: Zvoľte túto možnosť na svoju tlač pre určenie kvality tlače.
Počet buniek: Zvoľte túto možnosť a zvoľte č. 1
Posuv (mm / s): Zvoľte túto možnosť pre zmenu rýchlosti tlače: 30 až 80 milimetrov / s
Posuv: Zvoľte túto možnosť a zmente na 70
Teplota tlače: Zvoľte túto možnosť a zmente na 220
VYTVORENIE Z SD KARTY
Stlačte tretie tlačidlo v zelenom pruhu "Build to file for use with SK card a uložte
súbor ako .x3g formáte na SK kartu. Zadajte názov súboru
Vložte SK kartu do slot otvoru a uložte súbor k tlači.
PRÁCA S PC
Vyberte typ stroja v repklikátore G, potom pripojenie na sériový port. Stlačte pripojiť. Po
pripojení tlač.
Táto kapitola popisuje základné riešenie problémov a údržbu pre Wanhao Duplikátor.
Podrobné informácie o pokročilejsích problémoch nájdete na stránke
wanhao3dprinter.com/FAQ.