1
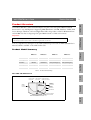
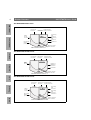
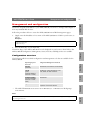
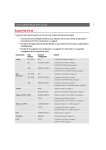
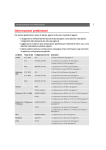
Axis Print Servers
High Performance Multi-Protocol
Print Servers for Virtually All Networks
A X I S 5 7 0 / 6 7 0 User's Guide v 3 . 0
Read Me First
Read Me First
To get your print server quickly up and running, follow the instructions below:
1. Connect the AXIS 570/670 to your network and to your printer as described in Connecting the
Printer to the Network, on page 6.
1
IBM AS/400
AXIS 570/670 User’s Guide
Action
SNA
1. SNA Printing in the AS/400 environment, on page 8
IBM
Mainframe
TN3270E (TCP/IP)
PPR/PPD (TCP/IP)
1. Assigning an IP address, on page 7
2. AS/400 IPDS over PPR/PPD Printing, on page 13
1. SNA Printing in the Mainframe Environment, on page 16
1. Assigning an IP address, on page 7
2. SNA Printing in the Mainframe Environment, on page 16
1. Assigning an IP address, on page 7
2. Mainframe IPDS over PPR/PPD Printing, on page 23
NDPS
1. Setup for NDPS, on page 26
Standard NetWare
1. Setup for NetWare, on page 27
NetBIOS/NetBEUI
1. Setup for Windows 95/98 & NT, on page 25
NetWare
Windows
95/98/NT
TCP/IP
NetBIOS/NetBEUI
Windows
3.1/WfW
TCP/IP
Windows
SNA
2. TN5250E Printing in the AS/400 environment, on page 11
NetWare
PPR/PPD (TCP/IP)
1. Assigning an IP address, on page 7
1. Assigning an IP address, on page 7
2. Setup for Windows 95/98 & NT, on page 25
1. Setup for Windows 3.1 and WfW, on page 25
OS/2
TN5250E (TCP/IP)
1. Assigning an IP address, on page 7
2. Setup for Windows 3.1 and WfW, on page 25
OS/2
NetBIOS/NetBEUI
1. Setup for OS/2, on page 28
Macintosh
AppleTalk
1. Set up for Macintosh, on page 29
UNIX
TCP/IP
1. Assigning an IP address, on page 7
2. Setup for UNIX, on page 30
Please proceed to Management and configuration, on page 31 for information about supported
management and configuration tools.
Macintosh
AS/400
Network Configuration
UNIX
Environment
IBM Mainframe
2. Proceed to the setup sections that are relevant to your network environment, as described in
the table below:
2
Safety notices
AXIS 570/670 User’s Guide
IBM AS/400
Safety notices
Take some time to read through the safety notices before installing the AXIS 570/670. Please observe all safety markings and
instructions when using this product.
Warning! - must be observed to avoid bodily injuries.
Caution! - must be observed to avoid loss of data or damage to your equipment.
OS/2
NetWare
Windows
IBM Mainframe
Important: - must be observed to avoid operational impairment.
Do not proceed any of the above notices, until you have fully understood the implications.
Electromagnetic Compatibility (EMC) USA - This equipment generates and radiates radio frequency energy and if not
installed and used in accordance with the instruction manual, may cause interference to radio communications. It has been tested and
found to comply with the limits for a Class A computing device pursuant to Subpart B of Part 15 of FCC rules, which are designed to
provide reasonable protection against such interference when operated in a commercial environment. Operation of this equipment in a
residential area is likely to cause interference in which case the user at his own expense will be required to take whatever measures may be
required to correct the interference. Shielded cables should be used with this unit to ensure compliance with the Class A limits.
Europe - This digital equipment fulfils the requirements for radiated emission according to limit B of EN55022/1994,
and the requirements for immunity according to EN50082-1/1992 residential, commercial, and light industry (Compliance is not valid
for unshielded network and printer cables).
Liability - Every care has been taken in the preparation of this manual; if you detect any inaccuracies or omissions, please inform your
local Axis office, which can be found on the cover of this document. Axis Communications AB cannot be held responsible for any
technical or typographical errors and reserves the right to make changes to the product and manuals without prior notice. Axis
Communications AB makes no warranty of any kind with regard to the material contained within this document, including, but not
limited to, the implied warranties of merchantability and fitness for a particular purpose. Axis Communications AB shall not be liable
nor responsible for incidental or consequential damages in connection with the furnishing, performance or use of this material.
Year 2000 Compliance - Axis Communications warrants that all versions of the AXIS 570/670 with software versions 5.54 or
later are Year 2000 compliant.
Axis’ Trademarks - NetPilot, ThinWizard, 570, 670, 570e, 670e, IP Installer.
Other Trademark Acknowledgments - Adobe Acrobat Reader, Apple, Ethernet, EtherTalk, IBM, LAN Manager, LAN
Server, Macintosh, Microsoft, Novell NetWare, OS/2, OS/400, TokenTalk, UNIX, Windows, are registered trademarks of the
respective holders.
Support Services - Should you require any technical assistance, please contact your Axis dealer. If your questions cannot be
answered immediately, your Axis dealer will forward your queries through the appropriate channels to ensure you a rapid response.
UNIX
Macintosh
If you are connected to Internet, you can find on-line manuals, technical support, software updates, application software, corporate
information, etc., on any of the locations listed below.
WWW:
http://www.axis.com
FTP server:
ftp://ftp.axis.com/pub/axis
All local Axis Offices are displayed on the document cover.
AXIS 570/670 User’s Guide
Part No: 16456
Copyright © Axis Communications AB, 1995 - 1998
Revision 3.0
Dated: December 1998
Product Overview
Product Overview
The AXIS 570/670 is a LAN attached multiprotocol print server that prints IBM and ASCII
datastreams to any ASCII printer. Supporting IBM Mainframes, AS/400, NetWare, UNIX, LAN
Server Manager, Windows, OS/2 and Apple EtherTalk, this product is ideal for IBM Mainframe
and AS/400 sites that are migrating from pure IBM networks to LAN environments.
3
IBM AS/400
AXIS 570/670 User’s Guide
Unless specifically stated the AXIS 570, AXIS 670, AXIS 570e and AXIS 670e models are
collectively described as the AXIS 570/670 throughout this document.
A more comprehensive description of the AXIS 570/670 is presented in the AXIS 570/670 User’s
Manual, which is available on the AXIS Online CD.
IBM Mainframe
Important:
AXIS 570
X
Fast Ethernet
AXIS 570e
X
AXIS 670
AXIS 670e
X
X
X
Token Ring
Network
Connection
Network Speed
10baseT or
10base2
10baseT or
100baseTX
10 Mbps
10 or 100 Mbps
IPDS data streams
STP (media type 1) or STP (media type 1) or
UTP (media type 3)
UTP (media type 3)
4 or 16 Mbps
X
SCS data streams
X
4 or 16 Mbps
X
X
X
Table 1: Product Model Summary
X
NetWare
Ethernet
Windows
Product Model Summary
Ethernet
10base2
Connector
Ethernet
10baseT
Connector
COM1
Printer
Connector
Test Button
AXIS 570 Network Print Server
Macintosh
LPT2 Printer External Power
Connector
Supply Connector
Network Indicator
Power Indicator
UNIX
LPT1 Printer
Connector
OS/2
The AXIS 570 Print Server
4
Product Overview
AXIS 570/670 User’s Guide
IBM Mainframe
IBM AS/400
The AXIS 670 Print Server
LPT1 Printer
Connector
LPT2 Printer External Power
Supply Connector
Connector
Token Ring
STP
Connector
COM1
Printer
Connector
Token Ring
UTP
Connector
Ring Speed
Switch
(recessed)
Test Button
Network Indicator
Power Indicator
AXIS 670 Network Print Server
Windows
The AXIS 570e Print Server
LPT1 Printer
Connector
LPT2 Printer
Connector
External Power
Supply Connector
COM1
Printer
Connector
NetWare
10baseT or
100baseTX
Connector
Test Button
OS/2
AXIS 570e Network Print Server
The AXIS 670e Print Server
Macintosh
LPT1 Printer
Connector
LPT2 Printer
Connector
External Power
Supply Connector
Token Ring
STP
Connector
COM1
Printer
Connector
Token Ring
UTP
Connector
Ring Speed
Switch
(recessed)
UNIX
Network Indicator
Power Indicator
Test Button
Network Indicator
Power Indicator
AXIS 670e Network Print Server
AXIS 570/670 User’s Guide
Product Overview
5
AXIS 570e
(PS-D)
Media
CD
Printed Materials
Optional accessories
Cables
Kits
0057-1
AXIS 570e
0080-2
AXIS 670e
0057-6
Europe
13267
UK
13268
Australia
13269
USA
13270
Japan
13936
Europe
14233
UK
14234
Australia
14255
USA
14253
Japan
14254
Title
Part Numbers
AXIS Online CD
Revision no.
5.2 & higher
AXIS 570/670 User’s Guide
16456
Product Brochure
14412
Description
Part Numbers
Serial Printer Cable
13281
Parallel Printer Cable
13360
Flash Loading Kit
0041-4
IBM Mainframe
0056-1
AXIS 670
Windows
Power Supply Type
AXIS 570
NetWare
AXIS 570,
AXIS 670 &
AXIS 670e
(PS-B)
Part Numbers
OS/2
Print Server
Model variants
Macintosh
Hardware
UNIX
Unpack and check all the items using the following check list. Contact your dealer if anything is
missing or damaged. All packing materials are recyclable.
IBM AS/400
Hardware Inventory
6
Connecting the Printer to the Network
AXIS 570/670 User’s Guide
IBM AS/400
AXIS Online CD
The AXIS Online CD provides an easy-to-use electronic catalog, that includes all of the latest AXIS
Utilities Software, Product Software, White Papers, User Documents, Technical References, etc. It
is compatible for use within all of the supported Axis computing environments.
IBM Mainframe
You can view the contents of the AXIS Online CD via an Adobe Reader interface or an HTML
interface. However, all documents presented on the CD are in PDF format.
Note:
If the Adobe Acrobat Reader 3.0 is not installed on to your system, you can download it by clicking the Acrobat
Reader button located on the starting page of the AXIS Online CD.
Should you not have access to a CD-drive, please contact your local dealer to receive diskettes
containing the available Axis Utilities software and hard copies of the appropriate documentation.
NetWare
Windows
You can also create your own AXIS Utilities diskettes from the AXIS Online CD interface.
Connecting the Printer to the Network
Follow the instructions below to connect your printer to the network:
1. Switch off the printer and disconnect the AXIS 570/670 external power supply.
2. Locate the serial number, found on the underside label of the AXIS 570/670, and write it
down. You will need this number during the network configuration.
Note:
Each AXIS 570/670 is pre-configured with a unique node address that is identical to its serial number.
OS/2
3. Connect the printer to the LPT1, LPT2 or the COM1 port on your AXIS 570/670 using an
appropriate printer cable.
4. Connect your AXIS 570/670 to the network using the appropriate cabling types as defined in
Table 1: Product Model Summary, on page 3.
UNIX
Macintosh
5. For the AXIS 670 and AXIS 670e only: Slide the Ring Speed switch to 4 or 16, as appropriate
for your Token Ring network.
6. Switch on the printer and connect the external power supply to the AXIS 570/670. The power
light comes on. If the network indicator starts to flash, the AXIS 570/670 is correctly
connected to the network.
7. Press and release the test button on the AXIS 570/670 to print a test page. If the AXIS
570/670 is correctly connected to the printer, the AXIS 570/670 internal test page will be
printed.
Assigning an IP address
Assigning an IP address
To establish communication with the TCP/IP network, an IP Address must be assigned to your
AXIS 570/670. Choose an appropriate method from the table below:
Server Platform Availability
UNIX
Windows
X
RARP
X
BOOTP
X
DHCP
AXIS IP
Installer
X
X
Comments
Requires the IP address for each new device to be downloaded
individually. Cannot be used over routers.
Downloads the IP Address to each device automatically
Similar to RARP, although can operate on the entire network.
X
Automatic but temporary assignment of IP address from a central pool.
X
An Axis software tool that sets the IP address of each device.
Note:
IBM Mainframe
ARP
7
IBM AS/400
AXIS 570/670 User’s Guide
Win. 95, 98 &
NT
UNIX
Example
arp -s 192.168.3.191 00-40-8c-10-00-86
ping 192.168.3.191
arp -d <192.168.3.191>
arp -s npsname 00:40:8c:10:00:86 temp
ping npsname
AXIS 670 & AXIS 670e Print Servers:
Syntax
arp -s 802.5 <Internet address> <node address>
Win. 95, 98 &
ping <Internet address>
NT
arp -d <Internet address>
arp -s <host name> <Node address> temp
UNIX
ping <host names>
Example
arp -s 802.5 192.168.3.191 00-02-31-48-00-61
ping 192.168.3.191
arp -d <192.168.3.191>
arp -s npsname 00:02:31:48:00:61 temp
ping npsname
If you are using host names, you can map a unique host name to the IP address. Refer to your
system manuals or to your network administrator for instructions on how this is performed on your
system.
The AXIS 570/670 supports WINS (Windows Internet Name Service), which is recommended
when setting the IP address using DHCP in Windows NT environments.
NetWare
Syntax
arp -s <Internet address> <Ethernet address>
ping <Internet address>
arp -d <Internet address>
arp -s <host name> <Ethernet address> temp
ping <host names>
OS/2
AXIS 570 & AXIS 570e Print Servers:
Macintosh
As the ARP command is available in all supported environments, it is described in detail in the
table below. Refer to the AXIS 570/670 User’s Manual for a comprehensive description of the
other methods.
UNIX
All methods are enabled by default. This means that if you have a DHCP server running on your
network, the AXIS 570/670 will receive its IP address immediately after you have connected it to
the network.
Windows
Refer to Setting the IP address, on page 30, for setting the IP address in the Macintosh environment.
IBM AS/400
8
SNA Printing in the AS/400 environment
AXIS 570/670 User’s Guide
SNA Printing in the AS/400 environment
Important!
If you are using OS/400 Version 3 Release 1 or above, the AS/400 host in 5494 CU Mode will be configured
automatically. The information provided in this section describes this automated configuration procedure.
For information regarding manual configuration, refer to the AXIS Network Print Servers technical reference that is
supplied on the AXIS Online CD or see the Technical Notes that are available on the Axis Web site.
Configuring the AS/400 Host System
Follow the instructions below to verify that the AS/400 host is correctly configured for SNA
printing:
1. Type DSPNETA on the AS/400 command line. For your future reference, note the values of
the Local network ID and Default local location parameters. Press F3.
2. Type DSPLIND xxxxxxxxxx, where xxxxxxxxxx is the name given to your LAN Line
Description used with the AXIS 570/670. If you do not know the name of the Line
Description, type WRKCFGSTS *LIN to get a list of all line descriptions on the system.
3. Press F11 to display keywords.
4. For your future reference, note the values of the Local adapter address(ADPTADR)
and Maximum Controllers (MAXCTL)parameters. Press return to view the active
switched controllers display and verify that the number of controllers does not exceed
MAXCTL.
5. Press ENTER repeatedly to display the SSAP list. Make sure there is at least one SSAP entry
dedicated for SNA. For your future reference, note the SSAP value for this entry.
6. Press ENTER repeatedly to display the Autocreate controller (AUTOCRTCTL)
parameter. Ensure that the AUTOCRTCTL parameter is set to *YES. Press F3 to return to the
command line.
7. Type WRKSYSVAL. Find the QAUTOCFG and QAUTORMT parameters and check that both
are ON(1). Press F3.
8. Type DSPMODD QRMTWSC on the command line to check that the mode description exists
on the system. Press F3. Refer to the AXIS 570/670 User’s Manual for information regarding
the QRMTWSC mode.
9. Type DSPUSRPRF QUSER. Make sure that the QUSER Status is *ENABLED and has its
Maximum Storage Allowed parameter set to *NOMAX. Press F3.
SNA Printing in the AS/400 environment
10. Use the command WRKCFGSTS *CTL xxxx*, where xxxx is the first 4 characters of the
AXIS 570/670 LU Name, to delete any previously created Controller and Device descriptions
specific to your AXIS 570/670. Delete the Device Descriptions (indented text) first and then
the Controllers. You can print a test page if you are unsure of the AXIS 570/670 LU Name.
Configuring the AXIS 570/670
Important!
To perform the instructions presented in this section, you should first assign an IP address to your AXIS 570/670
using one of the methods presented in Assigning an IP address, on page 7. If your network does not support the
TCP/IP protocol suite, you can still configure the AXIS 570/670 using the AXIS Netpilot™ installation tool.
Follow the instructions below to configure the AXIS 570/670 using a Web browser:
1. Complete the Configuring the AS/400 Host System procedures on page 8.
2. Start a Web browser, e.g. Internet Explorer or Netscape Navigator.
3. Enter the IP address or the host name of the AXIS 570/670 in the location field and press the
Enter key on your keyboard. The internal Web pages of the AXIS 570/670 appear. You may be
asked to enter a user name and a password. The default values are root and pass, respectively.
4. Click the Configuration button.
5. Select SNA from the header.
6. Select 5494 from the 3174/5494 Emulation Parameter drop-down list.
7. Enter the SSAP in the Local SAP value text field.
8. Enter the Local network ID in the Local 5494 Network Name text field.
9. Enter the Local adapter address in the Host MAC address text field.
10. Enter the Local network ID in the Host Network Name text field.
11. Enter the Default local location in the Host LU Name text field and click the
Submit SNA settings button.
Depending on your choice of data streams, continue the installation by selecting the appropriate set
of instructions below:
IPDS data streams (AXIS 570e and AXIS 670e only)
1. Select IBM IPDS Configuration from the header.
2. Select your preferred system language from the System Language drop-down list and click the
Submit IBM IPDS Configuration settings button.
3. Select IBM IPDS Printer Driver from the header.
9
IBM AS/400
AXIS 570/670 User’s Guide
IBM AS/400
10
SNA Printing in the AS/400 environment
AXIS 570/670 User’s Guide
4. Select the paper size for each paper bin from the Paper Size drop-down list and click the
Submit IBM IPDS Printer Driver settings button.
5. Select SNA from the header.
6. Select an IPDS printer emulation from the Logical unit data stream drop-down list that
corresponds to the logical printer you want to use. If you are using several logical printers, each
corresponding Logical unit data stream should be set.
7. Set the Automatic link establishment (dialing) radio button to Yes and click the Submit SNA
settings button.
SCS data streams
1. Select IBM BASIC CONFIGURATION from the header.
2. Select your preferred system language from the System Language drop-down list.
3. Select a twinax printer emulation from the Printer Emulation drop-down list and click the
Submit IBM BASIC CONFIGURATION settings button.
4. Select IBM PRINTER DRIVER from the header.
5. Make sure that the Printer Driver parameter is matching your printer and click the Submit
IBM PRINTER DRIVER settings button.
6. Select IBM PAGE FORMAT from the header.
7. Select the appropriate page properties and click the Submit IBM PAGE FORMAT settings
button.
8. Select SNA from the header.
9. Set the Automatic link establishment (dialing) radio button to Yes and click the Submit SNA
settings button.
Verifying the communication link
1. Type WRKCFGSTS *CTL xxxx* , where xxxx is the first four characters of the AXIS
570/670 LU Name, on the AS/400 command line. The following items are displayed:
• One APPC controller with the same name as the AXIS 570/670 LU Name.
• One APPC device with the same name as the AXIS 570/670 LU Name, one controlling
session (QRMTWSC) and the currently active (default = 3) printer sessions(QRMTWSC).
• One twinax controller named xxxxxRMT, where xxxxx is the first five characters of the
AXIS 570/670 LU Name.
• Three twinax printer devices named xxxxPRT0z where xxxx is the first four characters
of the AXIS 570/670 LU Name and z is the printer device number.
The status of all items should now be ACTIVE or VARIED ON.
TN5250E Printing in the AS/400 environment
2. Type STRPRTWTR xxxxPRT01 on the AS/400 command line, where xxxxPRT01 is the
printer device name. This will start the writer for this printer device.
3. Press the AXIS 570/670 test button once to print a test page. Ensure that the SNA status is
defined on the test page as Idle, Actv or LU-1.
TN5250E Printing in the AS/400 environment
Before you begin:
Make sure that the AS/400 host is running OS/400 V3R2 or higher with TCP/IP support installed and configured.
Make sure that the latest PTFs are installed. Information about which PTFs to use can be obtained from
http://as400service.rochester.ibm.com/as4sde/nas4apar.nsf/nas4aparhome.
Configuring the AS/400 Host System
Follow the instructions below to verify that the AS/400 host is correctly configured for TN5250E
printing:
• Type DSPSYSVAL QAUTOVRT on the AS/400 command line. Make sure that the value of
the QAUTOVRT parameter is greater than the number of auto-configured virtual devices on
your AS/400 system.
Configuring the AXIS 570/670
Follow the instructions below to configure the AXIS 570/670 for TN5250E printing using a Web
browser:
1. Start a Web browser, e.g. Internet Explorer or Netscape Navigator.
2. Enter the IP address or the host name of the AXIS 570/670 in the location field and press the
Enter key on your keyboard. The internal Web pages of the AXIS 570/670 appear. You may be
asked to enter a user name and a password. The default values are root and pass, respectively.
3. Click the Configuration button.
4. Ensure that the IP address, subnet mask and default router are appropriately set for your
network.
5. Select IBM BASIC CONFIGURATION from the header.
6. Select your preferred system language from the System Language drop-down list.
7. Select 3812_TX from the Printer Emulation drop-down list and click the Submit IBM
BASIC CONFIGURATION settings button.
11
IBM AS/400
AXIS 570/670 User’s Guide
12
TN5250E Printing in the AS/400 environment
AXIS 570/670 User’s Guide
IBM AS/400
8. Select IBM PRINTER DRIVER from the header.
9. Make sure that the Printer Driver parameter is matching your printer and click the Submit
IBM PRINTER DRIVER settings button.
10. Select IBM PAGE FORMAT from the header.
11. Select the appropriate page properties and click the Submit IBM PAGE FORMAT settings
button.
12. Select TN5250E from the header.
13. Enter the IP address of your AS/400 host in the Host IP Address field.
14. Enter a printer device name of your choice in the Printer Name field. The name may comprise
the letters A-Z and the numerals 0-9, but must begin with a letter. A maximum of 10
characters are allowed.
15. Enter the AS/400 host’s Telnet port number in the Port field. The default port number (23)
can be used in most environments.
16. Select which logical printer to use from the Logical Printer drop-down list.
17. Set Auto Connect to ON
18. Repeat steps 13-17 for each session you want to set up.
19. Click the Submit TN5250E settings button to initialize the TN5250E sessions.
Verifying the communication link
1. Type WRKCFGSTS *DEV xxxx*, where xxxx are the first four characters of the printer
device name, on the AS/400 command line. A list of printer devices will be displayed. Make
sure that a virtual printer device is active.
2. Direct a printout to this printer device to check the integrity of the communication link.
AS/400 IPDS over PPR/PPD Printing
AS/400 IPDS over PPR/PPD Printing
Note:
IPDS is only supported by the AXIS 570e and the AXIS 670e print servers.
Before you begin:
Make sure that the AS/400 host is running OS/400 V3R6 or higher with TCP/IP support installed and configured.
Make sure that the latest PTFs are installed. Information about which PTFs to use can be obtained from
http://as400service.rochester.ibm.com/as4sde/nas4apar.nsf/nas4aparhome
Configuring the AXIS 570e/670e
Follow the instructions below to configure your AXIS 570e/670e using a standard Web browser:
1. Start a Web browser, e.g. Internet Explorer or Netscape Navigator.
2. Enter the IP address or the host name of the AXIS 570e/670e in the location field and press the
Enter key on your keyboard. The internal Web pages of the AXIS 570e/670e appear. You may
be asked to enter a user name and a password. The default values are root and pass.
3. Click the Configuration button.
4. Select TCP/IP from the header.
5. The Reverse Telnet parameters PR1, PR2 and PR3 are by default setup for IPDS data streams,
emulating an IBM 4028 printer model 1 on the port numbers 5001, 5002 and 5003
respectively. If you need to change a port number, enter a new number in the text field and
click the Submit TCP/IP settings button. Otherwise you do not have to do anything.
6. Select IBM IPDS Configuration settings from the header.
7. Select your preferred system language from the IPDS System Language drop-down list.
8. Click the Submit IBM IPDS Configuration settings button.
9. Select IBM IPDS PRINTER DRIVER from the header.
10. Select the appropriate page properties and click the Submit IBM IPDS PRINTER DRIVER
settings button.
Configuring the AS/400 Host System
When configuring the AS/400 host system you must:
• create a PSF configuration
• create a printer device description
13
IBM AS/400
AXIS 570/670 User’s Guide
14
AS/400 IPDS over PPR/PPD Printing
AXIS 570/670 User’s Guide
IBM AS/400
Creating a PSF Configuration
Follow the instructions below to create a PSF configuration:
1. Issue the command CRTPSFCFG.
2. Press F11 to display keywords.
3. Select a name for the PSF configuration and enter it at the PSF configuration
(PSFCFG) line. The name may comprise the letters A-Z and the numerals 0-9, but must
begin with a letter. A maximum of 10 characters are allowed.
4. Enter QGPL at the Library line.
5. Enter *YES at the IPDS pass through (IPDSPASTHR) line.
6. Enter *NORDYF at the Activate release timer (ACTRLSTMR) line.
7. Enter *NOMAX at the Release timer (RLSTMR) line.
8. Press the Enter key on your keyboard to create the PSF configuration.
Creating a Printer Device Description
Follow the instructions below to create a printer device description:
1. Issue the command CRTDEVPRT.
2. Select a name for the printer device and enter it at the Device Description (DEVD) line.
The name may comprise the letters A-Z and the numerals 0-9, but must begin with a letter. A
maximum of 10 characters are allowed.
3. Enter *LAN at the Device class (DEVCLS) line.
4. Enter *IPDS at the Device type (TYPE) line.
5. Enter 0 at the Device model (MODEL) line.
6. Enter *IP at the LAN attachment (LANATTACH) line.
7. Enter a port number at the Port number (PORT) line. The default port numbers are
defined in the table below:
Port
Number
Data Stream/
IPDS Printer Emulation
Logical Printer
Destination
5001
IPDS_4028_1
PR1
5002
IPDS_4028_1
PR2
5003
IPDS_4028_1
PR3
AS/400 IPDS over PPR/PPD Printing
8. Enter a FGID number at the Font Identifier (FONT) line. A list of all supported
FGIDs is available in the AXIS 570/670 User’s Manual.
9. Define the Remote location (RMTLOCNAME). Use the IP address of the AXIS 570e/670e.
10. Enter the name of the previously created PSF configuration at the User-defined object
(USRDFNOBJ): Object line.
11. Enter the library of the previously created PSF configuration at the User-defined object
(USRDFNOBJ): Library line.
12. Enter *PSFCFG at the User-defined object (USRDFNOBJ): Object type line.
13. Press the Enter key on your keyboard to create the printer device description.
Verifying the communication
Follow the instructions below to verify the communication by sending a print job to the AXIS
570e/670e:
1. Type WRKCFGSTS *DEV AX570PR1 on the AS/400 command line to display the
previously created printer device. The status of the printer device should be VARIED OFF.
2. Vary on the printer device by typing 1 in the Opt field. Press ENTER.
3. Press F5 to refresh the display. The printer device should now be VARIED ON.
4. Start the printer writer by typing STRPRTWTR AX570PR1 on the AS/400 command line.
Press ENTER.
5. Press F5 to refresh the display. The printer device should now be ACTIVE/WRITER.
6. Direct a printout to this printer device. A successful printout verifies the communication link
between the AS/400 and the AXIS 570e/670e.
Note:
In the example above, the logical printer PR1 is used and the printout is directed to the destination AX570PR1.
The AXIS 570e/670e is now ready for printing in the AS/400 environment.
15
IBM AS/400
AXIS 570/670 User’s Guide
16
SNA Printing in the Mainframe Environment
AXIS 570/670 User’s Guide
SNA Printing in the Mainframe Environment
IBM Mainframe
Configuring the Mainframe Host System for SNA printing
1. Define a VTAM Major Node Definition where the Print Server definitions will be
placed. Using a channel attached 3174 as a gateway to the host, this definition is typically
defined as a Local Major Node. If you are using a remotely attached gateway via a 37X5
communications controller or a LAN attached 3172, you will be working with a Switched
Major Node definition.
2. Add the Print Server PU and LU definitions to the major node definition.
Note:
For Switched Major Node definitions you will need to:
•
Add the IDBLK (default = E07) and IDNUM (default = last 5 digits of the 570/670 MAC address) entries
to the PU definition.
•
Code a PATH definition using the unit’s full 12 digit MAC address.
Example:
An AXIS 670 with a MAC/node address of 000231B80937 will be defined as:
PA6701 PATH DIALNO=0104000231B80937, GID=1, PID=1, GRPNM=gggggg
3. Ensure that the corresponding VTAM Logon-mode entries are available and that the
appropriate LU session types (LU1 or LU3) are used.
4. Vary ACTive the VTAM Major Node definition for the AXIS 570/670.
Configuring the AXIS 570/670 for SNA Printing
Important!
To be able to perform the instructions presented in this section, you should first assign an IP address to your AXIS
570/670 using one of the methods presented in Assigning an IP address, on page 7. If your network does not support
the TCP/IP protocol suite, you can still configure the AXIS 570/670 using AXIS Netpilot.
Follow the instructions below to configure the AXIS 570/670 using a Web browser:
1. Start a Web browser, e.g. Internet Explorer or Netscape Navigator.
2. Enter the IP address or the host name of the AXIS 570/670 in the location field and press the
Enter key on your keyboard. The internal Web pages of the AXIS 570/670 appear. You may be
asked to enter a user name and a password. The default values are root and pass, respectively.
3. Click the Configuration button.
4. Select SNA from the header.
AXIS 570/670 User’s Guide
SNA Printing in the Mainframe Environment
17
5. Select 3174 from the 3174/5494 Emulation Parameter drop-down list.
6. Enter the SSAP in the Local SAP value text field.
7. Enter the LAN-to-host gateway MAC/LAA address in the Host MAC address text field.
9. Enter the node identifier xxxnnnnn, where xxx = IDBLK and nnnnn = IDNUM, in the Local
node ID text field. These values must match the entries that were defined in the VTAM PU
setup.
10. Click the Submit SNA settings button.
Depending on your choice of data streams, continue the installation by selecting the appropriate set
of instructions below:
IPDS data streams (AXIS 570e and AXIS 670e only)
1. Select IBM IPDS Configuration from the header.
2. Select your preferred system language from the System Language drop-down list and click the
Submit IBM IPDS Configuration settings button.
3. Select IBM IPDS Printer Driver from the header.
4. Select the paper size for each paper bin from the Paper Size drop-down list and click the
Submit IBM IPDS Printer Driver settings button.
5. Select SNA from the header.
6. Set the Automatic link establishment (dialing) radio button to Yes and click the Submit SNA
settings button.
SCS data streams
1. Select IBM BASIC CONFIGURATION from the header.
2. Select your preferred system language from the System Language drop-down list.
3. Select a coax printer emulation from the Printer Emulation drop-down list.
4. Click the Submit IBM BASIC CONFIGURATION settings button.
5. Select IBM PRINTER DRIVER from the header.
6. Make sure that the Printer Driver parameter is matching your printer and click the Submit
IBM PRINTER DRIVER settings button.
7. Select IBM PAGE FORMAT from the header.
IBM Mainframe
8. Enter the host SSAP in the Host SAP value text field.
18
SNA Printing in the Mainframe Environment
AXIS 570/670 User’s Guide
8. Select the appropriate page properties and click the Submit IBM PAGE FORMAT settings
button.
9. Select SNA from the header.
IBM Mainframe
10. Set the Automatic link establishment (dialing) radio button to Yes and click the Submit SNA
settings button.
Verifying the communication link
1. Power on the Print Server and wait for 2 minutes.
2. Press the AXIS 570/670 test button once to print a test page and ensure that the SNA status is
defined as Idle, Actv, LU-1 or LU-3.
The AXIS 570/670 is now ready for use in the SNA environment.
Note:
If the LAN media at the remote (Print Server) location differs from that at the host location (e.g. Remote LAN =
Ethernet and Host LAN = Token Ring), the MAC address definitions must be modified, as outlined below:
Print Server Modifications:
The AXIS 570/670 Host MAC address (H1_MAC_ADDR) must be bit-order reversed for each byte,
e.g. if the host address is 08005AB77D49 the converted address will be 10005AEDBE92.
Host Modifications:
The required Host modifications are dependent upon the VTAM definition for the Major Node where the Print
Server definition is placed.
•
Case 1 - VTAM Major Node definition is a Switched Major Node.
The MAC address of the AXIS 570/670 must be bit-order reversed in the PATH entry. An AXIS 570 with a
MAC/node address of 00408C1B06D4 will be defined using the MAC/node address 000231D8602B as follows:
PA5701 PATH DIALNO=0104000231D8602B, GID=1, PID=1, GRPNM=gggggg
•
Case 2 - VTAM Major Node definition is a Local Major Node.
When using a channel attached controller as gateway to the host, the MAC address of the AXIS 570/670 is configured in the gateway. The address must be reversed, as in case 1 above.
AXIS 570/670 User’s Guide
TN3270E Printing in the Mainframe environment
19
TN3270E Printing in the Mainframe environment
The configuration procedures defined within this section are consequently presented in the
following three stages:
Configuring the Mainframe host
Consult your TN3270E server documentation and make sure that the appropriate VTAM host
system definitions are set up for mainframe-to-TN3270E server SNA communication.
Configuring the AXIS 570/670
Follow instructions below to configure the AXIS 570/670 using a Web browser:
1. Start a Web browser, e.g. Internet Explorer or Netscape Navigator.
2. Enter the IP address or the host name of the AXIS 570/670 in the location field and press the
Enter key on your keyboard. The internal Web pages of the AXIS 570/670 appear. You may be
asked to enter a user name and a password. The default values are root and pass, respectively.
3. Click the Configuration button.
4. Select TN3270E from the header.
5. Enter the IP address of your TN3270E server in the Server IP Address field.
6. Enter the printer device name in the Printer name field. The name may comprise the letters
A-Z and the numerals 0-9, but must begin with a letter. A maximum of 8 characters are
allowed. This name must correspond to the configured printer name in the TN3270E server.
7. Enter the TN3270E server’s Telnet port number in the Port field. The default port number
(23) can be used in most environments.
8. Select which logical printer to use from the Logical Printer drop-down list.
9. AXIS 570e/670e only: Select your IPDS printer emulation from the IPDS printer emulation
drop-down list.
10. Set Auto Connect to ON.
IBM Mainframe
Communication between the AXIS 570/670 and Mainframe host is achieved via a TN3270E
server using the TCP/IP transport protocol for the supported data streams, as illustrated below:
20
TN3270E Printing in the Mainframe environment
AXIS 570/670 User’s Guide
11. Repeat steps 5-10 for each session you want to set up.
Note:
The AXIS 570/670 supports eight semi-concurrent TN3270E host sessions.
12. Click the Submit TN3270E settings button to initialize the TN3270E sessions.
IBM Mainframe
Depending on your choice of data streams, continue the installation by selecting the appropriate
set of instructions below:
IPDS data streams (AXIS 570e and AXIS 670e only)
1. Select IBM IPDS Configuration from the header.
2. Select your preferred system language from the System Language drop-down list and click the
Submit IBM IPDS Configuration settings button.
3. Select IBM IPDS Printer Driver from the header.
4. Select the paper size for each paper bin from the Paper Size drop-down list and click the
Submit IBM IPDS Printer Driver settings button.
5. Click the TCP/IP tab and ensure that the IP address, subnet mask and default router are
appropriately set for your network.
SCS data streams
1. Select IBM BASIC CONFIGURATION from the header.
2. Select your preferred system language from the System Language drop-down list.
3. Select a coax printer emulation from the Printer Emulation drop-down list and click the
Submit IBM BASIC CONFIGURATION settings button.
4. Select IBM PRINTER DRIVER from the header.
5. Make sure that the Printer Driver parameter is matching your printer and click the Submit
IBM PRINTER DRIVER settings button.
6. Select IBM PAGE FORMAT from the header.
7. Select the appropriate page properties and click the Submit IBM PAGE FORMAT settings
button.
8. Click the TCP/IP tab and ensure that the IP address, subnet mask and default router are
appropriately set for your network.
AXIS 570/670 User’s Guide
TN3270E Printing in the Mainframe environment
21
Setting up the TN3270E server
This section describes how to configure Microsoft’s SNA Server.
Note:
Communication is established in two separate stages, SNA Server-to-Host connection and SNA
Server to AXIS 570/670 connection, described below:
Stage 1: SNA Server-to-Host Connection
Follow the steps below to set-up a SNA Server-to-Host connection for the AXIS 570/670:
1. Start Microsoft SNA Server Manager and click the Servers folder. The Main SNA Server
Manager Window is featured in the illustration below.
2. Insert a new Connection to the host under Connections. Refer to the online help for assistance
on how to configure the connection.
3. Select the new connection and Insert a 3270 Application LU (LUA) to this connection.
4. Set the LU Number to the LU Number specified in the host.
5. Set the LU Name to the name you want to use for the printer device. This is the same name
that you specify in the TN3270E Printer Name parameter of the AXIS 570/670.
6. Click OK.
SNA Server Manager Main Window
IBM Mainframe
For information on how to configure other TN3270E-capable servers, please refer to the AXIS 570/670 User’s
Manual, supplied on the AXIS Online CD or the Technical Notes featured on the AXIS Website
22
TN3270E Printing in the Mainframe environment
AXIS 570/670 User’s Guide
Stage 2: SNA Server - AXIS 570/670 connection
1. Select the new LUA and drag it to the TN3270 connection definition (highlighted in the SNA
Server Manager Window above).
2. Select the properties of the LUA.
3. Click on the TN3270 tab in the properties popup window.
IBM Mainframe
4. Select Generic Printer Type.
5. Click on the IP Address List tab.
6. Specify the IP Address of the client(s) that you want to assign to this LU. This is the IP address
of the AXIS 570/670, i.e. the same as the INT_ADDR parameter in the Print Server.
7. Click OK.
Verifying the Communication
Follow the instructions below to verify communication from the AXIS 570/670 to the Mainframe
host via the SNA Server:
1. Activate the connection you created in step 2 of the above SNA Server - AXIS 570/670
connection procedures. The status of the connection should be “active”.
2. Make sure the corresponding LU in the host is activated.
3. Activate the TN3270 connection to the AXIS 570/670. The LUA should change status to
SSCP.
4. Send a print job from the host.
The AXIS 570/670 is now ready for use.
Note:
You can check the status of the TN3270E connection by printing a test page from the print server. This is done by
pressing the test button once. Make sure the TN3270E status (St:) line for your server connection is defines as
either:
- SSCP
- LU-1
- LU-3
AXIS 570/670 User’s Guide
Mainframe IPDS over PPR/PPD Printing
23
Mainframe IPDS over PPR/PPD Printing
Note:
IPDS is only supported by the AXIS 570e and the AXIS 670e print servers.
1. Define the Communication Control Unit, e.g. 3172, to MVS.
2. Modify the PSF/MVS Startup Procedure with the following entry:
Example:
//WRT4317 PROC
//* The PSF/MVS TCP/IP Writer Procedure */
//* PRINTDEV
//PRT4317 CNTL
//
MGMTMODE=OUTAVAIL,
//
DISCINTV=0,
//
IPADDR=’xxx.xxx.xxx.xxx’,
//
PORTNO=5001,
//PRT4317 ENDCNTL
Note that xxx.xxx.xxx.xxx denotes the IP address of your AXIS 570e/670e.
3. Define the printer to JES2 or to JES3.
JES2:
FSSDEF FSSNAME=FSS4317, PROC=WRT4317, HASPFSSM=HASPFSSM,
PRT4317 FSS=FSS1, MODE=FSS, PRMODE=(LINE, PAGE, SOSI1),
CLASS=C, UCS=0, SEP, NOSEPDS, CKPTPAGE=100,
DRAIN, MARK, TRKCELL=YES
Make sure that the parameter PROC matches the PROC name in the PSF/MVS Startup
Procedure.
JES3:
FSSDEF TYPE=WTR FSSNAME=FSS4317, PNAME=WRT4317, SYSTEM=SYS1, TERM=NO
DEVICE, JNAME=PRT4317, JUNIT=(,SYS1, ,OFF), FSSNAME=FSS4317,
MODE=FSS, PM=(LINE, PAGE, SOSI1), CHARS=(YES, GT12)
Make sure that the parameters PNAME and JNAME matches the PROC name in the PSF/MVS
Startup Procedure.
IBM Mainframe
Configuring the Mainframe host
24
Mainframe IPDS over PPR/PPD Printing
AXIS 570/670 User’s Guide
Configuring the AXIS 570e/670e
Follow the instructions below to configure your AXIS 570e/670e using a standard Web browser:
1. Start a Web browser, e.g. Internet Explorer or Netscape Navigator.
IBM Mainframe
2. Enter the IP address or the host name of the AXIS 570e/670e in the location field and press
the Enter key on your keyboard. The internal Web pages of the AXIS 570e/670e appear. You
may be asked to enter a user name and a password. The default values are root and pass.
3. Click the Configuration button.
4. Select TCP/IP from the header.
5. The Reverse Telnet parameters PR1, PR2 and PR3 are by default setup for IPDS data streams,
emulating an IBM 4028 printer model 1 on the port numbers 5001, 5002 and 5003
respectively. If you need to change a port number, enter a new number in the text field and
click the Submit TCP/IP settings button. Otherwise you do not have to do anything.
6. Select IBM IPDS SETTINGS settings from the header.
7. Select your preferred system language from the IPDS System Language drop-down list.
8. Click the Submit IBM IPDS Configuration settings button.
9. Select IBM IPDS PRINTER DRIVER from the header.
10. Select the appropriate page properties and click the Submit IBM IPDS PRINTER DRIVER
settings button.
Verifying the communication
By sending a print job from the Mainframe to the AXIS 570e/670e, you can verify that the setup
procedures have been performed correctly and that communication is established.
AXIS 570/670 User’s Guide
Setup for Windows 95/98 & NT
25
Setup for Windows 95/98 & NT
AXIS Print Monitor
AXIS Print Monitor is the preferred method for network printing within Windows 95, Windows
98 and Windows NT environments. It allows you to install, configure and manage locally
networked printer ports over NetBIOS/NetBEUI and TCP/IP, as easily as any local printer port.
An Installation Wizard is provided to guide you through the installation process.
For peer-to-peer printing, the AXIS Print Monitor must be installed on all printing clients, while it
is only necessary to install it on the server for client-server printing.
To install a printer with the AXIS Print Monitor, you should use the Add Printer Wizard. The
AXIS Print Monitor’s built-in help system describes how to install printers as either
NetBIOS/NetBEUI or TCP/IP printer ports.
Setup for Windows 3.1 and WfW
AXIS Print Utility for Windows
AXIS Print Utility of Windows is the preferred method for network printing within Windows 3.1
and Windows for Workgroups environments.
Install the AXIS Print Utility of Windows software, if you have not already done so. It is available
on the AXIS Online CD in the software\prt_srv\utility\axpuw\latest folder.
Client-server printing - This print method is suitable for larger networks and requires only
one user to install the AXIS Print Utility for Windows software onto a workstation. The setup
procedure is described below:
1. Install AXIS Print Utility for Windows onto the file server.
2. Set up your AXIS 570/670 from the file server as described in the peer-to-peer printing section
below, but you must additionally check the Share box for your printer.
Your shared printers can now be used by all the Windows clients and you do not need to install the
AXIS Print Utility on the clients.
Important!
The server setup described above should only be made on a Windows for Workgroups workstation.
Windows
Install the AXIS Print Monitor software, if you have not already done so. It is available on the AXIS
Online CD. Once installed, the AXIS Print Monitor is automatically initialized on system start-up.
26
Setup for NDPS
AXIS 570/670 User’s Guide
Peer-to-peer printing - This print method is recommended for smaller networks and
requires that all users install the AXIS Print Utility for Windows on their workstations. Follow the
instructions below to install your AXIS 570/670 for peer-to-peer printing on a Windows for
Workgroups or Windows 3.1 workstation:
1. Double-click the AXIS Print Utility icon.
2. In the Port menu, click Add. In the NPS Port list, select the AXIS 570/670 port to be installed.
The ports appear as <name>.LP1, <name>.LP2, and <name>.CM1, where <name> is
AX followed by the last six digits of the AXIS 570/670 serial number. For example:
AX100B35.LP1
3. Accept or change the suggested Windows port name, and type any comments in the
Description field. Make a note of the Windows port name as you will need this later. Click OK
to install the Windows port.
Windows
4. In the Port menu, click Connect to bring up the Windows Printers dialog.
5. Select a printer driver from the list of Installed Printers, or click Add>> to install a new driver.
Click Connect...
6. Select the Windows port name defined in step 4 above that should now feature at the bottom
of the Ports list.
NetWare
7. Click OK to close the Connect dialog, and Close to close Printers.
The setup is completed and you can now print through your AXIS 570/670.
Notes:
Windows 3.1 requires network support such as LAN server or LAN Manager Workstation software to be
installed in order to redirect a local printer port to a network device.
AXIS Print Utility for Windows must be running when you print through your AXIS 570/670. We strongly
recommend that you copy the AXIS Print Utility icon into your StartUp folder.
Setup for NDPS
Important!
Before the AXIS 570/670 can be installed in NDPS IPX mode, you must install NDPS and an HP Gateway on
your NetWare file server. The HP Gateway is included in the NDPS software and is automatically installed
together with NDPS.
Follow the instructions below to install the AXIS 570/670 as a Public Access printer:
1. Make sure that the HP Gateway is configured to automatically create a public access printer.
2. Connect the AXIS 570/670 to the NetWare network, if it is not already connected.
AXIS 570/670 User’s Guide
Setup for NetWare
27
As soon as the HP Gateway finds the AXIS 570/670, it will automatically create a public access
printer, which is found with the Novell Printer Manager. All users have access to the public access
printer.
By using the NetWare Administrator software, you can easily configure your Public Access Printer
to become a Controlled Access Printer.
Note:
NDPS requires that you run NetWare 4.11 or higher.
Setup for NetWare
AXIS NetPilot is the tool you should use when you are installing the AXIS 570/670 in the
NetWare environment. Install the AXIS NetPilot software, if you have not already done so. It is
available on the AXIS Online CD.
Note:
The AXIS NetPilot software must be installed on a Windows platform running a NetWare client.
1. Start AXIS NetPilot by double-clicking the AXIS NetPilot icon. The icon is located in the
folder where AXIS NetPilot was installed.
2. Locate the AXIS 570/670 in the ‘New Axis Units’ folder. Select it and click the Install button
on the AXIS NetPilot toolbar. If your network is large, it could take a few seconds before the
print server appears in the folder.
3. Choose the with Installation Wizard option and click OK. The Installation Wizard will then
guide you through the installation process.
Should you require assistance with any of the operations, click the Help icon and follow the
instructions provided in the Help window.
After you have completed the installation you are ready to print in the NetWare environment.
Connecting additional print queues
Follow the instructions below to enhance your installation by adding extra print queues:
1. Select the Network Print Server to be set up by clicking its icon.
2. Choose Network from the Setup menu.
3. Select the NetWare tab, select the printer port and click the Connect... button.
NetWare
Follow the instruction below to install your AXIS 570/670 using the AXIS NetPilot Installation
Wizard:
28
Setup for OS/2
AXIS 570/670 User’s Guide
A new window opens that allows you to create new print queues and connect print queues to the
AXIS 570/670. You can also select Print Server mode or Remote Printer mode for each queue.
Setup for OS/2
AXIS Print Utility for OS/2
AXIS Print Utility for OS/2 is the preferred method for network printing within OS/2
environments.
Install the AXIS Print Utility for OS/2 software, if you have not already done so. It is available on
the AXIS Online CD in the software\prt_srv\utility\axpu\latest folder.
Note:
Use the MTPS/LAPS (LAN Server) or SETUP (LAN Manager) to activate the NetBEUI protocol.
Peer-to-peer printing - This print method is recommended for smaller networks and
requires that all users install the AXIS Print Utility for OS/2 on their workstations.
Follow the instructions below to install your AXIS 570/670 for peer-to-peer printing:
NetWare
1. Open an OS/2 window and execute the install.exe program.
2. With the AXIS Print Utility for OS/2 running, click Install to install your AXIS 570/670. The
ports appear as <name>.LP1, <name>.LP2, and <name>.CM1, where <name> is AX
followed by the last six digits of the AXIS 570/670 serial number. For example:
AX100B35.LP1
3. Select the ports you want to install, then click Install.
OS/2
Repeat this procedure for each server using the AXIS 570/670.
Creating a print queue:
Continue with the instructions below to create a print queue:
1. Double-click the Templates folder, then drag the Printer icon out to the Workplace Shell (or
into a folder) while holding the right mouse button down.
2. Type a name of your choice in the Name field.
3. Select \PIPE\<name>.LP1 or \PIPE\<name>.LP2 or \PIPE\<name>.CM1 from the Port list,
and select a printer driver suitable for your printer from the Standard Printer list.
4. Click OK to confirm the printer definition.
AXIS 570/670 User’s Guide
Set up for Macintosh
29
Client-server printing - This print method is suitable for larger networks and requires only
one user to install the AXIS Print Utility software onto one workstation. Follow the setup
procedure below:
1. Install AXIS Print Utility on an OS/2 workstation.
2. Set up your AXIS 570/670 from the file server as described in Peer-to-peer printing, on page 28.
3. The print queue must be shared before it can be accessed by other OS/2 clients. Open an OS/2
window and type the following command:
NET SHARE queue_name /PRINT, where queue_name is the name of the queue to
be shared.
Your shared print queues can now be used by all OS/2 clients.
Important!
The AXIS Print Utility for OS/2 must be running when you print through your AXIS 570/670. We strongly
recommend that you copy the AXIS Print Utility icon into your StartUp folder.
Set up for Macintosh
Important!
There is no support for Apple TokenTalk in the AXIS 670 and the AXIS 670e.
Follow the instructions below to choose a printer:
1. Select Chooser from the Apple menu.
4. Click the name of the printer you want to use. The default printer name is shown as
AXIS<nnnnnn>_<port>, where <nnnnnn> are the last six digits of the serial number,
and <port> is LPT1, LPT2, or COM1 respectively.
5. For LaserWriter 8.0 printer driver only:
Click Setup..., and then Select Auto Setup. If the printer as well as the print server supports
bi-directional printing, the installation will be automatically performed. If not, you will be
prompted to select a PPD file matching your printer. Click OK.
6. Click the close box. This completes the configuration.
Repeat this procedure for each Macintosh using the AXIS 570 or AXIS 570e.
Macintosh
3. If your network has more than one zone, click the name of the default zone. If your network
has no zones, this box does not appear.
OS/2
2. Click the LaserWriter, alternatively the LaserWriter 8.0 icon.
30
Setup for UNIX
AXIS 570/670 User’s Guide
Setting the IP address
Follow the instructions below to set the IP address:
1. Open the Chooser and select a network printer driver. Any LaserWriter will do.
2. Select the printer port which name ends with “_CFG” and close the Chooser.
3. Open a text editor, e.g. SimpleText and write a text file containing the following:
INT_ADDR: <IP address>
Example:
INT_ADDR: 171.16.2.143
4. Print the above text file. The settings will be stored permanently in the print server.
5. Open the Chooser and select the printer port you wish to use for printing documents. Close
the Chooser.
Important!
The _CFG port disappears 60 minutes after the AXIS 570 or AXIS 570e has been powered on. If you want it to
reappear, you must restart the print server.
Setup for UNIX
axinstall
Use the Axis automatic installation script axinstall to integrate the AXIS 570/670 into your host
spooler. This utility software is resident on the AXIS 570/670 and can be downloaded using FTP.
It is also provided on the AXIS Online CD in the software\prt_srv\utility\axinstall\latest folder.
Follow the procedure below to download axinstall to your host using FTP:
1. Log in to the AXIS 570/670 by typing:
ftp <host name> or ftp <IP address> in the UNIX shell window.
Macintosh
2. Enter root as the user id and pass as the password.
3. Download the axinstall utility by typing: get axinstall
Follow the instructions below to install the AXIS 570/670 using the axinstall script:
1. Type the command:
sh axinstall in the UNIX shell window.
UNIX
2. Follow the instructions that appear when the script is started.
When the AXIS 570/670 is installed, it will appear as if it is directly connected to the host printer
spooler.
Management and configuration
Management and configuration
If you have assigned an IP address to your AXIS 570/670 you are free to manage and configure it
from any standard Web browser.
Follow the procedures below to access the AXIS 570/670 internal Web management pages:
31
IBM AS/400
AXIS 570/670 User’s Guide
Examples:
http://192.36.253.96
http://salesdept
2. Press the Enter key on your keyboard.
IBM Mainframe
1. Simply enter the IP address or host name of the AXIS 570/670 as a URL in your browser, as
follows:
*
Configuration/Management methods
IPX/SPX
(NetWare)
AXIS NetPilot, HP JetAdmin, Novell Utilities
TCP/IP
(UNIX,
Windows 95/98/NT,
Windows 3.1/WfW)
Web Browser, AXIS ThinWizard(*), FTP,
telnet, SNMP, HP Web JetAdmin
NetBIOS/NetBEUI
(Windows 95/98/NT,
Windows 3.1/WfW,
OS/2)
AXIS NetPilot
AppleTalk
Web browser, Mac-FTP, AXIS NetPilot via a
PC platform in the same network.
The AXIS ThinWizard server cannot run in Windows 3.1 or Windows for Workgroups
environments.
NetWare
Operating System
Protocols
OS/2
The following table shows which configuration and management tools that are available for the
AXIS 570/670.
Macintosh
Configuration overview
Windows
The Home Page of the AXIS 570/670 will now be displayed in your browser, where links to the
AXIS 570/670 Configuration, Management, Status, Account, and Help services are available.
Please refer to the AXIS 570/670 User’s Manual for a comprehensive description of the supported configuration
and management tools.
UNIX
Note:
32
Management and configuration
AXIS 570/670 User’s Guide
IBM AS/400
Test Button
All Axis print servers are equipped with a test button. The functionality of the test button is
determined by the number of times the button is being pressed.
• Press the test button once to print a test page that contains basic information about the AXIS
570/670.
Windows
IBM Mainframe
• Double-click the test button to print out the current parameter settings of the unit.
You can also reset the AXIS 570/670 parameters to their factory default settings by using the test
button. Follow the instructions below:
1. Remove the external power supply to switch off the AXIS 570/670.
2. Press and hold down the test button, while you reconnect the external power supply. Continue
to hold down the test button until the network indicator starts to flash at one second intervals.
This should take about 5 seconds.
3. Release the test button and wait until the network indicator flashes at least five times.
4. Press and hold down the test button again until the network indicator remains constantly lit.
5. Restart the AXIS 570/670 by switching it off and on.
UNIX
Macintosh
OS/2
NetWare
Note:
All parameters except the node address (NODE_ADDR) and the IP address (IP_ADDR) are reset.