1
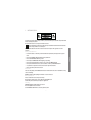
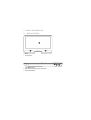
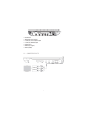
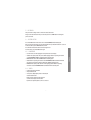
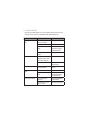
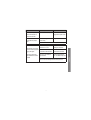
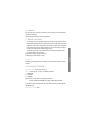
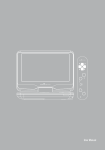
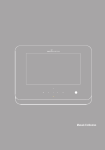
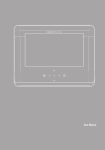
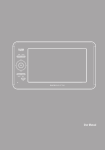
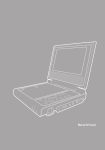
2;496@5 =<D2?6?054 User Manual To ensure your safety and the safety of others, please ensure that you read all the safety information before operating this product. Keep this information in a safe place for future reference. This symbol indicates that this product incorporates double insulation between hazardous mains voltage and user accessible parts. WARNING: To reduce the risk of fire or electric shock, do not expose this apparatus to rain or moisture. @NSRaf0\[`VQR_NaV\[` ≥ Position the cables so that they cannot be walked on or pinched by items placed on or against them. ≥ Do not use the Mobile 390 TV in humid or damp conditions. ≥ Do not allow the Mobile 390 TV to get wet. ≥ Do not expose the Mobile 390 TV to dripping or splashing. ≥ Do not place water filled objects such as vases on top of the Mobile 390 TV. ≥ Do not place naked flame sources, such as candles, on the top of the Mobile 390 TV. ≥ To prevent direct exposure to the laser beam, do not open the enclosure. ≥ Never stare directly into the laser beam. Ventilation The slots and openings on the Mobile 390 TV are for ventilation. Do not cover or block them as it may cause overheating. NEVER let children push anything into the holes or slots on the case. Battery Disposal Please ensure batteries are disposed of safely. Never dispose of batteries in a fire or with other household waste. Check with your local authority for disposal regulations. 0YRN[V[T ALWAYS unplug the product before you clean it. Do not use liquid or aerosol cleaners. Clean the Mobile 390 TV with a soft, damp (not wet) cloth. 3 2;496@5 1. INTRODUCTION 2. CONTROLS AND CONNECTIONS 2.1. PANEL ILLUSTRATION 1 2 2 1. Screen. 2. Stereo speakers. 3 3. Power ON/OFF indicator. 4. Infrared Sensor to receive the remote control signals. 5. Battery-charge indicator. 4 4 5 9 8 7 10 13 15 12 14 16 19 6 11 18 6. Disc cover opening button. 7. Next track/file. 8. Previous track/file. 9. Play/Pause. Starts of pauses the playback. 10. Stop. Stops the playback. 11. OK: To confirm the selection. 12. SOURCE: Media selection. 13. SETUP: Mobile 390 TV’s setup menu. 14. MENU: Access to the main menu. 15. EXIT: In DVB-T mode, press to exit the current menu. 16. Move up in the menus. 17. Move down in the menus. 18. Shift right in the menus. Fast Forward. 19. Shift left in the menus. Fast Rewind. 5 2;496@5 17 21 26 25 24 23 20.On/Off switch. 21. DC IN Power connection (12 V). 22. 3.5 mm (1/8”) stereo earphones output. 23. 3.5 mm (1/8”) TRRS A/V output. 24. Volume control. 25. USB host port (Type A). 26. ANT in (75 Ohm). 2.2. CONNECTING TO A TV 6 22 20 1. TFT ON/OFF: Turns on/off the screen. 2. DVB/USB: Switches between DVB and USB mode. 3. NUMERIC KEYBOARD. 4. GOTO: Go to a specific time index. 5. STOP: Press to stop playback. 6. PLAY/PAUSE: Press to start/pause/ resume the playback. 7. TV/RADIO: Switches between TV channels and radio channels. 8. NAVIGATION BUTTONS. 9. ZOOM/EPG: Press to zoom in. Press to show EPG info. 10. EXIT: In DVB-T mode, press to exit the current menu. 11. NEXT: Go to next chapter/track/file. 12. PREV: Go to previous chapter/track/file. 13. TITLE: Press to access DVD title menu. 14. MUTE: Press to mute/unmute the sound. 15. INFO: Shows detailed information about the current file, disc or program. 16. MENU: Access main menu. 17. SUBTITLE: Press to change between subtitles (if available). 18. AUDIO: Press to change the audio mode (if available). 19. REPEAT/FAV: Press to switch between different repeat modes. Press to show the favorite channels list. 20. RECALL: Press to return to the last ZOOM/EPG 21. 22. 23. 24. 25. 26. 27. 28. channel tuned. SETUP: Access the setup menu. ENTER: To confirm a selection. To open the TV/Radio channels list. SOURCE: Switches between DVD/USB/DVB-T mode. REV: Fast rewind. FWD: Fast forward. RANDOM/ADD: Press to randomize the playback mode Press to add a channel to the favorite channels list. PROG/DEL: Press to access program mode. Press to remove a channel from the favorite channels list. ANGLE: Press to change the angle mark (if available). 7 2;496@5 3. REMOTE CONTROL 3.1. BUTTON DESCRIPTION 3.2. BATTERY Pull the battery loader out and insert a CR2025 battery. Make sure to place the battery in the correct direction. 2 1 When not using the remote control for a long time remove the battery. When operating range reduces replace the battery. 4. MP3/WMA/MPEG4 You can play files stored in optical discs (CD/DVD) or USB devices. To select the desired media press the SOURCE button and use up/down to highlight DVD or USB. Press Direction key to choose the root directory and then press ENTER button to enter into the subdirectory. Press Direction keys to choose the desired track and then press ENTER or PLAY to start the music or movie playback. If you want to return to the upper menu, press Direction key to choose the folder named ‘...’ and press ENTER button. ≥ Filter: Allows selecting the categories of files (Audio, Photo and Video) displayed in the browser list. ≥ Repeat: To switch different repeat playing mode. ≥ Mode: Select different playing mode. Normal: Shuffle mode is cancelled. Shuffle: Shuffle mode enabled. When playback reaches the end of the current chapter/track, playback jumps to a random chapter/track. As the end of each chapter/track is reached, another random chapter/track will be played until all tracks/chapters have been played or the Shuffle mode is cancelled by toggling to a different Mode Option. Music Intro: In this mode, the media will play 10 seconds then skip to next media. Edit Mode: To enable programmed playback mode. When you select the mode, press LEFT Direction key to directory and press ENTER to choose the desired track and press Add to program to start program playback. 8 5. PICTURES The operation of the image viewer is similar to the music/video viewer. Image rotation: Use the direction keys to rotate the picture. Press ANGLE button to change the picture scan mode. 6. SYSTEM SETUP Press the SETUP button on the remote control, the SETUP MENU(main)will be displayed. After accessing the setup menu, press the direction buttons for up and down movement to select an item desired, then press the ENTER button to confirm. Press LEFT direction button return to the menu of upper level. To exit the setup, press the SETUP button again. stated in DVD MENU SETUP In combination with the desired option. ≥ MPEG4 Subtitle: Choice different MPEG4 subtitle encoding option. ≥ Audio: Follow the operating instructions stated in DVD MENU SETUP In Combination with the desired option. This option provides the built-in disc dubbing language options. ≥ DVD Menu: This option provides the film s menu language options. Follow the operating instructions stated in DVD MENU SETUP in combination with the desired option. 6.2. VIDEO ≥ Aspect Ratio: 4:3PS, 4:3LB, 16:9 ≥ TV System: NTSC, PAL ≥ Smart picture. Adjust display effect for video output: Standard: default effect. Bright: internal setting for bright view effect. Soft: internal setting for soft view effect. Dynamic: user adjust brightness, contrast, colour, etc. 9 2;496@5 6.1. LANGUAGE ≥ Use this item to select the language of the setup menu and screen display. ≥ Subtitle. This option provides the preset subtitle language. Follow the operating instructions 6.3. RATING ≥ Parental Control ≥ Selecting a Rating allows the user to set the parental control feature of the player Select Parental Control, and press ENTER to change the different mode. Note: Unlock the password before setting Parental Control. Set Password Use the 0-9 keys to input four digits(password), then press ENTER to confirm. Note: If you forget your password, please use the universal password 6666 to unlock. 6.4. MISC SETUP ≥ Use Default Settings Reset setup data to factory defaults. 7. DVB-T To access DVB-T function, press SOURCE button from the remote control to choose DVB-T mode. 7.1. FIRST TIME INSTALLATION If you are using the receiver for the first time, a First Time Installation menu will be displayed to guide you through the initial setup. Use the remote control to finish the setup. ≥ OSD Language: Select the language for the user interface. ≥ Area: Select the country of residence. ≥ Time Zone: Adjust the time zone parameters. Select the appropriate time zone to display the local time correctly. ≥ FTA Default Setting: If you want to reset your regional settings and clear all the stored channels, select FTA Default Setting and confirm to reset it. Once the Setup parameters have been properly configured, press ENTER to start the automatic channel search. Please wait until the scanning is completed. In case you want to stop the scanning process, press EXIT button. The channels already found will be stored. When finished, all the active channels found will be stored automatically. The last found channel will be showed. 10 7.2. DVB-T MAIN MENU To access the DVB-T Main Menu, press the SETUP or MENU buttons from the remote control. The DVB-T main setup menu appears in the screen. Use direction buttons to navigate through the DVB-T Menu options. The selected choice will be highlighted. 7.2.1. Auto Search: Choose the automatic search options. The operation of the Auto Search is the same as the explained in First Time Installation. For more details refer it. 7.2.2. Manual Search: 2;496@5 If any channel is missing after auto search, or you want to add recently launched channels, you can use Manual Search to scan the desired channels. To manually search the target channel, you must specify its parameters (Frequency and Bandwidth). Select ENTER button to start the manual search. After the channel is found, it is saved and appended to the current channel list. If no signal is found, a message indicating “no signal” will appear. 7.2.3. System Setup This menu will allow you to adjust the setup options: ≥ OSD Language: Use it to change the language for the user interface. ≥ Area: Choose the country of residence. ≥ Time Zone: Adjust the time zone parameters. Select the appropriate time zone to display the local time correctly. ≥ FTA Default Setting: If you want to reset your regional settings and clear all the stored channels, select FTA Default Setting and confirm to reset it. 7.3. FAVORITE FUNCTION In DVB-T mode, press ENTER button. The system will show the channels list. Then select from the list the channel you want to make favorite and press RANDOM/ADD button to add the channel to the favorite channels list. If you want to remove the channel from the favorite channels list, press PROG/DEL button. You can find the favorite channels list by pressing REPEAT/FAV button. 11 8. TROUBLESHOOTING If you experience problems with this receiver or its installation, in the first instance please read carefully the relevant sections of this User Manual and this Troubleshooting section. Problem Possible cause Solution There is no picture or no sound Improper connection with AC adapter or car adapter Check the connection Low battery Connect the power supply Use of unauthorized power supply Your device may be damaged. Use only the power supply provided with de device Power switch is on OFF position. Turn the switch to ON position If you can hear nothing through the speakers, maybe the earphone is plugged in Unplug the earphone The sound is muted Use the volume control to unmute the sound Dark picture Brightness and contrast are not properly adjusted Adjust Brightness, Contrast correctly The remote control is not working Battery exhausted Charge battery Remote control is incorrectly aimed Aim the remote control to the device. Check that nothing blocks the front panel Doesn’t display the subtitle The program signals no subtitle date Try pressing the SUB button to open the subtitle The subtitle doesn’t open or signal is too weak Make sure the signal is good There is no sound 12 Problem Possible cause Solution The LED does not light up / not lit when the device is connected to the mains Mains cable is not connected Check that the mains cable is plugged into the power socket Can’t play the music file correctly OR can’t play the video The file is damaged or the code is wrong Change the file The format of the video is not compatible, or the file is damaged The aerial is not properly connected to the machine Check the aerial installation, including its connections The aerial is not suitable for digital channels Check that digital transmissions are available in your area When the device tries to find and store channels you get the The aerial is not correctly di- Check that the aerial is direcmessage “No signal” rected towards the transmitter ted towards the transmitter When only very few of the expected number of channels are found There are no terrestrial digital transmissions in your area 13 2;496@5 OR 9. SPECIFICATIONS General TV System PAL / NTSC Supported disc formats DVD, VCD, CD, CD-R, CD-RW, DVD+-R/W Supported file formats MP3, JPEG, MPEG4 Video S/N Ratio >= 65 dB Resolution >= 500 lines Audio Frequency 20 Hz - 20 kHz +/- 1 dBI S/N ratio >= 90 dB Dynamic Range >= 80 dB Distortion < 0.01 % D/A Converter 96 KHz / 24 bit Output Screen technology TFT-LCD Color Screen size 9“ Video output 1 Vp-p (75 Ohms) Audio output 2 CH Power supply DC 12 V Power consumption <= 12 W Size 238 x 170 x 41 mm Weight 1.0 Kg DVB-T Tuner Input Frequency VHF 177.5MHz~226.5MHz UHF 474 MHz~858 Mhz Specifications are subject to change without further notice. 14 10. WARRANTY Energy Sistem Soyntec S.A. warrants its products to be free from defects in materials and workmanship at the time of purchase. The warranty period is 36 months from the date of purchase. 11. WARRANTY PROCEDURE ≥ Visit the Support section at http://support.energysistem.com and select your product to view the Trademarks: All company, brand and product names are trademarks or registered trademarks of their respective companies. 12. DECLARATION OF CONFORMITY :N[bSNPab_R_;NZR' Energy Sistem Soyntec S. A. Address: Pol. Ind. Finestrat – C/ Calpe, 1 – 03509 Finestrat Alicante Tel: 902 388 388 Fax: 902 119 034 ;63' A53107488 We declare under our own exclusive responsibility that the product: Energy Sistem® Portable DVD/DVB-T Player Energy™ Mobile 390 TV Deep Black is in compliance with the essential directives, norms and standards of the European Union 89/336/ EEC (EMC Directive). :N[bSNPab_V[TP\b[a_f' China 15 2;496@5 FAQ (Frequently Asked Questions). The solution to your problem is very likely to have been already published there. You will also be able to download user manuals, user guides, drivers and updates. ≥ If you cannot find an appropriate solution in the Support section, you may send us your enquiry or warranty service request by email: [email protected] ≥ Alternatively, you may prefer to contact the distributor from which you purchased the product, presenting the purchase receipt or invoice. Specifications are subject to change without notice. © 2011 by Energy Sistem®. All rights reserved.