1
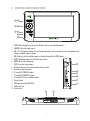
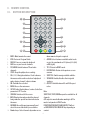
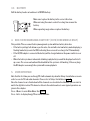
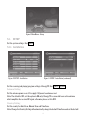
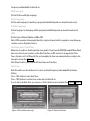
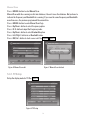
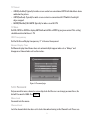
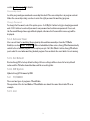
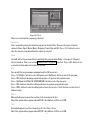
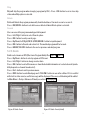
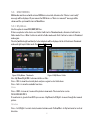
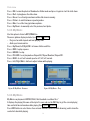
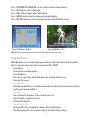
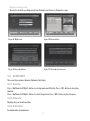
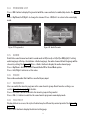
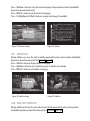
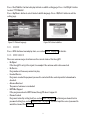
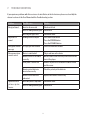
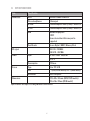
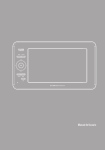
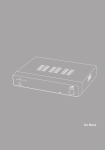
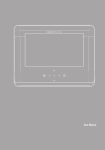
User Manual
1. INTRODUCTION
To ensure your safety and the safety of others, please ensure that you read all the safety information
before operating this product.
Keep this information in a safe place for future reference.
WARNING: To reduce the risk of fire or electric shock, do not expose this apparatus to rain or
moisture.
Safety Considerations.
≥≥ Position the cables so that they cannot be walked on or pinched by items placed on or against
them.
≥≥ Do not use the device in humid or damp conditions.
≥≥ Do not allow the device to get wet.
≥≥ Do not expose the device to dripping or splashing.
≥≥ Do not place water filled objects such as vases on top of the device.
≥≥ Do not place naked flame sources, such as candles, on the top of the device.
Ventilation
The slots and openings on the device are for ventilation. Do not cover or block them as it may cause
overheating.
NEVER let children push anything into the holes or slots on the case.
Battery Disposal
Please ensure batteries are disposed of safely.
Never dispose of batteries in a fire or with other household waste.
Check with your local authority for disposal regulations.
3
Cleaning
ALWAYS unplug the product before you clean it.
Do not use liquid or aerosol cleaners.
Clean the device with a soft, damp (not wet) cloth.
EnergyTV handling and care
Place the product in a well-ventilated area
Don’t install it in the cold or under direct sunlight
Leave a minimum 10cm gap all around the product
Do not disassemble, repair,
or reorganize the product
Don’t place cups with water or other liquids
on the top of the product
Don’t place objects on the top of the product
4
2. CONTROLS AND CONNECTIONS
1 2
3 4
5 6
7
8
1. SETUP: Adjust brightness/contrast/color/hue of the screen in playback mode.
2. SOURCE: Select the input source.
3. CH+/- V+/-: Navigation buttons. Used to browse the menus and to confirm selection. In playback mode
changes channel / adjusts volume.
4. OK: Confirm a selection within a menu or show the channel list in DVB-T mode.
5. ASPECT: Switch between 4:3 and 16:9 aspect ratios.
6. MENU: Access the setup menu.
7. EXIT: Leave the current menu.
8. IR Sensor: Receives the signal from the remote control.
9. Antenna coaxial connector.
10. 3.5 mm (1/8”) TRRS A/V input.
11. 3.5 mm (1/8”) TRRS A/V output.
12. 3.5 mm (1/8”) Stereo earphone output.
13. Power Switch.
14. DC Power connection DC (12 V).
15. USB connector.
16. Card reader.
15
16
5
9
10
11
12
13
14
3. REMOTE CONTROL
3.1. BUTTON DESCRIPTION
1 2
MUTE
EPG
INFO
RECORD
12 13
3
PAUSE
1
2
3
4
FAV
4
5
6
5
TV/
RADIO
7
8
9
6
STOP
0
AUDIO
15
TTX
16
14
CH+
7 8
VOL
+
OK
VOL
-
CH-
1.
2.
3.
4.
5.
6.
7.
8.
9.
10.
11.
12.
13.
14.
9
MENU
10 11
SETUP
SCREEN
MUTE: Mute/unmute the sound.
EPG: Electronic Program Guide.
PAUSE: Pause or resume the playback.
FAV: Access your favorite channels.
TV/RADIO: Switch between TV and radio
channels.
STOP: Stops the playback or recording.
CH+/- V+/-: Navigation buttons. Used to browse
the menus and to confirm selection. In playback
mode changes channel / adjusts volume.
OK: Confirms the selection.
MENU: Access the main menu.
SETUP: Adjust the brightness/contrast/color/hue
parameter of TFT screen.
SCREEN: Switch on/off the screen.
INFO: Display information about the channel
being viewed or special function indicated on
the menu.
RECORD: Record the program manually and
select the record duration if pressed twice.
Number keys: Select channels by number or use
EXIT/
RECALL
SUBTITLE
17 18
SPEAKER
ASPECT
19 20
when numerical input is required.
15. AUDIO: Selects between available audio tracks
or sets the sound mode as LR (stereo), LL (left)
or RR (right).
16. TTX: Teletext in DVB-T mode.
17. EXIT/RECALL: Return to the previous screen
or menu.
18. SUBTITLE: Switch among available subtitles.
19. SPEAKER: Enables/disables the integrated
speakers.
20. ASPECT: Switch between 4:3 and 16:9 aspect
ratios.
Note:
SUBTITLES/TEXT/AUDIO may not be available for all
channels.
A/V output is unavailable when working in A/V in
mode: it only works in DVB-T mode.
FUNCTION/SCREEN/SPEAKER/ASPECT will act
as RED/GREEN/YELLOW/BLUE key depending on
context.
6
3.2. BATTERY
Pull the battery loader out and insert a CR2025 battery.
Make sure to place the battery in the correct direction.
2
1
When not using the remote control for a long time remove the
battery.
When operating range reduces replace the battery.
4. BUILT-IN RECHARGEABLE BATTERY (2070/2090 MODELS ONLY)
This portable TV uses a smart battery management system with low-battery detection.
≥≥ If the battery voltage falls below a specific value, the unit will enter low battery mode displaying a
flashing low battery icon in the OSD, indicating the user needs to recharge the TV immediately.
≥≥ If the AC/DC adapter is connected the battery will be charged whatever the power switch is on or
off.
≥≥ When the battery is almost exhausted a blinking empty battery icon will be displayed on the leftup corner. The screen and audio will be disabled but the system is still working. If the user plugs
the DC adaptor soon enough the system will resume playback.
5. USER INTERFACE
Note that the first time you use EnergyTV it will automaticaly show the Setup->Installation screen in
order to scan for TV and radio channels. Please refer to Setup->Installation in page 8.
Once the channel scan is finished and all the channels are stored into the database, you can start to
watch the digital terrestrial TV channel or listen to the radio broadcast, some typical operations are
given in this chapter.
Press <Menu> to enter Main Menu. See Figure 1.
Press <Info> to display EnergyTV version information.
7
Figure 1. Main Menu - Setup
5.1. SETUP
Set the system settings. See Figure 1.
5.1.1. Installation
Figure 2. SETUP - Installation
Figure 3. SETUP - Installation (continued)
Set the receiving and playing program settings of EnergyTV. See Figure 2, Figure 3.
Antenna Setting
Set the antenna power on or off to supply +5V power to antenna or not.
Note: The default is OFF, set this option to ON only if EnergyTV is connected to an active antenna
which amplifies the received RF signal, otherwise please set it to OFF.
Country Setting
Set the country for Auto Scan, Manual Scan and Time Zone.
Note: Change the Country Setting will automatically change the default Time Zone and set the default
8
Frequency and Bandwidth for Auto Scan.
OSD Language
Set the On Screen Display Language.
Audio Language
Set the audio language for watching a program (availability depends on channel broadcaster).
Subtitle Language
Set the language for displaying subtitle program (availability depends on channel broadcaster).
LCN
Set the Logical Channel Number to ON or OFF.
Note: LCN is a number that uniquely identifies a logical channel, which is popular in some European
countries such as England or France.
Auto Time Zone / Time Zone
Allows you to enable or disable auto time zone update. If you know the GMT (Greenwich Mean Time)
time zone offset of your location, set the Auto Time Zone to OFF and select an appropriate Time
Zone, otherwise set it to ON and let the system update the time zone automatically according to the
transport stream. See Figure 3.
Note: Some Countries are covered with more than one Time Zone.
Auto Scan
Auto Scan will erase the database first, and scan default frequency and bandwidth by Country
Setting.
Press <OK> button to start Auto Scan.
Press <OK> button to confirm clear action and start Auto Scan.
It costs time to do Auto Scan, you can press <Exit> button to exit at anytime. See Figure 4, Figure 5.
Figure 4. Clear database message
Figure 5. AutoScan Finished
9
Manual Scan
Press <GREEN> button to start Manual Scan.
Manual Scan adds the scanning results into database, it doesn’t erase the database. But you have to
indicate the Frequency and Bandwidth for scanning. If you scan the same Frequency and Bandwidth
more than once, the previous programs will be overwritten.
Press <GREEN> button to enter Manual Scan Page.
Press <Up/Down> button to select Frequency option.
Press <0~9> button to input the Frequency value.
Press <Up/Down> button to select Bandwidth option.
Press <Left/Right> button to set Bandwidth value.
Press <OK/Exit> button to start scan or exit. See Figure 6, Figure 7.
Figure 6. Manual Scan edit
Figure 7. Manual Scan finished
5.1.2.TV Setup
Setup the display mode for TV. See Figure 8.
Figure 8. TV Setup
10
TV Format
≥≥ 4:3LB(LetterBox): Typically for wide screen content on conventional 4:3 TV with black bars above
and below the picture.
≥≥ 4:3PS(PanScan): Typically for wide screen content on conventional 4:3 TV with left and right
edges cropped.
≥≥ 16:9PB(PillarBox)/16:9 AUTO: Typically for wide screen 16:9 TV.
TV Mode
Set PAL, NTSC or AUTO for display. AUTO will switch PAL or NTSC by program content. This setting
should be matched with user’s TV.
OSD Transparency
Set the On Screen Display transparency. “1” is the most transparent.
Banner Display Time
Set Banner display time. Banner does not automatically disappear when set as “Always” and
disappears at timeout when set to other values.
Figure 9. Password page
5.1.3.Password
Set password for menu, channel or censorship lock. And the user can change password here, the
default Password is 6666. See Figure 9.
Menu Lock
Password-lock the menus.
Channel Lock
Lock the channel which has been set to lock status when turning on the Channel Lock. Please see
11
section “Lock” on page 13 for details.
Censorship Lock
Lock the program by password and censorship threshold. The censorship info is in program content.
Under the censorship rating, user has to enter the right password for watching program.
Change Password
To change the Password, select this option, press <Left/Right> button to trigger changing password
and <0~9> buttons to enter old password, new password and confirm new password. If succeed,
the Password Changed message will be displayed, otherwise the Password Error message will be
displayed.
5.1.4.Advance Timer
User can set timer for watching the program by date and time manually or from the TV/Radio
Guide(see section “Guide” on page 14). When scheduled date/time arrives, EnergyTV will automatically
switch to the scheduled program. Press any key except <Vol-/Vol+/Mute> button, EnergyTV will ask
you to abort it or not when watching booked program. You can delete the event while it is not running.
5.1.5.Set Default
Restore EnergyTV to factory default settings. All user settings will be restored to factory default
values and the TV/radio channel database will be erased together.
5.1.6.SW Update
Updates EnergyTV firmware by USB.
5.2. TV/RADIO
There are two types of programs: TV and Radio.
The operation of the List and Guide of TV and Radio are almost the same. Herein take TV as an
example.
5.2.1.List
12
Figure 10. TV List
There are several options to manage channels:
Favorites
User can quickly arrange the favorite programs by favorite filter. There are 8 groups of favorite
channels: News, Sport, Movie, Music, Shopping, Travel, Boy and Girl. Press <1~8> button to set or
clear the favorite group when Favorites option is selected.
Lock
Lock will ask for the password before watching this program when Setup -> Password ->Channel
Lock is turned on. Please see section “Channel Lock” on page 11 for details. Press <OK> button to set
or clear lock status when Lock option is selected.
Edit
You can edit the program name, maximum length is 20 characters.
Press <Left/Right> button to select Edit option and <Up/Down> button to select the program.
Press <OK> button to display program info and press it again to edit program name.
Press <Up/Down/Left/Right/0~9/RED/GREEN> button to select the character.
Press <OK> button to finish the editing and return to previous program info page.
Press <RED> button to save the editing and return to List or press <Exit> button to return to List
without saving.
Move
Move will allow you to move the position of the channels in the list.
Note: This option will not appear when SETUP->Installation->LCN is set to ON.
Sort
Sort will allow you to sort the channels by A<->Z or Pay<->Free.
Note: This option will not appear when SETUP->Installation->LCN is set to ON.
13
Skip
Skip will skip the program when changing a program by CH+/-. Press <OK> button to set or clear skip
status when Skip option is selected.
Delete
Delete will delete the program permanently from the database. You must rescan to recover it.
Press <OK/GREEN> button to set delete one or delete all when Delete option is selected.
Search
User can search the program name by partial keyword.
Press <Left/Right> button to select Search option.
Press <OK> button to entry search page.
Press <Up/Down/Left/Right/OK/0~9/RED/GREEN> button to input keyword.
Press <OK> button to Search and return List. The matched program will be focused.
Press <GREEN/YELLOW> button to the next or previous matched program.
5.2.2.Guide
Guide is also known as EPG (Electronic Program Guide). See Figure 11, Figure 12.
Press <Up/Down> button to select program or EPG event.
Press <Left/Right> button to change event or date.
Press <OK> button to exit all the menus or show the detailed information of a selected event (availability depends on channel broadcaster).
Press <Exit> button to exit to previous menu.
Press <RED> button to enter Book page and <YELLOW> button to save after edition. If it’s in conflict
with itself or other event, a conflict message will be displayed. The successful booking will be added
to Main Menu-> Setup-> Advanced Timer(see section 5.1.4 on page 12).
Figure 11. Guide - Event
Figure 12. Guide - Event (detail)
14
5.3. MULTIMEDIA
Multimedia must be used with external USB device inserted, otherwise the “Device is not ready!”
message will be displayed. If you remove the USB device a “Device is removed!” message will be
shown and the system will return to Main Menu.
5.3.1.My Album
Use this option to view JPEG/BMP/GIF files.
If there are photos in the device root folder it will start in Thumbnail mode, otherwise it will start in
Folder mode. Press <Blue> button to switch to Folder mode and <Exit> button to return to Thumbnail
mode again.
The info (width x height and date) of selected photo will be displayed at the left bottom in Thumbnail
mode and right up in Folder mode. See Figure 13,Figure 14.
Figure 13. My Album - Thumbnails
Figure 14. My Album - Folder
Use <Up/Down/Right/OK> to browse folders or files.
Press <OK> to view the selected photo and press again to start slide show.
Press <Info> to view the available functions.
Zoom
Press <RED> to zoom in / zoom out the photo in view mode. The zoom factor can be:
25-50-100-150-200 %
If zoom factor is greater than 100% you can use <Up/Down/Left/Right> to move through the zoomed
picture.
Rotation
Press <Left/Right> to rotate clock/counterclockwise and <Yellow/Blue> to flip horizontal or vertical
direction.
15
Slide show
Press <OK> to view the photo in Thumbnail or Folder mode and press it again to start the slide show.
Press <Red> to play/pause the slide show.
Press <Green> to set background music while slide show is running.
Press <Yellow> to switch between repeating modes.
Press <Blue> to set the time gap between photos.
Press <Up/Down> to manually select the previous/next photo.
5.3.2.My Music
Use this option to listen to MP3/WMA files.
The music jukebox display includes (see Figure 15, Figure 16):
≥≥ Progress bar with elapsed and total playing time.
≥≥ Audio spectrum visualizer.
Press <Up/Down/Left/Right/OK> to browse folders and files.
Press <RED> to play or pause.
Press <GREEN> to stop.
Press <YELLOW> to set play mode as Repeat All / Repeat Random / Repeat Off.
Press <BLUE> to set fast forward speed as x2 / x3 / x4 / normal.
Press <Left/Right/Mute> button to adjust volume while playing.
Figure 15. My Music - Browser
Figure 16. My Music - Play
5.3.3.My Movie
My Movie can play most of MPEG2, DivX, Xvid standard-resolution files.*
It displays the playing file name at the top left corner and use the INFO key to get the current playing
time and total time information while playing. See Figure 17, Figure 18.
Press INFO button to select device if an external USB hub connected while browsing, and to show the
control info bar while playing.
16
Press <UP/DOWN/LEFT/RIGHT/OK> to select folders and files during browsing
Press <OK> button to select a file to play.
Press <RED> button to play or pause while playing.
Press <GREEN> button to play the frame one by one while playing.
Press <YELLOW> button to set fast backguard speed as x2,x4,x8,x16,x32, normal.
Figure 17. My Movie - Browser
Figure 18. My Movie - Play
* Multimedia files compatibility depends on container file format and audio / video codec
5.3.4.My Record
Within My Record you can view the programs already recorded and configure recording options.
Note: the external storage device file system must be FAT or FAT32.
≥≥ Recorded List
View or delete recorded programs.
≥≥ Recording Device
Select the storage device and partition where the recordings will be stored.
≥≥ Recording Preference
Time Shift Size
Note that Time Shift Size is calculated automatically according to the current storage device or
partition and cannot be modified.
Time Shift
Pause: Timeshift starts when <Pause> button is pressed.
Auto: Timeshift is continuously active.
Off: Timeshift disabled
One Button recording
On: EnergyTV starts recording with a simple <Record> button press.
Off: After pushing <Record> you have to specify the lenght of the recording.
17
Default recording period
Specify the default recording period from 15 minutes to 8 hours in 15-minutes steps.
Figure 19. My Record
Figure 20.Recorded list
Figure 21. Recording Device
Figure 22. Recording Preferences
5.4. ACCESSORY
There are three options: Gomoku, Calendar, Calculator.
5.4.1.Gomoku
Press <Up/Down/Left/Right> button to set play mode and difficulty. Press <OK> button to start play
Gomoku.
Press <Up/Down/Left/Right> button to select the position. Press <OK> button to place the piece.
5.4.2.Calendar
Displays the year, month and day.
5.4.3.Calculator
For mathematical calculations.
18
6. NORMAL PLAY
Normal Play means EnergyTV under watching TV or listening to the Radio. See Figure 23, Figure 24, .
Figure 23. Normal Play - TV
Figure 24. Normal Play - Radio
6.1. INFORMATION
Press <Info> button once to display info banner. Banner displays the program No., favorite setting,
current time, program name, now and next event, lock, scramble, subtitle and teletext info. See
Figure 25.
Press <Info> button when banner exists to display detailed info of a present event
Press <Info> button when detail exist to display current program info. See Figure 26.
Figure 25. Information banner
Figure 26. Program Info
6.2. SWITCH PROGRAM
User can switch program by <CH+/-> or input channel number directly. If the input program number
doesn’t exist, EnergyTV will ignore the input.
Press <Recall> button to switch to the last watched channel from the current program.
6.3. VOLUME
Press <Vol-/Vol+> button to adjust the volume. Press <Mute> button to mute.
If you adjust the volume while on mute, mute will be cancelled.
19
6.4. PROGRAM LIST
Press <OK> button to display Program List with No., name and lock/scramble/skip status. See Figure
27.
Press <Up/Down/Left/Right> to change the channel. Press <OK/Exit> to return to the normal play
mode.
Figure 27. Program List
Figure 28. Audio Channels
6.5. AUDIO
Switch the sound channel and switch sound mode to LR(stereo) or LL(left) or RR(right). If setting
audio language at Setup->Installation->Audio Language, the audio channel default language will be
chosen by setting. See Figure 28. Press <Audio> button to display the audio channel page.
Press <Up/Down> button to select Channel/Audio PID or Sound Mode option.
Press <Left/Right> button to set the value.
6.6. PAUSE
Pause video and audio. But it will be cancelled by any input.
6.7. FAVORITES
User can switch the favorite programs in the same favorite group. About favorites settings, see
section “Favorites” on page 13 for details.
Press <YELLOW> button to switch to the favorite group in Program list.
Press <CH +/-> button to switch to the same favorite program in normal play mode.
6.8. TELETEXT
Display teletext on screen, the style of teletext may be different by content provider. See Figure 29,
Figure 30.
Press <Text> button to display the teletext setting page.
20
Press <Up/Down> button to select the teletext language if the program has teletext (availability
depends on channel broadcaster).
Press <OK/Exit> button to exit the teletext setting page.
Press <0~9/Up/Down/Left/Right> button to change teletext page (if available).
Figure 29. Teletext settings
Figure 30. Teletext
6.9. SUBTITLES
Display subtitles on screen. The style of subtitles may be different by content provider (availability
depends on channel broadcaster). See Figure 31, Figure 32.
Press <Subtitle> button to display subtitle setting page.
Press <Up/Down> button to select subtitle language, if subtitles are available.
Press <OK/Exit> button to exit subtitle setting page.
Figure 31. Subtitle settings
Figure 32. Subtitles
6.10. TELETEXT SUBTITLE
Display subtitle by teletext, the style of the teletext subtitle may be different by content provider
(availability depends on channel broadcaster). See Figure 33, Figure 34.
21
Press <Text/Subtitle> button to display teletext or subtitle setting page. Press <Left/Right> button
to select “TTX Subtitle”.
Press <Up/Down> button to select teletext subtitle language. Press <OK/Exit> button to exit the
setting page.
Figure 33. Teletext language
Figure 34. Teletext subtitles
6.11. GUIDE
Press <EPG> button at normal play state, see section “Guide” on page 14 for details.
6.12. MESSAGES
There are some messages to inform user the current status of the EnergyTV.
≥≥ No Signal
If the EnergyTV can’t get the signal, for example if the antenna cable is disconnected.
≥≥ No Service
Program doesn’t have any contents to play.
≥≥ Encoded Service
Program is encoded for payment, you need to contact with the content provider to know how to
decode it.
≥≥ Antenna Overload
The power of antenna is overloaded.
≥≥ HDTV Not Support
If the program content is HDTV format, EnergyTV doesn’t support it.
≥≥ Channel Locked
Program is locked by setting lock (see section “Lock” on page 13) and turning on channel lock in
password setting (see section “Channel Lock” on page 11). You must input the correct password to
watch the channel. See Figure 35.
22
Figure 35. Password-locked channel
6.13. SCREEN SETTING
Press the SETUP button to change the parameters of the image.
Figure 36. Picture settings
23
7. TROUBLESHOOTING
If you experience problems with this receiver or its installation, in the first instance please read carefully the
relevant sections of this User Manual and this Troubleshooting section.
Problem
Possible cause
Solution
No signal found
Aerial is disconnected
Check aerial lead
Aerial is damaged/misaligned Check aerial
Out of digital signal area
Check with dealer
No picture or
sound
Viewing incorrect output
Press the DTV/AV button
Press the SCREEN button
Press the SPEAKER button
Encrypted channel
message
It’s a pay-per-view channel
Select an alternative channel
No response from
remote control
Device is switched off
Plug in and turn on the device
Remote control is not aimed
correctly
Aim the remote control directly at the sensor on the
front of the player
Front panel is obstructed
Remove any obstacles between the remote control
and the sensor
Remote control batteries
inserted incorrectly
Check the polarity of the batteries
Remote control batteries
exhausted
Replace the batteries if necessary
Aerial may not be compatible
Check with dealer
Square blocks in
picture or picture
freezes
Aerial is damaged/misaligned Check aerial
24
8. SPECIFICATIONS
Item
Specification
Connectors
RF in
IEC 169-2 female connector
Stereo headphones
3.5 mm jack
A/V out
3.5 mm Composite video (CVBS) + audio L/R
A/V in
3.5 mm Composite video (CVBS) + audio L/R
USB
Multimedia playback
FAT32
Some external hard disks may not be
supported
Card Reader
Secure Digital / MMC / Memory Stick
RF signal
Power
VHF: 174 - 230 MHz
UHF: 470 - 862 MHz
Input
AC 100—240 V 50/60 Hz
DC 12 V
Screen
Consumption
12 W max.
Type
Color TFT-LCD
Size
7” (1070/2070 models) or 9” (2090 model)
Resolution
480 x 234 pixels
Dimensions
220 x 125 x 31.5 mm (1070/2070 models)
265 x 155 x 32 mm (2090 model)
Specifications are subject to change without further notice.
25
WARRANTY
Energy Sistem Soyntec S.A. warrants its products to be free from defects in materials and workmanship at the time of purchase.
The warranty period is 36 months from the date of purchase.
WARRANTY PROCEDURE
≥≥ Visit the Support section at http://support.energysistem.com and select your product to view the
FAQ (Frequently Asked Questions). The solution to your problem is very likely to have been already
published there. You will also be able to download user manuals, user guides, drivers and updates.
≥≥ If you cannot find an appropriate solution in the Support section, you may send us your enquiry or
warranty service request by email: [email protected]
≥≥ Alternatively, you may prefer to contact the distributor from which you purchased the product,
presenting the purchase receipt or invoice.
Specifications are subject to change without notice.
© 2010 by Energy Sistem®. All rights reserved.
TRADEMARKS.
All company, brand and product names are trademarks or registered trademarks of their respective
companies.
DECLARATION OF CONFORMITY
Manufacturer Name: Energy Sistem Soyntec S. A.
Address: Pol. Ind. Finestrat – C/ Calpe, 1 – 03509 Finestrat Alicante
Tel: 902 388 388
Fax: 902 119 034
NIF: A53107488
We declare under our own exclusive responsibility that the products:
Energy Sistem® Portable Multimedia TV Energy™ TV1070 Black
Energy Sistem® Portable Multimedia TV Energy™ TV2070 Black/White/Pink
Energy Sistem® Portable Multimedia TV Energy™ TV2090 Black
Are in compliance with the essential directives, norms and standards of the European Union 89/336/
EEC (EMC Directive).
Manufacturing country: China
26