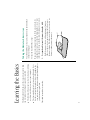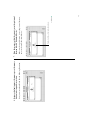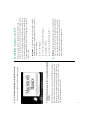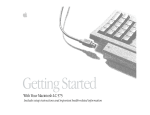
1
Includes setup instructions and important health-related information
With Your Macintosh LC 520
Getting Started
irst
F
s
i
h
T
Read
n
n
n
Your Computer at a Glance 18
Taking the Macintosh Basics tour 12
Turning the computer on and off 16
n
The AppleCD 300i drive 31
Setting up your CD-ROM software 33
Using discs in your CD-ROM drive 35
Playing audio compact discs and audio tracks on
CD-ROM discs 38
Working with Photo CD images 41
Troubleshooting for the CD-ROM drive 53
Using the Optional CD-ROM Drive 31
Setting Up 1
Learning the Basics 12
Using Your Macintosh LC 520 20
Plugging in the computer 2
Connecting the mouse and keyboard 3
Turning on your computer for the first time 4
Problems starting up? 6
Safety instructions 6
Health-related information about computer use 7
What’s next? 11
n
Adjusting the sound 20
Using the built-in microphone 22
Adjusting the screen 22
Saving energy 23
Installing an expansion card 25
Using a RAM disk for temporary storage 29
Advice about using a modem with your
Macintosh LC 520 30
Starting up your computer from an external
hard disk 30
Radio and television interference ii
Laser information iii
Contents
m Plug the computer into an outlet that is on a different circuit from the
television or radio. (That is, make certain the computer and the television
or radio are on circuits controlled by different circuit breakers or fuses.)
m Move the computer farther away from the television or radio.
m Move the computer to one side or the other of the television or radio.
m Turn the television or radio antenna until the interference stops.
If your computer system does cause interference to radio or television
reception, try to correct the interference by using one or more of the following
measures:
You can determine whether your computer system is causing interference by
turning it off. If the interference stops, it was probably caused by the computer
or one of the peripheral devices.
This equipment has been tested and found to comply with the limits for a
Class B digital device in accordance with the specifications in Part 15 of FCC
rules. These specifications are designed to provide reasonable protection
against such interference in a residential installation. However, there is no
guarantee that the interference will not occur in a particular installation.
The equipment described in this manual generates, uses, and can radiate radiofrequency energy. If it is not installed and used properly—that is, in strict
accordance with Apple’s instructions—it may cause interference with radio and
television reception.
Radio and television interference
This equipment has been tested and found to comply with the limits for a
Class B digital device in accordance with the specifications in Part 15 of FCC
rules. See instructions if interference to radio or television reception is
suspected.
Important
Observation des normes—Classe B Le présent appareil numérique n’émet
pas de bruits radioélectriques dépassant les limites applicables aux appareils
numériques de la Classe B prescrites dans les règlements sur le brouillage
radioélectrique édictés par le Ministère des Communications du Canada.
DOC Class B Compliance This digital apparatus does not exceed the Class B
limits for radio noise emissions from digital apparatus set out in the radio
interference regulations of the Canadian Department of Communications.
This product was tested for FCC compliance under conditions that
included the use of shielded cables and connectors between system
components. It is important that you use shielded cables and connectors to
reduce the possibility of causing interference to radios, television sets, and
other electronic devices. For Apple peripheral devices, you can obtain the
proper shielded cables from your authorized Apple dealer. For non-Apple
peripheral devices, contact the manufacturer or dealer for assistance. S
S Important: Changes or modifications to this product not authorized by
Apple Computer, Inc., could void the FCC Certification and negate your
authority to operate the product.
If necessary, consult your authorized Apple dealer or an experienced
radio/television technician for additional suggestions. You may find helpful the
following booklet, prepared by the Federal Communications Commission:
Interference Handbook (stock number 004-000-00345-4). This booklet is
available from the U.S. Government Printing Office, Washington, DC 20402.
s Warning: Do not attempt to disassemble the cabinet containing the laser.
The laser beam used in this product is harmful to the eyes. The use of
optical instruments, such as magnifying lenses, with this product increases
the potential hazard to your eyes. For your safety, have this equipment
serviced only by an authorized Apple service provider. s
s Warning: Making adjustments or performing procedures other than
those specified in your equipment’s manual may result in hazardous
exposure. s
CAUTION
ADVARSEL
ADVARSEL
VARNING
VARO!
LASER RADIATION WHEN OPEN: AVOID EXPOSURE TO BEAM
LASERSTRÅLING VED ÅBNING, UNDGÅ UDSÆTTELSE FOR STRÅLING
LASERSTRÅLING NÅR DEKSEL ÅPNES, UNNGÅ EKSPONERING FOR STRÅLEN
LASERSTRÅLNING NÄR DENNA DEL ÄR ÖPPNAD, STRÅLEN ÄR FARLIG
AVATTAEESSA OLET ALTTIINA LASERSÄTEILYLLE, ÄLÄ KATSO SÄTEESEN
CLASS 1 LASER PRODUCT
KLASSE 1 LASER PRODUKT
LASER KLASSE 1 PRODUKT
If you have an internal Apple CD-ROM drive in your computer, your computer
is a Class 1 laser product. The Class 1 label, located on the computer, indicates
that the drive meets minimum safety requirements. A service warning label is
on the CD-ROM drive inside the computer.
AppleCare is a service mark of Apple Computer, Inc., registered in the U.S. and other
countries.
AppleCD, Apple Desktop Bus, and QuickTime are trademarks of Apple Computer, Inc.
Apple, the Apple logo, LaserWriter, and Macintosh are trademarks of Apple Computer,
Inc., registered in the U.S. and other countries.
© Apple Computer, Inc., 1993
20525 Mariani Avenue
Cupertino, CA 95014-6299
(408) 996-1010
The Apple logo is a trademark of Apple Computer, Inc., registered in the U.S. and other
countries. Use of the “keyboard” Apple logo (Option-Shift-K) for commercial purposes
without the prior written consent of Apple may constitute trademark infringement and
unfair competition in violation of federal and state laws.
You may use the software on any computer owned by you, but extra copies cannot be
made for this purpose.
This manual and the software described in it are copyrighted, with all rights reserved.
Under the copyright laws, this manual or the software may not be copied, in whole or
part, without written consent of Apple, except in the normal use of the software or to
make a backup copy of the software. The same proprietary and copyright notices must
be affixed to any permitted copies as were affixed to the original. This exception does
not allow copies to be made for others, whether or not sold, but all of the material
purchased (with all backup copies) may be sold, given, or loaned to another person.
Under the law, copying includes translating into another language or format.
K Apple Computer, Inc.
Mention of third-party products is for informational purposes only and constitutes
neither an endorsement nor a recommendation. Apple assumes no responsibility with
regard to the performance or use of these products.
Simultaneously published in the United States and Canada.
Trinitron is a registered trademark of Sony Corporation.
Tektronix is a registered trademark and Phaser is a trademark of Tektronix, Inc.
QuarkXPress is a registered trademark of Quark, Inc.
MacPaint is a registered trademark of Claris Corporation.
Macintosh Basics was developed using VideoWorks Interactive. MacroMind is a
registered trademark and VideoWorks Interactive is a trademark of MacroMind, Inc.
Kodak is a trademark of Eastman Kodak Company.
ITC Zapf Dingbats is a registered trademark of International Typeface Corporation.
Exposure is a registered trademark of Preferred Publishers, Inc.
Adobe, Adobe Illustrator, and PostScript are trademarks of Adobe Systems
Incorporated, which may be registered in certain jurisdictions. Adobe Photoshop is a
trademark of Adobe Systems Incorporated.
Plugging in the computer
Connecting the mouse and keyboard
Turning on your computer
n
n
n
Power cord
Optional security screws
Setting up your computer involves these steps:
In this all-in-one computer, Apple has integrated a Trinitron®
monitor for exceptional color quality, reduced the number of
cables, and moved controls to the front for easy access. Set it up
and learn the basics. Then explore the many options to see what
you can do with Apple’s most affordable media-ready system,
featuring stereo sound and an optional CD-ROM drive.
Congratulations on your purchase of a Macintosh LC 520
computer!
Setting Up
Keyboard
Keyboard cable
Macintosh LC 520
Mouse
1
2
Main power
switch
S Important: To protect both yourself and the computer
from electrical hazards, the Macintosh LC 520 should remain
turned off until you are finished connecting its parts. Check
the main power switch at the back of the computer. Make sure
that the bottom of the switch (marked with an “j”) is
pressed in. S
Plug in the Macintosh before connecting anything to it. The plug
grounds the computer and protects it from electrical damage
while you are setting up.
Plugging in the computer
Power
cord plug
Socket end of the
power cord
2. Plug the other end of the power cord into a three-hole
grounded outlet or power strip.
S Important: Be sure at least one end of the power cord is
within easy reach so that you can unplug the computer easily
when you need to. S
1. Plug the socket end of the power cord into the recessed
power plug (marked with the symbol ≤) on the back
of the computer.
v By the way: The ◊ icon is often called the Apple Desktop Bus
(ADB) icon. You may see this term in other places in the
manuals that came with your computer. v
The plug and the port are marked with the same icon (◊).
Align the icons before you insert the plug.
1. Plug the mouse cable into the port on the right side of
the keyboard. (If you prefer to use the mouse with your
left hand, plug the mouse cable into the port on the
left side of the keyboard.)
Follow these steps to connect the mouse and keyboard:
Connecting the mouse and keyboard
s Warning: This equipment is intended to be electrically
grounded. Your Macintosh LC 520 is equipped with a threewire grounding plug—a plug that has a third (grounding) pin.
This plug will fit only a grounded AC outlet. This is a safety
feature. If you are unable to insert the plug into the outlet,
contact a licensed electrician to replace the outlet with a
properly grounded outlet. Do not defeat the purpose of the
grounding plug! s
ADB port
As you work with your Macintosh, you may find that you want to
adjust the height of the keyboard. Your Macintosh User’s Guide
provides information on adjusting the keyboard so that you can
work comfortably.
3. Plug the other end of the keyboard cable into one of
the ports marked with the ◊ icon on the back of the
computer.
If you plugged the mouse cable in on the right, for example,
plug the keyboard cable in on the left.
2. Plug one end of the keyboard cable—both ends are the
same—into the port on the other side of the keyboard.
This icon is on both
the cable and the port.
3
4
Main power
switch
This switch provides power to your computer, but doesn’t
turn it on.
1. Press the top of the main power switch at the back
of the computer. The top of the switch is marked with
an “i”.
To see if your hard disk already has system software installed,
follow these two steps to turn on your computer.
In order to start up, your computer must have special software
(called system software) installed on the hard disk. Your computer
may have this software already installed.
Turning on your computer for the first time
Power key
Now your computer is on.
2. Press the Power key (marked with the P icon) on the
keyboard to turn on your computer.
v Note: The desktop is gray right now because that’s the way
your Macintosh LC 520 was shipped from the factory. If you
want to change the color of the desktop pattern, see
Chapter 11 of the Macintosh User’s Guide. v
If your screen looks like the one below, with a small, labeled
picture (icon) at the top right, then system software has already
been installed and your computer is ready to use. Look at “Safety
Instructions,” later in this book, for important safety instructions.
What you see after you turn on your computer depends on
whether system software has already been installed on your hard
disk.
v If your computer came with a CD-ROM disc labeled CD
Install Me First: See the manual titled System Software
Installation & Backup for information on how to use the
CD-ROM disc to install system software. v
S Important: When installing system software from floppy
disks, be sure to use the Install Me First disk you received
with your computer. Check the label of the Install Me First
disk to make sure it is for your Macintosh LC 520. S
v If your computer came with a set of floppy disks: See
Chapter 8 of the Macintosh User’s Guide for instructions on
how to install system software from floppy disks. v
If you see a blinking question mark, you need to install system
software in one of the following ways:
5
6
n
n
n
Is the keyboard cable connected correctly? (Don’t disconnect
the keyboard cable while your computer is on. You could
damage your equipment.)
Is the computer itself turned on? Check to see if the power-on
light on the front of your computer is green. If it’s not, you
need to turn the computer on, using the main power switch
at the back of the computer.
Is the computer firmly plugged into a power source? If it is
plugged into a power strip, is the power strip turned on?
If you don’t see anything on the screen, check these items to see
if you can identify the problem:
Problems starting up?
n
n
If you see a blinking question mark, you’ll need to install
system software. If your computer came with a set of floppy
disks, go to Chapter 8 of the Macintosh User’s Guide for
instructions on installing system software from floppy disks.
Make sure that the label of the Install Me First disk says
“Macintosh LC 520.” If your computer came with a CD-ROM
disc labeled CD Install Me First, see the manual titled System
Software Installation & Backup for instructions on how to
use the disc to install system software.
If you have an external hard disk attached to your computer,
is that hard disk turned on? Was it turned on before you
turned on the computer? If you’re not sure, turn everything
off as described in “Turning the Computer On and Off.” Then
turn on the external hard disk before you turn on your
computer.
you want to clean the case (use only the recommended
procedure described below)
you suspect that your Macintosh LC 520 needs service or
repair
your Macintosh LC 520 has been dropped or the case has
been otherwise damaged
your Macintosh LC 520 is exposed to rain or any other excess
moisture
you spill something into the case
the power cord or plug becomes frayed or otherwise
damaged
n
n
Never turn on your computer with any of the internal parts
removed.
Replace the back panel of the computer, if you ever need to
remove it, before you use your computer.
For additional safety:
n
n
n
n
n
n
n
Turn off the computer completely and disconnect the power plug
(by pulling the plug, not the cord) if any of the following
conditions exists:
Follow all instructions and warnings dealing with your system.
Keep these instructions handy for reference by you and
others.
Read all the installation instructions carefully before you plug
your Macintosh LC 520 into a wall socket.
Protect your Macintosh LC 520 from dampness or wet
weather, such as rain, snow, and so on.
Keep your Macintosh LC 520 away from sources of liquids,
such as wash basins, bathtubs, shower stalls, and so on.
2. Wipe the surfaces lightly with a clean, soft cloth dampened
with water.
1. Turn off the computer completely and then disconnect the
power plug. (Pull the plug, not the cord.)
To clean the case, do the following:
7
s Warning: Electrical equipment may be hazardous if misused.
Operation of this product, or similar products, must always be
supervised by an adult. Do not allow children access to the
interior of any electrical product and do not permit them to
handle any cables. s
n
n
n
n
Be sure that you always do the following:
For your own safety and that of your equipment, always take the
following precautions.
Safety instructions
8
The most common health effects associated with using a
computer are musculoskeletal discomfort and eye fatigue. We’ll
discuss each area of concern below. For information about electric
and magnetic emissions, look in the reference material that comes
with your computer.
Muscle soreness, eye fatigue, and other discomforts and injuries
sometimes associated with using computers can occur from
performing any number of activities. In fact, misuse of the same
muscles during multiple activities can create a problem that might
not otherwise exist. For example, if you engage in nonwork
activities that involve repetitive stress on the wrist—such as
bicycling—and also use your computer’s keyboard improperly,
you may increase your likelihood of developing wrist problems.
Some individuals are at greater risk of developing these problems
because of their health, physiology, lifestyle, and general exposure
to stress. Work organization and conditions, such as workstation
setup and lighting, also play a part in your overall health and
comfort. Preventing health problems is a multifaceted task that
requires careful attention to the way you use your body every
hour of every day.
Health-related information about
computer use
Another type of musculoskeletal concern is repetitive stress
injuries (RSIs), also known as cumulative trauma disorders
(CTDs). These problems can occur when a certain muscle or
tendon is repeatedly overused and forced into an unnatural
position. The exact causes of RSIs are not totally understood, but
in addition to awkward posture, such factors as the amount of
repetition, the force used in the activity, the individual’s
physiology, workplace stress level, and lifestyle may affect the
likelihood of experiencing an RSI.
As with any activity that involves sitting for long periods of time,
using a computer can make your muscles sore and stiff. To
minimize these effects, set up your work environment carefully,
using the guidelines that follow, and take frequent breaks to rest
tired muscles. To make working with your computer more
comfortable, allow enough space in your work area so that you
can change position frequently and maintain a relaxed posture.
Musculoskeletal discomfort
No one, of course, can guarantee that you won’t have problems
even when you follow the most expert advice on using computer
equipment. You should always check with a qualified health
specialist if muscle, joint, or eye problems occur.
This section offers advice on setting up your work area to
enhance your comfort while you use your computer. Since the
effects of repetitive movements associated with using a computer
can be compounded by those of other work and leisure activities
to produce or aggravate physical problems, proper use of your
computer system must be considered as just one element of a
healthy lifestyle.
RSIs did not suddenly arise when computers were invented;
tennis elbow and writer’s cramp, for example, are two RSIs that
have been with us for a long time. Although less common than
other RSIs, one serious RSI discussed more often today is a wrist
problem called carpal tunnel syndrome, which may be aggravated
by improper use of computer keyboards. This nerve disorder
results from excessive pressure on the median nerve as it passes
through the wrist to the hand.
n
n
Take frequent short breaks to give your muscles and eyes a
chance to rest.
Arrange your work space so that the furniture is properly
adjusted for you and doesn’t contribute to an awkward
working posture.
To prevent discomfort and eye fatigue:
Whenever you’re engaged in an activity that involves close-up
work—such as reading a magazine, doing craft work, or using a
computer—be sure to have sufficient glare-free lighting and give
your eyes frequent rest breaks by looking up and focusing on
distant objects. Remember to have your eyes examined regularly.
Eye fatigue can occur whenever the eyes are focused on a nearby
object for a long time. This problem occurs because the eye
muscles must work harder to view an object that’s closer than
about 20 feet (6 meters). Improper lighting can hasten the
development of eye fatigue. Although eye fatigue is annoying,
there’s no evidence that it leads to permanent damage.
Eye fatigue
9
10
n
Thighs horizontal
Lower back supported
Forearms level or tilted up slightly
Forearms and hands in a straight line
Shoulders relaxed
n
45–70 cm (18–28 in.)
The back of the chair should support your lower back (lumbar
region). Follow the manufacturer’s instructions for adjusting
the backrest to fit your body properly.
An adjustable chair that provides firm, comfortable support is
best. Adjust the height of the chair so your thighs are
horizontal and your feet flat on the floor.
Here are some guidelines for adjusting the furniture in your office
to accommodate your physical size and shape.
Arranging your office
Feet flat on the floor
Clearance under work surface
Screen positioned to avoid reflected glare
Top of the screen at or slightly below eye level
(You may need to adjust the height of your
computer by placing something under it or
by raising your work surface.)
You may have to raise your chair so your forearms and hands
are at the proper angle to the keyboard. If this makes it
impossible to rest your feet flat on the floor, you can use a
footrest with adjustable height and tilt to make up for any gap
between the floor and your feet. Or you may lower the
desktop to eliminate the need for a footrest. Another option is
to use a desk with a keyboard tray that’s lower than the
regular work surface.
When you use the computer keyboard, your shoulders should
be relaxed. Your upper arm and forearm should form an
approximate right angle, with your wrist and hand in roughly
a straight line.
n
n
Position the computer to minimize glare and reflections on
the screen from overhead lights and windows.
Arrange the computer so the top of the screen is slightly
below your eye level when you’re sitting at the keyboard. The
best distance from your eyes to the screen is up to you,
although most people seem to prefer 18 to 28 inches (45 to
70 cm).
Position your mouse at the same height as your keyboard.
Allow adequate space to use the mouse comfortably.
n
n
n
n
n
11
Start your own work. Consult the Macintosh User’s Guide or
this book if you have questions about your computer.
Read the “Using Your Macintosh LC 520” section of this book
for tips on how to use some of the important features of your
computer.
Turn to “Your Computer at a Glance,” later in this book, for an
overview of major features of your computer and instructions
on how to find out more about them.
Read “Turning the Computer On and Off,” later in this book,
for important information.
If you are new to the Macintosh, continue with the next
section, “Learning the Basics,” to learn more about how to use
your computer.
You’ve completed setting up your computer. Continue with one of
the following steps:
What’s next?
The Learning Macintosh section of your Macintosh User’s
Guide is a tutorial that reinforces basic skills taught in the
tour, and teaches a few additional skills you’ll find helpful as
you become more proficient.
The Macintosh Basics tour teaches the most basic skills you
need to master before you can use your computer.
12
Take the Macintosh Basics tour first.
n
n
The Macintosh LC 520 comes with a tour and a tutorial to help
you start using your computer as quickly as possible.
Learning the Basics
Hold the mouse as shown, cable pointing away from you.
Slide it so that it stays in contact with the table. Don’t press
the mouse button. Watch the arrow (8) on your screen to see
if it moves when you move the mouse.
1. Use your hand to scoot the mouse along the table.
Make sure your computer is turned on. If the screen is dark, try
adjusting the screen (as described in “Adjusting the Screen,” later
in this book) until you see the Macintosh desktop on your screen.
To take the tour, follow these steps:
Your Macintosh Basics tour can be found on the hard disk that’s
inside your computer.
Taking the Macintosh Basics tour
You can move
the arrow by
moving the
mouse.
If the arrow doesn’t move on the screen, make sure that the
cable connecting the mouse to the keyboard is secure and
that your mouse is positioned as shown in the picture. (Don’t
disconnect the cable while your computer is on; you could
damage your equipment.)
2. Notice that the arrow (8) moves in the direction you
move the mouse.
13
continues .
Put the tip of
the arrow
inside this
picture.
Make sure the tip of the arrow is over the picture, not over
the words “Macintosh HD.”
3. Move the mouse so that the arrow is over the picture
labeled “Macintosh HD.”
Try pressing twice more quickly and be careful not to
move the mouse while you press.
Be sure to press the mouse button twice.
Make sure the tip of the arrow is touching the picture, not
the words beneath it.
14
The items in this illustration may not exactly match those on your
screen.
n
n
n
Now your screen should look like the picture shown in this
step. If it doesn’t, try steps 3 and 4 again, paying special
attention to the following:
4. Being careful not to move the mouse, click the mouse
button twice in quick succession.
Make sure the tip of the arrow is over the picture, not over
the words “Macintosh Basics.”
Put the tip of the arrow inside this picture.
5. Move the mouse to place the tip of the arrow inside the
picture of the folder labeled “Macintosh Basics.”
Make sure the tip of the arrow is over the picture of the man,
not over the words “Macintosh Basics.”
Now your screen should look like the following illustration:
15
continues .
Put the tip of the arrow inside this picture.
7. Move the mouse so that the arrow is over the picture of
the man labeled “Macintosh Basics.”
6. Being careful not to move the mouse, press the mouse
button twice in quick succession.
16
When you finish the tour, continue with “Turning the Computer
On and Off.” Read the rest of this book for information that can
help you use your computer safely and efficiently. Then turn to
the Learning Macintosh section of your Macintosh User’s Guide
and begin the learning exercises there.
9. Follow the instructions on the screen and work through
the tour.
Now your screen should look like the following picture:
8. Press the mouse button twice in quick succession.
attach other equipment to the computer
unplug the computer
leave it for an extended period of time
n
n
n
s Warning: If you turn off the computer by pressing the main
power switch on the back of the computer before shutting it
down by either of the methods described next, you will lose
any work you haven’t previously saved onto a disk, and you
risk permanently losing open documents. s
S
move the computer
n
S Important: Use the main power switch on the back of the
computer to turn the computer completely off if you need to
do any of the following:
When you started up your computer for the first time, you
pressed the main power switch at the back of the computer. From
now on, you’ll leave the main power switch on the back in the on
position and shut down your computer with the keyboard or with
a menu command. Both methods of shutting down are described
in this section.
Turning the computer on and off
You will be prompted to save your work, if you haven’t already
done so.
2. Click Shut Down.
You see a message asking whether you want to shut down or
continue working.
1. Press the Power key (marked with the P icon) on the
keyboard.
To shut down the computer with the keyboard:
Shutting down the computer with the keyboard
You will be prompted to save your work, if you haven’t already
done so.
Use the mouse to choose the Shut Down command from the
Special menu.
n
17
You’ll find the Power key at the top of the keyboard.
(Remember that the Power key works only if the main power
switch on the back of the computer is turned on.)
Press the Power key (marked with the P icon) on the
keyboard. (Make sure that the main power switch on the back
of the computer is in the “on” position. The top part of the
switch, marked with an “i”, should be pressed in.)
To turn on the computer after you have shut it down with either
the menu command or the keyboard:
Turning on the computer
n
Shutting down the computer with a menu
command
18
Keyboard
(See your Macintosh User’s Guide
for information on adjusting
the keyboard height.)
(Use this key to
turn your computer
on and off.)
P Power key
Power-on light
(A green light indicates
that the computer is on.)
Screen control buttons
(Use these buttons
to lighten or darken
your screen.)
(Use these buttons to
change the volume of
the computer’s sound.)
_ Sound control buttons
CD-ROM drive
(optional)
Your Computer at a Glance
Headphone jack
Stereo speakers
Floppy disk drive
Color Trinitron display
(Supports up to
thousands of colors.)
Built-in microphone
(See your Macintosh User’s
Guide for information on
recording sound.)
Mouse
(Connects your Macintosh to SCSI
devices, such as hard disk drives,
scanners, and printers. See your
Macintosh User’s Guide for
more information.)
g SCSI port
W Modem port
[ Printer port
V ADB ports
(Connect your Macintosh
to input devices, such as a
keyboard or a trackball. See
your Macintosh User’s Guide
for more information.)
I Main power switch
≤ Power plug
(Connects your Macintosh
to another audio source such
as a compact disc or an audio
cassette player.)
≈ Sound input port
(Connects your Macintosh
to sound output devices,
such as a pair
of headphones.)
_ Sound output port
Expansion card
access cover
(See the “Using Your
Macintosh LC 520”
section of this book to
learn how to install
expansion cards.)
Hole for optional
security screw
(You can use the screws
that came with your computer
to secure the back panel.)
Hard disk drive
(Internal)
19
Using the built-in microphone
Adjusting the screen
Saving energy
Installing an expansion card
Using a RAM disk for temporary storage
Advice about using a modem with your Macintosh LC 520
Starting up your computer from an external hard disk
n
n
n
n
n
n
n
20
Adjusting the sound
n
The following topics are covered here:
As you work with your Macintosh, you can consult your
Macintosh User’s Guide for answers to questions that you may
have. This section provides information on features that are not
covered in the user’s guide.
v Note: If you are playing an audio compact disc, see “Playing
Audio Compact Discs and Audio Tracks on CD-ROM Discs”
later in this book. v
There are two ways you can adjust the volume of the sounds that
your Macintosh plays: by using the buttons on the front of the
computer or by using the Sound control panel.
Many programs have the Macintosh make sounds when your
attention is required or when you’re giving a command or
attempting an action that the computer cannot recognize or
perform at that time.
Adjusting the sound
Using Your Macintosh LC 520
Press the button on the bottom to make the sound softer.
n
_ Sound
control buttons
Press the button on the top to make the sound louder.
n
You can also adjust the volume of the sounds your computer plays
by using the Sound control panel. To use the Sound control panel:
On the front of your Macintosh are two sets of buttons. The set on
the right (marked with the - icon) is for sound control. To use
these buttons to increase or decrease the volume of the sounds
your Macintosh plays:
21
v By the way: You can turn off sound completely by clicking the
Mute box. When the Mute box is checked and your Macintosh
wants to alert you, the menu bar flashes. v
After you release the mouse, the sound plays at the new
volume.
Drag the slider to
adjust the volume.
3. Drag the slider of the Speaker Volume up or down to
set the volume level.
2. Open the Sound control panel.
1. Choose Control Panels from the Apple (K) menu.
Using the Sound control panel
Using the sound control buttons on the computer
22
s Warning: Do not stick any small objects into the built-in
microphone. Doing so may damage your equipment. s
Built-in
microphone
You can adjust the level of light and dark on the screen of your
built-in monitor (to change the contrast) either by using the
buttons on the front of the computer or by using the Screen
control panel.
Your Macintosh LC 520 comes with a built-in microphone to
record live sounds. The microphone is highly sensitive. Once
you’ve turned it on (which you do with a sound-recording
program), it can pick up sounds within a range of several feet. See
your Macintosh User’s Guide for information on recording sound.
Press the button on the bottom to darken your screen.
n
Screen
control buttons
Press the button on the top to lighten your screen.
icon) on
n
To use the screen control buttons (marked with the
the computer:
Using the screen control buttons on the computer
Adjusting the screen
Using the built-in microphone
S Important: Normally, use only the Screen Contrast control.
Don’t use the Screen Brightness control unless your screen
appears dark even when the Screen Contrast slider is all the
way to the right. S
The screen changes as you drag the slider.
Drag the slider to adjust the contrast on
your screen.
You should only use the Brightness control if
your screen begins to appear dark after extended
computer use (two to three years).
3. Drag the Screen Contrast slider to the right or left to
adjust the level of light.
2. Open the Screen control panel.
23
Turning off the screen conserves energy. It also protects the
screen from “burning in” images, which can occur if you leave an
unchanging image on the screen for many hours or days.
Your Macintosh comes with software that reduces the amount of
energy consumed when you are not using your computer. The
software allows you to set the screen to turn off after a period of
inactivity, the length of which you specify. The image on the
screen reappears when you move the mouse or press any letter or
number key on the keyboard. Because the screen needs to warm
up, it will take up to 15 seconds for the picture to reappear.
You can also use the Screen control panel to adjust the level of
light on your screen.
1. Choose Control Panels from the Apple (K) menu.
Saving energy
Using the Screen control panel
24
Click here to
activate the
screen power
saver.
3. Click the box labeled “Turn off built-in screen when
idle.”
2. Open the Screen control panel.
1. Choose Control Panels from the Apple (K) menu.
To set the screen to turn off:
S Important: When the screen is off, the computer is still on.
The green light on the front of the computer indicates that
the computer is still on. S
For example, if you choose 15 minutes, your screen will
darken after your computer has been inactive for 15 minutes.
The image will appear once again, exactly as you left it, if you
move the mouse or press any letter or number on the
keyboard. Because the screen needs to warm up, it will take
up to 15 seconds for the picture to reappear.
4. Drag the slider to choose the number of minutes until
the screen turns off.
s Warning: To avoid damaging your computer and expansion
card, do not attempt to install any expansion card without
first checking the documentation for that card. If the
documentation specifies that an Apple-authorized dealer
or service provider must install the card (usually because
the installation requires special training or tools), be sure to
have your Apple dealer or service provider do the installation.
If you attempt to install the card yourself, any damage you
cause to your computer will not be covered by the limited
warranty on your computer. If the card is not an Apple-labeled
product, then check with an authorized Apple dealer or
service provider to see if you can install it yourself. s
s Warning: If you have installed a floating-point unit (FPU) on
the main logic board of your Macintosh LC 520, do not install
an expansion card that also contains one. If you have two
FPUs, your Macintosh LC 520 may not work properly. s
The Macintosh LC 520 comes with a slot inside called a processordirect slot in which you can install a processor-direct expansion
card for special purposes. Some expansion cards are designed so
that you can install them yourself. Others can be installed only by
an authorized Apple representative. To install a card, use the
documentation supplied with the card you plan to install, or
follow the instructions in this section.
Installing an expansion card
25
continues .
4. If there are screws on either side of the back panel,
remove them.
3. Unplug the cable that connects your keyboard to the
computer.
2. Turn off the computer completely by pressing the main
power switch at the back of the computer.
1. Choose Shut Down from the Special menu or press the
Power key on the keyboard.
To install an expansion card:
26
6. Press down on the tabs and pull gently until the back
panel opens.
5. Place your thumbs on the two plastic tabs on the back
panel of the computer.
s Warning: Don’t pull the board all the way out; this can
damage your Macintosh. s
8. Slide the logic board (the board that holds the
components that make your computer work) partway
out until you have access to the entire slot at the right
side of the board.
7. Take the back panel off and set it aside.
Hold the card by its top edge to avoid touching the connector
on the bottom of the card.
9. Remove the processor-direct expansion card from its
static-proof bag.
You’ll need to hook your fingers around the little metal boxes
to pull the logic board.
27
continues .
Don’t force the card. If you meet resistance, pull the card out
and try again. To see if the card is properly connected, lift it
gently. If it resists and stays in place, it’s connected.
11. Press down on the card until the connector is solidly in
place.
10. Align the card over the expansion slot.
28
Pinch together the plastic tabs on the access cover to remove
it and pop it out. With the access cover off, you can use the
port on the card you just installed.
13. If there is a connector on the card that you just
installed (for example, if you are installing an Apple IIe
Card), remove the access cover on the back panel you
removed earlier.
Push on the edge of the logic board until it is finally in place.
12. Slide the logic board back in.
s Warning: Never operate your computer without replacing all
of its internal parts and the back panel. You could cause
damage to your equipment. s
Slip the back cover over the prongs at the bottom edge of the
back of the computer. If your back panel was held on by
screws, replace them.
14. Replace the back panel of the computer.
Leave the switch on so you can use the Power key on the
keyboard to turn your computer on and to shut it down
without having to turn it completely off.
16. Press the main power switch on the back of the
computer.
15. Plug in your keyboard cable.
s Warning: If you use a RAM disk, be sure to save your work
onto another disk before turning off your computer so that
you won’t lose your data. s
4. Drag the slider to indicate how much memory you
want to use for a RAM disk.
29
Remember that the more RAM you allot as a RAM disk, the
less you will have available for running application programs.
3. Click On to turn on the RAM disk.
2. Open the Memory control panel.
1. Choose Control Panels from the Apple (K) menu.
To set up a RAM disk:
You use a RAM disk exactly as you would use a hard disk or floppy
disk, except that you save your work onto another disk before you
shut down the computer.
For improved performance, you may want to set aside part of your
random-access memory (RAM) to use as a temporary hard disk.
Using a RAM disk improves performance because the computer
can get data from a RAM disk much faster than from a hard disk or
floppy disk.
Using a RAM disk for temporary storage
30
n
If you have virtual memory turned on, turn it off. See your
Macintosh User’s Guide for instructions.
S Important: Not all application programs support 32-bit
addressing. The use of such programs when 32-bit addressing
is turned on may cause problems with your computer. Check
with the software manufacturer to find out whether your
program is compatible with 32-bit addressing. S
Turn on 32-bit addressing. See your Macintosh User’s Guide
for instructions.
If you are unable to start up your Macintosh from an external disk,
the appropriate System Enabler file may be missing from that disk.
Use the Installer program on the Install Me First disk that came
with your computer to install system software on the external
disk. If your computer came with a CD-ROM disc titled CD Install
Me First, the software you need is on the CD-ROM disc.
To start up your Macintosh from an external hard disk, the hard
disk must contain a System Folder, and the System Folder must
contain a System Enabler for your Macintosh LC 520. (A System
Enabler file contains software necessary to start up a specific
Macintosh model.)
If you use a modem with a baud rate of over 9600, you
may experience some limitations in your computer’s
performance. To improve performance, try the following:
n
Starting up your computer
from an external hard disk
Advice about using a modem with your
Macintosh LC 520
m Troubleshooting
m Working with Photo CD images
m Playing audio compact discs and audio tracks on
CD-ROM discs
m Using discs in your CD-ROM drive
m Setting up your CD-ROM software
m The AppleCD 300i drive
Your AppleCD 300i drive is an internal CD-ROM drive for
Macintosh computers that works with CD-ROM discs as well as
standard audio compact discs and Kodak multisession Photo CD
discs. This section provides information on using your AppleCD
300i drive:
(This section applies only if you purchased your Macintosh LC 520
with an AppleCD 300i drive.)
31
Your CD-ROM drive provides access to large amounts of
information. However, you cannot save information on CD-ROM
discs. ROM stands for “read-only memory,” which means that the
drive cannot “write” information on CD-ROM discs.
A wide selection of CD-ROM discs is available, offering materials
for education, entertainment, and business. One disc can hold
over 650 megabytes of information—the equivalent of 270,000
pages of text, one to eight hours of speech or music (depending
on the sound quality), hundreds of high-resolution color images,
or a combination of text, sound, and graphics.
The AppleCD 300i drive
Using the Optional CD-ROM Drive
32
Software that lets you use discs with these file formats is installed
on your system. (If you need to reinstall this software, see
“Installing the Macintosh CD-ROM Setup Software.”) With this
software installed, you can use discs with these formats without
further setup.
m The High Sierra format, which is a part of the ISO 9660
format.
m ISO 9660—the International Standards Organization’s file
format for CD-ROM discs. This format has been adopted by
many CD manufacturers to make their discs compatible with a
variety of computers. It is also the format that allows you to
use Photo CD discs in your AppleCD 300i.
m HFS (Hierarchical File System)—the standard format used by
the Macintosh.
You can use CD-ROM discs with these standard file formats:
The AppleCD 300i drive can open images stored on Photo CD
discs. To view Kodak Photo CD images, your Macintosh must have
QuickTime and the Photo CD extension. Both were automatically
placed on your computer when system software was installed. If
you have removed either QuickTime or the Photo CD extension
from your system, refer to the instructions for installing the
AppleCD software in “Setting Up Your CD-ROM Software.” For
further information about using Photo CD discs, refer to “Working
With Photo CD Images.”
Photo CD discs
The AppleCD 300i drive can play audio compact discs through
headphones, internal speakers, or speakers attached to your
computer. For further information, refer to “Playing Audio
Compact Discs and Audio Tracks on CD-ROM Discs.”
Audio compact discs
The AppleCD 300i drive can also work with file formats other than
the ones listed above (for example, CD-ROM XA, CD+G, and
CD+MIDI), provided the appropriate software is available for the
Macintosh. To find out about the availability of software for
additional file formats, contact the publisher of a particular disc.
Not all CD-ROM discs store information in the same way. A disc
stores and displays information according to a given file format.
Your computer’s system software must understand the file format
in order to use the disc’s contents.
Standard file formats
Other CD-ROM formats
Types of discs you can use
m Pull down the Apple (K) menu and check whether AppleCD
Audio Player appears in the menu.
If AppleCD Audio Player appears in the menu, then CD-ROM
software has already been installed. Skip to “Using Discs in Your
CD-ROM Drive” to learn about using your CD-ROM drive. If
AppleCD Audio Player isn’t in the menu, follow the instructions in
the next section to install the CD-ROM software.
m Never transport your computer with a CD-ROM disc or a
caddy inside the drive.
m Avoid exposing your equipment to dust. If dust collects on the
lens inside your AppleCD 300i, the drive might have problems
reading your CD-ROM discs.
In most cases, all the required software for using your
AppleCD 300i drive is already installed on your computer and
ready for use. Follow the instructions in this chapter only if the
CD-ROM software is not installed, or if you need to reinstall the
software for any reason.
33
m If you received a CD-ROM disc labeled CD Install Me First, the
software you need is on the disc. See the manual titled System
Software Installation & Backup that came with your
computer for information on how to use the disc to install the
CD-ROM software.
m If you received a set of floppy disks with your computer, the
software you need is on the floppy disks labeled Install Me
First and Extras. Follow the directions in this section to install
the software.
The software you need to install is in one of two places.
Installing the Macintosh CD-ROM setup software
To check for CD-ROM software:
Follow these guidelines as you use your AppleCD 300i:
Setting up your CD-ROM software
Checking whether the CD-ROM software is installed
Care and handling
34
You see the Easy Install dialog box.
3. Click OK.
A welcome screen appears.
2. Open the Installer icon.
1. Insert the Install Me First disk into your computer’s
floppy disk drive.
To install the CD-ROM software, you use the Customize option of
the Installer to choose which portions of the AppleCD 300i
software you want to install.
Installing the software from a floppy disk
5. If necessary, click the Switch Disk button until the
name of the disk you use to start up your computer is
shown.
You see the Customize dialog box. Scroll down until you see
the CD-ROM System Software selection.
4. Click Customize.
A message appears asking you to restart your computer. You
need to restart your computer to activate the new software.
8. Click Quit.
The Installer takes a few moments to prepare for installation.
A message then appears asking you to insert the Extras disk.
Follow the instructions on the screen. A message informs you
when the installation has been successfully completed.
7. Click Install.
Information about each item you select appears in the box.
You can also select the QuickTime 1.5 option, required by the
CD-ROM drive to display Photo CD images, if you need to reinstall it. Hold down the Shift key as you click to select more
than one item.
6. Select the CD-ROM System Software option from the
list in the dialog box.
35
One caddy is included with your AppleCD 300i drive. You can get
additional caddies from an authorized Apple dealer. You may find
it convenient to store your CD-ROM discs in caddies.
S Important: The plastic case in which most CDs are sold is
not a caddy. You must put a disc in a caddy before you insert it
into the drive. S
Before you use a CD-ROM disc, audio compact disc, or Photo CD
disc, you must put it into a caddy—a plastic case that protects the
disc from damage. When you insert the caddy into the AppleCD
300i drive, the protective metal shutter on the caddy slides away
to expose a section of the disc, allowing the drive’s optical head to
read the data.
Using discs in your CD-ROM drive
36
Press here.
Press here.
Press in on the corners of the caddy with one hand while you
lift the clear plastic lid with the other hand.
1. Open the caddy.
Follow these instructions to load a CD-ROM disc, audio compact
disc, or Photo CD disc into a caddy, then into the drive. After that,
follow the instructions provided with your disc, as well as the
instructions in this book.
Loading discs in the CD-ROM drive
The disc must lie flat in the caddy.
S Important: Be sure the disc lies flat in the caddy; if it isn’t
lying flat, the AppleCD 300i won’t be able to read it, and you
may have difficulty ejecting the disc. S
Hold the disc by the edges with the label side up. Try not to
touch the bottom surface of the disc as you transfer it to the
caddy. Tip the leading edge of the disc down as you insert it,
making sure to seat the disc in the groove below the hinge of
the caddy. Close the caddy lid.
2. Put the disc into the caddy, label side up.
If the message “This is not a Macintosh disk. Do you want to
initialize it?” appears, then the data on the CD-ROM disc
cannot be used by your computer (the files are in a format
that the computer doesn’t recognize). Eject the disc.
After a few seconds, the disc icon appears on your Macintosh
desktop.
When a caddy is loaded in the drive, the words “Caddy
Loaded” appear on the drive door.
Insert the caddy with the label side of the disc facing up, with
the metal shutter end first. Release the caddy when you feel it
being automatically pulled into the drive.
3. Put the caddy containing your disc into the drive.
S Important: Do not transport the computer with a caddy
inside the CD-ROM drive. S
37
v Maintenance tip: For best performance, avoid exposing discs
and the AppleCD 300i to dust or smoke. If dust collects on the
lens inside of the AppleCD 300i, the drive might have
problems reading your discs. v
v Using shared discs: If you share a CD-ROM disc using the filesharing feature of System 7, you will be able to hear audio
portions of the disc yourself, but other people on the network
will not. Likewise, you cannot hear the audio portions of discs
you access over a network. v
4. Use each disc following the instructions that came with
the disc, as well as the instructions in this book.
38
v By the way: The AppleCD 300i drive’s motor shuts off
automatically when the caddy is ejected or when the disc has
not been accessed for a few minutes. The drive motor turns
on automatically again when you work with the drive or insert
a disc. v
S Important: You cannot eject a disc if File Sharing is on and
you started up the computer with the disc in the CD-ROM
drive. You must turn File Sharing off to eject the disc. (See
your Macintosh User’s Guide for information about turning
off File Sharing.) When File Sharing is on, you can eject a disc
inserted in the drive after the computer is started up. S
You can also eject a disc by clicking the Eject button of the
AppleCD Audio Player. See “Using the AppleCD Audio Player,”
later in this book.
To eject a disc while the Macintosh is turned on, select the disc
icon on the desktop and choose Put Away from the File menu, or
eject the disc by dragging its icon to the Trash.
Ejecting a disc
If you have more than one AppleCD drive, the AppleCD Audio
Player works only with the drive that has the lowest SCSI ID
number. For more information about SCSI ID numbers, see
“Troubleshooting for the CD-ROM Drive” at the end of this book.
The AppleCD Audio Player program is in the Apple Menu Items
folder in your System Folder. To open the player, choose AppleCD
Audio Player from the Apple (K) menu. If the player name
doesn’t appear on your menu, you must install the player. (See
“Setting Up Your CD-ROM Software” for installation instructions.)
You use the AppleCD Audio Player to start, stop, and otherwise
control sound tracks. Before you use the player, make sure that
the compact disc you are using contains audio information. The
player only plays audio compact discs and audio tracks on
CD-ROM discs.
You can play audio compact discs or audio tracks on CD-ROM
discs on the AppleCD 300i drive using the AppleCD Audio Player
application program and your computer’s built-in speaker. You
can attach headphones or speakers to the computer for stereo
sound. See “Your Computer at a Glance,” earlier in this book, and
the Macintosh User’s Guide that came with your computer for
information about connecting sound devices to your computer.
Playing audio compact discs and audio
tracks on CD-ROM discs
2. Choose AppleCD Audio Player from the Apple (K)
menu.
1. Put the caddy containing your disc into the drive.
Follow these instructions to use the AppleCD Audio Player:
After inserting a disc in the CD-ROM drive, you can use the
AppleCD Audio Player on your screen to select and play audio
tracks. It’s designed to look and work much like a standard
remote control unit. You can open the player and start playing an
audio CD at any track. You can also close the player the way you
close any window on your Macintosh screen and the disc will
continue playing.
If you insert an audio CD disc, its icon appears on the desktop
with the name Audio CD 1. (If you insert a CD-ROM disc with
audio tracks, its icon appears with the name of the disc.)
S Important: A disc must be inside the caddy before you insert
it into the AppleCD 300i. S
To play audio tracks, start up your Macintosh, place an audio CD
disc (or a CD-ROM disc with audio tracks) into the caddy, and
insert it into the AppleCD 300i drive.
Using the AppleCD Audio Player
Eject button
Track buttons
Play/Pause button
39
continues .
When a disc is first placed in the drive, the player is set to begin
with track 1. You can click the Track buttons to select any track
and click the Play/Pause button to begin playing. As the disc plays,
the player shows the current track and elapsed time. The controls
on the AppleCD Audio Player are explained in the following
sections.
When the CD-ROM drive is empty, the AppleCD Audio Player
shows no information in the track number or elapsed time
display. When a disc with no audio tracks is in the drive, dashes
appear across the display.
Volume control
Stop button
The AppleCD Audio Player opens.
Eject button
Track buttons
Play/Pause button
To eject a disc, click the Eject button on the player or drag the disc
icon to the Trash. The disc icon disappears from the desktop.
You can also choose Eject CD from the File menu or press
Command-E to eject a disc.
You can also press the spacebar, the Return key, or the Enter key
to play or pause the current track.
Next and Previous Track
40
You click the Track button that has right arrows to move forward
Eject
v Note: You can also control the volume of your audio CDs or
audio sound on your CD-ROM discs by using the sound
control buttons on the front of your Macintosh LC 520. v
You can also press the Up and Down Arrow keys to increase or
decrease the volume.
You can use the volume control on the player to adjust the
volume from the built-in speaker, headphones, or speakers
attached to the computer. Drag the slider to the right to increase
volume, or to the left to decrease volume.
Volume
You can also press the Left and Right Arrow keys to select the next
or previous track.
You click the Track button that has left arrows to move backward
one track. (After you reach the first track on the disc, the button
moves you again to the last track on the disc.)
one track. (After you reach the last track on the disc, the button
moves you again to the first track on the disc.)
You click the Play/Pause button to start playing a disc. You click
the Play/Pause button again to stop without losing your place on
the disc. To resume playing the current track, you click the
Play/Pause button again.
Play/Pause
You click the Stop button to stop playing a disc and reset the track
number to 1. You can also press the Clear or Delete key to stop
playing a disc.
Stop
Volume control
Stop button
S Important: If you select one of the track icons and choose
Get Info from the File menu, you see the track’s playing time.
If you copy an audio track icon to a floppy disk or hard disk,
the icon is copied, but the copy isn’t usable. S
41
You can use your AppleCD 300i to open Kodak Photo CD images
stored on Photo CD discs. A Photo CD image is a digitized version
of a standard 35-millimeter photograph that you can open and
view on your computer screen.
If you open the icon for an audio compact disc or a CD-ROM
disc with audio tracks, you see document icons labeled Track 1,
Track 2, and so on. You can start playing a track by opening the
track icon as you can any document icon.
m Click the icon and choose Open from the File menu.
Working with Photo CD images
Another way to start audio tracks
42
S Important: To view Photo CD images on your Macintosh,
you must have QuickTime and the Photo CD extension in
your System Folder. Both were automatically placed on
your computer when system software was installed. To
reinstall the Photo CD extension, refer to “Setting Up Your
CD-ROM Software,” earlier in this manual, for installation
instructions. S
Photo CD images are an excellent source of graphics for desktop
publishing, multimedia presentations, business documents, and
professional-quality graphic design.
You can open and view Photo CD images individually on your
computer screen. You can copy and save them, print them, paste
them into word-processing documents or other documents that
accept graphics, and edit them using graphics applications. You
can also view your Photo CD images displayed in a series on your
computer screen as you would view a slide presentation.
You can take a Photo CD disc back to your photofinisher and have
more photos added until the disc is full. Such discs are called
multisession discs because the photofinisher can add more
images to them after the first session of adding images. The
AppleCD 300i can read both single-session and multisession
Photo CD discs. (Some CD-ROM drives may be unable to read the
additional images placed on a multisession disc. Such drives can
read only single-session discs.)
You can have your own photographs recorded as Photo CD
images on a Photo CD disc. To obtain a Photo CD disc of your
own photographs, you give standard 35-millimeter film to a
photofinisher who has a Kodak Photo CD System. The
photofinisher develops your film, digitizes the photographs, and
returns a Photo CD disc to you containing your Photo CD images.
A single Photo CD disc can hold approximately 100 images or
more.
Obtaining Photo CD discs
To view images on a Photo CD disc, you place the Photo CD disc
in a caddy and insert the caddy into the CD-ROM drive. The first
time you insert a Photo CD disc, a message appears telling you the
system is creating custom Photo CD icons. You can click Stop if
you wish the system to use standard PICT document icons
instead. After several seconds, an icon for the Photo CD disc
appears on the desktop. The disc name appears with the letters
“PCD” and an identifying number supplied by the photofinisher.
You cannot change the name of the disc.
Viewing the contents of a Photo CD disc
A Photo CD window always contains a Slide Show, a Slide Show
Viewer, and a Photos folder. The Slide Show and Slide Show
Viewer (described in the section “Viewing Several Images in
Sequence”) allow you to view your images as you might browse
through slides. The Photos folder holds your Photo CD images.
(The Photo CD window also contains a PHOTO_CD folder that
holds technical information about your Photo CD images. You
normally will have no need to use this folder.)
Double-click the disc icon to open the Photo CD window.
43
44
When a Photo CD image is created, it’s recorded at five different
levels of resolution. The resolution level of an image determines
the amount of information recorded for it, which in turn
determines how well the image can be displayed or printed. The
higher the image resolution, the more information that is
recorded for it.
If you open the Photos folder you see five folders. Each folder
contains all your Photo CD images recorded at a specific
resolution.
Because each Photo CD image is recorded at five levels of
resolution, you can select and work with an image at a resolution
appropriate for your display or printing device. For example, you
might use a Photo CD image at low resolution for displaying
images on a TV or computer screen in a multimedia presentation.
On the other hand, to produce high-quality color separations
from a Photo CD image, you might select a high-resolution image
appropriate for the high-resolution printing capabilities of an
imagesetter.
High-resolution images can contain as much as 18 megabytes
of data for one photograph. However, depending on your
computer’s screen resolution or printer’s printing resolution,
you may not be able to view or print the graphic at such high
resolution.
Within each folder, an icon appears for each Photo CD image.
Each icon is also a thumbnail image of the Photo CD image.
Because your images are recorded on a “read-only” CD-ROM disc,
you can’t rename your images. You can copy your Photo CD
images to a hard disk or floppy disk. Once they reside on a hard
or floppy disk, you can rename and change the images as you can
other Macintosh documents.
45
continues .
S Important: You can preset your images so that they
automatically open in a particular application other than
Picture Compressor or TeachText. For instructions, see the
section “Choosing a Program to Open Photo CD Images.” S
If you don’t have Picture Compressor, you can also view individual
images as TeachText documents.
You can view and work with your Photo CD images using many
popular graphics applications. Your images are preset to be
opened by the QuickTime utility Picture Compressor that
generally comes with QuickTime.
Viewing one image at a time
If you have preset the image to open in another program, that
program launches and your image appears in a new
document.
2. When the Photo CD disc icon appears on the desktop,
double-click the icon to open the Photo CD window.
46
4. Open the folder for the resolution at which you want to
see the image.
3. In the Photo CD window, double-click the Photos
folder.
If you have the Picture Compressor program, you see the
image appear on the screen.
5. Double-click the icon of the image you want to see.
1. Insert the caddy holding the Photo CD disc into the
AppleCD 300i drive.
To view a Photo CD image:
If you don’t have the Picture Compressor program and have
not preset the image to open in another program, a dialog
box appears asking if you want to open the image using
TeachText.
You can now view, save, and print the image. You can also copy
and paste the image into your Scrapbook, or into other
documents or graphics programs.
The image appears in a TeachText document.
6. Click OK.
47
48
Slide Show movie
1. Double-click the Slide Show movie icon.
You can conveniently browse through all your Photo CD images
by using the Slide Show movie and Slide Show Viewer in the
Photo CD window. The Slide Show file is a QuickTime movie of all
your Photo CD images. The Slide Show Viewer plays the movie. (If
you have the QuickTime MoviePlayer utility, you can also use it to
play the Slide Show movie.)
Click to
start or stop
the movie.
Image number
Drag to scroll to a
different image.
Click to move forward or
backward through the images.
You can also display an image by typing an image number
when the viewer is active.
You can drag the viewer’s size box to resize the viewer
window to a convenient viewing size.
2. Use the Slide Show Viewer controls to stop or start the
movie, scroll to particular images, or flip forward or
backward through the images.
The Slide Show Viewer automatically begins displaying
Photo CD images.
To play the Slide Show movie:
Viewing several images in sequence
You can’t use the viewer to make changes to the images. To
change images, see “Working With Photo CD Images in Other
Programs.”
2. Click one of the Slide Show Size buttons.
The Preferences dialog box appears.
1. Choose Preferences from the File menu.
Once you’ve opened the image in another program, you can
change it and save your changes on a hard disk or floppy disk.
You can set a default program so that when you double-click a
Photo CD image, the image automatically opens in the program
you chose. When you are viewing images with the Slide Show
Viewer, you can transfer the image currently displayed to the
default program or any other program you want to work with.
Finally, you can copy and paste images using the Clipboard.
49
You can work with your Photo CD images in a variety of other
programs, such as graphics or image-editing programs, and
incorporate them into any document that can accept images. You
have several ways to open and work with Photo CD images in
other programs.
You can drag the size box on the viewer to resize the viewer
window. You can also preset the Slide Show Viewer to show your
images in one of two sizes.
To change the size at which the viewer displays images:
Working with Photo CD images in other programs
Changing the size at which images are displayed
50
The Preferences dialog box opens.
2. Choose Preferences from the File menu.
1. Open the Slide Show Viewer by double-clicking it.
To set the program you want to view the images in:
You choose the program you want to open Photo CD images by
using the Preferences command in the Slide Show Viewer.
Choosing a program to open Photo CD images
In the dialog box that appears, find and click the name of the
application you want to remove, then click OK.
6. If you want to remove a program from the list, click the
Remove button.
5. Choose the resolution you want the images to open at
from the Size pop-up menu.
If you see an error message, the program you want to use isn’t
capable of opening images this way. You can still open your
Photo CD images from within the program you want to use,
usually by opening the program and then choosing the Open
command. See the manuals that came with your program for
instructions on opening files from within the program.
In the dialog box that appears, find and click the name of the
application you want, then click Add. You can add as many
programs as you want.
4. To add another program to the Using menu, click the
Add button.
If you don’t see the program you want, you can add it to the
menu, as explained in the next step.
3. Choose the program you want to open your images
from the Using pop-up menu in the Viewing Options
section.
The image opens in the program and at the resolution you
specified in the Preferences dialog box (described in the
previous section).
m While the image you want is displayed, choose View from the
Photos menu.
To transfer the image according to the settings in the Preferences
dialog box:
When you are looking at an image with the Slide Show Viewer,
you can transfer that image into another program using the
Photos menu. You can use the settings you’ve chosen in the
Preferences dialog box, or you can override those settings.
Transferring the displayed image to another program
Your changes don’t take effect until you restart your Macintosh.
After restart, when you double-click a Photo CD image, it opens in
the program and at the resolution you specified.
7. When you’ve chosen the options you want, click OK to
close the Preferences dialog box.
The image opens in the program and at the resolution you
specified.
4. When you’ve chosen the options you want, click OK.
To remove a program from the list, click Remove. Then, on
the next screen, select the program you want to remove.
To add another program to the list, click Add. Then, on the
next screen, select the program you want to add.
51
3. Choose the program you want to open the image from
the Using pop-up menu.
2. In the dialog box that appears, choose the resolution
you want from the Size pop-up menu.
1. While the image you want is displayed, choose View As
from the Photos menu.
To transfer the image using new settings:
52
You can also copy an image displayed in the viewer at a
resolution different than the one specified in the Preferences
dialog box.
The image appears in your document, where you can work
with it and save it (on a hard disk or floppy disk).
3. Choose Paste from the Edit menu.
2. Open the document you want to paste the image into.
1. While the image you want is displayed in the viewer,
choose Copy from the Edit menu.
To copy an image and paste it into a document:
1. While the image you want is displayed, choose Copy As
from the Edit menu.
You can also copy the image and paste it into any document that
accepts images. The image is copied at the resolution chosen in
the Preferences dialog box.
3. When you’ve chosen the resolution you want, click OK.
2. In the dialog box that appears, choose the resolution
you want from the Size pop-up menu.
To copy the image at a different resolution:
Copying and pasting an image
S Important: Be sure to use the method of copying described
here. If you copy the Slide Show movie by dragging its icon,
the original links between the movie and the Photo CD disc
will not be maintained. S
The movie is saved in a compressed format and the links
between the movie and the images on the Photo CD disc are
maintained.
4. Click Save.
A file-compression dialog box appears. If you wish, you can
choose a compression method other than the preselected
method.
3. Type a name for the copy. Click Save.
2. Choose Save a Copy from the File menu.
1. Open the Slide Show Viewer.
53
The caddy has a hinged lid. Squeeze the sides of the caddy (where
it says Open) with the thumb and a finger of one hand, while
lifting the lid with your other hand.
The caddy won’t open.
Problems starting up
If the suggestions in this section don’t solve your problem, refer
to the service and support information that came with your
computer for information about obtaining technical assistance.
Many problems can be caused by improper installation of the
software for the AppleCD 300i. If you install the software yourself,
make sure you install it exactly as described in “Setting Up Your
CD-ROM Software.”
This section describes solutions to problems you may encounter
while using your AppleCD 300i drive.
You can copy the Slide Show movie to a floppy disk or hard disk
and use it to browse and work with the images on the Photo CD
disc.
To copy the Slide Show movie:
Troubleshooting for the CD-ROM drive
Making copies of the Slide Show movie
54
If you attempt to install the software for the AppleCD 300i without
using the Installer as described in “Setting Up Your CD-ROM
Software,” you may not be able to restart your computer. Restart
from a floppy disk and install the software according to the
instructions in that section.
Your computer won’t restart after you’ve copied software
for the AppleCD 300i to the System Folder.
Check that each SCSI device attached to your computer has a
unique SCSI ID number. The SCSI ID number of your internal
CD-ROM drive is 3. The ID number for other devices often
appears on the back near the SCSI ports (on Apple devices.) Refer
to the device’s owner’s manual if you need to reset SCSI ID
numbers.
Be sure to restart your computer after reinstalling the CD
software.
The computer doesn’t seem to know that there is an
AppleCD 300i drive.
Shut down your computer and then turn it back on. Select the
CD-ROM icon on the desktop and choose Eject from the File
menu, or drag the icon to the Trash.
The caddy is not being ejected far enough to remove
it easily.
Shut down your computer and then turn it back on. Try to load
the disc by pushing the caddy gently into the drive.
The caddy is not being loaded into the drive.
v Note: If you are unable to insert or eject a caddy even after
following the suggestions here, contact your authorized Apple
dealer or service provider. v
Problems inserting or ejecting a caddy
CD-ROM is a read-only medium. That means that information can
be read (retrieved) from it, but not written (stored) on it. You can
save the changed information on a hard disk or floppy disk.
You can’t save changes you make to information on a
CD-ROM disc.
Read the manual that came with your CD-ROM disc. Some discs
come with a separate floppy disk containing the program that
reads the information on the disc.
There is no application program capable of displaying the
contents of a particular CD-ROM.
Make sure the CD caddy is inserted in the drive right side up with
the CD disc label up and visible, and the end with the metal
shutter entering first into the drive.
Make sure the AppleCD 300i software is installed.
Try restarting the computer.
You insert a CD-ROM disc but its icon does not appear on
the Macintosh desktop.
Problems using CD-ROM discs
If this suggestion doesn’t work, the CD-ROM disc is probably
damaged and needs to be replaced.
Make sure you’ve inserted the disc correctly in the caddy (the
label side should be up and the disc should be lying flat).
55
Your computer ejects the CD-ROM disc without giving you
any error message.
If the disc uses the ISO 9660/High Sierra, Macintosh HFS, or audio
CD disc format, make sure that the Foreign File Access extension
is installed in your Extensions folder in the System Folder. If it’s
not there, see “Installing the Macintosh CD-ROM Setup Software.”
The disc uses a format other than ISO 9660/High Sierra,
Macintosh HFS, or audio CD disc formats. Eject the disc and
exchange it for a disc that works with the AppleCD 300i.
Your computer displays the message “This is not a
Macintosh disk: Do you want to initialize it?” when you
insert a CD-ROM disc in the AppleCD 300i.
Try opening the application program first; then open the
document.
You cannot open a document on a CD-ROM disc.
56
To open the Speed Switch control panel, choose Control Panels
from the Apple menu and double-click the AppleCD 300 Speed
Switch icon. When the AppleCD Speed Switch window appears,
click Standard Speed. Click the close box to close the window.
You don’t hear any sound when you try to use an
audio CD.
The AppleCD 300i can transfer data at rates up to twice as fast as
standard CD-ROM drives. Some CD-ROM application programs,
which may be optimized for slower transfer rates, may not work
compatibly when the AppleCD 300i is operating in its fastest
mode. You can slow the AppleCD 300i to make it more
compatible with such application programs using the AppleCD
Speed Switch control panel. This control panel is automatically
installed when you install all the CD-ROM software. (See “Setting
Up Your CD-ROM Software” for installation instructions.)
Did you use the AppleCD Audio Player to play the disc, then click
the Play/Pause button to pause and forget to click it again to
resume play?
Is the volume control turned all the way down? Turn it up slowly.
Do you have headphones or speakers connected to the
computer? Try adjusting the connector to make sure you have a
good connection.
Are you trying to access audio information through a network?
You can’t hear the audio portion of discs you access over a
network. Likewise, if you share a CD-ROM disc using the filesharing feature of System 7, you will be able to hear audio
portions of the disc yourself, but other people on the network will
not.
Problems playing audio CDs
Information displays jerkily or sound seems
poorly synchronized.
When recording sound from a disc, you cannot immediately
replay the sound from the Sound control panel’s Add dialog box.
You must first save the sound and then replay by selecting it from
the Alert Sounds list in the Sound control panel.
Check the Sound control panel to make sure that “Internal CD” is
selected as the sound input device.
You seem to be unable to record sound from a disc.
You can’t open a CD-ROM disc while it’s playing an audio track.
Click the Stop button in the AppleCD Audio Player before
opening the disc.
When you double-click the icon of a CD that combines
audio tracks and data (while that CD is playing), you
cannot open it.
57
s Warning: If you have a problem with your AppleCD 300i and
nothing in this troubleshooting section solves it, refer to the
service and support information that came with your
computer for instructions about obtaining technical
assistance. If you attempt to repair the product yourself, any
damage you may cause to your equipment will not be covered
by the limited warranty on your equipment. s
To open Photo CD images, your computer must have both
QuickTime and the Photo CD extension installed on your system.
To install the Photo CD extension, follow the installation
instructions in “Setting Up Your CD-ROM Software.”
Your Apple CD 300i will not open Photo CD discs.
Problems using Photo CD discs
58
PostScript, the LaserWriter page-description language, was developed by Adobe Systems
Incorporated.
Text type is Apple’s corporate font, a condensed version of Garamond. Ornaments are
custom symbols designed for Apple Computer.
This Apple manual was written and edited on a desktop publishing system using Apple
Macintosh computers and QuarkXPress. Proof pages were created on Apple LaserWriter
printers and on the Tektronix Phaser III PXi color printer. Final pages were produced in
QuarkXPress and output directly to separated film on a PostScript™-driven imagesetter.
Line art was created with Adobe Illustrator. Cover art was produced with Adobe
Photoshop. Screen shots were created and modified with system software, Exposure,
MacPaint, and Photoshop.
The Apple Publishing System
20525 Mariani Avenue
Cupertino, California 95014-6299
(408) 996-1010
TLX 171-576
Apple Computer, Inc.
030-4220-A
Printed in Singapore
e
referenc
e
r
u
t
u
f
for
is book
h
t
p
e
e
K