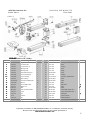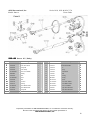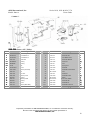
1
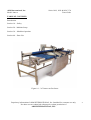
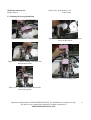
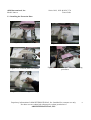
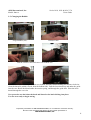
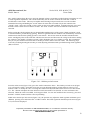
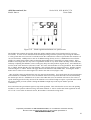
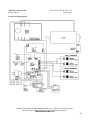
ABM International, Inc.
Model: Innova
Series 1018, 1022 & 1026 V7.0
Users Guide
Folder Contents:
1. Users Guide
2. Service Manual
3. 18” Pro-frame Assembly
4. 22” and 26” Pro-frame Assembly
5. Leader Installation
6. Bobbin Winder Assembly and Operation
7. Light Bar Assembly
8. Innova Warranty
9. Warranty Registration Form
Proprietary information of ABM INTERNATIONAL, Inc. furnished for customer use only.
No other uses are authorized without prior written permission of
ABM INTERNATIONAL, INC.
1
ABM International, Inc.
Model: Innova
Series 1018, 1022 & 1026 V7.0
Users Guide
TABLE OF CONTENTS:
Introduction
Section 1.0 – Safety
Section 2.0 - Machine Setup
Section 3.0 – Machine Operation
Section 4.0 – Parts List
Figure 0.1 – 26” Innova on Pro-frame
Proprietary information of ABM INTERNATIONAL, Inc. furnished for customer use only.
No other uses are authorized without prior written permission of
ABM INTERNATIONAL, INC.
2
ABM International, Inc.
Model: Innova
Introduction
Series 1018, 1022 & 1026 V7.0
Users Guide
ABM International would like to thank you for the purchase of an Innova Long Arm Sewing Machine. ABM is
confident that this machine will meet or exceed your expectations.
If at anytime you experience problems with your ABM machine we ask that you contact us - 24 hours a day by
calling our service department at (936) 441-4401. We can help you solve the problem quickly, and correctly. Your
calls, questions, and comments will in turn help us to perfect the quality of our products and services in the future.
Once again, we thank you for your purchase.
ABM International, Inc.
Joe Podolski
Vice President
Engineering Department
Proprietary information of ABM INTERNATIONAL, Inc. furnished for customer use only.
No other uses are authorized without prior written permission of
ABM INTERNATIONAL, INC.
3
ABM International, Inc.
Model: Innova
Series 1018, 1022 & 1026 V7.0
Users Guide
Section 1: Safety
1.0 Safety Introduction
ABM is dedicated to assuring your safe operation of the Innova quilting machine. This section will alert you to
many precautions that you can take to help avoid unnecessary accidents. Though ABM cannot anticipate all
actions that may create an unsafe environment and we urge you to be aware, and extremely careful when operating
the Innova quilting machine.
It is imperative that the operating person of the Innova quilting machine read and understand the information in
this manual before operating the machine.
1.1 Safety Policy Statement
The conservation of the assets of any company, which include the buildings, equipment, supplies and
inventories as well as personnel, must be and is the responsibility of all levels of management. The purpose of a
personnel and property conservation program is to insure that all phases of management recognize that personnel
and property conservation are both inseparable parts of a company’s objective…to produce quality products at the
lowest possible cost.
Safety of personnel in every aspect must be of first consideration. The implementation of a conservation
program will eliminate human suffering and effectively lower the direct and indirect costs resulting from employee
injury. It will substantially reduce the exposure and probability of damage and / or loss of a company’s physical
assets.
1.2 Safety Practices
The safety factors must be observed to ensure safe operation of the Innova .
1.
2.
3.
4.
5.
6.
7.
8.
9.
10.
11.
12.
13.
Read and understand the operating instructions of the Innova before operating.
Use extreme caution when working around the Innova electrical controls.
Keep hands or other body parts away from the moving parts of the Innova.
Wear appropriate personal safety protection.
Stop the Innova immediately at any sign of malfunction or danger.
Never lean on the Innova Quilting machine.
Do not use the Innova quilting machine as leverage to lift yourself off a chair.
Do not crawl under or into the Innova for any reason during the operation of the machine.
Do not reach into the Innova at any time during the operation of the machine.
Do not climb, walk, or stand on the Innova at any time.
Do not tamper with factory installed guards and or safety devices.
Never operate machinery without all ABM installed guards and safety devices intact, and in working order.
Before starting the Innova, ensure that no loose tools, bars or parts are lying in or on any part of the
machine.
14. Proper fire fighting equipment should be kept in good operating condition and kept near in the event of fire.
15. Do not wear loose clothing or jewelry when operating the Innova.
16. Always keep hair from coming in contact with moving parts.
Proprietary information of ABM INTERNATIONAL, Inc. furnished for customer use only.
No other uses are authorized without prior written permission of
ABM INTERNATIONAL, INC.
4
ABM International, Inc.
Model: Innova
Series 1018, 1022 & 1026 V7.0
Users Guide
SECTION 2.0 – Machine Setup
The Innova ships fully tested ready to operate. As a result, this manual provides a section on machine setup so that
you can install the machine. Please read this manual in its entirety and follow all ABM instructions, especially the
inspections. Total setup time, excluding frame assembly, will take approximately 1 hour.
SETUP INSTRUCTIONS:
INSPECTION #1: Upon receipt of the machine, check to ensure that there is no visible damage. Figure 0.1 and
the front cover of this manual are enough for this inspection. Note: that some components may be in different
locations depending on the version of the machine.
Determine the location in your facility for the quilting machine. Once a final position has been determined for the
machine, plug it into your 3 prong AC outlet (NOTE: Machine is voltage specific 110-125 VAC 60Hz or 220-240
VAC 50/60Hz). The machine comes wired with a voltage specific plug according to the original machine shipment
destination, and should be plugged directly into the wall receptacle or a surge protector (not supplied). ABM does
not recommend the use of any type of extension cord to power the machine. As with any machine, power should be
run properly through approved ducting with proper termination. Coil any excess cable and wire tie it to the table of
the machine, which will reduce the risk of a tripping hazard.
WARNING: RISK OF ELECTRICAL SHOCK. MAKE SURE THE OUTLET
BEING USED FOR THE INNOVA HAS A WORKING EARTH GROUND
CONNECTION. IF YOU ARE UNSURE, HAVE A QUALIFIED ELECTRICIAN
CHECK THE CIRCUIT. FAILURE TO DO SO MAY RESULT IN SERIOUS
INJURY OR DEATH.
INSPECTION #2: Will confirm that the electronics of the Innova long arm quilting machine are functioning
properly.
WARNING: ELECTRICAL SHOCK HAZARD. NEVER ATTEMPT TO WORK
ON OR OPERATE THE MACHINE WHILE THE ELECTRICAL COVERS ARE
REMOVED. WHENEVER REMOVING THE ELECTRICAL COVERS PLEASE
BE CERTAIN TO TURN-OFF THE MACHINE AND UNPLUG THE POWER
RECEPTICAL.
Upon power up, the PLC should power up and show up on the LCD. If this does not occur, check for incoming
voltage at the outlet.
WARNING – WHEN OPERATING THE MACHINE, YOU MUST ENSURE THAT THERE
ARE NO LOOSE ITEMS SUCH AS TOOLS, FOOD, DRINKS, ETC. ON THE MACHINE AND
THAT ALL PERSONNEL ARE CLEAR OF THE MACHINE.
Proprietary information of ABM INTERNATIONAL, Inc. furnished for customer use only.
No other uses are authorized without prior written permission of
ABM INTERNATIONAL, INC.
5
ABM International, Inc.
Model: Innova
Series 1018, 1022 & 1026 V7.0
Users Guide
Final Test:
Inspect the front of the machine and ensure that the sewhead is free of obstructions. Upon power up the
LCD will read UP or DN and display a speed.
Step 1: Press and release the (Red) left hand button and the needle will move to the up position.
Step 2: Press and release the (Red) left hand button again and the needle will move to the down position.
Step 3: Press and release the (Green) right hand button and the sewhead will start to run
Step 4: Press and hold the (Green) right hand button and the sewhead will increase sewing speed.
Step 5: Press and hold the (Red) left hand button and the sewhead will decrease sewing speed.
Step 6: Press and release the (Green) right hand button again and the sewhead will stop.
Setup and inspection is now complete.
Proprietary information of ABM INTERNATIONAL, Inc. furnished for customer use only.
No other uses are authorized without prior written permission of
ABM INTERNATIONAL, INC.
6
ABM International, Inc.
Model: Innova
Series 1018, 1022 & 1026 V7.0
Users Guide
SECTION 3.0 – Machine Operation
This section will discuss how to properly use the Innova 1018 and 1026 to fulfill all of your quilting needs.
3.1 Rotating the Sewing Head
ABM’s has equipped the Innova with an industry “exclusive” rotating sewhead for ease of material, head, and roller
removal, as well as ease of sewing machine maintenance. To properly rotate the head, follow these easy steps:
Figure 3.1 – Loosen Lock Screw
Figure 3.11 – Depress Locking Lever.
WARNING – DEPRESSING THE
LOCKING LEVER PAST THE SECOND
GROOVE ON THE SIDE OF THE BEAM
MAY DAMAGE THE MACHINE.
Figure 3.12 – Continue holding lever and rotate
Figure 3.13 – Release lever and finish rotation
Proprietary information of ABM INTERNATIONAL, Inc. furnished for customer use only.
No other uses are authorized without prior written permission of
ABM INTERNATIONAL, INC.
7
ABM International, Inc.
Model: Innova
Series 1018, 1022 & 1026 V7.0
Users Guide
3.2 Rotating the Sewing Head Back
Figure 3.20 – Depress Locking Lever
Figure 3.23 – Press on the needle bar gently to
center needle in hole
Figure 3.21 – Continue holding lever and rotate
until the head locks
Figure 3.24 – Turn locking screw
Figure 3.22 – Rotate hand wheel until needle
nears hole in plate
Proprietary information of ABM INTERNATIONAL, Inc. furnished for customer use only.
No other uses are authorized without prior written permission of
ABM INTERNATIONAL, INC.
8
ABM International, Inc.
Model: Innova
Series 1018, 1022 & 1026 V7.0
Users Guide
3.3 Installing the Extension Plate
Figure 3.30 – Rotate the head
Figure 3.33 – Press plate down firmly
Figure 3.31 – Position plate over latches
Figure 3.34 – Rotate the head and follow locking
procedures
Figure 3.32 – Remove paper backing
Proprietary information of ABM INTERNATIONAL, Inc. furnished for customer use only.
No other uses are authorized without prior written permission of
ABM INTERNATIONAL, INC.
9
ABM International, Inc.
Model: Innova
Series 1018, 1022 & 1026 V7.0
Users Guide
3.4 THREADING THE SEWING HEAD
1. Pull thread from cone
2. Pass thread through upper thread guide
on motor cover.
3. Pass thread through upper hole of thread
post. Thread should go through the hole
from the right to the left.
4. Bring thread around the post and back
into the bottom hole of thread post. Thread
should go through the hole from right
to left.
5. Pass thread through the upper thread
guide of the pre-tension.
6. Bring the thread clockwise around the
pre-tension discs and pass through the lower
thread guide hole of the pre-tension.
NOTE: DO NOTE WRAP THE THREAD COMPLETELY
AROUND THE DISC. THE THREAD SHOULD TRAVEL
FROM THE TOP HOLE TO THE BOTTOM HOLE AND
PASS THROUGH THE DISCS ON THE RIGHT SIDE
ONLY.
7. Pass the thread through thread guide
8. Wrap the thread completely around the rotary tension
assembly twice - clockwise. Pass thread over check spring.
NOTE: OIL FELTS ON ROTARY TENSION TO ENSURE
SMOOTH MOVEMENT.
9. Pass the thread through thread guide
10. Pass the thread through the take-up finger. Make sure thread
Runs from right to left.
11. Pass thread through thread guide
12. Pass thread through thread guide at the bottom of the needle
Bar bushing.
13. Pass the thread through the needle bar thread guide located
on the end of the needle bar.
14. Insert thread through the eye of the needle from left to right. Pull
thread to check for proper threading. As the thread is pulled through
the needle, the check spring should move and thread should pull from the cone.
Proprietary information of ABM INTERNATIONAL, Inc. furnished for customer use only.
No other uses are authorized without prior written permission of
ABM INTERNATIONAL, INC.
10
ABM International, Inc.
Model: Innova
Series 1018, 1022 & 1026 V7.0
Users Guide
3.5 Changing the Bobbin
Large Bobbin- (M) -
Release Latch
Pull the release Latch and remove the bobbin case
Remove the old bobbin and press in the new bobbin. Inset the bobbin making sure it turns clockwise
when the thread is pulled (viewed from the bobbin side). Pull the loose thread up and under the guide
into the case. Route the thread under the tension spring, and through the guide hole. Place the loose
thread through the case slot.
Now press the case back into the hook and listen for the latch clicking into place.
You are now ready to begin sewing.
Proprietary information of ABM INTERNATIONAL, Inc. furnished for customer use only.
No other uses are authorized without the prior written permission of
ABM INTERNATIONAL, INC.
11
ABM International, Inc.
Model: Innova
Series 1018, 1022 & 1026 V7.0
Users Guide
3.6 Controller Operations
The Innova is equipped with a machine controller that handles all of the electronic functions of the machine.
The controller performs the following tasks:
•
•
•
•
•
•
•
stop and start the sewing motor
maintain and adjust sewing speed
perform needle positioning - up and down
display sewing speed
display electronic error messages in case of failure
maintain stitches per inch (if equipped)
deactivation of stitch regulation if idle for more than 20 seconds (if equipped)
When the power switch is turned ON, the machine controller defaults to the main screen (Figure 3.60). From
this screen, the user can turn stitch regulation ON or OFF (if equipped), adjust needle stop position UP or DN
and adjust the sewing speed when in manual sewing mode.
Figure 3.60 – Main Screen
The needle stop position is toggled between up and down by pressing the button marked “4”. The upper right
section of the screen displays the current needle stop position “UP” or “dn” (down).
The stitch regulator, if equipped, is turned ON and OFF by pressing the button marked “5”. When stitch
regulation is active, “Sr” will appear on the display. When stitch regulation is turned OFF, the “Sr” will not be
visible and manual sewing mode is active.
Sewing speed in manual mode (SR off), can also be adjusted on the front of the control panel by using the
buttons marked 0,1,2, and 3. Each time the button is pressed, the digit which corresponds to that button will
increase by one. The 0 button adjusts speed from 0-9 in single digit increments. The 1 button adjusts speed
from 10-90 in increments of 10. The 2 button adjusts speed from 100-900 in increments of 100 and the 3 button
adjusts speed from 1000-3000 in increments of 1000. Any value entered that is less than 75 or greater than 3000
will revert to the closest default value, 75 or 3000.
Proprietary information of ABM INTERNATIONAL, Inc. furnished for customer use only.
No other uses are authorized without the prior written permission of
ABM INTERNATIONAL, INC.
12
ABM International, Inc.
Model: Innova
Series 1018, 1022 & 1026 V7.0
Users Guide
The “mode” button allows the user to navigate through various screens that provided technical assistance as well
as stitch regulation adjustment. The “mode” button may also be used to lock out the controller so that no
modifications can be made. This may be helpful when allowing inexperienced users to use the machine
unattended. Pressing and holding the “mode” button for more than 2 seconds will put the controller into
“LOCK” mode. The word “LOCK” will be visible on the screen when enabled. To disable the lock, press and
hold the “mode” button for more than 2 seconds. The word “LOCK” will turn off when the mode has been
canceled.
Before setting the stitch regulator the user should understand the basics of the system. Stitch regulation is used
to maintain stitches per inch during quilting. When in regulated mode the machine will automatically accelerate
and decelerate based on the quilting operator’s movements. This occurs when the encoders mounted on the
tracks send digital pulses to the controller which in turn increases and decreases the voltage to the motor running
the sewhead. The number of stitches per inch is fully adjustable from 5-15 stitches per inch. We recommend
that you set your machine between 8 and 12 stitches per inch to achieve the best results. The following steps
will walk you through setting the stitches per inch, adjusting minimum stitch speed and turning stitch regulation
(SR) on and off.
Figure 3.61 – Stitches per inch screen
From the main screen (Figure 3.60), press the “mode” button three times. The stitches per inch screen (Figure
3.61) will now be visible. From this screen, the user can adjust the stitches per inch between 5 and 15. Use
buttons 0 and 1 to modify the value. Pressing the 0 button will adjust the SPI value between 0-9 in increments
of 1. The 1 button will adjust the value between 0-90 in increments of 10 (NOTE: 15 is the maximum value
allowed). When the value is modified, it will begin to flash. To store the modified value in memory, press and
hold the “1/2/SET” button until the value stops flashing.
While in the stitches per inch screen (Figure 3.61), the operator may adjust the stitch regulator minimum speed
(SrSPD). Quickly press and release the “1/2/SET” button. The stitch regulation minimum speed screen (Figure
3.62) will now be displayed.
Proprietary information of ABM INTERNATIONAL, Inc. furnished for customer use only.
No other uses are authorized without the prior written permission of
ABM INTERNATIONAL, INC.
13
ABM International, Inc.
Model: Innova
Series 1018, 1022 & 1026 V7.0
Users Guide
Figure 3.62 – Stitch regulation minimum sew speed screen
The SrSPD value controls the speed at which the quilting machine motor runs when the head is at rest (no
movement). A value of zero would mean the head stops sewing when the operator stops moving the machine.
A value greater than zero, between 75 and 500, means the sewhead runs at that set speed when the machine is at
rest (no movement). ABM prefers to not use an SrSPD setting (factory set to 0). SrSPD has been used in the
industry to combat large stitches when accelerating the machine from a stand still or in sharp corners. If the
SrSPD is set too high, the user may notice a significant amount of very small stitches in sharp corners and starts
and stops. Adjusting the SrSPD to a lower setting may help solve this problem. Again, the 0,1, and 2 buttons are
used to set the value between 0 (off) and 75-500. The value will flash when it is being modified. Press and hold
the “1/2/SET” button until the vale stops flashing. This will lock the new value into memory. Quickly pressing
and releasing the “1/2/SET” button will toggle between the SPI menu and SrSPD menu. Pressing the “mode”
button once in either screen will bring the user back to the main screen (Figure 3.60).
Once all of the values are adjusted, the user may start stitch regulation. Press and release the green start button
on the handle bar. If SrSPD is set to zero, the machine starts to sew only when the head is moved, maintaining
the stitches per inch set. If SrSPD is set to some value other than zero, the machine will start to sew at the set
speed. Stitching speed will only increase if the machine is moved fast enough to require a speed increase to hold
the proper stitches per inch. (NOTE: Setting the SrSPD too high may result in poor stitches per inch
consistency).
Press and release the green button again to stop stitch regulation. This will allow the user to move the quilting
machine to a new position without sewing. The button marked “5” can be used to turn stitch regulation on and
off. If “Sr” is not visible on the main screen, the machine is in manual sewing mode.
Proprietary information of ABM INTERNATIONAL, Inc. furnished for customer use only.
No other uses are authorized without the prior written permission of
ABM INTERNATIONAL, INC.
14
ABM International, Inc.
Model: Innova
Series 1018, 1022 & 1026 V7.0
Users Guide
3.7 Quick Reference – manual and stitch regulated modes
Operating in manual mode –
Step 1: Quickly pressing and releasing the (Red) left hand button will toggle the machine between needle up and
down position.
Step 2: Press and release the (Green) right hand button and the sewhead will start to run
Step 3: Press and hold the (Green) right hand button and the sewhead will increase sewing speed.
Step 4: Press and hold the (Red) left hand button and the sewhead will decrease sewing speed.
Step 5: Press and release the (Green) right hand button again and the sewhead will stop.
Operating in stitch regulated mode –
Step 1: Quickly pressing and releasing the (Red) left hand button will toggle the machine between needle up and
down.
Step 2: Press the #5 button on the control panel and stitch regulation (SR) is activated. The main screen of the
display will show “Sr” when stitch regulation is activated.
Step 3: Press and release the (Green) right hand button and the sewhead will start to run
Step 4: The faster you move the machine the faster it will run.
Step 5: The slower you move the machine the slower it will run.
Step 6: Press and release the (Green) right hand button again and the sewhead will stop.
Step 7: Press the #5 button on the control panel and stitch regulation mode will turn off.
Proprietary information of ABM INTERNATIONAL, Inc. furnished for customer use only.
No other uses are authorized without the prior written permission of
ABM INTERNATIONAL, INC.
15
ABM International, Inc.
Model: Innova
Series 1018, 1022 & 1026 V7.0
Users Guide
SECTION 4.0 – Parts List
This section lists the ABM part numbers needed to order any part on the Innova 1018 and 1026. The
section is divided into four drawings with the item description and ABM part number for all the
components needed to completely rebuild a machine. ABM carries all of the components below in
stock at all times. Any order placed before 6:00 P.M. CST can be shipped the same day for next day
delivery. The parts/service department can be reached at (936)441-4401 or (888)99-QUILT. Buying
the correct parts from ABM will ensure that your machines will operate their best. Buying parts from
sources other than ABM will void your warranty.
Proprietary information of ABM INTERNATIONAL, Inc. furnished for customer use only.
No other uses are authorized without the prior written permission of
ABM INTERNATIONAL, INC.
16
ABM International, Inc.
Model: Innova
Series 1018, 1022 & 1026 V7.0
Users Guide
10181018-A00 Innova 18” (Pinky)
No
Parts No
Description
Amt.
No
Parts No
Description
Amt.
1
1018-A01
Upper Profile 18”
1
20
BB-MR74ZZ
bearing
2
2
1018-A02
Vertical Profile
1
21
1018-A21
Shaft
1
3
1018-A03
Lower Profile 18”
1
22
1018-A22
Bushing
1
4
1018-A04
Backing Plate
1
23
1018-A23
Shaft
1
5
1018-A05
Backing Plate
1
24
1018-A24
Spring
1
6
1018-A06
Sewhead Casting Lwr
1
25
SR-4374006
Screw
1
7.1
1018-A071
Corner Casting Upr
1
26
1018-A26
Bushing
1
7.2
1018-A072
Corner Casting
1
27
SC-79418100
Screw5/16-18UNCX100L
8
8
1018-A08
Base Casting
1
28
SR-3174404
Screw
4
9
SC-7941819
Screw5/16-18UNCX19L
15
29
SR-4374008
Screw
4
10
1018-A10A
Spacer
(1)
30
1018-A30
Table
1
11
SC-40712
Screw M4X0.7X12L
3
31
1018-A31
Table latch
(2)
12
1018-A12
Ball φ 6.35
1
32
1018-A32
Shaft
(1)
13
1018-A13
Bolt
1
33
SR-4374006
Screw
1
14
HN-43740
Hex. Nut SM11/64X40
1
34
SD-607506
Screw M6X0.75X6L (26” )
2
15
1018-A15
Lever
1
35
SD-4374005
Screw SM11X64X40 (26” )
4
16
1018-A16
Pin
1
36
1026-C36A
Bearing 26”
(1)
17
ET-05
CliP E5
1
1.1
1026-A01
Upper profile 26”
1
18
1018-A18
Pin
1
2.1
1026-A02
Vertical profile 26”
1
19
ETET-03
Clip E3
3
3.1
10261026-A03
Lower Profile 26”
26”
1
Proprietary information of ABM INTERNATIONAL, Inc. furnished for customer use only.
No other uses are authorized without the prior written permission of
ABM INTERNATIONAL, INC.
17
ABM International, Inc.
Model: Innova
Series 1018, 1022 & 1026 V7.0
Users Guide
101800 Innova 18” ( Pinky)
1018-B00
No
Parts No
Description
Amt.
No
Parts No
Description
Amt.
1
1018-B01
Upper Drive Shaft
1
16
WP-1271910
Spacer
1
2
1018-B02
Lower Drive Shaft
1
17
1018-B17
Hand Wheel Plate
1
3
1018-B03
Timing belt
1
18
1018-B18
Pin
1
4
1018-B04
Lower Pulley
4
19
1018-B19
Spring
1
5
SD-4763206
Screw 3/16-32NUF
8
20
1018-B20
Hand Wheel
1
6
BB-R8ZZ
Bearing
1
21
1018-B21
Shaft
1
7
1018-B07
Gear
1
22
1018-B22
Bushing
1
8
SD-6354006
Screw
2
23
BB-R8ZZ
Bearing
2
9
1018-B09
Gear
1
24
WP-081915
Spacer
1
10
1018-B10
Eccentric
1
25
SC-7941865
Screw 5/16-18UNC
1
11
1018-B11
Bushing
2
26
SD-607506
Screw M6X0.75X6L
1
12
SD-607506
Screw M6X0.75X6L
2
27
SC-6352830
Screw 1/4-28UNF
4
13
SD-50805
Screw M5X0.8X5L
2
1.1
1026-B01
Upper Drive Shaft 26”
1
14
1018-B14
Timing belt
1
2.2
1026-B02
Lower Drive Shaft 26”
1
15
10181018-B15
Collar
1
Proprietary information of ABM INTERNATIONAL, Inc. furnished for customer use only.
No other uses are authorized without the prior written permission of
ABM INTERNATIONAL, INC.
18
ABM International, Inc.
Model: Innova
Series 1018, 1022 & 1026 V7.0
Users Guide
10181018-C00 Innova 18” ( Pinky)
No
Parts No
Description
Amt.
No
Parts No
Description
Amt.
1
1018-C01
Counterweight
1
16
SR-3574006
Screw
1
2
SD-607512
Screw M6X0.75
2
17
1018-D10
Presser Bar Pin
1
3
SD-607506
Screw M6X0.75
2
18
SC-40712
Screw M4X0.7X12L
1
4
1018-C04
Crank Rod
(1)
19
1018-C19
Presser Bar Bracket
1
4.1
BB-6805ZZ
Bearing
1
20
1018-C20A
Presser bar
(1)
4.2
BB-FR4ZZ
Bearing
2
21
1018-C21
Screw
1
4.3
CS-25
Clip
1
22
1018-C22
Hopping Foot
1
5
SR-4374007
Screw
1
23
1018-C23A
Needle Bar
(1)
6
1018-C06A
Take Up Assembly
(1)
24
1018-C24
Needle Bar Thread Guide
1
7
1018-C07
Pin
1
25
SR-3174404
Screw
1
8
1018-C08
Pin Lever
1
26
1018-C26
Needle #16
1
9
1018-C09
Take Up Lever
1
27
1018-C27A
Needle Bar Frame
(1)
10
BN-8128
Bearing
1
28
WP-051008
Washer
4
11
1018-C11
Take Up Crank
1
29
SC-4763212
Screw 3/16-32UNF
4
12
BN-8128
Bearing
1
20.1
1026-C20A
Presser Bar 26”
(1)
13
1018-C13
Screw
1
23.1
1026-C23A
Needle Bar 26”
(1)
14
1018-C14
Take Up Main Body
1
27.1
1026-C27A
Needle Bar Frame 26”
(1)
15
10181018-C15
Needle Bar Holder
1
10261026-C28
Presser bar spring
1
30
Proprietary information of ABM INTERNATIONAL, Inc. furnished for customer use only.
No other uses are authorized without the prior written permission of
ABM INTERNATIONAL, INC.
19
ABM International, Inc.
Model: Innova
Series 1018, 1022 & 1026 V7.0
Users Guide
10181018-D00 Innova 18” (Pinky)
No
Parts No
Description
Amt.
No
Parts No
Description
Amt.
1
1018-D01A
Hook Assembly
1
10
1018-D10
Screw
2
1.1
1018-D011
Rotating Hook
1
11
1018-D11
Hook Drive Gear
1
1.2
1018-D012
Screw
1
12
SD-4374005
Screw
2
1.3
1018-D013
Bobbin Case
1
13
BB-FR4ZZ
Bearing
7
1.4
1018-D014
Bobbin
1
14
1018-D14
Gear
1
2
1018-D02
Needle Plate
1
15
SD-4374004
Screw
1
3
SJ-4374009
Screw
2
16
1018-D16
Timing Belt
1
4
1018-D04
Backing Plate
1
17
1018-D17
Shaft
1
5
SK-4763210
Screw
2
18
SR-4374008
Screw
4
6
WP-051008
Washer
2
19
1018-D19
Plate
1
7
SD-3574006
Screw
4
20
SR-4374010
Screw
1
8
SD-4763206
Screw
1
21
1018-D21
Position Finger
1
9
10181018-D09
D09
Hook Drive Gear
2
Proprietary information of ABM INTERNATIONAL, Inc. furnished for customer use only.
No other uses are authorized without the prior written permission of
ABM INTERNATIONAL, INC.
20
ABM International, Inc.
Model: Innova
Series 1018, 1022 & 1026 V7.0
Users Guide
10181018-E00 Innova 18” ( Pinky)
No
Parts No
Description
Amt
.
No
Parts No
Description
Amt.
1
1018-E01
Handle Bar Support Plate Rear
2
24
1018-E24
Clamp (A)
1
2
1018-E02
(L1) Handle Bar (red)
1
25
1018-E25
Clamp(B)
1
3
1018-E03
(R1) Handle Bar (green)
1
26
1018-E26
Pin
1
4
1018-E04
Handle Bar Support Bracket Front
1
27
SC-6352832
Screw 1/4-28UNFX32L
1
5
1018-E05
(L2) Handle Bar (red)
1
28
SI-7941819
Screw 5/16-18UNCX19L
1
6
1018-E06
(R2) Handle Bar (green)
1
29
HN-79418
Nut 5/16-18UNC
1
7
SC-061020
SCREW M6X1X20
20
30
SJ-3564007
Screw SM9/64X40X7L
3
8
1018-E08
PLC Support Bracket
1
31
1018-E31
Thread Guide
1
9
1018-E09
Motor Support Bracket
1
32
1018-E32
Screw
1
10
1018-E10
Motor Cover
1
33
1018-E33
Thread Guide
2
11
1018-E11
PLC Support Plate
1
34
SQ-6352832
Screw 1/4-28UNFX31L
6
12
1018-E12
Lower Support Plate
1
35
1018-E35
Thread Guide
1
13
1018-E13
Rear Cover
1
36
SQ-6352816
Screw 1/4-28UNFX16L
2
14
1018-E14
Thread Stand
1
37
HN-63528
Washer 1/4-28UNF
2
15
1018-E15
Thread Guide Assemble
1
38
SR-4374008
Screw SM11/64X40X8L
20
16
1018-E16
Thread Guide Pin
1
39
SD-4763206
Screw 3/16-32UNFX6L
2
17
1018-E17
Tension Complete
1
40
SR-4374010
Screw SM11/64X40X10L
3
18
1018-E18
Front Cover
1
41
SC-6352832
Screw 1/4-28UNFX32L
4
19
1018-E19
Locking Plate
2
42
1018-E42
Grip
4
20
1018-E20
Bracket(A)
1
43
WP-081915
Washer
1
21
1018-E21
Plate (B)
1
8.1
1026-E08
PLC Support Bracket 26”
1
22
1018-E22
Nut
1
13.1
1026-E13
Rear Cover 26”
1
23
10181018-E23
Pin
1
Proprietary information of ABM INTERNATIONAL, Inc. furnished for customer use only.
No other uses are authorized without the prior written permission of
ABM INTERNATIONAL, INC.
21
ABM International, Inc.
Model: Innova
Series 1018, 1022 & 1026 V7.0
Users Guide
General wiring diagram:
Proprietary information of ABM INTERNATIONAL, Inc. furnished for customer use only.
No other uses are authorized without the prior written permission of
ABM INTERNATIONAL, INC.
22