1
User Guide
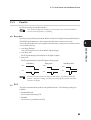
Troubleshooting printer problems
True Type fonts, AppleTalk, EtherTalk and Macintosh are trademarks of Apple Computer, Inc., registered in the
United States and other countries.
NetWare is a registered trademark of Novell, Inc., in the United States and other countries.
Microsoft, MS-DOS, Windows and Windows NT are either registered trademarks or trademarks of Microsoft
Corporation in the United States and/or other countries.
Permission has been obtained from Microsoft Corporation for use of software screen shots.
This software is based in part on the work of the Independent JPEG Group.
All product/brand names are trademarks or registered trademarks of the respective holders.
Important
This manual is copyrighted with all rights reserved. Under the copyright laws, this manual may not be copied,
in whole or part, without the written consent of the publisher.
Parts of this manual are subject to change without prior notice.
We welcome any comments on ambiguities, errors, omissions, or missing pages.
Never attempt any procedure on the machine that is not specifically described in this manual. Unauthorized
operation can cause faults or accidents. Fuji Xerox is not liable for any problems resulting from unauthorized
operation of the equipment.
Xerox is a registered trademark.
The Document Company and Ethernet are trademarks and may be registered in certain jurisdictions.
Preface
Thank you for choosing DocuPrint C621.
This manual contains important information regarding printer operation, control panel operation, and
troubleshooting methods. To get the most out of your printer, read the manual carefully and completely.
Keep this manual handy for future reference.
This manual is written with the assumption that you are familiar with the basics of your personal
computer to be connected, the operating system used in your computer, and the respective software. You
can also refer to the respective manuals for information on basic knowledge and operation methods of the
product.
In this manual, safety instructions are described with the symbol . Always read and follow the
instructions before performing the required procedure. Make sure your read through the Safety Notes
section in the Setup Guide.
i
2
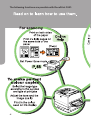
Trouble? Don't know how to operate! Problem occurred when using the
printer....
2
ii
2
iii
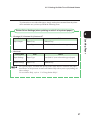
The following functions are possible with DocuPrint C621:
2
iv
2
v
Contents
Preface .......................................................................................................................... i
Contents ...................................................................................................................... vi
Types of Manuals ........................................................................................................... x
Using this Guide .......................................................................................................... xii
Organisation of this Guide ............................................................................................ xii
Conventions ................................................................................................................ xiii
Chapter 1 Basic Printing Operations
1.1
1.2
1.2.1
1.2.2
1.3
1.4
1.5
Printer Parts and Functions ................................................................................... 2
Switching the Power On/Off .................................................................................. 5
Switching on ......................................................................................................... 5
Switching off ......................................................................................................... 6
Printing from Computers ....................................................................................... 7
Using Online Help ............................................................................................... 10
Cancelling a Print Job ......................................................................................... 13
1.5.1 Cancelling a Print Job on the Computer ................................................... 13
1.5.2 Cancelling a Print Job on the Control Panel ............................................. 15
1.6 Forced Output of Data Still in the Printer .............................................................. 16
1.7 Changing the Printer Configuration ...................................................................... 17
1.8 Printing the Printer Settings List ........................................................................... 21
1.9 Printing the Job Log Report ................................................................................. 23
1.10 Checking the Printer Status on the Computer ...................................................... 26
Chapter 2 Loading Paper
2.1
2.2
2.3
2.4
vi
Paper Handling ................................................................................................... 32
2.1.1 Recommended Paper ............................................................................ 32
2.1.2 Unsuitable Paper .................................................................................... 36
2.1.3 Storing Paper ......................................................................................... 37
Loading Paper .................................................................................................... 38
2.2.1 Loading Paper in the Paper Trays ........................................................... 38
2.2.2 Loading Paper on the Manual Tray .......................................................... 41
Replacing the Paper Tray with an Optional Tray ................................................... 44
2.3.1 Removing the Paper Tray ....................................................................... 44
2.3.2 Installing the Paper Tray ......................................................................... 45
Printing On Special Media ................................................................................... 46
2.4.1 Printing on Transparencies ..................................................................... 46
2.5
2.4.2 Printing on Postcards ............................................................................. 49
2.4.3 Printing on Envelopes ............................................................................. 51
2.4.4 Printing on Glossy paper ......................................................................... 54
Printing on Side Two of Printed Sheets ................................................................ 56
Chapter 3 Control Panel
3.1
3.2
3.3
Control Panel Components and Functions ........................................................... 60
3.1.1 LED ....................................................................................................... 60
3.1.2 Display ................................................................................................... 61
3.1.3 Buttons .................................................................................................. 62
Basic Operations of the Menu Screen.................................................................. 63
3.2.1 Menu Screen .......................................................................................... 63
3.2.2 Basic Menu Operations .......................................................................... 64
List of Items on the Menu Screen ......................................................................... 66
3.3.1 System .................................................................................................. 66
3.3.2 Maintenance Mode .................................................................................. 68
3.3.3 Parallel ................................................................................................... 69
3.3.4 Report/List ............................................................................................. 70
3.3.5 Network .................................................................................................. 71
Chapter 4 Troubleshooting
4.1
4.2
4.3
4.4
4.5
4.6
4.7
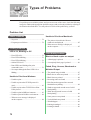
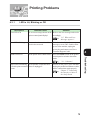
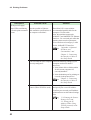
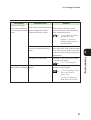
Types of Problems .............................................................................................. 76
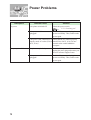
Power Problems ................................................................................................. 78
Printing Problems ............................................................................................... 79
4.3.1 LED is Lit, Blinking or Off ........................................................................ 79
4.3.2 Unable to Print from Windows ................................................................. 82
4.3.3 Unable to Print from Macintosh ............................................................... 85
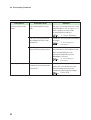
Print Quality Problems ........................................................................................ 86
4.4.1 Blank or Black Copies are Output ........................................................... 86
4.4.2 Faded, Dirty, Uneven, Shadowed or Wrinkled Output ............................... 87
4.4.3 Output is Not Clear ................................................................................. 91
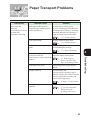
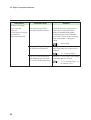
Paper Transport Problems .................................................................................. 93
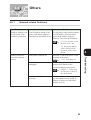
Others ................................................................................................................ 95
4.6.1 Network-related Problems ...................................................................... 95
4.6.2 Other Problems ...................................................................................... 97
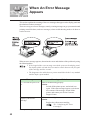
When An Error Message Appears ....................................................................... 98
vii
4.8
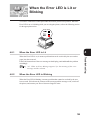
When the Error LED is Lit or Blinking ................................................................. 109
4.8.1 When the Error LED is Lit ..................................................................... 109
4.8.2 When the Error LED is Blinking ............................................................. 109
Chapter 5 Paper Jams
5.1
Clearing Paper Jams ........................................................................................ 112
5.1.1 Paper Jams at the Manual Tray ............................................................. 114
5.1.2 Paper Jams in the Manual Feed Unit ..................................................... 115
5.1.3 Paper Jams in the Lower Left Unit ......................................................... 117
5.1.4 Paper Jams at the Top Left Cover ......................................................... 122
5.1.5 Paper Jams at the Lower Left Cover ..................................................... 123
5.1.6 Paper Jams at the Right Cover ............................................................. 124
5.1.7 Paper Jams in the Paper Tray ............................................................... 126
5.1.8 Paper Jams in the Duplex Tray ............................................................. 127
5.1.9 Paper Jams at the Lower Right Cover of the Tray Module ...................... 128
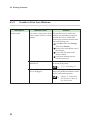
Chapter 6 Consumables
6.1
6.2
6.3
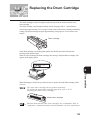
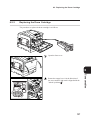
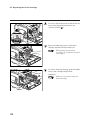
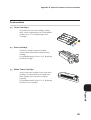
Replacing the Toner Cartridges ......................................................................... 130
6.1.1 Handling Precautions for Toner Cartridges ............................................ 131
6.1.2 Replacing the Toner Cartridges ............................................................ 132
Replacing the Drum Cartridge ........................................................................... 135
6.2.1 Handling Precautions for Drum Cartridges ............................................ 136
6.2.2 Replacing the Drum Cartridge ............................................................... 137
Replacing the Waste Toner Cartridge ................................................................ 141
6.3.1 Handling Precautions for Waste Toner Cartridge ................................... 141
6.3.2 Replacing the Waste Toner Cartridge ................................................... 142
Chapter 7 Maintenance
7.1
7.2
7.3
Cleaning ........................................................................................................... 146
Storing the Printer ............................................................................................. 147
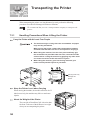
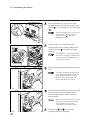
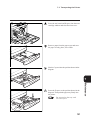
Transporting the Printer ..................................................................................... 148
7.3.1 Handling Precautions When Lifting the Printer ....................................... 148
7.3.2 Transporting the Printer ........................................................................ 149
7.3.3 Environmental Requirements for Installing the Printer ............................ 153
Appendices
viii
A
B
C
D
E
F
G
H
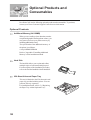
Optional Products and Consumables ................................................................ 158
Optional Products ............................................................................................. 158
Consumables ................................................................................................... 161
Menu List on the Control Panel .......................................................................... 162
Obtaining Product Information ........................................................................... 165
Main Specifications ........................................................................................... 166
Life Span of Consumables ................................................................................ 168
Parallel Interface Specifications ......................................................................... 169
Installing Additional Memory ............................................................................... 171
Glossary ........................................................................................................... 174
Index
ix
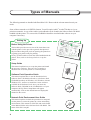
Types of Manuals
The following manuals are bundled with DocuPrint C621. Please read the relevant manual to suit your
needs.
Some of these manuals are in PDF file formats. You will require Adobe® Acrobat® Reader to view or
print these manuals. A copy of the Adobe Acrobat Reader can be found in the Software Pack CD-ROM
bundled with the printer. You can use this CD-ROM to install the Acrobat Reader software on your
computer if necessary.
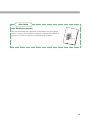
Setting Up
Before Using the Printer
This booklet provides an overview of the items that come
with the printer. It also provides a general description of
the procedures that guide you from opening the printer box
to getting your printer ready for printing.
Firstly, use this booklet to check the items bundled with the
printer. Then, refer to the Setup Guide to set up the
printer.
Setup Guide
This manual explains how to set up the printer and install
the necessary software. There are also examples to
illustrate how to use the printer as a network printer.
Software Pack Operation Guide
This manual explains how to use the DocuPrint C621
Software Pack CD-ROM (referred to as Software Pack
CD-ROM hereafter) on Windows® 95, Windows® 98 and
Windows NT®, and how to install the various software
available in the Software Pack. Once you insert the
Software Pack CD-ROM in the CD-ROM drive of your
computer, the Fuji Xerox Setup Menu will appear
automatically. Click on the desired button to display this
manual on the screen.
Network Print Environment User Guide
This manual explains in detail the procedures to setup and
use the printer as a network printer in various networking
environments. This manual is a PDF file and can be found
in the Manual folder in the Software Pack CD-ROM. The
name of this file is net.pdf.
x
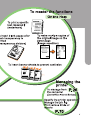
After Setup
User Guide (this manual)
This manual describes the capabilities of DocuPrint C621 and explains
what to do when you encountered a problem. It explains the methods of
operation as well as the solutions to troubleshoot the problems.
xi
Using this Guide
Organisation of this Guide
This guide consists of eight chapters. A brief introduction of each chapter is provided
below.
Chapter 1 Basic Printing Operations
This chapter describes the basic functions of the printer and how to use these functions.
Chapter 2 Loading Paper
This chapter describes the types of paper that can be used with DocuPrint C621, how to
load the paper on the respective trays, and the procedure to switch to the optional paper
tray.
In addition, it describes the procedure to print on special media such as transparencies,
postcards, and envelopes.
Chapter 3 About the Control Panel
This chapter explains how to use the printer control panel and define the settings for the
individual functions by using the printer control panel.
Chapter 4 Troubleshooting
This chapter explains what each error message shown on the printer control panel means
and how to resolve them.
This chapter also describes the solutions to the common problems that you will encounter
when using the printer. Read this chapter to determine the nature of the problem when the
problem arose.
Chapter 5 Paper Jams
This chapter explains the procedures for dealing with paper jams.
Chapter 6 Consumables
This chapter provides information on handling and replacing the consumables.
Chapter 7 Maintenance
This chapter provides information on cleaning, storing and transporting the printer.
xii
Appendices
This section contains the following information:
• Optional products and consumables
• Control panel menu list
• How to obtain product information
• Main specifications
• Life span of the consumables
• Parallel interface specifications
• Installing additional memory
• Glossary
Conventions
This manual uses the following conventions:
Notation
Explains points to pay attention to. Be sure to read it.
Gives supplementary information for reference.
Indicates where to find related information.
" ": indicates that the source of reference is in this manual.
Italics: indicates that the source of reference is in another manual.
xiii
Symbols
Symbol
Bold
Meaning
Indicates selections or all kinds of buttons.
Example: Click Next.
""
Indicates input contents.
Example: Enter "DocuPrint C621" in the text box.
Initial Caps
Indicates the names of windows, menus, dialog boxes, list boxes, and
combo boxes.
Example: The Add Port dialog box is displayed.
+
Indicates that the key on the keyboard and the button on the control
panel should be pressed simultaneously.
Example: Press the ▲ + ▼ buttons.
xiv
Basic
Printing
Operations
1.1
Printer Parts and Functions .................................................................. 2
1.2
Switching the Power On/Off ................................................................ 5
1.3
Printing from Computers ...................................................................... 7
1.4
Using Online Help ............................................................................. 10
When You Have Difficulties Setting the Print Properties
1.5
Cancelling a Print Job ........................................................................ 13
When Printing Stopped Halfway
1.6
Forced Output of Data Still in the Printer .......................................... 16
When Printing Stopped Halfway
1.7
Changing the Printer Configuration .................................................... 17
When Optional Products are Added
1.8
Printing the Printer Settings List ......................................................... 21
To Check the Printer Configuration and Network Settings
1.9
Printing the Job Log Report ............................................................... 23
Print Job Log
1.10
Checking the Printer Status on the Computer ...................................... 26
1.1
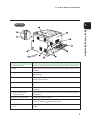
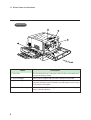
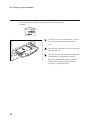
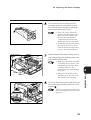
Printer Parts and Functions
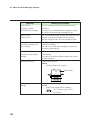
The names and functions for the various parts of the printer are as follows:
Front View
Name
Description
1. Paper Tray
Load paper for normal printing here.
2. Front Cover
This is the cover at the front of the printer. Open it to install and replace
toner and drum cartridges.
3. Printer Control Panel
The control panel consists of the respective LED and buttons, as well
as the display. Refer to "Chapter 3 Control Panel" for details.
4. Face-down Tray
Printed documents are delivered to this tray with the printed side facing
down.
5. Paper Stopper
Pull out the paper stopper to prevent printed paper from falling off the
printer.
6. Top Right Cover
This is the cover at the upper-right side of the printer. Open this cover
when you are installing additional memory or the hard disk.
7. Manual Tray
Use this tray to manual feed media such as postcards and envelopes.
8. Manual Feed Unit
This is a pulled-out unit located on the right side of the printer. Open it to
remove jammed paper.
9. Right Cover
This is the cover at the lower-right side of the printer. Open it to remove
jammed paper.
10. Ethernet Interface
This is for the Ethernet cable when the printer is used as a network
printer.
2
1.1 Printer Parts and Functions
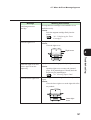
Rear View
1
Basic Printing Operations
Name
11. Parallel Interface
Description
This is for the parallel cable when the printer is used as a local printer.
12. Filter
This prevents toner from being ejected out of the machine. Do not remove
the filter.
13. Top Left Cover
This is the cover at the left side of the printer. Open this cover to remove
jammed paper.
14. Lower Left Unit
This is a pulled-out unit located on the left side of the printer. Open it to
remove jammed paper.
15. Face-up Tray
Printed documents are delivered to this tray with the printed side facing
up.
16. Ventilation Outlet
This vents heat from inside the printer. Make sure the outlet is never
obstructed.
17. Duplex Print Module
Connector Cover
This cover hides the connector that is used to connect the optional duplex
print module.
18.Power Cord Connector
Connect the power cord here.
19.Power Switch
Switches the power on and off. Press the "|" side to switch on the
printer on, and the " " side to switch it off.
20.Tray Module Connector
Cover
This cover hides the connector that is used to connect the optional tray
module.
3
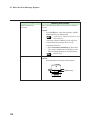
1.1 Printer Parts and Functions
Internal View
Name
Description
21. Fuser Unit
This unit fuses the toner to the paper with heat. Do not touch the fuser,
as it gets hot during printing.
22. Toner Cartridges
Black, yellow, magenta and cyan toner cartridges are provided.
23. Drum Cartridge
This cartridge includes the light-sensitive drum, drum cleaner, and toner
collection cartridge. Images are initially created through an electric charge
on the surface of this drum.
24. Waste Toner Cartridge
Collects used toner. This cartridge is attached to the drum cartridge, but
can be replaced separately.
4
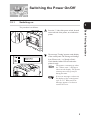
1.2
1.2.1
Switching the Power On/Off
Switching on
1
The procedure is as follows:
Basic Printing Operations
Press the "|" side of the power switch, located
on the left side of the printer, to switch on the
printer.
The message "Testing" appears on the display
of the control panel. The message will change
from "Please wait..." to "Ready to Print".
Check that the Online LED is lit when the
printer is ready.
The printer is warming up when
the "Please wait..." message is
shown on the display. The printer
cannot process any print job
during this time.
If an error message is shown on
the display of the control panel
refer to "4.7 When an Error
Message Appears" on how to
resolve the error.
5
1.2 Switching the Power On/Off
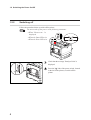
1.2.2
Switching off
Follow the procedure below to switch off the printer.
Do not switch off the power in the following situations:
• When "Please wait..." is
displayed.
• When the Data LED is lit.
• When the Error LED is lit.
Check that the message "Ready to Print" is
displayed.
Press the " " side of the power switch, located
at the left of the printer, to switch off the
printer.
6
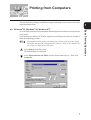
1.3
Printing from Computers
The procedures for printing from different computer operating systems (OS) are described
in the following sections.
You can simply select the Print command in almost all application software to send a print job
to the printer.
The following uses Microsoft® Word 97 application on Windows 98 OS as an example to
illustrate the printing procedure.
The method used to display the dialog box and the contents of the dialog
box differ amongst OS and application software. Refer to the manuals of
the respective software for reference.
Select Print from the File menu.
The Print dialog box is displayed.
Select FX DocuPrint C621 XPL2 from the Printer Name list box. Then, click
Properties.
7
Basic Printing Operations
Windows® 95, Windows® 98, Windows NT®
1
1.3 Printing from Computers
Specify the required settings on the respective tabs and click OK.
• Refer to the Online Help for details of each item within the tabs.
To learn how to use Online Help, refer to "1.4 Using Online
Help".
• You can make adjustments to the image or colour under the
Graphics tab to suit the type and purpose of the image.
Select an option from Page range in the Print dialog box and click OK.
"1.5 Cancelling a Print Job" on how to cancel printing
8
1.3 Printing from Computers
Macintosh®
1
In this section, Microsoft Office Word 98 is used to illustrate the printing procedure.
Select Print from the File menu.
Click
on the General Settings bar. From the displayed list, select the items
that you want to change.
On the displayed dialog box, specify the necessary items and then click Print.
• Refer to the Online Help for details of each item within the tabs.
To learn how to use Online Help, refer to "1.4 Using Online
Help".
• You can make adjustments to the image or colour under the
Graphics tab to suit the type and purpose of the image.
The print data is sent to the printer.
"1.5 Cancelling a Print Job" on how to cancel printing.
9
Basic Printing Operations
The method used to display the dialog box and the contents of the dialog
box differ amongst OS and application software. Refer to the manuals of
the respective software for reference.
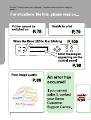
1.4
Using Online Help
When You Have Difficulties Setting the Print
Properties
Online Help is provided by the DocuPrint C621 printer driver. You can find explanations in
the Online Help on the function of each printer driver item and on how to print.
Online Help allows you to easily obtain the information you want without leaving the
computer.
The following is an explanation on how to use Online Help under different OS.
Windows 95, Windows 98, Windows NT
Display the Properties dialog box and select the tab containing the items that you want to
know in more details.
The following explanation uses the Paper/Output tab in Windows 98 as an example.
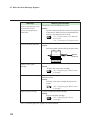
The Online Help items and contents vary according to the OS used.
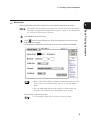
To show the explanation of an item
Click on ? at the top right corner of the Properties dialog box. (See 1 in the
diagram below.)
To get the explanation for any item, click on that item. (See 2 in the diagram
below.) This will display the explanation for the item.
1.
2.
3.
10
1.4 Using Online Help
To display a detail explanation of an item within a tab
1
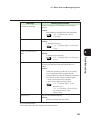
Click the Help button. (See 3 in the diagram on the previous page.) This will
bring up the Help window for the tabs.
To display the table of contents in Help
Click Contents on the Help window. (See 5 in the diagram below.)
Click on the item to learn more about it. (See 6 in the diagram below.)
To search for information with keywords
Click the Index tab. (See 7 in the diagram below.)
Enter the keywords in "Type the first few letters of the word you're looking for"
(see 8 in the diagram below). Then, click Display (see 8 in the diagram
below).
5.
7.
4.
6.
8.
11
Basic Printing Operations
Click on the item to learn more about it. (See 4 in the diagram below.)
1.4 Using Online Help
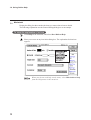
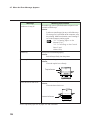
Macintosh
Display the dialog box that contains the items you want to know in more details.
The following explanation uses the General Settings dialog box as an example.
To show the explanation of an item
Click Help on the menu bar, and select Show Balloon Help.
Place your cursor on any item in the dialog box. The explanation for that item
appears.
When you do not need help on the items, select Hide Balloon Help
from the Help menu on the menu bar.
12
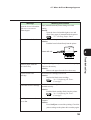
1.5
Cancelling a Print Job
To cancel a print job, you have to first cancel the print command on the computer, and
then cancel the print data that is being processed in the printer using the control panel.
Cancelling a Print Job on the Computer
The procedures for cancelling a print job on the different OS are described in the following
sections.
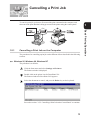
Windows 95, Windows 98, Windows NT
The procedure is as follows:
Click the Start menu and select Settings and Printers.
The Printers window is displayed.
Double-click on the printer icon for DocuPrint C621.
The Printer window for DocuPrint C621 appears.
Select the document to cancel, and press the Delete key on the keyboard.
Proceed to section "1.5.2 Cancelling a Print Job on the Control Panel" to continue.
13
Basic Printing Operations
1.5.1
1
1.5 Cancelling a Print Job
Macintosh
When Background Printing is selected in the Chooser window, you can cancel a print job
from the print monitor.
Once background printing is set, the print monitor will automatically be activated whenever a
print command is sent from an application.
To cancel a print job from the print monitor, follow the procedure below.
Switch to the XPL2 Print Monitor screen.
Select the document to cancel, and click
.
Proceed to section "1.5.2 Cancelling a Print Job on the Control Panel" to continue.
14
1.5 Cancelling a Print Job
1.5.2
Cancelling a Print Job on the Control Panel
"3.2 Basic Operations of the Menu Screen" on how to use the control
panel
(Printer is processing data)
Press Online.
This message appears when the printer is
processing the data that is currently being
printed. The processing time differs according to
the size of the data printed. Please wait until the
message changes.
(The printer is offline)
Press Cancel once. The print operation will be cancelled.
Once the cancellation is completed, the Print screen is displayed.
(Print screen (when the printer is ready to print again))
15
1
Basic Printing Operations
After a print job is cancelled on the computer, the procedure described below will help you
cancel the data that is being processed on the printer. However, if there is a page printing on
the printer, that page will be printed in its entirety.
1.6
Forced Output of Data Still in
the Printer
When Printing Stopped Halfway
When a page at the end of a processing data is terminated halfway, the next data will have
to wait until job timeout occurred before it can be printed. The display panel will show the
message "Please wait...".
You can push forward the next job by forcing the data still remaining in the printer to be
printed, without waiting for the job timeout to occur.
This section describes the procedure to forcibly output the remaining data.
The factory setting for job timeout is 30 seconds.You can specify the
setting from 5 to 300 seconds. For job timeout details, refer to "3.3 List of
Items on the Menu Screen".
The procedure is as follows:
"3.2 Basic Operations of the Menu Screen" on how to use the control
panel
(Printer is processing data)
Press Online.
This message appears when the printer is
processing the data that is currently being
printed. The processing time differs according to
the size of the data printed. Please wait until the
message changes.
(The printer is offline)
Press Set/Eject. The remaining data will be printed.
Once the printing is done, the Print screen is displayed.
(Print screen (when the printer is ready to print again))
16
1.7
Changing the Printer
Configuration
When Accessories are Added
If you are adding optional products to the printer after it is installed, you have to change the
printer configuration on the printer driver.
• Hard disk
Basic Printing Operations
• Duplex print module
1
• Additional memory
• 2-tray module
• A3 oversize tray
For installation procedure of these optional products, refer to their
respective booklets or the Setup Guide. This section will discuss how to
configure the printer drivers with the assumption that these products are
installed.
17
1.7 Changing the Printer Configuration
Windows 95, Windows 98, Windows NT
The procedure is as followins. Windows 98 is used as an example here.
Click the Start menu, select Settings and followed by Printers.
The Printers window is displayed.
Select the DocuPrint C621 printer icon. Then select Properties from the File
menu.
The printer properties dialog box is displayed.
Select the Printer Configuration tab.
Select the optional products that were installed, and click OK.
18
1.7 Changing the Printer Configuration
Macintosh
1
The procedure is as follows:
From the top left box of the Chooser window, click the DPC621 icon.
Click the printer zone in AppleTalk Zones when you are setting the printer zone.
In a network environment where the zone is not specified,
AppleTalk Zones will not be displayed.
19
Basic Printing Operations
Select Chooser from the Apple menu. The Chooser window is displayed.
1.7 Changing the Printer Configuration
Select the printer to be set from Connect to, and click Setup.
Select the installed optional products in the Printer Settings dialog box, and click
OK.
Close the Chooser window.
20
1.8
Printing the Printer Settings
List
To check the Printer Configuration and Network
Settings
You can simply use the printer control panel to print a copy of the Printer Settings List to
check what optional products are installed on the printer or what are the network settings.
1
Basic Printing Operations
Show
information
about the
optional
products.
21
1.8 Printing the Printer Settings List
The Printer Settings List is printed in portrait orientation on A4-size
paper. Load A4-size paper in portrait orientation in the paper tray.
"3.2 Basic Operations of the Menu Screen" on how to use the control
panel
(Print screen (when the printer is ready to print))
Press Online.
(The printer is offline)
Press Menu. The Menu screen is displayed.
(Menu screen)
Press ▼ thrice.
Press Set/Eject once.
Press Set/Eject once.
Press Set/Eject once.
Once printing is done, the Print screen is displayed.
22
1.9
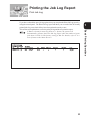
Printing the Job Log Report
Print Job Log
If Yes is selected for Auto Log Print in 1 System, the printer will
automatically generate the Print Job Log report when the number of print
jobs done exceeds 50. The factory setting is No. For details, refer to "3.3
List of Items on the Menu Screen".
23
1
Basic Printing Operations
If you have selected the store job log option, then you can print the Print Job Log report by
using the control panel. The Print Job Log report will show you a record of the 50 recently
printed jobs for you to check if they have been printed correctly or not.
This section will explain how to save the print job log and how to print the report.
1.9 Printing the Job Log Report
The following procedure explains how to save the print log of the printer.
"3.2 Basic Operations of the Menu Screen" on how to use the control
panel
(Print screen (when the printer is ready to print))
Press Online.
(The printer is offline)
Press Menu. The Menu screen is displayed.
(Menu screen)
Press Set/Eject once.
Press ▼ four times.
Press Set/Eject once.
Press ▼ once.
Press Set/Eject once.
Press ▼ once.
Press Set/Eject once.
24
Press Online once.
1.9 Printing the Job Log Report
The following procedure explains how to print the Job Log report.
1
Basic Printing Operations
The printer prints the Job Log report on A4-size paper in portrait
orientation. Load A4-size paper in the paper tray in the portrait
orientation.
(Print screen (when the printer is ready to print))
Press Online.
(The printer is offline)
Press Menu. The Menu screen is displayed.
(Menu screen)
Press ▼ thrice.
Press Set/Eject once.
Press ▼ thrice.
Press Set/Eject once.
Press Set/Eject once.
The Print screen is displayed once printing is done.
25
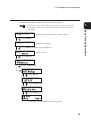
1.10
Checking the Printer Status
on the Computer
When DocuPrint C621 is installed in a TCP/IP environment, you can use the WWW
browser on the network computer to check the printer status or change any kind of printer
settings.
This feature is known as CentreWare Internet Services.
CentreWare Internet Services is a software that enables the user to display the printer
status or change the printer settings without leaving the computer.
You can also check how much of your consumables and paper is still available in the
printer.
The following procedure explains how to use the CentreWare Internet Services.
Switch on the computer and activate the WWW browser.
Here, we use Microsoft Internet Explorer 5.0 on Windows 98 as an example.
To ensure that CentreWare Internet Services is working correctly,
you need to change the following settings of the browser.
If the CentreWare Internet Services is not connected properly,
check these settings.
• setting to enable Java
(any options except Disable Java for Java permission)
• Set Check for newer versions of stored pages to Every visit to the
page or Every time you start Internet Explorer
For details on CentreWare Internet Services, refer to the Network
Print Environment User Guide (net.pdf) in the Software Pack CDROM.
26
1.10 Checking the Printer Status on the Computer
Enter the IP address or the internet address of the printer in the address column of
the browser.
If the network is using Domain Name System (DNS) and the printer
host name is registered in the DNS name server, you can use the
Internet address which has both host and domain names to access
the printer.
DNS allows you to obtain the IP address from the host name using
Internet. Check with your network administrator on whether DNS
is used on the network and the internet address of the printer.
Example: For IP address, "13.198.33.195", enter, "http://13.198.33.195/"
Example: For internet address, "dpc620.aaa.bbb.fujixerox.co.jp" (host name:
dpc620; document name: aaa.bbb.fujixerox.co.jp), enter, "http://
dpc620.aaa.bbb.fujixerox.co.jp/"
Press Enter on the keyboard.
The screen of CentreWare Internet Services is displayed.
27
1
Basic Printing Operations
If you do not know the printer IP address, print out the Printer
Settings List to check. Refer to "1.8 Printing the Printer Settings
List" for information on printing the Printer Settings List.
1.10 Checking the Printer Status on the Computer
Click Status to check printer status.
Printer information is displayed at the right side of the screen.
28
1.10 Checking the Printer Status on the Computer
Check the displayed content. You can check the status of the paper trays, output
tray, and covers; as well as information about the toner and other consumables;
and the output accounts.
1
Basic Printing Operations
To check if any error occurred, click on Fault Status.
The displayed content at the right of the screen changes to display the fault status.
29
1.10 Checking the Printer Status on the Computer
Check the displayed content. You can also check the status of the printer control
panel here.
30
Loading
Paper
2.1
Paper Handling .................................................................................. 32
2.2
Loading Paper .................................................................................... 38
2.3
Replacing the Paper Tray with an Optional Tray ............................... 44
2.4
Printing on Special Media ................................................................. 46
2.5
Printing on Side Two of Printed Sheets ............................................. 56
2.1
Paper Handling
If you use paper that is unsuitable for printing, they may cause paper jams and
deterioration in print quality. We recommend you to use the types of paper listed below to
obtain the best results from your printer.
2.1.1
Recommended Paper
Plain Paper (general-purpose)
When you are printing on plain paper (general-purpose paper), the plain paper used should
meet the following standards. However, for better printing, standard paper is
recommended.
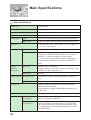
Paper Supply
Standard
Manual Tray
G.S.M.: 64 to 220 g/m2
Ream weight: 55 to 189 kg
Trays 1, 2 and 3
G.S.M.: 64 to 105 g/m2
Ream weight: 55 to 90 kg
G.S.M. or g/m2 is a measure of the substance of paper expressed in
grammes per square meter, which does not depend on the number of
sheets in the ream. Ream weight is the weight of a 788 x 1,091 mm ream
consisting of 1,000 sheets.
Plain Paper (Standard)
The types of standard paper for DocuPrint C621 are as follows:
Standard
Paper Type
G.S.M.: 82 g/m2
FXJ Paper
(For colour, one-sided printing) Ream weight: 70 kg
FXJD Paper
G.S.M.: 98 g/m2
(For colour, two-sided printing) Ream weight: 84 kg
FXP Paper
(For monochrome printing)
32
G.S.M.: 64 g/m2
Ream weight: 55 kg
2.1 Paper Handling
Special Media
In addition to plain paper, the following types of special media can also be used:
Paper Type
Product
Code
Transparencies
(XEROX FILM (no border))
V516
Do not use transparencies meant for fullcolour printing (with white border).
Labels (A4)
V862
You may use any full-page and uncut label
sheets.
Note
2
-
Do not use envelopes that have tape seals. If
you are using an envelope with a glue seal,
make sure it is dry before use.
Postcards
-
Postcards that have been printed on one side
may be slightly bent, resulting in paper jams.
Use your hands to straighten all the bends
before use.
We do not recommend printing on multi-coloured
postcards.
Heavy Weight Paper
(G.S.M.: 105 to 220 g/m2)
-
Image may slip when printing on heavy
weight paper.
Coated Paper
Glossy Paper
• Mylar Film
157g/m2
(A4)
(A3)
• NK Special Double-sided
Art Paper
(For two-sided printing)
(A4)
(A3)
(12 ✕ 18")
V588
V589
Do not use coated paper for inkjet printers.
When printing on either coated paper or
glossy paper, load one sheet at a time.
Coated and glossy paper can stick together
due to moisture. If more sheets were loaded
together, more than one sheet may be fed at
the same time, causing damage to the
machine.
V607
V608
V844
For plain paper, heavy weight paper, postcard, coated paper and glossy
paper, you can use the manual tray to print on side 2 (back) of the paper
only if side 1 (front) was printed using DocuPrint C621. For details, refer
to "2.5 Printing on Side Two of Printed Sheets".
33
Loading Paper
Envelopes
• Type 2 162 ✕ 114 mm
• Type 3 148 ✕ 98 mm
• Type 4 235 ✕ 105 mm
• Type 3 Long 235 ✕ 120 mm
2.1 Paper Handling
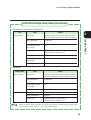
Paper Trays, Paper Types and Sizes
The following table shows you the type, size and quantity of paper that can be loaded onto
a specific tray.
Paper Supply
Manual Tray
Paper Type
Plain paper
Up to 150 sheets
Postcards
or 16 mm thick
Envelopes
Labels
Transparencies
(no border)
Heavy weight
Paper
Coated paper
Glossy paper
Tray 1
250 sheets universal tray Plain paper
(bundled or optional)
A3 oversize tray
(optional)
Trays 2, 3
2-tray module
(optional)
34
Maximum
Capacity
1 sheet
Paper Size
A5 portrait
B5 portrait
A4 portrait/landscape
B4 landscape
A3 landscape
8.5 ✕ 11" (Letter) portrait/
landscape
8.5 ✕ 14" (Legal) landscape
11 ✕ 17 " landscape
12 ✕ 18 " landscape
328 ✕ 453 mm landscape
Postcard
Envelope (Types 2/3/4 and Type 3
Long)
Custom Size
(Width: 90 to 330.2 mm,
Length: 144.8 to 457.2 mm)
Up to 250 sheets B5 portrait
or 26 mm thick
A4 portrait/landscape
B4 landscape
A3 landscape
8.5 ✕ 11" (Letter) portrait
8.5 ✕ 14" (Legal) landscape
11 ✕ 17 " portrait
12 ✕ 18 " portrait
Plain paper
Up to 250 sheets 328 ✕ 453 mm landscape
or 26 mm thick
Plain paper
Up to 500 sheets B5 portrait
per tray or 53 mm A4 portrait/landscape
thick
B4 landscape
A3 landscape
8.5 ✕ 11" (Letter) portrait
8.5 ✕ 14" (Legal) landscape
11 ✕ 17" landscape
The number of sheets that can be loaded varies according to the
thickness of paper.
2.1 Paper Handling
Paper Types and Sizes for Two-sided Printing
If you have installed the duplex print module (optional), you can perform two-sided
printing. The various paper types and sizes that can be used for two-sided pritned are as
follows:
Paper type
Plain paper
Size
2
Loading Paper
Plain paper
B4 portrait
A4 portrait/ landscape
B4 landscape
A3 landscape
8.5 ✕ 11 " (Letter) portrait/landscape
8.5 ✕ 14 " (Legal) landscape
11 ✕ 17 " landscape
12 ✕ 18 " landscape
Use FXJD paper if you are printing documents with high image resolution
in colour and two-sided.
The following are examples of width, length and landscape/portrait
orientations mentioned in the above tables.
35
2.1 Paper Handling
2.1.2 Unsuitable Paper
Paper with any of the following properties may cause apper jams, and therefore should not
be used.
• Fuji Xerox full colour transparency
• Inkjet paper
• Too thick or thin paper
• Pre-printed paper
• Folded, wrinkled or torn paper
• Damp or wet paper
• Curled paper
• Sheets adhered with static electricity
• Layered or adhesive paper
• Specially coated paper
• Treated-surface coloured paper
• Pre-printed with ink that is affected at 155 ºC
• Heat sensitive paper
• Carbon paper
• Paper with a rough surface, such as textured or fibre form paper
• If using acidic paper, characters may fade; in which case change to a neutral paper
• Rough envelopes or envelopes with
metal seals
• Paper with staples, clips, ribbon or tape attached
• Envelopes with sticky adhesive
• Non-full page labels or cut labels
36
2.1 Paper Handling
• T-shirt transfer paper (heat press use)
• Transfer paper (cold water use)
• Opaque film
• Digital coated glossy paper
2
• Adhesive paper (transparent/colourless)
Storing Paper
Loading Paper
2.1.3
If paper is not stored improperly, it could cause paper jams, degraded print quality, and
even damage to the printer. Paper should be stored in a location satisfying the following
conditions:
• Temperature
Between 10 ºC and 30 ºC
• Relative Humidity
Between 30 to 65%
• The location should have low humidity.
• After opening a package, re-pack the unused paper with the wrapping paper, and store in
a cabinet or at a place with low humidity.
• Paper should be stored on a flat surface.
• Make sure that the paper are not wrinkled, folded or curled.
• Do not store paper under direct sunlight.
37
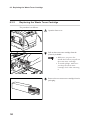
2.2
Loading Paper
This section explains how to replenish the paper trays when paper has run out.
"2.1 Recommended Paper" for paper that can be loaded in the respective
trays
2.2.1
Loading Paper in the Paper Trays
When you have run out of paper in the trays or when you want to load a different paper on
to the trays, the procedure is as follows.
Here, we will explain how to load A4-size paper in the portrait orientation in tray 1.
You can load paper into the trays in the optional 2-tray module in the
same way.
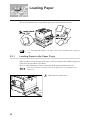
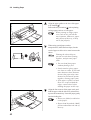
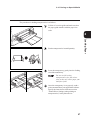
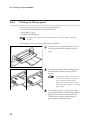
Pull out the tray until it stops.
38
2.2 Loading Pape
Push down the metal plate inside the paper tray
until it locks.
2
Align the four corners of the paper stock and
load the paper with the side to be printed facedown.
Load paper under the tab on the front right
hand side as shown in the diagram.
• Do not use folded, wrinkled or
curled paper.
• Do not load beyond the
maximum (MAX) fill line
indicated at the side of the
tray.
• Make sure the top sheet is
under the tab.
If you are loading into trays of
the 2-tray module, you can load
up to the maximum (MAX) fill line
indicated at the far end of the
tray. Do not load all the way up
to the grey tab shown in the
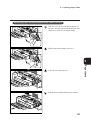
illustration. This tab is to prevent
paper from being fed in the
slanted position.
39
Loading Paper
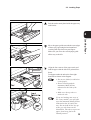
Move the paper guides towards the outer edges
of the tray by squeezing the horizontal and
vertical guide clips between your fingers.
Make sure you move the vertical paper guide
all the way to the left.
2.2 Loading Pape
Align the horizontal paper guide with the width
of the paper.
If the paper guide is pressed
tightly against the paper, a paper
jam may occur. However, if the
paper guide is too loose, the
paper may become warp.
After aligning the edges of the paper, align the
mark on the horizontal guide with the
appropriate paper size mark.
• Make sure that the vertical
paper guide stopper is in the
right hole.
• If the vertical paper guide is
out of position, the paper size
may not be detected. When this
happens, slide the vertical
guide to the left, and then realign it with the paper scale.
Push the paper tray firmly into the printer.
Do not push in the tray with
excessive force.
40
2.2 Loading Pape
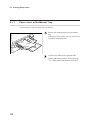
2.2.2
Loading Paper on the Manual Tray
The procedure for loading paper on the manual tray is as follows.
To avoid paper jams, do not load different sizes of paper on the tray at
the same time, and do not add paper to the tray before it empties.
• "2.4 Printing on Special Media" when loading postcards,
transparencies and glossy paper onto the manual tray.
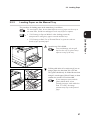
Open the tray if it is folded.
To avoid damage, do not pull
hard on the tray or place heavy
objects on top of the tray.
Lift the guide in the A3 oversize tray if you are
using a paper size other than 328 x 453 mm.
This guide should only be folded down when
using A3 oversize paper (328 x 453 mm), or when
custom size exceeds 12.2 inch in width.
If you attempt to print with the
guide folded down (when
printing on paper with width less
than 12.2 inch), the image
position may slip on the printed
page.
41
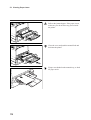
Loading Paper
• "2.5 Printing on Side Two of Printed Sheets" to print on side two
(back) of pre-printed paper.
2
2.2 Loading Pape
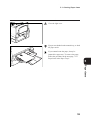
Align the paper guides to the size of the paper
to be loaded ( ).
Pull out the tray extension ( ) when printing
on large paper such as A3-size paper.
➀
➁
When printing on larger paper
sizes, such as A3, pull out the
tray extension. Otherwise, paper
may fall out of the tray, or may
not be fed properly.
When using special paper such as
transparencies, labels and envelopes, fan the
stack of paper to allow air to enter between the
sheets.
Fanning the sheets helps to
prevent several sheets feeding
together, and prevents paper
jams.
• You can load plain paper
without fanning it first.
• Load coated or glossy paper
one sheet at a time. If you load
more than one sheet, moisture
between the paper may cuase
them to be fed into the printer
together, causing paper jams.
• If the paper is poorly cut and
there are scraps around the
edges, remove these before
loading the paper on the tray.
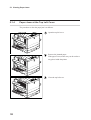
Align the four corners of the paper stock, and
load the paper with the side to be printed faceup onto the manual tray. Insert the paper gently
into the feeding slot.
• Do not use folded, wrinkled or
curled paper.
• Do not load beyond the (MAX)
fill line indicated at the side of
the tray.
42
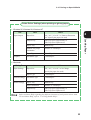
2.2 Loading Pape
Incorrect Method of Loading Paper
Is the paper loaded properly?
Have you aligned the paper guides with the paper carefully?
Is the guide pushing against the paper too much? Or, is there too much gap between the paper and
the guide?
Are the edges of the stack aligned?
2
Loading Paper
If the paper is not loaded correctly, the printing position may shift, causing the page to printout
incorrectly.
43
2.3
Replacing the Paper Tray with
an Optional Tray
You can install the optional 250-sheets universal tray or the A3 oversize tray to replace
tray 1. If you have purchaed the 250-sheets universal tray, you can load paper of a
different size in the tray. If necessary, you can also replace the tray.
This section explains how to remove and install the paper trays.
"Appendix A Optional Products and Consumables" for information on the
types of optional trays available.
2.3.1
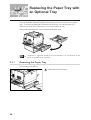
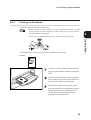
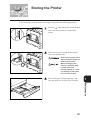
Removing the Paper Tray
The procedure is as follows:
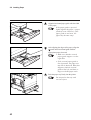
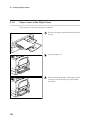
Pull out the tray until it stops.
44
2.3 Replacing the Paper Tray with an Optional Tray
Hold the paper tray with both hands, gently lift
the front of the tray and pull it out completely.
After removing the tray, place it
on a flat and level surface.
2
Loading Paper
2.3.2
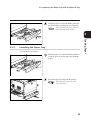
Installing the Paper Tray
The procedure is as follows:
Hold the paper tray with both hands, and insert
it into the grooves for the paper tray inside the
printer.
Push the paper tray firmly into the printer.
Do not push in the tray with
excessive force.
45
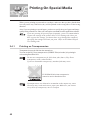
2.4
Printing On Special Media
When you are printing on postcards or envelopes, make sure that you have placed them
correctly on the tray. Otherwise, they will be printed on the wrong side or in the wrong
direction.
Also, if you are printing on special paper, you have to specify the type of paper and image
quality in the printer driver when you send a print command from the application software.
If you are printing on special paper frequently, you are recommended to
register the settings in the printer driver's User Settings tab. Once you
have register the settings, you do not have to go through the trouble of
specifying the settings each time you print. Refer to the Online Help on
User Settings tab.
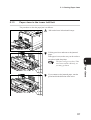
2.4.1
Printing on Transparencies
Transparencies must be fed from the manual tray.
You can use the Fuji Xerox transparencies (XEROX Film (no border)) for printing in
colour using DocuPrint C621.
Do not use transparencies for full colour jobs (that is, Fuji Xerox
transparency with a white border).
If you use unsuitable transparency, machine fault may occur.
FUJI XEROX full colour transparencies
cannot be used on DocuPrint C621.
If transparencies are allowed to accumulate in the output tray, static
electricity may result and cause a paper jam. Make sure you remove
every sheet of transparency once it is output.
46
2.4 Printing on Special Media
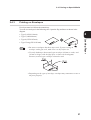
The procedure for loading transparencies is as follows:
Lift the A3 oversize guide and make sure that
the paper guide matches with the paper size
scale.
2
Loading Paper
Fan the transparencies in small quantity.
Insert the transparency gently into the feeding
slot of the manual tray.
Do not use full colour
transparencies for full colour
jobs as this may cause paper jam
and fuser fault.
Once the transparency is set properly, send a
print command from your application software.
Specify the items shown in the next section
"Printer Driver Settings (when printing on
transparencies)" in the printer driver.
47
2.4 Printing on Special Media
Printer Driver Settings (when printing on transparencies)
• Windows 95, Windows 98, Windows NT
Tab
Paper/Output
Graphics
Item
Value
Paper Size
"A4" or "Same as Document Size" (when the
document size is A4)
Output Tray
"Side Tray (Face Up/Forward)" or
"Side Tray (Face Up/Reverse)"
Paper Tray
"Manual Tray"
Manual Tray Paper
Orientation
"Portrait" or "Landscape"
Paper Type
Transparency
Document Type
Transparencies
• Macintosh
Dialog Box
Paper Settings
Item
Value
Paper Size
"A4" or "No change" (when the paper size is
A4)
Paper Type
Transparency
General Settings
Document Type
Transparencies
Printer Settings
Paper Tray
Manual Tray
Paper Orientation
"Portrait" or "Landscape"
Output Tray
"Side Tray (Face Up/Forward)" or
"Side Tray (Face Up/Reverse)"
When you are printing on transparencies, you can choose to insert dividers
between the transparencies. Refer to the Online Help on how to insert dividers and
the different functions of each printer driver item. To use Online Help, refer to
"1.4 Using Online Help".
48
2.4 Printing on Special Media
2.4.2
Printing on Postcards
Postcards must be fed from the manual tray.
• When printing on side 2 (back) of a pre-printed postcard (side 1 (front)
is pre-printed), even the slightest curl may cause paper to jam. Flatten
the postcard and load again.
• You are not recommended to print on multi-coloured postcards.
2
Loading Paper
The example below shows you how to print an address on a postcard.
Example:
Lift the A3 oversize guide and make sure that
the paper guide matches with the postcard size
scale.
Load the postcard with the side to be printed
face-up and the pre-printed postal code boxes
at the far end as shown in the diagram.
Once the postcards are set properly, send a
print command from your application software.
Specify the items shown in the next section
"Printer Driver Settings (when printing on
postcards)" in the printer driver.
49
2.4 Printing on Special Media
Printer Driver Settings (when printing on postcards)
• Windows 95, Windows 98, Windows NT
Tab
Paper/Output
Item
Value
Paper Size
"Postcard" or "Same as Document Size" (when
the document size is Postcard)
Output Tray
"Side Tray (Face Up/Forward)" or
"Side Tray (Face Up/Reverse)"
Paper Tray Selection
"Manual Tray"
Manual Tray Paper
Orientation
"Landscape"
Paper Type
Postcard
• Macintosh
Dialog Box
Paper Settings
Printer Settings
Item
Value
Output Size
"Postcard" or "Same as Document Size" (when
the document size is Postcard)
Paper Type
"Postcard"
Paper Tray
"Manual Tray"
Paper Orientation
"Landscape"
Output Tray
"Side Tray (Face Up/Forward)" or
"Side Tray (Face Up/Reverse)"
Refer to Online Help regarding the different functions of each printer driver item.
To use Online Help, refer to "1.4 Using Online Help".
50
2.4 Printing on Special Media
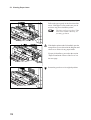
2.4.3
Printing on Envelopes
Envelopes must be fed from the manual tray.
You can use envelopes in the following sizes. Open the flap, and insert as shown in the
diagram.
2
• Type 2 (162 ✕ 114 mm)
• Type 3 (148 ✕ 98 mm)
• Type 3 Long (235 ✕ 120 mm)
• Do not use envelopes that have tape seals. If you are using an
envelope with a glue seal, make sure it is dry before use.
• Use only landscape (horizontal) type envelopes (90 mm or wider, and
143 mm or longer with the flap open, as shown in the diagram).
Portrait (vertical) type envelopes cannot be used.
• Depending on the type of envelope, envelopes may sometimes crease or
not print properly.
51
Loading Paper
• Type 4 (235 ✕ 105 mm)
2.4 Printing on Special Media
For example, when printing on an envelope in the following manner:
Example:
Lift the A3 oversize guide and make sure that
the paper guide matches the postcard size
scale.
Open the flap. Insert the envelope with the flap
open towards you.
Once the envelope is set properly, send a print
command from your application software.
Specify the items shown in the next section
"Printer Driver Settings (when printing on
envelopes)" in the printer driver.
52
2.4 Printing on Special Media
Printer Driver Settings (when printing on envelopes)
• Windows 95, Windows 98, Windows NT
Tab
Paper/Output
Item
Value
Custom envelope size or "Same as Document Size"
(when the document size is one of the custom sizes)
Doc Orientation
"Landscape"
Turn Image by 180º
(Envelope)
"On"
Output Tray
"Side Tray (Face Up/Forward)" or
"Side Tray (Face Up/Reverse)"
Paper Tray
"Manual Tray"
Manual Tray Paper
Orientation
"Portrait"
Paper Type
"Envelope"
2
Loading Paper
Paper Size
• Macintosh
Dialog Box
Paper Settings
Printer Settings
Item
Value
Paper Size
Custom envelope size or "Same as Document Size"
(when the document size is one of the custom sizes)
Doc Orientation
"Landscape"
Turn Image by 180º
(Envelope)
"On"
Paper Type
"Envelope"
Paper Tray
"Manual Tray"
Paper Orientation
"Portrait"
Output Tray
"Side Tray (Face Up/Forward)" or
"Side Tray (Face Up/Reverse)"
Refer to Online Help regarding the different functions of each printer driver item.
To use Online Help, refer to "1.4 Using Online Help".
53
2.4 Printing on Special Media
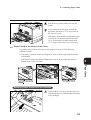
2.4.4
Printing on Glossy paper
Glossy paper must be fed one at a time from the manual tray.
You can use the following media with DocuPrint C621:
• Mylar film (157 g/m2)
• NK double-sided art paper
If media other than those mentioned above are used, paper jams may
result.
The procedure on how to print on glossy paper is as follows.
Lift the A3 oversize guide and make sure that
the paper guide matches with the paper size
scale.
Insert the paper gently into the feeding slot of
the manual tray, with the side to be printed
face-up.
Load glossy paper one sheet at a
time. If you load more than one
sheet, moisture between the
paper may cause them to be fed
into the printer together, causing
paper jams.
Once the glossy paper is set properly, send a
print command from your application software.
Specify the items shown in the next section
"Printer Driver Settings (when printing on
glossy paper)" in the printer driver.
54
2.4 Printing on Special Media
Printer Driver Settings (when printing on glossy paper)
• Windows 95, Windows 98, Windows NT
Tab
Paper/Output
Value
Paper Size
"A4", "A3", "12 x 18" " or "Same as Document
Size" (Specify the paper size used)
Output Tray
"Side Tray (Face Up/Forward)" or
"Side Tray (Face Up/Reverse)"
Paper Tray
"Manual Tray"
Manual Tray Paper
Orientation
"Portrait" or "Landscape"
Paper Type
"Coated Paper"
Document Type
"Coated Paper"
2
Loading Paper
Graphics
Item
• Macintosh
Dialog Box
Paper Settings
Item
Value
Paper Size
"A4", "A3", "12 x 18" " or No Change
(Specify the paper size used)
Paper Type
"Coated Paper"
General Settings
Document Type
"Coated Paper"
Printer Settings
Paper Tray
"Manual Tray"
Paper Orientation
"Portrait" or "Landscape"
Output Tray
"Side Tray (Face Up/Forward)" or
"Side Tray (Face Up/Reverse)"
Refer to Online Help regarding the different functions of each printer driver item.
To use Online Help, refer to "1.4 Using Online Help".
55
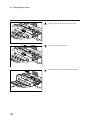
2.5
Printing on Side Two of
Printed Sheets
After the following media are printed once on one side, you can run them through the
printer again to print on the reverse side. This is possible only if the first side was printed
by DocuPrint C621.
• Plain paper
• Heavy weight paper
• Postcards
• Coated paper
• Special glossy paper
If the side 1 was printed by another printer, it may cause DocuPrint C621
to breakdown. Do not use paper not pre-printed by DocuPrint C621.
To print on side 2 of a printed paper, feed the paper from the manual tray. Place the paper
according to the document orientation and binding direction.
56
2.5 Printing On Side Two of Printed Sheets
To print on the reverse side of the paper, simply send a print command from the printer
driver and make sure you have specified the following items.
Printer Driver Settings (when printing on side 2 of a printed paper)
2
• Windows 95, Windows 98, Windows NT
Paper/Output
Item
Value
Paper Tray
"Manual Tray"
Paper Type
"xxx (Side 2)" (xxx refers to the type of paper)
Loading Paper
Tab
• Macintosh
Dialog Box
Item
Value
Paper Settings
Paper Type
"xxx (Side 2)" (xxx refers to the type of paper)
Printer Settings
Paper Tray
"Manual Tray"
For special paper, you must also specify other items that are related to the paper
used. Refer to the previous sections and Online Help when you are performing all
these settings.
To use Online Help, refer to "1.4 Using Online Help".
57
Control
Panel
3.1
Control Panel Components and Functions .......................................... 60
3.2
Basic Operations of the Menu Screen ................................................ 63
3.3
List of Items on the Menu Screen ....................................................... 66
3.1
Control Panel Components
and Functions
The control panel consists of LED, a display panel, and buttons. This section gives an
introduction of the components on the printer control panel and how they function.
3
LED
3.1.1
DisplayPanel
Buttons
LED
The LED signals (on/blinking/off) illustrate the status of the printer.
Name
Descriptions
Online LED
This LED is green in colour. It indicates the data processing status.
On
Ready to receive print jobs
Off
Unable to print
Data LED
On
Blinking
Off
Error LED
On
Blinking
Off
60
This LED is green in colour. It indicates the printing status.
This indicates that the printer is not receiving data during a print operation.
This LED will also be lit when the printer is ejecting or cancelling data.
This indicates that the printer is receiving data during a print operation.
This indicates that the printer is not running any print operation.
This LED is red in colour. It indicates that an error has occurred.
This indicates an error that can be rectified by the user, for example, a
paper jam, has occurred.
This indicates an error that cannot be rectified by the user has occurred.
This indicates that the printer is operating normally.
3.1 Control Panel Components and Functions
3.1.2
Display
There are two major screens. One is the Print screen that displays the printer status and the
other is the Menu screen for printer-related settings.
The contents displayed will differ depending on the optional products
installed on the printer and the settings at that moment.
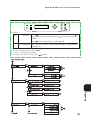
Print Screen
The Print screen appears on the display panel when the printer is printing or is waiting for
data.
Printer status
Name
Mode
Control Panel
Input Port
Tray
Descriptions
This shows the printer status.
Example: "Please wait", "Printing", "Ready to Print"
Printer status
3
Mode
This shows the print mode.
Example: "XPL2"
Input Port
This shows the port used to receive data.
Example: "Parallel", "lpd", "NetWare", "AppleTalk", "SMB"
Tray
This shows the paper tray.
Example: "Tray 1", "Tray 2", "Tray 3", "Manual Tray"
Menu Screen
This screen shows settings related to the printer.
To get to this screen, press the Online button when the display panel is showing the Print
screen. Then, when the printer goes offline, press the Menu button. The first Menu screen
that you will see is the following screen.
"3.2 Basic Operations of the Menu Screen" on how to use the Menu screen.
61
3.1 Control Panel Components and Functions
3.1.3
Buttons
The following eight buttons can be found on the control panel.
Each of these buttons has the following functions on the Print screen and on the Menu
screen.
3
Menu
Print Screen
buttons
-
Display the menu and the options in
sequence.
-
Move the cursor (_) left and right to
select the value that you want.
buttons
Menu button
Press this button when the printer is
offline to enter the Menu screen.
Menu Screen
-
Online button
Press this button to switch between
online and offline.
Press this button to end the Menu
screen and to switch to online mode.
Set/Eject button
Press this button to eject the data still
remaining in the printer. Refer to "1.6
Forced Output of Data Still in the
Printer" on how to perform the
operation.
Use this button to select the displayed
menu or options. When a menu is
displayed, use this button to move to
the next level until the option that you
want appears. Press the button again
to confirm the setting.
Cancel button
Press this button when the printer is
Use this button to move the displayed
offline, this will cancel a job in process. menu one level up.
Refer to "1.5 Cancelling a Print Job"
on how to perform this operation.
62
3.2
Basic Operations of the Menu
Screen
Settings related to the printer such as power saver mode, job timeout settings, network settings
can be done on the Menu screen.
3.2.1
Menu Screen
The menus and settings that can be performed with the control panel are listed below.
For details on each menu, refer to "3.3 List of Items on the Menu Screen".
Menu
Description
3
Enables you to specify settings related to the basic operations of the
printer such as the power saver mode and job log.
2. Maintenance
Enables you to adjust the copy voltage according to the type of paper
used, and to initialise the NV memory of the printer.
3. Parallel
Enables you to specify settings related to the parallel interface.
4. Report/List
Enables you to print a copy of the Printer Settings List, XPL2 Font List,
Panel Settings List and Job Log report.
5. Network
Enables you to specify the network settings.
The menu consists of several levels. By selecting the targeted menus and options, you have
configured the printer settings.
Some menus may be found
three levels (no options) down
the menu tree.
Main
menu
Sub
menu
Items
Values
63
Control Panel
1. System
3.2 Basic Operations of the Menu Screen
3.2.2
Basic Menu Operations
The following illustrates how to use the control panel. The example used below will show
you how to configure the job timeout settings.
(Print screen (printer is ready for printing))
Press Online.
3
(The printer is offline)
Press Menu.
(Menu screen)
Once the display has moved to the Menu
screen, the printer will automatically enter into
a state where it is unable to print.
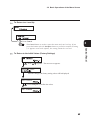
Press Set/Eject. The sub-menu a level down from the current menu will be displayed.
Press
until the sub-menu you want appears.
Press Set/Eject. This will bring you to the next level down.
An "*" will appear next to the current setting.
Press
buttons several times to reach the desired value.
Press Set/Eject. This will confirm the setting.
A "*" will appear next to the specified
setting to confirm that the setting is
currently selected.
Press Online.
This will end the Menu screen and return to the Print screen.
64
3.2 Basic Operations of the Menu Screen
To Return to a Level Up
Press Cancel.
To Return to the Initial Values (Factory Settings)
Press
together. The next screen appears.
After the changes, the factory setting values will be displayed.
Press Set/Eject to confirm the values.
65
3
Control Panel
The Cancel button is used to return the menu only one level up. If you
press this button after the Set/Eject button is pressed to confirm a setting
("*" appears next to the option), the setting cannot be reversed.
3.3
List of Items on the Menu
Screen
This section describes the settings and values available on the individual main menus.
Some items on the Menu screen can also be specified on the computer
when you are sending a print command from an application. When the
settings you specified on the computer differs from that set in the Menu
screen, the settings performed through the computer will take precedence.
The initial values refer to the values of the factory settings.
3.3.1
3
System
This section describes how to configure settings related to the printer itself, such as the
power saver mode and job log settings.
Power Saver
The power saver mode conserves energy when the printer is not in used. The power
saver mode settings consist of Power Save Mode 1 and Power Save Mode 2.
When the power saver mode is engaged, the "Ready/Standby" message is displayed on the
display panel. Also, the printer will take a longer time than usual to start printing after it
has received data.
You can set the duration that the printer will wait before it enters into the power saver mode.
The power saver mode is disengaged when the following situation occurs:
• When the printer is receiving print data.
• When the printer is printing reports or lists through 4 Report/List menu.
• Power Save Mode 1 (Default: 15 minutes)
Specify a value from 1 to 120 minutes. When the printer is left idling for a predetermined period of time after a print job ended, it will enter into Power Save Mode 1.
If the power saver mode is set to "Off", Power Save Mode 1 will not be engaged.
• Power Save Mode 2 (Default: 30 minutes)
Specify a value from 1 to 120 minutes. When the printer is left idling for a predetermined period of time after a print job ended, it will enter into Power Save Mode 2.
If the power saver mode is set to "Off", Power Save Mode 2 will not be engaged.
66
3.3 List of Items on the Menu Screen
Error Alarm
Specify whether error alarm will be sounded when an error occurred.
• Off
Do not sound the error alarm even if an error has occurred.
• On (Default)
Sound error alarm when an error has occurred.
The volume cannot be adjusted.
3
Job Timeout
• You can specify any value from 5 to 300 seconds, in increments of 1 second, for job
timeout settings.
• Off
Job timeout will not be engaged.
Panel Language
You can indicate the display language here. The options are as follows:
• English (Default)
• Japanese
Job Log Setting
You can set whether you want the printer to store the past print log and automatically print
the job log or not.
You can also print the Job Log report using 4 Reports/Lists on the Menu
screen.
• Auto Log Print (Default: No)
If Yes is selected, the printer will automatically generate a Job Log report when the
number of print jobs processed has reached 50.
If No is selected, no Job Log report will be generated automatically even when the
number of print jobs processed has reached 50.
67
Control Panel
When a job timeout occurred, the printer will print only the data received up to that point of
time.
3.3 List of Items on the Menu Screen
• Store Job Log (Default: No)
The printer will start storing information regarding each print job starting from the time
when Yes is selected. However, when the record of print jobs reached 50, the earliest
print job information will be deleted.
When No is selected, information regarding the print jobs will not be stored.
If there is a set of past printing job log stored in the printer, when you
change the setting to No, this set of printing history will remain and you
can print them using the Print Job Log command. However, if you
change the setting from No to Yes, this set of records will be cleared.
3
3.3.2
Maintenance Mode
This menu enables you to initialise the NV memory in the printer and adjust the copy
voltage according to the type of paper used.
Init NVM (NV Memory Initialisation)
NV memory refers to non-volatile memory that stores printer settings even when the
power is cut off.
• Yes
Initialises the NV memory. When the NV memory is initialised, all menu settings on the
control panel will be reset to their initial values.
In order for the selected settings to take effect, you must restart the
printer. After the setting, you have to switch off the printer and then
switch it on again.
• No
Return to the menu without initialising the NV memory.
Adjust Voltage
Adjust the copy voltage for each of the following settings. The ten levels are: -2, -1, 0, 1,
2, 3, 4, 5, 6 and 7.
68
• Plain paper
(Default: 0)
• Transparency
(Default: 0)
• Heavy weight
(Default: 0)
• Label
(Default: 0)
• Coated paper
(Default: 0)
• Envelope
(Default: 0)
• Postcard
(Default: 0)
3.3 List of Items on the Menu Screen
3.3.3
Parallel
Specify the settings for parallel interface.
You cannot change the settings on this menu if you entered the Menu
screen when the printer is printing.
Busy-Ack
Specify the output timing for both the BUSY and the ACK signals of the parallel interface.
The BUSY signal indicates to the computer that the printer cannot receive data.
The ACK signal indicates to the computer that the printer is ready to receive data or it has
received data correctly.
Control Panel
• Ack-Busy (Default)
After ACK signal is received, the BUSY signal changes.
• Ack-Busy-Ack
BUSY signal changes first and then ACK signal is output.
• Busy-Ack
BUSY signal changes when ACK signal is being output.
Ack-Busy
Busy-Ack
3
Ack-Busy-Ack
BUSY
BUSY
BUSY
ACK
ACK
ACK
In order for the selected settings to take effect, you must restart the
printer. After the setting, you have to switch off the printer and then
switch it on again.
ECP
This is the communications mode for the parallel interface. The following settings are
available:
• Enabled (Default)
Receive print data using ECP.
• Disabled
Do not receive print data with ECP.
69
3.3 List of Items on the Menu Screen
3.3.4
Report/List
This menu allows you to print various kinds of reports and lists.
You cannot change the settings on this menu if you entered the Menu
screen when the printer is printing.
The lists and reports will be printed on A4-size paper in portrait
orientation. When there are no A4-size paper in portrait orientation
loaded in any of the paper trays, a message that says "Load A4 Portrait
Paper" will appear on the display panel. Once the A4-size paper is
loaded and in portrait orientation, printing starts.
3
Printer Settings List
Shows information regarding printer hardware components and the other settings.
"1.8 Printing the Printer Settings List" for examples.
Panel Settings List
Shows the contents of the settings for the individual control panel menu.
XPL2 Font List
Shows the information of the fonts that can be printed in XPL2 data.
Job Log Print
Shows information related to the print jobs processed (a maximum of 50 print jobs). You
can check if a particular print job has been printed successfully or not.
"1.9 Printing the Job Log Report" for examples.
70
3.3 List of Items on the Menu Screen
3.3.5
Network
This menu allows you to specify network-related settings.
• You cannot change the settings on this menu if you entered the Menu
screen when the printer is printing.
• In order for the selected settings to take effect, you must restart the
printer. After the setting, you have to switch off the printer and then
switch it on again.
3
Ethernet Settings
Specify the Ethernet communications speed and mode.
Control Panel
• Auto (Default)
Switch automatically to 10Base/Half, 10Base/Full, 100Base/Half or 100Base/Full.
• 100Base/Full
• 100Base/Half
• 10Base/Full
• 10Base/Half
TCP/IP
Specify the essential settings for using the TCP/IP protocol. The following items are
available in this menu.
• IP Address Setup
Specify the methods to obtain IP address. The possible values are as follows:
"DHCP" (Default)
Obtains the IP address from the DHCP server on the network.
"Panel"
Specify the IP address on the control panel.
71
3.3 List of Items on the Menu Screen
• IPAddress
Specify the IP address of the printer.
"aaa.bbb.ccc.ddd"
Specify a value from 0 to 255 for "aaa", "bbb", "ccc" and "ddd".
The following settings are incorrect:
224~255.xxx.xxx.xxx
127.xxx.xxx.xxx
• If "DHCP" is specified in IP Address Setup menu, the settings here
will be invalid. To enable settings on the control panel to be valid,
specify "Network" in "IP Address Setup".
3
• The IP address is controlled by the whole network system. If a
wrong IP address is set, the whole network might be affected.
Confirm the IP address assigned to you with the network
administrator.
• Subnet Mask
Specify the subnet mask settings.
"aaa.bbb.ccc.ddd"
Specify the value 0, 128, 192, 224, 240, 252, 254 or 255 for "aaa", "bbb", "ccc" and "ddd".
• Gateway Address
Specify the gateway address.
"aaa.bbb.ccc.ddd"
Specify a value from 0 to 255 for "aaa", "bbb", "ccc" and "ddd".
The following settings are incorrect:
224~255.xxx.xxx.xxx
127.xxx.xxx.xxx
IIP Frame Type
Specify the frame type when the printer is used in IPX/SPX (NetWare) environment.
• Auto (Default)
Specify the frame type automatically.
• Ethernet-II
Use the frame type for Ethernet-II specification.
72
3.3 List of Items on the Menu Screen
• SNAP
Use the frame type for IEEE802.3/802.2/SNAP specification.
• 802.2
Use the frame type for IEEE802.3/802.2 specification.
• 802.3
Use the frame type for IEEE802.3 specification.
Protocol
For the following items, set as Enabled or Disabled to use or not use the protocol.
3
Control Panel
• lpd (Default: Enabled)
To use lpd (lpr) in TCP/IP environment to print, select Enabled. Otherwise, set as
Disabled.
• NetWare (Default: Enabled)
To print in NetWare environment, select Enabled. Otherwise, set as Disabled.
• EtherTalk (Default: Enabled)
To print in AppleTalk (EtherTalk) environment, select Enabled. Otherwise, set as
Disabled.
• SMB TCP/IP (Default: Enabled)
To print in SMB (Windows Network) environment that uses TCP/IP as the transport
protocol, select Enabled. Otherwise, set as Disabled.
To print in SMB (Windows Network) environment that uses NetBEUI as the transport
protocol, select Enabled. Otherwise, set as Disabled.
• SNMP UDP/IP (Default: Enabled)
If you are using SNMP agent features in TCP/IP environment, select Enabled.
Otherwise, set as Disabled.
• SNMP IPX (Default: Enabled)
If you are using SNMP agent features in NetWare environment, select Enabled.
Otherwise, set as Disabled.
• Internet Services (Default: Enabled)
If you are using CentreWare Internet Services, select Enabled. Otherwise, set as
Disabled.
73
3.3 List of Items on the Menu Screen
Init NVM (NV Memory Initialisation)
Initialises the NV memory on the network card.
The NV memory refers to non-volatile memory that retains the content of the settings
even when the power is down.
• Yes
Initialise the NV memory. Once the NV memory is initialised, the settings in 5 Network
menu will be set to their initial values.
In order for the selected settings to take effect, you must restart the
printer. After the setting, you have to switch off the printer and then
switch it on again.
3
• No
Return to the menu without initialising the NV memory.
74
Troubleshooting
4.1
Types of Problems ............................................................................. 76
4.2
Power Problems ................................................................................ 78
4.3
Printing Problems .............................................................................. 79
4.4
Print Quality Problems ....................................................................... 86
4.5
Paper Transport Problems ................................................................. 93
4.6
Others ................................................................................................ 95
4.7
When an Error Message Appears ...................................................... 98
4.8
When the Error LED is Lit or Blinking ............................................ 109
4.1
Types of Problems
If a problem occurs with the printer, and you are not sure of the cause, check the following
categories. Find out the appropriate problem category and resolve the problem by referring to
the solution described there. You may also solve some of the problems by yourself.
Problem List
Power Problems
Unable to Print from Macintosh
• No power ..................................................... 78
• The printer selected in the Chooser
window is not displayed ................................ 85
• Frequent power failures ................................ 78
• When an error message is displayed
on the computer ............................................ 85
Printing Problems
4
LED is Lit, Blinking or Off
• Error LED is lit ............................................. 79
• Error LED is blinking .................................... 79
Print Quality Problem
Blank or black copies are output
• Error LED is blinking .................................... 79
• A blank page is printed ................................. 86
• Online LED is off ......................................... 79
• A completely black page is printed ................ 86
• Data LED is not blinking after print
command is sent ........................................... 79
• No output although the Data LED is lit or
blinking ......................................................... 81
Faded, Dirty, Uneven, Shadowed or
Wrinkled Output
• The printed image is faded ............................ 87
• Black dots or stains are printed ..................... 87
Unable to Print from Windows
• Black lines are printed .................................. 88
• Unable to print .............................................. 82
• Recurring stains are found ............................ 88
• Unable to print when TCP/IP protocol is
used ............................................................. 83
• Hair-line marks appeared in or around
black half-tone printing .................................. 88
• Unable to print when TCP/IP Direct Print
Utility is used ................................................ 83
• Shadows appeared around areas of solid
black printing ................................................ 88
• Unable to print in SMB environment ............. 83
• White dots appeared in areas of solid
black printing ................................................ 89
• Unable to print in NetWare environment ....... 84
• When an error message is displayed
on the computer ............................................ 84
• Some parts are not printed ............................ 89
• Vertical blanks are printed ............................ 89
• Wrinkled paper ............................................. 89
• Printing is smudged ....................................... 90
• Printing is slanted .......................................... 90
76
4.1 Types of Problems
Output is Not Clear
Other Problems
• Transparency failed to print clearly ............... 91
• Unable to print in colour ................................ 97
• Postcard failed to print clearly ....................... 91
• Unable to print from the specified tray .......... 97
• Envelope failed to print clearly ...................... 92
• Printing is slow ............................................. 97
• Failed to print clearly .................................... 92
• Unusual sounds ............................................ 97
4
Paper Transport Problems
Others
Network-Related Problems
• IP address changes each time the
printer is switched on .................................... 95
• Unable to connect to CentreWare Internet
Services ....................................................... 95
• Unable to run CentreWare Internet Services . 96
Troubleshooting
• Paper is not fed/Paper jam/Several sheets
are fed at the same time/Paper slants when
fed ............................................................... 93
If you cannot find anything that matches the
description of the trouble you are facing, or
if you cannot solve the problem after you
have followed the solution described in this
manual....
If the symptom you are looking for is not
included in one of the above categories, or if
the problem cannot be solved using the
procedure described here, switch off the
printer, unplug the power cord from the AC
outlet, and contact your Xerox Customer
Support Centre.
Do not try to alter the machine configuration, or modify any parts. An
unauthorized modification can cause smoke or fire.
Be sure to switch off an unplug the machine before accessing the
interior of the machine for maintenance, or fault clearance. Access
to a live machine's interior can cause electric shocks.
77
4.2
Description
No power
Power Problems
Possible Cause
Solution
Is the printer switched off?
Check the power switch.
"1.2.1 Swtiching on"
Is the power cord loose or
unplugged?
Switch off the power, and plug the
power cord firmly. Then, switch on the
power again.
Is the power cord connected to a Check that the AC outlet is properly
properly rated AC outlet (220 to rated (220 to 240 V, 10 A). Do not
240 V, 10 A)?
connect to the socket behind the
computer.
Frequent power failures
78
The printer may be faulty.
Switch off the power of the machine,
unplug the power plug and contact your
Xerox Customer Support Centre.
Is the power cord loose or
unplugged?
Switch off the power, and plug the
power cord firmly. Then, switch on the
power again.
4.3
4.3.1
Printing Problems
LED is Lit, Blinking or Off
Description
Error LED is on
Possible Cause
Solution
Is an error message shown on the Refer to the error message and resolve
printer control panel display?
accordingly.
"4.7 When an Error
Message Appears"
Error LED is blinking
An error that the user is unable to Write down the displayed error
message or error code. Switch off the
resolve has occurred.
power of the machine, unplug the
power plug and contact your Xerox
Customer Support Centre.
Online LED is off
Is the printer in the offline mode?
"3.1.3 Buttons"
Data LED is not blinking
or lit after print command
is sent
Is the parallel or Ethernet cable
loose or unplugged?
Switch off the power of the machine,
unplug the parallel and Ethernet cables,
and re-connect them again properly.
Chapter 2 Connecting
the Interface Cables in
the Setup Guide
79
4
Troubleshooting
Press the Online button on the printer
control panel to switch to the online
mode.
4.3 Printing Problems
Description
Possible Cause
Solution
(From previous page)
Data LED is not blinking
or lit after print command
is sent
Does the parallel or Ethernet
cable match the specifications of
the computer or machine?
DocuPrint C621 comes with the
recommended parallel cable for the
computer. Use this cable.
Also, this machine supports the
10BASE-T and 100BASE-TX Ethernet
intefaces. Use a twisted pair cable that
matches the network requirements.
You will also need a category 5 cable
for the 100BASE-TX interface.
"Appendix A Optional
Products and
Consumables" and
4
Chapter 2 Connecting
the Interface Cables in
the Setup Guide
Is the environment of the computer Check the following settings of your
computer and correct them if
correctly configured?
necessary:
• Is the printer driver of this machine
for the current computer OS
correctly installed?
• Is the destination port for printing set
correctly in the printer driver?
Chapter 2 Connecting
the Interface Cables in
the Setup Guide
Is the correct IP address set for the Check with you network administrator
and specify the correct IP address.
printer? (When TCP/IP is used)
Confirm your currently set IP address
with that shown on the Printer Settings
List.
"1.8 Printing the Printer
Settings List" and
3.2 Setting the IP
Address (When Using
TCP/IP protocol) in the
Setup Guide
80
4.3 Printing Problems
Description
Possible Cause
Solution
(From previous page)
Data LED is not blinking Is the network environment of the Print the Printer Settings List and
or lit after print command printer configured correctly?
check if the network environment has
(When the network is used)
is sent
been configured correctly.
"1.8 Printing the Printer
Settings List" and
Chapter 3 Network
Settings (Quick Setup) in
the Setup Guide
Check that the power of the machine has
been switched on. Send a print command
from the computer again. If the same
symptom persists, consult your network
administrator.
The printer is switched off
Press the "|" side of the power switch
to switch on the printer..
"1.2.1 Switching on"
No output although the
Data may still remain inside the
Data LED is lit or blinking printer.
Select to abort the print job or forcibly
output the remaining data.
"1.5.2 Cancelling a Print
Job on the Control
Panel" and
"1.6 Forced Output of
Data Still in the Printer"
81
4
Troubleshooting
A network error may have
occurred. (When the network is
used)
4.3 Printing Problems
4.3.2
Unable to Print from Windows
Description
Unable to print
4
Possible Cause
Solution
Is the status of the printer on the The machine may be in the Pause
Printer window shown as "Pause Printing state if printing is stopped or
aborted due to error. Perform the
Printing"?
following to release the machine from
the Pause Printing state:
Click Start and select Settings.
Then select Printers.
Double-click on the printer icon of
this machine.
Click on the File menu of the
Printer window.
If the Pause Printing option is
checked, click on it.
Is the power of the machine
switched off?
Press the "|" side of the power switch
to switch on the printer.
"1.2.1 Switching on"
Is the parallel or Ethernet cable
loose or unplugged?
Switch off the power of the machine,
unplug the parallel and Ethernet cables,
and re-connect them properly.
Chapter 2 Connecting
the Interface Cables in
the Setup Guide
82
4.3 Printing Problems
Description
Unable to print when the
TCP/IP protocol is used
Possible Cause
Is the IP address set correctly?
Solution
The IP address may be changed.
Check with your network administrator
and specify the correct IP address.
Check the currently specified IP
address with that shown on the Printer
Settings List.
"1.8 Printing the Printer
Settings List" and
3.2 Setting IP address
(When Using TCP/IP
protocol) in the Setup
Guide
4
Double-click the printer icon and
check the Details tab on the
printer properties window. Is the
spool setting option, Spool print
jobs so program finishes
faster selected? (When
Windows 95 is used.)
Click Spool Settings on the Details
tab and select Spool print jobs so
program finishes faster from the
displayed dialog box.
Is "Printer Error" shown on the
status display of the Printer
window?
Refer to the Network Print
Environment User Guide if printing
cannot be done via the TCP/IP Direct
Print Utility.
7.1 For TCP/IP
Environment in the
Network Print
Environment User Guide
Unable to print in the
SMB environment
Is "No file storage area in server" This message may be displayed if the
shown on the computer?
print requests are received from more
than one computer, or pritning is being
done from another protocol.
Before you send a print job, check the
Printer window to make sure that no data
is being processed, then send your data
for printing.
83
Troubleshooting
Unable to print when the
TCP/IP Direct Print
Utility is used
4.3 Printing Problems
Description
(From previous page)
Unable to print in the
SMB environment
Unable to print in the
NetWare environment
4
Possible Cause
Solution
Is "Write Error" shown on the
computer?
The message may be displayed if the
number of computers that can be
connected to the Windows network
simultaneously has exceeded the limit.
Before you send a print job, check the
Printer window to make sure that no
data is being processed, then send your
data for printing.
Are the network configurations
such as the hub suitable for auto
setting of frame types?
Check if the data link LED of the port
for network configured devices is lit.
If the LED is off, use the printer
control panel to set the value of the
frame type to be the same as those of
the NetWare File Server.
"3.3 List of Items on the
Menu Screen"
Is the NetWare File Server or
print server (when using the
remote printer mode) started up?
Start up the NetWare File Server and
the print server (if the remote printer
mode is used).
Is the NetWare environment
correctly configured on the
NetWare File Server?
Use the Network Utility to check if
the network environment of the
machine has been configured
correctly.
4.3 Configuring Xerox
Network Utility and 7.3
For NetWare
Environment in the
Network Print
Environment User Guide
An error message is
shown on the computer
84
A printer error may have
occurred.
Refer to the error message and resolve
accordingly.
4.3 Printing Problems
4.3.3
Unable to Print from Macintosh
Description
Possible Cause
The printer selected in the Is the printer switched off?
Chooser window is not
displayed
Is the Ethernet cable loose or
unplugged?
Solution
Press the "|" side of the power switch
to switch on the printer.
"1.2.1 Switching On"
Switch off the power of the machine,
unplug the Ethernet cable, and reconnect it properly.
Chapter 2 Connecting
the Interface Cables in
the Setup Guide
4
QuickDraw GX is not supported on
DocuPrint C621. Do not use
QuickDraw GX.
Are the zone name and/or printer
name set correctly?
Zone name and/or printer name may be
changed. Consult your network
administrator and make sure that it is
set correctly.
You can check the current settings on
the Printer Settings List.
"1.8 Printing the Printer
Settings List"
An error message is
shown on the computer
Is the Mac OS version MacOS
7.6.1 or later?
Is the OpenTransport version is
1-1.1.2 or later?
Make sure you are printing from a
computer that has the correct version
installed.
A printer error may have
occurred.
Refer to the error message and resolve
accordingly.
85
Troubleshooting
Is QuickDraw GX used?
4.4
4.4.1
Print Quality Problems
Blank or Black Copies are Output
Description
A blank page is printed
4
A completely black page
is printed
86
Possible Cause
Solution
Are two or more sheets fed at
the same time?
Remove the paper stack and fan it.
Then, re-load in the paper tray.
Is the drum cartridge scratched
or damaged?
Replace with a new drum cartridge.
Is the toner cartridge installed
properly?
Install it properly.
A high voltage fault may have
occurred.
Contact your Xerox Customer Support
Centre.
Is the drum cartridge scratched
or damaged?
Replace with a new drum cartridge.
A high voltage fault may have
occurred.
Contact your Xerox Customer Support
Centre.
"6.2.2 Replacing the
Drum Cartridge"
"6.1.2 Replacing Toner
Cartridges"
"6.2.2 Replacing Drum
Cartridges"
4.4 Print Quality Problems
4.4.2
Faded, Dirty, Uneven, Shadowed or Wrinkled Output
Description
The printed image is
faded
Possible Cause
Did you use the recommended
paper type?
Solution
Replace with paper of the
recommended size and type.
"2.1 Paper Handling"
Is the paper damp?
Replace with new paper stock.
"2.2 Loading Paper"
Is the drum cartridge scratched
or damaged?
Replace the drum cartridge.
Is it time to replace the toner
cartridges?
Replace the toner cartridges.
Is the EconoMode selected on
the printer driver?
Check under the Graphics tab on the
printer driver (for Windows) or the
General Settings dialog box (for
Macintosh), and change the settings.
"6.2.2 Replacing the
Drum Cartridge"
4
Troubleshooting
"6.1.2 Replacing the
Toner Cartridges"
Online Help.
Black dots or stains are
printed
Did you use the recommended
paper type? Was pre-printed
Load only recommended paper type.
"2.1 Paper Handling"
paper or inkjet paper used?
Is the drum cartridge scratched
or damaged?
Replace with a new drum cartridge.
"6.2.2 Replacing the
Drum Cartridge"
87
4.4 Print Quality Problems
Description
Possible Cause
Solution
Is the drum cartridge scratched
or damaged?
Replace with a new drum cartridge.
There may be dirt in the paper
path.
Print several sheets to remove the dirt.
Is the drum cartridge scratched
or damaged?
Replace with a new drum cartridge.
Hair-line marks appeared
in or around black halftone printing
Did you use paper unpacked and
left unused for a long period of
time (especially when the
humidity is low)?
Replace with new paper stock.
Shadows appeared
around areas of solid
black printing
Did you use paper unpacked and
left unused for a long period of
time (especially when the
humidity is low)?
Replace with new paper stock.
Black lines are printed
Recurring stains are
found
4
88
"6.2.2 Replacing the
Drum Cartridge"
"6.2.2 Replacing the
Drum Cartridge"
"2.2 Loading Paper"
"2.2 Loading Paper"
4.4 Print Quality Problems
Description
White dots appeared in
areas of solid black
printing
Possible Cause
Did you use the recommended
paper type?
Was folded or wrinkled paper
used?
Solution
Replace with paper of the
recommended size and type.
"2.1 Paper Handling"
Is the drum cartridge scratched or Replace with a new drum cartridge.
damaged?
"6.2.2 Replacing the
Drum Cartridge"
Some parts are not
printed
Is the paper damp?
Replace with new paper stock.
4
"2.2 Loading Paper"
Replace with paper of the
recommended size and type.
Troubleshooting
Did you use the recommended
paper type?
"2.1 Paper Handling"
Vertical blanks are
printed
Is the drum cartridge installed
properly?
Install it properly.
"6.2.2 Replacing the
Drum Cartridge"
Is the drum cartridge scratched or Replace with a new drum cartridge.
damaged?
"6.2.2 Replacing the
Drum Cartridge"
Wrinkled paper
Is the paper damp?
Replace with new paper stock.
"2.2 Loading Paper"
Did you use the recommended
paper type?
Is the paper warp?
Replace with paper of the
recommended size and type.
"2.1 Paper Handling"
Is the paper tray open?
Push the paper tray firmly into the
printer.
89
4.4 Print Quality Problems
Description
(From previous page)
Wrinkled paper
4
Printing is smudged
Possible Cause
Solution
Are there scraps of paper or
other objects in the printer?
Switch off the power and remove these
objects from the printer.
If you have difficulties removing these
objects from the printer without
disassembling it, contact your Xerox
Customer Support Centre.
Is the D spacer removed from
the printer?
Remove the D spacer.
Is the paper damp?
Replace with new paper stock.
1.1 Removing the
Packing Tape and
Spacers in the Setup
Guide
"2.2 Loading Paper"
Did you use the recommended
paper type?
Replace with paper of the
recommended size and type.
"2.1 Paper Handling"
Printing is slanted
Are the guide clips of the paper
tray in the correct positions?
Adjust the vertical and horizontal guide
clips fo the paper tray to their correct
positions.
"2.2 Loading Paper"
90
Is the paper guide of the manual
tray aligned at the scale of the
paper to be used?
Adjust the paper guide in the manual
tray to the correct position.
Is the A3 oversize guide lifted
when loading paper other than
A3 oversize on the manual tray?
Lift the A3 oversize guide when loading
paper other than A3 oversize.
"2.2.2 Loading Paper on
the Manual Tray"
"2.2.2 Loading Paper on
the Manual Tray"
4.4 Print Quality Problems
4.4.3
Output is Not Clear
Description
Transparency failed to
print clearly
Possible Cause
Solution
Is the recommended
transparency used?
The following type of transparency can
be used with DocuPrint C621:
• Transparency (XEROX FILM (no
border), product code: V516)
Do not use transparencies for fullcolour jobs.
Is the transparency loaded
properly on the manual tray?
Load the transparency properly on the
manual tray.
"2.4.1 Printing on
Transparencies"
"2.4.1 Printing on
Transparencies"
Postcard failed to print
clearly
Is the recommended postcard
used?
Replace with postcard of the
recommended size and type.
"2.1 Paper Handling"
Is the A3 oversize guide lifted
when loading postcard on the
manual tray?
Lift the A3 oversize guide when loading
postcards.
Is Postcard selected as the
paper type on the printer driver?
Check under the Paper/Output tab on
the printer driver (for Windows) or the
Paper Settings dialog box (for
Macintosh), and make sure that
Postcard is selected.
"2.4.2 Printing on
Postcards"
"2.4.2 Printing on
Postcards"
91
Troubleshooting
Is Transparency selected as the Check under the Paper/Output tab on
paper type on the printer driver? the printer driver (for Windows) or the
Paper Settings dialog box (for
Macintosh), and make sure that
Transparency is selected.
4
4.4 Print Quality Problems
Description
Envelope failed to print
clearly
Possible Cause
Is the recommended envelope
used?
Solution
The types of envelope that can be used
with DocuPrint C621 are Types 2, 3, 4
and 0. Replace envelope of the
recommended size and type.
"2.1 Paper Handling"
4
Is the A3 oversize guide lifted
when loading envelope on the
manual tray?
Lift the A3 oversize guide when loading
envelopes.
Is Envelope selected as the
paper type on the printer driver?
Check under the Paper/Output tab on
the printer driver (for Windows) or the
Paper Settings dialog box (for
Macintosh), and make sure that
Envelope is selected.
"2.4.3 Printing on
Envelopes"
"2.4.3 Printing on
Envelopes"
Failed to print clearly
Is EconoMode or a low
resolution option selected on the
printer driver?
Check under the Graphics tab on the
printer driver (for Windows) or the
General Settings dialog box (for
Macintosh), and change the settings.
Online Help
92
4.5
Description
Paper is not fed
Paper jam
Several sheets are fed at
the same time
Paper slants when fed
Paper Transport Problems
Possible Cause
Is the paper loaded properly?
Is special paper loaded properly
on the manual tray?
Solution
Load the paper stock properly.
If you are loading special media such
as transparencies, labels, or envelopes,
fan them and make sure that there is
some air buffer between the media.
"2.2 Loading Paper"
Is the paper damp?
Replace with new paper stock.
"2.2 Loading Paper"
Is the recommended paper type
used?
Replace with paper of the
recommended size and type.
"2.1 Paper Handling"
4
Is the paper tray open?
Push the paper tray firmly into the
printer.
Is paper jammed?
Clear the paper jam.
The jam may be caused by tape or
adhesive stuck to the rollers. Check the
interior of the printer carefully, and
remove all foreign objects.
"Chapter 5 Paper Jams"
Is the printer placed on a level
platfrom?
Move the printer to a level platform.
"7.3.3 Environmental
Requirements for
Installing the Printer"
93
Troubleshooting
Have all packing materials and
Switch off the power switch, and
seals been removed?
check the interior of the printer.
Is the E spacer removed from the
1.1 Removing the
printer ?
Spacers and Packing
Tape in the Setup Guide
4.5 Paper Transport Problems
Description
(From previous page)
Paper is not fed
Paper jam
Several sheets are fed at
the same time
Paper slants when fed
Possible Cause
Is the paper tray specified
correctly on the printer driver?
Solution
Check the paper tray setting on the
printer driver. If the optional tray
module is installed but the printer
configuration has not been changed,
trays 2 and 3 will not be able to supply
paper to the printer. Change the
setting.
Online Help
Are the guide clips of the paper
tray in the correct positions?
4
Adjust the vertical and horizontal guide
clips of the paper tray to their correct
positions.
"2.2 Loading Paper"
Is the A3 oversize guide lifted
when loading paper other than
A3 oversize on the manual tray?
94
Lift the A3 oversize guide when loading
paper other than A3 oversize.
"2.2.2 Loading Paper on
the Manual Tray"
4.6
4.6.1
Others
Network-related Problems
Description
IP address changes each
time the power of the
machine is switched on
Possible Cause
Solution
Is the IP address setting of the
Use the printer control panel to assisn a
printer such that the address is
fixed IP address. Select the Panel
obtained from the DHCP server? option for IP Address Setup in 5
Network. Then enter the IP address.
"3.3 List of Items on the
Menu Screen" and
3.2 Setting IP address
(When Using TCP/IP
Protocol) in the Setup
Guide
Is the printer switched off?
Press the "|" side of the power switch
to switch on the printer.
"1.2.1 Switching on"
Is the Ethernet cable loose or
unplugged?
Switch off the power of the machine
and check the Ethernet cable
connection and plug it in properly.
Chapter 2 Connecting
the Interface Cables in
the Setup Guide
Is the internet address entered
correctly?
Check the internet address again. If
you still cannot connect, use the IP
address to connect to CentreWare
Internet Services.
95
Troubleshooting
Unable to connect to
CentreWare Internet
Services
4
4.6 Others
Description
(From previous page)
Unable to connect to
CentreWare Internet
Services
Possible Cause
Is the IP address entered
correctly?
Solution
The IP address may be changed.
Check with your network administrator
and specify the correct IP address.
Check the currently specified IP
address with that shown on the Printer
Settings List.
"1.8 Printing the Printer
Settings List" and
3.2 Setting IP address
(When Using TCP/IP
Protocol) in the Setup
Guide
4
Is a proxy server used?
Sometimes, connection through the
proxy server may fail. Change your
WWW browser setting so that no
proxy server is used, or the address to
be connected does not use the proxy
server for the connection.
6.3 Configuring WWW
Browser in the Network
Print Environment User
Guide
Is the port number specified
correctly?
Unable to run
CentreWare Internet
Services
-
The factory setting of the port number
is 80. Specify the correct port number.
Refer to the Network Print
Environment User Guide on how to
resolve the problem if you are unable to
run CentreWare Internet Services.
7.5 For CentreWare
Internet Services in the
Network Print
Environment User Guide
96
4.6 Others
4.6.2
Other Problems
Description
Unable to print in colour
Possible Cause
Is Black/White selected as the
output colour on the printer
driver?
Solution
Check under the Graphics tab on the
printer driver (for Windows) or the
General Settings dialog box (for
Macintosh), and make sure that the
correct setting is selected.
Online Help
The settings specified in the
application software may take
precedence over the settings on
the printer driver.
Make sure the application settings
match the printer driver settings.
Printing is slow
Is Color selected as the output
colour when printing black and
white documents?
Check under the Graphics tab on the
printer driver (for Windows) or the
General Settings dialog box (for
Macintosh), and make sure that the
correct setting is selected.
4
Online Help
Is the timeout period for the
printer to enter into power saver
mode too short?
If the printer received a print job while
it is in power saver mode, it takes some
time for it to warm up and print. You
can set a longer timeout to prevent the
printer from entering into power save
mode too quickly.
"3.3 List of Items on the
Menu Screen"
Unusual sounds
Is the printer placed on a level
platfrom?
Move the printer to level platform.
Is the paper tray open?
Push the paper tray firmly into the
printer.
Are there scraps of paper or
other objects in the printer?
Switch off the power and remove these
objects from the printer. If you have
difficulties removing these objects from
the printer without disassembling it,
contact your Xerox Customer Support
Centre.
"7.3.3 Environmental
Requirements for
Installing the Printer"
97
Troubleshooting
Unable to print from the
specified tray
4.7
When An Error Message
Appears
This section explains the meaning of the error messages that appear on the display panel and
the solutions for these messages.
There are two types of error messages, namely, warning messages to get your attention and
printing can still be done, and error messages, where troubleshooting needs to be done to
resolve an error.
When an error message appears, determine the cause and solution of the problem by using
the following tables.
• If the length of the error message exceed the space on the display panel,
the display panel will take three seconds to switch between the first part
of the message and the second.
• The diagram in the table shows a printer installed with the 2-tray module
and the duplex print module.
Message
**-**Switch the power off/
on.
Replace yellow toner
cartridge.
Meaning and Solution
Printer is not functioning properly.
Solution
Switch off the printer power, and switch it on
again. If the same message appears, write down
the contents of the message, switch off the
printer, and contact your Xerox Customer
Support Centre.
Yellow toner cartridge has run out.
Solution
Replace the yellow toner cartridge.
"6.1.2 Replacing the Toner
Cartridges"
"**" represents alphanumeric characters
98
4.7 When An Error Message Appears
Message
Meaning and Solution
Install yellow toner
cartridge.
The yellow toner cartridge is not installed or is not installed
correctly.
Solution
Push the yellow cartridge firmly into the printer.
"6.1.2 Replacing the Toner
Cartridges"
Open and close any cover.
An error has occurred inside the printer.
Solution
Open any cover, such as the front cover, and
then close it.
If further actions are required, the corresponding
error message will be displayed. Resolve the
problem accordingly.
Paper jams occurred near the manual feed unit when
paper is fed from tray 1 or the manual tray.
Solution
Open the manual feed unit to remove the jammed
paper. Make sure that no paper is jammed in the
manual tray or the paper tray.
"5.1 Clearing Paper Jams"
Paper jam.
Open the manual feed unit
and the lower right cover.
Paper jam occurred inside the printer when paper is fed
from tray 2 or tray 3.
Solution
Open the manual feed unit and the lower right
cover on the right side of the tray module to
remove the jammed paper. Make sure that no
paper is jammed in the paper trays.
"5.1 Clearing Paper Jams"
Paper jam.
Open the lower left cover.
Paper jam occurred inside the printer during two-sided
printing.
Solution
Open the lower left cover to remove the jammed
paper. Make sure that no paper is jammed in the
paper trays.
"5.1.5 Paper Jams at the Lower Left
Cover"
99
Troubleshooting
Paper jam.
Open the manual feed unit.
4
4.7 When An Error Message Appears
Message
100
Meaning and Solution
Paper jam.
Open the lower left unit.
Paper jam occurred inside the printer near the left.
Solution
Open the lower left unit to remove the jammed
paper. If further actions are required, the
corresponding error message will be displayed.
Resolve the problem accordingly.
"5.1 Clearing Paper Jams"
Paper jam.
Open the right cover.
Paper jam occurred inside the printer near the right.
Solution
Open the right cover to remove the jammed
paper.
"5.1.6 Paper Jams at the Right
Cover"
Paper jam. Remove the
jammed paper.
Paper jam occurred inside the printer.
Solution
Remove the jammed paper.
"5.1 Clearing Paper Jams"
This drum cartridge cannot
be used. ID error.
The drum cartridge is faulty.
Solution
Replace the drum cartridge.
"6.2.2 Replacing the Drum
Cartridge"
This drum cartridge cannot
be used. Write error.
The drum cartridge is faulty.
Solution
Replace the drum cartridge.
"6.2.2 Replacing the Drum
Cartridge"
Replace cyan toner
cartridge.
Cyan toner cartridge has run out.
Solution
Replace the cyan toner cartridge.
"6.1.2 Replacing the Toner
Cartridges"
Install cyan toner cartridge.
Cyan toner cartridge is not installed or is not installed
correctly.
Solution
Push the cyan cartridge firmly into the printer.
"6.1.2 Replacing the Toner
Cartridges"
4.7 When An Error Message Appears
Message
System settings cleared.
Press Set.
Meaning and Solution
Disk full.
Press Set.
Hard disk is full during electronic collation and no data
can be written.
Solution
Press Set/Eject and the print job is deleted. Use
the following methods to re-send the printing:
• Divide the pages and print in small amount.
• De-select the hard disk setting in the driver, and
then send the print job.
"1.7 Changing the Printer
Configuration"
Load xxxx on the manual
tray.
xxxx (media type) is not loaded on the manual tray, or a
size different from that specified in the printer driver is
loaded.
Solution
Load xxxx (media type) in the manual tray. If a
wrong size is specified on the computer, stop the
printing. Make sure that the paper size setting is
correct on the computer, and try again.
"2.2.2 Loading Paper on the
Manual Tray",
"1.5.2 Cancelling on the Control
Panel" and
Online Help
101
4
Troubleshooting
The system settings stored in the NV memory is
corrupted.
Solution
Follow the procedure below to initialise NV
memory:
Press Set/Eject.
When "Ready to Init?" message appear, use
to select Yes.
Press Set/Eject.
Printer settings may disappear once the NV
memory is initialised.
Print the Printer Settings List and the Panel
Settings List to check the settings.
"1.8 Printing the Printer Settings
List" and
"3.3 List of Items On the Menu
Screen"
4.7 When An Error Message Appears
Message
Meaning and Solution
Remove transparency from
the manual feed unit.
Do not use transparency
with border.
Transparency is jammed inside the printer.
Solution
Open the manual feed unit to remove the jammed
transparency. Make sure the recommended size
and type of transparencies are used.
"5.1.2 Paper Jams in the Manual
Feed Unit"
"2.4.1 Printing on Transparencies"
Close the manual feed unit
The manual feed unit is open.
Solution
Push the manual feed unit firmly into the printer.
Manual
feed unit
Replace waste toner
cartridge
It is time to replace the waste toner cartridge.
Solution
Replace the waste toner cartridge.
"6.3.2 Replacing the Waste Toner
Cartridge"
Install waste toner cartridge The waste toner cartridge is not installed or is not
installed correctly.
Solution
Push the waste toner cartridge firmly into the
printer.
"6.3.2 Replacing the Waste Toner
Cartridge"
Replace drum cartridge
It is time to replace the drum cartridge.
Solution
Replace the drum cartridge.
"6.2.2 Replacing the Drum
Cartridge"
"xxxx" represents paper size or paper size and orientation.
102
4.7 When An Error Message Appears
Message
Meaning and Solution
The drum cartridge is not installed or is not installed
correctly.
Solution
Push the drum cartridge firmly into the printer.
"6.2.2 Replacing the Drum
Cartridge"
Tray 1 is out of paper
There is no paper in tray 1.
Solution
Load paper into tray 1.
"2.2.1 Loading Paper in the Paper
Trays"
Trays 1 to N are out of
paper
There is no paper in all trays from tray 1 to tray N.
Solution
Load paper into each tray.
"2.2.1 Loading Paper in the Paper
Trays"
Load xxxx into tray N
xxxx (media type) is not loaded in tray N, or a size
different from that specified in the printer driver is
loaded.
Solution
Load xxxx (media type) in tray N. If a wrong
size is specified on the computer, stop the
printing. Make sure that the following settings are
set correctly on the computer, and try again.
• Is the correct paper tray selected?
• Is the correct paper size specified?
"2.2.2 Loading Paper on the
Manual Tray",
"1.5.2 Cancelling a Print Job on
the Control Panel" and
Online Help
Install tray N.
Tray N is not installed properly.
Solution
Push tray N firmly into the printer.
"N" represents numbers.
"xxxx" represents paper size or paper size and orientation.
103
4
Troubleshooting
Install drum cartridge
4.7 When An Error Message Appears
Message
Meaning and Solution
Load xxxx in tray N
The media type (xxxx) specified on the computer is not
available in all the trays.
Solution
Load xxxx (media type) in any or all of the trays.
If a wrong size is specified on the computer, stop
the printing. Make sure that the correct setting is
set on the computer, and try again.
"2.2.2 Loading Paper on the
Manual Tray",
"1.5.2 Cancelling on the Control
Panel" and
Online Help
Install tray
All trays are not installed properly.
Solution
Push all trays firmly into the printer.
Close top left cover
The top left cover is open.
Solution
Close the top left cover firmly.
Top left cover
Close the lower left cover
The lower left cover is open.
Solution
Close the lower left cover.
Lower left cover
"xxxx" represents paper size or paper size and orientation.
‚ Í
•s
104
4.7 When An Error Message Appears
Message
Meaning and Solution
Open the lower left and the
right covers to remove
jammed paper
Paper jammed inside the printer during two-sided
printing.
Remedy
Open the lower left and the right covers and
check if any paper is jammed inside the printer.
"5.1 Clearing Paper Jams"
Close the lower left unit
The lower left unit is open.
Solution
Push the lower left unit firmly into the printer.
4
Lower left unit
The quantity of paper output has exceeded the capacity
of the face-down tray.
Solution
Remove the paper from the face-down tray.
Replace black toner
cartridge
The black toner cartridge has run out.
Solution
Replace the black toner cartridge.
"6.1.2 Replacing the Toner
Cartridges"
Install black toner cartridge
The black toner cartridge is not installed or is not
installed correctly.
Solution
Push the black cartridge firmly into the printer.
"6.1.2 Replacing the Toner
Cartridges"
Invalid print command.
Press Set.
Unable to print with the settings specified on the
computer.
Solution
Press Set/Eject to cancel the printing. Check the
printer settings on the printer driver and try again.
105
Troubleshooting
Remove paper from the
face-down tray
4.7 When An Error Message Appears
Message
Meaning and Solution
Ready to Print.
Get ready to replace
OOOOOO toner cartridge.
This is a warning message. The OOOOOO toner is
running low.
Get ready a new OOOOOO toner cartridge to replace
the current one when the ink has totally run out.
Ready to Print.
Call for service.
This is a warning message. An error has occurred. Write
down the message shown and contact your Xerox
Customer Support Centre. You can continue to print.
Ready to Print.
Get ready to replace waste
toner cartridge.
This is a warning message. It is about time to replace the
waste toner cartridge.
Get ready a new waste toner cartridge to replace the
current one when required.
Ready to Print.
Get ready to replace drum
cartridge.
This is a warning message. It is about time to replace the
drum cartridge.
Get ready a new drum cartridge to replace the current
one when required.
Close the front cover
The front cover is open.
Solution
Close the front cover properly.
Front cover
Replace magenta toner
cartridge
106
The magenta toner cartridge has run out.
Solution
Replace the magenta toner cartridge.
"6.1.2 Replacing the Toner
Cartridges"
4.7 When An Error Message Appears
Message
Meaning and Solution
Install magenta toner
cartridge
The magenta toner cartridge is not installed or is not
installed correctly.
Solution
Push the magenta cartridge firmly into the
printer.
"6.1.2 Replacing the Toner
Cartridges"
Close the right cover
The right cover is open.
Solution
Close the right cover.
Right cover
4
Troubleshooting
Check the right cover and
remove paper from the
duplex tray
Paper jam occurred during twp-sided printing.
Solution
Open the right cover to remove the jammed
paper. If no jammed paper if found, check the
duplex tray for jammed paper.
"5.1 Clearing Paper Jams"
Close the lower right cover
The lower right cover at the right side of the tray module
is open.
Solution
Close the lower right cover at the right side of the
tray module.
Lower right
cover
107
4.7 When An Error Message Appears
Message
Meaning and Solution
Insufficient memory.
Press Set.
There is insufficient memory for the printer to function
properly.
Solution
Press Set/Eject to cancel the printing. Add the
additional memory, and try again.
"Appendix A Optional Products and
Consumables"
If memory cannot be added, you can still print
with the following settings. However, the
resolution will be low.
• Select Document (Standard) for Document
Type on the Graphics tab (for Windows) and
General Settings dialog box (for Macintosh).
Online Help
Close duplex tray.
The duplex tray is open.
Solution
Push the duplex tray firmly into the printer.
Duplex tray
108
4.8
When the Error LED is Lit or
Blinking
A red Error LED on the control panel indicates that the printer has a problem. When the
Error LED is on or is blinking while you are using the printer, refer to the following section
for the appropriate action.
4.8.1
4
When the Error LED is Lit
"4.7 When An Error Message Appears" for the meaning of the error
message and the solution.
4.8.2
When the Error LED is Blinking
When the Error LED is blinking, it means a problem that cannot be resolved by the user
has occurred. Write down the contents of the message and the message code, switch off
the printer, and contact your Xerox Customer Support Centre.
109
Troubleshooting
When the Error LED is on, it means a problem that can be resolved by the user such as
paper jam, has occurred.
Follow the instructions of the error message on the display panel and handle the problem
accordingly.
Paper Jams
5.1
Clearing Paper Jams ........................................................................ 112
5.1
Clearing Paper Jams
When paper jams occur, error messages will be displayed on the printer and the printer will
stop printing.
If paper jams occur, clear the jammed paper immediately using the following procedure.
Do not continue using the printer when paper jams occurred as this will
cause the printer to breakdown. Remove the jammed paper immediately.
The diagram below shows the printer with the optional 2-tray module and
duplex print module installed.
5.1.4 Paper Jams at the Top Left Cover
5.1.3 Paper Jams at the
Lower Left Unit
5
5.1.5 Paper Jams at
the Lower Left Cover
5.1.2 Paper Jams in the Manual Feed Unit
5.1.1 Paper Jams at
the Manual Tray
5.1.8 Paper Jams in
the Duplex Tray
5.1.6 Paper Jams at
the Right Cover
5.1.7 Paper Jams in
the Paper Tray
5.1.9 Paper Jams at the
Lower Right Cover of the Tray
Module
• When removing jammed paper, make sure that no pieces of torn
paper are left in the machine. A piece of paper remaining in the
machine can cause a fire.
If a sheet of paper is wrapped around the heat roller, or when
clearing a jammed paper that is difficult or impossible to see, do
not try to remove it by your self. Doing so can cause injuries or
burns. Switch off the machine immediately, and contact your
Xerox Customer Support Centre.
• Never touch a labelled area found on or near the heat roller. You
can get burnt.
112
5.1 Clearing Paper Jams
• If you see smoke emitting from the printer when paper jam occurs, do
not open the printer cover. Switch off the power, remove the power
cord from the AC outlet, and contact your Xerox Customer Support
Centre.
• Remove jammed paper slowly and carefully to avoid tearing the paper.
Paper jams can be caused by the type and placement of paper, refer to
"2.1 Paper Handling".
When the Following Messages Appear on the Control Panel
When the following messages appear on the control panel, check the location mentioned below for
paper jams. If you did not find any paper jams in these areas, look at covers or units near to the
mentioned location.
• Manual tray (P.114)
• Manual feed unit
(P.115)
• Paper tray 1 (P.126)
• Lower left unit (P.117)
• Top left cover (P.122)
• Lower left cover
(P.123)
Lower left cover (P.123)
• Right cover (P.124)
• Paper tray (P.126)
5
• Manual tray (P.114)
• Paper trays 2, 3 (P.126)
• Lower right cover of the
tray module (P.128)
Paper Jams
• Manual tray (P.114)
• Manual feed unit
(P.115)
• Lower left cover
(P.123)
• Right cover (P.124)
• Top left cover (P.122)
• Right cover (P.124)
• Duplex tray (P.127)
113
5.1 Clearing Paper Jams
5.1.1
Paper Jams at the Manual Tray
The procedure to clear the paper jam is as follows:
Remove the jammed paper from the manual
tray.
If the paper is torn, make sure you do not leave
any pieces inside the printer.
As there may still be paper jammed in the
printer, follow the procedure on the next page,
"5.1.2 Paper Jams in the Manual Feed Unit".
5
114
5.1 Clearing Paper Jams
5.1.2 Paper Jams in the Manual Feed Unit
The procedure to clear the paper jam is as follows:
Remove any paper on the manual tray.
.
Pull out the manual feed unit until it stops.
5
Paper Jams
Lift the handle to open the cover.
115
5.1 Clearing Paper Jams
Pull out the jammed paper. If the paper is torn,
make sure you do not leave any pieces inside
the printer.
Close the cover and push the manual feed unit
back into the printer.
5
If paper was loaded on the manual tray, re-load
the paper stock.
116
5.1 Clearing Paper Jams
5.1.3
Paper Jams in the Lower Left Unit
The procedure to clear the paper jam is as follows:
Pull out the lower left unit until it stops.
Lift the green lever and remove the jammed
paper.
If the paper is torn, make sure you do not leave
any pieces inside the printer
If you cannot see the jammed paper, turn the
green knob in the direction of the arrow.
117
5
Paper Jams
The fuser will get very hot. Take
care not to touch it directly, as
you may get burnt.
5.1 Clearing Paper Jams
Pull out the paper gently in the direction of the
arrow. If the paper is torn, make sure you do
not leave any pieces inside the printer.
The fuser will get very hot. Take
care not to touch it directly, as
you may get burnt.
If the duplex print moduel is installed, open the
transparent cover as shown in the diagram and
check to see if there is any paper inside.
If paper is found here, proceed to the section
"Paper Found at the Centre of the Cover" on
the next page.
5
Return the green lever to its original position.
118
5.1 Clearing Paper Jams
Push the lower left unit firmly back into the
printer.
If you cannot locate the paper, perform the
procedure described in "5.1.4 Paper Jams at
the Top Left Cover".
If the duplex print module is installed, the paper
jam may have occurred inside the lower left
cover. Perform the procedure described in
"5.1.5 Paper Jams at the Lower Left Cover".
Paper Found at the Centre of the Cover
Depending on the location of the jam, clear the paper by using one of the following
methods to resolve:
• If the paper is jammed as shown in Diagram A, refer to "Removing Small Sheets such
as Postcards"
• If the paper is jammed as shown in Diagram B, refer to "Removing Paper from the
Bottom of the Lower Left Unit"
5
Paper Jams
Removing Small Sheets such as Postcards
Gently hold the cover open so it does not close,
and push the paper towards the output direction
with you fingers.
119
5.1 Clearing Paper Jams
Pull the paper in the direction of the arrow.
Close the cover and nip lever.
5
Push the lower left unit firmly into the printer.
120
5.1 Clearing Paper Jams
Removing Paper from the Bottom of the Lower Left Unit
With the cover open, reach into the bottom of
the lower left unit as shown in the diagram and
check to see if there is any paper inside.
Pull the paper downward to remove it.
5
Paper Jams
Close the cover and nip lever.
Push the lower left unit firmly into the printer.
121
5.1 Clearing Paper Jams
5.1.4
Paper Jams at the Top Left Cover
The procedure to clear the paper jam is as follows:
Open the top left cover.
Remove the jammed paper.
If the paper is torn, make sure you do not leave
any pieces inside the printer.
5
Close the top left cover.
122
5.1 Clearing Paper Jams
5.1.5
Paper Jams at the Lower Left Cover
The procedure to clear the paper jam is as follows:
Open the lower left cover.
Remove the jammed paper.
If the paper is torn, make sure you do not leave
any pieces inside the printer.
5
Paper Jams
Close the lower left cover.
123
5.1 Clearing Paper Jams
5.1.6
Paper Jams at the Right Cover
The procedure to clear the paper jam is as follows:
Remove any paper on the manual tray and fold
the tray.
Open the right rover.
5
Remove the jammed paper. If the paper is torn,
make sure you do not leave any pieces inside
the printer.
124
5.1 Clearing Paper Jams
Close the right cover.
If paper was loaded on the manual tray, re-load
the paper stock.
If you cannot locate the paper, it may be
jammed in a paper tray. To remove the paper,
follow the procedure on the next page, "5.1.7
Paper Jams in the Paper Trays".
5
Paper Jams
125
5.1 Clearing Paper Jams
5.1.7
Paper Jams in the Paper Tray
The procedure to clear the paper jam is as follows:
Gently pull out the paper tray until it stops, and
remove the jammed or wrinkled paper.
If the paper is torn, make sure you do not leave
any pieces inside the printer.
Push down on the metal plate inside the paper
tray until it locks.
5
Gently push the paper tray into the printer until
it stops.
Do not push in the tray with
excessive force.
126
5.1 Clearing Paper Jams
5.1.8
Paper Jams in the Duplex Tray
If you cannot find the jammed paper in the lower left cover or in the right cover, check in
the duplex tray.
The procedure to clear the paper jam is as follows:
Before pulling out the duplex tray, check that there is no paper jammed at
the lower left cover or the right cover.
Gently pull out the duplex tray until it stops.
5
If paper was jammed at the far
end of the duplex tray and
cannot be removed, you have to
uninstall the duplex tray. Refer
to the booklet bundled with the
optional duplex print module for
information on how to install and
uninstall the duplex tray.
Gently push the duplex tray into the printer until
it stops.
127
Paper Jams
Remove the jammed or wrinkled paper.
If the paper is torn, make sure you do not leave
any pieces inside the printer.
5.1 Clearing Paper Jams
5.1.9
Paper Jams at the Lower Right Cover of the Tray Module
The procedure to clear the paper jam is as follows. Here, the optional 2-tray module is
used as an example.
Open the lower right cover on the right side of
the tray module.
Remove the jammed paper.
If the paper is torn, make sure you do not leave
any pieces inside the printer.
5
Close the lower right cover on the tray module.
128
Consumables
6.1
Replacing the Toner Cartridges ....................................................... 130
6.2
Replacing the Drum Cartridge ......................................................... 135
6.3
Replacing the Waste Toner Cartridge .............................................. 141
6.1
Replacing the Toner
Cartridges
The printer uses four toner cartridges, namely, black, yellow, magenta, and cyan.
The black and colour (yellow, cyan, and magenta) toner cartridges can print approximately
5,500 A4 pages and 6,000 A4 pages respectively with a 1:1 monochrome/colour ratio
(approximately 5% coverage of each colour on the factory default print density setting).
Toner cartridges
If the toner is running low, printing in that colour may appear faded or fragmented. When it
is time to change the toner cartridge, this message "Replace xxxx toner cartridge" (xxxx
refers to the colour of the toner cartridge) will appear on the display panel.
When this happens, follow the procedure below to replace the used cartridge with a new
one.
Toner cartridges are consumables. Refer to "Appendix A Optional
Products and Consumables" for more information.
130
6.1 Replacing the Toner Cartridges
6.1.1
Handling Precautions for Toner Cartridges
Never throw used toner cartridges into an open flame. It can cause
an explosion and you can get burnt.
Handling Precautions
• Once a toner cartridge has been removed from the printer, do not re-install it, as this
could disperse loose dirt and deteriorate print quality.
• Avoid shaking or striking used toner cartridges, as the remaining toner in the cartridge
may spill out.
• After moving a toner cartridge from a cold to a warm place, allow at least one hour for
the toner to adjust to the new room temperature. (This is not necessary if there is no
condensation.)
• Although the toner is harmless, it should be washed off immediately if it comes into
contact with hands or clothing.
• Do not use any cartridges except those recommended. Fuji Xerox does not accept any
responsibility for damage or loss of print quality resulting from the use of unapproved
toner cartridges.
Storage Precautions
6
Store cartridges in the following conditions away from direct sunlight:
• Avoid hot and humid areas.
• Avoid storing near magnetic objects such as CRT screens, disk drives, and floppy disks.
• Keep out of reach of children.
131
Consumables
• Temperature range: 0 to 35ºC, Humidity Range: 15 to 80% RH (no condensation).
6.1 Replacing the Toner Cartridges
6.1.2
Replacing the Toner Cartridges
The procedure to replace the toner cartridges is as follows:
Open the front cover.
If the cartridge you want to replace is at the
toner cartridge window, proceed to step .
Otherwise, push up the anti-rotational switch to
release the lock.
The anti-rotational switch will be
lowered automatically when you
turn the knob in the next step.
Remove your hand after you
have pushed up the switch.
132
6.1 Replacing the Toner Cartridges
To move the cartridge, turn the knob until it
stops in the direction of the arrow in the
diagram.
Once you turn the knob, you will
hear a click indicating that the
anti-rotational switch has
returned to the down position.
Repeat Steps and until the toner
cartridge of the colour you want to remove
appears in the toner cartridge window.
When the cartridge you want to remove
appears in the toner cartridge window, turn the
cartridge in the direction of the arrow shown in
the diagram to align the " " mark on the
cartridge with the "unlock" position ( ) on the
printer.
Remove the new toner cartridge of the same
colour from its packaging.
133
6
Consumables
Pull the toner cartridge out and remove it from
the printer.
6.1 Replacing the Toner Cartridges
Shake the toner cartridge seven to eight times
as shown in the diagram to distribute the toner
evenly.
Align the toner cartridge so that the arrow is as
shown in the diagram. Then insert and push the
cartridge firmly into the printer.
Align the " " mark on the cartridge by turning
the toner cartridge in the direction of the arrow
until it points to the "lock" position ( ) on the
printer.
Toner may spill if the toner
cartridge is not rotated
completely.
Close the front cover.
After the replacement, place the used toner
cartridge into the empty packaging box. Then,
paste the return seal bundled with the toner
cartridge on the packaging box, and mail it out.
Never throw used toner
cartridges into an open
flame. It can cause an
explosion and you can
get burnt.
134
6.2
Replacing the Drum Cartridge
The drum cartridge consists of a light-sensitive drum, the drum cleaner and the waste
toner cartridge.
The drum cartridge can print approximately 20,000 A4 pages with a 1:1 monochrome/
colour ratio (approximately 5% coverage of each colour on the factory default print density
setting). The drum cartridge can print approximately 6,000 pages of A3-size colour only
images.
Drum cartridge
If the drum cartridge is scratched, print quality may decline and result in black dots
showing on the printed copies.
When it is time to change the drum cartridge, this message "Replace drum cartridge" will
appear on the display panel.
6
The waste toner cartridge can be replaced separately.
To replace the waste toner cartridge separately, refer to "6.3.2
Replacing the Waste Toner Cartridge"
Waste toner cartridge
Both the drum and the waste toner cartridges are consumables. Refer to
"Appendix A Optional Products and Consumables" for more information.
135
Consumables
When this happens, follow the procedure below to replace the used drum cartridge with a
new one.
6.2 Replacing the Drum Cartridge
6.2.1
Handling Precautions for Drum Cartridges
Never throw used toner cartridges into an open flame. It can cause
an explosion and you can get burnt.
Handling Precautions
• Do not touch the surface (the blue part) of the drum. Also, never use any material to hit
or rub the surface of the drum. Print quality will deteriorate if the drum is scratched or
the dirt from your hands rubs off onto the drum.
• Do not leave the drum cartridge in direct sunlight. Avoid fluorescent lamplight whenever
possible. Areas of printing may blur or not print at all if you do so.
• Always place the drum cartridge on a flat surface while performing the replacement to
avoid scratching the drum.
• Toner collected in the waste toner cartridge should not be reused.
• Once a full waste toner cartridge has been removed from the printer, it should not be
used again. If it is placed in the printer again, the toner may spill inside the printer and
cause damage.
• Do not tilt or shake the drum cartridge and waste toner cartridge that have been
removed from the printer temporarily. Otherwise, toner may spill and cause damage
when it is reinstalled.
• Do not use drum cartridges that are not recommended. If cartridges other than the
recommended ones were used, the printer may not be able to optimise its performance
or may suffer from a loss of print quality.
• To ensure good print quality, always keep the drum cartridge level when handling it.
Storage Precautions
• Do not remove the cartridge from its packaging until you are ready to use it. If it has
already been removed, carefully repack it in the foil bag provided.
• Store cartridges in the following conditions away from direct sunlight:
Temperature range: 0 to 35ºC, Humidity Range: 15 to 80% RH (no condensation).
• Avoid hot and humid areas.
• Avoid storing near magnetic objects such as CRT screens, disk drives, and floppy disks.
• Keep out of reach of children.
• Always store the drum cartridge in a level position.
136
6.2 Replacing the Drum Cartridge
6.2.2
Replacing the Drum Cartridge
The procedure to replace the drum cartridge is as follows:
Open the front cover.
6
137
Consumables
Rotate the orange lever A in the direction of
the arrow until the " " mark is aligned with the
"unlock" position ( ).
6.2 Replacing the Drum Cartridge
Turn lever B in the direction as indicated by the
arrow in the diagram until it points to the
"unlock" position ( ).
Place your hand in the groove of the drum
cartridge, and pull it slowly towards you.
When pulling out the drum
cartridge, be careful not to pinch
your fingers.
To remove the drum cartridge, grasp the handle
on top of the cartridge and pull it out
completely.
Make sure you do not drop the
drum cartridge.
138
6.2 Replacing the Drum Cartridge
Take out the new drum cartridge from its
packaging, and remove the protective sheet
that covers the drum cartridge by pulling the
part marked with the green arrow.
• Never hit, rub or touch the
surface (the blue part) of the
drum. The print quality will
deteriorate if the drum is
scratched or dirt from your
hands rubs off onto the drum.
• To maintain good print quality,
peel off the protective sheet
from the drum cartridge while
it is in a horizontal position.
Hold the handle on the drum cartridge, place it
on the left and right rails inside the printer, and
push it firmly into the printer.
• Make sure the drum cartridge
is seated properly on the rails.
Attempting to insert the drum
cartridge while it is not
properly seated could damage
the printer.
Turn lever B in the direction as indicated by the
arrow in the diagram until it points to the "lock"
position ( ).
The lever will not turn unless the
drum cartridge has been inserted
properly.
139
Consumables
• Make sure the drum surface
(the blue part) does not come
into contact with anything.
6
6.2 Replacing the Drum Cartridge
Align the " " mark on the cartridge by turning
lever A in the direction of the arrow until it
points to the "lock" position ( ).
Close the front cover.
You cannot close the front cover
if levers A and B are not returned
to their proper positions. When
this happens, check the position
of the two levers.
After replacement, place the used drum
cartridge into the empty aluminium bag and
then into the packaging box.
Attach the seal bundled with the drum cartridge
on the packaging box and mail it out.
Never throw used toner
cartridges into an open
flame. It can cause an
explosion and you can
get burnt.
140
6.3
Replacing the Waste Toner
Cartridge
As the waste toner cartridge is part of the drum cartridge, it is replaced when you install a
new drum cartridge, but it can also be replaced separately. If the waste toner cartridge
becomes full before the drum cartridge needs to be replaced, the printer display panel will
show "Replace waste toner cartridge".
When this happens, follow the procedure below to replace the waste toner cartridge.
6.3.1
Handling Precautions for Waste Toner Cartridge
Never throw used waste toner cartridge into an open flame. It can
cause an explosion and you can get burnt.
6
Handling Precautions
• Once a full toner collection cartridge has been removed from the printer, it should not be
used again. If it is placed in the printer again, the toner may spill inside the printer and
cause damage.
• Do not tilt or shake drum cartridges and toner collection cartridges that have been
removed from the printer temporarily. Otherwise, toner may spill and cause damage
when it is reinstalled.
141
Consumables
• Toner collected in the waste toner cartridge should not be reused.
6.3 Replacing the Waste Toner Cartridge
6.3.2
Replacing the Waste Toner Cartridge
The procedure is as follows:
Open the front cover.
Pull out the waste toner cartridge from the
printer by its handle.
• Make sure you press the
handle knob when you pull out
the waste toner cartridge.
• To avoid spillage, make sure
you keep the waste toner
cartridge level when removing
it.
Remove the new waste toner cartridge from its
packaging.
142
6.3 Replacing the Waste Toner Cartridge
Push the new cartridge firmly into the printer
until you hear a click.
Do not press the handle knob
when inserting the waste toner
cartridge.
Close the front cover.
After replacement, place the used waste toner
cartridge into the packaging box. Attach the
seal bundled with the waste toner cartridge on
the packaging box and mail it out.
Never throw used waste
toner cartridge into an
open flame. It can cause
an explosion and you can
get burnt.
6
Consumables
143
Maintenance
7.1
Cleaning ........................................................................................... 146
7.2
Storing the Printer ............................................................................ 147
7.3
Transporting the Printer ................................................................... 148
7.1
Cleaning
The printer should be cleaned about once a month to keep it in good condition.
Be sure to switch off and unplug the machine before accessing the
interior of the machine for cleaning, maintenance, or fault
clearance. Access to a live machine's interior can cause electric
shocks.
Cleaning Precautions
• Never spray cleaning liquid directly onto the printer, as the spray could enter the printer
and cause a malfunction. Further, use only neutral detergent to clean the printer.
• Never lubricate the printer with oil. Normal printer maintenance does not require
lubrication of any kind.
• The inside of the printer unit does not require any cleaning for normal maintenance.
Cleaning the Exterior of the Printer
Press the " " side of the power switch to
switch off the printer.
Moisten a soft material and wipe any dirt from
the outside of the printer.
If the stains cannot be wiped off easily, wipe
with a soft cloth that has been moistened with
diluted neutral detergent.
Wipe away any excess water with a soft and
dry cloth.
146
7.2
Storing the Printer
If you are going to store the printer for a long period, perform the following procedure:
Press the " " side of the power switch, located
on the left of the printer, to switch off the
printer.
Remove the power cord and all other cables,
such as the parallel cable.
Never touch a power cord
with wet hands. Danger of
electric shock exists.
When unplugging the
machine, grasp the plug
instead of the cord.
Forcibly pulling on a cord
can damage it and cause
fire or electric shocks.
Remove all paper from the paper trays, and
store the paper in a dry place, free from dust.
7
Maintenance
147
7.3
Transporting the Printer
When transporting the printer over long distances by truck, perform the following
procedure to avoid risk of damage from intense vibrations.
We recommend that you use a transportation company to transport the
printer.
7.3.1
Handling Precautions When Lifting the Printer
Carry the Printer with At Least Four People
•
The machine weighs 71.2 kg when the consumables and paper
trays are fully assembled.
When moving the printer, contact the transportation company
and make sure that there are four or more persons carrying it.
•
When lifting the machine, face the front panel and firmly grip
the recessed areas provided under the front, rear and left sides
of the machine. Lifting the machine by gripping any other areas
can cause to machine to fall and result in injuries.
•
When lifting the machine, get a firm footing and bend your
knees to avoid possible injuries to your back.
Carrying here may
damage the
printer.
Keep the Printer Level when Carrying
When moving the machine, do not tilt it more than 10o. If
tilted excessively, the machine may fall over and cause
injuries.
About the Weight of the Printer
The rear side of DocuPrint C621 is heavier than
the front. Take note of the difference in weight
when you are transporting the printer.
148
7.3 Transporting the Printer
7.3.2
Transporting the Printer
You will need A, B, C, D, E and F spacers, which were removed during installation, to
prepare the printer for transportation. After you have the spacers ready, follow the
procedure below.
• When transporting the printer, do not reinstall toner cartridges that
were removed beforehand. The toner may spill and damage the inside
the printer.
• When the optional 2-tray module or special cabinet is installed, remove
them from the printer before moving the printer. If the printer is not
properly secured to the tray module, it may fall or tip over, and may be
damaged or cause injury. For removal and installation of the optional
accessories, refer to their respective manual. In addition, these
optional accessories are heavy items, we recommend that you use a
transportation company to transport them.
Press the " " side of the power switch, located
on the left side of the printer, to switch off the
printer.
Never touch a power cord
with wet hands. Danger of
electric shock exists.
When unplugging the
machine, grasp the plug
instead of the cord.
Forcibly pulling on a cord
can damage it and cause
fire or electric shocks.
149
7
Maintenance
Remove the power cord and all other cables,
such as the parallel cable.
7.3 Transporting the Printer
Push and hold the face-up tray to the right,
dislodge the tab on the left from the hole in the
printer ( ). Next, dislodge the tab on the right
( ).
Do not bend the face-up tray too
much when you carry out the
operation in ( ). You may
damage the tray.
Open the front cover and turn the toner
cartridge in the toner cartridge window to the
"unlock" position ( ), then pull out the toner
cartridge.
If the printer is transported with
the toner cartridges installed, the
toner may spill and damage the
inside of the printer.
Push up the anti-rotational switch to release the
knob.
The anti-rotational switch will be
lowered automatically when you
turn the knob in the next step.
Remove your hand after you
have pushed up the switch.
Turn the knob in the direction of the arrow until
it stops to move the next cartridge into the
toner cartridge window. Then, remove the
toner cartridge.
Once you turn the knob, you will
hear a click indicating that the
anti-rotational switch has
returned to the down position.
Repeat Steps and to remove the
remaining three toner cartridges.
150
7.3 Transporting the Printer
Insert the anti-rotational B spacer into the toner
cartridge window and close the front cover.
Remove paper from the paper trays and store
the paper in a dry place, free of dust.
Slot the C spacer into the position shown in the
diagram.
7
Do not push in the tray with
excessive force.
151
Maintenance
Insert the E spacer to the position shown in the
diagram. Then push the paper tray firmly into
the printer.
7.3 Transporting the Printer
Pull out the manual feed unit until it stops and
insert the D spacer as shown in the diagram.
Then, push the unit firmly into the printer.
Install the F spacer as shown in the diagram
( ) and then fold the manual tray ( ).
Before transporting the printer, pack the unit
carefully so it will not get damaged.
This printer is considered as a
heavy item, we recommend that
you use a transportation
company to transport the printer.
152
7.3 Transporting the Printer
7.3.3
Environmental Requirements for Installing the Printer
For safe and convenient printer operation, consider the following when installing the
printer.
Install the Printer in a Location that Meets the Following Conditions
• Level and stable
• Well-ventilated
• Ambient temperature range 5 to 32ºC, relative humidity 15 to 85% (no condensation) If
operating the printer with an ambient temperature of 32ºC, the relative humidity should
not exceed 48%. If the relative humidity reaches 85%, the ambient temperature should
not exceed 28ºC.
Do not place the printer in a room where there are sudden fluctuations
in temperature, and do not move the printer from a cold place to a
warm humid place. If you do, condensation may occur within the
printer and print quality will deteriorate. If condensation occurs, allow
at least one hour for the printer to adapt to the new environment before
use.
Connect the Printer to Its Own AC Outlet
If possible, do not plug any other appliances into the printer's AC outlet. If the printer is
connected to the same circuit used by other high power consumption machines, such as
copiers and air conditioners, or machines that generate electrical noise, this may cause
computing errors, resulting in data loss and improper performance.
Avoid Installing the Printer in the Following Locations
• Under direct sunlight
• Near air conditioner or heater
• In a windy place
• On a shaky or vibrating surface
153
7
Maintenance
Connect the power plug only to a properly rated power outlet (220240 V, 15 A). Never use multi-plug adaptors to plug multiple power
plugs in the same outlet. Be sure to operate the machine on a soleuse receptacle. Multiple connectors can cause the outlet to
overheat and cause fire.
7.3 Transporting the Printer
• In a dusty place
• Near an open flame
• Near water
• Near magnetic fields
• In places subject to sudden changes in temperature or humidity
If Used with a Water Vaporiser
When mains water or well water is used in a supersonic humidifier, impurities in the water
are released into the air and can accumulate inside the printer, causing a deterioration in
print quality. If using a water vaporiser in the same room as the printer, be sure to use only
purified water.
154
7.3 Transporting the Printer
Printer Clearance Requirements
The machine has ventilation holes on the rear and side panels.
Ensure that the machine is installed with a minimum clearance of
150 mm from the rear vent to the wall. A poorly ventilated machine
can cause excessive internal heat and fire. The accompanying
diagram shows the minimum clearances required for normal
operation, consumable replacement, and maintenance to ensure
your machine operates at peak performance.
Top View
Front View
7
Maintenance
Side View
* The figures indicated in brackets ( ) are the clearances required when the optional duplex print
module is attached.
155
Appendices
Appendix A Optional Products and Consumables ...................................... 158
Appendix B Menu List on the Control Panel .............................................. 162
Appendix C Obtaining Product Information ............................................... 165
Appendix D Main Specifications ............................................................... 166
Appendix E Life Span of Consumables ...................................................... 168
Appendix F Parallel Interface Specifications............................................. 169
Appendix G Installing the Additional Memory........................................... 171
Appendix H Glossary ................................................................................. 174
A
Optional Products and
Consumables
DocuPrint C621 has the following optional products and consumables. To purchase,
contact your Xerox Customer Support Centre for more information.
Optional Products
Additional Memory (64/128MB)
When you are sending colour data that contains
complicated graphics and huge data volume, you
may want to increase your printer memory by
installing additional memory.
The specification of the additional memory of
the printer is as follows:
• 168 pin DIMM SDRAM
Refer to "Appendix G Installing Additional
Memory" on the installation method.
Hard Disk
The hard disk allows you to print and collate
multiple copies of a document in high speed.
For a description of the installation procedure,
refer to the booklet bundled with the hard disk.
250-Sheet Universal Paper Tray
This tray is identical to the 250-sheet universal
paper tray provided with the printer. You can
purchase this tray separately.
For installation details, refer to "2.3 Replacing
the Paper Tray with an Optional Tray".
158
Appendix A Optional Products and Consumables
A3 Oversize Paper Tray
This can be used in tray 1 of the printer. You
can load up to 250 sheets of A3 oversize paper
(328 mm x 435 mm) at a time.
For installation details, refer to "2.3 Replacing
the Paper Tray with an Optional Tray".
2-Tray Module
This tray module allows you to attach another
two paper trays to the printer. You can set up to
500 sheets in each tray, giving a total capacity of
1000 sheets. When installed, the trays become
tray 2 and tray 3.
For installation details, refer to the booklet
bundled with the 2-tray module.
Duplex Print Module
This unit allows you to print on both sides of the
paper.
For installation details, refer to the booklet
bundled with the duplex print module.
Appendix
159
Appendix A Optional Products and Consumables
Special Cabinet
For installation details, refer to the booklet
bundled with the special cabinet.
Parallel Cable
The following cables are available as optional accessories. Use the appropriate one on
your computer.
• Parallel Interface Cable (36 Pin for PC98)
• Parallel Interface Cable (for PC/AT)
• Connection cable for PC98MATE
Earthquake Protection Kit
This kit helps to prevent the printer from toppling.
160
Appendix A Optional Products and Consumables
Consumables
Toner Cartridges
The printer uses four toner cartridges, namely,
black, yellow, magenta and cyan. For installation
details, refer to "6.1.2 Replacing the Toner
Cartridges".
C
M
Y
K
Drum Cartridge
The Drum Cartridge comprises the lightsensitive drum, drum cleaner and waste toner
cartridge.
For installation details, refer to "6.2.2 Replacing
the Drum Cartridge".
Waste Toner Cartridge
As the waste toner cartridge is part of the drum
cartridge, it is replaced when you install a new
drum cartridge, but it can also be replaced
separately.
For installation details, refer to "6.3.2 Replacing
the Waste Toner Cartridge".
Appendix
161
B
Menu List on the Control
Panel
These screens show
only the lower part of the
menu screens
162
Appendix B Menu List on the Control Panel
• Symbols
Press
[SE]
•
•
•
•
.
Press Set/Eject.
Press
to switch menus or items within the same level. Press to
move to the menu/item in front and press to move to the menu/item
behind.
Press
to move the cursor (_) to the right/left.
Moves to the level below. Also, to confirm setting ("*" will be added to
the value set).
To return to the level above, press Cancel.
To close the menu screens, press Offline.
"*" and "_" indicate factory settings.
together.
To return to the factory settings, press
Appendix
163
Appendix B Menu List on the Control Panel
164
C
Obtaining Product Information
The following information is provided on our internet home page:
• Latest product information
• Latest software
• Recommended applications
• Limitations of applications
Internet Homepage
URL
http://www.fujixerox.co.jp/
The company will not be responsible for
any communications fee incurred.
The Fuji Xerox Homepage provides
information on products and services.
(4 August 2000, current)
Appendix
165
D
Main Specifications
Main Specifications
Machine type
Desktop printer
Print method
Laser xerography
Resolution
600 dots/25.4 mm (600 dpi)
Gradation
256 gradation for each colour (16.7 million colours)
Printing Speed
Colour
6 sheets/minute (continuous printing for the same document)
Monochrome
26 sheets/minute (continuous printing for the same document)
Paper Size
Paper Type
Number
of Sheets
(Plain paper)
A5, B5, A4, B4, A3, 8.5 x 11" (Letter), 8.5 x 14" (Legal), 11 x
17", 12 x 18", 328 x 453 mm
Paper Tray
Plain Paper (64 to 105 g/m2)
Manual Tray
Plain paper/heavy weight paper (64 to 220 g/m2),
transparencies (XEROX FILM (no border)), postcards (*),
envelopes (*), labels, coated paper and glossy paper.
(*) Certain types of postcards and envelopes, depending on
their paper quality and their size, cannot be used with the
printer.
Paper Tray
Standard: (Tray 1) 250 sheets
Optional products: A3 oversize tray (tray 1) 250 sheets, 2-tray
module (tray 2 and 3) 500 sheets x 2
Manual Tray
150 sheets
Output Capacity Face-down Tray
Face-up Tray
250 sheets (B5 or larger, plain paper, quality of 105g/m2 or
lower)
150 sheets (A4 or smaller), 50 sheets (larger than A4)
Memory Size
Standard: 64 MB (a maximum of 256 MB with optional
additional memory installed)
Optional products: 64 MB, 128 MB additional memory (two
memory slots)
Internal HD
Optional product: 6.3 GB
Installed Fonts
166
Japanese
(4 typefaces)
FX Ryobi Hon Mincho-L, FX RyobiGothic-B, FX Ryobi P Hon
Mincho-L, FX Ryobi P Gothich-B
European
(15 typefaces)
Arial, Arial Bold, Arial Italic, Arial Bold Italic, Courier New,
Courier New Bold, Courier New Italic, Courier New Bold
Italic, Times New Roman, Times New Roman Bold, Times
New Roman Italic, Times New Roman Bold Italic, Century,
Symbol,Wingdings
Appendix D Main Specifications
PDL
XPL2
Operating System Requirements
Windows 95, Windows 98, Windows NT 4.0, MacOS 7.6.1
and later.
Interface
Standard:Bi-direction Parallel (IEEE1284 standard)
Optional accessories:Ethernet 100Base-TX/10Base-T (TCP/
IP), IPX/SPX (NetWare), EtherTalk (AppleTalk)
Noise Level
Operating: Max 55.0 dB(A) Standby: Max 39.0 dB(A)
Power Supply
220/240 V ± 10% (198 to 264 V), 50/60 Hz ± 3 Hz
Max. Power Consumption
Operating: below 1200 W, standby: below 30 W
Dimensions/Weight
Dimensions: 650 (W) (*) x 647 (D) x 556 (H) mm
Weight: 71.2kg
(*) When manual tray and face-up tray are folded
Printable Area
For A3 paper
or smaller
For 12 x 18"
and 328 x 453
mm paper
For paper 328
x 453 mm or
larger
167
Appendix
• Printable area is the print area where
the print quality is assured by DocuPrint
C621.
• Non-printable area is the area that
cannot be printed on.
• Non-assured print area is the area that
can be printed on but there is no
guarantee that the colour be reproduced
faithfully.
E
Life Span of Consumables
Life Span of Consumables (number pages that can be printed)
Name of Consumable
Number of Pages (*)
Black toner cartridge
About 5,500 pages
Yellow toner cartridge
About 6,000 pages
Magenta toner cartridge
About 6,000 pages
Cyan toner cartridge
About 6,000 pages
Drum cartridge
(Including the waste toner cartridge)
About 20, 000 pages
The number of pages that the consumable can print is based on the following conditions. The
actual number will vary according to the contents, size and type of paper being used, and the
operating environment.
(*
168
Paper size
A4 portrait
Coverage
5%
B/W : colour ratio
1:1
Number of sheets in a
single print run
Average: 4 sheets
F
Parallel Interface
Specifications
Get ready the IEEE1284-B type parallel interface connector on the printer. The shape of
the connector is as follows.
Pin Configuration
The configuration of each communication pin is as follows (when bi-direction is OFF).
• I/O can be seen from the printer where "I" refers to input signal and
"O" refers to the output signal.
• The connection cable used when bi-direction is ON should adhere to
the IEEE 1284-B type connector standard.
Signal Name
I/O
Pin No.
Signal Name
1
DATASTROBE
I
19
RETURN
2
DATA1
I
20
RETURN
3
DATA2
I
21
RETURN
4
DATA3
I
22
RETURN
5
DATA4
I
23
RETURN
6
DATA5
I
24
RETURN
7
DATA6
I
25
RETURN
8
DATA7
I
26
RETURN
9
DATA8
I
27
RETURN
10
ACKNOWLEDGE
O
28
RETURN
11
BUSY
O
29
RETURN
12
PAPER END
O
30
RETURN
13
SELECT
O
31
INPUTPRIME
I
14
AUTO FEED
I
32
FAULT
O
15
(RESERVED)
33
(RESERVED)
16
SIGNALGND
34
(RESERVED)
17
FRAME GND
35
(RESERVED)
18
+5V
36
SELECTIN
O
I/O
Appendix
Pin No.
I
169
Appendix F Parallel Interface Specifications
Signal Definition
(When bi-directional feature is OFF)
DATA STROBE (Pin No.1)
Active low pulse used to transfer data into the printer
at the same time when DATA1 to 8 is read.
DATA1~8 (Pin No.2~9)
8-bit parallel data input with DATA1 as the LSB
(least sensitive bits) and DATA8 as the MSB (most
sensitive bits).
ACKNOWLEDGE (Pin No.10)
Active low pulse indicates that data has been
received.
BUSY (Pin No.11)
A high signal indicates that the printer cannot receive
data.
PAPER END (Pin No.12)
A high signal indicates that the printer is out of paper
(Paper End).
SELECT (Pin No.13)
A high signal indicates that the printer is online.
AUTO FEED (Pin No.14)
A signal transmitted when the bi-direnction feature is
ON.
SIGNAL GND (Pin No.16)
Grounding for each signal.
FRAME GND (Pin No.17)
Grounding for the printer chassis
+5V (Pin No.18)
+5V voltage at the printer end.
RETURN (Pin No.19~30)
Connected to the grounding for each signal
INPUTPRIME (Pin No.31)
A low signal initialises the printer.
FAULT (Pin No.32)
A low signal indicates that the printer is in an offline
or error state.
SELECT IN (Pin No.36)
A signal transmitted when the bi-directional feature is
ON.
(When bi-directional feature is ON)
Each signal cable is based on IEEE 1284 standard.
170
G
Installing Additional Memory
This section explains how to install the additional memory to your printer.
When you add memory to the printer, the memory capacity of the printer increases.
Additonal memory is recommended when printing large volume of data in colour.
DocuPrint C621 comes with the following additional memory. The performance of the
printer cannot be guaranteed if other non-recommended additional memory is
installed.
• Type: 168 Pin DIMM SDRAM
• Capacity: 64 or 128 MB
There are two slots in the printer. Usually, 64 MB of memory is available for the slot
on the left. If you want to change to a larger capacity, the maximum limit is 256 MB
(128 MB x 2).
The procedure to install additional memory is as follows.
Switch off the machine before connecting the interface cable and
additional memory. Connecting the cable or memory with a live
machine can cause electric shocks.
Switch off the printer.
Open the front cover ( ) and pull out the
manual feed unit ( ).
Appendix
171
Appendix G
Installing Additional Memory
There are three screws near the top of the
right cover of the printer. Unscrew them.
Slide the right cover to the back of the printer
( ). Flip it down ( ) and remove it from the
printer.
Push out the ejector levers at both ends of the
memory slot.
Hold the two sides of the memory and fit the
two cutouts with the two protruding parts on
the slot and push it straight in.
Some parts of the PCB may be very
hot. Do not touch the PCB as this may
damage the board.
After you have inserted the memory, push in
the ejector levers to fasten the memory to the
slot.
To install the hard disk, skip the next
two steps and proceed with the
installation.
172
Appendix G Installing Additional Memory
Insert the tabs near the bottom of the right
cover into the holes in the printer ( ). Flip to
close the cover ( ).
Then slide the right cover toward the front of
the printer ( ) and close the cover completely.
Fasten the screws removed in Step ( )
and push the manual feed unit firmly into the
printer ( ).
Close the front cover .
This completes the installation of the additional
memory. Print the Printer Settings List and
make sure you have installed the additional
memory properly.
Proceed to configure your printer driver before
you start printing from the applications.
• "1.7 Changing the Printer
Configuration" on how to
change the printer
configuration.
173
Appendix
• "1.8 Printing the Printer
Settings List" on how to print
the Printer Settings List.
H
Glossary
10BASE-T
This refers to the 10 Mbps, baseband, twisted pair
cable compliant with the IEEE802.3 standard.
100BASE-TX
This is the extended version of 10BASE-T and is
also referred to as Fast Ethernet. The
communications speed is 100 Mbps, a much faster
speed compared to the 10M bps speed of 10Base-T.
Ack Signal
The signal indicating that the machine is ready to
receive data from the host device or that data is
correctly received.
Address
This refers to information (unique identifier)
assigned for identifying nodes (various computers
and terminals) on the network. Also, it can be used
to refer to a specified location in the memory where
data is stored.
Bi-directional Communications
This refers to the sending and receiving of
information between two devices. With bi-directional
communications, print data can be sent to a printer
and the printer can also send information of the
printing status to the computer.
Browser
This is the software for displaying and viewing
www server information on the computer via the
internet. Some representative browsers are Netscape
Communicator, Internet Explorer and so forth.
Busy Signal
The signal indicating that the printer is not able to
receive data from the host device.
CD-ROM
Compact disk designed to store data like software,
image and so forth to be used with a computer.
Click
AppleTalk
This is the network software for Macintosh. The
communications protocols available are LocalTalk
and EtherTalk.
Application Software
This refers to the tools for running jobs on the
computer. These applications include wordprocessing, spreadsheet, graphics, database and so
forth and all kinds of software applications are
available in the market.
174
A click refers to the action of pressing the mouse
button once and releasing your finger. In this
manual, "click" is used when you click the left
mouse button. When you click the mouse button
twice quickly, then release your finger, this action is
referred to as a "double-click".
Client
On a network, the server is used for storing data to
be used by other computers. Computers accessing
this server are called the clients.
Appendix H Glossary
DHCP
The acronym for Dynamic Host Configuration
Protocol. It is the protocol that automatically assigns
IP address from the DHCP server to the DHCP
client.
DNS
The acronym for Domain Name System. It is the
name service for host on the internet to have both
domain and IP addresses.
dpi
The acronym for Dot Per Inch. It represents the
number of dots that can printed in one-inch (25.4
mm) width. This is the unit measure used to define
resolution.
Drive
This is the device reading and writing a disk. There
are different types of drives, like floppy disk drive, a
CD-ROM drive, and a hard disk drive.
Face-down
When paper is delivered to the tray in DocuPrint
C621 with the printed side facing down.
Font
This refers to a set of characters with the same
typeface.
Full Colour
The maximum number of colours that can be
displayed on the computer screen is about 16.77
millions.
G.S.M. (g/m2)
This is a measure of the substance of paper
expressed in grammes per square metre, which does
not depend on the number of sheets in the ream.
HTTP
This is the protocol for accessing www servers on
the internet.
Install
This refers to the action of making software and
hardware usable by computers or the peripheral
equipment. It refers to such actions like installing the
printer driver software to the computer system or
putting a network card in the printer.
Installer
Face-up
When paper is delivered to the tray in DocuPrint
C621 with the printed side facing up.
This is a special software for installing software in a
computer.
Face-up/Face-down
When the printed paper is delivered with the printed
area facing up, it is known as “face-up”; when the
printed paper is delivered with the printed area facing
down, it is known as “face-down”.
This refers to the part that connects different
systems, for example, between a computer and a
printer, between humans and machines, and so
forth.
175
Appendix
Interface
Appendix H Glossary
Interface Cable
This is the cable that connects several devices so
that they can be compatible in use.
Some examples of interface cables are the parallel
cable for directly connecting the printer to the
computer and the Ethernet cable for connecting a
printer to the network.
IP Address
It is the network address used by the TCP/IP
protocol. An IP address is expressed by four sets of
decimal values separated by periods.
Java
It is a programming language developed by Sun
Microsystems in the United States for developing
software for running home pages on the internet.
Applications created by using Java are called applets.
Job
A group of print data. The stopping and output of
printing are conducted on a job basis.
Local Printer
In this manual, a local printer refers to a printer
connected directly to a computer via a parallel cable.
Login
This refers to the state whereby a user is able to
access resources (hard disks, printers on a network)
of a computer system. You "logout" to exit from a
login session.
NetWare®
This is a network OS developed by Novell, Inc.
NetWare File Server
This is the dedicated server required for
constructing a network with NetWare. Server
software is run on this server while client software
is run on the client computer.
Network Path
This points to the target computer or file on a
network. It is used to specify a server name and so
forth.
LED
This is the acronym for Light Emitted Diode.
Legal
This is paper measuring 14 x 8.5" (about 356 x 216
mm) in size. This type of paper size is commonly
used in legal documents in the United States.
Letter
This is paper measuring 11 x 8.5" (about 279 x 216
mm) in size. This type of paper isze is commonly
used in correspondences in the United States.
176
Network Printer
In this manual, a printer that is connected to the
network via the Ethernet cable is called a "network
printer".
NV Memory
This is a non-volatie memory that allows the settings
of the printer to be maintained even when power is
switched off.
Appendix H Glossary
N-up
This the feature that allows you to print multiple
pages on one sheet of paper. DocuPrint C621 allows
you to print using the 2-Up, 4-Up, 8-Up, or 16-UP
feature.
Online/Offline
When the printer is ready to receive data, it is
"online", if not, it is "offline". The machine has to be
online before copying or printing from applications
can be done. However the machine must be offline
in order to use the printer control panel to select or
change settings. You can toggle between online and
offline by pressing the Online button on the printer
control panel.
Online help
This is electronic information shown on the
computer screen.
OS
This is the acronym for Operating System that
controls the basic operations of a computer's
hardware and software. It also manages the
software and serves as the platform on which
software applications run.
Parallel Interface
PDF is the acronym for Portable Document Format.
A PDF file can be created by using the Acrobat
software developed by Adobe Systems
Incorporated. PDF files are online documents and
you need to install the Adobe Acrobat Reader in
order to view or print them.
Plug and Play
This function is adopted in Windows 95 and
Windows 98 where it allows the computer to
configure itself to work with peripheral equipment.
Print Queue
When data are received from the computer to be
printed to a designated printer, these data are stored
temporarily in the print queue.
Printer Driver
This is the software for converting data created with
an application to data that can be interpreted by the
printer.
Port
This is the connection part for exchanges between
the computer and peripherals.
Protocol
This is a set of rules for regulating the
communications amongst multiple devices and
computer systems, for example, the transmission of
information between hardware, the communications
between two computers via the network and so
forth.
177
Appendix
This is one of the data transmission modes between
a computer and the peripherals. Multiple bits of data
can be sent at the same time. A representative make
is Centronics, used in connecting printers to their
peripheral equipment.
PDF File
Appendix H Glossary
Ream weight
This refers to the weight of a 788 x 1,091 mm ream
consisting of 1,000 sheets.
Sort
The printer can print multiple sets of a document
and arrange them in order like 1, 2, 3... 1, 2, 3. This
is the "sort" function.
Resolution
It refers to the image quality. It shows how many
dots can be represented in a one-inch width area
(dpi). The higher the number, the better the image
quality.
SDRAM
This is the acronym for Synchronous DRAM. It is a
dynamic random access memory device that is
much faster than the conventional DRAM in read
and write access.
SMB
This is a network communications mode for sending
data via the Windows network (Microsoft network).
It can be used on Windows 95, Window 98, and
Windows NT 4.0.
Software
Software is program designed to make the computer
work. Operating system and application software
are different categories of software.
TCP/IP
This is the acronym for Transmission Control
Protocol/Internet Protocol. It is a network protocol
developed by DARPANET (Defense Advanced
Research Project Agency Network). It has become
the standard internet protocol widely used by various
machine types, from personal computers to
mainframes.
Uninstall
This refers to the action of deleting a software that
exists on the computer.
Server
On a network, the server is sued for storing data to
be used by other computers. Computers accessing
this server are called the clients
SNMP
This is the acronym for Simple Network
Management Protocol. Through the network, this
protocol manages the devices connected to the
network.
This is done on the managing side with SNMP
Manager and on the managed side with SNMP agent
software.
178
Web screen
This refers to information screen that is displayed by
the WWW browser.
WINS
This is the acronym for Windows Internet Naming
Services. This is the naming service for obtaining
the IP address from a host name in the TCP/IP
environment.
WWW
This is the acronym for World Wide Web. It is the
mechanism that provides web pages on the internet.
Index
Numbers
E
100BASE-TX .................................................. 174
10BASE-T ....................................................... 174
2-Tray Module ..................................... 17, 34, 159
250-Sheet Universal Paper Tray ..................... 158
Earthquake Protection Kit ............................... 160
ECP ................................................................... 69
Envelopes .......................................................... 33
Environmental Requirements for Installing the
Printer .............................................................. 153
Error Alarm ....................................................... 67
Error LED ......................................................... 60
Error Message ................................................... 98
Ethernet Interface ............................................... 2
Ethernet Settings ................................................ 71
Ethernet-II ......................................................... 72
EtherTalk ........................................................... 73
A
A3 Oversize Paper Tray .................... 17, 34, 159
Ack Signal ....................................................... 174
Additional Memory .................................... 17, 158
Installing ................................................... 171
Adjust Voltage ................................................... 68
AppleTalk ........................................................ 174
B
Basic Menu Operations ..................................... 64
Bi-directional Communications ........................ 174
Browser ........................................................... 174
Busy Signal ...................................................... 174
Busy-Ack .......................................................... 69
Buttons ............................................................... 62
C
Cancel button ..................................................... 62
Cancelling a Print Job ........................................ 13
CentreWare Internet Services .......................... 26
Checking the Printer Statuson the Computer .... 26
Cleaning ........................................................... 146
Clearing Paper Jams ....................................... 112
Coated Paper ..................................................... 33
Consumables .................................................... 161
Life Span .................................................. 168
Control Panel Components and Functions ........ 60
D
Face-down ....................................................... 175
Face-down Tray .................................................. 2
Face-up ............................................................ 175
Face-up Tray ....................................................... 3
Filter ..................................................................... 3
Front Cover ......................................................... 2
Full Colour ....................................................... 175
Fuser Unit ............................................................ 4
G
G.S.M. (g/m2) ................................................. 175
Gateway Address .............................................. 72
Glossy Paper ...................................................... 33
H
Hard Disk .................................................. 17, 158
Heavy Weight Paper ......................................... 33
I
IIP Frame Type ................................................. 72
Init NVM .................................................... 68, 74
Interface .......................................................... 175
Interface Cable ................................................ 176
Internet Services ................................................ 73
IP Address ................................................. 72, 176
IP Address Setup .............................................. 71
J
179
Index
Data LED .......................................................... 60
DHCP ....................................................... 71, 175
Display ............................................................... 61
DNS ................................................................. 175
Drum Cartridge .......................................... 4, 161
Duplex Print Module ................................. 17, 159
Duplex Print Module Connector Cover .............. 3
F
Index
Job Log Print ..................................................... 70
Printing ....................................................... 23
Job Log Setting .................................................. 67
Job Timeout ....................................................... 67
Operating System Requirements ..................... 167
Optional Products ............................................ 158
Optional Tray ..................................................... 44
OS .................................................................... 177
L
P
Labels ................................................................ 33
LED .......................................................... 60, 176
Legal ................................................................ 176
Letter ............................................................... 176
Loading Paper ................................................... 38
Local Printer .................................................... 176
Lower Left Unit .................................................. 3
lpd ...................................................................... 73
Panel .................................................................. 71
Panel Language ................................................. 67
Panel Settings List ............................................. 70
Paper Handling .................................................. 32
Paper Stopper ...................................................... 2
Paper Transport Problems ................................ 93
Paper Tray ........................................................... 2
Parallel ............................................................... 69
Parallel Cable .................................................. 160
Parallel Interface ........................................ 3, 177
Parallel Interface Specifications ..................... 169
PDF File .......................................................... 177
Pin Configuration ............................................. 169
Plain Paper ........................................................ 32
Port .................................................................. 177
Postcards ........................................................... 33
Power Cord Connector ....................................... 3
Power Problems ................................................ 78
Power Saver ...................................................... 66
Power Supply .................................................. 167
Power Switch ...................................................... 3
Print Quality Problems ...................................... 86
Print Queue ..................................................... 177
Print Screen ....................................................... 61
Printable Area ................................................. 167
Printer Clearance Requirements ..................... 155
Printer Control Panel ........................................... 2
Printer Driver .................................................. 177
Printer Parts and Functions ................................. 2
Printer Settings List ........................................... 70
Printing ....................................................... 21
Printing from Computers ..................................... 7
Printing on Side Two of Printed Sheets ............ 56
Printing On Special Media ................................. 46
M
Macintosh ............................................................ 9
Main Specifications ......................................... 166
Maintenance Mode ............................................ 68
Manual Feed Unit ................................................ 2
Manual Tray ................................................. 2, 34
Max. Power Consumption ............................... 167
Menu button ....................................................... 62
Menu List on the Control Panel ...................... 162
Menu Screen .............................................. 61, 63
N
N-up ................................................................. 177
NetWare ............................................................ 73
NetWare File Server ....................................... 176
NetWare® ....................................................... 176
Network ............................................................. 71
Network Path .................................................. 176
Network Printer ............................................... 176
Network-related Problems ................................ 95
NV Memory .................................................... 176
O
Obtaining Product Information ........................ 165
Online button ...................................................... 62
Online help ....................................................... 177
Online LED ....................................................... 60
Online/Offline .................................................. 177
180
Index
Printing Problems .............................................. 79
Protocol .................................................... 73, 177
R
Ream Weight ................................................... 178
Recommended Paper ........................................ 32
Replacing the Drum Cartridge ........................ 135
Replacing the Toner Cartridges ...................... 130
Replacing the Waste Toner Cartridge ............ 141
Report/List ......................................................... 70
Right Cover ......................................................... 2
S
Set/Eject button ................................................. 62
Signal Definition ............................................... 170
SMB ................................................................. 178
SMB TCP/IP ..................................................... 73
SNAP ................................................................ 73
SNMP .............................................................. 178
SNMP IPX ........................................................ 73
SNMP UDP/IP ................................................. 73
Special Cabinet ................................................ 160
Special Media .................................................... 33
Storing Paper ..................................................... 37
Storing the Printer ........................................... 147
Subnet Mask ...................................................... 72
Switching off ........................................................ 6
Switching on ........................................................ 5
Using Online Help ............................................. 10
V
Ventilation Outlet ................................................. 3
W
Waste Toner Cartridge .............................. 4, 161
When the Error LED is Blinking ..................... 109
When the Error LED is Lit ............................. 109
Windows® 95, Windows® 98, Windows NT® .. 7
WWW .............................................................. 178
X
XPL2 Font List .................................................. 70
T
Index
TCP/IP ...................................................... 71, 178
Toner Cartridges ......................................... 4, 161
Top Left Cover .................................................... 3
Top Right Cover .................................................. 2
Transparencies .................................................. 33
Transporting the Printer .................................. 148
Tray 1 ................................................................ 34
Tray Module Connector Cover ........................... 3
Trays 2, 3 ........................................................... 34
Types of Problems ............................................. 76
U
Unsuitable Paper ............................................... 36
181
Customer Response Sheet
DocuPrint C621 User Guide (DE-0826E2)
To improve our publications, we would appreciate your feedback regarding this manual. Please take a few moments
to complete and return this form to us.
z
1.
About Yourself
How often do you use this manual?
[ ] Daily
2.
[ ] Weekly
[ ] Monthly
[ ] Infrequently
When do you usually refer to the manual?
[ ] Doing a usual operation
[ ] Using unfamiliar features
[ ] Solving a problem
3.
Which part of the manual do you read frequently?
Chapter/Section/Page:
4.
Where do you keep this manual?
5.
(Optional)
Your Name:
Occupation:
Company or organisation:
Address:
z
About the Manual
Strongly
agree
Neutral
Strongly
disagree
1.
It is handy.
1
2
3
4
5
2.
It is easy to read.
1
2
3
4
5
3.
Titles of chapters and sections make sense.
1
2
3
4
5
4.
Information is logically placed.
1
2
3
4
5
5.
Referencing is easy.
1
2
3
4
5
6.
Content is easy to understand.
1
2
3
4
5
7.
The step-by-step instructions are easy to follow.
1
2
3
4
5
8.
All necessary information is included.
1
2
3
4
5
9.
Illustrations aid in the understanding of content.
1
2
3
4
5
10.
The use of colour is effective.
1
2
3
4
5
Other comments:
After completing this form, detach and send it to the address below.
(Please use your own envelope and postage stamp.)
Thank you for your cooperation.
Fuji Xerox Co., Ltd.
Document Engineering
KSP R&D 2D7
3-2-1, Sakado, Takatsu-ku
Kawasaki-shi, Kanagawa-ken
JAPAN 213-0012
DocuPrint C621 User Guide
Document Engineering Group
Human Interface & Design Development
Document Products Company
Fuji Xerox Co., Ltd.
DE-0826E2 (Edition 1)
Copyright® 2000 by Fuji Xerox Co., Ltd
Printed in Japan