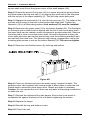
1
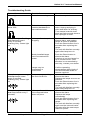
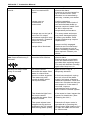
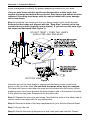
UV Pure Technologies Inc. ULT RAVI O L ET WAT ER PURI F I CAT IO N SYST EM INSTRUCTION MANUAL Hallett 30 1” Systems MODEL: Hallett 30 VOLTAGE: SERIAL #: Hallett 30 1” NSF/ANSI 55 CLASS A CERTIFIED Certified to IEC PUBLICATION 60335 th EDITION 4 Hallett 30 1” Instruction Manual INSTRUCTION MANUAL Copyright UV Pure Technologies Inc. 2014 All rights reserved. No part of this document may be photocopied, reproduced, transmitted, or translated to another language without the prior written consent of UV Pure Technologies Inc. UV Pure®, Hallett®, and Crossfire Technology® are registered trademarks of UV Pure Technologies Inc. Publication Number: X800058P Seven Edition, May 2014 120V versions of the product are certified by Intertek 240V versions of the product meet IEC 60335 Edition 4 and CE NOTICE THANK YOU By purchasing the Hallett UV system with Crossfire Technology, you can now be 100% certain that when you turn on the tap, every drop is microbiologically safe to drink. The Hallett outperforms conventional systems by delivering highly effective UV dosage rates for the inactivation of pathogens, including: viruses bacteria cryptosporidium giardia legionella E. coli Total coliforms The Hallett 30 1” drinking water system is NSF/ANSI Standard 55 Class A certified. For the Hallett units, the EPA Establishment number is 075213-CAN-001 Please read the complete instruction manual before installing or operating the Hallett. Retain these instructions and the purchase receipt for the unit. Released on 1-May-14 – X800058P Page 2 UV Pure Technologies Inc. © 2014 Hallett 30 1” Instruction Manual 1. ABOUT THE HALLETT The Hallett is the world’s only ultraviolet water purification device with patented Crossfire Technology. Patented in US 6,707,048, Canada 2,463,503, Australia 2,002,333,084, Mexico 248805 Patent Pending in Japan, UK, Europe, & Eurasia UV Pure’s Hallett UV systems employ revolutionary Crossfire Technology that is self-cleaning, self-monitoring, and fail-safe. The Hallett® system designed with Crossfire Technology® eliminates the potential risks associated with conventional single lamp UV systems. Committed to exceeding drinking water purification standards, UV Pure’s founder, Ron Hallett, turned conventional technology inside-out by running the water inside the quartz sleeve and including two lamps mounted in air, dual smart sensors, elliptical reflectors and an optional fail-safe solenoid valve. Crossfire Technology is complete UV disinfection: Crossfire Technology incorporates two proprietary high-output UV lamps, with elliptical reflectors, that target pathogens with radiation from 360º, to deactivate pathogens and provide microbiologically safe drinking water. Crossfire Technology is risk-free and fail-safe: Crossfire Technology uses dual smart UV sensors mounted in air, which cannot foul and are more reliable indicators of system performance. The lamps are air-cooled and maintain consistent levels of UV output for maximum pathogen deactivation. Computerized alarms, and an auto shut-off fail-safe valve are on board so you know only safe water can enter your water system. Each system shipped to the North American market is supplied with a Transient Voltage Surge Suppressor (TVSS)/Surge Protective Device (SPD) that has been certified to the UL 1449 standard by an NRTL/C and includes integral Over/Under Voltage shutoff protection. Crossfire Technology is self-cleaning: Crossfire Technology uses a stainless steel wiper to clean the inside of the quartz sleeve eliminating quartz fouling and the need for a water softener making abrasive quartz cleaning a thing of the past – saving money and the environment. The wiper is automated to cycle for 5 minutes every 4 hours. The cycle begins shortly after power is applied. Crossfire Technology is virtually maintenance-free: Crossfire technology utilizes two lamps mounted in air, outside the quartz sleeve so maintaining a Hallett is as easy as changing a light bulb with no system draining required. The UV lamps require replacement after 12 months of operation and notification is given via alarm one month in advance. Crossfire Technology is easy to install: Crossfire technology employs flexible stainless steel hoses with Female Iron Pipe (FIP) connections for quick and simple installation. Released on 1-May-14 – X800058P Page 3 UV Pure Technologies Inc. © 2014 Hallett 30 1” Instruction Manual 1. ABOUT THE HALLETT ................................................................................... 3 2. INSTALLATION INSTRUCTIONS ......................................................................... 5 Before Beginning Installation ................................................................. 5 Water Conditions - Pre-treatment Parameters ........................................ 5 Safety Information................................................................................. 6 Parts Included....................................................................................... 7 Other Materials Needed ........................................................................ 7 Tools Needed ....................................................................................... 8 Location ............................................................................................... 8 Time Required ...................................................................................... 8 Assembling the Unit ............................................................................ 10 Connecting the Pipes .......................................................................... 11 Parallel Installation.............................................................................. 13 Plugging in the Hallett ......................................................................... 13 Flushing Instructions ........................................................................... 14 External Alarm Contacts...................................................................... 14 Cold Air Kit ......................................................................................... 16 3. OPERATING INSTRUCTIONs .......................................................................... 17 Unit Functions..................................................................................... 17 Starting the Unit .................................................................................. 17 Seasonal Use and Shutting Down of Unit............................................. 18 Disinfecting the Plumbing .................................................................... 18 4. M AINTENANCE & TROUBLESHOOTING ............................................................ 20 Troubleshooting Guide ........................................................................ 21 Replacing and Cleaning UV Lamps ..................................................... 23 Draining the Unit ................................................................................. 25 Cleaning the Unit ................................................................................ 25 Determining the Need for Cleaning ...................................................... 25 In-place cleaning................................................................................. 27 Disassembling the Unit........................................................................ 28 Spare Parts List .................................................................................. 29 Cleaning/Removing the Quartz Sleeve ................................................ 30 Reassembling the Unit ........................................................................ 31 Replacement Parts ............................................................................. 33 5. SERVICE RECORD SHEET ............................................................................ 34 6. UV PURE TECHNOLOGIES LIMITED WARRANTY ............................................... 35 7. NSF STATEMENT ....................................................................................... 38 Released on 1-May-14 – X800058P Page 4 UV Pure Technologies Inc. © 2014 Hallett 30 1” Instruction Manual 2. INSTALLATION INSTRUCTIONS Before Beginning Installation Water Conditions - Pre-treatment Parameters Note this section is designed to ensure the optimal performance of your Hallett system. Please review the following pre-treatment parameters prior to installation. If any specifications are of concern or unclear please contact your water dealer or specialist. Note some of the information below is technical in nature and you may want to contact your water treatment specialist to review the parameters. IMPORTANT - Should any of the preceding water parameters exceed the recommended limits, the system will not be serviceable under warranty. Water Parameters for Treating Drinking Water: The minimum water requirements for operating the Hallett system are: UV Transmittance - more than 75 percent transmission of ultraviolet light (if there is color in the water the UV transmittance may fall below 75 and the system will not provide the necessary UV dose for safe drinking water). It is recommended for all surface water applications for the water to be tested for UV transmittance. Total Dissolved solids (TDS) - must be less than or equal to 1000 mg/L (mg/L=ppm) Level of turbidity - or cloudiness - of less than or equal to 1 NTU (nephelometric turbidity unit). A 5 micron sediment filter is recommended upstream of the unit to reduce turbidity (the presence of a filter will also simplify disinfection of plumbing – see Disinfecting the Plumbing). For surface waters, a dual gradient pre-filter (75x25 or 50x5) is recommended in addition to the 5 micron filter. Water Capacity in Drinking Water Application: Hallett 30 The water treatment range for the Hallett 30 is 0–113 liters per minute (or 0–30 U.S. gallons per minute), with a working pressure of 69–690 kPa (or 10–100 psig). The Hallett 30 1” unit includes a flow regulating device that will limit the flow rate. Warning: Do not remove this device or water may flow through the system at a rate that exceeds the certified performance and the system may not provide the necessary UV dose to remove all pathogens. Temperature Requirements: Where the unit is installed, the ambient temperature should be between 7–38°C (45–100°F). If the temperature drops below freezing, drain the unit completely to prevent damage (see Draining Instructions page 26). The water temperature range is 1–38°C (34–100°F). Special Note: Drafts or areas where cold air is blowing on the system can adversely affect the temperature – make sure the Released on 1-May-14 – X800058P Page 5 UV Pure Technologies Inc. © 2014 Hallett 30 1” Instruction Manual system is free from cold air currents). If cold room conditions cannot be avoided, the Cold Air Kit should be installed. Energy Requirements: There are two standard operating voltages for the Hallett unit. The unit may be 120Vac or 220-240 Vac. Please refer to the power input label located near the power cord entry of the unit. See Figure 1B. Record the operating voltage and serial on the front cover of the manual. 120Vac Models Hallett 30 - 173W, 1.5A max. 60Hz 220-240Vac Model Hallett 30 -177W, 1A max. 50/60Hz UV Pure supplies Transient Voltage Surge Protectors (that have been certified to UL1449 standard or equivalent that includes integral Over/Under Voltage shutoff protection) with its Hallett and Upstream models in North America to help protect against damage from power fluctuation. Those models must be plugged into the supplied protectors in North America, and into equivalent protectors outside North America (not supplied with systems in those markets). UV Pure Technologies’ UV water purification system models are designed to operate within normal power grid specifications (voltages and frequencies), worldwide. However power spikes, surges and brownouts are a common occurrence in all countries. When that happens, line voltages may fluctuate outside the systems’ operating specifications. Installation of the supplied TVSS/SPD between the UV system and the power source will increase the ability of the system to survive transient events on the AC power. This will help to ensure uninterrupted water treatment and reduce the risk of costly repairs due to damage from power spikes, surges and brownouts which are NOT COVERED BY UV PURE TECHNOLOGIES’ Limited Warranty. Safety Information GROUNDING This UV unit must be grounded. In the event of a malfunction or breakdown, grounding will reduce the risk of electric shock by providing a path of least resistance for electric current. This unit is equipped with a cord having an appliance-grounding conductor and a grounding plug. The plug must be plugged into an appropriate outlet that is installed and grounded in accordance with all local codes and ordinances. The piping connected to the UV unit must also be properly grounded. Install a grounding lug or strap as required. WARNING - Improper connection of the equipment-grounding conductor can result in a risk of electric shock. Check with a qualified electrician or service representative if you are in doubt whether the unit is properly grounded. Do not modify the plug provided with this unit; if it will not fit the outlet, have a proper outlet installed by a qualified electrician. GROUND-FAULT CIRCUIT-INTERRUPTER To comply with National Electrical Code, NFPA 70, the circuit where the UV Released on 1-May-14 – X800058P Page 6 UV Pure Technologies Inc. © 2014 Hallett 30 1” Instruction Manual unit(s) is connected must be protected by a ground-fault circuit-interrupter (GFCI). UV Pure recommends the use of Hubbell GFICs WARNING: Potential Shock Hazard Use only a grounded electrical outlet when connecting the unit to a power source. If an extension cord is necessary, the cord should contain a ground and be rated for the same amperage as the unit or combined units. Do not plug in unit if water is present on the unit. WARNING: Ultraviolet Light Hazard. The lamps in the unit emit ultraviolet (UV) light that can cause permanent damage to the skin & eyes. Never look at the lamp when it is operating. Do not plug the unit in unless it is properly secured to a wall (see Installation Instructions) and all the covers are installed. Do not remove any cover unless the unit has been unplugged. Never look into the unit or place any exposed skin into the illuminated areas when it is operating. Do not operate a unit that has been damaged or missing any components or safety devices. UV The Hallett unit is not intended for use by young children or infirm persons without supervision. Young children should be supervised to ensure that they do not play with the Hallett unit. Parts Included Hallett UV system complete with integral wall brackets (1) Ultraviolet lamps (2) – installed within the unit Instruction manual (1) Power cord (1) (located within packaging) Stainless flexible hoses (2) per system, for bottom inlet & top outlet External alarm contact for remote monitoring. Transient Voltage Surge Suppressor (TVSS)/Surge Protective Device (SPD) for North American markets (120Vac systems) Pipe wrap insulation for top hose Cold Air Kit complete with installation instructions for Hallett 30 units (If not immediately used, keep in a safe place. Do not discard these items) Optional – Automatic shutoff solenoid valve Pre-treatment sediment and or carbon filter to remove water particles, odour or trace chemicals for improved taste. Other Materials Needed The Hallett requires 1” male NPT fittings for the hose connections and also the solenoid valve. These fittings and any piping compatible with the plumbing should be on hand before you begin installation. See Figure 1B and make a list of all necessary components including solder, paste and thread sealant. Bypass piping and valves that isolate the unit are optional, as is a drain valve for draining the unit. Released on 1-May-14 – X800058P Page 7 UV Pure Technologies Inc. © 2014 Hallett 30 1” Instruction Manual Pipe insulation is provided to wrap around the top hose coming out from the unit. Any other piping overhead must also be wrapped to prevent condensation from dripping back onto the unit. Note: Teflon tape and thread sealant are not required to connect the Stainless flexible hoses to the Hallett or to the plumbing system – the FIP connectors mate with male NPT (National Pipe-Taper) fittings. The rubber washer in each end of the hose provides the seal. Ensure that the washer is in place before making the connection. Tools Needed pipe cutter, torch and other typical plumbing tools for modifying piping Wrench for tightening hose connections Phillips screwdriver Slotted screwdriver Do not operate a unit that has been damaged or that is missing any components. If a part is missing from your Hallett, contact your dealer. The installation of the Hallett (see Figures 1A through 1E) should be done in compliance with all applicable federal, state/provincial, and local regulations. We recommend that the unit be installed by a qualified service technician. Failure to install the system properly may result in property damage (leaks/flooding) or personal injury (electrical shock). Location The unit must be positioned vertically on a wall (the performance of the system will be adversely affected if mounted horizontally) with the following clearances: Hallett 30 (See Figure 1A and 1D) 21" (53 cm) above the unit for lamp replacement 12" (30 cm) minimum below the unit for service access 7" (18 cm) on each side of the unit for service access The Hallett is intended only for indoor use in a dry location. The unit should not be installed in any drafty areas (that could affect the temperature requirements see pre-treatment requirements page 6). Should these minimum installation recommendations not be met, the system will not operate effectively. The Hallett should be installed downstream of any pre-treatment devices such as filters, water softeners etc and also any pressure tanks. However, it must be installed upstream of any branches in the piping so that all the water is disinfected before splitting and distributing throughout the home or facility. The Hallett unit must be upstream of any chlorine injection system. Warning: If connection is made to a potable water system, the system shall be protected against backflow. Time Required Please note that full installation of the Hallett requires shutting off the main water Released on 1-May-14 – X800058P Page 8 UV Pure Technologies Inc. © 2014 Hallett 30 1” Instruction Manual supply for a number of hours. If disinfection is necessary, all pipes must be treated and flushed. Once the unit is plugged in, the new UV lamps may take from a few moments to several hours to reach full power. Having a Lamp Alarm is normal with a new system (or with newly installed lamps) until the lamps have reached full power. Hallett 30 -1" 1" [21.6cm] 82 WALL 9" [22.9cm] 7" [17.8cm] MIN. LEAVE THIS AREA CLEAR OF PIPES FOR LAMP REPLACEMENT 7" [17.8cm] MIN. TOP VIEW 21" [53.3cm] REQUIRED CLEARANCE FOR LAMP REPLACEMENT 1" [19.1cm] 72 WATER OUT 1" FIP FLEXIBLE TUBING WALL BRACKET 3121" [80.0cm] 213 8" [54.3cm] WALL BRACKET FLEXIBLE TUBING 12" [30.5cm] WATER IN 1" FIP RECOMMENDED CLEARANCE FRONT VIEW Figure 1A Released on 1-May-14 – X800058P Page 9 UV Pure Technologies Inc. © 2014 Hallett 30 1” Instruction Manual Assembling the Unit TYPICAL INSTALLATION FLEXIBLE TUBING COPPER TUBING OR EQUIVALENT OR HIGH TEMP. PLASTIC SUCH AS PEX. DO NOT USE PVC. PIPE INSULATION (MUST BE INSTALLED) PURGE VALVE OPTION GFCI 120VAC 50/60 OR 220-240VAC 50/60 Hz PLUG FOR VALVE (DO NOT CONNECT ANY OTHER DEVICE IN THIS RECEPTACLE) TO DRAIN FLEXIBLE TUBING SECURE CABLE TO WALL PRESSURE TANK SUPPLIED FOR NORTH AMERICAN MARKETS ONLY POWER CORD ENTRY (LOCATION OF FUSE) OPTIONAL SOLENOID VALVE (TEST VALVE MONTHLY) FROM WATER SOURCE TRANSIENT VOLTAGE SUPPRESSOR OPTIONAL BYPASS VALVES TO DISTRIBUTION PIPING DEVICES OPTIONAL DRAIN VALVE OPTIONAL BYPASS PIPING & DRAIN VALVE LEVER FOR OVERRIDE FOR NON REGULATED SITES ONLY VALVE CONNECTOR SOLENOID VALVE (ACTS AS A CHECK VALVE) POWER INPUT LABEL & UNIT SERIAL NUMBER POWER CORD ENTRY 5x20mm FUSE & SPARE FLO W AUTOMATIC POSITION FLO W MANUAL POSITION (FORCE OPEN) FUSE DRAWER Figure 1B Step 1: Unpack the unit, being careful to remove all packaging material. Remove the elastic band stretched around the top of the lamps in the unit. Inspect the unit for damage particularly the quartz sleeve – See Figure 4A for disassembly. Tighten any loose fasteners (#16 in Figure 4B) Step 2: Connect the Stainless flexible hoses to both the top and bottom of the Hallett. Remove the top and bottom covers of the unit to make the connection more accessible. Make sure that the sealing washer is inside the hose end before making the connection. Tighten securely. Released on 1-May-14 – X800058P Page 10 UV Pure Technologies Inc. © 2014 Hallett 30 1” Instruction Manual TIGHTEN HOSE AS SHOWN PROTECT AREA FROM WATER, DIRT, OR SOLDER ETC. Figure 1C Step 3: Two wall brackets, with two 1/4" slotted holes each are provided on the unit. The unit should be secured vertically to a solid wall large enough to cover the complete backside of the unit – See Figure 1D. Install the top two fasteners (not provided) into the wall, and slide the unit onto them using the slotted holes in the upper brackets. Then install the bottom two fasteners. Do not install the unit horizontally. Leave clearance over the unit for lamp removal. Connecting the Pipes We recommend that a qualified plumber or certified technician perform the water connections for your Hallett. Water must flow into the inlet at the bottom of the unit. The outlet is located at the top of the unit. Install the valve upstream of the unit. Step 1: Shut off the water supply. Caution: Always turn off the water supply before modifying or disconnecting any piping. Always open a faucet after shutting off the water supply to relieve water pressure and ensure that the water has been completely shut off. Step 2: If you have decided to install an optional bypass line and drain, you may begin to install these fittings at this point. See Figure 1B for more information on how to connect optional bypass piping and drain. Step 3: Connect the solenoid valve to the plumbing just upstream of the unit (before the unit). Note the solenoid valve ensures that should the system fail, due to power loss, color in the water or low UV lamp output, the system will fail in safe mode and shut down the flow of water to your tap. The direction of flow through the valve is important – verify flow direction with label on the valve. Caution: over tightening a metal fitting into the valve will cause it to crack. Released on 1-May-14 – X800058P Page 11 UV Pure Technologies Inc. © 2014 Hallett 30 1” Instruction Manual Do not over tighten. Keep the coil of the valve pointing upward (to prevent water from dripping on it). Water will not flow backwards through the valve. MOUNT UNIT FLAT AGAINST PLYWOOD ON A WALL WOOD TO RISE ABOVE UNIT OR INCORRECT MOUNTING CORRECT MOUNTING WOOD TO FALL BELOW UNIT Figure 1D Step 4: Connect the solenoid valve to the Stainless flexible hose attached to the bottom of the Hallett. Do not bend the hose excessively. Make sure the sealing washer is inside the end of the hose before making the connection. The solenoid valve plugs into a polarized plug at the bottom of the front cover near the power cord. The valve is a non-serviceable component and nothing else should be plugged into this port. Secure the cable from the valve to the wall. The solenoid valve is normally closed and must be powered to open. The valve has a manual override (white lever) that can be used to force the valve open should you require water for service/emergency purposes (note in the event of alarm and shut down it is recommended you boil your water). In any regulated sites such as municipal applications, the manual override should not be used. For normal operation, always leave valve in automatic position. Test the valve monthly to confirm valve opens and closes. Unplug valve from unit to confirm water stops flowing. Caution: Do not allow solder or solder flux to fall in or on the unit. Step 5: Connect the remaining piping to the top Stainless flexible hose at the top of the unit. Do not use PVC pipe or braided hose at the outlet – during periods of no flow, water temperatures may exceed softening point of PVC. Metal pipe or high temperature plastic pipe such as PEX, should be used after the flexible hose. Make sure the sealing washer is inside the end of the hose before making the connection. Do not bend the flexible hose excessively. Tighten securely. Released on 1-May-14 – X800058P Page 12 UV Pure Technologies Inc. © 2014 Hallett 30 1” Instruction Manual Step 6: Caution: do not allow the inside of the unit to get wet. Before opening the water supply, double check all connections and cover the top of the unit with a rag or some plastic to prevent water entry. Close any faucets you opened in Step 1 and then slowly turn on the water supply to check for leaks. If leaks exist, investigate the cause and repair. Caution: Do not connect the unit to electrical power until the piping and unit are free of water leaks. The solenoid valve can be placed into manual mode to allow water to enter the unit. Switch back to automatic mode when done. Step 7: Once the system is checked for leaks under full system pressure, install pipe insulation on the outlet hose and piping to prevent condensation from falling onto or into the unit. In extended periods of no flow conditions, water temperatures will rise which may lead to the precipitation of minerals and/or decreases in water quality. To avoid this, the installation of a purge valve assembly (p/n X500000) is recommended. Contact your water treatment professional for consultation. Parallel Installation When more than one unit is installed in parallel (flow split between units), the units must be installed with manual shutoff valves both upstream and downstream of each unit. This allows one unit to be serviced without interrupting the flow to the other units. Another requirement is the installation of a check valve downstream of the unit (after the unit). This will prevent the backflow of water to a unit. See Figure 1E. Plugging in the Hallett Step 1: Ensure that the covers on the unit have been installed and the unit is securely fastened to the wall. (Note: You should not remove any cover unless the unit has been unplugged). Step 2: Plug the female end of the power cord into the power entry module located on the underside of the front panel. Note that the power entry module contains the only fuse for the unit, which can be accessed by pulling out the sliding fuse drawer. The power cord must be removed before changing the fuse. See Figure 1B Connect the male end of the system’s power cord into the Transient Voltage Surge Suppressor, and connect the Transient Voltage Surge Suppressor to a GFCI (live and neutral wires must be correctly wired within receptacle). Important: after the unit has been operating for a few hours, unplug the unit and check all hose connections for leaks (the top hose in particular). Repeat this procedure periodically. Proceed to system operation for further instruction to ensure optimal performance. Released on 1-May-14 – X800058P Page 13 UV Pure Technologies Inc. © 2014 Hallett 30 1” Instruction Manual TYPICAL INSTALLATION OF PARALLEL UNITS MANUAL SHUTOFF VALVE - ESSENTIAL CHECK VALVE ESSENTIAL PURGE VALVE OPTION (2 PLACES) Min. 12" [30cm] GROUNDED OUTLET 120VAC/60 Hz TO DRAIN SOLENOID VALVE OPTIONAL DRAIN MANUAL SHUTOFF VALVE - ESSENTIAL 5 MICRON FILTER 20" "BIG BLUE" (OPTIONAL) Figure 1E Flushing Instructions Flushing the system is required after installation or after any disassembly and cleaning. Flushing may also be required to remove colored water from the unit. Most filters (if installed) also require flushing prior to use – follow the manufacturer’s recommendations. The system may be flushed in two ways. It can be done manually by disassembling the unit and filling and draining the unit by hand (see Cleaning the Unit). Flushing may also be done while the unit is operating. Plug in the unit and open a faucet closest to the unit and run the water for a minimum of 5 minutes. External Alarm Contacts The Hallett system provides an external “dry” contact for remote alarms or autodialers – the word “dry” indicates no voltage present at the contact. It can be wired normally open or normally closed. The contact is referred to as a “System Run” condition. The status of the contact changes when the Hallett unit changes Released on 1-May-14 – X800058P Page 14 UV Pure Technologies Inc. © 2014 Hallett 30 1” Instruction Manual from a normal to alarm condition. The contact is meant for control purposes only, not to drive devices. The maximum rating of the contact is 1A at 24Vdc Max.. A suppressor or MOV is recommended to be placed across the leads in DC applications. There is a knockout provided at the base of the front cover for cable entry. See Figure 1F. Ensure alarm contact wires stay clear from multicolor ballast output wires when routing them within unit. Caution: Unplug the unit before gaining access to do any wiring. TYPICAL HALLETT UNIT CAUTION - HANDLE CAREFULLY TO NOT DAMAGE GREEN RIBBON CABLE GRIP CONNECTOR TO REMOVE UV SENSOR ARRAY DISPLAY RIBBON CABLE CIRCUIT BOARD WITHIN UNIT DRY CONTACT TERMINALS RATED AT 1A/24VDC MAX. ELECTRONIC BALLAST FRONT COVER KNOCKOUT LOCATED HERE FUSE WITHIN POWER ENTRY MODULE SEE FIGURE 1B Figure 1F The front cover must be removed to gain access to external alarm contacts. This is accomplished by removing the screw that secures the top cover. Remove the top cover. Gently remove the front cover and hold it a couple of inches off from the body of the unit. You must disconnect a thin ribbon cable that powers the display lights – be careful not to damage it. Reach in and disconnect the ribbon cable from the circuit board by grabbing the end black connector (never pull on the green cable itself). The front cover will then come free. Proceed with inspection or repair of unit as required. Released on 1-May-14 – X800058P Page 15 UV Pure Technologies Inc. © 2014 Hallett 30 1” Instruction Manual When complete, replace the front cover by first reconnecting the 6-pin ribbon cable to the port marked ‘DISPLAY’ (ensure the black connector is aligned properly and do not miss any pins). Place the front cover in its rest position. Replace the top cover and screw it down Cold Air Kit If cold room conditions cannot be avoided, the Cold Air Kit should be installed. The kit also helps when water temperatures are very low. The kit consists of two cover plates, two lamp insulators and two pieces of foil insulation. The cover plates are to be placed on the top aluminum plate to cover the convection holes. The foil insulation is placed between the lamp base and bottom endcap. The lamp insulators are to be wrapped around the bottom of the lamps just below the bottom aluminum plate. See Figure 1G. If during the summer months the room temperature exceeds 20°C (68°F), the Cold Air Kit may be removed and then reinstalled for winter months only. TOP VIEW OF UNIT COVER PLATE FOIL INSULATION - INSTALL BETWEEN LAMP & BTM ENDCAP. LIFT LAMP TO INSTALL. LAMP INSULATOR BOTTOM VIEW OF UNIT Figure 1G Released on 1-May-14 – X800058P Page 16 UV Pure Technologies Inc. © 2014 Hallett 30 1” Instruction Manual 3. OPERATING INSTRUCTIONS The Hallett applies advanced Crossfire Technology, yet is simple to operate. With automatic quartz cleaning, periodic shutdowns are not necessary to inspect the cleanliness of the quartz. The only required maintenance is the replacement of the two UV lamps every 12 months (note - if you shut your system down for seasonal use - the lamp life will be extended) Unit Functions GREEN LIGHT UNIT TREATING FAUCET AND GLASS RED LIGHT LAMP FAULT LAMP RED LIGHT WATER QUALITY FAULT WATER NOT CLEAN RESET BUTTON RESET LAMP TIMER HOURGLASS Display Pad p/n E100016 Figure 2 There are three indicating lights and a pushbutton on the front panel. See Figure 2. At the top beside the FAUCET AND GLASS graphic is a green light that, when illuminated, indicates the unit is safe or treating normally. In the middle beside the LAMP graphic is a red light that, when illuminated, indicates a lamp fault. Near the bottom beside the WATER NOT CLEAN graphic is a red light that, when illuminated, indicates a water quality fault. At the very bottom under the "Hourglass" graphic is a reset button that you will use after replacing lamps (see Lamp Replacement section for more detail.) Pressing the button also silences the audible alarm for 24 hours. Although the audible alarm is off, the red light for the specific alarm will remain illuminated and the solenoid valve will remain closed. Unplugging and plugging in the unit will re-enable the audible alarm. See Troubleshooting Guide for description of faults. Starting the Unit Caution: Avoid continuously starting and stopping the unit within a 24 hr period, as this will accelerate the aging of the UV lamps (note: however shutting down the system for seasonal use will extend lamp life). Caution: Do not operate unit dry. There must be water in the treatment chamber to prevent damage to internal components. In the event of a lack of Released on 1-May-14 – X800058P Page 17 UV Pure Technologies Inc. © 2014 Hallett 30 1” Instruction Manual water, unplug the unit until the water supply can be restored. In the event of a power failure, the unit will shut down and the solenoid valve will close, preventing water from flowing. When the power returns, the unit will automatically restart and perform a self-test. If no faults are detected, the unit will return to normal operation and the solenoid valve will open. Note that even during a brownout, the supply voltage may drop low enough to cause the unit to shut down. If the unit does not automatically restart as described above, unplug the unit and plug it in again. Step 1: Plug the unit into the Transient Voltage Surge Suppressor. Connect the surge protector to a GFCI. Flip the switch on the Transient Voltage Surge Suppressor to ON position to start the lamps. Caution: Never look into or place any exposed skin into the illuminated areas when the unit is operating. Step 2: Once the unit is plugged in, all three lights will illuminate and an audible alarm will sound. This verifies that the lights and the alarm are functioning. The unit then performs a self-test. During this test, the alarm continues to beep and the solenoid valve remains closed. The green light illuminates when the UV lamps have reached full power and there are no system faults. New lamps may take from a few moments to several hours to reach full power. Continue to run the unit until the lamps reach full power. The optional solenoid valve will then open and allow water to flow through the unit. This is the normal operating mode of the unit. If the unit fails to start, unplug the unit and plug it in again. Avoid continuously starting and stopping the unit within a 24 hr period, as this will accelerate the aging of the UV lamps. The self-cleaning feature of the Hallett system involves a wiper turning inside the quartz sleeve. The wiper operates either upon power up of the unit or shortly afterwards and then periodically afterwards. Pushing the Reset button for 1 second will also cause the wiper to operate for several minutes. Seasonal Use and Shutting Down of Unit Unplug the unit during extended periods of no water usage (four days or more), as in the case of seasonal residences or during a vacation. If the possibility of freezing exists, the unit and any filters must be drained. (See Draining the Unit.) Upon returning, reconnect all fittings, close all valves and turn on water supply. Plug in the Hallett and when operational, flush the water through the unit for at least 5 minutes. Caution: When the unit is not operating, the solenoid valve remains closed. If the solenoid valve is forced open or if the optional bypass piping is used, untreated water may enter the plumbing system. Emergency use of untreated water is the only situation where the bypass piping should be used. Any water used for drinking should be boiled. Unplug the unit if the bypass is used. Do not run the unit dry. This will cause potential damage and scratching of the quartz sleeve. Disinfecting the Plumbing Disinfection of the household or facility plumbing should be performed after the Hallett has been installed and is operating. This procedure should also be done if Released on 1-May-14 – X800058P Page 18 UV Pure Technologies Inc. © 2014 Hallett 30 1” Instruction Manual the unit is not functioning normally, if the bypass has been used, or if there has been a high background bacteria count in a water sample. Disinfecting the plumbing will ensure that any potential bacteria or contaminants in the distribution system are treated prior to system use. Please note that this procedure is ineffective against protozoa that can be found in surface water or shallow wells under the influence of surface water. Under these circumstances, it is important to perform the disinfecting procedure and then operate the Hallett in combination with a device for cyst reduction, approved under the appropriate NSF/ANSI standard and installed upstream of the unit. This procedure does not work with sediments or heavy biofilm and encrustations, which must be removed mechanically. The accepted practice for sanitizing the household or facility plumbing involves adding 50 ppm chlorine from bleach for 12 hours and then flushing. This can be achieved by doing the following: Step 1: Turn off the unit by unplugging it. Step 2: Shut off the water supply and relieve the water pressure by opening a faucet. Step 3: Remove the filter from its housing and fill the housing with bleach. Step 4: Re-mount the housing (but not the filter) and plug in the Hallett to turn it on. Step 5: Once the Hallett is operating, turn on the water supply and run water to all faucets (hot and cold), toilets, the washing machine and other water-using appliances – the bleach must fill every inch of plumbing. The Water Quality light may come on after the introduction of bleach. If this occurs, use the manual override on the solenoid valve to keep valve open during procedure. Return override to auto position afterward. Step 6: When you detect the odor of chlorine at each spot, stop running the water and let the bleach remain in the lines for at least 12 hours – turn off the Hallett unit. Step 7: After the waiting period is over, plug in the unit. Once stable, flush every line for at least five minutes or until the odor of chlorine is gone. See local regulations for proper disposal of chlorine residual, especially in the case of discharge into a septic system. Step 8: Now that the disinfection procedure is complete you will need to return the filter to its housing. Shut off the water supply, relieve water pressure by opening a faucet, and return the filter to the housing. Allow a few days after a disinfection procedure before getting a sample since residual chlorine may affect the results. Have the water tested by a local recognized testing agency prior to any water Released on 1-May-14 – X800058P Page 19 UV Pure Technologies Inc. © 2014 Hallett 30 1” Instruction Manual consumption. UV Pure partners with water testing organizations in select locations throughout North America. Contact UV Pure for potential water testing partners: 1-888-407-9997. The testing should be performed on a regular basis as required by local regulations. Caution: Do not allow corrosive chemicals to remain in the unit for more than 12 hours – Do not operate unit during this time period as heating the water will increase corrosive nature of chemicals. 4. M AINTENANCE & TROUBLESHOOTING The Hallett will run unattended until a fault arises. If a fault does occur, the solenoid valve will close, preventing water from flowing. The green light will go out, one of the red lights will illuminate, and the alarm will beep. The alarm contact will change status. The fault must be corrected to return the unit to normal operation and have the water flow again. In addition to system faults, there are system warnings. System warnings do not close the solenoid valve. A warning allows the problem to be addressed before the solenoid valve closes. If the warnings are left unattended, a system fault will occur. The alarm will sound when a warning arises, but it can be silenced for 24 hours by pushing and holding the Reset button for one second. The “Lamp” red light will flash during a warning. The disinfection of water will occur as long as the unit is properly maintained in accordance with the instructions set out in this manual. Operating a malfunctioning unit or defeating any system sensors may jeopardize the safety of the water. If any system failure occurs and water enters the plumbing system without being disinfected, if the valve has been placed into manual mode, or if the optional bypass is used, any water used for drinking should be boiled. Under these circumstances, the water supply should be disinfected after returning the unit to normal operation. If water should fall on the unit, unplug the unit and repair leak (or add pipe insulation to prevent condensation runoff). Dry up all remaining water and inspect lamps and lamp sockets for water spots and clean if necessary– see section on Replacing and Cleaning UV Lamps. Inspect reflectors for water damage. The reflectors are the shiny elliptical panels surrounding the lamps. The reflectors may be wiped with a clean soft cloth. If the panels do not come clean or are damaged, they must be replaced. In the event of an alarm, a physical inspection of the unit with the power off should be done to try to identify a cause. A trouble shooting guide is provided to assist you. If one or both UV lamps exhibit significant discoloration at their ends, this implies the lamps and ballast have expired. Both lamps and ballast must be replaced. Operating new lamps with an expired ballast will cause damage to the new lamps. If the lamps operate for a short while then go out, examine the filaments (electrodes). If the filaments are very black (and there is no discoloration on the bulbs), then only lamp replacement is required. Released on 1-May-14 – X800058P Page 20 UV Pure Technologies Inc. © 2014 Hallett 30 1” Instruction Manual Troubleshooting Guide System Status Green light on Possible Cause Unit safe or treating. Corrective Action No action required. Green light on but no water flow. Solenoid valve may be installed backwards or has malfunctioned Check direction of flow on the valve. Unplug and plug in valve and listen for clicking. Turn manual override lever back and forth several times to see if plunger is stuck. "Lamp" red light flashing and one beep heard every 5 seconds. Warning Only. Green light on. UV output from lamps is dropping. Push the Reset button to silence alarm, and replace lamps as soon as possible. Push the Reset button for six seconds after replacing the lamps. The unit will disinfect normally again after lamp burn-in. Newly installed lamps have not reached full power. Push the Reset button to silence the alarm. Continue to run the lamps for up to several hours. If the situation is not remedied by next day, contact your dealer. Lamps may be overheated or overcooled. Confirm operating temperatures within limits of unit and eliminate drafts or heat as required. Push the Reset button to silence the alarm. Replace the lamps as soon as possible. Push the Reset button for six seconds after replacing the lamps. The unit will disinfect normally again after lamp burn-in. Push the Reset button to silence the alarm. Replace the lamps immediately. Push the Reset button for six seconds after replacing the lamps. The unit will disinfect normally again and the solenoid valve will open after the new lamps reach full power. "Lamp" red light flashing and two beeps heard every 5 seconds. Warning Only. Green light on. Lamps are approaching the end of their life. "Lamp" red light on and one beep heard every 5 seconds. UV output from old lamps have dropped below alarm set point. Released on 1-May-14 – X800058P Page 21 UV Pure Technologies Inc. © 2014 Hallett 30 1” Instruction Manual cont’d... Newly installed lamps have not reached full power. Push the Reset button to silence the alarm. Continue to run the lamps for up to several hours. If the situation is not remedied by next day, contact your dealer. Lamps may be overheated or overcooled. Confirm operating temperatures within limits of unit and eliminate drafts or heat as required. Install Cold Air Kit to improve low temperature performance. If lamps are not old yet & have low UV output, premature expiration may have occurred. Examine lamps for unusual discoloration. Too many starts and stops may have damaged lamps. Contact your dealer. Both lamps & ballast may require replacement. Lamps fail to illuminate. "Lamp" red light on and two beeps heard every 5 seconds. The UV lamps have exceeded their lifetime. "Water Quality" red light on and one beep heard every 5 seconds The ultraviolet light from the lamps cannot penetrate the water if the water is colored from tannins or other organics. The water may also contain bubbles which can trip the alarm. Lamps not fully engaged. Remove and re-insert them. Allow the lamps to cool off before restarting. Ballast may have expired. Contact your dealer. Push the Reset button to silence alarm. Replace lamps immediately. Push the Reset button for 6 seconds after replacing lamps. The unit will disinfect normally again after lamp burn-in. Unplug the unit and plug it in again to see if only a temporary situation. If fault has remained, unplug the unit, shut off the water supply, and open a faucet to relieve the pressure. Drain the water into a bucket so that you can inspect it. If the water is not clear, improve pretreatment with a carbon filter or tannin removal system. The ultraviolet light from the lamps cannot penetrate the water if the quartz is fouled. If the water is clear, inspect the quartz for cleanliness. (See Cleaning the Unit.) The quartz wipers have stopped turning and are shadowing the UV sensor determining water quality. Determine if wiper motor is operational by pressing the Reset button and listening for it or mark the shaft and run unit for 30 seconds. Released on 1-May-14 – X800058P Page 22 UV Pure Technologies Inc. © 2014 Hallett 30 1” Instruction Manual No lights on front display or beeping heard. The unit is not powered. Plug in unit. Check if wall receptacle has power. Blown fuse. Ground fault Interrupter (GFI) tripping. Check fuse and replace if necessary. Before plugging in unit, check for water leaks or discoloured lamps. A failed ballast, wiper motor, or solenoid valve may also cause fuse to blow or GFI to trip. Replacing and Cleaning UV Lamps The Hallett contains two ultraviolet (UV) lamps that emit high-intensity UV light in the germicidal range, providing effective disinfection of the water flowing through the unit. The lamps in your unit will decay over time and should be replaced every 12 months for optimum performance. Your unit has an internal timer to keep track of the lifetime of the lamps. It will issue a warning when the end of their lifetime approaches (see Troubleshooting Guide). The lamps can be replaced in a few minutes. Draining the unit is not required. See Figure 3. Caution: The lamps in the unit emit ultraviolet (UV) light that can cause permanent damage to the skin and eyes. Never look at a lamp when it is operating. Always unplug the unit before replacing lamps. Caution: Never touch the bulb of a lamp with your fingers. Handle the lamp by its ends only. If the surface of the lamp becomes dusty or dirty, use a clean lint-free cloth and some rubbing alcohol to remove the dirt. For more difficult stains such as water spots, use a scale remover to remove the stain and then rubbing alcohol afterwards. The lamps are fragile and must be handled with care. Tools Needed Slotted screwdriver Phillips screwdriver Step 1: Always unplug the unit before attempting to install or replace the lamps. This will close the solenoid valve and temporarily shut off the water supply. Caution: The lamps heat up after continuous use and can burn your skin if touched. Allow lamps to cool for five minutes before removing them. Step 2: Remove the top cover and bottom covers by removing the screws. Step 3: Slowly lift the old lamps out of the unit. Do not twist the lamps when they are installed. For assistance in this task, use a flat screwdriver and pry the lamps between their base and the socket to disengage the pins (see Figure 3). Dispose of the old lamps in the same way as you would dispose of ordinary fluorescent tubes. Note that old lamps should be disposed of at a household waste management depot or transfer station; contact your local recycling and Released on 1-May-14 – X800058P Page 23 UV Pure Technologies Inc. © 2014 Hallett 30 1” Instruction Manual waste management authority for proper disposal procedures in your area. If one or both lamps exhibit significant discoloration at their ends, this implies the lamps and ballast have expired. Both lamps and ballast must be replaced. Operating new lamps with an expired ballast will cause damage to the new lamps. Step 4: Install the new lamps into the unit, being careful not to touch the bulb. Ensure that the lamps are aligned with the “Stop Sign” printed on the top ceramic facing inward (towards quartz sleeve). If you can see the stop sign, the lamps are backward (See Figure 3). DO NOT TWIST / TURN THE LAMPS WHILE PINS ARE ENGAGED UV www.uvp ure.com FACES OUT FACES IN BOTTOM VIEW Figure 3 Once the pins of the lamp begin to engage into the lamp socket, push firmly down on the top of the lamp. Do not twist the lamps when they are inserted. The lamp will come to rest when the pins are fully seated into the socket. When pressing down, be sure to position the lamp ceramic end in the centre of the hole in the aluminum top plate. Repeat this for the other side. Step 5: Replace the top cover and screw. Note that the slots on the either side of the top cover must align with the top wall bracket. Step 6: Record the date of the lamp replacement in your Service Record Sheet. Step 7: Plug in the unit. Step 8: Wait for the start-up sequence to end, then push and hold the "Reset" Released on 1-May-14 – X800058P Page 24 UV Pure Technologies Inc. © 2014 Hallett 30 1” Instruction Manual button for six seconds to reset the internal timer – the audible alarm will beep indicating reset acknowledged. New lamps may take from a few moments to several hours to reach full power. Continue to run the unit until the lamps reach full power. The solenoid valve will remain closed until the lamps have reached full power. Draining the Unit The Hallett does not normally require draining for routine operation or lamp replacement. Draining is necessary to disassemble the system, to protect against freezing, or to remove poor-quality water. Step 1: Shut off the water supply. Step 2: Unplug the unit. Step 3: Place a bucket under the unit to collect the water. Step 4: Open a faucet downstream of the unit. Step 5: If you have installed the optional drain valve, open the drain valve. If you do not have an optional drain valve, disconnect the Stainless flexible hose below the unit and allow the system to drain for a few minutes. Step 6: When draining is complete, close the drain valve or reconnect the flexible hose. Step 7: Close any faucets that were previously opened. Cleaning the Unit The Hallett has automatic quartz cleaning and does not normally require disassembly and cleaning of the quartz - the quartz will remain clear and transparent as glass. If a component of the cleaning device fails, such as the wiper motor, or in extreme water cases the quartz may become fouled and require manual cleaning. In this situation the "Water Quality" alarm will arise and alert you to the unsatisfactory conditions. Follow the steps below to inspect the quartz and disassemble the unit for quartz cleaning. Caution: Always unplug the unit before performing any maintenance. Never operate a unit unless all the covers are installed. Tools Needed slotted screwdriver Philips screwdriver 3/16" Hex wrench Determining the Need for Cleaning Step 1: Unplug the unit. Released on 1-May-14 – X800058P Page 25 UV Pure Technologies Inc. © 2014 Hallett 30 1” Instruction Manual Step 2: Loosen the screws and remove the top and bottom covers. Step 3: Remove the lamps (see Replacing UV Lamps). Keep the lamps in a safe place. LOOSEN SCREWS HALLETT 30 Figure 4A Step 4: Remove the side cover panels by loosening the two screws on the top fold. On the newer Hallett 30s, the reflectors are held in place by a U-clip and pins. First remove the U-clip from both sides, the remove the back reflector by gently pushing the tab out from the alignment pins. To remove the front reflector, the UV sensor can be removed. If the left lamp is removed, the front reflector can be manipulated out leaving UV sensor in place. Step 5: Examine the quartz sleeve both inside and out. If it is clean, no disassembly is required. Replace the reflectors &/or side panels, lamps and covers. Plug in the unit and operate as normal. If the quartz sleeve is dirty on the outside, proceed to wipe it down with a clean lint-free cloth and rubbing alcohol to remove the dirt. If the quartz sleeve is dirty on the inside, proceed with in-place cleaning or disassembly. Released on 1-May-14 – X800058P Page 26 UV Pure Technologies Inc. © 2014 Hallett 30 1” Instruction Manual Caution: The quartz sleeve can break or chip if mishandled. Always handle it with care and keep it in a safe place if it is removed from the unit. Do not strike the quartz sleeve with any tool, since even the smallest chip can cause it to break under pressure. In-place cleaning Note that numbers in parentheses refer to Figure 4B. This procedure will clean the quartz without its removal from the unit. This is a quick and easy procedure that works well in most cases. Step 1: Fill a bucket or container with water before shutting off the water supply since you will need the water later to clean the quartz sleeve (4). A squeeze bottle is useful for applying water or cleaning solution to the inside of the quartz sleeve. Step 2: Open the unit and remove the lamps and reflectors (see Determining the Need for Cleaning). Step 3: Place another bucket under the unit and drain the unit until there is about 1” (3cm) of water left in the quartz sleeve (see Draining the Unit). Step 4: Disconnect the top hose from the plumbing side (not the unit side but other end). Step 5: Add about 2 oz. (60cc) of cleaning solution to the top hose. The cleaning solution can be a citric acid, vinegar or other non-hazardous solutions. Any solution used should be thoroughly rinsed out afterwards. Fill the rest of the quartz with water. Step 6: Let the cleaning solution remain in the quartz for at least 10-20 minutes. Step 7: Manually turning the wiper may greatly assist the cleaning process. To do this, remove the motor assembly (see Step 7 in the Disassembling the Unit section) and turn the wiper shaft with a flat-bladed screwdriver (counterclockwise while looking at the shaft). Step 8: Drain the unit and inspect the quartz sleeve. If clean, flush the unit with clean water. If fouling remains, repeat procedure. Step 9: Once the unit is clean, reassemble the unit including the motor and top hose connection. Step 10: Slowly open the water supply and check for leaks. Step 11: Replace all covers and plug in the Hallett unit. Released on 1-May-14 – X800058P Page 27 UV Pure Technologies Inc. © 2014 Hallett 30 1” Instruction Manual 19 26A 6 8 26 6A 16 1 27 25 15 10 14 11 17 24 22 24 23 18 12 20 13 21 4 5 VIEW A A 8 7 28 REFLECTOR ASSEMBLY REMOVED FOR CLARITY Figure 4B – Hallett 30 Disassembling the Unit NOTE: This procedure is not recommended for individual household users please contact your certified water specialist to assist should disassembly be required. Unplug unit at all times. Note that numbers in parentheses refer to Figure 4B. Step 1: Fill a bucket or container with water before shutting off the water supply since you will need the water later to clean the quartz sleeve (4). A squeeze Released on 1-May-14 – X800058P Page 28 UV Pure Technologies Inc. © 2014 Hallett 30 1” Instruction Manual bottle is useful for applying water or cleaning solution to the inside of the quartz sleeve. Step 2: Place another bucket under the unit and drain the unit (see Draining the Unit). Step 3: Open the unit and remove the lamps and reflectors (see Determining the Need for Cleaning). Step 4: Disconnect the Stainless flexible hose from the top of the unit (8) and remove the top quartz seal assembly. Caution: Do not damage the sealing surfaces of the end caps (12 and 23) or the shaft adapter of the wiper assembly (6A). Handle these parts with care to prevent water leaks. Step 5: Use the 3/16” Hex wrench to remove the top bracket (14) by undoing the four fasteners in an alternating pattern (top left, bottom right, bottom left, then top right). The bottom bracket does not require removal to clean the quartz, so leave it in place. This will support the quartz sleeve during cleaning and simplify the overall process. Step 6: Remove the top end cap (17) by lifting it straight up. Step 7: Remove the wiper assembly (6). Carefully lift the wiper assembly up out of the quartz sleeve – rotating the assembly clockwise will help. Caution: the wiper blades are sharp, handle them with care. Step 8: To replace the wiper seals, the quartz and bottom quartz sleeve assembly must be removed – see next section Most item numbers in list below can be referenced in Figure 4B. Items in Bold are typical spares. Spare Parts List Item No. 1 2 3 4 5 6 6A 7 8 9 10 11 12 13 14 Part Name Lamps (shipped in pairs- Single lamp p/n C300064) Electronic Ballast UV Sensor Array Replacement Kit – Drinking Water Quartz sleeve Replacement Kit (includes 2 O rings) Wiper Motor Kit (includes items 20 & 21) Wiper Assembly Kit Shaft Adapter Reflector Panel Assy– sold as each Flexible SS Hose – 1” Seal Kit (includes items 18,19,20,24,25,26 & 27 ) Bearing & Base for Wiper Shaft Bearing O ring Seal Insert Adapter for Flow Regulator Internal Flow Regulator Bracket – Top, Plain End Released on 1-May-14 – X800058P Page 29 Qty Hallett 30-1” 1 1 1 1 1 1 1 2 2 1 1 1 1 1 1 C300065 X100010 C100006R* C300067 E100042 C300079 E300208 C300115* R400007 C500008 E300142 350011 C300075 C300076 C300012 UV Pure Technologies Inc. © 2014 Hallett 30 1” Instruction Manual 15 16 17 18 19 20 21 22 23 24 25 26 26A 27 28 29 30 31 32 33 34 35 36 37 1/4” Lock Washer Bracket Fastener, 1/4-20 x 5/8” long Top End Cap c/w Shaft guide Shaft Retaining Ring (included in Seal Kit) Seal Washer for SS Hose – sold in pairs Rubber Washer – Motor Shaft (Included in Motor Kit) Foam Pad for Motor (Included in Motor Kit) Bottom Bracket Assy c/w Lamp Wire Harness Bottom End Cap Assy – Motor End c/w Seals Quartz O ring seal (included in Quartz Kit or Seal Kit) Wiper O ring Seal (included in Seal Kit) Washer, Teflon 5/8” ID x 1” OD (included in Seal Kit) Plastic Washer (included in Wiper Assembly Kit) U Cup Seal for Wiper (included in Seal Kit) Solenoid Shut-off Valve (Normally Closed) Display Pad (Membrane switch) Purge Valve Assembly Cold Air Kit Replacement Fuse Pack for 120V units (6 in pack) Replacement Fuse Pack for 240V units (6 in pack) Transient Voltage Surge Suppressor for 115V systems Circuit board – Drinking Water Hallett Diagnostic Tool External 30gpm Flow restrictor – NSF approved 8 8 1 1 2 1 1 1 1 2 1 1 1 1 1 1 1 1 1 1 1 1 1 1 650001 650000 C300055 N/A C500009 N/A N/A C300068 C300078 N/A N/A N/A N/A N/A 550055 E100016 X500000 X500001 E400020 E400021 150207 E100065 X100012 C500016 *Older generation Hallett 30s used semi-circular reflector panels – to reorder these panels, use p/n E300084T; UV sensors for these units are p/n C100006. Cleaning/Removing the Quartz Sleeve Note that numbers in parentheses refer to Figure 4B. Step 1: Use a bottle cleaning brush with a long handle to scrub the inside of the quartz sleeve. Scrub and flush with clean water repeatedly to clean the quartz. Use a squeeze bottle to apply water or solution to the quartz sleeve to keep the area tidy. Note: Keep the rest of the unit free from moisture. Examine the quartz by looking through the unit. Step 2: If the quartz is still dirty, use a scale remover such as CLR or Lime Away and apply it to the inside of the quartz sleeve. Citric acid, available at a drug store, can also be used. Always flush with clean water afterwards. Step 3: Once the quartz is clean, reassemble the unit (see below). Replace any seals that appear to have been damaged. Step 4: If the quartz is still not clean, it requires replacement. This is done by removing the bottom quartz seal assembly. Step 5: Disconnect the wiper motor (5) from the bottom bracket (22) by undoing the three nuts. See Figure 4C. Pull off the motor plate and foam pad (21) from the mounting standoffs and unplug the motor. Set the motor aside, holding it by the body, not the wires. Do not place the motor in any location where it can be exposed to moisture. Released on 1-May-14 – X800058P Page 30 UV Pure Technologies Inc. © 2014 Hallett 30 1” Instruction Manual Step 6: Remove the bottom Bracket (22) by undoing the four fasteners in an alternating pattern (top left, bottom right, bottom left, then top right). The bottom End Cap (23) will drop as the bracket is removed. Support the quartz sleeve as you remove these two items. Step 7: Remove the quartz sleeve by removing the top and bottom O rings (24). Lift the quartz sleeve out of the unit. Step 8: Inspection of wiper seals can be done now. This is a two-step process. First, remove the rubber washer (20) and shaft retaining ring (18) and place them in a safe place. Second, lift the shaft adapter (6A) out of the bottom End Cap (23). Check the U-cup seal (27) Wiper O ring (25) – replace/clean if necessary. Re-install shaft adapter (6A). Replace the wiper retaining ring (18) by inserting it into the grooved area on the shaft adapter. Replace the rubber washer (20). Step 9: Install the new quartz sleeve into the unit and center it vertically. Be careful not to chip the ends. Support the quartz for the next two actions. Step 10: Replace the top and bottom O rings (24), keeping the quartz centered vertically in the unit. Step 11: Replace the bottom End Cap (23) and bottom Bracket (22) by installing the four fasteners in an alternating pattern (top left, bottom right, bottom left, then top right) (lock washers must be installed). Ensure that the welded elbow is at the backside of the unit. Ensure that the bottom End Cap (23) sits centered in the bottom Bracket (22). DO NOT OVERTIGHTEN NUTS ALIGN MOTOR SHAFT WITH SLOT IN WIPER SHAFT (REMOVE FOAM PAD TO SEE) RUBBER WASHER TO BE INSTALLED ON WIPER SHAFT BEFORE MOTOR USE AN 11/32" NUT DRIVER TO REMOVE NUTS Figure 4C Reassembling the Unit Note that numbers in parentheses refer to Figure 4B. Step 1: Replace the wiper assembly (6) carefully in the quartz sleeve. Turn the wiper assembly clockwise (looking from the top) as it is being inserted into the quartz – this will make the task easier and align the wiper blades properly. The Released on 1-May-14 – X800058P Page 31 UV Pure Technologies Inc. © 2014 Hallett 30 1” Instruction Manual square shaft must fit into the square cavity of the shaft adapter (6A). Step 2: Ensure the quartz O-ring seal (24) is in place around the quartz sleeve and then replace the top end cap (2) by aligning the small hole in the thin plate with the top pin of the wiper assembly (6). This will help center both parts. Step 3: Replace the top bracket (14) over the top end cap (17). The collar of the end cap will fit snugly in the hole in the bracket and align itself. Tighten the fasteners (16) in an alternating pattern (lock washers (15) must be installed). Step 4: Reconnect the wiper motor (5) to the bottom bracket (22). The flat blade on the wiper motor shaft must be aligned with the slot in the round wiper shaft – the wiper shaft can be rotated counter-clockwise to accommodate this. Remove the foam pad in order to see the motor shaft. Once this alignment is done, the motor plate and foam pad can be placed back onto the mounting standoffs and secured with the three nuts. The nuts are self-locking, engage them until motor mounting plate comes to rest on the bottom Bracket (22). Do not over tighten. Step 5: Reconnect the flexible hoses (8), both top and bottom. Figure 4D Step 6: Close any faucets and open the water supply. Inspect for leaks. The solenoid valve can be placed into manual mode to allow water to enter the unit. Switch back to automatic mode when done. Repair any leaks if necessary. Caution: Do not operate the unit if there are any leaks at the piping connections or within the unit. Step 7: Reinstall the reflectors &/or side panels. Ensure the cover panel is completely flat against the body of the unit before tightening the screws. Step 8: Replace the lamps. Step 9: Reinstall the top and bottom covers. Step 10: Plug in the unit. Released on 1-May-14 – X800058P Page 32 UV Pure Technologies Inc. © 2014 Hallett 30 1” Instruction Manual Step 11: Make an entry in the service record to establish a cleaning schedule. Replacement Parts Use only genuine UV Pure Technologies’ parts when servicing your Hallett disinfection system. Failure to use genuine UV Pure Technologies’ replacement parts will void the factory warranty, and any laboratory validation and/or certification for water safety and system operating performance. The Table on page 29 shows a complete list of original factory parts. Replacement parts and service are available from your Installer, a Certified Service Dealer (CSD), or directly from UV Pure Technologies on our e-commerce site: www.uvpuredirect.com . A complete list of Certified Service Dealers and their coverage areas is available on UV Pure’s website: www.uvpure.com . Manufactured by: UV Pure Technologies Inc. 60 Venture Drive, Unit 6 Toronto, Ontario, Canada M1B 3S4 Phone: 416-208-9884 Toll Free (USA & CDA) 1-888-407-9997 Fax: 416-208-5808 email inquiries: [email protected] www.uvpure.com Date of Purchase: Dealer Name: Model: Serial Number (Near power cord entry – See Figure 1B): Released on 1-May-14 – X800058P Page 33 UV Pure Technologies Inc. © 2014 Hallett 30 1” Instruction Manual 5. SERVICE RECORD SHEET Record lamp replacement dates and events in the space provided below. Date Action (MMM/DD/YYYY) System Installed Released on 1-May-14 – X800058P Page 34 UV Pure Technologies Inc. © 2014 Hallett 30 1” Instruction Manual 6. UV PURE TECHNOLOGIES LIMITED WARRANTY Limited Warranty for UV Pure Technologies’® water purification systems and peripheral parts purchased in Canada, the United States, Australia and New Zealand. What this warranty covers: Defects in materials and workmanship in Products and Parts manufactured by UV Pure Technologies Inc. (UV Pure) including Hallett® systems, Upstream® systems, Cactus™ systems and parts such as replacement UV lamps other original equipment manufacturer components such as manifolds or NEMA cabinets sold or certified by UV Pure Technologies Inc. What the period of coverage is for UV Pure Products and Parts: Five-year Limited Warranty for structural, hardware, and mechanical components. Specifically, this includes the following UV Pure Parts: system casing (powder coated steel parts, machined and extruded aluminum parts, stainless steel parts, and ABS molded components), stainless steel and CPVC manifolds, NEMA cabinets, welded steel skids and structural components, stainless steel self-cleaning mechanism, mechanical fasteners, and stainless steel flexible connector hoses. Three-year Limited Warranty for electrical components, reflectors, and quartz sleeve. Specifically, this includes the following UV Pure Parts: wiper motor, air blowers, circuit boards, ballast and micro-processor with digital display, wiring harnesses, lamp sockets, reflectors, quartz sleeve, and remote monitor (excluding any battery if included). One-year Limited Warranty for lamps, sensor probes, and remote lamp replacement reminder alarm. Specifically this includes the following UV Pure Parts: UV lamps, UV sensors and the circuit board they are mounted in, temperature probes, purge valves, and the remote lamp replacement reminder alarm. One –year Limited Warranty for all replacement lamps Ninety-day Limited Warranty or Balance of Original Warranty for replacement Parts or Products. Specifically this includes any UV Pure Parts or Products replaced or repaired under this Limited Warranty, and any Parts purchased for routine service or maintenance. This warranty period is for balance of the original warranty or for 90 days from the date the Product or Part is repaired and/or returned to the first end-user whichever is longer. An exception is all replacement lamps that are covered for one year from date of replacement. Released on 1-May-14 – X800058P Page 35 UV Pure Technologies Inc. © 2014 Hallett 30 1” Instruction Manual Who is covered: This Limited Warranty extends to you only if you are the FIRST END-USER PURCHASER and with respect to the ORIGINAL INSTALLATION; the warranty period shall commence upon the Date of Purchase. What we will do to correct problems covered by this Limited Warranty: During the warranty period, as set out above, UV Pure will repair or replace Products or Parts, at its sole discretion and cost, with the exception of shipping and handling charges. UV Pure may require that certain failed part be returned to UV Pure within 45 days for analysis and to facilitate continuous improvement; for example, circuit boards and sensors that fail must be returned to UV Pure. Replacement parts or systems may be functionally equivalent reconditioned/refurbished/pre-owned or new products or parts at UV Pure’s sole discretion. UV Pure may provide software updates, at its discretion, but is under no obligation to do so. Based on an agreement between UV Pure and its service providers, Certified Service Dealers, this warranty will be honoured by either UV Pure or a Certified Service Dealer. In North America, based on an agreement between UV Pure and its service providers, Certified Service Dealers, this warranty will be honoured by either UV Pure or a Certified Service Dealer. Outside North America UV Pure has appointed Distributors that will honour this warranty and that provide service directly or via local Certified Service Dealers. How to get help: Call a Certified Service Dealer (CSD) or UV Pure’s Customer Service toll free line: 1-888-407-9997. A complete list of Certified Service Dealers and their coverage areas is available on UV Pure’s website: www.uvpure.com. Or, email UV Pure’s Customer Service Center: [email protected]. What this Limited Warranty does NOT cover: Maintain your original PROOF OF PURCHASE. UV Pure or its Certified Service Dealers reserve the right to deny warranty coverage if you cannot provide proof of original purchase including date of purchase, who you purchased the Product or Part from, and serial number. USE OF REPLACEMENT UV LAMPS THAT ARE NOT ORIGINAL UV PURE EQUIPMENT WILL VOID THIS WARRANTY. USE OF REPLACEMENT UV LAMPS THAT ARE NOT ORIGINAL UV PURE EQUIPMENT WILL INVALIDATE CERTIFICATION TO OR BY NSF, MENV, EPA, AND OTHER VALIDATION PROTOCOLS AND CERTIFYING BODIES. All UV lamps lose power over their usable lifetime; original equipment UV Pure lamps are engineered and tested to ensure that all of our systems achieve the Released on 1-May-14 – X800058P Page 36 UV Pure Technologies Inc. © 2014 Hallett 30 1” Instruction Manual minimum power for disinfection specified, at the end of lamp life. Lamps that are not made by, or that are not approved by UV Pure may not meet those same high standards. Of course UV Pure performs rigorous testing of its systems and original equipment components to its own high quality control standards, and external testing and certification protocols are performed with original equipment UV Pure lamps. NON-ORIGINAL EQUIPMENT UV LAMPS have not been approved by certifying bodies, thereby invalidating those tests and certifications. If you have a question as to whether UV Pure lamps are original equipment, please call our Toll Free Customer Service line at: 1-888-407-9997. UV Pure may source and supply equipment that is manufactured and warrantied by other companies (the Original Equipment Manufacturer) and offered as options in conjunction with UV Pure’s Products and Parts. For example: heaters or AC units used in NEMA cabinets, solenoid shut-off valves, filter housings and inserts, UPS power supplies, and on-line instrumentation or web-enabling communications equipment. Warranties for those components are solely the responsibility of the Original Equipment Manufacturer, and NOT UV Pure. UV Pure uses reasonable efforts to ensure that OEM options are of the highest quality possible and consistent with UV Pure’s high standards. UV Pure is not responsible for Parts or Products that are improperly installed, used and/or not maintained as set out in the Product Manual or as expressly advised by UV Pure. This Limited Warranty does not cover damage caused by accidents, acts of God, minor scratches or imperfections and normal wear and tear. This Limited Warranty is void if the Product is improperly installed, used in conditions that exceed UV Pure’s specifications as set out in the Manual or Product Specifications, or if there is water damage due to improper installation or poorly or improperly tightened plumbing connections. This Limited Warranty is void if the Product or Parts have been altered or modified in any way by anyone other than a UV Pure technician or a Certified Service Dealer. Warranty coverage may be void if the Product is operated in combination with ancillary or peripheral equipment not approved by UV Pure for use with the Products. UV Pure’s water purification systems are technically advanced. Certain models include UV sensors that monitor treatment effectiveness via on-board computers. Like all computers, they may be sensitive to fluctuations in the power grid, like surges or brown outs. UV Pure supplies Tranient Voltage Surge Protectors (that have been certifed to UL1449 standard or equivalent) with its Hallett and Upstream models in North America to help protect against damage from power fluctuation. Those models must be plugged into the supplied protectors in North America, and into equivalent protectors outside North America (not supplied with systems in those markets). Failure to install voltage protection in Hallett or Upstream installations will void warranty coverage. UV Pure highly recommends that all installations of its systems incorporate voltage protection. This Limited Warranty excludes the cost of labour in removing and/or reinstalling any defective Product or Part. In the event that a Product is returned to UV Pure for repair or replacement under the terms of this Limited Warranty, the Product must be returned in its original shipping container and packaging. UV Pure will not be liable for damage to the Product during shipping otherwise. Released on 1-May-14 – X800058P Page 37 UV Pure Technologies Inc. © 2014 Hallett 30 1” Instruction Manual UV Pure does not assume any liability for personal injury or property damage caused by the use or misuse of any Product or Part. UV Pure is not liable for special, incidental, indirect or consequential damages. UV Pure’s liability is limited to repair or replacement of the defective Part or Product and this liability shall terminate upon the expiration of the applicable warranty period as set out above. This Limited Warranty may be amended or changed at any time, at UV Pure’s sole discretion, without notice. UV Pure offers inspection and refurbishing for older systems. To assist our customers, UV Pure’s certified technicians can provide inspection, recommendations, cost estimates, and complete refurbishing of older systems that may be out of warranty. TO THE EXTENT PERMITTED BY APPLICABLE CONSUMER PROTECTION LAWS, ANY WARRANTIES PROVIDED FOR HEREIN ARE IN LIEU OF ANY OTHER WARRANTY, AND ALL OTHER WARRANTIES ARE HEREBY DISCLAIMED, WHETHER EXPRESS OR IMPLIED. 7. NSF STATEMENT The NSF certification applies to the Hallett 30 1” system. System Tested and Certified by NSF International against NSF/ANSI Standard 55 for Disinfection Performance, Class A. Who is the NSF? The NSF is the global gold standard accepted by environmental regulatory agents worldwide for water treatment and disinfection. This Class A system conforms to NSF/ANSI 55 for the disinfection of microbiologically contaminated water that meets all other public health standards. This system is not intended to convert wastewater or raw sewage to drinking water. The system is intended to be installed on visually clear water. NSF/ANSI 55 defines wastewater to include human and/or animal body waste, toilet paper, and any other material intended to be deposited in a receptacle designed to receive urine and/or feces (blackwaste); and other waste materials deposited in plumbing fixtures (greywaste). If this system is used for the treatment of untreated surface waters or ground water under the direct influence of surface water, a device found to be in conformance for cyst reduction under the appropriate NSF/ANSI Standard must be installed upstream of the system. Released on 1-May-14 – X800058P Page 38 UV Pure Technologies Inc. © 2014 Hallett 30 1” Instruction Manual The information contained in this document is subject to change without notice. UV Pure Technologies Inc. shall not be liable for errors contained herein or for consequential damages from improper installation or operation of this unit. UV Pure Technologies Inc. 60 Venture Drive, Unit 6 Toronto, Ontario M1B 3S4 www.uvpure.com Released on 1-May-14 – X800058P Page 39 UV Pure Technologies Inc. © 2014