1
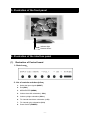
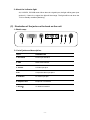
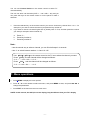
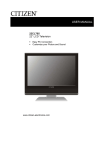
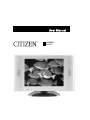
User Manual
C15604D
LCDTV
To users:
Thank you for using our 15″ LCD-TV. After unpacking, please check
that you have the following items: instruction manual, remote
control, AC adapter, AC cord.
Before connecting the items and turning the power on, please read
this book carefully. Please keep this book for later use. If a loss of
function caused by electrostatic shock occurs, please switch the
on/off button for restoring the function.
INDEX
1
Cautions………..………………………………………………………2
2
Features….……….……………………………………………………2
3
Illustration of the front panel……………………………………………3
4
Illustration of the interface panel………………………………………3
5
Illustration of the remote control……….……….………………………5
6
Basic operations…………………………………………………………6
7
Menu operations……………………….……………………………...7
8
Product specification…….…..………..………………………………11
9
Warranty………………………………………………………………….12
1
1- Cautions
Incorrect usage will cause a fire or electric shock. To prevent this, please handle it carefully when you
are installing, using and cleaning this machine. To ensure safety and extend the life-span of your
LCD-TV, please read the following items carefully:
● Please keep the book for later use;
● Please read and comply with all the warnings and instructions on the machine and this manual
thoroughly before operation;
● Do not use additional devices/accessories that are not recommended by manufacturer;
● Before operation, please make sure that the operating voltage of your unit is normal;
● Do not place the unit on unstable, dusty and humid places;
● Do not install near direct sunlight or any heat sources, such as radiators, heat registers, stoves or
other apparatus (including amplifiers) that produce heat;
● Allow enough space for proper ventilation;
● Please keep water away from the TV. If water comes in contact with the TV, disconnect the power
cord from the plug receptacle, then wipe the set with a dry soft cloth;
● Do not remove the back cover or repair LCD display by yourself. Once the shell is opened, you are
exposed to high voltage and face risks that can cause serious injury;
● Refer all servicing to qualified service personnel. Servicing is required when the apparatus has
been damaged in any way, such as power-supply cord or plug is damaged, liquid has been spilled
or objects have fallen into the apparatus, the apparatus has been exposed to rain or moisture,
does not operate normally, or has been dropped.
2- Features
● Can be connected with analog PC input
● Can be connected with AV and S-VIDEO input
● Can receive TV signal
● Bundled with 2×2W B-class power speakers, two group of audio input
● Full function of infrared remote control
2
3- Illustration of the front panel
Indicator light
Remote sensor
4- Illustration of the interface panel
(1)
Illustration of Control board
1- Sketch map:
2- List of controls and description:
1-
Select the input signals (INPUT)
2-
Exit (ESC)
3-
MENU/ENTER (MENU)
4-
Volume down/left orientation (- VOL)
5-
Volume up/right orientation (VOL+)
6-
TV channel down/down orientation (- CH)
7-
TV channel up/up orientation (CH+)
8-
Power On/Off (POWER)
-3-
3- About the indicator light
AV, S-VIDEO, PC-RGB mode: When there is a signal input, the light will be green (see
section 3). If there is no signal, the light will be orange. The light will be red when the
TV is in standby condition (Stand-by).
(2) Illustration of the jacks on the back on the unit
1- Sketch map:
1
2
4
3
2- List of jacks and description:
JACK
DESCRIPTION
1 DC 12V IN
Power input interface
2 VGA
DB15 VGA interface.
3 S-Video
S-Video input jack.
4 AV
Composite video input jacks.
5 PC Audio
PC audio input jack.
6 Earphone Out
Earphone out interface.
7 RF(75Ω)
TV antenna interface.
-4-
5
6
7
5- Illustration of the remote control
1- Sketch map of the remote control
2- List of the keys on the remote control and their function
1. POWER
Power supply switch
2. MUTE
MUTE
3. DISP
Display / cancel current TV channel or cancel
4. AUTO
Auto Adjust (PC MODE)
5. INPUT
TV / PC-RGB / AV / S-VIDEO mode Select
6. 0~9
TV channel number select
7. -/--
One bit or two bit TV channel select
8. RETURN
Quick TV channel switch
9. MENU
MENU / ENTER
10. EXIT
ESC
11. ◄VOL-
Volume down / Left orientation
12. ►VOL+
Volume up / Right orientation
13. ▼CH-
TV channel down / Down orientation
14. ▲CH+
TV channel up / Up orientation
-5-
6- Basic operations
Turn on the LCD-TV
When the power is on, the indictor light will be orange or green (TV
mode). Once the signal is received, the light will turn green. Please
note: it will remain orange if there is no signal. When the set is on,
the input signal will be displayed on the screen. The indicator Light
will turn red in standby mode.
Note:
The display of the input mode will disappear in 3 seconds.
TV
PC - RGB
AV
S - Video
Switch among TV / PC-RGB / AV / S-VIDEO
Press INPUT and choose the input mode you want.
When you press INPUT each time, TV, PC-RGB, AV,
S-VIDEO will appear on the screen in a cycle.
Note:
The display of the input mode will disappear in 3 seconds.
TV
PC - RGB
AV
S - V id eo
Audio control
1. Press VOL+ to increase the volume, and there is a bar with numbers
on the screen indicating the loudness.
2. Press VOL- to lower the volume and also there is a bar with numbers
on the screen indicating the loudness.
VOLUME
50
VOLUME
10
×
Mute
1. Press MUTE to turn off the sound temporarily and a sign will appear on the screen.
2. Press MUTE again, the mute status will be cancelled and the sign will disappear.
Note:
When you press POWER, the mute status will be cancelled automatically.
Enter a standby status
Press POWER, the unit will enter a standby status and the indicator light will turn red at the same time.
Press POWER again, the unit will exit the standby status and the indicator light will turn orange (no
signal input) or green (signal input).
-
Select the TV channel you want
8
-6-
--
You can use Channel Select on the remote control to select TV
channels directly.
The unit can store 125 channels (CATV 1 - 125 / AIR 2 - 69), and you
can press the keys on the remote control or on the panel to make a
selection.
12-
Press the relevant key on the remote control if you want to choose any channel from 1 to 9.(for
example: if you want to choose channel 8, just press the key number 8.)
If you want to choose a channel higher than 9, please press -/-- first, and then press the number
you want.(for example: select channel 45)
a.
b.
c.
Press -/-- ;
Press key number 4 ;
Press key number 5.
Note:
·Use the second way to select a channel, you can finish all steps in 4 seconds.
·Use -/-- to switch between stations 1~9 and 10~125.
Use (CH-)/(CH+)on the remote control or the TV set to select the channel you want.
Press (CH+), and the channel will be changed as follows:
2→3→…→124→125→1→2→3…
Press (CH-), and the channel will be changed as follows:
3→2→1→125→124→…→4→3
7- Menu operations
1. Press MENU to display the menu options.
2. Press ▲ / ▼ on the remote to select sub-menu, and press MENU to enter, and press▲▼◄► to
change the parameters.
3. Press EXIT on the remote to return to main menu.
NOTE: In this manual, the OSD (On screen display) may be different from your TV’s display
-7-
Input mode: AV / S-VIDEO
Name of
submenu
Picture of submenu
Instructions
IMAGE SETTING
1.
2.
3.
4.
5.
6.
z
TV SETTING
VIDEO ADVANCE
MAIN
MENU
OSD SETTING
SOUND SETTING
RESET
INPUT SOURCE
IMAGE SETTING
VIDEO ADVANCE
OSD SETTING
SOUND SETTING
RESET
INPUT SOURCE
Press key ▲ / ▼ on the
remote to select sub-menu,
and press MENU to enter.
BRIGHTNESS
50
CONTRAST
IMAGE
SETTING
50
COLOR
50
TINT
0
SHARPNESS
VIDEO
ADVANCE
OSD
SETTING
ON
1. BLUE SCREEN
ENGLISH
OSD . H
1. LANGUAGE: Change the
language of the menu.
2. OSD.H
3. OSD.V
50
OSD . V
50
SOUND
SETTING
BRIGHTNESS
CONTRAST
COLOR
TINT
SHARPNESS
2
BLUE SCREEN
LANGUAGE
1.
2.
3.
4.
5.
TREBLE
0
BASS
0
BALANCE
0
MUTE
OFF
VOLUME
50
-8-
1.
2.
3.
4.
5.
TREBLE
BASS
BALANCE
MUTE
VOLUME
Name of
submenu
Picture of submenu
1.
2.
3.
4.
z
PC - RGB
AV
INPUT
SOURCE
Instructions
S - VIDEO
TV
PC-RGB
AV
S-VIDEO
TV
Press ▲ / ▼ button to select
one of it, then press MENU to
confirm your selection. The
input source will change to
your selection.
Input mode: TV
Name of
submenu
Picture of submenu
IMAGE SETTING
1.
2.
3.
4.
5.
6.
7.
z
TV SETTING
VIDEO ADVANCE
MAIN
MENU
Instructions
OSD SETTING
SOUND SETTING
RESET
INPUT SOURCE
TV
SETTING
CHANNEL
0
SOUND
DK
SKIP THIS
NO
AUTO FINE
YES
FINE TUNE
56 MHz
MANUAL SEARCH
1.
2.
3.
4.
5.
6.
7.
IMAGE SETTING
TV SETTING
VIDEO ADVANCE
OSD SETTING
SOUND SETTING
RESET
INPUT SOURCE
Press key ▲ / ▼ on the
remote to select sub-menu,
and press MENU to enter.
CHANNEL
SOUND
SKIP THIS
AUTO FINE
FINE TUNE
MANUAL SEARCH
AUTO SEARCH: Press
MENU to enter auto search
as follow:
AUTO SEARCH
NO
YES
AUTO SEARCH
AUTO SEARCH
PLEASE WAIT
2
NOTE: The other TV menus are the same as AV’s.
-9-
Input mode: PC
Name of
submenu
Picture of submenu
Instructions
CONTRAST
1.
2.
3.
4.
5.
6.
7.
8.
z
BRIGHTNESS
IMAGE SETTING
COLOR SETTING
MAIN
MENU
OSD SETTING
SOUND SETTING
RESET
INPUT SOURCE
CONTRAST
CONTRAST
BRIGHTNESS
BRIGHTNESS
CONTRAST
BRIGHTNESS
IMAGE SETTING
COLOR SETTING
OSD SETTING
SOUND SETTING
RESET
INPUT SOURCE
Press key ▲ / ▼ on the
remote to select sub-menu,
and press MENU to enter.
z Press ◄/► to change the
parameters.
50
z Press ◄/► to change the
parameters.
50
AUTO CONFIG
PHASE
IMAGE
SETTING
50
CLOCK
50
H - POSITION
50
V - POSITION
1.
2.
3.
4.
5.
AUTO CONFIG
PHASE
CLOCK
H-POSITION
V-POSITION
1.
2.
3.
4.
NATIVE
9300K
6500K
USER
50
NATIVE
COLOR
SETTING
9300K
6500K
USER
NOTE: The other PC menus are the same as AV’s.
- 10 -
8- Product specification
Items
Relevant illustrations
LCD
15” TFT LCD
Brightness
250cd/m²
Life-span of the screen backlight
50,000 hours
View angle
160°H / 135°V
Resolution
1024×768
TV standard
NTSC M
Number of Channels
CATV(1~125), AIR(2~69)
PC
DB15 VGA input interface
AV video, S-Video
Composite video input interface, S-Video input interface
TV
75Ω ANT.
Audio
Audio 1 (left, right audio input interface for PC)
Audio 2 (left, right audio input interface for AV)
Features
Input interface
Power Speakers
2W×2
OSD language
English, French, Spanish
Power supply
DC 12 V
Power consumption
< 36W
Accessories
Instruction Manual, Remote control, AC adapter, AC cord
Note: Designs and specifications are subject to change without prior notice.
- 11 -
CITIZEN
®
WARRANTY
Consumer Electronics Products and Home Appliances
®
Thank you for choosing CITIZEN !
SYNNEX Canada Limited gives the following express warranty to the original consumer purchaser or gift recipient for this CITIZEN product, when
shipped in its original container and sold or distributed in Canada by SYNNEX Canada Limited or by an Authorized CITIZEN Dealer:
SYNNEX Canada Limited warrants that this product is free, under normal use and maintenance, from any defects in material and workmanship. If any
such defects should be found in this product within the applicable warranty period, SYNNEX Canada Limited shall, at its option, repair or replace the
product as specified herein. Replacement parts furnished in connection with this warranty shall be warranted for a period equal to the unexpired portion of
the original equipment warranty.
This warranty shall not apply to:
a.
Any defects caused or repairs required as a result of abusive operation, negligence, accident, improper installation or inappropriate use as
outlined in the owner’s manual.
b.
Any CITIZEN product tampered with, modified, adjusted or repaired by any party other than SYNNEX Canada Limited or CITIZEN’s Authorized
c.
Damage caused or repairs required as a result of the use with items not specified or approved by SYNNEX Canada Limited, including but not
Service Centres.
limited to head cleaning tapes and chemical cleaning agents.
d.
Any replacement of accessories, glassware, consumable or peripheral items required through normal use of the product including but not
limited to earphones, remote controls, AC adapters, batteries, temperature probe, stylus, trays, filters, cables, paper, cabinet, cabinet parts,
knobs, buttons, baskets, stands, shelves, cookware and
cooking utensils.
e.
Any cosmetic damage to the surface or exterior that has been defaced or caused by normal wear and tear.
f.
Any damage caused by external or environmental conditions, including but not limited to transmission line/power line voltage or liquid spillage.
g.
Any product received without appropriate model, serial number and CSA /cUL /cULus /cETL /cETLus markings.
h.
Any products used for rental or commercial purposes.
i.
Any installation, setup and/or programming charges.
Should this CITIZEN product fail to operate during the warranty period, warranty service may be obtained upon delivery of the CITIZEN product together
with proof of purchase and a copy of this LIMITED WARRANTY statement to an Authorized CITIZEN Service Centre. In-home warranty service may be
provided at SYNNEX Canada Limited’s discretion on any CITIZEN television with the screen size of 27” or larger. This warranty constitutes the entire
express warranty granted by SYNNEX Canada Limited and no other dealer, service centre or their agent or employee is authorized to extend, enlarge or
transfer this warranty on behalf of SYNNEX Canada Limited. To the extent the law permits, SYNNEX Canada Limited disclaims any and all liability for
direct or indirect damages or losses or for any incidental, special or consequential damages or loss of profits resulting from a defect in material or
workmanship relating to the product, including damages for the loss of time or use of this CITIZEN product or the loss of information. The purchaser will
be responsible for any removal, reinstallation, transportation and insurance costs incurred. Correction of defects, in the manner and period of time
described herein, constitute complete fulfillment of all obligations and responsibilities of SYNNEX Canada Limited to the purchaser with respect to the
product and shall constitute full satisfaction of all claims, whether based on contract, negligence, strict liability or otherwise.
CARRY-IN PARTS & LABOUR WARRANTY PERIODS:
•
Audio Products: 1 Year (Remote Control, if applicable – 90 Days)
•
DVD Products: 1 Year (Remote Control – 90 Days)
•
LCD & Plasma Display TV: 1 Year (Remote Control – 90 Days)
•
Television Products: 1 Year (Remote Control – 90 Days)
•
VCR Products: 1 Year (Remote Control – 90 Days, Video Heads – 6 Months)
•
Home Appliances: 1 Year
- 12 -
o
Microwave Magnetron parts only additional 3 Years
o
Refrigerator / Freezer Compressor parts only, additional 4 years
To obtain the name and address of the nearest Authorized CITIZEN Service Centre or for more information on this warranty
-
visit www.citizen-electronics.com
-
mail your inquiry to SYNNEX Canada Limited
Citizen Customer Service
200 Ronson Drive
Toronto, ON
-
M9W 5Z9; or
call toll free 1-800-663-5954, Monday to Friday 9:00am – 5:00pm Eastern Time.
Citizen is a registered trade-mark of SYNNEX Canada Limited
08.2007
- 13 -
- 14 -