1
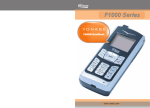
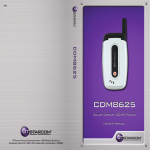
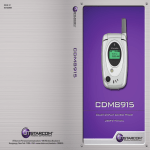
F1000 Series
www.utstar.com
Copyright c 2005, UTStarcom, Inc. All rights reserved.
May not be reproduced without prior written permission.
Are you
ready to join
the telephone
revolution? This
Quick Start Guide
has everything you
need to get your
Vonage phone service
working with the
UTStarcom F1000 WiFi
handheld phone. Take a look
at the equipment, follow the
simple instructions and you'll be
talking in no time at all.
Doc. Code: 8810027600.0510
www.utstar.com
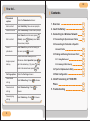
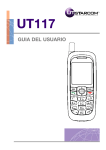
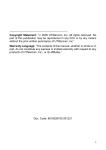
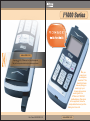
Getting to know your F1000 Handset
Antenna
Earpiece
II.
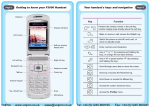
Your handset's keys and navigation
Key
Earphone socket
Make or receive a call; access the Dialed Log
in standby mode.
Display indicators
Switch the phone on and off, end a call, or
return to standby mode.
LCD screen
Soft key function
display area
4-way
navigation key
Left soft key
Talk key
Function
Perform the function shown in the soft key
function display area directly above the soft key.
_
Enter numbers and characters.
Key in "*" or change the text input method.
Right soft key
Power key
Key in "#" or pause symbol "P" (by pressing
and holding the key), or lock the keypad.
Scroll through menu lists and move the
cursor.
Number keypad
* key / Switch key
Scroll up and access the Received Log.
# key / Lock key
Scroll down and access the Missed Log.
Microphone
Access the custom functions menu.
Access the current profile menu.
I.
IV.
How do I...
Many of these operations need to be performed while in standby
mode (when Menu is the left soft key function). When the phone
is idle, it enters Screen Saver mode (Clock displayed). To return
to standby mode, press
.
You can make a call and use speed dial from either mode.
Turn phone on/off
Press and hold
Make a call
Key in the phone number and press
Answer a call
Press
Press
Reject a call
Press
(Hangup) or
go to voice mail.
Clear a keypad
entry
Press
Use speed dial
Press and hold the speed dial key to
display the phone number, and then
press
.
Access menu
options
.
Turn Vibration
on/off
(Hangup) or
.
.The call will
Set Time Zone
and DST
. Scroll to Ring Volume and
(Ok). Scroll to High or Low
(Ok).
Press and hold
until the
indicator
appears/disappears.
Press
.
End a call
Adjust listening
volume
Press
Adjust ring volume press
and press
.
(Answer) or
How do I...
(Menu). Scroll to Tools and press
(Ok). Scroll to Time Zone or DST Setting
and press
(Ok). Scroll to the desired
option and press
(Ok). The phone's
date and time is provided by the network.
(Clear) .
Lock/Unlock
keypad
Press and hold
until the
indicator
appears/disappears.
WARNING: Prior to placing or receiving calls, the WiFi phone must be
connected to a Wireless Access Point and registered with the Vonage
While on a call, press
Press
.
Network. If you purchased this WiFi phone from a retail store, you need to
(Menu) to access the main
menu. Press
to reach the desired
submenu/option, and then press
(Ok).
activate your device at www.vonage.com/activate. See Section 3,
"Connecting to a Wireless Network" for detailed instructions.
IMPORTANT 911 SERVICE INFORMATION: Our 911 offering is different
from that offered by traditional telephone companies; please visit the
Features section of our website, www.vonage.com, to learn more about it.
III.
VI.
How do I...
Contents
Phonebook
options:
Under the Phonebook submenu:
Add a contact
Select Add Entry; follow screen prompts.
Delete a contact
Select Delete Entry; follow screen prompts.
Select Search; scroll to name; press
Edit a contact
(Details); press
get to the desired key (1-9); press
Call Log options:
Under the Call Log submenu:
View missed
call log
Select Missed Log. Press
View received
call log
View outgoing
call log
V.
Select Received Log. Press
to
(Set);
(Ok).
to browse.
to
browse.
Select Dialed Log. Press
3. Connecting to a Wireless Network
03
3.3 Finding and Saving the Access Point
Phonebook. Select Speed Dial; press
scroll to the desired name; press
02
Access Points
to scroll.
Contact name must already be in the
Assign a speed
dial key
2. Insert the Battery
03
3.2 Connecting to Protected or Specific
Select Search; key in the first letter(s) of
the name; press
01
3.1 Connecting to Open Access Points
(Option); select Edit;
follow screen prompts.
Search
phonebook
1. Overview
to browse.
04
05
3.3.1 Using Net Search
05
3.3.2 Entering SSIDs Directly
06
3.4 Tips for Alphanumeric Entry
07
3.5 Web Configuration
08
4. Initial Provisioning of F1000 WiFi
Phone
5. Troubleshooting
09
09
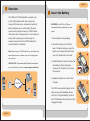
1 Overview
The UTStarcom F1000 Handheld is a wireless Voice
over IP (VoIP) telephone that, when coupled with
Vonage VoIP phone service, combines the benefits of
Internet telephone service, with mobility. This guide
covers how to configure and use your F1000 to make
VoIP phone calls via Vonage service. You can make and
receive calls as long as you are within range of a
wireless access point. See the F1000 Handbook for
more information on all features.
Note: Before using your F1000 Handheld, you should have highspeed Internet access, a wireless router, and a Vonage phone
Page 02
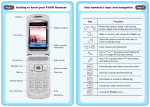
2 Insert the Battery
IMPORTANT: Use ONLY the UTStarcom
2
rechargeable battery supplied with your new
phone!
1. Remove battery from packaging.
2. Remove the battery cover. With the
back of the phone facing you, press the
battery cover release button and lift the
cover off in the direction of the arrow.
3
account set up.
HELPFUL HINT: If you purchased this WiFi phone from a retail store,
you need to activate your device at www.vonage.com/activate.
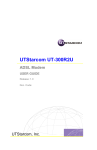
Internet
3. Install the battery. Connect the cord of the
new battery by firmly inserting the
connector into its place. Do not reverse
the connector.
4. Replace the battery cover until it clicks
into place.
The F1000 comes partially charged, so the
phone can be used immediately. Please
refer to the "Charge the Battery" section of
the F1000 Handbook for instructions on fully
charging the battery.
Page 01
Black
Yellow
Red
4
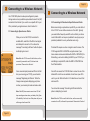
3 Connecting to a Wireless Network
Your F1000 WiFi phone has been preconfigured to provide
Vonage service via any available open wireless Access Point (AP)
connected to the Internet. If you want to use a specific AP or your
AP is protected by encrypted access, refer to Section 3.2.
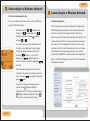
3.1 Connecting to Open Access Points
When you turn on the F1000, it searches for
available APs, selects the AP with the best signal
and attempts to connect to it. You will see the
message "Connecting to APname" while the phone
is attempting to connect.
Note: When the F1000 is used for the first time, and has
successfully connected to an AP, it will need to be
provisioned. Please refer to Section 4.
Once connected (and provisioned if this is the first
time you are using your F1000), you will see the
message "Registering via APname". When the
Vonage screen appears displaying your phone
number, you are ready to make and receive calls.
Note: If the WiFi phone cannot connect to an AP, it will
Page 04
3 Connecting to a Wireless Network
3.2 Connecting to Protected or Specific Access Points
Before connecting to a protected or specific AP, you must define it
to the F1000. You can define a maximum of four APs. Typically
you would define frequently used APs such as that of your home
router. Defined APs can be open (available for use by anyone) or
protected (available for use by authorized users only).
Protected APs require use of an encryption code for access. The
F1000 supports WEP or WPA-PSK encryption codes. If your
home wireless router was installed with a WEP or WPA-PSK (PreShared Key), use it when defining the SSID to your F1000. If you
are defining a corporate AP, obtain the WEP or WPA-PSK from
the AP administrator.
Once APs are saved, the F1000 first tries to connect to one of the
defined APs and if none are available, it looks for an open AP to
use for your call. Refer to Section 3.3 for directions on how to find
and save APs.
You will see the message "Connecting to APname" while the
phone is attempting to connect.
keep searching and wear down your battery. Verify Open
Page 03
AP availability. If not found, turn off the phone until you are
Note: When the F1000 is used for the first time, and has successfully
within range of an Access Point.
connected to an AP, it will need to be provisioned. Please refer to Section 4.
3 Connecting to a Wireless Network
Once connected (and provisioned if this is the first
time you are using your F1000), you will see the
message "Registering via APname". When the
Vonage screen appears displaying your phone
number, you are ready to make and receive calls.
Note: If the WiFi phone cannot connect to an AP, it will
keep searching and wear down your battery. Verify Open
AP availability. If not found, turn off the phone until you are
within range of an Access Point.
3.3 Finding and Saving the Access Point
APs can be defined and saved automatically using the Net
Search feature if APs have broadcast turned on. If the desired
AP has broadcast turned off, the AP can be entered directly
through a series of keystrokes on your handset.
3.3.1 Using Net Search
Note: You must be within range of the AP when using Net Search to
define it to the F1000.
1. There are two ways to initiate Net Search:
- Press
(Search) while the F1000 is automatically
scanning for an AP (when the phone is first turned on).
Or,
- Use the menus to initiate Net Search:
Press
(Menu); press
to scroll to WiFi-Settings and
press
(Ok); press
to scroll to Net Search and press
(Ok).
Page 06
3 Connecting to a Wireless Network
Available SSIDs are displayed. Those with no lock next to the name
are open APs; those with a lock are protected APs and you will
need to supply their WEP keys or WPA-PSKs to access them.
2. Press
to scroll to the desired SSID and press
(Save). Press
to reach the desired AP profile and
press
(Save) to save the SSID.
3. With the Security Mode option highlighted, press
(Ok).
Select from Open AP, WEP Key and WPA-PSK according
to the AP's authentication mode.
4. If WEP Key or WPA-PSK is selected, the phone will directly
access the WEP KEY Info or WPA-PSK Info option. Follow
the prompt to set the option:
- WEP KEY Info: Select 64bit or 128bit to specify the encryption
method that was used to create the WEP; enter the WEP key
and press
(Ok). To set the WEP key authentication method
and index, select Auth Method and WEP Key Index.
- WPA-PSK Info: Enter the WPA-PSK key and press
3.3.2 Entering SSIDs Directly
1. Press
(Menu); press
to scroll to WiFi-Settings and
press
(Ok); press
to scroll to WiFi Config and press
(Ok); press
to scroll to AP Profile and press
(Ok).
2. Press
to reach the desired AP profile and press
(Ok). With the SSID option highlighted, press
(Ok).
3. Enter the desired AP's SSID and press
4. Follow steps 3-4 specified in Section 3.3.1.
Page 05
(Ok).
(Ok).
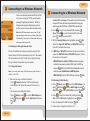
3 Connecting to a Wireless Network
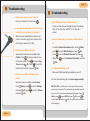
3.4 Tips for Alphanumeric Entry
You can enter alpha and numeric values, such as a WEP Key,
using the F1000 phone keys.
A shaded character ( or ) appears under
the entry line.
indicates Alpha entry;
indicates numeric entry. Press
to switch
between
and
.
For numeric entry, press the desired key once.
For alpha entry, rapidly press a key to toggle
through the letters assigned to that key. For
example,
enters a, b, c, A, B, and C.
Rapidly press
to toggle through the
entries. Therefore, to enter B, rapidly press
five times.
Pause between key presses to enter the next
character in the string. For example, to enter the
string "ab", press
once, pause then rapidly
press
twice.
If you want to change something previously
entered, press
(Clear) to delete the
character to the left of the cursor; press and hold
(Clear) to delete all characters. Press
to move the cursor position in the string.
Page 07
Page 08
3 Connecting to a Wireless Network
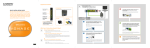
3.5 Web Configuration
A PC browser can be used as an alternative to configuring the
SSID/Encryption key information via the handset. Ensure that
the PC is connected to the same AP as the F1000 phone.
Enter the phone's IP address in the address bar of the PC's web
browser and press <Enter>. Follow screen prompts to enter the
user name ("user") and password (the phone's security code),
and then click <OK>. Select the desired item from the left pane
and configure the corresponding parameters. Click <submit>
and then click <REBOOT> to initiate and save the configurations.
Refer to the "Web Configuration" section of the F1000 Handbook
for detailed information.
Initial Provisioning of F1000 WiFi
4 Phone
If you are using the phone for the first time, once the phone has
connected to the Internet successfully via the Access Point, the
F1000 will need to be provisioned with the latest configuration
and software. This process is automatic and will take several
minutes to complete. During this time, several status messages
such as downloading, decompressing will be displayed on the
phone's display. Once complete, the phone will power off.
Turn on the F1000 phone. The phone will use the same process
as previously described for connecting to Access Points.
5 Troubleshooting
These are the most common problems and solutions that
come up when starting to use the F1000 WiFi Phone with
Vonage service. If you are having trouble placing a phone call,
go through this checklist until your problem is solved:
5 Troubleshooting
If the phone hasn't connected to an AP, refer to Section 3.1
("Connecting to Open Access Points") and Section 3.2
("Connecting to Protected or Specific Access Points") for advice.
If the phone has connected to an AP, but hasn't registered
with the Vonage Network, the following message will
appear "No Service Try Another AP. This may indicate
connection to an AP for which there is no Internet, or
possibly an AP that has filtering. Try connecting to another AP.
- If you purchased this WiFi phone from a retail store, you
need to activate your device at www.vonage.com/activate.
- Is there sufficient signal strength?
Check the Signal Bars in the top left
corner of the display. Move closer to
AP for better signal strength.
I cannot make a phone call:
- Is the Keypad locked? If so, unlock by
pressing and holding
until the
indicator disappears.
- Is the phone connected to an AP and registered with the
Vonage network?
The phone cannot be switched on:
If so, you will see the standby screen displaying your phone
number and Vonage logo. Key in the phone number to call
and press
.
Page 09
Page 10
Strong
- Press
and make sure you hold it down for more than
2 seconds.
- If it still doesn't switch on, check your battery. Refer to Section 2,
"Insert the Battery", and if necessary, charge the battery.
Weak
Page 12
5 Troubleshooting
5 Troubleshooting
Volume is too low or too loud on a call:
During a call, adjust the volume using
.
I am using a headset/earpiece, but I can't seem
to hear the conversation or it is distorted:
My F1000 phone's time is off by one hour:
Check your Time Zone and Daylight Saving Time settings.
Refer to "Set Time Zone and DST" in the "How do I..."
section.
Make sure your headset/earpiece has a round
2.5mm 3 conductor plug (4 silver sections with 3
black rings) as used by the F1000.
How do I know what my IP address and Mac Address
is?
I'd like to use a different ring tone:
Several ring tone choices are available under
Profiles: Press
to quickly access the menu
of the current profile. Press
to scroll to Ring
Tone and press
(Ok). Press
to reach the
desired ring tone option and press
(Ok).
I'd like to use a different standby screen
picture:
Several choices are available under Scheme:
Press
(Menu); press
to scroll to Settings
and press
and press
(Ok); press
(Ok).
to scroll to Scheme
Access the Network Information option: Press
to scroll to WiFi-Settings and press
press
to scroll to Network Parameter and press
(Ok). Press
(Ok);
to scroll to Network Information and press
(Ok).
Net Search didn't find my AP:
Make sure SSID broadcasting is enabled on your AP.
For more troubleshooting help, visit www.vonage.com/help.
HELPFUL HINT: Your WiFi phone's Local Log function provides the
phone's status information. The troubleshooting help website may ask
you to refer to this information while analyzing the problem. Press
(Menu); press
to reach MISC and press
scroll to Local Log and press
will be displayed.
Page 11
(Menu);
press
(Ok); press
to
(Ok). The phone's status information