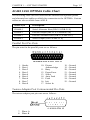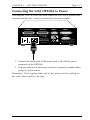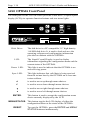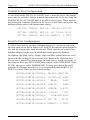
1
AGILE ® TM 5250 OPTIMA Intelligent Protocol Converter ™ USER’S MANUAL TABLE OF CONTENTS Page xv Table of Contents Preface Copyright Information ................................................................................ ii Release Notes .............................................................................................. ii About AGILE ............................................................................................. iii Also From AGILE ...................................................................................... iv 5250 ALLY ......................................................................................... iv 6287 ULTRA ...................................................................................... iv 6287 ALLY PLUS .............................................................................. iv 6287 ALLY ......................................................................................... iv 3270 KLONE ...................................................................................... iv Printer Monitor.................................................................................... iv AGILE Product Warranty ............................................................................v Standard Warranty ................................................................................v Optional Warranties and Services ...................................................... vi Extended Warranty ..................................................................... vi Express Exchange Service .......................................................... vi Medallion Support Program ....................................................... vi Software Upgrades .............................................................................. vi FCC Statement .......................................................................................... vii About the AGILE 5250 OPTIMA ........................................................... viii 5250 OPTIMA Features and Specifications ................................................x About This Manual ................................................................................... xii Typographical Conventions ............................................................... xii Chapter 1 — Getting Started Overview / Objectives .............................................................................. 1-1 Physical Interface .............................................................................. 1-2 Data Stream Interface ....................................................................... 1-2 Before Beginning ..................................................................................... 1-3 Page xvi AGILE 5250 OPTIMA User’s Guide and Reference Selecting a Location ................................................................................. 1-3 Space Requirements .......................................................................... 1-3 Electrical Requirements .................................................................... 1-4 Operating Environment .................................................................... 1-4 Unpacking ................................................................................................ 1-4 Package Contents .............................................................................. 1-5 Important Safety Instructions/Precautions............................................... 1-5 5250 OPTIMA Rear Panel ....................................................................... 1-6 AGILE 5250 OPTIMA Cable Chart ................................................. 1-7 Parallel Port Pin-Outs ....................................................................... 1-7 Twinax Adapter Port Unterminated Pin-Outs .................................. 1-7 DB-25 Serial Port .............................................................................. 1-8 DB-9 Serial Port ................................................................................ 1-8 Connecting to the Host System ................................................................ 1-9 Connecting Twinax ........................................................................... 1-9 Connecting the Printer(s) ....................................................................... 1-10 Connecting a Printer via Centronics Parallel ................................. 1-11 Connecting Printers via Serial ........................................................ 1-11 Connecting the First Printer via Serial ........................................... 1-12 Connecting a Second Printer via Serial .......................................... 1-13 Connecting the Alternate Host(s) .......................................................... 1-14 Connecting an Alternate Host via Parallel ..................................... 1-14 Connecting the First Alternate Host via Serial ............................... 1-15 Connecting a Second Alternate Host via Serial ............................. 1-16 Connecting the 5250 OPTIMA to Power .............................................. 1-17 5250 OPTIMA Front Panel .................................................................... 1-18 Starting Up ............................................................................................. 1-19 Basic Port Configuration ........................................................................ 1-20 Configuring the Twinax Ports................................................................ 1-20 Setting the Twinax Address ............................................................ 1-21 Activating the Twinax Port ............................................................. 1-21 Setting the Device Emulation Type ................................................ 1-22 Configuring the Parallel Out Printer Port .............................................. 1-23 Configuring a Serial Printer Port ........................................................... 1-24 TABLE OF CONTENTS Page xvii Configuring the Parallel In Alt Host Port .............................................. 1-27 Configuring a Serial Alt Host Port ........................................................ 1-28 Saving the Configuration ....................................................................... 1-31 Summary ................................................................................................ 1-31 Chapter 2 — Advanced Configuration Configuration Menu ................................................................................. 2-1 Menu Hierarchy ................................................................................ 2-1 Configuration Option Notation ......................................................... 2-2 Punctuation Codes ............................................................................ 2-3 Menu Movement ............................................................................... 2-3 Twinax Ports ............................................................................................ 2-3 Activating a Twinax Port .................................................................. 2-3 Twinax Addressing ........................................................................... 2-4 Emulations ........................................................................................ 2-4 Modes ................................................................................................ 2-5 Data Routing ..................................................................................... 2-6 Timeout ............................................................................................. 2-7 Alternate Host Input Ports ....................................................................... 2-7 Parallel In Port Configuration........................................................... 2-8 Serial In Port Configuration.............................................................. 2-8 Output Ports.............................................................................................. 2-9 Printer Drivers Available .................................................................. 2-9 Output Port Configuration .............................................................. 2-10 Parallel Output Port......................................................................... 2-10 Serial Output Ports .......................................................................... 2-11 Format Information ................................................................................ 2-12 Carriage Return After Form Feed ................................................... 2-12 Movement ....................................................................................... 2-12 Resolution ....................................................................................... 2-13 Offset ............................................................................................... 2-13 Vertical Percentage Reduction in COR .......................................... 2-14 CPI/Font Order ................................................................................ 2-14 Justification ..................................................................................... 2-14 Bolding ............................................................................................ 2-15 Page Resetting ................................................................................. 2-15 Page xviii AGILE 5250 OPTIMA User’s Guide and Reference Underlining Spaces ......................................................................... 2-16 Orientation ...................................................................................... 2-16 Paper Sources (Drawers) ................................................................ 2-19 Chapter 3 — Character Code Translation Overview .................................................................................................. 3-1 Selecting a Translation Table................................................................... 3-2 Twinax Translation ........................................................................... 3-3 Alternate Host Translation ................................................................ 3-3 5250 OPTIMA Translation ............................................................... 3-3 Reading Translation Tables ..................................................................... 3-3 Editing a Translation Table ...................................................................... 3-4 Translation Tables .................................................................................... 3-6 ASCII to ASCII ................................................................................. 3-6 EBCDIC to ASCII............................................................................. 3-7 ASCII to EBCDIC............................................................................. 3-8 EBCDIC to EBCDIC ........................................................................ 3-9 EBCDIC to HP ................................................................................ 3-10 EBCDIC to PC ................................................................................ 3-11 EBCDIC to PS................................................................................. 3-12 Xerox 275 EBCDIC to ASCII ........................................................ 3-13 User Table 1 .................................................................................... 3-14 User Table 2 .................................................................................... 3-15 User Table 3 .................................................................................... 3-16 User Table 4 .................................................................................... 3-17 User Table 5 .................................................................................... 3-18 User Table 6 .................................................................................... 3-19 User Table 7 .................................................................................... 3-20 Xerox Font EBCDIC to ASCII ....................................................... 3-21 Chapter 4 — Programmable Function Strings Overview .................................................................................................. 4-1 Editing PFSs (A Tutorial) ........................................................................ 4-2 Parameters Within PFSs ................................................................... 4-3 GFIDs ....................................................................................................... 4-4 User Font Configuration ................................................................... 4-4 TABLE OF CONTENTS Page xix PFS Descriptions ...................................................................................... 4-6 INITIBM ........................................................................................... 4-6 INIT T1 ............................................................................................. 4-6 INIT T2 ............................................................................................. 4-7 INIT T3 ............................................................................................. 4-7 INITALT ........................................................................................... 4-7 INIT275 ............................................................................................. 4-7 INITOPT ........................................................................................... 4-8 FF ...................................................................................................... 4-8 CR...................................................................................................... 4-8 LF ...................................................................................................... 4-8 PORT ................................................................................................. 4-9 LAND ................................................................................................ 4-9 VERMOVE ....................................................................................... 4-9 LINEDEN ....................................................................................... 4-10 PAGELEN ....................................................................................... 4-10 P 5CPI ............................................................................................. 4-10 P 8CPI ............................................................................................. 4-11 P 10CPI ........................................................................................... 4-11 P PSCPI ........................................................................................... 4-12 P 12CPI ........................................................................................... 4-12 P 15CPI ........................................................................................... 4-12 P 16CPI ........................................................................................... 4-13 P 17CPI ........................................................................................... 4-13 L 5CPI ............................................................................................. 4-14 L 8CPI ............................................................................................. 4-14 L 10CPI ........................................................................................... 4-14 L PSCPI ........................................................................................... 4-15 L 12CPI ........................................................................................... 4-15 L 15CPI ........................................................................................... 4-16 L 16CPI ........................................................................................... 4-16 L 17CPI ........................................................................................... 4-16 COR 10............................................................................................ 4-17 COR 12............................................................................................ 4-17 COR 15............................................................................................ 4-18 BOLD ON ....................................................................................... 4-18 BOLDOFF ....................................................................................... 4-18 BSBOLD1 and BSBOLD2 ............................................................. 4-19 UNDL ON ....................................................................................... 4-19 UNDLOFF ...................................................................................... 4-20 SUBS ON ........................................................................................ 4-20 SUBSOFF........................................................................................ 4-20 SUPS ON......................................................................................... 4-20 Page xx AGILE 5250 OPTIMA User’s Guide and Reference SUPSOFF ........................................................................................ 4-20 LOWQUAL ..................................................................................... 4-21 MEDQUAL ..................................................................................... 4-21 HIQUAL ......................................................................................... 4-21 SIMPLEX ........................................................................................ 4-21 DUPLEX ......................................................................................... 4-22 TUMBLE ........................................................................................ 4-22 PPAPER 1 ....................................................................................... 4-22 PPAPER 2 ....................................................................................... 4-22 PPAPER 3 ....................................................................................... 4-22 P ENVEL ........................................................................................ 4-23 PORTCUT ....................................................................................... 4-23 PORTTRC ....................................................................................... 4-23 PORTMAN ..................................................................................... 4-23 LPAPER 1 ....................................................................................... 4-23 LPAPER 2 ....................................................................................... 4-24 LPAPER 3 ....................................................................................... 4-24 L ENVEL ........................................................................................ 4-24 LANDCUT ...................................................................................... 4-24 LANDTRC ...................................................................................... 4-24 LANDMAN .................................................................................... 4-25 JOG OUT ........................................................................................ 4-25 DEST1 ............................................................................................. 4-25 DEST2 ............................................................................................. 4-25 DEST3 ............................................................................................. 4-25 JSTSTRT ......................................................................................... 4-25 JOBSTRT ........................................................................................ 4-26 JOBEND.......................................................................................... 4-26 TIMEOUT ....................................................................................... 4-26 Chapter 5 — Maintenance and Troubleshooting Diagnostics ............................................................................................... 5-1 Twinax Addressing ........................................................................... 5-1 Error Codes ....................................................................................... 5-2 Twinax Error Log ............................................................................. 5-3 Printing Reports ....................................................................................... 5-4 TEST! Report .................................................................................... 5-5 PFSTEST! Report ............................................................................. 5-6 CONFIG! Report............................................................................... 5-7 OPTIONS! Report............................................................................. 5-8 XLATES! Report ............................................................................ 5-12 TABLE OF CONTENTS Page xxi PFS! Report ..................................................................................... 5-20 PORTFID! Report ........................................................................... 5-23 LANDFID! Report .......................................................................... 5-29 LOOP! Report ................................................................................. 5-35 Troubleshooting ..................................................................................... 5-35 Step 1: Power .................................................................................. 5-35 Step 2: Connections ........................................................................ 5-35 Step 3: Configuration ...................................................................... 5-36 Step 4: Printer Test.......................................................................... 5-36 Step 5: Configuration Test .............................................................. 5-37 Step 6: Twinax Host Test................................................................ 5-37 Step 7: Alternate Host Test ............................................................. 5-37 Other Issues ..................................................................................... 5-37 Contacting AGILE Technical Support ........................................... 5-38 The AGILE Bulletin Board .................................................... 5-39 Appendix A — Interfacing Xerox Printers Introduction ............................................................................................. A-1 System-Based Formatting ................................................................ A-1 XES Mode ........................................................................................ A-2 Formatting Conflict Overview ......................................................... A-2 Coexistence ...................................................................................... A-3 Separate Addresses .......................................................................... A-3 Delimiting XES Jobs........................................................................ A-4 Well-Formed XES Jobs ................................................................... A-4 Automatic PFS Suppression ............................................................ A-5 Automatic Form Feed Suppression ................................................. A-5 Passing FFs in Auto FF Suppression Mode .................................... A-6 Logical Not (¬) Commands ............................................................. A-8 Special Formatting Problems .................................................................. A-9 Font Downloading ........................................................................... A-9 UDK Character Conflict .................................................................. A-9 Line Endings ......................................................................................... A-10 Support for all Types of SCS Line Endings .................................. A-10 Auto UDK Termination ........................................................................ A-10 Line Feed vs. Relative Movements ............................................... A-11 Antiquities ...................................................................................... A-11 Page xxii AGILE 5250 OPTIMA User’s Guide and Reference Font Correspondences ........................................................................... A-11 Downloading Font Correspondences ............................................ A-11 Font Correspondence Limits.......................................................... A-14 Xerox Menu Options ............................................................................. A-14 The Xerox Menu ............................................................................ A-15 UDK Character Translation Configuration ................................... A-15 PFS Suppression Configuration ..................................................... A-16 Form Feed Suppression Configuration .......................................... A-16 Change Form Feed to New Line Configuration ............................ A-17 Logical Not Command Configuration ........................................... A-17 Job Restart to Form Feed Translation Configuration .................... A-18 Metacode Transparency ................................................................. A-18 Line Feed Configuration ................................................................ A-19 Interfacing Xerox 4235 Printers in XPPM Mode ................................. A-20 Appendix B — SCS / DCA Command Summary Overview ..................................................................................................B-1 Null (NUL) ........................................................................................B-2 ASCII Transparency (ATRN) ...........................................................B-2 Horizontal Tab (HT) .........................................................................B-2 Required New Line (RNL) ...............................................................B-3 Superscript (SPS) ..............................................................................B-4 Repeat (RPT) .....................................................................................B-4 Form Feed (FF) .................................................................................B-5 Carriage Return (CR) ........................................................................B-5 New Line (NL) ..................................................................................B-6 Unit Back Space (UBS) ....................................................................B-6 Back Space (BS) ...............................................................................B-7 Interchange Record Separator (IRS) ................................................B-7 Word Underscore (WUS) .................................................................B-8 Line Feed (LF) ..................................................................................B-9 Switch (SW) ......................................................................................B-9 Set Horizontal Format (SHF) ..........................................................B-10 Set Vertical Format (SVF) ..............................................................B-10 Set Line Density (SLD) ..................................................................B-11 Set Graphic Error Action (SGEA) ..................................................B-12 Execute PMP (PMP) .......................................................................B-12 Set Coded Graphic Character Set Local ID (SCGL) ......................B-13 TABLE OF CONTENTS Page xxiii Set GCGID Through GCID (SCG) .................................................B-14 Set FID Through GFID (FSG) ........................................................B-15 Begin Emphasis (BES) ...................................................................B-17 End Emphasis (EES) .......................................................................B-17 Release Left Margin (RLM) ...........................................................B-17 Set Indent Level (SIL) ....................................................................B-18 Set Line Spacing (SLS) ...................................................................B-19 Set Initial Conditions (SIC) ............................................................B-20 Set Horizontal Tabs (STAB)...........................................................B-21 Justify Text Field (JTF) ..................................................................B-22 Set Justify Mode (SJM) ..................................................................B-23 Set Horizontal Margins (SHM) ......................................................B-24 Set Presentation Page Size (SPPS) .................................................B-25 Set Single Line Distance (SSLD) ...................................................B-26 Set Character Density (SCD) ..........................................................B-27 Set Presentation Color (SPC) ..........................................................B-28 Page Presentation Media (PPM) .....................................................B-30 Set Vertical Margins (SVM) ...........................................................B-32 Set Printer Setup (SPSU) ................................................................B-33 Set Exception Action (SEA) ...........................................................B-34 Set Text Orientation (STO).............................................................B-35 Begin Underscore (BUS) ................................................................B-36 End Underscore (EUS) ...................................................................B-36 Begin Overstrike (BOS) ..................................................................B-37 End Overstrike (EOS) .....................................................................B-37 Load Alternate Characters (LAC) ..................................................B-38 Bell (BEL) .......................................................................................B-39 Index Return (IRT) .........................................................................B-39 Absolute Horizontal Print Position (AHPP) ...................................B-40 Absolute Vertical Print Position (AVPP) .......................................B-40 Relative Horizontal Print Position (RHPP) ....................................B-41 Relative Vertical Print Position (RVPP).........................................B-41 Transparent (TRN) ..........................................................................B-42 Numeric Backspace (NBS) .............................................................B-42 Subscript (SPS) ...............................................................................B-43 Indent Tab (IT) ................................................................................B-43 Required Form Feed (RFF).............................................................B-44 Substitute (SUB) .............................................................................B-44 Space (SP) .......................................................................................B-44 Required Space (RSP).....................................................................B-44 Numeric Space (NSP) .....................................................................B-45 Appendix C — Pseudo Transparency Introduction ..............................................................................................C-1 i-data Pseudo Transparency .....................................................................C-1 MPI Pseudo Transparency .......................................................................C-2 Appendix D — OPTEDIT Overview ................................................................................................. D-1 Installing OPTEDIT ......................................................................... D-1 Running OPTEDIT .......................................................................... D-2 Editing the Current Configuration ................................................... D-2 Editing Configuration Options ........................................................ D-3 Basic Port Configuration ......................................................................... D-4 Activating Ports ............................................................................... D-4 Input Ports ............................................................................................... D-5 Setting the Mode .............................................................................. D-5 Choosing the Data Routing .............................................................. D-6 Choosing the Timeout Period .......................................................... D-7 Configuring the Input Ports .................................................................... D-7 Setting the Twinax Address ............................................................. D-8 Setting the Device Emulation Type ................................................. D-8 Interfacing Xerox Printers....................................................................... D-9 UDK Character Translation ............................................................. D-9 PFS Suppression ............................................................................ D-10 Form Feed Suppression ................................................................. D-11 Change Form Feed to New Line .................................................... D-12 Logical Not Commands ................................................................. D-12 Job Restart to Form Feed Translation............................................ D-13 Metacode Transparency ................................................................. D-14 Alternate Host Input Ports .................................................................... D-15 Configuring the Parallel Input Port ............................................... D-15 Configuring the Serial Input Ports ................................................. D-15 Seleting Input (Alt Host)................................................................ D-15 Serial Interface Settings ................................................................. D-16 Configuring the Output Ports ................................................................ D-17 Loading an Output Port Configuration .......................................... D-17 Saving an Output Port Configuration ............................................ D-19 Configuring the Parallel Output Port .................................................... D-19 Parallel Output Port Timing........................................................... D-19 Configuring Serial Ports for Output ..................................................... D-20 Selecting Output............................................................................. D-20 Printer Error Timeout (ERRTIME) ............................................... D-21 Format Information ............................................................................... D-21 Choosing a Translation Table ............................................................... D-23 Special Editors ...................................................................................... D-24 Programmable Function Strings .................................................... D-24 Translation Table Editing .............................................................. D-26 Glossary PREFACE Page i TM 5250 OPTIMA Intelligent Protocol Converter 5250 OPTIMA™ User’s Guide and Reference AGILE 875 Alfred Nobel Drive Hercules, CA 94547-1899 TEL (510) 724-1600 • TEL (800) 538-1634 • FAX (510) 724-9624 Customer Support: FAX (510) 724-2222 • E-MAIL [email protected] Page ii AGILE 5250 OPTIMA User’s Guide and Reference Copyright Information ©1996 AGILE All rights reserved. Copyright protection claimed includes all forms and matters of copyrightable material and information now allowed by statutory or judicial law or hereinafter granted. AGILE is a registered trademark of AGILE. 5250 OPTIMA and all other AGILE products mentioned in this publication are trademarks of AGILE. IBM and all IBM products mentioned in this publication are registered trademarks of International Business Machines, Inc. Xerox and all Xerox products mentioned in this publication are trademarks of Xerox Corporation. Hewlett-Packard and all Hewlett-Packard products mentioned in this publication are trademarks of the Hewlett-Packard Company. All other trademarks appearing in this document are owned by their respective companies. Release Notes This version of the AGILE 5250 OPTIMA Users Guide and Reference was printed in February 1996. It describes 5250 OPTIMA software revision 6.00 and later. Printed in the United States of America. Fill in for future reference: AGILE 5250 OPTIMA Purchase Date: _______________________ AGILE 5250 OPTIMA Serial Number: _______________________ PREFACE Page iii About AGILE In 1978 IBM and the word compatible were rarely found together, but IBMs mainframe customers wanted a less expensive, more flexible printing solution than IBM offered them. They wanted value, performance and features that only ASCII printers could provide. They wanted freedom of choice. This market need prompted Robert Torrey, then Director of Engineering for AGILE, to develop a bridge between popular ASCII printers and the IBM 3270 coax protocol that was a barrier to using ASCII printers in an IBM environment. Robert Torrey is now president of AGILE, and his coax protocol converter was so successful that more than 40 companies tried to copy it. The industry has undergone enormous changes, and so has AGILE. As the age of the mainframe fades, AGILEs 6287 ULTRA coax printer interface is still known industry wide as the finest available. The recognized leader in IBM and PCM mainframe and midrange connectivity, AGILE continually seeks new ways to offer its customers options that broaden their choices and provide solutions to their printing problems. Over 50,000 AGILE interfaces have been installed worldwide. By working closely with industry leaders including Xerox, Lexmark, Hewlett-Packard and Novell, AGILE makes certain that its products will continue to provide full compatibility, remain attractively priced and stay on the leading edge of market developments. AGILEs staff of experienced hardware, software and technical support engineers ensure that we will remain in the forefront of technology without sacrificing reliability. The custom solution is one of our strengths, and we have a variety of platforms from which to fulfill the special needs of our customers. If we cannot provide the connectivity you require, we will gladly refer you to one of our strategic business partners who can. If you read what AGILEs customers have to say, you will see words like the performance was flawless and the best support we have seen. You see, customer satisfaction is the only true measure of our success. We understand that to keep pace with the rapidly changing environment, we must do more than simply provide products. That is why we remain uncompromising about some very important things: Quality, Performance, Value and Service. Page iv AGILE 5250 OPTIMA User’s Guide and Reference Also From AGILE 5250 ALLY™ An intelligent protocol converter that enables an industry-standard parallel ASCII or EBCDIC printer to be attached to a System/3X or AS/400 midrange computer. Its alternate host feature allows the midrange host and a PC to share the printer without an A/B switch. 6287 ULTRA™ A full-featured protocol converter that enables a serial or parallel ASCII or EBCDIC printer or plotter to be attached to a 3270-type controller. Its alternate host feature allows the mainframe host and a PC to share the printer without an A/B switch. 6287 ALLY PLUS™ A high-speed protocol converter that enables serial and parallel ASCII and EBCDIC printers and plotters to be attached to a 3270-type controller. Its alternate host feature allows the mainframe host and a PC to share the same printer without an A/B switch. 6287 ALLY ™ A high-speed protocol converter that enables serial and parallel ASCII and EBCDIC printers and plotters to be attached to a 3270-type controller. 3270 KLONE ™ A PC expansion card that enables an IBM PC/AT/XT, PS/2 or compatible computer to emulate a mainframe terminal. Its features include powerful file transfer utilities for sharing PC and mainframe data, plus mainframe printer emulation, allowing mainframe data to be printed on a PC printer. Printer Monitor™ A small device that enables the user to capture print data streams for troubleshooting analysis. Attaches to a parallel port of a PC used to capture data that otherwise would have been sent to the printer. PREFACE Page v AGILE Product Warranty Standard Warranty AGILE warrants to the original purchaser that this product will be free from defects in materials and workmanship and in good working order per the functional specifications current at the time of shipment for a period of two (2) years from the date of shipment to the purchaser. AGILE units that fail within the first thirty (30) days from the date of delivery will be treated as an Express Exchange Service (see Optional Warranties and Services) at no extra charge. Should this product fail to be in good working order at any time during the twoyear period, AGILE will, at its absolute discretion, repair or replace this product. AGILE shall have no obligation whatsoever if the product has been damaged due to accident or disaster, or if it has been misused, carelessly handled, defaced, modified or altered, including unauthorized repairs made or attempted, or if the user has failed to provide and maintain a proper environment for the product. AGILE reserves the right to determine what constitutes warranty repair. Out-ofwarranty products will be repaired using AGILEs flat repair rate. All out-ofwarranty repaired units have a 90-day Standard Warranty. Units returned for repair and found not defective will, at AGILEs discretion, incur a handling and testing charge. AGILE is not responsible for delays caused by shipping or nonavailability of replacement components or other similar causes, events or conditions beyond its reasonable control. Claims must be reported to AGILEs Technical Support Department at (510) 724-1600, (800) 538-1634, or by FAX at (510) 724-2222. AGILE will assist the customer in verifying the source of the problem. At AGILEs discretion, a Return Materials Authorization (RMA) number will be issued to the customer. The customer will then carefully package and ship the unit to AGILE (preferably in the original shipping container) with the RMA number on the outside of the box. Shipping costs incurred in sending the unit to AGILE are borne by the customer. Shipping costs incurred in returning the unit to the customer via UPS Ground (or equivalent service with a secondary shipper) are borne by AGILE. Repair parts and replacement products will be furnished on an exchange basis and will be either reconditioned or new. All replaced parts and products become the property of AGILE. This warranty is the only warranty provided by AGILE. If this product is not in good working order as warranted above, the customers sole remedy shall be repair or replacement as provided above. This warranty states the purchasers exclusive remedy for any breach of AGILEs warranty and for any claim, whether in contract or tort, for loss, injury or damages caused by the sale or use of any product and is in lieu of all other warranties, expressed or implied. In no Page vi AGILE 5250 OPTIMA User’s Guide and Reference event shall AGILE be responsible for any loss of business, savings or profits, downtime or delay, labor repair or material costs, injury to person or property, or any similar or dissimilar consequential or inconsequential loss or damage resulting from this product, its use, or arising out of any breach of warranty, even if AGILE or an authorized AGILE dealer has been advised of the possibility of such damage, or for any claim by any other party. Some states do not allow the exclusion or limitation of incidental or consequential damages, so the above limitations or exclusions may not apply. All expressed and implied warranties for this product, including the warranties of merchantability and fitness for a particular purpose, are limited in duration to a period of two (2) years from the date of purchase by the original purchaser, and no warranties, whether expressed or implied, will apply after this period. Some states do not allow limitations on how long an implied warranty lasts, so the above limitations may not apply. This warranty gives the user specific legal rights, and the user may also have other rights which may vary from state to state. Optional Warranties and Services Extended Warranty lengthens the Standard Warranty and is available in 12month increments for a maximum of three (3) years. This extension can effectively lengthen the Standard Warranty to five (5) years. Any Extended Warranty must be purchased prior to the expiration date of the Standard Warranty. Express Exchange Service provides a next-business-day delivery of a replacement unit. The customer must contact AGILE, and AGILEs Customer Support Department must determine by 2:00 p.m. PST that a replacement unit is required. Express Exchange Service is available in 12-month increments for a maximum total of five (5) years and must be concurrent with Standard or Extended Warranties. Medallion Support Program extends the AGILE two-year Standard Warranty by one year to three years, plus it includes three years of Express Exchange Service, all at a savings of one-third off the standard price. Software Upgrades AGILE periodically makes improvements to the operating software for its products. These software upgrades are available from AGILE for a nominal charge during the warranty period. All future code modifications will be made through the replacement of the disk. To upgrade to a new revision of software, start up the AGILE 5250 OPTIMA with your current disk, remove it, and insert a backup copy of the new disk, and SAVE! under CONFIG. PREFACE Page vii FCC Statement This equipment generates, uses and can radiate radio frequency energy. If it is not installed and used in strict accordance with AGILEs instructions, it may cause interference to radio and television reception. This equipment has been tested and complies with the limits for a Class A computing device in accordance with the specifications in Subpart J of Part 15 of FCC Rules, which are designed to provide reasonable protection against such interference when operated in a commercial environment. Operation of this equipment in a residential area is likely to cause interference. However, there is no guarantee that interference will not occur in a particular installation. If this equipment does cause interference to radio and television reception, which can be determined by turning the equipment off, the user is encouraged to try to correct the interference by one or more of the following measures: Reorient the receiving antenna. Relocate the OPTIMA with respect to the receiver. Move the OPTIMA away from the receiver. Plug the OPTIMA into a different outlet so that the OPTIMA and receiver are on different branch circuits. If necessary, the user should consult an experienced radio/television technician for additional suggestions. The booklet, How to Identify and Resolve Radio-TV Interference Problems, prepared by the Federal Communications Commission, may also be helpful. This booklet is available from the US Government Printing Office, Washington, DC 20402, Stock No. 004-000-00345-4. WARNING: This equipment has been certified to comply with the limits for a Class A computing device, pursuant to Subpart J of Part 15 of FCC rules. Only peripherals (computer input/output devices, printers, plotters, etc.) certified to comply with the Class A (commercial) or Class B (residential) limits may be attached to the OPTIMA. Operation with noncertified peripherals is likely to result in interference to radio and TV reception. Note: This equipment uses shielded cables to meet compliance limits for a Class A computing device. Shielded cables must be used to ensure this equipment continues to meet these limits. The shield must be terminated to the metallic connector at both ends to guarantee adequate suppression of undesirable emissions. All cables are double shielded (Mylar foil and tinned copper braid.) Page viii AGILE 5250 OPTIMA User’s Guide and Reference About the AGILE 5250 OPTIMA The AGILE 5250 OPTIMA is a powerful, easy-to-use, intelligent protocol converter/printer interface controller that allows industry-standard, parallel or serial, ASCII or EBCDIC printers to be attached to an IBM System 34, 36, 38 or an AS/400. The OPTIMA also can be attached to plotters, rasterizers, bar code printers and other output devices that support Centronics parallel or serial interfacing. The alternate host input ports allow the attached printers to be shared with PCs, DEC VAXes, HP 3000s, PC LANs and even other protocol converters. The AGILE 5250 OPTIMA is a self-contained unit with a built-in disk drive, power supply and operator control panel. It is designed to be fast and to have maximum flexibility. Up to three twinax addresses (also referred to as sessions or logical units) are supported. Each is individually configurable to emulate an IBM 3812 (SCS mode), 4214, 5219, 5224, 5225 or 5256 printer. The OPTIMA automatically validates port addresses on each active twinax port, thus avoiding address conflicts. 5219 support includes IBM DisplayWrite 36 and Office/400 support, including multi-column justification, GFIDs with multiple fonts per page, superscripting, subscripting, bolding, overstriking, backspacing, underlining, pitch control, sheetfeeder control, page orientation and format. Connectivity is provided by two bidirectional serial ports, one parallel input port and one Centronics parallel output port. The parallel input port is dedicated to input, which can come from a source such as a PC. The parallel output port is dedicated to output. The serial ports are bidirectional, and they can be attached either to additional printers or to alternate hosts. The serial ports support data rates of 300 baud to 19.2K baud (input) or 115.2K baud (output). The ports and the software provide simultaneous support of up to either three output devices and one alternate host input device, or three alternate hosts and one output device. The twinax addresses and the alternate host inputs can be individually configured to print to any and all attached printers, with appropriate character translation provided by the OPTIMA. It translates IBM twinax output to parallel or serial output, and it translates high-level formatting information to a format appropriate for supported printers (i.e., it converts IBM printer control codes to features found in other printers). PREFACE Page ix The operating software and configuration data are stored on a PC/MSDOS-compatible diskette, instead of a conventional ROM or EPROM. The built-in 1.44MB disk drive facilitates easy configuration and software upgrading. The unit can be configured from the front panel, or with OPTEDIT, a PC-based, menu-driven configuration utility. System uniformity is assured because the unit can be configured once and the settings then duplicated for additional stations. Upgrading is as easy as inserting a new disk. Users with Xerox 275s can replace those units without changing their host software. The OPTIMA also provides extensive special support for Xerox printers in both XDPM (XES) and XPPM modes, including the ability to provide Xerox 4235 to System/3X or AS/400 connectivity in XDPM and XPPM modes simultaneously. The OPTIMA allows Xerox 4235 users to download fonts and forms in XPPM and XDPM modes through the printers parallel and serial ports. Diskettes with operating software preconfigured for these applications are available. Programmable function strings, computer output reduction (COR) and user-editable font correspondence tables are also standard features. The unit is user-configurable for full SCS formatting support on virtually any printer. Throughput is rated at 35 logical pages per minute in IBM emulation, or 55 logical pages per minute in 275 emulation. 100% print density is defined as 132 columns by 66 lines, for a total of 8712 characters per page. Diagnostics include a power-on self test of ROM and RAM, automatic twinax address validation and conflict avoidance, an internal twinax loopback test, an LCD display of active ports and their communication activity, a twinax error log and an EBCDIC HEX printout of data sent to the printer. Reports generated by the OPTIMA include a printer test, a PFS test, a configuration report, a translate table report, a PFS report, font correspondence table reports, a loop report and an o§ions report. The AGILE 5250 OPTIMA is backed by a full two-year warranty. Optional warranties and services are also available. Page x AGILE 5250 OPTIMA User’s Guide and Reference 5250 OPTIMA Features and Specifications Input/Output Ports IBM Twinax Port 2 DB-25 Parallel Ports (1 input, 1 output) DB-9 Serial Port (bidirectional) DB-25 Serial Port (bidirectional) Host Interface Automatic terminating / cable-through intelligent T connector Up to three twinax addresses (sessions/logical units) with automatic address validation and conflict avoidance Printer/Plotter Output Interfacing ASCII or EBCDIC Centronics DB-25 Parallel Port DB-9 Serial Port (300 - 115.2K Baud) DB-25 Serial Port (300 - 115.2K Baud) Alternate Host Input Interfacing DB-25 Parallel Port DB-9 Serial Port (300 - 19.2K Baud) DB-25 Serial Port (300 - 19.2K Baud) Printer Sharing Printer sharing between twinax host and up to three alternate hosts Host Systems Supported IBM AS/400 IBM System 34/36/38 Printer Emulations IBM 3812 (SCS mode), 4214, 5219, 5224, 5225 and 5256 printers Printers Supported Xerox 2700 II, 3700, 4030, 4045, 4050, 4197, 4213 and 4235 printers Other Xerox distributed electronic printers Hewlett-Packard LaserJet II, IID, IIID, IIISi, 4, 4Si and compatibles IBM laser, dot matrix and compatible printers Plotters Supported Hewlett-Packard 7221, 7475, 7550 Zeta plotters All HPGL- and GML-capable plotters PREFACE Page xi Throughput Supports up to 35 logical pages-per-minute at 100% print density (132 columns by 66 lines, for a total of 8712 characters per page) in IBM emulation; 55 logical pages-per-minute in 275 emulation Upgradeability Operating software and configuration data on PC/MS DOScompatible 1.44MB 3.5" floppy diskette Programmability Front panel menu configuration with LCD OPTEDIT a PC-based, menu-driven configuration utility User Programmable Function Strings (PFSs) PFSs dynamically allocated up to 60K total (512 PFSs using up to 20K per output port) Transparency IBM 35h IBM 03h Xerox Metacode 35h i-data pseudo transparency (in IBM emulation) MPI pseudo transparency (in 275 emulation) Translation Translation tables changeable on line Character Sets ASCII or EBCDIC character sets Custom Application Support XES DisplayWrite/36 Office/400 Metacode Special application customization available Power 110V 60Hz / 220V 50Hz with low power consumption Size 10.75" x 9.25" x 3.50" Weight 6.0 lbs. Technical Support Toll-free technical support is available from 7:00 a.m. to 4:30 p.m. Pacific time Page xii AGILE 5250 OPTIMA User’s Guide and Reference About This Manual This manual covers the installation and use of the AGILE 5250 OPTIMA intelligent protocol converter. AGILE makes no warranties, expressed or implied, as to its completeness or accuracy. The information in this manual is current as of the date of its publication, but it is subject to change by AGILE at any time without notice. This manual is not intended to be used for manufacturing or engineering specifications, and it is assumed that the user understands the interrelationship between any affected systems, machines, programs and media. AGILE periodically updates this manual for clarity, to correct inaccuracies and typographical errors, or to document added or changed product features. AGILE will be pleased to improve the manual by implementing suggestions from our customers. Please put suggestions in writing and mail to AGILE at the address below: AGILE Attn: Marketing 875 Alfred Nobel Drive Hercules, CA 94547-1899 Typographical Conventions This manual uses various fonts to represent different types of information. An understanding of this font usage will aid the user in understanding the information this manual presents. Text that is highlighted in this manner represents information of great importance that should not be overlooked. d f s g ENTER MENU/STATUS RESET represent the buttons on the OPTIMA's front panel. OPTIMA:CONFIG:PAR OUT:FNTINFO:PORTFID> is used to represent information displayed on the OPTIMAs Liquid Crystal Display. Information in this typeface is used to represent output from the printer. CHAPTER 1 — GETTING STARTED Page 1-1 CHAPTER 1 GETTING STARTED Overview / Objectives This chapter provides information on installing the AGILE 5250 OPTIMA. Sections of this chapter provide instructions regarding: Choosing a location for the OPTIMA Physical interfacing to the host system and printers Configuring the OPTIMA for communication with the host system, printer(s) and alternate host(s) Saving the new configuration All physical interfacing should be performed before the OPTIMA is turned on. This chapter provides instructions for interfacing all of the OPTIMA ports to the other equipment before providing instructions on configuring those interfaces. Please follow this order when installing the OPTIMA. This chapter provides step-by-step instructions to assist the user in performing the basic port configuration required to get the OPTIMA communicating with the host system and printers. Detailed menu operation instructions can be found in Chapter 2 Advanced Configuration. Note: The punctuation codes that follow the OPTIMA menu options each have a specific meaning. These directions may indicate that an equals sign (=) should appear in the LCD (Liquid Crystal Display), when a does not equal sign (≠) is actually displayed. Chapter 2 Advanced Configuration lists the meaning of these and all punctuation codes used in the OPTIMA menu system. Physical Interface IBM midrange hosts are attached to IBM midrange printers via a twinaxial interface. Industry-standard printers are typically attached to computers via a Centronics parallel interface. The 5250 OPTIMA provides the physical connection that converts a twinaxial interface to a Centronics parallel interface. Page 1-2 AGILE 5250 OPTIMA User’s Guide and Reference Data Stream Interface The data stream in a print job from an IBM midrange host consists of hexadecimal values, some of which are SCS/DCA control codes, and some of which represent printable characters for an IBM midrange printer. The IBM midrange host uses over fifty SCS/DCA commands to control how an IBM midrange printer formats a given print job. The commands can control all formatting aspects, including orientation and paper size, the amount of justification and special print features like bolding and underlining. Industry-standard printers are not capable of understanding or interpreting either the commands or the hexadecimal values representing printable characters. The 5250 OPTIMA interprets the various SCS/DCA control codes it receives and sends to the printer the command it needs to accomplish the formatting specified by the SCS/DCA control code. It does this by sending a specific programmable function string (PFS) to the printer upon receipt of a specific SCS/DCA hexadecimal command. The conversion of printable characters is accomplished by the 5250 OPTIMA with translation tables. Upon receipt of a hexadecimal value representing a printable character, the 5250 OPTIMA looks up the value in the active translation table, and it sends to the attached industry-standard printer the corresponding value that will produce the same printed character. The key to allowing this interpretation and character translation is the proper configuration of the 5250 OPTIMA. Most important to the configuration process is the loading of the output port configuration (printer driver) appropriate for the attached industry-standard printer. By loading this driver, programmable function strings will automatically be defined for the users specific printer for accurate conversion of the SCS/ DCA formatting commands received by the 5250 OPTIMA. The output port configuration will also define the appropriate translation table to use for the printer. The user may modify or delete any PFSs that produce undesirable print results, and translation tables may also be edited by the user to access printable characters not converted by the translation tables to the users desired characters. CHAPTER 1 — GETTING STARTED Page 1-3 Before Beginning The following are needed before installing the 5250 OPTIMA: A suitable location A serial or parallel printer (or other output device) A twinax host interface cable connected to the users host system or remote twinax controller Additionally, the user or someone in the users organization should be knowledgeable about the host system and printers Selecting a Location The compact size, quiet operation and attractive styling of the 5250 OPTIMA allow it to be placed in almost any location with a flat, stable surface. For ease of operation and servicing, it is recommended that it is installed near the printer. If the printer has a large enough flat surface, the OPTIMA may be placed there for convenience. Space Requirements The dimensions of the OPTIMA are as follows: ™ Page 1-4 AGILE 5250 OPTIMA User’s Guide and Reference Electrical Requirements The 5250 OPTIMA requires 110 VAC (50-60 Hz) at 0.5 amperes, unless specifically configured for 220 VAC / 0.25 ampere usage (factory optional). Plug the OPTIMA and the printer into different electrical circuits. Do not use extension cords with the OPTIMA. Users with any questions regarding the electrical service at their site should contact a qualified, licensed electrician. Operating Environment The 5250 OPTIMA operates best in an environment with a temperature between 50° and 90° Fahrenheit (10°-32° Celsius) and a relative humidity between 15% and 65%. It should be located in a well-ventilated area away from direct sunlight and sources of heat, cold or humidity. Unpacking After removing the OPTIMA from the shipping container, inspect the unit for any damage in shipment. Immediately report any damage to the freight carrier. Save the packing container. CHAPTER 1 — GETTING STARTED Page 1-5 Package Contents After unpacking the 5250 OPTIMA, please check that all of the following items have been included. If any of these items are missing, please contact AGILE immediately. Unless ordered otherwise, the OPTIMA shipping container includes: This users guide The AGILE 5250 OPTIMA protocol converter 110 VAC 3-prong, 6-foot power cord (the power supply is optionally factory-configured for 220 VAC) Parallel printer cable Twinax auto-terminating T type connector Operating/configuration software on PC/MS-DOS-compatible 1.44MB 3.5-inch disk The following optional items may be included under separate packaging: Serial printer (output) cables Alternate host input cables (serial and/or parallel) Important Safety Instructions/Precautions Follow these important safety precautions: Read these instructions carefully before turning on the 5250 OPTIMA and before plugging the unit into a power outlet. The OPTIMA must be properly grounded, and it is equipped with a 110 VAC 3-prong power cord (approved by UL, CSA, FCC) as a safety feature. Make certain that the OPTIMA is plugged into a properly grounded three-pronged power outlet. If no properly grounded outlet is available, contact a qualified, licensed electrician to install one. Disconnect the power plug by pulling the plug, not the cord. Never use the unit if it has been damaged or exposed to excessive moisture. Never open the cover of the OPTIMA. Page 1-6 AGILE 5250 OPTIMA User’s Guide and Reference 5250 OPTIMA Rear Panel The rear panel of the OPTIMA provides an on/off switch, a NEMA power cord outlet, a DB-15 port for connecting a twinax adapter (TWINAX), a Centronics DB-25 parallel output port (PARALLEL OUT PRINTER), a DB-25 parallel input port (PARALLEL IN ALT HOST), a DB-9 serial I/O port (SERIAL I/O PORT 1) and a DB-25 serial I/O port (SERIAL I/O PORT 0). PARALLEL OUT PRINTER PC COMPATIBLE 117 VAC 0.5A 50/60 Hz 35W PARALLEL IN ALT HOST SERIAL I/O PORT 1 PC COMPATIBLE PC-AT COMPATIBLE SERIAL I/O PORT 0 DCE FUSE: 250v 0.5A SLO-BLO CAUTION: FOR CONTINUED PROTECTION AGAINST FIRE, REPLACE ONLY WITH SAME TYPE AND RATING OF FUSE. MADE IN USA TWINAX LISTED U ®L ® LR 69521 E.D.P. EQUIPMENT Y 47T8 This equipment complies with the requirements in Part 15 of FCC Rules for a Class A computing device. Operation of this equipment in a residential area may cause unacceptable interference to radio and TV reception requiring the operator to take whatever steps are necessary to correct the interference. The PARALLEL OUT PRINTER port is a PC-compatible DB-25 Centronics port that is dedicated to output to a printer or another parallel-attached output device. The PARALLEL IN ALT HOST port is a PC-compatible DB-25 port dedicated to input from a PC or another parallel-attached alternate host input device. SERIAL I/O PORT 1 is a PC/AT-compatible DB-9 port that can be used for serial interfacing to either a printer or an alternate host. SERIAL I/O PORT 0 is a DCE-standard DB-25 port that can be used for serial interfacing to either a printer or an alternate host. The TWINAX port is used to attach an intelligent twinax T adapter for attachment to a twinax host. The adapter will automatically terminate or cable-through. The power cord attaches to the standard NEMA power cord receptacle. CHAPTER 1 — GETTING STARTED Page 1-7 AGILE 5250 OPTIMA Cable Chart The following chart lists and describes the standard and optional printer and alternate host cables available for connection to the OPTIMA. Custom cables are also available from AGILE. AGILE P/N Description 830640-1 830650-1 830680-1 830690-1 Serial Alternate Host (DB-25 S/DB-25 S) Parallel Output (DB-25 S/ Centronics 36) Parallel Alternate Host (DB-25 P/DB-25 P) Serial Output (DB-9 S/DB-25 P) Parallel Port Pin-Outs The pin-outs for the parallel ports are as follows: 1. 2. 3. 4. 5. 6. 7. 8. 9. Strobe Data 1 Data 2 Data 3 Data 4 Data 5 Data 6 Data 7 Data 8 10. Printer Acknowledge 11. Busy 12. Paper Error 13. Select 14. Auto Feed 15. Fault 16. Init 17. Select In Twinax Adapter Port Unterminated Pin-Outs The twinax adapter port pin-outs are as follows: 7. Phase A 8. Phase B 18. 19. 20. 21. 22. 23. 24. 25. Ground Ground Ground Ground Ground Ground Ground Ground Page 1-8 AGILE 5250 OPTIMA User’s Guide and Reference The twinax port pin-outs are as follows: DB-25 Serial Port 1 2 3 4 5 6 7 8 9 10 11 12 13 14 15 16 17 18 19 20 21 22 23 24 25 1 = Signal Ground 5 = CTS → (Clear To Send) 2 = RXD ← (Receive Data) 6 = DSR ← (Data Set Ready) 3 = TXD → (Transmit Data) 20 = DTR → (Data Terminal Ready) 4 = RTS ← (Ready To Send) DB-9 Serial Port 1 2 3 4 5 6 7 8 9 1 = DCD ← (Data Carrier Detect) 5 = Signal Ground 2 = RXD ← (Receive Data) 6 = DSR ← (Data Set Ready) 3 = TXD → (Transmit Data) 7 = RTS ← (Ready To Send) 4 = DTR → (Data Terminal Ready) 8 = CTS → (Clear To Send) CHAPTER 1 — GETTING STARTED Page 1-9 Connecting to the Host System The 5250 OPTIMA can be connected via its twinax T adapter to any IBM 5250 protocol device (System/3X, AS/400 or remote controller) that has an address configured as an IBM 3812 (SCS Mode), 4214, 5219, 5224, 5225 or 5256 printer. Connecting Twinax To connect the OPTIMA to the host system or remote controller twinax line: PARALLEL OUT PRINTER PC COMPATIBLE 117 VAC 0.5A 50/60 Hz 35W PARALLEL IN ALT HOST SERIAL I/O PORT 1 PC COMPATIBLE PC-AT COMPATIBLE SERIAL I/O PORT 0 DCE FUSE: 250v 0.5A SLO-BLO CAUTION: FOR CONTINUED PROTECTION AGAINST FIRE, REPLACE ONLY WITH SAME TYPE AND RATING OF FUSE. MADE IN USA TWINAX LISTED U ®L ® LR 69521 E.D.P. EQUIPMENT Y 47T8 This equipment complies with the requirements in Part 15 of FCC Rules for a Class A computing device. Operation of this equipment in a residential area may cause unacceptable interference to radio and TV reception requiring the operator to take whatever steps are necessary to correct the interference. 1. Attach the twinax T cable adapter to the DB-15 connector located on the lower right of the rear panel of the OPTIMA. This connector is labeled TWINAX. 2. Tighten the thumbscrews until the connection is firm, but do not overtighten. Page 1-10 AGILE 5250 OPTIMA User’s Guide and Reference 3. Screw the twinax cable from the local System/3X, AS/400 CPU or remote controller into one side of the twinax cable adapter T. Both sides of the T are identical, so either side may be used. 4. To cable through, simply connect to the other side of the twinax adapter. Otherwise, the adapter will automatically terminate the twinax line. Connecting the Printer(s) The first step in connecting the 5250 OPTIMA to the printer(s) is determining which interface to use. The OPTIMA has three interface ports that can be used to connect a printer: Centronics parallel output port with a PC-compatible DB-25 connector Serial input/output port with a PC/AT-compatible DB-9 connector Serial input/output port with a DCE-standard DB-25 connector If the printer supports Centronics parallel interfacing, use the PARALLEL OUT PRINTER port to connect the 5250 OPTIMA to the printer. If connecting more than one printer, use the PARALLEL OUT PRINTER port to interface to the faster of the printers. The serial ports should be used to interface the remaining printer(s). If connecting one printer to the OPTIMA via serial, use SERIAL I/O PORT 1 to provide that connection. SERIAL I/O PORT 0 can then be used as an alternate host port. CHAPTER 1 — GETTING STARTED Page 1-11 Connecting a Printer via Centronics Parallel A parallel output cable is included with the OPTIMA. The cable supplied by AGILE may be used, or if a parallel cable is already connected to the printer, it may be used instead. The PARALLEL OUT PRINTER port on the OPTIMA is IBM PC, XT, AT, and PS/2 compatible. Any cable used to connect one of these computers to the printer may be used to connect the OPTIMA to the printer. 1. Insert the Centronics 36-pin device end of the AGILE printer cable into the connector on the rear of the printer. 2. If the printers Centronics connector includes latches, secure them. PARALLEL OUT PRINTER PC COMPATIBLE 117 VAC 0.5A 50/60 Hz 35W PARALLEL IN ALT HOST SERIAL I/O PORT 1 PC COMPATIBLE PC-AT COMPATIBLE SERIAL I/O PORT 0 DCE FUSE: 250v 0.5A SLO-BLO CAUTION: FOR CONTINUED PROTECTION AGAINST FIRE, REPLACE ONLY WITH SAME TYPE AND RATING OF FUSE. MADE IN USA TWINAX LISTED U ®L ® LR 69521 E.D.P. EQUIPMENT Y 47T8 This equipment complies with the requirements in Part 15 of FCC Rules for a Class A computing device. Operation of this equipment in a residential area may cause unacceptable interference to radio and TV reception requiring the operator to take whatever steps are necessary to correct the interference. 3. Insert the Centronics DB-25 parallel end of the AGILE printer cable into the PARALLEL OUT PRINTER port of the OPTIMA. This port is located in the upper left of the rear panel. 4. Tighten the thumbscrews until the connection is firm, but do not overtighten. Connecting Printers via Serial The OPTIMA has two serial ports, each of which can be used to connect it to a printer with a serial interface. Each of these two serial ports have different types of connectors. Page 1-12 AGILE 5250 OPTIMA User’s Guide and Reference Due to the OPTIMAs internal port priority system, if connecting a single serial printer to the 5250 OPTIMA, it should be connected to SERIAL I/O PORT 1. If connecting two serial printers to the OPTIMA, the printers may be connected to either of the OPTIMAs two serial ports. Connecting the First Printer via Serial The first (and perhaps only) serial printer connected to the 5250 OPTIMA should be connected via the OPTIMAs SERIAL I/O PORT 1. The cable necessary to connect SERIAL I/O PORT 1 to a printer may be ordered from AGILE. SERIAL I/O PORT 1 has a DB-9 connector that is compatible with the serial ports found on IBM PC/AT and PS/2 computers. If the SERIAL I/O PORT 1 output cable was not ordered from AGILE, a cable designed to interface such a computer with the printer may be used instead. To connect the printer to the OPTIMA: 1. Insert the DB-25 device end of the serial printer cable into the connector on the rear of the printer. 2. Tighten the thumbscrews until the connection is firm, but do not overtighten. PARALLEL OUT PRINTER PC COMPATIBLE 117 VAC 0.5A 50/60 Hz 35W PARALLEL IN ALT HOST SERIAL I/O PORT 1 PC COMPATIBLE PC-AT COMPATIBLE SERIAL I/O PORT 0 DCE FUSE: 250v 0.5A SLO-BLO CAUTION: FOR CONTINUED PROTECTION AGAINST FIRE, REPLACE ONLY WITH SAME TYPE AND RATING OF FUSE. MADE IN USA TWINAX LISTED U ®L ® LR 69521 E.D.P. EQUIPMENT Y 47T8 This equipment complies with the requirements in Part 15 of FCC Rules for a Class A computing device. Operation of this equipment in a residential area may cause unacceptable interference to radio and TV reception requiring the operator to take whatever steps are necessary to correct the interference. 3. Insert the DB-9 end of the AGILE printer cable into the SERIAL I/O PORT 1 connector on the rear panel of the OPTIMA. 4. Tighten the thumbscrews until the connection is firm, but do not overtighten. CHAPTER 1 — GETTING STARTED Page 1-13 Connecting a Second Printer via Serial After connecting a printer to the 5250 OPTIMA via SERIAL I/O PORT 1, a second printer may be connected via SERIAL I/O PORT 0. SERIAL I/O PORT 0 has a DB-25, DCE-standard pin-out. It is intended primarily for use as an alternate host port; however, it may be used as an output port to a printer. The cable necessary to connect SERIAL I/O PORT 0 to a printer may be ordered from AGILE. To connect the OPTIMA to the printer: 1. Insert the printer end of the serial printer cable into the connector on the rear of the printer. 2. Tighten the thumbscrews until the connection is firm, but do not overtighten. PARALLEL OUT PRINTER PC COMPATIBLE 117 VAC 0.5A 50/60 Hz 35W PARALLEL IN ALT HOST SERIAL I/O PORT 1 PC COMPATIBLE PC-AT COMPATIBLE SERIAL I/O PORT 0 DCE FUSE: 250v 0.5A SLO-BLO CAUTION: FOR CONTINUED PROTECTION AGAINST FIRE, REPLACE ONLY WITH SAME TYPE AND RATING OF FUSE. MADE IN USA TWINAX LISTED U ®L ® LR 69521 E.D.P. EQUIPMENT Y 47T8 This equipment complies with the requirements in Part 15 of FCC Rules for a Class A computing device. Operation of this equipment in a residential area may cause unacceptable interference to radio and TV reception requiring the operator to take whatever steps are necessary to correct the interference. 3. Insert the OPTIMA end of the AGILE serial printer cable into the SERIAL I/O PORT 0 connector on the rear panel of the OPTIMA. 4. Tighten the thumbscrews until the connection is firm, but do not overtighten. Page 1-14 AGILE 5250 OPTIMA User’s Guide and Reference Connecting the Alternate Host(s) The 5250 OPTIMA supports up to three alternate hosts. Each of these alternate hosts may share the printers attached to the output ports with each other and with the host system. Data received from these ports is sent to the output ports on a first-come-first-served basis. No operator intervention is required to switch to the alternate host ports the OPTIMA does this automatically. The OPTIMAs PARALLEL IN ALT HOST port is dedicated for use as an alternate host port. Each of the two serial ports, if not used as an output port, may also be used as an alternate host port. If only one serial port is to be used as an alternate host port, use SERIAL I/O PORT 0. Connecting an Alternate Host via Parallel The cable required to connect the PARALLEL IN ALT HOST port to an alternate host device such as an IBM PC or compatible is available from AGILE as an option. To connect the PARALLEL IN ALT HOST port to an alternate host device: 1. Insert one end of the AGILE parallel alternate host cable into the connector on the rear of the alternate host device. Both ends of the cable are the same, so either end may be used. 2. Tighten the thumbscrews until the connection is firm, but do not overtighten. PARALLEL OUT PRINTER PC COMPATIBLE 117 VAC 0.5A 50/60 Hz 35W PARALLEL IN ALT HOST SERIAL I/O PORT 1 PC COMPATIBLE PC-AT COMPATIBLE SERIAL I/O PORT 0 DCE FUSE: 250v 0.5A SLO-BLO CAUTION: FOR CONTINUED PROTECTION AGAINST FIRE, REPLACE ONLY WITH SAME TYPE AND RATING OF FUSE. MADE IN USA TWINAX LISTED U ®L ® LR 69521 E.D.P. EQUIPMENT Y 47T8 This equipment complies with the requirements in Part 15 of FCC Rules for a Class A computing device. Operation of this equipment in a residential area may cause unacceptable interference to radio and TV reception requiring the operator to take whatever steps are necessary to correct the interference. CHAPTER 1 — GETTING STARTED Page 1-15 3. Insert the other end of the AGILE alternate host cable into the PARALLEL IN ALT HOST port of the 5250 OPTIMA. 4. Tighten the thumbscrews until the connection is firm, but do not overtighten. Connecting the First Alternate Host via Serial The 5250 OPTIMAs first serial connection to an alternate host device should be made through SERIAL I/O PORT 0. This port has a DB-25, DCE-standard pin-out, and may be connected to an alternate host device using a standard serial cable. This cable is available as an option from AGILE. To connect SERIAL I/O PORT 0 to an alternate host device: 1. Insert one end of the serial printer cable into the connector on the rear of the alternate host device. Both ends of the cable are the same, so either end may be used. 2. Tighten the thumbscrews until the connection is firm, but do not overtighten. PARALLEL OUT PRINTER PC COMPATIBLE 117 VAC 0.5A 50/60 Hz 35W PARALLEL IN ALT HOST SERIAL I/O PORT 1 PC COMPATIBLE PC-AT COMPATIBLE SERIAL I/O PORT 0 DCE FUSE: 250v 0.5A SLO-BLO CAUTION: FOR CONTINUED PROTECTION AGAINST FIRE, REPLACE ONLY WITH SAME TYPE AND RATING OF FUSE. MADE IN USA TWINAX LISTED U ®L ® LR 69521 E.D.P. EQUIPMENT Y 47T8 This equipment complies with the requirements in Part 15 of FCC Rules for a Class A computing device. Operation of this equipment in a residential area may cause unacceptable interference to radio and TV reception requiring the operator to take whatever steps are necessary to correct the interference. 3. Insert the other end of the AGILE serial cable into the SERIAL I/O PORT 0 connector on the rear panel of the OPTIMA. 4. Tighten the thumbscrews until the connection is firm, but do not overtighten. Page 1-16 AGILE 5250 OPTIMA User’s Guide and Reference Connecting a Second Alternate Host via Serial If using both of the 5250 OPTIMAs serial ports as alternate host ports, connect the second device through SERIAL I/O PORT 1. This port has a DB-9, PC/AT-compatible connector. Connecting SERIAL I/O PORT 1 to an alternate host device requires a null modem cable, available as an option from AGILE. To connect SERIAL I/O PORT 1 to an alternate host device: 1. Insert the device end of the serial alternate host cable into the connector on the rear of the alternate host device. 2. Tighten the thumbscrews until the connection is firm, but do not overtighten. PARALLEL OUT PRINTER PC COMPATIBLE 117 VAC 0.5A 50/60 Hz 35W PARALLEL IN ALT HOST SERIAL I/O PORT 1 PC COMPATIBLE PC-AT COMPATIBLE SERIAL I/O PORT 0 DCE FUSE: 250v 0.5A SLO-BLO CAUTION: FOR CONTINUED PROTECTION AGAINST FIRE, REPLACE ONLY WITH SAME TYPE AND RATING OF FUSE. MADE IN USA TWINAX LISTED U ®L ® LR 69521 E.D.P. EQUIPMENT Y 47T8 This equipment complies with the requirements in Part 15 of FCC Rules for a Class A computing device. Operation of this equipment in a residential area may cause unacceptable interference to radio and TV reception requiring the operator to take whatever steps are necessary to correct the interference. 3. Insert the DB-9 end of the AGILE alternate host cable into the SERIAL I/O PORT 1 connector on the rear panel of the OPTIMA. 4. Tighten the thumbscrews until the connection is firm, but do not overtighten. CHAPTER 1 — GETTING STARTED Page 1-17 Connecting the 5250 OPTIMA to Power Now that the 5250 OPTIMA has been connected to all of the printers and alternate host devices, it may be connected to the power outlet. PARALLEL OUT PRINTER PC COMPATIBLE 117 VAC 0.5A 50/60 Hz 35W PARALLEL IN ALT HOST SERIAL I/O PORT 1 PC COMPATIBLE PC-AT COMPATIBLE SERIAL I/O PORT 0 DCE FUSE: 250v 0.5A SLO-BLO CAUTION: FOR CONTINUED PROTECTION AGAINST FIRE, REPLACE ONLY WITH SAME TYPE AND RATING OF FUSE. TWINAX LISTED U ®L ® LR 69521 E.D.P. EQUIPMENT Y MADE IN USA 47T8 This equipment complies with the requirements in Part 15 of FCC Rules for a Class A computing device. Operation of this equipment in a residential area may cause unacceptable interference to radio and TV reception requiring the operator to take whatever steps are necessary to correct the interference. 1. Connect the female end of the power cord to the NEMA power receptacle of the OPTIMA. 2. Plug the male end of the power cord into a properly grounded threeprong AC power outlet. Remember: Never unplug either end of the power cord by pulling on the cord. Always pull by the plug. Page 1-18 AGILE 5250 OPTIMA User’s Guide and Reference 5250 OPTIMA Front Panel The front panel of the 5250 OPTIMA provides a disk drive, a liquid crystal display (LCD), six operator function buttons and two status lights. 5250 OPTIMA™ Disk Drive: LCD: The disk drive is a PC-compatible 3.5" high-density 1.44 MB disk drive. It is used to load and save the operating software and configuration information provided on diskette with the OPTIMA. The Liquid Crystal Display is used to display information regarding the configuration menu and the current status of the OPTIMA. Power LED: This light is used to indicate that the OPTIMA is on and receiving power. Sync LED: This light indicates that valid data is being received from the twinax host by the OPTIMA on at least one twinax address. d is used to move up through menu choices. f is used to move down through menu choices. g is used to move right through menu choices. s is used to move left through menu choices. ENTER: This button is used to accept the configuration menu choice currently displayed by the LCD. MENU/STATUS: This button toggles the LCD display of either the configuration menu or the status of the OPTIMA. RESET: To reset the OPTIMA, press the ENTER and MENU/ STATUS buttons simultaneously. CHAPTER 1 — GETTING STARTED Page 1-19 Starting Up Follow these instructions each time the 5250 OPTIMA is powered up: 1. Make certain the printer(s) is/are powered on and ready to receive and to print data. Power on the alternate host(s), if any. 2. If the diskette received with the OPTIMA is not in the OPTIMAs disk drive, insert the diskette into the drive. 3. Turn on the OPTIMA with the rear panel power switch. 4. The power indicator LED should turn on, and as the OPTIMA cycles through its self-diagnostics, the LCD display should read: TESTING ROM. TESTING RAM. RELOAD TIMER 0 RELOAD TIMER 1 5. The disk drive light will turn on, and the LCD display will read: LOADING SOFTWARE 6. After approximately 6 seconds the LCD display will read: LOADING CONFIG. 7. After approximately 3 more seconds the disk drive light will go out, the OPTIMA will sound an audible alert, and the status display will appear on the LCD: T1 T2 PI Po The user may now configure the OPTIMA. Page 1-20 AGILE 5250 OPTIMA User’s Guide and Reference Basic Port Configuration The 5250 OPTIMA is configurable to its specific printer/host environment. While many options are set to factory defaults that may match the users needs, the first time the OPTIMA is used, the user will need to configure its ports so it may properly use the devices attached to them. This section is intended to walk the user step-by-step through the port configuration process. Each of the OPTIMAs communication ports is described individually. If not using a particular port, the configuration instructions for that port may be ignored. Start by pressing the MENU/STATUS button to toggle the display to the menu. (This button may be pressed again during the configuration process to display how the changes have affected the status of the OPTIMA.) The LCD will read: OPTIMA: CONFIG: Configuring the Twinax Ports The 5250 OPTIMA supports up to three twinax addresses simultaneously. Each of these three addresses can be configured separately for a different type of IBM printer emulation, character translation, mode of operation, etc. If using more than one twinax address, each address must be configured independently. Since the names of the twinax ports change with the addresses assigned to them, each twinax device emulation will be referred to as TWINAXn, with n representing the assigned address number. The default factory configuration for the OPTIMAs three twinax addresses are 1, 2 and 3. Thus, the first three menu options under CONFIG: are TWINAX1:, TWINAX2: and TWINAX3. If using one of these addresses, simply select the appropriate twinax port and activate it. When starting the configuration, the OPTIMA LCD should read: OPTIMA: CONFIG: Press g. The display should read: CONFIG:TWINAX1: CHAPTER 1 — GETTING STARTED Page 1-21 Setting the Twinax Address Follow these instructions to configure each of the twinax ports to be used: 1. Use d and f to select one of three twinax ports. If using address 1, 2 or 3, select the appropriate port. The display should read: CONFIG: TWINAXn: where n is the twinax address of the port. When performing this configuration for the first time, n should be equal to the factory default of 1. 3. Press g. The display should read: TWINAXn: ON/OFF= 4. Press f. The display should read: TWINAXn:ADDRESS= 5. Press g. The display should read: ADDRESS= n 6. Using d and f, select the number of the physical twinax address (0-6). The display should read: ADDRESS≠ n where n is the twinax address selected. 7. Press ENTER. The display should scroll to the left and read: TWINAXn:ADDRESS= Activating the Twinax Port Follow these instruction to activate (enable) the twinax port. The display should read: TWINAXn:ADDRESS= 1. Press d. The display should read: TWINAXn: ON/OFF= 2. Press g. The display should read: ON/OFF= setting where setting is either ACTIVE or INACTIVE. Page 1-22 AGILE 5250 OPTIMA User’s Guide and Reference 3. Use d and f until the display reads: ON/OFF= ACTIVE 4. Press ENTER. The display should read: TWINAXn: ON/OFF= Setting the Device Emulation Type The LCD should read: TWINAXn: ON/OFF= 1. Press f twice. The display should read: TWINAXn:EMULATE= 2. Press g. The display should read: EMULATE= IBM 3812 3. Using d and f, select the type of printer to emulate. The display should read: EMULATE≠ device Where device is the device emulation selected. (Note that the IBM 3812 and IBM 5219 emulations are identical, so if one is selected, both will be preceded by equals signs.) 4. Press ENTER. The display should scroll to the left and read: TWINAXn:EMULATE= 5. Press s. The display should read: CONFIG:TWINAXn: The twinax port is now configured. This procedure must be repeated for each of the twinax ports to be used. If using a single twinax port, move to the next step in the configuration process. CHAPTER 1 — GETTING STARTED Page 1-23 Configuring the Parallel Out Printer Port The next step is to configure the PARALLEL OUT PRINTER port. Starting this procedure, the display should read: CONFIG: port: where port is one of the 5250 OPTIMA ports. 1. Use d and f, until the display reads: CONFIG: PAR OUT: 2. Press g. The display should read: PAR OUT: ON/OFF= 3. Press f seven times, or until the display reads: PAR OUT: LOAD> 4. Press g. The disk drive light will go on as the OPTIMA loads the list of supported printer configurations from the disk. The display should read: LOAD>_filename where filename is the name of a printer device driver, listed in alphanumeric order. Each of the printer device drivers is listed in Chapter 2 Advanced Configuration. 5. Using d and f, select the type of printer or device to be used on the parallel out port. If there is no configuration option for the specific printer, select the _GENERIC option. 6. Press ENTER. The disk drive light will appear as the file is loaded, then the display will scroll to the left, and the display should read: PAR OUT: LOAD> 7. Press s. The display will scroll to the left and should read: CONFIG:PAR OUT: The PARALLEL OUT PRINTER port is now configured. If not using any other output ports or any alternate host ports, the user may now proceed to Saving the Configuration. Page 1-24 AGILE 5250 OPTIMA User’s Guide and Reference Configuring a Serial Printer Port The next step is to configure the serial output ports. If not using any serial output ports, skip this procedure and move to Configuring the Parallel In Alt Host Port. Starting this procedure the display should read: CONFIG: port: where port is one of the 5250 OPTIMA ports. 1. Use d and f, until the display reads: CONFIG:SERIAL1: 2. Press g. The display should read: SERIAL1: ON/OFF= 3. Press f fifteen times, or until the display reads: SERIAL1: LOAD> 4. Press g. The disk drive light will go on as the 5250 OPTIMA loads the list of supported printer configurations from the disk. The display should read: LOAD>_filename where filename is the name of a printer device driver, listed in alphanumeric order. Each of the printer device drivers is listed in Chapter 2 Advanced Configuration. 5. Using d and f, select the type of printer or device to be used on SERIAL I/O PORT 1. If there is no configuration option for the specific printer, select the _GENERIC option. 6. Press ENTER. The disk drive light will appear as the file is loaded, then the display will scroll to the right, and the display should read: SERIAL1: LOAD> Loading the printer device driver into the serial port activates (enables) the port and configures it as an output port automatically, except for the serial ports communication parameters. Refer to the printer users guide for information regarding the appropriate communication parameters. CHAPTER 1 — GETTING STARTED Page 1-25 7. Press d thirteen times. The display should read: SERIAL1: BAUD= 8. Press g. The display should read: BAUD= setting where setting is the default baud rate for the printer. 9. If the baud rate shown is not correct, use d and f to select the proper setting. When the baud rate is set, press ENTER. The display should scroll to the right to read: SERIAL1: BAUD= 10. Press f. The display should read: SERIAL1: PARITY= 11. Press g. The display should read: PARITY= setting where setting is the default parity setting for the printer. 12. If the parity setting shown is not correct, use d and f to select the proper setting. When the parity setting is set, press ENTER. The display should scroll to the right to read: SERIAL1: PARITY= 13. Press f. The display should read: SERIAL1: LENGTH= 14. Press g. The display should read: LENGTH= setting where setting is the default word length (number of data bits) setting for the printer. 15. If the length shown is not correct, use d and f to select the proper value. When the length is set, press ENTER. The display should scroll to the right to read: SERIAL1: LENGTH= 16. Press f. The display should read: SERIAL1: STOPS= Page 1-26 AGILE 5250 OPTIMA User’s Guide and Reference 17. Press g. The display should read: STOPS= setting where setting is the default number of stop bits for the printer. 18. If the stop bit setting shown is not correct, use d and f to select the proper setting. When the value is set, press ENTER. The display should scroll to the right to read: SERIAL1: STOPS= 19. Press f. The display should read: SERIAL1: FLOW= 20. Press g. The display should read: FLOW= setting where setting is the default flow control setting for the printer. 21. If the flow control setting shown is not correct, use d and f to select the proper setting. When the value is set, press ENTER. The display should scroll to the right to read: SERIAL1: FLOW= 22. Press s. The display will scroll to the left and should read: CONFIG:SERIAL1: SERIAL I/O PORT 1 is now configured. If not using any other serial output port or any alternate host ports, the user may move to Saving the Configuration. To configure SERIAL I/O PORT 0 as an output port, simply repeat this procedure for SERIAL0. CHAPTER 1 — GETTING STARTED Page 1-27 Configuring the Parallel In Alt Host Port Follow this procedure to enable or disable the PARALLEL IN ALT HOST port. The default factory for this port is active, i.e., enabled. If this port is not going to be used, it should be disabled. Starting this procedure the display should read: CONFIG: port: where port is any of the 5250 OPTIMA ports. 1. Use d and f, until the display reads: CONFIG: PAR IN: 2. Press g. The display should read: PAR IN: ON/OFF= 3. Press g. The display should read: ON/OFF= setting where setting is either ACTIVE or INACTIVE. 4. Use d and f to select either ACTIVE or INACTIVE. When the value is set, press ENTER. The display should scroll to the right to read: PAR IN: ON/OFF= 5. Press s. The display should read: CONFIG: PAR IN: The PARALLEL IN ALT HOST port is now configured. Page 1-28 AGILE 5250 OPTIMA User’s Guide and Reference Configuring a Serial Alt Host Port The next step is to configure the serial ports for alternate host input. If not using any serial ports for alternate host input, skip this procedure and move to Saving the Configuration. Starting this procedure the display should read: CONFIG: port: where port is one of the 5250 OPTIMA ports. 1. Use d and f, until the display reads: CONFIG:SERIAL0: 2. Press g. The display should read: SERIAL0: ON/OFF= 3. Press g. The display should read: ON/OFF= setting where setting is either ACTIVE or INACTIVE. 4. If the current setting is INACTIVE, press f. The display should read: ON/OFF= ACTIVE 5. Press ENTER. The display should scroll to the right and read: SERIAL0: ON/OFF= 6. Press f. The display should read: SERIAL0: IN/OUT= 7. Press g. The display should read: IN/OUT= setting where setting is either OUTPUT or ALT HOST. 8. If the current setting is OUTPUT, press f. The display should read: IN/OUT≠ALT HOST 9. Press ENTER. The display should read: SERIAL0: IN/OUT= CHAPTER 1 — GETTING STARTED Page 1-29 Note: Refer to the alternate host serial interface users guide for information regarding the appropriate communication parameters. 10. Press f. The display should read: SERIAL0: BAUD= 11. Press g. The display should read: BAUD= setting where setting is the default baud rate for the alternate host. 12. If the baud rate shown is not correct, use d and f to select the proper rate. When the baud rate is set, press ENTER. The display should scroll to the right to read: SERIAL0: BAUD= 13. Press f. The display should read: SERIAL0: PARITY= 14. Press g. The display should read: PARITY= setting where setting is the default parity setting for the alternate host. 15. If the parity setting shown is not correct, use d and f to select the proper setting. When the parity setting is set, press ENTER. The display should scroll to the right to read: SERIAL0: PARITY= 16. Press f. The display should read: SERIAL0: LENGTH= 17. Press g. The display should read: LENGTH= setting where setting is the default word length (number of data bits) setting for the alternate host. 18. If the length shown is not correct, use d and f to select the proper value. When the length is set, press ENTER. The display should scroll to the right to read: SERIAL0: LENGTH= 19. Press f. The display should read: SERIAL0: STOPS= 20. Press g. The display should read: STOPS= setting where setting is the default number of stop bits for the alternate host. 21. If the stop bit setting shown is not correct, use d and f to select the proper stop bit setting. When the value is set, press ENTER. The display should scroll to the right to read: SERIAL0: STOPS= 22. Press f. The display should read: SERIAL0: FLOW= 23. Press g. The display should read: FLOW= setting where setting is the default flow control setting for the alternate host. 24. If the flow control setting shown is not correct, use d and f to select the proper setting. When the value is set, press ENTER. The display should scroll to the right to read: SERIAL0: FLOW= 25. Press s. The display will scroll to the left and should read: CONFIG:SERIAL0: SERIAL I/O PORT 0 is now configured. Unless using the other serial port for alternate host input, move to Saving the Configuration. To configure SERIAL I/O PORT 1 as an alternate host input port, simply repeat this procedure for that port. Saving the Configuration When done configuring the 5250 OPTIMA, save the configuration to diskette so that the OPTIMA can remember the settings after it is reset or powered off. When starting this procedure the display should read: CONFIG: port: where port is one of the OPTIMA ports. 1. Press f until the display reads: CONFIG: SAVE! 2. Press ENTER. The display should read: SAVING CONFIG. then the display will scroll to the left and read: CONFIG: SAVE! The OPTIMA is now ready for printing. Unless the system (twinax addresses, alternate hosts and printers) changes, this configuration procedure will not have to be performed again. Summary The 5250 OPTIMA should now be up and running with the users configuration requirements set and permanently stored on the diskette. For many applications, this will be all that is necessary to install and use the OPTIMA. However, AGILE suggests reading the next chapter Advanced Configuration to gain a full understanding of the OPTIMAs capabilities and how it may be further configured to maximize its usefulness and efficiency. In addition, if using the OPTIMA to interface the host system to a Xerox printer, read Appendix A Interfacing Xerox Printers. CHAPTER 2 — ADVANCED CONFIGURATION Page 2-1 CHAPTER 2 ADVANCED CONFIGURATION Configuration Menu To efficiently navigate the menu, it is helpful to be familiar with its punctuation and structure. A complete chart of the menu tree is displayed on the quick reference card included with this manual. Refer to the menu diagram when making changes to the 5250 OPTIMA configuration. Menu Hierarchy The configuration options accessible through the OPTIMAs front panel are logically organized in a hierarchy. When the OPTIMAs display is in menu mode, it is divided into left and right sides of eight characters each. The option on the left of the display is the parent option, and the option on the right is the suboption. Most parent options have more than one suboption. The following example shows the first menu presented to the user after pressing the MENU/STATUS button to enter menu mode: OPTIMA: CONFIG: PRINT: DISK: VERSION! The box shows what is actually displayed in the OPTIMAs LCD. Use the d and f buttons on the front panel to move up and down through the list of suboptions. For example, pressing the f button when at the display shown above, the result will be: OPTIMA: CONFIG: PRINT: DISK: VERSION! If the user were to press the d button now, the display would return to: OPTIMA: CONFIG: PRINT: DISK: VERSION! Page 2-2 AGILE 5250 OPTIMA User’s Guide and Reference The g button is used to move to the right in the menu, making the current suboption the new parent option, and displaying its suboptions on the right. For example, if the user were to press the g button now, the result would be: CONFIG:TWINAX1: TWINAX2: TWINAX3: PAR IN: PAR OUT: SERIAL0: SERIAL1: XLATES: SAVE! Note: Only what is shown in the box is actually displayed on the OPTIMAs LCD. To move to the left, press the s button: OPTIMA: CONFIG: PRINT: DISK: VERSION! Configuration Option Notation Configuration option positions within the menu are documented in this manual using the following notation: OPTIMA: CONFIG:TWINAX1:ADDRESS= 1 which tells the user to: go to the CONFIG: suboption of the OPTIMA: option (using the d and f buttons when OPTIMA: is the parent option); go to the TWINAX1: suboption; go to the ADDRESS: suboption; go to the 1 suboption; and then to press ENTER to set the ADDRESS: option to a value of 1. Although it is not always shown here (due to space restrictions), all of these listings start with OPTIMA:, because that is the start (the root) of the menu hierarchy. CHAPTER 2 — ADVANCED CONFIGURATION Page 2-3 Punctuation Codes A punctuation code is used to indicate different types of menu listings. Hierarchy headings are followed by a colon (:). Option names are followed by either equals (=) or does not equal (≠) symbols. If the value for the option is the current setting, it will be preceded by an equals sign. If the value is preceded by a does not equal sign, it is not the current value. To change the current value to the displayed value, press ENTER when the value is displayed on the LCD. The actual values are not followed by any punctuation. PFS names and translation table names are followed by greater than (>) symbols. Pressing the right arrow key (g) when the greater than sign is displayed to the right of a PFS or translation table name will enter an edit mode. To exit an edit mode, press ENTER. Actions are followed by exclamation points (!). To perform the action, press ENTER. Menu Movement To move through the menu, use the arrow buttons (d, f, s and g) on the front panel of the OPTIMA. If no movement in the selected direction is possible, the OPTIMA will make a beeping noise. After making a configuration selection, press ENTER. Make certain to save any permanent changes before either resetting or turning off the OPTIMA. Twinax Ports To use a twinax port, the user must activate it, set its address, select the appropriate emulation and mode and choose the output port(s) and the timeout period. Activating a Twinax Port TWINAX1 and TWINAX2 are active by default. To activate TWINAX3, use the arrow keys to move through the menu until the ON/OFF: selection reads ACTIVE, then press ENTER. OPTIMA: CONFIG:TWINAX3: ON/OFF= ACTIVE Page 2-4 AGILE 5250 OPTIMA User’s Guide and Reference Setting the twinax port to ACTIVE causes the OPTIMA to start twinax communications on that address. Active twinax ports are displayed in the OPTIMAs status display; inactive twinax ports are not displayed. To deactivate a twinax port, set its ON/OFF: option to INACTIVE by going to: OPTIMA: CONFIG:TWINAX1: ON/OFF=INACTIVE and pressing ENTER. Twinax Addressing The OPTIMA can concurrently emulate three devices on the twinax line. For each twinax address the OPTIMA will emulate, the user must choose an address that does not conflict with an existing device on the twinax line. To change an address, use the arrow keys to move through the menu to the ADDRESS: selection for the twinax device, use d and f to choose the address number, then press ENTER. OPTIMA: CONFIG:TWINAX1:ADDRESS= 1 Changing a twinax ports address also changes its name automatically. For example, after making the address change shown below, the name of the twinax port also changes: OPTIMA: CONFIG:TWINAX6:ADDRESS= 6 Changing a twinax address causes the OPTIMA to stop communication on the that address, unless the address is currently in use. The twinax address must timeout before the OPTIMA will end communication on the address. (See below for more information on timeouts.) When the address change takes place, the OPTIMA will end communication on the address, reconfigure the twinax port for the new address, then reestablish communication on the new address. Emulations In IBM emulation mode, the OPTIMA imitates a printer, and the user must tell the OPTIMA which of the following possible printers it will emulate. Each of the three possible twinax addresses can emulate one of several device types. The device emulations are: CHAPTER 2 — ADVANCED CONFIGURATION Page 2-5 1. IBM 3812 laser printer ( SCS mode 5219 emulation) 2. IBM 4214-2 dot matrix printer 3. IBM 5219-D02 daisy wheel printer (default) 4. IBM 5224-2 dot matrix printer 5. IBM 5225-4 dot matrix printer 6. IBM 5256-1 band printer To select an emulation, use the arrow keys to move through the menu to the EMULATE: selection for the twinax device, use d and f to display the emulation name, then press ENTER. For example: OPTIMA: CONFIG:TWINAX1:EMULATE=IBM 3812 Changing a twinax ports emulation, like changing its address, causes the OPTIMA to end communication on that address, change the emulation, then reestablish communication on that address. The OPTIMA will not do this if the address is currently in use; the twinax address must timeout before the OPTIMA will end communication on the address. (See the section Timeout later in this chapter for more information on timeouts.) Modes The mode selection from the menu tells the OPTIMA what to do with the data it receives from the system. If the OPTIMA will emulate one of the IBM printers listed above, the user should select IBM EMUL. The five mode options are described below. 1. IBM EMUL. IBM printer emulation. This mode is the default, and it activates the emulations above. 1. SCS DUMP. An EBCDIC hexadecimal data dump, this mode simply prints a formatted hexadecimal report of the incoming EBCDIC data, including a human-readable interpretation of the SCS and DCA commands of the incoming data stream from the twinax host. 2. 275 EMUL. Xerox 275 twinax protocol converter emulation. If the user selects this, the user ordinarily should also select either 5225 or 5256 from the emulation menu. Selecting this mode will also usually require the user to set the XLAT: option found in the menu at OPTIMA:CONFIG:outport:XLTINFO:inport: to 275 E->A (Xerox 275 protocol converter EBCDIC to ASCII). If the users printer is set for the EBCDIC character set, the user must set the twinax table option to EBCDIC->EBCDIC. Page 2-6 AGILE 5250 OPTIMA User’s Guide and Reference 4. TRNSPRNT. Transparent. This is used only for diagnostic purposes. 5. HEX DUMP. Hex dump mode will cause the 5250 OPTIMA to print all data it receives as 16 hexadecimal bytes per line on the left column of a page, accompanied in the right column by the 16 ASCII characters they represent. SCS/DCA commands are represented by a backslash (\) character. Refer to Chapter 5 Maintenance & Troubleshooting for a printout of a sample Hex dump. To select a mode, use the arrow keys to move through the menu to the MODE: selection for the twinax device, use d and f to display the mode name, then press ENTER. For example: OPTIMA: CONFIG:TWINAX1: MODE=IBM EMUL Changing a twinax ports mode, like changing its address, causes the OPTIMA to end communication on that address, change the mode, then reestablish communication on the address, unless the address is currently in use. The twinax address must timeout before the OPTIMA will end communication on the address. (See the section Timeout later in this chapter for more information on timeouts.) Data Routing Each input channel is user-configurable to allow output to any combination of output ports. When data is received from an input port (twinax or alternate host), the OPTIMA looks at the output ports in order of priority, searching for an output port that is acceptable to the input ports configuration. The first acceptable output port that is not in use by another input port is acquired and used. If all configuration-allowable output ports are currently in use, the input port must wait in a queue for its turn. The output ports have a predefined priority: 1. PO PARALLEL OUT PRINTER (if active) 2. S1 SERIAL I/O PORT 1 (if active and configured for output) 3. S0 SERIAL I/O PORT 0 (if active and configured for output typically used for input) The OUT TO: selection in the menu under TWINAX: allows the user to choose those output devices to which each input device will send data. To select the output devices, use the arrow keys to move through the menu to the OUT TO: selection for the twinax port, use d and f to display the output devices, then press ENTER. For example: CHAPTER 2 — ADVANCED CONFIGURATION Page 2-7 OPTIMA: CONFIG:TWINAX1: OUT TO= PO,S0,S1 One of the reasons the user may want to change this setting is to force nonSCS data streams to be sent to a compatible output device. For example, if the user has an XES mode printer on the PARALLEL OUT PRINTER port, a PCL printer on one of the serial ports, and TWINAX 3 is receiving XES data, set the option as follows: OPTIMA: CONFIG:TWINAX3: OUT TO= PO to prevent the XES data streams from being routed to the PCL printer. Timeout When any twinax, parallel or serial input port has stopped using an output port for a user-configurable period, the OPTIMA considers the output port available and gives it to the next input port in the queue. To change the timeout period, use the arrow keys to move through the menu to the TIMEOUT: selection for the twinax device, use d and f to display the length of time, then press ENTER. For example: OPTIMA: CONFIG:TWINAX1: TIMEOUT= 5 SECS The timeout period should be as short as possible to prevent too much time from being wasted between print jobs from different sources, but not so short that a job from one source could interrupt a job from another source. For most twinax hosts, the default value of 5 seconds is fine. For parallel and serial alternate host ports connected to IBM PCs or compatibles, the user may need to increase the timeout value when running complex graphics applications that take time during printing to compute the image. Some applications may require timeout values as long as a minute. Alternate Host Input Ports Other than the three twinax addresses, there are three ports that can be used by the OPTIMA to receive data. These are the PARALLEL IN ALT HOST port, SERIAL I/O PORT 0 and SERIAL I/O PORT 1. Each of these ports can be used as alternate host pass-through ports, allowing the output device(s) to be shared between the twinax host/controller and three other data sources. Page 2-8 AGILE 5250 OPTIMA User’s Guide and Reference Parallel In Port Configuration To use the PARALLEL IN ALT HOST port, it must be active, the output ports must be selected, and the timeout period must be set. If not using the PARALLEL IN ALT HOST port, it should be deactivated. These options are selected in a manner identical to the way in which the twinax ports are defined (please refer to the instructions above). OPTIMA: CONFIG: PAR IN: ON/OFF= ACTIVE OPTIMA: CONFIG: PAR IN: OUT TO=PO,S0,S1 OPTIMA: CONFIG: PAR IN:TIMEOUT= 5 SECS Serial In Port Configuration To use a serial port as an input (alternate host) port, it must be activated, the port must be set up for input (ALT HOST), the timeout period must be set, and the output ports must be selected. These options are selected in a manner identical to the way in which the twinax ports are defined. In addition, the baud, parity, length, stops and flow control must be set to agree with the settings of the alternate host. Refer to the alternate host device users manual for information on baud, parity, length and stops. If the alternate host uses XON/XOFF flow control, select XON/XOFF under FLOW; otherwise, select HARDWARE. If using only one of the serial ports for an alternate host device, it is recommended that SERIAL I/O PORT 0 is used. These are the default settings: OPTIMA:CONFIG:SERIAL0: ON/OFF=INACTIVE OPTIMA:CONFIG:SERIAL0: IN/OUT=ALT HOST OPTIMA:CONFIG:SERIAL0: BAUD= 9600 OPTIMA:CONFIG:SERIAL0: PARITY= NONE OPTIMA:CONFIG:SERIAL0: LENGTH= 8 BITS OPTIMA:CONFIG:SERIAL0: OPTIMA:CONFIG:SERIAL0: STOPS= 1 BIT FLOW=XON/XOFF OPTIMA:CONFIG:SERIAL0: OUT TO= PO,S1 OPTIMA:CONFIG:SERIAL0:TIMEOUT= 5 SECS CHAPTER 2 — ADVANCED CONFIGURATION Page 2-9 Output Ports The 5250 OPTIMA has one dedicated output port and two configurable output ports. The PARALLEL OUT PRINTER port is dedicated to output. If not being used for alternate host input, SERIAL I/O PORT 0 and SERIAL I/O PORT 1 can be used as output ports. This allows the OPTIMA to control/share up to three output devices. Each output port has a configuration that specifies the translation tables, format information and PFS codes appropriate for the printer attached to the port. When a twinax address acquires the output port to which it is going to direct its output, it uses that ports configuration to allow the formatting to remain correct regardless of the printer to which the twinax data will be sent. Printer Drivers Available The following output port configurations are available on the OPTIMA diskette: _3700ASC Xerox 3700 printer in ASCII mode _3700EBC Xerox 3700 printer in EBCDIC mode _4030ASC Xerox 4030 printer in ASCII mode _4030EBC Xerox 4030 printer in EBCDIC mode _4045ASC Xerox 4045 printer in ASCII mode _4045EBC Xerox 4045 printer in EBCDIC mode _4197ASC Xerox 4197 printer in ASCII mode _4197EBC Xerox 4197 printer in EBCDIC mode _4235ASC Xerox4235 printer in ASCII mode _4235EBC Xerox 4235 printer in EBCDIC mode _4235PPM Xerox 4235 printer in Production Print mode (emulating a centralized printer) Using the EBCDIC character set _4700ASC Xerox 4700 color printer in ASCII mode _4700EBC Xerox 4700 color printer in EBCDIC mode Page 2-10 AGILE 5250 OPTIMA User’s Guide and Reference _DIAGASC A diagnostic-only printer configuration, for ASCII printers, that prints the name of each PFS as it is invoked by the data stream, rather than using the PFS to format the document _DIAGEBC A diagnostic-only printer configuration, for EBCDIC printers, that prints the name of each PFS as it is invoked by the data stream, rather than using the PFS to format the document _EPSONFX Epson FX printer _GENERIC A printer configuration that is used as the basis for creating a configuration when the configuration for the users printer is not included on the OPTIMA diskette (default) _HPLJ2 Hewlett-Packard LaserJet II printer _HPLJ3SI Hewlett-Packard LaserJet IIISi printer _HPLJ4 Hewlett-Packard LaserJet 4 printer _IBMQW3 IBM QuietWriter III printer _LQ1000 Epson LQ series printer _LQ2500 Epson LQ 2500 printer Output Port Configuration If the printer is in the list of supported printer configurations, configuring the output ports can be as simple as loading the appropriate configuration as indicated in Chapter 1 Getting Started. If the user would like to modify the configuration for the printer, the user should first load it from the diskette, then refer to later chapters for instructions on the specific features to be modified, including translation tables, PFSs and GFIDs. If the printer is not listed in the supported configurations, and if the _GENERIC configuration option is unsuitable, the user will either have to build a configuration from scratch or modify a similar one that is listed in the supported configurations. Then save the port configuration. Parallel Output Port If building a parallel output port configuration, the output port must be activated, translation tables must be chosen and programmable function strings must be edited. Detailed information on all of these features can be found in later chapters. CHAPTER 2 — ADVANCED CONFIGURATION OPTIMA: CONFIG:PAR OUT: ON/OFF= OPTIMA: CONFIG:PAR OUT: Page 2-11 ACTIVE LOAD>_filename Loading a printer configuration for the port will automatically activate the port. OPTIMA: CONFIG:PAR OUT: SAVE>_filename Serial Output Ports If either of the serial ports will not be used as alternate host input ports, they may be used as output ports. To use one of the serial ports as an output port, the user should load the configuration for the printer. Additionally, the baud, parity, length, stops and flow control must be set. If no driver is available for the printer, use the _GENERIC driver. If building a configuration from scratch, in addition to the steps outlined for the parallel out port, the user must specify the baud, parity, length, stops and flow control. If configuring a serial port for output, load the printer driver for the port before making any changes to the configuration. The printer driver includes all of the IN/OUT, BAUD, PARITY, LENGTH, STOPS and FLOW settings, and these settings will overwrite the current settings when loaded. OPTIMA: CONFIG:SERIAL0: ON/OFF= ACTIVE OPTIMA: CONFIG:SERIAL0: IN/OUT= OUTPUT OPTIMA: CONFIG:SERIAL0: BAUD= 9600 OPTIMA: CONFIG:SERIAL0: PARITY= NONE OPTIMA: CONFIG:SERIAL0: LENGTH= 8 BITS OPTIMA: CONFIG:SERIAL0: OPTIMA: CONFIG:SERIAL0: STOPS= 1 BIT FLOW=XON/XOFF OPTIMA: CONFIG:SERIAL0: OUT TO= PO,S1 OPTIMA: CONFIG:SERIAL0:TIMEOUT= 5 SECS OPTIMA: CONFIG:SERIAL0: LOAD>_filename Page 2-12 AGILE 5250 OPTIMA User’s Guide and Reference Format Information The AGILE 5250 OPTIMA is capable of emulating most popular IBM printers. In order to do this, it needs some information about the target printer. The user needs to provide some of this information under OPTIMA: CONFIG: FMTINFO: in the configuration menu. (Other information is provided under PFSINFO:, XLTINFO: and FNTINFO:.) When a supported printer configuration is loaded from the diskette, the 5250 OPTIMA sets the FMTINFO: appropriate for the printer. If the output device is supported, and if no changes to the default settings are needed, the user can skip this section. If the printer/output device is not among the supported printer configurations, the user must specify the appropriate format information. The information required should be found in the reference section of the printer users manual. With this reference information, use the following tutorial to specify the appropriate format for the printer: Carriage Return At Form Feed Some printers automatically perform a carriage return (CR) when they receive a form feed (FF) command, while other printers do not perform this function. The CRATFF= option provides users with two choices. If the user chooses ADD CR (the default value), the OPTIMA will send a carriage return every time it sends a form feed to the printer. This is the appropriate choice if the printer does not perform a carriage return. If the user chooses DONT ADD, a carriage return will not be sent with a form feed. This choice assumes that the printer will perform this function. Movement The HORMOVE= and VERMOVE= choices of RELATIVE (the default) and ABSOLUTE refer to the type of parameters that the printer recognizes for controlling the printers horizontal and vertical cursor movement. Some printers recognize a command to move the cursor to an absolute position on the page, and others recognize a command to move a relative distance from the current cursor position. Some printers recognize either type. Determine the type of parameter the printer recognizes for horizontal and vertical movement. The two types of movement may be different. Set HORMOVE= and VERMOVE= appropriately. If the printer recognizes both types of parameters, choose ABSOLUTE for vertical movement and RELATIVE for horizontal movement. This choice must be coordinated with the definitions given to the HORMOVE> and VERMOVE> PFSs. CHAPTER 2 — ADVANCED CONFIGURATION Page 2-13 Note: The LINEFEED option for vertical movement is included only for compatibility with older applications, and it should not ordinarily be selected by the user. Resolution HOR RES= and VER RES= should be set to the units used by the printer for the command in the HORMOVE> and VERMOVE> PFSs. Choose the smallest unit size that the printer is capable of accepting (720 DPI, or 1/ 720-inch, is the smallest unit size; 60 DPI, or 1/60-inch, is the largest unit size). This allows the OPTIMA to calculate the parameter values to insert into those PFSs. The VER RES= setting (6 LPI is the default value) is used in calculating the VERMOVE> PFS parameter. The HOR RES= setting (180 DPI is the default) is used to calculate the parameters for the HORMOVE>, SNDMOVE> and SENDHMI> PFSs. (The SNDMOVE> and SENDHMI> PFSs are used for justification.) Note: The 6 LPI option is included only for compatibility with older applications, and it should not ordinarily be selected by the user. VRELMAX= is used to specify the maximum parameter value allowed for the VERMOVE> PFS. Unless this value is set to NONE, large relative vertical movements will be broken up into several smaller movements. This option is used only if the VERMOVE= parameter is set to RELATIVE. The default value is 1 LINE, but this value is not intended for selection by the user. It is included only for compatibility with older applications and in conjunction with the 6 LPI vertical resolution mentioned above. Offset The H OFF= and V OFF= options allow the user to offset all printing from the left and top edges of the paper, respectively. These options can be used to help place text onto preprinted forms. The horizontal offset option (H OFF=) specifies a left margin that will be added to any system-requested left margin in non-COR jobs. The vertical offset option (V OFF=) specifies a top margion that will be added to any system-requested top margin in non-COR jobs. The default value is NONE, but the user may selct any value between .05 inches and 1 inch. Page 2-14 AGILE 5250 OPTIMA User’s Guide and Reference The CORHOFF= and CORVOFF= options specify the offsets only when the page orientation is COR (Computer Output Reduction). The value DEFAULT (the default value) for these options is .05 inches, which is the same offset as the IBM 3812 printer. The user may also select NONE or another value between .05 inches and 1 inch. Note: The DEFAULT option is included only for compatibility between the current OPTIMA software and older output port configuration files, and it is not intended for selection by the user. Vertical Percentage Reduction in COR The CORVER%= option allows the user to decide the percentage of vertical reduction performed by the OPTIMA when printing in COR format. The default percentage of vertical reduction is 70%, which is the IBM standard. Some printers, such as the Hewlett-Packard LaserJet series, require a reduction of 65% for all data to fit on the page. For larger margins, the user may select a 60% vertical reduction. CPI/Font Order The RES CPI= option specifies the order in which the OPTIMA will send PFSs to the printer when it receives a command from the system to change both the font and the characters per inch. The PRE-FONT setting tells the OPTIMA to send the PFS to set the CPI at the printer first, and then to set the font. This is the normal (default) setting. If, after the CPI has been set, the font selection is ignored by the printer because the font is not available, the character spacing will still be correct. The POSTFONT setting is used for printers that can vary the character spacing of any font. This setting tells the OPTIMA to send the PFS to set the font at the printer first, and then to set the CPI. After the font has been set at the printer, the CPI setting can be made to affect it. Justification The choices under JUSTTYP= refer to the way in which the OPTIMA will perform horizontal justification of text. If the printer is capable of justifying text, and if the user chooses PRINTER, the OPTIMA will send the PFS STRTJST> at the beginning of a justified field, and it will send the PFS ENDJUST> at the end of the field. Even if the printer is not capable of justifying text, the OPTIMA may still be able to drive it such that it will print with justified text. The way in which the OPTIMA will do this depends upon the printer. CHAPTER 2 — ADVANCED CONFIGURATION Page 2-15 If the printer is capable of moving variable relative distances to the left, choose SENDMOVE (the default value). This will cause the OPTIMA to send the PFS SNDXTRA> to the printer after each character that needs additional space. If HORMOVE= is set to RELATIVE, the SNDXTRA> PFS should be the same as the HORMOVE> PFS. If the printer is not capable of performing relative horizontal movements, but uses an HMI (horizontal motion index) mechanism to change CPI, set JUSTTYP= SET HMI. This tells the OPTIMA to print the SENDHMI> PFS to the printer before each character it prints. The OPTIMA will calculate the parameter for the SENDHMI> PFS based upon the current CPI and the additional amount of space required after the character. If the printer cannot justify text itself, is not capable of relative horizontal movements and does not have commands to set HMI, then the OPTIMA will not be able to justify text on that printer. In this case, set JUSTTYP= PRINTER, and leave the STRTJST> and ENDJUST> PFSs blank. Bolding The choices for the BOLDTYP= option allow the user to determine the way in which the OPTIMA will achieve bolding of text. The PRINTER choice (the default value) causes the OPTIMA to send the BOLD ON> PFS to the printer at the beginning of bold printing, and to send the BOLDOFF> PFS to the printer at the end of bold printing. For printers that are not otherwise capable of bold printing, the BACK SPC setting causes the OPTIMA to print each bold character in the following way: Character - Backspace - BSBOLD1> PFS - Character BSBOLD2> PFS. The BSBOLD1> PFS and BSBOLD2> PFS are used to perform small relative vertical movements to the right and left, respectively, there by offsetting the two occurrences of the character and creating a bold appearance. Page Resetting When the RSTPAGE= option is activated, the OPTIMA will reset all formatting option parameters at the beginning of each page sent to the printer (i.e., all PFSs required for correct formatting of the page are resent to the printer). The use of this option is necessary only if the user mixes system commands with printer commands in the data stream, an action strongly discouraged by AGILE. If the user mixes command types in the data stream, this option will ensure that incorrect formatting will occur over no more than one page at a time. NO RESET is the default. To activate this feature, set the option to RESET. Page 2-16 AGILE 5250 OPTIMA User’s Guide and Reference Underlining Spaces The setting of the UNDLSPC= option determines the way in which the OPTIMA will tell the printer to underline spaces when an underlined space is encountered in the data stream. It is useful primarily for nine-pin dot matrix printers. If the UNDL PFS choice is selected, the OPTIMA will have the printer print the space character and then underline it as defined by the entry in the UNDL ON> PFS (on a nine-pin dot matrix printer, this will require a second pass of the printhead). This is the default selection. If the UNDERLIN choice is selected, the OPTIMA will have the printer underline space characters by printing an underscore. The advantage of this method is that a second pass of the printhead is avoided, and printing is faster. The drawback is that when underlined spaces are combined with underlined text on the same line, the result will be an uneven line, because the underline character and the underscore character are at different heights on the line. Orientation The choices under ORIENT= are used to determine page orientation. Portrait orientation indicates the page height is greater than its width; landscape orientation indicates the page width is greater than its height. There are three different methods that the OPTIMA can use to select page orientation. (When determining the appropriate orientation, the System tells the OPTIMA which drawer to use, and the OPTIMA assumes that the PFS for that drawer has been set correctly.) 1. System Command: If the OPTIMA receives a command from the System for page orientation, the System command will be used to orient the page. 2. Drawer: If there is no System command for page orientation, and if the user chooses /DRAWER, the page orientation will be determined by the rotation setting (PORT, LAND or COR) that has been indicated for the drawer selection (PAPER 1:ROTATE=, PAPER 2:ROTATE=, PAPER 3:ROTATE= or ENVEL 2: ROTATE=). CHAPTER 2 — ADVANCED CONFIGURATION Page 2-17 3. Auto: If there is no System command for page orientation, and if the user chooses AUTO, the OPTIMA will orient the page automatically using the following procedure: The OPTIMA will deduce the appropriate page size based upon the information the System provides about the number of lines, the lines per inch, etc. It will then check the height and width settings on the selected drawer (PAPER 1:, PAPER 2:, ENVEL 1: and ENVEL 2:) to check if the size is valid. Finally, it checks the page size to see which dimension is larger and orients the page accordingly. (It checks to see if it is possible to fit all of the data on the page, determines which orientation is best, and then executes the orientation command.) If the data will not fit on the page using this method, the OPTIMA uses the settings for the drawer. (See 2. Drawer above.) The OPTIMA orientation selection algorithm: Calculate Page Orientation The FMTINFO: ORIENT= settings of LAND, PORT and COR allow overriding of all system orientation requests. Is the setting of FMTINFO:ORIENT= PORT, LAND or COR? Yes Use Orientation Specified by the FMTINFO: ORIENT= regardless of system requests. No The 5250 OPTIMA supports only portrait, landscape and COR (Computer Output Reduction) orientations; it does not support “reverse” portrait or landscape orientations. Rotations of 0 or 180 degrees are both portrait. Rotations of 90 or 270 degrees are both landscape. Has System Specifically Requested Landscape, Portrait or COR? Yes Use SystemRequested Orientation. No (Or System Requests Default) As always, FMTINFO: settings are for the currently active output port — ie., the output port sending the data to the printer. What Is The Setting Of FMTINFO:ORIENT=? /DRAWER Use Setting of FMTINFO: DRAWER: ROTATE= as Orientation. (COR by default.) AUTO System page size is calculated as: Columns (MPP) x CPI = width in inches, Lines (MPL) x LPI = length in inches. Physical paper width and height are FMTINFO: DRAWER: WIDTH= and FMTINFO: DRAWER : HEIGHT= repectively, where DRAWER: is the currently selected paper source drawer. Will System-Requested Page Size Fit On Paper In Current Drawer? No Use Setting of FMTINFO: DRAWER: ROTATE= as Orientation. (COR by default.) Yes When automatically orienting, pages that are taller than wide are printed in portrait orientation, and pages that are wider than tall are printed in landscape orientation. Is System-Requested Height > System-Requested Width? Yes Use Portrait Orientation. No Use Landscape Orientation. Paper Sources (Drawers) For each possible source drawer that the printer can use, the user must specify the width, height and rotation. Each of the four drawers can be used to define any possible envelope or paper size and rotation, regardless of the name of the drawer. The names of the four source drawers are PAPER 1:, PAPER 2:, PAPER 3: and ENVELOP:. When the OPTIMA receives a command from the system to use one of these source drawers, it prints the PFS of the same name to tell the printer the correct source drawer. Each drawer has settings for WIDTH=, HEIGHT= and ROTATE=. These settings are used by the orientation selection algorithm in determining the best orientation for the drawer. WIDTH= Regardless of the orientation of the page, find the smallest dimension of the paper in the drawer. For example, if the paper in the drawer is 8 1/2 X 11 inches, select 8.5 INCH. If the size of the page is not included in the configuration menu, choose the next smallest size. If the paper is smaller than all of the choices in the menu, choose the smallest available size. HEIGHT= Find the largest dimension of the paper in the drawer. For example, if the paper in the drawer is 8 1/2 X 11 inches, select 11 INCH. If the size of the page is not included in the configuration menu, choose the next smallest size. If the paper is smaller than all of the choices in the menu, choose the smallest available size. ROTATE= PORT indicates that the paper height is greater than the paper width. LAND indicates that the paper width is greater than the paper height. COR, or computer output reduction, is the default setting for each drawer. If the OPTIMA is driving the printer in COR mode, the printer will be put into landscape mode (LAND) using the LAND> PFS. The line spacing will be reduced to 70% (depending upon the setting of the CORVER%= option) of the system-requested line spacing, allowing an 11-inch page depth to fit into 8.5 inches. If using COR mode, define the PFSs COR 10>, COR 12> and COR 15>. COR 10> should select a landscape font greater than or (preferably) equal to 13 pitch. COR 12> should select a landscape font greater than or equal to 15 pitch. COR 15> should select a landscape font greater than or equal to 20 pitch. CHAPTER 3 — CHARACTER CODE TRANSLATION Page 3-1 CHAPTER 3 CHARACTER CODE TRANSLATION Overview The data stream that is sent from the AS/400, System/3X or alternate host device is not forwarded directly through the AGILE 5250 OPTIMA to the printer. Rather, all characters must first pass through the appropriate character code translation table. If the data format that the printer uses is the same as the format in which the source device sends data, then the data is routed through a passthrough table (either ASCII to ASCII or EBCDIC to EBCDIC). If the data formats of the two devices are different, then a translation table must be selected that will convert the data from one format to another. The 5250 OPTIMA contains sixteen translation tables that are used to translate character codes. Of these, four are used by the OPTIMA for predefined functions (the four combinations of ASCII/EBCDIC to/from ASCII/EBCDIC.) Four are used for specialized printer applications. One table is used to convert Xerox EBCDIC characters into ASCII format during downloading from the host. The other seven tables are user configurable for translation to nonstandard character sets, international use, etc. Each of these tables has 256 values that are used to translate an input value to an output value. Both the input value and the output value are a single byte, i.e., two hexadecimal digits. Each table is organized as 16 rows of 16 values, which makes it easy to look up the output for any input. (These tables are sometimes called lookup tables.) The most basic function of the 5250 OPTIMA is to convert EBCDIC SCS (twinax host) data to ASCII one byte at a time. When a character is received by the 5250 OPTIMA, the corresponding character from the selected translation table is substituted, and that value is sent to the printer. The appropriate character code translation tables for the input and output devices are selected when a supported printer configuration is loaded. If the printer/output device is not among the supported printer configurations, the user must select the appropriate translation table, or XLTINFO:, for each active input device that can send data to it. These tables may be modified by the user, if necessary. Page 3-2 AGILE 5250 OPTIMA User’s Guide and Reference Selecting a Translation Table When configuring the OPTIMA output ports, for each input device the appropriate translation table must be selected. The default selection of the translation tables might meet the users needs, but the user may need to find the appropriate tables from among the other fifteen tables included with the software. The sixteen tables are as follows: ASCII to ASCII (default for 5250 ALLY & alternate host) EBCDIC->ASCII: EBCDIC to ASCII (default for twinax translation) ASCII->EBCDIC: ASCII to EBCDIC EBCDIC->EBCDIC: EBCDIC to EBCDIC EBCDIC->HP LJ: EBCDIC to HP LaserJet (Roman 8 extended ASCII) EBCDIC->PC: EBCDIC to PC (standard PC extended ASCII character set) EBCDIC->PS: EBCDIC to PostScript (IsoLatin1 extended ASCII character set) 275 E->A: Xerox 275 protocol converter EBCDIC to ASCII User Table 1: User-defined User Table 2: User-defined User Table 3: User-defined User Table 4: User-defined User Table 5: User-defined User Table 6: User-defined User Table 7: User-defined XFNTE->A: Xerox EBCDIC Font Download to ASCII (default for fonts) ASCII->ASCII: Notice that the tables are mostly made up of some combination of EBCDIC or ASCII. To determine which is the appropriate table for an input device at an output port, the user must determine the format of the data stream and the format used by the printer. If the source device is twinax, the input will be in EBCDIC. If the source device is a PC, the input will probably be ASCII. The printer might use either EBCDIC, ASCII, Hewlett-Packard LaserJet, PC ASCII or Postscript. If unsure what format the device uses, please consult the manual that came with it. Once the appropriate table for each input/output device combination has been determined, find XLTINFO: in the menu under each output port configuration heading. Then, for each input device, select the appropriate table name, and press ENTER. CHAPTER 3 — CHARACTER CODE TRANSLATION Page 3-3 Twinax Translation Because all twinax-generated data is in EBCDIC SCS format, the user should select one of the EBCDIC tables (EBCDIC->ASCII, EBCDIC->EBCDIC, EBCDIC->HP LJ, EBCDIC->PC, EBCDIC->PS), depending upon the printer. Choose 275 E->A only if the twinax mode is Xerox 275 emulation mode, and if the Xerox printer is configured for the ASCII character set. Most users operate their printers in ASCII mode, so EBCDIC->ASCII is the default. When the data source is a twinax device, unprintable characters (00h - 3Fh in EBCDIC) are removed from the data stream before the data is translated with the translation tables. Any value of 0 is printed as the graphic error action character (- by default). Thus, the first four rows of each table usually need to be modified only for alternate host input. Alternate Host Translation When using an alternate host, the only function that the OPTIMA performs is to send the data through a translation table. Although the translation tables can translate both printable (40h - FFh in EBCDIC) and unprintable characters (00h - 3Fh), the user will usually need to translate only printable characters. 5250 OPTIMA Translation Since all OPTIMA-generated data is in ASCII, the table selected for OPT XLAT: should be either ASCII to ASCII or ASCII to EBCDIC, depending upon the printer. Reading Translation Tables The left column of each table is a series of numerals and letters representing the most significant digit of the hexadecimal input character received by the 5250 OPTIMA. The top row of each table is a series of numerals and letters representing the least significant digit of the hexadecimal input character received by the 5250 OPTIMA. The intersection in the table of the most significant and least significant digits of the input character is the location of the output value that the 5250 OPTIMA sends to the printer upon receiving a given input character in the data stream. Page 3-4 AGILE 5250 OPTIMA User’s Guide and Reference To understand the way in which the translation tables work, look at the EBCDIC to ASCII table. Find the output value for the hexadecimal input character 'C1.' (This is an uppercase A in EBCDIC.) Look down the left column and find the entry C_. Look across the table until reaching the intersection of the column headed by _1. The table shows that the output value for the input value of 'C1' is '41.' (This is an uppercase A in ASCII.) When this table is selected, an uppercase EBCDIC A received by the 5250 OPTIMA is translated into an uppercase ASCII A and sent to the printer. Editing a Translation Table The appropriate translation table for the input/output device combinations may not exist. If this is the case, the user will have to edit an existing table. A sample translation table report can be found in Chapter 5 Maintenance & Troubleshooting. Before changing any translation table, the user should print a translation table report as described in this chapter. This report will send the printer a report of each of the translation tables. Find the table that most closely matches the requirements from among those tables labeled USER 1> to USER 7>. Move through the configuration menu until reaching CONFIG: XLATES. Press g, then press d and f until reaching the table to be edited. Press g again to enter the character code translation table edit mode. In the edit mode, notice that the table name is displayed on the left, followed by a greater than sign (>). On the right is a hexadecimal value representing the table location, a right arrow and the hexadecimal output value. For example: EBC->ASC> $00->$00 shows that for the EBCDIC to ASCII table, the value 00h translates to 00. To move through the table, use s and g to move to either digit of the hexadecimal value representing the table location, then use d and f to change the value. For example, if looking at the display shown above, and wanting to change the translation of the EBCDIC space character 40h, press d four times. The result would be: EBC->ASC> $40->$20 CHAPTER 3 — CHARACTER CODE TRANSLATION Page 3-5 After reaching the location of the input value to be changed, use g to move to the appropriate digit(s) of the hexadecimal output value. For example, to change the EBCDIC space character to translate into ASCII 21h, press g three times: EBC->ASC> $40->$20 Use d and f to change the appropriate digit(s) of the output value. In this example, press d once: EBC->ASC> $40->$21 For ease in editing successive values in the table, the user can move one value forward in the table by using g when the cursor is on the right digit of the output value. Following the example, if g is pressed now, the display will look like this: EBC->ASC> $41->$20 When the editing is complete, press ENTER to exit the translation table edit mode. Page 3-6 AGILE 5250 OPTIMA User’s Guide and Reference Translation Tables ASCII to ASCII This is a pass-though table. It is the default translation table for 5250 OPTIMA-generated data (tests and reports) and for alternate host data. LS MS 0 1 2 3 4 5 6 7 8 9 10 11 12 13 14 0 1 2 3 4 5 6 7 8 9 A B C D E 15 F 00 0 00 NUL 01 SOH 02 STX 03 ETX 04 EOT 05 ENQ 06 ACK 07 BEL 08 BS 09 HT 0A LF 0B VT 0C FF 0D CR 0E SO OF SI 16 1 10 DLE 11 DC1 12 DC2 13 DC3 14 DC4 15 NAK 16 SYN 17 ETB 18 CAN 19 EM 1A SUB 1B ESC 1C FS 1D GS 1E RS 1F US 32 2 20 SP 21 ! 22 " 23 # 24 $ 25 % 26 & 27 ' 28 ( 29 ) 2A * 2B + 2C , 2D - 2E . 2F / 48 3 30 0 31 1 32 2 33 3 34 4 35 5 36 6 37 7 38 8 39 9 3A : 3B ; 3C < 3D = 3E > 3F ? 64 4 40 @ 41 A 42 B 43 C 44 D 45 E 46 F 47 G 48 H 49 I 4A J 4B K 4C L 4D M 4E N 4F O 80 5 50 P 51 Q 52 R 53 S 54 T 55 U 56 V 57 W 58 X 59 Y 5A Z 5B [ 5C \ 5D ] 5E ^ 5F _ 96 6 60 ` 61 a 62 b 63 c 64 d 65 e 66 f 67 g 68 h 69 i 6A j 6B k 6C l 6D m 6E n 6F o 112 7 70 p 71 q 72 r 73 s 74 t 75 u 76 v 77 w 78 x 79 y 7A z 7B { 7C | 7D } 7E ~ 7F DEL 128 8 80 81 82 83 84 85 86 87 88 89 8A 8B 8C 8D 8E 8F 144 9 90 91 92 93 94 95 96 97 98 99 9A 9B 9C 9D 9E 9F 160 A A0 A1 A2 A3 A4 A5 A6 A7 A8 A9 AA AB AC AD AE AF 176 B B0 B1 B2 B3 B4 B5 B6 B7 B8 B9 BA BB BC BD BE BF 192 C C0 C1 C2 C3 C4 C5 C6 C7 C8 C9 CA CB CC CD CE CF 208 D D0 D1 D2 D3 D4 D5 D6 D7 D8 D9 DA DB DC DD DE DF 224 E E0 E1 E2 E3 E4 E5 E6 E7 E8 E9 EA EB EC ED EE EF 240 F F0 F1 F2 F3 F4 F5 F6 F7 F8 F9 FA FB FC FD FE FF CHAPTER 3 — CHARACTER CODE TRANSLATION Page 3-7 EBCDIC to ASCII This table is the default translation table for twinax data. LS MS 0 1 2 3 4 5 6 7 8 9 10 11 12 13 14 0 1 2 3 4 5 6 7 8 9 A B C D E 15 F 00 0 00 00 00 00 00 00 00 00 00 00 00 00 0C FF 0D CR 00 00 16 1 00 00 00 00 00 00 00 00 00 00 00 00 00 00 00 00 32 2 00 00 00 00 00 0A LF 00 1B ESC 00 00 00 00 00 00 00 00 48 3 00 00 00 00 00 00 00 00 00 00 00 00 00 00 00 00 64 4 20 SP 20 SP 61 a 61 a 61 a 61 a 61 a 61 a 63 c 6E n 5B [ 2E . 3C < 28 ( 2B + 21 ! 80 5 26 & 65 e 65 e 65 e 65 e 69 i 69 i 69 i 69 i 42 B 5D ] 24 $ 2A * 29 ) 3B ; 5E ^ 96 6 2D - 2F / 41 A 41 A 41 A 41 A 41 A 41 A 43 C 4E N 7C | 2C , 25 % 5F _ 3E > 3F ? 112 7 6F o 45 E 45 E 45 E 45 E 49 I 49 I 49 I 49 I 60 ` 3A : 23 # 40 @ 27 ' 3D = 22 " 128 8 4F O 61 a 62 b 63 c 64 d 65 e 66 f 67 g 68 h 69 i 3C < 3E > 64 d 79 y 70 p 2B + 144 9 6F o 6A j 6B k 6C l 6D m 6E n 6F o 70 p 71 q 72 r 61 a 6F o 61 a 2C , 41 A 6F o 160 A 75 u 7E ~ 73 s 74 t 75 u 76 v 77 w 78 x 79 y 7A z 21 ! 3F ? 44 D 59 Y 50 P 52 R 176 B 63 c 4C L 59 Y 50 P 66 f 53 S 50 P 61 / 61 / 61 / 5E ^ 7C | 2D - 22 " 27 ' 5F _ 192 C 7B { 41 A 42 B 43 C 44 D 45 E 46 F 47 G 48 H 49 I 2D - 6F o 6F o 6F o 6F o 6F o 208 D 7D } 4A J 4B K 4C L 4D M 4E N 4F O 50 P 51 Q 52 R 31 1 75 u 75 u 75 u 75 u 79 y 224 E 5C \ 20 SP 53 S 54 T 55 U 56 V 57 W 58 X 59 Y 5A Z 32 2 4F O 4F O 4F O 4F O 4F O 240 F 30 0 31 1 32 2 33 3 34 4 35 5 36 6 37 7 38 8 39 9 33 3 55 U 55 U 55 U 55 U 00 Page 3-8 AGILE 5250 OPTIMA User’s Guide and Reference ASCII to EBCDIC This table can be used for alternate host data if using a Xerox printer running in EBCDIC mode. LS MS 0 1 2 3 4 5 6 7 8 9 10 11 12 13 14 0 1 2 3 4 5 6 7 8 9 A B C D E 15 F 00 0 00 00 00 00 00 00 00 2F BEL 00 00 25 LF 00 0C FF 0D CR 00 00 16 1 00 00 00 00 00 00 00 00 00 00 00 27 ESC 00 00 00 00 32 2 40 SP 4F ! 7F " 7B # 5B $ 6C % 50 & 7D ' 4D ( 5D ) 5C * 4E + 6B , 60 - 4B . 61 / 48 3 F0 0 F1 1 F2 2 F3 3 F4 4 F5 5 F6 6 F7 7 F8 8 F9 9 7A : 5E ; 4C < 7E = 6E > 6F ? 64 4 7C @ C1 A C2 B C3 C C4 D C5 E C6 F C7 G C8 H C9 I D1 J D2 K D3 L D4 M D5 N D6 O 80 5 D7 P D8 Q D9 R E2 S E3 T E4 U E5 V E6 W E7 X E8 Y E9 Z 4A ¢ E0 \ 5A ! 5F ¬ 6D _ 96 6 7D ' 81 a 82 b 83 c 84 d 85 e 86 f 87 g 88 h 89 i 91 j 92 k 93 l 94 m 95 n 96 o 112 7 97 p 98 q 99 r A2 s A3 t A4 u A5 v A6 w A7 x A8 y A9 z C0 { BB ] D0 } A1 ~ 00 128 8 00 00 00 00 00 00 00 00 00 00 00 00 00 00 00 00 144 9 00 00 00 00 00 00 00 00 00 00 00 00 00 00 00 00 160 A 00 00 00 00 00 00 00 00 00 00 00 00 00 00 00 00 176 B 00 00 00 00 00 00 00 00 00 00 00 00 00 00 00 00 192 C 00 00 00 00 00 00 00 00 00 00 00 00 00 00 00 00 208 D 00 00 00 00 00 00 00 00 00 00 00 00 00 00 00 00 224 E 00 00 00 00 00 00 00 00 00 00 00 00 00 00 00 00 240 F 00 00 00 00 00 00 00 00 00 00 00 00 00 00 00 00 CHAPTER 3 — CHARACTER CODE TRANSLATION Page 3-9 EBCDIC to EBCDIC This table can be used to translate twinax data if using a Xerox printer running in EBCDIC mode. LS MS 0 1 2 3 4 5 6 7 8 9 10 11 12 13 14 0 1 2 3 4 5 6 7 8 9 A B C D E 15 F 00 0 00 NUL 01 SOH 02 STX 03 ATN 04 SEL 05 HT 06 RNL 07 DEL 08 GE 09 SPS 0A RPT 0B VT 0C FF 0D CR 0E SD 0F SI 16 1 10 DLE 11 DC1 12 DC2 13 DC3 14 RES 15 NL 16 BS 17 POC 18 CAN 19 EM 1A UBS 1B CU1 1C IFS 1D IGS 1E IRS 1F IUS 32 2 20 DS 21 SOS 22 FS 23 WUS 24 BYP 25 LF 26 ETB 27 ESC 28 SA 29 2A SW 2B FMT 2C MFA 2D ENQ 2E ACK 2F BEL 48 3 30 31 32 SYN 33 IRT 34 PP 35 TRN 36 NBS 37 EOT 38 SBS 39 IT 3A RFF 3B CU3 3C DC4 3D NAK 3E 3F SUB 64 4 40 SP 41 RSP 42 â 43 ä 44 à 45 á 46 ã 47 å 48 ç 49 ñ 4A [ 4B . 4C < 4D ( 4E + 4F ! 80 5 50 & 51 é 52 ê 53 ë 54 è 55 í 56 î 57 ï 58 ì 59 ß 5A ] 5B $ 5C * 5D ) 5E ; 5F ^ 96 6 60 - 61 / 62  63 Ä 64 À 65 Á 66 à 67 Å 68 Ç 69 Ñ 6A ¦ 6B , 6C % 6D _ 6E > 6F ? 112 7 70 ø 71 É 72 Ê 73 Ë 74 È 75 Í 76 Î 77 Ï 78 Ì 79 ` 7A : 7B # 7C @ 7D ' 7E = 7F " 128 8 80 Ø 81 a 82 b 83 c 84 d 85 e 86 f 87 g 88 h 89 i 8A « 8B » 8C ð 8D ý 8E þ 8F ± 144 9 90 ° 91 j 92 k 93 l 94 m 95 n 96 o 97 p 98 q 99 r 9A ª 9B º 9C æ 9D ¸ 9E Æ 9F ¤ 160 A A0 µ A1 ~ A2 s A3 t A4 u A5 v A6 w A7 x A8 y A9 z AA ¡ AB ¿ AC Ð AD Ý AE Þ AF ® 176 B B0 ¢ B1 £ B2 ¥ B3 Pts B4 ƒ B5 § B6 ¶ B7 ¼ B8 ½ B9 ¾ BA ¬ BB | BC ¯ BD ¨ BE ´ BF 192 C C0 { C1 A C2 B C3 C C4 D C5 E C6 F C7 G C8 H C9 I CA SHY CB ô CC ö CD ò CE ó CF õ 208 D D0 } D1 J D2 K D3 L D4 M D5 N D6 O D7 P D8 Q D9 R DA ¹ DB û DC ü DD ù DE ú DF ÿ 224 E E0 \ E1 NSP E2 S E3 T E4 U E5 V E6 W E7 X E8 Y E9 Z EA ² EB Ô EC Ö ED Ò EE Ó EF Õ 240 F F0 0 F1 1 F2 2 F3 3 F4 4 F5 5 F6 6 F7 7 F8 8 F9 9 FA ³ FB Û FC Ü FD Ù FE Ú FF EO Page 3-10 AGILE 5250 OPTIMA User’s Guide and Reference EBCDIC to HP LaserJet This table translates twinax data for printers that use Roman 8 extended ASCII. LS MS 0 1 2 3 4 5 6 7 8 9 10 11 12 13 14 0 1 2 3 4 5 6 7 8 9 A B C D E 15 F 00 0 00 00 00 00 00 00 00 00 00 00 00 00 0C FF 0D CR 00 00 16 1 00 00 00 00 00 00 00 00 00 00 00 00 00 00 00 00 32 2 00 00 00 00 00 0A LF 00 1B ESC 00 00 00 00 00 00 00 00 48 3 00 00 00 00 00 00 00 00 00 00 00 00 00 00 00 00 64 4 20 SP 20 SP C0 â CC ä C8 à C4 á E2 ã D4 å B5 ç B7 ñ 5B [ 2E . 3C < 28 ( 2B + 21 ! 80 5 26 & C5 é C1 ê CD ë C9 è D5 í D1 î DD ï D9 ì DE ß 5D ] 24 $ 2A * 29 ) 3B ; 5E ^ 96 6 2D - 2F / A2  D8 Ä A1 À E0 Á E1 à D0 Å B4 Ç B6 Ñ 7C | 2C , 25 % 5F _ 3E > 3F ? 112 7 D6 ø DC É A4 Ê A5 Ë A3 È E5 Í A6 Î A7 Ï E6 Ì A9 ` 3A : 23 # 41 @ 27 ' 3D = 22 " 128 8 D2 Ø 61 a 62 b 63 c 64 d 65 e 66 f 67 g 68 h 69 i FB « FD » E4 ð B2 ý F1 þ FE ± 144 9 B3 ° 6A j 6B k 6C l 6D m 6E n 6F o 70 p 71 q 72 r F9 ª FA º D7 æ 2C , D3 Æ BA ¤ 160 A F3 µ AC ~ 73 s 74 t 75 u 76 v 77 w 78 x 79 y 7A z B8 ¡ B9 ¿ E3 Ð B1 Ý F0 Þ 52 R 176 B BF ¢ BB £ BC ¥ 50 P BE ƒ BD § F4 ¶ F7 ¼ F8 ½ F5 ¾ 5E ^ 7C | B0 - AB ¨ A8 ´ 5F _ 192 C 7B { 41 A 42 B 43 C 44 D 45 E 46 F 47 G 48 H 49 I 2D - C2 ô CE ö CA ò C6 ó EA õ 208 D 7D } 4A J 4B K 4C L 4D M 4E N 4F O 50 P 51 Q 52 R 31 1 C3 û CF ü CB ù C7 ú EF ÿ 224 E 5C \ 20 SP 53 S 54 T 55 U 56 V 57 W 58 X 59 Y 5A Z 32 2 DF Ô DA Ö E8 Ò E7 Ó E9 Õ 240 F 30 0 31 1 32 2 33 3 34 4 35 5 36 6 37 7 38 8 39 9 33 3 AE Û DB Ü AD Ù ED Ú FF CHAPTER 3 — CHARACTER CODE TRANSLATION Page 3-11 EBCDIC to PC This table translates twinax data for printers that use the standard PC extended ASCII character set. LS MS 0 1 2 3 4 5 6 7 8 9 10 11 12 13 14 0 1 2 3 4 5 6 7 8 9 A B C D E 15 F 00 0 00 00 00 00 00 00 00 00 00 00 00 00 0C FF 0D CR 00 00 16 1 00 00 00 00 00 00 00 00 00 00 00 00 00 00 00 00 32 2 00 00 00 00 00 0A LF 00 1B ESC 00 00 00 00 00 00 00 00 48 3 00 00 00 00 00 00 00 00 00 00 00 00 00 00 00 00 64 4 20 SP 20 SP 83 â 84 ä 85 à A0 á 61 a 86 å 87 ç A4 ñ 5B [ 2E . 3C < 28 ( 2B + 21 ! 80 5 26 & 82 é 88 ê 89 ë 8A è A1 í 8C î 8B ï 8D ì E1 ß 5D ] 5B $ 2A * 29 ) 3B ; 5E ^ 96 6 2D - 2F / 41 A 8E Ä 41 A 41 A 41 A 8F Å 80 Ç A5 Ñ 7C | 2C , 25 % 5F _ 3E > 3F ? 112 7 ED ø 90 É 45 E 45 E 45 E 49 I 49 I 49 I 49 I 61 ` 3A : 23 # 41 @ 27 ' 3D = 22 " 128 8 4F O 61 a 62 b 63 c 64 d 65 e 66 f 67 g 68 h 69 i AE « AF » 64 d 79 y 70 p F1 ± 144 9 F8 ° 6A j 6B k 6C l 6D m 6E n 6F o 70 p 71 q 72 r A6 ª A7 º 91 æ 2C , 92 Æ 6F o 160 A E6 µ 7E ~ 73 s 74 t 75 u 76 v 77 w 78 x 79 y 7A z AD ¡ A8 ¿ 44 D 59 Y 50 P 52 R 176 B 9B ¢ 9C £ 9D ¥ 9E Pts 9F ƒ 53 S 50 P AC ¼ AB ½ 61 / AA ¬ 7C | 2D - 22 " 27 ' 5F _ 192 C 7B { 41 A 42 B 43 C 44 D 45 E 46 F 47 G 48 H 49 I 2D - 93 ô 94 ö 95 ò A2 ó 6F o 208 D 7D } 4A J 4B K 4C L 4D M 4E N 4F O 50 P 51 Q 52 R 31 1 96 û 81 ü 97 ù A3 ú 98 ÿ 224 E 5C \ 20 SP 53 S 54 T 55 U 56 V 57 W 58 X 59 Y 5A Z FD ² 4F O 99 Ö 4F O 4F O 4F O 240 F 30 0 31 1 32 2 33 3 34 4 35 5 36 6 37 7 38 8 39 9 33 3 55 U 94 Ü 55 U 55 U 00 Page 3-12 AGILE 5250 OPTIMA User’s Guide and Reference EBCDIC to PostScript This table translates twinax data for printers that use the IsoLatin1 extended ASCII character set. LS MS 0 1 2 3 4 5 6 7 8 9 10 11 12 13 14 0 1 2 3 4 5 6 7 8 9 A B C D E 15 F 00 0 00 00 00 00 00 00 00 00 00 00 00 00 0C FF 0D CR 00 00 16 1 00 00 00 00 00 00 00 00 00 00 00 00 00 00 00 00 32 2 00 00 00 00 00 0A LF 00 1B ESC 00 00 00 00 00 00 00 00 48 3 00 00 00 00 00 00 00 00 00 00 00 00 00 00 00 00 64 4 20 SP 20 SP E2 â E4 ä E0 à E1 á E3 ã E5 å E7 ç F1 ñ 5B [ 2E . 3C < 28 ( 2B + 21 ! 80 5 26 & E9 é EA ê EB ë E8 è ED í EE î EF ï EC ì DF ß 5D ] 24 $ 2A * 29 ) 3B ; 5E ^ 96 6 2D - 2F / C2  C4 Ä C0 À C1 Á C3 à C5 Å C7 Ç D1 Ñ A6 ¦ 2C , 25 % 5F _ 3E > 3F ? 112 7 F8 ø C9 É CA Ê CB Ë C8 È CD Í CE Î CF Ï CC Ì 91 ‘ 3A : 23 # 40 @ 27 ' 3D = 22 " 128 8 D8 Ø 61 a 62 b 63 c 64 d 65 e 66 f 67 g 68 h 69 i AB « BB » F0 ð FD ý FE þ B1 ± 144 9 B0 ° 6A j 6B k 6C l 6D m 6E n 6F o 70 p 71 q 72 r AA ª BA º E6 æ B8 ¸ C6 Æ A4 ¤ 160 A B5 µ 7E ~ 73 s 74 t 75 u 76 v 77 w 78 x 79 y 7A z A1 ¡ BF ¿ D0 Ð DD Ý DE Þ AE ® 176 B A2 ¢ A3 £ A5 ¥ 50 P 66 f A7 § B6 ¶ BC ¼ BD ½ BE ¾ AC ¬ 7C | AF ¯ A8 ¨ B4 ´ 5F _ 192 C 7B { 41 A 42 B 43 C 44 D 45 E 46 F 47 G 48 H 49 I 2D - F4 ô F6 ö F2 ò F3 ó F5 õ 208 D 7D } 4A J 4B K 4C L 4D M 4E N 4F O 50 P 51 Q 52 R B9 ¹ FB û FC ü F9 ù FA ú FF ÿ 224 E 5C \ 20 SP 53 S 54 T 55 U 56 V 57 W 58 X 59 Y 5A Z B2 ² D4 Ô D6 Ö D2 Ò D3 Ó D5 Õ 240 F 30 0 31 1 32 2 33 3 34 4 35 5 36 6 37 7 38 8 39 9 B3 ³ DB Û DC Ü D9 Ù DA Ú 00 CHAPTER 3 — CHARACTER CODE TRANSLATION Page 3-13 Xerox 275 Protocol Converter EBCDIC to ASCII This table is used to translate twinax data if the 5250 OPTIMA has been configured to emulate a Xerox 275 protocol converter and if the printer is configured for the ASCII character set. The user should also set the printer emulation to 5225 or 5256. LS 0 1 2 3 4 5 6 7 8 9 10 11 12 13 14 0 1 2 3 4 5 6 7 8 9 A B C D E 15 F 00 0 00 00 00 00 00 00 00 00 00 00 00 00 0C FF 0D CR 00 00 16 1 00 00 00 00 00 00 08 BS 00 00 00 00 00 00 00 00 00 32 2 00 00 00 00 00 0A LF 00 1B ESC 00 00 00 00 00 00 00 07 BEL 48 3 00 00 00 00 00 00 00 00 00 00 00 00 00 00 00 00 64 4 20 SP A3 £ A4 $ A5 ¥ A6 # A7 § A8 ¤ F8 l AA " AB « A2 ¢ 2E . 3C < 28 ( 2B + 7C | 80 5 26 & BA " BB » C0 C1 ` BD ½ BC ¼ C4 ~ C5 ¯ C6 ( MS 21 ! 24 ¤ 2A * 29 ) 3B ; 98 ¬ 96 6 2D - 2F / C7 C8 ¨ C9 ¨ D0 - D1 ¹ D2 ® D3 © D4 ™ 99 ¦ 2C , 25 % 5F _ 3E > 3F ? 112 7 D5 m 9A 9B 9C 9D E0 Ω E2 Ð E3 ª E4 H 60 ` 3A : 23 # 40 @ 27 ' 3D = 22 " 128 8 B5 µ 61 a 62 b 63 c 64 d 65 e 66 f 67 g 68 h 69 i A1 ¡ E6 IJ E7 Li E8 L E9 Ø F0 κ 144 9 F1 æ 6A j 6B k 6C l 6D m 6E n 6F o 70 p 71 q 72 r F2 d F3 ð F4 h F5 i F6 ij F7 li 160 A A0 7E ~ 73 s 74 t 75 u 76 v 77 w 78 x 79 y 7A z AD ↑ C2 ´ AC ← 5B [ AE → AF ↓ 176 B B0 ° B1 ± B2 ² B3 ³ B4 × 5E ( B6 ¶ B7 · B8 ÷ B9 ' F9 ø C3 ^ A9 ' 5D ] BE ¾ BF ¿ 192 C 7B { 41 A 42 B 43 C 44 D 45 E 46 F 47 G 48 H 49 I CA · CB ¸ CC _ CD " CE CF / 208 D 7D } 4A J 4B K 4C L 4D M 4E N 4F O 50 P 51 Q 52 R 9E 9F DC ¿ DD ¡ DE ¬ DF œ/8 224 E 5C \ E1 Æ 53 S 54 T 55 U 56 V 57 W 58 X 59 Y 5A Z EA Œ EB º EC Þ ED T EE η EF ni 240 F 30 0 31 1 32 2 33 3 34 4 35 5 36 6 37 7 38 8 39 9 FA œ FB ß FC þ FD t FE η FF w Page 3-14 AGILE 5250 OPTIMA User’s Guide and Reference User Table 1 The user may edit and use this table for any purpose. LS MS 0 1 2 3 4 5 6 7 8 9 10 11 12 13 14 0 1 2 3 4 5 6 7 8 9 A B C D E 15 F 00 0 00 01 02 03 04 05 06 07 08 09 0A 0B 0C 0D 0E OF 16 1 10 11 12 13 14 15 16 17 18 19 1A 1B 1C 1D 1E 1F 32 2 20 21 22 23 24 25 26 27 28 29 2A 2B 2C 2D 2E 2F 48 3 30 31 32 33 34 35 36 37 38 39 3A 3B 3C 3D 3E 3F 64 4 40 41 42 43 44 45 46 47 48 49 4A 4B 4C 4D 4E 4F 80 5 50 51 52 53 54 55 56 57 58 59 5A 5B 5C 5D 5E 5F 96 6 60 61 62 63 64 65 66 67 68 69 6A 6B 6C 6D 6E 6F 112 7 70 71 72 73 74 75 76 77 78 79 7A 7B 7C 7D 7E 7F 128 8 80 81 82 83 84 85 86 87 88 89 8A 8B 8C 8D 8E 8F 144 9 90 91 92 93 94 95 96 97 98 99 9A 9B 9C 9D 9E 9F 160 A A0 A1 A2 A3 A4 A5 A6 A7 A8 A9 AA AB AC AD AE AF 176 B B0 B1 B2 B3 B4 B5 B6 B7 B8 B9 BA BB BC BD BE BF 192 C C0 C1 C2 C3 C4 C5 C6 C7 C8 C9 CA CB CC CD CE CF 208 D D0 D1 D2 D3 D4 D5 D6 D7 D8 D9 DA DB DC DD DE DF 224 E E0 E1 E2 E3 E4 E5 E6 E7 E8 E9 EA EB EC ED EE EF 240 F F0 F1 F2 F3 F4 F5 F6 F7 F8 F9 FA FB FC FD FE FF CHAPTER 3 — CHARACTER CODE TRANSLATION Page 3-15 User Table 2 The user may edit and use this table for any purpose. LS MS 0 1 2 3 4 5 6 7 8 9 10 11 12 13 14 0 1 2 3 4 5 6 7 8 9 A B C D E 15 F 00 0 00 00 00 00 00 00 00 2F 00 00 25 00 0C 0D 00 00 16 1 00 00 00 00 00 00 00 00 00 00 00 27 00 00 00 00 32 2 40 4F 7F 7B 5B 6C 50 7D 4D 5D 5C 4E 6B 60 4B 61 48 3 F0 F1 F2 F3 F4 F5 F6 F7 F8 F9 7A 5E 4C 7E 6E 6F 64 4 7C C1 C2 C3 C4 C5 C6 C7 C8 C9 D1 D2 D3 D4 D5 D6 80 5 D7 D8 D9 E2 E3 E4 E5 E6 E7 E8 E9 4A E0 5A 5F 6D 96 6 7D 81 82 83 84 85 86 87 88 89 91 92 93 94 95 96 112 7 97 98 99 A2 A3 A4 A5 A6 A7 A8 A9 C0 BB D0 A1 00 128 8 00 00 00 00 00 00 00 00 00 00 00 00 00 00 00 00 144 9 00 00 00 00 00 00 00 00 00 00 00 00 00 00 00 00 160 A 00 00 00 00 00 00 00 00 00 00 00 00 00 00 00 00 176 B 00 00 00 00 00 00 00 00 00 00 00 00 00 00 00 00 192 C 00 00 00 00 00 00 00 00 00 00 00 00 00 00 00 00 208 D 00 00 00 00 00 00 00 00 00 00 00 00 00 00 00 00 224 E 00 00 00 00 00 00 00 00 00 00 00 00 00 00 00 00 240 F 00 00 00 00 00 00 00 00 00 00 00 00 00 00 00 00 Page 3-16 AGILE 5250 OPTIMA User’s Guide and Reference User Table 3 The user may edit and use this table for any purpose. LS MS 0 1 2 3 4 5 6 7 8 9 10 11 12 13 14 0 1 2 3 4 5 6 7 8 9 A B C D E 15 F 00 0 00 01 02 03 04 05 06 07 08 09 0A 0B 0C 0D 0E OF 16 1 10 11 12 13 14 15 16 17 18 19 1A 1B 1C 1D 1E 1F 32 2 20 21 22 23 24 25 26 27 28 29 2A 2B 2C 2D 2E 2F 48 3 30 31 32 33 34 35 36 37 38 39 3A 3B 3C 3D 3E 3F 64 4 40 41 42 43 44 45 46 47 48 49 4A 4B 4C 4D 4E 4F 80 5 50 51 52 53 54 55 56 57 58 59 5A 5B 5C 5D 5E 5F 96 6 60 61 62 63 64 65 66 67 68 69 6A 6B 6C 6D 6E 6F 112 7 70 71 72 73 74 75 76 77 78 79 7A 7B 7C 7D 7E 7F 128 8 80 81 82 83 84 85 86 87 88 89 8A 8B 8C 8D 8E 8F 144 9 90 91 92 93 94 95 96 97 98 99 9A 9B 9C 9D 9E 9F 160 A A0 A1 A2 A3 A4 A5 A6 A7 A8 A9 AA AB AC AD AE AF 176 B B0 B1 B2 B3 B4 B5 B6 B7 B8 B9 BA BB BC BD BE BF 192 C C0 C1 C2 C3 C4 C5 C6 C7 C8 C9 CA CB CC CD CE CF 208 D D0 D1 D2 D3 D4 D5 D6 D7 D8 D9 DA DB DC DD DE DF 224 E E0 E1 E2 E3 E4 E5 E6 E7 E8 E9 EA EB EC ED EE EF 240 F F0 F1 F2 F3 F4 F5 F6 F7 F8 F9 FA FB FC FD FE FF CHAPTER 3 — CHARACTER CODE TRANSLATION Page 3-17 User Table 4 The user may edit and use this table for any purpose. LS MS 0 1 2 3 4 5 6 7 8 9 10 11 12 13 14 0 1 2 3 4 5 6 7 8 9 A B C D E 15 F 00 0 00 01 02 03 04 05 06 07 08 09 0A 0B 0C 0D 0E OF 16 1 10 11 12 13 14 15 16 17 18 19 1A 1B 1C 1D 1E 1F 32 2 20 21 22 23 24 25 26 27 28 29 2A 2B 2C 2D 2E 2F 48 3 30 31 32 33 34 35 36 37 38 39 3A 3B 3C 3D 3E 3F 64 4 40 41 42 43 44 45 46 47 48 49 4A 4B 4C 4D 4E 4F 80 5 50 51 52 53 54 55 56 57 58 59 5A 5B 5C 5D 5E 5F 96 6 60 61 62 63 64 65 66 67 68 69 6A 6B 6C 6D 6E 6F 112 7 70 71 72 73 74 75 76 77 78 79 7A 7B 7C 7D 7E 7F 128 8 80 81 82 83 84 85 86 87 88 89 8A 8B 8C 8D 8E 8F 144 9 90 91 92 93 94 95 96 97 98 99 9A 9B 9C 9D 9E 9F 160 A A0 A1 A2 A3 A4 A5 A6 A7 A8 A9 AA AB AC AD AE AF 176 B B0 B1 B2 B3 B4 B5 B6 B7 B8 B9 BA BB BC BD BE BF 192 C C0 C1 C2 C3 C4 C5 C6 C7 C8 C9 CA CB CC CD CE CF 208 D D0 D1 D2 D3 D4 D5 D6 D7 D8 D9 DA DB DC DD DE DF 224 E E0 E1 E2 E3 E4 E5 E6 E7 E8 E9 EA EB EC ED EE EF 240 F F0 F1 F2 F3 F4 F5 F6 F7 F8 F9 FA FB FC FD FE FF Page 3-18 AGILE 5250 OPTIMA User’s Guide and Reference User Table 5 The user may edit and use this table for any purpose. LS MS 0 1 2 3 4 5 6 7 8 9 10 11 12 13 14 0 1 2 3 4 5 6 7 8 9 A B C D E 15 F 00 0 00 00 00 00 00 00 00 2F 00 00 25 00 0C 0D 00 00 16 1 00 00 00 00 00 00 00 00 00 00 00 27 00 00 00 00 32 2 40 4F 7F 7B 5B 6C 50 7D 4D 5D 5C 4E 6B 60 4B 61 48 3 F0 F1 F2 F3 F4 F5 F6 F7 F8 F9 7A 5E 4C 7E 6E 6F 64 4 7C C1 C2 C3 C4 C5 C6 C7 C8 C9 D1 D2 D3 D4 D5 D6 80 5 D7 D8 D9 E2 E3 E4 E5 E6 E7 E8 E9 4A E0 5A 5F 6D 96 6 7D 81 82 83 84 85 86 87 88 89 91 92 93 94 95 96 112 7 97 98 99 A2 A3 A4 A5 A6 A7 A8 A9 C0 BB D0 A1 00 128 8 00 00 00 00 00 00 00 00 00 00 00 00 00 00 00 00 144 9 00 00 00 00 00 00 00 00 00 00 00 00 00 00 00 00 160 A 00 00 00 00 00 00 00 00 00 00 00 00 00 00 00 00 176 B 00 00 00 00 00 00 00 00 00 00 00 00 00 00 00 00 192 C 00 00 00 00 00 00 00 00 00 00 00 00 00 00 00 00 208 D 00 00 00 00 00 00 00 00 00 00 00 00 00 00 00 00 224 E 00 00 00 00 00 00 00 00 00 00 00 00 00 00 00 00 240 F 00 00 00 00 00 00 00 00 00 00 00 00 00 00 00 00 CHAPTER 3 — CHARACTER CODE TRANSLATION Page 3-19 User Table 6 The user may edit and use this table for any purpose. LS MS 0 1 2 3 4 5 6 7 8 9 10 11 12 13 14 0 1 2 3 4 5 6 7 8 9 A B C D E 15 F 00 0 00 01 02 03 04 05 06 07 08 09 0A 0B 0C 0D 0E OF 16 1 10 11 12 13 14 15 16 17 18 19 1A 1B 1C 1D 1E 1F 32 2 20 21 22 23 24 25 26 27 28 29 2A 2B 2C 2D 2E 2F 48 3 30 31 32 33 34 35 36 37 38 39 3A 3B 3C 3D 3E 3F 64 4 40 41 42 43 44 45 46 47 48 49 4A 4B 4C 4D 4E 4F 80 5 50 51 52 53 54 55 56 57 58 59 5A 5B 5C 5D 5E 5F 96 6 60 61 62 63 64 65 66 67 68 69 6A 6B 6C 6D 6E 6F 112 7 70 71 72 73 74 75 76 77 78 79 7A 7B 7C 7D 7E 7F 128 8 80 81 82 83 84 85 86 87 88 89 8A 8B 8C 8D 8E 8F 144 9 90 91 92 93 94 95 96 97 98 99 9A 9B 9C 9D 9E 9F 160 A A0 A1 A2 A3 A4 A5 A6 A7 A8 A9 AA AB AC AD AE AF 176 B B0 B1 B2 B3 B4 B5 B6 B7 B8 B9 BA BB BC BD BE BF 192 C C0 C1 C2 C3 C4 C5 C6 C7 C8 C9 CA CB CC CD CE CF 208 D D0 D1 D2 D3 D4 D5 D6 D7 D8 D9 DA DB DC DD DE DF 224 E E0 E1 E2 E3 E4 E5 E6 E7 E8 E9 EA EB EC ED EE EF 240 F F0 F1 F2 F3 F4 F5 F6 F7 F8 F9 FA FB FC FD FE FF User Table 7 The user may edit and use this table for any purpose. LS MS 0 1 2 3 4 5 6 7 8 9 10 11 12 13 14 0 1 2 3 4 5 6 7 8 9 A B C D E 15 F 00 0 00 01 02 03 04 05 06 07 08 09 0A 0B 0C 0D 0E OF 16 1 10 11 12 13 14 15 16 17 18 19 1A 1B 1C 1D 1E 1F 32 2 20 21 22 23 24 25 26 27 28 29 2A 2B 2C 2D 2E 2F 48 3 30 31 32 33 34 35 36 37 38 39 3A 3B 3C 3D 3E 3F 64 4 40 41 42 43 44 45 46 47 48 49 4A 4B 4C 4D 4E 4F 80 5 50 51 52 53 54 55 56 57 58 59 5A 5B 5C 5D 5E 5F 96 6 60 61 62 63 64 65 66 67 68 69 6A 6B 6C 6D 6E 6F 112 7 70 71 72 73 74 75 76 77 78 79 7A 7B 7C 7D 7E 7F 128 8 80 81 82 83 84 85 86 87 88 89 8A 8B 8C 8D 8E 8F 144 9 90 91 92 93 94 95 96 97 98 99 9A 9B 9C 9D 9E 9F 160 A A0 A1 A2 A3 A4 A5 A6 A7 A8 A9 AA AB AC AD AE AF 176 B B0 B1 B2 B3 B4 B5 B6 B7 B8 B9 BA BB BC BD BE BF 192 C C0 C1 C2 C3 C4 C5 C6 C7 C8 C9 CA CB CC CD CE CF 208 D D0 D1 D2 D3 D4 D5 D6 D7 D8 D9 DA DB DC DD DE DF 224 E E0 E1 E2 E3 E4 E5 E6 E7 E8 E9 EA EB EC ED EE EF 240 F F0 F1 F2 F3 F4 F5 F6 F7 F8 F9 FA FB FC FD FE FF Xerox EBCDIC Font Download to ASCII This is a table used to translate Xerox EBCDIC fonts for use on an ASCII printer. LS MS 0 1 2 3 4 5 6 7 8 9 10 11 12 13 14 0 1 2 3 4 5 6 7 8 9 A B C D E 15 F 00 0 00 00 00 00 00 00 00 00 00 00 00 00 00 00 00 00 16 1 00 00 00 00 00 00 00 00 00 00 00 00 00 00 00 00 32 2 00 00 00 00 00 00 00 00 00 00 00 00 00 00 00 00 48 3 00 00 00 00 00 00 00 00 00 00 00 00 00 00 00 00 64 4 00 00 00 00 00 00 00 00 00 00 00 30 0 00 39 9 7D } 00 80 5 31 1 00 00 00 00 00 00 00 00 00 00 00 00 32 2 00 00 96 6 00 33 3 00 00 00 00 00 00 00 00 00 34 4 35 5 36 6 00 37 7 112 7 00 00 00 00 00 00 00 00 00 00 38 8 00 00 00 7E ~ 00 128 8 00 61 a 62 b 63 c 64 d 65 e 66 f 67 g 68 h 69 i 00 00 00 00 00 00 144 9 00 6A j 6B k 6C l 6D m 6E n 6F o 70 p 71 q 72 r 00 00 00 00 00 00 160 A 00 00 73 s 74 t 75 u 76 v 77 w 78 x 79 y 7A z 00 00 00 00 00 00 176 B 00 00 00 00 00 00 00 00 00 00 00 00 00 00 00 00 192 C 00 41 A 42 B 43 C 44 D 45 E 46 F 47 G 48 H 49 I 00 00 00 00 00 00 208 D 00 4A J 4B K 4C L 4D M 4E N 4F O 50 P 51 Q 52 R 00 00 00 00 00 00 224 E 00 00 53 S 54 T 55 U 56 V 57 W 58 X 59 Y 5A Z 00 00 00 00 00 00 240 F 3F ? 40 @ 5B [ 5C \ 5D ] 5F _ 60 ` 7B { 7C | 00 00 00 00 00 00 00 CHAPTER 4 — PROGRAMMABLE FUNCTION STRINGS Page 4-1 CHAPTER 4 PROGRAMMABLE FUNCTION STRINGS Overview Programmable Function Strings (PFSs) are used by the AGILE 5250 OPTIMA to control all functions that vary from printer to printer. Whenever some special formatting or control function is required, the OPTIMA looks up the appropriate PFS and sends it to the printer. For example, if the System requests bold printing, the OPTIMA looks up and sends the BOLD ON> PFS. The OPTIMA has a total PFS storage of 20K bytes per output port. For a complete list of the PFSs used by the OPTIMA, refer to Appendix B. The OPTIMA will load the appropriate PFSs for the printer when the configuration for the printer is loaded from the OPTIMA diskette. If the printer is among the listed printer configurations, the user will probably not have to make any modifications to the PFSs. However, if the user would like to use the PFSs in a way not anticipated by AGILE, the user can create new PFSs or modify them in PFS edit mode. For example, if the printer can double underline, and if the user would like to configure the OPTIMA to double underline instead of single underline, enter the appropriate control string into PFS UNDL ON>. The user also will have to enter into PFS UNDLOFF> the appropriate control string that turns off double underlining. PFSs in the OPTIMA are both printed and entered as a string of hexadecimal or numeric characters. Most printer reference manuals have examples of control strings in hexadecimal, and this makes it easy to enter them directly into the OPTIMA as PFSs. If the output device is not listed among the supported printer configurations, the user either will have to create a new set of PFSs or modify an existing set as part of the output port configuration. By changing or defining PFSs, almost any printer can be driven by the OPTIMA. Page 4-2 AGILE 5250 OPTIMA User’s Guide and Reference Editing PFSs (A Tutorial) To edit an existing PFS, move through the configuration menu to the appropriate output port, load a supported printer configuration, then find PFSINFO:. Press g, then use d and f until finding the name of the PFS to be edited. Press g again, and the user will be in PFS edit mode. If the PFS is empty, the user will see the name of the PFS followed by a greater than sign (>) and the word END with a cursor under the E. Press either d or f. The LCD will read INSERT!. To insert a character, press ENTER, and following the greater than sign (>) the LCD will read $00 NUL. $00 is a two-digit hexadecimal value, and NUL is its ASCII equivalent. Since some printer manuals list their control codes in hexadecimal and others list their codes in ASCII, this enables the user to use either method to define the PFSs. When the hexadecimal value is a control character (00 - 1F), the ASCII side will display the characters name. When the hexadecimal value has a standard, printable ASCII equivalent, the ASCII equivalent will be displayed to the right in single quotes, e.g., A. When the hexadecimal character is an extended control character (80 - 9F), then an ellipses ( ) will be displayed to the right. When the hexadecimal value represents an extended printable ASCII character (A0 - FF), it will be displayed to the right in double quotes, e.g., A. Control functions end in exclamation points (!). With the cursor on the dollar sign ($), press d a few times, and the LCD will read INSERT!, DELETE!, END PFS!, Decimal, Byte, HiLoWord, LoHiWord and Hex. The functions perform as follows: INSERT! Insert a hexadecimal value before the current value. DELETE! Delete the current hexadecimal value. END PFS! End the PFS. This indicates that the PFS is completely defined. If the user presses ENTER when END PFS! is displayed, the current value and all hexadecimal values to the right of the current value will be deleted. All PFSs have END as the last value. The other options are parameter formats that are described below. For now, stop when the display reads $00 NUL. Now move the cursor to the first digit to the right of the dollar sign. To change the hexadecimal value, press d or f. Notice that the ASCII equivalent value to the right changes as the hexadecimal value changes. Stop when the first digit is the correct value, then change the right digit CHAPTER 4 — PROGRAMMABLE FUNCTION STRINGS Page 4-3 until the value is correct. Press g, and the LCD should read END. Press d, then press ENTER when the display reads INSERT!. Continue editing and inserting until the PFS is completely defined using the printers control codes. To delete a value, use g and s to display the value in the LCD. With the cursor on the dollar sign, press d until the LED reads DELETE!. Press ENTER and the current value will be deleted. To insert a value, use g and s to display the value that will be to the right of the inserted value. With the cursor on the dollar sign or on the E of END, press d until INSERT! is displayed. Press ENTER, then edit the new value. Remember that some PFSs must be coordinated with the format options selected under FMTINFO:. For instance, if SENDMOVE has been selected in FMTINFO:JUSTTYP=, a PFS must be selected for SNDXTRA>. Similarly, the format information for PAPER 1:, PAPER 2:, PAPER 3: and ENVELOP: in FMTINFO: should be coordinated with the PFSs for the equivalent paper source drawers. Parameters Within PFSs To perform their functions, a few PFSs require a parameter that specifies a variable value. The OPTIMA allows only one such parameter per PFS. Parameters can take one of five formats (see below), but usually the format will be in decimal (base 10). Both the decimal format and the hexadecimal format parameters are sent through an OPTIMA character code translation table. As such, make certain that the OPTIMA character code translation table is either an ASCII to ASCII pass-through table or an ASCII to EBCDIC table, depending upon the printer, that has not been edited (all OPTIMA-generated data is ASCII). To determine which parameter format the printer uses, refer to the printer manual in the section that defines the printers control codes. Since parameters are crucial for controlling the printers cursor, the user will probably find the format of the required parameters in the section that discusses horizontal or vertical movement. The format of the parameter may not be mentioned specifically in the manual, so the user may have to make a deduction based upon the information the manual provides. A brief description of the available parameter formats follows below: Page 4-4 AGILE 5250 OPTIMA User’s Guide and Reference Decimal Prints out the parameter value in decimal (base 10). To use this format, the user must have the character code translation table for the OPTIMA set correctly. Byte One byte. It cannot send a value greater than 255. HiLoWord A two-byte word in which the high-order byte precedes the low-order byte. LoHiWord A two-byte word in which the low-order byte precedes the high-order byte. Hex Prints the parameter value in hexadecimal (base 16). To use this format, the user must have the character code translation table for the OPTIMA set correctly. GFIDs IBM systems refer to fonts using numbers from 00001 to 65534. These numbers are called GFIDs, or global font identifiers. (Sometimes they are referred to as font identifiers, FIDs or typestyle numbers.) The System selects a particular font by sending a GFID request to the printer. The OPTIMA takes the GFID request and translates it into an escape sequence that the printer will use to select a font. The escape sequence that a particular GFID evokes is determined by two tables used by the OPTIMA. The Portrait Font Correspondence Table (PORT ID>) contains the escape sequences for portrait oriented fonts, and the Landscape Font Correspondence Table (LAND ID>) is used for landscape oriented fonts. If the printer is listed among the supported configurations, the font correspondence tables will be loaded with the rest of the configuration. The fonts evoked by the escape sequences in the correspondence tables for the printer will approximate those evoked by the IBM GFIDs as closely as possible using the fonts readily available for the printer. User Font Configuration To edit an existing GFID, move through the configuration menu to the appropriate output port, load a supported printer configuration, then find FNTINFO:. Press g, then use d and f to select either PORT ID> or LAND ID>. Press g again, and the user will be in GFID edit mode. CHAPTER 4 — PROGRAMMABLE FUNCTION STRINGS Page 4-5 Changes in GFID edit mode are made in the same way they are made in PFS edit mode (see the tutorial above). The only exception is that parameters are not permitted in GFID edit mode. There are several situations in which the user may have to edit the font correspondence tables. 1) The printer may not have one or more of the fonts that will be evoked by the font correspondence tables. If the System never requests the GFID for a font that the printer does not have, and if the printer considers this an error that needs to be corrected. If the System does request a GFID for a font that the printer does not have, the user will either have to eliminate the System request, or the user will have to change the table entry for that GFID. Do one of the following: a) Delete the GFID. No escape sequence will be sent to the printer, and it will continue printing in the current font. b) Replace the escape sequence with one that will request a font that is available to the printer 2. The user may have a font available to the printer that is not being evoked by the font correspondence tables. Do one of the following: Replace an escape sequence for a font that the printer does not have with the escape sequence for a font it does have. Add a new entry into the font correspondence table. 3. The System may request a GFID that is not in the table. Do one of the following: Do nothing. The current font will remain active. Add a new entry into the font correspondence table. 4. The printer may not be listed in the supported configurations. The user may want to build a table from scratch. 5. The user may want to evoke a PFS or printer command using a System font request. Since the escape sequence can be composed of any characters, it is not restricted to font selection escape sequences. As such, GFIDs can be used as an extension to the PFS capacity of the OPTIMA. Page 4-6 AGILE 5250 OPTIMA User’s Guide and Reference PFS Descriptions The following is a complete list of PFSs currently offered with the 5250 OPTIMA. Each listing describes the action of the PFS and indicates when each PFS will be sent to the printer by the 5250 OPTIMA. The descriptions also indicate the type of command that should be entered by the user in the PFS definition, and where appropriate, indicates related configuration options that may have to be coordinated with the PFS definitions. Note that PFSs are used by the 5250 OPTIMA only in IBM emulation mode, except for the initialization PFSs. Further, they are not used if any type of PFS suppression is active (except for the initialization PFS and FF, CR, LF, BOLD ON, BOLD OFF BSBOLD1, BSBOLD2, UNDL ON and UNDL OFF, depending upon the configuation of PFS suppression). Please refer to Appendix A Interfacing Xerox Printers for information about PFS suppression and other special Xerox commands. The only PFS definitions that are not empty by default in the Generic printer configuration are FF, CR, LF and VERMOVE. If the user is aware of how each of the PFSs is used and what conditions will trigger them, the user may define them for anmy purpose. Please refer to Appendix B SCS/DCA Command Summary for detailed information on the commands that will trigger each PFS. INITIBM This PFS is empty by default in all printer configurations. Use this to initialize the printer to a known state for communication with twinax printer emulation-generated data. For instance, the user can clear the margins, set movement units, turn off bolding, underlining, scripting, emphasis, etc. This PFS is sent to the printer after either INIT T1, INIT T2 or INIT T3 is sent, if using IBM emulation mode. INIT T1 This PFS is empty by default in all printer configurations. Use this to initialize the printer to a known state for communication with input on the twinax address that by default is TWINAX 1. For instance, the user can clear the margins, set movement units, turn off bolding, underlining, scripting, emphasis, etc. This PFS is sent to the printer when the 5250 OPTIMA first receives data from this twinax address. CHAPTER 4 — PROGRAMMABLE FUNCTION STRINGS Page 4-7 INIT T2 This PFS is empty by default in all printer configurations. Use this to initialize the printer to a known state for communication with input on the twinax address that by default is TWINAX 2. For instance, the user can clear the margins, set movement units, turn off bolding, underlining, scripting, emphasis, etc. This PFS is sent to the printer when the 5250 OPTIMA first receives data from this twinax address. INIT T3 This PFS is empty by default in all printer configurations. Use this to initialize the printer to a known state for communication with input on the twinax address that by default is TWINAX 3. For instance, the user can clear the margins, set movement units, turn off bolding, underlining, scripting, emphasis, etc. This PFS is sent to the printer when the 5250 OPTIMA first receives data from this twinax address. INITALT This PFS is empty by default in all printer configurations. Use this to initialize the printer to a known state for communication with input from an alternate host (the only PFS used with an alternate host). For instance, the user can clear the margins, set movement units, turn off bolding, underlining, scripting, emphasis, etc. This PFS is sent to the printer when the 5250 OPTIMA first receives data from an alternate host. INIT275 This PFS is empty by default in all printer configurations. Use this to initialize the printer to a known state for communication with a twinax host when the 5250 OPTIMA is in Xerox 275 protocol converter emulation mode. For instance, the user can clear the margins, set movement units, turn off bolding, underlining, scripting, emphasis, etc. This PFS is sent to the printer after either INIT T1, INIT T2 or INIT T3 is sent, if using Xerox 275 protocol converter emulation mode. Page 4-8 AGILE 5250 OPTIMA User’s Guide and Reference INITOPT This PFS is defined in all printer configurations except Generic. Use this to set the printer to a known font, orientation and margins for OPTIMAgenerated output. This PFS is sent before sending a hex dump or performing any options under the PRINT: menu. FF Form Feed. This PFS is defined in all printer configurations. This should eject the old page and start a new page. If the user would like something else to occur at the start of a new page, the user should put it here. (It is possible for this PFS to be sent to the printer in response to an SCS Required New Line, Form Feed, New Line, Interchange Record Separator, Line Feed, Set Horizontal Format, Set Vertical Format, Set Initial Conditions, Set Presentation Page Size, Page Presentation Media, Index Return, Absolute Vertical Print Position or Required Form Feed command.) CR Carriage Return. This PFS is defined in all printer configurations. This should move the print position horizontally to the left edge of the page. It should not cause any vertical movement. (It is possible for this PFS to be sent to the printer in response to an SCS Required New Line, Form Feed, Carriage Return, New Line, Interchange Record Separator, Set Horizontal Format, Index Return, Absolute Horizontal Print Position or Required Form Feed command.) It may also be sent to the printer by the 5250 OPTIMA with every Form Feed if Carriage Return at Form Feed is active, or when underlining or overstriking requires a second pass of the printhead. LF Line Feed. This PFS is defined in all printer configurations. It should cause one vertical Line Feed. It should not result in any horizontal movement. (It is possible for this PFS to be sent to the printer in response to an SCS Required New Line, New Line, Interchange Record Separator, Set Horizontal Format, Set Vertical Format, Line Feed or Index Return command.) CHAPTER 4 — PROGRAMMABLE FUNCTION STRINGS Page 4-9 This is not normally used with laser printers, and it is only used when some type of PFS Suppression is active or when Vertical Movement has been set to Line Feed. Normally, the 5250 OPTIMA sends the VERMOVE PFS to control all vertical movement. PORT Print page in portrait orientation. This PFS is sent to the printer at the beginning of all portrait pages, determined by the 5250 OPTIMAs page orientation algorithm. This should cause the printer to enter a portrait page orientation and to select a default font for that orientation. If page orientation for the printer is selected by font, the user needs only to select the appropriate font. LAND Print page in landscape orientation. This PFS is sent to the printer at the beginning of all landscape pages, determined by the 5250 OPTIMAs page orientation algorithm. This should cause the printer to enter a landscape page orientation and to select a default font for that orientation. If page orientation for the printer is selected by font, the user needs only to select the appropriate font. VERMOVE Move the printhead vertically. This is sent to the printer whenever the 5250 OPTIMA needs to position something vertically on the page, e.g., the beginning of a line of text or the top margin of a page. It is dependent upon two format options (under FMTINFO: in the configuration menu). If ABSOLUTE, the parameter specifies the vertical position to which to be moved. If RELATIVE, it provides the distance down to move. The unit of measure for the distance must also be supplied in the VER RES= option under FMTINFO: for the port. The SCS commands that may affect this PFS include: Required New Line, New Line, Interchange Record Separator, Line Feed, Set Initial Conditions (top margin parameter), Set Vertical Margins (top margin parameter), Index Return, Absolute Vertical Print Position and Relative Vertical Print Position. The 5250 OPTIMA uses the ls parameter in the SCS Set Line Spacing command to calculate the vertical movement commands to send to the target printer. Page 4-10 AGILE 5250 OPTIMA User’s Guide and Reference LINEDEN This is used to set the line density at the printer. This PFS is sent to the printer whenever the System changes the line density setting in response to an SCS Set Line Density or Set Single Line Distance command. Although the OPTIMA normally performs vertical movement at the printer using the VERMOVE> PFS, there are two primary reasons that the printer may need to know the actual line density. 1) The user can cause the OPTIMA to use line feeds (the LF> PFS) instead of the VERMOVE> PFS by setting the VERMOVE= option (under FMTINFO: for the output port) to LINEFEED. If the OPTIMA is using line feeds to perform vertical movement, the printer needs to know the line density so that the line spacing created by the line feeds will be correct. 2) If the printer supports continuous feed paper (i.e., fanfold instead of cut-sheet) then the printer needs to know the length of the paper so that it can move the correct distance when it receives a form feed. Most printers set forms length as a number of lines per page after the line density has been set. (See PAGELEN below.) The new line density is sent as the parameter of this PFS and is converted to the unit of measurement specified by the VER RES= option (under FMTINFO: in the output port). PAGELEN The PAGELEN> PFS is used to set the length of the form, and it is sent to the printer in response to an SCS Set Vertical Format or Set Initial Conditions command. This is usually needed only for printers that use continuous forms such as fanfold paper. Because the length of the form is set in lines per page, the line density must be set correctly at the printer in order for the forms length to be set properly. For this reason, the LINEDEN> PFS must be set correctly in order for the PAGELEN> PFS to work. (See LINEDEN above.) P 5CPI Print 5 characters per inch in portrait orientation. This PFS is sent to the printer when the 5250 OPTIMAs page orientation algorithm has selected a portrait orientation, and when the System has requested a font with a pitch of 5 CPI or less (using either an SCS Set Character Density command or an SCS Set FID through GFID command). CHAPTER 4 — PROGRAMMABLE FUNCTION STRINGS Page 4-11 If the printer is capable of printing any font at any pitch (CPI), then this PFS should set the pitch for the current font. If a specific font is needed to achieve 5 CPI, then this PFS should be defined to select that font. If the RES CPI= option (under FMTINFO: for the output port) is set to PRE-FONT, then this PFS will be sent before the GFID for the font is sent. If the RES CPI= option is set to POSTFONT then this PFS will be sent after the GFID for the font is sent. P 8CPI Print 8 characters per inch in portrait orientation. This PFS is sent to the printer when the 5250 OPTIMAs page orientation algorithm has selected a portrait orientation, and when the System has requested a font with a pitch of greater than 5 but less than or equal to 8 CPI (using either an SCS Set Character Density command or an SCS Set FID through GFID command). If the printer is capable of printing any font at any pitch (CPI), then this PFS should set the pitch for the current font. If a specific font is needed to achieve 8 CPI, then this PFS should be defined to select that font. If the RES CPI= option (under FMTINFO: for the output port) is set to PRE-FONT, then this PFS will be sent before the GFID for the font is sent. If the RES CPI= option is set to POSTFONT then this PFS will be sent after the GFID for the font is sent. P 10CPI Print 10 characters per inch in portrait orientation. This PFS is sent to the printer when the 5250 OPTIMAs page orientation algorithm has selected a portrait orientation, and when the System has requested a font with a pitch of greater than 8 but less than or equal to 10 CPI (using either an SCS Set Character Density command or an SCS Set FID through GFID command). If the printer is capable of printing any font at any pitch (CPI), then this PFS should set the pitch for the current font. If a specific font is needed to achieve 10 CPI, then this PFS should be defined to select that font. If the RES CPI= option (under FMTINFO: for the output port) is set to PRE-FONT, then this PFS will be sent before the GFID for the font is sent. If the RES CPI= option is set to POSTFONT then this PFS will be sent after the GFID for the font is sent. Page 4-12 AGILE 5250 OPTIMA User’s Guide and Reference P PSCPI Print with proportional spacing in portrait orientation. This PFS is sent to the printer when the 5250 OPTIMAs page orientation algorithm has selected a portrait orientation, and when the System has requested proportional spacing (using either an SCS Set Character Density command or an SCS Set FID through GFID command). If the printer is capable of printing any font with proportional spacing, then this PFS should set proportional spacing for the current font. If a specific font is needed to achieve proportional spacing, then this PFS should be defined to select that font. If the RES CPI= option (under FMTINFO: for the output port) is set to PRE-FONT, then this PFS will be sent before the GFID for the font is sent. If the RES CPI= option is set to POSTFONT then this PFS will be sent after the GFID for the font is sent. P 12CPI Print 12 characters per inch in portrait orientation. This PFS is sent to the printer when the 5250 OPTIMAs page orientation algorithm has selected a portrait orientation, and when the System has requested a font with a pitch of greater than 10 but less than or equal to 12 CPI (using either an SCS Set Character Density command or an SCS Set FID through GFID command). If the printer is capable of printing any font at any pitch (CPI), then this PFS should set the pitch for the current font. If a specific font is needed to achieve 12 CPI, then this PFS should be defined to select that font. If the RES CPI= option (under FMTINFO: for the output port) is set to PRE-FONT, then this PFS will be sent before the GFID for the font is sent. If the RES CPI= option is set to POSTFONT then this PFS will be sent after the GFID for the font is sent. P 15CPI Print 15 characters per inch in portrait orientation. This PFS is sent to the printer when the 5250 OPTIMAs page orientation algorithm has selected a portrait orientation, and when the System has requested a font with a pitch of greater than 12 but less than or equal to 15 CPI (using either an SCS Set Character Density command or an SCS Set FID through GFID command). CHAPTER 4 — PROGRAMMABLE FUNCTION STRINGS Page 4-13 If the printer is capable of printing any font at any pitch (CPI), then this PFS should set the pitch for the current font. If a specific font is needed to achieve 15 CPI, then this PFS should be defined to select that font. If the RES CPI= option (under FMTINFO: for the output port) is set to PRE-FONT, then this PFS will be sent before the GFID for the font is sent. If the RES CPI= option is set to POSTFONT then this PFS will be sent after the GFID for the font is sent. P 16CPI Print 16 characters per inch in portrait orientation. This PFS is sent to the printer when the 5250 OPTIMAs page orientation algorithm has selected a portrait orientation, and when the System has requested a font with a pitch of greater than 15 but less than or equal to 16 CPI (using either an SCS Set Character Density command or an SCS Set FID through GFID command). If the printer is capable of printing any font at any pitch (CPI), then this PFS should set the pitch for the current font. If a specific font is needed to achieve 16 CPI, then this PFS should be defined to select that font. If the RES CPI= option (under FMTINFO: for the output port) is set to PRE-FONT, then this PFS will be sent before the GFID for the font is sent. If the RES CPI= option is set to POSTFONT then this PFS will be sent after the GFID for the font is sent. P 17CPI Print 17 characters per inch in portrait orientation. This PFS is sent to the printer when the 5250 OPTIMAs page orientation algorithm has selected a portrait orientation, and when the System has requested a font with a pitch of greater than 16 CPI (using either an SCS Set Character Density command or an SCS Set FID through GFID command). If the printer is capable of printing any font at any pitch (CPI), then this PFS should set the pitch for the current font. If a specific font is needed to achieve 17 CPI, then this PFS should be defined to select that font. If the RES CPI= option (under FMTINFO: for the output port) is set to PRE-FONT, then this PFS will be sent before the GFID for the font is sent. If the RES CPI= option is set to POSTFONT then this PFS will be sent after the GFID for the font is sent. Page 4-14 AGILE 5250 OPTIMA User’s Guide and Reference L 5CPI Print 5 characters per inch in landscape orientation. This PFS is sent to the printer when the 5250 OPTIMAs page orientation algorithm has selected a landscape orientation, and when the System has requested a font with a pitch of greater than 5 CPI or less (using either an SCS Set Character Density command or an SCS Set FID through GFID command). If the printer is capable of printing any font at any pitch (CPI), then this PFS should set the pitch for the current font. If a specific font is needed to achieve 5 CPI, then this PFS should be defined to select that font. If the RES CPI= option (under FMTINFO: for the output port) is set to PRE-FONT, then this PFS will be sent before the GFID for the font is sent. If the RES CPI= option is set to POSTFONT then this PFS will be sent after the GFID for the font is sent. L 8CPI Print 8 characters per inch in landscape orientation. This PFS is sent to the printer when the 5250 OPTIMAs page orientation algorithm has selected a landscape orientation, and when the System has requested a font with a pitch of greater than 5 but less than or equal to 8 CPI (using either an SCS Set Character Density command or an SCS Set FID through GFID command). If the printer is capable of printing any font at any pitch (CPI), then this PFS should set the pitch for the current font. If a specific font is needed to achieve 8 CPI, then this PFS should be defined to select that font. If the RES CPI= option (under FMTINFO: for the output port) is set to PRE-FONT, then this PFS will be sent before the GFID for the font is sent. If the RES CPI= option is set to POSTFONT then this PFS will be sent after the GFID for the font is sent. L 10CPI Print 10 characters per inch in landscape orientation. This PFS is sent to the printer when the 5250 OPTIMAs page orientation algorithm has selected a landscape orientation, and when the System has requested a font with a pitch of greater than 8 but less than or equal to 10 CPI (using either an SCS Set Character Density command or an SCS Set FID through GFID command). CHAPTER 4 — PROGRAMMABLE FUNCTION STRINGS Page 4-15 If the printer is capable of printing any font at any pitch (CPI), then this PFS should set the pitch for the current font. If a specific font is needed to achieve 10 CPI, then this PFS should be defined to select that font. If the RES CPI= option (under FMTINFO: for the output port) is set to PRE-FONT, then this PFS will be sent before the GFID for the font is sent. If the RES CPI= option is set to POSTFONT then this PFS will be sent after the GFID for the font is sent. L PSCPI Print with proportional spacing in landscape orientation. This PFS is sent to the printer when the 5250 OPTIMAs page orientation algorithm has selected a landscape orientation, and when the System has requested proportional spacing (using either an SCS Set Character Density command or an SCS Set FID through GFID command). If the printer is capable of printing any font with proportional spacing, then this PFS should set proportional spacing for the current font. If a specific font is needed to achieve proportional spacing, then this PFS should be defined to select that font. If the RES CPI= option (under FMTINFO: for the output port) is set to PRE-FONT, then this PFS will be sent before the GFID for the font is sent. If the RES CPI= option is set to POSTFONT then this PFS will be sent after the GFID for the font is sent. L 12CPI Print 12 characters per inch in landscape orientation. This PFS is sent to the printer when the 5250 OPTIMAs page orientation algorithm has selected a landscape orientation, and when the System has requested a font with a pitch of greater than 10 but less than or equal to 12 CPI (using either an SCS Set Character Density command or an SCS Set FID through GFID command). If the printer is capable of printing any font at any pitch (CPI), then this PFS should set the pitch for the current font. If a specific font is needed to achieve 12 CPI, then this PFS should be defined to select that font. If the RES CPI= option (under FMTINFO: for the output port) is set to PRE-FONT, then this PFS will be sent before the GFID for the font is sent. If the RES CPI= option is set to POSTFONT then this PFS will be sent after the GFID for the font is sent. Page 4-16 AGILE 5250 OPTIMA User’s Guide and Reference L 15CPI Print 15 characters per inch in landscape orientation. This PFS is sent to the printer when the 5250 OPTIMAs page orientation algorithm has selected a landscape orientation, and when the System has requested a font with a pitch of greater than 12 but less than or equal to 15 CPI (using either an SCS Set Character Density command or an SCS Set FID through GFID command). If the printer is capable of printing any font at any pitch (CPI), then this PFS should set the pitch for the current font. If a specific font is needed to achieve 15 CPI, then this PFS should be defined to select that font. If the RES CPI= option (under FMTINFO: for the output port) is set to PRE-FONT, then this PFS will be sent before the GFID for the font is sent. If the RES CPI= option is set to POSTFONT then this PFS will be sent after the GFID for the font is sent. L 16CPI Print 16 characters per inch in landscape orientation. This PFS is sent to the printer when the 5250 OPTIMAs page orientation algorithm has selected a landscape orientation, and when the System has requested a font with a pitch of greater than 15 but less than or equal to 16 CPI (using either an SCS Set Character Density command or an SCS Set FID through GFID command). If the printer is capable of printing any font at any pitch (CPI), then this PFS should set the pitch for the current font. If a specific font is needed to achieve 16 CPI, then this PFS should be defined to select that font. If the RES CPI= option (under FMTINFO: for the output port) is set to PRE-FONT, then this PFS will be sent before the GFID for the font is sent. If the RES CPI= option is set to POSTFONT then this PFS will be sent after the GFID for the font is sent. L 17CPI Print 17 characters per inch in landscape orientation. This PFS is sent to the printer when the 5250 OPTIMAs page orientation algorithm has selected a landscape orientation, and when the System has requested a font with a pitch of greater than 16 CPI (using either an SCS Set Character Density command or an SCS Set FID through GFID command). If the printer is capable of printing any font at any pitch (CPI), then this PFS should set the pitch for the current font. If a specific font is needed to achieve 17 CPI, then this PFS should be defined to select that font. CHAPTER 4 — PROGRAMMABLE FUNCTION STRINGS Page 4-17 If the RES CPI= option (under FMTINFO: for the output port) is set to PRE-FONT, then this PFS will be sent before the GFID for the font is sent. If the RES CPI= option is set to POSTFONT then this PFS will be sent after the GFID for the font is sent. COR 10 Select a landscape font greater or equal to 13 pitch (preferably equal to). This PFS is sent to the printer when the 5250 OPTIMAs page orientation algorithm has selected computer output reduction, and when the System has specified a font with a pitch less than or equal to 10 CPI (using either an SCS Set Character Density command or an SCS Set FID through GFID command). If the printer is capable of printing any font at any pitch (CPI), then this PFS should set the pitch for the current font to greater than or equal to 13 CPI, in order to horizontally compress the print enough for 13.2 inches of print at the Systems CPI value to fit on 10 inches of paper at the printers CPI value. If a specific font is needed to achieve 13 CPI, then this PFS should be designed to select this font. Example: 10 CPI (Systems CPI value) x 13.2 inches (Systems expected page width) = 132 columns. 132 columns ÷ 10 inches (actual paper width) = 13 CPI. COR 12 Select a landscape font greater or equal to 15 pitch. This PFS is sent to the printer when the 5250 OPTIMAs page orientation algorithm has selected computer output reduction, and when the System has specified a font with a pitch less than or equal to 12 CPI (using either an SCS Set Character Density command or an SCS Set FID through GFID command). If the printer is capable of printing any font at any pitch (CPI), then this PFS should set the pitch for the current font to greater than or equal to 15 CPI, in order to horizontally compress the print enough for 13.2 inches of print at the Systems CPI value to fit on 10 inches of paper at the printers CPI value. If a specific font is needed to achieve 15 CPI, then this PFS should be designed to select this font. Example: 12 CPI (Systems CPI value) x 13.2 inches (Systems expected page width) = 158 columns. 158 columns ÷ 10 inches (actual paper width) = 15 CPI. Page 4-18 AGILE 5250 OPTIMA User’s Guide and Reference COR 15 Select a landscape font greater or equal to 20 pitch. This PFS is sent to the printer when the 5250 OPTIMAs page orientation algorithm has selected computer output reduction, and when the System has specified a font with a pitch less than or equal to 15 CPI (using either an SCS Set Character Density command or an SCS Set FID through GFID command). If the printer is capable of printing any font at any pitch (CPI), then this PFS should set the pitch for the current font to greater than or equal to 20 CPI, in order to horizontally compress the print enough for 13.2 inches of print at the Systems CPI value to fit on 10 inches of paper at the printers CPI value. If a specific font is needed to achieve 20 CPI, then this PFS should be designed to select this font. Example: 15 CPI (Systems CPI value) x 13.2 inches (Systems expected page width) = 198 columns. 198 columns ÷ 10 inches (actual paper width) = 20 CPI. BOLD ON If the BOLDTYP= option (under FMTINFO: for the output port) is set to PRINTER, then this PFS will be sent at the beginning of bold text to turn on bold mode. This PFS is used only for printers that ordinarily support bolding. It is sent to the printer in response to an SCS Begin Emphasis command, or when a character-Backspace-same character sequence or a text-Carriage Return-same text sequence is detected in the data stream. BOLDOFF If the BOLDTYP= option (under FMTINFO: for the output port) is set to PRINTER, then this PFS will be sent at the end of bold text to turn off bold mode. This PFS is used only for printers that ordinarily support bolding. It is sent to the printer in response to an SCS End Emphasis command, or when a character-Backspace-same character sequence or a text-Carriage Return-same text sequence has terminated. CHAPTER 4 — PROGRAMMABLE FUNCTION STRINGS Page 4-19 BSBOLD1 and BSBOLD2 Backspace bold. These PFSs are sent to the printer in response to an SCS Begin Emphasis command, or when a character-Backspace-same character sequence or a text-Carriage Return-same text sequence is detected in the data stream. The BSBOLD1> and BSBOLD2> PFSs are used only for printers that are otherwise incapable of bold printing. If the BOLDTYP= option (under FMTINFO: for the output port) is set to BACK SPC, the OPTIMA will perform the following sequence of operation for each character that is to be printed bold. 1) The character to be printed bold is sent to the printer to be struck the first time. 2) The BSBOLD1> PFS is sent to the printer. It should backspace one character, then perform a small offset to the right. The small offset is so that the first and second striking of the character are not directly on top of each other which would not perform bolding on laser printers. 3) The character is sent a second time. 4) The BSBOLD2> PFS is sent to the printer. It should perform a small offset to the left of the same distance that the BSBOLD1> PFS offset to the right. This will place the print position at the printer at the same place it was before step 2. UNDL ON If UNDLSPC has been set to UNDERLIN in the FMTINFO menu, this PFS will be sent to the printer to turn on underline mode. This can be the result of a direct System request for underlined text as a response either to an SCS Word Underscore command or an SCS Begin Underscore command, or if the System sends Underscore characters in a second pass through the line (with a character-Backspace-Underscore sequence or a text-Carriage Return-Underscore sequence). Page 4-20 AGILE 5250 OPTIMA User’s Guide and Reference UNDLOFF If UNDLSPC has been set to UNDERLIN in the FMTINFO menu, this PFS will be sent to the printer to turn off underline mode. This is sent to the printer in response to an SCS End Underscore command, at the end of the word to be underlined in response to an SCS Word Underscore command, or after Underscore characters sent by the System in a second pass through the line (with a character-Backspace-Underscore sequence or a text-Carriage Return-Underscore sequence) have terminated. SUBS ON Turn on subscript mode. This can be the result only of a direct System request for subscripting using the SCS Subscript command. If the user defines this PFS with the printers Subscript On command, only one level of subscripting will be supported. If the user defines this PFS with the printers relative downward movement command, multiple levels of subscripting will be supported. SUBSOFF If subscripting is active, this PFS will turn off subscript mode and return printing to the baseline, triggered by the System with an SCS Superscript command. This PFS must be defined as the opposite of the SUBS ON PFS (i.e., either as the printers Subscript Off command, or as the printers relative upward movement command). SUPS ON Turn on superscript mode. This can be the result only of a direct System request for superscripting using the SCS Superscript command. If the user defines this PFS with the printers Superscript On command, only one level of superscripting will be supported. If the user defines this PFS with the printers relative upward movement command, multiple levels of superscripting will be supported. SUPSOFF If superscripting is active, this PFS will turn off superscript mode and return printing to the baseline, triggered by the System with an SCS Subscript command. This PFS must be defined as the opposite of the SUPS ON PFS (i.e., either as the printers Superscript Off command, or as the printers relative downward movement command). CHAPTER 4 — PROGRAMMABLE FUNCTION STRINGS Page 4-21 LOWQUAL This PFS is sent to the printer when the System has selected a low quality or draft print mode using the SCS Page Presentation Media command with the pq parameter set to 03h. This is normally applicable only for dot matrix printers. The user can use this PFS to control any mode of operation of the printer. Start that mode of operation by selecting draft print mode at the System. MEDQUAL This PFS is sent to the printer when the System has selected a medium quality print mode using the SCS Page Presentation Media command with the pq parameter set to 01h. This is normally applicable only for dot matrix printers. The user can use this PFS to control any mode of operation of the printer. Start that mode of operation by selecting the appropriate print mode at the System. HIQUAL This PFS is sent to the printer when the System has selected a high quality or near letter quality print mode using the SCS Page Presentation Media command with the pq parameter set to 02h. This is normally applicable only for dot matrix printers. The user can use this PFS to control any mode of operation of the printer. Start that mode of operation by selecting the appropriate print mode at the System. SIMPLEX Print in simplex (single-sided) mode (selected by sending the SCS Page Presentation Media command with the dx parameter set to 01h). If the System is printing in duplex mode, it will insert an additional Form Feed into the data stream if necessary at the end of print jobs. Note: This command will not be sent by the OS/400 operating system, due to IBM restrictions, but some application software may support it. Page 4-22 AGILE 5250 OPTIMA User’s Guide and Reference DUPLEX Print in duplex (double-sided) mode for documents that are to be bound on the side of the page (selected by sending the SCS Page Presentation Media command with the dx parameter set to 02h). If the System is printing in duplex mode, it will insert an additional Form Feed into the data stream if necessary at the end of print jobs. Note: This command will not be sent by the OS/400 operating system, due to IBM restrictions, but some application software may support it. TUMBLE Print in duplex (double-sided) mode for documents that are to be bound at the top of the page (selected by sending the SCS Page Presentation Media command with the dx parameter set to 03h). If the System is printing in duplex mode, it will insert an additional Form Feed into the data stream if necessary at the end of print jobs. Note: This command will not be sent by the OS/400 operating system, due to IBM restrictions, but some application software may support it. PPAPER 1 Use paper from source/drawer 1. This PFS is sent to the printer at the beginning of each portrait page when the System has sent an SCS Page Presentation Media command with the sd parameter set to 01h. It uses format information from PAPER 1: under FMTINFO: for the port. PPAPER 2 Use paper from source/drawer 2. This PFS is sent to the printer at the beginning of each portrait page when the System has sent an SCS Page Presentation Media command with the sd parameter set to 02h. It uses format information from PAPER 2: under FMTINFO: for the port. PPAPER 3 Use paper from source/drawer 3. This PFS is sent to the printer at the beginning of each portrait page when the System has sent an SCS Page Presentation Media command with the sd parameter set to 03h. It uses format information from PAPER 3: under FMTINFO: for the port. CHAPTER 4 — PROGRAMMABLE FUNCTION STRINGS Page 4-23 P ENVEL Use paper from source/drawer 4. This PFS is sent to the printer at the beginning of each portrait page when the System has sent an SCS Page Presentation Media command with the sd parameter set to 04h. It uses format information from ENVELOP: under FMTINFO: for the port. PORTCUT Use cut feed paper (sheet feed). PORTCUT> and LANDCUT> are the only settings allowed by the System if the printer is configured as an IBM 3812 laser printer. If the System specifies cut feed paper with the SCS Set Printer Setup command, and if the printer is in portrait mode, then this PFS will be sent to the printer. Afterward, one of the drawer-select PFSs above will be sent to select the paper source drawer. PORTTRC Use tractor feed paper. If the System specifies tractor feed with the SCS Set Printer Setup command, and if the printer is in portrait mode, then this PFS will be sent to the printer. If the printer has more that four paper drawers, this PFS can be used to allow access to a fifth paper drawer. However, automatic orientation selection works only for (P/L) PAPER 1>, (P/L) PAPER 2>, (P/L) PAPER 3>, and (P/L) ENVEL>. It does not work for PORTTRC>. PORTMAN Use manual feed paper (sheet feed). If the System specifies manual feed with the SCS Set Printer Setup command, and if the printer is in portrait mode, then this PFS will be sent to the printer. If the printer has more that four paper drawers, this PFS can be used to allow access to a fifth or sixth paper drawer. However, automatic orientation selection works only for (P/L) PAPER 1>, (P/L) PAPER 2>, (P/L) PAPER 3>, and (P/L) ENVEL>. It does not work for PORTMAN>. LPAPER 1 Use paper from source/drawer 1. This PFS is sent to the printer at the beginning of each landscape page when the System has sent an SCS Page Presentation Media command with the sd parameter set to 01h. It uses format information from PAPER 1: under FMTINFO: for the port. Page 4-24 AGILE 5250 OPTIMA User’s Guide and Reference LPAPER 2 Use paper from source/drawer 2. This PFS is sent to the printer at the beginning of each landscape page when the System has sent an SCS Page Presentation Media command with the sd parameter set to 02h. It uses format information from PAPER 2: under FMTINFO: for the port. LPAPER 3 Use paper from source/drawer 3. This PFS is sent to the printer at the beginning of each landscape page when the System has sent an SCS Page Presentation Media command with the sd parameter set to 03h. It uses format information from PAPER 3: under FMTINFO: for the port. L ENVEL Use paper from source/drawer 4. This PFS is sent to the printer at the beginning of each landscape page when the System has sent an SCS Page Presentation Media command with the sd parameter set to 04h. It uses format information from ENVELOP: under FMTINFO: for the port. LANDCUT Use cut feed paper (sheet feed). PORTCUT> and LANDCUT> are the only settings allowed by the System if the printer is configured as an IBM 3812 laser printer. If the System specifies cut feed paper with the SCS Printer Setup command, and if the printer is in landscape mode, then this PFS will be sent to the printer. Afterward, one of the drawer-select PFSs above will be sent to select the paper source drawer. LANDTRC Use tractor feed paper. If the System specifies tractor feed with the SCS Printer Setup command, and if the printer is in landscape mode, then this PFS will be sent to the printer. If the printer has more that four paper drawers, this PFS can be used to allow access to a fifth paper drawer. However, automatic orientation selection works only for (P/L) PAPER 1>, (P/L) PAPER 2>, (P/L) PAPER 3>, and (P/L) ENVEL>. It does not work for LANDTRC>. CHAPTER 4 — PROGRAMMABLE FUNCTION STRINGS Page 4-25 LANDMAN Use manual feed paper (sheet feed). If the System specifies manual feed with the SCS Printer Setup command, and if the printer is in landscape mode, this PFS will be sent to the printer. If the printer has more that four paper drawers, this PFS can be used to access a fifth or sixth drawer. However, automatic orientation selection works only for (P/L) PAPER 1>, (P/L) PAPER 2>, (P/L) PAPER 3>, and (P/L) ENVEL>. It does not work for LANDMAN>. JOG OUT Move paper output tray to the other position (when the printer can output paper to two positions). This is sometimes referred to as output offsetting. This PFS is sent to the printer at the beginning of each page that requires an offset when the System has sent an SCS Set Initial Conditions command with the ic parameter set to FFh (DP), when the System has sent an SCS Page Presentation Media command with the do parameter set to a value other than 00h, or when the System has sent an SCS Page Presentation Media command with the dd parameter changed from its last setting. DEST1 Select paper output drawer 1. This PFS is sent to the printer at the beginning of each page when the System has selected paper output tray number 1 with the SCS Page Presentation Media command. DEST2 Select paper output drawer 2. This PFS is sent to the printer at the beginning of each page when the System has selected paper output tray number 2 with the SCS Page Presentation Media command. DEST3 Select paper output drawer 3. This PFS is sent to the printer at the beginning of each page when the System has selected paper output tray number 3 with the SCS Page Presentation Media command. JSTSTRT Start justification if the printer is capable of text justification. The user must select the PRINTER setting for JUSTTYP= (under FMTINFO: for the output port) for the OPTIMA to use this PFS. Page 4-26 AGILE 5250 OPTIMA User’s Guide and Reference JOBSTRT Prepare the printer to receive a new print job. This PFS is sent to the printer when the System declares that a new print job is about to start (upon receipt of an SCS Set Initial Conditions command). Some of the potential uses for this PFS are: 1) Declare a new print job at the printer to allow job offsetting, spooling and/or duplexing to occur properly. 2) Set default formatting settings at the printer. 3) Perform a form feed to cause a blank page between jobs. JOBEND This PFS is not normally used. It is triggered at the end of a print job from the System. The user may define this in any appropriate way. TIMEOUT This PFS is sent to the printer before switching hosts after the timeout period defined in the configuration of the current input port. This is not the result of a System request. It is intended primarily so users can define a cleanup procedure to be executed before switching hosts (e.g., send a form feed to the printer). CHAPTER 5 — MAINTENANCE & TROUBLESHOOTING Page 5-1 CHAPTER 5 MAINTENANCE & TROUBLESHOOTING Diagnostics When the AGILE 5250 OPTIMA either powers up or is reset, it performs a set of diagnostics on the internal hardware. These diagnostics include a ROM checksum test to ensure that the ROM has not been corrupted, a RAM test, and an internal twinax loop-back test. (The internal twinax loop-back test tests the OPTIMA twinax communication controller chip, and it is permissible to be connected to the network during this operation.) To perform these tests continuously, press g on power up or reset. An additional diagnostic is available on power up or reset. This diagnostic will test the transmit and receive circuits of the OPTIMA. NOTE: to perform this test, the twinax T must be attached to the OPTIMA twinax port, and both cables must be disconnected from the T connector so that it only serves as a terminator for the test. Failure to disconnect can cause permanent damage to the equipment. To perform this additional test on power up or reset, press d while either turning on the OPTIMA or while pressing the RESET button. To perform continuous testing of the OPTIMA, including the internal loop-back test, press both g and d while either turning on or resetting the OPTIMA. Twinax Addressing After power-on hardware diagnostics and during twinax initialization, the twinax port is monitored to check the OPTIMA twinax configuration against the actual port configuration. Before the OPTIMA will begin twinax communications on a twinax address, it monitors the line to ensure that the selected address is not being used by another device on the twinax network. If the address is already used, the OPTIMA will not use the address, but it will flag the configuration error to the user. This is not a fatal error. Normal operation will proceed on the nonconflicting addresses. After twinax initialization, during normal operation, the configured twinax addresses are continually monitored by the OPTIMA. The LCD indicates where any twinax address error is occurring by flashing the twinax address indicator. Page 5-2 AGILE 5250 OPTIMA User’s Guide and Reference The user must know on which addresses OPTIMA will be configured. If using a wrong address, the twinax status indicator will flash, but this will not cause an error at the system. If the status indicator is flashing, either the twinax address has a conflict, or the system is not polling that address. If the system is not polling that address, either the unit is not connected properly, or the system is not configured to have a device on that address. Check the connections, and if the error persists, either pick another address, or configure the system to accept a device on that address. Error Codes The LCD status display indicates the status of the twinax line and the status of the OPTIMA itself. The information displayed indicates which input ports and output ports are currently communicating with one another. For instance, T0->P O T 1->S0 T2->S 1 PI indicates that input from twinax address 0 is output to the PARALLEL OUT PRINTER port, that input from twinax address 1 is output to SERIAL I/O PORT 0, that input from twinax address 2 is output to SERIAL I/O PORT 1, and that input from the PARALLEL IN ALT HOST port is not being output. When using a standard setup with a parallel alternate host and no data is being transferred, the status display should read: Tn P I PO with n representing the twinax address. If an indicator on the status display is flashing, more detailed information about the error is available by pressing either d or f . If the error is a twinax error, the display will read either Twinaxn: No Polls or Twinaxn: Conflict. If the display reads No Polls, that indicates that no twinax device is being polled by the system at that address. This can be caused by the unit not being configured on the system. Also make certain to vary on the unit. If the display reads Conflict, that means that there is an address conflict error. CHAPTER 5 — MAINTENANCE & TROUBLESHOOTING Page 5-3 If the error is on the PARALLEL OUT PRINTER port, the display will read either Par Out: Offline or Par Out: No Paper. The Offline message can be caused either by the unit being offline or by a fault condition at the printer (e.g., out of toner, cover off, output tray full, etc.) The No Paper message usually means that the printer is out of paper, but it could also mean another error condition such as a full output tray. Either error message could also mean that there is an improper connection to the printer, and particular printers generate varied error messages in different situations. If the error message is on a serial port, the display will read Serialn: Offline. Serial port errors can be detected only when there is a device connected to a serial port. Twinax Error Log The OPTIMA makes a log of any errors it encounters on the physical twinax line. Most errors encountered are parity errors caused by faulty cabling or termination. This feature is useful for diagnosing the cause of twinax errors. To use this feature, go to menu location: OPTIMA: TWINERR:DISPLAY! Press ENTER, and the LCD will display: ERROR CNT= 00000 Thsi display automatically updates the number of errors logged by the OPTIMA. To leave this display, press ENTER. To reset the log to zero, press f to display: TWINERR: and press ENTER. RESET! Page 5-4 AGILE 5250 OPTIMA User’s Guide and Reference Printing Reports The 5250 OPTIMA will print nine reports that allow the user to verify that the unit is functioning properly, and that the status, fonts and other configuration settings are correct. If experiencing problems with the unit, it is helpful to start solving them by first printing and checking these reports: 1. TEST! 2. PFSTEST! 3. CONFIG! 4. OPTIONS! 5. XLATES! 6. PFS! 7. PORTFID! 8. LANDFID! 9. LOOP! To begin printing reports, make certain that the printer is properly connected to the OPTIMA and that both the printer and the OPTIMA are turned on. Select the printer to which the OPTIMA will print under OPTIMA: PRINT: TO= in the configuration menu. Select the report to be printed under OPTIMA: PRINT: in the configuration menu. CHAPTER 5 — MAINTENANCE & TROUBLESHOOTING Page 5-5 TEST! Report: The TEST! Report is a repeating set of characters that demonstrates that the printer is operating correctly and that the interface is properly connected. The following is a sample report: ----------------------------------------------------------------------------AGILE 5250 OPTIMA V6.00 COPYRIGHT (C) 8/2/93 BY AGILE. ALL RIGHTS RESERVED. Printer Test Page ----------------------------------------------------------------------------!”#$%&’()*+,-./0123456789:;<=>?@ABCDEFGHIJKLMNOPQRSTUVWXYZ[\]^_‘abcdefghijkl !”#$%&’()*+,-./0123456789:;<=>?@ABCDEFGHIJKLMNOPQRSTUVWXYZ[\]^_‘abcdefghijklm “#$%&’()*+,-./0123456789:;<=>?@ABCDEFGHIJKLMNOPQRSTUVWXYZ[\]^_`abcdefghijklmn #$%&’()*+,-./0123456789:;<=>?@ABCDEFGHIJKLMNOPQRSTUVWXYZ[\]^_‘abcdefghijklmno $%&’()*+,-./0123456789:;<=>?@ABCDEFGHIJKLMNOPQRSTUVWXYZ[\]^_‘abcdefghijklmnop %&’()*+,-./0123456789:;<=>?@ABCDEFGHIJKLMNOPQRSTUVWXYZ[\]^_‘abcdefghijklmnopq &’()*+,-./0123456789:;<=>?@ABCDEFGHIJKLMNOPQRSTUVWXYZ[\]^_‘abcdefghijklmnopqr ‘()*+,-./0123456789:;<=>?@ABCDEFGHIJKLMNOPQRSTUVWXYZ[\]^_`abcdefghijklmnopqrs ()*+,-./0123456789:;<=>?@ABCDEFGHIJKLMNOPQRSTUVWXYZ[\]^_‘abcdefghijklmnopqrst )*+,-./0123456789:;<=>?@ABCDEFGHIJKLMNOPQRSTUVWXYZ[\]^_‘abcdefghijklmnopqrstu *+,-./0123456789:;<=>?@ABCDEFGHIJKLMNOPQRSTUVWXYZ[\]^_‘abcdefghijklmnopqrstuv +,-./0123456789:;<=>?@ABCDEFGHIJKLMNOPQRSTUVWXYZ[\]^_‘abcdefghijklmnopqrstuvw ,-./0123456789:;<=>?@ABCDEFGHIJKLMNOPQRSTUVWXYZ[\]^_‘abcdefghijklmnopqrstuvwx -./0123456789:;<=>?@ABCDEFGHIJKLMNOPQRSTUVWXYZ[\]^_‘abcdefghijklmnopqrstuvwxy ./0123456789:;<=>?@ABCDEFGHIJKLMNOPQRSTUVWXYZ[\]^_‘abcdefghijklmnopqrstuvwxyz /0123456789:;<=>?@ABCDEFGHIJKLMNOPQRSTUVWXYZ[\]^_‘abcdefghijklmnopqrstuvwxyz{ 0123456789:;<=>?@ABCDEFGHIJKLMNOPQRSTUVWXYZ[\]^_‘abcdefghijklmnopqrstuvwxyz{| 123456789:;<=>?@ABCDEFGHIJKLMNOPQRSTUVWXYZ[\]^_‘abcdefghijklmnopqrstuvwxyz{|} 23456789:;<=>?@ABCDEFGHIJKLMNOPQRSTUVWXYZ[\]^_‘abcdefghijklmnopqrstuvwxyz{|}~ 3456789:;<=>?@ABCDEFGHIJKLMNOPQRSTUVWXYZ[\]^_‘abcdefghijklmnopqrstuvwxyz{|}~ 456789:;<=>?@ABCDEFGHIJKLMNOPQRSTUVWXYZ[\]^_‘abcdefghijklmnopqrstuvwxyz{|}~ 56789:;<=>?@ABCDEFGHIJKLMNOPQRSTUVWXYZ[\]^_‘abcdefghijklmnopqrstuvwxyz{|}~ ! 6789:;<=>?@ABCDEFGHIJKLMNOPQRSTUVWXYZ[\]^_‘abcdefghijklmnopqrstuvwxyz{|}~ !” 789:;<=>?@ABCDEFGHIJKLMNOPQRSTUVWXYZ[\]^_‘abcdefghijklmnopqrstuvwxyz{|}~ !”# 89:;<=>?@ABCDEFGHIJKLMNOPQRSTUVWXYZ[\]^_‘abcdefghijklmnopqrstuvwxyz{|}~ !”#$ 9:;<=>?@ABCDEFGHIJKLMNOPQRSTUVWXYZ[\]^_‘abcdefghijklmnopqrstuvwxyz{|}~ !”#$% :;<=>?@ABCDEFGHIJKLMNOPQRSTUVWXYZ[\]^_‘abcdefghijklmnopqrstuvwxyz{|}~ !”#$%& ;<=>?@ABCDEFGHIJKLMNOPQRSTUVWXYZ[\]^_‘abcdefghijklmnopqrstuvwxyz{|}~ !”#$%&’ <=>?@ABCDEFGHIJKLMNOPQRSTUVWXYZ[\]^_‘abcdefghijklmnopqrstuvwxyz{|}~ !”#$%&’( =>?@ABCDEFGHIJKLMNOPQRSTUVWXYZ[\]^_‘abcdefghijklmnopqrstuvwxyz{|}~ !”#$%&’() >?@ABCDEFGHIJKLMNOPQRSTUVWXYZ[\]^_‘abcdefghijklmnopqrstuvwxyz{|}~ !”#$%&’()* ?@ABCDEFGHIJKLMNOPQRSTUVWXYZ[\]^_‘abcdefghijklmnopqrstuvwxyz{|}~ !”#$%&’()*+ @ABCDEFGHIJKLMNOPQRSTUVWXYZ[\]^_‘abcdefghijklmnopqrstuvwxyz{|}~ !”#$%&’()*+, ABCDEFGHIJKLMNOPQRSTUVWXYZ[\]^_‘abcdefghijklmnopqrstuvwxyz{|}~ !”#$%&’()*+,BCDEFGHIJKLMNOPQRSTUVWXYZ[\]^_‘abcdefghijklmnopqrstuvwxyz{|}~ !”#$%&’()*+,-. CDEFGHIJKLMNOPQRSTUVWXYZ[\]^_‘abcdefghijklmnopqrstuvwxyz{|}~ !”#$%&’()*+,-./ DEFGHIJKLMNOPQRSTUVWXYZ[\]^_‘abcdefghijklmnopqrstuvwxyz{|}~ !”#$%&’()*+,-./0 EFGHIJKLMNOPQRSTUVWXYZ[\]^_‘abcdefghijklmnopqrstuvwxyz{|}~ !”#$%&’()*+,-./01 FGHIJKLMNOPQRSTUVWXYZ[\]^_‘abcdefghijklmnopqrstuvwxyz{|}~ !”#$%&’()*+,-./012 GHIJKLMNOPQRSTUVWXYZ[\]^_‘abcdefghijklmnopqrstuvwxyz{|}~ !”#$%&’()*+,-./0123 HIJKLMNOPQRSTUVWXYZ[\]^_‘abcdefghijklmnopqrstuvwxyz{|}~ !”#$%&’()*+,-./01234 IJKLMNOPQRSTUVWXYZ[\]^_‘abcdefghijklmnopqrstuvwxyz{|}~ !”#$%&’()*+,-./012345 JKLMNOPQRSTUVWXYZ[\]^_‘abcdefghijklmnopqrstuvwxyz{|}~ !”#$%&’()*+,-./0123456 KLMNOPQRSTUVWXYZ[\]^_‘abcdefghijklmnopqrstuvwxyz{|}~ !”#$%&’()*+,-./01234567 LMNOPQRSTUVWXYZ[\]^_‘abcdefghijklmnopqrstuvwxyz{|}~ !”#$%&’()*+,-./012345678 MNOPQRSTUVWXYZ[\]^_‘abcdefghijklmnopqrstuvwxyz{|}~ !”#$%&’()*+,-./0123456789 NOPQRSTUVWXYZ[\]^_‘abcdefghijklmnopqrstuvwxyz{|}~ !”#$%&’()*+,-./0123456789: OPQRSTUVWXYZ[\]^_‘abcdefghijklmnopqrstuvwxyz{|}~ !”#$%&’()*+,-./0123456789:; PQRSTUVWXYZ[\]^_‘abcdefghijklmnopqrstuvwxyz{|}~ !”#$%&’()*+,-./0123456789:;< QRSTUVWXYZ[\]^_‘abcdefghijklmnopqrstuvwxyz{|}~ !”#$%&’()*+,-./0123456789:;<= RSTUVWXYZ[\]^_‘abcdefghijklmnopqrstuvwxyz{|}~ !”#$%&’()*+,-./0123456789:;<=> STUVWXYZ[\]^_‘abcdefghijklmnopqrstuvwxyz{|}~ !”#$%&’()*+,-./0123456789:;<=>? TUVWXYZ[\]^_‘abcdefghijklmnopqrstuvwxyz{|}~ !”#$%&’()*+,-./0123456789:;<=>?@ ----------------------------------------------------------------------------- Page 5-6 AGILE 5250 OPTIMA User’s Guide and Reference PFSTEST! Report This report will print a test sample of most of the OPTIMA PFSs. PFSs are specific to the output port and the printer it is using. Print to the device for which the PFSs are being tested (e.g., to test the PFSs for the printer connected to the PARALLEL OUT PRINTER port, select PO under OPTIMA: PRINT: TO=). For each PFS, see that it has been implemented properly by looking at the effect on the text that follows the PFS name. For example, to test the PFS 10 CPI>, the report will print This line of text is in 10 CPI. using the appropriate font as defined in the PFS. The following is a sample report: ----------------------------------------------------------------------------AGILE 5250 OPTIMA V6.00 COPYRIGHT (C) 8/2/93 BY AGILE. ALL RIGHTS RESERVED. PFS Test Page ----------------------------------------------------------------------------This is a test of the PFSs for the printer printing this report. Each of the following print enhancements are made with the indicated PFS. Not all printers support all PFS functions. 5 5 CPI> Characters Per Inch. 10 CPI> This text should be 10 Characters Per Inch. PS CPI> This text should be proportionally spaced. WWWWWWWWWW iiiiiiiiii 12 CPI> This should be 12 Characters Per Inch. 15 CPI> This should be 15 Characters Per Inch. 16 CPI> This should be 16 Characters Per Inch. Now Back to 10 CPI. BOLD ON> This text should be bold. BOLDOFF> This text should not be bold. UNDL ON> This text should be underlined. UNDLOFF> This text should not be underlined. EMPH ON> This text should be emphasized. EMPHOFF> This text should not be emphasized. SUBS ON> Baseline. SUPS ON> Baseline. Subscripted. SUBSOFF> Superscripted. SUPSOFF> ----------------------------------------------------------------------------- CHAPTER 5 — MAINTENANCE & TROUBLESHOOTING Page 5-7 CONFIG! Report This report will print the current configuration settings of the AGILE 5250 OPTIMA. The following is a sample report: ----------------------------------------------------------------------------AGILE 5250 OPTIMA V6.00 COPYRIGHT (C) 8/2/93 BY AGILE. ALL RIGHTS RESERVED. Port Configuration Page ----------------------------------------------------------------------------Input Ports Routing Output Ports +------------------+ ! Twinax Address 1 ! ! !—>Parallel Out ! 3812/5219 Id, ! ! IBM Emulation, ! ! Timeout= 05 Secs ! +------------------+ +------------------+ ! Twinax Address 3 ! ! !—>Parallel Out ! 3812/5219 Id, !—>Serial 0 (DB-25) ! IBM Emulation, !—>Serial 1 (DB-9) ! Timeout= 05 Secs ! +------------------+ +------------------+ ! Parallel In !—>Parallel Out ! !—>Serial 0 (DB-25) ! Timeout= 05 Secs !—>Serial 1 (DB-9) +------------------+ Twinax Address 1—>EBCDIC->ASCII—>+------------------+ ! Parallel Out ! Twinax Address 3—>EBCDIC->ASCII—>! ! Parallel In—>ASCII->ASCII——>! ! ! ! ! ! OPTIMA—>ASCII->ASCII——>+------------------+ +------------------+ ! Serial 0 (DB-25) ! ! ! Twinax Address 3—>EBCDIC->ASCII—>! 9600 Baud, ! Parallel In—>ASCII->ASCII——>! No Parity, ! ! 8 Data Bits, ! OPTIMA—>ASCII->ASCII——>! 1 Stop Bit, ! ! Xon/Xoff Flow ! +------------------+ +------------------+ ! Serial 1 (DB-9) ! ! ! Twinax Address 3—>EBCDIC->ASCII—>! 9600 Baud, ! Parallel In—>ASCII->ASCII——>! No Parity, ! ! 8 Data Bits, ! OPTIMA—>ASCII->ASCII——>! 1 Stop Bit, ! ! Xon/Xoff Flow ! +------------------+ ----------------------------------------------------------------------------- Page 5-8 AGILE 5250 OPTIMA User’s Guide and Reference OPTIONS! Report This four-page report lists each OPTIMA port and displays each ports current option settings, with the exception of their PFS definitions. PFS definitions can be listed by printing the PFS! Report for each output port. The following is a sample CONFIG! Report: ----------------------------------------------------------------------------AGILE 5250 OPTIMA V6.00 COPYRIGHT (C) 8/2/93 BY AGILE. ALL RIGHTS RESERVED. Configuration Options Report ----------------------------------------------------------------------------OPTIMA: CONFIG: TWINAX1: TWINAX2: TWINAX3: PAR IN: PAR OUT: ON/OFF= ADDRESS= EMULATE= MODE= OUT TO= TIMEOUT= XEROX: ON/OFF= ADDRESS= EMULATE= MODE= OUT TO= TIMEOUT= XEROX: ON/OFF= ADDRESS= EMULATE= MODE= OUT TO= TIMEOUT= XEROX: ON/OFF= MODE= OUT TO= TIMEOUT= XEROX: ON/OFF= TIMING= ERRTIME= ACTIVE 1 IBM 3812 IBM EMUL PO,S0,S1 5 SECS UDK XLT= PFSSPRS= FF SPRS= FFTONL= XTLSPRS= JOB FF= METATRN= ACTIVE 2 IBM 5225 275 EMUL PO,S0,S1 5 SECS UDK XLT= PFSSPRS= FF SPRS= FFTONL= XTLSPRS= JOB FF= METATRN= INACTIVE 3 IBM 3812 IBM EMUL PO,S0,S1 5 SECS UDK XLT= PFSSPRS= FF SPRS= FFTONL= XTLSPRS= JOB FF= METATRN= ACTIVE TRNSPRNT PO,S0,S1 5 SECS UDK XLT= PFSSPRS= FF SPRS= FFTONL= XTLSPRS= JOB FF= METATRN= ACTIVE FAST DEFAULT XLT UDKS AUTOSPRS AUTOSPRS INACTIVE USE XTL ACTIVE INACTIVE XLT UDKS AUTOSPRS AUTOSPRS INACTIVE USE XTL ACTIVE INACTIVE XLT UDKS AUTOSPRS AUTOSPRS INACTIVE USE XTL ACTIVE INACTIVE XLT UDKS AUTOSPRS AUTOSPRS INACTIVE USE XTL ACTIVE INACTIVE ----------------------------------------------------------------------------- CHAPTER 5 — MAINTENANCE & TROUBLESHOOTING Page 5-9 ----------------------------------------------------------------------------AGILE 5250 OPTIMA V6.00 COPYRIGHT (C) 8/2/93 BY AGILE. ALL RIGHTS RESERVED. Configuration Options Report ----------------------------------------------------------------------------XLTINFO: T1 XLAT= T2 XLAT= T3 XLAT= PI XLAT= S0 XLAT= S1 XLAT= OPTXLAT= FMTINFO: CRATFF= HORMOVE= VERMOVE= HOR RES= VER RES= VRELMAX= H OFF= V OFF= CORHOFF= CORVOFF= CORVER%= RES CPI= JUSTTYP= BOLDTYP= RSTPAGE= UNDLSPC= ROTATE= PAPER 1: PAPER 2: PAPER 3: ENVELOP: SERIAL0: FNTINFO: ON/OFF= IN/OUT= BAUD= PARITY= LENGTH= STOPS= FLOW= ERRTIME= MODE= OUT TO= TIMEOUT= XLTINFO: LOOK UP= ACTIVE ALT HOST 9600 NONE 8 BITS 1 BIT HARDWARE DEFAULT TRNSPRNT PO,S1 5 SECS T1 XLAT= T2 XLAT= T3 XLAT= PI XLAT= S1 XLAT= EBC->ASC EBC->ASC EBC->ASC ASC->ASC ASC->ASC ASC->ASC ASC->ASC ADD CR RELATIVE RELATIVE 300 DPI 300 DPI NONE DEFAULT DEFAULT DEFAULT DEFAULT VERT 70% PRE-FONT SENDMOVE PRINTER NO RESET UNDL PFS AUTO WIDTH= 8.5 INCH HEIGHT= 11 INCH ROTATE= COR WIDTH= 8.5 INCH HEIGHT= 14 INCH ROTATE= COR WIDTH= 11 INCH HEIGHT= 17 INCH ROTATE= COR WIDTH= 8.5 INCH HEIGHT= 11 INCH ROTATE= COR P&L TABS EBC->ASC EBC->ASC EBC->ASC ASC->ASC ASC->ASC ----------------------------------------------------------------------------- Page 5-10 AGILE 5250 OPTIMA User’s Guide and Reference ----------------------------------------------------------------------------AGILE 5250 OPTIMA V6.00 COPYRIGHT (C) 8/2/93 BY AGILE. ALL RIGHTS RESERVED. Configuration Options Report ----------------------------------------------------------------------------- FMTINFO: OPTXLAT= CRATFF= HORMOVE= VERMOVE= HOR RES= VER RES= VRELMAX= H OFF= V OFF= CORHOFF= CORVOFF= CORVER%= RES CPI= JUSTTYP= BOLDTYP= RSTPAGE= UNDLSPC= ROTATE= PAPER 1: PAPER 2: PAPER 3: ENVELOP: FNTINFO: LOOK UP= XEROX: UDK XLT= PFSSPRS= FF SPRS= FFTONL= XTLSPRS= JOB FF= METATRN= SERIAL1: ON/OFF= INACTIVE IN/OUT= OUTPUT BAUD= 19200 PARITY= NONE LENGTH= 8 BITS STOPS= 1 BIT FLOW= HARDWARE ERRTIME= DEFAULT MODE= TRNSPRNT OUT TO= PO,S0 TIMEOUT= 5 SECS XLTINFO: T1 XLAT= T2 XLAT= T3 XLAT= PI XLAT= ASC->ASC ADD CR RELATIVE RELATIVE 180 DPI 6 LPI 1 LINE DEFAULT DEFAULT DEFAULT DEFAULT VERT 70% PRE-FONT SENDMOVE PRINTER NO RESET UNDL PFS PORT WIDTH= HEIGHT= ROTATE= WIDTH= HEIGHT= ROTATE= WIDTH= HEIGHT= ROTATE= WIDTH= HEIGHT= ROTATE= P&L TABS XLT UDKS AUTOSPRS AUTOSPRS INACTIVE USE XTL ACTIVE INACTIVE 8.5 INCH 11 INCH PORT 8.5 INCH 11 INCH PORT 8.5 INCH 11 INCH PORT 8.5 INCH 11 INCH PORT EBC->EBC EBC->EBC EBC->EBC ASC->EBC ----------------------------------------------------------------------------- CHAPTER 5 — MAINTENANCE & TROUBLESHOOTING Page 5-11 ----------------------------------------------------------------------------AGILE 5250 OPTIMA V6.00 COPYRIGHT (C) 8/2/93 BY AGILE. ALL RIGHTS RESERVED. Configuration Options Report ----------------------------------------------------------------------------S0 XLAT= OPTXLAT= FMTINFO: CRATFF= HORMOVE= VERMOVE= HOR RES= VER RES= VRELMAX= H OFF= V OFF= CORHOFF= CORVOFF= CORVER%= RES CPI= JUSTTYP= BOLDTYP= RSTPAGE= UNDLSPC= ROTATE= PAPER 1: PAPER 2: PAPER 3: ENVELOP: PRINT: FNTINFO: LOOK UP= XEROX: UDK XLT= PFSSPRS= FF SPRS= FFTONL= XTLSPRS= JOB FF= METATRN= TO= PO,S0,S1 ASC->EBC ASC->EBC ADD CR RELATIVE LINEFEED 300 DPI 300 DPI NONE DEFAULT DEFAULT DEFAULT DEFAULT VERT 70% PRE-FONT SENDMOVE PRINTER NO RESET UNDL PFS AUTO WIDTH= 8.5 INCH HEIGHT= 11 INCH ROTATE= COR WIDTH= 8.5 INCH HEIGHT= 14 INCH ROTATE= COR WIDTH= 11 INCH HEIGHT= 17 INCH ROTATE= COR WIDTH= 8.5 INCH HEIGHT= 11 INCH ROTATE= COR P&L TABS XLT UDKS AUTOSPRS AUTOSPRS INACTIVE USE XTL ACTIVE INACTIVE ----------------------------------------------------------------------------- Page 5-12 AGILE 5250 OPTIMA User’s Guide and Reference XLATES! Report This eight-page report will print all sixteen translation tables. Compare this report to the translation table worksheets in Appendix B. ----------------------------------------------------------------------------AGILE 5250 OPTIMA V6.00 COPYRIGHT (C) 8/2/93 BY AGILE. ALL RIGHTS RESERVED. Translation Tables - Page 1 of 8 ----------------------------------------------------------------------------- 0_: 1_: 2_: 3_: 4_: 5_: 6_: 7_: 8_: 9_: A_: B_: C_: D_: E_: F_: _0 _1 _2 _3 _4 _5 _6 _7 _8 _9 _A _B _C _D _E _F ----------------------------------------------00 01 02 03 04 05 06 07 08 09 0A 0B 0C 0D 0E 0F 10 11 12 13 14 15 16 17 18 19 1A 1B 1C 1D 1E 1F 20 21 22 23 24 25 26 27 28 29 2A 2B 2C 2D 2E 2F 30 31 32 33 34 35 36 37 38 39 3A 3B 3C 3D 3E 3F 40 41 42 43 44 45 46 47 48 49 4A 4B 4C 4D 4E 4F 50 51 52 53 54 55 56 57 58 59 5A 5B 5C 5D 5E 5F 60 61 62 63 64 65 66 67 68 69 6A 6B 6C 6D 6E 6F 70 71 72 73 74 75 76 77 78 79 7A 7B 7C 7D 7E 7F 80 81 82 83 84 85 86 87 88 89 8A 8B 8C 8D 8E 8F 90 91 92 93 94 95 96 97 98 99 9A 9B 9C 9D 9E 9F A0 A1 A2 A3 A4 A5 A6 A7 A8 A9 AA AB AC AD AE AF B0 B1 B2 B3 B4 B5 B6 B7 B8 B9 BA BB BC BD BE BF C0 C1 C2 C3 C4 C5 C6 C7 C8 C9 CA CB CC CD CE CF D0 D1 D2 D3 D4 D5 D6 D7 D8 D9 DA DB DC DD DE DF E0 E1 E2 E3 E4 E5 E6 E7 E8 E9 EA EB EC ED EE EF F0 F1 F2 F3 F4 F5 F6 F7 F8 F9 FA FB FC FD FE FF 0_: 1_: 2_: 3_: 4_: 5_: 6_: 7_: 8_: 9_: A_: B_: C_: D_: E_: F_: _0 _1 _2 _3 _4 _5 _6 _7 _8 _9 _A _B _C _D _E _F ----------------------------------------------00 00 00 00 00 00 00 00 00 00 00 00 00 00 00 00 00 00 00 00 00 00 00 00 00 00 00 00 00 00 00 00 00 00 00 00 00 00 00 00 00 00 00 00 00 00 00 00 00 00 00 00 00 00 00 00 00 00 00 00 00 00 00 00 20 20 00 00 00 00 00 00 00 00 5B 2E 3C 28 2B 21 26 00 00 00 00 00 00 00 00 00 5D 24 2A 29 3B 5E 2D 2F 00 00 00 00 00 00 00 00 7C 2C 25 5F 3E 3F 00 00 00 00 00 00 00 00 00 60 3A 23 40 27 3D 22 00 61 62 63 64 65 66 67 68 69 00 00 00 00 00 00 00 6A 6B 6C 6D 6E 6F 70 71 72 00 00 00 00 00 00 00 7E 73 74 75 76 77 78 79 7A 00 00 00 00 00 00 00 00 00 00 00 00 00 00 00 00 00 7C 00 00 00 00 7B 41 42 43 44 45 46 47 48 49 2D 00 00 00 00 00 7D 4A 4B 4C 4D 4E 4F 50 51 52 00 00 00 00 00 00 5C 00 53 54 55 56 57 58 59 5A 00 00 00 00 00 00 30 31 32 33 34 35 36 37 38 39 00 00 00 00 00 00 ASCII->ASCII—> EBCDIC->ASCII—> ----------------------------------------------------------------------------- CHAPTER 5 — MAINTENANCE & TROUBLESHOOTING Page 5-13 ----------------------------------------------------------------------------AGILE 5250 OPTIMA V6.00 COPYRIGHT (C) 8/2/93 BY AGILE. ALL RIGHTS RESERVED. Translation Tables - Page 2 of 8 ----------------------------------------------------------------------------- 0_: 1_: 2_: 3_: 4_: 5_: 6_: 7_: 8_: 9_: A_: B_: C_: D_: E_: F_: _0 _1 _2 _3 _4 _5 _6 _7 _8 _9 _A _B _C _D _E _F ----------------------------------------------00 00 00 00 00 00 00 2F 00 00 25 00 0C 0D 00 00 00 00 00 00 00 00 00 00 00 00 00 00 00 00 00 00 40 4F 7F 7B 5B 6C 50 7D 4D 5D 5D 4E 6B 60 4B 61 F0 F1 F2 F3 F4 F5 F6 F7 F8 F9 7A 5E 4C 7E 6E 6F 7C C1 C2 C3 C4 C5 C6 C7 C8 C9 D1 D2 D3 D4 D5 D6 D7 D8 D9 E2 E3 E4 E5 E6 E7 E8 E9 4A E0 5A 5F 6D 7D 81 82 83 84 85 86 87 88 89 91 92 93 94 95 96 97 98 99 A2 A3 A4 A5 A6 A7 A8 A9 C0 BB D0 A1 00 00 00 00 00 00 00 00 00 00 00 00 00 00 00 00 00 00 00 00 00 00 00 00 00 00 00 00 00 00 00 00 00 00 00 00 00 00 00 00 00 00 00 00 00 00 00 00 00 00 00 00 00 00 00 00 00 00 00 00 00 00 00 00 00 00 00 00 00 00 00 00 00 00 00 00 00 00 00 00 00 00 00 00 00 00 00 00 00 00 00 00 00 00 00 00 00 00 00 00 00 00 00 00 00 00 00 00 00 00 00 00 00 00 00 00 00 00 00 00 00 00 00 00 00 00 00 00 00 0_: 1_: 2_: 3_: 4_: 5_: 6_: 7_: 8_: 9_: A_: B_: C_: D_: E_: F_: _0 _1 _2 _3 _4 _5 _6 _7 _8 _9 _A _B _C _D _E _F ----------------------------------------------00 01 02 03 04 05 06 07 08 09 0A 0B 0C 0D 0E 0F 10 11 12 13 14 15 16 17 18 19 1A 1B 1C 1D 1E 1F 20 21 22 23 24 25 26 27 28 29 2A 2B 2C 2D 2E 2F 30 31 32 33 34 35 36 37 38 39 3A 3B 3C 3D 3E 3F 40 41 42 43 44 45 46 47 48 49 4A 4B 4C 4D 4E 4F 50 51 52 53 54 55 56 57 58 59 5A 5B 5C 5D 5E 5F 60 61 62 63 64 65 66 67 68 69 6A 6B 6C 6D 6E 6F 70 71 72 73 74 75 76 77 78 79 7A 7B 7C 7D 7E 7F 80 81 82 83 84 85 86 87 88 89 8A 8B 8C 8D 8E 8F 90 91 92 93 94 95 96 97 98 99 9A 9B 9C 9D 9E 9F A0 A1 A2 A3 A4 A5 A6 A7 A8 A9 AA AB AC AD AE AF B0 B1 B2 B3 B4 B5 B6 B7 B8 B9 BA BB BC BD BE BF C0 C1 C2 C3 C4 C5 C6 C7 C8 C9 CA CB CC CD CE CF D0 D1 D2 D3 D4 D5 D6 D7 D8 D9 DA DB DC DD DE DF E0 E1 E2 E3 E4 E5 E6 E7 E8 E9 EA EB EC ED EE EF F0 F1 F2 F3 F4 F5 F6 F7 F8 F9 FA FB FC FD FE FF ASCII->EBCDIC-> EBCDIC->EBCDIC-> ----------------------------------------------------------------------------- Page 5-14 AGILE 5250 OPTIMA User’s Guide and Reference ----------------------------------------------------------------------------AGILE 5250 OPTIMA V6.00 COPYRIGHT (C) 8/2/93 BY AGILE. ALL RIGHTS RESERVED. Translation Tables - Page 3 of 8 ----------------------------------------------------------------------------- 0_: 1_: 2_: 3_: 4_: 5_: 6_: 7_: 8_: 9_: A_: B_: C_: D_: E_: F_: _0 _1 _2 _3 _4 _5 _6 _7 _8 _9 _A _B _C _D _E _F ----------------------------------------------00 00 00 00 00 00 00 00 00 00 00 00 00 00 00 00 00 00 00 00 00 00 00 00 00 00 00 00 00 00 00 00 00 00 00 00 00 00 00 00 00 00 00 00 00 00 00 00 00 00 00 00 00 00 00 00 00 00 00 00 00 00 00 00 20 20 C0 CC C8 C4 E2 D4 D5 B7 5B 2E 3C 28 2B 7C 26 C5 C1 CB C9 D5 D1 DB D9 DE 5D DB 2A 29 3B 5E 2D 2F A2 D8 A1 E0 E1 D0 B4 B6 7C 2C 25 5F 3E 3F D6 DC A4 A5 A3 E5 A6 A7 E6 A8 3A D8 DA 27 3D CC D2 61 62 63 64 65 66 67 68 69 FB FD 00 00 F1 FE B3 6A 6B 6C 6D 6E 6F 70 71 72 F9 FA D7 00 D3 BA 00 00 73 74 75 76 77 78 79 7A B8 B9 E3 00 F0 00 BF BB BC 00 BE BD 00 F7 F8 00 5E 7C B0 AB A8 00 7B 41 42 43 44 45 46 47 48 49 2D C2 CE CA C6 FA 7D 4A 4B 4C 4D 4E 4F 50 51 52 00 C3 CF CB C7 EF 5C 00 53 54 55 56 57 58 59 5A 00 DF DA E8 E7 E9 30 31 32 33 34 35 36 37 38 39 00 AE D8 AD ED 00 0_: 1_: 2_: 3_: 4_: 5_: 6_: 7_: 8_: 9_: A_: B_: C_: D_: E_: F_: _0 _1 _2 _3 _4 _5 _6 _7 _8 _9 _A _B _C _D _E _F ----------------------------------------------00 00 00 00 00 00 00 00 00 00 00 00 00 00 00 00 00 00 00 00 00 00 00 00 00 00 00 00 00 00 00 00 00 00 00 00 00 00 00 00 00 00 00 00 00 00 00 00 00 00 00 00 00 00 00 00 00 00 00 00 00 00 00 00 20 20 83 84 85 A0 00 86 87 A4 5B 2E 3C 28 2B 7C 26 82 88 89 8A A1 8C 8B 8D E1 5D DB 2A 29 3B 5E 2D 2F 2F 00 8E 00 00 00 8F 80 7C 2C 25 5F 3E 3F ED 90 00 00 00 00 00 00 00 00 3A D8 DA 27 3D CC 00 61 62 63 64 65 66 67 68 69 AE AF 00 00 00 00 F8 6A 6B 6C 6D 6E 6F 70 71 72 A6 A7 91 00 92 00 00 00 73 74 75 76 77 78 79 7A AD A8 00 00 00 00 98 9C 00 00 9F 00 00 AC AB 00 AA 7C 00 00 00 00 7B 41 42 43 44 45 46 47 48 49 2D 93 94 95 A2 00 7D 4A 4B 4C 4D 4E 4F 50 51 52 00 00 00 00 00 00 5C 00 53 54 55 56 57 58 59 5A FD 00 99 00 00 00 30 31 32 33 34 35 36 37 38 39 00 00 94 00 00 00 EBCDIC->HP LJ--> EBCDIC->PC--> ----------------------------------------------------------------------------- CHAPTER 5 — MAINTENANCE & TROUBLESHOOTING Page 5-15 ----------------------------------------------------------------------------AGILE 5250 OPTIMA V6.00 COPYRIGHT (C) 8/2/93 BY AGILE. ALL RIGHTS RESERVED. Translation Tables - Page 4 of 8 ----------------------------------------------------------------------------- 0_: 1_: 2_: 3_: 4_: 5_: 6_: 7_: 8_: 9_: A_: B_: C_: D_: E_: F_: _0 _1 _2 _3 _4 _5 _6 _7 _8 _9 _A _B _C _D _E _F ----------------------------------------------00 00 00 00 00 00 00 00 00 00 00 00 00 00 00 00 00 00 00 00 00 00 00 00 00 00 00 00 00 00 00 00 00 00 00 00 00 00 00 00 00 00 00 00 00 00 00 00 00 00 00 00 00 00 00 00 00 00 00 00 00 00 00 00 20 20 E2 E4 E0 E1 E3 E5 E7 F1 5B 2E 3C 28 2B 7C 26 E9 EA EB E8 E5 EE EF EC DF 5D DB 2A 29 3B 5E 2D 2F C2 C4 C0 C1 C3 C5 C7 D1 A6 2C 25 5F 3E 3F F8 C9 CA C3 CB CD CE CF CC 91 3A D8 DA 27 3D CC D8 61 62 63 64 65 66 67 68 69 AB BB F0 FD DE B1 B0 6A 6B 6C 6D 6E 6F 70 71 72 AA BA E6 9B C6 A4 B5 7E 73 74 75 76 77 78 79 7A A1 BF D0 DD FE AE A2 A3 A5 00 00 A7 B7 BC BD BE AC 7C 95 98 92 00 7B 41 42 43 44 45 46 47 48 49 2D F4 F6 F2 F3 F5 7D 4A 4B 4C 4D 4E 4F 50 51 52 90 FB FC F9 FA FF 5C 00 53 54 55 56 57 58 59 5A B2 D4 D6 D2 D3 D5 30 31 32 33 34 35 36 37 38 39 B3 DB DC D9 DA 00 0_: 1_: 2_: 3_: 4_: 5_: 6_: 7_: 8_: 9_: A_: B_: C_: D_: E_: F_: _0 _1 _2 _3 _4 _5 _6 _7 _8 _9 _A _B _C _D _E _F ----------------------------------------------00 00 00 00 00 00 00 00 00 00 00 00 0C 0D 00 00 00 00 00 00 00 00 08 00 00 00 00 00 00 00 00 00 00 00 00 00 00 0A 00 00 00 00 00 00 00 00 00 07 00 00 00 00 00 00 00 00 00 00 00 00 00 00 00 00 20 A3 A4 A5 A6 A7 A8 F8 AA AB A2 2E 3C 28 2B 7C 26 BA BB C0 C1 BD BC C4 C5 C6 21 24 2A 29 3B 98 2D 2F C7 C8 C9 D0 D1 D2 D3 D4 99 2C 25 5F 3E 3F D5 9A 9B 9C 9D E0 E2 E3 E4 60 3A 23 40 27 3D 22 B5 61 62 63 64 65 66 67 68 69 A1 E6 E7 E8 E9 F0 F1 6A 6B 6C 6D 6E 6F 70 71 72 F2 F3 F4 F5 F6 F7 A0 7E 73 74 75 76 77 78 79 7A AD C2 AC 5B AE AF B0 B1 B2 B3 B4 5E B6 B7 B8 B9 F9 C3 A9 5D BE BF 7B 41 42 43 44 45 46 47 48 49 CA CB CC CD CE CF 7D 4A 4B 4C 4D 4E 4F 50 51 52 9E 9F DC DD DE DF 5C E1 53 54 55 56 57 58 59 5A EA EB EC ED EE EF 30 31 32 33 34 35 36 37 38 39 FA FB FC FD FE FF EBCDIC -> PS --> 275 E->A --> ----------------------------------------------------------------------------- Page 5-16 AGILE 5250 OPTIMA User’s Guide and Reference ----------------------------------------------------------------------------AGILE 5250 OPTIMA V6.00 COPYRIGHT (C) 8/2/93 BY AGILE. ALL RIGHTS RESERVED. Translation Tables - Page 5 of 8 ----------------------------------------------------------------------------- 0_: 1_: 2_: 3_: 4_: 5_: 6_: 7_: 8_: 9_: A_: B_: C_: D_: E_: F_: _0 _1 _2 _3 _4 _5 _6 _7 _8 _9 _A _B _C _D _E _F ----------------------------------------------00 01 02 03 04 05 06 07 08 09 0A 0B 0C 0D 0E 0F 10 11 12 13 14 15 16 17 18 19 1A 1B 1C 1D 1E 1F 20 21 22 23 24 25 26 27 28 29 2A 2B 2C 2D 2E 2F 30 31 32 33 34 35 36 37 38 39 3A 3B 3C 3D 3E 3F 40 41 42 43 44 45 46 47 48 49 4A 4B 4C 4D 4E 4F 50 51 52 53 54 55 56 57 58 59 5A 5B 5C 5D 5E 5F 60 61 62 63 64 65 66 67 68 69 6A 6B 6C 6D 6E 6F 70 71 72 73 74 75 76 77 78 79 7A 7B 7C 7D 7E 7F 80 81 82 83 84 85 86 87 88 89 8A 8B 8C 8D 8E 8F 90 91 92 93 94 95 96 97 98 99 9A 9B 9C 9D 9E 9F A0 A1 A2 A3 A4 A5 A6 A7 A8 A9 AA AB AC AD AE AF B0 B1 B2 B3 B4 B5 B6 B7 B8 B9 BA BB BC BD BE BF C0 C1 C2 C3 C4 C5 C6 C7 C8 C9 CA CB CC CD CE CF D0 D1 D2 D3 D4 D5 D6 D7 D8 D9 DA DB DC DD DE DF E0 E1 E2 E3 E4 E5 E6 E7 E8 E9 EA EB EC ED EE EF F0 F1 F2 F3 F4 F5 F6 F7 F8 F9 FA FB FC FD FE FF 0_: 1_: 2_: 3_: 4_: 5_: 6_: 7_: 8_: 9_: A_: B_: C_: D_: E_: F_: _0 _1 _2 _3 _4 _5 _6 _7 _8 _9 _A _B _C _D _E _F ----------------------------------------------00 00 00 00 00 00 00 00 00 00 00 00 00 00 00 00 00 00 00 00 00 00 00 00 00 00 00 00 00 00 00 00 40 4F 7F 7B 5B 6C 50 7D 4D 5D 5D 4E 6B 60 4B 61 F0 F1 F2 F3 F4 F5 F6 F7 F8 F9 7A 5E 4C 7E 6E 6F 7C C1 C2 C3 C4 C5 C6 C7 C8 C9 D1 D2 D3 D4 D5 D6 D7 D8 D9 E2 E3 E4 E5 E6 E7 E8 E9 4A E0 5A 5F 6D 7D 81 82 83 84 85 86 87 88 89 91 92 93 94 95 96 97 98 99 A2 A3 A4 A5 A6 A7 A8 A9 C0 BB D0 A1 00 00 00 00 00 00 00 00 00 00 00 00 00 00 00 00 00 00 00 00 00 00 00 00 00 00 00 00 00 00 00 00 00 00 00 00 00 00 00 00 00 00 00 00 00 00 00 00 00 00 00 00 00 00 00 00 00 00 00 00 00 00 00 00 00 00 00 00 00 00 00 00 00 00 00 00 00 00 00 00 00 00 00 00 00 00 00 00 00 00 00 00 00 00 00 00 00 00 00 00 00 00 00 00 00 00 00 00 00 00 00 00 00 00 00 00 00 00 00 00 00 00 00 00 00 00 00 00 00 User Table 1-> User Table 2-> ----------------------------------------------------------------------------- CHAPTER 5 — MAINTENANCE & TROUBLESHOOTING Page 5-17 ----------------------------------------------------------------------------AGILE 5250 OPTIMA V6.00 COPYRIGHT (C) 8/2/93 BY AGILE. ALL RIGHTS RESERVED. Translation Tables - Page 6 of 8 ----------------------------------------------------------------------------- 0_: 1_: 2_: 3_: 4_: 5_: 6_: 7_: 8_: 9_: A_: B_: C_: D_: E_: F_: _0 _1 _2 _3 _4 _5 _6 _7 _8 _9 _A _B _C _D _E _F ----------------------------------------------00 01 02 03 04 05 06 07 08 09 0A 0B 0C 0D 0E 0F 10 11 12 13 14 15 16 17 18 19 1A 1B 1C 1D 1E 1F 20 21 22 23 24 25 26 27 28 29 2A 2B 2C 2D 2E 2F 30 31 32 33 34 35 36 37 38 39 3A 3B 3C 3D 3E 3F 40 41 42 43 44 45 46 47 48 49 4A 4B 4C 4D 4E 4F 50 51 52 53 54 55 56 57 58 59 5A 5B 5C 5D 5E 5F 60 61 62 63 64 65 66 67 68 69 6A 6B 6C 6D 6E 6F 70 71 72 73 74 75 76 77 78 79 7A 7B 7C 7D 7E 7F 80 81 82 83 84 85 86 87 88 89 8A 8B 8C 8D 8E 8F 90 91 92 93 94 95 96 97 98 99 9A 9B 9C 9D 9E 9F A0 A1 A2 A3 A4 A5 A6 A7 A8 A9 AA AB AC AD AE AF B0 B1 B2 B3 B4 B5 B6 B7 B8 B9 BA BB BC BD BE BF C0 C1 C2 C3 C4 C5 C6 C7 C8 C9 CA CB CC CD CE CF D0 D1 D2 D3 D4 D5 D6 D7 D8 D9 DA DB DC DD DE DF E0 E1 E2 E3 E4 E5 E6 E7 E8 E9 EA EB EC ED EE EF F0 F1 F2 F3 F4 F5 F6 F7 F8 F9 FA FB FC FD FE FF 0_: 1_: 2_: 3_: 4_: 5_: 6_: 7_: 8_: 9_: A_: B_: C_: D_: E_: F_: _0 _1 _2 _3 _4 _5 _6 _7 _8 _9 _A _B _C _D _E _F ----------------------------------------------00 01 02 03 04 05 06 07 08 09 0A 0B 0C 0D 0E 0F 10 11 12 13 14 15 16 17 18 19 1A 1B 1C 1D 1E 1F 20 21 22 23 24 25 26 27 28 29 2A 2B 2C 2D 2E 2F 30 31 32 33 34 35 36 37 38 39 3A 3B 3C 3D 3E 3F 40 41 42 43 44 45 46 47 48 49 4A 4B 4C 4D 4E 4F 50 51 52 53 54 55 56 57 58 59 5A 5B 5C 5D 5E 5F 60 61 62 63 64 65 66 67 68 69 6A 6B 6C 6D 6E 6F 70 71 72 73 74 75 76 77 78 79 7A 7B 7C 7D 7E 7F 80 81 82 83 84 85 86 87 88 89 8A 8B 8C 8D 8E 8F 90 91 92 93 94 95 96 97 98 99 9A 9B 9C 9D 9E 9F A0 A1 A2 A3 A4 A5 A6 A7 A8 A9 AA AB AC AD AE AF B0 B1 B2 B3 B4 B5 B6 B7 B8 B9 BA BB BC BD BE BF C0 C1 C2 C3 C4 C5 C6 C7 C8 C9 CA CB CC CD CE CF D0 D1 D2 D3 D4 D5 D6 D7 D8 D9 DA DB DC DD DE DF E0 E1 E2 E3 E4 E5 E6 E7 E8 E9 EA EB EC ED EE EF F0 F1 F2 F3 F4 F5 F6 F7 F8 F9 FA FB FC FD FE FF User Table 3-> User Table 4-> ----------------------------------------------------------------------------- Page 5-18 AGILE 5250 OPTIMA User’s Guide and Reference ----------------------------------------------------------------------------AGILE 5250 OPTIMA V6.00 COPYRIGHT (C) 8/2/93 BY AGILE. ALL RIGHTS RESERVED. Translation Tables - Page 7 of 8 ----------------------------------------------------------------------------- 0_: 1_: 2_: 3_: 4_: 5_: 6_: 7_: 8_: 9_: A_: B_: C_: D_: E_: F_: _0 _1 _2 _3 _4 _5 _6 _7 _8 _9 _A _B _C _D _E _F ----------------------------------------------00 00 00 00 00 00 00 00 00 00 00 00 00 00 00 00 00 00 00 00 00 00 00 00 00 00 00 00 00 00 00 00 40 4F 7F 7B 5B 6C 50 7D 4D 5D 5D 4E 6B 60 4B 61 F0 F1 F2 F3 F4 F5 F6 F7 F8 F9 7A 5E 4C 7E 6E 6F 7C C1 C2 C3 C4 C5 C6 C7 C8 C9 D1 D2 D3 D4 D5 D6 D7 D8 D9 E2 E3 E4 E5 E6 E7 E8 E9 4A E0 5A 5F 6D 7D 81 82 83 84 85 86 87 88 89 91 92 93 94 95 96 97 98 99 A2 A3 A4 A5 A6 A7 A8 A9 C0 BB D0 A1 00 00 00 00 00 00 00 00 00 00 00 00 00 00 00 00 00 00 00 00 00 00 00 00 00 00 00 00 00 00 00 00 00 00 00 00 00 00 00 00 00 00 00 00 00 00 00 00 00 00 00 00 00 00 00 00 00 00 00 00 00 00 00 00 00 00 00 00 00 00 00 00 00 00 00 00 00 00 00 00 00 00 00 00 00 00 00 00 00 00 00 00 00 00 00 00 00 00 00 00 00 00 00 00 00 00 00 00 00 00 00 00 00 00 00 00 00 00 00 00 00 00 00 00 00 00 00 00 00 0_: 1_: 2_: 3_: 4_: 5_: 6_: 7_: 8_: 9_: A_: B_: C_: D_: E_: F_: _0 _1 _2 _3 _4 _5 _6 _7 _8 _9 _A _B _C _D _E _F ----------------------------------------------00 01 02 03 04 05 06 07 08 09 0A 0B 0C 0D 0E 0F 10 11 12 13 14 15 16 17 18 19 1A 1B 1C 1D 1E 1F 20 21 22 23 24 25 26 27 28 29 2A 2B 2C 2D 2E 2F 30 31 32 33 34 35 36 37 38 39 3A 3B 3C 3D 3E 3F 40 41 42 43 44 45 46 47 48 49 4A 4B 4C 4D 4E 4F 50 51 52 53 54 55 56 57 58 59 5A 5B 5C 5D 5E 5F 60 61 62 63 64 65 66 67 68 69 6A 6B 6C 6D 6E 6F 70 71 72 73 74 75 76 77 78 79 7A 7B 7C 7D 7E 7F 80 81 82 83 84 85 86 87 88 89 8A 8B 8C 8D 8E 8F 90 91 92 93 94 95 96 97 98 99 9A 9B 9C 9D 9E 9F A0 A1 A2 A3 A4 A5 A6 A7 A8 A9 AA AB AC AD AE AF B0 B1 B2 B3 B4 B5 B6 B7 B8 B9 BA BB BC BD BE BF C0 C1 C2 C3 C4 C5 C6 C7 C8 C9 CA CB CC CD CE CF D0 D1 D2 D3 D4 D5 D6 D7 D8 D9 DA DB DC DD DE DF E0 E1 E2 E3 E4 E5 E6 E7 E8 E9 EA EB EC ED EE EF F0 F1 F2 F3 F4 F5 F6 F7 F8 F9 FA FB FC FD FE FF User Table 5-> User Table 6-> ----------------------------------------------------------------------------- CHAPTER 5 — MAINTENANCE & TROUBLESHOOTING Page 5-19 ----------------------------------------------------------------------------AGILE 5250 OPTIMA V6.00 COPYRIGHT (C) 8/2/93 BY AGILE. ALL RIGHTS RESERVED. Translation Tables - Page 8 of 8 ----------------------------------------------------------------------------- 0_: 1_: 2_: 3_: 4_: 5_: 6_: 7_: 8_: 9_: A_: B_: C_: D_: E_: F_: _0 _1 _2 _3 _4 _5 _6 _7 _8 _9 _A _B _C _D _E _F ----------------------------------------------00 01 02 03 04 05 06 07 08 09 0A 0B 0C 0D 0E 0F 10 11 12 13 14 15 16 17 18 19 1A 1B 1C 1D 1E 1F 20 21 22 23 24 25 26 27 28 29 2A 2B 2C 2D 2E 2F 30 31 32 33 34 35 36 37 38 39 3A 3B 3C 3D 3E 3F 40 41 42 43 44 45 46 47 48 49 4A 4B 4C 4D 4E 4F 50 51 52 53 54 55 56 57 58 59 5A 5B 5C 5D 5E 5F 60 61 62 63 64 65 66 67 68 69 6A 6B 6C 6D 6E 6F 70 71 72 73 74 75 76 77 78 79 7A 7B 7C 7D 7E 7F 80 81 82 83 84 85 86 87 88 89 8A 8B 8C 8D 8E 8F 90 91 92 93 94 95 96 97 98 99 9A 9B 9C 9D 9E 9F A0 A1 A2 A3 A4 A5 A6 A7 A8 A9 AA AB AC AD AE AF B0 B1 B2 B3 B4 B5 B6 B7 B8 B9 BA BB BC BD BE BF C0 C1 C2 C3 C4 C5 C6 C7 C8 C9 CA CB CC CD CE CF D0 D1 D2 D3 D4 D5 D6 D7 D8 D9 DA DB DC DD DE DF E0 E1 E2 E3 E4 E5 E6 E7 E8 E9 EA EB EC ED EE EF F0 F1 F2 F3 F4 F5 F6 F7 F8 F9 FA FB FC FD FE FF 0_: 1_: 2_: 3_: 4_: 5_: 6_: 7_: 8_: 9_: A_: B_: C_: D_: E_: F_: _0 _1 _2 _3 _4 _5 _6 _7 _8 _9 _A _B _C _D _E _F ----------------------------------------------00 00 00 00 00 00 00 00 00 00 00 00 00 00 00 00 00 00 00 00 00 00 00 00 00 00 00 00 00 00 00 00 40 4F 7F 7B 5B 6C 50 7D 4D 5D 5D 4E 6B 60 4B 61 F0 F1 F2 F3 F4 F5 F6 F7 F8 F9 7A 5E 4C 7E 6E 6F 7C C1 C2 C3 C4 C5 C6 C7 C8 C9 D1 D2 D3 D4 D5 D6 D7 D8 D9 E2 E3 E4 E5 E6 E7 E8 E9 4A E0 5A 5F 6D 7D 81 82 83 84 85 86 87 88 89 91 92 93 94 95 96 97 98 99 A2 A3 A4 A5 A6 A7 A8 A9 C0 BB D0 A1 00 00 00 00 00 00 00 00 00 00 00 00 00 00 00 00 00 00 00 00 00 00 00 00 00 00 00 00 00 00 00 00 00 00 00 00 00 00 00 00 00 00 00 00 00 00 00 00 00 00 00 00 00 00 00 00 00 00 00 00 00 00 00 00 00 00 00 00 00 00 00 00 00 00 00 00 00 00 00 00 00 00 00 00 00 00 00 00 00 00 00 00 00 00 00 00 00 00 00 00 00 00 00 00 00 00 00 00 00 00 00 00 00 00 00 00 00 00 00 00 00 00 00 00 00 00 00 00 00 User Table 7-> XFNTE>A-> ----------------------------------------------------------------------------- Page 5-20 AGILE 5250 OPTIMA User’s Guide and Reference PFS! Report This report will print a list of all PFSs for an active output port. Unlike PFSTEST, this will report the actual definitions for the PFSs rather than samples of the results of the PFS definitions. Use this test in conjunction with PFSTEST. In this sample report, the PFSs listed are for Xerox XES mode printers. The column on the left is the shows the names of the PFSs. The middle column shows the hex value of the PFS. The column on the right shows the human-readable characters. ----------------------------------------------------------------------------AGILE 5250 OPTIMA V6.00 COPYRIGHT (C) 8/2/93 BY AGILE. ALL RIGHTS RESERVED. PFS Listings ----------------------------------------------------------------------------PFS INITIBM> END PFS INITALT> END PFS INIT275> END PFS INITOPT> $1B $31 $0A $33 $37 $37 $2B $30 $1B $33 $35 $35 $39 $69 $39 $30 $2C $0D $54 $73 $1B $30 $37 $0A $69 $6F $7A $2C $35 END $74 $2D $66 $37 $2C $61 $50 $1B $35 $32 $6E $0D $6D $2C $34 esc + 1 0 lf esc 3 3 7 5 7 5 PFS FF> $0C END ff PFS CR> $0D END cr PFS LF> $0A END lf 9 T i s 9 esc 0 0 , 7 cr lf i o z , 5 t f 7 , a P esc 5 2 n cr m , 4 t f 0 3 a P esc , 0 n cr m 0 0 PFS PORT> $1B $31 $0A $33 $2C $0D $2B $30 $1B $33 $31 $0A $39 $69 $39 $30 $35 END $54 $73 $1B $30 $2C $69 $6F $7A $2C $33 $74 $2D $66 $30 $33 $61 $50 $1B $2C $30 $6E $0D $6D $30 $30 esc + 1 0 lf esc 3 3 , 1 cr lf 9 i 9 0 5 T s esc 0 , i o z , 3 PFS LAND> $1B $69 $39 $30 $35 END $2B $73 $1B $30 $2C $39 $6F $7A $2C $33 $58 $2D $66 $30 $33 $43 $4C $1B $2C $30 $50 $0D $6D $30 $30 $31 $0A $33 $2C $0D $34 $1B $33 $31 $0A esc + i s 9 esc 0 0 5 , 9 o z , 3 X f 0 3 C L esc , 0 PFS HORMOVE> $1B $72 $72 DEC $20 END esc r r DEC PFS VERMOVE> $1B $72 $64 DEC $20 END esc r d DEC PFS 5 CPI> END PFS 10 CPI> END PFS PS CPI> END PFS 12 CPI> END PFS 15 CPI> END P cr m 0 0 1 4 lf esc 3 3 , 1 cr lf ----------------------------------------------------------------------------- CHAPTER 5 — MAINTENANCE & TROUBLESHOOTING Page 5-21 ----------------------------------------------------------------------------AGILE 5250 OPTIMA V6.00 COPYRIGHT (C) 8/2/93 BY AGILE. ALL RIGHTS RESERVED. PFS Listings ----------------------------------------------------------------------------PFS 1'ICPI> END PFS COR 10> END PFS COR 12> END PFS COR 15> END PFS BOLD ON> $1B $62 END esc b PFS BOLDOFF> $1B $70 END esc p PFS UNDL ON> $1B $75 END esc u PFS UNDLOFF> $1B $77 END esc w PFS SUBS ON> $1B $6C END esc l PFS SUBSOFF> $1B $73 END esc s PFS SUPS ON> $1B $68 END esc h PFS SUBSOFF> $1B $73 END esc s PFS PAPER 1> $1B $63 $31 END esc c 1 PFS PAPER 2> $1B $63 $32 END esc c 2 PFS PAPER 3> $1B $63 $33 END esc c 3 PFS ENVEL 2> $1B $63 $31 END esc c 1 esc o PFS EMPH ON> END PFS EMPHOFF> END PFS OUTDRW1> END PFS OUTDRW2> END PFS OUTDRW3> END PFS JOG OUT> $1B $6F END PFS LOWQUAL> END ----------------------------------------------------------------------------- Page 5-22 AGILE 5250 OPTIMA User’s Guide and Reference ----------------------------------------------------------------------------AGILE 5250 OPTIMA V6.00 COPYRIGHT (C) 8/2/93 BY AGILE. ALL RIGHTS RESERVED. PFS Listings ----------------------------------------------------------------------------PFS MEDQUAL> END PFS HIQUAL> END PFS SIMPLEX> END PFS DUPLEX> END PFS MANFEED> END PFS TRCFEED> END PFS CUTFEED> END PFS SENDHMI> END PFS SNDXTRA> $1B $72 $72 DEC $20 END esc r r DEC PFS JSTSTRT> END PFS JUSTEND> END ----------------------------------------------------------------------------- CHAPTER 5 — MAINTENANCE & TROUBLESHOOTING Page 5-23 PORTFID! Report This report will print a portrait font correspondence table. The following is a sample report: ----------------------------------------------------------------------------AGILE 5250 OPTIMA V6.00 COPYRIGHT (C) 8/2/93 BY AGILE. ALL RIGHTS RESERVED. Portrait Font Correspondence Listings ----------------------------------------------------------------------------GFID 00003> $1B $2B $39 $4F $43 $52 $42 $31 $30 $2D $50 $0D $0A $1B $39 END esc 0 + - 9 P O cr C R lf esc B 9 1 GFID 00005> $1B $2B $39 $53 $70 $6F $6B $65 $73 $6D $61 $6E $31 $30 $69 $73 $6F $2D $50 $0D $0A $1B $39 END esc s o + m - 9 a P S n cr p o 1 0 lf esc k i 9 e s GFID 00011> $1B $2B $39 $54 $69 $74 $61 $6E $31 $30 $69 $73 $6F $2D $50 $0D $0A $1B $39 END esc + 1 0 lf esc 9 i 9 T s i o t - a P n cr GFID 00012> $1B $2B $39 $56 $69 $6E $74 $61 $67 $65 $31 $30 $69 $73 $6F $2D $50 $0D $0A $1B $39 END esc g P 9 V 1 0 lf esc i i 9 n s t o a - GFID 00013> $1B $2B $39 $54 $69 $74 $61 $6E $31 $30 $69 $73 $6F $2D $50 $0D $0A $1B $39 END esc + 1 0 lf esc 9 i 9 T s i o t - a P n cr GFID 00018> $1B $2B $39 $54 $69 $74 $61 $6E $31 $30 $49 $69 $73 $6F $2D $50 $0D $0A $1B $39 END esc 1 cr + 9 0 I lf esc T i 9 i s t o a - n P GFID 00019> $1B $2B $39 $4F $43 $52 $41 $31 $30 $2D $50 $0D $0A $1B $39 END esc 0 + - 9 P O cr C R lf esc A 9 1 GFID 00020> $1B $2B $39 $56 $69 $6E $74 $61 $67 $65 $31 $30 $69 $73 $6F $2D $50 $0D $0A $1B $39 END esc g P + e cr 9 V 1 0 lf esc i i 9 n s t o a - GFID 00021> $1B $2B $39 $56 $69 $6E $74 $61 $67 $65 $31 $30 $42 $69 $73 $6F $2D $50 $0D $0A $1B $39 END esc g - + e P 9 1 cr n i 9 t s a o GFID 00022> $1B $2B $39 $54 $69 $74 $61 $6E $31 $30 $42 $49 $69 $73 $6F $2D $50 $0D $0A $1B $39 END esc 1 P + 0 cr 9 T B I lf esc i i 9 t s a o n - GFID 00025> $1B $2B $39 $43 $68 $61 $72 $74 $31 $30 $2D $50 $0D $0A $1B $39 END esc 1 + 0 9 - C P h cr a r lf esc t 9 GFID 00027> $1B $2B $39 $46 $6F $72 $6D $73 $31 $30 $2D $50 $0D $0A $1B $39 END esc 1 + 0 9 - F P o cr r m lf esc s 9 + e cr V i 0 B lf esc ----------------------------------------------------------------------------- Page 5-24 AGILE 5250 OPTIMA User’s Guide and Reference ----------------------------------------------------------------------------AGILE 5250 OPTIMA V6.00 COPYRIGHT (C) 8/2/93 BY AGILE. ALL RIGHTS RESERVED. Portrait Font Correspondence Listings ----------------------------------------------------------------------------GFID 00030> $1B $2B $39 $54 $69 $74 $61 $6E $31 $30 $69 $73 $6F $2D $50 $0D $0A $1B $39 END esc + 1 0 lf esc 9 i 9 T s i o GFID 00038> $1B $2B $39 $53 $70 $6F $6B $65 $73 $6D $61 $6E $31 $30 $69 $73 $6F $2D $50 $0D $0A $1B $39 END esc s o 9 a P S n cr GFID 00039> $1B $72 $30 $0A $2B $47 $42 $1B $39 $6F $69 $39 esc + r G 0 B lf esc 9 o i 9 GFID 00040> $1B $72 $30 $1B $2B $47 $69 $39 $39 $4C $65 $74 $74 $65 $6F $74 $68 $69 $63 $31 $73 $6F $2D $50 $0D $0A END esc r 0 esc + G i 9 9 o s GFID 00041> $1B $2B $39 $56 $69 $6E $74 $61 $67 $65 $31 $30 $69 $73 $6F $2D $50 $0D $0A $1B $39 END esc g P + e cr GFID 00042> $1B $2B $39 $54 $69 $74 $61 $6E $31 $30 $69 $73 $6F $2D $50 $0D $0A $1B $39 END esc + 1 0 lf esc GFID 00043> $1B $2B $39 $54 $69 $74 $61 $6E $31 $30 $49 $69 $73 $6F $2D $50 $0D $0A $1B $39 END esc 1 cr GFID 00046> $1B $2B $39 $54 $69 $74 $61 $6E $31 $30 $42 $69 $73 $6F $2D $50 $0D $0A $1B $39 END esc 1 cr GFID 00060> $1B $2B $39 $55 $50 $43 $41 $6D $65 $64 $69 $75 $6D $2D $50 $0D $0A $1B $39 END esc + e d lf esc GFID 00061> $1B $2B $39 $55 $50 $43 $45 $6D $65 $64 $69 $75 $6D $2D $50 $0D $0A $1B $39 END GFID 00062> $1B $2B $39 $49 $6E $74 $65 $72 $6C $65 $61 $76 $65 $64 $32 $6F $66 $35 $2D $50 $0D $0A $1B $39 END $4C $65 $74 $74 $65 $74 $68 $69 $63 $31 $73 $6F $2D $50 $0D END a P n cr p o 1 0 lf esc k i 9 e s L t s e h o t i - t c P e 1 cr L t o e h - t i P t c cr e 1 lf 9 V 1 0 lf esc i i 9 n s t o a - 9 i 9 T s i o t - a P n cr + 9 0 I lf esc T i 9 i s t o a - n P + 9 0 B lf esc T i 9 i s t o a - n P 9 i 9 U u P m C - A P m cr esc + e d lf esc 9 i 9 U u P m C - E P m cr esc l f 9 a - I v P n e cr t e d 2 lf esc + m - + e 5 t - r o 9 ----------------------------------------------------------------------------- CHAPTER 5 — MAINTENANCE & TROUBLESHOOTING Page 5-25 ----------------------------------------------------------------------------AGILE 5250 OPTIMA V6.00 COPYRIGHT (C) 8/2/93 BY AGILE. ALL RIGHTS RESERVED. Portrait Font Correspondence Listings ----------------------------------------------------------------------------GFID 00063> $1B $2B $39 $43 $6F $64 $65 $33 $6F $66 $39 $2D $50 $0D $0A $1B $39 END esc o 9 + f 9 9 C - o P d cr e 3 lf esc GFID 00066> $1B $72 $32 $1B $2B $47 $69 $39 $39 $4C $65 $74 $74 $65 $6F $74 $68 $69 $63 $31 $73 $6F $2D $50 $0D $0A END esc r 2 esc + G i 9 9 o s L t o e h - t i P t c cr e 1 lf GFID 00068> $1B $72 $32 $1B $2B $47 $69 $39 $39 $4C $65 $74 $74 $65 $6F $74 $68 $69 $63 $31 $73 $6F $2D $50 $0D $0A END esc r 2 esc + G i 9 9 o s L t o e h - t i P t c cr e 1 lf GFID 00069> $1B $72 $32 $0A $2B $47 $42 $1B $39 $6F $69 $39 esc + r G 2 B lf esc 9 o i 9 L t s e h o t i - t c P e 1 cr GFID 00070> $1B $2B $39 $56 $69 $6E $74 $61 $67 $65 $31 $32 $69 $73 $6F $2D $50 $0D $0A $1B $39 END esc g P + e cr 9 V 1 2 lf esc i i 9 n s t o a - GFID 00071> $1B $2B $39 $56 $69 $6E $74 $61 $67 $65 $31 $32 $69 $73 $6F $2D $50 $0D $0A $1B $39 END esc g P + e cr 9 V 1 2 lf esc i i 9 n s t o a - GFID 00072> $1B $2B $39 $56 $69 $6E $74 $61 $67 $65 $31 $32 $42 $69 $73 $6F $2D $50 $0D $0A $1B $39 END esc g - + e P 9 1 cr V i 2 B lf esc n i 9 t s a o GFID 00080> $1B $2B $39 $54 $69 $74 $61 $6E $31 $32 $69 $73 $6F $2D $50 $0D $0A $1B $39 END esc + 1 2 lf esc 9 i 9 T s i o t - a P n cr GFID 00085> $1B $2B $39 $54 $69 $74 $61 $6E $31 $32 $69 $73 $6F $2D $50 $0D $0A $1B $39 END esc + 1 2 lf esc 9 i 9 T s i o t - a P n cr GFID 00086> $1B $2B $39 $45 $6C $69 $74 $65 $31 $32 $69 $73 $6F $2D $50 $0D $0A $1B $39 END esc + 1 2 lf esc 9 i 9 E s l o i - t P e cr GFID 00087> $1B $72 $32 $1B esc r 2 esc 9 o s L t o e h - t i P t c cr e 1 lf $2B $47 $69 $39 $4C $65 $74 $74 $65 $74 $68 $69 $63 $31 $73 $6F $2D $50 $0D END $39 $4C $65 $74 $74 $65 $6F $74 $68 $69 $63 $31 $73 $6F $2D $50 $0D $0A END + G i 9 ----------------------------------------------------------------------------- Page 5-26 AGILE 5250 OPTIMA User’s Guide and Reference ----------------------------------------------------------------------------AGILE 5250 OPTIMA V6.00 COPYRIGHT (C) 8/2/93 BY AGILE. ALL RIGHTS RESERVED. Portrait Font Correspondence Listings ----------------------------------------------------------------------------GFID 00091> $1B $2B $39 $54 $69 $74 $61 $6E $31 $32 $49 $69 $73 $6F $2D $50 $0D $0A $1B $39 END esc 1 cr + 9 2 I lf esc T i 9 i s t o a - n P GFID 00095> $1B $2B $39 $54 $69 $74 $61 $6E $31 $32 $42 $69 $73 $6F $2D $50 $0D $0A $1B $39 END esc 1 cr + 9 2 B lf esc T i 9 i s t o a - n P GFID 00100> $1B $2B $39 $46 $6F $72 $6D $73 $31 $32 $2D $50 $0D $0A $1B $39 END esc 1 + 2 9 - F P o cr r m lf esc s 9 GFID 00108> $1B $2B $39 $46 $6F $72 $6D $73 $31 $32 $2E $35 $2D $50 $0D $0A $1B $39 END esc 1 esc + 2 9 9 . F 5 o - r P m cr s lf GFID 00110> $1B $72 $32 $0A esc + r G 2 B lf esc 9 o i 9 L t s e h o t i - t c P e 1 cr E i 9 l s i o t - e P $2B $47 $42 $1B $39 $6F $69 $39 $4C $65 $74 $74 $65 $74 $68 $69 $63 $31 $73 $6F $2D $50 $0D END GFID 00111> $1B $2B $39 $45 $6C $69 $74 $65 $31 $32 $42 $69 $73 $6F $2D $50 $0D $0A $1B $39 END esc 1 cr + 9 2 B lf esc GFID 00112> $1B $2B $39 $45 $6C $69 $74 $65 $31 $32 $69 $73 $6F $2D $50 $0D $0A $1B $39 END esc + 1 2 lf esc 9 i 9 E s l o i - t P e cr GFID 00115> $1B $2B $39 $54 $69 $74 $61 $6E $31 $32 $69 $73 $6F $2D $50 $0D $0A $1B $39 END esc + 1 2 lf esc 9 i 9 T s i o t - a P n cr GFID 00155> $1B $2B $39 $42 $6F $6C $64 $49 $50 $53 $69 $73 $6F $2D $50 $0D $0A $1B $39 END esc + P S lf esc 9 i 9 B s o o l - d P I cr GFID 00158> $1B $2B $39 $54 $72 $65 $6E $64 $50 $53 $69 $73 $6F $2D $50 $0D $0A $1B $39 END esc + P S lf esc 9 i 9 T s r o e - n P d cr GFID 00159> $1B $2B $39 $42 $6F $6C $64 $50 $53 $69 $73 $6F $2D $50 $0D $0A $1B $39 END esc S esc + i 9 9 s B o o - l P d cr P lf GFID 00160> $1B $2B $39 $53 $71 $75 $61 $72 $65 $33 $50 $53 $69 $73 $6F $2D $50 $0D $0A $1B $39 END esc e P + 3 cr 9 S P S lf esc q i 9 u s a o r - ----------------------------------------------------------------------------- CHAPTER 5 — MAINTENANCE & TROUBLESHOOTING Page 5-27 ----------------------------------------------------------------------------AGILE 5250 OPTIMA V6.00 COPYRIGHT (C) 8/2/93 BY AGILE. ALL RIGHTS RESERVED. Portrait Font Correspondence Listings ----------------------------------------------------------------------------GFID 00162> $1B $2B $39 $53 $71 $75 $61 $72 $65 $33 $50 $53 $69 $73 $6F $2D $50 $0D $0A $1B $39 END esc e P + 3 cr 9 S P S lf esc GFID 00163> $1B $2B $39 $53 $71 $75 $61 $72 $65 $33 $50 $53 $42 $69 $73 $6F $2D $50 $0D $0A $1B $39 END esc e - + 3 P 9 P cr GFID 00173> $1B $2B $39 $53 $71 $75 $61 $72 $65 $33 $50 $53 $69 $73 $6F $2D $50 $0D $0A $1B $39 END esc e P + 3 cr 9 S P S lf esc GFID 00175> $1B $2B $39 $54 $72 $65 $6E $64 $50 $53 $69 $73 $6F $2D $50 $0D $0A $1B $39 END esc + P S lf esc 9 i 9 GFID 00193> $1B $2B $39 $54 $69 $74 $61 $6E $31 $32 $69 $73 $6F $2D $50 $0D $0A $1B $39 END esc + 1 2 lf esc GFID 00198> $1B $2B $39 $54 $69 $74 $61 $6E $31 $30 $69 $73 $6F $2D $50 $0D $0A $1B $39 END GFID 00204> $1B $72 $32 $1B u s a o r - u i 9 a s r o q i 9 u s a o r - T s r o e - n P d cr 9 i 9 T s i o t - a P n cr esc + 1 0 lf esc 9 i 9 T s i o t - a P n cr $39 $4C $65 $74 $74 $65 $6F $74 $68 $69 $63 $31 $73 $6F $2D $50 $0D $0A END esc r 2 esc + G i 9 9 o s L t o e h - t i P t c cr e 1 lf GFID 00221> $1B $2B $39 $56 $69 $6E $74 $61 $67 $65 $31 $35 $69 $73 $6F $2D $50 $0D $0A $1B $39 END esc g P + e cr 9 V 1 5 lf esc i i 9 n s t o a - GFID 00223> $1B $2B $39 $54 $69 $74 $61 $6E $31 $35 $69 $73 $6F $2D $50 $0D $0A $1B $39 END esc + 1 5 lf esc 9 i 9 i o t - a P n cr GFID 00225> $1B $2B $39 $56 $69 $6E $74 $61 $67 $65 $31 $35 $69 $73 $6F $2D $50 $0D $0A $1B $39 END esc g P + e cr 9 V 1 5 lf esc i i 9 n s t o a - GFID 00229> $1B $2B $39 $56 $69 $6E $74 $61 $67 $65 $31 $35 $69 $73 $6F $2D $50 $0D $0A $1B $39 END esc g P + e cr 9 V 1 5 lf esc i i 9 n s t o a - GFID 00230> $1B $72 $35 $1B esc r 5 esc + G i 9 9 o s e h - t i P t c cr e 1 lf $2B $47 $69 $39 $2B $47 $69 $39 $39 $4C $65 $74 $74 $65 $6F $74 $68 $69 $63 $31 $73 $6F $2D $50 $0D $0A END q i 9 S q S B lf esc T s L t o ----------------------------------------------------------------------------- Page 5-28 AGILE 5250 OPTIMA User’s Guide and Reference ----------------------------------------------------------------------------AGILE 5250 OPTIMA V6.00 COPYRIGHT (C) 8/2/93 BY AGILE. ALL RIGHTS RESERVED. Portrait Font Correspondence Listings ----------------------------------------------------------------------------GFID 00231> $1B $72 $35 $0A $2B $47 $42 $1B $39 $6F $69 $39 $4C $65 $74 $74 $65 $74 $68 $69 $63 $31 $73 $6F $2D $50 $0D END esc + r G 5 B lf esc 9 o i 9 L t s e h o t i - t c P e 1 cr GFID 00234> $1B $2B $39 $46 $6F $72 $6D $73 $31 $34 $2D $50 $0D $0A $1B $39 END esc 1 + 4 9 - F P o cr r m lf esc s 9 GFID 00235> $1B $2B $39 $46 $6F $72 $6D $73 $31 $35 $2D $50 $0D $0A $1B $39 END esc 1 + 5 9 - F P o cr r m lf esc s 9 GFID 00252> $1B $2B $39 $58 $43 $50 $31 $34 $69 $73 $6F $2D $50 $0D $0A $1B $39 END esc i 9 + s 9 o X - C P P cr 1 4 lf esc GFID 00253> $1B $2B $39 $58 $43 $50 $31 $34 $69 $73 $6F $2D $50 $0D $0A $1B $39 END esc i 9 + s 9 o X - C P P cr 1 4 lf esc GFID 00254> $1B $2B $39 $58 $43 $50 $31 $34 $69 $73 $6F $2D $50 $0D $0A $1B $39 END esc i 9 + s 9 o X - C P P cr 1 4 lf esc GFID 00281> $1B $2B $39 $58 $43 $50 $31 $34 $69 $73 $6F $2D $50 $0D $0A $1B $39 END esc i 9 + s 9 o X - C P P cr 1 4 lf esc GFID 00290> $1B $2B $39 $58 $43 $50 $31 $34 $69 $73 $6F $2D $50 $0D $0A $1B $39 END esc i 9 + s 9 o X - C P P cr 1 4 lf esc ----------------------------------------------------------------------------- CHAPTER 5 — MAINTENANCE & TROUBLESHOOTING Page 5-29 LANDFID! Report This report will print a landscape font correspondence table. The following is a sample report: ----------------------------------------------------------------------------AGILE 5250 OPTIMA V6.00 COPYRIGHT (C) 8/2/93 BY AGILE. ALL RIGHTS RESERVED. Landscape Font Correspondence Listings ----------------------------------------------------------------------------GFID 00003> $1B $2B $39 $4F $43 $52 $42 $31 $30 $2D $4C $0D $0A $1B $39 END esc 0 + - 9 L O cr C R lf esc B 9 1 GFID 00005> $1B $2B $39 $53 $70 $6F $6B $65 $73 $6D $61 $6E $31 $30 $69 $73 $6F $2D $4C $0D $0A $1B $39 END esc s o + m - 9 a L S n cr p o 1 0 lf esc k i 9 e s GFID 00011> $1B $2B $39 $54 $69 $74 $61 $6E $31 $30 $69 $73 $6F $2D $4C $0D $0A $1B $39 END esc + 1 0 lf esc 9 i 9 T s i o t - a L n cr GFID 00012> $1B $2B $39 $56 $69 $6E $74 $61 $67 $65 $31 $30 $69 $73 $6F $2D $4C $0D $0A $1B $39 END esc g L 9 V 1 0 lf esc i i 9 n s t o a - GFID 00013> $1B $2B $39 $54 $69 $74 $61 $6E $31 $30 $69 $73 $6F $2D $4C $0D $0A $1B $39 END esc + 1 0 lf esc 9 i 9 T s i o t - a L n cr GFID 00018> $1B $2B $39 $54 $69 $74 $61 $6E $31 $30 $49 $69 $73 $6F $2D $4C $0D $0A $1B $39 END esc 1 cr + 9 0 I lf esc T i 9 i s t o a - n L GFID 00019> $1B $2B $39 $4F $43 $52 $41 $31 $30 $2D $4C $0D $0A $1B $39 END esc 0 + - 9 L O cr C R lf esc A 9 1 GFID 00020> $1B $2B $39 $56 $69 $6E $74 $61 $67 $65 $31 $30 $69 $73 $6F $2D $4C $0D $0A $1B $39 END esc g L + e cr 9 V 1 0 lf esc i i 9 n s t o a - GFID 00021> $1B $2B $39 $56 $69 $6E $74 $61 $67 $65 $31 $30 $42 $69 $73 $6F $2D $4C $0D $0A $1B $39 END esc g - + e L 9 1 cr n i 9 t s a o GFID 00022> $1B $2B $39 $54 $69 $74 $61 $6E $31 $30 $42 $49 $69 $73 $6F $2D $4C $0D $0A $1B $39 END esc 1 L + 0 cr 9 T B I lf esc i i 9 t s a o n - GFID 00025> $1B $2B $39 $43 $68 $61 $72 $74 $31 $30 $2D $4C $0D $0A $1B $39 END esc 1 + 0 9 - C L h cr a r lf esc t 9 GFID 00027> $1B $2B $39 $46 $6F $72 $6D $73 $31 $30 $2D $4C $0D $0A $1B $39 END esc 1 + 0 9 - F L o cr r m lf esc s 9 + e cr V i 0 B lf esc ----------------------------------------------------------------------------- Page 5-30 AGILE 5250 OPTIMA User’s Guide and Reference ----------------------------------------------------------------------------AGILE 5250 OPTIMA V6.00 COPYRIGHT (C) 8/2/93 BY AGILE. ALL RIGHTS RESERVED. Landscape Font Correspondence Listings ----------------------------------------------------------------------------GFID 00030> $1B $2B $39 $54 $69 $74 $61 $6E $31 $30 $69 $73 $6F $2D $4C $0D $0A $1B $39 END esc + 1 0 lf esc 9 i 9 T s i o GFID 00038> $1B $2B $39 $53 $70 $6F $6B $65 $73 $6D $61 $6E $31 $30 $69 $73 $6F $2D $4C $0D $0A $1B $39 END esc s o 9 a L S n cr GFID 00039> $1B $72 $30 $0A $2B $47 $42 $1B $39 $6F $69 $39 esc + r G 0 B lf esc 9 o i 9 GFID 00040> $1B $72 $30 $1B $2B $47 $69 $39 $39 $4C $65 $74 $74 $65 $6F $74 $68 $69 $63 $31 $73 $6F $2D $4C $0D $0A END esc r 0 esc + G i 9 9 o s GFID 00041> $1B $2B $39 $56 $69 $6E $74 $61 $67 $65 $31 $30 $69 $73 $6F $2D $4C $0D $0A $1B $39 END esc g L + e cr GFID 00042> $1B $2B $39 $54 $69 $74 $61 $6E $31 $30 $69 $73 $6F $2D $4C $0D $0A $1B $39 END esc + 1 0 lf esc GFID 00043> $1B $2B $39 $54 $69 $74 $61 $6E $31 $30 $49 $69 $73 $6F $2D $4C $0D $0A $1B $39 END esc 1 cr GFID 00046> $1B $2B $39 $54 $69 $74 $61 $6E $31 $30 $42 $69 $73 $6F $2D $4C $0D $0A $1B $39 END esc 1 cr GFID 00060> $1B $2B $39 $55 $50 $43 $41 $6D $65 $64 $69 $75 $6D $2D $4C $0D $0A $1B $39 END esc + e d lf esc GFID 00061> $1B $2B $39 $55 $50 $43 $45 $6D $65 $64 $69 $75 $6D $2D $4C $0D $0A $1B $39 END GFID 00062> $1B $2B $39 $49 $6E $74 $65 $72 $6C $65 $61 $76 $65 $64 $32 $6F $66 $35 $2D $4C $0D $0A $1B $39 END $4C $65 $74 $74 $65 $74 $68 $69 $63 $31 $73 $6F $2D $4C $0D END a L n cr p o 1 0 lf esc k i 9 e s L t s e h o t i - t c L e 1 cr L t o e h - t i L t c cr e 1 lf 9 V 1 0 lf esc i i 9 n s t o a - 9 i 9 T s i o t - a L n cr + 9 0 I lf esc T i 9 i s t o a - n L + 9 0 B lf esc T i 9 i s t o a - n L 9 i 9 U u P m C - A L m cr esc + e d lf esc 9 i 9 U u P m C - E L m cr esc l f 9 a - I v L n e cr t e d 2 lf esc + m - + e 5 t - r o 9 ----------------------------------------------------------------------------- CHAPTER 5 — MAINTENANCE & TROUBLESHOOTING Page 5-31 ----------------------------------------------------------------------------AGILE 5250 OPTIMA V6.00 COPYRIGHT (C) 8/2/93 BY AGILE. ALL RIGHTS RESERVED. Landscape Font Correspondence Listings ----------------------------------------------------------------------------GFID 00063> $1B $2B $39 $43 $6F $64 $65 $33 $6F $66 $39 $2D $4C $0D $0A $1B $39 END esc o 9 + f 9 9 C - o L d cr e 3 lf esc GFID 00066> $1B $72 $32 $1B $2B $47 $69 $39 $39 $4C $65 $74 $74 $65 $6F $74 $68 $69 $63 $31 $73 $6F $2D $4C $0D $0A END esc r 2 esc + G i 9 9 o s L t o e h - t i L t c cr e 1 lf GFID 00068> $1B $72 $32 $1B $2B $47 $69 $39 $39 $4C $65 $74 $74 $65 $6F $74 $68 $69 $63 $31 $73 $6F $2D $4C $0D $0A END esc r 2 esc + G i 9 9 o s L t o e h - t i L t c cr e 1 lf GFID 00069> $1B $72 $32 $0A $2B $47 $42 $1B $39 $6F $69 $39 esc + r G 2 B lf esc 9 o i 9 L t s e h o t i - t c L e 1 cr GFID 00070> $1B $2B $39 $56 $69 $6E $74 $61 $67 $65 $31 $32 $69 $73 $6F $2D $4C $0D $0A $1B $39 END esc g L + e cr 9 V 1 2 lf esc i i 9 n s t o a - GFID 00071> $1B $2B $39 $56 $69 $6E $74 $61 $67 $65 $31 $32 $69 $73 $6F $2D $4C $0D $0A $1B $39 END esc g L + e cr 9 V 1 2 lf esc i i 9 n s t o a - GFID 00072> $1B $2B $39 $56 $69 $6E $74 $61 $67 $65 $31 $32 $42 $69 $73 $6F $2D $4C $0D $0A $1B $39 END esc g - + e L 9 1 cr V i 2 B lf esc n i 9 t s a o GFID 00080> $1B $2B $39 $54 $69 $74 $61 $6E $31 $32 $69 $73 $6F $2D $4C $0D $0A $1B $39 END esc + 1 2 lf esc 9 i 9 T s i o t - a L n cr GFID 00085> $1B $2B $39 $54 $69 $74 $61 $6E $31 $32 $69 $73 $6F $2D $4C $0D $0A $1B $39 END esc + 1 2 lf esc 9 i 9 T s i o t - a L n cr GFID 00086> $1B $2B $39 $45 $6C $69 $74 $65 $31 $32 $69 $73 $6F $2D $4C $0D $0A $1B $39 END esc + 1 2 lf esc 9 i 9 E s l o i - t L e cr GFID 00087> $1B $72 $32 $1B esc r 2 esc 9 o s L t o e h - t i L t c cr e 1 lf $2B $47 $69 $39 $4C $65 $74 $74 $65 $74 $68 $69 $63 $31 $73 $6F $2D $4C $0D END $39 $4C $65 $74 $74 $65 $6F $74 $68 $69 $63 $31 $73 $6F $2D $4C $0D $0A END + G i 9 ----------------------------------------------------------------------------- Page 5-32 AGILE 5250 OPTIMA User’s Guide and Reference ----------------------------------------------------------------------------AGILE 5250 OPTIMA V6.00 COPYRIGHT (C) 8/2/93 BY AGILE. ALL RIGHTS RESERVED. Landscape Font Correspondence Listings ----------------------------------------------------------------------------GFID 00091> $1B $2B $39 $54 $69 $74 $61 $6E $31 $32 $49 $69 $73 $6F $2D $4C $0D $0A $1B $39 END esc 1 cr + 9 2 I lf esc T i 9 i s t o a - n L GFID 00095> $1B $2B $39 $54 $69 $74 $61 $6E $31 $32 $42 $69 $73 $6F $2D $4C $0D $0A $1B $39 END esc 1 cr + 9 2 B lf esc T i 9 i s t o a - n L GFID 00100> $1B $2B $39 $46 $6F $72 $6D $73 $31 $32 $2D $4C $0D $0A $1B $39 END esc 1 + 2 9 - F L o cr r m lf esc s 9 GFID 00108> $1B $2B $39 $46 $6F $72 $6D $73 $31 $32 $2E $35 $2D $4C $0D $0A $1B $39 END esc 1 esc + 2 9 9 . F 5 o - r L m cr s lf GFID 00110> $1B $72 $32 $0A esc + r G 2 B lf esc 9 o i 9 L t s e h o t i - t c L e 1 cr E i 9 l s i o t - e L $2B $47 $42 $1B $39 $6F $69 $39 $4C $65 $74 $74 $65 $74 $68 $69 $63 $31 $73 $6F $2D $4C $0D END GFID 00111> $1B $2B $39 $45 $6C $69 $74 $65 $31 $32 $42 $69 $73 $6F $2D $4C $0D $0A $1B $39 END esc 1 cr + 9 2 B lf esc GFID 00112> $1B $2B $39 $45 $6C $69 $74 $65 $31 $32 $69 $73 $6F $2D $4C $0D $0A $1B $39 END esc + 1 2 lf esc 9 i 9 E s l o i - t L e cr GFID 00115> $1B $2B $39 $54 $69 $74 $61 $6E $31 $32 $69 $73 $6F $2D $4C $0D $0A $1B $39 END esc + 1 2 lf esc 9 i 9 T s i o t - a L n cr GFID 00155> $1B $2B $39 $42 $6F $6C $64 $49 $50 $53 $69 $73 $6F $2D $4C $0D $0A $1B $39 END esc + P S lf esc 9 i 9 B s o o l - d L I cr GFID 00158> $1B $2B $39 $54 $72 $65 $6E $64 $50 $53 $69 $73 $6F $2D $4C $0D $0A $1B $39 END esc + P S lf esc 9 i 9 T s r o e - n L d cr GFID 00159> $1B $2B $39 $42 $6F $6C $64 $50 $53 $69 $73 $6F $2D $4C $0D $0A $1B $39 END esc S esc + i 9 9 s B o o - l L d cr P lf GFID 00160> $1B $2B $39 $53 $71 $75 $61 $72 $65 $33 $50 $53 $69 $73 $6F $2D $4C $0D $0A $1B $39 END esc e L + 3 cr 9 S P S lf esc q i 9 u s a o r - ----------------------------------------------------------------------------- CHAPTER 5 — MAINTENANCE & TROUBLESHOOTING Page 5-33 ----------------------------------------------------------------------------AGILE 5250 OPTIMA V6.00 COPYRIGHT (C) 8/2/93 BY AGILE. ALL RIGHTS RESERVED. Landscape Font Correspondence Listings ----------------------------------------------------------------------------GFID 00162> $1B $2B $39 $53 $71 $75 $61 $72 $65 $33 $50 $53 $69 $73 $6F $2D $4C $0D $0A $1B $39 END esc e L + 3 cr 9 S P S lf esc GFID 00163> $1B $2B $39 $53 $71 $75 $61 $72 $65 $33 $50 $53 $42 $69 $73 $6F $2D $4C $0D $0A $1B $39 END esc e - + 3 L 9 P cr GFID 00173> $1B $2B $39 $53 $71 $75 $61 $72 $65 $33 $50 $53 $69 $73 $6F $2D $4C $0D $0A $1B $39 END esc e L + 3 cr 9 S P S lf esc GFID 00175> $1B $2B $39 $54 $72 $65 $6E $64 $50 $53 $69 $73 $6F $2D $4C $0D $0A $1B $39 END esc + P S lf esc 9 i 9 GFID 00193> $1B $2B $39 $54 $69 $74 $61 $6E $31 $32 $69 $73 $6F $2D $4C $0D $0A $1B $39 END esc + 1 2 lf esc GFID 00198> $1B $2B $39 $54 $69 $74 $61 $6E $31 $30 $69 $73 $6F $2D $4C $0D $0A $1B $39 END GFID 00204> $1B $72 $32 $1B u s a o r - u i 9 a s r o q i 9 u s a o r - T s r o e - n L d cr 9 i 9 T s i o t - a L n cr esc + 1 0 lf esc 9 i 9 T s i o t - a L n cr $39 $4C $65 $74 $74 $65 $6F $74 $68 $69 $63 $31 $73 $6F $2D $4C $0D $0A END esc r 2 esc + G i 9 9 o s L t o e h - t i L t c cr e 1 lf GFID 00221> $1B $2B $39 $56 $69 $6E $74 $61 $67 $65 $31 $35 $69 $73 $6F $2D $4C $0D $0A $1B $39 END esc g L + e cr 9 V 1 5 lf esc i i 9 n s t o a - GFID 00223> $1B $2B $39 $54 $69 $74 $61 $6E $31 $35 $69 $73 $6F $2D $4C $0D $0A $1B $39 END esc + 1 5 lf esc 9 i 9 i o t - a L n cr GFID 00225> $1B $2B $39 $56 $69 $6E $74 $61 $67 $65 $31 $35 $69 $73 $6F $2D $4C $0D $0A $1B $39 END esc g L + e cr 9 V 1 5 lf esc i i 9 n s t o a - GFID 00229> $1B $2B $39 $56 $69 $6E $74 $61 $67 $65 $31 $35 $69 $73 $6F $2D $4C $0D $0A $1B $39 END esc g L + e cr 9 V 1 5 lf esc i i 9 n s t o a - GFID 00230> $1B $72 $35 $1B esc r 5 esc + G i 9 9 o s e h - t i L t c cr e 1 lf $2B $47 $69 $39 $2B $47 $69 $39 $39 $4C $65 $74 $74 $65 $6F $74 $68 $69 $63 $31 $73 $6F $2D $4C $0D $0A END q i 9 S q S B lf esc T s L t o ----------------------------------------------------------------------------- Page 5-34 AGILE 5250 OPTIMA User’s Guide and Reference ----------------------------------------------------------------------------AGILE 5250 OPTIMA V6.00 COPYRIGHT (C) 8/2/93 BY AGILE. ALL RIGHTS RESERVED. Landscape Font Correspondence Listings ----------------------------------------------------------------------------GFID 00231> $1B $72 $35 $0A $2B $47 $42 $1B $39 $6F $69 $39 $4C $65 $74 $74 $65 $74 $68 $69 $63 $31 $73 $6F $2D $4C $0D END esc + r G 5 B lf esc 9 o i 9 L t s e h o t i - t c L e 1 cr GFID 00234> $1B $2B $39 $46 $6F $72 $6D $73 $31 $34 $2D $4C $0D $0A $1B $39 END esc 1 + 4 9 - F L o cr r m lf esc s 9 GFID 00235> $1B $2B $39 $46 $6F $72 $6D $73 $31 $35 $2D $4C $0D $0A $1B $39 END esc 1 + 5 9 - F L o cr r m lf esc s 9 GFID 00252> $1B $2B $39 $58 $43 $50 $31 $34 $69 $73 $6F $2D $4C $0D $0A $1B $39 END esc i 9 + s 9 o X - C L P cr 1 4 lf esc GFID 00253> $1B $2B $39 $58 $43 $50 $31 $34 $69 $73 $6F $2D $4C $0D $0A $1B $39 END esc i 9 + s 9 o X - C L P cr 1 4 lf esc GFID 00254> $1B $2B $39 $58 $43 $50 $31 $34 $69 $73 $6F $2D $4C $0D $0A $1B $39 END esc i 9 + s 9 o X - C L P cr 1 4 lf esc GFID 00281> $1B $2B $39 $58 $43 $50 $31 $34 $69 $73 $6F $2D $4C $0D $0A $1B $39 END esc i 9 + s 9 o X - C L P cr 1 4 lf esc GFID 00290> $1B $2B $39 $58 $43 $50 $31 $34 $69 $73 $6F $2D $4C $0D $0A $1B $39 END esc i 9 + s 9 o X - C L P cr 1 4 lf esc ----------------------------------------------------------------------------- CHAPTER 5 — MAINTENANCE & TROUBLESHOOTING Page 5-35 LOOP! Report This report is a diagnostic test that is not normally used. ABCDEFGHIJKLMNOPQRSTUVWXYZ0123456789{}~abcdefghijklmnopqrstuvwxyz!@#$^&*()[+]? Troubleshooting This guide is intended as a quick reference for identifying and correcting the most likely causes of problems encountered when installing or troubleshooting the AGILE 5250 OPTIMA. Step 1: Power o OPTIMA Check that the 5250 OPTIMA is connected to a power source and that the power switch and front panel LED are on. Refer to Chapter 1 Getting Started: Electrical Requirements, Important Safety Instructions/ Precautions, Connecting the 5250 OPTIMA to Power and Starting Up. o Printer Confirm that the printer is connected to a power source, powered on and on-line. Ensure that the printer is functioning properly by performing a self-test. Refer to the printer users manual for instructions. Step 2: Connections o OPTIMA to Printer Check that the cable between the OPTIMA and the printer is an AGILEapproved cable and that the cable is securely fastened to both units. Refer to the printer users manual and to Chapter 1 Getting Started: Connecting the Printer(s). o SERIAL: If using a serial printer, verify that the cable between the OPTIMA and the printer is connected to SERIAL I/O PORT 1 on the OPTIMA. If using two serial printers, verify that the second printer is connected to SERIAL I/O PORT 0 on the OPTIMA. o PARALLEL: If using a parallel printer, note that the cable between the OPTIMA and the printer is connected to the PARALLEL OUT PRINTER port on the OPTIMA. Page 5-36 AGILE 5250 OPTIMA User’s Guide and Reference o OPTIMA to Twinax Host Check that the twinax T cable adapter is firmly connected to the OPTIMA and that the twinax cable is securely fastened to one side of the T. Refer to the system documentation and to Chapter 1 Getting Started: Connecting to the Host System. o OPTIMA to Alternate Host (if using an alternate host) Confirm that the alternate host is connected to the OPTIMA with an AGILE-approved cable, and that the cable is securely fastened at both ends. Refer to the alternate host documentation and to Chapter 1 Getting Started: Connecting Alternate Host Inputs. o SERIAL: If using a serial alternate host, verify that the cable between the OPTIMA and the alternate host is connected to SERIAL I/O PORT 0 on the OPTIMA. If using two serial alternate hosts, verify that the second alternate host is connected to SERIAL I/O PORT 1 on the OPTIMA. o PARALLEL: If using a parallel alternate host, note that the cable between the OPTIMA and the alternate host is connected to the PARALLEL IN ALT HOST port on the OPTIMA. Step 3: Configuration Perform the basic configuration steps outlined in Chapter 1 Getting Started: Basic Port Configuration. Pay particular attention to Configuring the Parallel Out Printer Port and/or Configuring a Serial Out Printer Port. Note: An output port configuration (printer driver) must be loaded from the OPTIMA disk for the unit to print properly. Make sure to save the configuration. Step 4: Printer Test Verify that each connected printer is operating correctly and that the interfaces are properly connected by sending a TEST! Report to each printer. If the report does not print, recheck the connections and ensure that the printer is functioning properly, or reconfigure the printer ports as described in Chapter 2 Advanced Configuration: Output Ports. CHAPTER 5 — MAINTENANCE & TROUBLESHOOTING Page 5-37 Step 5: Configuration Test Confirm correct configuration by sending both a CONFIG! Report and an OPTIONS! Report to the printer. Consult the printouts of these reports for sources of potential problems. Step 6: Twinax Host Test Confirm that the OPTIMA LCD does not indicate any address errors. Note that the SYNC LED will be on if the host and OPTIMA are configured properly. If an error is indicated, correct it by reconfiguring the twinax ports as described in Chapter 2 Advanced Configuration: Twinax Ports. Step 7: Alternate Host Test Test the alternate host connection by sending a Print Screen job (or device equivalent) from the alternate host to a printer attached to the OPTIMA. Refer to the alternate host documentation. If the test fails to print, recheck the connections, or reconfigure the alternate host port as described in Chapter 2 Advanced Configuration: Alternate Host Input Ports. Other Issues o Orientation If the page size indicated by the host is bigger than the page size indicated by the OPTIMA in FMTINFO: PAPER 1: (2:, 3:), by default the OPTIMA will invoke COR and automatically rotate the job to a landscape orientation. To change the default settings, refer to Chapter 2 Advanced Configuration: Format Information, and change the settings of FMTINFO: PAPER 1: (2:, 3:) and FMTINFO: ROTATE. o Xerox 4235 Printer Duplexing When duplex printing on the 4235 printer, program the JOB END> PFS with the DUPLEX SIDE SELECT (<Esc>zyi1<CR/LF>) command. This will ensure that new jobs start printing on the front side of the page. Page 5-38 AGILE 5250 OPTIMA User’s Guide and Reference Contacting AGILE Technical Support If the problem persists after each of the potential problems listed above has been checked and corrected, call the AGILE technical support hotline. Please have the following information available before calling: A printout of the CONFIG! Report, if able to print one. A printout of the OPTIONS! Report. 5250 OPTIMA serial number (found on the back panel): S/N Software version number (found on the diskette): Host type: Model: Host port: Address: Host OS: Version: Release: Modification: Printer make: Model: OPTIMA printer port used: Output port configuration (driver) used: Printer cable #: Parallel or serial interface: If serial: Baud: Parity: Length: Stops: Flow: Alternate host make: Model #: OPTIMA alternate host port used: Alternate host cable #: Parallel or serial interface: If serial: Baud: Parity: Length: Stops: Flow: CHAPTER 5 — MAINTENANCE & TROUBLESHOOTING Page 5-39 AGILE technical support is available between the hours of 7:00 a.m. and 4:30 p.m. PST. For Express Exchange Service customers who would like next-business-day replacement of a unit, AGILE technical support must be contacted early enough so that the need for a replacement unit can be determined before 2:00 p.m. PST. Call (800) 538-1634, or FAX (510) 724-2222. The AGILE Bulletin Board System To upload files or download a new configuration, call the AGILE BBS: 1. Load the communications software. 2. Set up the modem: Baud rate: Fastest setting available (AGILE supports speeds of up to 28.8 with both V.FC and V.34 modems) Data bits: 8 Stop bits: 1 Parity: None 3. Dial 15107248073. If using a line with Call Waiting, dial *70,15107248073 to disable Call Waiting. 4. As prompted by the bulletin board, enter the following: First name Last name Y to confirm name Password Re-enter password C to continue Company name Voice phone number 5. Now answer a few questions about your system: Hot keys (Y/N) allow options to be selected without pressing Enter Color menus A = auto-detect Default editor mode F = full screen (if the user has ANSI terminal emulation); L = line edit (if the user does not have ANSI terminal emulation) Protocol for file transfers the preferred file transfer protocol is ZMODEM (Z), but the user may also use any of the other protocols displayed on the screen. Page 5-40 AGILE 5250 OPTIMA User’s Guide and Reference 6. The bulletin board will then ask if you want to display the Bulletin menu (Y/N), inform you that you have no personal mail, and after you press Enter, will display the Main menu. 7. To download new code for the 5250 OPTIMA, perform the following steps: Press F to display the File menu Press L to List files Press 1 to go to File area 1 (AGILE software download area) Press M to Mark the file Type the number of the file to be downloaded Press D to Download the file Press D to confirm the download Perform the local download procedure according to your communications software instructions 8. After downloading the file, press Enter, then exit the bulletin board with the following steps: Press S to Stop downloading and exit the Download menu Press Q to Quit to the Main menu Press G to Goodbye and Logoff Press Y to confirm the Logoff APPENDIX A — INTERFACING XEROX PRINTERS Page A-1 APPENDIX A INTERFACING XEROX PRINTERS Introduction The AGILE 5250 OPTIMA provides extensive special support for Xerox printers in XDPM and XPPM modes. XDPM mode is also referred to as XES mode or UDK mode. XES mode is the native Xerox print mode for Xerox 2700, 3700, 4030, 4045 and 4213 printers. The XDPM mode option on the 4235 also provides the XES command set. XPPM mode is available on Xerox centralized printers such as the 4050, 4090, 4850, etc. XPPM mode is also available on the 4235. This appendix describes the use of XDPM/XES mode commands to control the formatting of Xerox printers attached through the OPTIMA to an IBM System 34, 36, 38 or AS/400. It also describes how to use the OPTIMA to interface twinax systems to the 4235 in XPPM mode. The first part of this appendix describes the issues involved in using a Xerox printers native command set to control formatting. The last part of this appendix is a reference of the options in the OPTIMAs menu that are used to resolve these issues. System Based Formatting Normally the 5250 OPTIMA controls the formatting of documents received from the IBM host via the SCS (SNA Character String) commands embedded in the document by the host system. The subset of the SCS command set that the system uses is dependent on the IBM printer that the OPTIMA has been configured to emulate. 5256, 5224/5225, 4214, 5219 and 3812 emulations provide successively more control over document formatting. The OPTIMA achieves its emulation of IBM printers by translating the SCS codes into sequences of PFSs (Programmable Function Strings). When the user loads a printer driver for a Xerox printer, these PFSs are defined with XES commands that the Xerox printer understands. This allows documents sent from the host system to be formatted as they would be on an IBM printer. Page A-2 AGILE 5250 OPTIMA User’s Guide and Reference XES Mode The XES command set used by Xerox printers allows more functionality than the SCS command set used by IBM printers. For example, the XES command set allows overlay forms, APA (All-Points-Addressable) graphics, special fonts for barcodes or logos, and downloading of fonts and forms from the host system. All XES commands are consist of printable text. Each command is initiated with a special character called the UDK (User-Defined Key). The Xerox printer allows the UDK to be assigned to most printable characters by sending the command =UDK=%, where % is the character to be used as the UDK. The UDK should be assigned only to a character that will not be printed for the duration of the UDK assignment. Additionally, the UDK should be assigned only to punctuation characters, not to alphanumeric characters. After the UDK has been assigned, most XES commands can be sent to the printer as textual data streams. Some XES commands require a line ending. When a line ending sequence is used to terminate an XES command, it is not acted upon in the usual way, but instead is treated as part of the command. The line ending terminator requirement of some XES commands can pose some special problems. XES commands themselves also can cause some formatting conflicts. Formatting Conflict Overview When XES commands are sent to the printer, the host system does not understand the function of these commands. The host system also may be sending SCS commands to control the documents formatting. The coexistence of these separate and potentially conflicting sources of formatting information can cause the documents formatting to be incorrect. This is known as a formatting conflict. This type of formatting conflict can be exacerbated, because depending upon the host system and its operating software, the user may have little or no control over the SCS codes the system uses to control the printer. Another type of conflict can occur because several XES commands require a line ending as part of the command. Most IBM host systems automatically count the number of lines per page and insert an FF (Form Feed) character when the end of a page is reached. Because each XES command that requires a line ending consumes one line in the systems count, it may be difficult or impossible to fit the required XES commands within the number of lines the system considers to be a page. APPENDIX A — INTERFACING XEROX PRINTERS Page A-3 The OPTIMA provides several methods that allow SCS and XES documents to coexist in the same environment. Coexistence In order to eliminate the formatting conflicts that can arise when using XES commands to control document formatting, the OPTIMA provides two special modes of operation, one called PFS (Programmable Function String) suppression mode, and the other called FF (Form Feed) suppression mode. These two modes of operation can act independently or in unison. When the OPTIMA receives SCS commands from the host system, it sends PFSs to the printer to simulate the behavior of the IBM printer it is emulating. PFSs contain the XES commands used to control the printer. When the OPTIMA is in PFS suppression mode, it continues to receive and interpret SCS commands from the host system; however, it does not send the required PFSs to the printer. For the duration of PFS suppression mode, the system effectively loses the ability to control document formatting, allowing full control of the formatting via XES commands. When PFS suppression is active, the only PFSs sent to the printer are CR>, LF> and FF> PFSs. When the OPTIMA is in FF suppression mode, any Form Feed characters received from the host system are ignored. This allows the user to fit an large number of XES commands on one physical page at the printer, even though the system thinks it is printing multiple pages. The OPTIMA provides three general methods for initiating and terminating PFS and FF suppression modes. Two of these methods use embedded triggers in the data stream to delimit the section of the data stream where the PFS or FF suppression modes are to be active. Another method the OPTIMA provides for initiating and terminating PFS and FF suppression modes is the use of separate addresses. Separate Addresses Of the three methods used to control PFS and FF suppression, the use of separate addresses is probably the simplest. The idea behind the separate addresses method is that one twinax address can be configured on the OPTIMA to have PFS and/or FF suppression modes constantly active, and another address can be configured to have them inactive. Page A-4 AGILE 5250 OPTIMA User’s Guide and Reference These separate addresses appear to the system as two logical printers, although they can share a single Xerox printer. The OPTIMA automatically holds data from one address when the other address is using the printer, in the same way that it queues an alternate host data stream from a PC. When using separate addresses for conflict avoidance, one address is used to print only XES- or XPPM-formatted documents, and the other address is used to print only SCS-formatted (system) documents. This method eliminates both the need for the OPTIMA to change modes of operation and the need for nonstandard printable sequences in the data stream to trigger mode changes. The drawback of this method is that FF suppression must be constantly on or off, and it cannot be changed dynamically. Using this method, either all or none of the form feeds sent by the system go to the printer. See the sections Auto PFS Suppression and Auto FF Termination for some possible to this problem. Also, refer to the next section for another method of initiating and terminating PFS and FF suppression modes that does not suffer from this limitation. Delimiting XES Jobs The OPTIMA provides two different methods of initiating and terminating PFS and FF suppression based upon printable trigger sequences. Automatic PFS/FF suppression uses the natural format of an XES mode job to automatically turn on PFS and/or FF suppression at the beginning of an XES command data stream, and turn the suppression off at the end of the XES command data stream. For XES jobs that do not conform to conventions, and for compatibility with existing applications and documents, the OPTIMA also supports Logical Not (¬) commands that can be used to independently initiate and terminate PFS and FF suppression modes. Well-Formed XES Jobs The XES command set provides several commands that are used to declare the beginning of a print job. Each of these commands declares the beginning of a different type of job. The XES command set also includes a command to end the print job. This document uses the term well-formed to refer to an XES print job that uses XES commands to delimit the beginning and end of a print job. APPENDIX A — INTERFACING XEROX PRINTERS Page A-5 Automatic PFS suppression Automatic PFS suppression uses the format of a well-formed XES job to automatically begin and end PFS suppression. In the XES command set, there are four different commands that can be used to begin a job. These commands indicate to the printer that a new print job has begun. These commands are listed below: s+Pd Print Job s+Qd Print Job (mixed orientation) s+Md Merge Page Load s+Nd Form Load where d indicates a line ending. When Auto PFS suppression is active, the OPTIMA automatically begins PFS suppression mode when it sees one of these XES commands in the data stream. Auto PFS suppression is ended when the OPTIMA sees the XES job end command in the data stream: s+Xd Reset These job begin and end commands are part of the XES command set. Although these are the commands normally used to begin and end XES mode print jobs, Xerox printers are forgiving if they are not in the data stream. In order for Auto PFS suppression to work, the XES job must be started and ended with these commands. Automatic Form Feed Suppression Auto FF suppression is initiated in the same way as Auto PFS suppression, although there is a separate configuration option to select whether or not this occurs. Because Auto FF suppression is particularly useful for form download jobs, it is possible to configure FF suppression to be initiated by s+Md or s+Nd (both of which initiate a form-based job) but not s+Pd or s+Qd. This is in addition to the standard Auto FF suppression mode that is initiated by any of the four commands. Page A-6 AGILE 5250 OPTIMA User’s Guide and Reference Passing FFs in auto FF suppression mode Because Auto FF suppression mode is active for the duration of the XES job, a method is necessary to pass form feeds to the printer. The method the OPTIMA uses is designed to take advantage of the behavior of XES printers. If an XES mode printer receives a job begin command while a job is currently active, it prints the current page and begins a new page as an effect of starting the new job. Many existing applications take advantage of this behavior and use job start commands as form feed commands. This use of the job start command works well on most Xerox printers, but it fails when used on 4235 printers. Each page is considered by the 4235 printer to be a separate job. 4235 printers treat a job as a logical unit in the way they spool and print data. Some possible effects of printing each page as a separate job are: the job queue quickly becomes cluttered; each page may be offset in the output tray; and the printer throughput may be noticeably reduced. When the OPTIMA is in Auto FF suppression mode, it enforces the rule that the current job must be ended before starting a new job. For the duration of the current print job, the XES command used to begin the job may be used as a Form Feed command. The OPTIMA will automatically translate this command into a form feed to avoid the problems caused by having only a single page per job. In this example, the column on the left shows the data stream for a print job, and the column on the right shows the OPTIMAs output: Input to OPTIMA: Output from OPTIMA: s+Pd s+Pd ...(commands and text)... ...(commands and text)... <FF> (inserted by System) (Form Feed is removed) ...(commands and text)... ...(commands and text)... s+Pd <FF> ...(commands and text)... ...(commands and text)... <FF> (inserted by System) (Form Feed is removed) ...(commands and text)... ...(commands and text)... s+Xd s+Xd <FF> <FF> APPENDIX A — INTERFACING XEROX PRINTERS Page A-7 In the example above, the first and second Form Feeds were not sent to the printer, because Auto FF suppression was initiated by the s+Pd job beginning. The second s+Pd was translated into a Form Feed. This means the second page is actually part of the same job as the first page. The s+Xd ended auto FF suppression mode and the job. The last Form Feed was passed because auto FF suppression had ended. Input to OPTIMA: Output from OPTIMA: s+Pd s+Pd ...(commands and text)... ...(commands and text)... <FF> (inserted by System) (Form Feed is removed) ...(commands and text)... ...(commands and text)... s+Xd s+Xd s+Pd s+Pd ...(commands and text)... ...(commands and text)... <FF> (inserted by System) (Form Feed is removed) ...(commands and text)... ...(commands and text)... s+Xd s+Xd <FF> <FF> This example shows that the job start command is translated to a Form Feed only when there is already an active job. Input to OPTIMA: Output from OPTIMA: s+Pd s+Pd ...(commands and text)... ...(commands and text)... <FF> (inserted by System) (Form Feed is removed) ...( commands and text)... ...(commands and text)... s+Md s+Md ...(commands and text)... ...(commands and text)... <FF> (inserted by System) (Form Feed is removed) ...(commands and text)... ...(commands and text)... s+Xd s+Xd <FF> <FF> Page A-8 AGILE 5250 OPTIMA User’s Guide and Reference This example shows that a job start command is only translated to a Form Feed if it is the same type of job as the currently active job. Logical Not (¬) Commands In order to maintain compatibility with existing data streams and applications, the OPTIMA supports the use of logical not (¬) commands to initiate PFS and FF suppression modes. The PFS/FF suppression modes that these command initiate are not the same as Auto PFS and Auto FF suppression modes. For example, if a logical not command is used to initiate FF suppression mode, then the FF pass-through feature described above is not available. Also, if PFS/FF suppression mode is initiated with a Logical Not command, it cannot be terminated automatically with the Auto PFS/FF suppression terminator s+Xd; it must be terminated with the appropriate Logical Not command. The logical not commands: ¬¬<<< Initiates PFS Suppression ¬¬>>> Terminates PFS Suppression ¬¬{{{ Initiates Form Feed Suppression ¬¬}}} Terminates Form Feed Suppression If ¬¬{{{ is used to initiate FF suppression mode, then following is the only way to send a form feed to the printer: use ¬¬}}} to terminate FF suppression mode send the FF use ¬¬{{{ to reinitiate the FF suppression mode. For this reason, AGILE recommends the use of these commands only for existing applications and documents. New applications and documents should use the auto PFS/FF suppression modes. APPENDIX A — INTERFACING XEROX PRINTERS Page A-9 Special Formatting Problems This section discusses some additional issues regarding data stream conflicts. Font Downloading XES mode printers require a special translation table to be used when downloading sixelized data to the printer. When downloading an EBCDICencoded font from the host system through the OPTIMA, no special setup or handling are required. The OPTIMA automatically changes to the correct translate table for the duration of the sixelized data, and returns to the current translation table after the sixelized data. The OPTIMA automatically strips all SCS control and formatting commands for the duration of the font download regardless of whether or not PFS and/or FF suppression are active. UDK Character Conflict The UDK character is a shared resource. Each data stream sent to the printer is responsible for defining the UDK character at the beginning of the data stream, and using a s+Xd command to undefine the character at the end of the data stream. Failure to follow these rules can cause a UDK character conflict. An example of this type of conflict is illustrated by the following sequence of events: 1) A job from one source defines the UDK character. 2) A job from another source redefines the UDK character. 3) A second job from the first source expects the same UDK character defined in step 1to be active. Data stream number 3 is not following the rules, but this is not an uncommon problem. Here is an example of another common problem: 1) A job from one source defines and uses a UDK character, but does not end its job with a s+Xd to undefine the UDK character. 2) A second job from the system that does not define or use a UDK character tries to use the previously defined UDK character as a printable character. In this case, the failure that will occur in step 2 is actually caused by the first job not following the rules. Page A-10 AGILE 5250 OPTIMA User’s Guide and Reference These types of problems are sometimes made more acute because of the OPTIMAs dynamic data routing. To reduce these kinds of problems, the OPTIMA provides Auto UDK character translation. Auto UDK character translation works, because regardless of the state of the UDK character definition, the XES mode printer continues to accept the s character as a UDK character equivalent. When Auto UDK translation is enabled, the OPTIMA translates all occurrences of the UDK character to the s character for the duration of the =UDK= character assignment. The =UDK= assignment is never actually passed to the printer when this mode is enabled. Line Endings The OPTIMAs handling of the XES command set is not limited to simple character translation. The OPTIMA provides several special features to assist in the proper generation of the line endings required by some XES commands. One common problem in generating proper line endings to some XES commands is that it is often difficult or impossible to control the SCS commands generated by the IBM host system. Support for all types of SCS line endings The OPTIMA automatically translates any possible line ending condition in the SCS command set into a proper <CR><LF> line ending. This translation includes all single byte and multiple byte SCS commands. This feature is particularly important for environments in which the system will be generating the data stream. For example, it is possible to include XES commands to control the formatting of screen prints or word processed documents (DisplayWrite/36, Text Management, Office Vision/ 400, etc.) without concern for the methods used by the system or application software to terminate lines. Auto UDK termination The OPTIMA also allows multiple XES commands to occur on one line of text from the host system, even if those commands normally require line endings. The OPTIMA understands the XES command set, and it will insert the line endings for any commands that require them. An example: APPENDIX A — INTERFACING XEROX PRINTERS Page A-11 Input to OPTIMA: sx20,200,5sx40,400,5d Output from OPTIMA: sx20,200,5d sx40,400,5d In the example above, when the OPTIMA encountered the second UDK character, it automatically terminated the previous UDK command. This termination was provided only because the previous command (sx line draw) requires a line ending termination. If the previous command does not require a line ending termination, none will be inserted. This feature does not require any special mode to be entered; it is part of the natural behavior of the OPTIMA. There is no limit to the number of commands that can be placed on a single line, except that the line length limit (MPP Maximum Print Position) must not be exceeded. This feature can be useful in reducing the number of lines of text required to encode a data stream, and it can be used to eliminate the requirement for FF suppression for some less complex documents. Line Feed vs. Relative Movements When the OPTIMA is emulating an IBM printer, it normally uses relative vertical movements to simulate the line spacing requested by the system. This behavior has several advantages over set-line-density-then-line-feed type vertical movement methods: 1) Line density is under direct system control regardless of the font selection. This is the same behavior as the IBM printers that the OPTIMA emulates. 2) Use of this method allows the reduction of line spacing to 70% of the system requested value during COR (Computer Output Reduction) jobs. This is the same as IBM printers. 3) The system controls line density using either 1/72-inch units or 1/1440-inch units. The Xerox printer allows line density to be set only in 1/300-inch units. For some system-supported line densities, the closest line density in 1/300-inch would be in error. This error would accumulate as text moves down the page. The OPTIMA normally maintains vertical positioning information in the systems 1/1440-inch resolution. Each line of text is placed within one-half pixel of its correct position. There is no error accumulation. Page A-12 AGILE 5250 OPTIMA User’s Guide and Reference This feature does not cause interference with the proper termination of XES commands. Antiquities The OPTIMA supports the following additional Logical Not (¬) commands for compatibility with existing documents and applications. Their use is not recommended. ¬¬%%%x Set Default Font Correspondence Table 1. Because the OPTIMA has one large font correspondence table, instead of several small tables, this command has little use. It is treated as a no-operation by the OPTIMA; however, it is removed from the data stream. ¬¬&&&x Set Default Font Correspondence Table 2. Nooperation; removed from data stream. ¬¬###x Set Current Font Correspondence Table. No-operation; removed from data stream. Font Correspondences The 5250 OPTIMA maintains a separate pair of font correspondence tables for each of its output ports. One of the tables is used for portrait orientation, and other is used for landscape orientation. When the host system requests a GFID (Global Font ID, also referred to as a typestyle number), the OPTIMA looks up the GFID in one of the two tables. If an entry for the GFID is found in the table, the associated PFS is sent to the printer to cause the printer to change to the correct font. Normally the OPTIMA uses XES font selection commands of the form: s+9fontnameds9 This allows the printers font index numbers 0 - 8 to be used without any conflicts caused by the OPTIMAs use of font index numbers. Downloading Font Correspondences The 5250 OPTIMA supports the use of the Logical Not command used to download font correspondences from the host system. The general format for this command is: ¬¬(((x on=fontname ))) APPENDIX A — INTERFACING XEROX PRINTERS Page A-13 where: x is any digit. It is ignored. o is either P for Portrait or L for Landscape. This character specifies in which of the two font correspondence tables the entry should be placed. If the last character of the font name (see below) is either P or L, then the o parameter is optional. n is the IBM GFID (typestyle number) to be used by the host system to refer to the font. This value must be in the range of 1 - 65534. Leading zeros in the GFID number are acceptable, but not required. fontname is the name of the font to be used. This name must be spelled exactly as it is referred to by the printer. Case is also important, i.e., Titan10iso-P and titan10iso-P are different font names. Make certain that the case is correct in the font name. When the OPTIMA receives this command, it creates an entry in the font correspondence table and turns the fontname into an escape sequence that will select the font at the printer. An example: ¬¬(((0 P11=Titan10iso-P ))) The example above will add an entry to the portrait font correspondence table that maps GFID (typestyle) number 11 to the font Titan10iso-P. The P or L at the beginning of the entry is optional if the last character of the font name is either P or L. For example: ¬¬(((0 11=Titan10iso-P ))) This example performs the same function as the previous example. Multiple entries can be separated either by line endings or by commas. For example: ¬¬(((0 11=Titan10iso-P,11=Titan10iso-L 87=LetterGothic12iso-P,87=LetterGothic12iso-L ))) This example creates four new entries in the font correspondence tables two for the landscape table, and two for the portrait table. Page A-14 AGILE 5250 OPTIMA User’s Guide and Reference If the GFID number of an entry already exists in the table, the new entry replaces the old entry. For example: ¬¬(((0 87=PrestigeElite12iso-P ))) If this entry were sent to the OPTIMA after the previous example, the old font entry of LetterGothic12iso-P would be replaced by the new entry of PrestigeElite12iso-P. Font entries can be deleted by not specifying a font for the GFID. In this case, the orientation character at the beginning is required, because there is no font name from which the OPTIMA can derive the orientation. An example: ¬¬(((0 P87,P11,L87,L11 ))) This example deletes the four entries from the font correspondence table for GFIDs 11 and 87 in both portrait and landscape orientations. Font Correspondence Limits Each of the OPTIMAs two font correspondence tables (portrait and landscape) can hold up to 128 entries. Additionally, there is a total limit of 20K (20480 bytes) for each of the OPTIMAs output ports. This storage is used to hold the PFSs and the GFID tables for the port. If the user attempts to download a font correspondence entry to the OPTIMA when either the maximum number of entries has been reached or the total storage is full, the new entry will be ignored. In these circumstances it is necessary to delete existing (and preferably unused) entries to make room for the new entries. Xerox Menu Options The previous sections described the options available on the 5250 OPTIMA that are used to assist the user in interfacing the host system to Xerox printers. This section lists the specific options available in the OPTIMAs menu structure and describes the special modes invoked by these options. For more information about how these modes can be used to help solve any specific problems, please refer to the previous sections of this appendix. APPENDIX A — INTERFACING XEROX PRINTERS Page A-15 The Xerox Menu Each of the OPTIMAs twinax address ports (and other input ports) has a submenu of options that are used to control the special modes of operation used by Xerox printers. This menu can be found at: OPTIMA: CONFIG: TWINAXn: XEROX: in the OPTIMAs menu structure (where n is the twinax address currently used by the port). Note: The Xerox options are used only when the twinax address or input port is configured for IBM EMUL. Xerox options are used for non-twinax input ports only for diagnostic purposes. Each of the twinax ports has its own set of these options, so multiple addresses can be configured with different settings. This is an way to support multiple types of data streams on a single Xerox printer, or on multiple printers. For example, the user can configure the OPTIMA with two twinax addresses, both routing data to a 4235, one through the serial port, and one through the parallel port. The 4235 could then be configured to receive XDPM data through the serial port, and receive XPPM data through the parallel port. This configuration allows usage of the printer in both modes of operation simultaneously without mode switching. UDK Character Translation Configuration This option is useful only for twinax addresses receiving XDPM /XES data streams. The OPTIMAs UDK character translation option controls whether the OPTIMA will perform UDK character to Escape character translation, or whether it should let the printer do the translation. The option can be found in the OPTIMAs menu at: OPTIMA: CONFIG:TWINAXn: XEROX:UDK XLT= XLT UDKS This setting causes the OPTIMA to perform the UDK character translation itself instead of letting the printer do it. This is particularly useful in resolving UDK character conflicts that can be caused by the OPTIMAs dynamic data routing. In this mode, the OPTIMA will not pass the =UDK= character assignment to the printer, but will store the UDK character and translate it to s. Page A-16 AGILE 5250 OPTIMA User’s Guide and Reference NOUDKXLT This setting causes the OPTIMA to pass any =UDK= character assignments to the printer and not to perform the UDK character translation itself. PFS Suppression Configuration This option is useful for both XDPM and XPPM data streams. The PFS suppression option allows the user to control how the OPTIMA suppresses PFS for the data it receives on the twinax address. This option can be found in the menu at: OPTIMA: CONFIG:TWINAXn: NO SPRS XEROX:PFSSPRS= This option tells the OPTIMA not to suppress PFSs for the data stream received on the twinax address. This option gives the host system full control over document formatting. AUTOSPRS This option causes the 5250 ALLY automatically to suppress all PFSs except the INIT, CR>, LF> and FF> PFSs at the beginning of an XDPM print job. The XDPM job is delimited by one of the job start commands: s+Pd, s+Qd, s+Md, or s+Nd. This setting is useful only for XDPM data streams. SUPPRESS This option causes the OPTIMA to suppress all PFSs for the data streams received on this twinax address. This allows the data stream to format the page without conflicts from system formatting requests. This option is useful for XPPM data streams. If the twinax address is receiving XPPM data to be sent to a printer in XPPM mode, this option should be set. SPRS/BU This option is identical to SUPPRESS, except that the BOLD ON>, BOLDOFF>, BSBOLD1>, BSBOLD2>, UNDL ON> and UNDLOFF> PFSs are not suppressed. AUTO/BU This option is identical to AUTOSPRS, except that the BOLD ON>, BOLDOFF>, BSBOLD1>, BSBOLD2>, UNDL ON> and UNDLOFF> PFSs are also not suppressed. Form Feed Suppression Configuration The form feed suppression option can be useful for either XDPM or XPPM mode data streams, although it is probably most useful for XDPM mode. This option specifies how the OPTIMA will suppress form feeds. When form feed suppression is active, the OPTIMA will not send the FF> PFS to the printer. This option can be found in the menu at: APPENDIX A — INTERFACING XEROX PRINTERS OPTIMA: CONFIG:TWINAXn: NO SPRS Page A-17 XEROX:FF SPRS= This option tell the OPTIMA not to suppress the FF> PFS. This means that form feeds received for this twinax address will be sent to the printer normally. AUTOSPRS This option tells the 5250 ALLY to suppress the FF> PFS automatically after receiving an XDPM job start command. These commands are: s+Pd, s+Qd, s+Md and s+Nd. Form feed suppression will continue until the XDPM job end command is received: s+Xd. This setting is useful only for XDPM data streams. FORMSPRS This option is similar to the AUTOSPRS option, except that the 5250 ALLY starts suppression only for form-based jobs. Form-based jobs are started with s+Md and s+Nd. The Form Feed suppression mode is terminated with the job reset command: s+Xd. This setting is useful only for XDPM data streams. SUPPRESS This option causes the OPTIMA to suppress all form feeds for data received from the twinax address. If the user sets this option, the only way to get a form feed to the printer is to change a character translation table to translate a printable EBCDIC character into the form feed character. This setting is useful in both XDPM and XPPM mode, but it is rarely used. For more information on Form Feed suppression, see the previous sections of this appendix, Automatic PFS Suppression and Automatic Form Feed Suppression. Change Form Feed to New Line Configuration If Form Feed suppression is occuring, activating this feature will change all form feeds requests into new lines (CR/LF). This option can be found in menu location: OPTIMA: CONFIG:TWINAXn: XEROX:FFTONL= Logical Not Command Configuration This option is useful for both XDPM and XPPM data streams; however it is rarely used for XPPM. This option controls how the OPTIMA uses Logical Not commands (¬). This option can be found in the OPTIMAs menu at: Page A-18 AGILE 5250 OPTIMA User’s Guide and Reference OPTIMA: CONFIG:TWINAXn: XEROX:XTLSPRS= IGNORE specifies that Logical Not commands in the data stream are to be ignored, i.e., treated as printable text. This mode is very useful in debugging data streams that use Logical Not commands. REMOVE specifies that Logical Not commands are to be removed from the data stream, i.e., neither printed nor acted upon. This mode is useful for debugging data streams, but it is primarily intended to assist the user in migrating existing documents that use Logical Not commands to the OPTIMAs more powerful automatic PFS and FF suppression modes. USE XTL specifies that the OPTIMA should use the Logical Not commands to perform their correct actions. For more information on Logical Not commands, see the previous sections of this appendix, Logical Not Commands, Antiquities and Downloading Font Correspondences. Job Restart to Form Feed Translation Configuration This option is useful only for XDPM data streams. The OPTIMA is capable of converting XDPM/XES print job restarts into form feeds. This is helpful for jobs that use a job restart to cause a form feed to occur when form feed suppression is active. This option can be found in the OPTIMAs menu at: OPTIMA: CONFIG:TWINAXn: ACTIVE XEROX: JOB FF= specifies that the OPTIMA should translate job restarts into form feeds. INACTIVE specifies that the OPTIMA should not translate job restarts into form feeds. For more information about job restart to form feed translation, see the previous section, Passing FFs in Auto FF Suppression Mode. Metacode Transparency This option is useful only for XPPM data streams. APPENDIX A — INTERFACING XEROX PRINTERS Page A-19 The OPTIMA has two different modes of transparency for use in passing Metacode from the host system to the printer. The OPTIMAs normal handling of transparent data is to remove the data from the transparent packet and to send the data to the printer. XPPM printers, however, require that they receive the data in a transparent packet. The OPTIMA has a special option that specifies whether the transparent packet header should be passed along to the printer. This option can be found in the OPTIMA menu at: OPTIMA: CONFIG:TWINAXn: ACTIVE XEROX:METATRN= specifies that the OPTIMA should keep transparent data packets intact when sending them to the printer. When the OPTIMA receives a packet of the form: Hex 35 countbyte ...data..., the printer will receive Hex 35 countbyte ...data.... INACTIVE specifies that the OPTIMA should not send transparent packets intact to the printer, but that it should send only the data in the packet. For example when the OPTIMA receives: Hex 35 countbyte ...data..., only the ...data... will be sent to the printer. The Hex 35 and countbyte will be stripped. Line Feed Configuration This setting is useful only for XDPM data streams. It has no use for XPPM data streams. The OPTIMA, when driving Xerox XDPM mode printers, usually performs a relative vertical movement command at the end of each line of text in order to place the next line of text at the correct vertical position. This vertical positioning is based upon the system-requested line density setting. Some XDPM documents are formatted with the assumption that the line density is based upon the height of the current active font. The OPTIMA has a setting that allows the user to specify whether the line density should be based upon the fonts height, or the system-specified line density. This option is located in the OPTIMA menu at: OPTIMA: CONFIG:outport:FMTINFO:VERMOVE= where outport is the port to which the printer is connected. ABSOLUTE This setting should not be used for Xerox printers. RELATIVE specifies that the OPTIMA should use relative vertical movements to simulate system-specified line density. Page A-20 AGILE 5250 OPTIMA User’s Guide and Reference LINEFEED specifies that the OPTIMA should use line feeds to move from line to line. This causes the line density to be based upon the current fonts height. Regardless of the setting of this option, the OPTIMA always uses line feeds when PFS suppression is active. Interfacing Xerox 4235 Printers in XPPM Mode Interfacing the 4235 printer in XPPM mode creates its own set of problems. The primary problem is that the OPTIMA does not provide SCS/DCA (host system command) to XPPM translation. This is not normally a problem, because the main reason for using XPPM mode is to print preexisting applications and documents that use XPPM commands and strategies (DJDE, JDE, JDL and sometimes Metacode) to provide formatting. In order to print XPPM documents, the user needs to tell the OPTIMA not to send XDPM codes that it normally uses to control formatting. Only one configuration option needs to be set in this situation: CONFIG:TWINAXn: XEROX:PFSSPRS=SUPPRESS specifies that the OPTIMA should not send PFSs to the printer for data received on twinax address n. If the user would also like to be able to send system print jobs to the printer, the user can activate a second twinax address port on the OPTIMA and configure it to send data to a different output port (parallel or serial) and configure the printer to print that data in XDPM mode. APPENDIX B — SCS/DCA COMMAND SUMMARY Page B-1 APPENDIX B SCS/DCA COMMAND SUMMARY Overview The AGILE 5250 OPTIMA, like the IBM printers it emulates, accepts SCS (SNA Control String) and DCA - FFT (Document Content Architecture Final Form Text) commands. These commands control formatting of the text and other printer functions. The OPTIMAs IBM printer emulation uses the FMTINFO: and PFSINFO: settings for the output port to simulate the appropriate behavior on the output device (usually a printer). The OPTIMA supports most of the commands that are available on any of the IBM printers it emulates. These commands are not limited to the emulations of the IBM printers that normally use those commands, but are available in all of the IBM printer emulations. For example, the OPTIMA supports the DCA command, Justify Text Field, not only when it is emulating a 5219 or 3812 (IBM printers that support that command), but also when it is emulating a 5225 (an IBM printer that does not support that command). This means that the OPTIMA implements the full command set listed here regardless of the IBM printer emulation for which it is configured. This section lists the SCS and DCA commands that the OPTIMA implements and also gives some information about the methods it uses in emulating the IBM printer. Note: All variables are entered as hexadecimal (base 16) values. The parameter nn represents a count byte equal to the number of bytes following the count byte plus the count byte itself, except where otherwise specified. Page B-2 AGILE 5250 OPTIMA User’s Guide and Reference Command: Null (NUL) Format: 00 Printers: 3812, 4214, 5219, 5224, 5225, 5256 Action: No operation is performed. No character is printed. IBMEMUL: No operation. 275EMUL: NUL is sent to printer. Command: ASCII Transparency (ATRN) Format: 03 nn [ASCII data] Printers: IBM printer emulation on 3197 display station Action: The following nn bytes of data are sent directly to the printer. The nn parameter counts the number of following bytes. The count nn does not include the count byte itself. IBMEMUL: Same as IBM. 275EMUL: No operation. Command: Horizontal Tab (HT) Format: 05 Printers: 3812, 5219 Action: Moves the current print position to the right one tab stop. If there are no tab stops to the right, a space is performed. IBMEMUL: Same as IBM. 275EMUL: Sends HT to printer. APPENDIX B — SCS/DCA COMMAND SUMMARY Page B-3 Command: Required New Line (RNL) Format: 06 Printers: 3812, 5219 Action: Resets the indent level to the left margin, performs a Carriage Return (CR) and a Line Feed (LF). If the current print position is on the last line of the logical page, an automatic Form Feed (FF) is performed, and printing continues on the first line of the next page. Most IBM host system print spoolers use the Form Feed character to delimit and count pages. For this reason, only Form Feed should be used to move to the next page. Required New Line should not be used to move to a new page. IBMEMUL: Same as IBM. 275EMUL: No operation. Page B-4 AGILE 5250 OPTIMA User’s Guide and Reference Command: Superscript (SPS) Format: 09 Printers: 3812, 5219 Action: Causes the current print position to move up one-half line distance. On the 5219, only one level of superscript is supported. On the 3812, multiple levels of superscript are supported. IBMEMUL: Same as the 3812. The PFS SUPS ON> is sent to the printer once for each superscript level. A superscript command received after a subscript command (to restore the normal baseline position) causes the PFS SUPSOFF> to be sent to the printer once per level. The use of subscript ON/OFF and superscript ON/OFF printer commands inthe SUPS ON>, SUPSOFF>, SUBS ON> and SUBSOFF> PFSs will allow only one level of sub/superscripting, because the target printer is performing the sub/superscript, and it will support only a single level. The use of relative upward/downward movement commands for the PFSs SUPS ON>, SUPSOFF>, SUBS ON> and SUBSOFF> will allow multiple sub/superscript levels to be supported. 275EMUL: No operation. Command: Repeat (RPT) Format: 0A Printers: 3812, 5219 Action: No operation is performed; no character is printed. IBMEMUL: No operation. 275EMUL: No operation. APPENDIX B — SCS/DCA COMMAND SUMMARY Page B-5 Command: Form Feed (FF) Format: 0C Printers: 3812, 4214, 5219, 5224, 5225, 5256 Action: Moves the current print position to the top line of the next logical page. The print position is restored to the current indent level, or to the left margin if there is no indent. Most IBM host system print spoolers use the Form Feed character to delimit and count pages. For this reason, only Form Feed should be used to move to a new page. Vertical movement commands other than Form Feed should not be used to move to a new page. IBMEMUL: The PFS FF> is sent to the printer. Normally this PFS sends a Form Feed character to the printer. Support for source paper drawer selection on some target printers requires that the PFS FF> be empty. See Page Presentation Media (PPM) for more information. 275EMUL: FF is sent to printer. Command: Carriage Return (CR) Format: 0D Printers: 3812, 4214, 5219, 5224, 5225, 5256 Action: Returns the current print position to the first position on the current line. On the 3812 and 5219, the current print position is returned to the current indent level as set by Indent Tab (IT) and/or Set Indent Level (SIL). If there is no indent level set, the current print position is returned to the left margin. IBMEMUL: Same as the 3812 and 5219. 275EMUL: CR is sent to printer. Page B-6 AGILE 5250 OPTIMA User’s Guide and Reference Command: New Line (NL) Format: 15 Printers: 3812, 4214, 5219, 5224, 5225, 5256 Action: Performs a Carriage Return (CR) and a Line Feed (LF). If the current print position is on the last line of the logical page, it performs an automatic Form Feed (FF), and printing continues on the first line of the next page. Most IBM host system print spoolers use the Form Feed character to delimit and count pages. For this reason, only Form Feed should be used to move to a new page. New Line should not be used to move to a new page. IBMEMUL: Same as IBM. 275EMUL: CR and LF are sent to printer. Command: Unit Back Space (UBS) Format: 1A Printers: 3812, 5219 Action: When in proportional spacing mode (PSM), this command causes the current print position to move 1/60inch to the left. If not in proportional spacing mode, no operation is performed. IBMEMUL: No operation. 275EMUL: No operation. APPENDIX B — SCS/DCA COMMAND SUMMARY Page B-7 Command: Back Space (BS) Format: 1B Printers: 3812, 5219 Action: Causes the current print position to be moved one character to the left. On the 3812, Back Space can cause the current print position to move to the left of the logical left margin. On the 5219, Back Space will not move to the left of the logical left margin unless a Release Left Margin (RLM) command has been received on the current print line. IBMEMUL: Same as the 5219. 275EMUL: No operation. Command: Interchange Record Separator (IRS) Format: 1E Printers: 3812, 4214, 5219, 5224, 5225, 5256 Action: Performs a Carriage Return (CR) and a Line Feed (LF). If the current print position is on the last line of the logical page, it performs an automatic Form Feed (FF), and printing continues on the first line of the next page. Most IBM host system print spoolers use the Form Feed character to delimit and count pages. For this reason, only Form Feed should be used to move to a new page. Interchange Record Separator should not be used to move to a new page. IBMEMUL: Same as IBM. 275EMUL: No operation. Page B-8 AGILE 5250 OPTIMA User’s Guide and Reference Command: Word Underscore (WUS) Format: 23 Printers: 3812, 5219 Action: Causes the preceding word to be underscored. The beginning of the word is delimited by any of the following commands: Underscore Word Underscore Space Numeric Space Back Space Unit Back Space Horizontal Tab Indent Tab Justify Text Field New Line Required New Line Line Feed Carriage Return Form Feed Required Form Feed Print Position Interchange Record Separator IBMEMUL: Same as IBM. The PFS UNDL ON> is sent to the printer before the word to be underscored. The PFS UNDLOFF> is sent to the printer after the word to end the underscoring. Normally these PFSs turn underlining on and off at the target printer. 275EMUL: No operation. APPENDIX B — SCS/DCA COMMAND SUMMARY Page B-9 Command: Line Feed (LF) Format: 25 Printers: 3812, 4214, 5219, 5224, 5225, 5256 Action: Moves the print position down one line. The character position is not changed. If the current print position is the last line of the logical page, it performs an automatic Form Feed (FF), and printing continues at the current position on the first line of the next page. Most IBM host system print spoolers use the Form Feed character to delimit and count pages. For this reason, only Form Feed should be used to move to a new page. Line Feed should not be used to move to a new page. IBMEMUL: Same as IBM. 275EMUL: LF is sent to printer. Command: Switch (SW) Format: 2A Printers: 3812, 5219 Action: No operation is performed. No character is printed. IBMEMUL: No operation. 275EMUL: No operation. Page B-10 AGILE 5250 OPTIMA User’s Guide and Reference Command: Set Horizontal Format (SHF) Format: 2B C1 nn hh Printers: 3812, 4214, 5219, 5224, 5225, 5256 Action: Sets the horizontal Maximum Print Position (MPP) to the value of the hh parameter. If the hh parameter is 00h, or if the hh parameter is omitted, the default value for MPP is calculated as 13.2 inches x the current CPI setting. For the 3812, setting the hh parameter to 01h also sets MPP to the default value. For the 3812 and 5219, activates auto new line function. For all others, auto new line is always active. If the current print position is = MPP+1 when auto new line is active, a new line sequence is automatically generated. IBMEMUL: Same as IBM. 275EMUL: The hh parameter is used as Maximum Print Position (MPP). Auto line ending is always active. Command: Set Vertical Format (SVF) Format: 2B C2 nn vv Printers: 3812, 4214, 5219, 5224, 5225, 5256 Action: Sets the vertical Maximum Print Line (MPL) to the value of the vv parameter. Occurrence of the command sets the current print line to the top of the form (line one). If the vv parameter is 00h, or if the vv parameter is omitted, MPL is set to the default value of 66. On the 3812 and 5219, this command activates the auto new page function. On all others, auto new page is always active. IBMEMUL: Same as IBM. 275EMUL: No operation. APPENDIX B — SCS/DCA COMMAND SUMMARY Page B-11 Command: Set Line Density (SLD) Format: 2B C6 nn ld Printers: 3812, 4214, 5219, 5224, 5225 Action: Sets the height of one line of print to be the value of the ld parameter divided by 72 inches. For the 4214, if the value of the ld parameter is greater than 48h, a default value of 0Ch (6 lines per inch) will be used. For the 5219, ld parameter values other than 12h (4 lines per inch), 0Eh (5.33 lines per inch), 0Ch (6 lines per inch), 09h (8 lines per inch), 08h (9 lines per inch) and 06h (12 lines per inch) will result in no operation; line density remains unchanged. For the 3812, 5224 and 5225, all values of the ld parameter are allowed. For the 3812, Computer Output Reduction (COR) mode causes the ld parameter to be reduced automatically to 70% of its set value (the CORVER%= option default value). This reduces a form height of 11 inches to 7.7 inches. IBMEMUL: Same as the 3812. Because many target printers are not capable of changing line density (line density is a function of the font selected), the OPTIMA does not send line feeds to most printers. Instead, it performs vertical downward movements (with the PFS VERMOVE>) to simulate IBM line spacing and to provide full support for this command. If the Initial Condition Set specified by Set Initial Conditions (SIC) is Data Processing (DP), the line density set either by this command or by the Set Single Line Distance (SSLD) command is used in page length calculations when determining orientation automatically. 275EMUL: No effect, except that if the vv parameter is less than 0Ch (6 lines per inch), subsequent lines are double spaced. Page B-12 AGILE 5250 OPTIMA User’s Guide and Reference Command: Set Graphic Error Action (SGEA) Format: 2B C8 nn gg uu Printers: 3812, 4214, 5219, 5224, 5225, 5256 Action: Sets both the replacement character and the action to be performed when a non-printable graphic is encountered. The gg parameter specifies the character with which to replace the non-printable graphic. If the gg parameter is omitted or invalid (non-printable), the value defaults to a hyphen (60h). The uu parameter specifies the action to be performed when a non-printable graphic is encountered. If the uu parameter value is between 00h and 02h, the printer will not stop or return an error status to system. If the uu parameter value is 03h or 04h, the printer will stop and return an error status to system. IBMEMUL: Same as IBM for the gg parameter. The OPTIMA does not stop or return an error status to the system, so the uu parameter is discarded. 275EMUL: No operation. Command: Execute PMP (PMP) Format: 2B CA nn pm Printers: 3812 Action: Causes the printer to execute a set of primitive commands. PMP is Page Map Primitives, the machinelevel language for the 3812. It provides the ability to use functions such as vector graphics, reverse image printing, user-generated characters and print macro modification. IBMEMUL: No operation. 275EMUL: No operation. APPENDIX B — SCS/DCA COMMAND SUMMARY Page B-13 Command: Set Coded Graphic character set though Local ID (SCGL) Format: 2B D1 nn 81 id Printers: 3812, 4214, 5219, 5224, 5225 Action: Selects the character set used for subsequent printing. The id parameter value is one of the following, listed with the name of the corresponding character set: 00 Multinational 01 United States 02 Austria/Germany 03 Belgium 04 Brazil 05 Canadian French 06 Denmark/Norway 07 Finland/Sweden 08 France 09 Italy 0A Japan English 0B Japan Katakana 0C Portuguese 0D Spain 0E Spanish Speaking 0F United Kingdom 65 New Spanish Word Processing FF Default Value For the 4214, 5224 and 5225, this command clears all character bit images loaded with the Load Alternate Characters (LAC) command. IBMEMUL: No operation. 275EMUL: No operation. Page B-14 AGILE 5250 OPTIMA User’s Guide and Reference Command: Set GCGID through GCID (SCG) Format: 2B D1 nn 01 gcgc cpcp Printers: 3812, 5219 Action: Sets the character set used to map subsequent text. The gcgc parameter specifies the Graphic Character set Global ID (GCGID). The cpcp parameter specifies the Code Page Global ID (CPGID). The 3812 discards the gcgc parameter. IBMEMUL: No operation. 275EMUL: No operation. APPENDIX B — SCS/DCA COMMAND SUMMARY Page B-15 Command: Set FID through GFID (SFG) Format: 2B D1 nn 05 gfid fntw ps Printers: 3812, 5219 Action: Selects the font and spacing used for subsequent text. The gfid parameter specifies the Global Font ID (GFID) or typestyle number to be used. The fntw parameter divided by 1440 specifies the character width in inches (Characters Per Inch equals 1440 divided by the fntw parameter). For the 5219, the fntw parameter is restricted to 0060h (15 CPI), 0078h (12 CPI) or 0090h (10 CPI). All other values default to 0060h (10 CPI). The ps parameter specifies whether monospacing (01h) or proportional spacing (02h) is to be used. A value of 00h means no change. For the 3812, both the fntw and the ps parameters are discarded. The 3812 always uses the spacing for which the font requested was designed. IBMEMUL: Same as IBM. When the OPTIMA receives this command, it selects a font at the target printer in the following manner: If Computer Output Reduction (COR) is active, and if the CPI value selected by the fntw parameter is different than the current setting, one of these PFSs is sent to the target printer: PFS: Condition: COR 10> CPI = 10 COR 12> CPI = 12 COR 15> CPI > 12 For COR mode, these PFSs should select fonts 13, 15 and 20 CPI, respectively, to provide horizontal reduction. If the orientation is COR, this is the only action performed. Page B-16 AGILE 5250 OPTIMA User’s Guide and Reference If the current orientation is either portrait or landscape, then the font selection process has two steps. First, one of the following PFSs is sent to the target printer (in this order of priority): Orientation PFS Condition Portrait P PSCPI> ps = 02h Portrait P 5CPI> CPI = 5 Portrait P 8CPI> CPI = 8 Portrait P 10CPI> CPI = 10 Portrait P 15CPI> CPI = 15 Portrait P 16CPI> CPI = 16 Portrait P 17CPI> CPI = 17 Landscape L PSCPI> ps = 02h Landscape L 5CPI> CPI = 5 Landscape L 8CPI> CPI = 8 Landscape L 10CPI> CPI = 10 Landscape L 15CPI> CPI = 15 Landscape L 16CPI> CPI = 16 Landscape L 17CPI> CPI = 17 Next, the OPTIMA looks up the GFID in the font correspondence table for the orientation (PORT ID> or LAND ID>). If there is an entry for the requested GFID, the corresponding PFS is sent to the printer to select the font. If there is no entry in the font table for the requested CPI, or if the font selected by the PFS for the GFID is not available at the target printer, then the target printers spacing will still be correct because of the CPI PFS. 275EMUL: No operation. APPENDIX B — SCS/DCA COMMAND SUMMARY Page B-17 Command: Begin Emphasis (BES) Format: 2B D1 nn 8A ca Printers: 3812 Action: Activates the continuous emphasis function. It emphasizes characters by overlaying them with the same pel pattern displaced by two pels horizontally. The ca parameter is ignored. IBMEMUL: Same as IBM. If BOLDTYP is set to PRINTER, the BOLD ON PFS is sent to the printer before the text to be bolded. The BOLDOFF PFS is sent to the printer after the text to end the bolding. Normally these PFSs turn bolding on and off at the target printer. If BOLDTYP is set to BACK SPC, bolding is achieved by printing each bold character in the following way: Character - Backspace - BSBOLD1 - Character BSBOLD2. PFSs BSBOLD1 and BSBOLD2 are used to perform small relative vertical movements to the right and left, respectively, thereby offsetting the two occurences of the character and creating a bold appearance. 275EMUL: No operation. Command: End Emphasis (EES) Format: 2B D1 nn 8E xx Printers: 3812 Action: Deactivates the continuous emphasis function. The xx parameter is ignored. IBMEMUL: Same as IBM. Ends bolding mode previously started by Begin Emphasis command. 275EMUL: No operation. Page B-18 AGILE 5250 OPTIMA User’s Guide and Reference Command: Release Left Margin (RLM) Format: 2B D2 nn 0B Printers: 3812, 5219 Action: Release Left Margin (RLM) is used to indicate to the printer that Back Spaces (BS) and Unit Back Spaces (UBS) are allowed to go to the left of the logical left margin. The left margin becomes unreleased upon the next occurrence of a Carriage Return (CR), New Line (NL), Required New Line (RNL), Interchange record Separator (IRS), Form Feed (FF) or Required Form Feed (RFF) command. For the 3812, the left margin is always released. This command is used by the 3812 only in determining the last line of a justified paragraph (see Set Justify Mode). IBMEMUL: Same as the 5219. 275EMUL: No operation. Command: Set Indent Level (SIL) Format: 2B D2 nn 07 il Printers: 3812, 5219 Action: Specifies the number of tab stops to indent on subsequent Carriage Returns (CR). The il parameter specifies how many tab stops to indent. A value of 00h turns off indenting. IBMEMUL: Same as IBM. 275EMUL: No operation. APPENDIX B — SCS/DCA COMMAND SUMMARY Page B-19 Command: Set Line Spacing (SLS) Format: 2B D2 nn 09 ls Printers: 3812, 5219 Action: Specifies the line spacing to be used for subsequent text. The ls parameter specifies the number of half-lines to space. The distance of a full line is determined by the value most recently set either by the Set Line Density (SLD) command or by the Set Single Line Distance (SSLD) command. IBMEMUL: Same as IBM. The OPTIMA uses the ls parameter in calculating vertical movement commands (the PFS VERMOVE>) to send to the target printer. See Set Line Density (SLD) and Set Single Line Distance (SSLD) for more information. 275EMUL: No operation. Page B-20 AGILE 5250 OPTIMA User’s Guide and Reference Command: Set Initial Conditions (SIC) Format: 2B D2 nn 45 ic Printers: 3812, 5219 Action: This command resets all system-changeable settings to one of two sets of default values. The ic parameter specifies the initial condition of the printers settings. An ic value of FFh specifies the Data Processing condition set (DP); an ic value of 01h specifies the Word Processing condition set (WP). DP WP Page Width 13.2 inches 8.5 inches Page Height 11 inches 11 inches Left Margin none 1.5 inches Right Margin 13.2 inches 7.5 inches Top Margin none 1 inch Bottom Margin 11 inches none Typestyle (GFID) 11 87 Lines Per Inch 6 6 Auto New Line On Off Auto New Page On Off An ic value of FFh also specifies a job boundary. On the 3812, an ic parameter value of FFh causes the output tray to be jogged (offset). IBMEMUL: Same as the 3812. When the OPTIMA receives this command with the ic parameter set to FFh, it sends the PFS JOGOUT> to the target printer. This PFS is usually used to jog (offset) the output paper tray. Besides the target printer settings that are reset by this command, the OPTIMA also sends the PFS JOBSTRT> to the target printer if the ic parameter is set to FFh (DP). By default this PFS is unused. It can be used to reset duplex or 2-up print modes at the target printer, ensuring that the last logical page from one job and the first APPENDIX B — SCS/DCA COMMAND SUMMARY Page B-21 logical page of the next job are not printed on the same physical page. When the OPTIMA is calculating automatic page orientation, the setting of the initial condition set determines how page size will be calculated. If the ic parameter is set to 01h (Word Processing), then the page size is determined by the settings of the last received Set Presentation Page Size (SPPS) command. If the ic parameter is set to FFh (Data Processing), then the page width is determined by Maximum Print Position (MPP) divided by CPI, and the page height is determined by Maximum Print Line (MPL) divided by LPI. 275EMUL: The system-changeable parameters supported by the 275 are set to their default values. Command: Set Horizontal Tabs (STAB) Format: 2B D2 nn 01 ff a1 tab1 a2 tab2 a3 tab3 Printers: 3812, 5219 Action: Sets horizontal tab characteristics and positions. The ff parameter specifies the type of tab stops. If the ff parameter value is 00h, the tab stops are column (floating) positions. If the ff parameter value is 01h, the tab stops are fixed positions. The a1 and a2 parameters are not used but must be present. All tab stops are specified by sets of three bytes each. The tab1 and tab2 parameters are either column or fixed positions. For floating tabs, the tab1 and tab2 parameters are the column numbers relative to the left margin. For fixed tabs, the tab1 and tab2 parameters are the tab positions in 1/1440-inch units relative to the left margin. If this command specifies no tab positions, all current tab positions are cleared. IBMEMUL: Same as IBM. 275EMUL: No operation. Page B-22 AGILE 5250 OPTIMA User’s Guide and Reference Command: Justify Text Field (JTF) Format: 2B D2 nn 03 rere pr Printers: 3812, 5219 Action: Specifies that a field of text is to be justified. Text to be justified follows the command. Justification ends at the next Justify Text Field (JTF), Carriage Return (CR), New Line (NL), Required New Line (RNL), Interchange Record Separator (IRS), Form Feed (FF) or Required Form Feed (RFF) command. The left edge of the fields placement is the current print position. The rere parameter specifies the right edge the fields placement in 1/1440-inch units relative to the left margin. The pr parameter specifies the percentage of white space at the end of the field that is to be redistributed within the field. Allowed values of pr for 3812 and 5219 printers are 00h (no change from last value), 32h (50%) and 64h (100%). If the text to be justified does not fit within the field, no justification takes place. JFT cannot occur while Set Justify Mode is active. IBMEMUL: Same as IBM. The OPTIMA allows any percentage rule: 00h (no change), and 01h (1%) to 64h (100%). The OPTIMA turns off justify mode (as set by Set Justify Mode) upon receiving this command. The OPTIMA performs all calculations necessary to perform the justification on the target printer. Because of the complexity of these calculations, justification may result in significantly reduced throughput. The OPTIMA sends the PFS SNDXTRA> to the printer between the characters in the text field to place small amounts of additional space between the characters. This results in the text being justified. 275EMUL: No operation. APPENDIX B — SCS/DCA COMMAND SUMMARY Page B-23 Command: Set Justify Mode (SJM) Format: 2B D2 nn 0D st pr Printers: 3812, 5219 Action: Set Justify Mode is used to activate and deactivate justification. The st parameter specifies whether justify mode is to be activated or deactivated. An st value of 00h means no change. An st value of 01h means activate justify mode. An st value of 02h means deactivate justify mode. The pr parameter specifies the percentage of white space at the end of the field to be redistributed within the field. A pr value of 00h means no change. Allowed values of pr are 00h, 32h (50%) and 64h (100%). When justification is active, Justify Text Field (JTF) is not allowed. When justification is active, subsequent text is justified between the left and right margins. Lines ended with any of the following combinations of commands are considered to be the last line of a paragraph and are not justified: NL (or IRS) & NL (or IRS); RNL (or IRT); NL (or IRS) & LF; NL (or IRS) & HT; NL (or IRS) & Indent Tab; NL (or IRS) & Space; NL (or IRS) & Numeric Space; NL (or IRS) & Required Space; NL (or IRS) & BS; NL (or IRS) & UBS; NL (or IRS) & CR; NL (or IRS) & RLM; NL (or IRS) & NBS; Required Form Feed. Lines of text that extend past the right margin are not justified. IBMEMUL: Same as IBM. The OPTIMA allows any percentage rule: 00h (no change), and 01h (1%) to 64h (100%). The OPTIMA turns off justify mode (as set by Set Justify Mode) upon receiving this command. The OPTIMA performs all calculations necessary to perform the justification on the target printer. 275EMUL: No operation. Page B-24 AGILE 5250 OPTIMA User’s Guide and Reference Command: Set Horizontal Margins (SHM) Format: 2B D2 nn 11 lmlm rmrm Printers: 3812, 5219 Action: Specifies the left and right margins for subsequent printing. The lmlm parameter specifies the left margin position in 1/1440-inch units. The rmrm parameter specifies the right margin position in 1/1440-inch units. Both the lmlm and rmrm parameters are relative to the physical left edge of the page. Valid values for both lmlm and rmrm parameters are 0000h through 7FFFh. A value of 0000h means no change to last setting. The rmrm parameter is used in justifying text only when Set Justify Mode (SJM) has turned justification on. IBMEMUL: Same as IBM. The rmrm parameter is used only in justification calculations. 275EMUL: No operation. APPENDIX B — SCS/DCA COMMAND SUMMARY Page B-25 Command: Set Presentation Page Size (SPPS) Format: 2B D2 nn 40 wdwd htht Printers: 3812, 5219 Action: Specifies the physical size of the page. This deactivates the auto new line function. The auto new page function is deactivated if the htht parameter is not omitted. The wdwd parameter specifies the physical width of the page. The htht parameter specifies the physical height of the page. Valid values for both the wdwd and htht parameters are 0000h through 7FFFh. A value of 0000h indicates no change to the last setting. For the 5219, the wdwd parameter is limited to the range of 0000h through 4A00h. This command is restricted to page boundaries. If the initial condition set specified by Set Initial Conditions (SIC) is Word Processing (WP), then the physical size of the page is used in automatic page orientation calculations. IBMEMUL: Same as 3812. 275EMUL: No operation. Page B-26 AGILE 5250 OPTIMA User’s Guide and Reference Command: Set Single Line Distance (SSLD) Format: 2B D2 nn 15 ldld Printers: 3812, 4214, 5219 Action: Specifies in 1/1440-inch units the distance between subsequent print lines. This command overrides the last Set Single Line Distance or Set Line Density (SLD) command. Set Single Line Distance has the same effect as Set Line Density, with the exception that the units are different. The ldld parameter specifies the height of a print line in 1/1440-inch units. For the 5219, the following ldld parameter values are supported: 001Eh (48 LPI), 003Ch (24 LPI), 0078h (12 LPI), 0096h (9.6 LPI), 00B4h (8 PLI), 00F0h (6 LPI), 010Eh (5.33 LPI), 168h (4 LPI) and 023Ah (1 line per centimeter). For the 4214, all values are valid and are translated to equivalent 1/72-inch units. For the 3812, values between 0001h and 7FFFh are valid. IBMEMUL: Same as the 3812. All values of the ldld parameter are supported. The OPTIMA maintains all vertical movement distances in 1/1440-inch units; however, actual commands to the target printer are translated to the equivalent units specified by the output port option FMTINFO:VER RES=. This means that the accumulated error across multiple lines of text is never more than one-half of the target printers vertical resolution. 275EMUL: No operation. APPENDIX B — SCS/DCA COMMAND SUMMARY Page B-27 Command: Set Character Density (SCD) Format: 2B D2 nn 29 00 cp Printers: 3812, 4214, 5219, 5224, 5225 Action: Specifies the character density in characters per inch (CPI) for subsequent text. The cp parameter specifies CPI. For the 4214, values of 00h (no change), 05h (5CPI), 0Ah (10CPI), 0Ch (12 CPI) and 10h (16.7 CPI) are valid. For the 3812 and 5219, values of 00h (no change), 0Ah (10 CPI), 0Bh (proportional spacing), 0Ch (12 CPI) and 0Fh (15 CPI) are valid. For the 3812 and 5219, the value 0Bh (proportional spacing) is effectively the same as setting the ps parameter value of the Set FID through GFID (FSG) command to 02h. For the 5224 and 5225, values of 00h (no change), 0Ah (10 CPI), 0Ch (12 CPI) and 0Fh (15 CPI) are valid. This command recalculates the horizontal Maximum Print Position (MPP). If the newly calculated MPP is less than the current MPP, it overrides the old MPP setting. IBMEMUL: Same as IBM. The OPTIMA supports all CPI values for all IBM printer emulations. The OPTIMA, in addition to all of the above values of the cp parameter, supports values of 08h (8.6 CPI) and 11h (17.1 CPI). If the current orientation is portrait, one of the PFSs P 5CPI> (CPI≤5), P 8CPI> (CPI≤8), P 10CPI (CPI≤10), P PSCPI> (proportional spacing), P 12CPI> (CPI≤12), P 15CPI> (CPI≤15), P 16CPI> (CPI≤16) or P 17CPI (CPI>16) will be sent to the target printer to invoke the appropriate CPI value. Page B-28 AGILE 5250 OPTIMA User’s Guide and Reference If the current orientation is landscape, one of the PFSs L 5CPI> (CPI≤5), L 8CPI> (CPI≤8), L 10CPI (CPI≤10), L PSCPI> (proportional spacing), L 12CPI> (CPI≤12), L 15CPI> (CPI≤15), L 16CPI> (CPI≤16) or L 17CPI> (CPI>16) will be sent to the target printer to invoke the appropriate CPI value. If the current orientation is Computer Output Reduction (COR), one of the PFSs COR 10> (CPI≤10), COR 12> (CPI≤12) or COR 15> (CPI>12) will be sent to the target printer to invoke the appropriate CPI value. Although the OPTIMA automatically reduces all line spacing during COR printing to 70% (the default reduction value), the COR 10>, COR 12> and COR 15> PFSs should select CPI values ≥ 13, 15 and 20 CPI, respectively, to provide horizontal character spacing reduction. 275EMUL: No operation. Command: Set Presentation Color (SPC) Format: 2B D2 nn 2D cccc Printers: IBM printer emulation on 3197 display Action: Specifies the color used for subsequent text. The cccc parameter may be either a one- or two-byte number. For one-byte numbers the following values are valid: Hex value: Color: F0 Brown F1 Blue F2 Red F3 Pink F4 Green F5 Turquoise F6 Yellow F7 Neutral F8 Orange F9 Color of Medium APPENDIX B — SCS/DCA COMMAND SUMMARY Page B-29 For two-byte numbers the following values are valid: Hex value: Color: 0000 Black (or other ribbon color) 0001 Blue 0002 Red 0003 Pink/Magenta 0004 Green 0005 Turquoise/Cyan 0006 Yellow 0007 White 0008 Black 0009 Dark Blue 000A Orange 000B Purple 000C Dark Green 000D Dark Turquoise 000E Mustard 000F Grey 0010 Brown FF00 Default FF01 Blue FF02 Red FF03 Pink FF04 Green FF05 Turquoise/Cyan FF06 Yellow FF07 Black FF08 Color of Medium FFFF Default When the current print color is Color of Medium, no text is printed until a new color is selected. IBMEMUL: No operation. 275EMUL: No operation. Page B-30 AGILE 5250 OPTIMA User’s Guide and Reference Command: Page Presentation Media (PPM) Format: 2B D2 nn 48 xxxx fc sd do dd pq dx Printers: 3812, 4214, 5219 Action: Specifies parameters regarding the paper. The fc parameter specifies the forms control. A value of 00h means no change to current setting; 01h specifies paper; 02h specifies envelopes. For the 3812, the value 02h is not supported. The sd parameter specifies the paper source drawer. Valid values are 00h (no change), and from 01h to the number of drawers installed in the printer. The do parameter specifies the destination (output) tray offset. A value of 00h means do not offset; any other value means offset the tray. This parameter is supported only by the 3812. The dd parameter specifies the destination (output) drawer. Valid values are 00h (no change), and from 01h to the number of output drawers installed in the printer. The 3812 jogs (offsets) the output tray if the value is changed from the last setting. The pq parameter specifies the print quality for subsequent text. Valid values are 00h (no change), 01h (data processing), 02h (near-letter quality) and 03h (high-speed draft). For the 5219, a value of 01h specifies ribbon-saver mode. For the 3812, a value of 01h allows Computer Output Reduction, and values of 02h and 03h disallow COR. If COR is disallowed, portrait mode is used instead. The dx parameter specifies duplex mode. A value of 00h specifies no change; 01h specifies simplex (one-sided) printing; 02h specifies duplex (two-sided) printing. For the 3812, 4214 and 5219, the dx parameter is not used. This command is restricted to page boundaries. APPENDIX B — SCS/DCA COMMAND SUMMARY IBMEMUL: Page B-31 Same as IBM, except that the OPTIMA will perform COR even if it has been disallowed with this command. The OPTIMA uses the fc and sd parameters to select a source paper drawer simply by adding two (2) to the sd parameter if a forms-type of envelope (fc=02h) is requested. The OPTIMA recognizes up to four source drawers on the target printer called PAPER 1, PAPER 2, PAPER 3 and ENVELOP. On systems that restrict the source drawer number to less than 3, access to the third and fourth drawers can be accomplished by selecting a forms-type of envelope (fc=02h). The OPTIMA will send one of the PFSs PPAPER1>, PPAPER2>, PPAPER3>, P ENVEL>, LPAPER1>, LPAPER2>, LPAPER3>, L ENVEL> at the beginning of each page. For target printers that force a page eject when a paper source is selected, it may be necessary to delete the PFS FF> and rely on these PFSs to perform form feeding. For printers that do not force a page eject when selecting a source drawer, the FF> PFS should be left unmodified (usually containing only 0Ch). Although source drawer 4 is called ENVELOP, there is no reason that this drawer needs to contain envelopes. Similarly, there is no reason that PAPER 1, PAPER 2 and PAPER 3 need to hold paper. The PFS JOGOUT> is sent to the target printer by the OPTIMA at the beginning of each page that requires an output tray offset (jog), either because the do parameter was non-zero or because the dd parameter was changed from the last setting. The JOGOUT> PFS is also sent to the printer if the Set Initial Conditions (SIC) command specifies the Data Processing (DP) initial condition set. This is the same as the 3812. The OPTIMA supports dd (destination drawer) parameters of 00h (no change), and the range of 01h through 03h. One of the PFSs DEST1>, DEST2> or DEST3> is sent to the target printer at the beginning of each page. These PFSs can be used to select a destination (output) drawer. Page B-32 AGILE 5250 OPTIMA User’s Guide and Reference The qq parameter controls the print quality at the target printer by sending one of the PFSs LOWQUAL> (qq=03h), MEDQUAL> (qq=01h) or HIQUAL> (qq=02h). These PFSs are sent to the printer only if the print quality setting is changed. Many target printers (specifically dot matrix) place limitations on print quality, proportional spacing, font and/or print enhancement combinations. The OPTIMA supports the dx (duplex) parameter by sending the SIMPLEX>, DUPLEX> or TUMBLE> PFSs to the target printer whenever the parameter is changed. 275EMUL: No operation. Command: Set Vertical Margins (SVM) Format: 2B D2 nn 49 tmtm bmbm Printers: 3812, 5219 Action: Specifies top and bottom margins for subsequent pages. The tmtm parameter specifies the top margin in 1/1440inch units. Valid values are 0000h through 7FFFh. A value of 0000h causes no change to the last setting. The bmbm parameter specifies the bottom margin in 1/1440-inch units. This parameter is not used by 3812 or 5219 printers. IBMEMUL: Same as IBM. When in Computer Output Reduction (COR) mode, a default half-inch margin is added to the top margin requested by the system. 275EMUL: No operation. APPENDIX B — SCS/DCA COMMAND SUMMARY Page B-33 Command: Set Printer Setup (SPSU) Format: 2B D2 nn 4C xx pf xx si Printers: 3812, 5219 Action: Specifies both the paper feed technique and the print setup to be used. The pf parameter specifies the paper feed technique. Valid values are 00h (no change), 01h (manual feed), 02h (tractor feed) and 03h (automatic cut sheet feed). The si parameter is a string of up to 60 bytes that is used to indicate the printer setup to the operator. On the 5219, the first two bytes of this string are interpreted as decimal digits and displayed on the front panel LED. This command is ignored by the 3812. IBMEMUL: Same as the 5219. The OPTIMA uses the fc parameter to determine which forms control PFS to send to the target printer. PORTMAN> or LANDMAN> (fc=01h), PORTTRC> or LANDTRC> (fc=02h), or PORTCUT> or LANDCUT> (fc=03h) is sent to the printer if the fc parameter is changed. The OPTIMA discards the si parameter. 275EMUL: No operation. Page B-34 AGILE 5250 OPTIMA User’s Guide and Reference Command: Set Exception Action (SEA) Format: 2B D2 nn e1 a1 e2 a2... Printers: 3812, 5219 Action: Set Exception Action is used to specify the action to be taken for each of the exception condition levels. The parameters en and an must be specified in pairs. From zero to 4 pairs can be supplied. The en parameter specifies an exception condition level. The an parameter specifies the action to take when that exception condition level is encountered. IBMEMUL: No operation. The OPTIMA performs automatic error recovery for all error conditions. 275EMUL: No operation. APPENDIX B — SCS/DCA COMMAND SUMMARY Page B-35 Command: Set Text Orientation (STO) Format: 2B D3 nn F6 caca lala Printers: 3812 Action: This command is used to specify character and line rotation for subsequent text. The caca parameter specifies character rotation angle and is not supported on the 3812. The lala parameter specifies the text line rotation angle. Valid values are: 0000h (normal portrait), 2D00h (landscape left), 5A00h (upside-down portrait), 8700h (landscape right), FFFEh (Computer Output Reduction) and FFFFh (default orientation based upon page size). IBMEMUL: Same as the 3812. The OPTIMA performs orientation selection in the same way as the IBM 3812, with two exceptions. The OPTIMA allows system-specified orientation with the STO command to be overridden at the front panel option FMTINFO: ROTATE=. The 3812 does not allow the automatic orientation selection of COR if the pq (print quality) parameter in the Page Presentation Media (PPM) command is set to 01h (data processing quality). The OPTIMA does not enforce this limitation. One of the two PFSs, PORT> or LAND>, is sent to the target printer at the beginning of each page. The LAND> PFS is sent for either landscape or COR orientation. 275EMUL: No operation. Page B-36 AGILE 5250 OPTIMA User’s Guide and Reference Command: Begin Underscore (BUS) Format: 2B D4 nn 0A 01 bp Printers: 3812, 5219 Action: The Begin Underscore command specifies that all subsequent text is to be underscored until the next End Underscore command is received. The bp parameter specifies the set of characters for which to bypass underscoring. Valid values are 00h (bypass horizontal tab and indent tab commands), 01h (continuous underscore) and 80h (bypass space, horizontal tab, indent tab and relative horizontal print position commands). Underscoring is disabled either by an End Underscore command or by a Set Initial Conditions command. IBMEMUL: Same as IBM. The OPTIMA sends the PFSs UNDL ON> and UNDLOFF> to begin and end underscoring. It also uses the underline PFSs instead of the underscore character if it is used to overstrike another character. This is especially fast on dot matrix printers that can both print and underscore text in one pass of the printhead. It also is usually more attractive, providing a smooth, continuous underline. 275EMUL: No operation. Command: End Underscore (EUS) Format: 2B D4 nn 0E Printers: 3812, 5219 Action: Ends underscoring mode previously started by Begin Underscore command. IBMEMUL: Same as IBM. 275EMUL: No operation. APPENDIX B — SCS/DCA COMMAND SUMMARY Page B-37 Command: Begin Overstrike (BOS) Format: 2B D4 nn 72 ch bp gcgc cpcp Printers: 3812, 5219 Action: Starts character overstrike mode. After a Begin Overstrike command is received, all characters printed (except bypassed characters), are overstruck until an End Overstrike command is received. The ch parameter is the character to use for overstriking. The bp parameter specifies the set of characters for which to bypass overstriking. Valid values are 00h (bypass horizontal tab and indent tab commands), 01h (continuous underscore) and 80h (bypass space, horizontal tab, indent tab and relative horizontal print position commands). The gcgc and cpcp parameters are not used or inspected by the 3812 or 5219, but both gcgc and cpcp should be zero (0000h). Overstrike mode, once activated with the Begin Overstrike command, is deactivated by either the End Overstrike or Set Initial Conditions commands. IBMEMUL: Same as IBM. 275EMUL: No operation. Command: End Overstrike (EOS) Format: 2B D4 nn 76 Printers: 3812, 5219 Action: This command ends the character overstrike mode enabled by Begin Overstrike (BOS). IBMEMUL: Same as IBM. 275EMUL: No operation. Page B-38 AGILE 5250 OPTIMA User’s Guide and Reference Command: Load Alternate Characters (LAC) Format: 2B FE nn mm ch i1 i2 i3 i4 i5 i6 i7 i8 i9 [i10]... Printers: 4214, 5224, 5225 Action: Specifies new character bit images for selected characters. The parameters ch and i1 through i9 (or i10) must be specified in sets (10 or 11 bytes per set). The mm parameter specifies the image type for all character images defined with the command. For the 4214, valid values for the mm parameter are 01h, which specifies that the bit images are 8 bits tall by 9 bits wide, and 02h, which specifies that the bit images are 8 bits tall by 10 bits wide. For the 5224 and 5225, the only valid value is 01h. The ch parameter specifies the character for which a new bit image is to be defined. The ch parameter value may range from 00h to FFh. Control characters that have bit images defined for them in this way may be printed in transparent mode. See Transparent (TRN 35h) for more information. Parameters i1 through i9 (or i10) are the bytes of image data. The data is organized as vertical slices of eight bits (one byte) each. For 8 x 9 mode (mm=01h), there are 9 bytes of slice data per character bit image. For 8 x 10 mode (mm=02h) there are 10 bytes of slice data per character bit image. The first byte of bit image data for a character is the leftmost vertical slice of the character bit image; the last byte of data is the rightmost vertical slice of data. The most significant bit of each byte is the top bit of the slice; the least significant bit of each byte is the bottom bit of the slice. Bits that are set ON are printed as black; bits that are set OFF are not printed. APPENDIX B — SCS/DCA COMMAND SUMMARY Page B-39 The printing mechanism of the 4214 prints characters only as 8 x 10. If character bit image information is loaded with 8 x 9 mode (mm=01h), the 9th slice of the image is automatically copied into the 10th slice, to expand the character width to 10 slices. The 5225 is not capable of printing solid black areas for more than 5 minutes. Permanent damage to the 5225 may result if the printer is made to print solid black areas for more than 5 minutes. IBM suggests that after highdensity printing on the 5225, the printer is allowed to cool down (no printing) for 10 minutes. IBMEMUL: No operation. 275EMUL: No operation. Command: Bell (BEL) Format: 2F Printers: 3812, 4214, 5219, 5224, 5225, 5226 Action: Sounds an audible alarm and causes the printer to stop and wait for operator intervention. IBMEMUL: No operation. 275EMUL: Sends BEL to printer. Command: Index Return (IRT) Format: 33 Printer: 3812, 5219 Action: Same function as Required New Line (RNL). IBMEMUL: Same as IBM. 275EMUL: No operation. Page B-40 AGILE 5250 OPTIMA User’s Guide and Reference Command: Absolute Horizontal Print Position (AHPP) Format: 34 C0 ah Printers: 3812, 4214, 5219, 5224, 5225, 5226 Action: Causes the current print position to move to the column specified by the parameter ah. Valid values are in the range of 01h to the current setting of Maximum Print Position (MPP), inclusive. If the requested horizontal print position is to the left of the current print position, a carriage return is performed, and the position is moved to the specified placement. The vertical position is not changed by this command. IBMEMUL: Same as IBM. 275EMUL: Same as IBM. Command: Absolute Vertical Print Position (AVPP) Format: 34 C4 av Printers: 3812, 4214, 5219, 5224, 5225, 5226 Action: Causes the current print position to move to the line specified by the parameter av. Valid values for av are from 01h to the current setting of Maximum Print Line (MPL), inclusive. If the requested vertical position is above (less than) the current position, a Form Feed (FF) is automatically performed, and the printer is moved to the requested position on the next page. This command causes no change to the current horizontal position. IBMEMUL: Same as IBM. 275EMUL: Same as IBM. APPENDIX B — SCS/DCA COMMAND SUMMARY Page B-41 Command: Relative Horizontal Print Position (RHPP) Format: 34 C8 rh Printers: 3812, 4214, 5219, 5224, 5225, 5226 Action: Causes the current print position to be moved horizontally rh character positions to the right. Any value that does not cause the print position to exceed the Maximum Print Position (MPP) is valid. If the rh parameter value is 00h, this command performs no operation. This command causes no change to the vertical position. IBMEMUL: Same as IBM. 275EMUL: Same as IBM. Command: Relative Vertical Print Position (RVPP) Format: 34 4C rv Printers: 3812, 4214, 5219, 5224, 5225, 5226 Action: Causes the current print position to move down the number of lines specified by the rv parameter. Any value that does not cause the current print position to exceed the Maximum Print Line (MPL) is valid. If the rv parameter value is 00h, this command performs no operation. This command causes no change to the horizontal position. IBMEMUL: Same as IBM. 275EMUL: Same as IBM. Page B-42 AGILE 5250 OPTIMA User’s Guide and Reference Command: Transparent (TRN) Format: 35 nn [data] Printers: 4214, 5224, 5225 Action: Causes the printer to enter a transparent printer mode, where the subsequent nn characters are not checked for control codes. This command allows printing of the bit images previously associated with control characters by the Load Alternate Characters (LAC) command. The count parameter, nn, unlike the count parameter for format commands, does not include the count byte itself. The count parameter is the count of following bytes not to be checked for SCS/DCA control codes. IBMEMUL: The OPTIMA allows data to be sent directly to the printer (or other output device) with this command. After receiving the Transparent command, it sends the following nn bytes directly out the output port. Unlike the ASCII Transparent (ATRN) mode, Transparent data is translated before it is sent to the target printer. 275EMUL: Same as IBMEMUL. Command: Numeric Backspace (NBS) Format: 36 Printers: 5219 Action: This command is the same as Back Space (BS). IBMEMUL: Same as IBM. 275EMUL: No operation. APPENDIX B — SCS/DCA COMMAND SUMMARY Page B-43 Command: Subscript (SPS) Format: 38 Printer: 3812, 5219 Action: Causes the current print position to move down one-half line distance. On the 5219, only one level of superscript is supported. On the 3812, multiple levels of superscript are supported. IBMEMUL: Same as the 3812. The PFS SUBS ON> is sent to the printer once for each subscript level. A subscript command received after a superscript command (to restore the normal baseline position) causes the PFS SUBSOFF> to be sent to the printer once per level. The use of subscript ON/OFF and superscript ON/OFF printer commands in the SUPS ON>, SUPSOFF>, SUBS ON> and SUBSOFF> PFSs will allow only one level of sub/superscripting, because the target printer is performing the sub/superscript, and it will support only a single level. The use of relative upward/downward movement commands for the PFSs SUPS ON>, SUPSOFF>, SUBS ON> and SUBSOFF> will allow multiple sub/superscript levels to be supported. 275EMUL: No operation. Command: Indent Tab (IT) Format: 39 Printers: 3812, 5219 Action: Moves the print position to the right one Tab stop and sets the effective left margin to this position. If no Tab stop is encountered, it will move the print position one Space to the right. IBMEMUL: Same as IBM. 275EMUL: No operation. Page B-44 AGILE 5250 OPTIMA User’s Guide and Reference Command: Required Form Feed (RFF) Format: 3A Printers: 3812, 5219 Action: Performs the same function as the Form Feed (FF) control and restores the print position to the left margin. On the 3812, RFF causes the current page to print. IBMEMUL: Same as IBM. 275EMUL: No operation. Command: Substitute (SUB) Format: 3F Printers: 3812, 5219 Action: Prints the hyphen (-) graphic. IBMEMUL: Same as IBM. 275EMUL: No operation. Command: Space (SP) Format: 40 Printers: 3812, 5219 Action: Prints the standard Space graphic. It is a word delimiter, and it can increase in width during formatting. IBMEMUL: Same as IBM. 275EMUL: Same as IBM. Command: Required Space (RSP) Format: 41 Printers: 3812, 5219 Action: Prints the standard Space graphic. It is processed like Space (SP), but it is not recognized as a word delimiter, and it is not increased in width during formatting. IBMEMUL: Same as IBM. 275EMUL: No operation. APPENDIX B — SCS/DCA COMMAND SUMMARY Page B-45 Command: Numeric Space (NSP) Format: E1 Printers: 3812, 5219 Action: Prints the standard Space graphic. It is processed like Space (SP), but it is not recognized as a word delimiter, and it is not increased in width during formatting. IBMEMUL: Same as IBM. 275EMUL: No operation. APPENDIX C — PSEUDO TRANSPARENCY Page C-1 APPENDIX C PSEUDO TRANSPARENCY Introduction Most ASCII and EBCDIC printers have features that are not available on IBM midrange printers. If the users application software is aware that the destination of the data may be a non-IBM printer attached to a protocol converter, the application can send printer commands that will activate the printers advanced features. Printer commands must be sent to the printer without being modified by the System or the protocol converter. For this to occur, the commands must be sent in a transparent packet. (Refer to the printer users manual for a list of available printer commands.) A transparent packet consists of a trigger followed by the data or command that will be sent to the printer. The trigger alerts the protocol converter that the data that follows it should be sent directly to the printer without translation. The 5250 OPTIMA will recognize the triggers for IBM transparency (35h), ASCII transparency (03h) in IBM emulation mode, Xerox Metacode transparency (35h) in IBM emulation mode, and Xerox transparency (36h) in Xerox 275 twinax protocol converter emulation mode. The 5250 OPTIMA will also support two forms of pseudo transparency. i-data Pseudo Transparency This form of pseudo transparency is valid only for twinax data streams when the 5250 OPTIMA is in IBM emulation mode. The trigger used by i-data applications for pseudo transparency is designated by the user within the application. The application sets the trigger at the protocol converter by sending two ampersand characters (&&), two question marks (??) and the designated transparency trigger. For instance, to define the trigger as a percent sign (%), the application would send the following command string: &&??% Page C-2 AGILE 5250 OPTIMA User’s Guide and Reference The transparent packet itself consists of two trigger characters, the data to be sent to the printer without translation, and one trigger character that is used to terminate the transparent packet. For example, to send an ASCII escape (1Bh) to the printer, the application would send the following packet: %%1B% Transparent data may also be sent as text when the text is placed between apostrophes ('), as shown below: %%1B'0Titan10iso-P'0D0A% The 5250 OPTIMA will convert all printable text characters between apostrophes into the appropriate hexadecimal values using the active character code translation table. All hexadecimal values may be separated with spaces, commas or carriage control commands. The 5250 OPTIMA will remove these characters before sending the transparent command to the printer. MPI Pseudo Transparency This form of pseudo transparency is valid only for twinax data streams when the 5250 OPTIMA is in Xerox 275 twinax protocol converter emulation mode. The trigger and terminator for MPI pseudo transparency is not determined by the user. Both the trigger and the terminator consist of an ampersand (&) followed by a percent sign (%). When the 5250 OPTIMA encounters these two characters together, it begins pseudo transparency operations until the next consecutive occurence of the characters. For instance, to send a PCL printer reset command (Esc E) to the printer, the command sent to the 5250 OPTIMA would look like this: &%1B45&% 1Bh is the ASCII escape character, and 45h is the uppercase E. All values in this form of transparency must be in hexadecimal format, and they must not be separated by any printable characters or carriage control commands. APPENDIX D — OPTEDIT Page D-1 APPENDIX D OPTEDIT Overview OPTEDIT is a menu-driven program used to edit the full configuration of the AGILE 5250 OPTIMA. It serves as an alternative to editing the configuration from the OPTIMA front panel. OPTEDIT operates on IBM PC, PS/2 and compatible computers with MS/PC-DOS version 3.3 or later. System requirements are 640K RAM and one 3.5 inch, 1.44MB highdensity floppy disk drive. OPTEDIT allows the user to perform the following functions: Edit the basic configuration information for the OPTIMA, including twinax, parallel and serial port information. Edit translation tables, programmable function strings and font correspondence tables in ASCII, EBCDIC and hexadecimal modes. Apply character translation to programmable function strings and font correspondence tables using editable translation tables. Edit output port configuration information for compatibility with special applications, such as barcode printers, plotters, etc. Edit character translation tables for custom character sets, including the ability to reverse translation tables to change the direction of character translation. Installing OPTEDIT The OPTEDIT program is included on the diskette provided with the 5250 OPTIMA. No special installation of the program is required; however, if the program is used frequently, the user may want to copy it to a hard drive. It is recommended that hard drive users also copy their output port (i.e., printer) configuration files and the OPTIMA configuration file (_OPTCNFG._), including archival files saved under different names, to the same directory as OPTEDIT. Before using OPTEDIT, the user should complete the OPTIMA basic setup and make all of the required connections of the users equipment. Page D-2 AGILE 5250 OPTIMA User’s Guide and Reference Running OPTEDIT To run OPTEDIT, choose the directory where OPTEDIT resides, type OPTEDIT at the DOS prompt, and press ENTER. The software will prompt the user to specify the letter of the disk drive where the configuration file to be edited is located. Type the letter of the drive, and press ENTER. The file name used by the OPTIMA for its current configuration is _OPTCNFG._. Note: The OPTIMA and OPTEDIT will load and use only configuration files named _OPTCNFG._. If the user would like to keep several different configurations for archival purposes, the user should use the DOS rename command to change the name of each file until it is to be used. Editing The Current Configuration To edit the current configuration of the OPTIMA, follow these steps. In these instructions, it is assumed that the 3.5 inch diskette is in drive B:. If not, substitute the correct drive letter for B: in these instructions. 1) Place the OPTIMA diskette in the PC disk drive B:. 2) At the B:> DOS prompt, type: OPTEDIT Press ENTER. 3) When prompted by the program for the letter of the disk drive where _OPTCNFG._ resides, type: B Press ENTER. Any of the configuration options for the OPTIMA can now be changed. After editing the configuration options, save the configuration before exiting the program: 4) To save the new configuration, press F10 at the OPTEDIT main screen. The program will present the user with the following choices: Quitting and saving (Y)es, and SAVE Quitting without saving e(X)it without saving Returning to OPTEDIT (N)o APPENDIX D — OPTEDIT Page D-3 5) Press Y to quit the program and save the new configuration. 6) To use the new configuration, remove the diskette from the PC disk drive and replace it in the OPTIMA disk drive. If the OPTIMA is powered down, power up the unit. If the OPTIMA is powered up, press the RESET buttons on the front panel to restart. Editing Configuration Options The main screen of OPTEDIT shows each of the seven I/O ports of the OPTIMA and the basic configuration options for each group (I/O port) as shown below: +----------- OPTEDIT Ver 2.40 Copyright (c) Feb 26 1993 by AGILE. -------------+ ¦ + Twinax -1-------Active ---------+ + Parallel Out -----Active ------+ ¦ ¦ ¦Emulate=IBM 5219 Mode=IBM Emul ¦ ¦ Timing=Fast ErrTime=Default ¦ ¦ ¦ ¦ Out To=PO,S1,S0 Timeout=5 Secs ¦ ¦ Translate Info: Format Info: ¦ ¦ ¦ ¦ Xerox Special: ¦ ¦ PFS/GFID Info: ¦ ¦ ¦ +----------------------------------+ ¦ Load Par Out Save Par Out ¦ ¦ ¦ + Twinax -2-------Active ---------+ +---------------------------------+ ¦ ¦ ¦Emulate=IBM 5225 Mode=275 Emul ¦ + Serial 0 -Alt Host----Inactive--+ ¦ ¦ ¦ Out To=PO,S1,S0 Timeout=5 Secs ¦ ¦ Baud=9600 Parity=None ¦ ¦ ¦ ¦ Xerox Special: ¦ ¦ Length=8 Bits Stops=1 Bit ¦ ¦ ¦ +----------------------------------+ ¦ Flow=Hardware Out To=PO,S1 ¦ ¦ ¦ + Twinax -3-------Inactive---------+ ¦ErrTime=Default Timeout=5 Secs ¦ ¦ ¦ ¦Emulate=IBM 5219 Mode=IBM Emul ¦ ¦ Translate: Format: PFS/GFID: ¦ ¦ ¦ ¦ Out To=PO,S1,S0 Timeout=5 Secs ¦ ¦ Load Serial 0 Save Serial 0 ¦ ¦ ¦ ¦ Xerox Special: ¦ +---------------------------------+ ¦ ¦ +----------------------------------+ + Serial 1 -Output ----Inactive--+ ¦ ¦ + Parallel In ----Active ---------+ ¦ Baud=19200 Parity=None ¦ ¦ ¦ ¦ Out To=PO,S1,S0 Timeout=5 Secs ¦ ¦ Length=8 Bits Stops=1 Bit ¦ ¦ ¦ ¦ Mode=TRNSPRNT Xerox Special: ¦ ¦ Flow=Hardware Out To=PO,S0 ¦ ¦ ¦ +----------------------------------+ ¦ErrTime=Default Timeout=5 Secs ¦ ¦ ¦ + Translation Tables --------------+ ¦ Translate: Format: PFS/GFID: ¦ ¦ ¦ ¦ Edit Tables ¦ ¦ Load Serial 1 Save Serial 1 ¦ ¦ ¦ +----------------------------------+ +---------------------------------+ ¦ +------------------------------------------------------------------------------+ F1Help F4Edit Xlates F10Exit Screen To select an option to be edited, use the tab key to move between fields, then use the arrow keys to move the cursor to the name of the option, and press ENTER. Selecting any of the options will cause OPTEDIT to display a menu that will allow the user to select a new value for that option. To exit a menu without making any changes, press F10 or Esc. To display information about an option, use the arrow keys to move the cursor to the name of the option, and press F1. Help text describing the purpose and function of the option will be displayed. Press any key to exit the Help screen. Page D-4 AGILE 5250 OPTIMA User’s Guide and Reference Basic Port Configuration The OPTIMA is configurable to the users specific printer/host environment. While most of the configuration options are set to factory defaults that may match the needs of the user, the OPTIMA ports will need to be configured before they are used the first time, so that the devices attached to them may be used properly. This section will describe the process for configuring each of the OPTIMAs communication ports. The user may skip any section that describes a port or a port function that will not be used. Begin by activating each OPTIMA port that will be used (twinax, parallel and serial), and deactivate each port that will not be used. Activating Ports Twinax 1, Twinax 2, Parallel In and Parallel Out are active by default. If the word Active is displayed to the right of the port name, no action is needed. The port is already active. If the word Inactive is displayed to the right of the port name, use the arrow keys to move the cursor on the OPTEDIT main screen to the word Inactive, and press ENTER. The user will be presented with a choice of Active or Inactive. Use the arrow keys to move the cursor to the word Active, and press ENTER. (To make a port inactive, use the arrow keys to move the cursor on the OPTEDIT main screen to the word Active to the right of the port name. Then use the arrow keys to move the cursor to select the word Inactive, and press ENTER.) After the port has been either activated or deactivated, the OPTEDIT main screen will return. APPENDIX D — OPTEDIT Page D-5 Input Ports The OPTIMA has three twinax addresses, one parallel input port and two serial ports that are configurable for use as input ports. To use a port for input, in addition to activating it as described earlier, the user must choose a mode (except for the serial ports), specify the output ports that each input port will use, and select a timeout period. In some cases, the Xerox Special Options selections will have to be modified. Setting the Mode The mode selection tells the OPTIMA what to do with the data it receives from the system. If a twinax address will be emulating one of the printers listed in Setting the Device Emulation Type below, the user should select IBM Emul. The Parallel In port should use TRNSPRNT, except for diagnostic purposes. The default mode for the serial ports is TRNSPRNT, and it cannot be changed in OPTEDIT. The five mode options are described below: 1) IBM Emul. IBM printer emulation. This mode is the default for twinax addresses, and it activates the emulations described later. This mode is not used for alternate host input ports except for diagnostic purposes. 2) SCS Dump. An EBCDIC data dump. This mode is used to print a formatted hexadecimal report, including a human-readable interpretation of the SCS and DCA commands, of the incoming EBCDIC data from the twinax host. This mode is not used for alternate host input ports except for diagnostic purposes. 3) 275 Emul. Emulation of a Xerox 275 twinax protocol converter. If this mode is selected, the user must also select either 5225 or 5256 from the emulation menu (described later). Also, for every output port selected in Out To (described in the next subsection), the Translate Info selection must be Twinax Port n=275 EBC-> ASCII (or Twinax Port n=EBCDIC -> EBCDIC if using a Xerox printer in EBCDIC mode). This mode is not used for alternate host input ports except for diagnostic purposes. 4) BLT Mode. A twinax mode used with specific applications. Do not choose BLT Mode unless advised to do so by AGILE. Page D-6 AGILE 5250 OPTIMA User’s Guide and Reference 5) TRNSPRNT. Transparent mode used for alternate host input. When in transparent mode, the data output by the OPTIMA is identical to the data received, with the exception that the data is routed through the active translate table. This mode is not used by twinax addresses except for diagnostic purposes. At the appropriate twinax address or at Parallel In on the OPTEDIT main screen, use the arrow keys to move the cursor to the word Mode= (the default is IBM Emul for Twinax 1 and Twinax 3; 275 Emul for Twinax 2; and TRNSPRNT for Parallel In) and press ENTER. The user will be presented with a choice between IBM Emul, SCS Dump, 275 Emul, BLT Mode or TRNSPRNT. Use the arrow keys to move the cursor to the appropriate choice, and press ENTER. After the mode has been selected, the OPTEDIT main screen will return. Choosing the Data Routing Each input channel is user-configurable to allow output to any combination of output ports. When data is received from an input port (twinax or alternate host), the OPTIMA looks at the output ports, in order of priority, searching for an output port that is acceptable to the input ports configuration. The first acceptable output port that is not in use by another input port is acquired and used. If all configuration-allowable ports are in use, the input port must wait in a queue for its turn. The output ports have a predefined priority: 1) PO Parallel out (if active) 2) S1 Serial 1 (if active and configured for output) 3) S0 Serial 0 (if active and configured for output typically used for input) To choose the output ports to which each input port will send data, at the specific input port on the OPTEDIT main screen, use the arrow keys to move the cursor to the words Out To= (the default is PO,S1,S0 for the twinax and parallel in ports; the serial port defaults exclude the respective serial port itself), and press ENTER. The user will be presented with a choice of every possible combination of output ports. Use the arrow keys to move the cursor to the output port or combination of output ports to be used with the input port, and press ENTER. After the output ports have been selected, the OPTEDIT main screen will return. APPENDIX D — OPTEDIT Page D-7 Choosing the Timeout Period When any twinax, parallel or serial input port has stopped using an output port for a user-configurable timeout period, the OPTIMA considers the output port available and gives it to the next input port in the queue. The timeout period should be as short as possible to prevent too much time being wasted between print jobs from different sources, but it should not be so short that a job from one source could interrupt a job from another source. For most twinax hosts, a timeout of five seconds should be fine. For parallel and serial alternate hosts connected to IBM PCs or compatibles, the timeout value may need to be increased when running complex graphic applications that take time during printing to compute the image. Some applications may require timeout values as large as one minute. To change the length of the timeout period, at the appropriate port on the OPTEDIT main screen, use the arrow keys to move the cursor to the word Timeout= (the default is 5 seconds), and press ENTER. The user will be presented with a choice of times ranging from one second to one minute. Use the arrow keys to move the cursor to the appropriate time, and press ENTER. After the timeout period has been selected, the OPTEDIT main screen will return. Configuring the Twinax Ports The OPTIMA supports up to three twinax ports simultaneously. Each of these three addresses may be configured separately for a different type of IBM printer emulation, character translation, mode of operation, etc. If the user intends to use more than one twinax address, each one must be configured independently. For a twinax port to be used, the user must activate it, choose the output port(s), specify the timeout period and select the mode, as described earlier. Then the user must set its address and choose the appropriate emulation. If using a Xerox printer, the user should also refer to the section that follows, entitled Interfacing Xerox Printers. Note: Two of the options described in the Xerox section (PFS Suppression and Form Feed Suppression) will also affect non-Xerox printers. Page D-8 AGILE 5250 OPTIMA User’s Guide and Reference Setting the Twinax Address The OPTIMA can concurrently emulate three addresses on the twinax line. For each address, a value must be chosen that does not conflict with an existing device on the twinax line. The OPTIMA will not allow the user to use the same address value more than once. The default addresses for the three twinax emulations are 1, 2 and 3. If one of these addresses is appropriate for the user, the user needs only to activate the port. To change an address, use the arrow keys to move the cursor on the OPTEDIT main screen to the numeral next to the word Twinax, and press ENTER. A list of numerals 0-6 will be displayed. Use the arrow keys to move the cursor to the numeral to be used as the address of the twinax port, and press ENTER. After selecting the address value, the OPTEDIT main screen will return. Setting the Device Emulation Type The OPTIMA in emulation mode (IBM Emul) acts like a printer, and the user must tell the OPTIMA which of the following possible printers it will emulate. Each of the three possible twinax addresses can emulate one of several device types. The device emulations are: 1) 3812 IBM laser printer (SCS mode 5219 emulation) 2) 4214-2 IBM dot matrix printer 3) 5219-D02 IBM daisy wheel printer 4) 5224-2 IBM dot matrix printer 5) 5225-4 IBM dot matrix printer 6) 5256-1 IBM band printer At the appropriate twinax address on the OPTEDIT main screen, use the arrow keys to move the cursor to the word Emulate= (the default for Twinax 1 and Twinax 3 is IBM 5219; the default for Twinax 2 is IBM 5225), and press ENTER. The user will be presented with a choice between IBM 3812, IBM 4214, IBM 5219, IBM 5224, IBM 5225 and IBM 5256. Use the arrow keys to move the cursor to the appropriate choice, and press ENTER. After selecting the emulation, the OPTEDIT main screen will return. APPENDIX D — OPTEDIT Page D-9 Interfacing Xerox Printers Before using these twinax port options, it is recommended that the user become familiar with the issues discussed in Appendix A Interfacing Xerox Printers. These options are also available for alternate host input ports, but they are used only for diagnostic purposes. To change the settings for these options, at the appropriate twinax address on the OPTEDIT main screen, use the arrow keys to move the cursor to the words Xerox Special:, and press ENTER. The screen will display the following list of Xerox Special Options along with their default/current values: Translate UDK Char=Translate UDK to Esc PFS Suppression=Suppress PFSs in XES jobs FF Suppression=Suppress FFs in XES jobs Suppressed FF to NL=Suppressed FF is Removed XTL Suppression=Use XTL Commands Job Start Change FF=Job restarts are passed Metacode TRN Usage=Normal TRN usage UDK Character Translation This option is useful only for twinax addresses receiving XDPM/XES data streams, and it determines whether the OPTIMA or the printer will perform UDK character to Escape character translation. To define this option, use the arrow keys to move the cursor on the Xerox Special Options screen to the words Translate UDK Char= (Translate UDK to Esc is the default), and press ENTER. The following choices will be displayed: Translate UDK to Esc Dont Translate UDK Translate UDK to Esc will cause the OPTIMA to perform the UDK translation. This is useful for resolving UDK character conflicts that can sometimes be caused by the OPTIMAs dynamic data routing. Dont Translate UDK will cause the OPTIMA not to perform the UDK character translation, but to pass any =UDK= UDK character assignments to the printer. Page D-10 AGILE 5250 OPTIMA User’s Guide and Reference Use the arrow keys to move the cursor to the appropriate choice, and press ENTER. The Xerox Special Options screen will return. To return to the OPTEDIT main screen, press F10 or Esc. PFS Suppression This option is useful for both XDPM and XPPM data streams, and it allows the user to control how the OPTIMA will suppress PFSs for the data it receives on the twinax address. To define this option, use the arrow keys to move the cursor on the Xerox Special Options screen to the words PFS Suppression= (Suppress PFSs in XES jobs is the default), and press ENTER. The following choices will be displayed: Dont Suppress PFSs Auto Suppress PFSs in XES Always Suppress PFSs Suppress all but Bold/Und Auto, but not Bold/Und Dont Suppress PFSs tells the OPTIMA not to suppress PFSs for the data stream received on the twinax address. This option gives the host full control over document formatting. Auto Suppress in XES will cause the OPTIMA to suppress all PFSs except the CR>, LF> and FF> PFSs during XDPM print jobs. The XDPM job is delimited by one of the job start commands <UDK>+P, <UDK>+Q, <UDK>+M or <UDK>+N. The PFS suppression will continue until the XDPM job end command (<UDK>+X) is received. This option is useful only in XDPM data streams. Always Suppress PFSs will cause the OPTIMA to suppress all PFSs for the data streams received from this twinax address. This allows the data stream to format the page without conflicts with system formatting requests. This option is very useful for printing XPPM data streams. If the twinax address is receiving XPPM data that will be sent to a printer in XPPM mode, this option should always be selected. Suppress all but Bold/Und tells the OPTIMA to suppress all PFSs except BOLD ON>, BOLD OFF>, BSBOLD1>, BSBOLD2>, UNDL ON> and UNDLOFF>. APPENDIX D — OPTEDIT Page D-11 Auto, but not Bold/Und behaves like Auto Suppress PFSs in XES, except that it will not suppress the BOLD ON>, BOLD OFF>, BSBOLD1>, BSBOLD2>, UNDL ON> and UNDLOFF> PFSs. Use the arrow keys to move the cursor to the appropriate choice, and press ENTER. The Xerox Special Options screen will return. To return to the OPTEDIT main screen, press F10 or Esc. Note: The option Always Suppress PFSs will suppress PFSs even for non-Xerox printers. Form Feed Suppression The form feed suppression option can be useful for both XDPM and XPPM mode data streams, although it is probably most useful for XDPM mode. This option specifies how the OPTIMA will suppress form feeds. When form feed suppression is active, the OPTIMA will not send the FF> PFS to the printer. For more information on form feed suppression, refer to the sections in Appendix A entitled Automatic PFS Suppression and Automatic Form Feed Suppression. To define this option, use the arrow keys to move the cursor on the Xerox Special Options screen to the words FF Suppression= (Suppress FFs in XES jobs is the default), and press ENTER. The following choices will be displayed: Dont Suppress FFs Suppress FFs in XES jobs Suppress FFs in Form jobs Always Suppress FFs Dont Suppress FFs tells the OPTIMA not to suppress the FF> PFS. Form feeds for this address will be sent to the printer normally. Suppress FFs in XES jobs will cause the OPTIMA to suppress the FF> PFS during XDPM print jobs. The XDPM job is delimited by one of the job start commands <UDK>+P, <UDK>+Q, <UDK>+M or <UDK>+N. The form feed suppression will continue until the XDPM job end command (<UDK>+X) is received. This option is useful only in XDPM data streams. Page D-12 AGILE 5250 OPTIMA User’s Guide and Reference Suppress FFs in Form jobs will cause the OPTIMA to suppress the FF> PFS during form-based XDPM print jobs. The form-based XDPM job is delimited by <UDK>+M or <UDK>+N. The form feed suppression will continue until the XDPM job end command (<UDK>+X) is received. This option is useful only in XDPM data streams. Always Suppress FFs will cause the OPTIMA to suppress all form feeds for the data streams received from this twinax address. If this option is selected, the only way to get a form feed is to change a character translation table to translate a printable EBCDIC character into the form feed character. This setting is equally useful in both XDPM and XPPM modes, but it is rarely used. Use the arrow keys to move the cursor to the appropriate choice, and press ENTER. The Xerox Special Options screen will return. To return to the OPTEDIT main screen, press F10 or Esc. Note: The option Always Suppress FFs will suppress FFs even for nonXerox printers. Change Form Feed to New Line This option is used only if form feed suppression is occurring (see above). It determines the way in which the suppressed form feed is used. To define this option, use the arrow keys to move the cursor on the Xerox Special Options screen to the words Suppressed FF to NL= (the default is Suppressed FF is Removed), and press ENTER. The following choices will be displayed: Suppressed FF Becomes NL Suppressed FF is Removed Suppressed FF becomes NL will cause the OPTIMA to convert all suppressed form feeds into new lines (CR/LF). Suppressed FF is Removed will tell the OPTIMA to delete all suppressed form feeds before outputting data to the printer. Use the arrow keys to move the cursor to the appropriate choice, and press ENTER. The Xerox Special Options screen will return. To return to the OPTEDIT main screen, press F10 or Esc. Logical Not Commands This option is useful for both XDPM and XPPM data streams; however, it is rarely used for XPPM. This option controls how the OPTIMA will use Logical Not (¬) commands. APPENDIX D — OPTEDIT Page D-13 To define this option, use the arrow keys to move the cursor on the XEROX Special Options screen to the words XTL Suppression= (Use XTL Commands is the default), and press ENTER. The following choices will be displayed: Ignore XTL Commands Remove XTL Commands Use XTL Commands Ignore XTL Commands tells the OPTIMA to ignore Logical Not commands in the data stream and to treat them as printable text. This mode is useful for debugging data streams that use Logical Not commands. Remove XTL Commands will cause the OPTIMA to remove Logical Not commands from the data stream, and neither to print them nor to act upon them. This mode is also useful for debugging data streams, but it is intended primarily to assist the user in migrating documents that use Logical Not commands to the OPTIMAs more powerful automatic PFS and FF suppression modes. Use XTL Commands will cause the OPTIMA to use Logical Not commands as they were intended to be used. Use the arrow keys to move the cursor to the appropriate choice, and press ENTER. The Xerox Special Options screen will return. To return to the OPTEDIT main screen, press F10 or Esc. For more information on Logical Not commands, refer to the sections in Appendix A entitled Logical Not Commands and Antiquities. Job Restart to Form Feed Translation This option is useful only for XDPM data streams. The OPTIMA is capable of converting XDPM/XES print job restarts into form feeds. This is helpful for jobs that use a job restart to cause a form feed to occur when form feed suppression is active. To define this option, use the arrow keys to move the cursor on the Xerox Special Options screen to the words Job Start Change FF= (Job restarts are passed is the default), and press ENTER. The following choices will be displayed: Job restarts become FF Job restarts are passed Page D-14 AGILE 5250 OPTIMA User’s Guide and Reference Job restarts become FF tells the OPTIMA to translate job restarts into form feeds. Job restarts are passed tells the OPTIMA not to translate job restarts into form feeds. Use the arrow keys to move the cursor to the appropriate choice, and press ENTER. The Xerox Special Options screen will return. To return to the OPTEDIT main screen, press F10 or Esc. For more information on job restart to form feed translation, refer to the section in Appendix A entitled Passing FFs in Auto FF Suppression Mode. Metacode Transparency This option is useful only for XPPM data streams. The OPTIMA uses two modes for passing Metacode from the host system to the printer. The OPTIMA normally handles transparent data by removing the data from the transparent packet and sending it to the printer. XPPM printers, however, require that they receive the data in a transparent packet. The OPTIMA has an option that specifies whether or not the transparent packet will be sent to the printer. To define this option, use the arrow keys to move the cursor on the Xerox Special Options screen to the words Metacode TRN Usage= (Normal TRN usage is the default), and press ENTER. The following choices will be displayed: Normal TRN usage Use TRN for Metacode Normal TRN usage tells the OPTIMA not to send transparent data packets intact to the printer, but to send only the data within the packet. For example, when the OPTIMA receives 35h-count byte-data, only the data will be sent to the printer. The 35h and count byte will be stripped. Use TRN for Metacode tells the OPTIMA to keep transparent data packets intact when sending them to the printer. Specifically, when the OPTIMA receives a packet in the form 35h-count byte-data, the printer will receive 35h-count byte-data. Use the arrow keys to move the cursor to the appropriate choice, and press ENTER. The Xerox Special Options screen will return. To return to the OPTEDIT main screen, press F10 or Esc. APPENDIX D — OPTEDIT Page D-15 Alternate Host Input Ports Besides the three twinax addresses, there are three other ports that can be used by the OPTIMA to receive data. These are the Centronics parallel input port and the serial I/O ports (Serial 0 and Serial 1). Each of these ports can be used as alternate host pass-through ports, allowing the output device(s) to be shared between the twinax host/controller and three other data sources. Configuring the Parallel Input Port To use the parallel in alternate host port, it must be active, the output ports must be selected, and the timeout period must be set, as described earlier. In some cases, the mode and the Xerox Special options selections will have to be modified. Configuring the Serial Input Ports To use one or both of the serial ports as an input (alternate host) port, it must be activated, the timeout period must be set, and the output ports must be selected, as described earlier. Next, the port must be set up for input (Alt Host). In addition, the baud rate, parity, word length (data bits), stop bits and flow control (handshaking) must be set to agree with the settings of the alternate host interface. Refer to the alternate host documentation for information on the appropriate serial interface settings. Selecting Input (Alt Host) Serial 0 is set up for input (alternate host) by default. Serial 1 is set up for output by default. If the word Alt Host is displayed to the right of the words Serial 0, or Serial 1, depending upon which port the user is defining, no action is needed. The port is already set up for input. If the word Output is displayed at the appropriate port on the OPTEDIT main screen, use the arrow keys to move the cursor to the word Output, and press ENTER. The user will be presented with a choice of Output or Alt Host. Use the arrow keys to move the cursor the words Alt Host, and press ENTER. After the port has been set up for alternate host input, the OPTEDIT main screen will return. Page D-16 AGILE 5250 OPTIMA User’s Guide and Reference Serial Interface Settings To choose the baud rate, at the appropriate port on the OPTEDIT main screen, use the arrow keys to move the cursor to the word Baud= (the default is 9600 for Serial 0; 19200 for Serial 1), and press ENTER. The user will be presented with choices ranging from 300 to 115200 baud. Use the arrow keys to move the cursor to the appropriate number, and press ENTER. To choose parity, use the arrow keys to move the cursor to the word Parity= (the default is None), and press ENTER. The user will be presented with a choice of None, Odd or Even. Use the arrow keys to move the cursor to the appropriate choice, and press ENTER. To choose the word length, use the arrow keys to move the cursor to the word Length= (the default is 8 bits), and press ENTER. The user will be presented with a choice between 7 bits or 8 bits. Use the arrow keys to move the cursor to the appropriate choice, and press ENTER. To choose the stop bits, use the arrow keys to move the cursor to the word Stops= (the default is 1 bit), and press ENTER. The user will be presented with a choice between 1 bit and 2 bits. Use the arrow keys to move the cursor to the appropriate choice, and press ENTER. To choose the flow control, use the arrow keys to move the cursor to the word Flow= (the default is Xon/Xoff), and press ENTER. The user will be presented with a choice of Hardware or Xon/Xoff. If the alternate host uses Xon/Xoff flow control, use the arrow keys to move the cursor to that choice, and press ENTER. If the alternate host uses any other form of flow control, use the arrow keys to move the cursor to select Hardware, and press ENTER. Note: For alternate host input, the selections Translate Info:, Format Info:, PFS/GFID Info:, Load Serial n and Save Serial n are not used. After each selection has been made, the OPTEDIT main screen will return. APPENDIX D — OPTEDIT Page D-17 Configuring the Output Ports The OPTIMA has one dedicated parallel output port and two outputconfigurable serial ports. The Centronics parallel output port is dedicated to output. If not being used for alternate host input, Serial 1 and Serial 0 may be used as output ports. This allows the OPTIMA to control/share up to three output devices. Each output port has a configuration that specifies the format information, translation tables and PFS codes appropriate for the printer attached to the port. When a twinax address acquires the port to which it is going to direct its output, it uses that ports configuration to allow the formatting to remain correct regardless of the printer to which the twinax data is going. If the printer attached to the OPTIMA is among the supported printer configurations on the OPTIMA diskette (see below), configuring the output ports can be as simple as loading the appropriate configuration. Loading a printer configuration activates the output port, sets the appropriate timing and loads the appropriate format, translate and PFS/ GFID information. If the output port is a serial port, the port will also be set up for output, and the baud rate, word length, parity and flow control settings will be loaded. Once the configuration is loaded, the timing, printer error timeout period, format information, translation tables, PFSs, GFIDs and serial interface settings may be modified by the user. Do not modify any output port settings before loading a printer configuration, because loading a configuration will overwrite all output port settings. If the users printer configuration is not among those on the OPTIMA diskette, the user should load the configuration named _GENERIC.CFG. If this configuration does not work properly with the users printer, either a configuration will have to be built from scratch, or _GENERIC.CFG or another configuration file will have to be modified by the user. Loading an Output Port Configuration To load a printer configuration file from the OPTIMA diskette, at the appropriate port on the OPTEDIT main screen, use the arrow keys to move the cursor to the words Load port name, and press ENTER. The user will be prompted to enter the name of the printer configuration file. Type in the path and file name of the configuration, without an extension, and press ENTER. The names of the files currently on the OPTIMA diskette and the printer for which each is used are listed as follows: _3700ASC Xerox 3700 printer in ASCII mode Page D-18 AGILE 5250 OPTIMA User’s Guide and Reference _3700EBC Xerox 3700 printer in EBCDIC mode _4030ASC Xerox 4030 printer in ASCII mode _4030EBC Xerox 4030 printer in EBCDIC mode _4045ASC Xerox 4045 printer in ASCII mode _4045EBC Xerox 4045 printer in EBCDIC mode _4197ASC Xerox 4197 printer in ASCII mode _4197EBC Xerox 4197 printer in EBCDIC mode _4235ASC Xerox 4235 printer in ASCII mode _4235EBC Xerox 4235 printer in EBCDIC mode _4235PPM Xerox 4235 printer in Production Print mode (emulating a centralized printer) using the EBCDIC character set _4700ASC Xerox 4700 color printer in ASCII mode _4700EBC Xerox 4700 color printer in EBCDIC mode _DIAGASC A diagnostic-only printer configuration, for ASCII printers, that prints the name of each PFS as it is invoked by the data stream, rather than using the PFS to format the document _DIAGEBC A diagnostic-only printer configuration, for EBCDIC printers, that prints the name of each PFS as it is invoked by the data stream, rather than using the PFS to format the document _EPSONFX Epson FX printer _GENERIC A printer configuration that is used as the basis for creating a configuration when the configuration for the users printer is not included on the OPTIMA diskette _HPLJ2 Hewlett-Packard LaserJet II printer _HPLJ3SI Hewlett-Packard LaserJet IIISi printer _HPLJ4 Hewlett-Packard LaserJet 4 printer _IBMQW3 IBM QuietWriter III printer _LQ1000 Epson LQ series printer _LQ2500 Epson LQ 2500 printer After selecting the appropriate printer configuration, the configuration will be updated, and the OPTEDIT main screen will return. APPENDIX D — OPTEDIT Page D-19 Saving an Output Port Configuration If the user makes any changes to the configuration of an output port after loading a printer configuration from the OPTIMA diskette, the user should save the changes. Saving the full configuration will save the changes to the configuration, including the output port/printer configuration, but the user will probably want to have the printer configuration changes saved separately, so that the information will be retained for creating a new configuration file in the future. Note that saving a printer configuration will actually create two files on the OPTIMA diskette. Each will have the same name but a different extension. The printer configuration is given an extension .CFG, while the PFSs for the printer will be given a file name extension of .PFS. To save a printer configuration, at the appropriate port on the OPTEDIT main screen, use the arrow keys to move the cursor to the word Save port name, and press ENTER. The user will be prompted to enter the full path and file name of the configuration. It is recommended that the user enter a new file name, rather than writing over the original files. After the two files have been saved, the OPTEDIT main screen will return. Configuring the Parallel Output Port To build a parallel output port configuration from scratch, the user will have to activate the port as described earlier. The user will also have to specify the timing and the printer error timeout period, choose translation tables, specify format information and edit programmable function strings and GFIDs. Printer error timeouts, format information, translation tables and programmable function strings are discussed later. Parallel Output Port Timing The timing option is used to specify the relative speed at which the attached printer can receive data. In general, laser printers should be set to fast, and dot matrix printers should be set to slow. The printer configurations supplied on the OPTIMA diskette specify the appropriate timing level for each printer. To change the timing, at the parallel output port on the OPTEDIT main screen, use the arrow keys to move the cursor to the word Timing= (Fast is the default), and press ENTER. The user will be presented with a range of timing options ranging from Very Slow to Very Fast. Use the arrow keys to move the cursor to the appropriate choice, and press ENTER. After selecting the timing, the OPTEDIT main screen will return. Page D-20 AGILE 5250 OPTIMA User’s Guide and Reference Configuring Serial Ports for Output If either of the serial ports are not going to be used as alternate host input ports, they may be used as output ports. To build a serial output port configuration from scratch, the user will have to activate the port as described earlier. The user must also select output, set the printer error timeout period, specify format information, choose translation tables and edit programmable function strings and GFIDs. Additionally, the user will have to configure the settings of the serial interface as described earlier, even if a configuration for the users printer was supplied on the OPTIMA diskette. Be certain to load the configuration before configuring the serial interface settings, because loading a configuration will overwrite these settings. Selecting Output Serial 0 is set up for input (alternate host) by default. Serial 1 is set up for output by default. If the word Output is displayed to the right of the words Serial 0, or Serial 1, depending upon which port the user is defining, no action is needed. The port is already set up for output. If the word Alt Host is displayed at the appropriate port on the OPTEDIT main screen, use the arrow keys to move the cursor to the word Alt Host, and press ENTER. The user will be presented with a choice of Output or Alt Host. Use the arrow keys to move the cursor the words Output, and press ENTER. After the port has been set up for output, the OPTEDIT main screen will return. Printer Error Timeout (ERRTIME) Some printers do not send error information (e.g., out of paper, paper jam, etc.) to the system. This is true of most Xerox printers and printers connected via serial interfacing. The OPTIMA, however, recognizes when the printer is no longer accepting data, and it is capable of alerting the system. APPENDIX D — OPTEDIT Page D-21 This feature determines the length of time that the OPTIMA will wait after the printer is no longer accepting data before alerting the system operator. The default is five seconds, which is suitable for most laser printers. The setting should be increased if the system alerts the operator when no error has actually occurred. This setting is specific to a given output port, so it is loaded as part of an output port configuration, and it is necessary to change this setting only for active ports dedicated to output. To change this setting, at the appropriate output port on the OPTEDIT main screen, use the arrow keys to move the cursor to the word ErrTime= (Default-5 seconds is the default), and press ENTER. The user will be presented with a range of timing options ranging from 1 second to 1 minute. The value Default (5 seconds) is included only to maintain compatibility between the new OPTIMA software and older output port configurations, so existing users do not have to modify their configuration settings. Use the arrow keys to move the cursor to the appropriate choice, and press ENTER. After selecting the printer error timeout period, the OPTEDIT main screen will return. Format Information Format information is loaded when a printer configuration is loaded from the OPTIMA diskette, so most users will not have to change these settings unless building a printer configuration from scratch. Before using OPTEDIT to change the format information for an output port, the user should become familiar with the issues discussed under Format Information in Chapter 2 Advanced Configuration. To change the format information for an output port, at the appropriate port on the OPTEDIT main screen, use the arrow keys to move the cursor to the words Format Info:, and press ENTER. The following Formatting Information screen will be displayed: Page D-22 AGILE 5250 OPTIMA User’s Guide and Reference ++------------------------- Formatting Information ---------------------------++ ¦¦ + Movement -----------+ ¦¦ ¦¦ ¦ Horizontal=Relative ¦ + Paper Drawer 1 -----+ + Paper Drawer 3 -----+ ¦¦ ¦¦ ¦ Vertical=Relative ¦ ¦ Width=8.5 Inches ¦ ¦ Width=11 Inches ¦ ¦¦ ¦¦ +---------------------+ ¦ Height=11 Inches ¦ ¦ Height=17 Inches ¦ ¦¦ ¦¦ + Resolution ---------+ ¦ Rotation=COR ¦ ¦ Rotation=COR ¦ ¦¦ ¦¦ ¦ Horizontal=300 DPI ¦ +---------------------+ +---------------------+ ¦¦ ¦¦ ¦ Vertical=300 DPI ¦ ¦¦ ¦¦ ¦ Vert. Max=None ¦ + Paper Drawer 2 -----+ + Envelope Drawer ----+ ¦¦ ¦¦ +---------------------+ ¦ Width=8.5 Inches ¦ ¦ Width=8.5 Inches ¦ ¦¦ ¦¦ + Offset -------------+ ¦ Height=14 Inches ¦ ¦ Height=11 Inches ¦ ¦¦ ¦¦ ¦ Horizontal=None ¦ ¦ Rotation=COR ¦ ¦ Rotation=COR ¦ ¦¦ ¦¦ ¦ Vertical=None ¦ +---------------------+ +---------------------+ ¦¦ ¦¦ ¦ COR Horiz.=Default ¦ ¦¦ ¦¦ ¦ COR Vert.=Default ¦ ¦¦ ¦¦ +---------------------+ ¦¦ ¦¦ + Special -------------------------------------------------------+ ¦¦ ¦¦ ¦ Add CR At FF=Add CR COR Vertical Reduction=70% ¦ ¦¦ ¦¦ ¦ CPI/Font Order=CPI / Font Per Page Format Reset=No Reset ¦ ¦¦ ¦¦ ¦ Justif. Type=Send Move Underline/Space Type=PFS ¦ ¦¦ ¦¦ ¦ Bold Type=Printer GFID Look-up Method=Both Tables ¦ ¦¦ ¦¦ ¦ Rotate Type=Auto ¦ ¦¦ ¦¦ +----------------------------------------------------------------+ ¦¦ ++----------------------------------------------------------------------------++ F1Help F10Exit Screen Choices are provided in the following areas: Movement. The user can specify whether the printer uses absolute or relative parameters for its horizontal and vertical movements. Resolution. The user can specify the horizontal and vertical resolution of the printer by choosing among values between 6 LPI and 720 DPI. The user can also specify the maximum value the printer will accept for relative and vertical movements. Offset. The user can specify a horizontal or vertical offset for the printer. Special. The user can specify options concerning carriage returns after form feeds, the order in which font and CPI information will be sent to the printer, and information concerning justification, bolding, rotation, COR reduction, resetting the printer, underlining and GFID lookup methods. Paper Drawer 1. The user can specify the dimensions and the orientation of the page. Paper Drawer 2. The user can specify the dimensions and the orientation of the page. Paper Drawer 3. The user can specify the dimensions and the orientation of the page. Envelope Drawer. The user can specify the dimensions and the orientation of the page. APPENDIX D — OPTEDIT Page D-23 Each of the options is displayed on the Formatting Information screen along with its default selection. Editing each of these options is done in the same manner as editing any other options: If the default setting is inappropriate, use the arrow keys to move the cursor to the option to be defined, and press ENTER. A list of choices will be displayed. Then use the arrow keys to move the cursor to the appropriate choice, and press ENTER. After each selection is made, the Formatting Information screen will return. To exit to the OPTEDIT main screen, press F10 or Esc. For more information about formatting, refer to Format Information in Chapter 2 Advanced Configuration. Choosing a Translation Table A specific translation table is selected for every input port when a printer configuration is loaded from the OPTIMA diskette, so most users will not have to change these settings unless building a printer configuration from scratch. Before using OPTEDIT to choose a translation table for each input port that will send data to a specific output port, the user should become familiar with the issues discussed in Chapter 3 Character Code Translation. To choose a translation table, at the appropriate port on the OPTEDIT main screen, use the arrow keys to move the cursor to the words Translate Info:, and press ENTER. A Translate screen with a list of all possible input ports (plus the OPTIMA itself) along with the default translation table for each port will be displayed. Use the arrow keys to move the cursor on the Translate screen to the name of the input port for which the translate table is to be changed, and press ENTER. A list of all sixteen translation tables will be displayed. Use the arrow keys to move the cursor to the name of the appropriate translation table, and press ENTER. After the selection has been made, the Translate screen will return. Press F10 or Esc to return to the OPTEDIT main screen. Page D-24 AGILE 5250 OPTIMA User’s Guide and Reference Special Editors There are two special editors for translation tables and programmable function strings. Programmable Function Strings The appropriate PFSs are defined for an output port when a printer configuration is loaded from the OPTIMA diskette, so most users will not have to change the PFS definitions unless building a printer configuration from scratch. Before using OPTEDIT to edit PFSs, the user should become familiar with the issues discussed in Chapter 4 Programmable Function strings. The PFS (Programmable Function String) editor is used to edit the strings the OPTIMA sends to an output device to perform various systemrequested functions, including the function strings used to select various fonts at the printer. To enter the PFS/GFID editor, at the appropriate output port on the OPTEDIT main screen, use the arrow keys to move the cursor to the words PFS/GFID Info:, and press ENTER. The PFS editor is shown below: +----------- OPTEDIT Ver 2.40 Copyright (c) Feb 26 1993 by AGILE. -------------+ ¦ ++---------------- Programmable Function String Editor -----------------++ ¦ ¦ ¦¦ _0 _1 _2 _3 _4 _5 _6 _7 _8 _9 _A _B _C _D _E _F ¦¦ ¦ ¦ ¦¦ 000_: END ¦¦ ¦ ¦ ¦¦ ¦¦ ¦ ¦ +¦ ¦¦ ¦ ¦ +¦ ¦+ ¦ ¦ ¦¦ ¦+ ¦ ¦ ¦¦ ¦¦ ¦ ¦ ¦¦ ¦¦ ¦ ¦ +¦ ¦¦ ¦ ¦ +¦ ¦¦ ¦ ¦ ¦¦ ¦¦ ¦ ¦ ¦¦ ¦¦ ¦ ¦ ¦¦ ¦+ ¦ ¦ +¦ ¦+ ¦ ¦ +¦ ¦¦ ¦ ¦ ¦¦ ¦¦ ¦ ¦ ¦¦ ¦¦ ¦ ¦ +¦ ¦¦ ¦ ¦ +¦ Current PFS:INITIBM> PFS/GFID Group:OPTIMA PFSs ¦¦ ¦ ¦ ¦¦ Free Bytes:17055 Edit/Display Mode:Hex Over-Strike Mode ¦¦ ¦ ¦ ++----------------------------------------------------------------------++ ¦ +------------------------------------------------------------------------------+ F1Help F2PFS F3Group F4Mode F6Xlt F7Spcl F8Block F9Funct F10Exit APPENDIX D — OPTEDIT Page D-25 The PFS editor provides the following functions: F1 On-line help text. F2 Select the PFS to be edited. If in PFS mode (see F3 below), a menu showing all of the PFSs will allow the user to select one. If in portrait or landscape GFID mode, the menu will display a list of all the Font IDs (GFIDs). F3 Select the group. Displays a menu that allows the user to choose among editing either PFSs, portrait GFIDs or landscape GFIDs. F4 Edit Mode. Allows the user to select hexadecimal, ASCII or EBCDIC display/edit modes. F6 Translate. Allows the user to translate a PFS or GFID using one of the OPTIMA translation tables. This is useful when the user has created a set of PFSs or GFIDs for an output device that supports multiple character codes and the user needs to translate a PFS or GFID from one character code to another. F7 Special. Allows the user to enter a Null (00h) or to place a parameter within the PFS or GFID definition. F8 Block. Used to mark a block within a PFS or GFID for editing. Press F8 once at the beginning or end of the block. Press F8 again at the other end of the block to delimit the block for editing. F9 Functions. Edit functions for selected blocks. Displays a menu that allows the user to delete, copy or move the selected block. F10 Exit to the main screen. INS Toggle between insert and overstrike modes. DEL Delete the character at the cursor. HOME Go to the beginning of the PFS or GFID. END Go to the end of the PFS or GFID. PGUP Move up one screen. PGDN Move down one screen. Translation Table Editing Before using OPTEDIT to change a translation table, the user should become familiar with the issues discussed in Chapter 3 Character Code Translation. The translation table editor allows the user to modify translation tables. To use the translation table editor, press F4 on the OPTEDIT main screen, or use the arrow keys to move the cursor to the Edit Table option, and press ENTER. The translation table editor allows the table to be edited in ASCII, EBCDIC or hexadecimal modes. The users choice will depend on the format used in the printer users manual. The translation table editor is shown below: +----------- OPTEDIT Ver 2.40 Copyright (c) Feb 26 1993 by AGILE. -------------+ ¦ ++---------------------- Translate Table Editor ------------------------++ ¦ ¦ ¦¦ _0 _1 _2 _3 _4 _5 _6 _7 _8 _9 _A _B _C _D _E _F ¦¦ ¦ ¦ ¦¦ 0_: 00 01 02 03 04 05 06 07 08 09 0A 0B 0C 0D 0E 0F ¦¦ ¦ ¦ ¦¦ 1_: 10 11 12 13 14 15 16 17 18 19 1A 1B 1C 1D 1E 1F ¦¦ ¦ ¦ +¦ 2_: 20 21 22 23 24 25 26 27 28 29 2A 2B 2C 2D 2E 2F ¦¦ ¦ ¦ +¦ 3_: 30 31 32 33 34 35 36 37 38 39 3A 3B 3C 3D 3E 3F ¦+ ¦ ¦ ¦¦ 4_: 40 41 42 43 44 45 46 47 48 49 4A 4B 4C 4D 4E 4F ¦+ ¦ ¦ ¦¦ 5_: 50 51 52 53 54 55 56 57 58 59 5A 5B 5C 5D 5E 5F ¦¦ ¦ ¦ ¦¦ 6_: 60 61 62 63 64 65 66 67 68 69 6A 6B 6C 6D 6E 6F ¦¦ ¦ ¦ +¦ 7_: 70 71 72 73 74 75 76 77 78 79 7A 7B 7C 7D 7E 7F ¦¦ ¦ ¦ +¦ 8_: 80 81 82 83 84 85 86 87 88 89 8A 8B 8C 8D 8E 8F ¦¦ ¦ ¦ ¦¦ 9_: 90 91 92 93 94 95 96 97 98 99 9A 9B 9C 9D 9E 9F ¦¦ ¦ ¦ ¦¦ A_: A0 A1 A2 A3 A4 A5 A6 A7 A8 A9 AA AB AC AD AE AF ¦¦ ¦ ¦ ¦¦ B_: B0 B1 B2 B3 B4 B5 B6 B7 B8 B9 BA BB BC BD BE BF ¦+ ¦ ¦ +¦ C_: C0 C1 C2 C3 C4 C5 C6 C7 C8 C9 CA CB CC CD CE CF ¦+ ¦ ¦ +¦ D_: D0 D1 D2 D3 D4 D5 D6 D7 D8 D9 DA DB DC DD DE DF ¦¦ ¦ ¦ ¦¦ E_: E0 E1 E2 E3 E4 E5 E6 E7 E8 E9 EA EB EC ED EE ¦¦ ¦ ¦ ¦¦ F_: ¦¦ ¦ ¦ +¦ ¦¦ ¦ ¦ +¦ Translate Table:ASCII -> ASCII Edit Mode:Hex ¦¦ ¦ ¦ ¦¦ ¦¦ ¦ ¦ ++----------------------------------------------------------------------++ ¦ +------------------------------------------------------------------------------+ F1Help F2Select Table F4Mode F5Copy From F6Reverse F7Nul F10Exit To edit a value in the table, place the cursor on the value, and type the new value. If the current edit mode is hexadecimal, enter the value in hexadecimal. If the current edit mode is ASCII or EBCDIC, press the character on the keyboard. When in ASCII or EBCDIC mode, control characters may be entered by holding down the control key and typing the character. The escape key may be pressed to enter the escape character. Special characters in extended ASCII character sets (above 80h) may have to be entered in hexadecimal mode. EBCDIC characters not available in ASCII may also have to be entered in hexadecimal mode. The translation table editor has the following special functions: F1 Help text. F2 Select Table. The OPTIMA has sixteen translation tables, of which 8 are dedicated for custom user functions. However, all 16 tables can be edited. F4 Mode. Selects hexadecimal, ASCII or EBCDIC display/edit modes. F5 Copy From. Copies an entire translation table to the table currently being edited. A menu allows the user to select the translation table to be copied. This feature is useful for creating a new translation table that is based on, or similar to, an existing table. F6 Reverse. Reverses the direction of translation. For example, if the user is editing an ASCII to EBCDIC table, the Reverse command will change it into an EBCDIC to ASCII table. Note: When reversed twice, most tables have values that will not revert to their original values. For example, if the original table has three locations that all translate into 50h, when the table is reversed, the value 50h can only be translated into one value. This value will be the smallest value that translated into 50h in the original table. Two of the values will be translated into 00h. F7 Null. A convenient way to enter the value 00h when in ASCII or EBCDIC modes. F10 Exit. Return to the main screen. GLOSSARY Page G-1 GLOSSARY A A/B switch A switch that allows input devices to share a printer. AFP Advanced Function Printing. AFPDS Advanced Function Printing Data Stream. Alternate host Input device other than the twinax host that can use the printer attached to the 5250 OPTIMA, such as a PC, network server, print sharing device or even another protocol converter. ASCII American Standard Code for Information Interchange. A 7-bit standard character code used for interchanging data between communications equipment. B Backspace Moves the print position one column to the left. Binary A base 2 numbering system. Bit A binary digit. The smallest unit of binary information. Either a 0 or a 1. BM Bottom margin. Bold A typestyle in which the strokes of the characters are thicker than normal. Bottom margin The last line on which the 5250 OPTIMA will allow a character to be printed. Break An interruption of a transmission. BS Backspace. Buffer A block of internal memory that stores information until it is ready to be used. Page G-2 AGILE 5250 OPTIMA User’s Guide and Reference Byte A unit of information consisting of eight binary bits. Character codes are often represented in bytes. C Carriage Return A control character that (unless set to be interpreted as a line end) causes the printer to begin printing at the left margin of the current line. Centronics The printer manufacturer that produced the parallel interface that is now the industry standard. Also used to refer to the interface itself. CNT Count. The number of bytes in a command string. Column The vertical members of one line of an array. Computer Output Reduction A feature that reduces and reorients SYSOUT output intended for 13.2"x11" paper so that it will fit on letter-size paper (8.5"x11"). Configuration To assemble a collection of hardware and software into a system and to adjust each of the parts so they all work together. Control code A byte of information representing a print instruction (e.g., a tab). Control Unit The portion of the CPU that directs the step-by-step operation of the entire computing system. COR Computer Output Reduction. Count byte A byte that indicates the number of bytes to follow in an escape sequence. CPI Characters per inch. Pitch. CR Carriage return. CR/LF Carriage return/line feed. CRT Cathode ray tube. A video display terminal. GLOSSARY Page G-3 D Data stream Information transmitted between the host system and the 5250 OPTIMA. DB-25 A plug with 25 male or female pins. Decimal A base 10 numbering system. Default Formatting configurations that are present and are used automatically when no other information is available. Delimit To mark the beginning and end of a character string. Diagnostic A routine designed to verify the operation of a system and to find a malfunction in a device. DisplayWrite/400 An IBM word processing application that supports bolding, underlining and overstriking. DPA Display printer adapter. DSC Data stream compatible. A pre-SNA protocol. E EBCDIC Extended Binary Coded Decimal Interchange Code. An eight bit character code. Emulation A hardware or software product imitating the function of another hardware or software product. Esc Escape control character. A non-graphic (unimaged) code that signals the transmission of control information to the 5250 OPTIMA. Extended ASCII Some printer manufacturers have implemented their own version of 8 bit transmission. Extended ASCII allows 128 additional characters to be displayed by the printer. Page G-4 AGILE 5250 OPTIMA User’s Guide and Reference F FCC Federal Communications Commission. FF Form feed. Form feed A control code that instructs the printer to process the current page and print it; a page end. The physical transport of paper to the beginning of a new page. G GDDM Graphical Data Display Manager. An IBM graphics software product. GML Graphic Machine Language. Graphic Windows A feature of Xerox printers. H Hardware Any physical device in a computer network. Hewlett-Packard A California company that produces a wide range of computer equipment and peripherals. Hexadecimal A base 16 numbering system. Numbers are represented using digits 0-9 and letters A-F. Horizontal tab Moves the presentation position horizontally to the next tab stop to the right. Host The system that transmits information to the 5250 OPTIMA. IBM twinax host. HP Hewlett-Packard. HPGL Hewlett-Packard Graphics Language. A language used to transfer graphic information to an HP or HP-compatible plotter. HT Horizontal tab. GLOSSARY Page G-5 I IBM The worlds largest manufacturer of computing equipment. IBM 35 Hex transparency A standard form of transparency used in SCS data streams. IFS Interchange file separator. IGS Interchange group separator. Initialization To preset to proper starting values. Input The introduction of data from an input device to the computers main memory. Input device A unit used to enter data. Interchange separator A command used to delimit information strings in SCS data streams (IFS, IGS, IRS, IUS). Interface The method by which different types of devices are linked to each other for communication (e.g., parallel, serial, twinax). Invalid character In hexadecimal, any character other than numerals 0-9 and letters A-F. IR Intervention required. IRS Interchange record separator. IUS Interchange unit separator. L Least significant digit The digit representing the least value (e.g., in 1024, the 4 is the least significant). Left margin The number of the first column at which a character can be printed on a page. LF Line feed. Line density Vertical spacing, or the number of lines per inch that can be printed on a page. Line Feed A control code that advances the print position down by one line. Page G-6 AGILE 5250 OPTIMA User’s Guide and Reference LM Left margin. Logical buffer RAM used to display a displayable or printable image. Logical Unit Number A number assigned to a physical device for identification purposes. M Margin The number of spaces between the edges of a page and the beginning of text. Maximum presentation line The number of the last physical line on the page. Maximum presentation position The number of the rightmost character position on the physical page. Metacode A Xerox printer command code. Most significant digit The digit representing the greatest value (e.g., in 1024, the 1 is the most significant). MPL Maximum presentation line. MPP Maximum presentation position. N New Line A printer operation consisting of a carriage return (CR) and a line feed (LF). NL New line. O Output Data transferred from a computers internal storage to an output device. Output device A unit that takes data output from a computer and presents it in the form desired by the user. Overstrike A DisplayWrite/400 function in which two characters may be printed in the same presentation position. GLOSSARY Page G-7 P Page control The method by which page boundaries (margins) are determined. Page control may be done either by the host application or by the 5250 OPTIMA. Parallel interface 8 bits of a byte are transmitted simultaneously through 8 parallel wires. PFS Programmable function string. POR Power on reset. Power on reset The method by which a peripheral device announces to the host that it is ready. Presentation line The number of the line that is the current presentation position. Presentation position The line and column number of the current position on the page. Presentation surface Represents a single page of printed output. Print screen A PC keyboard command that will print the text currently displayed on the screen. Printer An output device that produces hard copy output. Programmable function string An instruction string used by the 5250 OPTIMA to activate printer features. Protocol A set of rules governing the format of data and the control of information interchange between two communicating devices. Protocol converter A device that takes input in one data communications format and outputs the data in another communications format. PSF Print Services Facility. R RAM Random access memory. Used for temporary storage of information. Rasterizer A device that converts an image sequentially line by line, instead of by vector. Reset To return components to a specified static state. Right margin The last column at which data can be printed on a page. RM Right margin. ROM Read-only memory. S SCS SNA character string. EBCDIC control codes that are used to format data. Sense codes An SNA code that describes an exception condition. Set horizontal format The SCS command that describes left and right margins and horizontal tab stops. Set vertical format The SCS command that describes top and bottom margins and vertical tab stops. SHF Set horizontal format. SLD Set line density. SNA System network architecture. An IBM communication standard. Space A print position where no character is printed. SVF Set vertical format. T Tab A carriage control that specifies output columns and rows. Terminator A character or sequence of characters that indicates the end of a data string that is variable in length. Timer A configuration option that determines how long an idle host or alternate host controls an output port. TM Top margin. Top margin The topmost position on a page where a character can be printed. Translate tables Look-up tables used by the 5250 OPTIMA to translate data input into the desired data output. U UDK User-defined key. Feature used in Xerox laser printers to define a substitute escape character. V VCS Vertical channel select. Vertical channel select An SCS command that the 5250 OPTIMA outputs as one or more CR/ LF sequences. Vertical Tab Moves the presentation position down to the next vertical tab stop. VT Vertical tab. X XDPM Xerox Decentralized Print Mode. XPPM Xerox Production Print Mode Xerox A large manufacturer of computers, printers, peripherals and other electronic equipment. XES Xerox Escape Sequence. The native print mode for Xerox 2700, 3700, 4030, 4045 and 4213 printers. Also available on 4235 printers in XDPM. INDEX Page 1 INDEX Symbols 275 EMUL (twinax mode) ................................................................ 34 A ABSOLUTE (setting for VERMOVE option) ....................................... 45 Absolute Horizontal Print Position (SCS command) ........................ 173 Absolute Vertical Print Position (SCS command) .................... 173–174 activation/enablement twinax ports configuring ......................................................................... 17–18 address twinax ports configuring ......................................................................... 32–33 address, twinax ports, configuring ............................................. 17, 32 alternate host input ports ............................................................ 36–37 and character translation .............................................................. 44 Centronics parallel ....................................................................... 36 connecting ................................................................................... 10 RS-232 serial .......................................................................... 37–38 connecting .......................................................................... 10–11 arrow buttons using to move throught the Menu Hierarchy........................... 29–30 ASCII Transparency (SCS command) .............................................. 134 automatic Form Feed suppression .................................................... 97 configuring ................................................................ 109–114, 112 passing Form Feeds in ............................................................ 97–99 automatic PFS suppression ......................................................... 96–97 configuring ................................................................................. 109 B Back Space (SCS command)........................................................... 139 Begin Overstrike (SCS command)................................................... 170 Begin Underscore (SCS command) ................................................. 169 Bell (SCS command) ...................................................................... 172 BOLD ON (PFS) ............................................................................. 124 BOLDOFF (PFS) ............................................................................. 124 BSBOLD1 and BSBOLD2 (PFSs)..................................................... 125 Byte (PFS parameter type) ................................................................ 52 Page 2 C Carriage Return (SCS command) ............................................ 137–138 centronics parallel configuring alternate host ............................................................................ 23 printers ..................................................................................... 19 connecting printers ................................................................................... 6–7 CONFIG report ........................................................................ 59–60, 64–65 configuration basic port ............................................................................... 15–16 saving the ..................................................................................... 27 configuration option notation .................................................................................. 30–31 punctuation codes ........................................................................ 31 configuring alternate hosts Centronics parallel .................................................................... 23 RS-232 serial ....................................................................... 23–26 fonts ....................................................................................... 55–56 output port priority ................................................................. 34–35 printers centronics parallel .................................................................... 19 RS-232 ................................................................................ 20–22 twinax ports..................................................................... 16, 32–36 activation/enablement ................................................. 17–18, 32 address......................................................................... 17, 32–33 emulation .......................................................................... 18, 33 mode ........................................................................................ 34 out to .................................................................................. 34–35 timeout ............................................................................... 35–36 connecting alternate hosts .............................................................................. 10 Centronics parallel .............................................................. 10–11 RS-232 serial .................................................... 10–11, 11–12, 13 host system .................................................................................... 4 power ........................................................................................... 14 printers ....................................................................................... 5–6 Centronics parallel .................................................................. 6–7 RS-232 ....................................................................................... 7 RS-232 serial ......................................................................... 9–10 INDEX Page 3 twinax ........................................................................................ 4–6 COR 10 (PFS) .......................................................................... 48, 123 COR 12 (PFS) .......................................................................... 48, 124 COR 15 (PFS) .......................................................................... 48, 124 CORHOFF (FMTINFO option) ......................................................... 46 CORVOFF (FMTINFO option) .......................................................... 46 CR (PFS) ......................................................................................... 116 CUTFEED (PFS) .............................................................................. 128 D Decimal (PFS parameter type) .......................................................... 52 DELETE! (PFS edit function) .............................................................. 52 delimiting XES jobs .................................................................... 95–96 DEST1 (PFS) ................................................................................... 129 DEST2 (PFS) .......................................................................... 129, 130 diagnostics ....................................................................................... 57 downloading font correspondences for Xerox XES mode printers ............................................... 105–106 drawer (paper source) ................................................................ 47–48 DUPLEX (PFS) ................................................................................ 127 E editing translation tables .................................................................... 42–43 electrical requirements ...................................................................... 3 grounding ................................................................................... 3–4 EMPH ON (PFS) ............................................................................. 126 EMPHOFF (PFS) ............................................................................. 126 emulation, twinax ports, configuring ......................................... 18, 33 End Overstrike (SCS command) .............................................. 170–171 END PFS! ......................................................................................... 52 End Underscore (SCS command) ............................................ 169–170 ENDJUST ......................................................................................... 46 ENVELOP (PFS) .............................................................................. 128 environment, operating ..................................................................... 3 error codes, status display .......................................................... 58–59 F features, of the 5250 OPTIMA ........................................................... vi FF (PFS) .......................................................................................... 116 FMTINFO menu heading ................................................................. 45 font configuration....................................................................... 55–56 Page 4 font correspondences and Xerox XES mode printers.............................................. 104–107 font downloading to Xerox printers in XES mode .................................................... 100 Form Feed (SCS command) ............................................................ 137 Form Feed suppression automatic ..................................................................................... 97 passing Form feeds in .......................................................... 97–99 configuration ...................................................................... 109–110 logical not command............................................................ 99–100 G GFID................................................................................................ 55 H H OFF (FMTINFO option) ................................................................ 46 HEIGHT ........................................................................................... 47 Hex .................................................................................................. 52 HEX DUMP ..................................................................................... 34 HiLoWord (PFS paramter type) ......................................................... 52 HIQUAL (PFS) ................................................................................ 127 HOR RES (FMTINFO option)............................................................ 46 horizontal offset, target printer ......................................................... 46 horizontal resolution, target printer .................................................. 46 Horizontal Tab (SCS command) ............................................. 134–135 horizontal text placment ............................................................ 45–46 HORMOVE (PFS) .................................................................... 45, 117 I IBM EMUL ....................................................................................... 34 Index Return (SCS command) ................................................. 172–173 INIT275 (PFS) ................................................................................. 115 INITALT (PFS) ................................................................................ 115 INITIBM (PFS) ................................................................................ 115 INITOPT (PFS) ................................................................................ 115 INSERT! (PFS edit option) ................................................................. 52 Interchange Record Separator (SCS command) ....................... 139–140 interference (radio and television) ................................................ ii–iii J JOBSTRT (PFS) ............................................................................... 131 INDEX Page 5 JOG OUT (PFS) .............................................................................. 129 JSTSTRT (PFS) ................................................................................. 130 JUSTEND (PFS) .............................................................................. 130 justification, target printer .......................................................... 46–47 Justify Text Field (SCS command) ........................................... 153–155 JUSTTYP (FMTINFO option) ............................................................. 46 L L 10CPI (PFS) ................................................................................. 121 L 12CPI (PFS) ................................................................................. 122 L 15CPI (PFS) ................................................................................. 122 L 16CPI (PFS) ................................................................................. 123 L 17CPI (PFS) ................................................................................. 123 L 5CPI (PFS) ................................................................................... 121 L 8CPI (PFS) ................................................................................... 121 L PSCPI (PFS) ................................................................................. 122 LAND (PFS).................................................................................... 116 LANDFID report ........................................................... 59–60, 83–89 LF (PFS) .......................................................................................... 116 line endings and Xerox XES mode printers ...................................................... 102 configuration .................................................................. 113–114 Line Feed (SCS command) ............................................................. 141 LINEDEN (PFS)....................................................................... 117–118 Load Alternate Characters (SCS command) ............................ 171–172 logical lot (¬) commands ................................................ 99–100, 104 configuring ................................................................................. 111 for font correspondence downloading ................................ 105–106 LoHiWord (PFS parameter type) ....................................................... 52 LOOP report ............................................................................. 60, 89 loop-back test .................................................................................. 57 LOWQUAL (PFS) ........................................................................... 127 M MANFEED (PFS) ............................................................................. 129 MEDQUAL (PFS) ............................................................................ 127 menu moving through the ................................................... 29–30, 31–32 punctuation codes (equals and not equals) .................................... 1 MetaCode configuration ...................................................................... 112–113 mode Page 6 twinax ports configuring ............................................................................... 34 N New Line (SCS command) ............................................................. 138 Null (SCS command) ...................................................................... 134 Numeric Backspace (SCS command) ..................................... 175–176 O offset, target printer .......................................................................... 46 operating, environment ..................................................................... 3 orientation, determining ................................................................... 49 out to, twinax ports, configuring ................................................ 34–35 output ports................................................................................ 37–39 configuring ................................................................................... 38 parallel ......................................................................................... 38 priority ................................................................................... 34–35 serial ............................................................................................ 39 P P 10CPI (PFS) ................................................................................. 119 P 12CPI (PFS) ................................................................................. 119 P 15CPI (PFS) ................................................................................. 120 P 16CPI (PFS) ................................................................................. 120 P 17CPI (PFS) ................................................................................. 120 P 5CPI (PFS) ................................................................................... 118 P 8CPI (PFS) ........................................................................... 118–119 P PSCPI (PFS) ................................................................................. 119 Page Presentation Media (SCS command) .............................. 163–165 PAGELEN (PFS) .............................................................................. 118 PAPER 1 (PFS) ................................................................................ 128 PAPER 2 (PFS) ................................................................................ 128 PAPER 3 (PFS) ................................................................................ 128 paper sources (drawers).............................................................. 47–48 PAPER1 ............................................................................................ 47 PAPER2 ............................................................................................ 47 parallel output port ................................................................................... 38 PFS report ........................................................................ 59–60, 74–77 PFS suppression automatic ............................................................................... 96–97 INDEX Page 7 configuration .............................................................................. 109 logical not command............................................................ 99–100 PFS TEST report ..................................................................................... 59–60 PFSs BOLD ON .................................................................................. 124 BOLDOFF .................................................................................. 124 BSBOLD1 and BSBOLD2 ........................................................... 125 COR 10 ...................................................................................... 123 COR 12 ...................................................................................... 124 COR 15 ...................................................................................... 124 CR .............................................................................................. 116 CUTFEED ................................................................................... 128 DEST1 ........................................................................................ 129 DEST2 ............................................................................... 129, 130 DUPLEX ..................................................................................... 127 EMPH ON .................................................................................. 126 EMPHOFF .................................................................................. 126 ENVELOP ................................................................................... 128 FF ............................................................................................... 116 HIQUAL ..................................................................................... 127 HORMOVE ................................................................................ 117 INIT275 ...................................................................................... 115 INITALT...................................................................................... 115 INITIBM ..................................................................................... 115 INITOPT ..................................................................................... 115 JOBSTRT .................................................................................... 131 JOG OUT ................................................................................... 129 JSTSTRT ...................................................................................... 130 JUSTEND ................................................................................... 130 L 10CPI ...................................................................................... 121 L 12CPI ...................................................................................... 122 L 15CPI ...................................................................................... 122 L 16CPI ...................................................................................... 123 L 17CPI ...................................................................................... 123 L 5CPI ........................................................................................ 121 L 8CPI ........................................................................................ 121 L PSCPI ....................................................................................... 122 LAND ......................................................................................... 116 LF ............................................................................................... 116 LINEDEN............................................................................ 117–118 LOWQUAL ................................................................................ 127 MANFEED .................................................................................. 129 Page 8 MEDQUAL ................................................................................. 127 P 10CPI ...................................................................................... 119 P 12CPI ...................................................................................... 119 P 15CPI ...................................................................................... 120 P 16CPI ...................................................................................... 120 P 17CPI ...................................................................................... 120 P 5CPI ........................................................................................ 118 P 8CPI ................................................................................ 118–119 P PSCPI ...................................................................................... 119 PAGELEN ................................................................................... 118 PAPER 1 ..................................................................................... 128 PAPER 2 ..................................................................................... 128 PAPER 3 ..................................................................................... 128 PORT ......................................................................................... 116 SENDHMI .................................................................................. 130 SIMPLEX ..................................................................................... 127 SNDXTRA .................................................................................. 130 SUBS ON ................................................................................... 126 SUBSOFF ................................................................................... 126 SUPS ON ................................................................................... 126 SUPSOFF.................................................................................... 126 TRCFEED .................................................................................... 129 UNDL ON ................................................................................. 125 UNDLOFF .................................................................................. 126 VERMOVE .................................................................................. 117 PFSTEST report ..................................................................................... 62–63 PORT (PFS) .................................................................................... 116 PORTFID report ........................................................................ 59–60, 77–83 printers Centronics parallel connecting .............................................................................. 6–7 RS-232 serial connecting ................................................................................. 7 printing reports........................................................................... 59–60 priority, output port .................................................................... 34–35 programmable function strings (PFS) .......................................... 51–52 editing .................................................................................... 52–53 parameters within ......................................................................... 54 punctuation codes menu ............................................................................................ 31 INDEX Page 9 R RELATIVE (setting of VERMOVE option) ........................................... 45 Relative Horizontal Print Position (SCS command) ......................... 174 Relative Vertical Print Position (SCS command) ..................... 174–175 Release Left Margin (SCS command) .............................................. 149 release notes ..................................................................................... ii Repeat (SCS command) ......................................................... 136–137 report printing CONFIG ................................................................................. 64–65 LANDFID ............................................................................... 83–89 LOOP ........................................................................................... 89 PFS ......................................................................................... 74–77 PFSTEST ................................................................................. 62–63 PORTFID ................................................................................ 77–83 TEST ....................................................................................... 60–61 XLATES ................................................................................... 66–74 reports, printer ........................................................................... 59–60 Required New Line (SCS command) ...................................... 135–136 resolution, target printer ................................................................... 46 ROTATE ........................................................................................... 47 rotation, target printer ...................................................................... 48 RS-232 configuring alternate host ...................................................................... 23–26 printers ............................................................................... 20–22 connecting alternate host ...................................................................... 10–11 printers ...................................................................................... 7 second printer ....................................................................... 9–10 S saving configuration ......................................................................... 27 SCS (SNA Character String) ........................................................ 91–92 second printer, RS-232, connecting .............................................. 9–10 SENDHMI (PFS) ...................................................................... 47, 130 SENDMOVE (PFS) ............................................................................ 47 serial ouput port ............................................................................... 39 Set Character Density (SCS command) ................................... 159–161 Set Coded Graphic character set though Local ID (S .............. 145–146 Set Exception Action (SCS command) .................................... 167–168 Set FID through GFID (SCS command) ................................... 147–149 Set GCGID through GCID (SCS command) ............................ 146–147 Page 10 Set Graphic Error Action (SCS command)............................... 144–145 SET HMI (PFS) .................................................................................. 47 Set Horizontal Format (SCS command) .......................................... 142 Set Horizontal Margins (SCS command) ................................. 156–157 Set Horizontal Tabs (SCS command) ...................................... 152–153 Set Indent Level (SCS command) ............................................ 149–150 Set Initial Conditions (SCS command) .................................... 151–152 Set Justify Mode (SCS command) ............................................ 155–156 Set Line Density (SCS command) ........................................... 143–144 Set Line Spacing (SCS command) ................................................... 150 Set Presentation Color (SCS command) ................................. 161–163 Set Presentation Page Size (SCS command) ............................ 157–158 Set Printer Set-Up (SCS command) ......................................... 166–167 Set Single Line Distance (SCS command) ............................... 158–159 Set Text Orientation (SCS command) ..................................... 168–169 Set Vertical Format (SCS command) ....................................... 142–143 Set Vertical Margins (SCS command) ..................................... 165–166 SIMPLEX (PFS) ................................................................................ 127 SNDXTRA (PFS) ...................................................................... 47, 130 status display error codes ........................................................... 58–59 STRTJST (PFS) ................................................................................... 46 SUBS ON (PFS) .............................................................................. 126 Subscript (SCS command) .............................................................. 176 SUBSOFF (PFS) .............................................................................. 126 Superscript (SCS command) ........................................................... 136 SUPS ON (PFS) .............................................................................. 126 SUPSOFF (PFS) .............................................................................. 126 Switch (SCS command) .......................................................... 141–142 T TEST report ........................................................................ 59–60, 60–61 tests (diagnostics) ............................................................................. 57 text placement ........................................................................... 45–46 throughput ........................................................................................ vi timeout, twinax ports, configuring.............................................. 35–36 translation tables ........................................................................ 41–42 and alternate hosts ........................................................................ 44 editing .................................................................................... 42–43 selecting ....................................................................................... 42 transparency, MetaCode, configuring ..................................... 112–113 Transparent (SCS command) .......................................................... 175 TRCFEED (PFS)............................................................................... 129 INDEX Page 11 twinax ports configuring ............................................................................. 32–36 connecting .......................................................................... 4–6, 16 U UDK (User Defined Key).................................................................. 91 auto command termination ................................................ 102–103 conflicts...................................................................................... 101 configuration .......................................................................... 108 UNDL ON (PFS) ............................................................................ 125 UNDLOFF (PFS) ............................................................................. 126 Unit Back Space (SCS command) ........................................... 138–139 upgrades ........................................................................................... iv user font configuration ............................................................... 55–56 V V OFF (FMTINFO option) ................................................................ 46 VER RES (FMTINFO option) ............................................................. 46 VERMOVE (PFS) ...................................................................... 45, 117 vertical offset, target printer ............................................................. 46 vertical resolution, target printer ...................................................... 46 vertical text placment ................................................................ 45–46 W warranty optional hardware ......................................................................... iv express exchange ....................................................................... iv extended warranty ..................................................................... iv standard ................................................................................... iii–iv upgrades ........................................................................................ iv WIDTH ............................................................................................ 47 Word Underscore (SCS command) ......................................... 140–141 X XDPM (Xerox Decentralize Print Mode) ........................................... 91 XEROX (menu) ....................................................................... 107–108 XES (Xerox Esacpe Sequence) ........................................................... 91 XES jobs and line endings ........................................................ 102, 103–104 delimiting ............................................................................... 95–96 font correspondence downloading ...................................... 105–106 font downloading ....................................................................... 100 well formed .................................................................................. 96 XLATES report ..................................................................................... 66–74 reports .................................................................................... 59–60 XLTINFO ......................................................................................... 42 XPPM (Xerox Production Print Mode) using the OPTIMA with .............................................................. 114