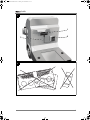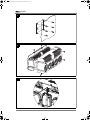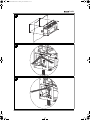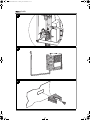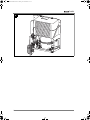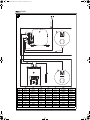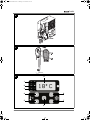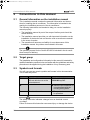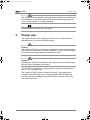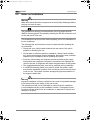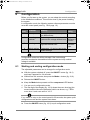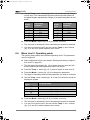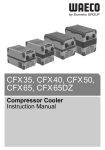
1
SP-900-Install.book Seite 1 Montag, 25. Januar 2010 4:53 16 SP-900 DE 11 LKW-Splitklimaanlage Einbauanleitung NL 107 Split airconditioning voor vrachtwagens Montagehandleiding EN 30 HGV split air conditioner Installation manual DA 126 Splitklimaanlæg til lastbiler Installationsvejledning FR 49 Climatiseur split pour poids lourds Notice de montage SV 145 Split-klimatanläggning för lastbilar Monteringsanvisning ES 68 NO 164 Delt klimaanlegg for lastebiler Montasjeveiledning IT 87 Equipo de aire acondicionado Split para camiones Instrucciones de instalación Impianto di climatizzazione split per autocarri Istruzioni di montaggio FIN 182 Kuorma-auton ilmastointilaite Asennusohje SP-900-Install.book Seite 3 Montag, 25. Januar 2010 4:53 16 CoolAir 1 1 3 2 2 3 SP-900-Install.book Seite 4 Montag, 25. Januar 2010 4:53 16 CoolAir 3 4 4 SP-900-Install.book Seite 5 Montag, 25. Januar 2010 4:53 16 CoolAir 5 6 7 5 SP-900-Install.book Seite 6 Montag, 25. Januar 2010 4:53 16 CoolAir 8 9 10 6 SP-900-Install.book Seite 7 Montag, 25. Januar 2010 4:53 16 CoolAir 11 12 13 7 SP-900-Install.book Seite 8 Montag, 25. Januar 2010 4:53 16 CoolAir 14 8 SP-900-Install.book Seite 9 Montag, 25. Januar 2010 4:53 16 CoolAir 15 - + 4441300097 sw ro br 4441300108 gr gl w bl gl ro br 4441300096 ro sw ro C + C T F + F + + ro + - br 4441300097 4441300096 4441300108 gl br gr w 4 3 21 DE EN ES FR IT NL DA SV NO FI bl br gl gr ro sw w Blau Blue Azul Bleu Blu Blauw Blå Blå Blå Sininen Braun Brown Marrón Marron Marrone Bruin Brun Brun Brun Ruskea Gelb Yellow Amarillo Jaune Giallo Geel Gul Gul Gul Keltainen Grün Green Verde Vert Verde Groen Grøn Grön Grønn Vihreä Rot Red Rojo Rouge Rosso Rood Rød Röd Rød Punainen Schwarz Black Negro Noir Nero Zwart Sort Svart Svart Musta Weiss White Blanco Blanc Bianco Wit Hvid Vit Hvit Valkoinen 9 SP-900-Install.book Seite 10 Montag, 25. Januar 2010 4:53 16 CoolAir 16 17 18 9 1 2 3 4 8 5 7 6 10 SP-900-Install.book Seite 30 Montag, 25. Januar 2010 4:53 16 Safety instructions CoolAir Contents 1 Safety instructions. . . . . . . . . . . . . . . . . . . . . . . . . . . . . . . . . . . . . . . . . . . . . . . . . . . .30 1.1 Using the device . . . . . . . . . . . . . . . . . . . . . . . . . . . . . . . . . . . . . . . . . . . . . . . .31 1.1.1 Handling electrical cables. . . . . . . . . . . . . . . . . . . . . . . . . . . . . . . . . . . . . . . . . . . . 31 2 Conventions in this manual . . . . . . . . . . . . . . . . . . . . . . . . . . . . . . . . . . . . . . . . . . . .32 2.1 General information on the installation manual . . . . . . . . . . . . . . . . . . . . . . . . .32 2.2 Target group . . . . . . . . . . . . . . . . . . . . . . . . . . . . . . . . . . . . . . . . . . . . . . . . . . .32 2.3 Symbols and formats. . . . . . . . . . . . . . . . . . . . . . . . . . . . . . . . . . . . . . . . . . . . .32 3 Proper use . . . . . . . . . . . . . . . . . . . . . . . . . . . . . . . . . . . . . . . . . . . . . . . . . . . . . . . . . .33 4 Scope of delivery . . . . . . . . . . . . . . . . . . . . . . . . . . . . . . . . . . . . . . . . . . . . . . . . . . . . .34 5 Installation . . . . . . . . . . . . . . . . . . . . . . . . . . . . . . . . . . . . . . . . . . . . . . . . . . . . . . . . . .34 5.1 Prescribed installation method . . . . . . . . . . . . . . . . . . . . . . . . . . . . . . . . . . . . .34 5.2 Notes on installation . . . . . . . . . . . . . . . . . . . . . . . . . . . . . . . . . . . . . . . . . . . . .35 5.3 Installation steps . . . . . . . . . . . . . . . . . . . . . . . . . . . . . . . . . . . . . . . . . . . . . . . .36 5.3.1 5.3.2 5.3.3 5.3.4 5.3.5 5.3.6 Determining the installation position. . . . . . . . . . . . . . . . . . . . . . . . . . . . . . . . . . . . 36 Installing the condenser unit. . . . . . . . . . . . . . . . . . . . . . . . . . . . . . . . . . . . . . . . . . 37 Installing the evaporator unit . . . . . . . . . . . . . . . . . . . . . . . . . . . . . . . . . . . . . . . . . 38 Connecting the condenser unit to the evaporator unit . . . . . . . . . . . . . . . . . . . . . . 39 Installing and connecting the power cable . . . . . . . . . . . . . . . . . . . . . . . . . . . . . . . 41 Sealing and attaching the cover . . . . . . . . . . . . . . . . . . . . . . . . . . . . . . . . . . . . . . . 42 6 Configuration . . . . . . . . . . . . . . . . . . . . . . . . . . . . . . . . . . . . . . . . . . . . . . . . . . . . . . . .43 6.1 6.2 6.3 6.4 6.5 Starting and ending configuration mode. . . . . . . . . . . . . . . . . . . . . . . . . . . . . . . . . 43 Menu level 1: Set temperature . . . . . . . . . . . . . . . . . . . . . . . . . . . . . . . . . . . . . . . . 44 Menu level 2: Low voltage cut-off . . . . . . . . . . . . . . . . . . . . . . . . . . . . . . . . . . . . . . 44 Menu level 3: Operating mode . . . . . . . . . . . . . . . . . . . . . . . . . . . . . . . . . . . . . . . . 45 Menu level 4: Default setting . . . . . . . . . . . . . . . . . . . . . . . . . . . . . . . . . . . . . . . . . 46 7 Maintenance and care . . . . . . . . . . . . . . . . . . . . . . . . . . . . . . . . . . . . . . . . . . . . . . . . .47 7.1 7.2 7.3 Condenser unit . . . . . . . . . . . . . . . . . . . . . . . . . . . . . . . . . . . . . . . . . . . . . . . . . . . . 47 Evaporator unit . . . . . . . . . . . . . . . . . . . . . . . . . . . . . . . . . . . . . . . . . . . . . . . . . . . . 47 Miscellaneous. . . . . . . . . . . . . . . . . . . . . . . . . . . . . . . . . . . . . . . . . . . . . . . . . . . . . 47 8 Technical data . . . . . . . . . . . . . . . . . . . . . . . . . . . . . . . . . . . . . . . . . . . . . . . . . . . . . . .48 1 Safety instructions You must read the entire manual thoroughly and carefully. We can only guarantee the reliability of the air conditioner if the instructions are adhered to. The same applies to the prevention of injury and damage to property. a The manufacturer will not be held liable for claims for damage resulting from the following: Installation errors Damage to the system resulting from mechanical influences or overvoltage, Changes to the air conditioner that are made without explicit permission by the manufacturer, Use for purposes other than those described in the installation manual. 30 SP-900-Install.book Seite 31 Montag, 25. Januar 2010 4:53 16 CoolAir 1.1 Safety instructions Using the device Only use the air conditioner for the purpose specified by the manufacturer and do not make any alterations or structural changes to the device. Only operate the air conditioner if you are certain that the housing and the cables are not damaged. Installation, maintenance and repair work may only be carried out by qualified personnel from a specialist company who are familiar with the risks involved and the relevant regulations. Do not use the air conditioner near flammable fluids or in closed rooms. Do not reach into air grilles or ventilation nozzles or insert any foreign objects in the system. Do not open the system in the event of a fire. Use approved extinguishing agents instead. Do not use water to extinguish fires. Switch off the air conditioner before using automatic washing equipment (automatic car washes etc.) to clean the vehicle. Disconnect all connections to the power supply when carrying out work on the device. The system must be switched off before you tilt the cab. 1.1.1 Handling electrical cables The electrical cables might be laid over sharp edges. Use ducts or tubes to prevent damage. Do not lay loose or bent cables next to electrically conductive materials (metal). The electrical power supply may only be connected by a qualified workshop. 31 SP-900-Install.book Seite 32 Montag, 25. Januar 2010 4:53 16 Conventions in this manual CoolAir 2 Conventions in this manual 2.1 General information on the installation manual This installation manual contains the essential information and instructions for installing the air conditioner. The information is intended to be read by the installation personnel of the air conditioner. The following instructions are intended to help you use the installation manual properly: The installation manual is part of the scope of delivery and should be stored carefully. The installation manual provides you with important information on the installation of the device and can also be used as a reference material in the event of repairs. The manufacturer assumes no liability for non-observance of this installation manual. Any claims are excluded in this case. I The operating manual for the CoolAir SP-900 is included in the air conditioner's scope of delivery. 2.2 Target group The installation and configuration information in this manual is intended for qualified installation personnel who are familiar with the guidelines and safety precautions to be applied during the installation of lorry accessory parts. 2.3 Symbols and formats You will come across certain symbols and formats in this documentation. This is what they mean: Format Bold ➤ Meaning Important information in the text which must not be misunderstood Instruction text ✓ Results of an action e Example Set the switch (3) to the COOLING symbol. ➤ Place the air conditioner on a work surface with the housing facing down. ✓ The system is now ready for operation. The safety instruction indicates a danger from an electrical current or voltage. Failure to observe this instruction can cause injury or damage the device. 32 SP-900-Install.book Seite 33 Montag, 25. Januar 2010 4:53 16 Proper use CoolAir a The safety instruction indicates potential hazards which could arise during the installation or operation of the product and cause damage to the device or environmental or economic damage. I Supplementary information on the product. 3 Proper use The CoolAir SP-900 is for supplying the cab of a lorry with cooled and dehumidified air. It can be used while driving. a Caution The CoolAir SP-900 is not suitable for installation in agricultural machines and construction machines or similar equipment. It does not work properly in the event of strong vibrations and exposure to dust. a Caution Operating the SP-900 air conditioner with voltages other than those specified can result in damage to the device. The SP-900 air conditioner is only designed for ambient temperatures of up to 43 °C in cooling mode. The CoolAir SP-900 is ready to install on delivery. The manufacturer strongly recommends the use of a vehicle-specific WAECO fastening frame for optimally installing the CoolAir SP-900 condenser unit on the rear panel of the cab. 33 SP-900-Install.book Seite 34 Montag, 25. Januar 2010 4:53 16 Scope of delivery 4 CoolAir Scope of delivery CoolAir SP-900 5 Part designation CoolAir SP-900 air conditioning unit consisting of: - Condenser unit - Evaporator unit with connection line Remote control (incl. type CR2025 battery) Battery cables 2 x AWG 8 Operating manual Installation manual Installation template, evaporator unit Quantity Item no. 1 9100100002 1 1 1 1 1 Installation template, condenser unit 1 4442700183 4442700184 4441600084 4441300097 4445100326 4445100327 see packaging see packaging Installation a Caution The air conditioner may only be installed by qualified personnel from a specialist company. The following information is intended for specialists who are familiar with the guidelines and safety precautions to be applied. 5.1 Prescribed installation method The condenser unit (see Fig. 1 on page 3, 2) is attached to the firm and straight rear panel of the cab or by means of a firm fastening frame. The evaporator unit (see Fig. 1 on page 3, 1) is fitted on the inside of the rear panel of the cab. I The connection line (see Fig. 1 on page 3, 3) can only be installed after fitting the evaporator unit and the condenser unit. The condensation from the evaporator unit is automatically drained off. This purely physical function is only possible within certain angles of inclination of the cab. Horizontal inclination during operation should not exceed 10°, vertical forward inclination should not exceed 18°. The lorry's split air conditioner consists of the following components: No. in fig. 15 1 2 3 34 Designation Condenser unit Evaporator unit Connection lines SP-900-Install.book Seite 35 Montag, 25. Januar 2010 4:53 16 Installation CoolAir 5.2 Notes on installation e Warning Make sure that all electrical components are electrically discharged before carrying out work on them. I The manufacturer strongly recommends the use of a vehicle-specific WAECO fastening frame for optimally installing the SP-900 condenser unit on the rear panel of the cab. This installation manual must be read completely prior to the installation of the air conditioner. The following tips and instructions must be observed while installing the air conditioner: Please ask your vehicle dealer whether the rear panel of the cab is suitable for installing the unit. Check there is sufficient space for installation. Always check whether any vehicle components could be damaged, deformed or their operation impaired by the installation before installing the system. Avoid any unnecessary and frequent mechanical stress to the supply line between the evaporator unit and the condenser unit. Damage can result in the loss of refrigerant and impair the performance of the system. The supplied assembly parts must not be modified during installation. If a WAECO fastening frame is not used to install the system, make sure that the installation position of the condenser unit on the rear panel is not too low. The system could be damaged by high temperatures of the engine's waste heat. a Warning Improper installation of the air conditioner can result in irreparable damage to the device and put the safety of the user at risk. The manufacturer will not be held liable for claims if the air conditioner is not installed according to this installation manual. That applies to malfunctions and the safety of the air conditioner, in particular to injuries and damage to property. 35 SP-900-Install.book Seite 36 Montag, 25. Januar 2010 4:53 16 Installation 5.3 CoolAir Installation steps a Caution The manufacturer only assumes liability for parts included in the scope of delivery. The validity of the warranty expires if the system is installed together with third-party parts. 5.3.1 Determining the installation position The system's installation position must meet the following criteria: The installation position must be chosen so that maintenance work can be performed without difficulties and so that there is sufficient space for the add-on parts (refrigerant line). The condenser and evaporator unit may not be inclined horizontally or vertically during installation (see Fig. 5 on page 5). The condenser unit must not be fitted near direct waste heat (engine heat etc.). The length of the refrigerant line (approx. 1.7 m) must be sufficient for the connection of the condenser and evaporator unit. The line must not be laid taut (see Fig. 5 on page 5). The fastening surface should be as flat as possible. Use spacer sleeves for uneven surfaces. If spacer sleeves are used, longer fastening screws with sufficient tensile strength (not included in the assembly set) must be used. a Caution Due to its weight, the condenser unit must have contact with at least two fastening points of the fastening surface. Do not use spacer sleeves for all six fastening points. The freedom of movement of semi-trailers (the outer edges of the trailer when turning) and other vehicle attachments must not be restricted. 36 SP-900-Install.book Seite 37 Montag, 25. Januar 2010 4:53 16 Installation CoolAir 5.3.2 Installing the condenser unit I To install the condenser unit using a vehicle-specific WAECO fastening frame, please observe the instructions included in the frame's scope of delivery. The following work steps describe the installation of the condenser unit without vehicle-specific fastening frame. a Caution Before drilling any holes, make sure that no electrical cables or other parts of the vehicle can be damaged. ➤ Use the enclosed template (cardboard print) to determine the position of the condenser unit. Six holes for fastening are marked on the template. ➤ Use a felt pen to mark the positions selected for the holes. ➤ Drill fastening holes (Ø 9 mm) at the marked positions. I Apply anti-oxidant compound to all drilled through-holes to prevent rust formation. ➤ Remove the eight hex screws from the housing of the condenser unit. ➤ Remove the housing and place it to the side (see Fig. 4 on page 4). ➤ Fasten the condenser unit using the four M8 x 18 screws, the AD Ø 40 mm washers (inside) and the M8 retainer nuts (see Fig. 5 on page 5). I The panelling can only be fitted once the refrigerant lines and the cables (see chapter “Connecting the condenser unit to the evaporator unit” on page 39) have been connected. 37 SP-900-Install.book Seite 38 Montag, 25. Januar 2010 4:53 16 Installation CoolAir 5.3.3 Installing the evaporator unit The evaporator unit is fitted on the vertical rear panel, near the bunk, in a horizontal position: ➤ Remove the panelling from the evaporator unit (see Fig. 6 on page 5). ➤ Find a suitable fastening position in the cab that allows sufficient air circulation. ➤ Use the enclosed template (cardboard print) to determine the position of the evaporator unit. Position the template at the selected point and use a felt pen to mark the positions of the six holes (Ø 6.5 mm) for fastening. ➤ Mark the positions of the through-holes for the connection line and the condensation line (interior trim: Ø 32 mm and rear panel of lorry Ø 25 mm). I If the space between the interior trim and the rear panel of the lorry is large, the hole (Ø 25 mm) for the inclined condensation line must be drilled slightly lower than specified on the template. That does not apply to the small hole (Ø 16 mm). If the space between the interior trim and the rear panel of the lorry is approx. 30 mm, the hole (Ø 25 mm) should be about 5 mm lower. ➤ Use a knife to cut out the interior trim around the hole. ➤ Use suitable drill bits to drill the marked points and insert the supplied cable sleeves in the large holes. ➤ Remove the six hex screws and the lower hex screw from the housing of the evaporator unit. ➤ Pull the housing back slightly and disconnect the connecting plug from the connection cable of the control panel (see Fig. 7 on page 5). ➤ Pull out the flexible condensation splash guard. ➤ Carefully unwind the connection line. ➤ To attach the evaporator unit, guide the connection line through the Ø 32 mm hole and guide the condensation line through the Ø 25 mm hole. ➤ Insert the M6 x 30 screws from the outside. ➤ Use the M6 retainer nuts and the M6 washers to fasten the evaporator unit from the inside (see Fig. 8 on page 6). ➤ Insert the flexible condensation splash guard. ➤ Connect the connection cable of the control panel to the connecting plug in the housing. ➤ Use the previously removed hex screws to fasten the housing of the evaporator unit. 38 SP-900-Install.book Seite 39 Montag, 25. Januar 2010 4:53 16 Installation CoolAir 5.3.4 Connecting the condenser unit to the evaporator unit a Caution Avoid narrow radii during bending. Use a suitable round object as a bending aid. If the radius is too narrow, the refrigerant line will be kinked and the air conditioner would not be ready for operation. a Caution Before fastening the connection couplings, make sure that the sealing and thread faces are absolutely clean. Any contamination will result in a malfunction of the air conditioner. ➤ At the rear panel of the lorry, bend the connection line down vertically with a radius of approx. 50 mm. ➤ Install the connection line for the condenser unit and insert it in the condenser unit. a Caution To screw and tighten the coupling halves, always use an open-ended spanner to firmly hold the fixed coupling half in position. I Make sure that the coupling half with the thin capillary tube is not twisted or kinked. a Caution The tube couplings are single couplings! The couplings must not be removed once they are connected. ➤ Join the rear coupling halves (thin refrigerant line) and use an open-ended spanner to hand-tighten the connection + 1/4 turn (see Fig. 9 on page 6). ➤ Join the front coupling halves (thick refrigerant line) and use an open-ended spanner to hand-tighten the connection + 1/4 turn (see Fig. 10 on page 6). ➤ Insert the protective sheath in the holder, under the coupling. ➤ Use the supplied pipe clip to fasten the refrigerant line to the holder in the condenser unit (see Fig. 11 on page 7). 39 SP-900-Install.book Seite 40 Montag, 25. Januar 2010 4:53 16 Installation CoolAir I The connection lines should be installed at right angles to the rear panel of the lorry (see Fig. 12 on page 7). For this purpose, use body adhesive (e.g. Betalink K1) and a self-tapping screw to fasten the holders (see Fig. 13 on page 7). ➤ Use the supplied holders to fasten the connection line to the rear panel of the lorry. ➤ Loosen the two screws on the cap of the control electronics and remove the cap (see Fig. 14 on page 8). ➤ Install the electrical cables for the control electronics. ➤ Connect the electrical cables according to the following wiring table (see Fig. 16 on page 10): No. in fig. 15 1 2 3 4 5 6 7 8 Designation Compressor with control unit Condenser fan Control unit Room sensor Vaporiser fan Control unit bus cable Condenser fan connection cable Power cable Item no. in No. in fig. 16 fig. 15 4441300096 1 4441300108 2 4441300097 3 Parameter Connection cable (condenser fan) Bus cable (control panel/control electronics) Main connection cable ➤ Use cable ties to protect the electrical cables from rubbing and damage. 40 SP-900-Install.book Seite 41 Montag, 25. Januar 2010 4:53 16 Installation CoolAir 5.3.5 Installing and connecting the power cable I We recommend that you connect the power cable to the fuse box or terminal block in the cab and not directly to the battery to avoid any tensile cable stress when the cab tilts. e Warning Make sure there is no voltage at electrically operated components before carrying out work on them! ➤ Choose the safest and shortest installation route for the power cable. Shorten the power cable as required. a Caution Only use cable clips that are suitable for the diameter of the power cable for the connection to the fuse box, terminal block or battery. If the wrong terminals are used, it could cause a voltage drop and increase heat formation at the terminal. That would result in a malfunction of the air conditioner. ➤ Fit a fuse of 25 amps to the connection with the vehicle's power supply. I The roof air conditioner must be connected to a battery which is able to supply the required current (see chapter “Technical data” on page 48). ➤ Connect the system to the battery via the lorry's terminal block or directly. The terminal block is to be preferred for the connection. Consult your vehicle manufacturer for the specifications for the terminal block. I If the length of the supplied power cable is not sufficient, the connection cable must be replaced with a new connection cable with a larger cable diameter. The diameter of the cable must ensure that the voltage drop between the vehicle connection and the cable connector on the compressor does not exceed 0.5 V. ➤ Install the power cable and connect it to the vehicle (red line to plus, black line to minus). ➤ Insert the plug of the power cable in the socket of the roof air conditioner. ➤ Use a cable tie to protect the power cable from rubbing and damage. ➤ After completing the installation, switch on the CoolAir SP-900 and check the start of the compressor. 41 SP-900-Install.book Seite 42 Montag, 25. Januar 2010 4:53 16 Installation CoolAir I Check the voltage drop between the vehicle connection and the cable connector on the compressor. The voltage drop must not exceed 0.5 V. ➤ Use the previously removed hex screws to fasten the housing of the condenser unit. 5.3.6 Sealing and attaching the cover ➤ Align the cover over the line outlet. ➤ Drill four holes (Ø 3 mm) through the fastening edge of the cover up to the rear panel of the cab. ➤ Use the drill to widen the holes to Ø 4 mm. ➤ Insert a holder for the protective hose at an appropriate point at the bottom of the cover. ➤ Apply body sealing compound to the fastening edge of the cover, the through-holes of the connection line and the condensation hose. ➤ Apply the cover at the previously determined position and fasten it using the supplied self-tapping screws. Make sure that the protective tube is fastened by the holder in the cover (see Fig. 17 on page 10). ➤ Seal all threaded connections used for the installation of the air conditioner. 42 SP-900-Install.book Seite 43 Montag, 25. Januar 2010 4:53 16 Configuration CoolAir 6 Configuration Before you first start up the system, you can adapt the controls according to the installation conditions. This must be done by the person installing the system. In configuration mode, the following system software parameters must be set at the control panel (see Fig. 18 on page 10). Menu level 1 2 3 4 Parameter Meaning Default setting 20 °C Set temperature The system starts at the temperature defined here. Low voltage The battery monitor shuts down the Charactershutdown system at the voltage defined here. istic figure 4 = 23.5 V Operating mode The system starts with the operat- 0 = ing mode defined here. Automatic mode Default settings Parameters 1-3 can be reset to the -default settings. I Configuration mode can still be activated if the undervoltage protection mechanism has switched off the system and only residual voltage is available. 6.1 Starting and ending configuration mode The adjustable parameters can be changed in configuration mode: ➤ With the system switched off, press the ON/OFF button (fig. 18, 6) and keep it pressed for 2-4 seconds. ➤ Within these 2-4 seconds, also press the Mode + button (fig. 18, 8). ➤ Release the ON/OFF button. ➤ Keep the Mode button pressed until the compressor LED flashes. ✓ You are now in configuration mode. ✓ The first digit of the display (fig. 18, 9) shows the menu level and the second and third show the parameter which can be set, e.g. 1.18 for menu level 1 and a set value of 18 °C. I If you make no entry on the control panel for 60 seconds, the system quits configuration mode and the system shuts down. ➤ Press the ON/OFF button (fig. 18, 6) to quit configuration mode. 43 SP-900-Install.book Seite 44 Montag, 25. Januar 2010 4:53 16 Configuration 6.2 CoolAir Menu level 1: Set temperature The system always starts with a defined value for the room temperature. This parameter can be configured between 17 and 30 °C: ➤ Start configuration mode (see chapter “Starting and ending configuration mode” on page 43). ✓ The first digit of the display (fig. 18, 9) shows the menu level and the second and third show the parameter which can be set. ➤ Press the Mode + button (fig. 18, 8) to change the parameter. ➤ Use the Temp. + and - buttons (fig. 18, 4 and 5) to select the temperature (in °C) for starting the system. ✓ The digits in the display flash until the parameter you enter is confirmed. ➤ Press the Mode + button (fig. 18, 8) to confirm your entry. 6.3 ✓ The set value is saved and is then used when the system is restarted. ✓ You are now in menu level 1 and can use the Temp. + and - buttons (fig. 18, 4 and 5) to switch between menu levels. Menu level 2: Low voltage cut-off The battery monitor protects the battery from excessive discharging. I When the battery monitor switches the device off, the battery only has part of its charging capacity. In this case, avoid starting repeatedly or operating electrical consumers. Make sure that the battery is recharged. As soon as the required voltage is available again, the system can be operated again. If only the set power supply is available here for the air conditioner, the system is switched off. ➤ Start configuration mode (see chapter “Starting and ending configuration mode” on page 43). ✓ The first digit of the display (fig. 18, 9) shows the menu level and the second and third show the parameter which can be set. ➤ Press the Temp. + button (fig. 18, 4) once to switch to menu level 2. ➤ Press the Mode + button (fig. 18, 8) to change the parameter. ✓ 44 The digits in the display flash until the parameter you enter is confirmed. SP-900-Install.book Seite 45 Montag, 25. Januar 2010 4:53 16 Configuration CoolAir ➤ Use the Temp. + and - buttons (fig. 184 or 5) to select the low voltage cut-off value. The characteristic figures at second and third place on the digital display represent the voltage (V) at which the system is shut down: Characteristic figure Characteristic figure Low voltage shutdown 23.2 23.3 23.4 23.5 23.6 01 02 03 04 05 Low voltage shutdown 06 07 08 09 10 23.7 23.8 23.9 24.0 24.1 ➤ Press the Mode + button (fig. 18, 8) to confirm your entry. 6.4 ✓ The set value is saved and is then used when the system is restarted. ✓ You are now in menu level 2 and can use the Temp. + and - buttons (fig. 18, 4 and 5) to switch between menu levels. Menu level 3: Operating mode The system always starts with a defined operating mode. This parameter can be configured: ➤ Start configuration mode (see chapter “Starting and ending configuration mode” on page 43). ✓ The first digit of the display (fig. 18, 9) shows the menu level and the second and third show the parameter which can be set. ➤ Press the Temp. + button (fig. 18, 3) twice to switch to menu level 3. ➤ Press the Mode + button (fig. 18, 8) to change the parameter. ✓ The digits in the display flash until the parameter you enter is confirmed. ➤ Use the Temp. + and - buttons (fig. 18, 4 and 5) to select the mode for starting the system: Characteristic figure 00 01 02 03 Operating mode Automatic mode Operating mode 1 Operating mode 2 Operating mode 3 ➤ Press the Mode + button (fig. 18, 8) to confirm your entry. ✓ The set value is saved and is then used when the system is restarted. ✓ You are now in menu level 3 and can use the Temp. + and - buttons (fig. 18, 4 and 5) to switch between menu levels. 45 SP-900-Install.book Seite 46 Montag, 25. Januar 2010 4:53 16 Configuration 6.5 CoolAir Menu level 4: Default setting You can reset the parameters you set in configuration mode at menu levels 1 to 3 to the default settings: ➤ Start configuration mode (see chapter “Starting and ending configuration mode” on page 43). ✓ The first digit of the display (fig. 18, 9) shows the menu level and the second and third show the parameter which can be set. ➤ Press the Temp. + button (fig. 18, 4) three times to switch to menu level 4. ✓ The digital display shows 00. ➤ Press the Mode + button (fig. 18, 8) to change the parameter. ✓ The – digits flash in the display. ➤ Press the Temp. + button (fig. 18, 4). ✓ The digital display shows 01. ➤ Press the Mode + button (fig. 18, 8) to confirm your entry. 46 ✓ The parameters set in configuration mode are reset to the default setting. ✓ You are now in menu level 4 and can use the Temp. + and - buttons (fig. 18, 4 and 5) to switch between menu levels. SP-900-Install.book Seite 47 Montag, 25. Januar 2010 4:53 16 Maintenance and care CoolAir 7 Maintenance and care a Caution Do not use abrasive cleaning agents or hard objects during cleaning as these can damage the device. 7.1 Condenser unit ➤ Clean the condenser unit at least once every season, ideally at the beginning of the season. To do this, remove the housing from the condenser unit and clean the lamellae of the condenser unit. Avoid damaging the lamellae in the process. a Caution Do not use a water jet! ➤ Check the lines (refrigerant lines, electrical cables) inside the condenser unit for damage. 7.2 Evaporator unit ➤ Clean or replace the condensation splash guard at regular intervals. ➤ Clean the housing of the evaporator unit with a damp cloth from time to time. 7.3 Miscellaneous ➤ Check the attachment of the condenser and evaporator unit as well as the connection line at regular intervals. ➤ Check the seals of all through-holes used for the air conditioner. ➤ Check the power cable for damage. 47 SP-900-Install.book Seite 48 Montag, 25. Januar 2010 4:53 16 Technical data 8 CoolAir Technical data CoolAir SP-900 air conditioner Item number 9100100002 Cooling capacity: 900 W Rated input voltage: 24 V DC Input voltage range: 20 V DC – 30 V DC Operating temperature range: 0 – 43 °C Current consumption: 12 – 18 A Low-voltage cut-off: Configurable (see chapter “Menu level 2: Low voltage cut-off” on page 44) Dimensions (W x H x D): Condenser unit 448 x 480 x 195 mm Evaporator unit 677 x 306 x 134 mm Weight: Evaporator unit 5,9 kg Condenser unit 16 kg (without fastening frame) Inspection/certification: Versions, technical modifications and delivery options reserved. 48 SP-900-Install.book Seite 25 Montag, 25. Januar 2010 4:53 16 D Dometic WAECO International GmbH · Hollefeldstraße 63 · D-48282 Emsdetten ℡ +49 (0) 2572 879-195 · +49 (0) 2572 879-322 · Mail: [email protected] · Internet: www.dometic-waeco.de Dometic Austria GmbH Neudorferstrasse 108 2353 Guntramsdorf ℡ +43 2236 908070 +43 2236 90807060 Mail: [email protected] I Dometic Italy S.p.A. Via Virgilio, 3 I-47100 Forlì ℡ +39 0543 754901 +39 0543 756631 Mail: [email protected] AUS WAECO Pacific Pty. Ltd. 1 John Duncan Court Varsity Lakes QLD 4227 ℡ +61 7 55076000 +61 7 55076001 Mail: [email protected] CH Dometic Switzerland AG Riedackerstrasse 7a CH-8153 Rümlang (Zürich) ℡ +41 44 8187171 +41 44 8187191 Mail: [email protected] N Dometic Norway AS Skolmar 24 N-3232 Sandefjord ℡ +47 33428450 +47 33428459 Mail: [email protected] HK DK Dometic Denmark A/S Nordensvej 15, Taulov DK-7000 Fredericia ℡ +45 75585966 +45 75586307 Mail: [email protected] A E F FIN Dometic Spain S.L. Avda. Sierra del Guadarrama, 16 E-28691 Villanueva de la Cañada Madrid ℡ +34 902 111 042 +34 900 100 245 Mail: [email protected] Dometic S.N.C. ZA du Pré de la Dame Jeanne F-60128 Plailly ℡ +33 3 44633500 +33 3 44633518 Mail: [email protected] Dometic Finland OY Mestarintie 4 FIN-01730 Vantaa ℡ +358 20 7413220 +358 9 7593700 Mail: [email protected] www.waeco.com Overseas + Middle East NL S UK Dometic Benelux B.V. Ecustraat 3 NL-4879 NP Etten-Leur ℡ +31 76 5029000 +31 76 5029090 Mail: [email protected] Dometic Scandinavia AB Gustaf Melins gata 7 S-42131 Västra Frölunda (Göteborg) ℡ +46 31 7341100 +46 31 7341101 Mail: [email protected] Dometic UK Ltd. Dometic House · The Brewery Blandford St. Mary Dorset DT11 9LS ℡ +44 844 626 0133 +44 844 626 0143 Mail: [email protected] WAECO Impex Ltd. Suites 2207-2211 · 22/F · Tower 1 The Gateway · 25 Canton Road Tsim Sha Tsui · Kowloon Hong Kong ℡ +852 24632750 +852 24639067 Mail: [email protected] ROC WAECO Impex Ltd. Taipei Office 2 FL-3 · No. 56 Tunhua South Rd, Sec 2 Taipei 106, Taiwan ℡ +886 2 27014090 +886 2 27060119 Mail: [email protected] UAE Dometic AB Regional Office Middle East P O Box 74775 Dubai, United Arab Emirates ℡ +971 4 321 2160 +971 4 321 2170 Mail: [email protected] 4445100327 01/2010 Europe