1
CCC Technologies, Inc.
700 Nicholas Blvd., Ste. 300
Elk Grove Village, IL 60007
877.282.9227
www.ccctechnologies.com
GENERAL NOTICE
The information contained in this document is not warranted by Mitel Networks Corporation or
any of its affiliates or subsidiaries ("Mitel") and is subject to change without notice. Mitel
assumes no liability for any errors or omissions. This document may be reproduced, either
wholly or in part, solely for distribution to authorized users of Mitel's products.
NOTICE TO DEALERS OR DISTRIBUTORS
As the dealer or distributor, you assume responsibility for the content contained in this
document. To signifiy responsibility, you must insert your company name in the one of the
places indicated.
Mitel logos and wordmarks, along with legal disclaimers and copyright information, contained in
these documents must NOT be removed.
Mitel provides this documents as is. No support is available from Mitel or its subsidiaries to
assist the user with the modification, printing, distribution, or other processes pertaining to the
use of these documents.
TRADEMARKS
Mitel and Speak@Ease are trademarks of Mitel Networks Corporation.
Windows and Microsoft are trademarks of Microsoft Corporation.
Other product names mentioned in this document may be trademarks of their respective
companies and are hereby acknowledged.
Symbol NetVision Phone - User Guide
September 2008
®,™ Trademark of Mitel Networks Corporation
© Copyright 2008, Mitel Networks Corporation
All rights reserved
IMPORTANT! This telephone is NOT suitable for direct connection to the public-switched
telephone network. Connect the telephone to a Mitel Networks system only.
CCC Technologies, Inc.
700 Nicholas Blvd., Ste. 300
Elk Grove Village, IL 60007
877.282.9227
www.ccctechnologies.com
Table of Contents
IMPORTANT INFORMATION ABOUT WIRELESS PHONES ...................................... 1
ABOUT YOUR NETVISION® PHONE ............................................................................. 1
BATTERY CHARGING ...................................................................................................... 2
Charge/Discharge .............................................................................................................. 2
Battery attaching/detaching .............................................................................................. 2
Placing the battery in the charger...................................................................................... 3
WARNINGS! .................................................................................................................... 4
OPTIONAL ACCESSORIES ............................................................................................... 4
BASIC OPERATION ........................................................................................................... 5
Turning the phone on and off............................................................................................ 5
Connecting to the network ................................................................................................ 5
Shared vs. Personal Phones............................................................................................... 5
Out of Range ..................................................................................................................... 6
Logging on to a shared phone ........................................................................................... 6
MAKING AND ANSWERING CALLS .............................................................................. 7
Answering a Call............................................................................................................... 7
Identifying a Caller ........................................................................................................... 7
Refusing a Call .................................................................................................................. 7
Making a Call .................................................................................................................... 7
Intercom Calling ............................................................................................................... 8
Adjusting the Volume During a Call ................................................................................ 8
Ending a Call..................................................................................................................... 9
Redial ................................................................................................................................ 9
Speed Call - Personal ........................................................................................................ 9
Speed Call - System ........................................................................................................ 10
CALL HANDLING ............................................................................................................ 10
Two-line Calling ............................................................................................................. 10
Transfer ........................................................................................................................... 10
Conference ...................................................................................................................... 11
Call Re-routing / Message Waiting................................................................................. 11
USING OTHER FEATURES ............................................................................................. 12
Call Pickup ...................................................................................................................... 12
Call Park Retrieve ........................................................................................................... 12
Camp-on .......................................................................................................................... 12
Do Not Disturb................................................................................................................ 13
Microphone Mute............................................................................................................ 13
Message Paging .............................................................................................................. 13
Night Answer .................................................................................................................. 14
Tag Call ........................................................................................................................... 14
CUSTOMIZING YOUR PHONE ...................................................................................... 15
Ringer Style .................................................................................................................... 15
Ringer Volume ................................................................................................................ 15
Earpiece Volume ............................................................................................................. 16
Auto-Answer Ring .......................................................................................................... 16
-i-
Display Contrast Control ................................................................................................ 16
Key Locking.................................................................................................................... 16
ACD AGENT FEATURES ................................................................................................ 17
ACD Agent Log in / Log out .......................................................................................... 17
ACD Agent Make Busy .................................................................................................. 17
ACD Agent Work Timer ................................................................................................ 17
Call an ACD Agent ......................................................................................................... 18
REGULATORY AND PATENT INFORMATION .......................................................... 19
- ii -
IMPORTANT INFORMATION ABOUT
WIRELESS PHONES
Wireless telephones use radio frequencies, which are susceptible to interference from
electrical devices such as motors, computers, VHF radios, and fluorescent lights. Such
interference can limit the operating range of the telephone and cause noisy or interrupted
reception. Walls, building wiring, and metal structures such as filing cabinets can also affect
the performance of the telephone.
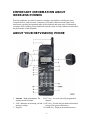
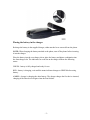
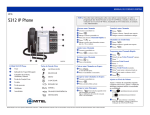
ABOUT YOUR NETVISION® PHONE
1. Antenna - High-gain antenna. The 10. FCT key - Accesses specially programmed
antenna does not extend.
features.
2. LED - Indicates an incoming call and 11. RCL key - Recalls the last number dialed,and
message waiting.
to access the speed-call directory.
3. Earpiece
12. NAME key - Displays the names directory
-1-
4. Mini-headset jack - Allows you to
13. SND key - Calls the number dialed, accepts a
plug a headset into phone for
call, powers on the phone, and selects items in
handsfree use.
phone menus.
5. Serial port - For system
14. END key - Ends a call, refuses a call, powers
administration use.
off the phone, and returns to a previous menu.
6. Volume adjust buttons - Adjusts the 15. CLR key - Removes the last digit entered from
current call volume and scroll phone
the keypad.
menus and lists.
7. SEL button - Selects a name from the 16. STO key - Stores a number in the speed-call
name list.
directory.
8. LCD Screen - Shows the phone
17. HOLD key - Puts a call on hold and switch to
status and menu options.
the other line.
9. MENU key - Displays the phone user 18. *< and # > keys - Scrolls through phone menus.
menu.
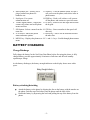
BATTERY CHARGING
Charge/Discharge
Fully charge the battery for the NetVision Data Phone before first using the phone. A fully
charged battery provides approximately 90 minutes of talk time and 40 hours standby
operation per charge.
As the battery discharges, the battery strength indicator on the display shows more white
space.
Battery attaching/detaching
Attach the battery to the phone by aligning the feet on the battery with the notches on
the phone. Push the top of the battery into the phone until the latch clicks.
Detach the battery by depressing the catch and pulling the top of the battery from the
phone.
-2-
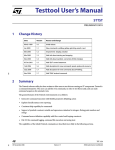
Placing the battery in the charger
Recharge the battery in the supplied charger, either attached to or removed from the phone.
NOTE: When charging the battery attached to the phone, turn off the phone before inserting
it into the charger.
Place the battery into the rear charger slot or place the battery and phone combination into
the front charger slot. The indicators for each slot on the charger indicate the following
status:
GREEN - battery is fully charged and ready for use.
RED - battery is charging; wait until the status indicator changes to GREEN before using
battery.
AMBER - charger is charging the other battery. The charger charges the first device inserted;
charging of the other device begins when the first finishes.
-3-
WARNINGS!
To prevent injury or burns, do not short-circuit the battery terminals with metal
objects.
Use only approved batteries and charging accessories with the NetVision Phone.
Do not charge the battery in a charger other than a Symbol NetVision Phone charger.
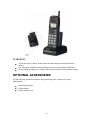
OPTIONAL ACCESSORIES
For the following optional accessories and replacement parts, contact your system
administrator.
Dual battery charger
Leather holster
Deluxe leather cases
-4-
BASIC OPERATION
Turning the phone on and off
Press and release SND to turn on the NetVision Data Phone and connect to the network. A
phone set up for personal operation is ready to use immediately after it is turned on. To use a
shared phone, you must log on to it first; see below for more information.
To turn off the phone, press and hold END for two seconds or until the display is blank.
Connecting to the network
The quality of communication depends on network radio reception. Large metal structures
such as filing cabinets and other devices that radiate radio signals can affect reception. The
vertical bar on the left side of the display shows you the strength of the radio signal at your
present location. The higher the bar, the stronger the signal and the better the quality of your
calls from that location.
The NetVision Data Phone can also cause radio interference to other devices. Use the phone
only in areas designated by the system administrator.
If the phone cannot connect to the network, the phone displays 'No Network'. You cannot
make or receive calls when disconnected from the network.
NOTE: When your NetVision Data Phone is disconnected from the network or out of range,
the system will automatically forward all your calls to a system-programmed destination -typically voice mail.
Shared vs. Personal Phones
Your NetVision Data Phone is configured to operate either as a shared or persona phone.
As a shared phone, the system administrator assigns each user a profile consisting of an
extension number, an optional username and a Personal Identification Number (PIN). Any
user with a valid profile can use any NetVision Data Phone configured for shared use.
As a personal phone, the system administrator configures the NetVision Data Phone for your
use only - a profile is not required to use the phone.
-5-
NOTE: The Symbol Admin user profile is reserved for system support personnel.
Out of Range
When the phone is outside the network coverage area, it displays "No Network" and,
when the phone is idle, sounds the out-of-range tone (one long beep and two short
beeps).
when the phone is active, sounds the call-waiting tone (two short beeps). You have
several seconds (typically 10) to move within range of the network before the phone
hangs up the call.
NOTE: The phone automatically shuts off after a period of time out of range (typically two
minutes).
Logging on to a shared phone
You must log on to a shared NetVision Data Phone before you can begin using it. Obtain an
extension number or a username and password (PIN) from the system administrator.
To log on to a shared phone:
1. Press SND to turn on the phone.
2. Press FCT.
3. Do one of the following:
o To log on using your name, use the scroll keys (*< , >#) or Vol buttons to
select Logon Name, and then select your name.
o To log on using your extension number, use the scroll keys (*< , >#) or Vol
buttons to select Logon Ext#, and then enter your extension number.
4. Press SND.
5. Enter your PIN.
6. Press SND.
To log off a shared phone:
1. Press FCT.
2. Use the scroll keys (*< , >#) or Vol buttons to select Logout.
3. Press SND.
You can also log off by turning off the phone.
-6-
MAKING AND ANSWERING CALLS
Answering a Call
You can program your NetVision Data Phone to answer calls in one of three ways:
Auto-Answering automatically answers the call after one ring.
One-Key Answering requires you to press SND to answer a call.
Any-Key Answering allows you to use any key but END or HOLD to answer a call.
To select an answering mode:
1. Press MENU.
2. Use the scroll keys (*<, >#) or the Vol buttons to select Phone Answer.
3. Select the desired mode.
To cancel your selection, press END.
Identifying a Caller
While in a call, the phone can display either the caller's number or name (if available) but not
both at once.
To alternate between the caller's number and name:
Press NAME.
Refusing a Call
To refuse an incoming call:
Press END.
NOTE: Holding down the END key for two seconds turns off the phone.
Making a Call
Extension and Outside Number Dialing
1. Dial the extension number
-orfor an external call, dial the code required to access an outside line (usually 9) and
then the number.
2. Press SND.
-7-
Dialing by Name
This feature (if available) enables you to call other extension users by selecting their names
from a menu. The system administrator stores the names.
1. Press the Vol buttons or NAME to activate the name list.Dial the extension number
2. Use the scroll keys (*<, >#) or the Vol buttons to select the desired name.
3. Press SND to place the call.
TIP: You can use the dial pad keys to jump to specific names when the list is long: Press the
key that corresponds to the first letter in the user name - for example to jump to names
beginning with "S", press 7. If a letter has no entries, the phone displays {No entries for ...}.
Intercom Calling
This feature allows you to speak to a group of other NetVision phone users at the same time.
Each user can belong to as many as 10 intercom groups. The system administrator manages
access to the groups. You can only speak to one intercom group at a time.
The phone automatically answers an intercom call if a call is not already in progress. If a call
is progress, a three-beep alert indicates that a call is waiting. The phone enters the intercom
call when you end or place the current call on hold.
Any user can leave an intercom call at any time. Only the initiating phone can end an
intercom call.
To place an intercom call:
1.
2.
3.
4.
Press #.
Enter the intercom group number (0-9).
Press SND.
Speak to the other users in the intercom group.
Adjusting the Volume During a Call
To adjust the earpiece volume for the current call only:
Press the Vol buttons on the side of the phone.
For information on adjusting the base volume for all calls, see Earpiece Volume elsewhere in
this guide.
-8-
Ending a Call
To end a call:
Press END.
NOTE: Holding down the END key for two seconds turns off the phone.
Redial
To redial any of the last eight numbers dialed:
Press RCL, and then SND to dial the last call made or received.
-orPress RCL repeatedly until the number or name of the party you want to call appears
in the display, and then press SND.
Speed Call - Personal
To add or replace a number in your personal Speed Call list:
1. Dial the number.
2. Press STO.
3. Dial a two-digit speed-call location, 00 through 99. The phone stores the number in
that location.
To clear the speed-call list:
1. Press MENU.
2. Use the scroll keys (*<, >#) or the Vol buttons to select Clear SD.
3. Press SND.
Caution!: This action removes all entries from your Speed Call list.
To dial a stored personal Speed Call number:
1. Press RCL.
2. Dial the speed dial location number (00-99)
-orUse the *<, #> keys or the Vol buttons to select the number.
3. Press SND to dial the number.
-9-
Speed Call - System
System Speed calling lets you call numbers that the system administrator stored for access by
all users on the network.
To make a System Speed call:
1. Dial the speed dial number. (Ask your system administrator for these.)
2. Press SND.
CALL HANDLING
Two-line Calling
To place another call without disconnecting the first call:
1. Press HOLD.
The current call is placed on consultation hold.
2. Place the call as usual.
To alternate between the two calls (Call Swap):
1. Press FCT.
2. Use the scroll keys (*<, >#) or the Vol buttons to select Swap.
3. Press SND.
Transfer
To transfer an active call:
1.
2.
3.
4.
Press HOLD.
Dial the number of the third party.
Press SND.
Do one of the following:
o To complete the transfer, press END.
o To announce the transfer, wait for an answer, consult, and then press END.
o To return to the first call, press FCT, select Back to Held, and then press
SND.
TIP: You can transfer to someone in the Dial by Name list, by pressing NAME, selecting the
person's name, and then pressing SND.
- 10 -
Conference
To form a Conference when a two-party call is already in progress, or to add another party to
an existing Conference:
1.
2.
3.
4.
5.
6.
Press FCT.
Use the scroll keys (*<, >#) or the Vol buttons to select Transfer.
Press SND.
Dial the number of the next party.
Press SND.
After the called party answers, press FCT.
To return to the previous call if the called party is busy or does not answer, press
FCT, select BacktoHeld, and then press SND.
7. Use the scroll keys (*<, >#) or the Vol buttons to select Conference.
8. Press SND. The conference is established.
To expand a conference to five parties (including yourself):
Repeat the above procedure for each additional party.
To exit a Conference:
Press END.
Call Re-routing / Message Waiting
If you cannot take a call, or if your NetVision Data Phone is turned off or out of range, the
system will automatically forward your calls to a preprogrammed destination--typically voice
mail.
A flashing Message Waiting light and an "M" on the display indicate that you have messages
waiting.
To retrieve your messages:
1.
2.
3.
4.
Press FCT.
Use the scroll keys (*<, >#) or the Vol buttons to select RetrieveMsg.
Press SND.
Proceed as instructed by your voice mail system.
- 11 -
USING OTHER FEATURES
Call Pickup
To answer a call that is ringing at another phone in your Pickup Group:
1. Press FCT.
2. Use the scroll keys (*<, >#) or the Vol buttons to select Group Pickup.
3. Press the SND.
The call is re-routed to your phone.
To answer a call that is ringing at another extension that is not in your Pickup Group:
1.
2.
3.
4.
5.
Press FCT.
Use the scroll keys (*<, >#) or the Vol buttons to select Call Pickup.
Press SND.
Dial the number of the ringing extension.
Press SND.
The call is re-routed to your phone.
Call Park Retrieve
Call Park lets you retrieve a call that the system attendant has put on Hold. Usually, the
attendant pages you to announce the call and the digits you need to dial to retrieve it.
To retrieve a parked call:
1.
2.
3.
4.
5.
Press FCT.
Use the scroll keys (*<, >#) or the Vol buttons to select UnparkCall.
Press SND.
Dial the digits announced by the attendant.
Press SND.
Camp-on
Call Park lets you retrieve a call that the system attendant has put on Hold. Usually, the
attendant pages you to announce the call and the digits you need to dial to retrieve it.
To have the system alert you when a busy extension is free to take your call:
While listening to busy tone, wait for the Camp-on timer to expire (typically 10
seconds).
- 12 -
When the extension becomes free your phone rings; answering automatically connects you to
the extension.
To respond to a camp-on (indicated by a tone) without ending the call in progress:
1. Press FCT.
2. Use the scroll keys (*<, >#) or the Vol buttons to select Swap.
3. Press SND, and then speak to the calling party.
To alternate between the two calls (Call Swap):
Repeat the above steps.
Do Not Disturb
Activating Do Not Disturb (DND) prevents calls from ringing your phone. Callers hear
special busy tone when DND is activated or are re-routed to voice mail (if available).
To activate or deactivate DND:
1.
2.
3.
4.
Press FCT.
Use the scroll keys (*<, >#) or the Vol buttons to select DoNotDisturb.
Press SND to display the current DND status.
Press SND to change the status.
Microphone Mute
To disable the microphone during a call:
Press SND.
To enable the microphone:
Press SND.
Message Paging
This feature allows the NetVision Data Phone to receive pager-style messages. Depending on
the configuration, the system administrator can arrange for other network users to send
messages to the NetVision Data Phone. The Data Phone alerts you to new messages with a
special tone.
To view messages:
1. Press FCT.
2. Press RCL.
- 13 -
3. Press SND to view the last new message received.
4. Press SND repeatedly to scroll through messages or type in the number corresponding
to a specific message.
Press RCL repeatedly to scroll through the Subject, Sender and Recipient fields.
To delete a message:
Press FCT while viewing the message.
Night Answer
To answer an external call while the system is in off-hours (Night Answer) mode:
1.
2.
3.
4.
Press FCT.
Use the scroll keys (*<, >#) or the Vol buttons to select AnsNightBell.
Press SND.
Speak to the caller.
Tag Call
Tag Call allows you to signal that you are the victim of a threatening or malicious call. Using
the tag, your system administrator or telephone company can identify the source of the call
and provide this information to appropriate personnel or authorities.
CAUTION: Tagging a non-malicious call may result in fines or other penalties.
To tag a malicious call:
1. Press
.
2. On the Function menu, use the scroll keys to display "Trans/Conf."
3. Press
to select Trans/Conf.
4. Dial *55.
5. Press
.
If the call was successfully tagged "Thank You" is shown on the display; otherwise, "Not
Allowed" is displayed.
Note: Tag Call can be used on active two-party calls only. Calls on hold and conference calls
cannot be tagged.
- 14 -
CUSTOMIZING YOUR PHONE
Access the features discussed in this section from the User Options Menu.
To view the User Options Menu:
1. Press SND.
2. Press the MENU key.
3. If not logged on to the phone, use the scroll keys (*<, >#) or the Vol buttons to select
User Options, and then press SND.
To select a menu choice:
1. Use the scroll keys(*<, >#) or the Vol buttons to select a choice.
2. Press SND.
To cancel a menu selection:
Press END.
Ringer Style
To change the ringing style:
1. Select Phone Ring from the User Options menu.
2. Select one of six different tones, the vibrator mode or the LED flashing mode.
3. Press SND.
To add vibration to the ringing style:
1.
2.
3.
4.
Select Ring Vibrate from the the User Options menu.
Press SND to display the current Ring Vibrate status, either Enabled or Disabled.
Select a different status.
Press SND to set the status.
Ringer Volume
To adjust the ringer volume while the phone is idle:
1. Select Ring Volume from the User Options menu.
2. Use the scroll keys(*<, >#) or the Vol buttons to adjust the volume from L(low) to
H(high).
3. Press SND.
- 15 -
Earpiece Volume
This sets the volume for all calls. To set the volume for the current call only, see Making and
Answering Calls.
To set the volume for all calls:
1. Select Play Volume from the User Options menu.
2. Use the scroll keys(*<, >#) or the Vol buttons to adjust the volume from L(low) to
H(high).
3. Press SND.
Auto-Answer Ring
To set the auto-answer ring:
1. Select AutoAns Ring from User Options menu.
2. Select LED, vibrator, or a tone value from 1 to 6.
3. Press SND.
Display Contrast Control
To adjust the display contrast to suit the lighting conditions:
1. Choose Contrast from the User Options menu.
2. Use the scroll keys (*<, >#) or the Vol buttons to adjust the contrast from L(low) to
H(high).
3. Press SND.
Key Locking
This feature allows you to lock the keypad to prevent accidental Data Phone operation and
unnecessary battery power consumption. Any incoming call automatically unlocks the
keypad.
To lock the keypad:
1. Choose Keypad Lock from the User Options menu.
2. Use the scroll keys (*<, >#) or the Vol buttons to enable or disable the feature.
3. Press SND.
To unlock the keypad:
Press and hold SND until the phone status changes to idle.
- 16 -
ACD AGENT FEATURES
ACD (Automatic Call Distribution) is a method of routing large volumes of calls directly to a
selected group of extensions (Agents). If your phone has been designated an ACD Agent,
then the features described in this section are available to you.
ACD Agent Log in / Log out
ACD calls are directed to logged in Agents only. As an Agent, you are assigned a 1- to 7digit identification number to log in with.
To log in or out:
1.
2.
3.
4.
5.
Press FCT.
Use the scroll keys (*<, >#) or the Vol buttons to select AgntLogInOut.
Press SND.
At the prompt, enter your Agent ID number.
Press SND.
The phone displays the letter "A" when you are logged in.
ACD Agent Make Busy
If you need extra time to handle paperwork between calls, or if you must leave your phone
unattended for a short period, you can place your phone in busy state. When your phone is in
busy state, ACD calls are not directed to your set.
To place your phone in or take it out of busy state (the phone must be idle and logged in as
an Agent):
1.
2.
3.
4.
Press FCT.
Use the scroll keys (*<, >#) or the Vol buttons to select Make Busy.
Press SND to display the current Make Busy status.
Press SND to change the status.
ACD Agent Work Timer
After ending an ACD call, you_ll be allowed a certain amount of time to complete the work
generated by the call before another ACD call is directed to your phone.
WORK TIME appears in the display while the timer is counting down. You have the option
of canceling the timer and accepting another call before the timer expires.
- 17 -
To cancel the after work timer from an idle phone:
1. Press FCT.
2. Use the scroll keys (*<, >#) or the Vol buttons to select CnclWrkTimer.
3. Press SND.
Your phone is now ready to receive another ACD call.
NOTE: If you make a call or answer a non-ACD call, the timer is automatically cancelled.
Be prepared to answer another ACD call when the current one ends.
Call an ACD Agent
To call another ACD agent:
1. Dial the agent's ID number.
2. Press SND.
- 18 -
REGULATORY AND PATENT INFORMATION
Radio Frequency Interference Requirements:
This device has been tested and found to comply with the limits for a Class A digital device pursuant to Part 15
of the Federal Communications Commissions Rules and Regulation.These limits are designed to provide
reasonable protection against harmful interference when the equipment is operated in a commercial
environment.This equipment generates, uses, and can radiate radio frequency energy and, if not installed and
used in accordance with the instruction manual, may cause harmful interference to radio communications.
Operation of this equipment in a residential area is likely to cause harmful interference in which case the user
will be required to correct the interference at his own expense. However, there is no guarantee that interference
will not occur in a particular installation. If the equipment does cause harm-ful interference to radio or
television reception, which can be determined by turning the equipment off and on, the user is encouraged to try
to correct the interference by one or more of the following measures:
- Re-orient or relocate the receiving antenna.
- Increase the separation between the equipment and receiver.
- Connect the equipment into an outlet on a circuit different from that to which the receiver is connected.
- Consult the dealer or an experienced radio/TV technician for help.
Radio Frequency Interference Requirements - Canada
This Class A digital apparatus meets the requirements of the Canadian Interference-Causing Equipment
Regulations.
Applicable Directives:
Electromagnetic Compatibility Directive 89/336/EEC.
Low Voltage Directive 73/23/EEC.
Applicable Standards:
EN 55 022 - Limits and Methods of Measurement of Radio Interference Characteristics of Information
technology Equipment
EN 50 082-1 - Electromagnetic Compatibility - Generic Immunity Standard, Part 1: Residential, commercial,
Light Industry
IEC 801.2 - Electromagnetic Compatibility for Industrial Process Measurement and Control Equipment Part 2:
Electrostatic.
Discharge Requirements
IEC 801.3 - Electromagnetic Compatibility for Industrial Process Measurement and Control Equipment Part 3:
Radiated
Electromagnetic Field Requirements
IEC 801.4 - Electromagnetic Compatibility for Industrial Process Measurement and Control Equipment Part 4:
Electrical Fast
Transients Requirements
EN 60 950 + Amd 1 + Amd 2 - Safety of Information Technology Equipment Including Electrical Business
Equipment
RF Devices
Symbol's RF products are designed to be compliant with the rules and regulations in the locations into which
they are sold and will be labeled as required.The majority of Symbol's RF devices is type-approved and does
not require the user to obtain license or authorization before using the equipment. Any changes or modifications
to Symbol Technologies equipment not expressly approved by Symbol Technologies could void the user's
authority to operate the equipment.
- 19 -
Patents
This product is covered by one or more of the following U.S. and foreign Patents:
U.S. Patent No.4,360,798; 4,369,361; 4,387,297; 4,460,120; 4,496,831; 4,593,186;
4,603,262; 4,607,156; 4,652,750; 4,673,805;
4,736,095; 4,758,717; 4,816,660; 4,845,350; 4,896,026; 4,897,532; 4,923,281; 4,933,538;
4,992,717; 5,015,833; 5,017,765;
5,021,641; 5,029,183; 5,047,617; 5,103,461; 5,113,445; 5,130,520 5,140,144; 5,142,550;
5,149,950; 5,157,687; 5,168,148;
5,168,149; 5,180,904; 5,229,591; 5,230,088; 5,235,167; 5,243,655; 5,247,162; 5,250,791;
5,250,792; 5,262,627; 5,262,628;
5,266,787; 5,278,398; 5,280,162; 5,280,163; 5,280,164; 5,280,498; 5,304,786; 5,304,788;
5,306,900; 5,321,246; 5,324,924;
5,337,361; 5,367,151; 5,373,148; 5,378,882; 5,396,053; 5,396,055; 5,399,846; 5,408,081;
5,410,139; 5,410,140; 5,412,198;
5,418,812; 5,420,411; 5,436,440; 5,444,231; 5,449,891; 5,449,893; 5,468,949; 5,471,042;
5,478,998; 5,479,000; 5,479,002;
5,479,441; 5,504,322; 5,519,577; 5,528,621; 5,532,469; 5,543,610; 5,545,889; 5,552,592;
5,578,810; 5,581,070; 5,589,679;
5,589,680; 5,608,202; 5,612,531; 5,619,028; 5,664,229; 5,668,803; 5,675,139; 5,693,929;
5,698,835; 5,705,800; 5,714,746;
5,723,851; 5,734,152; 5,734,153; 5,745,794; 5,754,587; 5,658,383; D305,885; D341,584;
D344,501; D359,483; D362,453;
D362,435; D363,700; D363,918; D370,478; D383,124; D391,250.
Invention No. 55,358; 62,539; 69,060; 69,187 (Taiwan); No. 1,601,796; 1,907,875;
1,955,269 (Japan).
European Patent 367,299; 414,281; 367,300; 367,298; UK 2,072,832; France 81/03938; Italy
1,138,713.
rev. 7/98
- 20 -