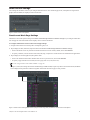
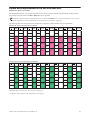
1
Whats New in Pro Tools | S6
Version 1.4
Legal Notices
© 2014 Avid Technology, Inc., (“Avid”), all rights reserved. This guide may not be duplicated in whole or in part without the written consent of Avid.
003, 192 Digital I/O, 192 I/O, 96 I/O, 96i I/O, Adrenaline, AirSpeed, ALEX, Alienbrain, AME, AniMatte, Archive, Archive II, Assistant Station, AudioPages,
AudioStation, AutoLoop, AutoSync, Avid, Avid Active, Avid Advanced Response, Avid DNA, Avid DNxcel, Avid DNxHD, Avid DS Assist Station, Avid Ignite,
Avid Liquid, Avid Media Engine, Avid Media Processor, Avid MEDIArray, Avid Mojo, Avid Remote Response, Avid Unity, Avid Unity ISIS, Avid VideoRAID,
AvidRAID, AvidShare, AVIDstripe, AVX, Beat Detective, Beauty Without The Bandwidth, Beyond Reality, BF Essentials, Bomb Factory, Bruno, C|24,
CaptureManager, ChromaCurve, ChromaWheel, Cineractive Engine, Cineractive Player, Cineractive Viewer, Color Conductor, Command|8, Control|24,
Cosmonaut Voice, CountDown, d2, d3, DAE, D-Command, D-Control, Deko, DekoCast, D-Fi, D-fx, Digi 002, Digi 003, DigiBase, Digidesign,
Digidesign Audio Engine, Digidesign Development Partners, Digidesign Intelligent Noise Reduction, Digidesign TDM Bus, DigiLink, DigiMeter, DigiPanner,
DigiProNet, DigiRack, DigiSerial, DigiSnake, DigiSystem, Digital Choreography, Digital Nonlinear Accelerator, DigiTest, DigiTranslator, DigiWear, DINR, DNxchange,
Do More, DPP-1, D-Show, DSP Manager, DS-StorageCalc, DV Toolkit, DVD Complete, D-Verb, Eleven, EM, Euphonix, EUCON, EveryPhase, Expander,
ExpertRender, Fairchild, FastBreak, Fast Track, Film Cutter, FilmScribe, Flexevent, FluidMotion, Frame Chase, FXDeko, HD Core, HD Process, HDpack,
Home-to-Hollywood, HyperSPACE, HyperSPACE HDCAM, iKnowledge, Impact, Improv, iNEWS, iNEWS Assign, iNEWS ControlAir, InGame, Instantwrite, Instinct,
Intelligent Content Management, Intelligent Digital Actor Technology, IntelliRender, Intelli-Sat, Intelli-Sat Broadcasting Recording Manager, InterFX, Interplay,
inTONE, Intraframe, iS Expander, iS9, iS18, iS23, iS36, ISIS, IsoSync, LaunchPad, LeaderPlus, LFX, Lightning, Link & Sync, ListSync, LKT-200, Lo-Fi,
MachineControl, Magic Mask, Make Anything Hollywood, make manage move|media, Marquee, MassivePack, MassivePack Pro, Maxim, Mbox, Media Composer,
MediaFlow, MediaLog, MediaMix, Media Reader, Media Recorder, MEDIArray, MediaServer, MediaShare, MetaFuze, MetaSync, MIDI I/O, Mix Rack, Moviestar,
MultiShell, NaturalMatch, NewsCutter, NewsView, NewsVision, Nitris, NL3D, NLP, NSDOS, NSWIN, OMF, OMF Interchange, OMM, OnDVD,
Open Media Framework, Open Media Management, Painterly Effects, Palladium, Personal Q, PET, Podcast Factory, PowerSwap, PRE, ProControl, ProEncode,
Profiler, Pro Tools, Pro Tools|HD, Pro Tools LE, Pro Tools M-Powered, Pro Transfer, QuickPunch, QuietDrive, Realtime Motion Synthesis, Recti-Fi,
Reel Tape Delay, Reel Tape Flanger, Reel Tape Saturation, Reprise, Res Rocket Surfer, Reso, RetroLoop, Reverb One, ReVibe, Revolution, rS9, rS18, RTAS,
Salesview, Sci-Fi, Scorch, ScriptSync, SecureProductionEnvironment, Shape-to-Shape, ShuttleCase, Sibelius, SimulPlay, SimulRecord, Slightly Rude Compressor,
Smack!, Soft SampleCell, Soft-Clip Limiter, SoundReplacer, SPACE, SPACEShift, SpectraGraph, SpectraMatte, SteadyGlide, Streamfactory, Streamgenie,
StreamRAID, SubCap, Sundance, Sundance Digital, SurroundScope, Symphony, SYNC HD, SYNC I/O, Synchronic, SynchroScope, Syntax, TDM FlexCable,
TechFlix, Tel-Ray, Thunder, TimeLiner, Titansync, Titan, TL Aggro, TL AutoPan, TL Drum Rehab, TL Everyphase, TL Fauxlder, TL In Tune, TL MasterMeter,
TL Metro, TL Space, TL Utilities, tools for storytellers, Transit, TransJammer, Trillium Lane Labs, TruTouch, UnityRAID, Vari-Fi, Video the Web Way, VideoRAID,
VideoSPACE, VTEM, Work-N-Play, Xdeck, X-Form, and XMON are either registered trademarks or trademarks of Avid Technology, Inc. in the United States and/or
other countries.
Bonjour, the Bonjour logo, and the Bonjour symbol are trademarks of Apple Computer, Inc.
Thunderbolt and the Thunderbolt logo are trademarks of Intel Corporation in the U.S. and/or other countries.
This product may be protected by one or more U.S. and non-U.S. patents. Details are available at www.avid.com/patents.
Product features, specifications, system requirements, and availability are subject to change without notice.
Guide Part Number 9329-65532-00 REV A 02/15
Contents
Chapter 1. Introduction . . . . . . . . . . . . . . . . . . . . . . . . . . . . . . . . . . . . . . . . . . . . . . . . . . . . . . . . . . . . . . . . . . . . . . . . . . . . . . 1
System Requirements and Compatibility . . . . . . . . . . . . . . . . . . . . . . . . . . . . . . . . . . . . . . . . . . . . . . . . . . . . . . . . . . . . . 1
Activation and Registration. . . . . . . . . . . . . . . . . . . . . . . . . . . . . . . . . . . . . . . . . . . . . . . . . . . . . . . . . . . . . . . . . . . . . . . 1
About This Guide. . . . . . . . . . . . . . . . . . . . . . . . . . . . . . . . . . . . . . . . . . . . . . . . . . . . . . . . . . . . . . . . . . . . . . . . . . . . . . 2
Resources . . . . . . . . . . . . . . . . . . . . . . . . . . . . . . . . . . . . . . . . . . . . . . . . . . . . . . . . . . . . . . . . . . . . . . . . . . . . . . . . . . 3
Chapter 2. New and Changed Features in
S6 Software v1.4 . . . . . . . . . . . . . . . . . . . . . . . . . . . . . . . . . . . . . . . . . . . . . . . . . . . . . . . . . . . . . . . . . . . . . . . . . . . . . . . . . . . 4
Input and Output Assignment Improvements . . . . . . . . . . . . . . . . . . . . . . . . . . . . . . . . . . . . . . . . . . . . . . . . . . . . . . . . . . 4
Automation Trim Metering and Write Indication on Fader Modules . . . . . . . . . . . . . . . . . . . . . . . . . . . . . . . . . . . . . . . . . . 6
New Preference Settings for Banking, Navigation and Display . . . . . . . . . . . . . . . . . . . . . . . . . . . . . . . . . . . . . . . . . . . . . 7
Home Screen Settings . . . . . . . . . . . . . . . . . . . . . . . . . . . . . . . . . . . . . . . . . . . . . . . . . . . . . . . . . . . . . . . . . . . . . . . . . . 9
Page Switches on the Master Module . . . . . . . . . . . . . . . . . . . . . . . . . . . . . . . . . . . . . . . . . . . . . . . . . . . . . . . . . . . . . . 10
Auto Talkback . . . . . . . . . . . . . . . . . . . . . . . . . . . . . . . . . . . . . . . . . . . . . . . . . . . . . . . . . . . . . . . . . . . . . . . . . . . . . . . 11
Displaying Names in Asian Characters . . . . . . . . . . . . . . . . . . . . . . . . . . . . . . . . . . . . . . . . . . . . . . . . . . . . . . . . . . . . . 11
Expand Mode Improvements for EQ and DYN Knob Sets . . . . . . . . . . . . . . . . . . . . . . . . . . . . . . . . . . . . . . . . . . . . . . . 12
Progress Indicators for Session Load and Workstation Connect . . . . . . . . . . . . . . . . . . . . . . . . . . . . . . . . . . . . . . . . . . . 13
Chapter 3. Updating S6 System and Workstation Software . . . . . . . . . . . . . . . . . . . . . . . . . . . . . . . . . . . . . . . . . . . . . . . 14
What’s New in S6 Software v1.4
iii
Chapter 1: Introduction
This document describes the new and changed features in S6 Software version 1.4 for Pro Tools® | S6 systems and other
EUCON™-enabled applications. These include improved input and output assignment, Automation Trim metering and Write indication on strip meters, new Preference settings for navigation and display, Auto Talkback, support for Asian language display of
channel names, and other enhancements.
For a complete description of features, see Chapter 2, “New and Changed Features in S6 Software v1.4.” For software installation instructions, see Chapter 3, “Updating S6 System and Workstation Software.”
System Requirements and Compatibility
S6 Software version 1.4 requires Pro Tools 11.2.2 or later, and is also compatible with other EUCON applications (check with the
manufacturer for compatibility information and requirements). Some features and bug fixes require Pro Tools 11.3.1 or later, as
noted in this guide.
For a list of supported applications, system requirements, and other compatibility information, visit:
http://www.avid.com/US/products/Avid-S6/tech-specs
Important Software Installation Information
After updating the S6 MasterModule software and module firmware, you must power cycle the system. For more information, see
Chapter 3, “Updating S6 System and Workstation Software.”
Activation and Registration
As soon as you have assembled your S6 system and confirmed a successful hardware installation, activate your S6 system software
on-line. Use the alphanumeric code on the included S6 System Software Activation Card to activate and download all S6 system
software and documentation.
Be sure to activate your purchase using the Activation Card included with the Master Module so you can receive software updates
directly in your Avid account. Check your Avid account for system software updates, Workstation software, and monitor control
software (XMON EUCON software, and Studio Monitor Pro).
Registering
By registering, you become eligible to receive the following:
• Technical support information
• Software update and upgrade notices
• Hardware warranty information
Chapter 1: Introduction
1
About This Guide
This guide explains how to assemble your Avid S6 system.
Conventions Used in This Guide
All of our guides use the following conventions to indicate menu choices and key commands:
:
Convention
Action
File > Save
Choose Save from the File menu
Control+N
Hold down the Control key and press the N key
Control-click
Hold down the Control key and click the mouse button
Right-click
Click with the right mouse button
The names of Commands, Options, and Settings that appear on-screen are in a different font.
The names of switches and keys on the control surface are shown in bold (such as Select). In addition, the Shift switch on the
Master Module is always shown in bold to distinguish it from the Shift switch on the computer keyboard.
The following symbols are used to highlight important information:
User Tips are helpful hints for getting the most from your system.
Important Notices include information that could affect your data or the performance of your system.
Shortcuts show you useful keyboard or mouse shortcuts.
Cross References point to related sections in this guide and other Avid guides.
Chapter 1: Introduction
2
Resources
The Avid website (www.avid.com) is your best online source for information to help you get the most out of your Avid system. The
following are just a few of the services and features available.
Account Activation and Product Registration
Activate your product to access downloads in your Avid account (or quickly create an account if you don’t have one). Register your
purchase online, download software, updates, documentation, and other resources.
https://www.avid.com/US/account
Support and Downloads
Contact Avid Customer Success (technical support); download software updates and the latest online manuals; browse the Compatibility documents for system requirements; search the online Knowledge Base or join the worldwide Avid user community on
the User Conference.
https://www.avid.com/US/Support/index.html
Training and Education
Study on your own using courses available online or find out how you can learn in a classroom setting at an Avid-certified training
center. For example, check out the series of Get Started Fast with S6, available from the main S6 product page:
http://www.avid.com/US/products/avid-S6
Products and Developers
Learn about Avid products; download demo software or learn about our Development Partners and their plug-ins, applications, and
hardware.
https://www.avid.com/US/Products/index.html
News and Events
Get the latest news from Avid or sign up for an S6 demo.
Chapter 1: Introduction
3
Chapter 2: New and Changed Features in
S6 Software v1.4
S6 Software v1.4 includes the following new and changed features:
• “Input and Output Assignment Improvements” on page 4
• “Automation Trim Metering and Write Indication on Fader Modules” on page 6
• “New Preference Settings for Banking, Navigation and Display” on page 7
• “Home Screen Settings” on page 9
• “Page Switches on the Master Module” on page 10
• “Auto Talkback” on page 11
• “Displaying Names in Asian Characters” on page 11
• “Expand Mode Improvements for EQ and DYN Knob Sets” on page 12
• “Progress Indicators for Session Load and Workstation Connect” on page 13
Be sure to check the S6 Software v1.4 ReadMe for additional information.
Input and Output Assignment Improvements
(Requires Pro Tools 11.3.1)
With Pro Tools 11.3.1 and later, the Input and Output knob sets have changed to simplify signal routing.
Input Assignment
To assign track Input from the Master Module:
1
Attention a track to bring it to the Attention Track knobs.
2
Navigate to the Home screen and tap to select Input in the Function scroller. The upper left knob shows the currently assigned
input source.
3
Do any of the following:
• To exit without changing the current assignment, tap to select any other function in the Function scroller.
• To select a different source, press the upper left knob; the two upper left knobs display interface and bus sources, respectively.
Rotate the corresponding knob until the desired source is displayed, then press the In switch for that knob.
• To return to the previous page of choices, press the Master Module Back switch (
).
To assign track Input from a channel strip:
1
In the strip for the desired track, press Input on the Process module. The top-most knob in the Knob Module shows the current
input assignment for the track (if no Knob Module is present for that strip, the current input assignment appears in the Process
Module encoder display).
2
Do any of the following:
• To exit without changing the current assignment, press any other Function switch.
• To select a different input, press the knob top showing the current input assignment. The top two knobs now show interface
and bus choices. Rotate the corresponding knob until the desired source is displayed, then press the In switch for that knob.
• To return to the previous page of choices, press Back.
Chapter 2: New and Changed Features in S6 Software v1.4
4
Output Assignment
To assign track output using the Master Module:
1
Attention a track to bring it to the Attention Track knobs.
2
Navigate to the Home screen and tap to select Bus in the Function scroller. The upper left knob displays the current output assignment.
3
Do any of the following:
• To exit without changing the current assignment, tap to select any other Function.
• To select a different output, press the knob showing the current assignment. The top two knobs show available interface and
bus outputs. Rotate the corresponding knob until the desired output is displayed, then press the In switch for that knob. This
assigns the selected output as the only output (removes any other assignments).
• To assign an additional output to the track, rotate the corresponding knob until the desired output is displayed and press the
Sel switch for the corresponding knob. This results in multiple output assignments (as indicated by the yellow Sel LED lighting, and on-screen in Pro Tools with a “+” in the Output assignment selector).
• To return to the previous page of choices, press the Master Module Back switch (
).
To assign track output from a channel strip:
1
2
In the strip for the desired track, press Bus on the Process module. The top-most encoder in the Knob Module shows the current
output assignment for the track (if no Knob Module is present for that strip, the current assignment appears in the Process Module encoder display).
Do any of the following:
• To exit without changing the current assignment, press any other Function switch.
• To select a different output, press the knob showing the current assignment. The top two knobs show available interface or bus
outputs. Rotate the corresponding knob until the desired output is displayed, then press the In switch for that knob. This assigns the selected output as the only output (removes any other assignments).
• To assign an additional output to the track, rotate the corresponding knob until the desired output is displayed and press the
Sel switch on the corresponding knob. This results in multiple output assignments (as indicated by the yellow Sel LED lighting, and on-screen in Pro Tools with a “+” in the Output assignment selector).
• To return to the previous page of choices, press Back.
Navigating Through Multiple Output Assignments
When there are multiple outputs assigned to a track, you can quickly navigate through assignments by pressing the corresponding
knob top. For example, if multiple Bus outputs are assigned to a track you can press the Bus knob to cycle through each currently
assigned Bus output to quickly re-assign or silence it (set it to no output).
Chapter 2: New and Changed Features in S6 Software v1.4
5
Automation Trim Metering and Write Indication on Fader Modules
(Requires Pro Tools 11.3.1)
Strip meters on Fader Modules (and the Attention Track meters on the Automation Module) show Trim automation, and indicate
when automation is being written in any Write mode other than Trim.
Automation Trim Metering
While writing an initial Trim pass, the Right meter lights the LED at 0 to indicate you are writing Trim automation.
While editing an existing Trim pass, the Right meter lights LEDs above or below 0 to indicate the underlying Trim value.
On-screen in Pro Tools, this corresponds to the yellow (Trim) or blue (Composite) automation line.
In order for the meters to show Trim, the Pro Tools preference for Coalesce Trim Automation must be set to Manually.
Write Indication
Whenever a track is writing automation in any mode other than Trim, the Right meter lights the LED that corresponds to the underlying automation level. For example, if in a Touch write mode the LED indicates where the fader will return when you release
it. If a track is the slave of a VCA, the lit LED corresponds to the blue automation line on-screen in Pro Tools.
Figure 1. Automation Trim meter when editing Trim data (left) and Write indication (right) in strip meters
Chapter 2: New and Changed Features in S6 Software v1.4
6
New Preference Settings for Banking, Navigation and Display
• New Banking preference settings let you define how the surface banks when you select tracks.
• New Strips preference settings provide control over several strip attributes, such as the ability to link Select and Attention
states, display or hide Track numbers, and manage the display of control values in strips when adjusting parameters.
• A new Knobs setting lets you optimize parameter mapping on strips that only have one Knob Module.
• The Display settings have been consolidated into a drop-down menu, replacing the earlier radio buttons.
Banking
The Banking section in Settings > Preferences now provides additional choices for Auto Bank to Selected Track Mode.
Figure 2. Settings > Preferences, Surface Banking
Auto-Bank to Selected Track Mode
These settings let you define how banking follows channel selection. These settings apply to all Select methods (tapping to select
tracks in the Tracks matrix, pressing a channel Select switch, or selecting a DAW track on-screen).
Off Banking ignores channel selection.
If Not Visible on Surface Banking ignores track selection if that track is already on the surface. For example, on a 16 fader system
displaying tracks 1–16, selecting track 15 will not bank the surface but selecting track 17 (or any other off-bank track) will bank.
Always When enabled, the surface will always bank to the currently selected track.
Strips
The new Strips preference settings control the behavior of hardware strips (on Fader Modules, and the Attention Track on the Automation Module). These include the ability to link/unlink strip Select and Attention states, show or hide track numbers, and manage how control values are displayed on strips when adjusting parameters.
Figure 3. Settings > Preferences, Strips
Attention Most Recently Selected Track
Selecting a track by pressing its Select switch also attentions that track.
Select Most Recently Attentioned Track
Attentioning a track by pressing its Attention key also selects that track.
Chapter 2: New and Changed Features in S6 Software v1.4
7
Show Home Screen on Strip Attention
When enabled, the Touchscreen displays the Home screen when any strip is Attentioned by pressing its Attention Key on a Fader
or Automation Module.
You can also specify a default function view and knob focus for the Home screen when a track is attentioned. See “Function and
Knob Page Settings” on page 9 for more information.
Show Track Number
When enabled, strip OLEDs show the track number assigned by the parent DAW to the left of the Track name.
Show Momentary Fader Values
When enabled, values temporarily replace track name on Fader Modules when the fader is touched or adjusted. The length of time
values are displayed is determined by the Momentary Control Value Delay setting.
Momentary Control Value Delay
Values temporarily replace track name (on Fader Modules) and parameter names (on Display Modules in any Function view) when
controls are touched or adjusted. The Momentary Control Value Delay settings lets you specify how long values are displayed.
For Fader Module displays to follow the Momentary Control Value Display, make sure to enable Show Momentary Fader Values.
To set the display time for function graphs on the Home screen, see “Auto Show Function Graph on Knob Touch” on page 10.
Knobs
Send/Insert/Input/Bus Knobs Reversed
The Send/Insert Knobs Reversed setting introduced in S6 software v1.3 has been enhanced to also control how Input and Bus knobs
appear on Knob modules.
Reverse Function Pages for 5-Knob Strips
This new setting lets you configure Knob Module function views to display parameters in their default order, or “reversed” from
their factory mapping. For example, enable Reverse Function Pages for 5-Knob Strips to have EQ plug-in parameters start with low
frequency parameters instead of high (or the opposite, depending on the default mapping of that plug-in).
Figure 4. Settings > Preferences, Knobs section
Display Module Settings
In the Display Module section of Settings > Preferences, choices for Display Module layout are now provided in a menu. Tap the
Layout field to select a view for all Display Modules.
Figure 5. Settings > Preferences, Display Module
Chapter 2: New and Changed Features in S6 Software v1.4
8
Home Screen Settings
New settings for the Home screen let you configure default function views and knob page focus, and adjust how long function
graphs (when available) are displayed on the Touchscreen.
Figure 6. Home Screen Local Options
Function and Knob Page Settings
The Home screen Local Options settings for Function and Knob Page Selected on Attention Change let you configure which function and page of controls the Home screen displays when a track is attentioned.
To configure default Home screen function and knob page settings:
1
Navigate to the Home screen and tap the Local Options (gear) icon.
2
Tap to display the first (left-most) drop down menu for Function and Knob Page Selected on Attention Change.
• To have the Home screen stay focused on whichever function was most recently edited, choose Last Selected.
• To specify a function, select a function such as Pan, Bus, EQ, or Dynamics. Not all functions are available in all applications.
3
Tap to display the second (right-most) drop down menu.
• To have the Attention Track knobs maintain their current or previous focus, choose Last Selected.
• To specify a page of knobs to be focused, choose a page (such as 1st, 2nd, and so on).
See also “Page Switches on the Master Module” on page 10.
In Figure 7, below, the settings for Function and Knob Page are EQ and 2nd, respectively. When a track is attentioned, the Home
screen displays the EQ function with the Assignable Track knobs focused on page 2 of EQ controls.
Figure 7. Home screen showing default function (EQ) and Knob Page (2nd) as defined in Home screen Local Options
Chapter 2: New and Changed Features in S6 Software v1.4
9
Backup Function and Knob Page Settings
These settings let you define a default function view and knob focus to display whenever you attention a track that does not contain
the same function as the previously attentioned track.
To configure backup function and knob page view settings:
1
Navigate to the Home screen and tap the Local Options (gear) icon.
2
Tap to display the first (left-most) drop down menu for Backup Function and Knob Page Selected on Attention Change.
• To have the Home screen stay focused on whichever function was most recently edited, choose Last Selected.
• To specify a function, select a function such as Pan, Bus, EQ, or Dynamics from the drop down menu.
3
To specify a knob page to be automatically focused when that function is displayed, tap to select a page from the second
(right-most) drop down menu.
• To have the Attention Track knobs maintain their previous focus, choose Last Selected.
• To specify a page of knobs to be focused, choose a page (such as 1st, 2nd, and so on).
Auto Show Function Graph on Knob Touch
When set to any value other than 0 secs (Off), adjusting a control for any function that has a graph display (such as EQ or pan) automatically displays the graph in the Home screen. The graph stays on-screen after you let go of the knob for the length of time
specified in the Auto Show Function Graph on Knob Touch slider (between 0.0 and 5.0 seconds).
Page Switches on the Master Module
You can use switches on the Master Module to page functions and focus the touchscreen knobs on different parameters. When the
Master Module Shift switch is held down, the four switches at the bottom left and right of the touchscreen enter Page mode as indicated by their LEDs lighting purple.
Sel
Sel
In
In
Sel
Sel
In
In
Sel
Sel
In
In
Sel
Sel
In
In
Home
Swap
Config
WS
Layout
Mode
All
Mon A
Tracks
Type
Flip
Mon B
L Spill
R Spill
Clear
Clip
Coms
Mixer
Close
Clear
Solo
Talk
Home
End
Setup
Setup
Display 1
Mon
Insert
Display 2
Alt 1
Spkrs
Settings
Sel
Alt 2
Spkrs
In
Setup
Shift
Config
Main
Spkrs
Dim
Cut
Figure 8. Shift and Page switches on the Master Module
When in Page mode, the Home and Swap switches page the Left knobs to their previous or next pages, and the Back (
Config switches page Right knobs. A focused knob group can page even if the knobs are locked.
)and
If both sides of the touchscreen are showing knobs from the same function, each set of Page switches page both knob groups. If a
different function is focused on each side of the touchscreen, the Page switches operate separately on each side.
Chapter 2: New and Changed Features in S6 Software v1.4
10
Auto Talkback
The Monitoring screen now provides its own Local Options, accessed by touching the Local Options (gear) icon.
Figure 9. Monitoring Local Options icon
To set Monitoring Local Options:
1
Press Setup in the Monitoring section of the Automation Module to go to the Monitoring screen.
2
Tap the Local Options icon (or press its Soft Key, below the icon), and set the following preferences as desired.
Auto Talkback
When enabled, the Talkback mic automatically shuts off when the Transport is playing or recording. When the Transport is
stopped, in shuttle, rewind or any mode other than play or record, Talkback turns on. Pressing the Talkback switch overrides this
setting.
Enable Surface Talkback Latching
When enabled, the Talkback switch operates in Latching mode if held down for less than 1/2 second (it stays in its current state until
the switch is pressed again).
Enable GPI Talkback Latching
When enabled, GPI-triggered Talkback operates in Latching mode if engaged for less than half a second (it stays in its current state
until the switch is triggered or pressed again).
Displaying Names in Asian Characters
You can specify an Asian language in which Channel names, memory locations and dynamic Soft Key names (such as Soft Keys
for memory locations or groups) are displayed using the new Language setting in Settings > Preferences.
Figure 10. Language Preferences in Settings > Preferences.
Tap to display the choices for language, then tap again to make a selection. After changing the Language setting, you must restart
the Master Module.
Chapter 2: New and Changed Features in S6 Software v1.4
11
Expand Mode Improvements for EQ and DYN Knob Sets
(Requires Pro Tools 11.3.1 or later)
EQ and Dynamics plug-ins now map more efficiently to the S6 Knob or Process Modules in Expand mode. All EQ and DYN
plug-ins map to the same knobs when EQ or DYN functions are expanded.
Manufacturer-specific parameter mappings are still accessed from the Inserts knob set. These will typically have more controls
than the unified layouts used in Expand mode. Not all parameters are available in all plug-ins.
The following tables show the location of EQ and Dynamics parameters on Knob Modules when in Expand Mode.
EQ Parameter Layout in Expand Mode, Knob Module
Sel
In
HPF
Type
Knob
HPF
Q or
Slope
Sel
In
LPF
Type
HPF
Freq
HPF
Type
HPF
In/Out
Knob
Sel
In
LPF
Q or
Slope
LF
Type
LPF
Freq
Input
Gain
LPF
Type
HPF
Q or
Slope
Alt
LPF
In/Out
Sel
In
Knob
Knob
LF
Q or
Slope
Output
Gain
LMF
Type
LF
Freq
LF
Type
LPF
Q or
Slope
Alt
Sel
In
Knob
LMF
Q or
Slope
MF
Type
LMF
Freq
LMF
Type
LF
Gain
LF
In/Out
Sel
In
Knob
MF
Q or
Slope
HMF
Type
MF
Freq
MF
Type
LMF
Gain
LMF
In/Out
Sel
In
Knob
HMF
Q or
Slope
HF
Type
HMF
Freq
HMF
Type
MF
Gain
MF
In/Out
Sel
In
Knob
HF
Q or
Slope
HF
Freq
HF
Type
HMF
Gain
HMF
In/Out
HF
Gain
HF
In/Out
DYN Parameter Layout in Expand Mode, Knob Module
Sel
In
Knob
C/L
Rel
Sel
In
Knob
Sel
In
Knob
C/L
Depth
C/L
Attack
Sel
In
Knob
Sel
In
Knob
Sel
In
Knob
Sel
In
Knob
Sel
In
Knob
E/G
Rel
E/G
Range
Ext Key
E/G
Attack
E/G
Hold
HPF
Type *
LPF**
Type
Key
Listen
C/L
Ratio
C/L
Knee
Input
Gain
E/G
Ratio
E/G
Knee
HPF
Freq *
LPF**
Freq
C/L
Thresh
C/L
Makeup
Gain
E/G
Output
Gain
E/G
Thresh
E/G
Hysteresis
HPF* Q
or Slope
LPF**Q
or Slope
HPF
In/Out
LPF
In/Out
*HPF filter may be labeled “LF” (Low Filter) in the plug-in.
** LPF filter may be labeled “HF” (High Filter) in the plug-in.
Chapter 2: New and Changed Features in S6 Software v1.4
12
Progress Indicators for Session Load and Workstation Connect
Progress indicators appear on the touchscreen when loading sessions and connecting to workstations.
System Status Graphs
The Settings > Workstations page provides a Graphs button, which lets you see status and information for CPU, Memory, and Network activity. Network errors are also logged.
To see Status Graphs for Workstations:
1
Navigate to Settings > Workstations.
2
Tap Graphs (or press its Soft Key).
3
Tap to select a different Workstation (if available) to see graphs for that workstation.
Figure 11. Workstations > Graphs display
4
To exit, tap Info or navigate to any other page.
Network Interrupt Indication
Whenever the system detects a network interrupt, the status graphs are outlined in orange.
Chapter 2: New and Changed Features in S6 Software v1.4
13
Chapter 3: Updating S6 System and Workstation
Software
The process of acquiring and updating S6 software involves these steps:
• Download the software update from your Avid Master Account and transfer the installer to a USB flash drive
• Log in as Administrator on the S6 Master Module and update Master Module software
• Follow the on-screen instructions to complete the installation (may include power cycling the system, or updating firmware)
• Download and install S6 Workstation and other supporting software, including documentation
Downloading and Transferring Software Updates
To download S6 software and other resources:
1
On a separate computer navigate to account.avid.com and log in to your Avid Master Account (or create one if you have not already done so). Software updates (if any), Workstation software, documentation, and other resources are available in the
My Products | Products I Own section, under S6 Software Updates.
2
Download the latest versions of the S6 Master Module Software (ZIP file) from your Avid account to your computer.
To save time, also download the available workstation software (WSControl for Mac and/or Windows) installers.
3
Insert a USB flash drive into an available USB port on your computer.
Do not use the System Restore USB drive! Use a separate USB flash drive.
4
Extract (decompress) the .ZIP file containing the Master Module software to unzip it.
5
Copy the resulting folder to the top (root) level of your USB drive.
Logging in as Administrator, Updating Master Module Software and Module Firmware
To install and update S6 Master Module software:
1
On the S6 Master Module Touchscreen, select Logout. (From the Home screen, navigate to Settings > About, then tap Logout.)
2
Select Administrator. When prompted enter the following default password:
password
3
Click the File Explorer tile.
4
Plug the USB flash drive with the downloaded S6 Master Module installer into one of the available USB ports on the back of
the Master Module. The USB drive appears in the left hand column under Computer.
5
Tap on the USB flash drive to see the contents.
6
Launch (run) the S6MasterModuleInstall software from the flash drive by double-tapping on the icon. Follow the instructions
on-screen.
7
After the installer has completed you will be prompted to remove USB drives and power cycle the system.
• Tap Shut Down Now to shut down the entire system immediately.
• Tap Shut Down Later to quit the install wizard. Do not launch the MasterModule application! Be sure to eject any USB drives,
then in Windows go to Settings > Power and choose Shut Down.
8
Turn off power, wait for all modules to power down, then power the system back on.
Chapter 3: Updating S6 System and Workstation Software
14
9
If you are prompted to update module firmware after the system restarts, do the following:
• Navigate to the Settings > Surface page and press Update.
If no Update option is displayed either the system hasn't completely booted yet, or a module is selected on that screen. Wait for
the system to finish starting up, and be sure no module is selected on-screen.
• When prompted, confirm the update and then wait until all modules have updated (which can take several minutes). Do not
turn off any modules during this process. The screen displays a message confirming that the update has completed.
Installing S6 Supporting Software
Your Avid Master Account also provides workstation software for Windows and Mac, and S6 documentation. XMON EUCON
and Studio Monitor Pro2 software options are included in these installers.
Whenever you update S6 system software you must also update workstation software on all connected workstations.
EUCON now installs into a default directory for all EUCON devices (including, Artist Series, S3, System 5 and S6) allowing
co-install of all software for these devices. In practice, this means you do not need to uninstall and re-install EUCON software
when switching between different EUCON control surfaces.
After updating S6 system software, do the following:
1
If you have not already done so, on a separate computer navigate to account.avid.com and log in to your Avid Master Account
(or create one if you have not already done so). WSControl (workstation) software, documentation, and other resources are
available in the My Products / Products I Own section under S6 Software Updates.
You can download these components directly to the workstation(s) you plan to use with S6, or to a USB flash drive as described
in the following steps.
2
Transfer the installers to a USB flash drive.
Do not use the included System Restore USB drive! Use a separate USB flash drive.
To install WSControl (workstation) software:
1
Insert the USB drive containing the downloaded WSControl installer into an available USB port on your workstation.
2
Navigate to the USB drive, double-click the Workstation Software installer and follow the instructions on-screen. To install
XMON EUCON or Studio Monitor Pro2 (Windows only) make sure their options are checked.
Chapter 3: Updating S6 System and Workstation Software
15
Avid
Technical Support (USA)
Product Information
280 N Bernardo Avenue
Mountain View, CA 94043 USA
Visit the Online Support Center at
www.avid.com/support
For company and product information,
visit us on the web at www.avid.com