1
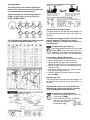
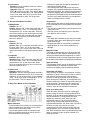
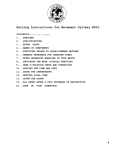
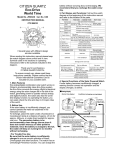
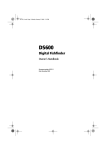
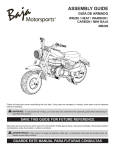
CITIZEN QUARTZ
NAVIHAWK
Model No. JNOXXX
Caliber No. C300
• INSTRUCTION MANUAL
CTZ-D6758
This combination watch can display the time in 30
cities of the world with a simple operation. In addition
to the time displayed in the analog section, the times
in 30 cities can be displayed in analog and digital
can easily be switched. This watch is a useful tool for
various purposes, such as on the international
business scene and when travelling.
Names and Functions
Look at the watch diagram at the beginning of this
instruction manual and refer to the location of the
parts.
Names of Parts:
[ 1 ] Minute hand
[ 2 ] Hour hand
[ 3 ] UTC Time Indicator (Displays
Coordinated Universal Time in hours
and minutes)
[ 4 ] Mode hand (Shows the mode selected
with the M button)
[ 5 ] 24-hour hand
[ 6 ] Displays the name of the city for which
the time is displayed in the digital
section [7]
[ 7 ] Displays the time or calendar
[ 8 ] Displays the functions of the A button
[ 9 ] Displays the functions of the M button
[ 10 ] Displays the functions of the B button
[ 11 ] Displays the functions of the C button
Main Functions
1. Displaying the Time in 30 Cities of the
World
The Coordinated Universal Time (UTC) and
the time in 30 cities of the world can easily
be displayed.
Operation:
Press the M button to move the mode hand to
[TME]. The name of and time in a city will be
displayed at [6] and [7] and change in
sequence each time the A (UP) or C
(DOWN) button is pressed.
• The time in the analog and digital section
can be switched.
Operation:
Press the M button to move the mode hand to
either [TME] or [CAL]. Press the A and C
buttons simultaneously to switch between the
analog and digital section.
2. Displaying the Calendar in 30 Cities of the
World
The calendar in 30 cities of the world can
easily be displayed.
Operation:
Press the M button to move the mode hand to
[CAL]. The name of and calendar for a city will
be displayed in [6] and [7] and change in
sequence each time the A (UP) or C (DOWN)
button is pressed.
3. Three Alarms
The watch has three alarms, each with a
different tone. Each alarm can be set for the
time in any one of thirty cities. See “Using the
Alarm” for details.
4. Chronograph
The time can be measured up to 23 hours, 59
minutes, 59 seconds and 99 hundredths of a
second, displayed in increments as small as
one-hundredth of a second (1/100 sec). See
“Using the Chronograph” for details.
5. Timer
The countdown timer can be set from 1 to 60
minutes in increments of 1 minute. See “Using
the Timer” for details.
6. Zone Setting
The time displayed can be programmed so
that only the desired cities are displayed.
Using the zone setting function allows you to
display the desired time and calendar for a city
more efficiently. See “Using the Zone Setting
function” for details.
Changing Modes
The mode changes each time the M button is
pressed. The current mode during operation can
be confirmed with the mode hand [4].
The modes change in the following sequence:
[TME] ➡ [CAL] ➡ [AL-1] ➡ [AL-2] ➡ [AL-3] ➡
[CHR] ➡ [TMR] ➡ [SET]
Using the Zone Setting Function
This page should be read with the watch diagram, on
the first page of this manual, showing the location of
the parts.
The Time Difference Between the Cities Indicated
by this Watch and Greenwich Mean Time
This watch can display the time in 30 cities of the
world in sequence. Using the zone setting
function allows you to skip the cities you do not
wish displayed.
[ Preparation for zone setting ]
Press the M (MODE) button to move the mode
hand to [SET]. (At this point, the cities to be
displayed or to be skipped can be confirmed by
using either the A [UP] or C [DOWN] button.)
[ Zone setting – Display/No Display]
1. Pull the M (MODE) button out to the setting position.
2. Use the A (UP) button to select the cities.
3. Use the B (SET) button to select either SET
(display the time) or OFF (do not display the time).
4. Use the C (SET) button to select daylight-saving
time ON or OFF.
5. Push the M (MODE) button to its normal position.
Zone setting is now completed.
6. Press the M (MODE) button to return the mode
hand to [TME].
Adjusting the Time
This page should be read with the watch diagram, on
the first page of this manual, showing the location of
the parts.
Adjusting the time for one of the 30 cities will
automatically adjust the time for the remaining
cities according to the time differences.
[Preparation for time adjustment]
1. Press the M (MODE) button to move the
mode hand to [TIME].
2. Press either the A (UP) or C (DOWN)
button to move to the desired city.
The name of the city will
be displayed at [6].
[Time adjustment]
1. Pull the M (MODE) button out to the
setting position. The time is displayed
in the digital section with the hours, minutes and
seconds blinking. (At this point, daylight-saving
time ON/OFF can be selected by pressing the C
(SET) button.)
2. Press the A (SELECT) button. The desired
segment of hours, minutes or seconds will blink in
sequence. The segments blink in the following
sequence: [hours, minutes and seconds] ➡
[seconds] ➡ [minutes] ➡ [hours] ➡ [switching
between 12- and 24-hour systems] ➡ [hours,
minutes and seconds].
3. Use the C (SET) button to adjust the blinking
segment.
4. Push the M (MODE) button in to its normal
position. Time adjustment is now completed.
Adjusting the Calendar
This page should be read with the watch diagram, on
the first page of this manual, showing the location of
the parts.
Adjusting the calendar for one of the 30 cities
will automatically adjust the calendar for the
remaining cities, according to the time
differences.
[Preparation for calendar adjustment]
1. Press the M (MODE) button to move the
mode hand to [CAL].
2. Press either the A (UP)
button or C (DOWN) button
to select the desired city.
[Calendar adjustment]
1. Pull the M (MODE) button out to the
setting position. The day of the week
(MO, TU, etc.) displayed in the digital
section disappears and the month number starts
blinking.
2. Press the A (SELECT) button. The desired
segment of the date will blink in sequence.
The segments in the following sequence:
[month] ➡ [date] ➡ [year] ➡ [month]
3. Use the C (SET) button to adjust the blinking
segment.
4. Push the M (MODE) button in to its normal
position. Calendar adjustment is now completed.
*There is no need to adjust the day of the week
since it is corrected automatically.
Using the Alarm
This page should be read with the watch diagram, on
the first page of this manual, showing the location of
the parts.
The operation of Alarms 1[AL-1], 2[AL-2] and
3[AL-3] are the same; only their tones are different.
Once an alarm is set, it sounds at the same time
every day until it is cancelled (set to OFF).
[Preparation for alarm setting]
Example: Setting AL-1
1. Press the M (MODE)
button to move the mode hand to [AL-1].
2. Press either the A (UP) or C (DOWN) button to
select the desired city.
[Alarm setting]
1. Pull the M (MODE) button out to the
setting position.
2. Press the A (SELECT) button. The desired
segment of the time will blink in sequence.
The segments blink in the following sequence:
[Alarm ON/OFF] ➡ [hours] ➡ [minutes] ➡ [alarm
ON/OFF]
3. Use the C (SET) button to adjust the blinking segment.
4. Push the M (MODE) button in to its normal position.
Alarm adjustment is now completed.
5. Press the M (MODE) button to return the mode
hand to [TME].
* To turn the alarm off, press either the A, B, C or
M button.
Using the Chronograph
This page should be read with the watch diagram, on
the first page of this manual, showing the location of
the parts.
In addition to the normal function of measuring
the time from a starting to a stopping point, this
chronograph has a split time function that
enables you to measure elapsed time at any
point from start to finish.
[Preparation for using the chronograph]
Press the M (MODE) button to move the
mode hand to [CHR].
[Using the chronograph - 1]
1. Pressing the A (START) button starts
time measurement.
2. Pressing the A (STOP) button stops time
measurement.
3. Pressing the C (RESET) button returns the
displayed numbers to zeros.
[Using the chronograph - 2]
1. Pressing the A (START) button starts time
measurement.
2. Pressing the C (SPLIT) button returns the elapsed
time for 10 seconds. (This function is useful in
measuring elapsed time upon passing a point
during a marathon, etc.)
3. Pressing the A (STOP) button stops the time
measurement.
4. Pressing the C (RESET) button returns the
displayed digits to zeros.
Convenient Functions
This page should be read with the watch diagram, on
the first page of this manual, showing the location of
the parts.
Using the Timer
This page should be read with the watch diagram, on
the first page of this manual, showing the location of
the parts.
The timer can be set from 1 to 60 minutes in
increments of 1 minute.
[Preparation for using the timer]
1. Press the M (MODE) button to move the
mode hand to [TMR].
2. Pull the M (MODE) button out to the
setting position.
3. Use the C (SET) button to set the time for the timer.
4. Push the M (MODE) button in to its normal
position. Now timer setting is completed.
[Using the timer - 1]
1. Pressing the A (START) button starts
the countdown. (When the set time
has expired (time up), the watch beeps
for 5 seconds.)
2. Pressing the A (STOP) button stops the countdown.
3. Pressing the C (RESET) button resets the timer
back to the set time.
[Using the timer - 2]
1. Pressing the M (MODE) button starts the
countdown.
2. Pressing the C button resets the timer back to the
set time and restarts the countdown again. (This
function is useful in restarting the countdown quickly.)
3. Pressing the A (STOP) button stops the countdown.
4. Pressing the C (RESET) button resets the timer
back to the set time.
When the hands of the analog section cover
the digital section, making the time in digital
difficult to read, utilise the –
Hand-retractor function:
Use this function to retract the hour and minute hands
of the analog section to the 12 o’clock position.
[Operation]
Hold the B button down for 2 seconds and then
release it when “H.R” blinks in [10].
*During Hand-Retractor mode the minute hand of
the UTC time at [3] goes back and forth by 1 minute
(-1 minute +1 minute), and “H.R” displayed
at [10] blinks.
[Cancelling Hand-Retractor mode]
B button again cancels HandPressing the Retractor mode.
(H.R.: Abbreviation of Hand-Retractor)
When the watch displays something
improperly and a malfunction is suspected,
perform –
ALL RESET and zero positioning:
When the watch displays something improperly
and a malfunction is suspected, perform ALL RESET
and zero positioning, then readjust the time,
calendar and other modes.
[ALL RESET]
This function can be operated from any mode.
M (MODE) button out to the setting
1. Pull the position.
A,
B and C buttons
2. Hold down the simultaneously for more than 2 seconds then
release them.
(All digital segments will light up. Immediately
reset to the zero position.)
[Zero positioning]
1. Pressing the B button resets all segments in
the digital section to zeros.
2. The digital display changes in the sequence of
B button is
UTC ➡ HR ➡ MIN each time the pressed.
UTC: For zero positioning of the UTC time display
HR: For zero positioning of the hour hand and
24-hour hand
MIN: For zero positioning of the minute hand.
A (UP) button turns each hand
3. Pressing the clockwise. Pressing the C (DOWN) button
turns each hand counterclockwise. Align all
hands to the 12 o’clock position.
M (MODE) button is pushed in to its
4. When the normal position, the watch beeps and at the
same time the hands start moving. ALL RESET
and zero positioning are now completed.
5. Set the time, calendar and other modes.
*Zero positioning can also be done in
Chronograph mode.
M (MODE) button to align the mode
1. Press the hand to [CHR].
M (MODE) button to its outward
2. Press the position.
3. The digital segments change in the sequence
B button
of UTC ➡ HR ➡ MIN each time the is pressed.
UTC: For zero positioning of the UTC time display
HR: For zero positioning of the hour hand and
the 24-hour hand
MIN: For zero positioning of the minute hand
A (UP) button turns each hand
4. Pressing the C (DOWN) button
clockwise. Pressing the turns each hand counterclockwise. Align all
hands to the 12 o’clock position.
A (UP) button is pushed back in to
5. When the this normal position, the watch beeps and at
the same time the hands start moving. Zero
positioning is now completed.
6. Set the time, calendar and other modes.
Using the Register Ring
[Calculation function]
Note the following points
when using this function.
Use the calculation
function of this watch only
as a guide. Scales like these cannot, place a decimal
point for you.
A. Navigational calculation
1. Time required
Example: Obtain the time required for the flight of
an aircraft at 180 knots for 450 nautical miles.
Answer: Align “18” on the outer scale with the
SPEED INDEX (▲) on the inner scale. Then, “45”
on the outer scale corresponds to “2:30” on the
inner scale (time scale). Thus, the time required
for the flight is 2 hours and 30 minutes.
2. Knots (air speed)
Example: Obtain the knots (air speed) for 240
nautical miles with a flight time of 1 hour and 20
minutes.
Answer: Align “24” on the outer scale with “1:20”
on the inner scale (time scale). Then, the SPEED
INDEX (▲) on the inner scale corresponds to “18”
on the outer scale. Thus, the air speed for the
flight is 180 knots.
3. Flight distance
Example: Obtain the air distance when the air
speed is 210 knots and the flight time is 40 minutes.
Answer: Align “21” on the outer scale with the
SPEED INDEX (▲) on the inner scale. Thus, the
air distance of the flight is 140 nautical miles.
4. Rate of fuel consumption
Example: Obtain the rate of fuel consumption
(gallons/hour) when the flight time is 30 minutes
and the fuel consumption is 120 gallons.
Answer: Align “12” on the outer scale with the “30”
on the inner scale. Then, the SPEED INDEX (▲) on
the inner scale corresponds to “24” on the outer
scale. Thus, the fuel consumption is 240 gallons
per hour.
5. Fuel Consumption
Example: Obtain the fuel consumption required
for a flight when the fuel consumption is 250 gallons
per hour and the flight time is 6 hours.
Answer: Align “25” on the outer scale with the
SPEED INDEX (▲) on the inner scale. Then,
“6:00” on the inner scale (time scale) corresponds
to “15” on the outer scale. Thus, the fuel
consumption is 1,500 gallons.
6. Estimated flight time
Example: Obtain the estimated flight time when
the fuel consumption is 220 gallons per hour and
the aircraft has 550 gallons of fuel.
Answer: Align “22” on the outer scale with the
SPEED INDEX (▲) on the inner scale. Then, “55”
on the outer scale corresponds to “2:30” on the
inner scale (time scale). Thus, the estimated flight
time is 2 hours and 30 minutes.
7. Differences in altitude
The difference in altitude can be obtained from the
rate of descent and the descent time.
Example: Obtain the difference in altitude when
an aircraft continues descending for 23 minutes at
a rate of 250 feet per minute.
Answer: Align “25” on the outer scale with “10” on
the inner scale. Then, “23” on the inner scale
corresponds to “57.5” on the outer scale. Thus,
the difference in altitude is 5,750 feet.
8. Rate of climb (or descent)
The rate of climb (or descent) can be obtained
from the time required to reach an altitude.
Example: Obtain the rate of climb when an
aircraft reaches an altitude of 7,500 feet after
climbing for 16 minutes.
Answer: Align “75” on the outer scale with the “16”
on the inner scale. Then, “10” on the inner scale
corresponds to “47” on the outer scale. Thus, the
rate of the climb is 470 feet.
9. Time of climb (or descent)
The time required for climb can be obtained from
the altitude to be reached and the rate of climb (or
descent)
Example: Obtain the time of climb when an aircraft
is to climb to 6,300 feet at a rate 550 feet per minute.
Answer: Align “55” on the outer scale with “10” on
the inner scale. Then, “63” on the outer scale
corresponds to “11.5” on the inner scale. Thus, the
time of climb is 11 minutes and 30 seconds.
10. Conversion
Example: Convert 30 statue miles into nautical
miles and kilometres.
Operation: Align “30” on the outer scale with
STAT (▲) on the inner scale. Then, NAUT (▲) on
the inner scale corresponds to “29” nautical miles
on the inner scale, and “12 km”(s) on the inner
scale corresponds to “48.2” km on the outer
scale.
* Exposure to water will diminish the durability of
most types of leather bands.
* The internal parts of the watch may hold some
moisture. If the external temperature is lower than
that inside the watch, the crystal may get fogged up.
Temporary fogging does not pose a problem. If it
persists for a prolonged period, we recommend that
you have your watch checked by your authorised
dealer or a Citizen Service Centre.
B. General Calculation Functions
Temperature
Avoid exposing the watch to direct sunlight or leaving
it in an extremely hot or cold location for prolonged
periods.
* This will cause malfunctioning and shorten the life
of the power cell.
* This may cause your watch to gain or lose time,
and affect its other functions.
1. Multiplication
Example: 20 x 15
Answer: Align the “20” on the outer scale with “10”
on the inner scale. Then, “15” on the inner scale
corresponds to “30” on the outer scale. Take into
account the position of the decimal point and add
one zero to obtain 300. Note that with the scales
of this watch, the position of the decimal point
cannot be obtained.
2. Division
Example: 250 / 20
Answer: Align “25” on the outer scale with “20” on
the inner scale. Then, “10” on the inner scale
corresponds to “12.5” on the outer scale. Take into
account the position of the decimal point to obtain
12.5.
3. Proportion
Example: 30/20 = 60/x
Operation: Align “30” on the outer scale with “20”
on the inner scale. Then, “60” on the outer scale
corresponds to “40” on the inner scale. At this
point, the proportion for every value on the inner
and outer scales is 30:20.
4. Square root
Example: Square root of 225
Operation: Turn the outer scale slowly and find a
value that corresponds to both “22.5” on the outer
scale and “10” on the inner scale. In this example,
‘‘22.5’’ on the outer scale corresponds to “15” on
the outer scale. Thus, the answer is 15.
To Keep Your Watch in Good Condition
Water resistance
* To prevent water from coming into contact with the
internal mechanism of the watch, never pull the
crown out when the watch is wet.
* If your water-resistant watch is exposed to salt
water or significant amounts of sweat, rinse it in
clean water and dry thoroughly.
Shock
* This watch will withstand bumps and jars normally
incurred in daily use or while playing non contact
sports such as golf.
* Dropping the watch on a hard floor or otherwise
applying shock to it may cause malfunction or
damage.
Magnetic Fields
This watch is antimagnetic up to 60 gauss and will
not be affected by the magnetic fields produced by
ordinary household electrical appliances. If used in
the immediate vicinity of strong magnetism, however,
the functions of the watch may temporarily be affected.
Static electricity
The integrated circuits used in the watch are sensitive
to static electricity. If exposed to intense static
electricity. the display may be adversely affected.
Chemicals and Gases
Avoid wearing the watch in the presence of strong
chemicals or gases. If the watch comes in contact
with solvents such as thinner and benzine or
products containing materials such as gasoline,
polish, detergent or adhesive, its components may
discolour, dissolve or crack. Be especially careful to
avoid chemicals. The watchcase and band may
become discoloured if they come in contact with
mercury. such as from a broken thermometer.
Keep your watch clean
When the watch has been worn for a prolonged
period, pulling the crown out may become difficult
because of dirt and dust caught between the crown
and the watchcase. To help prevent this from
happening, rotate the crown back and forth
occasionally while it is in the normal position.
Wipe off any moisture that adheres to the case,
crystal and band with a soft, clean cloth. Dirt left on
the case or band may cause a skin rash.
A watch band will easily become soiled with dust
and perspiration, as it is in direct contact with the
skin. Even a stainless steel or gold-plated band may
begin to corrode if it has not been cleaned for a
prolonged period.
Mesh bands have very fine mesh. They will lose
their “flexibility” if they are left soiled for a prolonged
period.
A metal watchband should be cleaned periodically
to keep it looking beautiful.
To clean your metal watchband, wash it with a
brush in mild, soapy water, rinse and wipe
thoroughly with a soft, absorbent cloth. Make sure
that all water is removed. Take care to prevent any
water from entering your watch during washing.
Be sure to keep the power cells out of reach of
infants and small children.
Should accidental ingestion occur, consult a
doctor at once.
Specifications
Model:
CITIZEN Combination Watch “Navihawk”
Quartz oscillation frequency:
32,768 Hz (Hz = Oscillations in 1 second)
Accuracy of time measurement
(under normal temperature range):
+
_ 20 seconds/month
Timepiece operation temperature range:
0°C-55°C (32-131°F)
Functions:
Time (hours and minutes), Calendar (year, month,
date and day of the week), Alarm modes (1, 2 and
3), Chronograph mode, Timer mode and Zone
Setting mode
Power cell:
Power cell No. 280-44 (Power cell code: SR 927W)
Life of power cell:
Approx. 3 years after installing a new power cell
Specifications subject to change without prior notice
for product improvement.
Water Resistance
The water-resistant quality of our timepieces is offered in varying degrees depending on the model. This
ranges from non-water resistant models to those suitable for SCUBA diving. Water resistance of our
timepieces is measured in BAR or Barometric Pressure. Each BAR of pressure is equal to 14.5 pounds per
square inch of pressure.
Water resistance is measured when the watch is at a static, or motionless state. As the watch is moved in
water, such as from the motion of swimming, pressure is added from velocity. While you may be swimming in
a pool at surface level, the watch may be experiencing forces equal to that of 100 feet of water pressure
(3 BAR). Diving into a pool can cause forces on the watch to exceed those pressures. As such, you
should always allow a margin of safety when exposing your watch to moisture. Never "push the limit" of
the degree of water resistance of your timepiece.
A primary factor to keep in mind about water resistance is that periodic maintenance is needed to
maintain original factory specifications for water resistance. When a watch is new, it meets
specifications for water resistance as indicated on the case back. However, as the watch ages, the
gaskets that seal the watch become dry and brittle, diminishing its water resistant quality. Exposure to
environments such as chlorinated pools, salt water or soaps from showering can accelerate drying of the
gaskets. We recommend that the gaskets be changed at least every 18 to 24 months to maintain the water
resistant quality of your timepiece. If the watch is frequently exposed to chlorinated pools, soaps salt
water, etc., we recommend that the gaskets be changed on a yearly basis.
From time to time, you may notice condensation that appears then goes away after a short period of time.
This is a normal occurrence and happens primarily from sudden temperature changes. When there are sudden
temperature changes such as entering a cool building from the hot out of doors, or jumping into pool on a
hot day the watch may fog. Conversely, if you go to the cold outdoors from a warm building, fogging may
occur. As long as the fogging clears in a short period of time, there is no need for concern.
Be sure the crown is completely pushed in prior to any contact with moisture. If your model is equipped
with a screw down crown, be sure it is properly seated against the case. Do not operate the crown or any
push button when the watch is wet as this may allow the entrance of moisture. . If at anytime, you notice
moisture in your timepiece that does not clear in a short period of time, you should send your timepiece
as soon as possible to the nearest Authorized Service Center for inspection.
You can determine the level of water resistance of our watches from the markings on your case-back.
Additionally, models that are water resistant to 100 or 200 meters have an indication on the dial as
well. The case-backs and dials are normally marked as follows:
The case back has no indication of water resistance
This indicates the watch is a non water-resistant model and is not designed for contact with moisture at
all. Caution should be exercised to avoid any contact with moisture, such as when washing your hands or
from a rainstorm.
“Water Resist”
This watch is designed to withstand water from accidental splashing, such as from washing your hands or
rain. Any submersion into water may result in the entrance of moisture.
“Water Resist 10BAR” or “W.R. 10BAR”, Dial marked “WR100”
This watch is designed to withstand water pressure up to 333 feet. This includes water exposure from
accidental splashing and rain, but also from showering, swimming in a pool and snorkeling. Be sure to
rinse the watch with fresh water after exposure to a chlorinated pool, salt water, soaps, etc. After
rinsing with fresh water, be sure to dry the exterior with a soft cloth.
“Water Resist 20BAR” or “W.R. 20BAR”, Dial marked “WR200”
This watch is designed to withstand water pressure up to 666 feet. This includes all exposure to water up
to and including recreational SCUBA diving. Be sure to rinse the watch with fresh water after exposure to
a chlorinated pool, salt water, soaps, etc. After rinsing with fresh water, be sure to dry the exterior
with a soft cloth.
Special Note about Jacuzzis and Hot Tubs
The various components used in the manufacture and assembly of your watch expand at various rates. This
results in a loss of the sealing capabilities of gaskets, which may allow moisture to enter. In addition,
heat from these sources can cause deformation of certain materials leading to mechanical failures. For
these reasons, you should remove your watch before entering a hot tub or Jacuzzi.