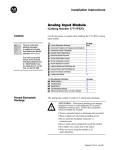
1
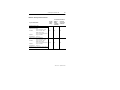
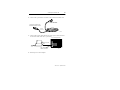
Allen-Bradley PKTx Communication Card (Cat. No. 1784-PKTX, -PKTXD, -PKTS User Manual Important User Information Because of the variety of uses for the products described in this publication, those responsible for the application and use of this control equipment must satisfy themselves that all necessary steps have been taken to assure that each application and use meets all performance and safety requirements, including any applicable laws, regulations, codes and standards. The illustrations, charts, sample programs and layout examples shown in this guide are intended solely for purposes of example. Since there are many variables and requirements associated with any particular installation, Allen-Bradley does not assume responsibility or liability (to include intellectual property liability) for actual use based upon the examples shown in this publication. Allen-Bradley publication SGI-1.1, Safety Guidelines for the Application, Installation, and Maintenance of Solid State Control (available from your local Allen-Bradley office), describes some important differences between solid-state equipment and electromechanical devices that should be taken into consideration when applying products such as those described in this publication. Due to the rapid change in technology and part availability, Allen-Bradley reserves the right to change the appearance of certain products which may not match those shown in this manual. Reproduction of the contents of this copyrighted publication, in whole or in part, without written permission of Allen-Bradley Company, Inc., is prohibited. Throughout this manual we use notes to make you aware of safety considerations: ! ATTENTION: Identifies information about practices or circumstances that can lead to personal injury or death, property damage or economic loss. Attention statements help you to: • identify a hazard • avoid the hazard • recognize the consequences Important: Identifies information that is critical for successful application and understanding of the product. Preface Preface Introduction This manual describes how to install, configure, and troubleshoot the 1784-PKTX, -PKTXD, and -PKTS Communication cards. Throughout the manual, we refer to this product as the PKTx card. When one card differs from the others, this document individually calls out the cards by name. Contents of Your Order With this package you should receive: • One 1784-PKTx communication interface card • One 1784-PKTx Communication Interface Card User Manual, publication 1784-6.5.27 • One 3 1/2” 1784-PKTx Utility diskette containing diagnostic programs. If you are missing any of these pieces, contact your Allen-Bradley distributor. 1784-6.5.27 - September 1997 P-2 Preface Abbreviations Throughout this manual, we abbreviate some terms. Use this table to become familiar with our terminology. This is the abbreviation for ESD Electrostatic Discharge IRQ Interrupt Request ISA Industry-Standard Architecture ORB Outside Retaining Bracket PCI Peripheral Component Interface PC Personal Computer Conventions We use these conventions in this manual: • Screen displays and prompts are shown as Press ENTER to continue with the installation • Text that you type is shown as: a:\install c • Keys that you press look like Enter this: • Other actions to be performed are show as: Click on the Memory tab. 1784-6.5.27 - September 1997 Preface P-3 Handling the Card ! ATTENTION: The 1784-PKTx card uses CMOS technology, which is highly sensitive to electrostatic discharge (ESD). ESD may be present whenever you are handling the card. Handling the card without any ESD protection can cause internal circuit damage that may not be apparent during installation or initial use. A grounding wrist strap has been shipped with the 1784-PKTx card. It is to be worn during the installation procedure. Instructions for use of the strap are found on the back of its package. Take these precautions to guard against ESD damage: • Before handling the card, be sure to wear the provided static strap and touch a grounding object to discharge any built-up static charge. • Avoid touching the backplane connector or interface connector pins on the 1784-PKTx card. • If the card is not in use, store it in the anti-static, plastic-molded clamshell in which it was shipped. 1784-6.5.27 - September 1997 P-4 Preface Specifications Functional Specifications 1784-PKTx CH 1A (3-pin Phoenix) runs DH+ and remote I/O CH 1C (6-pin Phoenix) runs DH-485 1784-PKTXD CH 1A (3-pin Phoenix) runs DH+ and remote I/O CH 1C (6-pin Phoenix) runs DH-485 Ch2 (3-pin Phoenix) runs DH+ and remote I/O 1784-PKTS CH 1A (3-pin Phoenix) runs remote I/O Maximum line lenghts and communication rates DH+: 10,000 ft. (3048 m) @ 57.6K bit/s 5, 000 ft. (1,524 m) @ 115.2K bits/s 2,500 ft. (762 m) @ 230.4K bits/s DH-485: 4,000 ft. (1219 m) @ 1200, 2400, 4800, 9600 or 19,200 bits/s remote I/O: 2,500 ft. (762 m) @ 230.4K bit/s 5,000 ft. (1524 m) @ 115.2K bit/s 10,000 ft. (3048 m) @ 57.6K bit/s Bus communications Local PCI LEDs 1 diagnostic/status LED per channel Wiring category 21 Number of modules per system 4 maximum (specified by jumper on card) Agency certification (when product marked) Class I, Division 2, Groups A, B, C, D marked for all applicable directives 1 Refer to publication 1770-4.1, Industrial Automation Wiring and Grounding Guidelines for Noise Immunity. 1784-6.5.27 - September 1997 Preface P-5 System Requirements Windows 95 and Windows NT Operating system Driver development for remote I/O For other operating systems, you have to create your own driver. 6001-RIO, contains binary files and example C code for remote I/O communication Use the RSLinx PKTx driver. Driver development for DH+ or DH-485 1784-DP4, contains binary files and example C code for DH+ or DH-485 communication. Environmental Specifications Operational slot temperature 0 to 60°C (32 to 140°F) Non-operational slot temperature -40 to 85°C (-40 to 185°F) Relative humidity 5- 95% without condensation Vibration 10 - 60 Hz, constant 0.012 in displacement 60 - 150 Hz, constant 2.0 G acceleration Operational shock 30 G peak for 11 ± 1 ms Non-operational shock 50 G peak for 11 ± 1 ms Power dissipation (for the PKTXD) 800ma @ 5Vdc 4.0W 1784-6.5.27 - September 1997 P-6 Preface CSA Hazardous Location Approval CSA certifies products for general use as well as for use in hazardous locations. Actual CSA certification is indicated by the product label as shown below, and not by statements in any user documentation. CL I, DIV 2 GP A,B,C,D TEMP ([DPSOHRIWKH&6$FHUWLILFDWLRQSURGXFWODEHO To comply with CSA certification for use in hazardous locations, the following information becomes a part of the product literature for this CSAcertified industrial control product. • • This equipment is suitable for use in Class I, Division 2, Groups A, B, C, D, or non-hazardous locations only. The products having the appropriate CSA markings (that is, Class I, Division 2, Groups A, B, C, D) are certified for use in other equipment where the suitability of combination (that is, application or use) is determined by the CSA or the local inspection office having jurisdiction. Important: Due to the modular nature of a programmable control system, the product with the highest temperature rating determines the overall temperature code rating of a programmable control system in a Class I, Division 2, location. The temperature code rating is marked on the product label as shown. Temperature code rating: CL I, DIV 2 GP A,B,C,D TEMP /RRN IRU WHPSHUDWXUH FRGHUDWLQJKHUH The following warnings apply to products having CSA certification for use in hazardous locations. WARNING: Explosion hazard-- • • • • • Substitution of components may impair suitability for Class I, Division 2. Do not replace components unless power has been switched off or the area is known to be nonhazardous. Do not disconnect equipment unless power has been switched off or the area is known to be nonhazardous. Do not disconnect connectors unless power has been switched off or the area is known to be nonhazardous. Secure any user-supplied connectors that mate to external circuits on this equipment by using screws, sliding latches, threaded connectors, or other means such that any connection can withstand a 15 Newton (3.4 lb.) separating force applied for a minimum of one minute. Batteries must only be changed in an area known to be non-hazardous. &6$ORJRLVDUHJLVWHUHGWUDGHPDUNRIWKH&DQDGLDQ6WDQGDUGV$VVRFLDWLRQ 1784-6.5.27 - September 1997 Preface P-7 Approbation d’utilisation dans des emplacements dangereux par la CSA La CSA certifie les produits d'utilisation générale aussi bien que ceux qui s'utilisent dans des emplacements dangereux. La certification CSA en vigueur est indiquée par l'étiquette du produit et non par des affirmations dans la documentation à l'usage des utilisateurs. ([HPSOHG pWLTXHWWHGHFHUWLILFDWLRQG XQSURGXLWSDUOD&6$ CL I, DIV 2 GP A,B,C,D TEMP Pour satisfaire à la certification de la CSA dans des endroits dangereux, les informations suivantes font partie intégrante de la documentation ce produit industriel de contrôle certifié par la CSA. • • Cet équipement convient à l'utilisation dans des emplacements de Classe 1, Division 2, Groupes A, B, C, D, ou ne convient qu'à l'utilisation dans des endroits non dangereux. Les produits portant le marquage approprié de la CSA (c'est à dire, Classe 1, Division 2, Groupes A, B, C, D) sont certifies a l'utilisation pour d'autres équipements où la convenance de combinaison (application ou utilisation) est déterminée par la CSA ou le bureau local d'inspection qualifié. Important: Par suite de la nature modulaire du système de contrôle programmable, le produit ayant le taux le plus élevé de temperature détermine le taux d'ensemble du code de température du système de contrôle d'un programmable dans un emplacement de Classe 1, Division 2. Le taux du code de température est indiqué sur l'étiquette du produit. 7DX[GXFRGHGHWHPSpUDWXUH CL I, DIV 2 GP A,B,C,D TEMP /H WDX[ GX FRGH GH WHPSpUDWXUHHVWLQGLTXpLFL Les avertissements suivants s'appliquent aux produits ayant la certification CSA pour leur utilisation dans des emplacements dangereux. AVERTISSEMENT: Risque d'explosion -• La substitution de composants peut rendre ce matériel inacceptable pour lesemplacements de Classe I, Division 2. • • • • Couper le courant ou s'assurer quel'emplacement est désigné non dangereux avant de remplacer lescomposants. Avant de débrancher l'équipement, couper le courant ou s'assurer que l'emplacement est désigné non dangereux. Avant de débrancher les connecteurs, couper le courant ou s'assurer que l'emplacement est reconnu non dangereux. Attacher tous connecteurs fournis par l'utilisateur et reliés aux circuits externes de cet appareil à l 'aide de vis, loquets coulissants, connecteurs filetés ou autres moyens permettant aux connexions de résister à une force de séparation de 15 Newtons (3,4 lb. - 1,5 kg) appliquée pendant au moins une minute. Afin d'éviter tout risque d'explosion, s'assurer que l'emplacement est désigné non dangereux avant de changer la batterie. /HVLJO H&6$HVWODPDUTXHGpSRVpHGHO $VVRFLDWLRQGHV6WDQGDUGVSRXUOH&DQDGD 1784-6.5.27 - September 1997 P-8 Preface 1784-6.5.27 - September 1997 Table of Contents Chapter 1 Introducing the 1784-PKTx Communication Interface Cards . . . . . . . . . .1-1 Compatibility . . . . . . . . . . . . . . . . . . . . . . . . . . . . . . . . . . . . . . . . . . .1-2 How the 1784-PKTx Card Operates . . . . . . . . . . . . . . . . . . . . . . . . . .1-2 Compliance to European Union Directives . . . . . . . . . . . . . . . . . . . . .1-4 EMC Directive . . . . . . . . . . . . . . . . . . . . . . . . . . . . . . . . . . . . . . . .1-4 Low Voltage Directive . . . . . . . . . . . . . . . . . . . . . . . . . . . . . . . . . .1-4 Chapter 2 Configuring the PKTx Hardware . . . . . . . . . . . . . . . . . . . . . . . . . . . . . . .2-1 Introduction . . . . . . . . . . . . . . . . . . . . . . . . . . . . . . . . . . . . . . . . . . . .2-1 Interrupt Request Assignment . . . . . . . . . . . . . . . . . . . . . . . . . . . . . .2-1 Base Memory Address Restriction . . . . . . . . . . . . . . . . . . . . . . . . . . .2-2 Setting a Base Memory Address Jumper . . . . . . . . . . . . . . . . . . . .2-3 Establishing Multiple PKTx Cards . . . . . . . . . . . . . . . . . . . . . . . . . . . .2-4 Planning Jumper Settings for Multiple Cards . . . . . . . . . . . . . . . . .2-5 What to Do Next . . . . . . . . . . . . . . . . . . . . . . . . . . . . . . . . . . . . . . . .2-5 Chapter 3 Installing the Card Inside the Computer . . . . . . . . . . . . . . . . . . . . . . . . .3-1 Before You Begin . . . . . . . . . . . . . . . . . . . . . . . . . . . . . . . . . . . . . . .3-1 On the Right Track? . . . . . . . . . . . . . . . . . . . . . . . . . . . . . . . . . . . . .3-1 Necessary Tools . . . . . . . . . . . . . . . . . . . . . . . . . . . . . . . . . . . . . . . .3-2 Accessing the Computer’s PCI Bus Slots . . . . . . . . . . . . . . . . . . . . . .3-2 Inserting the Card . . . . . . . . . . . . . . . . . . . . . . . . . . . . . . . . . . . . . . .3-3 The Windows 95 and the 1784-PKTx Card . . . . . . . . . . . . . . . . . . . .3-4 Reviewing the 1784-PKTx Settings in Windows 95 . . . . . . . . . . . . . .3-4 What to Do Next . . . . . . . . . . . . . . . . . . . . . . . . . . . . . . . . . . . . . . . .3-8 Chapter 4 Connecting the Interface Card . . . . . . . . . . . . . . . . . . . . . . . . . . . . . . . .4-1 1784-PKTX Connections . . . . . . . . . . . . . . . . . . . . . . . . . . . . . . . . . .4-2 1784-PKTS Connections . . . . . . . . . . . . . . . . . . . . . . . . . . . . . . . . . .4-3 1784-PKTXD Connections . . . . . . . . . . . . . . . . . . . . . . . . . . . . . . . . .4-4 Publication 1784-6.5.27 - September 1997 toc–ii Table of Contents Before You Begin . . . . . . . . . . . . . . . . . . . . . . . . . . . . . . . . . . . . . . . 4-5 Where to Go . . . . . . . . . . . . . . . . . . . . . . . . . . . . . . . . . . . . . . . . . . . 4-6 Connecting to Remote I/O Devices . . . . . . . . . . . . . . . . . . . . . . . . . . 4-6 Connecting to DH+ Devices . . . . . . . . . . . . . . . . . . . . . . . . . . . . . . . 4-8 Connecting the Card to a Classic PLC-5 Programmable Controller 4-8 Connecting the Card to an Enhanced PLC-5 Processor . . . . . . . . 4-10 Terminating the Last Node . . . . . . . . . . . . . . . . . . . . . . . . . . . . . 4-11 Connecting the Card to a Data Highway Plus Network . . . . . . . . 4-11 Connecting the Card via a DH-485 Network . . . . . . . . . . . . . . . . . . 4-12 Connecting the Card to a single SLC Processor on DH-485 . . . . 4-13 Terminating the Last Node . . . . . . . . . . . . . . . . . . . . . . . . . . . . . 4-15 What to Do Next . . . . . . . . . . . . . . . . . . . . . . . . . . . . . . . . . . . . . . . 4-16 Appendix A Running Diagnostics . . . . . . . . . . . . . . . . . . . . . . . . . . . . . . . . . . . . . . . A-1 What’s in This Appendix . . . . . . . . . . . . . . . . . . . . . . . . . . . . . . . . . . A-1 When Do I Run KTx Diagnostics? . . . . . . . . . . . . . . . . . . . . . . . . . . . A-1 Troubleshooting the PKTx Card . . . . . . . . . . . . . . . . . . . . . . . . . . . . A-1 Obtaining the Base Memory Address and the Interrupt Request . . . . A-2 Copying the KTx Diagnostics to Your Hard Drive . . . . . . . . . . . . . . . . A-3 Access Diagnostics . . . . . . . . . . . . . . . . . . . . . . . . . . . . . . . . . . . . . A-4 Start Diagnostics . . . . . . . . . . . . . . . . . . . . . . . . . . . . . . . . . . . . . . . A-5 Define a PKTx Card to Test . . . . . . . . . . . . . . . . . . . . . . . . . . . . . . . A-6 Test Computer Communications to the PKTx . . . . . . . . . . . . . . . . . . A-7 Test the PKTx Card . . . . . . . . . . . . . . . . . . . . . . . . . . . . . . . . . . . . . A-9 Test the Dual Port . . . . . . . . . . . . . . . . . . . . . . . . . . . . . . . . . . . . . A-10 Print the Log File . . . . . . . . . . . . . . . . . . . . . . . . . . . . . . . . . . . . . . A-13 Publication 1784-6.5.27 - September 1997 Chapter 1 Introducing the 1784-PKTx Communication Interface Cards Your 1784-PKTx communication interface card (cat. nos. 1784-PKTX, 1784-PKTXD, and 1784-PKTS) is a PCI (Peripheral Component Interconnect/Interface) card that must be inserted into a PCI bus slot. Table 1.1 Features supported by PKTx cards KTx card catalog # # of channels Active node on these networks Remote I/O scanner capability? 1784-PKTX 1 DH+ or DH-485 yes 1784-PKTXD 2 DH+ and/or DH-485 yes 1784-PKTS 1 yes Available only on channel 1 Table 1.2 Operating Systems and drivers supporting the PKTx cards MS-DOS/Windows 3.x Windows 95/Windows NT DH+ Write your own driver using 1784-DP4 Use the driver included with RSLinx DH-485 Same as DH+ Same as DH+ remote I/O Write your own driver using 6001-RIO - RIO Tool Kit Write your own driver using 6001-RIO - RIO Tool Kit 1784-6.5.27 - September 1997 1-2 Introducing the 1784-PKTx Communication Interface Cards Compatibility Table 1.3 shows the computer models with which the 1784-PKTx has been verified to work. Table 1.3 Computers compatible with the 1784-PKTx card Company Model Allen-Bradley • Selected 6153 Industrial Computers • Selected 6154 Industrial Computers • All 6155 Industrial Rackmount Computers • All 6180 Industrial Computers Important: Although the 1784-PKTXD has two channels, you cannot use the card to directly bridge between two networks. How the 1784-PKTx Card Operates The 1784-PKTX and -PKTXD cards: • communicate with nodes on Data Highway Plus networks, including PLC-5®, PLC-5/250, and SLC 5/04 processors, and SLC 5/01, SLC 5/02, and SLC5/03 processors (only via 1785-KA5) • communicate with SLC processors on DH-485 networks • act as a remote I/O scanner The 1784-PKTS card acts only as a remote I/O scanner. 1784-6.5.27 - September 1997 Introducing the 1784-PKTx Communication Interface Cards 1-3 The 1784-PKTx performs data transmission, management, and local network diagnostics. The interface to the host processor is through a boardresident dual-port memory. Rockwell Automation interface software (including RSLinx) manages data transmission and reception through dual-port memory. The PCI BIOS on your computer automatically assigns the PKTx card’s IRQ and base memory address (one for each channel). If your card has two channels, both channels share the same IRQ. 1784-6.5.27 - September 1997 1-4 Introducing the 1784-PKTx Communication Interface Cards Compliance to European Union Directives If this product has the CE mark, it is approved for installation within the European Union and EEA regions. This equipment is classified as open equipment and must be mounted in an enclosure during operation to provide safety protection. It has been designed and tested to meet the following directives. EMC Directive This product is tested to meet the Council Directive 89/336/EEC Electromagnetic Compatibility (EMC) and the following standards, in whole or in part, documented in a technical construction file: • EN 50081-2EMC - Generic Emission Standard, Part 2 - Industrial Environment • EN 50082-2EMC - Generic Immunity Standard, Part 2 - Industrial Environment This product is intended for use in an industrial environment. Low Voltage Directive This product is tested to meet Council Directive 73/23/EEC Low Voltage, by applying the safety requirements of EN 61131-2 Programmable Controllers, Part 2 - Equipment Requirements and Tests. For specific information required by EN 61131-2, see the appropriate sections in this publication, as well as the following Allen-Bradley publications: • Industrial Automation Wiring and Grounding Guidelines for Noise Immunity, publication 1170-4.1 • Automation Systems Catalog, publication B111 1784-6.5.27 - September 1997 Chapter 2 Configuring the PKTx Hardware Introduction The 1784-PKTx card is a PCI bus card, compliant with the PCI Bus Specification Revision 2.1. This card was developed with Plug and Play functionality, as defined in Revision 1.0A of the Plug and Play BIOS Specification. Because of this, PKTx cards do not require the use of switches or jumpers to configure their specific interrupt request levels (IRQ) and base memory address values. These configurations are automatically assigned to the PKTx card by the PCI BIOS when the computer is poweredup. The configurations are stored in the PCI configuration registers. These values may be retrieved by application software used to communicate with the PKTx card. Rockwell Software products that support the PKTx cards automatically retrieve these values and use them to communicate with the PKTx card. Interrupt Request Assignment The PCI BIOS automatically assigns the PKTx card an IRQ. Because of this, each time you add or remove cards and restart your computer, the BIOS may assign a different IRQ to each card. You should check the IRQ assignment each time you start your system. Most application software will verify this assignment for you. The appropriate plug and play driver that is shipped with your application software verifies the IRQ. The PKTx Utilities diskette contains a program (PKTXD.EXE) which allows you to view which IRQ was chosen by the system. Refer to page A-2 for more information. 1784-6.5.27 - September 1997 2-2 Configuring the PKTx Hardware The Base Memory Jumper (JP2) Card ID Jumper (JP3) 40021 Figure 2-1 Overview of the jumpers on the PKTx card Base Memory Address Restriction Although the assignment of the IRQ and base memory address values is automatic, and does not require user intervention, there is one jumper on the PKTx card that is used to restrict the range of values that can be assigned to the base memory address by the PCI BIOS. This jumper is called Base Memory Address jumper, and it must be set before you install the PKTx card inside your computer. The PKTx Utilities diskette contains a program (PKTXD.EXE) which allows you to view which base memory address was chosen by the system. Refer to page A-2 for more information. 1784-6.5.27 - September 1997 Configuring the PKTx Hardware 2-3 Setting a Base Memory Address Jumper The host computer and the PKTx card exchange data via a dual-port interface. The dual-port requires 4 Kbytes of memory. This 4 Kbyte block of memory begins at the base memory address assigned to the card by the PCI BIOS when the computer is started. Under MS-DOS, Windows 3.1 and Windows for Workgroups, the base memory address of PC cards should fall within the range of 0 and 1 Megabyte of PC memory. For the newer 32-bit operating systems, this restriction is no longer required, and the base memory address should be located anywhere in the PC memory space. The Base Memory Address jumper (JP2) forces the PCI BIOS to assign the base memory address to one of two address ranges, as shown in the table below. You should select the jumper position based on the operating system running on your PC. Table 2-1 Jumper Positions for single PKTx cards Operating System Jumper Position (JP2) Base Memory Address Range DOS Windows 3.1 Windows for Workgroups Non-Microsoft system Toward 1Meg position Located in the range between 0 and 1Mb in the PC memory Windows 95 Windows NT Toward 32bit position Located anywhere in the available physical memory of the PC 1784-6.5.27 - September 1997 2-4 Configuring the PKTx Hardware When looking directly at the 1784-PKTx card, the Base Memory Address jumper looks like: 32BIT This is a jumper that is not covered. 1MEG 32BIT This is a jumper that has the 32bit position for Windows 95 covered. 1MEG 40022 Establishing Multiple PKTx Cards It is possible to have more than one PKTx card within your system. However, you can only have up to four cards functioning at the same time. There are two jumpers which can be set to establish unique identification between the PKTx cards. The position and combination of the two jumpers allow each card to be uniquely recognized by any application software. 1784-6.5.27 - September 1997 Configuring the PKTx Hardware 2-5 Planning Jumper Settings for Multiple Cards Located on each PKTx card are a set of jumpers with markings which indicate how each jumper can be set. These jumpers are identified as JP3. It is important to coordinate the setting of these jumpers so that each card can be recognized by the system. The example below shows possible combinations of jumper settings that may be used if you have a total of four cards. Below is an example of a covered jumper for card ID 2. CID1 CID0 JP3 CID1 CID0 JP3 The JP3 jumper looks similar to this on the 1784-PKTx card. Key Indicates the jumper is open Indicates the jumper is covered 40023 When planning to use multiple PKTx cards, there are few things to consider. • It is best to document the jumper combination for each card. • If you remove a card and insert a new one in the same spot, the new card can have the same jumper settings as the card that was removed. What to Do Next Chapter 3 tells you how to install a PKTx card into your computer. 1784-6.5.27 - September 1997 2-6 Configuring the PKTx Hardware 1784-6.5.27 - September 1997 Chapter 3 Installing the Card Inside the Computer You’ve set the jumpers; now you’re ready to place the PKTx card inside your computer. Before You Begin Consider these points before you begin: • Do I know everything I need to know to accomplish my task? • Do I have the proper tools at hand? • Do I understand where I can and cannot put this card? ! ATTENTION: Before you can install the PKTx card, you need to verify that the appropriate jumpers have been set. Refer to chapter 2, Configuring the PKTx Hardware, for more information. On the Right Track? Make sure you know: • whether or not you have the correct driver for the PKTx card. Consult the table on page 1-1. • how to configure the card’s jumpers before you install the 1784-PKTx • how to install hardware into your computer’s expansion slots Consult your computer’s documentation for specific information. 1784-6.5.27 - September 1997 3-2 Installing the Card Inside the Computer Necessary Tools You need one of these tools to remove the cover from your central processing unit (CPU): • Phillips-head screwdriver • flat-head screwdriver Accessing the Computer’s PCI Bus Slots To install the PKTx card, you must have access to the computer’s PCI bus. Refer to your computer’s hardware manual for instructions about how to: 1. Shut down the computer. 2. Turn off power to the computer. Important: If you disconnect the ac power from the computer, you lose the chassis ground. Electrostatic damage (ESD) protection is lost. 3. Remove the computer’s CPU cover (according to the manufacturer’s instructions). 4. Select a vacant PCI bus slot. Important: The 1784-PKTx will function only in a PCI bus slot. 5. Remove the rear bracket slot’s expansion cover by loosening the screw on the back of the computer. 1784-6.5.27 - September 1997 Installing the Card Inside the Computer 3-3 Inserting the Card To insert the card inside the computer: 1. Follow the card handling instructions on page P-3. 2. Make sure you have set correctly the jumpers on the card. (See chapter 2.) 3. Turn off power to the computer. Important: If you disconnect the ac power from the computer, you lose the chassis ground. Electrostatic damage (ESD) protection is lost. 4. Loosen the expansion slot screw and remove the outside retaining bracket (ORB). 5. Insert the PKTx card into the edge connector and tighten the expansion slot screw on the PKTx ORB. 6. Restore power to the computer. 7. Run PKTx diagnostics from the PKTx Utility disk now. See appendix A. 8. Start the application software. 9. Make sure that the PKTx jumper settings are compatible with your operating system. If not, your jumper settings will need to be changed. 10.Turn off power to the computer. 11. Replace the CPU cover. 1784-6.5.27 - September 1997 3-4 Installing the Card Inside the Computer The Windows 95 and the 1784-PKTx Card To use the PKTx card with Windows 95, you need an appropriate plug and play driver. RSLinx contains the appropriate DH+/DH-485 driver for the 1784-PKTx card. Install RSLinx or a custom software driver before you attempt to use the PKTx card. To verify that your PKTx card is using the appropriate driver, use the Device Manager within Windows 95. If you do not have the appropriate driver installed, the 1784-PKTx card will not function properly. If you have RSLinx installed on your computer, call Rockwell Software Technical Support, at (440) 646-7800, for information on locating the plug and play driver for the 1784-PKTx card. Reviewing the 1784-PKTx Settings in Windows 95 By using the Device Manager within Windows 95, you can review the settings used to run the 1784-PKTx card without using the PKTx Utilities. Follow the steps below to review the Device Manager settings. 1. Click on the My Computer icon with the right mouse button. 2. Select Properties from the menu. The System Properties dialog box appears. 1784-6.5.27 - September 1997 Installing the Card Inside the Computer 3-5 3. Click on the Device Manager tab. All of the devices within the system are displayed. 4. Scroll through the devices and search for the Allen-Bradley PKTx family line. Click on the plus sign near the Allen-Bradley line. The Allen-Bradley 1784-PKTx device should be listed. If it is listed with a question mark, this indicates that the appropriate driver was not found by the system 5. Select Allen-Bradley 1784-PKTx. 1784-6.5.27 - September 1997 3-6 Installing the Card Inside the Computer 6. Click on the Properties pushbutton. The Device Status box informs you if the appropriate driver was not installed for the PKTx card. 1784-6.5.27 - September 1997 Installing the Card Inside the Computer 3-7 7. Click on the Resources tab in the Properties dialog box. 8. Scroll through the Resource Settings list to view the system setting used with the PKTx card. Continue by clicking on the Cancel button until you exit all of the dialog boxes. 1784-6.5.27 - September 1997 3-8 Installing the Card Inside the Computer What to Do Next Chapter 4 explains how to connect the PKTx card to various networks and devices. 1784-6.5.27 - September 1997 Chapter 4 Connecting the Interface Card You can connect the PKTx card to these networks: • DH+ • DH-485 • Remote I/O The purpose of this chapter it to explain: • what cables can be used to connect to the various networks • other information needed to connect to a network 1784-6.5.27 - September 1997 4-2 Connecting the Interface Card 1784-PKTX Connections DH+ Remote I/O 1 Clear 1 Blue 2 Shield 2 Shield 3 Blue 3 Clear DH-485 6 Termination Resistance 5 Channel A 4 Channel B 3 Signal Ground 2 Shield/Drain 1 Earth Ground 40024 1784-6.5.27 - September 1997 Connecting the Interface Card 4-3 1784-PKTS Connections Remote I/O 1 Blue 2 Shield 3 Clear 40026 1784-6.5.27 - September 1997 4-4 Connecting the Interface Card 1784-PKTXD Connections DH+ Remote I/O 1 Clear 1 Blue 2 Shield 2 Shield 3 Blue 3 Clear DH+ Remote I/O 1 Clear 1 Blue 2 Shield 2 Shield 3 Blue 3 Clear DH-485 6 Termination Resistance 5 Channel A 4 Channel B 3 Signal Ground 2 Shield/Drain 1 Earth Ground 40025 1784-6.5.27 - September 1997 Connecting the Interface Card 4-5 Before You Begin Before you make the connections, make sure you have the correct cable. For connections to: remote I/O And these termination resistors: Use this cable: 1770-CD í Belden #9463 82Ω or 150Ω 1770-CD í Belden #9463 DH+ 150Ω for 57.6K bits/sec 150Ω for 115.2K bits/sec 82Ω for 230.4K bits/sec DH-485 Belden #3106A ô not needed Classic programmable controllers 1784-CP12 not needed Enhanced programmable controllers 1784-CP13 not needed SLC 5/04 processors (direct DH+ connection) 1784-CP13 (DH+) not needed SLC family processors (direct DH-485 connection) 1784-CP14 (DH-485) Cables used for construction of custom cables ôMating Connector: A-B PN 941999-06 or Phoenix Order No. 1849406 íMating Connector: A-B PN 941999-03 or Phoenix Order No. 1849396 The 1784-PKTX, -PKTXD card does not support direct connections to PLC-2 or PLC-3 programmable controllers. The 1784-PKTX, -PKTXD card ships with 82Ω and 150Ω resistors and with the DH+/remote I/O and DH-485 mating connectors. For additional cable information, see these Allen-Bradley publications: Publication: Number: 1784-CP12 Cable Packing Data 1784-2.41 1784-CP13 Cable Packing Data 1784-2.44 1784-CP14 Cable Packing Data 1784-2.45 1784-6.5.27 - September 1997 4-6 Connecting the Interface Card Where to Go If you what information on: See: Connecting to remote I/O devices page 4-6 Connecting to DH+ devices page 4-8 Connecting to DH-485 devices page 4-12 Connecting to Remote I/O Devices Depending upon your application, you can use the PKTx card to communicate with a single device or to multiple devices via a remote I/O link. To connect the PKTx card to remote I/O, use Allen-Bradley 1770-CD or approved cable to construct a custom cable. See publication ICCG-2.2 for a list of approved cables. Important: For proper operation, terminate both ends of a remote I/O link by using external resistors. Use either an 82Ω or 150Ω terminator (see Table 4.D). 1784-6.5.27 - September 1997 Connecting the Interface Card 4-7 Table 4.D Selecting the External Resistor The maximum number of: If your remote I/O link: use this resistor rating: physical devices connected on the link: racks that you can scan on the link: 82Ω 32 16 150Ω 16 16 operates at 230.4 K bits operates at 57.6 or 115.2K bit/s, and no devices listed below are linked: Scanners: 1771-SN; 1772-SD, -SD2; 1775-SR, -S4A, -S4B; 6008-SQH1, -SQH2 Adapters 1771-AS; 1771-ASB (series A only); 1771-DCM Miscellaneous 1771-AF connects to any device listed below: Scanners 1771-SN; 1772-SD, -SD2; 1775-SR, -S4A, -S4B; 6008-SQH1, -SQH2 Adapters 1771-AS; 1771-ASB (series A only); 1771-DCM Miscellaneous 1771-AF operates at 57.6 or 115.2K bit/s, and you do not require over 16 physical devices 1784-6.5.27 - September 1997 4-8 Connecting the Interface Card Connecting to DH+ Devices Depending on your application, you may use the PKTx card to communicate with a single device or multiple DH+ devices via a DH+ network. This section shows you how to connect to a classic or an enhanced PLC-5 programmable controller. ! ATTENTION: Not all software and hardware supports 115.2K bit/s or 230.4K bit/s for DH+ communications. Make sure your software and hardware supports the baud rate your select. For information on: See classic programmable controllers page 4-8 enhanced programmable controllers page 4-10 terminating the last node page 4-11 connecting the card to a DH+ network page 4-11 Connecting the Card to a Classic PLC-5 Programmable Controller To connect the 1784-PKTX or -PKTXD card to a classic PLC-5 programmable controller, follow these steps: 1. Turn off power to the computer. Important: If you disconnect the ac power from the computer, you lose the chassis ground. Electrostatic damage (ESD) protection is lost. 1784-6.5.27 - September 1997 Connecting the Interface Card 4-9 2. Connect the 3-pin Phoenix end of the CP12 cable to the PKTx card. 1784-CP12 Cable 3-pin Phoenix connector with switchable termination resistor 10.5 ft. (3.20 m) 20223a 20223a-M 3. Connect the 9-pin D-shell end directly to the 9-pin D-shell connector on the front of the classic PLC-5 processor. PLC-5 Family Processor 1784-PKTx card Peer Communication Interface Connector 30172 30172-M 4. Restore power to the computer. 1784-6.5.27 - September 1997 4-10 Connecting the Interface Card Connecting the Card to an Enhanced PLC-5 Processor To connect the 1784-PKTX or -PKTXD card to an enhanced PLC-5 programmable controller, use a 1784-CP13 cable. Follow these steps: 1. Connect the 3-pin Phoenix end of the CP13 cable to the PKTx card. 2. Connect the adapter to the connector on the front of the enhanced PLC-5 programmable controller. 1784-CP13 Cable 20757-M 1784-6.5.27 - September 1997 Connecting the Interface Card 4-11 Terminating the Last Node You must terminate both ends of your DH+ network. If the PKTx is the last physical node on your network, you must set the switch on the CP12 or 13 to terminate the link as shown below. node terminated node not terminated 3-pin Phoenix connector with switchable termination resistor 20223c 20223c-M Connecting the Card to a Data Highway Plus Network To connect the 1784-PKTX or -PKTXD card to a Data Highway Plus network, use Allen-Bradley 1770-CD or approved cable to construct custom cable. (See publication ICCG-2.2, Approved Vendor List for DH, DH+, DH-485, and Remote I/O) Important: You must terminate the last physical node of the network with a resistor of appropriate value. ! ATTENTION: Not all software and hardware supports 115.2K bit/s or 230.4K bit/s for DH+ communications. Make sure your software and hardware supports the baud rate you select. 1784-6.5.27 - September 1997 4-12 Connecting the Interface Card Connecting the Card via a DH-485 Network Figure 4.1 shows an example of a network consisting of three SLC family controllers and one programming station. This configuration requires the 1784-PKTX or -PKTXD card and three link couplers: • An SLC family CPU is connected to each of the link couplers (1747AIC) with a 1747-C11 cable. • The 1784-PKTX or -PKTXD card is connected to the network at one of the link couplers, as shown in Figure 4.1. • The communication cable consists of three segments of cable daisychained at each link coupler. 1784-6.5.27 - September 1997 Connecting the Interface Card 4-13 Figure 4.1 Communicating to multiple SLCs via the DH-485 network Link Coupler 1747-AIC 1747-C11 SLC Controller Communication Cable Belden #9842 To 1784-PKTx Card Link Coupler 1747-AIC 1747-C11 SLC Controller Link Coupler 1747-AIC 1747-C11 17680 SLC Controller Connecting the Card to a single SLC Processor on DH-485 Figure 4.2 shows an example of a point-to-point link consisting of an SLC processor and a programming station. This configuration requires the 1784-PKTX or -PKTXD card and an SLC processor. The SLC CPU is connected directly to the 1784-PKTX or -PKTXD card with a 1784-CP14 cable, as shown. 1784-6.5.27 - September 1997 4-14 Connecting the Interface Card Figure 4.2 Communicating to a single SLC using a point-to-point DH-485 link To 1784-PKTx Card 1784-CP14 Cable SLC Controller 30173 Personal Computer To connect an SLC family processor to the PKTx card, you: 1. Connect the termination resistor end of the CP14 cable to the PKTx card 2. Connect the RJ-45 connector directly to the phone-jack connector on the front of the SLC processor RJ-45 connector 6-pin Phoenix connector with switchable termination resistor 1784-CP14 cable 20222a 20222-A 1784-6.5.27 - September 1997 Connecting the Interface Card 4-15 Terminating the Last Node You must terminate both ends of your DH-485 network. If the PKTx is the last node on your network, you must set the switch on the CP14 to terminate the link as shown below. node terminated 6-pin Phoenix connector with switchable termination resistor node not terminated 30174 30174-M Refer to publication 1770-6.2.2, Data Highway/Data Highway Plus/Data Highway II/Data Highway-485 Cable Installation Manual, for additional information about cable issues. 1784-6.5.27 - September 1997 4-16 Connecting the Interface Card What to Do Next If you have read each chapter, and still have questions, please call Allen-Bradley Automation Group Technical Support at (440) 646-6800. 1784-6.5.27 - September 1997 Appendix A Running Diagnostics What’s in This Appendix This appendix contains instructions for running the PKTXD utility and KTx diagnostics. The PKTXD utility reports the IRQ and the base memory address (one for each channel) of a PKTx card. The KTx diagnostics check PKTx’s network and host communications, interrupts, and memory access. Important: The 1784-PKTS card will not run the dual-port tests, i.e., it will attempt to run and fail. When Do I Run KTx Diagnostics? Run KTx diagnostics if: • • • • you just installed the PKTx card you want to test if you have set up the PKTx card correctly you are unable to communicate with the programmable controller the remote I/O scanner is unable to communicate with adapters Troubleshooting the PKTx Card If your PKTx card is not functioning properly, follow these steps: 1. Verify you have the correct driver for the card. Refer to page 1-1 for more information. 2. Continue with the instructions in this chapter to run the diagnostics to determine if there are any hardware failures. 3. If you receive any failures, print the log file. 1784-6.5.27 - September 1997 A-2 Running Diagnostics 4. Call Allen-Bradley Automation Group Technical Support at (216) 646-6800. Instructions are printed at the beginning of the log file. Obtaining the Base Memory Address and the Interrupt Request Before you can begin to use the diagnostics, you need to record the base memory addresses and the interrupt request (IRQ) of the card(s) you wish to test. The PKTx card comes with a MS-DOS based program that was designed to display the IRQ of each card loaded into your computer, and the base memory address of each card’s channel. To run the program, follow the steps below. ! ATTENTION: The computer must be started with the Base Memory Address jumper (JP2) on the PKTx card in the 1MEG position. The diagnostics will not find the card if it is set in the 32BIT position. 1. Access an MS-DOS prompt. 2. Insert the PKTx Utilities diskette into your diskette drive. 3. Access the diskette drive. 4. At the diskette drive prompt, type the following: pktxd Enter The program displays the Base Memory Address for each channel, the IRQ (INTA), and the card ID of each PKTx card within your computer. The card ID is used to uniquely identify each card by your application software 5. Record the information presented. 1784-6.5.27 - September 1997 Running Diagnostics A-3 Copying the KTx Diagnostics to Your Hard Drive The diagnostics are located in the PKTx Utilities diskette. Follow these procedures to install the program on the root drive of your computer: 1. Access an MS-DOS prompt. 2. Insert the Utilities diskette into your diskette drive. 3. Access your root drive and type: Enter cd\ md ktxdiag Enter copy a:\ktxdiag c:\ktxdiag Enter The system copies the files to your hard drive. If the files are not copied to the root drive of your computer, the program will not run properly. 1784-6.5.27 - September 1997 A-4 Running Diagnostics Access Diagnostics ! ATTENTION: You can run diagnostics on only one card or channel at a time. If you run diagnostics using a memory address that is incorrect, the computer may lock up. Be sure to run diagnostics using the correct address setting. At the MS-DOS prompt, type: cd c:\ktxdiag ktxdiag Enter Enter Add this to the end of the ktxdiag command If you: For example: don’t want to create a KTXDIAG.LOG file -l ktxdiag -l are using a monochrome monitor -m ktxdiag -m -h ktxdiag -h want to see this list of options or -? ktxdiag -? The introductory screen appears: To Press this key Go to page Start the diagnostics F1 page A-5 Exit the software F10 N/A 1784-6.5.27 - September 1997 Running Diagnostics A-5 Start Diagnostics 1. From the introductory screen, press You see the main menu: F1 . F10 allows you to clear any messages on the screen. Press F1 to start the diagnostics. The information displayed is from the KTXDIAG.INI file in the KTXDIAG directory. Each time you run the diagnostics, the program looks for this file, not for the current PKTx settings. If this file is not found, default settings are used. To update the KTXDIAG.INI file, use the Online Configuration (F2) option. 2. Use the decision table below. To Press this key Go to Define a PKTx card to test (Online Configuration) F2 page A-6 Test the computer’s ability to communicate with the PKTx card F4 page A-9 Run the PKTx card’s self-diagnostics F5 page A-9 Test PKTx dual port communications F7 page A-10 Exit diagnostics F10 N/A Note: the F3 (M16 Test) and F4 (Test computer) options are not necessary for the PKTx card. 1784-6.5.27 - September 1997 A-6 Running Diagnostics Define a PKTx Card to Test This option updates the KTXDIAG.INI file. If you have more than one PKTx card installed or you are using a 1784-PKTXD card, you need to define the Base Memory Address for each channel and the IRQ of the card you want to test. Use the PKTXD utility to obtain this information (page A-2). 1. From the main menu, press F2 . 05 2. Change the configuration to match the base memory address (of one channel), and the IRQ for the PKTx card that you want to test To change the Press this key until you see the setting that you need channel’s memory address F4 interrupt F5 DH-485 baud F8 1784-6.5.27 - September 1997 Running Diagnostics To change the Press this key And DH+ address F6 DH-485 address F7 You will be prompted to enter an address: DH+ [0 . . . 77] DH-485 [0 . . . 31] F9 3. To save the configuration, press A-7 . The next time that you run diagnostics, the diagnostic program looks for this file and loads it. 4. To return to the introductory screen, press F10 twice. Test Computer Communications to the PKT x 1. From the main menu, press 2. Press F3 F3 . to execute the tests. You see 1784-6.5.27 - September 1997 A-8 Running Diagnostics If an error occurs, the diagnostics report a failure and continues with the next test. Diagnostic Description If the test fails Dual Port Tests the computer’s ability to read to and write from dual-port memory RAM memory may be corrupted or the PKTx card may have a problem (run the KTx card test) Reset Test Tests the computer’s ability to reset the PKTx card After reset, verifies the status of the PKTx card PKTx card may have a problem (run the PKTx card test) Interrupt Tests the interrupt capability from the PKTx card to the computer Only runs if you use an interrupt for the PKTx card (default is NONE) There may be a conflict in the interrupt assignments 3. Press F10 to return to the main menu. 1784-6.5.27 - September 1997 Running Diagnostics A-9 Test the PKTx Card 1. From the main menu, press F5 . You see: The results of this test indicate whether or not the PKTx card is working properly. 05 2. To execute the tests, press F1 . To return to the main menu without running the test, press F10 . If an error occurs, the diagnostics report a failure and continues with the next test. Errors are recorded in a log file (see page page A-13). 1784-6.5.27 - September 1997 A-10 Running Diagnostics Diagnostic Description If the test fails Memory Tests the PKTx card’s ability to read from and write to its internal memory chips The PKTx card’s RAM may have a problem Timer Operation Tests the accuracy and capabilities of the counter-timer chips PKTx card may not have reset completely • Turn power off to the computer. • Remove the card and reinsert. • Turn power on to the computer. • Run this test again. Serial Port Operation Tests the interrupts and loopback capabilities of the serial I/O chip There may be a hardware problem with the PKTx card or The wrong set of KTx*.BIN files are running Test the Dual Port 1. From the main menu, press F7 . This option allows you to test the DH+ or DH-485 communications on a live network. 2. Use the decision table below. To load this protocol to the PKT x card Press this key You see the message DH+ (page A-17) F3 DH+ Loading Test. . . . LOADED DH 485 (page A-17) F4 DH-485 Loading Test. . . . LOADED return to the main menu F10 N/A 1784-6.5.27 - September 1997 Running Diagnostics A-11 3. Use the decision table below for both protocols. To Press this key enable the PKTx card on a DH+ or DH-485 link F4 disable the PKTx card from a DH+ or DH-485 link (disables the card from the network but protocol is not removed from the card) F5 display the PKTx card on DH+ or DH-485 link F6 clear the memory location of the PKTx card: • disables card from the DH+ or DH-485 link • clears the DH+ or DH-485 protocol from the card F7 return to the main menu F10 1784-6.5.27 - September 1997 A-12 Running Diagnostics If you chose to view the card’s information, refer to the following table to interpret the information presented. This field Indicates PKTx node address is the node address of PKTx card PKTx DH+ or DH-485 node is if the node is unique or a duplicate Link State is if the DH+ or DH-485 link is on line, off line or unknown card state is if the PKTx card is enabled or disabled PKTx is (PKTx side) if the communication from the card to the computer is functional or not functional Protocol Software is if the protocol software is: DH+ or unknown DH-485 or unknown Baud rate is the communication rate is: for DH+: 57.6 bps or unknown for DH-485: 300, 600, 1200, 2400, 4800, 9600, 19200 or unknown PKTx is (host side) the communication from the computer to the card is active or stopped PKTx node name is the name you assigned to the computer in your application or the default name 1784KTx Number of active nodes the number of active nodes and shows a map of the nodes on the DH+ or DH-485 link if the card is communicating on the DH+ or DH-485 link (untitled) active nodes on network displayed as “mini-who” Viewing the card’s information reports the current status of DH+ or DH485 communications. The test results are recorded in the log file. Use this information to help you troubleshoot. If you encounter any difficulty, review your error log. 1784-6.5.27 - September 1997 Running Diagnostics A-13 Print the Log File If you did not add -l to the ktxdiag command when accessing diagnostics, your diagnostic test session was recorded in a log file that helps Allen-Bradley Automation Group Technical Support diagnose your difficulty. 1. To view the log file, at the MS-DOS prompt, type: Enter cd c:\ktxdiag type ktxdiag.log | more Enter 2. Use MS-DOS commands or a text editor to print a copy of the log file. 3. Call Allen-Bradley Automation Group Technical Support at (440) 646-6800, and request a customer log number and the name of a technical support specialist. Include this information on the fax cover letter along with the log print-out. Fax everything to the number indicated on the print-out. 1784-6.5.27 - September 1997 A-14 Running Diagnostics 1784-6.5.27 - September 1997 Index Numerics 1747-C11 cable 4-12 1770-CD cable 4-11 1784-CP12 cable 4-10 1784-CP14 cable 4-13, 4-15 1784-PKTx cards configuring hardware for 2-1 connecting to network 4-1 features supported by 1-1 B base memory address 2-1 BIOS 2-1 C cables 1784-CP12 4-9 compatibility 1-2 industrial computers 1-2 computer diagnostic tests A-9 connecting the interface card to a DH+ network 4-11 connections 1784-PKTS 4-3 1784-PKTX 4-2 1784-PKTXD 4-4 I–1 E European Union Directives 1-4 I inserting the card 3-3 installing the card 3-1 interrupt request 2-1 IRQ 2-1 M multiple PKTx cards 2-4–2-5 N node termination 4-11, 4-15 P PCI BIOS 2-1 PCI bus slot 1-1 PCI bus slots 3-2 PLC-5 processor classic 4-8 enhanced 4-10 programmable controlers 4-8, 4-10 R restrictions base memory address 2-2–2-3 D Data Highway Plus 4-11 DH+ 1-1 connecting to 4-11 DH+ network terminating last node 4-11 DH-485 1-1 DH-485 network connecting to 4-12 diagnostics testing the card A-9 S SLC family processor 4-14, 4-15 Specifications P-8 T testing PKTx card A-9 tools necessary 3-2 Publication 1784-6.5.27 - September 1997 I–2 Index Publication 1784-6.5.27 - September 1997 Allen-Bradley, a Rockwell Automation Business, has been helping its customers improve productivity and quality for more than 90 years. We design, manufacture and support a broad range of automation products worldwide. They include logic processors, power and motion control devices, operator interfaces, sensors and a variety of software. Rockwell is one of the world’s leading technology companies. Worldwide representation. Argentina • Australia • Austria • Bahrain • Belgium • Brazil • Bulgaria • Canada • Chile • China, PRC • Colombia • Costa Rica • Croatia • Cyprus • Czech Republic • Denmark • Ecuador • Egypt • El Salvador • Finland • France • Germany • Greece • Guatemala • Honduras • Hong Kong • Hungary • Iceland • India • Indonesia • Ireland • Israel • Italy • Jamaica • Japan • Jordan • Korea • Kuwait • Lebanon • Malaysia • Mexico • Netherlands • New Zealand • Norway • Pakistan • Peru • Philippines • Poland • Portugal • Puerto Rico • Qatar • Romania • Russia-CIS • Saudi Arabia • Singapore • Slovakia • Slovenia • South Africa, Republic • Spain • Sweden • Switzerland • Taiwan • Thailand • Turkey • United Arab Emirates • United Kingdom • United States • Uruguay • Venezuela • Yugoslavia Publication 1784-6.5.27 - September 1997 955129-51 Copyright 1997 Rockwell