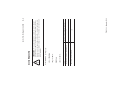
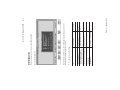
1
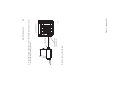
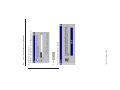
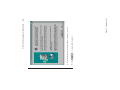
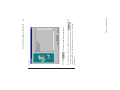
(Cat. Nos. 1784-KTX,
-KTXD, and -KTS )
1784-KTx
Communication
Interface Card
User Manual
identify a hazard
avoid a hazard
recognize the consequences
1784-6.5.22 - November 1999
Allen-Bradley is a trademark of Rockwell Automation.
Important: Identifies information that is critical for successful
application and understanding of the product.
•
•
•
Attention statements help you to:
!
ATTENTION:
Identifies information about practices or
circumstances that can lead to personal injury or death,
property damage or economic loss
Throughout this manual we use notes to make you aware of safety considerations:
Reproduction of the contents of this copyrighted publication, in whole or part, without
written permission of Rockwell Automation, is prohibited.
ii
Allen-Bradley publication SGI-1.1, Safety Guidelines for the Application, Installation and
Maintenance of Solid-State Control (available from your local Allen-Bradley office),
describes some important differences between solid-state equipment and
electromechanical devices that should be taken into consideration when applying products
such as those described in this publication.
The illustrations, charts, sample programs and layout examples shown in this guide are
intended solely for purposes of example. Since there are many variables and requirements
associated with any particular installation, Allen-Bradley does not assume responsibility
or liability (to include intellectual property liability) for actual use based upon the
examples shown in this publication.
Because of the variety of uses for the products described in this publication, those
responsible for the application and use of this control equipment must satisfy themselves
that all necessary steps have been taken to assure that each application and use meets all
performance and safety requirements, including any applicable laws, regulations, codes
and standards.
Important User Information
iii
1784-6.5.22 - November 1999
• Industrial Automation Wiring and Grounding Guidelines, publication
1770- 4.1
• Guidelines for Handling Lithium Batteries, publication AG- 5.4
• Automation Systems Catalog, publication B111
This equipment is classified as open equipment and must be installed
(mounted) in an enclosure as a means of providing safety protection.
For specific information required by EN 61131-2, see the appropriate
sections in this publication, as well as the following Allen- Bradley
publications:
This product is tested to meet Council Directive 73/ 23/EEC Low Voltage,
by applying the safety requirements of EN 61131–2 Programmable
Controllers, Part 2 – Equipment Requirements and Tests.
Low Voltage Directive
• EN 50081- 2 EMC – Generic Emission Standard, Part 2 – Industrial
Environment
• EN 50082- 2 EMC – Generic Immunity Standard, Part 2 – Industrial
Environment
The product described in this manual is intended for use in an industrial
environment.
This product is tested to meet Council Directive 89/ 336/EEC
Electromagnetic Compatibility (EMC) using a technical construction file
and the following standards, in whole or in part:
EMC Directive
Installation Requirements: If this product is installed within the
European Union or EEA regions, the following regulations apply.
If this product or package is marked with the CE mark, the product
complies with the following European Union Directives:
Adherence to European Union Directive Compliance
1784-6.5.22 - November 1999
iv
P-1
P-2
P-2
P-3
P-3
P-4
P-4
P-5
P-5
P-5
1784-6.5.22 - Novmber 1999
Select the Base Memory Address Location . . . . . . . . . . . . . . . . . . . . 2-1
Set the Card’s Switches . . . . . . . . . . . . . . . . . . . . . . . . . . . . . . . . . . 2-6
Select the Interrupt Setting . . . . . . . . . . . . . . . . . . . . . . . . . . . . . . . . 2-7
About KTx Interrupts . . . . . . . . . . . . . . . . . . . . . . . . . . . . . . . . . . . . . 2-7
New DH+‘ Specification - Link Baud Rate. . . . . . . . . . . . . . . . . . . . 2-11
What to Do Next . . . . . . . . . . . . . . . . . . . . . . . . . . . . . . . . . . . . . . . . 2-11
Chapter 2
Configure the Card Hardware
How the 1784-KTx Card Operates . . . . . . . . . . . . . . . . . . . . . . . . . . . 1-2
What to Do Next . . . . . . . . . . . . . . . . . . . . . . . . . . . . . . . . . . . . . . . . . 1-2
Chapter 1
Introduction to the 1784-KTx Communication Interface Cards
Contents of Your Order . . . . . . . . . . . . . . . . . . . . . . . . . . . . . . . . . . . .
If you ordered a 1784-KTS Interface Card . . . . . . . . . . . . . . . . . .
Handle the Card . . . . . . . . . . . . . . . . . . . . . . . . . . . . . . . . . . . . . . . . . .
Specifications. . . . . . . . . . . . . . . . . . . . . . . . . . . . . . . . . . . . . . . . . . . .
Conventions . . . . . . . . . . . . . . . . . . . . . . . . . . . . . . . . . . . . . . . . . . . . .
Summary of Changes. . . . . . . . . . . . . . . . . . . . . . . . . . . . . . . . . . . . . .
Revision Bars. . . . . . . . . . . . . . . . . . . . . . . . . . . . . . . . . . . . . . . . . . . .
Worksheet Tables . . . . . . . . . . . . . . . . . . . . . . . . . . . . . . . . . . . . . . . .
Related Publications . . . . . . . . . . . . . . . . . . . . . . . . . . . . . . . . . . . . . .
Rockwell Software Supports KTx Cards. . . . . . . . . . . . . . . . . . . . . . .
Preface
Important User Information. . . . . . . . . . . . . . . . . . . . . . . . . . . . . . . . . . . ii
Adherence to European Union Directive Compliance . . . . . . . . . . . . . iii
EMC Directive . . . . . . . . . . . . . . . . . . . . . . . . . . . . . . . . . . . . . . . . iii
Low Voltage Directive . . . . . . . . . . . . . . . . . . . . . . . . . . . . . . . . . . iii
Table of Contents
3-1
3-2
3-3
3-4
3-5
3-5
1784-6.5.22 - Novmber 1999
Install the Diagnostics . . . . . . . . . . . . . . . . . . . . . . . . . . . . . . . . . . . . . A-2
Run the 1784-KTx Diagnostics for Windows NT . . . . . . . . . . . . . . . A-12
When Do I Run Diagnostics? . . . . . . . . . . . . . . . . . . . . . . . . . . . A-12
Troubleshooting the KTx Card . . . . . . . . . . . . . . . . . . . . . . . . . A-12
Error Message . . . . . . . . . . . . . . . . . . . . . . . . . . . . . . . . . . . . . . . . . . A-17
No KTx cards are detected . . . . . . . . . . . . . . . . . . . . . . . . . . . . . A-17
View the readme.txt file. . . . . . . . . . . . . . . . . . . . . . . . . . . . . . . . . . . A-18
Remove the Card’s Diagnostics in Windows NT . . . . . . . . . . . . . . . A-19
Appendix A
Run the 1784-KTx Card Diagnostics for Windows NT
1784-KTX Connections . . . . . . . . . . . . . . . . . . . . . . . . . . . . . . . . . . . 4-1
1784-KTS Connections . . . . . . . . . . . . . . . . . . . . . . . . . . . . . . . . . . . . 4-2
1784-KTXD Connections . . . . . . . . . . . . . . . . . . . . . . . . . . . . . . . . . . 4-2
Before You Begin . . . . . . . . . . . . . . . . . . . . . . . . . . . . . . . . . . . . . . . . 4-3
Connect the 1784-KTx Card to DH+ Devices . . . . . . . . . . . . . . . . . . 4-4
Connect the Card to a Classic PLC-5 Processor . . . . . . . . . . . . . . . . . 4-4
Connect the Card to an Enhanced PLC-5 Processor . . . . . . . . . . . . . . 4-6
Terminate the Last Node . . . . . . . . . . . . . . . . . . . . . . . . . . . . . . . . 4-7
Connect the Card to a Data Highway Plus Network . . . . . . . . . . . . . . 4-7
Evaluate 1784-KTx Card Connection Options . . . . . . . . . . . . . . . . . . 4-7
Connect the Card via a DH-485 Network . . . . . . . . . . . . . . . . . . . . . . 4-8
Connect the Card to an SLC 500 Processor. . . . . . . . . . . . . . . . . . . . . 4-9
Terminate the Last Node . . . . . . . . . . . . . . . . . . . . . . . . . . . . . . . 4-10
What to Do Next . . . . . . . . . . . . . . . . . . . . . . . . . . . . . . . . . . . . . . . . 4-10
Chapter 4
Connect the Interface Card
Before You Begin . . . . . . . . . . . . . . . . . . . . . . . . . . . . . . . . . . . . . . . .
The KTx Skirt Area . . . . . . . . . . . . . . . . . . . . . . . . . . . . . . . . . . . . . . .
Access the Computer’s Expansion Slots . . . . . . . . . . . . . . . . . . . . . .
E3 Jumper Sets Operating Mode . . . . . . . . . . . . . . . . . . . . . . . . . . . . .
Insert the Card . . . . . . . . . . . . . . . . . . . . . . . . . . . . . . . . . . . . . . . . . . .
What to Do Next . . . . . . . . . . . . . . . . . . . . . . . . . . . . . . . . . . . . . . . . .
Chapter 3
Install the Card Inside the Computer
ii
1784-6.5.22 - Novmber 1999
KTx Card and 6200 Software
for PLC-5 and PLC-5/250 Programmable Controllers . . . . . . . . . . . . C-1
KTX Card and 6200 Software
for PLC-2 Direct-connect and PLC-3 Direct-connect . . . . . . . . . . . . . C-1
Appendix C
Use the KTx Card with 6200 Software
When Do I Run Diagnostics? . . . . . . . . . . . . . . . . . . . . . . . . . . . . . . . B-1
Troubleshooting the KTx Card . . . . . . . . . . . . . . . . . . . . . . . . . . . . . . B-2
Install DOS Diagnostics to Your Hard Drive . . . . . . . . . . . . . . . . . . . B-3
Access Diagnostics . . . . . . . . . . . . . . . . . . . . . . . . . . . . . . . . . . . . . . . B-5
Start Diagnostics . . . . . . . . . . . . . . . . . . . . . . . . . . . . . . . . . . . . . . . . . B-7
Define a KTx Card to Test . . . . . . . . . . . . . . . . . . . . . . . . . . . . . . . . . B-8
Run M16 Tests . . . . . . . . . . . . . . . . . . . . . . . . . . . . . . . . . . . . . . . . . B-10
Test Your Computer . . . . . . . . . . . . . . . . . . . . . . . . . . . . . . . . . . . . . B-11
Test the KTx Card . . . . . . . . . . . . . . . . . . . . . . . . . . . . . . . . . . . . . . B-13
Test the Dual Port . . . . . . . . . . . . . . . . . . . . . . . . . . . . . . . . . . . . . . . B-15
Print the Log File . . . . . . . . . . . . . . . . . . . . . . . . . . . . . . . . . . . . . . . B-20
Appendix B
Run the 1784-KTx Diagnostics for DOS
iii
1784-6.5.22 - Novmber 1999
iv
Chapter 2
Chapter 3
Chapter 4
Appendix A
Appendix B
configure the card
install the card inside the computer
connect the card to devices and networks
run card diagnostics for Windows NT
run card diagnostics for DOS
1784-6.5.22 - November 1999
If you are missing any of these pieces, contact your Allen-Bradley sales
representative.
• one 3 1/2” 1784-KTx Diagnostics for Microsoft Windows NT diskette
• one 3 1/2” 1784-KTx Utility diskette containing the installation and
diagnostic programs, and the README.TXT file
• one 1784-KTx Communication Interface Card User Manual,
publication 1784-6.5.22
• one 1784-KTx communication interface card
With this package you should receive:
Contents of Your Order
In this document, we refer to the 1784-KTX, 1784-KTXD, and 1784-KTS cards
collectively as “1784-KTx card” or KTx card.” When one card differs from the
other, this document individually calls out the cards by name.
Refer to:
Procedure:
Use this document to install and use the 1784-KTX, 1784-KTXD, and 1784-KTS
Communication Interface Cards. This document introduces the cards and
outlines these procedures.
To the Installer
Preface
To the Installer
1784-6.5.22 - November 1999
• If the card is not in use, store it in the anti-static plastic-molded clamshell in
which it was shipped.
• Avoid touching the backplane connector or interface connector pins on the
1784-KTx card.
• Before handling the card touch a grounded object to discharge any built-static
charge.
Take these precautions to guard against ESD damage:
!
ATTENTION: The NetLinx 1784-KTx card uses CMOS technology,
which is highly sensitive to electrostatic discharge (ESD). ESD may be
present whenever you are handling the card. Handling the card without any
ESD protection can cause internal circuit damage that may not be apparent
during installation or initial use.
Handle the Card
If you are missing either of these pieces, contact your Allen-Bradley/Rockwell
Automation sales representative.
• one 1784-KTx Communication Interface Card User Manual, publication
1784-6.5.22
• one 1784-KTS communication interface card
With the 1784-KTS package, you should receive:
The contents of your order will differ slightly from what is listed on page P-1 of
the user manual. 1784-KTS customers do not receive the utility disk.
If you ordered a 1784-KTS Interface Card
P-2
P-3
10 - 60 Hz, constant 0.012 in displacement
30 G peak for 11 ± 1 ms
50 G peak for 11 ± 1 ms
600 mA @ 5V dc
3.15 W
20 mA @ =12V dc 240 mW
20 mA @ -12V dc 240 mW
Vibration
Operational shock
Non-operational shock
Power dissipation (for the 1784-KTXD)
1784-6.5.22 - November 1999
For Windows applications screen displays and prompts are shown as screen and
button captures:
We use these conventions in this manual:
Conventions
•
Marked for all applicable directives
5 - 95% without condensation
Relative humidity
•
-40 to 85ºC (-40 to 185ºF)
Non-operational slot temperature
Agency Certification
(when product or pacakge is marked)
0 to 60ºC (32 to 140ºF)
Operational slot temperature
The operation parameters describe the environment within the KTx slot. Refer to
the documentation for your computer for environmental requirements. The KTx
card should not exceed those specifications.
Specifications
To the Installer
To the Installer
Press ENTER to continue with the installation
Preface
Preface
Chapter 1
Appendix A
how to handle the card
Rockwell Software support
supported features
diagnostics for Windows NT
1784-6.5.22 - November 1999
We use revision bars to call your attention to new or revised information.
A revision bar appears as a thick black line on the outside edge of the
page as indicated here.
Revision Bars
Is in:
Information on:
Several additions and changes to the KTx card and software information
have been made. The additions and changes to this manual include:
Summary of Changes
a:\install c:
• Text that you type is shown as:
• F10
•
For DOS applications screen displays and prompts are shown as screen captures
and text instructions.
P-4
P-5
1784-6.5.20
1784-6.5.21
1784-2.41
1784-2.44
1784-2.45
1784-2.43
1784-2.42
1770-6.2.2
1784-KTx Scanner Reference Manual
1784-KTx Dual-port Reference Manual
1784-CP12 Cable Packing Data
1784-CP13 Cable Packing Data
1784-CP14 Cable Packing Data
1784-CP15 Cable Packing Data
1784-CP16 Cable Packing Data
Data Highway/Data Highway Plus/Data Highway II/ Data
Highway-485 Cable Installation Manual
www.ab.com - for non-registered members
www.ab.com/mem/technotes/techmain.html - registered
members
440.646.5436 - requires a touch-tone telephone
440.646.5800 - For post-sales support and information on which
Rockwell Software products support the KTx card.
Internet Web Site
Autofax System
Rockwell Software
Customer Support
1784-6.5.22 - November 1999
Access at
Technical Support
Rockwell Software Supports KTx Cards
Pub. No.
Publication Title
Related Publications
We recommend that you make one copy of each worksheet for each KTx card or
channel (1784-KTXD). See Chapter 2.
Worksheet Tables
To the Installer
To the Installer
1784-6.5.22 - November 1999
P-6
1
2
1
1784-KTXD
1784-KTS
(3)
(2)
DH+ and/or
DH-485(2)
PLC-2 and PLC-3
direct-connect(1)
DH+ or DH-485
Active node on
these networks:
Available in version 4.5 or later
Available only on channel 1
Available via 6200 Series software
1
1784-KTX
(1)
# of
channels:
KTx card
catalog #:
Table 1.A Features supported by KTx cards
yes
yes
yes
Acts as remote
I/O scanner:
Table 1.A shows the 1784-KTx card features.
1784-KTx Scanner
Reference Set
1784-KTx Scanner
Reference Set
6200 Series(3)
INTERCHANGE™
AI
RS Logix5 and RSLogix
500 via RSLinx
1784-6.5.22 - November 1999
•
•
•
•
•
•
Supported by this
Allen-Bradley software:
Important: You must not place this card in an 8-bit expansion slot. Improper
operation and damage to the card will result.
Your 1784-KTx communication interface card (cat. nos. 1784-KTX,
1784-KTXD, and 1784-KTS) is an ISA half-sized card that must be inserted into
a 16-bit ISA or EISA expansion slot.
Introduction to the 1784-KTx
Communication Interface Cards
Chapter
Introduction to the 1784-KTx Communication Interface Cards
1784-6.5.22 - November 1999
Chapter 2 tells you how to configure the card hardware.
What to Do Next
Important: Although the 1784-KTXD has two channels, you cannot use the
card to directly bridge between two networks.
Remember to set the base memory address on the KTx card so that it does not
interfere with selected addresses of other expansion cards in your computer. On
dual-channel cards, set two addresses.
Allen-Bradley interface software (including RSLogix via RSLinx, AI, 6200, and
INTERCHANGE) manages data transmission and reception through dual-port
memory.
The 1784-KTx performs data transmission, management, and local network
diagnostics. The interface to the host processor is through a board-resident
dual-port memory.
The 1784-KTS card acts only as a remote I/O scanner.
• act as a remote I/O scanner
• communicate with SLC™ processors on DH-485 networks
• communicate with nodes on Data Highway networks, including PLC-2®,
PLC-3®, and on Data Highway Plus networks, including PLC-5®,
and SLC 5/04 processors, and SLC 5/01™, SLC5/02, and SLC 5/03
processors (only via 1784KA5)
The 1784-KTX and -KTXD cards:
How the 1784-KTx Card Operates
1-2
2
D700:
D600:
1
1
2
1784-KTX
1784-KTXD
D700:
D700:
1
1784-KTS
Address
Channel
Catalog Number
The 1784-KTx cards come set to memory address(es):
1784-6.5.22 - November 1999
The host computer and the KTx card exchange data via a dual-port interface. The
dual-port interface requires 4 Kbytes of memory (2 Kbytes for dual-port and 2
Kbytes for the rest of the interface). It begins at the specified base memory
address location. You must select an area where there is at least a 4 Kbyte
memory block available. If you have MS-DOS 6.0 or later, use the memory
option in Microsoft Diagnostics (MSD) to identify available memory.
Select the Base Memory Address Location
• card’s interrupt setting
• base memory address - the card’s physical addresses for the expansion
memory area of the host processsor’s system memory, that enables the KTx
card and the host computer to exchange data through the dual-port interface
Before you install the KTx card inside your computer, you must set the:
Configure the Card Hardware
Chapter
!
If another card or channel is already using a channel’s default
memory address, you must pick a new address for the channel.
Each channel on each card must have a separate and unique
address.
ATTENTION: If you have a two-channel card, you must set the base
addresses to different values—each channel must have a unique address.
Setting the base addresses to the same address can damage the KTx card.
Configure the Card Hardware
1784-6.5.22 - November 1999
B. Use Table 2.B on page 2-4 to determine which addresses are available for
the KTx card channel(s).
A. Use Table 2.A on page 2-3 to determine the recommended memory
address settings for your Allen-Bradley products.
1. Determine addresses for the channel(s) on your KTx card.
To configure the base memory address, you turn rotary switches on the
1784-KTx card.
Important: If you have a 386, 486, or Pentium host computer, you must find a
way to disable caching and shadow memory for at least the 4K of
memory space occupied by the KTx. This can usually be
accomplished through your CMOS set-up program or memory
manager, and must be done before running application with the
KTx card.
Important: When selecting configuration settings, check for conflicts with
other interface cards and system memory. If there is a conflict, the
system will not operate properly. To avoid the conflict, you must
change the base address of the channel via rotary switch settings to
an open memory address.
2-2
D700:
D600:
2
DC00:
2
1
DD00:
DC00:
2
1
DD00:
D200:, D600:, or DA00:
2
1
D300:, D700:, or DB00:
D600:
2
1
D700:
1
C400:
2
2-3
1784-6.5.22 - November 1999
Important: Verify within the 6155 workstations bios that any memory
shadowing is disabled to prevent conflict with the dual port
memory of the KTx.
6155 Workstations
6181 Workstations
6180 Workstations
T60 Industrial Workstations
T53 Industrial Programming Terminal
C300:
1
CC00:
2
1784-T50
CB00:
1
1784-T35
Recommended Memory Location
Channel #
Equipment
Table 2.A Recommended memory address settings
Configure the Card Hardware
Configure the Card Hardware
128K Read/Write Memory
Expansion in I/O Channel
Video Buffer
Expansion Card Area
8000:0000-09000:FFFF
A000:0000-C700:0FFF
C800:0000-
Unavailable for KTx
10000:0000-FF000:FFFF
Your System:
SW2
1784-6.5.22 - November 1999
SW1
Channel 2
For example:
D700:0000 =
D
SW3
Channel 1
7
SW4
Remember that switches 1 and 3 represent the high order digits and that
switches 2 and 4 represent the low order digits.
2. Record your selection(s) in Table 2.C on page 2-5.
128K ROM Reserved on
System Board
White areas are available for
KTx card
E000:0000-F000:FFFF
D700:0000-
D300:0000-
CF00:0000-
521 Read/Write Memory on
System Board
0000:0000-07000:FFFF
(Area Available for KTx
Memory Addresses)
Typical PC Assignments:
System Memory Address:
Table 2.B System Memory Allocation
2-4
No
SW3
SW4
If no, new memory
address:
Channel 2
Using default address: Yes
Slot number
Card:
No
SW2
2-5
1784-6.5.22 - November 1999
SW1
Record the base memory address for the 1784-KTx card’s channel 2:
If no, new memory
address:
Channel 1
Using default address: Yes
Slot number
Card:
Record the base memory address for the 1784-KTx card’s channel 1:
Table 2.C Address Selections
Configure the Card Hardware
Configure the Card Hardware
SW1
789A
SW2
789A
INTERRUPTS
CH2 CH1
3456
D
B
Channel 2 address
shown in DB00: position
01
EF 2
BCD
1784-6.5.22 - November 1999
3456
BCD
01
EF 2
Your switches might
resemble the
switches shown here.
3456
01
EF 2
3456
789A
BCD
01
EF 2
789A
3456
789A
789A
Channel 1
SW3 SW4
3456
Channel 2
SW1 SW2
SW3
789A
3456
3456
SW4
789A
turn the knobs to reflect the address(es) from
Table 2.C on page 2-5
go to the next section, Selecting the Interrupt
Setting
use the card’s default memory address
settings shown on page 2-1
BCD
01
EF 2
set a new base memory address
Then:
If you need to:
3. Use the decision table below.
2. Remove the 1784-KTx card from the anti-static clamshell.
1. Follow the card handling instructions on page P-2.
To set the card’s switches, follow these steps:
!
ATTENTION: When you set the switches, be certain to avoid touching
other components on the card.
Set the Card’s Switches
2-6
BCD
D
7
Channel 1 address
shown in D700: position
01
EF 2
BCD
01
EF 2
BCD
01
EF 2
42069
BCD
2-7
1
1
1784-KTX
1784-KTXD
2
1
Channel
1784-KTS
Catalog Number
no interrupt
Interrupt
The 1784-KTx cards are set to these interrupt(s):
About KTx Interrupts
1784-6.5.22 - November 1999
Important: When selecting configuration settings, check for conflicts with
other interface cards and system memory. If there is a conflict, the
system will not operate properly. To avoid the conflict, select a
unique interrupt setting for each channel. If another card is already
using a channel’s default interrupt, you must pick a new interrupt
for the channel.
Important: If you need to use the KTx as a remote I/O scanner within a
SoftLogix5 system, you must set an interrupt for the scanner
channel
Select the Interrupt Setting
Configure the Card Hardware
CH1
3
4
5
7
9
10
11
12
15
30555
1784-6.5.22 - November 1999
Important: If you are using the “no interrupt” setting, you must place the
jumper vertically over two pins on the right-side row as shown.
This way you can save the jumper for future use. Placing the
jumper on the left-side row will cause interrupt problems on the
motherboard.
3
4
5
7
9
10
11
12
15
CH2
CH1
move the jumper to the new interrupt
location(s) (as entered on Table 2.E,
page 2-10)
setting new interrupts
CH2
go to the next section, Installing the Card
Inside the Computer
using the card’s default interrupt settings, i.e.,
no interrupt
INTERRUPTS
Then:
Configure the Card Hardware
If you are:
2-8
Timer Output
Keyboard (Output Buffer Full)
Interrupt from Controller 2
Serial Port 2
Serial Port 1
Parallel Port 2
Diskette Controller
Parallel Port 1
Real-time Clock Interrupt
Software Redirected to INT
0AH (IRQ2)
Available
IRQ0
IRQ1
IRQ2
IRQ3
IRQ4
IRQ5
IRQ6
IRQ7
IRQ8
IRQ9
IRQ10
Fixed Disk Controller
Available
IRQ14
IRQ15
Your System
2. Record your selection(s) in Table 2.E
2-9
1784-6.5.22 - November 1999
Note: White areas are available for KTx card if you disable the function within the PC’s BIOS.
Co-processor
IRQ13
IRQ12
IRQ11
Assignments
Interrupts
Table 2.D Host Computer IRQ Assignments
Important: If you are using the KTx for remote I/O scanner emulation, you
must set an interrupt for the scanner channel.
1. Determine the interrupt(s) for the channel(s) on your KTx card. Use
Table 2.D to determine which interrupts are available for the KTx card
channel(s).
Configure the Card Hardware
Configure the Card Hardware
Yes
No
1784-6.5.22 - November 1999
If no, new interrupt:
Using default address:
Slot number
Card:
Yes
No
3
4
5
7
9
10
11
12
15
Record the interrupt setting for the 1784-KTx card’s channel 2:
If no, new interrupt:
Using default address:
Slot number
Card:
Record the interrupt setting for the 1784-KTx card’s channel 1:
3
4
5
7
9
10
11
12
15
CH2
CH1
Important: If you are using the “no interrupt” setting, you must place the
jumper vertically over two pins on the right-side row as show on
page 2-7. This way you can save the jumper for future use. Placing
the jumper on the left-side row will cause interrupt problems on the
motherboard.
Table 2.E Jumper Settings
2-10
2-11
Link Baud Rate
INI
FCh = 57.6 Kbaud
FEh = 230.4 Kbaud
R.........W
1784-6.5.22 - November 1999
Chapter 3 tells you how to install the card inside your computer.
What to Do Next
Important: Check the product documentation for your RSI communication
software to see if the product supports 230k baud rate.
:0007h
Host writes a valid
value (KTx baud
rate) to
byte:00007h. KTx
reads at start-up.
Note this update to the KTx dualport memory map for DH+, which is
documented in publication 1784-6.5.21
Allen-Bradley has added 230k baud rate enhancements to the DH+™ firmware of
the KTx.
New DH+™ Specification - Link Baud Rate
Configure the Card Hardware
Configure the Card Hardware
1784-6.5.22 - November 1999
2-12
3
• Phillips-head screwdriver
• flat-head screwdriver
1784-6.5.22 - November 1999
You need one of these tools to remove the cover from your central processing
unit (CPU):
Where’s Your Screwdriver?
Consult your computer’s documentation for specific information.
• configure the computer’s options before you install the 1784-KTx
• install hardware into your computer’s expansion slots
Be certain that you know how to:
On the Right Track?
• Do I know everything I need to know to accomplish my task?
• Do I have the proper tools at hand?
• Do I understand where I can and can’t put this card?
Consider these points before you begin:
Before You Begin
You’ve set the memory addresses and interrupts; you’re ready to place the KTx
card inside your computer.
Install the Card Inside the Computer
Chapter
Install the Card Inside the Computer
3456
01
EF 2
BCD
3456
1784-6.5.22 - November 1999
INTERRUPTS
CH2 CH1
789A
789A
SW3
3456
SW2
BCD
01
EF 2
789A
BCD
789A
SW4
Computer motherboard
Interference between the KTx card
and improperly placed
components on the motherboard.
01
EF 2
SW1
Figure 3.1 How Mechanical Interference Occurs
Skirt area
KTx card
42073
Important: As shown in Figure 3.1, placing the card in certain computers may
cause mechanical interference with improperly placed components
on the motherboard of the computer. Be certain to position the card
away from components that can touch the KTx’s skirt area.
The KTx Skirt Area
3-2
3456
01
EF 2
BCD
3-3
1784-6.5.22 - November 1999
5. Remove the rear bracket slot’s expansion cover by loosening the screw on the
back of the computer.
Important: The 1784-KTx will function only in a 16-bit ISA or EISA
expansion slot.
4. Select a vacant 16-bit ISA or EISA expansion slot.
3. Remove the computer’s CPU cover (according to the manufacturer’s
instructions).
Important: If you disconnect the ac power from the computer, you lose the
chassis ground. Electrostatic damage (ESD) protection is lost.
2. Turn off power to the computer.
1. Shut down and halt the host computer.
To install the KTx card, you must have access to the computer’s bus. Refer to
your computer’s hardware manual for instructions about how to:
Access the Computer’s Expansion Slots
Install the Card Inside the Computer
Install the Card Inside the Computer
pins 1 and 2, the two right-most pins
8-bit
1784-6.5.22 - November 1999
*Shipped from the factory in default 16-bit mode
pins 2 and 3, the two left-most pins
1
16-bit*
32
Jumper these pins:
E3
Channel 1
SW3 SW4
To set this mode:
INTERRUPTS
CH2 CH1
Channel 2
SW1 SW2
30142
Important: You must place the card in a 16-slot connector regardless of the
chosen mode of operation. Eight-bit mode is included only as a
fall-back in case of system issues with 16-bit operation; you should
run the card in 16-bit mode.
The E3 jumper sets the card to 8- or 16-bit mode.
E3 Jumper Sets Operating Mode
3-4
3-5
1784-6.5.22 - November 1999
Chapter 4 tells you how to connect the KTx card to various networks and devices.
What to Do Next
11. Replace CPU cover.
10. Turn off power to the computer.
If it does not come up correctly, you may have to change the switch settings.
When the unit comes up correctly, go to step 10.
9. Be certain that the KTx settings are compatible with the application
software program.
8. Activate the application software.
7. Run the appropriate version (DOS or NT) of the KTx diagnostics from the
appropriate disk now. For instructions on installing the Windows NT
diagnostic see Appendix A and see Appendix B for the DOS diagnostic.
6. Restore power to the computer.
5. Insert the KTx card into the edge connector and tighten the expansion slot
screw on the KTx ORB.
4. Loosen the expansion slot screw and remove shield outside retaining bracket
(ORB),
Important: If you disconnect the ac power from the computer, you lose the
chassis ground. Electrostatic damage (ESD) protection is lost.
3. Turn off power to the computer.
2. Be certain that you have set correctly all of the switches and jumpers on the
card. See Chapter 2.
1. Follow the instructions on how to handle the card on page P-2.
To insert the card inside the computer:
Insert the Card
Install the Card Inside the Computer
Install the Card Inside the Computer
1784-6.5.22 - November 1999
3-6
1784-KTX
Connections
2
1
1784
KTX
6
C
H 3
1 4
C
5
C
H
1
B
C 3
H
1 2
A 1
• DH+ networks
- classic PLC-5 processors
- enhanced PLC-5 processors
- SLC 5/04 processors
- ControlLogix DH+/RIO
3. Blue
2. Shield/Drain
1. Clear
DH+
42035
4
1784-6.5.22 - November 1999
6. Termination Resistance
5. Channel A
4. Channel B
3. Signal Ground
2. Shield/Drain
1. Earth Ground
Use the PLC-2 or PLC-3 direct-connect cable
(1784-CP15 and 1784-CP16 respectively)
3. Clear
2. Shield/Drain
1. Blue
Remote I/O
• DH-485 networks
- selected SLC 500 processors
- remote I/O networks acting
a scanner
You can connect the KTx card to these networks and devices:
Connect the Interface Card
Chapter
Connect the Interface Card
1. Clear
3. Blue
2. Shield/Drain
1. Clear
1. Blue
3. Clear
2. Shield/Drain
1. Blue
42134
6. Termination Resistance
5. Channel A
4. Channel B
3. Signal Ground
2. Shield/Drain
1. Earth Ground
2. Shield/Drain
2. Shield/Drain
DH+
3. Blue
3. Clear
Remote I/O
1784-6.5.22 - November 1999
1784
KTXD
6
2
C
H 3
1 4
C
5
1
C 3
H 2
2 1
C 3
H
1 2
A 1
1784-KTXD Connections
1784-KTS Connections
4-2
1784
KTS
C 3
H
1 2
A 1
42133
1. Blue
2. Shield/Drain
3. Clear
Remote I/O
4-3
1784-CP13
1784-CP14
1784-CP15
1784-CP-16
BELDEN #9842 (1) (2)
1770-CD (1) (3)
PLC-5/11, -5/20, -5/30, -5/40, -5/60, -5/80, and -5/VME
(1784-V40) enhanced programmable controllers
SLC 5/04 processors
SLC 500 processors
PLC-2 direct connect
PLC-3 direct connect
DH-485
remote I/O / DH+
Mating Connector: A-B PN 941999-03 or Phoenix Order No. 1849396
Mating Connector: A-B PN 94199-06 or Phoenix Order No. 1849406
Number:
1784-2.41
1784-2.44
1784-2.45
1784-2.43
1784-2.42
Publication:
1784-CP12 Cable Packing Data
1784-CP13 Cable Packing Data
1784-CP14 Cable Packing Data
1784-CP15 Cable Packing Data
1784-CP16 Cable Packing Data
1784-6.5.22 - November 1999
For additional cable information, see these Allen-Bradley publications:
(3)
(2)
Cables used for construction of custom cables
1784-CP12
PLC-5/10, -5/12, -5/15, -5/25, -5/VME (6008-LTV) and
PLC-5/250 classic programmable controllers
(1)
Use cable with
catalog number:
For:
Before you make the connections, be certain that you have the correct cables.
This table lists the cables for various programmable controllers and processors:
Before You Begin
Connect the Interface Card
Connect the Interface Card
1784-6.5.22 - November 1999
10.5 ft
(3.2 m)
3-pin Phoenix connector with
switchable termination resistor
1784-CP12 cable
9-pin D-shell connector
42135
2. Connect the 3-pin Phoenix end of the CP12 cable to the KTx card.
Important: If you disconnect the ac power from the computer you loose the
chassis ground. Electrostatic damage (ESD) protection is lost.
1. Turn off power to the computer.
To connect the 1784-KTX or-KTXD card to a classic PLC-5 processor, follow
these steps:
Connect the Card to a Classic PLC-5 Processor
In your application, you may need to use the KTx card to communicate with a
single device or multiple DH+ devices via a DH+ network. This section shows
you how to connect to a classic or an enhanced PLC-5 processor.
Connect the 1784-KTx Card to DH+ Devices
4-4
4-5
4. Restore power to the computer.
Peer Communication
Interface Connector
1784-CP12 Cable
1784-KTx Card
1784-6.5.22 - November 1999
18341
PLC-5 Family Processor
3. Connect the 9-pin D-shell end directly to the 9-pin D-shell connector on the
front of the classic PLC-5 processor.
Connect the Interface Card
Connect the Interface Card
10.5 ft
(3.20 m)
42137
3-pin Phoenix connector with
switchable termination resistor
1784-6.5.22 - November 1999
For additional information about the 1784-CP7 adapter, refer to publication
1784-2.29, the CP7 Adapter Installation Data.
1784-CP12 cable
9-pin D-shell connector
1784-CP7 adapter
3. Connect the adapter to the connector on the front of the enhanced
PLC-5 processor.
2. Connect the 9-pin D-shell connector to the CP7 adapter.
1. Connect the 3-pin Phoenix end of the CP12 cable to the KTx card.
To connect the 1784-KTX or -KTXD card to an enhanced PLC-5 processor, use
a 1784-CP12 cable and a 1784-CP7 adapter. Follow these steps:
Connect the Card to an Enhanced PLC-5 Processor
4-6
4-7
Figure 4.1 and Figure 4.2 illustrate these applications.
1784-6.5.22 - November 1999
• a single SLC 500 via a point-to-point DH-485 link (page 4-9)
• multiple DH-485 stations (for example, SLC 5/0x programmable controllers)
via the DH-485 network (page 4-8)
In your application, you may need to use the 1784-KTx card to
communicate with:
Evaluate 1784-KTx Card Connection Options
Important: You must terminate the last physical node of the network with a
resistor of appropriate value.
To connect the 1784-KTX or -KTXD card to a Data Highway Plus network, use
Allen-Bradley 1770-CD or approved cable to construct custom cable.
42138
node not terminated
Connect the Card to a Data Highway Plus Network
3-pin Phoenix connector with
switchable termination resistor
node terminated
You must terminate both ends of your DH+ network. If the KTx is the last
physical node on your network, you must set the switch on the CP12 to terminate
the link as shown below.
Terminate the Last Node
Connect the Interface Card
Connect the Interface Card
1784-6.5.22 - November 1999
To
1784-KTx Card
Communication Cable
Belden #9842
1747-C11
Link
Coupler
1747-AIC
1747-C11
Link
Coupler
1747-AIC
1747-C11
Link
Coupler
1747-AIC
Figure 4.1 Communicate to multiple SLC 500s via the DH-485 network
42139
SLC 500 Controller
SLC 500 Controller
SLC 500 Controller
• The communication cable consists of three segments of cable daisy-chained
at each link coupler.
• The 1784-KTX or -KTXD card is connected to the network at one of the link
couplers, as shown in Figure 4.1.
• An SLC 500 CPU is connected to each of the link couplers (1747-AIC) with a
1747-C11 cable.
Figure 4.1 shows an example of a network consisting of three SLC 500
controllers and one programming station. This configuration requires the
1784-KTX or -KTXD card and three link couplers:
Connect the Card via a DH-485 Network
4-8
4-9
1784-CP14 Cable
To the 1784-KTx Card
42140
SLC 500 Controller
10.5 ft
(3.20m)
6-pin Phoenix connector with
switchable termination resistor
42141
1784-6.5.22 - November 1999
1784-CP14 cable
RJ-45 connector
2. Connect the RJ-45 connector directly to the phone-jack connector on the front
of the SLC processor.
1. Connect the termination resistor end of the CP14 cable to the KTx card.
To connect an SLC family processor to the KTx card, you:
Personal
Computer
Figure 4.2 Communicating to a single SLC 500 using a point-to-point DH-485 link
Figure 4.2 shows an example of a point-to-point link consisting of an SLC 500
processor and a programming station. This configuration requires the 1784-KTX
or -KTXD card and an SLC 500 processor. The SLC 500 CPU is connected
directly to the 1784-KTX or -KTXD card with a 1784-CP14 cable, as shown.
Connect the Card to an SLC 500 Processor
Connect the Interface Card
Connect the Interface Card
node not terminated
42142
1784-6.5.22 - November 1999
If you have read each chapter, completed the worksheets, run diagnostics, and
still have questions, please call Rockwell Automation Technical Support at
440.646.5800.
What to Do Next
Refer to publication 1770-6.2.2, Data Highway/Data Highway Plus/Data
Highway II/Data Highway-485 Cable Installation Manual, for additional
information about cable issues.
6-pin Phoenix connector with
switchable termination resistor
node terminated
You must terminate both ends of your DH+ network. If the KTx is the last node
on your network, you must set the switch on the CP14 to terminate the link as
shown below.
Terminate the Last Node
4-10
A
1784-6.5.22 - November 1999
The Windows NT diagnostics support the 1784-KTX, -KTXD, and -KTS cards at
all addresses. It also supports the 1784-PKTX, -PKTXD, and -PKTS cards but
only if the cards jumper is set to memory addresses below 1 megabyte.
Important: The 1784-KTS card will not run the dual-port test. It will attempt to
run and fail.
Read this chapter to learn how to operate the 1784-KTx card on Windows NT.
Read the following before you install your 1784-KTx card.
Run the 1784-KTx Card Diagnostics
for Windows NT
Appendix
Run the 1784-KTx Card Diagnostics for Windows NT
1784-6.5.22 - November 1999
2. Install the 1784-KTx card into your computer by following the card
installation instructions in Chapter 3.
1. Start the install process with your machine off.
Follow the procedure below to install the 1784-KTx diagnostics
for Windows NT.
• We recommend running Windows NT 4.0 with Service Pack 3 or later, but it
is not required.
Important: Before you can install the diagnostics for the 1784-KTx card, you
must be logged in as an administrator of the machine or have
administrator privileges. Being an administrator gives you
permission to install or make changes to the machine software. If
you try to install the driver without being an administrator, you will
get error messages and the diagnostics will not install.
Be aware of the following important points before installing the Windows
NT diagnostics for 1784-KTx card.
Install the Diagnostics
A-2
A-3
The Run dialog box appears.
5. Access the Run window by selecting:
1784-6.5.22 - November 1999
Important: We strongly recommend that you exit all Windows programs
before running this utility. We cannot guarantee that data will not
be lost.
4. Insert the installation diskette into the floppy disk drive.
Important: Remember, in order for the installation process to run correctly,
you must have (administrator) privileges to install the software.
3. Turn your machine on and logon as an administrator.
Run the 1784-KTx Card Diagnostics for Windows NT
Run the 1784-KTx Card Diagnostics for Windows NT
.
1784-6.5.22 - November 1999
Please wait until InstallShield is finished.
7. Click
6. Type the path a:\setup.exe.
Substitute a:\ for the drive of your floppy disk, i.e b:\.
A-4
9. Click
to continue with the install.
A-5
1784-6.5.22 - November 1999
8. Read the information and decide either to continue or to cancel.
Run the 1784-KTx Card Diagnostics for Windows NT
Run the 1784-KTx Card Diagnostics for Windows NT
1784-6.5.22 - November 1999
10. To accept agreement and continue, click
You see:
A-6
.
if you have administrator permissions.
and
A-7
1784-6.5.22 - November 1999
see if the install process continues and go to Step 10. If the process does not
continue you don’t have administrator permissions, contact your Systems
Administrator.
If you don’t know if you have administrator permissions, click
11. Click
You see:
Run the 1784-KTx Card Diagnostics for Windows NT
Run the 1784-KTx Card Diagnostics for Windows NT
1784-6.5.22 - November 1999
.
to accept the default location (recommended). If
you would like to change the destination folder, click
13. Click
12. Now you have the opportunity to choose the destination of the
software.
A-8
A-9
15. Click
to accept the default.
1784-6.5.22 - November 1999
14. After you choose to select the default destination. Select a program
folder. The default is displayed. If you choose not to use the default,
click on the folder you created or assigned in the previous window.
Run the 1784-KTx Card Diagnostics for Windows NT
Run the 1784-KTx Card Diagnostics for Windows NT
to end the install process.
1784-6.5.22 - November 1999
16. Click
and:
The install process is very fast. You will see a couple small windows appear and
disappear quickly. When the installation process is over you see:
A-10
A-11
1784-6.5.22 - November 1999
Important: You must reboot before this program will be able to run.
17. Decide whether or not you want to reboot now
or later and click
.
You see:
Run the 1784-KTx Card Diagnostics for Windows NT
Run the 1784-KTx Card Diagnostics for Windows NT
1784-6.5.22 - November 1999
4. If you have followed the directions for correcting errors on page A-17 and
still have an error, call Rockwell Automation Customer Support at
440.646.5800.
3. If you receive a “No KTx cards are detected” error message see page A-17 for
error message explanation.
2. Continue with the instructions in this appendix to run the diagnostics to
determine if there are any hardware failures.
1. If you changed the default settings for the KTx card, check and correct the
configuration. You may have configured the KTx card at an address already
in use by another module.
If your KTx card is not functioning properly, follow these steps:
Troubleshooting the KTx Card
• remote I/O scanner is unable to communicate with adapters
• you are unable to communicate with the PLC processor
• you want to test if you have set up the KTx card correctly
• you just installed the KTx card
Run KTx diagnostics if:
When Do I Run Diagnostics?
Important: The 1784-KTS card will not run the dual-port test. The test will
attempt to run and fail.
This section contains instructions for you to run 1784-KTX, -KTXD, and KTS
diagnostics, which check network and host communications, interrupts, and
memory access.
Run the 1784-KTx Diagnostics for Windows NT
A-12
A-13
4. Select KTXDIAG.EXE.
3. Select Rockwell Automation.
2. Select Programs.
1. Select Start.
1784-6.5.22 - November 1999
Follow these instructions to run the KTx diagnostic tool for Windows NT:
Run the 1784-KTx Card Diagnostics for Windows NT
Run the 1784-KTx Card Diagnostics for Windows NT
1784-6.5.22 - November 1999
You see:
5. Type the number of the card that you need to test.
You see:
A-14
A-15
If
1784-6.5.22 - November 1999
– for bad cable or wiring. Check cable pinouts and press any key to
continue.
– that the baud rate is not mismatched (this utility only allows 57.6
kbaud)
– that the KTx DH+ node is unique (this utility only allows the KTx
to be at node 77)
7. Review the information and if you are connected to a DH+ network and you
only see one active node then you will want to check:
When you load the protocol, you see:
– No displays the previous menu.
– Yes displays the protocol.
6. Decide whether or not you want to load and view the network protocol
(network who).
Run the 1784-KTx Card Diagnostics for Windows NT
Run the 1784-KTx Card Diagnostics for Windows NT
1784-6.5.22 - November 1999
8. Either exit or continue to test other cards installed.
You see:
A-16
A-17
incorrect seating in the card slot
1784-6.5.22 - November 1999
Follow the card installation instructions in Chapter 3 and try the diagnostics
again. If you continue to get this error, call Rockwell Automation Customer
Support at 440.646.5800.
•
Follow the instructions in Chapter 2 and try the diagnostics again. If you
continue to get this error, call Rockwell Automation Customer Support at
440.646.5800.
• it did not get the resources you assigned to the card
• unavailable base memory address settings
Reasons that the diagnostic tool did not detect your card:
If you receive this message, no cards were found installed in your computer.
No KTx cards are detected
The following error message can occur when you run the diagnostics tool.
Error Message
Run the 1784-KTx Card Diagnostics for Windows NT
Run the 1784-KTx Card Diagnostics for Windows NT
1784-6.5.22 - November 1999
Please view the readme.txt for additional information.
View the readme.txt file
A-18
A-19
4. Click
.
1784-6.5.22 - November 1999
3. Click on KTX Diagnostic to select the program.
2. Double-click the Add/Remove Programs icon.
1. Access the Control Panel by selecting Start/Settings/Control Panel, or
go to My Computer and double click on Control Panel.
You can access the uninstaller through Windows NT’s Add/Remove programs
applet to remove the card’s drivers from your system.
We recommend uninstalling the diagnostics program after you have verified your
card’s operation.
Remove the Card’s Diagnostics in Windows NT
Run the 1784-KTx Card Diagnostics for Windows NT
1784-6.5.22 - November 1999
6. Close the Control Panel.
to remove the diagnostics from your computer.
Run the 1784-KTx Card Diagnostics for Windows NT
5. Click
You see:
A-20
B
1784-6.5.22 - November 1999
• remote I/O scanner is unable to communicate with adapters
• you are unable to communicate with the PLC processor
• you want to test if you have set up the KTx card correctly
• you just installed the KTx card
Run KTx diagnostics if:
When Do I Run Diagnostics?
Important: The 1784-KTS card will not run the dual-port test, i.e., it will
attempt to run and fail.
This appendix contains instructions for you to run 1784-KTX, -KTXD, and KTS
diagnostics, which check network and host communications, interrupts, and
memory access.
Run the 1784-KTx Diagnostics for DOS
Appendix
Run the 1784-KTx Diagnostics for DOS
1784-6.5.22 - November 1999
F10
Dual-port Tests
F7
KTx Card Test
F5
Computer Host Tests
F4
M16 Tests
F3
Define a card to test
F2
start diagnostics
F1
access diagnostics
copy KTx diagnostics
onto your hard disk
Start
Exit
F10
2. Continue with the instructions in this chapter to run the diagnostics to
determine if there are any hardware failures (see pages A-4 through A-20).
1. If you changed the default settings for the KTx card, check and correct the
configuration. You may have configured the KTx card at an address already
in use by another module.
If your KTx card is not functioning properly, follow these steps:
Troubleshooting the KTx Card
B-2
B-3
Install diagnostics to C:. . .
4. Select:
You see:
install c
3. Type:
a:
2. Type:
1. Insert the utility disk in drive A.
1784-6.5.22 - November 1999
Install the diagnostic files with the installation program on the KTx Utility Disk,
which came in the box with your KTx card.
Install DOS Diagnostics to Your Hard Drive
4. Call Rockwell Automation Customer Support at 440.646.5800. Instructions
are printed at the beginning of the log file.
3. If you received any failures, print the log file (see page B-20)
Run the 1784-KTx Diagnostics for DOS
Run the 1784-KTx Diagnostics for DOS
1784-6.5.22 - November 1999
You see the DOS prompt.
Exit
6. Select:
You see the Select Option screen.
Enter
5. Press:
Important: In some instances, the status bar does not reach 100% even though
all of the appropriate files have been copied.
You see:
B-4
-m
-h
-?
are using a monochrome monitor
want to see this list of options
1784-6.5.22 - November 1999
-l
Add this to the ktxdiag command:
don’t want to create a KTXDIAG.LOG file
If you:
and press Enter.
ktxdiag
and press Enter.
cd c:\ktxdiag
At the MS-DOS prompt, type:
!
B-5
ATTENTION: You can run diagnostics on only one card or channel
(1784-KTXD) at a time. If you run diagnostics using a memory address
that is incorrect, the computer may lock up. Be certain to run diagnostics
using the correct address setting (see page 2-4 for the memory address(es)
your configured).
Access Diagnostics
Run the 1784-KTx Diagnostics for DOS
Run the 1784-KTx Diagnostics for DOS
F1 (Start Diags)
F10 (Exit)
View the diagnostics menu
Exit the software
1784-6.5.22 - November 1999
Press this key:
To:
You see the introductory screen:
B-6
-
B-6
Go to page:
F2 (On-line Configuration)
F3 (M16 Tests)
F4 (Computer Host Tests)
F5 (KTX Card Tests)
F7 (Dual Port Tests)
F10 (Return to Previous Menu)
Define a KTx Card to Test
Run M16-diagnostics
Test the computer’s ability to
communicate with the KTx card
Run the KTx card’s self-diagnostics
Test the dual port’s ability to
communicate
Exit diagnostics
B-15
B-13
B-11
B-10
B-8
Go to page:
B-7
1784-6.5.22 - November 1999
Press this key:
To:
7. Use the decision table below.
The following instructions take you through running the diagnostic tests
individually and viewing the error log file.
You see the main menu:
From the introductory screen (see page B-6), press F1.
Start Diagnostics
Run the 1784-KTx Diagnostics for DOS
Run the 1784-KTx Diagnostics for DOS
F4 (Set Memory)
F5 (Set Intrrpt)
F8 (DH485 Baud)
memory address
interrupt
DH-485 baud
1784-6.5.22 - November 1999
Press this key until you see the setting that you need:
To change the:
2. Change the configuration to match the settings for the KTx card that you
want to test.
You see:
1. From the main menu (see page B-7), press F2.
Important: If you need to use settings other than the default settings, you must
define those settings on this screen.
If you have more than one KTx card installed or you are using a 1784-KTXD
card, you need to define which card or which memory address you want to test
Define a KTx Card to Test
B-8
F6 (DH+ Address)
F7 (DH485 Address)
DH+ address
DH-485 address
4.
You will be prompted to
enter an address
DH+ [0 . . . 77]
DH-485 [0 . . .31]
And:
B-9
1784-6.5.22 - November 1999
To return to the introductory screen (see page B-6), press F10.
The configuration is saved in the KTXDIAG.INI file in the KTXDIAG
directory. The next time that you run diagnostics, the diagnostics program
look for this file and loads it. If you don’t save your configuration or the
diagnostic program can’t find the KTXDIAG.INI file, it substitutes the
default address and interrupt settings for the KTx card
(see page B-5 and page B-8).
3. To save the configuration, press F9.
Press this key:
To change the:
Run the 1784-KTx Diagnostics for DOS
Run the 1784-KTx Diagnostics for DOS
1784-6.5.22 - November 1999
Important: If you are in 8-bit mode, you’ll see only the first two lines; those
lines will indicate 8-bit mode ON and Extended M16 OFF. You
cannot run M16 tests in 8-bit mode.
You see:
1. From the main menu (see page B-7), press F3.
Run M16 Tests
B-10
F1 (Execute Tests)
F10 (Return)
execute the tests
return to the main menu (page B-7) without
running the test
B-11
1784-6.5.22 - November 1999
Press this key:
To:
2. Use the decision table below.
You see:
1. From the main menu (see page B-7), press F4.
Test Your Computer
Run the 1784-KTx Diagnostics for DOS
Run the 1784-KTx Diagnostics for DOS
Tests the interrupt capability from
the KTx card to the computer
After reset, verifies the status of the
KTx card
•
1784-6.5.22 - November 1999
3. Press F10 to return to the main menu (page B-7).
Interrupt
•
Reset Test
Tests the computer’s ability to reset
the KTx card
Tests the computer’s ability to read
•
to and write from dual-port memory. •
Dual Port
There may be a conflict in the
interrupt assignments
KTx card may have a problem
(run the KTx card test)
RAM memory may be corrupted
KTx card may have a problem
(run the KTx card test)
If this test fails:
Description:
Diagnostic:
If an error occurs, the diagnostics report a failure and continues with the next
test. Errors are recorded in the log file (page B-20).
If you pressed F1, you see:
B-12
B-13
If you pressed F1, you see:
1784-6.5.22 - November 1999
To return to the main menu (page B-7) without running the test, press F10.
2. To execute the tests, press F1.
You see:
1. From the main menu (page B-7), press F5.
Test the KTx Card
Run the 1784-KTx Diagnostics for DOS
Run the 1784-KTx Diagnostics for DOS
Tests the accuracy and
capabilities of the
counter-timer chips
Tests the interrupts and
loopback capabilities of the
serial I/O chip
Timer Operation
Serial Port Operation
1784-6.5.22 - November 1999
The KTx card’s RAM may have a
problem
Tests the KTx card’s ability
to read from and write to its
internal memory chips
Memory
•
•
There may be a hardware problem
with the KTx card.
The wrong set of KTx*.BIN files are
running.
KTx card may not have reset completely
1. Turn power off to the computer.
2. Remove the card and reinsert.
3. Turn power on to the computer.
4. Run this test again.
If the test fails:
Description
Diagnostic
If an error occurs, the diagnostics report a failure and continues with the next
test. Errors are recorded in a log file (see page A-20).
B-14
DH-485 Loading Test . . . . LOADED
F4 Download DH 485
1784-6.5.22 - November 1999
DH+ Loading Test . . . .LOADED
F10 Return
return to the main menu (page B-7)
F3 Download DH+
F4 Download DH 485
DH 485 (page B-17)
You see the message:
F3 Download DH+
DH+ (page B-17)
B-15
If you press:
Press this key:
To load this protocol to the KTx card:
2. Use the decision table below.
You see:
1. From the main menu (page B-7), press F7.
Test the Dual Port
Run the 1784-KTx Diagnostics for DOS
Run the 1784-KTx Diagnostics for DOS
1784-6.5.22 - November 1999
For DH-485
For DH+
Then you see:
B-16
F4 Enable
F5 Disable
F6 Display
F7 Clear
F10 Return
enable the KTx card on a DH+ or DH-485 link (page B-17)
disable the KTx card from a DH+ or DH-485 link (disables the card
from the network but protocol is not removed from the card)
display the KTx car d on DH+ or DH-485 link
clear the memory location of the KTx card
• disables card from the DH+ or DH-485 link
• clears the DH+ or DH-485 protocol from the card
return to the main menu (page B-7)
For DH+
5. Press F6 to view the card’s information.
B-17
1784-6.5.22 - November 1999
• DH485 Enabling Test . . . . . ENABLED for DH-485
• DH+ Enabling Test . . . . . ENABLED for DH+
If everything is operating successfully, you see the message:
4. Press F4 to enable the card.
Press this key:
To:
3. Use the decision table below for both protocols.
Run the 1784-KTx Diagnostics for DOS
Run the 1784-KTx Diagnostics for DOS
1784-6.5.22 - November 1999
For DH-485
B-18
B-19
if the communication from the card to the computer is
functional or not functional
if the protocol software is:
• DH+ or unknown
• DH-485 or unknown
the communication rate is:
• for DH+: 57.6 bps or unknown
• for DH-485: 300, 600, 1200, 2400, 4800, 9600, 19200,
or unknown
the communication from the computer to the card is active or
stopped
the name you assigned to the computer in your application or
the default name 1784KTx
the number of active nodes and shows a map of the nodes on
the DH+ or DH-485 link if the card is communicating on the
DH+ or DH-485 link
active nodes on network displayed as ‘mini-who’
KTx is (KTx side)
Protocol Software is
Baud rate is
KTx is (host side)
KTx node name is
Number of active nodes
(untitled)
1784-6.5.22 - November 1999
This test reports the current status of DH+ or DH-485 communications. The test
results are recorded in the log file. Use this information to help you troubleshoot.
If you encounter any difficulty, review your error log.
if the DH+ or DH-485 link is on line or off line or unknown
if the KTx card is enabled or disabled
if the node is unique or a duplicate
KTx DH+ or DH-485 node is
card state is
the node address of the KTx card
KTx node address is
Link State is
Indicates:
This field:
Important: The address of the KTx card for this test is fixed at 77 octal. If
other nodes use this address, you will see duplicate nodes on the
network.
Run the 1784-KTx Diagnostics for DOS
Run the 1784-KTx Diagnostics for DOS
If you are running the KTx utilities from another
drive, use the appropriate drive letter instead or c:
1784-6.5.22 - November 1999
3. Call Rockwell Automation Technical Support at: 440.646.5800 and request a
customer log number and the name of a technical support specialist. Include
this information on the fax cover letter along with the log print-out. Fax
everything to the number indicated on the print-out.
1784-KTX Diagnostic v1.0
Feb 23, 1994 2:39:38 pm
*****************************************************************************
Allen-Bradley Global Technical Services
6680 Beta Drive
Mayfield Village, OH 44143
Voice Phone: 440.646.6800
FAX Phone: 440.646.6890
BB Phone: 440.646-6728
*****************************************************************************
COPYRIGHT NOTICE
_____________________________________________________
Allen-Bradley 1784-KTX Diagnostic Program
Copyright 1994 Allen-Bradley Company
This program has been designed to help you
determine whether or not your Allen-Bradley
1784-KTX Card is functioning properly.
This software is provided ’AS IS’ and
without any express implied warranties of
merchantability and fitness
for a particular purpose.
*****************************************************************************
Reading KTXDIAG.INI
_____________________________________________________
(KTX Card)
DPA=300
INTR=0xFFFF
*****************************************************************************
Configure KTX Card
_____________________________________________________
****************************************************************************
MAIN MENU
_____________________________________________________
****************************************************************************
1784-KTX CARD TESTING Started
_____________________________________________________
****************************************************************************
****************************************************************************
Memory.................................PASS
Timer Operation....................PASS
Serial Port Operation............PASS
****************************************************************************
1784-KTX CARD TESTING Completed
****************************************************************************
.....COMPLETED
1784-KTX Diagnostic v1.0
2. Use MS-DOS commands or a text editor to print a copy of the log file.
type ktxdiag.log | more and press ENTER.
cd c:\ktxdiag and press ENTER.
1. To view the log file, at the MS-DOS prompt, type:
If you did not add -1 to the ktxdiag command (see page B-5) when accessing
diagnostics, your diagnostic test session was recorded in a log file that helps
Allen-Bradley Automation Group Technical Support diagnose your difficulty.
Print the Log File
B-20
C
CF00:
•
•
•
D700:
D300:
•
•
DF00:
DB00:
See Chapter 2 for additional information.
CB00:
•
1784-6.5.22 - November 1999
1. Set the memory address on the card to one of the following:
Important: The screen prints presented here may not contain the same part and
release number as your KTx Utility software.
To use the KTX card for direct-connect operation to a PLC-2 or PLC-3
programmable controller, follow these steps:
Important: You can use only the 1784-KTX card for PLC-2 and PLC-3
direct-connect. The 1784-KTS and 1784-KTXD do not support
direct connection to a PLC-2 or PLC-3 processor.
KTX Card and 6200 Software
for PLC-2 Direct-connect and PLC-3 Direct-connect
Current versions of Allen-Bradley 6200 software for PLC-5 and PLC-5/250
programmable controllers have built-in support for the KTx card. If your version
does not support the KTx card, you must upgrade to the latest version of 6200
software before attempting to connect.
KTx Card and 6200 Software
for PLC-5 and PLC-5/250 Programmable Controllers
You can use the KTx card with Allen-Bradley PLC-2™, PLC-3™, PLC-5™, and
PLC-5/250 programmable controllers using 6200 software.
Use the KTx Card with 6200 Software
Appendix
Use the KTx Card with 6200 Software
install c
C. Type:
Update 6200 series for PLC 2 files . . .
1784-6.5.22 - November 1999
For a PLC-3 processor, select:
5. Select the ‘update’ routine for the KTx files.
•
• Update 6200 series for PLC 3 files . . .
4. Select the ‘update’ routine specific to your processor.
a:
B. Type:
A. Insert the utility disk in drive A.
3. Run the installation program on the KTx Utility Disk, which came in the box
with your KTx card.
Important: The following procedure to run the installation program is not
necessary with later versions of software. If your software lists the
KTx as an option, the utility is already installed.
2. Install the card in the computer by following the instructions in Chapter 3.
C-2
C-3
For a PLC-2 processor, select:
1784-6.5.22 - November 1999
Important: In some instances, the status bar does not reach 100% even though
all of the appropriate files have been copied.
You see:
Update target drive PLC 3 files with 1784 KTX files
Use the KTx Card with 6200 Software
Use the KTx Card with 6200 Software
1784-6.5.22 - November 1999
6. Exit the installation program.
You see:
Update target drive PLC 2 files with 1784 KTX files
C-4
C-5
110011 (DF00:)
•
•
•
101011 (D700:)
001011 (D300:)
•
•
111011 (DF00:)
011011 (DB00:)
1784-6.5.22 - November 1999
During subsequent programming sessions, these steps do not need
to be repeated.
12. Go on line to confirm that everything is set correctly.
11. Save the configuration.
6200 PLC-2 and PLC-3 software supports only these addresses.
010011 (CB00:)
•
10. Set the address on the on-line configuration screen to the following bit
patterns, corresponding to the selections on the KTx card:
• “1784-KT (BCL)” for PLC-3 programmable controllers
• “1784-KT (Direct Con.)” for PLC-2 programmable controllers
9. Go to on-line configuration and set the current device to:
8. Start 6200 software for the PLC-2 or PLC-3 programmable controller running
on the computer.
• 1784-CP16 for PLC-3
• 1784-CP15 for PLC-2
7. Connect the appropriate cable from the card to the port on the programmable
controller:
Use the KTx Card with 6200 Software
Use the KTx Card with 6200 Software
1784-6.5.22 - November 1999
C-6
i
1784-6.5.22 - November 1999
DH+ 4-3
connecting devices to the 1784-KTX card 4-4
DH+ networks 4-1
DH-485 4-3
DH-485 networks 4-1
diagnostics A-12, B-1
accessing B-5
defining card to test B-8
installation B-3
M16 test B-10
testing the card B-13
testing the dual port B-15
testing your computer B-11
D
connecting to an SLC 500 processor 4-9
connecting via a DH-485 network 4-8
C
base memory address
recommended memory address settings 2-3
base memory location 2-1
B
address selection worksheet 2-5
A
1771 remote I/O networks 4-1
1784-KTS connections 4-2
1784-KTx card
configuring 2-1
1784-KTx cards
features supported by 1-1
installation 3-1
selecting interrupt settings 2-7
setting card switches 2-6
1784-KTX connections 4-1
1784-KTXD connections 4-2
6200 software C-1
Numerics
1784-6.5.22 - November 1999
troubleshooting A-12, B-2
T
selecting the interrupt settings 2-7
setting the card’s switches 2-6
SLC processors 4-3
S
remote I/O 4-3
removing the card’s driver
in Windows NT A-19
R
PLC classic programmable controlers 4-3
PLC enhanced programmable controllers 4-3
PLC-2 direct connect 4-3
PLC-3 direct connect 4-3
P
M16 test B-10
M
log file B-20
L
KTx interrupts 2-7
K
jumper settings worksheet 2-10
J
intalling the card’s driver
on Windows NT A-1
I
host computer IRQ assignments 2-9
H
expansion slots 3-3
E
ii
explanation
o
Use back for more
Other Comments
What is not in the right
Sequence
What is unclear?
Clarity
Location/
Phone
o other
o
o
o
feature
definition
Return to: Technical Communications, Allen-Bradley, 1 Allen-Bradley Drive, Mayfield Hts.,
OH 44124-6118 Phone: 440.646.3176 FAX: 440.646.4320
Your
Name
o
o
o
example
o
What information is missing?
illustration
Part
No.
o illustration
o guideline
procedure/
o
Completeness
o
Pub.
Date
Describe Problem(s)
o
o
text
Pub.
No.
Check Problem(s) Type:
o Technical Accuracy
Cat.
No.
Pub.
Name
If you find a problem with our documentation, please complete and return this form.
Allen-Bradley
Publication Problem Report
Technical Communication
1 ALLEN BRADLEY DR
MAYFIELD HEIGHTS OH 44124-9705
POSTAGE WILL BE PAID BY THE ADDRESSEE
BUSINESS
REPLY MAIL
FIRST-CLASS MAIL PERMIT NO. 18235 CLEVELAND OH
NO POSTAGE
NECESSARY
IF MAILED
IN THE
Supersedes Publication 1784-6.5.22-RN1 July 1997
Supersedes Publication 1784-6.5.22 - December 1994
Publication 1784-6.5.22 - November 1999
Back Cover
© (1999) Rockwell International Corporation. Printed in the U.S.A.
PN 955135-70