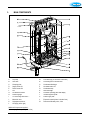
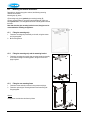
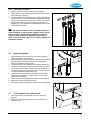
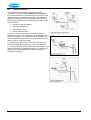
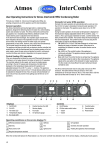
1
Atmos
InterCombi
Installation & Servicing Instructions for HE32
(GC 47-249-01)
Atmos Heating Systems
West March
Daventry
Northants, NN11 4SA
Tel: 01327 871990
Fax: 01327 871905
e-mail: [email protected]
internet: www.atmos.co.uk
Issue 01.11.11 (Main revision)
© 2011 Atmos Heating Systems
The information provided applies to the product in the standard model. Atmos Heating
Systems can therefore not be held liable for any damage resulting from the product
specifications that deviate from the standard model.
The information provided has been compiled with the utmost care. However, Atmos
Heating Systems cannot be held liable for any faults in the information nor for the
consequences thereof.
Atmos Heating Systems cannot be held liable for any damage resulting from the
activities carried out by third parties.
To be changed without prior notice
Building Regulations and the Benchmark Checklist
Building Regulations (England & Wales) require notification of the installation of a heating
appliance in a dwelling to the relevant Local Authority Building Control Dept. This can be
achieved via a Competent Persons Self Certification Scheme as an option to notifying the Local
Authority directly. Similar arrangements apply in Scotland and Northern Ireland.
Atmos Heating Systems is a member of the Benchmark Scheme and the Benchmark Checklist
is included at the back of these Instructions. The Benchmark Checklist provides a
Commissioning Checklist and Service Record to be completed by the Installer/ Service
Engineer.
Benchmark places responsibilities on both manufacturers and installers.
The purpose is to ensure that customers are provided with the correct
equipment for their needs, that it is installed, commissioned and serviced in
accordance with the manufacturer’s instructions by competent persons and
that it meets the requirements of the appropriate Building Regulations. The
Benchmark Checklist can be used to demonstrate compliance with Building
Regulations and should be provided to the customer for future reference.
Installers are required to carry out installation, commissioning and servicing
work in accordance with the Benchmark Code of Practice which is available
from the Heating and Hotwater Industry Council who manage and promote
the Scheme. Refer to www.centralheating.co.uk for more information.
2
TABLE OF CONTENTS
1.
Safety Regulations
7
1.1
General ....................................................................................................................................................................... 7
1.2
CH system................................................................................................................................................................... 7
1.3
Gas system ................................................................................................................................................................. 7
1.4
Electrical system ......................................................................................................................................................... 7
1.5
Domestic water system ............................................................................................................................................... 7
1.6
Flue discharge and air supply ..................................................................................................................................... 7
2.
Description of the Appliance
8
2.1
General ....................................................................................................................................................................... 8
2.2
Operation .................................................................................................................................................................... 8
2.3
Operating conditions ................................................................................................................................................... 8
2.4
PC interface .............................................................................................................................................................. 10
2.5
Test programmes ...................................................................................................................................................... 11
3.
Main Components
12
3.1
Accessories ............................................................................................................................................................... 13
4.
Installation
14
4.1
Overall dimensions.................................................................................................................................................... 14
4.2
Unpacking the appliance ........................................................................................................................................... 15
4.3
Additional dimensions ............................................................................................................................................... 15
4.4
Boiler location............................................................................................................................................................ 16
4.5
Mounting and General Information ............................................................................................................................ 17
4.6
Mount the appliance .................................................................................................................................................. 18
4.7
Fit the pipework cover (optional item) ....................................................................................................................... 18
4.8
Condensate disposal................................................................................................................................................. 19
5.
Connections
20
5.1
Connect the CH system ............................................................................................................................................ 20
5.2
Hot water system ...................................................................................................................................................... 21
5.3
Connecting the gas supply ........................................................................................................................................ 22
5.4
Electrical connection ................................................................................................................................................. 22
5.5
General Flue Requirements ...................................................................................................................................... 25
5.6
Flue discharge and air supply ................................................................................................................................... 26
5.7
Roof outlet prefabricated chimney............................................................................................................................. 32
5.8
Atmos MS System..................................................................................................................................................... 33
5.9
Atmos Communal Flue System (CFS) ...................................................................................................................... 34
6.
Commissioning
35
6.1
Fill and de-aerate the appliance and the system....................................................................................................... 35
6.2
Commissioning of the appliance ............................................................................................................................... 36
6.3
System Shutdown ..................................................................................................................................................... 37
7.
Setting and Adjustment
38
7.1
Directly via operating panel ....................................................................................................................................... 38
7.2
Settings through the service code ............................................................................................................................. 38
7.3
Parameters................................................................................................................................................................ 39
7.4
Setting maximum CH power...................................................................................................................................... 40
7.5
Setting pump position................................................................................................................................................ 40
7.6
Weather-dependent control....................................................................................................................................... 41
7.7
Conversion to other gas type .................................................................................................................................... 41
7.8
Gas-air control........................................................................................................................................................... 41
7.9
Setting gas-air control ............................................................................................................................................... 42
7.10 Carbon monoxide : carbon dioxide ratio (CO/CO2 ratio) ........................................................................................... 43
8.
Faults
44
8.1
Display last fault code. .............................................................................................................................................. 44
8.2
Burner does not ignite ............................................................................................................................................... 45
3
8.3
8.4
8.5
8.6
8.7
8.8
8.9
9.
Burner ignites with much noise ................................................................................................................................. 45
Burner resonates....................................................................................................................................................... 46
No heating (CH) ........................................................................................................................................................ 46
Reduced output ......................................................................................................................................................... 47
CH does not reach the correct temperature .............................................................................................................. 47
No hot water (HW) .................................................................................................................................................... 47
Hot water does not reach the correct temperature .................................................................................................... 48
SERVICING THE BOILER AND COMPONENT REPLACEMENT
49
9.1
SERVICING THE BOILER ........................................................................................................................................ 49
9.2
COMPONENT REPLACEMENT ............................................................................................................................... 50
10. Technical Specifications
54
10.1 Electrical diagram...................................................................................................................................................... 55
11. CE Declaration
NOTE The Benchmark Checklist & Service Record are included at the back of the Manual.
4
56
This manual
Using this manual you can safely install and maintain this appliance.
Carefully follow the instructions.
In case of doubt, contact Atmos Heating Systems.
Keep these instructions near the appliance.
Abbreviations and names used
Description
High Efficiency
Atmos InterCombi wall-mounted gas heater
Appliance with piping for central heating
Appliance with piping for domestic water
To be referred
to as
HE
Appliance
CH system
HW system
Icons
The following symbols are used in this manual:CAUTION
Procedures that, when not carried out with due care,
may result in damage to the product or the
environment or in personal injury.
Service and technical support
For information about specific adjustments, installation, maintenance
and repair activities, please contact:
Atmos Heating Systems,
West March,
DAVENTRY,
Northants, NNII 4SA
Tel: 01327 871990; fax: 01327 871905
Email: [email protected]; internet: www.atmos.co.uk
Environment
When the appliance needs replacement, your installer may
arrange for disposal. Should this not be possible, then
make enquiries with your local council about the
possibilities for re-use or environmental-friendly processing
of the materials used, or contact a scrap dealer about
disposal.
Various plastics and metals have been used in producing
the appliance. Also, the appliance contains electronic
components that are electronic waste.
Intended use
The appliance as described in this documentation is intended for heating
rooms with a central heating system and/or for supplying hot water. Any
other use is outside the scope of intended use for this appliance. Any
liability for damage resulting from improper use shall not be accepted.
5
Atmos Warranty – Short version
1.
2.
3.
4.
5.
6.
7.
Atmos Warranty covers any material, construction or operation faults
that are found to be of original manufacturing origin. A full statement of
the Atmos Warranty can be found on www.atmos.co.uk.
Atmos boiler warranty is two years from date of invoice or 12 months
from date of installation, whichever is the later. This warranty covers the
cost of replacement parts and associated labour. However the ignition &
ionisation probe and the glass fuse are excluded from this warranty. The
warranty for the heat exchanger is 10 years in total, but this covers the
cost of associated labour only for the first two years from date of invoice.
There is no carriage charge for the delivery of replacement parts
covered by the warranty. Any alleged faulty part must be returned to
Atmos carriage prepaid. Carriage will be credited if the fault is found to
be a manufacturer’s fault.
The serial number of the boiler must be supplied with any warranty
claim.
All products must be used in an appropriate application and manner.
This includes, but is not limited to, correct boiler sizing, system design,
system cleansing and use of corrosion inhibitors. If the boiler installed is
a combi boiler, an approved water conditioner device must be fitted in
areas where the water hardness exceeds 200ppm, as required by
Building Regulations.
The Benchmark Checklist & Service Record, found in the back of the
installation Instructions, must be filled in. Failure to install and
commission according to the manufacturer’s instructions and complete
the Benchmark Commissioning Checklist invalidates the warranty.
The Warranty card must be completed and the signed Atmos copy must
be received within 14 days of installation together with a copy of the
Benchmark Commissioning Checklist, completed by the installer. By
signing the Warranty card the buyer agrees that the goods have been
delivered in a satisfactory condition.
Exceptions
8. In the event of full payment for a product not being received, Atmos
shall be discharged from all further contractual or warranty obligations.
9. Surface and/or transport damage are outside the scope of this warranty.
10. Any warranty provision shall not apply if Atmos determines that the fault
is due to improper application, use, neglect, accidental damage or
injudicious treatment, non-observance of instructions contained in
Atmos Manuals or due to improper repair, adjustment, installation or
maintenance or due to work carried out by unqualified engineers. The
warranty also lapses if the Atmos boiler has not had a yearly service in
accordance with instructions.
11. This warranty shall not apply if the fault is caused by scale, failure or
abnormality of gas or water supply, or impact of any external influence
that adversely affects the normal operation of the product. This shall
include but not be restricted to dehydration, abnormal or high voltage,
and hard water.
12. Excluded parts are the ignition & ionisation probe and the glass fuse as
these are subject to wear and tear in normal use.
6
1.
SAFETY REGULATIONS
The appliance must be installed by a Gas Safe registered person in
accordance with the current Gas Safety (Installation and Use) Regulations.
Failure to install appliances correctly could lead to prosecution.
Atmos Heating Systems does not accept any liability for damage or injury
caused by not (strictly) observing the current safety regulations and
instructions, nor by negligence while installing the Atmos InterCombi wallmounted gas heater and any accompanying accessories.
The manufacturer’s instructions must NOT be taken as overriding statutory
requirements.
The regulations are mentioned separately for the different disciplines.
1.1
General
The entire system should comply with the valid (safety) regulations, as
mentioned in:•
This installation manual.
•
Gas Safety (Installation and Use) Regulations
•
The appropriate Building Regulations.
•
Health and Safety Document No 635 (Electricity at Work Regulations)
•
The Water Fittings Regulations or local Water byelaws.
1.2
CH system
The entire system should comply with the valid (safety) regulations, as
mentioned in:BS 5449 Central Heating for Domestic Premises.
•
1.3
Gas system
The entire system should comply with the valid (safety) regulations, as
mentioned in:•
BS 6798 Specification for installation of gas fired hot water boilers of rated input
not exceeding 60 kW.
•
BS 6891 Installation of low pressure gas pipework installations up to 28mm
(R1).
•
•
1.4
I.S.813 Installation of Gas Appliances (for installations in Ireland).
British Gas Guidance Notes for the Installation of Domestic Gas Boilers.
Electrical system
The entire system should comply with the valid (safety) regulations, as
mentioned in:•
BS 7671 The IEE Wiring Regulations.
1.5
Domestic water system
The entire system should comply with the valid (safety) regulations, as
mentioned in:•
BS 5546 Installation of gas hot water supplies for domestic purposes.
1.6
Flue discharge and air supply
The flue discharge and the air supply system should comply with:•
BS 5440 Flues and Ventilation for gas appliances of rated input not exceeding
60 kW. (Part 1 Flues and Part 2 Ventilation).
7
2.
DESCRIPTION OF THE APPLIANCE
2.1
General
The Atmos InterCombi wall-mounted gas boiler is designed for delivering
heat to the water of a CH system and the domestic hot water.
The air supply and flue discharge can be connected to the appliance by
means of two separate pipes or a concentric connection.
The appliance has its own wall mounting strip, but can also be fitted to
an optional wall mounting frame that allows top connections. An optional
pipe mounting bracket for use with the wall mounting strip is available.
These are supplied separately.
The Atmos InterCombi wall-mounted gas boiler has the CE quality mark
and the certification label NZ (Solar compatible) and IP44 Protection
class.
It is possible to use the appliance for hot water or for heating only. The
system that is not used does not need to be connected.
The appliance as delivered is suitable for natural gas (G20). A
conversion kit for propane (G31) can be supplied upon request.
2.2
Operation
The Atmos InterCombi wall-mounted gas heater is a modulating high
efficiency boiler. This means that the power is adjusted to the heat
demand.
In the aluminium heat exchanger two separate copper circuits have been
integrated.
Because of the separated circuits for central heating and hot water, the
heating and the hot water supply can operate independently of each
other. The hot water supply has priority over the heating. They cannot
work simultaneously.
The appliance has been provided with an electronic controller that
controls the fan with the heat demand from the heating system or the hot
water supply, opens the gas valve and ignites the burner, continuously
monitors the flame and controls it dependent on the power required.
2.3
Operating conditions
A code indicates the operating condition of the appliance on the service
display of the operating panel.
- Off
The appliance is not operating, but there is electrical power. There is no
response to any demand for hot domestic hot water or CH water. The
frost protection is active though. This means that the pump starts
running and the heat exchanger is heated when the temperature of the
heat exchanger drops to 5°C.
When the frost protection is activated, code 7
appears (heating of
the heat exchanger).
8
Waiting position
The LED of the on/off button is on and depending on the keep-hot
setting, one of the LED’s of the domestic hot water keep-hot function may
also be on. The appliance is ready for responding to the demand for CH or
domestic hot water.
0 Pump overrun
After CH operation the pump has an overrun. This overrun time is set to
the value according to parameter 8 (see §7.3; factory setting is 1 min).
This setting can be changed. Note: If there is a hot water demand during
this period, the overrun time is cancelled. The controller will automatically
run the pump for 10 seconds, once every 24 hours, to prevent it from
getting stuck. This activation of the pump takes place at the time of the
last heat demand 24hrs later. In order to change this time, set the room
thermostat higher for a while at the desired time.
1 Required temperature reached
The controller can temporarily block the heat demand and stop the burner.
This blocking takes place because the required temperature has been
reached. When the temperature has dropped sufficiently, the blocking is
cancelled.
2 Self-test
The controller regularly checks the connected sensors. During the check,
the controller does not carry out any other tasks.
3 Ventilate (Fan)
On starting, the fan is first brought to the starting speed. When the starting
speed has been reached, the burner is ignited. Code 3 is also visible
after stopping the burner, when post-purge takes place.
4 Ignite
When the fan has reached the ignition speed, the burner is ignited by
means of electric spark ignition. During ignition the code 4 appears. If
the burner is not ignited, another ignition attempt is made after about
5 seconds. If the burner has still not fired after the fourth ignition attempt,
the controller indicates a fault. See §8.2.
5 CH operation
An on/off thermostat can be connected to the controller, if necessary in
combination with an outside sensor. See the Electrical diagram §10.1.
When heat is demanded by a thermostat signal, the fan runs (code 3 )
and the burner is ignited (code 4 ), followed by the CH operating
condition (code 5 ).
During CH operation, the fan speed and hence the power of the appliance
is adjusted. This is done in such a way, that the temperature of the CH
water is controlled towards the set CH supply temperature. In the case of
an on/off thermostat, the CH supply temperature is set at the operating
panel. In the case of an outside sensor, the CH supply temperature is
9
determined by the weather dependent control programmed in the
controller.
During CH operation, the demanded CH supply temperature is displayed
on the operating panel.
During CH operation, the actual CH supply temperature can be read by
pressing the service button.
Note: Instead of an on/off thermostat, an OpenTherm thermostat can be
connected to the controller as described in §5.4.1. In this case, the
desired CH temperature is set by the thermostat. The minimum
temperature and the operation mode can be set with parameters [E] and
[E.] (refer to §7.3)
6 Domestic hot water operation
The hot water supply has priority over the heating. When the flow switch
detects a domestic hot water demand of more than 2 l/min, the fan starts
running (code 3 ) and ignition of the burner follows (code 4 ), and
the controller goes to domestic hot water operation (code 6 ). When
a domestic hot water demand is detected during a CH demand, the CH
demand is interrupted (pump stops), and the controller switches from CH
(code 5 ) to DHW (code 6 ). When after ending the domestic hot
water demand, the CH demand is still required, the pump starts again
and the controller switches back to CH.
During domestic hot water operation, the fan speed and hence the
power of the appliance is controlled by the controller on the basis of the
set domestic hot water temperatures. The demanded temperature is
displayed on the operating panel.
During domestic hot water operation, the actual domestic hot water
supply temperature can be read by pressing the service button.
7 Keep Hot Facility
For a quick supply of domestic hot water, a Keep hot function has been
provided in the controller. This function keeps the heat exchanger at the
correct temperature. This Keep hot function has the following settings:•
Off: (HW Store - Both LED’s off.) The heat exchanger is not kept
warm, delaying the supply of domestic hot water, except when CH
operation has recently occurred.
•
On: (HW Store – On LED on.) The Keep hot function of the
appliance is continuously activated. The appliance always supplies
domestic hot water immediately.
•
Eco: (HW Store - Eco LED on) The Keep hot function is selflearning. The appliance is inactivated during the night or after a
long absence. The appliance adjusts to the user pattern of the
domestic hot water requirements. The eco mode is the most
efficient hot water method.
Note: The initial ‘slug’ of hot water may be in excess of 60ºC irrespective
of the settings.
2.4
PC interface
The controller has an interface for a PC. With a special cable and
accompanying software, a PC can be connected. This provision makes it
possible to follow the behaviour of the controller, the appliance and the
heating system during a long period.
10
2.5
Test programmes
In the controller, there is provision for putting the appliance into a test
status.
By activating a test programme, the appliance will become active with a
fixed fan speed without intervention of the control functions. The safety
functions remain active though.
Simultaneously press + and – to switch off the test programme.
Test programmes
Description of programme
Burner on with minimum CH
power
Burner on with maximum
CH power
Burner on with maximum
HW power
Switch off test programme
2.5.1
Button
combinations
"service" and "-"
Display
reading
“L”
"service" and “+” (1x)
“h”
"service" and "+" (2x)
"H"
"+" and "-"
Current
operating
condition
Frost protection
The boiler has provision for protecting its heat exchanger as described
below.
NOTE! However to avoid the condensate freezing, the boiler must be
installed in a FROST-FREE room.
•
•
In order to avoid freezing of the appliance (heat
exchanger), it has an appliance frost protection.
When the temperature of the heat exchanger drops
to 5ºC, the burner will be activated and the pump
will start running until the temperature of the heat
exchanger reaches 10ºC.
Code 7 is given when the appliance frost
protection intervenes (heating heat exchanger).
When the system (or a part thereof) can freeze, a
frost thermostat should be installed in the area to
be protected. Connect this according to the wiring
diagram. See § 10.1.
Remark
When the appliance is out of action ( - on the service display), the
appliance frost protection is still active. However, there will be no
response to heat demand from an (external) frost thermostat.
11
3.
A
B
C
D
E
F
G
H
I
J
K
L
MAIN COMPONENTS
CH pump
Gas valve
Clamping plate
Supply sensor S1
Return sensor S2
Fan
Hot water flow switch
Pressure gauge
1m connecting cable 230 V ~
Manual air vent
Sight glass and mirror
Air supply (left or right)
Additional Components supplied :Valve set (supplied separately with boiler)
12
M
N
O
P
Q
R
S
T
U
V
W
Flue discharge (or concentric connection)
Connecting block / terminal list X
Condensate discharge
Hot water sensor S3
Condensate trap
Heat exchanger
Controller operating panel and display
Ionisation/ignition probe
Position type plate
Expansion vessel (shown in broken lines)
Pressure relief safety valve, 3 bar
3.1
Accessories
Description
Pipe mounting bracket
•
Connection supply and return 22 mm diameter
•
Connection cold and hot water 15 mm diameter
•
Connection gas ½" female thread
•
Mounting strip boiler
•
Bag with fixings
Rear mounting frame for top pipe connection
Bottom Pipework cover
Outside sensor for weather compensation
Conversion set to Propane (LPG or G31)
Interface cable (for Installers)
Part Ref
092.537
092507
092527
203207
075537
230677
13
4.
INSTALLATION
4.1
A=
B=
C=
D=
E=
F=
14
Overall dimensions
CH flow
CH return
Gas
Cold water
Domestic hot water
Condensate
22 mm diameter
22 mm diameter
15 mm diameter
15 mm diameter
15 mm diameter
32 mm dia (after trap 25 mm dia flexible)
h=
670mm
InterCombi HE 32
H=
810mm
InterCombi HE 32
Z=
Y=
Flue gas outlet
Air supply inlet
80 mm diameter
80 mm diameter
4.2
Unpacking the appliance
1.
2.
Unpack the appliance.
Check the content of the packaging. This consists of:• Appliance (A)
• Mounting strip (B)
• Condensate trap (C)
• Installation Instructions
• User Operating Instructions
• Warranty card
3. Valve set (supplied separately with boiler) comprising 2 x 22mm
isolation valves, 1 x 15mm flow regulating isolation valve with blue
lever (for cold water), 1 x gas valve.
4. Check the appliance for any damage: report damage to the Supplier
immediately.
CAUTION: This appliance should be lifted and handled by 2 people.
(Weight: 39 kg)
4.3
Additional dimensions
The diagram shown below gives additional dimensions primarily for the
mounting arrangement using the OPTIONAL mounting bracket.
Note: The centre line of the hexagonal notch in the mounting bracket is also
the centre line of the flue hole.
15
4.4
Boiler location
Clearances
Above casing
200mm min
Below casing
230mm min
RH
30mm min
LH
30mm min (in operation)
LH
140mm min (servicing)
Front 30mm min (in operation)
Front 450mm min (servicing)
Keep 50 mm free space above the front panel in order to be able to
remove the front panel from the casing. Allow 140 mm on the left side for
swinging out the expansion vessel during commissioning/service.
The appliance can be fitted to a mounting frame. The assembly or just
the appliance should be mounted to a wall with sufficient bearing
strength. In case of light wall constructions, resonance sounds may
occur.
The appliance is suitable for mounting on a combustible wall (eg stud
wall).
There must be an earthed electrical supply within a distance of 1 m from
the appliance.
In order to avoid freezing of the condensate discharge, the appliance
should be installed in a frost-free room.
4.4.1
Installation in a kitchen cupboard
Make sure there is sufficient ventilation above and below the appliance.
When the appliance is placed in a small cupboard, ventilation openings
of at least 50 cm2 must be made.
4.4.2
Installation in an airing cupboard
Compartment ventilation is not required for a standard airing cupboard
(eg 0.6 x 0.6 x 2.3m high).
4.4.3
Remove front panel
Remove the optional pipework cover and the front panel for carrying out
work on the appliance as follows:1. Remove the pipework cover (A), if used, forwards.
2. Unscrew both recessed crosshead screws (B) at the bottom of the
appliance.
3. Lift the front panel (C) vertically upwards and remove it forwards.
16
4.5
Mounting and General Information
Depending on the mounting option ordered, the following mounting
methods are available:Mounting strip (A) alone,
OR mounting strip (A) and optional pipe mounting bracket (B),
OR rear mounting frame (C) and pipe mounting bracket (B), which are
both optional items. This arrangement allows for vertical pipework behind
the boiler.
Note that when the pipe mounting bracket is used, the pipes can be
connected before installing the appliance.
A
4.5.1
1.
2.
Fasten the mounting strip horizontally to the wall, using the screws
and plugs supplied.
Mount the appliance.
4.5.2
1.
Fitting the mounting strip
Fitting the mounting strip and the mounting bracket
A
Fasten the mounting strip and the pipe mounting bracket horizontally
to the wall according to the drilling pattern, using the screws and
plugs supplied.
B
4.5.3
1.
2.
Fitting the rear mounting frame
Fasten the frame vertically to the wall, using screws and plugs.
Fasten the optional pipe mounting bracket to the frame using the
fixings supplied.
C
Caution
The appliance is wider than the frame by 20mm.
B
17
4.5.4
1.
2.
3.
Installation connections
Make the various connections to the valves (see diagram).
Install a filling loop (not supplied) between the cold water inlet pipe
and the CH return connection.
For most installations, the flexible tube for the safety discharge will
be long enough to fit into the condensate discharge waste pipe (see
below). In cases where this does not apply, install a 15 mm copper
safety discharge pipe to fit into the waste pipe (as shown in the
diagram, §5.1) or run separately to a safe discharge position on the
outside wall of the building.
Note
Where appropriate and always in areas of Hard Water (hardness in
excess of 200ppm), an approved water conditioner device must be
fitted in accordance with the Building Regulations. Atmos can
supply a suitable conditioner for fitting to the cold feed of the
boiler. In areas of hard water, failure to fit a suitable conditioner will
invalidate the warranty.
4.6
1.
2.
3.
4.
5.
6.
7.
4.7
1.
2.
18
Mount the appliance
Check whether the compression rings of the optional mounting
bracket are straight in the connectors.
Place the appliance: slide it top-down over the mounting strip. Make
sure that the pipes simultaneously slide into the compression
fittings of the optional mounting bracket.
The flexible tube from the condensate trap should be inserted into
an open waste pipe of not less than 32 mm diameter. If connected
to a soil pipe or waste system, the waste pipe must include a trap
(similar to arrangement for washing machine). For more information
on condensate disposal, please refer to §4.8.
The flexible tube from the pressure relief safety valve should be
inserted into the waste pipe, or pushed over the 15 mm copper
discharge pipe if provided.
Tighten the compression fittings to the optional mounting bracket.
Mount the air supply and the flue discharge.
Close the air supply opening that is not used with the plug supplied.
Fit the pipework cover (optional item)
Insert the four hooks of the pipework cover in the slots of the
appliance.
Slide the cover backwards, sliding the hooks into the slots and
locking the cover.
4.8
Condensate disposal
The appliance is provided with a 25 mm flexible pipe from its
condensate trap. As given in §Error! Reference source not found.,
this should be inserted into an open waste pipe of not less than 32 mm
diameter, together with the safety discharge pipe. The condensate is
slightly acidic (pH between 3 and 6) and should be disposed of in the
following ways, using suitable plastic waste pipe (Note: copper or steel
must not be used):• internal stack pipe (see diagram)
• waste pipe (see diagrams)
• external drain or gulley
• purpose made soak-away
The pipe work must incorporate a minimum fall of 2.5 degrees (or
44mm/metre) towards its point of termination. Condensate pipe work
external to the property, or in an unheated space (eg a garage), must be
protected against freezing through the use of pipe insulation and trace
heating. Atmos can supply trace heating.
If an external drain or gulley is used, then the open end of the pipe
should be terminated below the grid level, but above the water level.
If a proprietary soak-away is used, install at least 1 metre away from the
external wall and clear of foundations and services. The soak-away is
buried in the ground and surrounded by limestone chippings to
neutralise the condensate.
19
5.
CONNECTIONS
5.1
Connect the CH system
1.
2.
Flush the CH system thoroughly.
Connect the flow and return pipes using the 22mm isolation valves.
All pipes must be mounted tension-free in order to avoid ticking of
the pipes.
Existing connections must not be twisted in order to avoid leaks at
the connections with the external pipes.
The CH system should be provided with:• A filling loop in the return pipe directly below the appliance.
• A drain tap at the lowest point of the system.
• An additional expansion tank if required (see 5.1.1).
• A non-return valve when pipes are running upward at a short
distance from the appliance. This prevents a gravity effect
during domestic hot water operation of the appliance.
5.1.1
Expansion vessel
The appliance is fitted with a 6 litre expansion vessel which is adequate
for a system with a water volume not exceeding 100 litres, typically 8
radiators. For larger volume systems, an additional expansion vessel
must be fitted. Atmos can supply a 12 litre or 18 litre Robokit.
5.1.2
Thermostatic radiator valves
Building regulations require a room thermostat to be fitted on all
installations. Do not fit a thermostatic valve on the radiators in the room
where the thermostat is situated, otherwise the controls will not function
correctly.
5.1.3
System by-pass
A by-pass is not required for safe operation of the boiler. For heating
systems where there are thermostatic valves on all radiators, or where
there are other system flow restrictions such as zone valves, a by-pass
should be fitted to reduce system noise and to protect the pump. The bypass should comprise a proprietary by-pass valve with adjustable flow
regulation, not a fixed setting valve. Atmos can supply this valve.
20
Note
The flexible tube from the pressure relief safety
valve can be inserted directly into the waste pipe if
suitably located. The flexible tube must be installed
so that there are no sharp bends that kink the pipe
and cause a restriction in the flow.