1
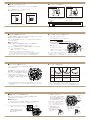
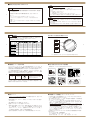
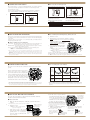
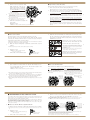
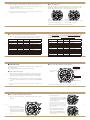
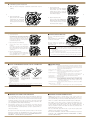
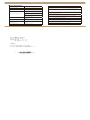
BSB5R86-0808
5R86
取扱説明書
INSTRUCTION
本 社 〒 105-8467 東京都港区芝浦 1-2-1
目 次
■ 製 品 の 特 長……………………………………………………………………
■ 各 部 の 名 称 とは たらき… …………………………………………………
■ ねじロックりゅうず について………………………………………………
ねじロックりゅうず の 使 いかた… ………………………………………
■ ぜんまい の 巻き上 げ について… …………………………………………
巻き上げのめ や す……………………………………………………………
りゅうずを 使った ぜんまい の 巻き上げかた… …………………………
■ パ ワーリザ ーブ 表 示 について… …………………………………………
パワーリザーブ 表 示 の見 かた… …………………………………………
■ 時 刻・カレンダーを 合 わ せるには…………………………………………
時 刻 の 合 わ せ かた… ………………………………………………………
より正 確に時 刻を 合 わ せるために… ……………………………………
カレンダーの 合 わ せ かた……………………………………………………
5
6
8
9
10
10
11
12
13
14
14
17
18
24時 針 の 使 いかた………………………………………………………… 2 1
■ 時 差 修 正 機 能 について… ………………………………………………… 2 2
時 差 修 正 機 能 の 使 いかた… ……………………………………………… 2 2
世 界 の 主 な 地 域 の 時 差 一 覧……………………………………………… 2 6
■ クロノグラフについて……………………………………………………… 2 8
クロノグラフ
( ストップウオッチ 機 能 ) の 使 いかた…………………… 3 0
積 算 計 測 のしかた…………………………………………………………… 3 2
■ ケース構 造 について………………………………………………………… 3 5
■レザーバンド用ワンプッシュ三つ 折 れ方 式 中 留の 使 いかた………… 3 6
■ 製 品 仕 様……………………………………………………………………… 3 7
■ アフターサービスについて………………………………………………… 3 8
■ 補 修 用 性 能 部 品 について………………………………………………… 3 9
■ 使 用 上 の 注 意とお 手入 れ のしかた……………………………………… 4 0
■こんなときには……………………………………………………………… 4 8
■製品の特長
このたびはガランテをお買い上げいただき、ありがとうございました。
SEIKO では、時計づくり100 有余年の伝統と、世界に誇る先進技術の
すべてを注ぎ、製造・検査を実施しております。
ガランテの優れた性能を保つために、
この取扱説明書をよくお読みの上、
末長くご愛用くださいますようお願い申し上げます。
この取扱説明書はお手もとに保管していただき、必要に応じてご覧くだ
さい。
ぜんまいがほどける力を唯一の動力源としながら、クオーツ時計と同等の高精
度を実現したスプリングドライブは、セイコー独自の機構です。
スプリングドライブクロノグラフは、そのスプリングドライブ機構をベースに、世
界初のスイープ運針センタークロノグラフを搭載しています。
ぜんまいの巻き上げは、自然な腕の動きで巻き上がる自動巻き機構にくわえて、
始動時の巻き上げに便利な手巻き機構をそなえています。
持続時間は、ぜんまいを充分に巻き上げた状態で約72時間(約3日間)。
ぜんまいの巻き上げ状態(残量)がわかるパワーリザーブ表示が付いています。
秒針は完全になめらかな動きをするスイープ運針です。
さらに24時針をそなえ、カレンダー連動式の時差修正機能が付いています。
注意
スプリングドライブはぜんまいの力で動きます。
パワーリザーブ表示を確認しながら、
充分に巻き上げてご使用ください。
⇒ ■パワーリザーブ表示について P. 12参照
■各部の名称とはたらき
●基本部分
●りゅうずの機能
クロノグラフ針(分)
センタークロノグラフ針(秒)
スタート/ストップボタン
りゅうず
カレンダー
小秒針
クロノグラフ針(時)
パワーリザーブ表示針
リセットボタン
24 時針
※表示の位置やデザインは、モデルによって異なる場合があります。
L :ねじロック位置
L
0
1
2
0 :ねじロック解除位置:ぜんまい巻き上げ(手巻)
1 :カレンダー合わせ
分針
時針
ねじロックりゅうず
2 :時刻合わせ
ねじロック式のりゅうずを操作をする場合は、ロックをはずしてください。
誤操作を防ぐために、操作しないときは必ずロックをしておいてください。
⇒ ●ねじロックりゅうずについて P . 8参照(次ページ)
■ねじロックりゅうずについて
●ねじロックりゅうずの使いかた
誤操作を防ぐために、使わないときにりゅうずをロックできる構造です。
ロックのはずしかた
ロックのしかた
りゅうずを操作するときは、ロックをはずしてください。
操作が終わったらロックをしてください。
ロックされた状態
ロックをはずした状態
ゆるめる
押しつけながら回す
りゅうずを左(下方向)に回してくだ
さい。ねじがゆるんで、操作できるよ
うになります。
りゅうずを時計本体に軽く押しつけな
がら、右(上方向)に止まるところま
で回してください。
注意 ロックをするときは、ねじのかみあい具合に注意してゆっくりと押しながら回してく
ださい。無理に押し込むと、ねじ部(ケース)を壊す恐れがありますのでご注意く
ださい。
※ロックをはずした状態でりゅうずが引き出せます。
■ぜんまいの巻き上げについて
●りゅうずを使ったぜんまいの巻き上げかた
この時計は自動巻式(手巻つき)です。腕に着けてご使用いただくと、自然な
腕の動きでぜんまいが自動的に巻き上がります。
止まっている時計を駆動させるときは、りゅうずを回してぜんまいを巻き上げる
ことをおすすめします。
●巻き上げのめやす
10
自動巻:1日あたり12時間の携帯で、連続して3~5日間使用すると、
フル巻き上げの状態になると想定しています。
手巻:りゅうずを5回転させると、約10時間ぶん駆動させることができます。
1.りゅうずのロックをはずしてください。
2.りゅうずを押し付けないように注意しながら、
右(上方向)にゆっくり回して、
パワーリザーブ表示がフル巻き上げの状態になるまで、
ぜんまいを巻き上げてください。
小秒針が動きはじめます。
11
3.操作が終わったら、
りゅうずをロックしてください。
パワーリザーブ表示を確認してください。
⇒ ●ねじロックりゅうずの使いかた P . 9参照
⇒ ■パワーリザーブ表示について P . 12参照
⇒ ●パワーリザーブ表示の見かた P . 13参照
※この時計のぜんまいは、必要以上に巻き上がらない構造になっています。
フル巻き上げの状態から更にりゅうずを回しても、ぜんまいはそれ以上巻き上がりません。
りゅうずを回し続けても時計が壊れることはありませんが、無理な操作はお控えください。
※低温下(0℃以下)では、パワーリザーブ表示が1/6以上の状態でご使用ください。
巻き上げに続いて時刻やカレンダーを合わせるときは、
りゅうずをロックせずにそのまま操作してください。
■パワーリザーブ表示について
●パワーリザーブ表示の見かた
⇒ ●時刻の合わせかた P. 14 参照、●カレンダーの合わせかた P. 18参照
パワーリザーブ表示で、ぜんまいの巻き上げ状態(残量)の
めやすが確認できます。
パワー
リザーブ
の状態
時計を腕からはずして置いておくときは、次に
使用(携帯)するときまで動き続けるかどうか
をパワーリザーブ表示で確認し、必要に応じ
てぜんまいを巻き上げておきましょう。
12
(時計を止めないようにして使い続けるために
は、余裕を持った時間ぶんを巻き上げるよう
にしましょう。)
13
ぜんまい
の状態
フル巻き上げ
半分程度
巻き上げなし
持続時間
約72時間
(約3日間)
約36時間
(約1日半)
時計が止まっている
または
止まる直前の状態
パワーリザーブ表示
※持続時間はお客様の使用状況(時計を携帯、使用する時間や運動量など)によって異なります。
※1日の使用時間が短いときは、パワーリザーブ表示を確認の上、必要に応じてぜんまいを巻き
上げてください。
※この時計のぜんまいは、必要以上に巻き上がらない構造になっています。
フル巻き上げの状態から更にりゅうずを回しても、ぜんまいはそれ以上巻き上がりません。
りゅうずを回し続けても時計が壊れることはありませんが、無理な操作はお控えください。
■時刻・カレンダーを合わせるには
4.時計回りに針が進むように、
りゅうずを回し、分針と24時針に
注目しながら時刻を合わせます。
合わせたい時刻の手前から、分針を
ゆっくり進めて合わせてください。
時刻・カレンダーを合わせるときは、24時針と分針を最初に合わせ、
その後で時針とカレンダーを合わせます。
●時刻の合わせかた
1.ぜんまいが巻き上げられた状態で、時計が動いていることを確認します。
※日付・時刻を合わせるときは、必ず時計が動いている状態で行ってください。
14
小秒針が
0秒位置
2.りゅうずのロックをはずしてください。
⇒ ●ねじロックりゅうずの使いかた P.9参照
3.小秒針が0秒位置にあるときに
りゅうずを2段目まで引き出し、
秒針を止めます
りゅうずを
2段引く
時計回りで
分針と
24 時針を
合わせる
※時針が、合わせたい時刻とは異なる時刻を
指しているときや、時針の位置によって
カレンダーの日付が変わることがありますが、
まず先に、分針と24時針を合わせましょう。
5.時報などに合わせて
りゅうずを押し込みます。
※これで24時針、分針、
小秒針が現在時刻に合った
状態になります。
時報に合わせ
りゅうずを
押し込む
15
6.次に、時針とカレンダーを
合わせます。りゅうずを1段目
まで引き出して
ください。
りゅうずを
1段引く
●より正確に時刻を合わせるために
7.りゅうずを回して時針を合わせます。
りゅうずを回したときにカレンダーの
日付が変わるところが午前0時です。
午前・午後を確認して時刻を
合わせましょう。
カレンダーを合わせたいときは、
ここで一緒に合わせてください。
16
スプリングドライブ機構の構造上、下記の点に注意しながら操作していただくと
より正確に時刻が合わせられます。
1.時刻を合わせる前に、ぜんまいを充分に巻き上げてください。
(パワーリザーブ表示を見て、フル巻上げの状態にしましょう。)
2.止まっている時計を駆動させるときは、ぜんまいを充分に巻き上げてく
ださい。その後、時刻を合わせるときは、30秒間ほど小秒針が動いて
からりゅうずを2段目に引き出してください。
※りゅうずはどちらの方向へも回せますが、
できるだけ日付修正が少ない方向で
合わせてください。
※りゅうずを回すときは、時針の1時間単位の
動きを確認しながら、ゆっくりと回してください。
※時針を合わせているときに、他の針が少し
動くことがありますが故障ではありません。
17
3.りゅうずを2段目まで引き出すと小秒針が止まります。小秒針を止めて
いる時間は30分以内にしてください。それ以上の時間りゅうずを引き
出していたときは、一旦りゅうずを押し込み、30秒間ほど小秒針が動
いてから時刻合わせを行ってください。
8.りゅうずを押し込むと操作は完了です。
りゅうずをロックしてください。
4.PM9:00~AM 1:00の時間帯に時刻を合わせるときは、
時針をPM8:00まで戻してから合わせてください。
(カレンダーを回す歯車を、きちんとかみ合わせるための動作です。)
⇒ ●ねじロックりゅうずの使いかた P.9参照
●カレンダーの合わせかた
カレンダーを合わせるには、時針を2周させて1日ぶんの日付修正を行います。
時針を、時計回りに2周(24時間ぶん)回すと「日を送る」ことができます。
逆に回すと「日を戻す」ことができます。
4.りゅうずを回して、時針を2周させるごとに、日付が
「1日ぶん」修正されます。
りゅうずを回したときにカレンダーの日付が変わるところが午前0時です。
午前・午後を確認して合わせましょう。
右(上方向)に回す:
時針を2周させると日付が1日戻ります。
※小の月(2、4、6、9、11 月)が終わった翌日などにカレンダー合わせを行ってください。
1.ぜんまいが巻き上げられた状態で、時計が動いていることを確認します。
18
※日付・時刻を合わせるときは、必ず時計が動いている状態で行ってください。
修正前
2.りゅうずのロックをはずしてください。
⇒ ●ねじロックりゅうずの使いかた P.9参照
3.りゅうずを1段目まで引き出して
ください。
⇒ ●ねじロックりゅうずの使いかた P.9参照
20
※この操作では時針とカレンダーが連動して動きます。
そのため、時刻の午前・午後が合っていないと、カレンダーが半日ずれることがあります。
※りゅうずはどちらの方向へも回せますが、できるだけ日付修正が少ない方向で合わせてください。
※りゅうずを回すときは、時針の 1 時間単位の動きを確認しながら、ゆっくりと回してください。
※時針を合わせているときに、他の針が少し動くことがありますが故障ではありません。
■時差修正機能について
時差のある地域へ移動するときなどに、簡単に目的地の時刻に合わせられます。
操作のときに時計を止めることがありません。
時針は目的地の時刻を示し、24時針は元の地域の時刻を示します。
時針はカレンダーと連動しているため、正しい操作が行なわれると目的地の日付
を表示します。
●時差修正機能の使いかた
22
1.ぜんまいが巻き上げられた状態で、時計が動いていることを確認します。
※操作は、必ず時計が動いている状態で行ってください。
● 24 時針の使いかた
24 時針には以下の2つの機能があります。
タイプ1:午前・午後を区別する
タイプ2:デュアルタイムとして使う
時 分 針が示 す時 刻を 24 時間制で 時差修正機能を使って、時分針が示す
表示する(通常の使いかた)
時刻とは異なる地域の時刻を表示する
(1時間以上の時差がある地域の時刻)
⇒ ■時差修正機能の使いかた P.22
(次ページ)参照
時 分 針、24 時 針
ともに日本時間
午前 10 時
21
時分針:日本時間
午前 10 時
24 時針:ニューヨーク
午後 8 時(20 時)
4.りゅうずを回して目的地の時刻に合わせます。
午前・午後、日付を確認して合わせましょう。
※この操作では時針とカレンダーが連動して動きます。
時刻の午前・午後が合っていないと、カレンダーが半日ずれることがあります。
⇒ ●世界の主な地域の時差一覧 P . 26参照
右
(上方向)
に回す:
マイナス
1時間
左
(下方向)
23
に回す:
プラス
1 時間
2.りゅうずのロックをはずしてください。
⇒ ●ねじロックりゅうずの使いかた P.9参照
3.りゅうずを1段目まで引き出して
ください。
りゅうずを
1段引く
19
左(下方向)に回す:
時針を2周させると日付が1日送られます。
りゅうずを
1段引く
5.操作が終わったら、時刻が合っているかどうかを確認して
りゅうずを押し込んでください。これで操作は完了です。
りゅうずをロックしてください。
※りゅうずはどちらの方向へも回せますが、
できるだけ修正が少ない方向で合わせてください。
※りゅうずはゆっくりと回してください。
※時針を合わせているとき、他の針が少し動くことが
ありますが故障ではありません。
※りゅうずはどちらの方向へも回せますが、できるだけ修正が少ない方向で合わせてください。
※りゅうずを回すときは、時針の1時間単位の動きを確認しながらゆっくりと回してください。
※りゅうずを回したときにカレンダーの日付が変わるところが午前0時です。
※時針を合わせているとき、他の針が少し動くことがありますが故障ではありません。
5.操作が終わったら、時刻が合っているかどうかを確認して
りゅうずを押し込んでください。これで操作は完了です。
りゅうずをロックしてください。
⇒ ●ねじロックりゅうずの使いかた P.9参照
●目的別の使いかた
時差修正機能を使うと、2つの地域の時刻を表示させるデュアルタイムとしてお
使いいただけます。表示のしかたは2通りあり、目的によって使い分けることが
できます。
※PM9:00~AM 1:00の時間帯に時刻を合わせるときは、
時針をPM8:00まで戻してから合わせてください。
24
25
例1:
時針・カレンダー:A 地域(日本)
24時針:B 地域(ニューヨーク)
例2:
時針・カレンダー:B 地域(ニューヨーク)
24時針:A 地域(日本)
24時針を合わせた後で、時針を合わせます。
●世界の主な地域の時差一覧
⇒ ●時差修正機能の使いかた P. 22参照
★印の地域ではサマータイムが導入されています。
(07/4 月現在)
代表都市名
26
日本からの時差 UTC からの時差
+12時間
+11時間
+10時間
+9時間
+8時間
その他の都市
ウェリントン★
ヌーメア
シドニー★
東京
香港
+3時間
+2時間
+1時間
±0時間
-1時間
フィジー諸島、オークランド★
ソロモン諸島
グアム島、ハバロフスク★
ソウル、平壌
マニラ、北京、シンガポール
バンコク
ダッカ
-2時間
-3時間
+7時間 ジャカルタ
+6時間
カラチ
ドバイ
モスクワ★
カイロ★
-4時間
-5時間
-6時間
-7時間
+5時間 タシケント★
+4時間
+3時間 メッカ、ナイロビ
+2時間 アテネ★、イスタンブール★
※世界各地には協定世界時(UTC)を基準にした時刻の差、時差があります。世界各地は1時
間ごとの時差を持つ24の地域に分けられており、地球1周で24時間(1日)になるように、
国際的に運用しています。地域によっては個別にサマータイム(夏時間)が設定されています。
※サマータイムは時差+1時間で、夏の間に時刻を1時間進めて、昼間の時間を長くする制度です。
代表都市名
日本からの時差 UTC からの時差
パリ★
-8時間
ロンドン★
アゾレス諸島★
-9時間
-10時間
±0時間 カサブランカ
-1時間
リオデジャネイロ★
-12時間
-3時間
サンティアゴ★
ニューヨーク★
-13時間
-14時間
-4時間
-5時間 ワシントン★、モントリオール★
シカゴ★
デンバー★
ロサンゼルス★
アンカレッジ★
-15時間
-16時間
-17時間
-18時間
-6時間 メキシコシティー★
-7時間 エドモントン★
-8時間 サンフランシスコ★
-9時間
ホノルル
-19時間
-10時間
※各地域の時差、及びサマータイムは、国または地域の都合により変更される場合があります。
ミッドウェイ島
-20時間
-11時間
■クロノグラフについて
●クロノグラフ部の名称とはたらき
クロノグラフとは、ストップウオッチ機能と時刻表示機能を合わせ持った時計の
ことです。
この時計では、最大12時間まで計測することができます。
●お使いになる前に
28
センタークロノグラフ針(秒)
1.ぜんまいが巻き上げられた状態で、時計が動いていることを確認します。
スタート/ストップボタン
29
12時間計
クロノグラフ針(時)
2.センタークロノグラフ針が0位置に合っているか確認してください。
合っていないときはリセットボタンを押してください。
●クロノグラフ(ストップウオッチ機能)の使いかた
27
30分計
クロノグラフ針(分)
1.ぜんまいを充分に巻き上げてください。
(パワーリザーブ表示を見て、フル巻き上げの状態にしましょう。)
ストップウオッチ機能を使うときは、必ず時計が駆動している状態で行って
ください。
※ストップウオッチ機能の動作中にりゅうずを引きだすと、計測が止まりますのでご注意ください。
その他の都市
+1時間 ローマ★、アムステルダム★
リセットボタン
※表示の位置やデザインは、モデルによって異なることがあります。
3.計測をとめる
計測したいタイミングで
再度スタート / ストップボタンを押すと
クロノグラフ針が止まります。
例:6時間20分10秒
※30分計は1時間で2周します。
30分計を読み取るときは、
12時間計の表示をめやすにしてください。
30
2.計測を始める
スタート / ストップボタンを押すと
クロノグラフ針が動き、
計測が始まります。
4.針を戻す
ストップした状態で
リセットボタンを押すと
すべてのクロノグラフ針が
0位置に戻ります。
31
●積算計測のしかた
1.ぜんまいが巻き上げられた状態で、時計が動いていることを確認します。
3.計測をとめる
計測したいタイミングで
再度スタート / ストップボタンを押すと
クロノグラフ針が止まり、
計測値が表示されます。
32
33
2.計測を始める
4.計測を再スタートする
スタート / ストップボタンを押すと
クロノグラフ針が動き、
計測が始まります。
スタート / ストップボタンを押すと
4でストップした位置から
クロノグラフ針が動き始めます。
■ケース構造について
5.計測をとめる
計測したいタイミングで
スタート / ストップボタンを押すと
クロノグラフ針が止まります。
このときの計測値は、1回目と2回目の
データの合計(積算値)です。
特殊なケース構造になっています。
ご使用に際しては下記内容に注意し、
安全な使用を心がけてください。
4か所にケースの縁部分を固定するた
めの柱が立っています。
6.繰り返し積算する
34
必要に応じて4、5を繰り返します。
このように、スタート / ストップボタンを
繰り返し押すと、積算計として計測する
ことができます。
※柱の固定や留めネジに異常を発見した場合は、お買い上げ店にご相談ください。
2.ケースは、厚く特殊な形状をしています。携帯時に他のものにぶつけるなどして、
思わぬケガをする可能性もありますので、携帯中は十分な注意が必要です。
剣先(けんさき)
上箱(うわばこ)
小穴(こあな)
1.上箱を持ち上げて、バン
ドの剣先(12 時側先端)
を上箱の中に通します。
適当な長さのところで
ピンを小穴に入れて、
バンドを固定します。
定革(ていかく)
遊革(ゆうかく)
2.剣先を、定革と遊革に
通します。
3.上箱をカチッと音がする
まで押して、しっかりと
留めます。
※装着するときは、バンドの剣先(12 時側先端)を定革・遊革に入れた後で、
中留を留めてください。
■製品仕様
1 . 基 本 機 能・・・・・ 3針
( 時・分・小 秒 針 )、 24時 針、 カレンダー 表 示 、
日付 連 動 式 時 差 修 正 機 能 、 パワーリザーブ 表 示
ストップウオッチ機 能:センタークロノグラフ針
( 秒)、クロノグラ
フ針
( 時・分)
2 . 水 晶 振 動 数・・・ 32,768Hz
3 . 精 度・・・・・・・・・・ 平 均月差 ±15秒以 内
( 日差 ±1秒 相 当 )
※気 温5℃~35℃において 腕 に 着 けた 場 合
4 .作 動 温 度 範 囲・ -10℃~ +60℃
37
※低 温下
( 0℃以 下 ) で は 、 パワーリザーブ 表 示 が1/6以 上
の 状 態 でご使 用ください 。
5 . 駆 動 方 式・・・・・ ぜんまい 巻き<自 動 巻
( 手 巻 つき) >
6 . 運 針 方 式・・・・・ スイープ 運 針
7. 持 続 時 間・・・・・ 通 常 時・ストップウオッチ機 能 作 動 時:約72時 間
( 約3日間 )
( パワーリザーブ 表 示 がフル 巻き上げの 場 合)
※ 使 用 環 境 により、 持 続 時 間 が 短くなる可 能 性 があります。
8 .電 子 回 路 ・・・・・ 発 振・分 周・スプリングドライブ 制 御 回 路
( C - M O S - I C ):1個
9 . 使 用 石 数 ・・・・・ 50石
※ 仕 様 は 改 良 のため 予 告なく変 更 することがあります。
■アフターサービスについて
■補修用性能部品について
・お買い求めいただきましたガランテは、厳重な検査・調整を行った後、お手も
とにお届けしております。しかし、取扱説明書に沿った正常なご使用状態で、
万が一、保証期間内に不具合が生じた場合には、保証書を添えてお買い上げ
・ガランテの補修用性能部品の保有期間は、通常 10 年を基準としています。
正常なご使用であれば、この期間中は原則として修理が可能です。
(補修用性
店へお持ちください。メーカーにて無料で修理・調整させていただきます。
38
・保証期間は、お買い上げ日より 1 年間(ムーブメントについては 2 年間)です。
その他の保証内容の詳細については、保証書に記載してあります。
・保証期間経過後の修理、およびガランテについてのご相談は、お買い上げ店
で承っております。その他わからない点がございましたら、下記の弊社お客様
相談室までお問い合わせください。
セイコーウオッチ(株)お客様相談室
ガランテ専用フリーダイヤル 0120 - 302 - 617
受付時間:月曜~金曜
9:30 ~ 21:00
土曜・日曜・祝日 9:30 ~ 17:30
35
1.この柱を固定しているネジ、および柱の先端にある留めネジは、絶対にゆるめな
いでください。故障や紛失の原因になります。
■レザーバンド用ワンプッシュ三つ折れ方式中留の使いかた
ピン
柱
注意
7.針を戻す
ストップした状態で、リセットボタンを
押すと、すべてのクロノグラフ針が
0位置に戻ります。
36
縁(ふち)
能部品とは、時計の機能を維持するのに必要な修理用部品です。)
・修理可能な期間は、ご使用条件により著しく異なります。精度が元通りにな
らない場合もありますので、修理ご依頼の際にお買い上げ店とよくご相談くだ
さい。
・修理のとき、ケース・文字板・針・ガラス・バンドなどは一部代替部品を使用
させていただくことがありますのでご了承ください。
・その他わからない点がございましたら、左記の弊社お客様相談室までお問い
合わせください。
39
■使用上の注意とお手入れのしかた
注意
注意
日常のお手入れ
・ケースやバンドは肌着類と同様に直接肌に接しています。汚れたままにしておくと
サビて衣類の袖口を汚したり、かぶれの原因になることがありますので、常に清潔に
してご使用ください。
40
かぶれやアレルギーについて
・バンドは多少余裕を持たせ、通気性をよくしてご使用ください。
・時計を外したときに、柔らかい布などで汚れや、汗、水分をふき取るだけで、
ケース・バンド及びパッキンの寿命が違ってきます。
〈革バンド〉
・革バンドは、柔らかい布などで吸い取るように軽くふいてください。
こするようにふくと色が落ちたり、ツヤがなくなったりする場合があります。
〈金属バンド〉
・金属バンドは、ときどき柔らかい歯ブラシなどを使い、部分洗いなどのお手入れを
お願いします。
注意 防水性能
・かぶれやすい体質の人や、体調によっては、皮膚にかゆみやかぶれをきたすことがあ
ります。
・かぶれの原因として考えられるのは、
1.金属・皮革に対するアレルギー
2.時計本体及びバンドに発生した錆、汚れ、付着した汗などです。
・万が一、肌などに異常を生じた場合は、ただちに使用を中止し、医師にご相談ください。
警告
防水性能
・日常生活用防水(3気圧)の時計は水の中に入れてしまうような環境での使用はでき
ません。
・日常生活用強化防水(5気圧)の時計は、スキンダイビングを含めて全ての潜水に使
用できません。
・日常生活用強化防水(10、20 気圧)の時計は、飽和潜水/空気潜水には使用できません。
時計の裏ぶたでも性能と型式の確認ができます
・…時計の文字板、または裏ぶたにある防水性能表示をご確認の上、ご使用ください。
・…水分のついたままりゅうずを回したり、引き出したりしないでください。
… 時計内部に水分が入ることがあります。
時計の防水表示…
上段:文字板…
下段:裏ぶた…
42
防水の…
基準…
雨や洗顔など日常生活… 水に関係の深い仕事(農水産・園… 空気ボンベを使用しない… 空気ボンベを使用する…ヘリウムガスを使用す…
で予想される「水がか… 芸・食堂など)やスポーツ(水泳… 潜水(スキンダイビング)…潜水(スキューバ潜水)…る潜水方式(飽和潜水)…
やヨット)で使用できる程度… で使用できる程度…
かる」程度…
に使用できる…
に使用できる…
×…
◯…
×…
×…
×…
×…
×…
×…
×…
×…
日常生活用強化防水…
(5気圧防水)…
◯…
◯…
×…
×…
×…
非防水…
表示なし…
または…
WATER RESIST 20 BAR
◯…
◯…
◯…
×…
×…
日常生活用強化防水…
(20気圧防水)…
◯…
◯…
◯…
×…
×…
WATER RESIST 20 BAR
44
43
耐磁性能
0� �
日常生活用強化防水…
(10気圧防水)…
WATER RESIST 10 BAR
型式番号
お客様の時計の
種類を示す番号
0� �A
日常生活用防水…
(3気圧防水)…
�6-� �0
WATER RESIST
または…
WATER RESIST 5 BAR
表示なし…
または…
WATER RESIST 10 BAR
防水性能
P.41 ~ P.42
を参照ください
使用例…
�
5 R8
表示なし
表示なし
表示なし
WATER RESIST
表示なし
P.44 ~ P.45
を参照ください
※上の図は例であり、お買い上げいただいた時計とは異なる場合があります。
●耐磁性能について(磁気の影響)
●時計に影響を及ぼす身の周りの磁気製品
・ガランテのスプリングドライブは、JIS 1種の耐磁水準をクリアしています。日
常生活において磁界を発生する機器に5cm まで近づけても、ほとんどの場合、
性能を維持できる耐磁性能を備えておりますが、強い磁界に遭遇するとムーブ
メント部品が磁気を帯びてしまい、精度が狂ってしまうことがあります。身の
周りの強い磁界を発生する機器(磁石を使った健康器具、スピーカー、携帯
電話など)の5cm 以内に近づけないようご注意ください。
・身の周りには、このように磁気を発するものがあります。
JIS 耐磁時計種類 耐磁性保証水準 耐磁表示(裏ぶた)
1種
41
4800A/m
耐磁性
日常生活において磁界を発生する機器に
5cm まで近づけても、ほとんどの場合、
性能を維持できる耐磁性水準
・ マグネットクリップ
45
・ 磁石を使ったアクセサリー
・ オーディオ機器、ラジオ、イヤホン、
携帯電話などのスピーカー
・なお、磁気を帯びたことが原因で、携帯使用時の精度めやす範囲(平均月差
± 15 秒)を超えている場合、磁気の除去および精度の再調整作業は、保証
期間にかかわらず有料とさせていただきます。
・ 磁気治療器
・ 冷蔵庫や家具のドアの
(シップ、寝具、腰痛バンドなど)
マグネット
●保管について
●分解掃除による点検調整(オーバーホール)について
・-10℃~+60℃からはずれた温度下では、機能が劣化したり、停止したり
する場合があります。
・この時計の点検、および分解掃除はメーカーにて行います。お買い上げ店には、
メーカーへ依頼するようお申しつけください。
・長くご愛用いただくために、3~4年に1回程度の分解掃除による点検調整
(オーバーホール)をおすすめします。
・磁気の影響(テレビ、スピーカー、磁気ネックレスなど)があるところに放置し
ないでください。
・強い振動のあるところに放置しないでください。
46
・ バッグや財布の留め金
・極端にホコリの多いところに放置しないでください。
・薬品の蒸気が発散しているところや、薬品に触れるところに放置しないでくだ
さい。
(薬品の例:ベンジン、シンナーなどの有機溶剤、およびそれらを含有
するもの、ガソリン、マニキュア、化粧品などのスプレー液、クリーナー剤、ト
イレ用洗剤、接着剤など、水銀、ヨウ素系消毒液など)
・温泉や、防虫剤の入った引き出しなど、特殊な環境に放置しないでください。
※この時計のムーブメントは、機構の性質上、動力を伝達する歯車部分に常に力が加わって
います。これらが正常に機能するためには、定期的な部品の洗浄、油の交換、精度の調整、
機能チェック、消耗部品の交換などが大切です。
特に、
お買い上げ後3~4年目の分解掃除による点検調整(オーバーホール)を行うことが、
長く使用するために重要です。
ご使用状況によっては、機械の保油状態が損なわれたり、油の汚れなどによって部品が磨
耗し、止まりにいたることがあります。また、パッキン等の部品の劣化が進み、汗や水分
の浸入などで防水性能が損なわれる場合があります。分解掃除による点検調整(オーバー
ホール)を、お買い上げ店にご指定ください。部品交換のときは、
「純正部品」とご指定
ください。分解掃除による点検調整(オーバーホール)の際には、パッキンやバネ棒の交
換もあわせてご依頼ください。
・その他わからない点がございましたら、下記の弊社お客様相談室までお問い
合わせください。
セイコーウオッチ(株)お客様相談室
ガランテ専用フリーダイヤル 0120 - 302 - 617
受付時間:月曜~金曜 9:30 ~ 21:00 土曜・日曜・祝日 9:30 ~ 17:30
47
■こんなときには
現象
時計が止まっている
(クロノグラフ針が動かない)
考えられる原因
このようにしてください
ぜんまいを巻き上げ、時刻を合わせ直してご使用ください。
携帯中や時計を外す際は、パワーリザーブ表示の針を確認し、必要に応じてぜんまいを巻いてください。
ぜんまいの巻き上げがされていない
毎日使用しているが、パワーリザーブ表示が
携帯時間が少ないか、あるいは腕の動きが少ない
上がらない
48
時計が一時的に進む/遅れる
ガラスのくもりが消えない
暑いところ、または寒いところへ放置した
常温に戻れば元の精度に戻ります。時刻を合わせ直してください。
この時計は気温5℃~35℃で腕に着けたときに安定した時間精度が得られるように調整してあります。
磁気を発生するもののそばに置いた
磁気を遠ざけると、元の精度に戻ります。時刻を合わせ直してください。
元に戻らない場合は、お買い上げ店にご相談ください。
落とした、強くぶつけた、または激しいスポーツをし
たなど、強い衝撃や振動が加えられた
時刻を合わせ直してください。
元に戻らない場合は、お買い上げ店にご相談ください。
パッキンの劣化などにより時計内部に水分が入った
お買い上げ店にご相談ください。
49
パワーリザーブ表示の残量があるのに時計が
低温下(0℃以下)に放置した
止まった
低温下(0℃以下)では、パワーリザーブ表示が「1/6」以下になると時計が止まることがあります。
りゅうずを回してぜんまいを巻いてください。
止まっている時計を駆動させた直後、時刻合 動き始めのときは調速機構が働くまで、
わせをしたら、秒針の運針が早く見えた
やや時間がかかります。
(故障ではありません)
調速機構がはたらくまでに数秒間かかります。
より正確に時刻を合わせるには、30秒程度秒針が動いてから、時刻合わせをしてください。
日付が日中に変わる
りゅうずを回したときに日付が変わるところが午前0時です。
午前・午後を確認して、再度時刻を合わせてください。
時刻が12時間ずれている
※その他の現象はお買い上げ店にご相談ください。
⇒ ●りゅうずを使ったぜんまいの巻き上げかた P. 11、●時刻の合わせかた P. 14
CONTENTS
50
携帯する時間を長くしてください。または、パワーリザーブ表示に注意し、時計をはずす際に、
次に携帯するまでの身に着けない時間の分を、りゅうずを回してぜんまいを巻き上げておいてください。
■ CHARACTERISTICS ………………………………………………………53
■ NAMES OF THE PARTS AND THEIR FUNCTION …………………54
■ SCREW LOCK TYPE CROWN ……………………………………………56
How to use the screw lock type crown ……………………………………57
■ HOW TO WIND THE MAINSPRING ……………………………………58
Guide for winding state of the mainspring …………………………………58
How to manually wind the mainspring by turning the crown ……………59
■ POWER RESERVE INDICATOR …………………………………………60
How to read the power reserve indicator …………………………………61
■ HOW TO SET THE TIME AND CALENDAR …………………………62
How to set the time …………………………………………………………62
Tips for more accurate time setting ………………………………………65
How to set the calendar ………………………………………………………66
How to use the 24-hour hand ………………………………………………69
■ TIME DIFFERENCE ADJUSTMENT FUNCTION …………………70
How to use the time difference adjustment function ……………………70
List of time zone differences in major regions of the world …………… 74
■ CHRONOGRAPH ……………………………………………………………76
How to use the chronograph (stopwatch) …………………………………78
Accumulated elapsed time measurement ……………………………………80
■ STRUCTURE OF THE CASE ……………………………………………83
■H
OW TO USE THE THREE-PIECE FOLDOVER CLASP FOR A LEATHER BAND …84
■ SPECIFICATIONS …………………………………………………………85
■ REMARKS ON AFTER-SALES SERVICING …………………………86
■ REMARKS ON REPLACEMENT PARTS ………………………………87
■ TO PRESERVE THE QUALITY OF YOUR WATCH …………………88
■ TROUBLESHOOTING ……………………………………………………96
51
■ CHARACTERISTICS
You are now the proud owner of a GALANTE watch. GALANTE
watches are designed and manufactured to operate with extremely
high accuracy by taking advantage of SEIKO'S more than 100
years of experience in watch making and the advanced technology
52
that SEIKO can boast to the world.
To preserve the highest quality of your GALANTE watch, please
read the instructions in this booklet carefully for its proper use
and care, and keep this booklet for ready reference.
Center chronograph second hand
Hour hand
● The mechanism of the crown
Chronograph minute hand
START/STOP button
Minute hand
Crown
54
Calendar
Small second hand
Power reserve indicator
53
CAUTION Spring Drive works by the power provided by the mainspring. Remember to check the power reserve indicator and keep the mainspring of the watch sufficiently wound while using the watch.
⇒ ■ Refer to "POWER RESERVE INDICATOR" on page 60.
■ NAMES OF THE PARTS AND THEIR FUNCTION
● Basic mechanism
Spring Drive, the unique mechanism made available only by SEIKO technology, ensures
quartz accuracy while using the mainspring as its sole power source.
With Spring Drive as its basic structure, the Spring Drive Chronograph features the
world's first center chronograph that has a glide-motion second hand.
In addition to the self-winding mechanism, which uses the natural motion of the wearer's
arm as a power source to wind its mainspring, the watch is equipped with the manual winding mechanism, which is convenient to wind the mainspring when you start using the watch.
The watch keeps working for approximately 72 hours (three days) when the mainspring is
fully wound.
The watch features the power reserve indicator to show the winding state of the mainspring.
The glide-motion second hand that moves around the dial in a perfectly smooth movement is
one of the remarkable features of this watch.
The watch is also equipped with a 24-hour hand, offering a time difference adjustment function, which works in conjunction with the calendar.
Chronograph hour hand
RESET button
24-hour hand
※ The orientation and design of the display may vary depending on the model.
Screw lock type crown
L :Screw lock type crown is at the locked position.
L
0
1
2
0 :Screw lock type crown is at the unlocked position:
the mainspring can be manually wound.
1 :Screw lock type crown is positioned for calendar setting.
2 :Screw lock type crown is positioned for time setting.
55
Before operating the screw lock type crown, it is necessary to unlock it.
In order to prevent any operational errors, once you have finished operating the crown, make
sure to relock it.
⇒ ● Refer to“SCREW LOCK TYPE CROWN”on the following page 56.
■ SCREW LOCK TYPE CROWN
● How to use the screw lock type crown
The watch features a screw-lock mechanism that can securely lock the
crown to prevent any operational errors when it is not being operated.
How to unlock the screw lock type crown
How to lock the screw lock type crown
Screw lock type crown
It is necessary to unlock the screw lock type crown before operating it.
Once you have finished operating the crown, make sure to relock it.
Screw lock type crown is locked.
Screw lock type crown is unlocked.
56
57
To loosen
Turn the crown while pressing it in.
Turn the crown counterclockwise
(downward) to unscrew it.
Now the crown can be operated.
Turn the crown clockwise (upward)
while gently pressing it in toward
the watch body until it stops.
CAUTION
When locking the crown, turn it slowly with care, ensuring that the
screw is properly engaged. Be careful not to forcibly push it in, as doing so may
damage the screw hole in the case.
※ Once the crown is unlocked, you can pull it out.
■ HOW TO WIND THE MAINSPRING
● How to manually wind the mainspring by turning the crown
This watch is a self-winding watch equipped with a manual winding mechanism. When
the watch is worn on the wrist, the motion of the wearer’
s arm winds the mainspring
of the watch.
When first using a stopped watch, it is recommended that you manually wind the
mainspring by turning the crown.
● Guide for winding state of the mainspring
58
Self-winding : The mainspring of the watch is designed to be fully wound when it is
worn for twelve hours per day for three to five consecutive days.
Manual winding : Five full rotations of the crown will provide the power to run the
watch for approximately ten hours.
Observe the power reserve indicator to check the level of the remaining power.
⇒ ■ Refer to“POWER RESERVE INDICATOR”on page 60.
※ The watch employs a device to prevent overwinding of the mainspring. Once the mainspring is fully
wound, the mainspring slips inside, disengaging the winding mechanism. When this happens, you can
still turn the crown without damaging the watch, however, please refrain from excessive operation of the
mainspring.
※ Under a low-temperature condition (below 0℃), always keep at least one-sixth of the watch power shown
by the power reserve indicator.
■ POWER RESERVE INDICATOR
1.Unlock the crown.
2.Slowly turn the crown clockwise (upward) to wind the
mainspring with extra care not to press it in. Wind the
mainspring until the power reserve indicator shows
a full-wound state. Immediately, the
small second hand starts moving.
59
3.Once you finish winding the mainspring, make sure you relock the
crown.
⇒ ● Refer to“How to use the screw lock type
crown”on page 57.
⇒ ● Refer to“How to read the power reserve
indicator”on page 61.
In order to set the time and calendar after winding the
mainspring manually, do not relock the crown but continue the procedures.
⇒ ● Refer to“How to set the time”on page 62, and“How to set the calendar”on page 66.
● How to read the power reserve indicator
The power reserve indicator lets you know the winding state of the mainspring.
60
Power
Reserve
Indicator
Before removing the watch from your wrist,
observe the power reserve indicator to
check if the watch has stored enough power
to keep running until the next time you wear
it. If necessary, wind the mainspring. (To
prevent the watch from stopping, wind the
mainspring to store the excess power that
will allow the watch to run for extra time.)
Power reserve indicator
Fully wound
Half wound
Unwound
Number of
hours the
watch can run
Approximately 72
hours (3 days)
Approximately 36
hours (1.5 days)
The watch either
stops or is running
down.
※ The continuous operable time of the watch may vary depending on actual use conditions, such as the number of hours you wear the watch or the extent of your movement while wearing it.
※ In a case where you wear the watch for a short period of time each day, observe the power reserve indicator to check the level of the remaining power. If necessary, manually wind the mainspring.
※ The watch employs a device to prevent overwinding of the mainspring. Once the mainspring is fully
wound, the mainspring slips inside, disengaging the winding mechanism. When this happens, you can
still turn the crown without damaging the watch, however, please refrain from excessive operation of the
mainspring.
■ HOW TO SET THE TIME AND CALENDAR
4.Turn the crown to rotate the 24-hour
hand and minute hand clockwise and set
them to the current time. While doing
so, set the minute hand a few minutes
behind the correct time, and then slowly advance it to the exact minute(s).
To set the time and calendar, set the 24-hour hand and minute hand first,
and then set the hour hand and calendar.
● How to set the time
1.Make sure that the mainspring is sufficiently wound and the watch is
working.
62
61
Winding
state of the
mainspring
※ When setting the date and time, ensure that the watch is working.
Small second hand is
pointing at the“ 0 ”
second position.
2.Unlock the crown.
⇒ ● Refer to“How to use the screw lock
type crown”on page 57.
3.Pull out the crown to the second
click when the small second hand is
pointing at the“ 0 ”second position. The small second hand will
stop on the spot.
Pull out the
crown to
the second
click.
※ Only the 24-hour and minute hands are to be set
first. Even if the hour hand is indicating incorrect
time, or the date may be altered depending on the
position of the hour hand, it is not necessary to make
an adjustment at this stage.
Set the 24-hour
hand and minute
hand by rotating
them clockwise.
63
5.Push the crown back in simultane- 6.To move on to the hour hand
and calendar setting, pull the
ously with the time signal.
crow n out to
※ The setting of the
24 -hou r, minute a nd
the first click.
small second hands to
the current time is now
completed.
Push the crown back
in simultaneously with
the time signal.
Pull the crown out
to the first click.
● Tips for more accurate time setting
7.Turn the crown to set the hour hand.
While turning the crown, the moment the date changes is midnight.
When setting the hour hand, be
sure that AM/PM is set correctly.
Adjust the calendar also at this
point if necessary.
64
Keep in mind the following points in order to set the time more accurately.
1.Before setting the time, wind the mainspring sufficiently.
(Ensure that the power reserve indicator is showing a full-wound state.)
2.When starting to use a watch after it stops, wind the mainspring sufficiently.
To set the time after that, wait for approximately 30 seconds after the small
second hand starts to move, then pull the crown out to the second click.
※ The crown can be turned in either direction to adjust
the date, however, it is recommended to turn the crown
in the direction which enables you to set the date with
a smaller adjustment.
※ Turn the crown slowly, checking that the hour hand
moves in one-hour increments.
※ When adjusting the hour hand, the other hands may
move slightly. However, this is not a malfunction.
3.The small second hand will stop moving while the crown is at the second
click. Do not stop the small second hand movement for longer than 30 minutes. If the stoppage of the small second hand movement exceeds 30 minutes,
push the crown back in, and wait for at least 30 seconds after the small second hand restarts moving, and then continue the time setting.
8.Push the crown back in to complete the
time setting.
Relock the crown.
⇒ ● Refer to“How to use the screw lock type crown”on page 57.
● How to set the calendar
Two full rotations of the crown will change the date for one day.
The date advances one day by turning the hour hand two full rotations
clockwise (for 24 hours), while the date is set back one day by turning the
hour hand two full rotations counterclockwise.
4.To set the time during any time between 9:00 P.M. and 1:00 A.M., temporarily set the hour hand back to 8:00 P.M., and then set the time. (This procedure is required to ensure the proper engagement of the calendar driving
wheel.)
4.Each time the hour hand makes two full rotations by turning the crown,
the date is adjusted one day. While turning the crown, the moment the
date changes is midnight. When setting the hour hand, be sure that
AM/PM is set correctly.
Turning the crown clockwise (upward):
Each time the hour hand makes two full
rotations, the date is set back one day.
※ Manual date adjustment is required on the first day after a month that has less than 31
days: February, April, June, September and November.
66
1.Make sure that the mainspring is sufficiently wound and the watch is
working.
※ When setting the date and time, ensure that the watch is working.
Before date
adjustment
2.Unlock the crown.
⇒ ● Refer to“How to use the screw lock
type crown”on page 57.
3.Pull out the crown to the first click.
⇒ ● Refer to“How to use the screw lock type crown”on page 57.
68
※ The calendar is designed to work in conjunction with the movement of the hour hand, therefore,
incorrect setting of AM/PM will cause the date to change at noon.
※ The crown can be turned in either direction to adjust the date, however, it is recommended to
turn the crown in the direction which enables you to set the date with a smaller adjustment.
※ Turn the crown slowly, checking that the hour hand moves in one-hour increments.
※ When adjusting the hour hand, the other hands may move slightly. However, this is not a malfunction.
■ TIME DIFFERENCE ADJUSTMENT FUNCTION
For example, while traveling abroad and staying in a place with a different time from
where you live, you can conveniently set the watch to indicate the local time in the
different time zone area without stopping the watch.
The hour hand indicates the time of the place where you currently are, while the
24-hour hand indicates the time of the place of origin.
The calendar works in conjunction with the movement of the hour hand. If the time
difference is correctly adjusted, the watch displays the correct date of the place
where you are staying.
70
● How to use the time difference adjustment function
1.Make sure that the mainspring is sufficiently wound and the watch is working.
※ When setting the hour hand to use the time difference adjustment function, ensure that the watch is working.
※ The crown can be turned in either direction to adjust the
date, however, it is recommended to turn the crown in the
direction which enables you to set the date with a smaller
adjustment.
※ Turn the crown slowly.
※ When adjusting the hour hand, the other hands may move
slightly. However, this is not a malfunction.
● How to use the 24-hour hand
This watch has two different types of 24-hour hand usage.
Type 1:24-hour hand as an AM/PM indicator
Simply using the 24-hour hand to show the
24-hour time as an AM/PM indicator.
(This is the standard usage type for the
24-hour hand.)
Type 2:24-hour hand as a dual time indicator
Using the time difference adjustment function, set the
24-hour hand to indicate a time different from the
time that the hour and minute hand indicate, which is
of a place in a different time zone area with at least
one hour of time difference from where you are.
⇒ ■ Refer to“How to use the time difference adjustment function”on the following page 70.
Both the hour
hand and the
24-hour hand
are indicating
the Japan time
10:00 A.M.
Hour hand:Japan time 10:00
A.M
24-hour hand:New York
time 8:00 PM
3.Pull out the crown to the first click.
Pull out the crown
to the first click.
69
4.Turn the crown to set the hour hand to indicate the time of the place
where you are staying. Make sure that AM/PM is correctly set.
※ The calendar is designed to work in conjunction with the movement of the hour hand, therefore, incorrect
setting of AM/PM will cause the date to change at noon.
⇒ ● Refer to“List of time zone differences in major regions of the world”on page 74.
Tu r n i n g t h e
crow n clockwise (upward):
The hour hand
is set back one
hour.
Tu r n i n g t h e
c r ow n c o u n t erclo ck w is e
(d ow nwa r d ) :
The hour hand
is advanced
one hour.
2.Unlock the crown.
⇒ ● Refer to“How to use the screw lock type
crown”on page 57.
67
Turning the crown counterclockwise (downward):
Each time the hour hand makes two full rotations, the date is advanced one day.
Pull out the crown
to the first click.
5.Upon completion of setting, make sure that the time indicated is correct, and then push the crown back in. The calendar setting is now
completed. Relock the crown.
65
※ The crown can be turned in either direction to adjust the date, however, it is recommended to turn the crown
in the direction which enables you to set the date with a smaller adjustment.
※ Turn the crown slowly, checking that the hour hand moves in one-hour increments.
※ While turning the crown, the moment the date changes is midnight.
※ When adjusting the hour hand, the other hands may move slightly. However, this is not a malfunction.
71
5.Upon completion of setting, make sure that the time indicated is correct, and then push the crown back in. The setting procedure is now
completed. Relock the crown.
⇒ ● Refer to“How to use the screw lock type crown”on page 57.
● Selectable display mode
With the time difference adjustment function, the watch features a dual
time display which shows time in two different time zones. It offers two display modes which you can select to suit your needs and preference.
※ If you set the time during any time between 9:00 P.M. and 1:00 A.M., temporarily set the
hour hand back to 8:00 P.M., and then set the time.
72
73
Example 1:
Hour hand and calendar: Area A (Japan)
24-hour hand: Area B (New York)
Example 2:
Hour hand and calendar: Area B (New York)
24-hour hand: Area A (Japan)
Set the 24-hour hand first, and then set the hour hand.
● List of time zone differences in major regions of the world
⇒ ● Refer to“How to use the time difference adjustment function”on page 70.
Regions marked with ★ use daylight saving time (as of April, 2007).
Names of the cities
74
Wellington ★
Nouméa
Sydney ★
Tokyo
Hong Kong
Bangkok
Time difference Time difference
Other cities
from Japan
from UTC
+ 3 hours
+ 12 hours Fiji islands, Auckland ★
+ 2 hours
+ 11 hours Solomon Islands
+ 1 hours
+ 10 hours Guam, Khabarovsk ★
±0
+ 9 hours Seoul, Pingyang
- 1 hour
+ 8 hours Manila, Beijing, Singapore
- 2 hours
+ 7 hours Jakarta
※ There are time zone differences based on time offsets from Coordinated Universal Time (UTC), which
has been internationally adopted. The world is divided into 24 time zones, and neighboring time zones
have a one-hour time difference, so that they correspond to the rotation of the earth which makes one full
rotation in 24 hours (1 day). In some regions of the world, daylight saving time is individually observed.
※ Daylight saving time is a system that advances the official local time by one hour during the summer to
take advantage of longer daylight hours.
Names of the cities
Paris ★
London ★
Azores ★
Time difference Time difference
Other cities
from Japan
from UTC
- 8 hours
+ 1 hour Rome ★ , Amsterdam ★
- 9 hours
± 0 Casablanca
- 10 hours
- 1 hour
Rio de Janeiro ★
Santiago ★
New York ★
Chicago ★
Denver ★
Los Angels ★
Anchorage ★
- 12
- 13
- 14
- 15
- 16
- 17
- 18
※ The time differences and use of daylight saving time in each region are subject to change according to the
governments of the respective countries or regions.
Honolulu
Midway Islands
- 19 hours
- 20 hours
■ CHRONOGRAPH
● Names of the chronograph parts and their function
Dacca
- 3 hours
+ 6 hours
Karachi
Dubai
Moscow ★
Cairo ★
-
+
+
+
+
4
5
6
7
hours
hours
hours
hours
5
4
3
2
hours Tashkend ★
hours
hours Mecca, Nairobi
hours Athens ★ , Istanbul ★
hours
hours
hours
hours
hours
hours
hours
-
76
Center chronograph
second hand
1.Make sure that the mainspring is sufficiently wound and the watch is
working.
Washington ★ , Montreal ★
Mexico City ★
Edmonton ★
San Francisco ★
START/STOP
button
77
12-hour dial
Chronograph
hour hand
2.Make sure that the center chronograph second hand is pointing at the
“0”position. If it is not pointing at the“0”position, press the RESET
button.
● How to use the chronograph (stopwatch function)
75
30-minite dial
Chronograph minute hand
1.Make sure that the mainspring is sufficiently wound. Ensure that the
power reserve indicator shows a full-wound state of the mainspring.
When using the stopwatch function, ensure that the watch is working.
※ Do not pull out the crown while the stopwatch is working, as doing so will stop the measurement.
hours
hours
hours
hours
hours
hours
hours
- 10 hours
- 11 hours
A chronograph is a watch that has a stopwatch function in addition to a
time display function.
The chronograph of this watch can measure up to 12 hours.
● Before using the chronograph
3
4
5
6
7
8
9
RESET button
※ The orientation and design of the display may vary depending on the model.
3.Stop measuring time.
At the moment you want to finish
the measurement, press the START/
STOP button again to stop the
chronograph hands.
Example: 6 hours 20 minutes 10 seconds
78
2.Start measuring time.
Upon pressing of the START/
STOP button, the chronograph
hands start moving and the
chronograph starts measuring
time.
※ The chronograph minute hand on the 30-minute dial
completes two full rotations in an hour. The display of
the 12-hour dial will be helpful as a rough indication to
read the 30-minute dial.
4.Reset the chronograph hands.
After stopping the chronograph
hands, press the RESET button to
return all the chronograph hands to
the“0”position.
79
● Accumulated elapsed time measurement
1.Make sure that the mainspring is sufficiently wound and the watch is
working.
80
3.Stop measuring time.
At the moment you want to finish the
measurement, press the START/
STOP button again to stop the
chronograph hands. The measured
time will be displayed.
81
2.Start measuring time.
Upon pressing of the START/
STOP button, the chronograph
hands start moving and the
chronograph starts measuring
time.
4.Restart measuring time.
5.Stop measuring time.
■ STRUCTURE OF THE CASE
Upon pressing of the START/STOP
button again, the chronograph hands
restart moving from the position
they had previously stopped.
A t t h e m o m e n t y o u w a n t t o f i n i s h t h e
measurement, press the START/STOP button
again to stop the chronograph hands. The
measured time displayed at this time will be the
total of the first and the second measurement
(accumulated elapsed time).
The case of this watch has a special
structure.
Take particular note of the following
for safe use of the watch.
The four pillar case screws are
mounted in order to support the
frame of the case.
6.Repeat measuring time cumulatively.
82
St e p 4 a n d 5 a b ove c a n b e r e p e at e d a s
required.
As you repeat pressing of the START/STOP
button, the measurement will stop and restart
and each elapsed time measurement will be
accumulated.
※ If the pillar screws become loose or the setscrews are not securely tightened, consult the
retailer from whom the watch was purchased.
2.The case of this watch is thick and has a unique shape. While wearing the watch,
be careful not to hit the watch against other objects as this may cause you injuries.
■ HOW TO USE THE THREE-PIECE FOLDOVER CLASP FOR A LEATHER BAND
end of the band
clasp
hole
1.Unfasten the clasp, and
slide the end of the band
(at the 12 o’
clock side)
into it. Fix the length of
the band by placing the
pin into an appropriate
hole.
fixed loop
movable loop
2.Insert the end of the
band into both the
movable loop and the
fixed loop.
3.Push the clasp down
until it clicks to securely
fasten the band.
※ When wearing the watch, make sure that you insert the end of the band (at the 12 o’
clock side) into both
the movable loop and the fixed loop, and then securely fasten the clasp.
86
83
1.Never loosen the screws that are used to fix the pillar screws or setscrews that
are tightened at the tip of the pillar screws. Doing so may cause damage or result
in loosening them.
A f t e r s t o p p i n g t h e c h r o n o g r a p h h a n d s ,
press the RESET button to return all the
chronograph hands to the“ 0 ”position.
pin
pillar
CAUTION
7.Reset the chronograph hands.
84
frame
■ SPECIFICATIONS
1.Features …………………3 hands (hour, minute and small second hands), 24-hour hand, Calendar
display, Time difference adjustment function interrelated to calendar,
Power reserve indicator, Stopwatch function: Center chronograph second
hand, Chronograph hour and minute hands
2.Frequency of crystal oscillator …32,768 Hz
3.Loss/gain ………………Within ± 15 seconds per month (equivalent to ± 1 second per day) (worn
on your wrist at normal temperature range between 5℃ and 35℃ )
4.Operational temperature range…between -10℃ and +60℃
※ Under the low-temperature condition (below 0℃ ), always keep at least
one sixth of the watch power shown by the power reserve indicator.
5.Driving System …………Mainspring (Self-winding type with manual winding function)
6.Hand movement …………Glide-motion hands
7.Continuous operable time …Approx. 72 hours (Approx. 3 days) when the normal time display function
and stopwatch function are used. (If the power reserve indicator shows
the power supplied by the mainspring is full before starting the watch.)
※ Depending on conditions of use, the continuous operable time may
become shorter than the above.
8.IC (Integrated Circuit) …Oscillator, frequency divider, and spring drive control circuit (C-MOSIC): 1 piece
9.Number of jewels ………50 jewels
※ The specifications are subject to change without prior notice due to product improvements.
■ REMARKS ON AFTER-SALES SERVICING
■ REMARKS ON REPLACEMENT PARTS
・Your GALANTE watch was strictly checked and completely adjusted at
the factory to ensure its high accuracy. However, if your watch gets out of
order with the correct way of use as described in this instruction booklet
within the guarantee period, take your watch to the dealer from whom
your watch was purchased together with the certificate of guarantee. Repair and adjustment will be made without charge.
・SEIKO makes it policy to usually keep a stock of spare parts for
GALANTE watches for 10 years. In principle, your watch can be reconditioned within this period if used normally. (Replacement parts are those
which are essential to maintaining the functional integrity of the watch.)
・The guarantee period is one year from the date of purchase. For the
movement only, this guarantee period is extended to two years from the
date of purchase. More detailed guarantee coverage is provided in the certificate of guarantee.
For repair services after the guarantee period has expired or for any other
information regarding the GALANTE watch, please contact the retailer
from whom your watch was purchased or the“CUSTOMER SERVICE DEPARTMENT”of SEIKO WATCH CORPORATION.
・The number of years that a watch is considered repairable may vary
greatly depending on the conditions under which it was used, and normal
accuracy may not be achieved in some cases. We recommend, therefore,
that you consult the retailer from whom the watch was purchased when
having them repair your watch.
・The case, dial, hands, glass and bracelet, or parts may be replaced with
substitutes if the originals are not available.
・For any other information, contact the retailer from whom your watch was
purchased or the“CUSTOMER SERVICE DEPARTMENT”of SEIKO
WATCH CORPORATION.
85
87
■ TO PRESERVE THE QUALITY OF YOUR WATCH
CAUTION
88
CAUTION
CARE OF YOUR WATCH
・The case and bracelet touch the skin directly just as underwear.
・If they are left dirty, the edge of sleeve may be stained with rust of those who have a
delicate skin may have a rash.
・After removing the watch from your wrist, wipe perspiration or moisture with a soft
cloth. This will prevent the watch from being soiled, adding to the life of the gasket.
・Do not clean the watch with chemicals (especially with organic solvents such as benzene, thinner, alcohol, detergent, etc.). Otherwise, the watch may be deteriorated.
〈LEATHER BAND〉
・When removing moisture from a leather band, do not rub the band with the cloth as
they may discolor it or reduce its gloss. Be sure to blot up the moisture using a soft
dry cloth.
Please note that leather bands may become less durable when they are moistened.
〈METAL BRACELET〉
・Clean the watch bracelet with a soft toothbrush dipped in water or soapy water.
CAUTION WATER RESISTANCE
90
Genuine
Genuine diving
diving using using heliumgas.
scuba.
Caliber Number
⃝
⃝
×
×
×
Magnetic resistance
No indication, or
WATER RESIST 10 BAR Water resistance
(10 bar)
WATER RESIST 10 BAR
⃝
⃝
⃝
×
×
⃝
⃝
⃝
×
×
WATER RESIST or
WATER RESIST 5 BAR
0� �
Water resistance
(5 bar)
b
91
0� �A
The number to identify
the type of your watch
�6-� �0
×
×
�
5 R8
Water resistance
(3 bar)
×
×
Refer to page
92 and 93.
※ The above figures are examples. Both of them may be different from the figure on the
case back of your watch.
● MAGNETIC RESISTANCE
● Magnetized items that may affect watches
・GALANTE Spring Drive conforms to the Magnetic Resistance Standard of JIS
Class 1. The watch has magnetic resistance to maintain performance in most cases
even where it is brought close to (at least 5cm spaced from) equipment generating a
magnetic field in normal life. However, the movement part is magnetized when it encounters a strong magnetic field, thereby accuracy may go out of order. Pay attention so as not to bring the instrument close to equipment (health appliances, speakers, and mobile phones using a magnet) generating a strong magnetic field within
5cm.
・Examples of common items that generate a magnetic field
・Magnetic clips
Classification of JIS
Certified level of
Indication of antimagantimagnetic watches magnetic resistance netism on the case back
Class 1
4800A/m
93
・ Magnetic accessories
Antimagnetic quality
・ Speaker of audio instruments, radios, earphones, mobile phone
The watch has magnetic resistance to maintain performance in most cases where it is
brought close to (at least 5cm spaced from)
equipment generating a magnetic field in normal life.
・If the accuracy exceeds the accuracy target range ( ± 15 seconds/month) during
normal usage due to magnetization, removal of magnetism and accuracy readjustment works are charged regardless of the guarantee period.
・ Magnetic health equipment (such ・ Magnetic door seal of
as magnetic plasters, magnetic
refrigerator or furniture
pillows, magnetic back belts etc.)
・ Magnetic buckle of handbags or purses
● PLACES TO KEEP YOUR WATCH
● Inspection and adjustment by disassembly and cleaning (overhaul)
・ I f the watch is left in a temperature below − 10℃ or above + 60℃ for a long time it may function improperly or stop operating.
・ I nspection and adjustment by disassembly and cleaning (overhaul) of this watch will be performed by SEIKO. When you take the watch to the retailer from whom it was purchased, request that the watch be inspected and overhauled by SEIKO.
・ We suggest that you have your watch checked by SEIKO every 3 to 4 years for long-time use of your watch.
・ Do not leave the watch in a place where it will be subjected to strong magnetism (for example, near television sets, loudspeakers or magnetic necklaces).
・ Do not leave the watch where there is strong vibration.
94
Refer to page
89 and 90.
×
×
No water resistance
No indication, or
a WATER RESIST 20 BAR Water resistance
(20 bar)
b WATER RESIST 20 BAR
92
Suitable for swimming, yachting Suitable for shallow
and other aquatic sports as wellas
for works closely associated with diving without a heavy
breathingapparatus.
water such as kitchen work,
watening and fishing.
Water resistance
×
×
No indication
No indication
No indication
WATER RESIST
No indication
b
WATER RESISTANCE
・If your watch is 3 bar water resistant, do not use it in water.
・If your watch is 5 bar water resistant, do not use it in any type of diving including
skin diving.
・If your watch is 10 or 20 bar water resistant, do not use it in saturation diving or
scuba diving.
×
⃝
a
b
a
b
a
a
Designed and
manufactured to withstand
accidental contact with
water such as splashes
and rain.
WARNING
89
The case back shows the caliber and performance of your watch
・Check the dial or case back of your watch for the water resistant quality, and then see the
table below.
・Do not turn or pull out the crown when the watch is wet, as water may get inside the watch.
Condition
Indication for water
of use
resistance
a: Indication on the dial
Degree
b: Indication on the
of water
case back
resistance
RASH AND ALLERGY
・Adjust the bracelet and band so that there will be a little clearance between the
bracelet or band and your wrist to avoid accumulation of perspiration.
・If you are constitutionally predisposed to rash, the band may cause you to develop a
rash or an itch depending on your physical condition.
・The possible cause of the rash are as follows:
1.Allergy to metals or leathers
2.Rust, dust or perspiration on the watch or band
・If you develop any skin reactions, take off the watch and consult a doctor immediately.
・ Do not leave the watch in a dusty place.
・ Do not expose the watch to gases or chemicals.
(Ex.: Organic solvents such as benzene and thinner, gasoline, nail polish, cosmetic spray, detergent, adhesives, mercury, and iodine antiseptic solution.)
・ Do not leave the watch in close contact with hot spring water, or do not keep it in a drawer having insecticides inside.
※ The movement of this watch has a structure that consistent pressure is applied on its power-transmitting wheels. To ensure these parts work together properly, periodic inspection including cleaning of parts and movement, oiling, adjustment of accuracy, functional check and replacement of worn parts is needed.
Inspection and adjustment by disassembly and cleaning (overhaul) within 3 to 4 years from the date of purchase is highly recommended for long-time use of your watch.
According to use conditions, the oil retaining condition of your watch mechanical parts may deteriorate, abrasion of the parts may occur due to contamination of oil, which may ultimately lead the watch itself to stop. As the parts such as gasket may deteriorate, water-resistant performance may be impaired due to intrusion of perspiration and moisture. Please contact the retailer from whom the watch was purchased for inspection and adjustment by disassembly and cleaning (overhaul). For replacement of parts, please specify “SEIKO GENUINE PARTS.” When asking for inspection and adjustment by disassembly and cleaning (overhaul), make sure that the gasket and push pin are also replaced with new ones.
For any questions or concerns, contact the “CUSTOMER SERVICE DEPARTMENT” of SEIKO WATCH CORPORATION.
95
■ TROUBLESHOOTING
Possible cause
Solution
The power supplied by the mainspring has been consumed.
Wind the mainspring and reset the time. While you are wearing the watch or when you take it off, check
the remaining power shown by the power reserve indicator and wind the mainspring if necessary.
Even though you wear the watch every day, the The watch is worn on your wrist only for a short pepower reserve indicator does not move up.
riod of time, or the amount of arm movement is small.
Wear the watch for an extended period of time, or when taking off the watch, turn the crown to wind the
mainspring if the remaining power shown by the power reserve indicator is not sufficient for the next
use.
Trouble
The watch stops operating.
(The chronograph hands do not move.)
The watch has been left in extremely high or low temperatures.
96
The watch temporarily gains or loses time.
The watch has been left close to an object with a strong
magnetic field.
You drop the watch, hit it against a hard surface, or
wear it while playing active sports. The watch is exposed to strong vibrations.
The inner surface of the glass is clouded.
Moisture has entered the watch because the gasket has
deteriorated.
The watch stops even though the power reserve
The watch has been left at a temperature below 0℃ .
indicator is not showing“0.”
Right after starting the watch, it seems that When starting the watch, it takes a little time before
the second hand moves more quickly than usual the adjustment function starts working (this is not a
when setting the time.
malfunction).
The date changes during daytime.
AM/PM is not correctly set.
※ In the event of any other problem, please contact the retailer from whom the watch was purchased.
ガランテ専用フリーダイヤル
0120-302-617
受付時間:月曜~金曜
9:30 ~ 21:00
土曜・日曜・祝日 9:30 ~ 17:30
お客様相談室
〒 100-0005 東京都千代田区丸の内 3-1-1国際ビル
〒 550-0013 大阪市西区新町 1-4-24 大阪四ツ橋新町ビルディング
本 社 東京都港区芝浦一丁目 2 番 1 号 〒 105-8467
http://www.seiko-watch.co.jp
Return the watch to a normal temperature so that it works accurately as usual, and then reset the time.
The watch has been adjusted so that it works accurately when it is worn on your wrist under a normal
temperature range between 5℃ and 35℃ .
Correct this condition by moving and keeping the watch away from the magnetic source. If this action
does not correct the condition, contact the retailer from whom the watch was purchased.
Reset the time. If the watch does not return to its normal accuracy after resetting the time, contact the
retailer from whom the watch was purchased.
Contact the retailer from whom the watch was purchased.
If the watch is left at a temperature below 0℃ , it may stop if the power reserve indicator is showing
less than one-sixth of the power reserve. In such a case, turn the crown to wind the mainspring.
It takes several seconds before the adjustment function starts working. Set the time after the second
hand moves for approximately 30 seconds to set the time correctly.
Advance the hour hands for 12 hours to correctly set the time and date.
⇒ ● Refer to“How to manually wind the mainspring by turning the crown”on page 59.
● Refer to“How to set the time”on page 62.
97