1
C32227DVBIPTVT2-LED
27
27
28
28
28
28
Connecting to Network ....................................................................................................................................................................29-31
Personal Account Setup..........................................................................................................................................................................32
Access Personal Account.......................................................................................................................................................................32
Using the i-Player................................................................................................................................................................................33-36
36
37
37-38
38-39
39
40
40
41
42
4
4-4
4
4
4
4
-
2
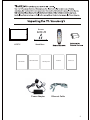
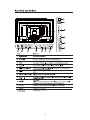
6FUHZV
/ ('79
User 0DQXDO
6WDQG%DVH
Quick Start Guide
Warranty Card
3RZHU$GDSWHU
*ROG&DUH
IPTV Manual
(WKHUQHW&DEOH
3
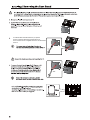
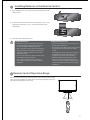
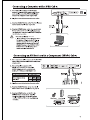
7RLQVWDOOWKHEDVHVWDQGILUVWPDNHVXUH\RXSRVLWLRQ
WKHIURQWRIWKHEDVHVWDQGIDFLQJWRZDUGVWKHIURQWRI
WKH79DQGWKHQXVHWKHVXSSOLHGVFUHZVWRIL[WKHVWDQGEDVH
WRWKH79
[PP0[
6FUHZVL]H0[
3
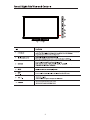
NETWORK
USB - WiFi
1/2
-WiFi
the Wireless LAN Adaptor.
DIGITAL AUDIO OUT
(COAXIAL)
broadband router.
4
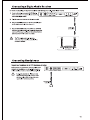
Installing Batteries in the Remote Control
1. Press and lift the back cover to open the battery compartment of the
remote control.
2. Insert two AA size batteries. Make sure to match the (+) and ( - ) ends
of the batteries with the (+) and ( - ) ends indicated in the battery
compartment.
3. Close the battery compartment cover.
Handling the Batteries
t Improper or incorrect use of batteries may cause
corrosion or battery leakage, which could cause
fire, personal injury or damage to property.
t Only use the battery type indicated in this manual.
t When the batteries are exhausted, the remote will
not function. Replace both batteries at the same
time with new ones.
t Do not install new batteries with used ones and do
not mix different types of batteries.
t Do not dispose of used batteries as domestic
waste. Dispose of them in accordance with local
regulations.
Handling the Remote Control
t Take care of your fingernails when you press and
hold the battery release tab.
t Do not drop or cause impact to the remote control.
t Do not spill water or any liquid on the remote
control.
t Do not place the remote control on a wet object.
t Do not place the remote control under direct
sunlight or near sources of excessive heat.
t Remove the battery from the remote control
when not in use for a long period of time, as it
could cause corrosion or battery leakage and may
result in physical injury and/or property damage
including fire.
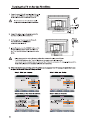
Remote Control Operation Range
Point the remote control at the TV no more than 5 metres from the remote control
sensor on the TV and within 60° in front of the TV. The operating distance may vary
depending on the brightness of the room.
30°
30°
5M
6RXUFH
79
795DGLR
,3OD\HU
4XLFN
6WDUW
+HOS
0HQX
*XLGH
6HDUFK
([LW
,QIR
92/
2.
&+
5
'9'
0HQX
3
6
3LFWXUH
6RXQG
6'
,3
'D\
'D\
,36HWXS
#
DEF
MNO
PQR
JKL
STUV
GHI
WXY
Z[\]
68%
7;7
6KXIIOH
7H[W
'HOHWH
8VHU
5&&
Remote Control
1. Source
1
DTV / ATV / SCART / YPBPR / PC / HDMI / AV / USB.
2.
Mutes and restores your TV sound.
3.
Switches the TV between on and standby mode.
4. TV / Radio
t A short-cut to switch input source to TV / Digital radio
channels.
t Press to exit from i-Player and go to TV mode. (Internet Player
mode)
6RXUFH
2
5
4
79
6
795DGLR
7
8
12
11
3
4XLFN
6WDUW
+HOS
0HQX
,3OD\HU
10
*XLGH
6HDUFK
([LW
9
,QIR
13
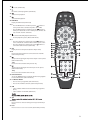
5.
Press to set the multi-satellite mode.
t No Satellite Receiver
Press the button and then press the numeric 0.
t Satellite Receiver with Recorder (known as "Plus" type)
Press the button and then press the numeric 1.
t
(known as "HD"
type)
Press the button and then press the numeric 2.
t Digital Satellite Receiver (known as "Digital" type)
Press the button and then press the numeric 3.
6.
I-Player
Press to switch to Internet Player mode. (Internet Player mode)
14
92/
2.
&+
16
17
5
'9'
0HQX
3
6
3LFWXUH
6RXQG
6'
,3
7. Menu
Display the OSD (On Screen Display) menu.
'D\
'D\
,36HWXS
8. Help
Display the helpline.
9. Quick Start
One press button to search all TV channels. It will take up to 10
minutes.
10.
11.
12.
Search
t Return to the previous viewing channel. (ATV / DTV mode)
t Search on the internet. (Internet Player mode)
Exit
Exit the OSD menu.
Guide
Displays the EPG (Electronic Programme Guide). (DTV mode)
#
DEF
GHI
JKL
MNO
PQR
STUV
WXY
Z[\]
68%
7;7
6KXIIOH
13. Info
t Display the present channel information such as the current
time and channel name. (ATV / DTV mode)
t Display the present disc information. (DVD mode)
t Display the information of the current playing media and the
next media. (Media mode)
14. VOL + / –
Adjusts the volume.
15. CH + / –
Select a channel.
16.
Allows you to navigate the OSD menus and adjust the system
settings to your preference.
OK
17.
To stop the playback or recording. (DVD / Media mode)
Please note that there are DVD mode functions on the remote control only operate on
TV models with a built-in DVD player.
7H[W
'HOHWH
8VHU
5&&
15
18.
Eject a disc. (DVD mode)
19.
Record the current programme. (DTV mode)
20.
To fast reverse playback
6RXUFH
21.
To fast forward playback
79
22. DVD Menu
Display the DVD menu. (DVD mode)
795DGLR
23. P
t Press the P button once and then press the
buttons to
select picture mode: Standard / Dynamic / User / Mild.
t Press the P button twice and then press the
buttons to
allow you to watch the screen in various picture formats: 4:3 /
16:9 / Zoom1 / Zoom2 / Panorama.
*XLGH
27. IP
Press for the initial setup and to connection to the network.
(Internet Player mode)
28.
–Day
Press to view the schedule of the previous day.
31
To skip to the beginning of the next chapter / track / photo.
(DVD / Media mode)
+Day
Press to view the schedule of the next day.
30. Coloured buttons
Access the TELETEXT items or channel edit when using Digital /
Freeview TV Channels. (ATV / DTV mode)
2.
&+
19
5
18
20
22
23
24
26
27
30
To skip to the beginning of the previous chapter / track / photo.
(DVD / Media mode)
29.
,QIR
92/
t To start the timeshift playback. (DTV mode)
t To start playback or pause. (Media / DVD mode)
26. SD1
Display the onscreen keyboard. (Internet Player mode)
6HDUFK
([LW
24.
25. S
t Press the S button once and then press the
buttons to
select sound mode: Standard / Music / Movie / Sports / User.
t Press the S button once and then press the
buttons to
select Mono to Nicam Stereo (ATV mode)
,3OD\HU
4XLFN
6WDUW
+HOS
0HQX
32
21
'9'
0HQX
3
6
3LFWXUH
6RXQG
6'
,3
'D\
'D\
,36HWXS
#
DEF
GHI
JKL
MNO
PQR
STUV
WXY
Z[\]
68%
7;7
6KXIIOH
34
25
29
28
33
7H[W
'HOHWH
8VHU
35
5&&
31. 0-9 Number Button
t Press to select a programme. (ATV / DTV mode)
t Press to enter numbers and text. (Internet Player mode)
32. SUB
t Selects subtitles which are broadcast with the programme.
(DTV ).
t Selects subtitles on the DVD. (DVD mode)
33. TXT
34. Delete
Press to remove a character during text entry. (Internet Player
mode)
35. User
Press to create / access a user account. (Internet Player mode)
1366×768
/Just scan
3DXVH 79
3DXVH79
3DXVH79
3DXVH79
3DXVH79
USB - WiFi NETWORK
3DXVH79
Entertainment
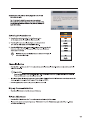
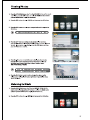
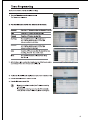
Connecting to Network
You can set up your TV through your local area network (LAN) using a wired or wireless connection.
t If wired and wireless networks are both available, wired network is the preferred method.
t Do not connect a modular phone cable to the NETWORK socket.
t After making a physical connection, a small number of home networks may require the TV network settings to be
adjusted. For most home networks, the TV will connect to automatically without any adjustments.
rations, please follow the
ations and instruction of your
t Since there are various connection c
telecommunication carrier, internet service provider and router setting user manual.
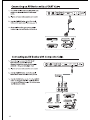
Connecting to a Wired Network
Use a Local Area Network (LAN) cable or an Ethernet cable to connect the TV’s NETWORK socket to the corresponding port on
your router socket.
R
Broadband Router /
Wireless Router
W
WAN
LAN1
LAN2
LAN3
LAN4
Internet
Ethernet Cable
(included)
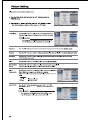
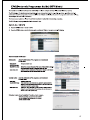
Wired Network Setup
Use the Network Setup when connecting your TV to a wired network.
1. Plug the connected devices into the mains socket before switching on the TV.
2. Press the STANDBY button on the top panel of the TV or the
button on the remote control to turn on your TV.
3. Press the I-Player button on the remote control to enter i-Player.
When you
enter i-Player there is a delay whilst the network card
boots. Please be patient.
4. The TV will automatically connect to the i-Player server and register with
it. If there is an update available, the server will deliver it at this time.
5. If you have
ty connecting or there is a "No Internet Connection"
message on the screen. Press the IP button on the remote control. The
Network SETUP menu will be displayed.
6. Press the
buttons to select Connection Type. Press the OK button
and then press the
buttons to select Wired. Press the OK button to
c
rm.
7. Press the
buttons to select IP Address. Press the OK button and
then press the
buttons to select Automatic IP or Fixed IP. Press the
rm.
OK button to c
Automatic IP
Select this if the network supports is a DHCP (Dynamic Host
C
ration Protocol). The IP address will automatically be determined.
Fixed IP
Select this if there is no DHCP server on the network or you want to set
the IP address manually.
Press the
buttons to select Edit. Use the
buttons to navigate
IP Address / Network Mask / Gateway / DNS Server and then press the
0-9 buttons to enter your IP address details.
8. Press the
to c
rm.
buttons to select Apply and then press the OK button
In wired mode the TV is connected to the router automatically
as soon as the connection is made. You will see a message
"Not connected" change to "Connected" at the top of the
screen. This means you are connected to your local network.
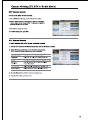
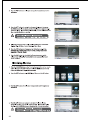
Connecting to a Wireless Network
Use the Wireless LAN adapter to connect the TV’s USB / WIFI socket.
Rear Left Side View of TV
Wireless LAN Adapter
(not included)
Wireless Router
WAN
LAN1
LAN2
LAN3
LAN4
Internet
Wireless Network Setup
Use the Network Setup when connecting your TV to a wireless network.
1. Plug the connected devices into the mains socket before switching on the TV.
2. Press the STANDBY button on the right side of the TV or the
button on the remote control to turn on your TV.
3. Press the I-Player button on the remote control to enter i-Player.
When you
enter i-Player there is a delay whilst the network card
boots. Please be patient.
4. The TV will automatically connect to the i-Player server and register with
it. If there is an update available, the server will deliver it at this time.
5. If you have
ty connecting or there is a "No Internet Connection"
message on the screen. Press the IP button on the remote control. The
Network SETUP menu will be displayed.
6. Press the IP button on the remote control and then press the
buttons to select Connection Type. Press the OK button and then press
the
buttons to select Wireless and then press the OK button to
c
rm.
7. Press the
buttons to select Rescan W and then press the OK
button. The new connection setting resets the current network settings.
8. Press the
buttons to select Network Name (SSID) and then press
the OK button. Press the
buttons to select your network from the list
and then press the OK button.
Alternative
Press the SD1 button on the remote control to display the online
keyboard and then use the
buttons and the OK button to
select the desired characters to enter the Network Name (SSID). Press
the
buttons to select the icon and then press the OK button
rm.
to c
9. Press the
buttons to select Encryption Type and then press the SD1
button on the remote control to display the online keyboard. Press the
buttons to select the characters to enter the Network Name
(SSID) (the same key to enter on a laptop to connect).
10. Press the
rm.
to c
buttons to select Apply and then press the OK button
WPS (WiFi Protected Setup)
If your router has a WPS button, press the
buttons to select WPS
and then press the WPS button on the router. The connection will be made
automatically.
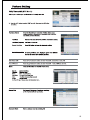
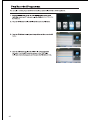
Personal Account Setup
Use the setup a personal account.
11. In iPTV mode, press the User button to display the LOGIN screen. Press
the
buttons to select the Create New User and then press the OK
button.
/2*,1
&UHDWH1HZ8VHU
&DQFHO
buttons to select the User Name and then press the
12. Press the
SD1 button to display the online screen. Press the
buttons and
the OK button to enter the desired character. Press the
buttons
to select the icon and then press the OK button to c
rm.
86(5352),/(
8VHU1DPH
3,1
7RNHHS\RXUDFFRXQWVHFXUHD3,1OHQJWKRIDWOHDVWGLJLWVLVUHFRPPHQGHG
5HSHDW3,1
13. If you want to set the PIN, press the
buttons to select the PIN
and then press the SD1 button to display the online screen. Use the
buttons and the OK button to select the desired characters. Press
the
buttons to select the icon and then press the OK button
to c
rm. Press the
buttons to select Repeat PIN and re-enter the
PIN for c
rmation.
14. Press the
button to c
15. Press the
<RX7XEH8VHU1DPH
%DFN
6WRUH8VHU'DWD
buttons to select Store User Data and press the OK
rm.
buttons to select Apply.
8VHUV
8VHUV
-XVWHQ4XLQWHQ
&UHDWH1HZ8VHU
(GLW
'HOHWH
&DQFHO
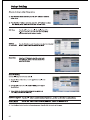
Access Personal Account
Use the access personal account.
In iPTV mode, press the User button to display the LOGIN screen. Press the
buttons to select the User Name. Press
OK button and then press the
the
buttons to select Login and then press the OK button.
/2*,1
86(51$0(
-XVWHQ4XLQWHQ
/RJLQ
&DQFHO
$SSO\
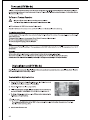
Using the i-Player
1. Press the
I-Player button on the remote control to enter i-Player.
2. The i-Player Main Menu will be displayed.
IPTV Services
Widgets
IPTV Services
Press the
buttons and then press the OK button to select
IPTV services.
erent
Widgets
Press the
buttons to select
erent Widgets or Apps. Press the
YELLOW or BLUE button to select
erent pages of each Widget.
3. During watching IPTV Services, press the Menu button to return to the i-Player Main Menu.
4. Press the TV button on the remote control to exit the i-Player and return to TV mode.
i-Player Search
To search a subject on YouTube or your home media. Home media is on a USB storage devices or from a PC on your home
network provided media server software on the PC.
1. In the i-Player Main Menu, press the SEARCH button to enter the
SEARCH MEDIA.
2. Press the
buttons and then press the OK button to select the search
place (YouTube / Home Media). A tick box will be display.
3. Press the
buttons to the SEARCH
and then press the SD1
button on the remote control to display the online keyboard.
4. Press the
buttons and the OK button to enter the desired
characters. Press the
buttons to select the icon and then press
the OK button to enter the name of your search.
You do not need to type the full name. It will search for
that contain the letters you type within the
name.
5. Press the RED button to search. The search result will be displayed.
6. Press the
buttons to select the desired subject and then press the
OK button to play.
i-Player Advanced Setting
1. Press the IP button on the remote control. The Network SETUP menu
will be displayed.
2. Press the BLUE button on the remote control to select General SETUP
menu.
Slideshow Delay
Press the
buttons to select Slideshow delay and then press the OK
button. Press the
buttons and then press the OK button to select
the desired options.
Detect USB
Press the
buttons to select Automatically display content of USB
device upon insertion and then press the OK button. A tick box will be
display.
i-Player Information
Press the
buttons to select OPEN in About
button to display the information.
t
t
t
d. Press the OK
Press the RED button to display the License.
Press the GREEN button to display the Copyrights.
Press the BLUE button to display the IP and mac data in Network.
Widget Preferences
a. Press the
buttons to select Preferences in Widget
the OK button to display the Widget Preferences SETUP menu.
b. Press the
buttons to move to the page number d. Press the
buttons to select more widget preferences pages. Press the OK
c. Press the
buttons and then press the OK button to select
the desired widget. A tick box will be display.
d. Some Widgets can be edited either to alter their action or to enable
/ disable them. Press the
buttons to select Edit and then
press the OK button.
Edit the weather widget
This will change the location that the weather is reported for.
a. In Widget SETUP menu, press the
buttons and then
press the OK button to select Edit next to the Weather. The
Weather Widget Settings will be displayed.
b. Press the
buttons to select °C or °F.
c. In the USER LOCATION, press the
buttons and then press
the 0-9 buttons to enter the your location postcode or press the
SD1 button to display the online keyboard and enter the desired
characters.
As delivered the TV will report the weather for the region
where it is connected to the internet. This may not close to
where you live.
d. Press the
button.
buttons to select SEARCH and then press the OK
e. Your location will be displayed on the map. If this is correct, press
the
buttons to select Apply.
Authorise the Facebook widget for your account
a. In Widget SETUP menu, press the
buttons and then
press the OK button to select Edit next to the Facebook widget.
The authorisation instruction will be displayed.
b. You will provide a Code and web address. On your PC, access the
web address and enter the code provided.
c. Press the
buttons and then press the OK button to
select Complete Process. The widget will then be authorised.
d. Press the
buttons to select Apply.
Authorise the Twitter widget for your account
a. In Widget SETUP menu, press the
buttons and then
press the OK button to select Edit next to the Twitter widget.
The authorisation instruction will be displayed.
b. Press the
buttons and then press the OK button to
select Generate Code.
c. You will provide a Code and web address. On your PC, access the
web address and enter the code provided.
d. Press the
buttons and then press the OK button to
select Complete Process. The widget will then be authorised.
e. Press the
buttons to select Apply.
i-Player Upgrade
i-Player upgrades are delivered online. They can add application,
a software bug or just keep you up-to-date.
An upgrade is available message will be displayed when you switch on the
i-Player.
If you accept the upgrade, press the
buttons and then press the OK
button to select YES. Upgrade successful message will be displayed when
d.
Do not turn
the TV or interupt the upgrade once you start the
upgrade. It will cause to damage the TV.
If do not want to upgrade, press the
buttons and then press the OK
button to select X. The upgrade is available message will disappear. The
message will display again when i-Player is turned on next time.
7KHUHDUHXSGDWHVDYDLODEOHIRUGRZQORDGGR\RX
ZLVKWRXSJUDGH"
2.
3
4
5
RJ
46
4
48
4