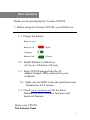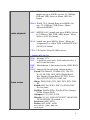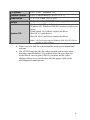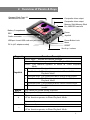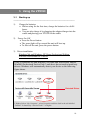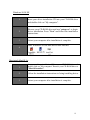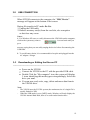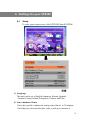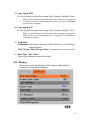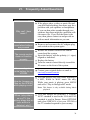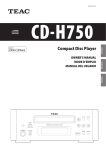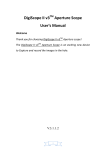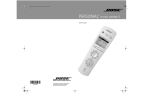
1
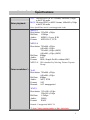
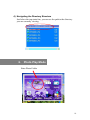
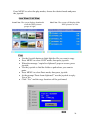
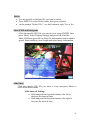
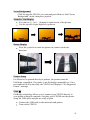
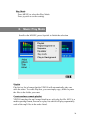
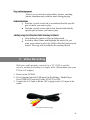
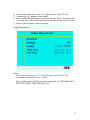
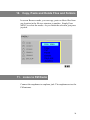
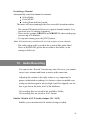
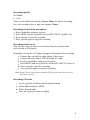
VP8390 User’s Guide Rev. A _________________________________________________________ © 2006 Vosonic Technology Corporation. All ̅ights reserved. Dear Customer Thank you for purchasing the Vosonic VP8390. 1. Before using the Vosonic VP8390, you will have to 1-1 Charge the battery Battery Level: Battery Low (Red) Charging: Battery Full: (Green) 1-2 Install Windows USB driver (if you are a Windows 98 user) 1-3 Keep VP8390 plugged into the AC adapter/charger while connected to your computer. 1-4 Make sure the HDD is already partitioned and formatted as FAT system. 1-5 Check www.vosonic.com for the latest firmware we offer with new functions and improved features. Enjoy your VP8390 The Vosonic Team 2 CAUTION Under no circumstances should you try to repair the system yourself, as this will invalidate the warranty. Do not open the system as there is risk of electrical shock. FCC Certifications This equipment has been tested and found to comply with the limits for a Class B digital de vice, pursuant to Part 15 of the FCC Rules. These limits are designed to provide reasonable protection against harmful interference in a residential installation. This equipment generates, uses and can radiate radio frequency energy and, if not installed and used in accordance with the instructions, may cause harmful interference to radio communications. However, there is no guarantee that interference will not occur in a particular installation. If this equipment does interfere with radio or television reception, which can be determined by turning the equipment off and on, try to correct the interference in one of the following ways: • Reorient or relocate the receiving antenna. • Increase the separation between the equipment and receiver. • Connect the equipment into an outlet on a different circuit from that to which the receiver is connected. • Consult the dealer or an experienced technician for help. 3 Important Warranty Information y To reduce the risk of fire or shock hazard, do not expose this equipment to rain, liquid or moisture. y Vosonic shall have no obligation to repair, replace or refund until the customer returns the defective product to Vosonic. y The repairs and replacement service will not apply to Product units that were misused, repaired without authorization or for other reasons beyond the range of intended use. y Any replacement product may be either new or like–new, provided that it has functionality at least equal to that of the product being replaced. y Vosonic is not responsible for any data stored on returned products, please backup any data prior to shipping the unit. y The limited warranty for accessories (including battery) is only valid for 6 months from the date of purchasing. y All OUT OF WARRANTY repairs may be subject to a normal repair fee. Please contact your dealer or Vosonic for current charges. Package Checklist y y y y y y y y y y y y y y Main unit Viewing / Recording Cradle Earphones A/V cable with 3 RCA plugs for AV input and output on cradle A/V cables for Audio / Video output on device (This allows you to view video away from home without carrying the cradle) Multi-connect 3 RCA Jack Mini 5 Pins USB Cable for cradle Line-in cable Remote Control Carrying Case English user's guide Setup CD-ROM Video-conversion software Power Adapter (100-240V auto-switched) 4 y Viewing / Recording Cradle Specifications Video playback AVI: Motion-JPEG in AVI format, 640x480 @30fps with PCM audio MOV: Motion-JPEG in MOV format, 640x480 @30fps with PCM audio Note: QuickTime movie is an unsupported codec MPEG-1 Resolution: 352x288 @30fps Bit Rate: 1.5Mbps Audio: MPEG-1 Layer II/III Format: MPG/.DAT, VCD MPEG-4 Resolution: 720x480 @25fps 640x480 @30fps 720x480 @10fps (4MV) 640x480 @15fps (4MV) Bit Rate: 4Mbps Audio: AAC Format: MP4, Simple Profile without 4MV MPEG-4: ISO standard by Moving Picture Experts Group Video resolution*) XviD Resolution: 720x480 @25fps 640x480 @30fps Bit Rate: 4Mbps Audio: MP3, PCM Format: AVI Remark: AC3 unsupported WMV9 Resolution: 352x240 @25fps 320x240 @30fps Bit Rate: 1.1Mbps Audio: WMA Format: WMV Remark: Unsupported WMV 7/8 *) Note: Video Output Quality is 320 x 240 pixels. 5 MP3: MPEG-1 Layer I/II/III, MPEG-2 Layer 2.5, sample rate up to 48KHz, bit rate 16~384kbps, CBR and VBR, Stereo or Mono, MP3 file format WMA: WMA 7/8/9, Sample Rate up to 44KHz, bit rate: 32~192Kbps, CBR, Stereo / Mono, Microsoft DRM10 Audio playback AAC: MPEG4-AAC, sample rate up to 48KHz, bit rate 16~320kbps, CBR, VBR, ABR, Stereo / Mono, M4A or AAC file format WAV: sample rate up to 48KHz, Stereo / Mono, uncompressed 8 or 16bits PCM in MS-RIFF WAV (WAV) file format CDA: CD-Audio (16bits 44.1KHz stereo) * Support M3U play list Photo viewer JPEG: Baseline YUV TIFF: 1 and 8 bits grey scale, 8 bits indexed-color, 8 and 16 bits true color BMP: Monochrome, 8 bits indexed-color, RGB, RLE8 GIF RAW: Support for the following camera models: Canon: 1Ds Mark-II, 1D Mark II N, 1Ds, 1DII, 1D, 5D, 20D, 10D, 300D (Digital Rebel, Kiss Digital), Digital Rebel XT, D30, Power Shot G1/G2/G3/G5/G6, 350D, 30D Nikon: D200, D100, D70, D50, D1X, D2X, D1H, D1 Kodak: DSC Pro SLR/c, DSC Pro SLR/n, DSC Pro 14n, P880 Fujifilm: FinePix S2Pro, FinePix S3Pro, Finepix S5500 ,Finepix E900 Olympus: E-1, E-500 ,E-300 Minolta: A1, A2, A200, DYNAX D7, MAXXUM 5D, MAXXUM 7D, DiMAGE 7 Panasonic: DMC-FZ30 Pentax: istD, istDL, istDS Sony DSC-R1 (.SR2), DMC-LX1 Lecia R8/R9 6 For more supported models check www.vosonic.com Voice Recording Video Recording FM Radio Direct Printing Text Viewer Support Memory Card Interfaces Hard Disk Format Zoom IN/Out Rotate by 900 EXIF data Slideshow with background music Voice recording from line-in or internal microphone *AAC format Resolution: 352x240 @30ftps Audio: AAC Format: MP4 87.5MHz ~ 108MHz PictBridge Compliant Support TXT file (Read) Compact FlashTM Card type I/type II (CF) Memory Stick® (MS) Secure Digital Card (SD) MultiMedia Card (MMC) IBM ®MicroDrive Mini-SD (with adapter) RS-MMC (with adapter) MS Duo (with adapter), MS Pro Duo (with adapter). 2.5” Hard Disk (ATA Interface) Display 20G ~ 120G Analogue AV-OUT composite RCA jack Stereo earphone jack. 3.5” OLED, 320 x 240 pixels, RGB Interface USB 2.0 Built–in speaker 8 Ohm up to 400mW 5V/2.5A DC IN, Li-ion 3.7V 2300 mAh battery*) (NP100 compatible) Hard Disk Size AV device Power supplier Non-Stop Photo backup: Approx. 38 times for 1GB**) Non-Stop Music Playback: Approx. 12 hours (LCD OFF) Non-Stop Video Playback: Approx. 4 hours *) The Li-ion rechargeable battery can be recharged approx. 500 times. Battery life-time may vary with use. **) The number of backup times is subject to the Hard Drive/ memory card / Files type. 7 TV system PAL / NTSC (Interlace TV) Remote Control IrDA (Lithium Battery CR2025 3V x 1) Dimensions 72 x 135 x 23mm (W x L x H) Weight 236gr. (including 2.5” HDD & battery pack) Windows 98/98SE with driver Windows XP, Windows 2000 SP3 or above requires no driver Linux kernel 2.4 or above requires no driver Mac OS 9.0 (with driver) Mac OS 10.0.1 and above requires no driver System OS Note: VP8390 doesn't support Windows 2000 SP1, SP2. Please upgrade to SP3 or above. x Please visit our web site to download the most recent manual and software. x The VP8390 may not play the videos created with a codec other than those specified above. If you have other file types that you would like to view on your VP8390, you must use the videoediting software to re-encode them into the proper video codec with supported sound stream. 8 2. Overview of Panels & Keys Compact Flash Type I/II IBM MicroDrive Slot Composite video output Composite video output Memory Stick/Memory Stick Pro, MMC/SD card slot Battery Compartment ESC Power Cradle connector Joystick USB port: Insert USB cord mini jack Power Button Lock Menu RESET DC In (AC adapter socket) Scroll up / volume Keypad Joystick MENU ESC + Function Description Press/ Enter: Execute the current selection Rotate: This function operates in Photo Playback Mode. Pause: This function operates in Music & Video Playback Mode. Direction icon: Use joystick to move cursor on the screen. Fast Backward: This function operates in Music & Video Playback Mode. Direction icon: Use joystick to move cursor on the screen. Fast Forward: This function operates in Music & Video Playback Mode. Direction icon: Use joystick to move cursor on the screen. Direction icon: Use joystick button to move cursor on the screen. Play modes & system setting selection Takes you back to previous mode Photo zoom-out This function operates in Photo Playback Mode. Increase volume _ Decrease volume Photo zoom-in This function operates in Photo Playback Mode. 9 3. Using the VP8390 3-1 Starting up ____________________________________________________ 1) 2) Charge the batteries x Before using for the first time, charge the batteries for a full 4 hours. x You can also charge it by plugging the adapter/charger into the cradle and placing your VP8390 in the cradle. Power On /Off x Press the Power button x The green light will go on and the unit will boot up. x To shut off the unit, press the power button. 3) Driver installation Windows Me and Windows XP Home Professional Edition, Win2000 Professional SP 3 above Users of Windows Me and Windows XP Home and Professional Edition, Win2000 Professional Service Pack 3 and above do not need to install any drivers. Windows will automatically detect your device as the following figure shows. ` Detected Drives * Right-click on ‘My Computer’, select Properties and then look in the tab labelled ‘General’. It should say “Service Pack 1” or higher. Windows 98/98 SE 10 :LQGRZV6( ,QVHUW\RXUGULYHULQVWDOODWLRQ&'LQWR\RXU&'520GULYH DQGGRXEOHFOLFNRQ0\FRPSXWHU %URZVH\RXU&'520GULYHDQGUXQVHWXSH[HWREHJLQ GULYHULQVWDOODWLRQ3UHVV1H[WDQGIROORZWKHLQVWDOODWLRQ LQVWUXFWLRQV 5HVWDUW\RXUFRPSXWHUDIWHULQVWDOODWLRQLVFRPSOHWH 8QGHU:LQGRZVWKHGLVNGULYHVORRNOLNHWKLV 0DFLQWRVK0DF26[ ,QVHUW\RXUGULYHULQVWDOODWLRQ&'LQWR\RXU&'520GULYHDQG GRXEOHFOLFNRQ0\FRPSXWHU%URZVH\RXU&'520GULYHWR 0DF26,QVWDOOHU )ROORZWKHLQVWDOODWLRQLQVWUXFWLRQVWREHLQJLQVWDOOLQJGULYHV 5HVWDUW\RXUFRPSXWHUDIWHULQVWDOODWLRQLVFRPSOHWH 86%&211(&7,21 BBBBBBBBBBBBBBBBBBBBBBBBBBBBBBBBBBBBBBBBBBBBBBBBBBBB :KHQ93FRQQHFWVWRWKHFRPSXWHUWKH06&'HYLFH PHVVDJHZLOODSSHDUDWWKHERWWRPRIWKHVFUHHQ 'XULQJILOHWUDQVIHULQ3&PRGH'R1RW 8QSOXJWKH86%FDEOH 5HPRYHPHPRU\FDUGVIURPWKHFDUGVORWHOVHFRUUXSWLRQ RUGDWDORVVPD\RFFXU 1RWHV )RU:LQGRZV;3XVHUVWRVDIHO\GLVFRQQHFWWKH93IURPWKHFRPSXWHU FOLFNRQWKHV\VWHPWUD\UHPRYH LFRQDQGZDLWXQWLO\RX JHWD PHVVDJHVD\LQJWKDW\RXFDQVDIHO\XQSOXJWKHGHYLFHEHIRUHGLVFRQQHFWLQJWKH 86%FDEOH 7RDYRLGEDWWHU\GUDLQLWLVUHFRPPHQGHGWRNHHSWKHXQLWSOXJJHGLQWRWKH $&DGDSWHUFKDUJHU 'RZQORDGLQJRU(GLWLQJWKHILOHVRQ3& BBBBBBBBBBBBBBBBBBBBBBBBBBBBBBBBBBBBBBBBBBBBBBBBBBBB 3RZHURQWKH93 &RQQHFWWKH93WRWKH3&ZLWKWKHSURYLGHG86%FDEOH 'RXEOH&OLFNWKH0\FRPSXWHULFRQWKHV\VWHPZLOOGLVSOD\ LFRQVLGHQWLI\LQJWKHPHGLDW\SHVFRUUHVSRQGLQJO\6HOHFWWKH GULYH\RXZDQW <RXFDQQRZUHDGZULWHFRS\GHOHWHDQGPRYHGDWDIURPWR WKH93GULYH 1RWH 7KH93XVHVWKH)$7ILOHV\VWHPWKHPD[LPXPVL]HRIDVLQJOHILOHLV XVXDOO\OLPLWHGWR*% :KHQWKH86%PRGHLVVHWWR>073@PRGH:LQGRZVZLOORQO\GLVSOD\WKH 93LQWHUQDO+DUG'LVNWKHUHLVQRFDUGUHDGHUIXQFWLRQKHUH 4. Settings for your VP8390 4-1 Setup To enter your setup screen, click OPTIONS then SYSTEM 1) Language This unit can be set to English, Japanese, Korean, Spanish, German, French, Italian, Portuguese, Chinese and Thai. 2) Auto shutdown Timer Press the joystick to adjust the setting, timed from 1 to 30 minutes. Scroll down to decrease the time value, scroll up to increase it. 13 3) Copy Speed (HD) Use the joystick to adjust the setting, from Normal to High to Ultra. Note: If you find that the unit shuts down after setting the copy speed to ULTRA or HIGH, it is recommended to set the copy speed to NORMAL to avoid data corruption. 4) Copy Speed (CF) Use the joystick to adjust the setting, from Normal to High to Ultra. Note: If you find that the unit shuts down after setting the copy speed to HIGH or ULTRA, it is recommended to set copy speed to NORMAL to avoid data corruption. 5) USB Mode PictBridge: Print images from the VP8390 directly to a PictBridgeenabled printer. MSC Device (Mass Storage Class): General use as a card reader 6) Time Zone / Date Time These show date and current local time. 4-2 Display To set up your Screen Display, click Options and highlight Display by using the menu button. 14 )LOH9LHZHU0RGH 8VLQJWKHMR\VWLFN\RXFDQVZDSEHWZHHQJUDSKLFLFRQVILOH PRGHDQGOLVWYLHZ YLHZHU <RXFDQFKDQJHWKHDXWRVFUHHQRIIWLPHUWRVDYHEDWWHU\SRZHUE\ XVLQJWKHMR\VWLFN9DOXHVDUHEHWZHHQWRVHFRQGV <RXFDQDGMXVWWKH/&'EDFNOLJKWE\XVLQJWKHMR\VWLFN3XVK GRZQXSWRGHFUHDVHLQFUHDVHEULJKWQHVV 796WDQGDUG 176&7DLZDQ86-DSDQHWF 3$/(XURSHDQFRXQWULHV &KDQJHWKHVHVHWWLQJVE\XVLQJWKHMR\VWLFN &UDGOH$9287 :KHQVHWLQFUDGOHWKH$9RXWFRQQHFWLRQDOORZVWKHXVHUWR YLHZDQGVKDUHWKHSKRWRVRUPRYLHVRQWHOHYLVLRQ 5HVHW%DFNJURXQG 5HVHWGHVNWRSEDFNJURXQGLPDJHWR9RVRQLF¶VGHIDXOWORJR 4-3. Your Media files For rapid search or playback of Videos, Music and Picture files, please import the files to the corresponding folders. Media File Conversion Because of the wide variety of formats, there’s a chance that some of the media files you have will not directly play on your device. If you have video files that do not play directly on your VP8390, they will have to be converted first. Please find the MAGIX MEDIA SUITE on the included CD-ROM. This program, developed by MAGIX (www.magix.com), has a simple interface which you can use to convert, edit, archive & burn video. Note: To convert a video file to the right size and format supported by the VP8390, please consult the VP8390 specifications for supported file types, or email [email protected] for instructions. 16 8VLQJDPHPRU\FDUGWRWUDQVIHUSKRWRVWR93 1RWH3OHDVHLQVHUWWKHPHPRU\FDUGZLWKWKHIURQWRIWKHFDUGIDFLQJWKH/&'DV VKRZQEHORZ )URQWRI&DUG DG TE :KHQDPHPRU\FDUGLVLQVHUWHGWKHV\VWHPZLOODXWRPDWLFDOO\GLVSOD\D PHQXZLWKWKHRSWLRQV1R$FWLRQ)XOO%DFNXSRU3KRWR%DFNXS )XOO%DFNXS <RXFDQEDFNXSWKHZKROHIROGHULQFOXGLQJLWVVXEIROGHUDQG ILOHV IURPPHPRU\FDUGVWRLQWHUQDOVWRUDJH+DUG'ULYH'LVN7RGR VRVFUROOWRWKH)XOO%DFNXSPRGHDQGSUHVVWKHMR\VWLFNEXWWRQ 3KRWR%DFNXS 7KH3KRWR%DFNXSDOORZV\RXWRTXLFNO\VHDUFKWKHGLJLWDOLPDJHV E\VDYLQJWKHVXEIROGHURQO\<RXFDQEDFNXSWKHVXEIROGHUIURP PHPRU\FDUGVWRLQWHUQDOVWRUDJH+DUG'ULYH'LVN7RGRVR VFUROOGRZQWRWKH³3KRWR%DFNXSPRGHDQGSUHVVMR\VWLFNEXWWRQ ,IWKHVDPHFDUGLVLQVHUWHGDQGFRSLHGWZLFHWZRGLIIHUHQW IROGHUVZLOOEHFUHDWHG93ZRQ WRYHUZULWHIROGHUV $OOILOHVWUDQVIHUHGIURPHDFKPHPRU\FDUGDUHVWRUHGRQWRWKH %DFNXSIROGHULQQXPHULFDOO\DVFHQGLQJRUGHU&) &)&)&)´ 7RVWRSWKHGDWDWUDQVIHUMXVWSUHVVWKH-R\VWLFNRUWKH(6& EXWWRQ ,IDQHUURQHRXVPHVVDJHLVGLVSOD\HGSOHDVHUHIRUPDWWKH PHPRU\FDUGVILUVWWKLVPD\EHGXHWREDGVHFWRUV 1R$FWLRQ (VFDSHIURPFXUUHQWPRGH ,I\RXZDQWWRUHWXUQWRWKH3KRWR)XOOEDFNXSPRGHVMXVWVFUROO WKHPHPRU\FDUGWKDW\RXZDQWWREDFNXSDQGSUHVV0(18EXWWRQ 4) Navigating the Directory Structure Just below the top status bar, you can see the path to the directory you are currently viewing. ! 6. Photo Play Mode Enter Photo Folder 19 Press MENU to select the play modes, choose the desired mode and press the joystick. Icon View / List View Icon View: The screen displays thumbnails of all the JPEG pictures groups of eight. List View: The screen will display all the JPEG pictures as a list. Copy x Use the Joystick button to high-light the file you want to copy. x Press MENU to select COPY mode, then press joystick. x When the message “copied to clipboard“ pops on screen, press joystick. x Use the joystick to find the folder or path where you want to paste. x Press MENU to select Paste mode, then press joystick. x At the prompt “Paste from clipboard?” use the joystick to reply Yes or No. x Click “Yes” and the copy fucntion will be performed. 20 Delete x Use the joystick to find the file you want to delete. x Press MENU to select Delete mode, then press joystick. x At the prompt “Delete File?“, use thej button to reply Yes or No. Show EXIF and histogram Click the specific JPG file you want to view. press ENTER, then press Menu. Select Display Settings and press OK. Find the Show EXIF and press OK to show file information such as shutter speed, flash condition, focal length and other image information. Slide Show Click the specific JPG file you want to view and press Menu to select Slide Show mode. Slide Interval Setting: x Hold and push the Joystick button to the left to decrease the interval time x Hold and push the Joystick button to the right to increase the interval time 21 6HWDV%DFNJURXQG &OLFNWKHVSHFLILF-3*ILOH\RXZDQWDQGSUHVV0HQXWRILQG³6HWDV %DFNJURXQG´PRGHWKHQSUHVVMR\VWLFN =RRP,Q2XW'LVSOD\ <RXFDQXVH>@RU>@EXWWRQVWR]RRPLQRXWRIWKHSLFWXUH 8VHWKHMR\VWLFNWRSDQULJKWOHIWXSGRZQ 5RWDWH'LVSOD\ 3UHVVWKHMR\VWLFNWRURWDWHWKHSLFWXUHLQFRXQWHUFORFNZLVH GLUHFWLRQ 3ULQWHU6HWXS )RU3KRWRVWREHSULQWHGGLUHFWO\WRSULQWHUVWKHSULQWHUVPXVWEH 3LFWEULGJHFRPSDWLEOH,IDSULQWHULVQRW3LFWEULGJHFRPSDWLEOHRULILWLV QRWFRQQHFWHGZHOOWRWKHXQLWWKH93ZLOOGLVSOD\D³1R6XSSRUWHG 3ULQWHU´PHVVDJH 3ULQW 3LFW%ULGJHWHFKQRORJ\DOORZV\RXWRFRQQHFW\RXU93GLUHFWO\WR \RXUSULQWHUZLWKRXWDFRPSXWHU-XVWSOXJ\RXU93LQWRWKHSULQWHU XVLQJWKH86%FDEOHDQG\RXDUHUHDG\WRSULQW &RQQHFWWKH86%FDEOHWRWKHPDLQXQLWDQGSULQWHU 7XUQRQWKH93 x Set the VP8390 USB mode at [ PictBridge/Media Palyer ] x Find the specific JPEG pictures you want to print and press the MENU button x Select [Print[ and press the joystick Note: The printing function is available only for JPEG files. 7. Video Play Mode To make sure that your video file is in the right size and format supported by the VP8390, please read the VP8390 specifications first. x Push up the joystick to fast forward the videos. x Push joystick to the left to rewind and find the specific part of movie you want to play. x Push joystick to the right to fast forward and find the specific part of movie you want to play. x To pause or start/resume playback, press joystick. Play Video Clips or Slideshow on your TV x x x x x x x x Click [Options] on the main menu Use [MENU] to go to [Display] Set [Cradle AVOUT] at ON Connect the A/V cable to the A/V OUT socket of the cradle Connect the AC adaptor to the cradle Turn on the VP8390 and your television. The screen on your VP8390 should go black. You should see the VP8390 screen now displayed on your television. Note: The video Output Quality is : PAL system : 352 X 288 pixels. NTSC system :320 X 240 pixels. Play modes Press the MENU to set the play modes ! Playlist Playlist is a list of songs that the VP8390 will automatically play one after the other. To create Playlist, you can simply copy, delete or paste the files into the folder you want. 23 Play Mode Press MENU to select the Play Mode. Press joystick to set the setting. 8. Music Play Mode Scroll to the MUSIC, press Joystick to finish the selection Playlist Playlist is a list of songs that the VP8390 will automatically play one after the other. To create Playlists, you can simply copy, delete or paste the files to the folder you want. Create and use a music playlist ! VP8390 can play the mp3 songs listed in an .m3u play list file. M3U is a media queuing format, known as a play list which will play sequentially each of the mp3 files in the order listed. 24 &RQQHFW93WR\RXU3&XVLQJ86% 8VH:LQPDSWRFUHDWHDSOD\OLVW 6DYHWKHSOD\OLVWRQWKH93RQKDUGGULYH 6DYHWKHSOD\OLVWDVPXW\SHRISOD\OLVWHJLQWKH6DYHRSWLRQV SXOOGRZQPHQX 1RWH 3OHDVHUHPHPEHUWRVHWERWKWKHSOD\OLVWDQGRSHUDWLQJV\VWHPWR WKHVDPHODQJXDJHRWKHUZLVHWKH08SOD\OLVWZRQ¶WEHUHFRJQL]HG 5HSHDW6HJPHQW2Q/RRSUHSOD\XVHUGHILQHGVHFWLRQVRIDVRQJ :KHQOLVWHQLQJWRPXVLFSUHVVWKHMR\VWLFNWRVHWWKHVWDUWLQJSRLQW 3UHVVWKHMR\VWLFNDJDLQWRVHWWKHHQGLQJSRLQW7KH93ZLOO SOD\WKHVHFWLRQLQDORRS 6HTXHQFH 6KXIIOH 7RVKXIIOHWKHPXVLFLQDUDQGRPRUGHU\RXFDQVFUROOWR >6KXIIOH@DQGSUHVVWKHMR\VWLFN7KHVKXIIOHRQO\ZRUNV ZLWKLQRQHIROGHU 5HSHDW$OO 3UHVV0(18 &OLFN>6HTXHQFH@WKHQVHOHFW>5HSHDW$OO@ &OLFNLWWRVHWLW21FOLFNDJDLQWRVHWLW2)) 5HSHDW6LQJOH 3UHVV0(18 &OLFN>6HTXHQFH@WKHQVHOHFW>5HSHDW6LQJOH@ &OLFNLWWRVHWLW21FOLFNDJDLQWRVHWLW2)) 3OD\DOO 3UHVV0(18 &OLFN>6HTXHQFH@WKHQVHOHFW>3OD\DOO@ &OLFNLWWRVHWLW21FOLFNDJDLQWRVHWLW2)) (TXDOL]HU 7KHUHDUH(4PRGHV1RUPDO%DVV&ODVVLF'DQFH/LYH 5RFN7UHEOHDQG8VHUGHILQHGIRU\RXUVHOHFWLRQ .H\/RFN 7RORFNDOOWKH93EXWWRQVIURPEHLQJDFFLGHQWDOO\ SUHVVHGVFUROOWR³.H\ORFN³PRGHDQGSUHVVWKHMR\VWLFN 3UHVV0(18DQG(6&EXWWRQVWRDFWLYDWHWKHEXWWRQVDJDLQ 3OD\LQ%DFNJURXQG $OORZV\RXWRVZLWFKWRRWKHUPRGHVVXFKDVZDWFKLQJ SKRWRVVLPXOWDQHRXVO\ZLWKWKHPXVLFEHLQJSOD\LQJ 2WKHUIXQFWLRQV 3XVKWKHMR\VWLFNWRWKHOHIWWRUHZLQGDQGILQGWKHVSHFLILF SDUWRIPXVLF\RXZDQWWRSOD\ 3XVKWKHMR\VWLFNWRWKHULJKWWRIDVWIRUZDUGDQGILQGWKH VSHFLILFSDUWRIPXVLF\RXZDQWWRSOD\ $GGLQJVRQJVWRD3OD\OLVWZKLOHOLVWHQLQJWR0XVLF $IWHUKLGLQJWKHMXNHER[3OD\LQEDFNJURXQG 6ZLWFKWRRWKHUIROGHUVDQGKLJKOLJKWWKHPXVLFILOH\RX ZDQWSUHVVPHQXWRVHOHFWWKH>$GGWR3OD\OLVW@DQGSUHVVRN EXWWRQ7KHVRQJZLOOEHDGGHGWRWKHFXUUHQWSOD\OLVW 9LGHR5HFRUGLQJ :LWK\RXUFUDGOHSURSHUO\FRQQHFWHGWRD79'9'RUVDWHOOLWH UHFHLYHUPDNLQJDUHFRUGLQJLVDVLPSOHDIIDLU3OHDVHPDNHVXUH\RXU 79KDV$9RXWSXW 3RZHURQWKH93 *RWR>2SWLRQV@DQGVHW>86%PRGH@DW3LFW%ULGJH0HGLD3OD\HU *RWR>',63/$<@DQGVHW>&UDGOH$9287@WR2)) &RQQHFWWKH$9FDEOHZLWKWKH5&$SOXJVWRWKH$9LQSXWRIWKH FUDGOH $9FDEOHZLWK5&$SOXJV &RQQHFWWKHRWKHUHQGWRWKH$9RXWSXWVRFNHWRIWKH79VHW &RQQHFWWKH$&DGDSWHUWRWKHFUDGOH 6HOHFW>9LGHR5HF@DQGSUHVVMR\VWLFNWRUHFRUG:KLOHUHFRUGLQJWKH UHFRUGLQJWLPHZLOOEHGLVSOD\HGLQWKHWRSULJKWFRUQHURIWKHVFUHHQ 3UHVVMR\VWLFNDJDLQWRVWRSUHFRUGLQJ 6HWXS3DUDPHWHUV 1RWH 'XHWRWKH:LQGRZV)$7$9,ILOHW\SHVSHFLILFDWLRQWKH PD[LPXPUHFRUGLQJILOHVL]HLV*% $OOUHFRUGHGYLGHRVZLOOEHVDYHGLQFUHPHQWDOO\DV95(&03 95(&0395(&03HWF &RS\3DVWHDQG'HOHWH)LOHVDQG)ROGHUV ,QVFUHHQ%URZVHUPRGH\RXFDQFRS\SDVWHRUGHOHWHILOHVIURP RQHORFDWLRQLQWKHILOHWUHHVWUXFWXUHWRDQRWKHU6LPSO\3UHVV 0(18WRVHOHFWWKHPRGHV$V\RXILQLVKWKHVHOHFWLRQMXVWSUHVV MR\VWLFN /LVWHQWR)05DGLR &RQQHFWWKHHDUSKRQHVWRHDUSKRQHMDFN7KHHDUSKRQHVDFWDVWKH )0DQWHQQD 3UHVHWWLQJD&KDQQHO $XWRPDWLFDOO\VFDQIURPFKDQQHOWRFKDQQHO 6HOHFW5DGLR 3UHVV0(18 6HOHFW>6FDQDQG6DYH@PRGH 7KHWXQHUZLOOVWRSVFDQQLQJDWWKHILUVWUHFHLYDEOHEURDGFDVWVWDWLRQ 7KHFXUUHQW)0VWDWLRQZLOOEHVHWWRDSUHVHWFKDQQHOQXPEHU<RX FDQVWRUHXSWRVWDWLRQVLQPHPRU\ 7KHUHDUHWZRJURXSV*5283DQG*5283ZKHUHHDFKJURXS FDQVDYHXSWRFKDQQHOV 7RVWRSDXWRWXQLQJSUHVVWKH>(6&@EXWWRQ 1RWH7KLVIXQFWLRQPD\VRPHWLPHVIDLOGRWREDGUHFHSWLRQRIVRPHFKDQQHOV 7KHUDGLRVHWWLQJZLOOEHVDYHGLQWKHV\VWHPIROGHUXQGHU+DUG 'ULYHDV5$',2,1,SOHDVHGRQRWUHPRYHWKLVIROGHURUWKH VHWWLQJVZLOOEHORVW $XGLR5HFRUGLQJ <RXFDQXVHWKH³5HFRUG´IXQFWLRQDQ\WLPH+RZHYHU\RXFDQQRW UHFRUGYRLFHVWUHDPVDQGOLVWHQWRPXVLFDWWKHVDPHWLPH $GMXVWLQJWKHYROXPHWRWKHULJKWYDOXHVLVYHU\LPSRUWDQWIRU SURSHUXQGLVWRUWHGUHFRUGLQJVLWLVEHWWHUWRFKRRVHDPLGGOHZD\ VHWWLQJVRWKDWWKHVLJQDOLVQRWWRRKLJKLWZLOOEHFOLSSHGQRUWRR ORZWRJHWORVWLQWKHQRLVHOHYHORIWKHKDUGZDUH $OOUHFRUGLQJILOHVDUHVDYHGLQWKH$XGLR5HF)ROGHU $OOUHFRUGLQJILOHVDUHVDYHGDV$$&IRUPDW (QDEOH'LVDEOH$287$XGLR2XWSXW212)) (QDEOHV\RXWRPRQLWRUWKHILOHZKLFKLVEHLQJUHFRUGHG 5HFRUGLQJ4XDOLW\ 00LGGOH //RZ 7KHUHDUHWZRGLIIHUHQWFKDQQHOV6WHUHR0RQRIRUOLQHLQUHFRUGLQJ IRUYRLFHUHFRUGLQJKHUHLVRQO\RQHFKDQQHO0RQR 5HFRUGLQJIURPEXLOWLQPLFURSKRQH 6HOHFW$XGLR5HFDQGSUHVVMR\VWLFN 3UHVV0(18DQGXVHMR\VWLFNWRVHWWKH5(&,1387DW>0,&,Q@ 3UHVVMR\VWLFNWRVWDUWWKHUHFRUGLQJ 3UHVVMR\VWLFNDJDLQWRVWRSWKHUHFRUGLQJ 5HFRUGLQJIURP/LQHLQ <RXFDQXVHDOLQH±LQFRUGWRUHFRUGPXVLFGLUHFWO\IURPDQDXGLR GHYLFHVXFKDV&'SOD\HU 5HPHPEHUWRNHHSWKH$&DGDSWRUSOXJJHGLQWKURXJKRXWWKHUHFRUGLQJ &RQQHFWOLQH±LQFDEOHWRDXGLRRXWSXWRIWKHVRXUFH &RQQHFWWKHRWKHUHQGWR93FUDGOH$9LQSXW 6FUROOWR>$XGLR5HF@DQGSUHVV>-R\VWLFN 3UHVV0(18DQGXVHMR\VWLFNWRVHWWKH5(&,1387DW/LQH±LQ 3UHVVMR\VWLFNWRVWDUWWKHUHFRUGLQJ 3UHVVMR\VWLFNDJDLQWRVWRSWKHUHFRUGLQJ 1RWH 6RPH&'VDUHFRS\SURWHFWHGDQGWKH93ZLOOQRWEHDEOHWRUHFRUG IURPWKHVHVRXUFHV 5HFRUGLQJ)0UDGLR 8VHWKHMR\VWLFNWRILQGDGHVLUHGFKDQQHOVWDWLRQ 6HOHFW5DGLRDQGSUHVV0(18 6HOHFW5HFRUGPRGH 3UHVVWKHMR\VWLFNWRVWDUWUHFRUGLQJ 7H[WILOHV5HDGHU )RUPDWW[W 5HDGVWH[WILOHVLQGLIIHUHQWODQJXDJHVDVDQ(%RRN *DPH 3OD\WKH0DWUL[JDPHDWGLIIHUHQWVSHHGVDQGXSWRGLIIHUHQW OHYHOV 6HOHFWOHYHOE\SUHVVLQJXSRUGRZQZKHQHQWHULQJWKHJDPH &RQWUROGLUHFWLRQVOHIWULJKWDQGGRZQ 3UHVV0(18WRSDXVH %DWWHU\5HFKDUJH 7RFKDUJHWKHEDWWHULHVSOHDVHFRQQHFWWKH$&DGDSWHUSOXJWRWKH '&9LQSXWVRFNHWRIWKHPDLQXQLW:KHQWKH3RZHU/HG LQGLFDWRUJRHVRIIWKHEDWWHU\LVIXOO\FKDUJHG 3OHDVHXVHRQO\WKH9RVRQLFRULJLQDOP$K 9 UHFKDUJHDEOH/LLRQEDWWHU\ )RUDGGLWLRQDOEDWWHU\SDFNVSOHDVHFRQWDFW\RXUGHDOHURUGLUHFWO\ IURP9RVRQLF 16. Erroneous display / operation x When the copy error message pop on screen, there may be a chance of corrupted data or the memory card may be damaged. Please reformat your memory card. x In case of a shut-down caused by erroneous operation, please reset the unit by depressing the [reset] button located on the right side of the main unit. x If the unit is linked via USB to the PC while the battery is low, erroneous displays / operations may occur. If this happens, unplug the USB cable, and reset the unit. 17. Hard Drive and memory card x To keep your hard drive in good operating shape, we recommend to periodically run Scandisk and Disk Defragmenter from your computer. x Hard Drive must be formatted to the FAT or FAT-32 file system, the NTFS format is not compatible with this unit. x If the computer or VP8390 cannot detect the Hard Drive, check that the flat connector is plugged securely x It is not recommended to format 32GB or above Hard Drives under Windows 2000 or Windows XP Note: Win 2K/Win XP cannot format the 30GB or above Hard Drive with FAT format. x Please don't use force when connecting the USB cable with the unit. x Insert and remove the memory card from each slot with care. x Do not shake or expose the unit to shock or severe vibration while data is being transferred. 32 7RUHGXFHWKHULVNRIHOHFWURQLFVKRFNGRQRWUHPRYHEDFN FRYHU 7RUHGXFHWKHULVNRIILUHRUVKRFNKD]DUGGRQRWH[SRVHWKLV HTXLSPHQWWRUDLQOLTXLGRUPRLVWXUH 7RDYRLGDQ\GDQJHUWRWKHHQYLURQPHQWDQGWRKXPDQKHDOWK SOHDVHGRQRWGLVSRVHRIWKHHOHFWURQLFGHYLFHLQWKHUHJXODU WUDVKELQEXWDWGHVLJQDWHGFROOHFWLRQSRLQWV +DUG'ULYH$VVHPEO\&KDUW 8VHWKHVXSSOLHGPLQLVFUHZGULYHU3KLOLSVKHDGWRUHPRYHWKH EDFNFRYHUUHWDLQLQJVFUHZV 6OLJKWO\OLIWWKHULJKWVLGHEDFNFRYHU 8VH\RXUILQJHUQDLOWRDYRLGVFUDWFKLQJWKHFDVHWRRSHQWKH VLGHFOLS &DUHIXOO\VOLGHWKH+''LQWRWKH,'(FRQQHFWRU7DNHFDUHQRW WREHQGWKHFRQQHFWRU¶VSLQVHOVHWKH+''ZLOOQRWIXQFWLRQ 3ODFHGRQRWVOLGHEDFNWKHFRYHU 19. Formatting the Hard Disk without a PC WARNING i When you partition and format a hard disk, all data on that partition is permanently deleted. i If the hard disk already contains data, please backup the data first. i The Hard Disk will be formatted as FAT file system x Select the Hard Disk icon and press MENU x Select Format Disk option and press the joystick. Disk formatting will be performed. 36 7URXEOHVKRRWLQJ :$51,1* 8QGHUQRFLUFXPVWDQFHVVKRXOG\RXWU\WRUHSDLUWKHV\VWHP \RXUVHOIDVWKLVZLOOLQYDOLGDWHWKHZDUUDQW\'RQRWRSHQ WKHV\VWHPDVWKHUHLVDULVNRIHOHFWULFDOVKRFN,IDIDXOW RFFXUVILUVWFKHFNWKHSRLQWVOLVWHGEHORZEHIRUHWDNLQJWKH V\VWHPIRUUHSDLU,I\RXDUHXQDEOHWRUHPHG\DSUREOHP FRQVXOW\RXUGHDOHURUVHUYLFHFHQWHU 3UREOHP 86%&RQQHFWLRQ LVVXHV 6ROXWLRQV 8QGHU:LQGRZV6(ILUVWLQVWDOOWKHGULYHU IURPWKHVXSSOLHG&'EHIRUHFRQQHFWLQJWKH 93WRWKH3& ,QVWHDGRIXVLQJD86%SRUWLQWKHIURQWRI \RXUFRPSXWHUWU\D86%SRUWDWWKHEDFN )URQW86%SRUWVDUHRIWHQQRQSRZHUHGDQG RQO\86%FRPSDWLEOH ,IXVLQJDODSWRSFRPSXWHUDQGDGRFNLQJ VWDWLRQWU\FRQQHFWLQJZLWKRXWWKHGRFNLQJ VWDWLRQ ,I\RXFDQQRWVHHRQ\RXU3&WKHILOHV\RX KDYHFRSLHGWRWKH93YLDWKH86%\RX PXVWSURSHUO\UHPRYHXQPRXQWWKH93 IURPWKHFRPSXWHUEHIRUH GLVFRQQHFWLQJWKH 86%FDEOHWRDYRLGORVVRIGDWDRU³IUHH]LQJ´ WKHFRPSXWHUDQGRUWKH93 ,IWKH93+''LFRQGRHVQRWVKRZXSLQ :LQGRZVIRURYHUPLQXWHWKH93+''¶V )LOHV$OORFDWLRQ7DEOH)$7PD\EH FRUUXSWHG<RXFDQXVHWKH)RUPDW)XQFWLRQRQ WKH93WRUHIRUPDWWKH'ULYHEXWQRWH WKDW LWZLOOHUDVH$//GDWDRQ\RXU93 MacintoshTM OS issues Data corruption, General Error, Can’t open Source File Formatting and partitioning Video Playback i MacOS 10.0.x does not adequately support FAT volumes. Upgrading to version 10.1 or later is mandatory. i The FAT-32 format made by MacOS 10´s Disk Utility is incorrect. Formatting must be done under MacOS 9. i The FAT volumes do not appear or disappear until after the mouse has been moved. i If the File Allocation Table (FAT) is corrupted, the data transferred to the VP8390 from a memory card may appear faulty. Please backup the data and run ScanDisk, Disk Defragmenter or reformat the memory card (but note that it will erase ALL data on your memory card). i If the browser shows a “?” sign, it indicates that it is not one of the standard file types which the system supports or can play. i To work in the standalone mode, both the disk and the memory cards must be formatted to the FAT or FAT-32 file systems. i Un-synchronized playback may occur due to the original video being encoded in NTSC format while your VP8390 is set to display the output as PAL (see the system display settings) or vice versa. Try changing this to the other setting. i Press Reset to turn off the device, then turn it on again. Operation freezes i If you get abnormal freezes from a video or Stops /audio playback, call our technical support hotline or email to [email protected] ! 38 )UHTXHQWO\$VNHG4XHVWLRQV 3UREOHP :K\FDQ W,KHDU PXVLF" 7KHV\VWHPGRHVQRW UHDFWZKHQEXWWRQV DUHSUHVVHG 7KHUHPRWHFRQWURO GRHVQRWIXQFWLRQ SURSHUO\ +RZFDQ,JHWDQ H[WUDEDWWHU\IRUP\ 93 +RZGR,EURZVHP\ ILOHVRQWKH93 ZKLOHSOD\LQJPXVLF" :KHQ,SOD\YLGHRV RQP\79WKH SLFWXUHLPDJHKDVQR FRORUDQGRULV GLVWRUWHGZK\" 6ROXWLRQ ,IWKHSOD\HUSOD\VDYLGHRRUPXVLFILOHDQG \RXGRQ WKHDUDQ\WKLQJWKHQWKHUHPD\EHD SUREOHPZLWK\RXUVSHDNHUVRUKHDGSKRQHV ,I\RXFDQKHDURWKHUVRXQGVWKURXJK\RXU VSHDNHUVWKHQWKHUHPLJKWEHDSUREOHPZLWK RXUVRXUFHILOH,I\RXIHHOWKHODWWHULVWKH FDVHWKHQSOHDVHFRQWDFWXVDQGSURYLGHXV ZLWKDVPXFKLQIRUPDWLRQDV\RXFDQ 5HPRYHDQGUHFRQQHFWWKH$&DGDSWHUSOXJ DQGVZLWFKRQWKHV\VWHPDJDLQ 5HGXFHWKHGLVWDQFHEHWZHHQWKHUHPRWH FRQWURODQGWKHV\VWHP ,QVHUWWKHEDWWHU\ZLWKWKHSRODULW\VLJQV DOLJQHGDVLQGLFDWHG 5HSODFHWKHEDWWHU\ 3RLQWWKHUHPRWHFRQWUROGLUHFWO\WRZDUGWKH ,5VHQVRURQWKHIURQWRIWKHV\VWHP &RQWDFW\RXURULJLQDOGHDOHURUHPDLOWR VHUYLFH#YRVRQLFFRPWZ <RXFDQEURZVH\RXUILOHVZKLOHOLVWHQLQJWR D 03 :0$ RU :$9 PXVLF ILOH RQO\ :KLOH \RXU PXVLF LV SOD\LQJ SUHVV 0(18 DQGVHOHFW³3OD\LQ%DFNJURXQG³PRGH 1RWH 7KLV IHDWXUH LV RQO\ DYDLODEOH GXULQJ 0XVLF SOD\EDFN 86$ DQG (XURSH XVH GLIIHUHQW 79 V\VWHPV 167&VWDQGDUGLVXVHGLQWKH86$DQG3$/ VWDQGDUGLVXVHGLQ(XURSH(QWHU237,216 DQGVHOHFW',63/$<WRVHW\RXU93WR WKH79VWDQGDUGUHTXLUHGLQ\RXUFRXQWU\ +RZWRXSGDWHWKHILUPZDUHIRUP\9RVRQLF 9,6,792621,&217+(:(% *RWRKWWSZZZYRVRQLFFRPWRGRZQORDGWKHODWHVWILUPZDUH 7KHODWHVWYHUVLRQRIWKLVPDQXDOPD\DOVREHDYDLODEOHRQ9RVRQLF VZHEVLWH &217$&792621,& 7RKHOS9RVRQLFWRSURPSWO\DQVZHU\RXUTXHVWLRQVSOHDVHKDYH\RXUSURGXFW¶V PRGHOQXPEHUVHULDOQXPEHUILUPZDUHYHUVLRQDQG\RXUFRQWDFWLQIRUPDWLRQZKHQ \RXFDOOVHQGDQHPDLOWR&XVWRPHU6HUYLFHVHUYLFH#YRVRQLFFRPWZ7KH61DQG PRGHOQXPEHUDUHRQWKHEDFNRI\RXU93FDVH 5(*,67(5$0(0%(5$79RVRQLF &/8% 7KHHDVLHVWZD\WRFRPPXQLFDWHDQGVKDUH\RXUH[SHULHQFHZLWKRWKHUXVHUVLVWR UHJLVWHUDVD9RVRQLFPHPEHUVDW9RVRQLF&OXE KWWSZZZYRVRQLFWZPDLOQHW 92621,&7(&+12/2*<&25325$7,21 7RSURFHVVDUHTXHVWIRU50$6HUYLFHWKHIROORZLQJLQIRUPDWLRQPXVWEH SURYLGHG 0RGHO1RBBBBBBBBBBBBBB 8VHU1DPH BBBBBBBBBBBBBBBBBBBBBBBBB 611RBBBBBBBBBBBB 7HOBBBBBBBBBBB (PDLOBBBBBBBBBBBBBBBBBBBBBBBBBBBBBBBBBBBBBBBBBBBBBB 5HWXUQ$GGUHVVBBBBBBBBBBBBBBBBBBBBBBBBBBBBBBBBBBBBBBB 3UREOHP'HVFULSWLRQ)RU8VHU 5HWXUQHG3URGXFW'HWDLO)RU0DQXIDFWXUHU 'HDOHULQIRUPDWLRQ Index Introduction and Warranty details. . . . . . . . . . . . . . . . . . 2 Specifications . . . . . . . . . . . . . . . . . . . . . . . . . . . . . . . . . . 5 Overview of panels & keys . . . . . . . . . . . . . . . . . . . . . . . 9 Using the VP8360 . . . . . . . . . . . . . . . . . . . . . . . . . . . . . 10 Settings . . . . . . . . . . . . . . . . . . . . . . . . . . . . . . . . . . . . . 13 Using memory cards . . . . . . . . . . . . . . . . . . . . . . . . . . . . 17 Photos . . . . . . . . . . . . . . . . . . . . . . . . . . . . . . . . . . . . . . 19 Video . . . . . . . . . . . . . . . . . . . . . . . . . . . . . . . . . . . . . . 23 Music . . . . . . . . . . . . . . . . . . . . . . . . . . . . . . . . . . . . . . 24 Video recording . . . . . . . . . . . . . . . . . . . . . . . . . . . . . . . 26 Working with Files and Folders . . . . . . . . . . . . . . . . . . . 28 FM Radio . . . . . . . . . . . . . . . . . . . . . . . . . . . . . . . . . . . . 28 Audio recording . . . . . . . . . . . . . . . . . . . . . . . . . . . . . . . 29 Text Files . . . . . . . . . . . . . . . . . . . . . . . . . . . . . . . . . . . 30 Game . . . . . . . . . . . . . . . . . . . . . . . . . . . . . . . . . . . . . . . 31 Battery recharge . . . . . . . . . . . . . . . . . . . . . . . . . . . . . . . 31 Error messages . . . . . . . . . . . . . . . . . . . . . . . . . . . . . . . . 31 Hard Disk and memory cards . . . . . . . . . . . . . . . . . . . . 32 Hard Disk Assembly Chart . . . . . . . . . . . . . . . . . . . . . . . 33 Hard Disk formatting . . . . . . . . . . . . . . . . . . . . . . . . . . 35 Troubleshooting . . . . . . . . . . . . . . . . . . . . . . . . . . . . . . 36 FAQ . . . . . . . . . . . . . . . . . . . . . . . . . . . . . . . . . . . . . . . . 38 Firmware upgrade . . . . . . . . . . . . . . . . . . . . . . . . . . . . . 39 THANK YOU FOR CHOOSING THIS PRODUCT We hope it will provide you with years of trouble-free enjoyment. Please look after your Vosonic. If you experience problems and cannot find solutions in the previous sections, please contact your dealer or check for updated firmware at www.vosonic.com or email to [email protected] The Vosonic Team 41