1
DIGITAL WORKSTATION
Reference Manual
Explains advanced features of the PSR-S650. After reading the Owner’s Manual and
you want more detailed information about PSR-S650 features, refer to the Reference Manual.
EN
Contents
Voice-Related Settings and Functions
3
Adjusting volume balance and timbre of the sounds for
each Voice.................................................................... 3
Calling up the Style Creator ........................................... 32
Beat settings .................................................................. 33
Section Settings ............................................................. 34
Voice Types...................................................................... 4
Copying a Section................................................ 34
Voice Characteristics ............................................. 4
Selecting a Section to be recorded...................... 36
Metronome Setting ........................................................... 5
Setting the Measure Length................................. 36
Muting the Bell ....................................................... 5
Part Settings .................................................................. 37
Adjusting the Metronome Volume .......................... 6
Selecting a Recording Part .................................. 37
Setting the touch sensitivity of the keyboard .................... 7
Selecting a Voice ................................................. 37
EQ settings....................................................................... 8
Part Volume ......................................................... 37
Harmony/Effect-Related Settings
9
Pan ...................................................................... 37
Reverb Level........................................................ 37
Selecting a Harmony type ................................................ 9
Chorus Level........................................................ 37
Selecting a Reverb type ................................................. 10
Recording part ............................................................... 38
Selecting a Chorus type ................................................. 11
Rhythm Part recording......................................... 38
Selecting a DSP type ..................................................... 12
Style-Related Settings
14
Adjusting the Style Volume ............................................ 14
Muting Independent Style Parts ..................................... 15
Selecting Chord Fingering Type..................................... 16
Pattern Variation (Sections) ........................................... 18
Bass, Chord, Pad and Phrase Part recording...... 39
Editing (Quantize and part clear) ................................... 40
Quantize .............................................................. 40
Clearing a recorded Part...................................... 41
Saving the data .............................................................. 42
Exit from the Style Creator............................................. 43
Setting the Split Point ..................................................... 19
The Functions
Stop Accompaniment function........................................ 20
Basic Operation ............................................................. 44
Style Types..................................................................... 20
Creating Your Own One Touch Setting Setups.............. 21
44
Connecting to a Computer
48
22
MIDI Settings for transferring performance data
with a computer.......................................................... 48
Adjusting the Song Volume ............................................ 22
PC Mode.............................................................. 48
Muting Independent Song Parts..................................... 23
MIDI Settings ....................................................... 49
Song-Related Settings
Random Song Playback................................................. 24
Initial Setup .......................................................... 50
Song Types .................................................................... 25
Transferring Data Between the Computer and
Instrument .................................................................. 51
Editing Songs
26
Creating Original Styles (Style Creator)
30
Transferring Data by using the Musicsoft
Downloader...................................................... 51
Style Structure................................................................ 30
Index.............................................................................. 53
Installing Musicsoft Downloader .......................... 51
Using the Style Creator .................................................. 31
Using the PDF manual
• To quickly jump to items and topics of interest, click on the desired items in the “Bookmarks” index to the left of the main display window. (Click the “Bookmarks” tab to open the index if it is not displayed.)
• Click the page numbers that appear in this manual to go directly to the corresponding page.
• Select “Find” or “Search” from the Adobe Reader “Edit” menu and enter a keyword to locate related information anywhere in
the document.
NOTE
• The names and positions of menu items may vary according to the version of Adobe Reader being used.
• The illustrations and displays as shown in this manual are for instructional purposes only, and may appear somewhat different from those on your instrument.
• The company names and product names in this manual are the trademarks or registered trademarks of their respective companies.
Reference Manual
2
Voice-Related Settings and Functions
When a Main, Dual or Left Voice is selected, suitable Voice parameters—such as Voice
Volume or effect send level—for each Voice are automatically recalled. However, you
can change these parameters as desired. This chapter explains how to set the Voice
parameters for each Voice and how to make other settings related to the keyboard performance.
Adjusting volume balance and timbre of the sounds for each Voice
You can adjust the volume balance or other Voice parameters among Main, Dual and
Left Voices. You can also memorize the settings here to the Registration Memory for
easy and convenient future recall.
1
Press the [FUNCTION] button to call up the Function display.
The currently selected item will appear in the display.
2
Press the CATEGORY [<] and [>] buttons repeatedly to select the
item you want to change.
You can individually adjust the Voice setting (Volume, Octave, Pan, Reverb
Level, Chorus Level, DSP Level and Dry Level) that is applied to the Main,
Dual, and Left Voices. For example, if you wish to change the DSP Level for the
Main Voice, select “Main DSP Level.”
Item (Display)
MAIN VOICE
Main Volume
Main Octave
Main Pan
Main Reverb Level
Main Chorus Level
Main DSP Level
Main Dry Level
DUAL VOICE
Dual Volume
Dual Octave
Dual Pan
Dual Reverb Level
Dual Chorus Level
Dual DSP Level
Dual Dry Level
LEFT VOICE
Left Volume
Left Octave
Left Pan
Left Reverb Level
Left Chorus Level
Left DSP Level
Left Dry Level
Value
000–127
-2–+2
000–64–127
(left–center–right)
000–127
000–127
000–127
000–127
000–127
-2–+2
000–64–127
(left–center–right)
000–127
000–127
000–127
000–127
000–127
-2–+2
000–64–127
(left–center–right)
000–127
000–127
000–127
000–127
Reference Manual
3
Voice-Related Settings and Functions
3
Use the dial or the [-/NO]/[+/YES] buttons to set the value as desired.
Play the keyboard and listen to the Voice.
4
Memorize the settings here to the Registration Memory as desired.
If you select a different keyboard Voice without saving, the parameters will be
reset and the ideal settings for the selected Voice will be automatically recalled.
Voice Types
The following two types of Voices can be used by this instrument.
Preset Voices
Voices built into the instrument
Expansion Voices
Voices saved into the instrument by installing the Expansion Pack
Preset Voices
Expansion Voice
Voice Characteristics
The Voice type and its defining characteristics are indicated in the Voice name.
• Live! .............These acoustic instrument sounds were sampled in stereo, to produce a
truly authentic, rich sound—full of atmosphere and ambience.
• Cool!.............These Voices capture the dynamic textures and subtle nuances of electric
instruments—thanks to a huge amount of memory and some very sophisticated programming.
• Sweet!...........These acoustic instrument sounds also benefit from Yamaha’s sophisticated technology, and feature extremely detailed, natural and authentic
sound.
• Kit.................Various drum and percussion sounds and special effect sounds are
assigned to individual keys.
• Mega.............Mega Voices make special use of velocity switching. Each velocity range
(the measure of your playing strength) has a completely different sound.
For example, a guitar Mega Voice includes the sounds of various performance techniques. In conventional instruments, different Voices having
those sounds would be called up via MIDI and played in combination to
achieve the desired effect. However, now with Mega Voices, a convincing
guitar part can be played with just a single Voice, using specific velocity
values to play the desired sounds. Because of the complex nature of these
Voices and the precise velocities need to play the sounds, they’re not
intended for playing from the keyboard. They are, however, very useful
and convenient when creating MIDI data—especially when you want to
avoid using several different Voices just for a single instrument part.
NOTE
• Mega Voices are unique to
this instrument and are not
compatible with other models. Any Song or Style data
you’ve created on this instrument using these Voices will
not sound properly when
played back on other instruments.
• Mega Voices sound differently depending on the keyboard range, velocity, touch,
etc. Hence, if you apply
effects, change the transpose setting or change the
Voice parameters, unexpected or undesired sounds
may result.
Reference Manual
4
Voice-Related Settings and Functions
Metronome Setting
Muting the Bell
You can mute the Metronome bell which sounds at the first beat of each measure.
1
Press the [FUNCTION] button.
2
Press the CATEGORY [<] and [>] buttons repeatedly to call up
Metronome category function “Bell.”
You can also call up Metronome category function display easily by holding the
[METRONOME] button for longer than a second.
Metronome category
Bell
ON/OFF status
3
Rotate the dial and select ON (sound) or OFF (mute).
Reference Manual
5
Voice-Related Settings and Functions
Adjusting the Metronome Volume
1
Press the [FUNCTION] button.
2
Press the CATEGORY [<] and [>] buttons repeatedly to call up
“Metronome Volume.”
Metronome Volume
3
Use the dial to set the Metronome Volume.
Reference Manual
6
Voice-Related Settings and Functions
Setting the touch sensitivity of the keyboard
You can adjust the touch response of the instrument (how the sound responds to the way you play the keys).
1
Confirm that Touch Response is on.
You can see the on/off status for Touch Response in the Main display. The
[TOUCH] button alternately turns Touch Response on and off.
Appears when Touch Response is on
When Touch Response is set to off, all notes will be played at the same volume
no matter how hard or softly you play the keys.
2
Press and hold the [TOUCH] button for longer than a second to
call up “Touch Sensitivity.”
Touch Sensitivity
Value
Hold for longer
than a second
3
Use the dial to select a Touch Sensitivity setting between 1 and 3.
NOTE
• The initial default setting is 2.
1 (Soft)
Produces high volume with moderate playing strength.
2 (Medium)
Standard touch response.
3 (Hard)
Requires moderately strong playing for higher volume.
Reference Manual
7
Voice-Related Settings and Functions
EQ settings
You can select one of five Master equalizer (EQ) settings which are provided to give you the best possible sound
when listening through different reproduction systems: the instrument’s built-in speakers, headphones and external speakers.
1
Press the [FUNCTION] button.
The currently selected function will appear in the display.
2
Press the CATEGORY [<] and [>] buttons repeatedly to call up
Master EQ Type.
The currently selected EQ
type will appear.
3
Use the dial to select an EQ Setting for the best sound.
Settings 1 and 2 are designed for optimum sound when using the built-in speakers of the instrument. Setting 1 provides balanced reproduction throughout the
frequency spectrum, low to high. Setting 2 has a more powerful sound than 1,
and is ideal for local music from South America and the Middle East.
Setting 3 is designed for headphone listening, and has a relatively flatter
response than 1.
Settings 4 and 5 are designed for use with a mixer and external speaker system.
Setting 4 in particular has a flat response, and is suitable for relatively largescale PA applications and recording using a mixer. Setting 5 is more suitable for
small external speakers, and compared to 4, emphasizes the low and high frequencies.
Reference Manual
8
Harmony/Effect-Related Settings
Harmony and Effect (Reverb, Chorus and DSP) have their own suitable preset types
which are automatically recalled when a Main Voice or Style/Song is selected. However,
you can change the effect type as desired. This chapter explains how to set the effect
type.
Selecting a Harmony type
This feature adds Harmony, Tremolo or Echo effects to the Main Voice when the Harmony is turned on. A suitable
Harmony type is automatically selected when you select a Main Voice, but you can easily select a different Harmony type.
1
Press the [HARMONY] button to turn the Harmony function on.
You can see the on/off status for the Harmony in the Main display. To turn Harmony
off, press the [HARMONY] button again.
Appears when Harmony is on
2
Press and hold the [HARMONY] button for longer than a second to
call up the Harmony type select display.
The currently selected Harmony type will be displayed.
Harmony type
Selected Harmony type
Hold for longer
than a second
3
4
Use the dial to select a Harmony type.
Refer to the Effect Type List in the separate Data List for information about the
available Harmony types. Try playing the keyboard with the Harmony function.
The effect and operation of each Harmony type is different—for details, refer to
the section “How to play Each Harmony Type” in chapter 1 in the Owner’s
Manual.
Memorize the settings here to the Registration Memory as desired.
If you select a different Main Voice without saving, the settings in steps 2–3 will
be cleared.
NOTE
• The Harmony notes can be
added only to the Main
Voice, not to Dual or Left
Voices.
• The keys left of the Split
Point of the keyboard produce no Harmony notes
when the Auto Accompaniment is on ([ACMP] button
lights).
• When chord fingering is set
to Full Keyboard, the Harmony function is turned off
automatically.
Reference Manual
9
Harmony/Effect-Related Settings
Selecting a Reverb type
Reverb enhances the sound of the Voices with the rich ambience of a concert hall. When you select a Style or
Song the optimum reverb type for the Voice used is automatically selected. If you want to select a different reverb
type, use the operation described below.
1
Press the [FUNCTION] button to call up the Function display.
2
Press the CATEGORY [<] and [>] buttons repeatedly to call up
“Reverb Type.”
The currently selected Reverb type will be displayed.
Reverb type
Selected Reverb type
3
Use the dial to select a Reverb type.
Refer to the Effect Type List in the separate Data List for information about the
available Reverb types. Try playing the keyboard with the Reverb function.
Adjusting the Reverb Level
You can individually adjust the amount of reverb that is applied to the Main,
Dual, and Left Voices (see page 3).
4
Memorize the settings here to the Registration Memory as desired.
If you select a different Style without saving, the settings in steps 3 will be
cleared.
Reference Manual
10
Harmony/Effect-Related Settings
Selecting a Chorus type
The Chorus effect creates a thick, textured sound that is similar to many of the same Voices being played in unison. When you select a Style or Song the optimum Chorus Type for the Voice used is automatically selected. If
you want to select a different Chorus Type, use the procedure described below.
1
Press the [FUNCTION] button to call up the Function display.
2
Press the CATEGORY [<] and [>] buttons repeatedly to call up
“Chorus Type.”
The currently selected Chorus type will be displayed.
Chorus type
Selected Chorus type
3
Use the dial to select a Chorus type.
Refer to the Effect Type List in the separate Data List for information about the
available Chorus types. Try playing the keyboard with the Chorus function.
Adjusting the Chorus Level
You can individually adjust the amount of Chorus that is applied to the Main,
Dual, and Left Voices (See page 3).
4
Memorize the settings here to the Registration Memory as desired.
If you select a different Style without saving, the settings in steps 3 will be
cleared.
Reference Manual
11
Harmony/Effect-Related Settings
Selecting a DSP type
In addition to the Reverb and Chorus effects, a wide variety of DSP (Digital Signal
Processor) effects let you enhance the sound, or completely transform it. Some DSP
types can be applied only to notes you play on the keyboard while the Reverb and
Chorus effects are applied to the entire instrument sound. When you select a Main
Voice, the optimum DSP Type for the Voice used is automatically selected. If you
want to select a different DSP type, use the procedure described below.
NOTE
1
NOTE
Press the [DSP] button to turn the DSP function on.
The [DSP] button lights when the DSP is turned on. To turn DSP off, press the
[DSP] button again.
Lights when the DSP is turned on.
2
Press and hold the [DSP] button for longer than a second to call
up the DSP type select display.
The currently selected DSP type will be displayed.
• DSP is an acronym for Digital Signal Processor and it
uses a micro processor to
change the audio in various
ways.
• The volume of the currently
playing Voice changes when
turning DSP on or off. This is
not a malfunction. The
amount of change differs
depending on the selected
Voice.
• The DSP type is an overall
setting—only one type can
be selected. For this reason,
when you play a newly
loaded Song or Style, for
example, the currently playing Voices may not sound as
expected. This is normal,
since the Song or Style has
its own DSP type which
replaces any selection
you’ve made before loading.
A similar phenomenon
occurs when you use the
[f], [r] buttons or A-B
Repeat function during
Song playback.
DSP type
Selected DSP type
Hold for longer than a
second
3
Use the dial to select a DSP type.
Refer to the Effect Type List in the separate Data List for information about the
available DSP types. Try playing the keyboard with the DSP function.
Adjusting the DSP Level
You can individually adjust the amount of DSP that is applied to the Main, Dual,
and Left Voices (see page 3).
4
Memorize the settings here to the Registration Memory as desired.
If you select a different Style without saving, the settings in steps 3 will be
cleared.
Reference Manual
12
Harmony/Effect-Related Settings
Voice Sound and Effect Type
You can select one type from each effect (Reverb, Chorus and DSP) then individually
adjust the amount of effect that is applied to the Main, Dual, and Left Voices. However, the effect type cannot be applied independently to each Main, Dual or Left
Voice. Because of this, you should adjust the send level for each Voice when using
effects.
When the DSP function is on, the overall sound may be wrong or unexpected if the
Main Voice is changed. This is because the DSP type is automatically selected
according to the currently selected Main Voice and the same effect is applied to the
Dual Voice or Left Voice as well as the Main Voice. If you want to enhance the sound
using the DSP, determine the Main Voice first, then adjust the send level of the DSP
effect applied to each Voice.
The Reverb/Chorus type is automatically selected according to the currently selected
Style or Song, and the same effect is applied to the Dual Voice or Left Voice as well
as the Main Voice. If you want to create a custom sound using a favorite Voice, determine the Voices, effects and Voice parameters first, then memorize the settings to the
Registration Memory without changing the Style or Song.
Reference Manual
13
Style-Related Settings
This section gives detailed information on the Style playback functions not covered in
the Owner’s Manual.
Adjusting the Style Volume
This lets you adjust the volume balance between Style playback and the sound you play on the keyboard.
1
Press the [FUNCTION] button.
2
Press the CATEGORY [<] and [>] buttons repeatedly to call up
“Style Volume.”
Style Volume
Setting range is
000–127
3
Use the dial to set the Style Volume.
NOTE
• For instructions on adjusting the volume of the keyboard performance, see
page 3.
Reference Manual
14
Style-Related Settings
Muting Independent Style Parts
Each “track” of a Style plays a different part of the Style—chord, bass, etc. You can mute individual tracks and
play the muted part on the keyboard yourself, or simply mute tracks other than the ones you want to listen to.
Use the [REGIST/PART [MIXER]] button to select the ACMP TR and use the STYLE PART [RHY 1]–[PHR 2]
buttons to mute or un-mute the corresponding tracks. Each track button is lit in green when that track is not muted,
and is unlit when the track is muted. Furthermore, the border around the track number in the display disappears
when that track is muted.
The bass part uses various
appropriate instrument
sounds to match the Style.
These are the basic parts of
the Style, containing the
drum and percussion rhythm
patterns.
1
These are the rhythmic chord backing
parts, commonly
used with piano or
guitar Voices.
This part is used
for sustained
instruments such
as strings, organ,
choir, etc.
These parts are used for punchy brass
stabs, arpeggiated chords, and other
extras that make the accompaniment
more interesting.
Press the [REGIST/PART [MIXER]] button until the desired track
is shown on the display.
The following items are selected on the display when you press the [REGIST/
PART [MIXER]] button. “REGIST” “ACMP. TR”
REGIST
ACMP. TR
In this state, you can use eight buttons as the Style track buttons.
2
Press the desired Track button(s) to set the mute track(s).
To cancel the mute, press the appropriate track button(s) again.
No track number ... No data.
Unlit ... Contains no data or is muted
Lit in green ... Contains data and played
Track number without border ... Track
contains data but is muted.
Track number with border ... Track
contains data and is not muted.
Reference Manual
15
Style-Related Settings
Selecting Chord Fingering Type
When the Auto Accompaniment is turned on, you can select one of three Chord Fingering types which detect
chords played with your left hand (in the auto accompaniment section of the keyboard).
1
Press and hold the [ACMP] button for longer than a second to
call up the Chord Fingering type select display.
2
Use the dial to select the type.
The default Fingering type is “Multi Finger.”
1 Multi Finger
Recognizes the various chord types which are listed on page
17.
2 FullKeyboard
Detects chords in the entire key range. Chords are detected
in a way similar to Multi Finger.
3 AI Fingered
Basically the same as Multi Finger, with the exception that
less than three notes can be played to indicate the chords
(based on the previously played chord, etc.). However, Easy
chords described in chapter 2 in the Owner’s Manual cannot
be detected in the AI Fingered mode.
“AI” stands for “Artificial Intelligence.”
Reference Manual
16
Style-Related Settings
Chord Types Recognized in the Multi Finger
C sus4
C aug
C M7aug
C dim7
)
)
(
(
C M7
(
C7
(b5)
(b5)
)
C7
(9)
(11)
C m7
C m7
(b5)
(9)
C mM7
C mM7
(b5)
C m7
C mM7
C dim
C 7aug
C 7sus4
C sus2
(#11)
(9)
)
(
)
(
)
)
)
(
(
)
(
C7
C7
)
)
(
(b5)
(#9)
(13)
C7
(
C7
C7
)
(b13)
C7
(
(b9)
(
(
(
)
)
(
)
C m7
C
(
C m6
(
C m add9
C M7
C M7
)
Cm
(#11)
(9)
C M7
(
C6
)
C add9
)
(9)
C6
C
* Notes enclosed in parentheses (
Chord Name/[Abbreviation]
) are optional; the chords will be recognized without them.
Normal Voicing
Display
Major [M]
1-3-5
C
Add ninth [(9)]
1-2-3-5
C add9
Sixth [6]
1 - (3) - 5 - 6
C6
Sixth ninth [6(9)]
1 - 2 - 3 - (5) - 6
C69
Major seventh [M7]
1 - 3 - (5) - 7
CM7
Major seventh ninth [M7(9)]
1 - 2 - 3 - (5) - 7
CM79
Major seventh add sharp eleventh [M7(#11)]
1 - (2) - 3 - #4 - 5 - 7 or 1 - 2 - 3 - #4 - (5) - 7
CM7#11
Flatted fifth [(b5)]
1 - 3 - b5
Cb5
Major seventh flatted fifth [M7b5]
1 - 3 - b5 - 7
CM7b5
Suspended fourth [sus4]
1-4-5
Csus4
Augmented [aug]
1 - 3 - #5
Caug
Major seventh augmented [M7aug]
1 - (3) - #5 - 7
CM7aug
Minor [m]
1 - b3 - 5
Cm
Minor add ninth [m(9)]
1 - 2 - b3 - 5
Cm add9
Minor sixth [m6]
1 - b3 - 5 - 6
Cm6
Minor seventh [m7]
1 - b3 - (5) - b7
Cm7
Minor seventh ninth [m7(9)]
1 - 2 - b3 - (5) - b7
Cm79
Minor seventh add eleventh [m7(11)]
1 - (2) - b3 - 4 - 5 - (b7)
Cm711
Minor major seventh [mM7]
1 - b3 - (5) - 7
CmM7
Minor major seventh ninth [mM7(9)]
1 - 2 - b3 - (5) - 7
CmM79
Minor seventh flatted fifth [m7b5]
1 - b3 - b5 - b7
Cm7b5
Minor major seventh flatted fifth [mM7b5]
1 - b3 - b5 - 7
CmM7b5
Diminished [dim]
1 - b3 - b5
Cdim
Diminished seventh [dim7]
1 - b3 - b5 - 6
Cdim7
Seventh [7]
1 - 3 - (5) - b7 or 1 - (3) - 5 - b7
C7
Seventh flatted ninth [7(b9)]
1 - b2 - 3 - (5) - b7
C7b9
Seventh add flatted thirteenth [7(b13)]
1 - 3 - 5 - b6 - b7
C7b13
Seventh ninth [7(9)]
1 - 2 - 3 - (5) - b7
C79
Seventh add sharp eleventh [7(#11)]
1 - (2) - 3 - #4 - 5 - b7 or 1 - 2 - 3 - #4 - (5) - b7
C7#11
Seventh add thirteenth [7(13)]
1 - 3 - (5) - 6 - b7
C713
Seventh sharp ninth [7(#9)]
1 - #2 - 3 - (5) - b7
C7#9
Seventh flatted fifth [7b5]
1 - 3 - b5 - b7
C7b5
Seventh augmented [7aug]
1 - 3 - #5 - b7
C7aug
Seventh suspended fourth [7sus4]
1 - 4 - 5 - b7
C7sus4
Suspended second [sus2]
1-2-5
Csus2
Reference Manual
17
Style-Related Settings
Pattern Variation (Sections)
The instrument features a wide variety of Style “sections” that allow you to vary the arrangement of the accompaniment to match the Song you are playing.
Play the Intro
Play the Ending
Press one of the INTRO [I]–[III] buttons to add an introduction as soon as
Style Playback is started. When the
Intro finishes playing, Style playback
automatically shifts to the Main section.
Press one of the ENDING/rit. [I]–[III] buttons to begin
playing an ending section. Playback will stop automatically when the ending has played all the way through.
You can have the ending gradually slow down (ritardando) by pressing the same ENDING/rit.button again
while the ending is playing back.
Play Fill-in
Play Main section
When the [AUTO FILL IN] button is turned on,
pressing any of the MAIN VARIATION [A]–[D]
buttons as you play automatically plays a fill-in section, spicing up the auto accompaniment. Even
when the [AUTO FILL IN] is turned off, pressing
the same button of the currently playing section
automatically plays a fill-in before returning to the
same Main section.
Pressing one of the MAIN VARIATION [A]–
[D] buttons during playback switches to the
other Main pattern. Press one of the MAIN
VARIATION [A]–[D] buttons before starting
Style playback to select the desired Main section
for playing.
Reference Manual
18
Style-Related Settings
Setting the Split Point
Set the point on the keyboard that separates the right and left-hand sections (Split Point). When Auto Accompaniment is off, keys played in the left-hand section are used for playing the Left Voice. When Auto Accompaniment
is on, the left-hand section becomes the Chord section (Auto Accompaniment range) and the chords played in the
Chord section produce an appropriate Auto Accompaniment playback, and add the Harmony effect to the notes
played in the right-hand section.
The initial default Split Point is key number 54 (the F sharp 2 key), but you can change it to another key using the
procedure described below.
1
Press the [FUNCTION] button.
2
Use the CATEGORY [<] and [>] buttons repeatedly to call up
“Split Point.”
3
Use the dial to set the Split Point to any key from 036 (C1) through
096 (C6).
Split Point (54: F#2)
Main Voice
NOTE
• A specified “Split Point” key
is included in the Auto
Accompaniment range.
• You can also use the [-/NO]
and [+/YES] buttons to set
the Split Point. The Split
Point setting can be reset to
the initial default value by
pressing the [-/NO] and [+/
YES] buttons simultaneously.
Auto Accompaniment range
Reference Manual
19
Style-Related Settings
Stop Accompaniment function
When the Auto Accompaniment is turned on and Synchro Start is off, you can play chords in the Auto Accompaniment range of the keyboard with the style stopped, and still hear the accompaniment chord. In this condition —
called “Stop Accompaniment” — any valid chord fingerings are recognized and the chord root/type are shown in
the display. Since the instrument properly recognizes chords, you can also use the Harmony effect without having
to play back a Style.
Auto Accompaniment range
[ACMP] button
lights
Style Types
The following four types of Styles can be used by this instrument.
Preset Styles
Styles built into the instrument
User Style
Styles created by Style Creator function
Styles transferred from a computer
Styles loaded from the USB flash memory
Expansion Styles
Styles saved into the instrument by installing the Expansion Pack
USB Style
Styles in USB flash memory
The chart below shows the basic operation flow for using the preset Styles, User Styles, loaded Styles and USB
Styles from storage to playback.
USB flash
memory
Computer
Your own performance
USB flash memory
Installation
(Owner’s Manual)
Style Creator
(page 30)
Transfer
(page 51)
Connect
Style storage location
Load
Play
Preset Styles
Expansion
Styles
User Style
USB Style
Save
Expansion Styles and User Styles can be selected using the
[EXPANSION/USER] button.
Reference Manual
20
Style-Related Settings
Creating Your Own One Touch Setting Setups
You can create your own One Touch Setting setups and save the setups to the User
Styles and USB Styles. Preset Styles and Expansion Styles cannot be used for the
save destination.
The setups you created will be saved as part of Style data.
1
Select the desired User Style or USB Style to which you want to
save your settings.
2
3
Make the panel settings for the desired Style selected in step 1.
NOTICE
• When the specified Style
contains One Touch Setting,
the previous One Touch Setting will be erased and
replaced by the new data.
NOTE
• Styles overwritten by the
new One Touch Setting is
automatically saved in SFF
GE format.
While holding the [MEMORY] button, press one of the ONE TOUCH
SETTING [1]–[4] buttons to memorize the panel settings to the
One Touch Setting contained in the selected Style.
When the display prompts you whether you want to overwrite the existing file
with the new One Touch Setting, press [EXECUTE] or [+/YES] to overwrite the
file, or the [-/NO] to cancel.
Press one of the ONE TOUCH SETTING [1]–[4] buttons to call up the new One
Touch Setting in the Style.
Reference Manual
21
Song-Related Settings
This section gives detailed information on the Song playback functions not covered in
the Owner’s Manual.
Adjusting the Song Volume
This lets you adjust the volume balance between Song playback and the sound you play on the keyboard.
1
Press the [FUNCTION] button.
2
Press the CATEGORY [<] and [>] buttons repeatedly to call up
“Song Volume.”
NOTE
• The explanations here only
apply to the Song mode.
Song Volume
Setting range is
000–127
3
Use the dial to set the Song Volume.
NOTE
• For instructions on adjusting the volume of the keyboard performance, see
page 3.
Reference Manual
22
Song-Related Settings
Muting Independent Song Parts
A Song consists of 16 tracks. Each “track” of a Song plays a different part of the Song—melody, percussion,
accompaniment, etc.
You can mute individual tracks and play the muted part on the keyboard yourself, or simply mute tracks other than
the ones you want to listen to.
Use the [REGIST/PART [MIXER]] button to select the TR 1-8, TR 9-16 and use the SONG PART [1/9]–[8/16]
buttons to mute or un-mute the corresponding tracks ([1]–[8], [9]–[16]). Each track button is lit in green when that
track is not muted, and is unlit when the track is muted. Furthermore, the border around the track number in the
display disappears when that track is muted.
1
Select a Song, then press and hold the [REGIST/PART [MIXER]]
button until the desired track is shown on the display.
The following items are alternately selected on the display when you press the
[REGIST/PART [MIXER]] button. “REGIST” “TR 1-8” “TR 9-16.”
REGIST
TR 1-8
TR 9-16
In this state, you can use the eight buttons as the Song track buttons.
2
Press the desired TRACK [1/9]–[8/16] buttons to set the mute
track(s).
To cancel the mute, press the appropriate REGISTRATION MEMORY [1/9]–
[8/16] buttons again.
Display
Setting
TR 1-8
Specify the mute tracks of 1–8 by pressing the [1/9]–[8/16] buttons.
TR 9-16
Specify the mute tracks of 9–16 by pressing the [1/9]–[8/16] buttons.
No track number ... No data.
Unlit ... Contains no data or is muted.
Lit in green ... Contains data and is played
Track number without border ... Track
contains data but is muted.
Track number with border ... Track
contains data and is not muted.
Reference Manual
23
Song-Related Settings
Random Song Playback
This function lets you randomly play the Songs via the [DEMO] button—in other words, the Songs specified in
the Demo Group (page 47). The explanations here do not applied when the Demo Group is set to “Demo.”
1
Press the [FUNCTION] button.
2
Press the CATEGORY [<] and [>] buttons repeatedly to call up
“Demo Play Mode.”
3
Use the dial to select “Random.”
If you want to restore the normal playback mode, select “Normal.”
4
Press the [DEMO] button to start random playback.
The Songs specified as the Demo Group will play back in random order.
You can stop playback at any time by pressing the [DEMO] or [START/STOP]
button.
Reference Manual
24
Song-Related Settings
Song Types
The following three types of Songs can be used by this instrument.
Preset Songs
Songs built into the instrument
Preset Song
numbers 001–009
Songs you record yourself
User Song
numbers 001–005
User Song
Songs transferred from a computer
Songs loaded from the USB flash memory
User Song
numbers 006–
Songs in USB flash memory
USB Song
–
The chart below shows the basic operation flow for using the Preset Songs, User Songs and USB Songs from storage to playback.
Computer
Your own performance
USB flash memory
Record
(Owner’s Manual)
Transfer
(page 51)
Connect
Song storage location
Load
Play
Preset Songs
(001–009)
User Songs
(001–005)
User Songs
(006–)
USB Songs
Save
User Songs can be selected using the [USER] button.
Reference Manual
25
Editing Songs
As desired, edit the User Song and the USB Song for each track in the Song Edit function to finalize the Song data. Adjustable items (parameters) in the Song Edit function
are Voice, Pitch and Quantize. In addition to these parameters, you can use the Mixer
function to adjust individual track parameters and save the settings while the Song
Edit function is engaged.
1
Select a User Song or a Song on a USB flash memory that contains the data you want to edit.
Available Songs are limited to SMF format with file extension: “.mid.” Preset
Songs cannot be used for editing.
2
Press and hold the [REC] button for longer than a second to call
up the Song Edit display.
The track (Part) selection display appears.
Hold for longer than
a second
3
NOTE
• If there is not enough capacity left on the instrument to
save the data, an appropriate message will appear in
the display. Erase unwanted
data from the instrument to
make more memory available.
• If a GM2 Song is selected
and step 2 is performed, a
message prompting you to
confirm conversion of the
Song data to the format of
this instrument will appear.
Press the [+/YES] button to
convert the Song data, or
the [-/NO] button to cancel.
Use the dial to select the desired track for editing.
NOTE
• In the Song Mode, you can
edit Songs. If the [SONG
MODE] button is unlit, press
it to turn it on.
4
Edit the track selected in step 3, then press the [EXECUTE] button.
You can change the “Voice,” “Ch Transpose” and “Quantize” parameters for the
selected track. Use the CATEGORY buttons [<] and [>] to select “Voice,” “Ch
Transpose” or “Quantize,” then use the dial to adjust the value. As for “Ch Transpose” and “Quantize,” press the [EXECUTE] button to confirm the change.
Repeat steps 3–4 to edit other tracks.
Reference Manual
26
Editing Songs
Voice
Change the Voice for the selected track. When a Voice is selected, the suitable Voice
parameters (page 3) such as Voice Volume or effect send level for each Voice is automatically recalled. However, the DSP level is set to 0.
Ch Transpose
This allows you to transpose the recorded data of individual channels up or down by a
maximum of two octaves in semitone increments.
Quantize
The Quantize function allows you to align the timing of all the notes in a track. For example, if you record the musical phrase shown below, you may not play it with absolute precision, and your performance may have been slightly ahead of or behind the precise
timing. Quantize is a convenient way of correcting for this.
NOTE
• Make sure not to transpose
channels 9 and 10. In general, Drum kits are assigned
to these channels. If you
transpose the channels of
Drum kits, the instruments
assigned to each key will be
changed.
Select the quantize size (resolution). For optimum results, you should set the Quantize
size to the shortest note value in the track. For example, if eighth notes are the shortest in
the track, you should use eighth note as the Quantize size.
After 1/8 note quantization
Settings
Display
1/4 note
1/4
1/4 note triplet
1/6
1/8 note
1/8
1/8 note triplet
1/12
1/16 note
1/16
1/16 note triplet
1/24
1/32 note
1/32
1/8 note + 1/8 note triplet*
1/8+1/12
1/16 note + 1/8 note triplet*
1/16+1/12
1/16 note + 1/16 note triplet*
1/16+1/24
The three Quantize settings marked with asterisks (*) are exceptionally convenient, since they
allow you to quantize two different note values at the same time. For example, when the straight
eighth notes and eighth notes triplet are contained in the same channel, if you quantize by the
straight eighth notes, all notes in the channel are quantized to straight eighth notes—completely
eliminating any triplet feel. However, if you use the eighth note + eighth note triplet setting, both
the straight and triplet notes will be quantized correctly.
Reference Manual
27
Editing Songs
5
Edit the parameters in the Mixer display, and adjust the Tempo.
Press and hold the [REGIST/PART[MIXER]] button for longer than a second to
call up the Mixer display. For details on operation in the Mixer display, refer to
Chapter 6 in the Owner’s Manual.
Use the TEMPO buttons to adjust the Tempo.
Hold for longer than
a second
To return to the Song Edit display, press the [EXIT] button.
6
Press the [
] button to hear the result of your settings.
Repeat steps 3–5 as desired.
7
To select a save destination, press the CATEGORY [<] and [>]
buttons repeatedly to select “Save To USB” or “Save to USER.”
Then press the [USB] button to switch the save destination, as
desired.
You can select a file save destination between USB flash memory and the instrument’s internal memory. If you want to save to USB flash memory, select “Save
To USB”; if you want to save to internal memory, select “Save To USER” in the
display.
Pressing the [USB] button alternates the save destination between USB flash
memory and internal memory.
NOTE
• If you wish to save the file to
a USB flash memory, ensure
beforehand that it is connected to the instrument.
The Song name selected in step one will automatically be displayed.
File save destination
File name
Switching a save destination
Reference Manual
28
Editing Songs
8
9
Press the [EXECUTE] button to confirm the save destination.
Change the file name as necessary.
A cursor will appear below the first character in the file name.
• The Registration Memory [1] button moves the cursor to the left, and the [2]
button moves it to the right.
• Use the dial to select a character for the current cursor location. The following
different types of characters are available:
[A]–[Z], [a]–[z], [0]–[9], [!], [#], [$], [%], [&], ['], [(], [)], [-], [^], [@], [{],
[}], [_], [`]
• The Registration Memory [8] button deletes the character at the cursor location.
Cursor
Cursor
left
Cursor
right
Delete
character
10
Press the [EXECUTE] button. When the display prompts you for
confirmation, press the [+/YES] button to execute the save operation, or the [-/NO] button if you want to cancel.
If an existing file name is specified, the display prompts you for confirmation. Press [EXECUTE] or [+/YES] if it is OK to overwrite the file, or the
[-/NO] to cancel. When the operation is complete, a “Completed” message
appears briefly, then returns to the previous display.
11
Press the [EXIT] button to exit from the Song Edit display.
Select characters
Reference Manual
29
Creating Original Styles (Style Creator)
This instrument has a Style Creator feature that lets you record and save your own
original Styles. Recorded Styles can be played in the same manner as the preset
Styles.
Style Structure
Style data consists of 14 sections, each of which has eight separate Parts.
FILL IN A–D
INTRO 1–3
MAIN A–D
ENDING 1–3
8 Parts in each
section
Parts: Rhythm 1, Rhythm 2, Bass, Chord 1, Chord 2,
Pad, Phrase 1, Phrase 2
Part 1
x8
With the Style Creator feature, you can create a Style by separately recording the parts, or by importing pattern
data from other existing Styles. Here are some of the aspects in which Style recording differs from Song recording:
• Loop Recording
Style playback repeats the rhythm patterns of several measures in a “loop,” and Style
recording is also done using loops. For example, if you start recording with a two-measure MAIN section, the two measures are repeatedly recorded. Notes that you record will
play back from the next repetition (loop), letting you record while hearing previously
recorded material.
• Overdub Recording
This method records new material to a channel already containing recorded data, without
deleting the original data. In Style recording, the recorded data is not deleted, except
when using functions such as Rhythm Clear (page 39) and Part Clear (page 41). For
example, if you start recording with a two-measure Main section, the two measures are
repeated many times. Notes that you record will play back from the next repetition, letting you overdub new material to the loop while hearing previously recorded material.
When creating a Style based on an existing internal Style, overdub recording is applied
only to the rhythm channels. For all other channels (except rhythm), you need to delete
the original data before recording.
Reference Manual
30
Creating Original Styles (Style Creator)
Using the Style Creator
Select a preset Style which is most similar to the Style you want to record.
page 32
* If you are creating a Style from scratch, this step is not necessary.
page 32
Call up the Style Creator.
* A confirmation message appears asking if you want to create a Style from scratch.
page 33
Beat settings
• Beat: 2/4, 3/4, 4/4, 5/4
* If you want to change the beat settings, you should clear all the previous data.
page 36
Section settings
• Section: INTRO 1–3, MAIN A–D, FILL IN A–D, ENDING 1–3.
• Section Copy
• Measure Length: 1–32
Part Settings
page 37
• Recording Part: RHY 1–2, BASS, CHD 1–2, PAD, PHR 1–2
• Voice: Select the recording Voice.
• Part Volume: Determines the Part volume.
• Pan: Determines the pan position.
• Reverb level
• Chorus level
Recording the Part
page 38
• Recording start/stop
• Clear the recorded drum Voice
Record another Part
Editing
page 40
• Quantize: 1/4, 1/6, 1/8, 1/12, 1/16, 1/24, 1/32
• Part clear
Saving
page 42
• Save to USB flash memory
• Save to internal memory
Record another section
Exit from the Style Creator
page 43
* Press the [EXIT] button whenever you want to exit from the Style Creator (except during recording). When the saving operation of recorded data is
finished, you can exit from the Style Creator. When the saving operation of recorded data is not finished, a confirmation message appears asking if
you want to exit from the Style Creator without saving the data. Press the [+/YES] button to exit, or the [-/NO] button to cancel.
Reference Manual
31
Creating Original Styles (Style Creator)
\
Calling up the Style Creator
1
Select a preset Style which is most similar to the Style you want
to record.
You can also select a Style from the User Styles or Styles on a USB flash memory (page 20).
If you are creating a Style from scratch, this step is not necessary. Make sure to
confirm that the instrument is in the Style Mode, then go on to the next step. (If
the [Song Mode] button is lit, press the button to switch to the Style Mode.)
2
Press the [REC] button to enter the Style Creator display.
NOTE
A confirmation message appears asking if you want to clear (discard) the original data and to create a Style from scratch.
• If there is not enough
capacity left on the instrument to save the data, an
appropriate message will
appear in the display. Erase
unwanted data from the
instrument to make more
memory available.
NOTE
• Adjust individual track volumes before recording.
You can use the Mixer function to adjust individual track
volumes before proceeding
with step 2. For details, refer
to chapter 6 in the Owner’s
Manual.
3
If you are creating a Style from scratch, press the [+/YES] button. If
you are creating a Style by using data from a specified Style (step
1), press the [-/NO] button.
The Style Creator display will be shown.
Current section
Specified measure and beat
Current tempo
When playing or recording,
the current measure number
appears
Currently selected function
by the CATEGORY [<]/[>]
buttons
For example, set the beat number by using the dial
Currently selected section and
selected Part in the section
Reference Manual
32
Creating Original Styles (Style Creator)
Beat settings
If you create a new Style from scratch, you need to set the Beat. If you use an existing Style with its original Beat,
no Beat setting is necessary; go on to “Section Setting.”
1
Press the CATEGORY [<]/[>] buttons repeatedly until “Beat”
appears in the display.
2
Rotate the dial and select the Beat number.
Range: 2/4, 3/4, 4/4, 5/4
3
Press the [EXECUTE] button to set the Beat.
When you create a Style based on an existing Style, the following message
appears.
Press the [+/YES] button to clear (discard) all sections in the Style.
Reference Manual
33
Creating Original Styles (Style Creator)
Section Settings
The Style Creator provides following two basic ways:
• Record parts from the keyboard (using Realtime Recording)
Perform “Select a section” and “Beat settings,” then go on to “Part Settings.”
• Assemble various sections from existing Styles
Perform “Section Copy.”
Copying a Section
Use this function when you want to create your own section by changing an existing
section, or by assembling sections from other existing Styles.
1
Press the CATEGORY [<]/[>] buttons repeatedly until “Section
Copy” appears in the display.
2
Press the [EXECUTE] button to enter the Section Copy function.
3
Press the CATEGORY [<]/[>] buttons or directly press the SECTION button in the STYLE CONTROL area to select the desired
section to which you want to copy (destination).
Settings: INTRO 1–3, MAIN A–D, FILL IN A–D, ENDING 1–3
Destination section
Reference Manual
34
Creating Original Styles (Style Creator)
4
Rotate the dial or directly press one the STYLE category buttons
to select a source Style.
You can select the currently edited Style. Use the dial to select [Current] in the
display.
NOTE
• If the measure length differs
between the copy source
and copy destination sections, the copy source measure will be used. If the
beats differ, the copy destination beats will be used.
Source Style
5
Press the [EXECUTE] button to set the source Style.
Now you can select a source section.
Source section
6
Rotate the dial to select a source section.
Settings: INTRO 1–3, MAIN A–D, FILL IN A–D, ENDING 1–3
To cancel the Section Copy operation, press the [EXIT] button.
7
Press the [EXECUTE] button to execute the Section Copy operation.
8
Press the [EXIT] button to exit from the Section Copy function.
The display returns to the one in step 2 above.
NOTE
• Depending on the data size
of source and destination
sections, the source section
may not be copied to the
destination properly
because of insufficient memory. In this case, some parts
in the source section may be
copied and other parts may
not.
Reference Manual
35
Creating Original Styles (Style Creator)
Selecting a Section to be recorded
1
Press the CATEGORY [<]/[>] buttons repeatedly until “Section”
appears in the display.
2
Rotate the dial or directly press the SECTION button in the STYLE
CONTROL area to select a section to be recorded.
Settings: INTRO 1–3, MAIN A–D, FILL IN A–D, ENDING 1–3
NOTE
• You can also select the
desired FILL IN A–D section
by pressing the [AUTO FILL
IN] button and then select
FILL IN A–D by using the
dial.
or
3
Press the [EXECUTE] button to set the section.
The section button to be recorded lights in red. When you select the FILL IN A–
D section to be recorded, the corresponding MAIN VARIATION A–D button
flashes.
Setting the Measure Length
Make sure to set the measure length when you want to create a Style from scratch.
When using an existing Style, set as necessary. You cannot set the measure length for
the FILL IN section because the FILL IN section is fixed at one measure.
1
Press the CATEGORY [<]/[>] buttons repeatedly until “Length”
appears in the display.
2
Rotate the dial and select the Measure Length.
Range: 1–32
3
Press the [EXECUTE] button to set the Measure Length.
NOTE
• If you set a length smaller
than that of the previous
one, any data existing
beyond the new length will
be deleted.
Reference Manual
36
Creating Original Styles (Style Creator)
Part Settings
Selecting a Recording Part
1
Press the CATEGORY [<]/[>] buttons repeatedly until “Part”
appears in the display.
2
Rotate the dial and select a recording Part.
Range: RHYTHM 1–2, BASS, CHORD 1–2, PAD, PHRASE 1–2
3
Press the [EXECUTE] button to set the Part.
The button corresponding to the Part to be recorded lights in red.
NOTE
• You can also select a part by
pressing the Part button
([RHY 1]–[PHR 2]) while
holding the [REC] button.
Selecting a Voice
1
Press the CATEGORY [<]/[>] buttons repeatedly until “Voice”
appears in the display.
2
Press a desired VOICE Category button to select the Voice category.
3
Range:
Rotate the dial to select a Voice.
When RHY 1 is selected as the Part, all Voices can be selected.
When RHY 2 is selected as the Part, drum Voices can be selected.
When other Part is selected, all Voices excepting drums can be
selected.
Part Volume
1
Press the CATEGORY [<]/[>] buttons repeatedly until “Part Volume” appears in the display.
2
Rotate the dial and set the Part Volume.
Range: 0–127
Pan
1
Press the CATEGORY [<]/[>] buttons repeatedly until “Pan”
appears in the display.
2
Rotate the dial and set the Pan position.
Range: 0–64–127
Reverb Level
1
Press the CATEGORY [<]/[>] buttons repeatedly until “Reverb
Level” appears in the display.
2
Rotate the dial and set the Reverb depth.
Range: 0–127
Chorus Level
1
Press the CATEGORY [<]/[>] buttons repeatedly until “Chorus
Level” appears in the display.
2
Rotate the dial and set the Chorus depth.
Range: 0–127
Reference Manual
37
Creating Original Styles (Style Creator)
Recording part
Part buttons indications
Unlit, does not contain data or is a
non-playing Part (muted)
Lit in green, contains data and selected as playing Part
Lit in red, recorded Part
Rhythm Part recording
If you select a rhythm Part for recording on page 37, follow the instructions below.
1
Make sure that the desired rhythm Part “RHY 1” or “RHY 2” is
selected for recording.
The button corresponding to the Part to be recorded lights in red.
In this condition, a REC mark also appears at the recorded Part on the display.
NOTE
• The part you have selected
may be changed if you
select the section again.
Current measure number
Contains no data
Contains data, sounds (Part ON)
Recorded part
Contains data, but is muted (Part OFF)
Play the keyboard to check that the appropriate drum Voices can be heard. You
can mute the Parts during recording (except for the Part you’re recording) by
simply pressing the [PART] button so that the mute mark is indicated at the Part.
In this condition, the [PART] button also changes from green to unlit.
If you want to rehearse a part before recording, press the [EXECUTE] button.
The REC mark for the Part in the display will turn off. In this situation, you can
start rehearsing by pressing the [START/STOP] button. Return to the Part
record standby mode, after stopping rehearsal by pressing the [START/ STOP]
button, and then press the [EXECUTE] button again.
2
Press the [START/STOP] button to begin recording.
Reference Manual
38
Creating Original Styles (Style Creator)
3
Play the keyboard and record the drum Voices.
Since the entire Style plays repeatedly, you can record at any point you like.
4
Press the [START/STOP] button to stop recording.
Clear the recorded drum Voices
To clear the recorded drum Voices, after starting recording (refer to step 2 of the
recording operation above), follow the instructions below.
1 Press and hold the [-] button and play the key or keys that correspond to the
cleared Voice.
NOTE
• Only the rhythm Part can be
cleared in this operation;
other Parts (e.g., bass or
chord) cannot be cleared.
2 Press the [START/STOP] button to exit from the clear operation.
Bass, Chord, Pad and Phrase Part recording
If you select Parts other than a rhythm Part for recording part on page 38, follow the
instructions below.
1
Make sure that the desired Part (other than rhythm) is selected
for recording.
The button corresponding to the Part to be recorded lights in red.
In this condition, a REC mark also appears at the recorded Part on the display.
2
3
Press the [START/STOP] button to begin recording.
NOTE
• The Part you have selected
may be changed if you
select the section again.
Play the keyboard and record your playing.
Rules for recording to non-rhythm Parts:
For information on recording to parts other than the rhythm parts (RHY1, 2),
refer to the section below, and perform using notes that match the chord CM7.
• Use only the CM7 scale tones when recording the Bass and Phrase Parts (i.e.,
C, D, E, G, A, and B).
• Use only the C chord tones when recording the Chord and Pad Parts (i.e., C,
E, G, and B).
C R C
C R C
NOTE
• Any desired chord or chord
progression can be used for
the INTRO and ENDING
sections. If you record each
sections keeping in mind the
section shifts (Intro Main
Fill in Main Ending),
you can achieve better
results.
C = Chord note
C, R = Recommended note
Using the data recorded here, the auto accompaniment (Style playback) is
appropriately converted depending on the chord changes you make during your
performance. The chord which forms the basis for this note conversion is called
the Source Chord, and is set by default to CM7 (as in the example illustration
above)
4
Press the [START/STOP] button to stop recording.
Record to other Parts in other sections.
5
Save the Style data (page 42).
Reference Manual
39
Creating Original Styles (Style Creator)
Editing (Quantize and part clear)
Quantize
This function allows you to automatically align the timing of all recorded notes.
1 measure
Actual
recorded note
When Quantize
is set to 1/8
1/4
1/8
1/2
3/4
1/4
When Quantize
is set to 1/4
1/4
1/2
1
Press the CATEGORY [<]/[>] buttons repeatedly until “Quantize” appears in the display.
2
Rotate the dial and select the value.
Settings: 1/4, 1/6, 1/8, 1/12, 1/16, 1/24, 1/32
3
Press the [EXECUTE] button.
NOTE
• If the recorded Part is not
specified, Quantize cannot
be set. Specify the Part for
recording and then use the
Quantize function.
• The undo icon on the display
will disappear if you exit
from the current display.
The “UNDO” message appears.
4
Press the [EXECUTE] button again if you want to replace with the
previous Quantize value.
Reference Manual
40
Creating Original Styles (Style Creator)
Clearing a recorded Part
Select a desired section for clearing, and then follow the instructions below.
1
Press the CATEGORY [<]/[>] buttons repeatedly until “Part
Clear” appears in the display.
2
To select a Part for clearing, press and hold the desired part button for longer than a second.
NOTE
• You can also select a Part by
rotating the dial. In this case,
press the [EXECUTE] button
to clear.
Hold for longer
than a second
A confirmation message appears.
3
Press the [+/YES] button to clear the selected Part.
Reference Manual
41
Creating Original Styles (Style Creator)
Saving the data
Save the recorded data. You can select either USB flash memory or internal memory as the save destination. If
you want to save to USB flash memory, connect an appropriate USB flash memory to the USB TO DEVICE terminal.
1
Press the CATEGORY [<]/[>] buttons repeatedly until “Save To
USB” or “Save To USER” appears in the display.
A new User Style number is applied automatically and indicated in the display.
NOTICE
• If you select a User Style
Number that already contains data, the previous
data is deleted and overwritten by the new data.
NOTE
• If you want to exit from the
Style Creator without saving,
press the [EXIT] button then
press the [+/YES] button.
• A maximum of 50 Style files
can be saved.
2
Press the [USB] button to select a save destination as desired.
Pressing the [USB] button alternates the save destination between USB flash
memory and internal memory. If you want to save to USB flash memory, select
“Save To USB”; if you want to save to internal memory, select “Save To USER”
in the display.
A default file name will automatically be created.
If you select “Save To USER” as a save destination, the recorded data will be
saved to the [EXPANSION/USER] button.
Save destination
File name
If you want to overwrite the existing user Style file, select the file by
using the dial, then go on to step 3.
Reference Manual
42
Creating Original Styles (Style Creator)
3
Press the [EXECUTE] button to set the save destination.
A confirmation message appears.
4
Press the [+/YES] button to execute the save operation.
The following display appears when saving is complete.
The Style is automatically saved in SFF GE format.
NOTE
• If you select a User Style
Number that already contains data, an “Overwrite?”
confirmation prompt
appears. If you wish to save
and overwrite, press the [+/
YES] button.
You can go back and set other sections with the Section Settings (page 34) and
then record additional parts as desired.
Exit from the Style Creator
Press the [EXIT] button to exit from the Style Creator.
If saving of the recorded data has not been done, a confirmation message appears
asking if you want to exit from the Style Creator without saving the data. Press the
[+/YES] button if it is OK to exit, or the [-/NO] button to cancel.
Deleting a User Style
1 Press the [FILE MENU] button.
2 Press the CATEGORY [<]/[>] buttons repeatedly until “User Delete” or “USB Delete”
appears in the display. Select “User Delete” if you want to delete a User Style from a
[EXPANSION/USER] button, or select “USB Delete” if you want to delete a User Style file
on a USB flash memory.
3 Use the Dial to select the User Style data you want to delete.
4 Press the [EXECUTE] button.
5 Press the [+/YES] button to delete the file.
Reference Manual
43
The Functions
The Function display lets you set the detailed settings for the instrument, such as fine
tuning the pitch, adjusting the volume balance between playback and your performance, effect related settings, and more. A total of 60 items are available.
Basic Operation
1
Press the [FUNCTION] button to call up the Function display.
2
Press the CATEGORY [<] and [>] buttons repeatedly until the
function’s display name appears in the display.
Take a look at the function list starting on page 45. The name of the previous
item in the list appears to the upper left, and the name of the next item in the list
appears to the upper right of the currently selected item.
Function
group
Previous item
Current selected item
3
Next item
Parameter
Use the dial or the [-/NO] and [+/YES] buttons to set the parameters.
The [-/NO] and [+/YES] buttons are used to make ON/ OFF type settings: [+/
YES] = ON, [-/NO] = OFF.
Press the [-/NO] and [+/YES] buttons simultaneously to recall the default setting (excepting the initial setup of MIDI).
• Decrement value by 1.
• OFF
• Increment value by 1.
• ON
Press these simultaneously to recall the default setting.
Some Function settings are stored in memory as soon as they are changed. To
restore all initial factor default settings perform the “Backup Clear” procedure
described in the “Initialization” section in the Owner’s Manual.
Reference Manual
44
The Functions
Function List
Item (Display)
Range/Settings
Default setting
Description
VOLUME
Style Volume
000–127
100
Determines the volume of the Style.
Song Volume
000–127
100
Determines the volume of the Song.
415.3–466.2Hz
440.0Hz
01–12
2
OVERALL
Tuning
Pitch Bend Range
Split Point
Touch Sensitivity
Chord Fingering
036–096
(C1–C6)
1 (Soft),
2 (Medium),
3 (Hard)
1 (Multi Finger),
2 (FullKeyboard),
3 (AI Finger)
Sets the pitch of the instrument’s sound.
Sets the pitch bend range in semitone increments.
054 (F#2)
Determines the highest key for the Split Voice and sets the Split
“point”—in other words, the key that separates the Split (lower) and
Main (upper) Voices. The Split Point setting and Accompaniment Split
Point setting are automatically set to the same value.
2 (Medium)
Determines the keyboard touch sensitivity. Small values will produce
a high volume level even if the key is hit softly. Large values require
that the keys be played relatively hard to produce maximum loudness.
Sets the chord detection mode. In the Multi Finger mode, both normal
chords and simple chords played to the left of the split point are
detected. In the Full Keyboard mode normal chords played anywhere
on the keyboard will be detected, and the notes played will sound as
1 (Multi Finger) well. The AI Finger mode is basically the same as Multi Finger, except
that less than three notes can be played to indicate the chords (based
on the previously played chord, etc.). However, Easy chords
described in the Owner’s Manual cannot be detected in the AI Finger
mode.
SCALE TUNE
Scale
EQUAL,
PURE MAJOR,
PURE MINOR,
PYTHAGOREAN,
MEAN-TONE,
WERCKMEISTER,
KIRNBERGER,
ARABIC1,
ARABIC2
Base Note
C, C#, D, Eb, E, F, F#,
G, Ab, A, Bb, B
Scale Tune
Note:
C, C#, D, Eb, E, F, Note: C
F#, G, Ab, A, Bb, B Cent: 0
Cent: -64–63
Part Select
MAIN/DUAL: ON/OFF MAIN/DUAL: ON Selects the part to which the preset Scale Tune or original Scale will
be applied. “MAIN/DUAL” and “LEFT” parts are keyboard Voices, and
LEFT: ON/OFF
LEFT: OFF
“STYLE” Part is Style playback.
STYLE: ON/OFF
STYLE: OFF
External Scale Tune
OFF,
ON (KEYBOARD)
EQUAL
C
Off
Sets the Scale. Details for each Scale are explained in the Owner’s
Manual.
Selects the Base Note for Scale Tune.
Sets Scale note pitches individually to create an original Scale.
Selects the part to which the Scale Tune MIDI messages received
from an external MIDI device will be applied. With the default setting
of “OFF,” MIDI messages are applied to Song channels 1–16, but not
to the keyboard performance. If you set this to “ON (KEYBOARD),”
the MIDI messages are applied to the keyboard performance as follows: Channel 1 = Main Voice, Channel 2 = Dual Voice, and Channel
3 = Left Voice; the other channels are not affected.
REGIST FREEZE
Freeze Group Setting
STYLE: ON/OFF
VOICE: ON/OFF
TEMPO: ON/OFF
TRANSPOSE: ON/OFF
SCALE: ON/OFF
STYLE: ON
VOICE: OFF
TEMPO: ON
Sets a Freeze Group which is not to be recalled.
TRANSPOSE: OFF
SCALE: OFF
MAIN VOICE
Main Volume
000–127
*
Main Octave
-2–+2
*
Determines the octave range for the Main Voice.
*
Determines the pan position of the Main Voice in the stereo image.
A value of “0” results in the sound being panned full left, while “127”
results in the sound being panned full right.
Main Pan
000–64–127
(Left - Center - Right)
Determines the volume of the Main Voice.
Reference Manual
45
The Functions
Item (Display)
Range/Settings
Default setting
Description
Main Reverb Level
000–127
*
Determines how much of the Main Voice’s signal is sent to the Reverb
effect.
Main Chorus Level
000–127
*
Determines how much of the Main Voice’s signal is sent to the Chorus
effect.
Main DSP Level
000–127
*
Determines how much of the Main Voice’s signal is sent to the DSP
effect.
Main Dry Level
000–127
*
Determines how much of the Main Voice’s unprocessed signal
sounds (no Reverb, Chorus or DSP effect processing).
Dual Volume
000–127
*
Determines the volume of the Dual Voice.
Dual Octave
-2–+2
*
Determines the octave range for the Dual Voice.
000–64–127
(Left - Center - Right)
*
Determines the pan position of the Dual Voice in the stereo image.
A value of “0” results in the sound being panned full left, while “127”
results in the sound being panned full right.
Dual Reverb Level
000–127
*
Determines how much of the Dual Voice’s signal is sent to the Reverb
effect.
Dual Chorus Level
000–127
*
Determines how much of the Dual Voice’s signal is sent to the Chorus
effect.
Dual DSP Level
000–127
*
Determines how much of the Dual Voice’s signal is sent to the DSP
effect.
Dual Dry Level
000–127
*
Determines how much of the Dual Voice’s unprocessed signal sounds
(no Reverb, Chorus or DSP effect processing).
Left Volume
000–127
*
Determines the volume of the Left Voice.
Left Octave
-2–+2
*
Determines the octave range for the Left Voice.
000–64–127
(Left - Center - Right)
*
Determines the pan position of the Left Voice in the stereo image.
A value of “0” results in the sound being panned full left, while “127”
results in the sound being panned full right.
Left Reverb Level
000–127
*
Determines how much of the Left Voice’s signal is sent to the Reverb
effect.
Left Chorus Level
000–127
*
Determines how much of the Left Voice’s signal is sent to the Chorus
effect.
Left DSP Level
000–127
*
Determines how much of the Left Voice’s signal is sent to the DSP
effect.
Left Dry Level
000–127
*
Determines how much of the Left Voice’s unprocessed signal sounds
(no Reverb, Chorus or DSP effect processing).
Reverb Type
01–36
**
Determines the Reverb type, including off (36).
Chorus Type
01–45
**
Determines the Chorus type, including off (45).
001–239
*
Determines the DSP type, including off (239).
DUAL VOICE
Dual Pan
LEFT VOICE
Left Pan
EFFECT
DSP Type
Master EQ Type
1 (Speaker 1),
2 (Speaker 2),
3 (Headphones),
4 (Line Out 1),
5 (Line Out 2)
1 (Speaker 1)
Selects one of five Master equalizer (EQ) settings which are provided
to give you the best possible sound when listening through different
reproduction systems: the instrument’s built-in speakers, headphones
and external speakers.
HARMONY
Harmony Type
01–26
*
Determines the Harmony type.
000–127
*
Determines the volume of the Harmony effect.
PC1/PC2/OFF
OFF
Optimizes the MIDI settings for transmitting/receiving performance
data (MIDI) in one convenient operation.
Local
ON/OFF
ON
Determines whether the instrument’s keyboard controls the internal
tone generator (ON) or not (OFF).
External Clock
ON/OFF
OFF
Determines whether the instrument synchronizes to the internal clock
(OFF) or an external clock (ON).
Harmony Volume
PC
PC Mode
MIDI
Reference Manual
46
The Functions
Item (Display)
Range/Settings
Default setting
Description
Keyboard Out
ON/OFF
ON
Determines whether keyboard performance data of the instrument is
transmitted (ON) or not (OFF).
Style Out
ON/OFF
OFF
Determines whether Style data is transmitted (ON) via USB TO
HOST or not (OFF) during Style playback.
Song Out
ON/OFF
OFF
Determines whether Song data is transmitted (ON) via USB TO
HOST or not (OFF) during Song playback.
Initial Setup
ON
–
Allows you to instantly send a MIDI data ‘snapshot’ of all panel settings to a computer or sequencer. Press [+/YES] to send.
Use this function before starting to record your keyboard performance
to a sequencer (DAW, etc.) on the computer connected via USB TO
HOST terminal. This ensures that all settings will be reproduced just
as you made them, along with the rest of the recording.
METRONOME
Time Signature – Numerator
01–60
**
Determines the time signature of the Metronome.
Time Signature – Denominator
2, 4, 8, 16
**
Sets the length of each Metronome beat.
Bell
ON/OFF
ON
Determines whether the Metronome bell sounds at the first beat in
each measure or not.
Metronome Volume
000–127
100
Determines the volume of the Metronome.
***
Depending on the Song data, you can make the score more readable
by adjusting the timing of the notes. This determines the minimum
timing resolution used in the Song. For example, if there are both
quarter notes and eighth notes in the Song, you should set this value
to “eighth note.” Any notes or rests shorter than this value will not be
shown in the score.
SCORE
Quantize
1 (1/4 note),
2 (1/4 note triplet),
3 (1/8 note),
4 (1/8 note triplet),
5 (1/16 note),
6 (1/16 note triplet),
7 (1/32 note),
8 (1/32 note triplet)
Right - Part
GuideTrack 1–16,
OFF
CH1
Determines the guide track number for the right-hand part. This setting applies to all Songs except for preset Songs. Songs recorded on
the instrument have the default setting.
Left - Part
GuideTrack 1–16,
OFF
CH2
Determines the guide track number for the left-hand part. This setting
applies to all Songs except for preset Songs. Songs recorded on the
instrument have the default setting.
Demo Group
1 (Demo),
2 (Preset),
3 (User),
4 (Download),
5 (USB)
1 (Demo)
Determines the Songs played back via the [DEMO] button. Pressing
the [DEMO] buttons will play the Songs specified here in sequence.
Demo Play Mode
1 (Normal),
2 (Random)
1 (Normal)
Determines the order of Song playback via the [DEMO] button.
DEMO
Demo Cancel
ON/OFF
OFF
Determines whether Demo cancel is enabled or not. When this is set
to ON, no Song will play back, even if the [DEMO] button is pressed.
NORMAL
Determines whether the external Song is played accurately in XG format or not. When it is set to XG, the external Song is played accurately in XG format, but the Song data may cause unintended
changes to the sound of your keyboard played parts.
UTILITY
TG Mode
Auto Power off
XG/Normal
OFF, 5, 10, 15, 30,
60, 120
30
Specifies the time that will elapse before the instrument’s power is
automatically turned off.
LANGUAGE
Language
English/Japanese
English
Determines the display language for the Song file names, lyrics and
certain display messages. All other messages and names are displayed in English. When this is set to Japanese, the file names are
displayed in the Japanese font. The lyrics display follows the language setting originally made in the Song data; however, when no
such setting exists, the setting here is used.
* Different for each voice combination.
** Different for each Song or Style combination.
*** Different for preset value in the Song. If no value, 6 (1/16 note triplet) is selected.
Reference Manual
47
Connecting to a Computer
This section gives detailed information on the MIDI settings necessary for transferring
performance data (MIDI) between the instrument and a computer, and how to transfer a
file. For details about connection with a computer and driver installation, refer to the
chapter “Connecting to a Computer” in the Owner’s Manual.
MIDI Settings for transferring performance data with a computer
PC Mode
Setting “PC Mode” in the Function display makes the following multiple MIDI settings in one convenient operation. Three settings are available: PC1, PC2, and OFF.
PC1
PC2
Local
OFF
OFF
OFF
ON
External Clock
ON
OFF
OFF
Song Out
OFF
OFF
OFF
Style Out
OFF
OFF
OFF
Keyboard Out
OFF
ON
ON
1
Press the [FUNCTION] button.
2
Press the CATEGORY [<] and [>] buttons repeatedly to select “PC
Mode.”
3
Use the dial to select PC 1, PC 2 or OFF.
NOTE
• Preset Song data cannot be
transmitted from the instrument by the Song Out function, but User Songs can.
• This setting is not necessary
when transferring a file
between the computer and
the instrument.
Reference Manual
48
Connecting to a Computer
MIDI Settings
These settings pertain to performance data transmission and reception.
Item
Range/
Settings
Description
Local control determines whether or not notes played on the instrument are sounded by its internal tone generator system: the internal
tone generator is active when local control is on, and inactive when
local control is off.
Local
ON/OFF
External Clock
These settings determine whether the instrument is synchronized to
ON/OFF its own internal clock (OFF), or to a clock signal from an external
device (ON).
Song Out
ON/OFF
These settings determine whether Song data is transmitted (ON) or
not (OFF) during Song playback.
Style Out
ON/OFF
These settings determine whether Style data is transmitted (ON) or
not (OFF) during Style playback.
Keyboard Out
ON/OFF
These settings determine whether keyboard performance data of the
instrument is transmitted (ON) or not (OFF).
1
Press the [FUNCTION] button.
2
Use the CATEGORY [<] and [>] buttons to select the item whose
value you want to change.
3
Use the dial to select ON or OFF.
NOTE
• If Local is set to OFF, the
instrument will not produce
any sound when the keyboard is played.
• If External Clock is ON and
no clock signal is being
received from an external
device, the Song, Style, and
Metronome functions will not
start.
Reference Manual
49
Connecting to a Computer
Initial Setup
This function lets you send the panel setup data to an external sequencer or a computer. Before you record performance data to an external sequencer or a sequencer
application running on your computer, it is a good idea to first send and record the
panel setup data before the actual performance data. This makes it possible to restore
the instrument panel setup and ensure that the same sound is produced upon playback.
1
Press the [FUNCTION] button.
2
Use the CATEGORY [<] and [>] buttons to select “Initial Setup.”
3
Press [+/YES] to send.
NOTE
• The playback sound of the
Drum Kit Voice may differ
from recording sound.
Reference Manual
50
Connecting to a Computer
Transferring Data Between the Computer and Instrument
You can transfer data on the instrument, such as Songs and Styles you have recorded and the Backup data, to a
computer to save them, or from a computer to the instrument. You can also transfer the external Style, Song and
Music Database files on a computer to the instrument. In order to transfer files between your computer and the
instrument, you will need to download the “Musicsoft Downloader” application (free of charge) and install it on
your computer.
Installing Musicsoft Downloader
You can download the “Musicsoft Downloader” application from the following website and install it on your computer. Make sure that your computer has an Internet
connection.
NOTE
• Visit the Yamaha website for
more information on the latest
version of Musicsoft Downloader (version 5.6.1 or
higher) and how to install it.
http://download.yamaha.com/
Please visit the URL above to get the information on the computer system requirements for Musicsoft Downloader.
Transferring Data by using the Musicsoft Downloader
For Musicsoft Downloader operating instructions see the Help menu: launch the
Musicsoft Downloader application and click “Help.”
Data that can be transferred between the instrument and a computer
• Backup data (PSR-S650.BUP)
• Styles, Songs and Music Database other than preset data
(Data capacity: approx. 1,130 KB)
• Songs: (SMF format 0 and 1)
• Style: (SFF/SFF GE)
• Music Database: (.mfd)
• The number of files that can be shown on the display is as follows:
• Songs: 100
• Styles: 50
• Music Database: 50
* The SMF (Standard MIDI File) format is one of the most common and widely compatible
sequence formats used for storing sequence data. Most commercially available MIDI sequence
data is provided in SMF Format 0.
NOTICE
• Never turn the power off
and never plug/unplug the
AC power adaptor during
data transmission. Not only
will the data fail to be transferred and saved, but operation of the flash memory
may become unstable and
its contents may disappear
completely when the power
is turned on or off.
NOTE
• Preset Style, Song and
Music Database cannot be
transmitted from the instrument.
• Even if the number of files
transferred is less than the
maximum allowed, if the
amount of data exceeds 1,130
KB, the data cannot be transferred to the instrument.
• Before using Musicsoft
Downloader application to
access the instrument, make
sure to return to the MAIN
display, and stop playback if
a Song or Style is being
played back.
• Close the window to exit from
the Musicsoft Downloader
and re-enable control of the
instrument.
• When the “Language” is set
to English, files with names
using double-byte characters cannot be transferred to
the instrument.
Reference Manual
51
Connecting to a Computer
Transferring Backup data to a computer
Operation
Using Musicsoft Downloader, move the “PSR-S650.BUP” file from “System
Drive” under “Electronic Musical Instruments” to a computer.
To recall the settings, move the “PSR-S650.BUP” file from a computer to “System
Drive” under “Electronic Musical Instruments.”
Transferring Styles and Songs you have recorded on the instrument to a
computer
Operation
Using Musicsoft Downloader, move the file from “Flash Memory” under “Electronic Musical Instruments” to a computer.
NOTICE
• The backup file is transmitted/received as a single file
with the same name. As a
result, all registration memory data on the instrument
and the file saved on a computer will be overwritten
every time you transmit or
receive. Keep this in mind
when transferring data.
• Do not rename the backup
file on the computer. If you
do so it will not be transferred to the instrument.
To move a file back, move the file from a computer to “Flash Memory” under “Electronic Musical Instruments.”
Transferring Style, Song and Music Database files, downloaded from the
Internet and saved on a computer, to the instrument
Operation
Using Musicsoft Downloader, move the file from a computer to “Flash Memory”
under “Electronic Musical Instruments.”
To move a file back, perform the same operation as in “Transferring Styles and Songs
you have recorded on the instrument to a computer” above.
Using Songs with Notation
When using Songs with notation (SMF format 0/1 only) transferred from a computer
for practice, you can specify which channels are to be played back as the right-hand
and left-hand parts.
1 Press the [USER] button and select the Song residing in internal memory for which you
want to set the guide track.
2 Press the [FUNCTION] button.
3 Use the CATEGORY [<] and [>] buttons to select the R-Part or L-Part item.
4 Use the dial to select the channel you want to play back as the specified right- or left-hand
part.
We recommend that you select channel 1 for the right-hand part and channel 2 for the
left-hand part.
Reference Manual
52
Index
A
L
AI Fingered .................................. 16
Left-Part ..................................47, 52
Local On/Off ................................49
B
Backup .......................................... 52
Beat ............................................... 33
Bell .................................................. 5
C
Chord ................................ 16–17, 20
Chord Fingering ........................... 16
Chorus .......................................... 11
Chorus Level .................................. 3
Clear (Part) ................................... 41
Clear (Rhythm) ............................ 39
Computer ...................................... 48
T
M
Master EQ .......................................8
Measure ........................................36
Mega Voice .....................................4
Metronome Volume .......................6
MIDI settings ...............................49
Multi Finger ...........................16–17
Mute ........................................15, 23
O
Octave .............................................3
One Touch Setting .......................21
D
P
Demo Cancel ............................... 47
Demo Group ................................ 47
Demo Play Mode ......................... 47
Dry Level ........................................ 3
DSP ............................................... 12
DSP Level ...................................... 3
Pan ...................................................3
Part ................................................37
Part Clear ......................................41
Part Recording ..............................38
Pattern ...........................................18
PC Mode .......................................48
E
Q
Effects ............................................. 9
Expansion Style ........................... 20
Expansion Voice ............................ 4
External Clock ............................. 49
Quantize ..................................27, 40
F
File Transition .............................. 51
Fingering ...................................... 16
FullKeyboard ............................... 16
Functions ...................................... 44
H
Harmony ......................................... 9
Harmony Volume ......................... 46
I
Initial Setup .................................. 50
K
Keyboard Out ............................... 49
Style Parts .................................... 15
Style Volume ................................ 14
Touch Sensitivity ........................... 7
U
USB Song .................................... 25
USB Style .................................... 20
User Song ..................................... 25
User Style ..................................... 20
V
Volume (Metronome) .................... 6
Volume (Song) ............................. 22
Volume (Style) ............................. 14
Volume (Voice) .............................. 3
R
Random Song Playback ..............24
Recording (Style) ...................38–39
Reverb ...........................................10
Reverb Level ..................................3
Rhythm Part ..................................38
Right Part ................................47, 52
S
Save (Song Edit) ..........................28
Save (Style Creator) .....................42
Section ....................................18, 34
Section Copy ................................34
Song Edit ......................................26
Song Out .......................................49
Song Parts .....................................23
Song Volume ................................22
Split Point .....................................19
Style Creator .................................30
Style Out .......................................49
U.R.G., Digital Musical Instruments Division
© 2011 Yamaha Corporation
109PO A0
Reference Manual
53


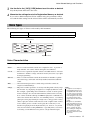
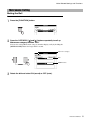

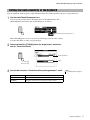


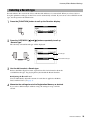


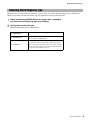

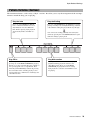
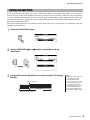
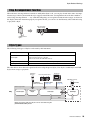
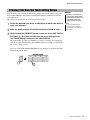
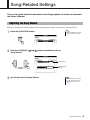

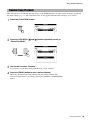
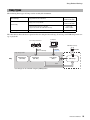
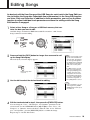

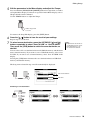


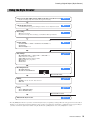


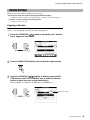
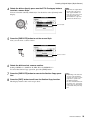
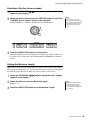

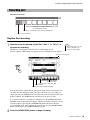

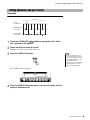


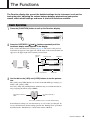
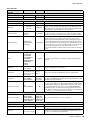
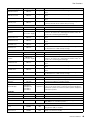

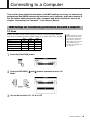

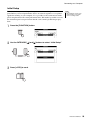


![Press the [FUNCTION] button.](http://vs1.manualzilla.com/store/data/005738170_1-cd4fded3b03c9e88548afe52897345e1-150x150.png)