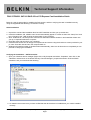
1
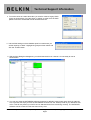
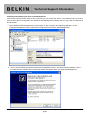
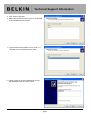
Technical Support Information
F5U197/F5U251 SATA II RAID 2-Port PCI Express Card Installation Guide
Below is a step by step guide for installing the F5U197/251, and then verifying the card is installed correctly
using the supplied drivers allowing it to function correctly.
Initial Installation
1. Unpack the card and the installation disk, DO NOT install the card into your pc at this time.
2. Insert the installation CD, a Belkin menu should automatically appear. If it does not then click “Start | Run” and
type “X:\autorun.exe” (With X being the drive letter of your CD drive).
3. Click “Install Driver”, the setup for the SATA driver and RAID software should run and install the drivers onto
your pc, if requested reboot the computer.
4. Close the menu and shut down your computer.
5. Insert the F5U197/251 into an empty PCI Express slot and secure using the bracket or screws provided in your
pc case. Close the case and turn the computer back on.
6. Windows will install a number of hardware items automatically, allow it to do this and once completed you can
proceed to verifying the installation.
Verifying the Installation – SATA Controller
1. Open your Windows device manager (Right click on My Computer and select “Properties”, then click on the
“Hardware” tab and click on the button that says “Device Manager”), expand the section “SCSI and RAID
controllers” and you should see the following.
2. As stated in the manual once you have verified that the device above is installed then your card is installed
correctly.
Belkin Ltd Express Business Park Shipton Way Rushden England NN10 6GL | [email protected] | www.belkin.com
Page 1
Technical Support Information
Setting up Your SATA Drive(s)
Now that your card is installed your can switch the computer off and connect up your SATA hard disc, boot your
computer back up and the basic guide below will help you setup your disc within the operating system. For further
setup information please consult the SATARAID manual located on the CD.
1. When you boot your computer up the SATARAID array manager will automatically open on the screen, you
should see something similar to the following.
2. You can see that the disc on Channel 1 has been recognised (For this guide we only have one drive).
Before you can use the drive within Windows you need to create a RAID group.
Belkin Ltd Express Business Park Shipton Way Rushden England NN10 6GL | [email protected] | www.belkin.com
Page 2
Technical Support Information
3. To use the drive as a stand alone disc you need to create a Legacy RAID
group as shown above, for instructions on setting up other forms of RAID
please consult the SATARAID manual located on the CD.
4. Leave all the settings on there defaults apart from make sure you
set the capacity to “MAX”. Highlight the group as shown above and
click the “Create” button.
5. Wait until this dialog box disappears, you should see the drive on channel 1 is now ready to use as
shown below.
6. You can now close the SATARAID5 software, however by default it is set to open every time you start the
OS, to prevent this simply remove the SATARAID5 shortcut from the “Startup” folder in your Windows start
menu. This will not prevent your SATA card or attached drives from functioning correctly. The SATARAID
software can be access from the start menu at any time.
Belkin Ltd Express Business Park Shipton Way Rushden England NN10 6GL | [email protected] | www.belkin.com
Page 3
Technical Support Information
Checking and Initialising the drive in the Windows OS
Your drive(s) should now be ready to use, but before you can access the drive in your Windows OS you need to
check that the disc is recognised in the Windows Disk Management software and you may need to initialise and
format the disc.
1. Open Windows Disk Management by right clicking on “My Computer” and selecting “Manage”, on the
Computer Management screen expand the storage section and select “Disk Management”.
2. As you can see above the new drive has been recognised as “Disk 1” but has not been initialised, if this is
the case then the “Initialise and Convert Disk Wizard” will appear when you open Disk Management.
Belkin Ltd Express Business Park Shipton Way Rushden England NN10 6GL | [email protected] | www.belkin.com
Page 4
Technical Support Information
3. Click “Next” to proceed.
4. Make sure the tickbox next to “Disk 1” is selected
to be initlialised and click “Next”.
5. Again make sure the tickbox next to “Disk 1” is
selected to be converted and click “Next”.
6. Finally verify that you have selected to convert
and initialise the disk and click “Finish”.
Belkin Ltd Express Business Park Shipton Way Rushden England NN10 6GL | [email protected] | www.belkin.com
Page 5
Technical Support Information
7. You will now return to the Disk Management screen, you will notice that Disk1 now shows as online. If the
partition on the disk shows “Unallocated” as in the screenshot below you will need to right click on that partition
and select “New Volume”.
8. Run through the Windows prompts accepting all the defaults and once the volume has been created right
click on that volume and select “Format”, once Windows has completed formatting the partition your drive
should be ready to use.
Belkin Ltd Express Business Park Shipton Way Rushden England NN10 6GL | [email protected] | www.belkin.com
Page 6