1
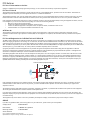
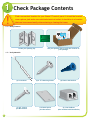
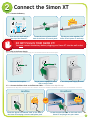
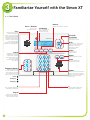
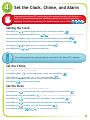
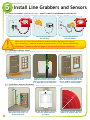
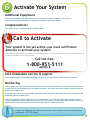
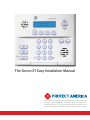
The Simon XT Easy Installation Manual This manual is the property of Protect America, Inc. This installation manual contains confidential information which is proprietary to Protect America, Inc. You may not disclose this information to third parties and you may not copy all or any part of this installation manual. FCC Notices FCC Part 15 Information to the User Changes or modifications not expressly approved by Interlogix, Inc can void the user’s authority to operate the equipment. FCC Part 15 Class B This equipment has been tested and found to comply with the limits for a Class B digital device, pursuant to Part 15 of FCC Rules. These limits are designed to provide reasonable protection against interference in a residential installation. This equipment generates, uses, and can radiate radio frequency energy, and if not installed and used in accordance with the instructions, may cause harmful interference with the radio communications. However, there is no guarantee that interference will not occur in a particular installation. If this equipment causes harmful interference to radio or television reception, which can be determined by turning the equipment off and on, the user is encouraged to try to correct the interference by taking one or more of the following measures: • Reorient or relocate the receiving antenna • Increase the separation between the equipment and the receiver • Connect the affected equipment to the panel receiver to separate outlets, on different branch circuits • Consult the dealer or an experienced radio/TV technician for help ACTA Part 68 This equipment complies with Part 68 of the FCC Rules. Located in this equipment is a label that contains, among other information, the FCC registration number and the ringer equivalence number (REN) for this equipment. If requested, this information must be provided to the telephone company. FCC Part 68 Registration No. B4ZUSA-27621-AL-E REN:0.2B The REN is used to determine the maximum number that may be connected to your telephone line. Excessive RENs on a telephone line may result in devices not ringing in response to an incoming call. In most areas, the sum of all device RENs should not exceed five (5.0). To be certain of the number of devices that may be connected to a line as determined by the total RENs, contact the local telephone company for products approved after July 23, 2001. The REN for this product is part of the product identifier that has the format US:AAAEQ##TXXXX. The digits represented by ## are the REN without a decimal point (e.g., 03 is a REN of 0.3). For earlier products, the REN is separately shown on the label. A plug and jack used to connect this equipment to the premises wiring and the telephone network must comply with the applicable FCC Part 68 rules and the requirements as adopted by the ACTA. A compliant telephone cord and modular plug is provided with this product. It is designed to be connected to a compliant modular jack. See the Installation Instructions for details. Alarm dialing equipment must be able to cease the telephone line and place a call in an emergency situation. It must be able to do this even if other equipment (telephone answering system, computer modem, etc.) already has the telephone line in use. To do so, alarm dialing equipment must be connected to a properly installed RJ31X jack that is electrically in series and ahead of all other equipment attached to the same phone line. Proper installation is depicted in the following diagram. If you have any questions concerning these instructions, consult your local telephone company or a qualified installer about installing an RJ31X jack and alarm dialing equipment for you. Customer Premises Equipment and Wiring RJ31X Jack Alarm Dialing Equipment Computer Unused RJ-11 Jack Network Service Provider’s Facilities Telephone Line Answering System Unused RJ-11 Jack Telephone Fax Machine Telephone Network Demarcation Point Telephone If this equipment causes harm to the telephone network, the telephone company may temporarily disconnect your service. If possible, you will be notified in advance. When advance notice is not practical, you will be notified as soon as possible. You will also be notified of your right to file a complaint to the FCC. The telephone company might make changes in its facilities, equipment, operations, or procedures that could affect the operation of the equipment. You will be given advanced notice in order to maintain uninterrupted service. If you experience trouble with this equipment, please contact the company that installed the equipment for service and/or repair information. The telephone company may ask you to disconnect the equipment from the network until the problem has been corrected or you are sure the equipment is not malfunctioning. This equipment may not be used on coin service provided by the telephone company. Connections to party lines are subject to tariffs. SERVICE If you have any questions about your security system or if you need service, please contact your security dealer. Company Name: Protect America Phone Number: 1-800-951-5111, option 2 Monitoring Number: 1-877-274-0604 2002 GE INTERLOGIX ITI is a registered trademark of GE Interlogix. Specifications are subject to change. Some features are optional. Table of Contents Contents Easy Installation Steps Step 1: Package Contents 2 Step 2: Connect the Simon XT 3 Step 3: Familiarize Yourself with the Simon XT 4 Step 4: Set the Clock, Chime, & Alarm 5 Step 5: Install Line Grabbers & Sensors 6 Step 6: Activate Your System 7 Additional Information About Your System Test Your System Monthly 8 False Alarm Prevention 9 Important Procedures 10 Frequently Asked Questions 11 Sensor Information Worksheet 13 ! Important An Alarm Permit May Be Required Some municipalities require third-party verification that an alarm system is registered or that an application be filed; please check with your local police department alarm division. It is your responsibility to ensure that you are in compliance with all of your city police or county sheriff's alarm regulations. Non-Compliance = No Dispatch 1 1 ! Check Package Contents Find a convenient location for your Simon XT control panel. It should be located near a phone jack and a non-switched electrical outlet. It should be in a location that can be accessed easily when entering or leaving the home. 1.1 — Verify Contents PA CK IN G L P S I Locate your packing slip. Simon XT Disarmed 12:23a Doors + Windows Motions Disarm Status Silent Bypass Use your packing slip to verify the contents of your package. 1.2 — Verify Materials 2 (1) Screwdriver (2) 0.75" Mounting Screws (2) 0.5" Screws per Microsensor (1) Plastic Spacer per Microsensor (2) Plastic Wall Anchors (2) Line Grabbers (Not included with HomePulse) 2 Connect the Simon XT 2.1 — Connect the Battery CLICK Simon XT Disarmed 12:23a Doors + Windows Motions Disarm Status Silent Bypass Press the two small tabs at the top of the Simon XT. Locate the two red wires on the back of the Simon XT control panel. Clip the two wires together. The Simon XT will power on and beep. DO NOT PLUG IN YOUR SIMON XT! You must connect the battery before plugging your Simon XT into the wall outlet. 2.2 — Plug in the Power Supply Make sure you properly secure the power supply to a non-switched and non-GFCI outlet faceplate. Unscrew the faceplate. Plug in power supply and secure Ensure that power supply is secure. with screw provided. 2.3 — Connect the Phone Cord or the Ethernet Cable — Cellular users skip this step Standard and Two-Way Voice customers follow the "Landline" instructions. HomePulse Broadband customers follow the "Broadband" instructions. Landline Broadband CLIC K Locate the phone wire labeled "Wall" on the back of the Simon XT and plug it into the wall phone jack. OR CLICK Locate the ethernet cable on the back of the Simon XT and plug it into your router. 3 3 Familiarize Yourself with the Simon XT 3.1 — The Controls Motions Doors + Windows Press to arm perimeter sensors. Siren The piezo siren is used for status beeps and alarms. Fire and intrusion alarms always sound at high volume. The volume of status beeps (such as trouble or chime beeps, entry and exit delay beeps, or auxiliary alarm beeps) are programmable. Press to arm interior sensors. LCD Display The LCD display can show a variety of phrases and icons. Scroll Up / Scroll Down Press to scroll through the menus. Simon XT Enter Disarmed 12:23a Doors + Windows Motions Disarm Press to select a particular menu item or commit to memory a menu item that has just been programmed. Status Status Press to check system status. Disarm Signifies the system is armed when lit. When illuminated, pressing the button will prompt you to enter your access code to disarm the system. Bypass Silent Bypass Press to bypass a sensor. Silent Press to silence exit beeps when arming. Emergency Buttons Press and hold button for two seconds (or press twice quickly) to notify the central monitoring station of a call for help. Police Speaker Used for voice output and key beeps. The Simon XT speaks arming level changes, system status, and voice-chime sensor trips. Emergency Emergency * Turn on lights (additional equipment is required). Keypad Twelve-key keypad for entering access codes or other numerical data. 4 # Turn off lights (additional equipment is required). 4 Set the Clock, Chime, and Alarm Programming the Simon XT requires keys to be pressed in order, with little or no delay. It is recommended that you familiarize yourself with these steps before beginning. For initial programming, the default master code is 1234 ( ). Setting the Clock Press SCROLL UP ( ) until the display reads "Set Clock," and then press ENTER ( Enter the master code, then press ENTER twice ( ). ). If no master code has been set, the default master code is 1234. The hour should be blinking. Type in the current hour using the KEYPAD then press ENTER ( ). The minute should be blinking. Type in the current minute using the KEYPAD then press ENTER ( Press SCROLL UP ( ) to select "am" or "pm," then press ENTER ( Press STATUS twice ( Status Status ). ). ) to return to the main menu. The settings below are optional and not required for the Simon XT to operate. Set the Chime If the chime is on and the system is disarmed, the Simon XT panel will use voice notification when doors or windows are opened. When the chime is on, a bell icon is shown on the display. Press SCROLL DOWN ( ) until the display reads, "Chime," then press ENTER ( ). Press SCROLL UP ( ) to select “on” or “off,” then press ENTER ( ). (Note: It is recommended that the chime be turned on while installing sensors.) Press STATUS ( Status ) to return to the main menu. Set the Siren A high-volume siren will sound if there is an intrusion while the system is armed. Press SCROLL UP ( ) until the display reads, "System Programming," then press ENTER ( Enter the master code, then press ENTER ( ). If no master code has been set, the default master code is 1234. Press SCROLL UP ( ) until the display reads, "Siren Options," then press ENTER ( Press SCROLL UP ( ) until the display reads, "Panel Piezo Alrm," then press ENTER ( Press SCROLL UP ( ) to select "on" or "off" then press ENTER ( Press STATUS three times ( Status Status Status ). ). ). ). ) to return to the main screen. 5 5 Install Line Grabbers and Sensors 5.1 — Install Line Grabbers (Landline users only) — DO NOT CONNECT A LINE GRABBER TO THE SIMON XT! Repeat this step for every phone in the home. For additional line grabbers please contact Protect America at 1-800-951-5111, option 2. CLIC K CLIC K Disconnect phone from wall. ! Connect the phone to the line grabber. Connect a line grabber to the wall plug. Make sure to clean the installation location before applying each sensor. Upon installing, write the location of each sensor on the "Sensor Information Worksheet" located on the last page of the manual for future reference. 5.2 — Install Door & Window Sensors Place marked sensors in their proper location. Additional sensors may be placed to your liking. When placing sensors, make sure that the arrows on each side are aligned. 3/8in sensor magnet Determine an appropriate location for each sensor. Make sure that the sensor and magnet are within 3/8" of each other. Use spacers on metal doors or to aid proper sensor alignment. 5.3 — Install Motion Detector (If Included) Use the provided self-adhesive velcro to secure the sensor to the door or window, and the magnet to the door or window frame. 6 Place the motion detector in the corner of the room, 7½' above the ground. 35 ft 7.5ft Motion detectors should be placed in the highest-traffic areas of your home, e.g., a living room or a hallway. Use the self-adhesive velcro to secure the motion detector in a corner. Each motion detector protects within a 35' range in a 90° arc. 6 Activate Your System Additional Equipment If you purchased additional equipment that is not found in this manual, please visit us online at www.protectamerica.com/support for equipment installation guides and manuals. Congratulations! Your system is now installed and ready to be activated. Call to Activate Your system is not yet active—you must call Protect America to activate your system! When calling, please have your Sensor Information Worksheet and your Packing Slip at hand. A representative will guide you through the activation process. Call toll-free: 1-800-951-5111 option 6 Post-installation service & support If you need any help or service after installing your system, call us toll-free at 1-800-951-5111, option 2. Monitoring When a proper user code is entered within sixty (60) seconds of an alarm activation, the system is disarmed and a cancel code is sent automatically to the monitoring station. No further steps are necessary and the monitoring station will not take action. If a proper user code is not entered within sixty (60) seconds of an alarm activation, the siren will sound and the monitoring station will take action. If an intrusion alarm has been triggered and is not deactivated, the monitoring station will attempt to call and verify an authorized contact. If there is no answer, if the line is busy, or if the contact does not know the correct password, then the monitoring station will immediately notify the proper authorities. If any siren has gone off, disarm the system, then contact the monitoring station toll-free at 1-877-274-0604. 7 Test Your System Monthly 1) Your monitoring service must be placed in test mode to avoid a false alarm and dispatch of emergency response personnel. To put your service into test mode contact Protect America. Central Monitoring Station toll-free 1-877-274-0604 24 Hrs/Day - 7 Days/Wk Customer Service toll-free 1-800-951-5111, option 2 Standard Hours (Back Cover) www.protectamerica.com/monthlytest Click for Live Chat Standard Hours (Back Cover) The siren will sound throughout the test. Do not disarm your system before the test is complete. 2) Close all doors and windows and make sure that the status light on your Simon XT is off. 3) Use the keypad to enter the master or a valid user code. Your display should read “System Disarmed” or “Sub Disarmed” - this ensures that you have a working disarm code. Make sure that you have a working code before beginning the test. 4) Arm your system: press DOORS + WINDOWS twice ( stop beeping when the system is fully armed. Doors + Windows Doors + Windows ), then press MOTIONS ( Motions ). Your system will 5) Test every sensor on your system using the chart below. 6) Disarm your system using your master or valid user code. The Simon XT should say "System disarmed" or "Alarm cancelled." Status 7) Press STATUS ( ) to listen to all of the sensors that were activated. Listen carefully to make sure that every sensor is mentioned. If any sensors are not mentioned, return to step 4 and re-test those sensors. 8) When your control panel has finished speaking the status, press DISARM ( Disarm ) to clear the memory. 9) Contact Protect America to verify that signals were received and to put your monitoring service back into active mode. Device To Trip Device Door / Window Sensor Keychain Remote Open the secured door or window. Press and hold both the lock and unlock buttons simultaneously for 2 seconds. Avoid the motion sensor’s area for five minutes, then enter its area. Press and hold the “Test” button until the system sounds. Press and hold each individual button for 3 seconds. Motion Sensor Smoke Detector Simon XT Emergency Buttons BROADBAND USERS: 8 It is highly recommended that you connect a battery back-up (not included) to your router and modem to prevent system failure in the event of power outage. False Alarm Prevention What is a false alarm? A false alarm is defined as any signal that elicits a response by police, fire, or emergency medical services for which there is no evidence of any activity that justifies an emergency response. With an estimated 25% yearly increase in alarm systems nationwide, emergency responders are becoming overwhelmed with false alarms. This is resulting in stricter ordinances, severe fines, and limited or no response policies. Help us reduce false alarms through the proper use and maintenance of your alarm system and by testing your alarm system monthly. Your alarm has been programmed with a 60-second alarm cancel period. If you activate your alarm, but disarm it with your code within 60 seconds of activation, the monitoring station will be notified that an authorized user has disarmed the system—the activity will be logged, but no further action is taken. You can also arrange to have the monitoring station call you—or another designated person—when your alarm is activated BEFORE calling police, fire, or medical personnel. This gives you another opportunity to avoid false alarms if you or a family member activate your alarm accidentally. To do this, contact customer support at 1-800-951-5111, option 2. For information on upgrading your system or ordering additional equipment visit www.protectamerica.com. Major causes of false alarms: • User error • Unlocked or loose doors or windows • Kids, pets, neighbors, visitors, repairmen, cleaning crews, etc. Before you activate your alarm: • Make sure you securely close and lock all protected doors and windows. • When leaving, make sure the exit door is closed tightly and locked. • Keep pets, balloons, fans, heaters, etc. away from motion sensor areas. • Know and rehearse the procedure to cancel an accidental alarm. Anyone with access to your home should know this procedure. • Be aware of how much time you have to exit your home after you arm your system and how much time you have to disarm your system when you return. What to do if you set off your alarm by accident: • DO NOT PANIC. Carefully enter your disarm code to deactivate your system. • Call the monitoring station toll-free at 1-877-274-0604 immediately. Be prepared to give your password. • Tell the monitoring station that you had an accidental alarm activation and ask them to cancel the dispatch. •DO NOT CALL 911. DO NOT LEAVE UNTIL YOU HAVE SPOKEN WITH THE MONITORING STATION. Contact the Protect America Service Department when you... • Need to perform your monthly system test. • Are planning any home renovation projects that will change the number of doors or windows, or that will require additional motion sensors. • Are planning on changing phone providers (or DSL / Cable if you are using HomePulse Broadband service). • Get a new pet. • Hire a contractor, cleaning crew, domestic help, realtor, etc. 9 Important Procedures Changing / adding access codes The master code is used for all operations including adding, modifying, and removing other codes. Up to eight user codes can be set along with one duress code. The duress code generates a silent duress alarm that is reported to the monitoring station. Press SCROLL UP ( ) until the display reads "System Programming" then press ENTER ( Enter the Master Code, then press ENTER twice ( Press SCROLL UP ( ). ). ) to select the code you wish to change, then press ENTER ( ). The current value will flash on the display. Use the KEYPAD to type in the new 4-digit code—or press DISARM ( Disarm ) to deactivate a user or duress code — then press ENTER ( Press STATUS three times ( Status Status Status ). ) to return to the main screen. Checking system status Pressing STATUS will cause the system to display and speak system information. The STATUS light will be lit for one of three reasons: 1) A secured door/window is open, or a motion sensor is detecting motion. 2) The alarm system has been activated. 3) There is a problem with the system; contact technical support toll-free at 1-800-951-5111, option 2. Arming the system when leaving Doors + Windows Press DOORS + WINDOWS ( ) to arm all door and window sensors. If you have a motion sensor, press MOTIONS ( Motions ) to arm all motion sensors. Your system will now beep; you generally have 60 seconds to exit the premises or disarm your system. Arming the system when staying (e.g., bedtime) Doors + Windows Doors + Windows Press DOORS + WINDOWS twice ( ) to instantly arm all door and window sensors. After the exit delay has expired, the alarm will sound immediately when a door is opened. Disarming the system Use the KEYPAD to enter your 4-digit master or user code. The Simon XT will voice "System Disarmed." For advanced programming tips, frequently asked questions, and further help with your system, visit www.protectamerica.com/support 10 Frequently Asked Questions How do I test my security system? Please see "Test Your System Monthly" on page 8 of this manual, or call toll-free 1-800-951-5111, option 2, and a representative will walk you through testing your security system. How many access codes can my Simon XT hold? The Simon XT control panel can store 8 user codes and 1 duress (panic) code in addition to the master code. Why is my system status light on? The system status light will remain lit while a secured door or window is open. If all secured doors and Status windows are closed and the system status light is still on, press STATUS ( ) to have your panel voice any pending status messages. How do I clear alarms from the memory? To clear alarms in the memory, press STATUS ( Status ). Your Simon XT will voice the list of alarms stored in memory. When your panel has spoken all alarms, press DISARM ( Disarm ) to clear the memory. Why does my system display a low battery? Your system will display a low battery when either the batteries in your sensors or the back-up battery in your Simon XT becomes low. Make sure that your battery is connected (see page 3 of this manual). The back-up battery is rechargeable and should be fully charged within 24 hours of regaining electrical power. Why does my system display sensors in failure? Your Simon XT will indicate sensor failure when it is unable to communicate with a sensor. This could be due to a missing sensor, damaged sensor, or a dead battery. See page 12 of this manual for instructions on replacing motion sensor batteries. For any other problems, please contact customer service toll-free at 1-800-951-5111, option 2. Why does my system beep 6 times every minute? These are called trouble beeps; they are used to indicate trouble conditions with your panel. Press STATUS ( Status ) to have your Simon XT voice any trouble conditions. Why does my system beep after I arm it? After you arm your system, it will beep for the exit-delay time—the time in which you can exit your home before it is armed. The beeping will grow more frequent as the end of the exit-delay time approaches. When the exit-delay time has expired, the beeping will stop and the system will be armed. How do I silence the exit-delay beeps? After arming your system, press SILENT ( ). The system will beep after the exit-delay time has Silent passed to indicate that it is fully armed. Note: This is not a permanent setting; press SILENT after arming each time that you want to silence the exit-delay beeps. 11 Frequently Asked Questions Why does my Simon XT have two phone lines? The phone line labeled "Wall" is connected to the wall phone jack; it is necessary to communicate to the monitoring station. The second phone line can be used to plug in a telephone. The Simon XT comes equipped with an internal line grabber. Do not connect an additional line grabber to the Simon XT. What is bypass? How do I use it? The bypass feature is used to bypass (deactivate) specific sensor(s) while the system is armed. For example, you are home with the system armed and want to open a specific door or window without disarming the entire system. To bypass a sensor press BYPASS ( ), then use the KEYPAD to enter Bypass your master/user code. Press SCROLL UP ( ) to select the sensor to be bypassed, then press ENTER ( ) to bypass the sensor. When a sensor is bypassed, the panel will display "Bypassed." Note: Bypassing a sensor only lasts until you disarm your system. You must disarm and then arm the system to void the bypass sensors. How do I add or remove a sensor? To add or remove sensors, please contact customer service toll-free at 1-800-951-5111, option 2. How do the door / window sensors work? Doors and windows use the same piece of equipment to detect when they have been opened. The component is comprised of a sensor and a magnet; the sensor is attached to the door or window, while the magnet is attached to the frame. The sensor then reads alignment with the magnet to determine the open or closed state of the door or window. If a door is constructed of steel (not aluminum), use of the spacer is necessary to ensure proper functioning of the magnet. Special sensors can be purchased for use with overhead garage doors (to order call toll-free 1-800-951-5111, option 2). How do the motion sensors work? Motion sensors are passive infrared. They will detect both heat and movement (this decreases falsealarms that could be caused by a curtain or plant blown by a fan). Motion sensors are designed to ignore any pets less than 40 pounds as long as they are not within 6 feet of the motion sensor. If your pet is larger than 40 pounds or will be within 6 feet of the motion sensor, please contact customer service tollfree at 1-800-951-5111 option 2. How do I change the motion sensor battery? 1. Slide Off Back Cover (green arrows) While pressing the center button down, slide off the back cover. Step 1 2. Slide Off Front Cover (blue arrows) While pressing down on the top two tabs and up on the bottom tab, slide off the front cover. 3. Replace the Batteries Replace both AA batteries. Make sure they are installed in the proper direction. 4. Replace the Front Cover Slide the front cover on until it locks into place. 5. Replace the Back Cover Slide the back cover on until it locks into place. 12 Step 3 Step 2 Sensor Information Worksheet Sensor Sensor Sensor Sensor Sensor Sensor Sensor Sensor Sensor Sensor Sensor Sensor Sensor Sensor Sensor Sensor Sensor Sensor Sensor Sensor Sensor Sensor Sensor Sensor Sensor Sensor Sensor Sensor Sensor Sensor Sensor Sensor Sensor Sensor Sensor Sensor Sensor Sensor Sensor Sensor Sensor 1 2 3 4 5 6 7 8 9 10 11 12 13 14 15 16 17 18 19 20 21 22 23 24 25 26 27 28 29 30 31 32 33 34 35 36 37 38 39 40 Location 13 Central Monitoring Station 1-877-274-0604 24 Hrs/Day — 7 Days/Week Customer Service 1-800-951-5111option 2 M-F: 7am - 10pm Central Sat: 8am - 9pm Central Sun: 10am - 8pm Central Contact us before you move for a free Relocation Kit: [email protected] For online assistance, Live Chat with a service representative, or to purchase additional equipment, visit us at: www.protectamerica.com Protect America, Inc., 3800 Quick Hill Rd. Building 1, Austin, TX 78728. Licenses: AL: 11-027; AR: E 2001-0538; AZ: ROC114856 (L-67), ROC114855 (C-12); CA: ACO 4115; DE: 06-204; FL: EG-0000192; GA: LVA205875; IA: AC-0081; IL: 127-001092; LA: F492; MD: 107-1657; MI: 8714 Huckleberry Lane, Lansing MI. 48917. Lic #3601202409; MS: 15005347; NC: 635-CSA; NJ: Burglar alarm and fire alarm bus. Lic. #34BF00023700; NM: 60519; OK: 739; PA: PA023169; SC: BAC 5432, FAC 3104; TN: 00000265; TX: B16272,ACR-1204; UT: 345548-6501; VA: 11-3129; WA: PROTEAI962LD; WV: WV032962.