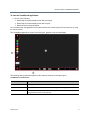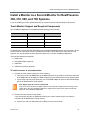
1
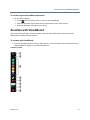
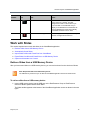
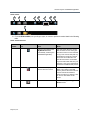
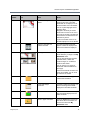
USER GUIDE 4.3.0 | May 2015 | 3725-08501-004A Polycom® VisualBoard™ Technology Application with Polycom® RealPresence® Group Series Copyright© 2015, Polycom, Inc. All rights reserved. No part of this document may be reproduced, translated into another language or format, or transmitted in any form or by any means, electronic or mechanical, for any purpose, without the express written permission of Polycom, Inc. 6001 America Center Drive San Jose, CA 95002 USA Trademarks Polycom®, the Polycom logo and the names and marks associated with Polycom products are trademarks and/or service marks of Polycom, Inc. and are registered and/or common law marks in the United States and various other countries. All other trademarks are property of their respective owners. No portion hereof may be reproduced or transmitted in any form or by any means, for any purpose other than the recipient's personal use, without the express written permission of Polycom. Disclaimer While Polycom uses reasonable efforts to include accurate and up-to-date information in this document, Polycom makes no warranties or representations as to its accuracy. Polycom assumes no liability or responsibility for any typographical or other errors or omissions in the content of this document. Limitation of Liability Polycom and/or its respective suppliers make no representations about the suitability of the information contained in this document for any purpose. Information is provided "as is" without warranty of any kind and is subject to change without notice. The entire risk arising out of its use remains with the recipient. In no event shall Polycom and/or its respective suppliers be liable for any direct, consequential, incidental, special, punitive or other damages whatsoever (including without limitation, damages for loss of business profits, business interruption, or loss of business information), even if Polycom has been advised of the possibility of such damages. End User License Agreement By installing, copying, or otherwise using this product, you acknowledge that you have read, understand and agree to be bound by the terms and conditions of the End User License Agreement for this product. The EULA for this product is available on the Polycom Support page for the product. Patent Information The accompanying product may be protected by one or more U.S. and foreign patents and/or pending patent applications held by Polycom, Inc. Open Source Software Used in this Product This product may contain open source software. You may receive the open source software from Polycom up to three (3) years after the distribution date of the applicable product or software at a charge not greater than the cost to Polycom of shipping or distributing the software to you. To receive software information, as well as the open source software code used in this product, contact Polycom by email at [email protected]. Customer Feedback We are striving to improve our documentation quality and we appreciate your feedback. Email your opinions and comments to [email protected]. Polycom Support Visit the Polycom Support Center for End User License Agreements, software downloads, product documents, product licenses, troubleshooting tips, service requests, and more. 2 Contents Conventions Used in This Guide . . . . . . . . . . . . . . . . . . . . . . . . . . . . . . . . . . . . . . . 4 Information Elements . . . . . . . . . . . . . . . . . . . . . . . . . . . . . . . . . . . . . . . . . . . . . . . . . . . . . . . . . 4 Typographic Conventions . . . . . . . . . . . . . . . . . . . . . . . . . . . . . . . . . . . . . . . . . . . . . . . . . . . . . 5 Before You Begin . . . . . . . . . . . . . . . . . . . . . . . . . . . . . . . . . . . . . . . . . . . . . . . . . . . 6 Audience, Purpose and Required Skills . . . . . . . . . . . . . . . . . . . . . . . . . . . . . . . . . . . . . . . . . . 6 Get Help . . . . . . . . . . . . . . . . . . . . . . . . . . . . . . . . . . . . . . . . . . . . . . . . . . . . . . . . . . . . . . . . . . 6 Polycom and Partner Resources . . . . . . . . . . . . . . . . . . . . . . . . . . . . . . . . . . . . . . . . . . . . 6 The Polycom Community . . . . . . . . . . . . . . . . . . . . . . . . . . . . . . . . . . . . . . . . . . . . . . . . . . 6 Introduction . . . . . . . . . . . . . . . . . . . . . . . . . . . . . . . . . . . . . . . . . . . . . . . . . . . . . . . . 7 Application Support . . . . . . . . . . . . . . . . . . . . . . . . . . . . . . . . . . . . . . . . . . . . . . . . . . . . . . . 7 Installation and Configuration . . . . . . . . . . . . . . . . . . . . . . . . . . . . . . . . . . . . . . . . . . . . . . . 7 Use the Polycom VisualBoard Application . . . . . . . . . . . . . . . . . . . . . . . . . . . . . . 8 Configure the VisualBoard Application . . . . . . . . . . . . . . . . . . . . . . . . . . . . . . . . . . . . . . . . . . . 8 Start and Exit the VisualBoard Application . . . . . . . . . . . . . . . . . . . . . . . . . . . . . . . . . . . . . . . . 8 Annotate with VisualBoard . . . . . . . . . . . . . . . . . . . . . . . . . . . . . . . . . . . . . . . . . . . . . . . . . . . 10 Work with Slides . . . . . . . . . . . . . . . . . . . . . . . . . . . . . . . . . . . . . . . . . . . . . . . . . . . . . . . . . . . 12 Retrieve Slides from a USB Memory Device . . . . . . . . . . . . . . . . . . . . . . . . . . . . . . . . . . 12 Automatically Saved Slides . . . . . . . . . . . . . . . . . . . . . . . . . . . . . . . . . . . . . . . . . . . . . . . . 15 Import Slides to Microsoft PowerPoint from VisualBoard . . . . . . . . . . . . . . . . . . . . . . . . . 16 Export Slides from Microsoft PowerPoint to a USB Memory Device . . . . . . . . . . . . . . . . 16 Capture and Annotate Live Content . . . . . . . . . . . . . . . . . . . . . . . . . . . . . . . . . . . . . . . . . 17 Troubleshoot . . . . . . . . . . . . . . . . . . . . . . . . . . . . . . . . . . . . . . . . . . . . . . . . . . . . . . . . . . . . . . 18 Install and Configure a Touch or Standard Monitor . . . . . . . . . . . . . . . . . . . . . . 20 Requirements for the VisualBoard Application . . . . . . . . . . . . . . . . . . . . . . . . . . . . . . . . . . . . 20 RealPresence Immersive Studio Installation and Configuration . . . . . . . . . . . . . . . . . . . . . . . 20 Install a Monitor as a Second Monitor for RealPresence 300, 310, 500, and 700 Systems . . 21 Touch Monitor Support and Required Components . . . . . . . . . . . . . . . . . . . . . . . . . . . . . 21 Configure the Monitor . . . . . . . . . . . . . . . . . . . . . . . . . . . . . . . . . . . . . . . . . . . . . . . . . . . . . . . 22 Polycom, Inc. 3 Conventions Used in This Guide This guide contains terms, graphical elements, and a few typographic conventions. Familiarizing yourself with these terms, elements, and conventions will help you successfully perform tasks. Information Elements This guide may include any of the following icons to alert you to important information. Icons Used in Polycom Guides Name Icon Description Note The Note icon highlights information of interest or important information needed to be successful in accomplishing a procedure or to understand a concept. Caution The Caution icon highlights information you need to know to avoid a hazard that could potentially impact device performance, application functionality, or successful feature configuration. Warning The Warning icon highlights an action you must perform (or avoid) to prevent issues that may cause you to lose information or your configuration setup, and/or affect phone or network performance. Web Info The Web Info icon highlights supplementary information available online such as documents or downloads on support.polycom.com or other locations. Polycom, Inc. 4 Conventions Used in This Guide Typographic Conventions A few typographic conventions, listed next, are used in Polycom guides to distinguish types of in-text information. Typographic Conventions Convention Description Bold Highlights interface items such as menus, menu selections, window and dialog names, soft keys, file names, and directory names when they are involved in a procedure or user action. Also used to highlight text to be entered or typed. Italics Used to emphasize text, to show example values or inputs (in this form: <example>), and to show titles of reference documents available from the Polycom Support Web site and other reference sites. Blue Text Used for cross references to other sections within this document and for hyperlinks to external sites and documents. Courier Used for code fragments and parameter names. Polycom, Inc. 5 Before You Begin The User Guide for the Polycom VisualBoard Technology Application with Polycom RealPresence Group Series explains how to use the Polycom VisualBoard application with Polycom RealPresence Group systems, including annotating, working with slides, and capturing content. It also explains how to install a touch monitor. Note: Former name of the application The Polycom VisualBoard Technology application was formerly known as the Polycom ActiveTouch application. Audience, Purpose and Required Skills This guide is intended for all users of the Polycom VisualBoard application and Polycom RealPresence Group Series systems. If you are an administrator who needs to install and configure the system, refer to Install and Configure a Touch or Standard Monitor. Get Help For more information about installing, configuring, and administering Polycom products, refer to Documents and Downloads at Polycom Support. Polycom and Partner Resources To find all Polycom partner solutions, see Strategic Global Partner Solutions. The Polycom Community The Polycom Community gives you access to the latest developer and support information. Participate in discussion forums to share ideas and solve problems with your colleagues. To register with the Polycom Community, simply create a Polycom online account. When logged in, you can access Polycom support personnel and participate in developer and support forums to find the latest information on hardware, software, and partner solutions topics. Polycom, Inc. 6 Introduction The Polycom VisualBoard application allows you to show and annotate content in real time from Polycom video conferencing systems by using an electronic annotation device such as a touch screen monitor. You can use the monitor as your only content monitor or you can use it in addition to your current content monitor. When using a touch screen monitor, you can annotate the content using your finger, a stylus, or a mouse. When using a standard monitor, you can use the UC Board device or a mouse to annotate. For flat, cold surfaces such as whiteboards with projectors, Polycom suggests using the Polycom UC Board with the VisualBoard application. Application Support The VisualBoard application is an integrated application that is supported on Polycom® RealPresence® Group Series and Polycom® RealPresence Immersive Studio™ systems. The application works with the following system models: ● Polycom RealPresence Group 300 system ● Polycom RealPresence Group 310 system ● Polycom RealPresence Group 500 system ● Polycom RealPresence Group 700 system ● Polycom RealPresence Immersive Studio system The VisualBoard application works with the following software versions: ● Polycom RealPresence Group Series software version 4.1.3 and later ● Polycom RealPresence Immersive Studio software version 4.2.0 and later Installation and Configuration If your system is already installed and configured, refer to Use the Polycom VisualBoard Application for instructions on using the VisualBoard application. To install the application and configure your touch monitor to work with a RealPresence Group system, refer to Install and Configure a Touch or Standard Monitor. For RealPresence Immersive Studio systems, refer to RealPresence Immersive Studio Installation and Configuration. For more information on setting up and using the UC Board, refer to the Quick Start Guide for the Polycom UC Board, available with the UC Board hardware and at support.polycom.com. Polycom, Inc. 7 Use the Polycom VisualBoard Application After you install and configure the Polycom VisualBoard application, perform the following tasks that are described in the next sections: ● Start and Exit the VisualBoard Application ● Annotate with VisualBoard ● Work with Slides ● Troubleshoot If you have not yet installed and configured the Polycom VisualBoard application, refer to Install and Configure a Touch or Standard Monitor. For a list of basic tasks and a quick introduction about how the application works, refer to the Quick Start Guide for the Polycom® UC Board™. Configure the VisualBoard Application The RealPresence Group system administrator can configure the VisualBoard Application to be enabled or disabled. To enable or disable the VisualBoard Application: In the web interface, go to Admin Settings > General Settings > System Settings > VisualBoard and do one of the following: » To enable VisualBoard, select Enable and then click Save. » To disable VisualBoard, clear the Enable option and click Save. Start and Exit the VisualBoard Application This section explains how to start and exit the VisualBoard application with RealPresence Group systems and RealPresence Immersive Studio systems. Note: Microsoft® mouse support The RealPresence Immersive Studio system does not support using a Microsoft mouse to operate the VisualBoard application. Polycom, Inc. 8 Use the Polycom VisualBoard Application To start the VisualBoard application: » Do one of the following: Double-tap the content display screen with your finger. Double-tap the content display screen with a stylus. Double-click the left mouse button. You can also launch the application from a paired device such as the Polycom Touch Control or by using the remote control. The VisualBoard application, shown in the next figure, appears on the second display. The following table provides descriptions of the reference numbers in the above figure. VisualBoard Screen Elements Reference Number Description 1 Drawing Space: The area where you can use the annotation colors and eraser tool. 2 Annotation Toolbar: These tools are for annotating in the drawing space. 3 Slides Toolbar: When you insert a USB memory device, the Slides toolbar appears along the bottom of the screen (red box). Polycom, Inc. 9 Use the Polycom VisualBoard Application To exit the Polycom VisualBoard application: » Do one of the following: Touch with your finger, stylus, or mouse to exit VisualBoard. Close the application from a paired device such as the Polycom Touch Control. Close the application using the remote control. Annotate with VisualBoard This section describes how to annotate content in real time from RealPresence Group Series and RealPresence Immersive Studio systems. To annotate with VisualBoard: » From the Annotation toolbar, use your finger, stylus, or mouse to perform the functions listed in the following table. To disable a tool, select any other tool. Annotation toolbar Polycom, Inc. 10 Use the Polycom VisualBoard Application Annotation Toolbar Elements Reference Number Task Notes 1 Point to sections of a slide. Point to sections on a slide without making annotations. You see a white glow around the icon when selected. When using a mouse, the arrow pointer is always present. You do not need to touch the arrow pointer when presenting slides. 2 Select the line thickness. The currently selected line thickness is highlighted. To select a different thickness, touch the icon to select the desired thickness. 3 Select color of annotations. You see a glow around the color icon when selected. 4 Erase a section of annotations. You see a pink glow around the eraser icon when selected. If you are annotating over an uploaded slide, the original slide is not erased. Hold the eraser icon down for one second to delete all the annotations you made. All deletions are final. 5 Undo annotations. Touch the red undo icon to remove the last annotation. Hold the undo icon down for two seconds to delete all the annotations you made. All deletions are final. 6 Create a new whiteboard. Create a whiteboard when you or the far-site views content on a projector. If you annotate on a whiteboard and you display a new whiteboard or blackboard, the previous whiteboard is saved automatically. The default annotation color is black. Polycom, Inc. Icon 11 Use the Polycom VisualBoard Application Reference Number Icon Task Notes 7 Create a new blackboard. Create a blackboard when you or the far-site views content on a monitor. The dark background is easier on the viewer’s eyes. If you annotate on a blackboard and you display a new blackboard or whiteboard, the previous blackboard is saved automatically. The default annotation color is white. 8 Exit the VisualBoard application. When the application exits, you hear a beep and see a red glow around the icon. Work with Slides This section explains how to work with slides in the VisualBoard application: ● Retrieve Slides from a USB Memory Device ● Automatically Saved Slides ● Import Slides to Microsoft PowerPoint from VisualBoard ● Export Slides from Microsoft PowerPoint to a USB Memory Device ● Capture and Annotate Live Content Retrieve Slides from a USB Memory Device After you have saved slides on a USB memory device, you can retrieve them from the device as follows. Note: Required format of the USB memory device The USB memory device that you use with the VisualBoard application must be in FAT32 format. To retrieve slides from a USB memory device: 1 Insert a USB memory device into the USB port on the RealPresence Group or RealPresence Immersive Studio system Media Center Stand. The Slides toolbar appears at the bottom of the VisualBoard application screen as shown in the next figure. Polycom, Inc. 12 Use the Polycom VisualBoard Application Slides toolbar 1 2 3 5 6 7 8 9 4 2 From the Slides toolbar, use your finger, stylus, or mouse to perform the tasks listed in the following table. Slides Toolbar Elements Reference Number 1 2 Polycom, Inc. Icon Task Notes Select to save slides (to the My Whiteboard folder automatically created by the VisualBoard application). You hear a beep when the current slide is saved. You see a blue glow around the Save icon when selected. A copy of the current slide (with any annotations) is saved as a new file next to the current slide file. This new file becomes the current slide. If you annotate a slide and save your changes, a copy of the original slide is saved on the USB memory device. Save error icon displays when a save error occurs. You can store up to 200 folders and slides in any folder on the USB memory device. When the maximum number of slides and folders is stored, the Save icon displays a red “X” and no other slides can be saved. Select to delete slides. Touch the icon again to toggle the Delete function. 13 Use the Polycom VisualBoard Application Reference Number 3 4 Polycom, Inc. Icon Task Notes Select the slide you want to delete. All slide thumbnails display a red “X” in the top left corner. The folder thumbnails do not display a red “X” because folders cannot be deleted. You see a yellow highlight around the active slide. Navigate to the slide you want to delete and touch the red “X” icon in the corner of the slide. The slide and all annotations are deleted from the USB memory device. If you touch outside of the red “X”, the slide displays and is not deleted. Select to view slide and folder thumbnails. The slide and folder thumbnails appear. Folders are displayed first and then the slides are displayed. Viewing thumbnails. When you open the thumbnail view for the first time, you begin in the My Whiteboard folder. You see thumbnails that represent individual slides, a folder that contains images, or a folder that contains other folders. You can load up to 10 pages of thumbnails with 20 thumbnails on each page. If more than 20 slides or folders are in the current folder, you can scroll up and down as needed. Basic folder thumbnail. If a folder contains nothing, you see a basic folder thumbnail. Folder with images thumbnail. If a folder contains only images, you see the first image in that folder displayed on the folder thumbnail. Folder with folders thumbnail. If a folder contains other folders, you see other folders displayed on the folder thumbnail. Move to upper level folder. Touch the Up arrow to move to the level above the current folder. You cannot move above the My Whiteboard folder. 14 Use the Polycom VisualBoard Application Reference Number Icon Task Notes 5 Select to view the previous slide in the current folder. You see a white glow around the icon when selected. 6 The left thumbnail displays a thumbnail of the previous slide. Using your finger, mouse, or stylus, slide the thumbnail to the left or right to view other thumbnails. When you click on the desired thumbnail, it becomes the current slide and displays full size. 7 The middle thumbnail displays a thumbnail of the current slide. You see a yellow glow around the current slide. Using your finger, mouse, or stylus, slide the thumbnail to the left or right to view other thumbnails. When you click on the desired thumbnail, it becomes the current slide and displays full size. 8 The right thumbnail displays a thumbnail of the next slide. Using your finger, mouse, or stylus, slide the thumbnail to the left or right to view other thumbnails. When you click on the desired thumbnail, it becomes the current slide and displays full size. 9 Select to view the next slide in the current folder. You see a white glow around the icon when selected. Automatically Saved Slides So that you never lose your work, slides and annotations are automatically saved in the following situations: ● While drawing on the whiteboard when the system is not in a call, and you receive an incoming call, the whiteboard exits and the current slide is saved automatically. ● While drawing on the whiteboard during a call and the far-end site hangs up the call, the whiteboard exits and the current slide is saved automatically. ● While drawing on the whiteboard during a call and you hang up the call, the whiteboard exits and the current slide is saved automatically. ● While drawing on a whiteboard or blackboard, and you display another whiteboard or blackboard, the previous whiteboard is saved automatically. File Name Format and Slide Order Graphic file names used with the VisualBoard application should adhere to a certain format. The correct file name format is IMG_XXXX.jpg, where “XXXX” is the number that corresponds to the order in which the graphic is used, starting with 0001. Polycom, Inc. 15 Use the Polycom VisualBoard Application After you insert the USB device, the graphic files in the My Whiteboard directory are read and renamed as necessary. Graphic files located in subdirectories are renamed after the VisualBoard application is launched and you select any slide in that directory. This means that graphic files are renamed if they are not in the file name format or order expected by the application. As an example, the files IMG_0001.jpg, IMG_0003.jpg, and IMG.0004.jpg are renamed to maintain file order. The file IMG_0003.jpg is renamed to IMG_0002.jpg, and IMG_0004.jpg is renamed to IMG_0003.jpg. When slides are deleted or saved, the slide order is maintained so that there are no gaps in slide numbering. Import Slides to Microsoft PowerPoint from VisualBoard Import slides one at a time or in bulk to Microsoft PowerPoint from VisualBoard on either a PC or a Mac using a USB device. To import slides to Microsoft PowerPoint from VisualBoard: 1 Create a new blank presentation in PowerPoint. 2 Select the option to add a photo album. 3 Select Insert picture from: File/Disk. 4 Select the USB device with the JPG files created with VisualBoard that you want to import into your presentation. 5 Click Create. To import slides in bulk to PowerPoint from VisualBoard: ● On a PC, use Microsoft Office PowerPoint. ● On a Mac, Microsoft Office 2011 does not support importing a whole photo album. Check the web for solutions that allow you to import many JPG files. Here is one for Mac systems running OSX Snow Leopard and Mountain Lion: http://depts.washington.edu/soail/wordpress/?p=258. Export Slides from Microsoft PowerPoint to a USB Memory Device PowerPoint slides can be exported as JPEG files and saved to a USB memory device for use with the VisualBoard application. If you have previously used a USB memory device with the VisualBoard application, you can export content and save it to the My Whiteboard folder, or you can create another folder on the USB memory device called My Whiteboard. To export slides from PowerPoint to a USB memory device: 1 Insert a USB memory device into your computer. 2 Open the PowerPoint presentation you want to export. 3 Select File > Save As. 4 Select the file destination folder My Whiteboard on your USB memory device. 5 Change Save as type to JPEG File Interchange format (*.jpg). 6 Select Save. A PowerPoint dialog box appears. Polycom, Inc. 16 Use the Polycom VisualBoard Application 7 Select Every Slide and click OK. 8 Remove the USB memory device from your computer and insert it into the USB port on your RealPresence Group or RealPresence Immersive Studio system Media Center Stand. Caution: Eject USB memory device first Polycom recommends that you eject the USB memory device from your PC before physically unplugging it. For Windows, right-click the drive that corresponds to the USB memory device and select the Eject option from the menu. For Apple, right‐click on the USB memory device icon on the desktop and select the Eject option. If you don't eject first, your USB memory device might become corrupted. 9 Double-tap the touch screen or double-click the mouse to start the VisualBoard application. 10 Touch the thumbnail icon to view your slides. Note: How to create 16:9 slides To create 16:9 slides in PowerPoint that fill the screen of most display monitors, go to Design > Page Setup. Select On-screen Show (16:9) from the slides sized for drop-down. Capture and Annotate Live Content With the VisualBoard application, you can capture content presented locally or received from other sites into a snapshot. You can then annotate on this snapshot. A snapshot is made when the application is launched and the system is showing content. To save content, you must have a USB memory device installed. Note: Requirement to show and annotate on content For sites in a call to show and annotate on content, the VisualBoard application must be enabled and running. While in a call, you can capture and annotate live content from the far-end site. This multisite collaboration allows every site in a call (either point-to-point or multipoint) to take control of the VisualBoard application. To capture and annotate live content from a PC or Mac: 1 Display content on your computer using People+Content IP. People+Content IP is a free application you can use to share your desktop during a call. You can download it from the Polycom Support Center. 2 Double-tap the touch monitor to start the VisualBoard application and capture the content. 3 Make annotations on the displayed content. 4 Select Save to save a slide of the computer screen with your annotations. Polycom, Inc. 17 Use the Polycom VisualBoard Application To capture and annotate live content from other content sources: 1 Display content using your content source: VCR/DVD Laptop connected with a VGA or DVI cable 2 Double-tap the touch monitor to start the VisualBoard application and capture the content. 3 Make annotations on the displayed content. 4 Select Save to save a slide of the content with your annotations. To capture and annotate live content from the far-end site: » Double-tap the screen to take control of the VisualBoard application. When you are finished annotating, the far-end site can double-tap their screen to take control. The slide you are working on is saved and sent to the far-end site, allowing them to make additional annotations. Note: Saving slides using a USB memory device • The near‐end site and far‐end sites can save slides to a USB memory device, if a USB memory device is inserted into their local system codec. • Each time control switches between the near site and the far‐end site, slides are saved to the connected USB memory device. • If there are unsaved annotations on a current slide, those annotations are saved to the local USB memory device. To use captured content: » Do one of the following: View the content later on your computer. Email the content to the meeting attendees. Import the content into Microsoft PowerPoint to create a presentation. Troubleshoot If you experience problems capturing or annotating live content, try the following possible solutions. ● Ensure that the HDMI and/or the USB cable connecting the monitor to the system is securely attached at both ends. ● Go to Status > VisualBoard. The Status screen shows whether VisualBoard is ready or not available, as shown in the next figure. ● Restart the system. Polycom, Inc. 18 Use the Polycom VisualBoard Application Verify the VisualBoard application Polycom, Inc. 19 Install and Configure a Touch or Standard Monitor To learn how to install the VisualBoard application for use with touch or standard monitors on RealPresence Group systems, refer to the following sections. ● Requirements for the VisualBoard Application ● Install a Monitor as a Second Monitor for RealPresence 300, 310, 500, and 700 Systems ● Configure the Monitor Requirements for the VisualBoard Application Before you can begin using the VisualBoard application, ensure that you have done the following: ● Installed and configured one of the following: USB mouse, UC Board hardware, or a supported touch monitor ● Connected two monitors for use with the RealPresence Group Series system (for RealPresence Group Series 300 and 310 systems, you must purchase the second monitor option key) ● Enabled the VisualBoard option on the RealPresence Group Series web interface RealPresence Immersive Studio Installation and Configuration RealPresence Immersive Studio systems require additional components and special installation and configuration. Note: RealPresence Immersive Studio installation requirements • A Media Center Stand and the Polycom 70” Touch Digital Display are required components to operate the VisualBoard application. The Media Center Stand includes a USB port for use with the VisualBoard application. • Polycom representatives must install and configure the RealPresence VisualBoard option. For details about installation, do one of the following: For Polycom-installed systems, contact the Polycom Support Center. For partner-installed systems, contact your Polycom certified channel partner. Polycom, Inc. 20 Install and Configure a Touch or Standard Monitor Install a Monitor as a Second Monitor for RealPresence 300, 310, 500, and 700 Systems If you are installing a touch or standard monitor as a second monitor, follow the steps in this section. Touch Monitor Support and Required Components The VisualBoard application is compatible with the following touch monitors. Brand Model Size Polycom Touch Digital Display 70” HP Compaq L2206 22” Planar PCT2785 27” Sharp PN-L702B 70” For RealPresence Group 500 and 700 systems, the VisualBoard application works only as monitor 2, so the monitor must be connected to monitor 2 HDMI monitor output. For RealPresence Group 300 and 310 systems, you must purchase the second monitor option key to use the VisualBoard application. You need the following components: ● HDMI cable ● DVI-HDMI adaptor (optional) ● USB cable ● USB memory device (optional) To install a monitor as a second monitor: 1 Connect the video cable by doing one of the following: Connect one end of an HDMI cable to the HDMI Input port on the monitor. Connect the other end of the HDMI cable to the Monitor 2 HDMI Output port on the RealPresence Group Series system. If your monitor has only a DVI input port, use a DVI-HDMI adaptor to connect it to the HDMI output port of the RealPresence Group system. Note: Digital output for content recommended Polycom recommends the use of digital output for content (DVI-D or HDMI) instead of analog (VGA or YPbPr) when using the VisualBoard application. Digital content produces the optimum results with alignment of the VisualBoard application. 2 Connect the touch monitor to the system. If you are using a Polycom UC Board sensor with your current content monitor, the sensor is connected to the RealPresence Group system. a Connect one end of a USB cable to the USB port on the touch monitor. Polycom, Inc. 21 Install and Configure a Touch or Standard Monitor b Connect the other end of the USB cable to the USB port on the RealPresence Group system. A USB memory device can also be installed in the second USB port on the RealPresence Group system for importing and exporting slides, images, or photos. Install a touch monitor as a second monitor HDMI Monitor 2/ Touch Monitor DVI-HDMI adaptor (optional) 1 2 USB RealPresence Group 300, 310, 500, 700 System Configure the Monitor Some monitors might delay the time between writing and displaying, due to processing within the monitor. When using the VisualBoard application with a monitor, configure your monitor or projector to use Game Mode, if that setting is available. Note: RealPresence Group 300 and 310 systems require a monitor option key To use the VisualBoard application with RealPresence Group 300 and 310 systems, you must purchase the monitor option key to enable a second monitor. To configure monitor 2 to show content: 1 In the web interface, go to Admin Settings > Audio/Video > Monitors. 2 Choose one of the following: ● For Monitor 1, use the Monitor Profile Decide for Me. With this default option, monitor 2 displays content by default. ● Set the Monitor Profile for both monitors: a For monitor 1, do not select Decide for Me; choose either Content Only or Speaker and Content. b For monitor 2, select Content Only or Speaker and Content. For more information on these settings, refer to the Administrator Guide for Polycom RealPresence Group Series at support.polycom.com. Polycom, Inc. 22