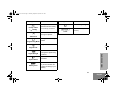
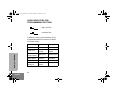
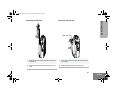
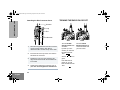
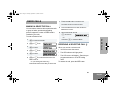
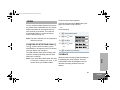
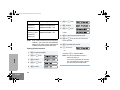
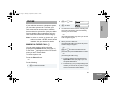
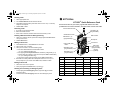
1
88C37-A_cvr.qxd
9/25/2002
4:06 PM
Page 1
MOTOROLA and the Stylized M Logo are registered in the US Patent & Trademark Office. All other product or service names are the property of their respective owners.
© Motorola, Inc. 2002. Inc. All rights reserved. Printed in U.S.A.
MOTOROLA, Le logo stylisé M, et intelligence universelle sont des marques de Motorola, Inc.
© 2002 Motorola, Inc. Tous droits réservés. Imprimé aux États-Unis.
HT1250™
Professional Series
Two-Way Radio User Guide
*6881088C37*
68P81088C37-A
Série Professionnelle
Manuel de l’utilisateur pour radios
bidirectionnelles
88C37-A_PR_UG_HT1250_EngTOC.fm Page 1 Monday, September 30, 2002 2:02 PM
CONTENTS
Radio Overview . . . . . . . . . . . . . . . . . . . . . 7
Parts of the Radio . . . . . . . . . . . . . . . . . . . . 7
HT1250 Full-Keypad Model . . . . . . . . . . 7
HT1250 Limited-Keypad Model . . . . . . . 8
On/Off/Volume Knob . . . . . . . . . . . . . . . 9
Channel Selector Knob . . . . . . . . . . . . . 9
LED Indicator . . . . . . . . . . . . . . . . . . . . . 9
Programmable Buttons . . . . . . . . . . . . . 9
Push-to-Talk (PTT) Button . . . . . . . . . . 11
Microphone . . . . . . . . . . . . . . . . . . . . . 11
Menu Keys . . . . . . . . . . . . . . . . . . . . . . 11
Keypad Keys (for full-keypad radios) . . 12
LCD Screen . . . . . . . . . . . . . . . . . . . . . 14
Audio Indicators for Programmable
Buttons . . . . . . . . . . . . . . . . . . . . . . . . . . . 16
Getting Started . . . . . . . . . . . . . . . . . . . . 17
Battery Information . . . . . . . . . . . . . . . . . . 17
Charging the Battery . . . . . . . . . . . . . . 17
Battery Charge Status . . . . . . . . . . . . . 18
19
19
20
20
20
21
21
22
22
23
23
23
24
24
CONTENTS
Computer Software Copyrights . . . . . . . . . . 3
Product Safety and RF Exposure
Compliance . . . . . . . . . . . . . . . . . . . . . . . . . 5
Battery Information . . . . . . . . . . . . . . . . . . . 5
Charging Batteries . . . . . . . . . . . . . . . . . 5
Attaching the Battery . . . . . . . . . . . . . .
Removing the Battery . . . . . . . . . . . . .
Accessory Information . . . . . . . . . . . . . . .
Attaching the Antenna . . . . . . . . . . . . .
Removing the Antenna . . . . . . . . . . . .
Attaching the Belt Clip . . . . . . . . . . . . .
Removing the Belt Clip . . . . . . . . . . . .
Attaching the Side Connector Cover . .
Turning The Radio On or Off . . . . . . . . . .
Adjusting the Volume . . . . . . . . . . . . . . . .
Selecting a Zone. . . . . . . . . . . . . . . . . . . .
Selecting a Radio Channel . . . . . . . . . . . .
Sending a Call . . . . . . . . . . . . . . . . . . . . .
Receiving a Call . . . . . . . . . . . . . . . . . . . .
Radio Calls . . . . . . . . . . . . . . . . . . . . . . . 25
Making a Selective Call . . . . . . . . . . . . . .
Receiving a Selective Call F. . . . . . . . . . .
Sending a Call Alert™ Page. . . . . . . . . . .
Receiving a Call Alert Page . . . . . . . . . . .
Radio Check . . . . . . . . . . . . . . . . . . . . . . .
Sending an Emergency Alert E . . . . . . .
Editing a Radio Call List K . . . . . . . . . . .
Repeater or Talkaround J Mode . . . . .
Setting Tight or Normal Squelch. . . . . . . .
Setting the Power Level B. . . . . . . . . . . .
Name and Call Tone Tagging. . . . . . . . . .
25
25
26
26
27
27
28
29
29
30
31
1
English
CONTENTS
88C37-A_PR_UG_HT1250_EngTOC.fm Page 2 Monday, September 30, 2002 2:02 PM
Scan . . . . . . . . . . . . . . . . . . . . . . . . . . . . . 33
Warranty . . . . . . . . . . . . . . . . . . . . . . . . . 47
Starting or Stopping Scan G . . . . . . . . .
Talkback . . . . . . . . . . . . . . . . . . . . . . . . . .
Deleting a Nuisance Channel . . . . . . . . . .
Restoring a Channel Back to the
Scan List . . . . . . . . . . . . . . . . . . . . . . .
Editing a Scan List . . . . . . . . . . . . . . . . . .
To Add or Delete Channels in a
Scan List . . . . . . . . . . . . . . . . . . . . . . .
Prioritizing a Channel in a Scan List . .
Setting Priority Channels . . . . . . . . . . .
Limited Warranty . . . . . . . . . . . . . . . . . . . 47
33
33
34
34
34
35
35
36
Phone. . . . . . . . . . . . . . . . . . . . . . . . . . . . 37
Making a Phone Call D . . . . . . . . . . . . . .
Modifying The Phone List K . . . . . . . . . .
To Add an Entry
(for full-keypad radios only) . . . . . . . . .
To Delete an Entry. . . . . . . . . . . . . . . .
To Edit an Entry
(for full-keypad radios only) . . . . . . . . .
37
38
38
39
40
Audio/Tone Settings. . . . . . . . . . . . . . . . 41
Utilities. . . . . . . . . . . . . . . . . . . . . . . . . . . 43
Setting the Time . . . . . . . . . . . . . . . . . . . . 45
2
English
Accessories . . . . . . . . . . . . . . . . . . . . . . 51
Carry Cases . . . . . . . . . . . . . . . . . . . . . . .
Chargers . . . . . . . . . . . . . . . . . . . . . . . . .
Headsets . . . . . . . . . . . . . . . . . . . . . . . . .
Remote Speaker Microphones. . . . . . . . .
Adapters. . . . . . . . . . . . . . . . . . . . . . . . . .
Batteries . . . . . . . . . . . . . . . . . . . . . . . . . .
Antennas . . . . . . . . . . . . . . . . . . . . . . . . .
51
51
52
52
52
52
52
88C37-A_PR_UG_HT1250_EngTOC.fm Page 3 Monday, September 30, 2002 2:02 PM
COMPUTER SOFTWARE
COPYRIGHTS
CONTENTS
The Motorola products described in this
manual may include copyrighted Motorola
computer programs stored in semiconductor
memories or other media. Laws in the United
States and other countries preserve for
Motorola certain exclusive rights for
copyrighted computer programs, including, but
not limited to, the exclusive right to copy or
reproduce in any form the copyrighted
computer program. Accordingly, any
copyrighted Motorola computer programs
contained in the Motorola products described
in this manual may not be copied, reproduced,
modified, reverse-engineered, or distributed in
any manner without the express written
permission of Motorola. Furthermore, the
purchase of Motorola products shall not be
deemed to grant either directly or by
implication, estoppel, or otherwise, any license
under the copyrights, patents or patent
applications of Motorola, except for the normal
non-exclusive license to use that arises by
operation of law in the sale of a product.
3
English
88C37-A_PR_UG_HT1250_EngTOC.fm Page 4 Monday, September 30, 2002 2:02 PM
CONTENTS
Notes:
4
English
SafetyNA.fm Page 5 Monday, September 30, 2002 2:06 PM
BATTERY INFORMATION
SAFETY
Charging Batteries
PRODUCT SAFETY AND RF
EXPOSURE COMPLIANCE
!
Caution
Before using this radio, read the
operating instructions for safe
usage contained in the Product
Safety and RF Exposure booklet
enclosed with your radio.
This radio is restricted to occupational use
only to satisfy FCC RF energy exposure
requirements. Before using this product, read
the RF energy awareness information and
operating instructions in the Product Safety
and RF Exposure booklet enclosed with your
radio (Motorola Publication part number
68P81095C98) to ensure compliance with RF
energy exposure limits.
For a list of Motorola-approved antennas,
batteries, and other accessories, visit the
following web site which lists approved
accessories: http://www.motorola.com/cgiss/
index.shtml.
SAFETY
ATTENTION!
This product is powered by a nickel-cadmium
(NICd), nickel-metal-hydride (NiMH), or lithiumion rechargeable battery. Charge the battery
before use to ensure optimum capacity and
performance. The battery was designed
specifically to be used with a Motorola charger.
Charging in non-Motorola equipment may lead
to battery damage and void the battery
warranty.
Note: When charging a battery attached to a
radio, turn the radio off to ensure a full
charge.
The battery should be at about 77°F (25°C)
(room temperature), whenever possible.
Charging a cold battery (below 50° F [10°C])
may result in leakage of electrolyte and
ultimately in failure of the battery. Charging a
hot battery (above 95°F [35°C]) results in
reduced discharge capacity, affecting the
performance of the radio. Motorola rapid-rate
battery chargers contain a temperaturesensing circuit to ensure that batteries are
charged within the temperature limits stated
above.
5
English
SafetyNA.fm Page 6 Monday, September 30, 2002 2:06 PM
SAFETY
Notes:
6
English
Radio Overview.fm Page 7 Monday, September 30, 2002 2:07 PM
RADIO OVERVIEW
PARTS OF THE RADIO
HT1250 Full-Keypad Model
Channel Selector Knob
Top Button (D)
(programmable)
On/Off/Volume Knob
Side Button 1 (A)
(programmable)
LED Indicator
Microphone
LCD Screen
Push-to-Talk (PTT)
Button
Side
Connector
Cover
RADIO OVERVIEW
Side Button 2 (B)
(programmable)
Menu Keys
(P1, P2, P3)
(programmable)
Keypad
Side Button 3 (C)
(programmable)
7
English
Radio Overview.fm Page 8 Monday, September 30, 2002 2:07 PM
HT1250 Limited-Keypad Model
Channel Selector Knob
Top Button (D)
(programmable)
On/Off/Volume Knob
Side Button 1 (A)
(programmable)
LED Indicator
Microphone
Push-to-Talk (PTT)
Button
Side Button 2 (B)
(programmable)
RADIO OVERVIEW
Side Button 3 (C)
(programmable)
8
English
LCD Screen
Menu Keys
(P1, P2, P3)
(programmable)
Radio Overview.fm Page 9 Monday, September 30, 2002 2:07 PM
On/Off/Volume Knob
Turns the radio on or off, and adjusts the
radio’s volume.
Each button can access up to two features,
depending on the type of button press:
•
short press—quickly pressing and releasing the programmable buttons, or
•
long press—pressing and holding the programmable buttons for a period of time (at
least 1 1/2 seconds), or
•
hold down—pressing and holding down
the programmable buttons while checking
status or making adjustments.
Channel Selector Knob
Switches the radio to different channels.
LED Indicator
Indicates status of battery, power-up, scan,
and receipt of a selective call.
Programmable Buttons
Several of your radio’s buttons can be
programmed by your dealer as shortcut
buttons for many of the radio’s features.
Check with your dealer for a complete list of
functions your radio supports.
•
the three Side Buttons (A, B, C) and the Top
Button (D)
•
the three lower Menu Keys (P1, P2, P3)
(when the radio is not in Menu Mode)
In the “Button” column, have your dealer write
down the programmable buttons next to the
features that have been programmed to them.
Use the abbreviations (e.g., A for Side
Button 1, D for Top Button, etc.) shown in the
radio illustration at the front of this manual.
Also, where a choice exists, have your dealer
indicate whether the button press is short
press (SP) or long press (LP).
RADIO OVERVIEW
Programmable buttons include:
The table on pages 10 and 9 summarizes the
programmable features available and shows
the page number where the feature is
explained.
9
English
RADIO OVERVIEW
Radio Overview.fm Page 10 Monday, September 30, 2002 2:07 PM
Function
Indicator
Emergency
(Top button only)
E
Monitor
C
Volume Set
—
Battery Gauge
P
Scan/Nuisance
Channel Delete
G
Long Press
Hold Down
Page Button
Initiate Emergency Alert.
Cancel Emergency
status.
—
27
Turn monitor
function off.
Continually monitor
selected channel.
—
—
—
—
Sound a tone for
adjusting your
radio’s volume level.
23
—
—
Check the battery’s
charge status.
18
Toggle scan on and Delete a nuisance
off.
channel while scanning.
—
34
Toggle transmit power level between
High and Low.†
—
30
Toggle keypad
between Locked
and Unlocked.
—
—
Power Level
B
Keypad Lock
L
Repeater/
Talkaround
J
Toggle between using a repeater or
transmitting directly to another radio.†
—
29
Squelch
—
Toggle squelch level between Tight and
Normal.†
—
29
†
—
This function is activated by EITHER a short OR a long press, but not both.
10
English
Short Press
Radio Overview.fm Page 11 Monday, September 30, 2002 2:07 PM
Function
Indicator
Short Press
Hold Down
Long Press
Page Button
Option Board
(if one is
installed)
N
Toggle between activating and
deactivating the option board.†
—
—
Phone
D
Access Phone Mode.†
—
37
Speed Dial
—
Access your phone list.†
—
37
Radio Call
—
Make a radio call.†
—
25
Light
—
Turn on your radio backlight.†
—
—
Zone
—
Access your zone list.†
—
23
†
This function is activated by EITHER a short OR a long press, but not both.
Push-to-Talk (PTT) Button
Press and hold down this button to talk;
release it to listen.
Menu Keys
Exit
Up
Menu/
Select
RADIO OVERVIEW
Microphone
When sending a message, hold the
microphone 1 to 2 inches (2.5 to 5 cm) away
from your mouth, and speak clearly into the
microphone.
P1
Left
P2
Down
P3
Right
11
English
Radio Overview.fm Page 12 Monday, September 30, 2002 2:07 PM
Menu/Select Key
)
Keypad Keys (for full-keypad radios)
Used to enter Menu Mode. When in Menu
Mode, this key is also used to make menu
selections.
Exit Key
1
4
7
*
(
Used to move to the previous Menu level (short
press) or to exit Menu Mode (long press).
Up Key
+ and Down Key ?
Used for scrolling when in Menu Mode.
The? key can also be programmed.
Right Key
>
Moves the cursor right or inserts a space when
editing. This key can also be programmed.
RADIO OVERVIEW
Left Key
Used as a backspace key when editing. This
key can also be programmed.
12
English
<
2
5
8
0
3
6
9
#
These keys are used for:
•
dialing a phone number
•
making a radio call
•
entering information when programming
radio lists
Each key can generate several different
characters. For example, to enter the character
“C,” press the 2 key three times. (Refer to the
following table.)
Radio Overview.fm Page 13 Monday, September 30, 2002 2:07 PM
Entering Characters Using the Keypad
Number of Times Key is Pressed
Key
1
2
3
4
5
0
0
(
)
<
>
1
1
&
%
#
*
2
A
B
C
2
3
D
E
F
4
G
H
5
J
6
7
8
9
10
a
b
c
2
3
d
e
f
3
I
4
g
h
i
4
K
L
5
j
k
l
5
M
N
O
6
m
n
o
6
7
P
Q
R
S
7
p
q
r
s
7
8
T
U
V
8
t
u
v
8
9
W
X
Y
Z
9
w
x
y
z
9
*
*
/
+
-
=
#
#
Blank
Space
-
.
!
?
’
”
,
;
11
RADIO OVERVIEW
6
:
13
English
Radio Overview.fm Page 14 Monday, September 30, 2002 2:07 PM
LCD Screen
Symbol
Indication
D
Phone Mode is selected.
Phone
Call Received
RADIO OVERVIEW
The top two screen rows display menu and
radio status information:
Indication
A
Companding
The Companding feature
is activated. When in
narrow band, this feature
improves audio quality.
B
Low Power “ R ” or High
Power “ S ” is activated.
C
Monitor
The selected channel is
being monitored.
An Emergency Alert is
being sent.
Emergency
F
A Selective Call or Call
Alert has been received.
Call Received
G
Scan
Power Level
14
English
Symbol
E
Priority 1 Scan
(
flashing)
The Scan feature has
been activated. Also,
during Scan, indicates
that there is some activity
on a non-priority
channel.
During Scan, indicates
that there is some activity
on a Priority 1 channel.
Radio Overview.fm Page 15 Monday, September 30, 2002 2:07 PM
Symbol
Indication
Symbol
Indication
H
During Scan, indicates
that there is some activity
on a Priority 2 channel.
Q
Not Currently Assigned
Priority 2 Scan
(
steady)
U
Shows the time (12- or
24-hour).
Clock
J
You are not transmitting
through a repeater.
Talkaround
K
A Program List is being
edited.
Programming Mode
L
Keypad is locked.
Keypad Lock
M
N
RADIO OVERVIEW
Signal Strength
The more bars, the
stronger the signal being
received.
Option board is
activated.
Option Board
P
Battery Level
The number of bars (0–
4) shown indicates the
charge remaining in your
battery.
15
English
Radio Overview.fm Page 16 Monday, September 30, 2002 2:07 PM
AUDIO INDICATORS FOR
PROGRAMMABLE BUTTONS
High-Low Tone
Low-High Tone
In addition to having visual indicators, some
programmable buttons use tones to indicate
one of two modes:
RADIO OVERVIEW
Button
Scan
Start scan
Stop scan
Power Level
Low power
selected
High power
selected
Squelch (no
Tight squelch
visual indicator)
Normal squelch
Option Board
Activated
Deactivated
Keypad Lock
Locked
Unlocked
Repeater/
Talkaround
Does not use
repeater
Uses repeater
16
English
High-Low Tone Low-High Tone
GettingStarted.fm Page 17 Monday, September 30, 2002 2:08 PM
BATTERY INFORMATION
Charging the Battery
LED color
No LED Indication
Battery/Charger Status
Battery inserted incorrectly.
Single Green Flash Successful charger power-up.
Flashing Red*
Battery unchargeable or not
making proper contact.
Steady Red
Battery in rapid-charge mode.
Flashing Yellow
Battery in charger, not in rapidcharge mode but waiting to be
charged.
Flashing Green†
Battery 90% (or more)
charged.
To charge the battery:
Steady Green
Battery fully charged.
Place the battery, with or without the radio, in
the charger. The charger LED indicates the
charging progress:
* Remove the battery from the charger and use a
If a battery is new, or its charge level is very
low, you will need to charge it before you can
use it.
Note: Batteries are shipped uncharged from
the factory. Always charge a new battery 14 to 16 hours before initial use,
regardless of the status indicated by
the charger.
GETTING STARTED
GETTING STARTED
pencil eraser to clean the four metal contacts on
the bottom of the battery. Place the battery back
in the charger. If the LED indicator continues to
flash red, replace the battery.
† A standard battery may require one hour to
charge to 90%.
17
English
GETTING STARTED
GettingStarted.fm Page 18 Monday, September 30, 2002 2:08 PM
Battery Charge Status
You can check battery charge status by
holding down the preprogrammed Battery
Gauge button (see page 10). The charge
status is shown by the number of bars in the
P status indicator symbol.
18
English
Battery
Level
Status Indicator
P
High
P
Sufficient
P or P
Low
P
Very Low
P (flashing)
Battery chargers will only charge the Motorolaauthorized batteries listed below; other
batteries may not charge.
Part No.
Description
HNN9008
High-Capacity/NiMH
HNN9009
Ultra-High-Capacity/NiMH
HNN9010
Ultra-High-Capacity/Factory Mutual/
NiMH
HNN9011
High-Capacity/Factory Mutual/NiCd
HNN9012
High-Capacity/NiCd
HNN9013
High-Capacity/Lithium-Ion
GettingStarted.fm Page 19 Monday, September 30, 2002 2:08 PM
Removing the Battery
GETTING STARTED
Attaching the Battery
Battery
Latches
2
②
2
3
1
1
Fit the extensions at the bottom of the battery
into the bottom slots on the radio.
2
Press the top part of the battery toward the
radio until you hear a click.
1
Turn off the radio (see page 22).
2
Slide both battery latches downward.
3
Pull the top part of the battery away from the
radio.
19
English
GETTING STARTED
GettingStarted.fm Page 20 Monday, September 30, 2002 2:08 PM
ACCESSORY INFORMATION
Attaching the Antenna
Turn the antenna clockwise to attach it.
20
English
Removing the Antenna
Turn the antenna counterclockwise to remove
it.
GettingStarted.fm Page 21 Monday, September 30, 2002 2:08 PM
Removing the Belt Clip
GETTING STARTED
Attaching the Belt Clip
Belt Clip Tab
1
2
1
Align the grooves of the belt clip with those of
the battery.
1
Use a key to press the belt clip tab away from
the battery.
2
Press the belt clip downward until you hear a
click.
2
Slide the belt clip upward to remove it.
21
English
GETTING STARTED
GettingStarted.fm Page 22 Monday, September 30, 2002 2:08 PM
Attaching the Side Connector Cover
TURNING THE RADIO ON OR OFF
Antenna
Loop
Slot
Thumbscrew
1
2
Insert the tab on the top of the cover into the
slot above the connector.
3
Position the cover over the connector and
align the thumbscrew with the threaded hole
in the radio.
4
22
English
Place the loop (attached to the side connector
cover) over the antenna; then slide it
downward until it touches the top of the radio.
Tighten the thumbscrew to hold the cover in
place. Do not overtighten the thumbscrew.
ON
OFF
Turn the On/Off/
Volume Control knob
clockwise.
Turn the On/Off/
Volume Control knob
counterclockwise until
you hear a click.
If power-up is successful, you will hear
the Self-Test Pass
Tone
and see the LED turn
green.
If the radio fails to
power up, you will
hear the Self-Test Fail
Tone
.
GettingStarted.fm Page 23 Monday, September 30, 2002 2:08 PM
1
2
3
Hold down the Volume Set or Monitor button
(see page 10); you will hear a continuous
tone.
Turn the On-Off/Volume Control knob to the
desired volume level.
Release the Volume Set or Monitor button.
5
) to select the zone.
SELECTING A RADIO CHANNEL
Your radio offers 128 channels (8 zones of 16
channels each).
Note: Due to government regulations, some
channels may not be programmed. Ask
your dealer for more information.
GETTING STARTED
ADJUSTING THE VOLUME
To select a channel:
SELECTING A ZONE
A zone is a group of up to 16 channels. To
access a channel in a zone, you need to select
the zone first.
To select a zone:
1
) to enter Menu Mode.
2
+ or ? until
Zone
3
) to select
Zone
4
+ or ? until you see the desired zone
1
Select the appropriate Zone, if required (see
“Selecting a Zone” on page 23).
2
Turn the Channel Selector knob clockwise or
counterclockwise until you reach the desired
channel, as shown on the LCD display.
name.
23
English
GETTING STARTED
GettingStarted.fm Page 24 Monday, September 30, 2002 2:08 PM
SENDING A CALL
1
Turn your radio on.
1
Turn your radio on.
2
Use the Channel Selector knob to select the
desired channel.
2
Adjust the radio’s volume (see page 23).
3
3
Hold the radio in a vertical
position, press the PTT button,
and talk at a distance of about
1 to 2 inches (2.5 to 5 cm)
from the microphone.
Switch to the desired channel.
Hold the radio in a vertical
position with its microphone 1
to 2 inches (2.5 to 5 cm) away
from your mouth.
4
24
English
RECEIVING A CALL
Release the PTT button to listen.
MAN WITH RA
Radio_call.fm Page 25 Monday, September 30, 2002 2:09 PM
RADIO CALLS
7
Press the PTT button to send the call.
The radio sounds a continuous tone.
MAKING A SELECTIVE CALL
You can make a selective call to a particular radio
or group of radios, provided the signalling
protocol supports it or when a DTMF board is
installed in your radio.
8
Press the PTT button and talk; release the
PTT button to listen.
9
When finished with the call
( to return to
To make a Selective Call:
SELECTIVE
Selective CALL
Call
–or–
) to enter Menu Mode.
2
+ or ? until
Radio Call
RECEIVING A SELECTIVE CALL F
3
) to select
RADIO
CALL
Radio
Call
When you receive a selective call:
4
+ or ? until
SELECTIVE Call
CALL
Selective
•
You will hear two alert tones.
) to select
SELECTIVE Call
CALL
Selective
•
The LED Indicator will light yellow.
5
•
6
+ or ? to locate the desired ID in the
The LCD screen will display F and the preprogrammed name or ID of the calling
radio.
Radio Call List.
–or– (for full-keypad radios only)
RADIO CALLS
Hold down ( to exit Menu Mode.
1
To answer the call, press the PTT button.
Enter the ID number of the radio you want to call.
25
English
Radio_call.fm Page 26 Monday, September 30, 2002 2:09 PM
SENDING A CALL ALERT™ PAGE
8
You can alert another person by sending a Call
Alert page.
you will see
RADIO CALLS
Acknowledge
If not received,
To send a Call Alert page:
you will see
No Acknowledge
( to return to
Call
CallAlert
Alert
1
) to enter Menu Mode.
2
+ or ? until
Radio Call
3
) to select
RADIO
CALL
Radio
Call
4
+ or ? until
Alert
CallCall
Alert
RECEIVING A CALL ALERT PAGE
5
) to select
Alert
CallCall
Alert
6
+ or ? to locate the desired ID in the
When your radio receives a Call Alert page, it
continuously sounds four alert tones, and
displays the F symbol with the ID of the calling
radio, until you respond.
Radio Call List.
–or– (for full-keypad radios only)
Enter the ID number of the radio you want to
page.
7
Press the PTT button to send the page.
You will see
26
English
If the Call Alert page is received,
Call In
Call
InProg
Prog
9
–or–
Hold down ( to exit Menu Mode.
Press the PTT button to answer the page, or
press any other key to cancel it.
Note: Your radio will display only the last Call
Alert page received. Also, your radio
will not receive any Selective Calls until
you clear the page.
Radio_call.fm Page 27 Monday, September 30, 2002 2:09 PM
RADIO CHECK
7
This feature allows you to determine if a radio is
within range without disturbing the user of the
radio. Radio Check can also be used when
attempts with Selective Call and Call Alert fail.
(This feature is available only if your signalling
protocol supports it.)
You will see
8
2
+ or ? until
Radio Call
3
) to select
Radio
Call
Radio
Call
4
+ or ? until
Radio
Check
Radio
Check
5
) to select
Radio
Check
Radio
Check
6
+ or ? to locate the desired ID in the
Radio Call List.
–or– (for full-keypad radios only)
Enter the ID number of the radio you are
checking.
Acknowledge
If not received,
you will see
9
No Acknowledge
( to return to
Radio Check
Radio
Check
–or–
Hold down ( to exit Menu Mode.
SENDING AN EMERGENCY
ALERT E
If programmed by your dealer (see page 9), the
orange Top button can send a priority
Emergency Alert (see page 10) to a specific
radio or dispatch center. Emergency alerts
have priority over all other calls.
RADIO CALLS
) to enter Menu Mode.
Call InIn
ProgProg
Call
If the Radio Check is received,
you will see
To perform a Radio Check:
1
Press the PTT button.
The E symbol will appear on the LCD screen
when your radio is in the Emergency Alert state.
27
English
Radio_call.fm Page 28 Monday, September 30, 2002 2:09 PM
An Emergency Alert can be programmed to do
one of the following:
1
) to enter Menu Mode.
show E and sound a tone
–or–
• show E (silent Emergency)
–or–
• activate the microphone so that all activity
can be transmitted (for a predetermined
amount of time).
2
+ or ? until
Program Lists
3
) to select
ProgramLists
Lists
Program
4
+ or ? until
RadioCall
ListList
RadioCall
5
) to select
RadioCall
List
RadioCall List
To activate the Emergency Alert, press the
Emergency button.
6
+ or ? until
Edit
EditEntry?
Entry?
7
) to select
Edit
EditEntry?
Entry?
8
+ or ? until you locate the desired entry.
9
) to select the entry.
RADIO CALLS
•
To cancel the Emergency Alert, press and hold
down the Emergency button.
EDITING A RADIO CALL LIST K
The ID numbers in your Radio Call List are
preprogrammed by your dealer. However, you
can edit the names associated with these IDs.
The K symbol will appear on the LCD screen
when you are editing.
Note: The radio cannot receive any calls while
you are editing.
To Edit a Call List entry:
28
English
10 Use your keypad to edit the entry (see page 12).
11 ) to save your changes.
Entry Saved
12 ( to return to
Program
Lists
Edit Entry?
–or–
Hold down ( to exit Menu Mode.
Radio_call.fm Page 29 Monday, September 30, 2002 2:09 PM
REPEATER OR TALKAROUND J
MODE
Talkaround Mode enables you to communicate
with another radio when either:
•
Rptr/Talkarnd
Rptr/Talkarnd
3
) to select
4
+ or ? until
Repeater Mode
or until
Talkarnd Mode
the repeater is not operating
5
–or–
•
your radio is out of the repeater’s range but
within communicating distance of another
radio.
To select either Repeater Mode or Talkaround
Mode:
Press the preprogrammed Repeater/
Talkaround button (see page 10) to toggle
between Repeater Mode and Talkaround
Mode.
–or–
1
) to enter Menu Mode.
2
+ or ? until
Rptr/Talkarnd
Rptr/Talkarnd
SETTING TIGHT OR NORMAL
SQUELCH
Use this feature to filter out nuisance
(unwanted) calls and/or background noise.
However, tightening squelch could cause calls
from remote locations to be filtered out as well.
In this case, normal squelch may be more
desirable.
RADIO CALLS
Note: The J symbol will appear on the LCD
screen when Talkaround Mode is selected.
) to confirm your selection.
To select tight or normal squelch:
Press the preprogrammed Squelch button
(see page 10) to toggle between tight and
normal squelch,
–or–
Do the following:
1
) to enter Menu Mode.
29
English
RADIO CALLS
Radio_call.fm Page 30 Monday, September 30, 2002 2:09 PM
2
+ or ? until
Utilities
Utilities
3
) to select
Utilities
Utilities
4
+ or ? until
Squelch
Squelch
5
) to select
Squelch
Squelch
6
+ or ? until
Sqlch Tight?
or until
Sqlch Normal?
7
SETTING THE POWER LEVEL B
Each channel in your radio has a predefined
transmit power level that can be changed.
•
High power (S) allows you to reach a radio
that is farther away.
•
Low power (R) conserves the battery’s
charge.
•
Auto power automatically sets the optimal
power level based on the strength of the
signal received. If the received signal is
30
English
) to confirm your selection.
weak, the transmit level will be set to high,
and vice-versa.
Note: Be aware that a message received
from a nearby radio might change
your radio’s power level to low. This
may cause radios that are farther
away not to receive your transmissions.
To set the power level:
Press the preprogrammed Power Level button
(see page 10) to toggle between low and high,
–or–
Do the following:
1
) to enter Menu Mode.
2
+ or ? until
Utilities
Utilities
3
) to select
Utilities
Utilities
4
+ or ? until
Power Level
Power
Level
5
) to select
Power Level
The display shows the current power level.
Radio_call.fm Page 31 Monday, September 30, 2002 2:09 PM
6
7
+ or ? until
Power High?
or until
Power Low?
or until
Power Auto?
) to confirm the selection.
NAME AND CALL TONE TAGGING
You can program your radio to sound a
particular alert tone when a specific user is
calling (name tone tagging), or when receiving
a particular type of radio call (call tone
tagging).
There are eight alert tones to select from. See
the table on page 41.
To tag a specific user’s name:
) to enter Menu Mode.
2
+ or ? until
Audio/Tones
Audio/Tones
3
) to select
Audio/Tones
Audio/Tones
4
+ or ? until
Name
Name Tone
ToneTag
Tag
5
) to select
Name
Name Tone
ToneTag
Tag
6
+ or ? until you see the name you
RADIO CALLS
1
want to tag.
7
) to confirm the selection.
31
English
Radio_call.fm Page 32 Monday, September 30, 2002 2:09 PM
8
9
+ or ? until you see and hear the tone
you want to use for this name.
You will see
Name
Set
Name Tag Set
10 ( to return to
Name
Name Tone
Tone Tag
Tag
RADIO CALLS
Hold down ( to exit Menu Mode.
8
+ or ? until you see and hear the tone
you want to use for this type of call.
9
) to confirm the selection.
1
) to enter Menu Mode.
2
+ or ? until
Audio/Tones
Audio/Tones
3
) to select
Audio/Tones
Audio/Tones
4
+ or ? until
Call
Tag Tag
CallTone
Tone
5
) to select
Call
Tag Tag
CallTone
Tone
6
+ or ? until you see the call type you
want to tag.
You will see
Call
Tone
Call Tone
SetSet
10 ( to return to
Call
Call Tone
Tone Tag
Tag
–or–
Hold down ( to exit Menu Mode.
To tag a type of radio call:
32
) to confirm the selection.
) to confirm the selection.
–or–
English
7
Scan.fm Page 33 Monday, September 30, 2002 2:09 PM
SCAN
You can monitor multiple channels and receive
any calls that are transmitted on them. Sixteen
different channels can be programmed into
each scan list by the dealer. Your radio will
automatically switch to a scan list channel
when it detects activity on it.
Note: The same channels can be assigned to
different scan lists.
STARTING OR STOPPING SCAN G
The Gsymbol, and the channel you are
transmitting on, will appear on the LCD screen
when you start a scan operation.
The LED indicator blinks green during a scan
operation, and stops blinking when the radio
switches to a channel.
Press the preprogrammed Scan button (see
page 10) to start or stop scanning.
–or–
Do the following:
1
) to enter Menu Mode.
2
+ or ? until
System
SystemScan
Scan
3
) to select
System
SystemScan
Scan
4
+ or ? until
Sys Scan On?
–or–
5
Sys Scan Off?
) to confirm your selection.
TALKBACK
While your radio is scanning, Talkback allows you
to participate in a call in progress. You must
press the PTT button to participate in the call;
otherwise, scanning continues to the next
channel.
SCAN
Note: If you enter Menu Mode while the radio
is scanning, scanning will stop. It will
resume when you exit Menu Mode.
To start or stop a scan operation:
33
English
Scan.fm Page 34 Monday, September 30, 2002 2:09 PM
DELETING A NUISANCE CHANNEL
EDITING A SCAN LIST
If a channel continually generates unwanted calls
or noise (a “nuisance” channel), use the Scan
button to temporarily delete the channel from the
scan list:
A scan list is a group of up to 16 channels.
Each position on the Channel Selector knob
can have a scan list assigned to it. The same
channel can be included in several scan lists,
and the same scan list can be assigned to
several Channel Selector positions. For
example:
1
While the radio is on the nuisance channel, hold
down the Scan button until you hear a tone.
2
Release the Scan button. The nuisance channel is deleted.
Note: You cannot delete a priority channel (see
page 35) or the last remaining channel in
a scan list.
Position 2
Position 14
1
1
3
2
5
3
6
11
Restoring a Channel Back to the Scan List
SCAN
To restore a previously deleted channel back to
the scan list, restart the scan operation or turn
your radio off and on again.
34
English
When you edit a scan list, you can either add,
delete, or prioritize channels.
Your radio cannot receive any calls while you
are editing a scan list. The K symbol will be
displayed while you are in edit mode.
Scan.fm Page 35 Monday, September 30, 2002 2:09 PM
To Add or Delete Channels in a Scan List:
1
) to enter Menu Mode.
10 If you added a channel,
Entry Saved
Entry
Saved
you will see
–or–
2
+ or ? until
Program
ProgramLists
Lists
If you deleted a channel,
3
) to select
Program
ProgramLists
Lists
you will see
4
+ or ? until
Scan
ScanList
List
) to confirm the deletion.
Entry
Deleted
Delete?
You will see
5
) to select
ScanList
List
Scan
6
+ or ? until
Add Entry?
or to return to
or until
Delete Entry?
–or–
7
) to confirm your selection.
8
+ or ? until you see the channel you
want to add or delete.
Note: You cannot delete the last remaining
channel of a scan list.
) to confirm your selection.
11 ( to return to
Add
Entry?
Add Entry?
Delete Entry?
Delet
Hold down ( to exit Menu Mode.
Prioritizing a Channel in a Scan List
You may want to check the activity on one or
two channels more frequently than others. You
can do this by prioritizing them:
Priority Channel
None specified
SCAN
9
Delete?
Delete?
Scanning Sequence
Ch1➠Ch2➠Ch3➠
Ch4➠…Ch1
35
English
Scan.fm Page 36 Monday, September 30, 2002 2:09 PM
Scanning Sequence
6
+ or ? until
Edit
Priority?
Edit
Priority?
Ch2➠Ch1➠Ch2➠Ch3➠
Ch2➠Ch4➠Ch2➠…Ch1
7
) to select
Edit
Priority?
Edit
Priority?
8
+ or ? until
Priority #1?
or until
Priority #2?
Priority Channel
Channel 2
(Priority 1)
Channel 2
(Priority 1) and
Channel 8
(Priority 2)
Ch2➠Ch1➠Ch8➠Ch3➠
Ch2➠Ch4➠Ch8➠…Ch1
9
Note: Even if there is activity on a non-priority
channel, your radio will automatically
switch to an active priority channel and
indicate the activity with a short tone.
Setting Priority Channels
) to select the desired priority level.
10 + or ? until you see the channel you
want to prioritize.
11 ) to prioritize that channel.
12 ( to return to
Edit
EditPriority?
Priority?
SCAN
–or–
1
) to enter Menu Mode.
2
+ or ? until
Program
ProgramLists
Lists
3
) to select
Program
ProgramLists
Lists
4
+ or ? until
Scan
ScanList
List
5
) to select
Scan
ScanList
List
36
English
Hold down ( to exit Menu Mode.
Notes: You cannot reprioritize a Priority 1
channel to Priority 2.
If you want to reprioritize all channels,
you must delete each priority channel
from the scan list and add it back.
Phone.fm Page 37 Monday, September 30, 2002 2:10 PM
PHONE
Note: In order to receive a phone call, your
radio must have a DTMF decode board
installed. Ask your dealer for details.
MAKING A PHONE CALL D
You can make a phone call by using the
preprogrammed Phone button (see page 11)
or the menu. D will appear on the LCD screen
when you are in Phone Mode.
To initiate a phone call:
Press the Phone Button.
+ or ? until
Phone Phone
3
) to select
Phone
Phone
4
You will hear a series of tones, indicating that
an access code is being sent automatically,
and see your access code;
–or–
(for full-keypad radios only) enter your access
code using the keypad.
5
When you hear a dial tone:
(For full-keypad radios only) enter the phone
number using the keypad.
–or–
+ or ? to select a number from the
phone list; then press the PTT button to send it.
–or–
(For full-keypad radios only)
a
Press and release the preprogrammed
Speed Dial button (see page 11) to use
the Speed Dial feature.
b
Press the key (1 to 9) corresponding to the
number you want to call, or press “0” if you
want to call the last number dialed.
–or–
Do the following:
1
) to enter Menu Mode.
PHONE
If your radio has access to a telephone system,
you can make a phone call. To do this, your
radio must send an access code to a station
that connects it to a phone line. (Ask your dealer
for more details.) After completing a call, your
radio must send a deaccess code to hang up.
2
37
English
Phone.fm Page 38 Monday, September 30, 2002 2:10 PM
5
–or–
Note: Press the PTT button, if required for your
radio.
8
PHONE
Note: To redial the last number dialed (if not
using Speed Dial), press and release the
PTT button. The radio sends the last
number dialed.
and return to
6
7
Hold down ( to exit Menu Mode.
Add an entry
•
Delete an entry
•
Edit an existing entry
To end a phone call, do one of the following:
Note: The radio cannot receive any calls while
you are modifying the phone list.
If your radio has the deaccess code preprogrammed, go to step 8.
38
You can modify a phone list in three ways:
•
–or–
English
MODIFYING THE PHONE LIST K
Switch to the desired channel.
Hold the radio in a vertical
position with the microphone 1
to 2 inches (2.5 to 5 cm) away
from your mouth.
Enter the deaccess code using the keypad.
8
Phone.
Phone
–or–
–or–
If you entered your access code using the
keypad, press the ? key once to access
the last number dialed; then press and
release the PTT button.
( to exit Phone Mode
Press the Phone button to exit Phone Mode.
The K symbol will appear on the LCD screen
when you are modifying the phone list.
To Add an Entry (for full-keypad radios only):
1
) to enter Menu Mode.
2
+ or ? until
Program
ProgramLists
Lists
Phone.fm Page 39 Monday, September 30, 2002 2:10 PM
) to select
Program
ProgramLists
Lists
4
+ or ? until
Phone
PhoneList
List
5
) to select
Phone
PhoneList
List
6
+ or ? until
Add Entry?
Entry?
Add
7
) to select
AddEntry?
Entry?
Add
You will see
Enter
Name
Enter Name
13 ) to store the phone number.
You will see
Entry Saved
14 ( to return to
Add Entry?
PHONE
3
–or–
Hold down ( to exit Menu Mode.
To Delete an Entry:
1
) to enter Menu Mode.
Use the keypad to enter the name (see pages
12 and 11).
2
+ or ? until
Program
ProgramLists
Lists
) to store the name.
3
) to select
Program
ProgramLists
Lists
4
+ or ? until
Phone
PhoneList
List
5
) to select
Phone
PhoneList
List
6
+ or ? until
Delete
Delete Entry?
Entry?
11 ) to select the phone number.
7
) to select
Delete Entry?
12 + or ? until you see the location in the
list where you want to store the phone number.
8
+ or ? until you see the entry you want
8
9
You will see
Enter
Phone# #
Enter Phone
10 Use the keypad to enter the phone number. You
can also add a dash (press >) and a Pause
Indicator (hold down # until the # character
on the LCD screen changes to a “P”).
to delete.
39
English
Phone.fm Page 40 Monday, September 30, 2002 2:10 PM
9
) to select the entry.
PHONE
You will see
8
to edit.
Delete?
) again to confirm the deletion.
+ or ? until you see the entry you want
9
) to select the entry.
You will see
Entry Deleted
10 + or ? until
10 ( to return to
Delete Entry?
(to edit the name),
–or– until
–or–
Hold down ( to exit Menu Mode.
Edit Number?
Edit Nu
(to edit the phone number),
–or– until
To Edit an Entry (for full-keypad radios only):
Edit Name?
Edit
Name?
Edit Edit
Location?
Loc
(to edit the location in the phone list).
1
) to enter Menu Mode.
2
+ or ? until
Program
ProgramLists
Lists
3
) to select
Program
ProgramLists
Lists
4
+ or ? until
Phone
PhoneList
List
5
) to select
Phone
PhoneList
List
13 ) to store the information.
6
+ or ? until
Edit Entry?
Edit
Entry?
14 ( to return to
7
) to select
EditEntry?
Entry?
Edit
11 ) to confirm your selection.
12 Use the keypad to edit the entry (see page
12).
–or–
+ or ? until you see the location where
you want to store the phone number.
Edit Entry?
–or–
40
English
Hold down ( to exit Menu Mode.
Indicators.fm Page 41 Monday, September 30, 2002 2:10 PM
AUDIO/TONE SETTINGS
You can customize the audio and tone feature
settings on your radio by:
1
) to enter Menu Mode.
2
+ or ? until
Audio/Tones
3
) to select
Audio/Tones
4
+ or ? until you see the feature you
want to change (see the table below).
5
) to select the feature. You will see the
feature’s current setting.
6
+ or ? for available settings. (For
Name and Call Tone Tagging, see page 31.)
7
) to select the desired setting.
AUDIO/TONE
SETTINGS
Audio/Tone Settings
Feature
What it Does
Settings
Alert Vol Lvl
Makes the volume level of the audio and alert tones independent. These two volume levels can be adjusted independently.
Ind Alert Off
Ind Alert On
Tone Disable
Turns all tones on or off.
Tones On
Tones Off
Name Tone Tag
Assigns a specific ring tone when receiving a call from a
specific user (see page 31 for details).
Standard
Alert #1 – #7
41
English
Indicators.fm Page 42 Monday, September 30, 2002 2:10 PM
Audio/Tone Settings (Continued)
AUDIO/TONE
SETTINGS
Feature
Settings
Call Tone Tag
Assigns a specific tone when receiving a specific type of
radio call (see page 32 for details).
Standard
Alert #1 – #7
Escalert
Increases the volume of the alarm tones when a call is
not answered.
Escalert On
Escalert Off
Companding
Provides the same audio quality for 12.5kHz channels as
for 25kHz channels.
Compand On
Compand Off
Keypad Tones
Turns keypad tones on or off.
Tones On
Tones Off
42
English
What it Does
Utilities.fm Page 43 Monday, September 30, 2002 2:10 PM
UTILITIES
You can customize some of your radio’s
features by:
1
) to enter Menu Mode.
2
+ or ? until
Utilities
3
) to select
Utilities
4
+ or ? until you see the feature you
want to change (see table below).
5
) to select the feature. You will see the
feature’s current setting.
6
+ or ? for available settings.
7
) to select the desired setting.
Utilities Features
Feature
What it Does
Settings
Sets radio squelch at either normal or tight (see page 29).
Sqlch Normal
Sqlch Tight
Power
Level
Changes the power level of the radio to high, low, or auto (see
page 30).
Power High
Power Low
Power Auto
Clock
Sets the time, or turns the clock on or off (see page 45).
Clock On
Clock Off
Set Time?
UTILITIES
Squelch
43
English
Utilities.fm Page 44 Monday, September 30, 2002 2:10 PM
Utilities Features (Continued)
Feature
Settings
Sets the alarm, or turns it on or off (see page 45).
Alarm On
Alarm Off
Set Time?
Option
board
Activates/deactivates the option board installed in your radio.
Opt Board On
Opt Board Off
Light
Disable
Turns the display and keypad backlight feature on or off.
Lights On
Lights Off
Software
Ver #
Displays the radio’s software version number when you press
).
UTILITIES
Reminder
Alarm
44
English
What it Does
——
Utilities.fm Page 45 Monday, September 30, 2002 2:10 PM
SETTING THE TIME
8
To set the time:
When a setting is blinking, you can change it
with + or ?.
Hour
(AM or PM)
3:05 PM
1
) to enter Menu Mode.
2
+ or ? until
Utilities
3
) to select
Utilities
4
+ or ? until
Clock
9
–or– until
Reminder Alarm
10 ) to save your changes.
5
) to confirm your selection.
6
+ or ? until
Set Time?
7
) to select
Set Time?
Minutes
(AM/PM or 24 hr)
Note: You cannot select “24 hr” for Reminder
Alarm.
> to move to the next setting.
11 ( to return to
or to return to
Clock
Reminder Alarm
–or–
Hold down ( to exit Menu Mode.
UTILITIES
45
English
Utilities.fm Page 46 Monday, September 30, 2002 2:10 PM
UTILITIES
Notes:
46
English
Warranty.fm Page 47 Monday, September 30, 2002 2:10 PM
WARRANTY
MOTOROLA COMMUNICATION PRODUCTS
I. WHAT THIS WARRANTY COVERS AND
FOR HOW LONG:
MOTOROLA INC. (“MOTOROLA”) warrants the
MOTOROLA manufactured Communication
Products listed below (“Product”) against defects
in material and workmanship under normal use
and service for a period of time from the date of
purchase as scheduled below:
HT1250 Portable Units
Two (2) Years
Product Accessories
One (1) Year
Motorola, at its option, will at no charge either
repair the Product (with new or reconditioned
parts), replace it (with a new or reconditioned
Product), or refund the purchase price of the
Product during the warranty period provided it is
returned in accordance with the terms of this
warranty. Replaced parts or boards are
warranted for the balance of the original
applicable warranty period. All replaced parts of
Product shall become the property of
MOTOROLA.
This express limited warranty is extended by
MOTOROLA to the original end user purchaser
only and is not assignable or transferable to any
other party. This is the complete warranty for the
Product manufactured by MOTOROLA.
MOTOROLA assumes no obligations or liability
for additions or modifications to this warranty
unless made in writing and signed by an officer
of MOTOROLA. Unless made in a separate
agreement between MOTOROLA and the
original end user purchaser, MOTOROLA does
not warrant the installation, maintenance or
service of the Product.
WARRANTY
LIMITED WARRANTY
MOTOROLA cannot be responsible in any way
for any ancillary equipment not furnished by
MOTOROLA which is attached to or used in
connection with the Product, or for operation of
the Product with any ancillary equipment, and all
such equipment is expressly excluded from this
warranty. Because each system which may use
the Product is unique, MOTOROLA disclaims
liability for range, coverage, or operation of the
system as a whole under this warranty.
47
English
Warranty.fm Page 48 Monday, September 30, 2002 2:10 PM
II. GENERAL PROVISIONS:
WARRANTY
This warranty sets forth the full extent of
MOTOROLA's responsibilities regarding the
Product. Repair, replacement or refund of the
purchase price, at MOTOROLA’s option, is the
exclusive remedy. THIS WARRANTY IS GIVEN
IN LIEU OF ALL OTHER EXPRESS
WARRANTIES. IMPLIED WARRANTIES,
INCLUDING WITHOUT LIMITATION, IMPLIED
WARRANTIES OF MERCHANTABILITY AND
FITNESS FOR A PARTICULAR PURPOSE,
ARE LIMITED TO THE DURATION OF THIS
LIMITED WARRANTY. IN NO EVENT SHALL
MOTOROLA BE LIABLE FOR DAMAGES IN
EXCESS OF THE PURCHASE PRICE OF THE
PRODUCT, FOR ANY LOSS OF USE, LOSS OF
TIME, INCONVENIENCE, COMMERCIAL
LOSS, LOST PROFITS OR SAVINGS OR
OTHER INCIDENTAL, SPECIAL OR
CONSEQUENTIAL DAMAGES ARISING OUT
OF THE USE OR INABILITY TO USE SUCH
PRODUCT, TO THE FULL EXTENT SUCH MAY
BE DISCLAIMED BY LAW.
48
English
III. STATE LAW RIGHTS:
SOME STATES DO NOT ALLOW THE
EXCLUSION OR LIMITATION OF INCIDENTAL
OR CONSEQUENTIAL DAMAGES OR
LIMITATION ON HOW LONG AN IMPLIED
WARRANTY LASTS, SO THE ABOVE
LIMITATION OR EXCLUSIONS MAY NOT
APPLY.
This warranty gives specific legal rights, and
there may be other rights which may vary from
state to state.
IV. HOW TO GET WARRANTY SERVICE:
You must provide proof of purchase (bearing the
date of purchase and Product item serial number)
in order to receive warranty service and, also,
deliver or send the Product item, transportation
and insurance prepaid, to an authorized warranty
service location. Warranty service will be
provided by Motorola through one of its
authorized warranty service locations. If you first
contact the company which sold you the Product
(e.g., dealer or communication service provider),
it can facilitate your obtaining warranty service.
You can also call Motorola at 1-800-927-2744
US/Canada.
Warranty.fm Page 49 Monday, September 30, 2002 2:10 PM
V. WHAT THIS WARRANTY DOES NOT
COVER:
A Product which, due to illegal or
unauthorized alteration of the software/
firmware in the Product, does not function in
accordance with MOTOROLA’s published
specifications or the FCC type acceptance
labeling in effect for the Product at the time
the Product was initially distributed from
MOTOROLA.
A
Defects or damage resulting from use of the
Product in other than its normal and
customary manner.
B
Defects or damage from misuse, accident,
water, or neglect.
C
Defects or damage from improper testing,
operation, maintenance, installation,
alteration, modification, or adjustment.
I
Scratches or other cosmetic damage to
Product surfaces that does not affect the
operation of the Product.
D
Breakage or damage to antennas unless
caused directly by defects in material
workmanship.
J
Normal and customary wear and tear.
WARRANTY
H
VI. PATENT AND SOFTWARE PROVISIONS:
E
A Product subjected to unauthorized
Product modifications, disassemblies or
repairs (including, without limitation, the
addition to the Product of non-Motorola
supplied equipment) which adversely affect
performance of the Product or interfere with
Motorola's normal warranty inspection and
testing of the Product to verify any warranty
claim.
MOTOROLA will defend, at its own expense, any
suit brought against the end user purchaser to
the extent that it is based on a claim that the
Product or parts infringe a United States patent,
and MOTOROLA will pay those costs and
damages finally awarded against the end user
purchaser in any such suit which are attributable
to any such claim, but such defense and
payments are conditioned on the following:
F
Product which has had the serial number
removed or made illegible.
A
G
Freight costs to the repair depot.
that MOTOROLA will be notified promptly in
writing by such purchaser of any notice of
such claim;
B
that MOTOROLA will have sole control of the
defense of such suit and all negotiations for
49
English
Warranty.fm Page 50 Monday, September 30, 2002 2:10 PM
its settlement or compromise; and
WARRANTY
C
should the Product or parts become, or in
MOTOROLA’s opinion be likely to become,
the subject of a claim of infringement of a
United States patent, that such purchaser
will permit MOTOROLA, at its option and
expense, either to procure for such
purchaser the right to continue using the
Product or parts or to replace or modify the
same so that it becomes non-infringing or to
grant such purchaser a credit for the Product
or parts as depreciated and accept its
return. The depreciation will be an equal
amount per year over the lifetime of the
Product or parts as established by
MOTOROLA.
MOTOROLA will have no liability with respect to
any claim of patent infringement which is based
upon the combination of the Product or parts
furnished hereunder with software, apparatus or
devices not furnished by MOTOROLA, nor will
MOTOROLA have any liability for the use of
ancillary equipment or software not furnished by
MOTOROLA which is attached to or used in
connection with the Product. The foregoing
states the entire liability of MOTOROLA with
respect to infringement of patents by the Product
or any parts thereof.
50
English
Laws in the United States and other countries
preserve for MOTOROLA certain exclusive rights
for copyrighted MOTOROLA software such as
the exclusive rights to reproduce in copies and
distribute copies of such Motorola software.
MOTOROLA software may be used in only the
Product in which the software was originally
embodied and such software in such Product
may not be replaced, copied, distributed,
modified in any way, or used to produce any
derivative thereof. No other use including,
without limitation, alteration, modification,
reproduction, distribution, or reverse engineering
of such MOTOROLA software or exercise of
rights in such MOTOROLA software is permitted.
No license is granted by implication, estoppel or
otherwise under MOTOROLA patent rights or
copyrights.
VII.GOVERNING LAW:
This Warranty is governed by the laws of the
State of Illinois, USA.
Accessories.fm Page 51 Monday, September 30, 2002 2:12 PM
ACCESSORIES
Motorola offers a number of accessories to
enhance the productivity of your two-way radio.
Many of the available accessories are listed
below.
CARRY CASES
Nylon Case, Standard Battery with Belt
Loop
HLN9703_
Nylon DTMF Case, Thin Battery with Belt
Loop
HLN9704_
Nylon DTMF Case, Standard Battery with
Belt Loop
HLN9710_
Soft-Leather Case, Short, Plain, Belt Loop,
Thin Battery (AAD & DC)
HLN9711_
Soft-Leather Case, Short, Plain, Belt Loop,
Standard Battery (AAD & DC)
HLN9712_
Soft-Leather Case, Short, DTMF, Belt Loop,
Thin Battery (AAD & DC)
HLN9713_
Soft-Leather Case, Short, DTMF, Belt Loop,
Standard Battery (AAD & DC)
HLN9744_
Soft-Leather Case, Tall, DTMF, Belt Loop,
Thin Battery (AAD & DC)
HLN9745_
Soft-Leather Case, Tall, DTMF, Belt Loop,
Standard Battery (AAD & DC)
HLN9714_
Spring 2 1/2” Belt Clip
HLN9952_
Belt Clip Carry Holder (compatible with all
batteries and radios)
HLN9652_
Leather Case, Thin Battery with Belt Loop
HLN9665_
Leather Case, Standard Battery with Belt
Loop
HLN9670_
Leather Case, Thin Battery with Swivel
HLN9676_
Leather Case, Standard Battery with Swivel
HLN9677_
Leather DTMF Case, Thin Battery with Belt
Loop
HLN9689_
Leather DTMF Case, Standard Battery with
Belt loop
AAHTN3000_
110V Single-Unit Rapid Charger, US Plug
HLN9690_
Leather DTMF Case, Thin Battery with
Swivel
AAHTN3001_
230V Single-Unit Rapid Charger, Euro Plug
AAHTN3002_
230V Single-Unit Rapid Charger, UK Plug
Leather DTMF Case, Standard Battery with
Swivel
AAHTN3003_
110V Multi-Unit Rapid Charger, US Plug
AAHTN3004_
230V Multi-Unit Rapid Charger, Euro Plug
AAHTN3005_
230V Multi-Unit Rapid Charger, UK Plug
HLN9694_
HLN9701_
Nylon Case, Thin Battery with Belt Loop
ACCESSORIES
HLN9702_
CHARGERS
51
English
Accessories.fm Page 52 Monday, September 30, 2002 2:12 PM
HEADSETS
BDN6647_
Lightweight Headset, Single-Muff
HNN9008_R
Small NiMH, High-Capacity
HMN9021_
Over-the-Head, Medium-Weight Headset,
Dual-Muff
HNN9009_R
Large NiMH, Ultra-High-Capacity
HNN9010_R
Large NiMH, Ultra-High-Capacity FM
HMN9022_
Behind-the-Head, Medium-Weight
Headset, Dual-Muff
HNN9011_R
Large NiCd, High-Capacity FM
HMN9787_
Headset with Boom Microphone
HNN9012_R
Large NiCd, High-Capacity
HNN9013_R
Slim Lilon, High-Capacity
ACCESSORIES
REMOTE SPEAKER MICROPHONES
AAHMN9052_ Standard Remote Speaker Microphone
AAHMN9053_ Noise-Cancelling Remote Speaker
Microphone
AAHMN9054_ Public Safety Remote Speaker
Microphone
ADAPTERS
HLN9716_
Adapter for Audio Accessories
HLN9717_
Adapter for the 3.5mm Audio Accessories
AAHLN9718_ Vehicular Adapter
52
English
BATTERIES
ANTENNAS
NAB6064_
Lowband, Heliflex
PMAD4012_
VHF 136–155 MHz 9 cm, Stubby
PMAD4013_
VHF 155–174 MHz 9 cm, Stubby
PMAD4014_
VHF 136–155 MHz 14 cm, Standard Length
PMAD4015_
VHF 155–174 MHz 14 cm, Standard Length
HAD9743_
VHF 162–174MHz, Stubby
PMAD4023_
VHF 150–161 MHz
PMAD4025_
VHF 150–161 MHz, Stubby
PMAE4002_
UHF 403–433 MHz
PMAE4003_
UHF 433–470 MHz
NAE6483AR
UHF 403–520 MHz, Whip
PMAE4006_
UHF 470–510 MHz
PMAE4007_
UHF 490–527 MHz
PMAE4008_
UHF 470–530 MHz, Whip
NAPrefQR Card.fm Page 53 Monday, September 30, 2002 2:12 PM
Sending a Call
1. Select appropriate zone.
HT1250™ Quick Reference Card
2. Turn Channel Selector knob to desired channel.
3. Press PTT and speak clearly with mouth about 2.5 to 5 cm (1 to 2 inches)
away from microphone.
4. Release PTT to listen.
Receiving a Call
Record the functions for your radio’s programmable buttons in the table
provided below. For further information, see pages 9 and 10 in this User Guide.
Channel Selector Knob
1. Turn radio on and set volume level.
2. Switch to desired channel.
3. When a call is received, it will be heard at the volume level you set.
Top Button (D)
(programmable)
On/Off/Volume Knob
Deleting a Nuisance Channel During Scanning
1. While on a nuisance channel, press and hold preprogrammed Scan button
until you hear a tone.
2. Release Scan button.
Microphone
Making a Phone Call
4. Hold radio in vertical position with microphone about 2.5 to 5 cm (1 to 2
inches) away from your mouth. Press PTT to talk; release it to listen.
Ending a Phone Call
1. Send de-access code, if required.
2. Press preprogrammed Phone button, or press (.
Sending and Cancelling an Emergency Alert
•
•
Press preprogrammed Emergency button (Top button [D]) to activate
Emergency Alert.
Press and hold down Emergency button to cancel Emergency Alert.
LCD Screen
Push-to-Talk (PTT)
Button
1. Press Phone button, or select Phone from the menu.
2. Send access code, if required.
3. Send phone number in one of the following ways:
• Press and release PTT to send last dialed number.
—or— (For full-keypad radios only)
• Press preprogrammed Speed Dial button, followed by a keypad key (1–9),
to access first nine numbers in your phone list. (Press PTT if buffered dial.)
—or— (For full-keypad radios only)
• Enter phone number using the keypad. (Press PTT if buffered dial.)
LED Indicator
Side Button 1 (A)
(programmable)
Menu Keys
(P1, P2, P3)
(programmable)
Side Button 2 (B)
(programmable)
Keypad
(optional)
Side Button 3 (C)
(programmable)
Button
Function
Short Press
Long Press
Hold Down
Page
NAPrefQR Card.fm Page 54 Monday, September 30, 2002 2:12 PM
Menu Navigation Chart
(Refer to Menu Navigation guidelines—
lower, left-hand corner of this page)
Zone
(p. 23)
Radio Call
(p. 25)
+ ?
)
+ ?
Rptr/
Talkarnd
System
Scan
(p. 29)
(p. 33)
+ ?
+ ?
repeater mode/
talkarnd mode
on/off
Program
Lists
Audio/
Tones
Phone
(p. 37)
Call Alert
Radio
Check
RadioCall
List
Scan List
(p. 34)
Phone List
(p. 38)
(p. 28)
select/
enter ID
select/
enter ID
select/
enter ID
Menu Navigation
) to enter Menu Mode
edit entry
add/delete
entry
edit
priority
+ or ? to scroll through the list
) to select Menu item
( to return to previous menu level
—or—
Hold down ( to exit Menu Mode
+ or ? to scroll through sub-list
) to select sub-menu item
add/delete/
edit entry
+ ?
Alert Vol
Lvl
Squelch
on/off
normal/
tight
Tone
Disable
Selective
Call
(p. 43)
(p. 41)
+ ?
+ ?
Utilities
on/off
Name
Tone Tag
standard/
alert #1 - #7
Call
Tone Tag
standard/
alert #1 - #7
Power
Level
high/low/
auto
Clock
on/off/
set time
Reminder
Alarm
Escalert
on/off/
set time
on/off
Option
Board
Companding
on/off
Keypad
Tones
on/off
on/off
Light
Disable
on/off
Software
Ver#
88C37-A_cvr.qxd
10/1/2002
9:34 AM
Page 1
MOTOROLA and the Stylized M Logo are registered in the US Patent & Trademark Office.
All other product or service names are the property of their respective owners.
© Motorola, Inc. 2002. Inc. All rights reserved. Printed in U.S.A.
HT1250™
MOTOROLA, Le logo stylisé M, et intelligence universelle sont des marques de Motorola, Inc.
© 2002 Motorola, Inc. Tous droits réservés. Imprimé aux États-Unis.
Professional Series
*6881088C37*
Série Professionnelle
68P81088C37-A
Two-Way Radio User Guide
Manuel de l’utilisateur pour radios
bidirectionnelles