1
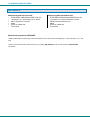
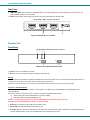
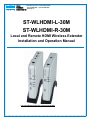
VPI
VIDEO
1275 Danner Drive Aurora,Ohio 44202
Tel: 330-562-2622 Fax: 330-562-1999
PRODUCTS
www.vpi.us
INCORPORATED
ST-WLHDMI-L-30M
ST-WLHDMI-R-30M
Local and Remote HDMI Wireless Extender
Installation and Operation Manual
Local and Remote Units are each sold separately
MAN007
Rev Date 010/28/2009
COPYRIGHT
Copyright © 2009 by Video Products Incorporated. All rights reserved. No part of this publication may be reproduced, stored in a
retrieval system, or transmitted, in any form or by any means, electronic, mechanical, photocopying, recording, or otherwise,
without the prior written consent of Video Products Incorporated, 1275 Danner Drive, Aurora, Ohio 44202
CHANGES
The material in this manual is for information only and is subject to change without notice. Video Products Incorporated reserves
the right to make changes in the product design without reservation and without notification to its users.
TABLE OF CONTENTS
Introduction...................................................................................................................................................................... 1
Materials .......................................................................................................................................................................... 2
Operation Controls and Functions .................................................................................................................................. 3
Local Unit ................................................................................................................................................................... 3
Front Panel ............................................................................................................................................................... 3
Side Panel................................................................................................................................................................. 4
Remote Unit................................................................................................................................................................ 4
Front Panel ............................................................................................................................................................... 4
Side Panel................................................................................................................................................................. 5
Remote Control.......................................................................................................................................................... 5
Connections..................................................................................................................................................................... 6
Technical Specifications.................................................................................................................................................. 7
Troubleshooting............................................................................................................................................................... 7
Warranty Information....................................................................................................................................................... 8
TABLE OF FIGURES
Figure 1- Front panel on Local Unit ................................................................................................................................................... 3
Figure 2- Side panel on Local Unit..................................................................................................................................................... 4
Figure 3- Front panel on Remote Unit................................................................................................................................................ 4
Figure 4- Side panel on Remote Unit................................................................................................................................................. 5
Figure 5- Remote Controls................................................................................................................................................................. 5
Figure 6-Operating range of remotes................................................................................................................................................. 5
Figure 7- Cable Connections ............................................................................................................................................................. 6
VPI WIRELESS HDMI EXTENDER
INTRODUCTION
The ST-WLHDMI-L/R-30M wireless HDMI transmitter (Local Unit) and receiver (Remote Unit) uses 5GHz radio technology to
deliver uncompressed high definition video and audio up to 98 ft. (30 m) in open field, while maintaining superb, wire-equivalent
quality and robustness. HDMI video from up to 3 sources can be transmitted to one or many receivers.
Features:
•
Crisp and clear 1080p resolution at 98 feet (30 meters) in open field, depending on environment.
•
Transmits through thin walls or wooden doors.
•
Supports both Unicast Mode (One-to-One, HDCP/Non-HDCP signal) and Broadcast Mode (One-to-Many, Non-HDCP
signal only) modes.
•
Local Unit:
o
•
Remote Unit:
o
•
Input: Three female HDMI Type A connectors.
Output: One female HDMI Type A connector.
Supports 480i, 480p, 576i, 576p, 720p, 1080i and 1080p resolution for HDTV displays.
o
1080p resolution at 24 or 30 Hz, all others at 60 Hz.
•
Wireless frequency range: 4.9 ~ 5.9 GHz.
•
Compliant with HDMI 1.2, HDCP 1.1 and DVI 1.0 standards.
•
Supports the DDC2B standard for all input ports.
•
Includes infrared remote controls for local unit and remote unit.
1
VPI WIRELESS HDMI EXTENDER
MATERIALS
Materials supplied with Local Unit:
•
ST-WLHDMI-L-30M Wireless HDMI Local Unit
Materials supplied with Remote Unit:
•
ST-WLHDMI-R-30M Wireless HDMI Remote Unit
•
100-240VAC, 50 or 60Hz-5VDC/2.6A AC Adapter
•
100-240VAC, 50 or 60Hz-5VDC/2.6A AC Adapter
•
•
•
CR-67 Remote for Local Unit
Stand
4-Stick-on rubber feet
This manual
•
•
•
CR-68 Remote for Remote Unit
Stand
4-Stick-on rubber feet
This manual
•
•
Materials Not supplied but REQUIRED:
HDMI-xx-MM cables for connecting Local Unit and Remote Unit to video source and display (xx = 3,6,9,14,20,30,50, 75, or 100
feet)
Cables can be purchased from Video Products Inc by calling (800) 626-7801 in the US and Canada or (330) 562-2622
(worldwide).
2
VPI WIRELESS HDMI EXTENDER
OPERATION CONTROLS AND FUNCTIONS
Local Unit
Front Panel
ST-WLHDMI-L-30M Local Unit- Front Panel
4
5
6
7
Power Link
Power
HDMI1 HDMI2 HDMI3
Input
1
ID
2
3
Figure 1- Front panel on Local Unit
1. Power: Press to turn ON/OFF the system.
2. Input: Press to select input source (1/2/3).
3. ID: Press to use for pairing the system or changing operating mode
Pairing
Pairing is performed to establish a wireless link between the Local Unit and Remote Unit. The systems are paired at the factory so
only press the “ID” buttons if the system doesn’t link up properly on their own.
Press the Local Unit “ID” button for 4 seconds, then the Remote Unit “ID” button for 4 seconds to pair the system.
Unicast vs. Broadcast Modes
The ST-WLHDMI-30M can be set to transmit a video signal to one Remote Unit (Unicast Mode) or multiple Remote Units
(Broadcast Mode).
Press the ID button for more than 15 sec. to switch to a different mode (Broadcast/Unicast).
•
•
Green power LED means Unicast mode is set (factory default)
Red power LED means Broadcast Mode is set.
Note: It is not necessary to press the Local Unit and Remote Unit's ID button at the same time.
Broadcast Mode Limitations
Note: Due to the nature of the transmission, the Broadcast mode has no uplink and therefore no bi-directional
communication between Local Unit and Remote Unit. This results in the following limitations:
• HDCP protected content will not be transmitted.
• CEC and EDID repeater functionalities are not supported.
• Broadcast mode is not HDCP compliant.
4. IR sensor: For receiving the IR signal from the remote control.
5. Power LED: The LED will illuminate when power is ON.
6. Link LED: When the devices are searching for each other, the Link LED will flash rapidly. While a link is being established, the
Link LED will flash slowly. Once the link is established the Link LED stays ON solid.
7. Input indicator: The LED will illuminate to indicate which input source is selected.
3
VPI WIRELESS HDMI EXTENDER
Side Panel
8. HDMI 1/2/3 Inputs: For connecting to the HDMI output of your source equipment such as DVD player or set-top-box. Up to 3
different HDMI sources can be connected.
9. Power: Plug the 5VDC power supply into this unit and connect the adapter to AC wall outlet.
ST-WLHDMI-L-30M Local Unit- Side Panel
DC 5V
HDMI3
HDMI2
+
HDMI1
8
9
Figure 2- Side panel on Local Unit
Remote Unit
Front Panel
ST-WLHDMI-R-30M Remote Unit- Front Panel
3
4 5
Power Link
Power
ID
1
2
Figure 3- Front panel on Remote Unit
1. Power: Press to turn ON/OFF the system.
2. ID: Press to use for pairing the system or changing operating mode
Pairing
Pairing is performed to establish a wireless link between the Local Unit and Remote Unit. The systems are paired at the factory so
only press the “ID” buttons if the system doesn’t link up properly on their own.
Press the Local Unit “ID” button for 4 seconds, then the Remote Unit “ID” button for 4 seconds to pair the system.
Unicast vs. Broadcast Modes
The ST-WLHDMI-30M can be set to transmit a video signal to one Remote Unit (Unicast Mode) or multiple Remote Units
(Broadcast Mode).
Press the ID button for more than 15 sec. to switch to a different mode (Broadcast/Unicast).
•
•
Green power LED means Unicast Mode is set (factory default)
Red power LED means Broadcast Mode is set.
Note: It is not necessary to press the Local Unit and Remote Unit's ID button at the same time.
Note: See also “Broadcast Mode Limitations” on previous page.
3. IR sensor: For receiving the IR signal from the remote control.
4. Power LED: The LED will illuminate when power is ON.
5. Link LED: When the devices are searching for each other, the Link LED will flash rapidly. While a link is being established, the
Link LED will flash slowly. Once a link is established the Link LED will stay ON solid.
4
VPI WIRELESS HDMI EXTENDER
Side Panel
ST-WLHDMI-R-30M Remote Unit- Side Panel
DC 5V
-
+
HDMI OUT
7
6
Figure 4- Side panel on Remote Unit
6. HDMI Input: For connecting to the HDMI input of your display.
7. Power: Plug the 5VDC power supply into this unit and connect the adapter to AC wall outlet.
2
2
Remote Control
POWER
ID
3
ID
1
1
1. Power: Press to turn ON/OFF the device (Local Unit or Remote Unit)
2. ID: used the same as described in “Local Unit Side” or “Remote Unit Side” sections
3. 1~3: Input source selection
POWER
1
2
3
Transmitter or Receiver
Transmitter CR67
3 Meters
Receiver CR68
3 Meters
Figure 5- Remote Controls
7 Meters
30
30
POWER
ID
Remote
Control
Figure 6-Operating range of remotes
5
VPI WIRELESS HDMI EXTENDER
CONNECTIONS
UNICAST Configuration
ST-WLHDMI-L-30M Local Unit
ID
ID
HDMI1 HDMI2 HDMI3
HDMI-xx-MM
Power Link
Power
CWHDI-RX Receiver
CWHDI-TX Transmitter
Power Link
Input
HDMI-xx-MM
HDTV
Power
PS3, DVD Player,
Blu-Ray
ST-WLHDMI-R-30M Remote Unit
BROADCAST Configuration
ST-WLHDMI-L-30M
Receiver (1)
HDMI-xx-MM
HDTV
Power Link
CWHDI-RX Receiver
HDMI-xx-MM
ST-WLHDMI-L-30M
Transmitter
Power Link
CWHDI-TX Transmitter
Power
ID
ID
ST-WLHDMI-L-30M
Receiver (2)
HDTV
Power Link
HDMI1 HDMI2 HDMI3
Input
Power
CWHDI-RX Receiver
Power
ID
ST-WLHDMI-L-30M
Receiver (3)
PS3, DVD Player,
Blu-Ray
HDTV
Power Link
CWHDI-RX Receiver
HDMI Type A
Male
Power
ID
HDMI-xx-MM
HDMI-A-Male
HDMI-A-Male
(3,6,14,20,30,50,75 and 100 foot cables available)
Figure 7- Cable Connections
6
HDMI Type A
Male
VPI WIRELESS HDMI EXTENDER
TECHNICAL SPECIFICATIONS
Video Data Rate
1.5Gbps
Frequencies Supported
4.9~5.9GHz
Bandwidth
20MHz
Wireless Range
15-30 meters open field
Operating Temperature
0°C ~ 40°C
Resolution
480i/p, 576i/p, 720p, 1080i @60Hz, 1080p @24/30Hz, VGA @60/72Hz, SVGA @60/72Hz,
XGA@60/70Hz
Video Connectors
Inputs – 3 HDMI Type A Female (Local Unit)
Output – 1 HDMI Type A Female (Remote Unit)
Power Consumption
5VDC, Local Unit: 1.6A, Remote Unit: 1.3A
Power Supply
100-240VAC, 50 or 60Hz-5VDC/2.6A AC Adapter
Weight
Local Unit: 0.6 lb., Remote Unit: 0.6 lb.
Size (In.) WxDxH
6.4 x 6.5 x 1.3 inches
Chassis Material
Plastic
Approvals
UL, (c)UL ( Power Adapter Only )
CE, RoHS
TROUBLESHOOTING
Each and every piece of every product produced by Video Products Inc is 100% tested to exacting specifications. We make
every effort to insure trouble-free installation and operation of our products. If problems are experienced while installing this
product, please look over the troubleshooting chart below to see if perhaps we can answer any questions that arise. If the
answer is not found in the chart, please check the FAQs (Frequently Asked Questions) at our website at http://www.vpi.us or
contact us directly for help at 1-800-626-7801 in US & Canada or 1-330-562-2622 worldwide. We will be happy to assist in any
way we can.
Problem
Solution
Power LED does not illuminate
when power is ON.
•
Check to see if the correct AC adapter is being used-
•
5VDC 2.6A
•
Check all power connections are plugged-in correctly
•
Push the power buttons to turn ON Local Unit and Remote Unit.
•
The Link LED will flash while the unit is pairing or learning. After pairing is complete
and the Local Unit and Remote Unit are linked, the LED will illuminate solid.
•
If the LED keeps flashing rapidly for more than 3 minutes, try pairing the devices by
pushing the ID buttons on each unit for 4 seconds.
•
If the LED keeps flashing slowly for more than 3 minutes, check the Local Unit input
selection, make sure the video source is ON and make sure the display is ON.
•
Check if the video source’s timing is supported by the device. The ST-WLHDMI-30M
supports up to 1080i @ 60Hz and 1080p @ 24/30Hz. Make sure the video source is
sending acceptable timing to the extender and display. Also make sure the display can
accept that timing.
•
Check if both the video source and display are HDCP/CEC compliant.
•
Check if display mode is properly selected.
•
Check if both the video source and display cables are securely connected
After powering on Local Unit
and Remote Unit, the Link
LED is flashing rapidly / slowly
without image.
The Link LED is illuminating
consistently without image display
or unexpected image display.
Input LED will not illuminate
When linking the first time, the input LED will not illuminate unless the display is connected
and powered ON. Make sure the display is connected and powered.
Local Unit and Remote Unit have
different colors on their Power
LED
Local Unit and Remote Unit are in different operating modes. Green indicates Unicast
Mode, Red indicates Broadcast Mode. Press the ID button of the unit that is set for the
wrong mode for 15 seconds to change it to the desired mode.
7
VPI WIRELESS HDMI EXTENDER
WARRANTY INFORMATION
The warranty period on this product (parts and labor) is one (1) year from the date of purchase. Please contact Video Products
Incorporated at (800) 626-7801 (800-RGB-TECH) or (330) 562-2622 or visit our website at http://www.vpi.us for information
regarding repairs and/or returns. A return authorization number is required for all repairs/returns.
PRODUCT
SERIAL NO.:
DATE:
INSPECTED BY:
MAN007
8
Rev. 10/28/09