1
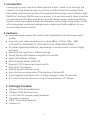
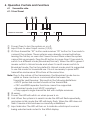
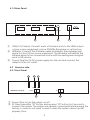
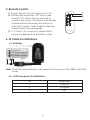
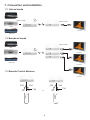
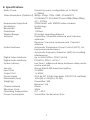
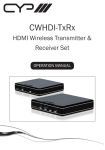
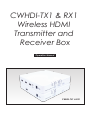
CWHDI-TX1 & RX1
Wireless HDMI
Transmitter and
Receiver Box
Operation Manual
CWHDI-TX1 & RX1
TABLE OF CONTENTS
1. Introduction................................................................................ 1
2. Features...................................................................................... 1
3. Package Contents.................................................................... 1
4. Operation Controls and Functions.......................................... 2
4.1
Transmitter side................................................................. 2
4.1.1 Front Panel...................................................................... 2
4.1.2 Rear Panel....................................................................... 3
4.2
Receiver side.................................................................... 3
4.2.1 Front Panel..................................................................... 3
4.2.2 Rear Panel...................................................................... 4
5. Remote Control......................................................................... 5
6. IR Cable Pin Definitions............................................................ 5
6.1 IR Blaster............................................................................... 5
6.2 3.5Ø Connectors Pin Defi nitions....................................... 5
7. Connection and Installation.................................................... 6
7.1 Unicast mode...................................................................... 6
7.2 Broadcast mode................................................................. 6
7.3 Remote Control distance.................................................. 6
8. Specifications............................................................................ 7
9. Troubleshooting......................................................................... 8
1. Introduction
Looking for a way to send an HDMI signal but don’t want to go through the
hassle of routing wires through your home or office? Well the wireless HDMI
transmitter and receiver boxes with baseband technology and a Wireless High
Definition Interface (WHDI) are your answer to a wire free world. Able to deliver
uncompressed HD video and audio up to 20 meters away, while maintaining
superb, wired-equivalent quality and reliability without lag, these boxes come
with embedded antennas making them a sleek and stylish addition to your
Home Entertainment System.
2. Features
●
●
●
●
●
●
●
●
●
●
●
●
●
Uncompressed wireless HD audio/video transmission at wired-equivalent
quality.
Supports most video resolutions including 480i/p, 576i/p, 720p, 1080i
VGA@60/72, SVGA@60/72, XGA@60/70 and 1080p(24fps/30fps).
20 meter operating distance, depending on environment, no line of sight
required.
Real time link, less than 1 millisecond lag.
Strong 256-bit AEC based encryption for security.
Video Data Rates 1.5Gbps.
5GHz licensed band, MIMO RF.
Supports CEC bypass and input switch.
Fully HDCP Compliant.
Unicast and Broadcast mode.
Auto shut down when one of the devices is turned off.
Instant signal transmission with a timing change under 10 seconds.
A Control Channel allows two-way communications at 10Kbps.
3. Package Contents
●
●
●
●
●
●
Wireless HDMI Transmitter box
Wireless HDMI Receiver box
2 x 5V/2.6A DC power supply adaptors
Operation Manual
CR-67 Transmitter Remote
Holders x 2
1
4. Operation Controls and Functions
4.1 Transmitter side
4.1.1 Front Panel
4
5
6
Power Link
CWHDI-TX1 Transmitter
Power
7
HDMI1 HDMI2 HDMI3
Input
1
ID
2
3
① Power: Press to turn the system on or off.
② Input: Press to select input source (1/2/3).
③ ID: Press transmitter “ID” button and receiver “ID” button for 2 seconds to
connect the systems. These systems were already connected before
leaving the factory so users don't need to reset them unless the system
cannot link up properly. Press the ID button for more than 10 seconds to
switch to a different mode (Broadcast/Unicast). When the LED is green it
means switch to Unicast mode and when it is red it means switch to
Broadcast mode. The factory default is Unicast mode and it is suggested
to use this mode for household use. It is not necessary to press both
transmitter and receiver ID buttons at the same time.
Note: Due to the nature of the transmission, the Broadcast mode has no
uplink so there can be no communication between the
Transmitter and Receiver. This results in the following limitations:
• HDCP protected content should not be transmitted.
• CEC and EDID repeater functions cannot be supported.
• Broadcast mode is not HDCP compliant.
• Only supports single transmitter link with multiple receivers.
④ IR sensor.
⑤ Power: The LED will switch on when power is on.
⑥ Link: When the system is in search mode the LED will flash repeatedly,
and when in link mode the LED will slowly flash. When the LED does not
flash it means a link has been successfully established.
⑦ Input indicator: The LED will turn on to indicate which input source is
being selected and routed to the HDMI display.
2
4.1.2 Rear Panel
HDMI IN3
HDMI IN1
HDMI IN2
DC 5V
IR
BLASTER
1
①
②
③
2
3
HDMI 1/2/3 Inputs: Connect each of the input ports to the HDMI output
of your source equipment such as DVD/Blu-Ray player or set-top-box.
IR Blaster: Connect the IR blaster cable included in the package and
place it in front of the source equipment. The IR blaster will transmit the
infrared signal to the connected source with the existing remote signal
send to this device.
Power: Plug the 5V DC power supply into this unit and connect the
adaptor to an AC outlet.
4.2 Receiver side
4.2.1 Front Panel
3
IR
CWHDI-RX1 Receiver
4
5
Power Link
Power
ID
1
2
① Power: Press to turn the system on/off.
② ID: Press transmitter “ID” button and receiver “ID” button for 2 second to
connect the system. The system was already connected before leaving the
factory, so users do not need to reset it unless the system cannot up link
properly. Press
3
the ID button for more than 10 seconds to switch to a different mode
(Broadcast/Unicast). When the LED is green it means switch to Unicast mode
and when it is Red, it means switch to Broadcast Mode. The factory default is
Unicast mode and it is suggested to use this mode for household use. It is not
necessary to press both the transmitter and receiver's ID buttons at the same
time.
③ IR sensor.
④ Power: The LED will switch on when power is ON.
⑤ Link: When the system is in search mode the LED will flash repeatedly, and
when in link mode the LED will slowly flash. When the LED does not flash it
means a link has been successfully established.
4.2.2 Rear Panel
DC 5V
HDMI OUT
1
2
① HDMI output: Connect the HDMI output to the HDMI input of your display
using an HDMI cable.
② HDMI output: Connect the HDMI output to the HDMI input of your display
using an HDMI cable.
4
5. Remote Control
①. Power: Press to turn the device on or off.
②. ID:Press the transmitters “ID” button and
receiver “ID” button for two seconds to
connect the system. This system was already
connected before leaving the factory so
users don't need to reset it again unless the
system cannot link up properly.
③. 1~3: Press 1-3 to have your desired input
source be displayed on the HDMI output.
POWER
ID
INPUT
1
2
①
②
③
3
Transmitter CR-67
6. IR Cable Pin Definitions
6.1 IR Blaster
Power 5V
IR blaster signal
IR blaster signal
Note: The IR Receiver & Blaster can support a frequency of 36~38KHz with NEC
Code.
6.2. 3.5Ø Connectors Pin Definitions
Pin
Assignment
1
Power 5V
2
IR Signal
3
NC
5
7. Connection and Installation
7.1 Unicast mode
HDMI Cable
HDMI Cable
HDMI
HDMI
PS3
DVD
LCD TV
Blu-Ray
7.2 Broadcast mode
HDMI Cable
HDMI
LCD TV
HDMI
HDMI
PS3
HDMI
HDMI
DVD
Blu-Ray
LCD TV
HDMI
7.3 Remote Control distance
LCD TV
3M
3M
3M
30˚
30˚
POWER
7M
3M
30
Or
ID
30˚
POWER
INPUT
INPUT
1
1
2
2
3
3
Transmitter CR-67
ID
Transmitter CR-67
6
7M
8. Specifications
Transmit power is configurable up to 60mW
(+17dBm)
Video Resolutions (Partial List) 480i/p, 576i/p, 720p, 1080i, VGA@60/72,
SVGA@60/72, XGA@60/70 and 1080p(24fps/30fps)
4.9 ~ 5.9GHz
OFDM MIMO with WHDITH video-modem
Frequencies Supported
Technology
Modulation
20MHz
Bandwidth
1.5Gbps
Data Rates
20 meters operating distance
Wireless Range
Transmitter: 4 transmit antennas and 2 receive
Antenna
antennas
Receiver: 5 receiver antennas and 1 transmit
antenna
Automatic Transmission Power Control (ATPC)- for
System Features
best power performance
Automatic Frequency Selection (AFS)-For avoiding
interferences
Digital Video Interface
Up to 24 bit RGB or YCbCr (4:4:4)
Digital Audio Interface
PCM2CH, DTS5.1, AC3 5.1
Less than 1 millisecond delay between video/audio
System Latency
source and sink
Strong 256 bit AES-based encryption
Security
3 x HDMI
Input Ports
1 x HDMI
Output Port
5V/2.6A DC (US/EU standards, CE/FCC/UL certified)
Power Supply
162.6(W) x 164.5(D) x 33.5(H)
Dimensions (mm)
Transmitter: 348
Weight(g)
Receiver: 316
Plastic
Chassis Material
White
Silkscreen Color
0°C ~ 40°C
Operating Temperature
Transmitter: 8w Receiver: 8.5w
Power Consumption
Radio Power
7
9. Troubleshooting
Situation
Check Point
1. Check if the right adaptor is used (5V 2.6A adaptor).
Power LED does not turn 2. Make sure all power connectors are correctly
on when power is on.
plugged in.
3. Push the power button to turn on the device.
1. This is normal if the devices are connecting or in
search mode, the LED will slowly turn on when it is
doing signal linking, after that is done and when the
signal is transmitted and received the LED will be
After powering on
consistent.
Tx & Rx the Link’s LED
2. If the LED keeps on flashing for more than 3 minutes,
is flashing repeatedly/
then repair the devices by pushing the ID keys for 2
seconds.
slowly without an image.
3. If the LED is still flashing slowly for more than 3
minutes, then make the input selection of the
Transmitter is correct.
The Link’s LED is
constantly on without
an image being
displayed or an
unexpected image is
displayed.
1. Check if the source’s timing is supported by the
device. The device supports up to 1080i so please
make sure the source is sending an acceptable
timing for the device and display and that the
display can also accept that timing.
2. Check if both source and the display are HDCP/CEC
compliant.
3. Check if TV mode is selected instead of HDMI mode.
4. Check if both source and display are connected.
Input’s LED does not
turn on.
1. When linking for the first time, if the output display
does not link up, the input LED will not switch on, so
please check if the HDMI output is connected.
Power LED is a different
color.
1. A red Power LED means Broadcast mode and green
Power LED means Unicast mode. If Tx has a Green
LED but Rx has a red LED, press the Rx's ID for 10
seconds to change it to Unicast mode. But when
Broadcast mode is demanded press Tx's ID key for 10
seconds to switch to Broadcast mode.
8
9
CYPRESS TECHNOLOGY CO., LTD.
Home page: http://www.cypress.com.tw
20090629 MPM-CWHDI-TX1 & RX1