1
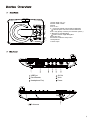
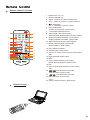
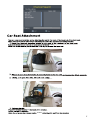
1.
2.
3.
4.
5.
6.
7.
4.
8.
9.
10.
11.
1.Switch DVD / AV / TV
2.Switch USB / CARD
3.Setup
4.Vol +/ Vol –
5. : Previous Chapter / Next Channel Selection
: Next Chapter / Previous Channel Selection
6.OK : Play (DVD) / Confirm your selection (ATSC )
7. : Rewind / Left Navigation
: Fast Forward / Right Navigation
8.Stop disc play
9.Accesses / Exits the setup menu
10.Play/Pause
11.Push Open
USB Port
Card Reader
AV Out
AV In
Headphone Port
Power
Antenna
Remote Control Functions
1.
2.
3.
4.
5.
1
16
17
2
18
3
4
5
6
7
4
8
9
10
11
12
13
14
15
5
7
19
20
21
22
23
Switch DVD / TV / AV
Numeric Keypad 0-9
Setup : accesses or exits the setup menu
CH+/- : switch to the next / previous channel
/ : Navigation
Vol -/+ : decrease / increase volume
6. Play ( DVD mode)
Confirm your selection ( ATSC mode)
7. To navigate inside the menus.
8. Switch USB / Card ( DVD mode)
Switch between Digital Radio and ATSC modes.
9. Display program information ( ATSC mode)
Display playback information ( DVD mode)
10. Switch languages that the disc supports
11. Switch OSD languages ( DVD mode)
Closed Caption ( ATSC mode)
12. Play / Pause/ Timeshift
13. Stop disc play ( DVD mode)
14. Zoom in or out the current picture ( DVD mode)
REC
15. Repeat Chapter (DVD mode)
16. Mute
17. Copy / Delete the files ( DVD mode)
Recall channel playback ( ATSC mode)
18. Exit
19. FAV: Setup favorite programs ( ATSC mode)
Title
20.
: Skip Backward / Forward
/
Program Guide ( ATSC mode)
21.
: Fast Backward / Forward
/
22. Menu playback ( DVD mode)
Timer
23. GOTO: Search progress ( DVD mode)
Remote Control
Remove the plastic cover
Turn on the power
etc.
or
player then press ENTER.
AV input/output
VCD, DVD play/VCR
Yellow Red white
AV connect
Ye llo w Re d wh it e
Notice: Please turn off all devices before connection.
As shown in the picture, use the A/V cable to connect the portable TV player with
other devices.
Switch the portable TV player to AV mode.
DVD Setup
The setup menu consists of four sub-menus, General Setup, Audio Setup, Video Setup,
and Preference Setup.
Digital TV Setup
If you are using the unit for the first time or have restored the unit to factory default, the installation
guide menu will appear on your TV screen.
USA
(1) [OSD Language] press RIGHT/LEFT key to select a language.
(2) [Country] press RIGHT/LEFT key to select your country of residence.
(3) [Channel Search] press RIGHT or OK key to begin Automatic channel search.
(4) Once channel tuning is complete, you can start watching TV programs.
supplied 9-12 volts AC adapter to the player and to the power outlet.
The charge indicator turns red while charging, the charge indicator turns off when the
battery is fully charged.The
usage
Power outlet
Car Adapter
car
Caution! Do not use any other cords but the one supplied with your product.
Voltage before connecting. Be sure to u
the
this range
Car Adapter
Rechargeable Internal Battery
Operating instructions: The internal battery automatically charges when the device is connected to the AC adapter
through a main power outlet. The internal rechargeable battery lasts up to 2.5 hours while fully charged.
Warning: To prevent fire or shock hazard, do not expose the device to water, rain, or moisture.
Never expose battery pack to temperature above 140 °F.
Do not disassemble
Do not incinerate
back
To access the menu, press MENU and select [Search Channel] using the RIGHT/LEFT keys.
This menu provides options to adjust the search channel settings.
Press UP/DOWN to select an option and press RIGHT/LEFT to adjust the setting .
Press EXIT to exit the menu.
USA
Singnal Type
Air
Auto Search will automatically search for channels and save them once the scanning is complete.
All previously saved channels and settings will be deleted.
(1) Select [Auto Search] and press OK or RIGHT to start channel search.
(2) To cancel channel search, press EXIT. Any channels that have been found will be saved.
1 inch.
on
unless