1
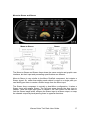
Waves Guitar Tool Rack
Designed in association with Paul Reed Smith™ Guitars
THANK YOU!
Thank you for purchasing the Waves GTR™ system. We hope that you
thoroughly enjoy the creativity and convenience that this can bring to your music.
Please read through the information below and begin working with your new
GTR™ system. If you have any questions or comments, please feel free to
contact Waves Tech Support. We’d love to hear from you! www.waves.com
Waves Guitar Tool Rack User Guide.
1
Introduction
The Waves Guitar Tool Rack is a software and hardware package that achieves
real professional guitar sounds in the virtual world. It offers a comprehensive
selection of guitar amp sounds, a complete set of guitar Stomp effects, a
precision tuner and the hardware WPGI (Waves/Paul Reed Smith Guitar
Interface).
The Waves GTR™ is similar to a typical suite of guitar gear, designed with both
the guitar player and DAW (Digital Audio Workstation) user in mind. The Waves
GTR™ system requires a supported Digital Audio Workstation host application
and some basic knowledge of its operation.
As always, sound quality is our foremost priority. This software was designed to
be used in professional sessions in place of hardware amplifiers and effects. This
doesn’t mean abandoning your usual recording practices, but instead, expanding
your options.
Using the WPGI, you can record both the signal playing through a hardware amp
and a high quality direct signal to another track for further processing. This way,
limitations in the recorded sound won’t make you lose a great take.
Another advantage is that the GTR™ system requires little or no maintenance to
deliver peak performance, while it puts the professionalism and experience of
leading guitar sound technicians at your fingertips.
Product Overview
The WPGI is a hardware unit that sends an optimized guitar signal to your DAW.
We highly recommend using the WPGI when recording your guitar direct into
your DAW.
The Waves GTR™ system includes a collection of 23 virtual Stomp boxes, 3
different sized virtual PedalBoards, a Tuner and the Waves Amp. These software
plug-ins were engineered to work with the host application of your choice.
The Waves Stomp software offers a selection of effects ranging from basics like
EQ, compressor and gate to modulation effects such as phaser, flanger, chorus,
and wah wah. Delays, reverbs and a collection of distortion effects are also
included. These Stomp effects are chained by the Stomp PedalBoard. MIDI
control is easily mastered by using the MIDI learn function.
Waves Guitar Tool Rack User Guide.
2
For best results: Use the Stomps together with the Waves Amp!!!
The Waves Amp gives you access to a series of premium high-end virtual guitar
amplifiers ranging from clean vintage tube amps to modern hard rocking amp
sounds. They sound as if they have been recorded with your choice of high end
and popular microphones and mic placements. As with any plug-in, you can use
as many instances of these effects as your workstation can handle.
The software is equipped with a comprehensive set of factory presets that help
you get started with great sounding effect chains and amp tones. These presets
are easily adjustable.
Live Input and Latency
Latency is the slight delay you hear between the time that you play your guitar
and that you hear the processed sound coming from your computer. This is not
an issue when you are mixing but can be annoying when you are playing.
While ProTools TDM has no noticeable latency, Native based systems do
have some latency.
It is important to understand that this latency is not caused by the GTR™
software but by the architecture of your DAW. In some cases DAWs can
eliminate latency by direct hardware monitoring of live input. While this method is
effective, it eliminates or bypasses any effects inserted in that track.
If you are experiencing latency, try lowering the buffer size in your host
application. A strong computer with a good soundcard and the appropriate
drivers will generally get low latency. For live playing you will need to achieve the
lowest possible latency; in contemporary systems, this should be less then 10
milliseconds and can potentially reach as low as 6 ms or even 4 ms. TDM
systems function without noticeable latency.
Quick Start
With the Waves GTR you can do virtually anything you could do with a real set of
guitar effects and amps. The better you can operate your DAW, the more options
you have for creating amazing virtual process setups. However, in order to get
great professional guitar tone all you need is the very basics.
For a good starting point it is recommended to open a Stomp6 PedalBoard as the
first insert of your guitar input track. Following the Stomp6, launch a Stereo Amp
and following the amp launch a stereo Stomp2 for post amp effects.
On the Stomp6 you can select you own custom choice of effects or go to the load
button and select a factory preset such as the first preset in the first group –
ReadyToRock. The Amp defaults are a great starting point and in the post amp
Waves Guitar Tool Rack User Guide.
3
Stomp2 go to the factory presets under the load menu and select the first preset
from the PostAmps group called – AmpComplement.
Now you have a perfectly playable setup and you can use your skill and
inspiration to experiment from here on as you like.
Useful Tips
ORDER OF PROCESSORS AND EFFECTS
Typical electric guitar sound setups usually include different types of effects such
as Dynamics, EQ, Modulation effects, Distortions or Non Linear Amplification and
Delays, Reverbs or other dimension enhancers. In the following section we will
discuss the recommended order of the process chains initially in a concise
fashion without going to the depth and reasoning of each recommendation.
Please note that a lot of what’s documented in this section is based on
experience and perception and is arguable although it will be concurrent with
what most professionals in guitar and recording business would say.
Pre Amplifier effects – e.g. A typical stomp effects Pedalboard that the guitar is
connected to its input and its output connects to the Guitar Amp.
Effects that fit this type naturally are – Gates, Compressors, EQ’s, Distortions,
Modulation effects are very good effects to insert before a fairly clean amp.
Manual WahWah effects are great in many places in the chain and inserting
them after the distortion effects is recommended in order to get the most wah.
However, auto filter and wah effects follow the signal dynamics which is
destroyed by distortion effects so an auto wah may work best before the
distortion effects.
Reverb and Delay effects will work differently when placed before vs. after the
guitar amplifier. When working with a mostly clean amp placing delays after the
Gates Compressors and Distortions and before the amp will sound great and will
receive the warmth and character of the guitar amp.
Reverb can also sound great through a clean guitar amp and if you are looking to
enhance the wash and surf of the reverb effect then trying it before the amp is a
must. For a natural room reverb sound, place the reverb in different place.
Guitar Amplifier – either a combo or head and cabinet. Many times amps have
an FX loop insert between the preamp and power amp stages. This insert point is
more commonly used in live performance and for the most part it is similar to
Post Amplifier effects, thus the GTR does not provide any effects processing
within the Amplifier.
Post Amplifier effects – e.g. a set of audio processors inserted on the channel
that captures the guitar signal from a microphone recording the amp cabinet.
Vibrato and dimension enhancers such as Reverb and Delay/Echo are common
post amp effects where the delay and echo are set as insert effects so that they
Waves Guitar Tool Rack User Guide.
4
are added to the input signal. This corresponds with the mix settings of 0 – 50 on
the GTR™ dimension stomp effects.
Auxiliary Send effects – These effects are inserted on an auxiliary bus and
usually output just the effect rather then a mix of the effect over the direct signal.
Here you can insert any effect that can have an effect only output such as a
100% wet Reverb, Delay, Doubler. This corresponds to using these GTR™
stomps at a mix value of 100. Using GTR you can use a Stomp2 Stereo plug-in
on your aux send insert and place a reverb and an EQ to tone shape the reverb
sound or use a compressor before the reverb to make the dynamics of the
Reverb input non linear to the affected signal. You can use multiple auxiliary
channels e.g. Aux1=Delay+EQ, Aux2=Comp+Reverb. And send from more then
one. It is important to have the mix of the reverb or delay on 100 or fully wet.
In Guitar recording tradition the basic setup is usually comprised of a set of
stomp effects that are connected to the guitar amp. In many cases the guitar amp
can provide some of its own effects such as a Spring Reverb, Vibrato (Tremolo is
actually the correct term for this type of amplitude modulation) and in some cases
chorus and naturally distortion.
There’s no absolute rule of thumb as to what the order of the effects has to be
but there are some useful guidelines that can help getting good results.
One of the important considerations is the type of Amp you use. A fairly clean
amp will work great with a full preceding set of stomps, however a distorted high
gain amp will many times work best on the direct guitar signal and most of the
effects processing is better done after the amp. In real high gain amplifiers
there’s many times an FX loop insert between the Preamp (that introduces most
of the distortion) and the Power amp. In the studio, it is common to use an
amplifier as it is to get good basic tone and then add any further effects at the
desk.
MULTIPLE PARALLEL AMPLIFIERS
Some of the most renowned guitar hero’s produced their huge sound by using
multiple amplifiers both on stage and in the studio. While the Waves GTR
software offers a choice of 2 cabinets and microphones in each amp, even
greater, thicker and bigger sound can be obtained by using multiple amplifiers
with different settings from slightly different drive and tone settings to simply
different amp types and different cabinets/microphones.
Important! Instantiating multiple amplifiers in series will not result in this
magnitude enhancement. Achieving parallel amplifiers means splitting the input
signal by clever usage of your DAW Routing, or simple replication of the direct
guitar track and opening separate Amp instances on each track.
Waves Guitar Tool Rack User Guide.
5
SETTING UP GTR™ FOR STEINBERG - NUENDO OR CUBASE
When using Cubase or NUENDO for playing live through the GTR software, all
you need to do is –
1. Open a track that takes input from the physical input that the WPGI –
Waves PRS Guitar Interface is connected to.
2. Launch the plug-ins that you would like to play through.
3. Press the little speaker icon on that track.
This will pass the input to your monitoring system and you should be able to hear
your live input guitar playing through your monitoring system in real time. Any
added plug-ins on the track’s inserts should also be affecting the live input in real
time.
Minimize Latency and Eliminate direct monitoring
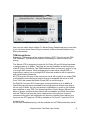
From the Cubase Devices menu select the bottom most item – Device Setup.
It is important to check the Device Setup panel and make sure that the VST
Audiobay is set to optimal buffer settings and does not have Direct Monitoring
checked because this will bypass any plug-ins on the track and the sound will be
direct only.
Click the VST Audiobay page and look for the Direct Monitoring checkbox.
If the Direct Monitoring checkbox is checked, uncheck it.
Check that the input and output latency are less or equal about 10ms. If the
indicated latency is more, then you should reduce the buffer size for your ASIO
device by selecting it, launching its device control panel and reducing buffer size
to 128 or as your device and computer CPU will allow. Note that smaller buffers
allow lower latency but add load on the CPU so when you are not recording and
latency is no longer a problem, it may be a good idea to increase the buffer size
settings for better CPU performance.
Track Routing and Channel configurations
In Nuendo and Cubase the track routing path is output oriented. So if your output
is Stereo you need to use a Stereo Track. While a guitar requires a mono input,
in many cases you would want to open mono to stereo and stereo effects.
However, it is possible to do the wrong thing and open stereo or mono to stereo
plug-ins on mono track. The results will be wrong and wont sound as they
should. Read on in order to understand how to make the routing work.
When working in Cubase or NUENDO mono plug-ins go on mono tracks; stereo
plug-ins go on stereo tracks;
Mono to Stereo plug-ins go on a stereo track w/ mono input, this is a common
and useful configuration for a Guitar input.
For Mono To Stereo Plug-ins in Nuendo/Cubase
-Open a stereo track
-Click on the little speaker icon for input monitoring. Or record or place your
mono audio file on the track
Waves Guitar Tool Rack User Guide.
6
-Open the Channel Settings window by clicking the "e" symbol.
-On the Audio Channel Settings window, go to the inserts column and switch the
view to routing.
-Cancel the right bypass input by double clicking the grey area on the insert point
in the VST Audio channel settings window on the selected slot. This will open the
Routing Editor Slot.
-In the Routing Editor Slot, click the line on the right channel to "disconnect" it.
Waves Guitar Tool Rack User Guide.
7
Now you can safely insert a Mono To Stereo Stomp Pedalboard plug-in and after
it you can insert more Stereo Plug-Ins such as a Stereo WavesAmp and more
Effects as needed.
TDM USAGE NOTES
Digidesign TDM systems allow using the Waves GTR™ Plug-Ins on the TDM
DSP hardware. This allows zero latency functionality for both live input and
mixing.
The Waves GTR is designed to work with ProTools HD and HD Accel hardware
in sample rates up to 96kHz. The Plug-Ins are also available as native plug-ins
under RTAS or AudioSuite. The TDM hardware allows running any plug-in on up
to a single DSP element. While multiple plug-ins can share a single DSP, a
single plug-in cannot run on multiple DSP’s and this creates a set of constrains
and some inherent limitations.
All GTR plug-ins will show in the menus but not all will be able to run under TDM
in all situations and selecting a plug-ins that is incompatible will result in DAE
Error 7004. this means that there no free DSP to run this plug-in.
On Digi HD Core and HD Process types running sessions at up to 48kHz all
Waves Stomp plug-ins are available and running however Waves Amp plug-in
will run only in Mono, but you can launch it in MultiMono in order to get a stereo
amp substitute in true TDM. The WavesAmp Mono Dual Cabinet, Waves Amp
Mono to Stereo and Waves Amp Stereo will be available as HTDM, this means
that the TDM bus will host the native code portion of the plug-ins, however
convenient this option will introduce a fair amount of latency when playing live
input into the GTR plug-ins. HTDM is available in ProTools 6.7 and up to 6.9.2.
At 96kHz only
the Stomp2 PedalBoard plug-in will be available for full TDM functionality and all
Waves Guitar Tool Rack User Guide.
8
the other bundle components will be available as HTDM or native RTAS or
AudioSuite plug-ins.
On Digi HD Accel process cards working in sample rates up to 48kHz will allow
running all bundle components. In 96kHz the only amp available will be the
Waves Amp mono, but you can launch it in MultiMono in order to get a stereo
amp substitute in true TDM. The WavesAmp Mono Dual Cabinet, Waves Amp
Mono to Stereo and Waves Amp Stereo will be available as HTDM, this means
that the TDM bus will host the native code portion of the plug-ins, however
convenient this option will introduce a fair amount of latency when playing live
input into the GTR plug-ins. HTDM is available in ProTools 6.7 and up to 6.9.2.
Stomp PedalBoard effect chainers are also limited by the TDM DSP hardware in
the amount of Stomp plug-ins that can be loaded into a single Stomp plug-in
instance. Thus when you launch a Stomp PedalBoard and begin to insert stomp
plug-ins you will see all Stomp plug-ins in the Stomp selection pop up menu’s,
however as DSP resources begin to be consumed the list will begin to have
certain stomps show as grayed out and unavailable. This means that there’s not
enough DSP left to run these stomps. Other stomps may get an asterisk sign “*”
next to their name. This means that inserting this stomp requires reshuffling or
reloading the DSP in order to fit this stomp. It will load very well but the load
operation will take a little longer then loading stomps that do not show the
asterisk.
Some of the Stomp PedalBoard factory presets include combinations that may
be too heavy to be fully loaded in some conditions. In this case the plug-ins that
cannot load will load blank with a message stating which Stomp is missing. In
this case you can hot-switch to a native version and the full chain with its full
settings will be launched into the new native (or HTDM) component plug-in.
Waves Guitar Tool Rack User Guide.
9
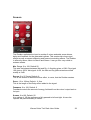
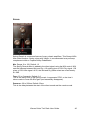
Waves Amp
Introduction and overview
The Waves Amp is an essential part of the Waves Guitar Tool Rack. It offers
different guitar amplifier types that play through mic’d speaker cabinets.
The Waves Amp plug-in is generally intended to be used for electric guitar.
However, the Amp plug-in is also useful for re-amping drum or vocal tracks. Bass
can also sound great through some of these settings.
The Waves Amp plug-in comes in Mono, Mono Dual Cabinet, Mono-to-Stereo,
and Stereo channel configurations. The Mono Dual Cab, Mono-to-Stereo, and
Stereo components each offer one amp type with two cabinet filters. In the Monoto-Stereo and Stereo plug-ins, the output of each cabinet can be panned
independently.
Each amp has two main sections:
•
Amp Type – This section lets you select the Amp head model. It also
includes a set of tone controls that are specifically tuned for each Amp
Type.
•
Cabinet & Mic – This section lets you choose the amp cabinet type,
microphone type and mic position (On Axis or Off Axis).
Waves Guitar Tool Rack User Guide.
10
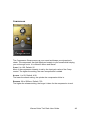
A Quick Start
As soon as you bring the Waves Amp up on your track insert, the amp is ready to
go. The default Amp Type is a Clean amplifier that recreates the behavior of a
vintage tube amp built circa 1959. It simulates playing through an open back
speaker cabinet equipped with four 10” Alnico magnet speakers. It is an
appropriate setup for any Stomp PedalBoard and its chain of effects. The Drive
control lets you crank up the gain for more intensity without changing your output
volume.
With a clean input, this amp can be driven into light distortion by turning up the
drive knob or by feeding it with the signal from a hot active pickup.
For a more distorted tone, click the Amp Type pop-up menu and select the type
of drive. The Amp Type models are sorted in an escalating gain order.
After you’ve selected your amplifier, open up a post amp PedalBoard. Reverb,
Vibrolo, Delay, EQ and Compression are all suitable post amp effects.
One example for a full setup would be a Stomp 6 Mono-to-Stereo PedalBoard
with its default preset, followed by a Stereo Waves Amp, followed by a Stomp 2
Stereo PedalBoard with a Vibrolo Stomp and a Spring Reverb Stomp.
With just this in mind you should be able to do wonders with the Waves GTR™
system. For more detailed information, please read on in this manual.
Waves Guitar Tool Rack User Guide.
11
Amps and Cabinets
AMP TYPES
The Amp Types offered are inspired by famous, rare and vintage guitar
amplifiers.
The Amp Types selector allows you to select the amp model. The types are
categorized by sound and increasing levels of Drive. They offer a limited range of
gain adjustment using the Drive control. Each Amp Type loads with presets for
cabinet, microphone, and mic placement settings. The Drive stages are
normalized to maintain relative loudness.
Here are some short descriptions of the Amp Types:
Direct – The Direct Amp is the cleanest model, producing a full-frequency tone
with light EQ and a hint of dynamics processing. Since this Amp Type loads
without a cabinet or microphone, you can choose the cabinet that best serves
your needs.
Clean – The Clean amp recreates the behavior of a vintage tube amplifier built
circa 1959. It has a smooth, warm sound that moves from transparent and
sparkling to a delicate distortion. By default, this amp launches with an open back
cabinet equipped with 4 Alnico magnet 10” speakers.
Edgy –The Edgy amp recreates the behavior of a 60’s-era tube amplifier and
ranges from cool and clear to a thunderous crunch. Its default setup is an open
back cabinet with two 12” thirty-watt speakers. It delivers a generous dynamic
response curve depending on the touch of the individual player.
Drive – is the go-to amp for a bluesy growl and saturated sounds. It will sound
almost clean at low drive settings. The default cabinet is an open back with four
10” speakers.
Crunch – The Crunch Amp Crunch is tailor-made for lead lines and heavy
sustained walls of grunge. Many prominent guitarists have used high gain tube
amp circuits such as the one that inspired this tone. The definition, resolution and
detail maintain clarity for each separate string. While additional odd harmonics
creep in with higher drive settings, lowering the drive will never quite deliver a
“clean” sound. The default cabinet is a closed back ¼ stack with two 12”
speakers. For a beefier tone, try the classic ½ stack with four 12” speakers.
Waves Guitar Tool Rack User Guide.
12
Hot – Hot produces passionate high gain sounds, perfect for power chords and
stinging solos. Boutique and modern tube amp lead channels were the role
models here. Its default cabinet is the closed back cabinet with two 12” speakers.
Since the Hot amp has a very high gain input, single coil pickup inputs are prone
to noise disturbance (just as with real amplifiers). When playing with a single coil
pickup, here’s what we suggest: Set your pickup selector to an out of phase
position and find the least inductive playing position (usually away from the
computer screen!)
Modern – Modern Lead is dedicated to cutting-edge, high-gain solo tones as well
as drop-tuned power chords. It opens with a standard cabinet fitted with four 12”
speakers. The tone controls for this model allow for extreme mid cutting
(scooping) and bass boosting.
Amp Controls
Each amp head features the following controls:
DRIVE: 0 to 10; Default: 5
This represents a range of +12dB to -12dBfs with a Default of 0dB.
BASS: 0 to 10; Default: 5
This is a low frequency EQ boost or cut knob; 5 = flat, 0 = minimum, 10 =
maximum.
MID: 0 to 10; Default: 5
This is a Mid Frequency EQ boost or cut knob. 5 = flat, 0 = minimum, 10 =
maximum.
TREBLE: 0 to 10; Default: 5
Treble is a High Frequency EQ boost or cut knob. 5 = flat, 0 = minimum, 10 =
maximum.
PRESENCE: 0 to 10; Default: 5
This is a High Frequency EQ boost or cut knob. 5 = flat, 0 = minimum, 10 =
maximum.
The response curve of the Tone controls changes with each Amp Type to
provide a custom tuned complement to the Amp tone.
Waves Guitar Tool Rack User Guide.
13
AMP: On/Bypass, default – On.
This control allows bypassing or activating the Amp. If set on Bypass, it will
bypass the Amp part only and play directly through the cabinet and mic. To
bypass the cabinet, select No Cabinet in the cabinet selector control. For full
bypass use the plug-in bypass provided by the host application.
TYPE: DIRECT/CLEAN/EDGY/DRIVE/CRUNCH/HOT/MODERN; Default – Clean.
Use the Amp Type Selector to choose the amp sound. Clicking on the Amp Type
selector will toggle it to the next Amp Type. Clicking the arrow to the right will
unfold all types in a drop down menu for instant selection of the Type you like.
When selecting an Amp Type the tones will flatten and the cabinet and mic
selectors will assume the Amp defaults. From here you can select different
options and save your custom presets into the Amp’s Load menu or to files.
In all channel configurations, you must choose one amp model. This will feed one
Amp Cabinet in Mono, or two cabinets and microphone models in Mono
DualCab, Mono-to-Stereo and Stereo to Stereo.
CABINETS AND MICROPHONES
CABINET AND MICROPHONE SELECTORS
Select your cabinet and microphone using the appropriate pop-up menu selector.
These selectors will toggle when clicking on the text bar and clicking on the arrow
to the right will unfold a drop down menu with all available choices for quick
selection.
Each cabinet offers a choice of 6 microphones. They can be positioned either on
or off axis.
You may also choose “No Cabinet” (which also uses no microphone). This is
essentially a bypassed cabinet. While listening to a cranked amp without a
speaker cabinet is not very sonically pleasing, the option is available and is the
default choice for the Direct Amp.
Waves Guitar Tool Rack User Guide.
14
All cabinets were close mic’d in order to raise the quality and accuracy of the
cabinet filters, and to reduce simulated distance and room effects. We
recommend using the best Room Reverb possible (such as Waves IR-1 or the
included Reverb Stomp) in the Aux Send setup.
VOL: 0 to 10; Default 5. There is one Volume control for each Cab/Mic located
below their selector control.
PAN: In Mono-to-Stereo or Stereo amps, each cabinet will have a Pan knob for
panning left and right.
PHASE: In dual cabinet configurations, each Cabinet/Microphone path can be
inverted in phase. The up position indicates natural phase and the bottom is for
inverted phase.
MASTER VOLUME: 0 to 10; Default 5
The Master Volume is the last control in the Amp and is actually an output gain
that doesn’t affect the amps tone. It sets the desired loudness and is used for
output clip protection. The Master volume is located just below the Amp’s output
meter. Look for the Red light clip indicator in the output meter. You will want to
protect your amp from this kind of clipping. (At this stage it is digital clipping and
not the intended saturated amp tone.)
Waves Guitar Tool Rack User Guide.
15
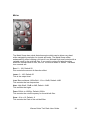
AMP PLUG-IN COMPONENTS
Mono Amp
The Mono Amp is the simplest Amp plug-in component. It inputs and outputs a
Mono signal, running the output through a single Amp module and then into a
single cabinet/microphone filter. The Mono Amp is also the least CPU-intensive
of the Amp components.
Mono DualCab
The Mono DualCab Amp is similar to the Mono amp in that it inputs and outputs
a Mono signal. Additionally, the DualCab configuration lets you play the Amp’s
sound through two separate cabinets. This allows for many combinations, such
as loading the same cabinet with different microphones or using two different
cabinets with the same mic.
The outputs of the two sources are then mixed together to a single output. Each
cabinet has a phase switch and a volume control. Note that selecting the same
cabinet and microphone in both cabinets will result in a normal Mono single
cabinet sound. In this case, inverting the phase to one of the two identical
cabinets will result in a silent output.
Waves Guitar Tool Rack User Guide.
16
Mono-to-Stereo and Stereo
Mono-to-Stereo
Stereo
The Mono-to-Stereo and Stereo Amps share the same controls and graphic user
interface, but their input and processing specifications are different.
Mono-to-Stereo is very similar to the Mono DualCab component, but outputs a
Stereo signal. So, rather than adding each cabinet’s output to a single path you
can flexibly pan them to create a Stereo image from the Mono input.
The Stereo Amp component is actually a dual-Mono configuration. It takes a
Stereo input and outputs Stereo. The left input goes through the Amp type to
cabinet 1 and the Right Input goes to cabinet 2. Its Pan control can be used to
limit the Stereo image width, collapse the Stereo input to a Mono output, or swap
the channel outputs by hard panning them in opposite directions.
Waves Guitar Tool Rack User Guide.
17
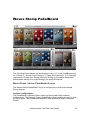
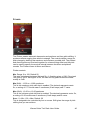
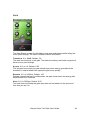
Waves Stomp PedalBoard
The 23 Virtual Stomp Boxes can be launched in any of 3 of the PedalBoard plugIns (“Stomp 2”, “Stomp 4” and “Stomp 6”). These allow chaining 2, 4 or 6 stomps
respectively. Choose your Stomp effects by clicking on the space assignment
button below the slot or by right clicking in an empty Stomp slot.
WAVES STOMP - VIRTUAL PEDALBOARD PLUG-IN
The Waves Stomp PedalBoard Plug-In is a single plug-in that hosts multiple
Stomp plug-ins.
Channel Configurations
The PedalBoard is offered in Mono, Mono-to-Stereo and Stereo channel
configurations. The Stereo to Stereo PedalBoard has an additional control to sum
the input signal. The PedalBoards appear in host application plug-in menus as
follows:
Waves Guitar Tool Rack User Guide.
18
•
•
•
2 Stomp Spaces PedalBoard: Stomp 2 Mono, Stomp 2 m>s (Mono-toStereo) and Stomp 2 Stereo.
4 Stomp Spaces PedalBoard: Stomp 4 Mono, Stomp 4 m>s (Mono-toStereo) and Stomp 4 Stereo.
6 Stomp Spaces PedalBoard: Stomp 6 Mono, Stomp 6 m>s (Mono-toStereo) and Stomp 6 Stereo.
Stomp assignment is flexible, allowing placement of the Stomps in any order.
Multiple instances of the same Stomp can even be chained together. The
selection of Stomps and their settings, including an alternative “B setting” can be
saved to PedalBoard setup files or workstation documents such as sessions,
songs, etc.
PedalBoard Controls
The Stomp PedalBoard has the following automatable controls:
Input gain, Setup A/B, Previous Setup and Next Setup.
The PedalBoard also has output meters and an output clip indicator.
The Stomp menu will show all of the Stomps that are available for inserting;
Stomps that are not available will be grayed out. In Native host applications the
list will consist of all installed Waves GTR™ Stomp Plug-Ins.
The Stomp PedalBoard launches fully loaded with its default setup. Each setup
has two presets (A and B). They consist of the same chain of Stomp effects in
the same order but with different settings. Going back and forth between setup A
and B is instantaneous and will not take much time to load. For example, this lets
you switch between different settings for different sections within the same song.
Drag and Drop your Stomps into any configuration that you like. Try it!
TDM NOTES
In TDM systems, the list displays Stomps according to availability. Only Stomps
that can fit the DSP chip on which the Stomp PedalBoard is loaded will show as
available. Stomps that require more than your available system resources will be
grayed out. Sometimes Stomps can be rearranged for better memory allocation.
In this case the Stomp menu item will display an asterisk ( * ) next to the Stomps’
menu item. This means that the Stomp can probably be loaded. The process
may require a reshuffle and will take a couple of seconds to resolve.
Waves Guitar Tool Rack User Guide.
19
Automation
The Stomp PedalBoard Plug-in features a bypass and 7 Expression elements
per Stomp Space, totaling 48 automatable elements. The Expression elements
automate the controls of any assigned Stomp. The Expression elements are
expressed as control numbers within Stomp spaces (e.g. Stomp 1 Bypass,
Stomp 1 Control 1, Stomp 1 Control 2, etc.)
After the bypass, the next expression element will be assigned to the upper left
hand control of the stomp. Additional elements will be assigned in order to the
right of that control and then lower than the control. So, on the Flanger Stomp,
the automation control order will be:
1 – Depth 2 – Manual Rate, 3 – Sync Rate, 4 – Sync On/Off , 5 – Delay, 6 –
Feedback, 7 – Stereo.
STOMP MIDI SUPPORT
The Stomp Pedalboard is fully MIDI controllable by assigning the controls of its
stomps to MIDI controllers. Continuous control scales are mapped to the full MIDI
controller resolution 0 = min and 127 = max. Toggle action buttons (such as the
sync rate button or bypass activate pedal) can receive a note-on command. Or,
they can get linear mapping to MIDI resolution over a 128 value range. A 2 state
toggle is at 0 (off) from 0-63 and 1 (on) from 64 to 127.
You can control A/B setup switching and preset selection by assigning the A/B or
Previous/Next toolbar controls to MIDI note or controller.
All MIDI assignments get saved with presets so that when you load your preset it
is ready to receive MIDI control as you programmed it.
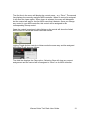
MIDI Assignment Interface
Each Stomp control can be assigned to a single MIDI controller at a time.
However, a single MIDI controller can be assigned to multiple Stomp controls.
The easiest option for linking a MIDI event to a stomp control is Learn.
Right Clicking on any of the Stomp controls will display a MIDI assignment menu
for that control As follows:
Waves Guitar Tool Rack User Guide.
20
The first line in the menu will display the control name – e.g. “Drive”. The second
line displays the currently assigned MIDI controller. When no control is assigned
it will show the Learn option. When Learn is selected, the menu will disappear
but the control will wait for the first MIDI event that it detects. Once you change
any control in your MIDI controller, this control will be assigned to the
corresponding Stomp control.
Once the control is assigned, right clicking on the control will show the linked
MIDI control ID below the control name as follows:
Linking Toggle Action controls to Notes works the same way and the assigned
MIDI Note ID will show as follows:
The third line displays the Clear option. Selecting Clear will clear any current
assignment and the control will be assigned to “None” as its MIDI controller.
.
Waves Guitar Tool Rack User Guide.
21
Virtual Stomp Boxes
The Waves Virtual Stomp Boxes are audio signal processing plug-Ins especially
designed for electric guitar. As with the Waves Amp, while these stomps are
intended for electric guitar they can sound great for many other applications as
well.
Most Waves Virtual Stomp boxes have Mono, Mono-to-Stereo and Stereo
components. Certain Stomps that specialize in Stereo processing (such as the
Panner) have only Mono-to-Stereo or Stereo components.
The Stomp plug-ins Toolbar shows the Preset name bar and Save/Load menus
for preset management.
Use the Load menu to go through the supplied factory presets or load your own
for each individual stomp. Use the Save function to save your own custom
presets to the preset menu or to an external file.
SOME STOMP TIPS:
The stomps are available only through the Stomp PedalBoard. The minimal
PedalBoard offers 2 Stomp spaces. It often sounds good to start with the Gate or
Gate/Comp Stomp to eliminate pickup buzz, signal noise, etc. This is especially
useful when using distortion setups or when going into a driven or high gain amp.
Stereo effects use more DSP power than their Mono counterparts, so it is
generally best to use Mono Stomps at the beginning of a chain. Use Mono-toStereo later on in the chain as needed. Then, feed the Stereo output to a Stereo
Amp (or to 2 Mono amps in Pro Tools or when applicable.)
In general, Distortion Stomps will sound good early in the chain while Delay and
Reverb Stomps will sound best later. Try opening a Stereo PedalBoard after your
amp for delays, reverbs, vibrato, panning and/or corrective EQ.
Waves Stomp effects are divided into four basic categories:
Modulation - This group includes pitch, amplitude and filter modulation plug-ins
such as Chorus, Flanger, Phaser, Panner, Vibrolo, Wah, Doubler and Octaver
effects.
Space & Ambience – includes Reverb, Delay, Spring and LayD.
Distortion – includes Distortion, OverDrive, Buzz, Fuzz and Metal Distortion.
Basics – includes effects such as gates, compressors, and equalizers.
Waves Guitar Tool Rack User Guide.
22
Many Stomps have time based controls such as LFO rate or Delay time. Some of
these Stomps can sync to the host BPM using a musical note duration to
represent the rate or time of the parameter. Manual Rate or Time is set in
milliseconds or seconds. Sync Rate is expressed using note durations from 2
whole notes to 1/32nd note triplets as shown in this
diagram:
Waves Guitar Tool Rack User Guide.
23
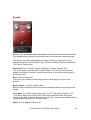
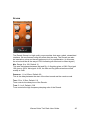
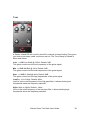
Distortion Stomps
From warm creamy OverDrive to scorching Metal madness, the GTR™ System
offers a selection of five different distortion algorithms. Inspired by classic Stomp
boxes, each of these effects delivers a different kind of distortion and provides a
selection that will fulfill all of your distortion needs.
OVERDRIVE
OverDrive is a classic Stomp effect which delivers everything from a gentle growl
to screaming highs. Perfect for playing the blues, it’s great for chords and solos
alike. Overdrive comes in Mono and Stereo configurations.
DRIVE: 0 – 100; Default: 50
Drive controls how hard the drive is over the input. This is a loudness normalized
drive stage so the volume doesn’t jump when you seek a crispier tone.
LEVEL: 0 – 100; Default: 50
This controls how loud you play at the output. Level doesn’t add distortion, it just
boosts or pads the output of the effect. A setting of 50 is a similar volume as you
would get by bypassing the effect.
TONE: 0 –100; Default: 50
The tone knob adjusts the tone from dark to bright and everywhere in between.
Waves Guitar Tool Rack User Guide.
24
DISTORTION
The Distortion Stomp takes you a step further than Overdrive, giving you even
more crunch and bite. Hot and spicy, it comes in Mono and Stereo Channel
configurations. The Distortion Stomp offers 4 controls:
DRIVE: 0 – 100; Default: 50
Drive sets the amount of distortion driven over the input signal. The drive control
is a loudness normalized control that allows you to hear the amount of drive
without an extreme boost in level.
LEVEL: 0 – 100; Default: 50
This sets the output level. Setting level to 50 is designed to maintain loudness
compared to bypass.
CONTOUR: 0 – 100; Default: 50
Contour sets the fullness and body of the distortion. Low values make for a
thinner sound that will cut through anything, while high values drive on a fuller
bodied and warmer sound.
TONE: 500Hz – 10 kHz. Default: 2.7 kHz.
This is the Cutoff of the Output Filter Range.
Waves Guitar Tool Rack User Guide.
25
FUZZ
Fuzz is a classic distortion effect that’s been popular since the ‘60’s. Big and
brutal, it’s terrific for solo licks and riffs as well as muted low string power chords.
Available in Mono and Stereo, the Fuzz offers 3 controls:
SUSTAIN: 0 – 100; Default 50
Similar to the Drive control in the previous Stomps, this will ultimately give your
fuzz sound longer sustain.
LEVEL: 0 – 100; Default: 50
This control will boost or pad the output level of the Fuzz.
TONE: 0 – 100; Default: 50
The Fuzz offers a Tone control that goes from a low pass, bass boost into a high
pass treble boosted fuzz sound. Some users will go for the extremes but the
whole range is valuable.
Waves Guitar Tool Rack User Guide.
26
BUZZ
Buzz offers a unique tone with a resonant peak at the high pass cutoff frequency.
Using an expression pedal to control the tone transforms Buzz into a
distortion/wah-wah hybrid. Buzz comes in Mono or Stereo. It has the following
controls:
DRIVE: 0 – 100; Default 50
Drive sets the amount of distortion driven over the input signal. The drive control
is a loudness normalized control that allows you to hear the amount of drive
without extreme level boost.
TONE: 0 – 100; Default 50
Tone controls the resonant low pass filter cutoff.
LEVEL: 0 – 100; Default 50
This sets the output level of the effect. 50 is a good neutral value compared to
the direct bypass loudness.
Waves Guitar Tool Rack User Guide.
27
METAL
The Metal Stomp has a dual distortion engine which can be driven very hard
while maintaining resolution for chords and solos. The Metal Stomp offers
enhanced EQ control offering a full set of Low, Mid and High tone controls with a
variable cutoff for the mid bell filter. If you need to go beyond what the other
distortion Stomps have to offer, this is it. It comes in Mono or Stereo. The Metal
tone controls are:
DIST: 0 – 100; Default 50
Dist controls the amount of distortion effect.
LEVEL: 0 – 100; Default 50
This is the output level.
LOW: Bass cut/boost 120Hz Bell: -12 to +18dB; Default +6dB
This controls the low frequencies.
HIGH: High Shelf -30dB to 0dB; Default -12dB
This controls the highs.
FREQ: 300Hz to 1500Hz; Default: 600Hz
This controls the cutoff frequency for the mid bell filter.
GAIN: -18 to +12; Default: -6
This controls the Gain of the mid bell filter.
Waves Guitar Tool Rack User Guide.
28
Modulation Effects
Inspired by vintage hardware units as well as Waves legendary software plugins, most of the GTR™’s Modulation effects feature both manual and sync-tohost rate control.
FLANGER
The Flanger is a versatile effect that can go from subtle and feathery to extreme
jet swooshes with the flip of a switch. This effect is achieved by replicating the
signal, adding delay, modulating its pitch and mixing it back with the original
signal. The Flanger offers 4 parameters and an additional Stereo Spread
parameter in the Mono-to-Stereo and Stereo components.
DEPTH: 0 to 100; Default: 50
This is the depth of the flanging effect.
SYNC: On/Off; Default Off
This syncs your Flanger to host tempo control, allowing you to “flange to the
groove.”
MANUAL RATE: 0 to 20Hz; Default: 0.20
Manual Rate controls the rate of the effect modulation when not syncing to host
tempo.
Waves Guitar Tool Rack User Guide.
29
SYNC RATE: 2 to 1/32t (double whole note to 1/32nd note triplet); Default: ½ (1/2
note).
When Sync is set to On, Sync Rate determines how the plug-in interprets the
beat. A shorter duration note will give a quick flange while a longer duration will
make for a longer, slower flange effect.
DELAY: 0.1 to 25ms; Default: 2.2
This is the length of the Delay added to the signal.
FEEDBACK: 0 to 100; Default: 0
This controls the amount of resonance in the Flanger. It gives a “rubbery” or
sweeping jet-like sound at high settings.
STEREO: 0 to 100; Default: 50
Stereo sets a different phase for the LFO (Low Frequency Oscillator) for the left
and right channels. This is essentially a time delay in the oscillation. A setting of
100 = 180 degrees.
Waves Guitar Tool Rack User Guide.
30
VIBROLO
The Vibrolo is a combined Vibrato and Tremolo. It utilizes amplitude modulation
for Vibrato and Frequency Modulation for Tremolo. This effect is great for
recreating classic amp Vibrato (tremolo) and vibrant pitch bends like a tremolo
arm (vibrato) The Vibrolo comes in Mono or Stereo.
WAVEFORM: Sine, Triangle, SawUp, SawDown, Square; Default: Sine
This is the shape of the waveform of the vibrolo. You can click the waveform
shape icon directly to jump to a specific waveform, of you can scroll through by
turning the knob.
SYNC: On/Off; Default Off
This syncs your Vibrolo to host tempo control, allowing you to “vibe to the
groove.”
MANUAL RATE: 1 to 20Hz; Default: 8Hz
When not syncing to host tempo, Manual Rate controls the rate of the effect
modulation.
SYNC RATE: 2 to 1/32t (double whole note to 1/32nd note triplet); Default: 1/16
(1/16 note). When Sync is set to On, Sync Rate determines how the plug-in
interprets the beat. A shorter duration note will give a quick vibrolo while a longer
duration will make for a longer, slower effect.
VIBRATO = FMDepth: 1 to 100; Default: 50
This is the depth of the vibrato effect.
Waves Guitar Tool Rack User Guide.
31
TREMOLO = AMDepth: 1 to 100; Default: 0
This is the depth of the tremolo effect.
Waves Guitar Tool Rack User Guide.
32
PANNER
Based on the acclaimed Waves MondoMod, the Panner enhances and expands
your spatial image, giving you precision control over waveform, width and sync.
The Vibrolo moves the guitar phantom image from left to right based on the
selected waveform and modulation rate. It comes in Mono-to-Stereo and Stereo.
The Panner Controls are:
WAVEFORM: Sine, Triangle, SawUp, SawDown, Square; Default: Sine
This is the shape of the waveform of the Panner. You can click the waveform
shape icon directly to jump to a specific waveform, of you can scroll through by
turning the knob.
SYNC: On/Off; Default Off
This syncs your Panner to host tempo control, allowing you to “pan to the
groove.”
MANUAL RATE: 1 to 20Hz; Default: 8Hz.
Manual Rate controls the rate of the effect modulation when not syncing to host
tempo.
SYNC RATE: 2 to 1/32t (double whole note to 1/32nd note triplet); Default: 1/16
(1/16 note). When Sync is set to On, Sync Rate determines how the plug-in
interprets the beat. A shorter duration note will give a quick panning effect while a
longer duration will make for a slower effect.
WIDTH: 0 to 90 degrees; Default: 45
Waves Guitar Tool Rack User Guide.
33
This is the width of the panning effect, in degrees.
PHASER
The Phaser Stomp, modeled after a classic vintage phaser, modulates the cutoff
frequency of a filter with multiple notches. It has a continuous depth control that
goes from gentle to extreme. The Stereo phaser has a great Stereo spread
control that shifts the phase of the modulation between left and right. It is offered
in Mono, Mono-to-Stereo and Stereo. The Controls are:
MANUAL RATE: 0.10 to 30 with BPM (Beats Per Minute) or ms (millisecond)
relation. Manual Rate controls the rate of the effect modulation when not syncing
to host tempo.
SYNC: On/Off; Default Off
This syncs your Panner to host tempo control, allowing you to “phase to the
groove.”
SYNC RATE: 2 to 1/32t (double whole note to 1/32nd note triplet); Default: 1/2 (1/2
note). When Sync is set to On, Sync Rate determines how the plug-in interprets
the beat. Sync Rate determines the length of an LFO cycle in terms of musical
note duration. A shorter duration note will give a quick phasing effect while a
longer duration will make for a slower effect.
DEPTH: 0 to 100; Default: 50
This determines the depth of the Phaser’s notch filters.
STEREO: 0 to 100; Default: 50
Waves Guitar Tool Rack User Guide.
34
This sets a different phase for the LFO (Low Frequency Oscillator) for the left and
right channels. This is essentially a time delay in the oscillation. A setting of 100
equals 180 degrees.
Waves Guitar Tool Rack User Guide.
35
OCTAVER
The Octaver generates two octaves below your input source, plus gives you
control over gain and panning of each octave independently. The Octaves below
the original note are synthesized using a square wave generator. Like the classic
Stomp box effect, the Octaver works best with a monophonic input. Polyphonic
input can create random sounding square wave “bleeps”.
DIRECT: -inf. to 0dBfs; Default: -6dB
This is the volume of the direct signal.
OCT1: -inf. to 0dBfs; Default: -6dB
This is the Gain control for 1 octave below the direct signal.
OCT1 PAN: +/-45deg; Default: 22.5
This is the 90 degree Panning control for 1 octave below the direct signal.
OCT2: -inf. to 0dBfs; Default: -inf
This is the Gain control for 2 octaves below the direct signal.
OCT2 PAN: +/-45 degrees; Default: -22.5
This is the 90 degree Panning control for 2 octaves below the direct signal.
Waves Guitar Tool Rack User Guide.
36
WAHWAH
The WahWah offers both an AutoWah that reacts to your input guitar signal as
well as a Manual Mode that lets you control the effect using an external MIDI
control or workstation automation. WahWah provides both classic WahWah
sounds as well as Mutron type filter effects. The WahWah Stomp has 5 controls:
SENSITIVITY: 0 to 100; Default 50
Sensitivity controls the sensitivity of the envelope follower. High sensitivity will
make even weak input excite the filter’s frequency modulator.
SPEED: 0 to 100; Default 50
Speed controls both the Attack and Release controls of filter modulation. At Low
values the Wah takes more time to begin. At high speed it happens immediately.
RANGE: 0 to 100; Default 50
The Range control defines the frequency around which the Wah works. Higher
values will generate a brighter and more “quacky” sound while lower values
create a more “wobbly” sound.
MODE – Auto/Manual; Default: Auto
Auto mode turns the pedal into an Auto Wah. Manual Mode enables MIDI or
mouse control of the Wah pedal.
WAH: 0 to 1; Default: 0.5
When set to Manual, this is the frequency of the Wah filter at any given time. This
controls where you are between the “ooo” (U) or “aaa” (A) spectrum in the Wah
sound.
Waves Guitar Tool Rack User Guide.
37
CHORUS
From a gentle touch to serious mangling, Chorus functions as both a tone and
space enhancer, also offering Leslie pan and pitch modulations. The same
Chorus engine is used for Mono, Mono-to-Stereo and Stereo but it is
recommended to use the Stereo output chorus for the best most spacious effects
and Leslie style pan and pitch modulations. Chorus has only two controls:
DEPTH: 0 to100; Default: 10
This controls how deep the overall detune of the chorusing effect will be.
RATE: 0.10 to 10; Default 0.77
This is the speed of the the modulation time of the detune.
Waves Guitar Tool Rack User Guide.
38
DOUBLER
The Doubler replicates the input in another 2 voices and adds some detune,
delay and feedback for the generated replicas. This creates rich chorus type
effects as well as stereo enhancing and harmonic enriching effects. The Doubler
is offered in Mono, Mono-to-Stereo and Stereo. It can go from very subtle to
extreme effects.
MIX: Range: 0 to 100; Default 50
This sets the balance between Wet and Dry. A 0 setting gives a 100% Dry signal
100 gives a 100% Wet signal. At 50, the Wet and Dry paths mixed are mixed
evenly at -3dB.
DETUNE: 0 to 25 Cents; Default: 8
This is the amount of detuned chorus effect, in cents, that the Doubler creates.
DELAY: 12 to 100ms; Default: 11.3ms
This is the length of the Delay effect added to the signal.
FEEDBACK: 0 to 100; Default: 0
Feedback controls the amount of energy fed back from the voices’ output back to
its input.
STEREO: 0 to100; Default: 50
At a setting of 100 the replicas are fully panned to left and right. At zero the
replicas are panned exactly to center.
Waves Guitar Tool Rack User Guide.
39
PITCHER
The Pitcher creates automatic harmonies and performs real time pitch shifting. It
produces effects ranging from subtle to strange. The controls define a range for
pitch change by defining the maximum and minimum possible shift. The pitched
and direct signals can be mixed together for a harmonizing effect and the pitch
can be used to specify the musical interval between the direct and pitched
sounds. The Pitcher comes in Mono and Stereo.
Pitcher controls:
MIX: Range: 0 to 100; Default 50
This sets the balance between Wet and Dry. A 0 setting gives a 100% Dry signal
100 gives a 100% Wet signal. At 50, the Wet and Dry paths mixed are mixed
evenly at -3dB.
MIN (Shift): -12.00 to +12.00 semitones
This is the maximum pitch shift that is enabled. The decimal represents cents.
So, a setting of 5.77 would mean 5 semitones (5 half-steps) and 77 cents.
MAX (Shift): -12.00 to +12.00 semitones
This is the minimum pitch shift that is enabled. The decimal represents cents. So,
a setting of 6.92 would mean 6 semitones (6 half-steps) and 92 cents.
SHIFT: 0 = Min, 100 = Max; Default: 50
This is designed to be controlled by foot or mouse. Shift gives the range of pitch
shifting that you can achieve.
Waves Guitar Tool Rack User Guide.
40
Space and Ambience Effects
The GTR™ system features a stunning array of reverb and delay effects
designed to take your sound to another dimension.
DELAY
The Delay pedal is an analog-sounding effect that gives you up to 2 seconds of
delay time. From traditional Mono delay to polyrhythmic ping pong effects, the
Delay also lets you synchronize to your host BPM. This is a classic effect that
can go from traditional Mono delay to full ping pong in the Stereo versions.
MIX: Range: 0 to 100; Default 50
This sets the balance between Wet and Dry. A 0 setting gives a 100% Dry signal
100 gives a 100% Wet signal. At 50, the Wet and Dry paths mixed are mixed
evenly at -3dB.
MANUAL TIME: 0.01 to 2.0; Default: 0.3
When the Sync control is turned off, this is the amount of delay time, in seconds.
SYNC TIME: 2 to 1/32t (double whole note to 1/32nd note triplet); Default: 1/2 (1/2
note). When Sync is set to On, Sync Time determines how the plug-in interprets
the beat. A shorter duration note will give a quick delay effect while a longer
duration will make for a slower effect.
Waves Guitar Tool Rack User Guide.
41
FEEDBACK: 0 to 10; Default: 5
This is the gain of the feedback loop. If you want more regenerations and a
longer delay effect, turn up the Feedback. Turning the feedback above 9 can
result in unruly effects!
HI CUT: 0 to 100; Default: 75
The Hi Cut control will shut out high frequencies. It has a resonant overshoot so
setting feedback above 87 may create a peak growth that can result in a clipping,
shrieking feedback.
STEREO: 0 to 100; Default 50
At 0, this is a Mono sounding effect. At higher settings, the “ping pongs” move
away from the Center, all the way to a full discrete Stereo ping pong at a setting
of 100.
Waves Guitar Tool Rack User Guide.
42
LAY – D
Lay-D delivers both traditional delay EFFECTS as well as mind-bending Reverse
& Pitch Shift modes. The Reverse feature creates backwards guitar effects, even
in live performance. The Pitch change can create extreme warping effects.
MIX: Range: 0 to 100; Default 50
This sets the balance between Wet and Dry. A 0 setting gives a 100% Dry signal
100 gives a 100% Wet signal. At 50, the Wet and Dry paths mixed are mixed
evenly at -3dB.
MANUAL TIME: 0.01 to 2sec; Default 0.3
When the Sync control is turned off, this is the amount of delay time, in seconds.
SYNC: On/Off Default: On
Sync makes the Delay time sync to the host BPM and allows specifying delay
times in Musical note durations.
SYNC TIME: 2 to 1/32t (double whole note to 1/32nd note triplet); Default: 1/2 (1/2
note). When Sync is set to On, Sync Time determines how the plug-in interprets
the beat. A shorter duration note will give a quick delay effect while a longer
duration will make for a slower effect.
Waves Guitar Tool Rack User Guide.
43
PITCH: -12.00 to +12.00; Default 0
This represents the amount of pitch shifting that will take place on the first
regeneration of the delay. The decimal represents cents. So, a setting of 5.77
would mean 5 semitones (5 half-steps) and 77 cents.
Consecutive regenerations will shift by the same amount, resulting in ever
ascending or descending regenerations.
FEEDBACK: 0 to 100; Default 30
This is the gain of the feedback loop. If you want more regenerations and a
longer delay effect, turn up the Feedback.
REVERSE: On/Off; Default Off
This reverses the regenerations to give a backwards guitar effect.
Waves Guitar Tool Rack User Guide.
44
REVERB
The Reverb Stomp is a high quality room emulator that uses a sleek, streamlined
interface. We recommend using this effect after the amp. The Reverb can also
be inserted on a bus and have signals sent to it for reverberation. (In this case,
the mix should be all the way at 100% indicating all effect and no direct signal.)
MIX: Range: 0 to 100; Default 12
This sets the balance between Wet and Dry. A 0 setting gives a 100% Dry signal
100 gives a 100% Wet signal. At 50, the Wet and Dry paths mixed are mixed
evenly at -3dB.
PREDELAY: 11 to 160ms; Default: 80
This is the delay between the start of the direct sound and the reverb sound.
TIME: 0.2 to 10 Sec; Default: 2.0
Time controls the decay time of the Reverb.
TONE: 0.1 to 2; Default: 0.60
Tone controls the high frequency damping ratio of the Reverb.
Waves Guitar Tool Rack User Guide.
45
SPRING
Spring Reverb is a common feature of many classic amplifiers. This Stomp fulfills
that critical function. Spring, along with Vibrolo, is recommended as a post amp
complement within a 2 space Stomp PedalBoard.
MIX: Range: 0 to 100; Default: 12
The Spring Reverb effect is added to the direct signal using the MIX control. MIX
sets the balance between Wet and Dry. A 0 setting gives a 100% Dry signal. 100
gives a 100% Wet signal. At 50, the Wet and Dry paths mixed are mixed evenly
at -3dB.
TIME: 0.5 to 5 seconds; Default: 3.6
This is the decay time of the Spring reverb. It represents RT60, or the time it
takes reverb to loose 60 dB of gain (and essentially dissappear).
PREDELAY: 20 to 200ms; Default: 20ms
This is the delay between the start of the direct sound and the reverb sound.
Waves Guitar Tool Rack User Guide.
46
Basic Effects
The GTR™ system also includes an essential toolkit of basic effects that are a
part of every guitar player’s basic rig. These gates, compressors and equalizers
give you the power to custom contour your sound for any musical situation.
GATE/COMP
The Gate/Comp puts two essential applications in one convenient Stomp. It
works well as the first in a chain of effects. The Gate component is useful for
eliminating unnecessary input noise, especially when using single coil pickups
with distortion effects and high gain amps. The Compressor is useful in
smoothing out your sound. The Gate Comp is offered in Mono and Stereo.
GATE: -80 to -24dB; Default: -60
This sets the sensitivity of the gate. The higher the setting, the louder a noise will
have to be in order to pass through.
COMP: 0 to 100; Default: 50
This controls the amount of compression that is added to your guitar signal.
Waves Guitar Tool Rack User Guide.
47
COMPRESSOR
The Compressor Stomp pumps up your sound and keeps your dynamics in
check. The compressor can add depth and sustain to your sound while helping
you cut through a mix. It is offered in Mono and Stereo.
COMP: 0 to 100; Default: 25
Most of the compressor intensity is set by the Input gain value of the Comp
control. The higher the setting, the more compression is added.
ATTACK: 1 to 50; Default: 4.99
The lower the attack setting, the quicker the compression kicks in.
RELEASE: 50 to 2000ms; Default: 750
The higher the release setting, the longer it takes for the compression to end.
Waves Guitar Tool Rack User Guide.
48
GATE
The Gate Stomp is great for eliminating noise and weak signals while letting the
music pass through. The Gate is offered in Mono and Stereo.
THRESHOLD: 0 to -80dB; Default: -56
This sets the sensitivity of the gate. The lower the setting, the louder a signal will
have to be to pass through.
ATTACK: 0.01 to 10; Default: 0.05
This controls how quickly the gate should open when energy goes above the
threshold. A shorter attack time opens the gate more quickly.
RELEASE: 0.01 to 1500ms; Default: 100
Release control how fast, in milliseconds, the gate closes when the energy falls
back beneath the Threshold.
HOLD: 0.01 to 5000ms; Default: 0.20
The hold control will keep the gate open after the last attack for the amount of
time that you set it to.
Waves Guitar Tool Rack User Guide.
49
TONE
A Simple 3 band EQ with LowCut and HiCut controls for band limiting Tone gives
you control over bass, treble, mid boost and cut. The Tone Stomp is offered in
Mono and Stereo.
LOW: -/+18dB Low Shelf @ 310Hz; Default: 0dB
This gives control over the low frequencies of the guitar signal.
MID: -/+18dB Mid Bell @ 1kHz; Default: 0dB
This gives control over the mid frequencies of the guitar signal.
HIGH: -/+18dB Hi Shelf @ 4kHz; Default: 0dB
This gives control over the high frequencies of the guitar signal.
LOWCUT: 16 to 310Hz; Default: 40Hz
LowCut is the cutoff frequency of the high pass filter. It allows shutting low
frequencies below the frequency selected.
HICUT:4kHz to 18kHz; Default: 14kHz
HiCut is the cutoff frequency of the low pass filter. It allows shutting high
frequencies above the frequency selected.
Waves Guitar Tool Rack User Guide.
50
EQ
The EQ plug-in is a 6 band graphic equalizer which has a hidden low frequency
attenuator for shutting out unwanted rumble. It is offered in Mono and Stereo.
Each band allows a +/- 12dB Boost or cut with a Q of 10 and a fixed frequency.
Waves Guitar Tool Rack User Guide.
51
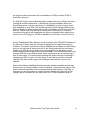
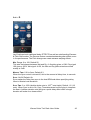
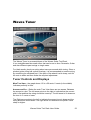
Waves Tuner
The Waves Tuner is an essential part of the Waves Guitar Tool Rack.
It is a straightforward chromatic tuner that can be set to Auto Chromatic, Guitar
and also different open tunings or single notes.
For ideal results, pluck your string about once per second while tuning. Since a
plucked guitar string has a pitch envelope, it is recommended to tune the string
by monitoring its sustained part. If the pitch of the attack is a bit sharp, wait for
the note to settle and then make the required adjustment.
Tuner Controls and Displays
MAIN TUNE VIEW – the graph shows -50 to +50 cents. 0 cents (in the middle)
indicates perfectly in tune.
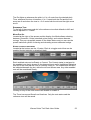
ARROWS AND DOT – Below the main Tune View there are two arrows. Between
the arrows is a dot. The left arrow points to the right to indicate that the current
pitch is flat and that the string should be tuned up. The left arrow is lit whenever
the tune is -3 cents or lower.
The Right arrow points to the Left to indicate the current tune is sharp and the
string should be tuned down. The right arrow is lit whenever the pitch 3 cents
sharp or higher.
Waves Guitar Tool Rack User Guide.
52
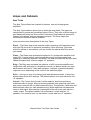
The Dot lights up whenever the pitch is -6 to +6 cents from the desired pitch.
Thus, whenever the tune is between -6 to -3 cents both the Dot and the Left
arrow are lit and when the tune is +3-+6 cents both the dot and the right arrow
are lit.
REFERENCE TUNE
To the left of the arrows and dot is the reference tune that defaults to 440 and
can be adjusted +/- 6 cents.
MODE POP-UP.
Located at the right of the arrows and dot display, the Mode allows selecting
between Chromatic, Guitar (standard guitar tuning), and various alternate
tunings. This pop-up applies presets to the Notes status and you can use the
preset load save system for saving and reloading custom alternate tunings.
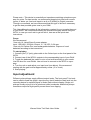
NOTES CONTROLS AND VIEWS
Located at the bottom are the 12 notes. Each is a toggle control that can be
enabled (bright highlight) or disabled (dark).
Each enabled note can be Ready or Current. The Current status is assigned to
the enabled note that is closest to the detected input and is highlighted indicating
that this is the note that the user is currently tuning to. The current note will also
be indicated beneath the dot, within the dot and arrows area. Any other enabled
note will be considered Ready.
Clicking on any of the note controls will disable or enable it.
The Tuner has normal Save/Load functions. Only the note status and the
reference tune will be saved.
Waves Guitar Tool Rack User Guide.
53
Waves/PRS Guitar Interface
Introduction and Quick Start Guide
The Waves PRS Guitar Interface (WPGI) is a device that delivers the Direct
Signal of your guitar to another audio device. It is an ideal solution for recording a
direct guitar signal to a DAW (Digital Audio Workstation). It guarantees that the
recorded signal captures the original guitar tone at its best, making it perfect for
further processing or re-amping.
The WPGI is offered here with the Waves GTR™, a collection of state-of-the-art
guitar amp and effects modeling plug-ins. It was included in order to make sure
that you can run the highest quality direct signal into your DAW.
The unit offers Guitar Impedance Matching, Signal Balancing and Preamplification. It delivers a high-quality Guitar Input stage that outputs an audio
workstation friendly signal through a range of output connection options for fast
and easy connection to most commercial audio inputs.
Waves Guitar Tool Rack User Guide.
54
Please note – This device is essentially an impedance matching microphone preamp for guitar. For best results, we recommend plugging into line level console
inputs, or better yet, line level inputs in an A to D (Analog to Digital) converter.
Through our research, we have discovered that this type of device is necessary
to get the best possible guitar tone in your DAW.
This Users Manual contains all the information required for you to make the most
of your WGPI. We recommend reading the manual thoroughly before using the
WPGI. In case you can’t wait to get on with it, here are a few quick start
instructions:
Power
We Recommend:
*Use only UL Listed Class 2 power adapter.
Input: 100-240V, 50-60Hz; Output: 12 - 18 VDC, 0.5A max.
*Use only 9V Carbon Zinc non-rechargeable batteries. Dispose of used
batteries according to the instructions.
To start playing
1. Connect your (¼” jack) guitar cable to the Guitar Input on the front panel of the
WPGI.
2. Connect one of the WPGI’s outputs to the corresponding input of your DAW.
3. Toggle the balanced line switch to mic or line level according to your needs.
Use line level for most DAWs. Use mic level to connect to the WPGI to a preamp.
4. Turn the unit on and adjust your input level (see below). We recommend
starting with the gain knob at approximately center (12 o’ clock).
5. Start playing!
Input adjustment
Different guitar pickups supply different output levels. The front panel Trim knob
can be used to scale the guitar’s input level so that it feeds the ideal level into the
recording device for optimal Signal to Noise Ratio without clipping. Single coil
pickups usually enjoy a bit of a gain boost while humbucker and active pickups
sometimes require a slight pad to prevent them from clipping.
Waves Guitar Tool Rack User Guide.
55
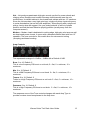
The 3 LEDs on the front panel are there to help with this adjustment. These
LEDs signify the following:
1. The green “Sig” LED indicates the existence of signal and should be lit as long
as you are playing into the device.
2. The orange “Nom” LED indicates healthy nominal levels and should be lit
occasionally according to the dynamics of your playing. If it is mostly off and only
turns on for the very peaks f your performance, you may want to boost the trim a
little. If “Nom” is mostly on, even on long sustained notes, then the signal may be
a little hot and you need to keep an eye out for the next (red) LED.
3. The red “Over” LED indicates that the signal is overloading and clipping is
occurring. If this happens more then rarely, then take the trim down to the point
where it almost never lights up.
For more information on how to obtain best results when using the WPGI, please
keep reading.
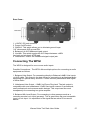
CONTROLLERS OVERVIEW
FRONT PANEL:
1. Guitar in: ¼” jack guitar input
2. Gain: Input level adjustment knob
3. Level: 3 LEDs indicate the input level
4. Low Batt: This LED indicates the battery power
5. On: On/Off LED indicator
Waves Guitar Tool Rack User Guide.
56
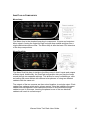
REAR PANEL:
1. +12VDC: DC jack connector
2. Power On/Off switch
3. GND/Lift: This switch allows you to eliminate ground loops.
“Lift” disconnects XLR ground DIN.
4. Balanced: An XLR balanced signal output
5. Line/Mic: This switch toggles the XLR output between +4dBV
line level and mic level -40 dB pad.
6. Unbalanced -10dBV: An unbalanced signal output jack.
Connecting The WPGI
The WPGI is designed for one or more audio inputs.
Possible Connections - The WPGI offers multiple options for connecting to audio
equipment as follows:
1. Balanced Line Output: For connecting directly to Balanced +4dBU Line inputs
via XLR cable. This output is the best choice for connecting to professional audio
equipment for optimal clarity and tone. It offers the best performance and Signal
to Noise Ratio.
2. Unbalanced Line Output: –10dBV via Phone Plug Jack. The jack output is
compatible with most unbalanced -10dBV line inputs common in professional,
semi-professional and consumer audio devices. This output can also work
transparently for connecting to a guitar amplifier.
3. Balanced Mic Level Output: For connecting to other preamps such as a
recording console’s mic input (pre-amp). This is great when the most accessible
input is a mic input. It is equivalent to the signal that an active DI box would
deliver.
Waves Guitar Tool Rack User Guide.
57
Using the Balanced +4dBU Line level via XLR is the definitive best
choice for getting the highest quality results when recording an
electric guitar using the WPGI.
Applications
The WPGI has 3 main applications:
1. Impedance matching: The guitar output is a high impedance signal. Most
audio input loads are incompatible with a guitar directly plugged in. Therefore the
WPGI transforms the signal suitable for most common audio input stages.
Extensive care has been taken to preserve the guitar tone and provide the
highest-quality signal to the DAW audio input device.
2. Converting an Unbalanced Signal to a Balanced Signal: The guitar signal
is conducted over two wires only. The signal is unbalanced and thus more prone
to picking up noise and loosing fidelity. The longer the cable, the more loss and
signal degradation you will experience. The WGPI converts the signal to
balanced, allowing you to run longer cables with better sound quality.
3. Pre-amplification: The custom circuit goes beyond Impedance-matching and
balancing. It provides amplification to common Line level input. The on-board
amps are especially selected for recording the clear, undistorted guitar signal.
Thus, they don’t replace the sound of a dedicated guitar tube preamp, but
instead allow a transparent neutral signal path ideal for further processing and reamplifying.
Waves Guitar Tool Rack User Guide.
58
Technical Specifications
INPUT TRS:
Input impedance : >1Mohm unbalanced
Max input level: 1.1 VRMS
OUTPUT BALANCED XLR:
*All measurements were preformed with volume at a nominal
setting.
Output impedance: 50 ohm
S/N: >105 @ line level, >70 @ mic level (S measured at 1%, 1 Khz,
A Weighted)
Response: 20-20Khz , -3dB @11Khz, -5dB @ 20Khz
THD+N: <0.005 (< -90dB) @ -10dB below max sensitivity level
Sensitivity: 1.1Vrms @ line level, 2.5 Vrms @ mic Level
Gain: 11dB @ line level, -28dB @ mic level. ±1.5dB
Volume range: +5dB, -10dB refer to nominal setting
Output short circuit protection.
Ground lift switch.
OUTPUT UNBALANCED ¼’ (TRS):
*All measurements were preformed with volume at a nominal
setting.
Output impedance: 100 ohms
S/N: >105 @ line level, (S measured at 1%, 1 Khz, A Weighted)
Response: 20-20Khz, -3dB @11Khz, -5dB @ 20Khz
THD+N: <0.005 (< -90dB) @ -10dB below max sensitivity level
Sensitivity: 1.1Vrms @ line level, 2.5 Vrms @ mic Level
Gain: 5dB @ line level, ±1dB
Volume range: +5dB, -10dB refer to nominal setting
Power supply:
Power on/off switch
Dual 9V battery
12-18V DC, Nominal 60mA±10%
Low Batt indicator: Blink @ 7V±0.5V
Power saving switch:
Automatic shut down when input ¼” jack is not connected
Level indicator:
Green LED – On @ 15mV rms input signal
Yellow LED – On @ 100mVrms input signal
Red LED – On @ 1.1Vrms input signal
Dimensions:
Length: 11.5 cm, Width: 9.5 cm, Height: 4.3 cm, Weight: 356 gr.
Waves Guitar Tool Rack User Guide.
59
Warranty
ONE YEAR LIMITED WARRANTY
Waves Audio Ltd. ("Waves") warrants that the Product conforms substantially to
the specifications contained in the Product documentation for a period of one (1)
year from the date of original purchase from Waves or its authorized resellers. In
the case of a valid warranty claim, your sole and exclusive remedy and Waves’
entire liability under any theory of liability will be, at its option, to repair or replace
the Product without charge or, if this is not possible, to refund the purchase price
to you. For warranty service, please call one of Waves offices listed above, to
obtain a Return Authorization (RA) number. After you obtain the RA number, ship
the defective Product, transportation and insurance charges prepaid, to the
Waves location listed above. Write the RA number in large letters on the outside
of the shipping box. Enclose your name, address, telephone number, copy of
original sales invoice and a detailed description of the problem. Waves will not
accept responsibility for loss or damage in transit.
The Warranty is void if the Product serial numbers have been removed from the
Product or if the Product has been damaged by misuse, modification or
unauthorized repair, as determined at Waves’ discretion.
The Product is designed and manufactured for use in professional and studio
audio systems and is not intended for other usage.
This limited warranty, with all terms, conditions and disclaimers set forth herein,
shall extend to the original purchaser and anyone who purchases the Product
within the specified warranty period. This limited warranty gives the Buyer certain
rights. You may have additional rights provided by applicable laws.
Waves does not authorize any third party, including any dealer or sales
representative, to assume any liability or make any additional warranties or
representation regarding this Product information on behalf of Waves.
Waves Guitar Tool Rack User Guide.
60
THIS WARRANTY IS IN LIEU OF ALL WARRANTIES, WHETHER ORAL OR
WRITTEN, EXPRESS, IMPLIED OR STATUTORY. WAVES MAKES NO
OTHER WARRANTY, EITHER EXPRESS OR IMPLIED, INCLUDING,
WITHOUT LIMITATION, ANY IMPLIED WARRANTIES OF
MERCHANTABILITY, FITNESS FOR A PARTICULAR PURPOSE, OR NONINFRINGEMENT. PURCHASER’S SOLE AND EXCLUSIVE REMEDY UNDER
THIS WARRANTY SHALL BE REPAIR OR REPLACEMENT AS SPECIFIED
HEREIN.
IN NO EVENT WILL WAVES BE LIABLE FOR ANY DIRECT, INDIRECT,
SPECIAL, INCIDENTAL OR CONSEQUENTIAL DAMAGES RESULTING FROM
ANY DEFECT IN THE PRODUCT, INCLUDING LOST PROFITS, DAMAGE TO
PROPERTY AND, TO THE EXTENT PERMITTED BY LAW, DAMAGE FOR
PERSONAL INJURY, EVEN IF WAVES HAS BEEN ADVISED OF THE
POSSIBILITY OF SUCH DAMAGES.
Some states do not allow the exclusion of implied warranties or limitations on the
duration of an implied warranty, so the above limitations may not apply to you.
This warranty gives you specific legal rights. You may have other rights, which
vary, state to state.
Governing Law and Severability
This agreement will be governed by the laws of Israel. If a court finds any
provision of this License unenforceable, that provision will be enforced to the
maximum extent possible, and the remainder of the License shall continue in full
force and effect. In the event of a dispute arising under this Agreement, you
consent to jurisdiction in the State of Israel.
Waves Guitar Tool Rack User Guide.
61