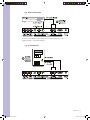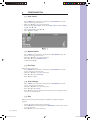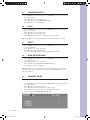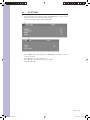
1
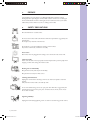
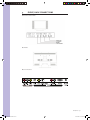
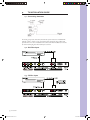
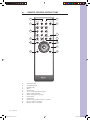
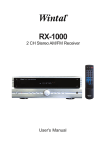
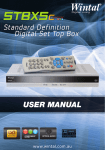
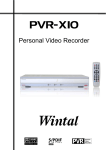
Model:
20L05
20”
4:3 Digital LCD Television/ PC Monitor
Operating Manual
http://wintal.com.au
Manual 20L05.indd a
12/07/2005 11:44:01 AM
Manual 20L05.indd b
12/07/2005 11:44:12 AM
TABLE OF CONTENTS
1.
PreFace
1
2.
Safety Precautions
1
3.
Front, Back Connections
2
4.
TV Installation Guide
3
4.1
Connecting Antennas
3
4.2
AV Video Input
3
4.3
S-Video Input
3
4.4
YcbCr Connection
4
4.5
PC Connection
4
5.
Manual 20L05.indd c
Configuration
5
5.1
Auto Search
5
5.2
Manual Search
5
5.3
Fine Tune
5
5.4
Save Settings
5
5.5
Skip
5
6.
Picture Setting
6
7.
Audio Setting
6
8.
Source Setting
6
9.
Language Select
7
10.
Lock
7
11.
Reset
7
12.
Blue Background
7
13.
Channel Swap
7
14.
PC Setting
8
15.
Remote Control Instructions
9
16.
Remote Control Setup
10
16.1 Battery Usage Caution
10
17.
Accessories
10
18.
Troubleshooting & Advice
11
19.
Specifications
12
12/07/2005 11:44:12 AM
1.
PREFACE
Congratulations on your purchase of a Wintal LCD! Please read this manual
thoroughly before operating the monitor. Make sure the monitor was not damaged
in transit. Should the monitor be damaged, do not install it and contact your dealer.
Check that you have all the accessories according to the model.
2.
SAFETY PRECAUTIONS
Place the Monitor on a stable surface.
Do not use the monitor with other fixations than those provided or suggested by the
manufacturer.
Do not place any material on the monitor.
Do not block or cover the ventilation openings on the monitor.
If you have a wall mount, check that it is steady.
Power source
The monitor must be plugged with a voltage source of 220/240 volts and 50 Hz.
Connection cable
Power cord and cables must be properly routed and protected to prevent people from
stepping on them and causing the monitor to fall.
Heating sources and humidity
Keep the monitor dry and away from humidity.
Keep the monitor away from heat sources
Cleaning and maintenance
Unplug the monitor before cleaning it. Do not use solvents or liquids to clean the
monitor.
Only clean the monitor with a soft and dry cloth.
In case of troubleshooting, do not use spare parts other than those suggested by the
manufacturer. Using incorrect spare parts can lead to electric shocks, short-circuits
fire or other incidents.
Lightning/ Holidays
Unplug the LCD during lightning storms or when not used for long periods of time.
1 | Wintal LCD
Manual 20L05.indd Sec1:1
12/07/2005 11:44:12 AM
3.
FRONT, BACK CONNECTIONS
Front View and Controls
Back View
Rear Connections
Wintal LCD | 2
Manual 20L05.indd Sec1:2
12/07/2005 11:44:12 AM
4.
TV INSTALLATION GUIDE
4.1 Connecting Antennas
To ensure good picture and sound, TV antenna system needs to be installed. The
antenna system as shown can be sourced from TV equipment shops, which will
provide service for correct installation and connection. After installation, insert the
75-ohm antenna plug into the antenna jack as shown.
4.2 AV Video Input
4.3 S-Video Input
3 | Wintal LCD
Manual 20L05.indd Sec1:3
12/07/2005 11:44:12 AM
4.4 YcbCr Connection
To connect to the RGB/ Component input on your DVD player, also use the
supplied S-Video -> Component Adaptor.
4.5 PC Connection
Wintal LCD | 4
Manual 20L05.indd Sec1:4
12/07/2005 11:44:13 AM
5.
CONFIGURATION
5.1 Auto Search
•
•
•
•
•
Press «MENU» key on the front control panel or «SYS MENU» key on the
remote control to go into the menu
Then press ◄ or ► to access the menu below
Before selecting «Auto search», choose the «Colour system» and the «Sound
system» with ▲ or ▼
Select « Auto search » with ▲ or ▼
Press ◄ or ► to confirm
5.2 Manual Search
•
•
•
•
Press «MENU» key on the front control panel or «SYS MENU» key on the
remote control to go into the menu
Then press ◄ or ► to access the menu above
Press ▲ or ▼ to select «Manual search»
Confirm with ◄ or ►
5.3 Fine Tune
If the reception signal is poor :
• Press «MENU» key on the front control panel or «SYS MENU» key on the
remote control to go into the menu
• Then press ◄ or ► to access the menu above
• Press ▲ or ▼ to select «Fine tune»
• Press ◄ or ► to adjust
5.4 Save Settings
•
•
•
•
Press «MENU» key on the front control panel or «SYS MENU» key on the
remote control to go into the menu
Then press ◄ or ► to access the menu above
Press ▲ or ▼ to select «Save»
Press ◄ or ► to save the channel you want when you use for example manual
search or sort channel option.
5.5 Skip
Skip function can jump the TV program you dislike. For example, to skip the
program:
•
•
•
Change the channel on the LCD to channel 2
Press «MENU» key on the front panel or «SYS MENU» on the remote control
to go into the menu
Press ◄ or ► to access the menu above
5 | Wintal LCD
Manual 20L05.indd Sec1:5
12/07/2005 11:44:13 AM
•
•
6.
•
•
•
•
7.
•
•
•
•
8.
•
•
•
•
Press ▲ or ▼ to select «SKIP»
Press ◄ o ► to activate «ON» and to delete the program 2
PICTURE SETTING
Press «MENU» key on the front panel or «SYS MENU» on the remote control
to go into the menu
Press ◄ or ► to access the menu below
Press ▲ or ▼ to select the setting you wish to adjust
Press ◄ or ► to adjust the setting selected
AUDIO SETTING
Press «MENU» key on the front panel or «SYS MENU» on the remote control
to go into the menu
Press ◄ or ► to access the menu below
Press ▲ or ▼ to select the setting you wish to adjust
Press ◄ or ► to adjust the setting selected
SOURCE SETTING
Press «MENU» key on the front panel or «SYS MENU» on the remote control
to go into the menu
Press ◄ or ► to access the menu below
Press ▲ or ▼ to access SOURCE
Press ◄ or ► to select TV, AV, S-Video, YcrCb, or PC source
Wintal LCD | 6
Manual 20L05.indd Sec1:6
12/07/2005 11:44:13 AM
9.
•
•
•
•
10.
•
•
•
•
LANGUAGE SELECT
Press «MENU» key on the front panel or «SYS MENU» on the remote control
to go into the menu
Press ◄ or ► to access the menu above
Press ▲ or ▼ to access LANGUAGE SELECT
Press ◄ or ► to choose the language
LOCK
Press «MENU» key on the front panel or «SYS MENU» on the remote control
to go into the menu
Press ◄ or ► to access the menu above
Press ▲ or ▼ to access LOCK setting
Press ◄ or ► to lock the front control panel keys of the LCD
NB : to unlock the front control panel keys, press any key on the remote control
11.
•
•
•
•
12.
•
•
•
•
RESET
Press «MENU» key on the front panel or «SYS MENU» on the remote control
to go into the menu
Press ◄ or ► to access the menu above
Press ▲ or ▼ to access RESET setting
Confirm with ◄ o ► to reset the LCD to default factory settings
BLUE BACKGROUND
Press «MENU» key on the front panel or «SYS MENU» on the remote control
to go into the menu
Press ◄ or ► to access the menu above
Press ▲ or ▼ to access BLUE BACKGROUND setting
Press ◄ or ► to activate the function
NB : This function can be activated for example when scanning program or when
reception signal is poor, if you wish to have a blue background instead of a screen
with snow and noise.
13.
CHANNEL SWAP
This function is used to sort channels.
•
•
•
•
•
Press «MENU» key on the front panel or «SYS MENU» on the remote control
to go into the menu
Press ◄ or ► to access the menu below
Press ▲ or ▼ to select the 2 channels you wish to swap
Press ◄ or ► to insert the 2 numbers of channels to be swapped
Swap by selecting «EXCHANGE» with ◄ or ►
7 | Wintal LCD
Manual 20L05.indd Sec1:7
12/07/2005 11:44:13 AM
14.
PC SETTING
•
•
•
Set up the LCD to PC mode by changing the «MODE» key on remote control
Switch on PC with a contrast ratio 800*600 /60Hz
Connect the LCD to the PC with the VGA cable
•
Press «MENU» key on the front panel or «SYS MENU» on the remote control
to go into the menu
Press ◄ or ► to access the menu above
Press ▲ or ▼ to select the setting you wish to adjust
Adjust with ◄ or ►
•
•
•
Wintal LCD | 8
Manual 20L05.indd Sec1:8
12/07/2005 11:44:13 AM
15.
REMOTE CONTROL INSTRUCTIONS
4
3
1
5
6
9
WE
PO R
SLEEP
1
2
3
4
5
6
7
8
9
-/--
0
MUTE
2
BACK
PICTURE
MODE
CH+
7
SYS MENU
AUDIO
VOL -
10
11
ENTER
12
8
VOL +
13
CH-
20L05
01
02
03
04
05
06
07
08
09
10
11
12
13
Power ON/OFF
TV/AV/PC Mode
Standby mode
Mute
Number keys
Access to several numbers program
System setting menu key
Return to the previous program
Picture mode
Audio mode
Channel control and menu item execute key
Decrease volume control key
Increase volume control key
9 | Wintal LCD
Manual 20L05.indd Sec1:9
12/07/2005 11:44:14 AM
16.
a.
b.
c.
REMOTE CONTROL SETUP
Open the cover
Insert the supplied “AA” size batteries
When inserting the batteries, make sure correct polarities as per the “+” and “-”
marks on the batteries are correct
Replace the battery cover
16.1 Battery Usage Caution
To prevent battery leakage which may result in injury or damage to the remote:
1.
2.
3.
17.
Install all batteries correctly, and as marked on the remote control
Do not mix batteries: (OLD and NEW or CARBON and ALKALINE, etc.)
Remove batteries when the remote is not used for a long time
ACCESSORIES
Included with your Wintal LCD are the following accessories:
1.
2.
3.
4.
5.
AC/DC Power Adapter
One Remote Control
2x 1.5V “AA” batteries
One User Manual
AV Cable
Wintal LCD | 10
Manual 20L05.indd Sec1:10
12/07/2005 11:44:14 AM
18.
TROUBLESHOOTING & ADVICE
Before calling our Customer Centre, please check if you can the following
suggestions will solve your problem.
Troubleshooting
No signal
Incorrect colour shades
Control
Please check that all cables and connectors are
correctly plugged in.
Adjust the contrast, the colour and the brightness
Double or multiple
image display
May be the result of an electrical wave disturbance
from another TV, Computer, Game console, or Radio
Bad/ Snowy picture
The cables of the antenna are not correctly plugged
in.
The remote control does
not work
No sound
Please check that the batteries are inserted correctly.
Check that the IR of the remote control is not hidden
by something.
Make sure that you have not pressed the MUTE
button on the front panel or on the remote control.
11 | Wintal LCD
Manual 20L05.indd Sec1:11
12/07/2005 11:44:14 AM
19.
SPECIFICATIONS
Screen Size
20.1 Inch
Display Type
LCD TFT
Resolution(Pixel)
800 x 600
Brightness
500 cd / m²
Color
24 bit ( 16,777,216)
Contrast Ratio
500 : 1
View Angle(H/V)
Horizontal 160,Vertical 140, CR10
Aspect Ratio
4:3
Power
100-240 VAC, 12V 50/60HZ.
Power consumption
60W
TV System
PAL / NTSC
Video Input Format
PAL / NTSC
Antenna Input
Standard antenna socket 75 Ω
Audio Output
L / R 3W + 3W
VGA Input
800 x 600 60HZ
Input
Output
RGB
0.7 VP- P 75 Ω
VIDEO
CVBS: 1.0 Vp – p, 75Ω; RCA
AV
Video 1.0 VP – 75 Ω; Audio 20 KΩ ; RCA
VIDEO 1
CVBS:1.0 VP- P 75 Ω; RCA
AUDIO L/R
200 m Vrms , 20 kΩ ( max.3.0 VP – P ) ; RCA
VIDEO 2
1.0 VP – P , 75 Ω ; RCA
Effective Range IR
<6m
Weight
9.2 Kg
The manual is only for your reference, any change to the design and specification will
not be advise.
Wintal LCD | 12
Manual 20L05.indd Sec1:12
12/07/2005 11:44:14 AM