1
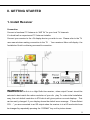
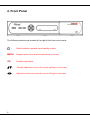
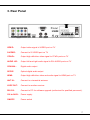
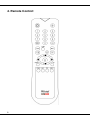
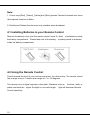
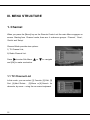
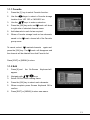
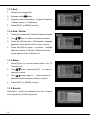
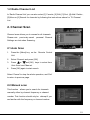
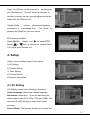
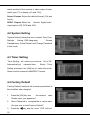
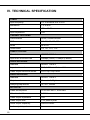
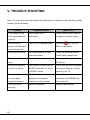
Table of Contents
I.GENERAL INFORMATION............................................................................... 3
1. Preface .................................................................................................. 3
2. Main Features ....................................................................................... 3
3. For Your Safety ..................................................................................... 4
4. General Operation of the Receiver ....................................................... 4
II. GETTING STARTED....................................................................................... 5
1. Install Receiver...................................................................................... 5
2. Front Panel............................................................................................ 6
3. Rear Panel ............................................................................................ 7
4. Remote Control: .................................................................................... 8
4.1 Installing Batteries in your Remote Control ................................... 10
4.2 Using the Remote Control ............................................................. 10
5. Scan your channels............................................................................. 11
III. MENU STRUCTURE ................................................................................... 12
1. Channel ............................................................................................... 12
1.1 TV Channel List ............................................................................. 12
1.2 Radio Channel List......................................................................... 15
2. Channel Scan...................................................................................... 15
2.1 Auto Scan....................................................................................... 15
2.2 Manual scan................................................................................... 15
2.2.1 Manual Scan by Frequency ........................................................ 16
2.2.2 Manual Scan by Channel............................................................ 16
3. Guide................................................................................................... 16
4. Setup ................................................................................................... 17
4.1 AV Setting ...................................................................................... 17
4.2 System Setting............................................................................... 18
1
4.3 Timer Setting.................................................................................. 18
4.4 Factory Default............................................................................... 18
4.5 System Information ........................................................................ 19
IV. TECHNICAL SPECIFICATION .................................................................... 20
V. TROUBLE SHOOTING................................................................................. 22
2
I.GENERAL INFORMATION
1. Preface
STB5HD provides beautiful High Defin ition and Standard Definition Television pictures
from Australian Digital TV broadcasts. An attractive On Screen Display and Electronic
Program Guides help simplify installation and
day to day use. Full Closed Caption
Subtitle and Teletext functions are included. Extensive Digital and Analogue Audio Video
connectivity simplify use with most modern display devices whilst Optical and Coaxial
SP/DIF Audio outputs can provide full surround audio.
Program parameters restore automatically after power is
disconnected. Equipped with
the latest chipset technologies, STB5HD runs cool providing stable Digital
Television
reception you can rely on.
2. Main Features
• Centre Cut option displays 16/9 HD on 4/3 screens without black bars
• Resolutions: 1920 x 1080i, 1280 x 720p, 720 x 576p and 720 x 576i
• On Screen Display in clear 32bit colour & multiple languages
• Signal Strength and Quality information display included
• HDMI and Y/Pb/Pr High Definition Component outputs
• Composite and S-Video Standard Definition outputs
• Optical and Coaxial Digital Audio SP/DIF outputs
• 8 day Electronic Program Guide (EPG) function
• Software upgradable via PC RS-232 serial port
• Stores up to 3000 TV and Radio channels
• Saves program parameters at Power Fail
• Time display on front panel in Standby
3
• Closed Captions and Digital Subtitles
• Low power consumption in Standby
• Full Teletext function included
• Program Information Hot Key
• Superb HD picture quality
3. For Your Safety
Allow clear space around the receiver to provide sufficient ventilation
Do not cover the receiver's ventilation slots or place it near a heat source
Use a soft cloth and mild washing solution to clean the case
Do not connect or change cables when the receiver is plugged in
Do not remove the cover
Do not allow the unit to be exposed to extreme heat, cold or humidity
Liquids, spray or other materials must not make contact with internal parts.
4. General Operation of the Receiver
The everyday operation of your receiver is accessed via user friendly On Screen
Displays and Menus. These Menus can guide you through installation and channel
manager with its various functions to enhance your viewing pleasure.All functions can be
accessed through the Remote Control and the front panel keys provide access to basic
functions. As new software may change the function of a receiver it should not be
installed unless specific upgrade instructions have been given by Wintal for this receiver.
Should you experience any difficulties with the operation of your unit, please consult the
relevant section of this manual or Trouble Shooting. Alternatively contact your dealer or
Wintal Customer Care Centre on 1300 662 946
4
II. GETTING STARTED
1. Install Receiver
Connection
Connect a functional TV Antenna to “ANT IN” for your local TV channels.
If in doubt call an experienced TV Antenna Installer.
Connect your receiver to the AV display device you wish to use. Please refer to the TV
user manual when making connection to the TV . Your receiver s Menu will display the
‘Installation Guide’ confirming successful connection.
WARNING! As th is is a High Defin ition receiver, video output Format
should be
selected to best match the native resolution of your dis play. To make initial installation
easy, the unit default resolution is 576i whi ch will give a picture on most displays . This
can be easil y changed. If your display shows the default error message “Please Select
576i …” you are connected to an SD output when the receiver is in a HD mode which can
be changed by repeatedly pressing the ‘FORMAT’ key until a picture shows.
5
2. Front Panel
The following controls are located at the right of the front mirror panel.
Switch between operation and standby modes.
:
MENU: Displays main menu and command box on screen.
Confirm operation.
OK:
6
:
Change channels or move the cursor up/down in the menu.
:
Adjust the volume or move the cursor left/right in the menu.
3. Rear Panel
VIDEO:
Output video signal to VIDEO port on TV
S-VIDEO:
Connect to S-VIDEO port on TV
Y/Pb/Pr:
Output high definition video signal to YPbPr ports on TV
AUDIO L/R:
Output left and right audio signal to R/L-AUDIO ports on TV
COAXIAL:
Digital audio output
SP/DIF:
Optical digital audio output
HDMI:
Output high definition video and audio signal to HDMI port on TV
ANT IN :
Connect to a terrestrial antenna
LOOP OUT:
Connect to another receiver
RS-232:
Connect to PC for software upgrade (authorized for qualified personnel).
100 to 240V:
Power supply
ON/OFF:
Power switch
7
4. Remote Control:
8
: Switch between operation and standby modes.
: Mute or restore the sound.
Number Keys: Number keys.
:
Back to the previous channel.
INFO:
Display information about current and next TV program.
AUDIO:
Switch audio languages.
Switch among left/right/stereo.
:
Switch between TV and radio modes.
:
EPG:
Display Electronic Program Guide menu.
MENU:
Display the main menu.
EXIT:
Back to the previous menu or full screen.
:
Change channels or move the cursor up/down in the menu.
:
Adjust the volume or move the cursor left/right in the menu.
OK:
Confirm operation.
FREEZE: Pause/restore the play.
FAV:
Display favorite channel list.
FORMAT: Switch video format among 1080i, 720p, 576p and 576i
SUB.T:
Switch on/off Subtitle.
TEXT:
Activate Teletext menu.
ASPECT: Change aspect ratio of screen among Full, Centre Cut and Letter Box.
9
Note:
1. Colour keys [Red] , [Green], [Yellow] and [Blue] operate Teletext functions and some
other special functions in Menu.
2. Subtitle and Teletext functions are only available when broadcast.
4.1 Installing Batteries in your Remote Control
Remove the battery cover from the remote control. Insert 2 x AAA
size batteries inside
the battery compartment. Please take note of the battery ’s polarity which is indicated
inside the battery compartment.
4.2 Using the Remote Control
Point it towards the front of your receiver and press the desired key. The remote control
has a range of up to 7 metres at an angle of + or - 60 degrees.
The remote contr ol signal requires a clear path. Obstacles such as
plants can block the signal. Sunlight or room with bright
Control sensitivity.
10
furniture , walls or
light will decrease Remote
5. Scan your channels
Check that ‘Select TV Type’ and ‘Select State’ match your screen shape and location.
Use
and
keys to change selection.
Press the [OK] key to start Scan. As digital broadcasts are found each channel is
identified on screen and its programs listed. You can cut the scan short by pressing the
[OK] or [EXIT] keys.
Menu reads ‘Installation Guide – END’ and shows a summary of the result.
Press [OK] to complete set up and exit to watch TV..
11
III. MENU STRUCTURE
1. Channel
When you press the [Menu] key on the Remote Control unit the main Menu engages on
screen. Starting from Channel mode, there are 4 sub-menu groups: ‘Channel’, ‘Scan’,
‘Guide’ and ‘Setup’.
Channel Mode provides two options:
1) TV Channel List;
2) Radio Channel List.
Press
to enter Sub Menu,
or
to navigate
and [OK] to make a selection.
1.1 TV Channel List
In this mode, you can select [1] Favorite, [2] Edit, [3]
Sort, [4] Add / Delete ,
[5] Move or [6] Search for
channels, by name – using the on screen keyboard.
12
1.1.1 Favorite
1.
Press the [1] key to select Favorite function.
2.
Use the
3.
Use the
4.
keys to select a Favorite storage
location from ‘HD’
‘ SD’ or‘ MOVIES’ etc.
keys to make a selection.
Press the [OK] key and a red
mark will show
to right side of selected channel name.
5.
Add channels to each list as required.
6.
When a Favorite storage locati on has channels
saved in it a
mark shows left of the Favorite
group name.
To cancel, select
marked channels
press the [OK] key. The
again and
mark will disappear and
the channel will be deleted from that Favorite list.
Press [EXIT] or [MENU] to store.
1.1.2 Edit
1.
Press [2] and
the On Screen
Keyboard will
appear.
keys.
2.
Navigate with
3.
Select CLR to Clear existing name.
4.
Press the [OK] key to select each character.
5.
When complete press Screen Keyboard OK to
confirm.
6.
Press [EXIT] or [MENU] to store new name.
13
1.1.3 Sort
1.
Press [3] to engage Sort.
2.
Navigate with
3.
Programs can be Sorted by ‘Logical’ Channels,
keys.
‘Channel Name’ or ‘Frequency’
.
4.
Press [EXIT] or [MENU] to store.
1.1.4 Add / Delete
1.
Press [4] to enter Add / Delete Channel function.
2.
Use
3.
Press the [OK] key and ‘CH Deleted ’ message
keys to select a channel to delete.
appears on the top left corner of your screen.
4.
Press the [OK] key again
to restore.
Deleted
channels remain in the Add / Delete list but no
longer appear in the Channel List.
1.1.5 Move
1.
Press [5] key to move a channel within the TV
Channel List.
2.
Use
keys and press [OK]
to select a
channel to move.
3.
Use
keys again to
move channel to
desired location and press [OK] to execute.
4.
Press [EXIT] or [MENU] to store.
1.1.6 Search
Press [6] to search for channels from the Channel
List using the On Screen Keyboard.
14
1.2 Radio Channel List
In ‘Radio Channel List’ you can also select [1] Favorite, [2] Edit, [3] Sort, [4] Add / Delete ,
[5] Move or [6] Search for channels by following the instructions above for TV Channel
List.
2. Channel Scan
Channel scan allows you to rescan for all channels.
Please note
previously saved
personal Channel
Settings are lost when Scanning.
2.1 Auto Scan
1.
Press the [Menu] key on the Remote Control
Unit.
2.
Select Channel and press [OK].
3.
Press
or
and [OK] keys to select from
‘Auto Scan’ and ‘Manual.
4.
Press [OK] again to start search.
Select ‘Cancel’ to stop the whole operation, and ‘Exit’
to return to previous page.
2.2 Manual scan
This function
allows you to search for channels
manually either by channel frequency or channel
number. This function should only be attempt if you
are familiar with the frequency or channel number.
15
2.2.1 Manual Scan by Frequency
1.
Input desired search frequency by using the
numerical keypad on the remote control.
2.
Press [OK] to start search.
3.
Channel that is found will be saved into c hannel
list.
2.2.2 Manual Scan by Channel
1.
Select desired search channel number by
2.
keys
Press [OK] to start search.
3.
Channels that are found will be saved into
pressing the
channel list.
3. Guide
Informative Electronic Program Guide up to 8 days in adva nced is transmitted by many
broadcasters.
Press the ‘GUIDE’ key to view EPG function (Full
Guide)
•
Press the
keys to see EPGs for other
channels and
keys to move between
program events.
•
Detail description of the program is
show ed in
the grey rectan gle towards the bottom of the
screen.
•
The [Yellow] and [Green] keys allow selection of
EPG for other days.
•
Where more than 1 page of
EPG data is
available, press the [Blue] key to view 2
•
16
Press EPG to exit.
nd
page.
Press the [OK] key on the program to
add program
into “Remind List ”. The unit will set a reminder to
remind you about the up coming program which are
added into the “Remind List”.
‘Simple Guide
’
shows
abbreviated program
information. It
is accessed from
‘Full Guide’ by
pressing the [Red] key, and vice versa.
EPG Access via Menu:
to enter EPG.
Select [MENU]
‘Guide’ and
Press
keys to select from ‘Simple Guide’
or
‘Full Guide’ and ‘Remind List’
.
4. Setup
‘Setup’ menu contains these 6 sub-menus:
1) AV Setting
2) System Setting
3) Timer Setting
4) Factory Default
5) System Information
4.1 AV Setting
‘AV Setting’ contains the following sub menus:
Audio Language: Select the desired language.
Resolution: Resolution
is use for switching the
video output mode (576i, 576p, 720p and 1080i). You
can press [Left/Right] key to select each mode
circularly.
Screen Ratio: This function allows you to select the
17
match method of the receiver ’s video output to best
match your TV or display (4:3 and 16:9).
Screen Format: Select the desired format (Full and
Letter).
SPDIF Output: Select the
desired digital audio
output option (Off, PCM and AC3).
4.2 System Setting
‘System Setting’ allows the user to select Time Zone,
Daylight
Saving, OSD Language,
Screen
Transparency, Guide Default and Change Password
in this mode.
4.3 Timer Setting
‘Timer Setting’ will switch your receiver On or Off
Automatically at
a desired time.
Select ‘Timer
Setting’ and press the [OK] key to enter this mode .
Dates must be entered in MM/DD/YY format.
4.4 Factory Default
‘Factory Default’ resets all the receiver parameters to
the condition when shipped.
1.
Press the [OK] key and
the receiver
asks
‘Please Input your password’
.
2.
Once Password is accepted the re ceiver asks
‘Are you sure to load Factory Default?’
3.
18
Press the
key and the word ‘YES’ will turn
Yellow. Press the ‘OK’ key and receiver will
reset.
4.
Factory Default password
is 1 2 3 4.
Use
function carefully.
Note: This function will reset all settings to default
settings and clear all saved channel including
favorite list.
4.5 System Information
System information provides technical information including Product, Software Version,
Hardware Version, and Loader version.
19
IV. TECHNICAL SPECIFICATION
TUNER
Input frequency
174 to 860MHz UHF & VHF
Bandwidth
7 or 8 MHz
Input level
-72 to -20dBm
Input impedance
75O
CHANNEL DECODING
Demodulation
QPSK,16QAM,64QAM
FEC
1/2, 2/3, 3/4, 5/6, 7/8.
Mode
8K or 2K
Guard Band
1/4, 1/8, 1/16, 1/32
DEMULTIPLEXER
Standard
ISO/IEC 13818-1
Input max. bit stream rate
60Mbps (Serial) /7.5MBps (Parallel)
VIDEO DECODING
Standard
ISO/IEC 13818-2
Aspect ratio modes
16:9, 4:3 Centre Cut and 4:3
Video output resolution modes
576i 576p 720p 1080i
AUDIO DECODING
Standard
ISO/IEC 13818-3
Output modes
Stereo, Left, Right.
Sampling frequencies
32, 44.1, 48KHz
AV OUTPUT
20
Video de-emphasis
CCIR REC.405-1, 625LINES
Video bandwidth
5.5 MHz
Video output impedance
75O
Video output level
1.0V peak to peak
Audio output frequency
20Hz to 20KHz
Audio output Impedance
Low
POWER
Input voltage
AC100 to 240V, 50 to 60Hz
Power consumption
15 W max
AMBIENT
Operating temperature
0° to 40°
C
21
V. TROUBLE SHOOTING
Note : If you cannot solve the problem by referring to the above trouble shooting, please
contact your local dealer.
Problem
Possible Causes
What To Do
The display on the
Mains cable is not
Check that the main cable is
front panel does not
connected.
plugged into power socket.
The unit is in standby mode.
Press the
key on the
RCU or front panel.
Poor signal quality or bad
Check the antenna system
interconnections
Check cable connections.
Signal is too strong.
Try a signal attenuator to the
light up.
No sound and
picture, but the front
panel shows time.
No sound or picture.
Bad picture/ Blocking
error.
RF IN port.
No picture appears
The system is connected by
Check that you have selected
on the TV screen.
SCART leads and TV is not
the correct channel or Video
in AV/EXT mode.
Input on your TV.
There is interference
The AV connection to your
Check the connection method
on your digital
display is nit matched
and press the FORMAT key
terrestrial channel.
properly to your receiver.
for best picture.
The RCU is not
Battery exhausted.
Replace the batteries.
working.
22