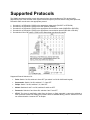
1
Nextiva S2800e Series
Programming Guide
Revision D
April 2009
Nextiva S2800e Series Programming Guide
© 2009 Verint Systems Inc. All Rights Reserved Worldwide.
Unauthorized use, duplication, or modification of this document in whole or in part without the written consent
of Verint Systems Inc. is strictly prohibited. By providing this document, Verint Systems Inc. is not making
any representations regarding the correctness or completeness of its contents and reserves the right to alter
this document at any time without notice. Features listed in this document are subject to change.
Verint Systems Inc. does not warrant, guarantee or make any representation regarding the use or the results
of the use of the information, links, tools, and materials in terms of the accuracy, reliability, quality, validity,
stability, completeness, currentness, or otherwise of its content or products. The entire risk as to the use,
results and performance of information, links, tools and materials provided or referenced herein is assumed
by the user. Verint Systems Inc. shall not be liable for damages resulting from the use, misuse or unlawful
use of the information, links, tools, and materials contained or referenced herein.
The Verint Systems Inc. products are protected by one or more of the following U.S., European or
International Patents: USPN 5,659,768; USPN 5,689,442; USPN 5,790,798; USPN 6,278,978; USPN
6,370,574; USPN 6,404,857; USPN 6,510,220; USPN 6,724,887; USPN 6,751,297; USPN 6,757,361; USPN
6,782,093; USPN 6,839,667; USPN 6,952,732; USPN 6,959,078; USPN 6,959,405; USPN 7,047,296; USPN
7,149,788; USPN 7,155,399; USPN 7,203,285; USPN 7,216,162; USPN 7,219,138; USPN 7,254,546; USPN
7,281,173; USPN 7,284,049; USPN 7,325,190; USPN 7,466,816; USPN 7,478,051; USPN RE40,634; and
other provisional rights from one or more of the following Published US Patent Applications: US 11/394,408;
US 11/771,499; US 11/396,514; US 11/772,440; US 11/565,943; US 11/565,946; US 11/565,948; US
11/540,739; US 11/540,086; US 11/541,313; US 11/541,252; US 11/540,282; US 11/529,947; US
11/540,785; US 11/540,736; US 11/540,904; US 11/540,353; US 11/608,340; US 11/608,350; US
11/608,358; US 11/567,808; US 11/692,983; US 11/693,933; US 11/693,923; US 11/693,828; US
11/567,852; US 11/608,440; US 12/015,621; US 11/540,322; US 11/924,201; US 11/616,490; US
11/621,134; US 11/752,458; US 11/712,933; US 11/824,980; US 11/729,185; US 11/804,748; US
11/831,260; US 11/395,992; US 11/359,319; US 11/359,195; US 11/359,357; US 10/832,509; US
11/742,733; US 11/831,257; US 11/831,250; US 11/691,530; US 11/479,267; US 11/529,942; US
11/768,349; US 11/540,281; US 10/633,357; US 11/693,899; US 11/479,056; US 11/529,132; US
11/540,320; US 11/037,604; US 11/529,842; US 11/540,171; US 11/478,714; US 11/529,946; US
11/868,656; US 11/776,659; US 11/090,638; US 11/410,004; US 10/771,315; US 10/771,409; US
11/540,900; US 11/528,267; US 12/118,781; and other U.S. and International Patents and Patents Pending.
VERINT, the VERINT logo, ACTIONABLE INTELLIGENCE, POWERING ACTIONABLE INTELLIGENCE,
WITNESS ACTIONABLE SOLUTIONS, STAR-GATE, RELIANT, VANTAGE, X-TRACT, NEXTIVA, ULTRA,
AUDIOLOG, WITNESS, the WITNESS logo, IMPACT 360, the IMPACT 360 logo, IMPROVE EVERYTHING,
EQUALITY, CONTACTSTORE, and CLICK2STAFF are trademarks or registered trademarks of Verint
Systems Inc. or its subsidiaries. Other trademarks mentioned are the property of their respective owners.
ii
Contents
Overview ..............................................................................................................................1
Integrating the S2800e to Nextiva ......................................................................................2
Programming the S2800e Camera .....................................................................................3
System Settings..............................................................................................................................................4
Camera Controller ..........................................................................................................................................7
Alarm Handling .............................................................................................................................................12
Relay Driver...................................................................................................................................................15
Source Titling................................................................................................................................................15
Preset/Tour Handler .....................................................................................................................................17
Schedule/Time of Day ..................................................................................................................................20
Language.......................................................................................................................................................21
Install Defaults ..............................................................................................................................................21
Supported Protocols.........................................................................................................23
Contents • iii
Overview
The Nextiva® S2800e series is a partnership between Vicon and Verint. The Verint encoder installed on the Vicon
main board provides IP functionality to the Vicon SurveyorVFT PTZ camera. This way, camera users have the
benefit of using the Nextiva software, including its IntelliStream virtual matrix. In addition, by connecting the output
relay from the main Vicon board to the alarm input contact on the IP encoder board, you add one alarm to the
S2800e camera that can be handled with the Nextiva IntelliFlow automated rule engine.
This guide describes how to program the Nextiva S2800e series cameras. All functions programmed into the
S2800e stay resident in the camera and do not occupy any external CPU memory.
The series contains the following types of cameras:
•
22X high-resolution cameras
•
22X high-resolution cameras with the ExView CCD technology (also called 22XEX)
•
23X day/night cameras
•
35X day/night cameras featuring image stabilization
Unless otherwise specified, the word S2800e refers to any of these cameras.
All camera types have many of the same features, although some models have unique features that will be
mentioned specifically in the guide.
In addition to this programming guide, the following documents are also available:
•
Nextiva S2800e Series User Guide
•
Nextiva Administrator Guide
•
Nextiva Review Operator Guide
•
TN_5.1_093 Integrating Third Party PTZ Cameras technical note
Nextiva S2800e Series Programming Guide
Overview • 1
Integrating the S2800e to Nextiva
Before programming the S2800e camera, you must configure it and integrate it with the Nextiva software.
Integrating the S2800e with Nextiva enables the camera functionality, including PTZ control, camera presets, and
patterns, to be controlled from Nextiva Review or a keyboard connected to the Nextiva system.
Once the camera is added to Nextiva, you need to perform such operations on the camera as configuring video
input settings, assigning a recording profile, and assigning user rights. Then you define the S2800e in
IntelliStream (to create camera tours) and create IntelliFlow scenarios.
The major integration steps are:
1. Installing the camera. Follow the guidelines in the Nextiva S2800e Series User Guide.
2. Setting network parameters with the Verint SConfigurator tool. For details, refer to the Nextiva S2800e Series
User Guide.
3. Discovering the new camera with the System Setup Wizard: Start Nextiva Control Center > Tools > System
Setup Wizard. For details, refer to the Nextiva Control Center online Help.
4. Configuring the PTZ settings in Nextiva Control Center: Select System Components > Devices, then select
the S2800e, then select the PTZ tab:
• Check Enable the Camera PTZ Control.
• Select the Vicon Surveyor 2000 protocol.
• Enter 1 as the PTZ address.
• Select the S2800e RS-232/RS-422 serial port.
For more information about camera integration with Nextiva version 5.1, refer to the TN_5.1_093 Integrating Third
Party PTZ Cameras technical note. This document is located on the Verint Video Intelligence Solutions extranet
(http://vvs.verint.com), under Community Links > Technical Notes - HotFixes - Rollups > Nextiva
Enterprise > Nextiva 5.1.
Nextiva S2800e Series Programming Guide
Integrating the S2800e to Nextiva • 2
Programming the S2800e Camera
Programming is performed through an on-screen menu that appears on top of the live view of the camera in
the Nextiva Review application. The menu contents vary depending on the camera model.
To access the on-screen menu:
1. Open Nextiva Review.
2. View live video for the camera.
3. Click the Show PTZ Toolbar
4. Click the Menu
button on the video window toolbar.
button.
5. Press the Enter key to select a menu. Instructions are available on the screen for almost all functions.
6. Use the up and down arrows on the computer keyboard to browse through a menu.
7. Use the left and right arrows on the computer keyboard to select values for a specific command.
8. To leave a menu without retaining the changes, press the Backspace key.
9. Click the Menu button to exit the main menu of the S2800e.
For more information, refer to the “Live and Recorded Video” chapter in the Nextiva Review Operator Guide.
You can also use a PTZ keyboard to control the camera. Ensure that the keyboard you connect is supported
by the Nextiva software.
The commands on the main menu are:
•
System Settings —Adjusts the speed of the pan and tilt axes. Solving preset positions is always done
at full speed. This menu also controls the Zoom Scalable Pan/Tilt, Compass, PTZ Timeout, and Flip
features.
•
Camera Controller —Adjusts the advanced video features available on the S2800e.
•
Alarm Handling — Configures the four alarm inputs of the S2800e.
•
Relay Driver — Adjusts and configures the output relay for control of external devices.
•
Source Titling — Programs and displays the various titles available to the S2800e.
Note: All titles are disabled from the factory and will not be displayed upon initial startup.
•
Preset/Tour Handler — Programs preset events into the camera dome. On the 23X/35X models, it
allows Motion Detection zone set up.
Nextiva S2800e Series Programming Guide
Programming the S2800e Camera • 3
Overview
The Nextiva® S2800e series is a partnership between Vicon and Verint. The Verint encoder installed on the Vicon
main board provides IP functionality to the Vicon SurveyorVFT PTZ camera. This way, camera users have the
benefit of using the Nextiva software, including its IntelliStream virtual matrix. In addition, by connecting the output
relay from the main Vicon board to the alarm input contact on the IP encoder board, you add one alarm to the
S2800e camera that can be handled with the Nextiva IntelliFlow automated rule engine.
This guide describes how to program the Nextiva S2800e series cameras. All functions programmed into the
S2800e stay resident in the camera and do not occupy any external CPU memory.
The series contains the following types of cameras:
•
22X high-resolution cameras
•
22X high-resolution cameras with the ExView CCD technology (also called 22XEX)
•
23X day/night cameras
•
35X day/night cameras featuring image stabilization
Unless otherwise specified, the word S2800e refers to any of these cameras.
All camera types have many of the same features, although some models have unique features that will be
mentioned specifically in the guide.
In addition to this programming guide, the following documents are also available:
•
Nextiva S2800e Series User Guide
•
Nextiva Administrator Guide
•
Nextiva Review Operator Guide
•
TN_5.1_093 Integrating Third Party PTZ Cameras technical note
Nextiva S2800e Series Programming Guide
Overview • 1
Integrating the S2800e to Nextiva
Before programming the S2800e camera, you must configure it and integrate it with the Nextiva software.
Integrating the S2800e with Nextiva enables the camera functionality, including PTZ control, camera presets, and
patterns, to be controlled from Nextiva Review or a keyboard connected to the Nextiva system.
Once the camera is added to Nextiva, you need to perform such operations on the camera as configuring video
input settings, assigning a recording profile, and assigning user rights. Then you define the S2800e in
IntelliStream (to create camera tours) and create IntelliFlow scenarios.
The major integration steps are:
1. Installing the camera. Follow the guidelines in the Nextiva S2800e Series User Guide.
2. Setting network parameters with the Verint SConfigurator tool. For details, refer to the Nextiva S2800e Series
User Guide.
3. Discovering the new camera with the System Setup Wizard: Start Nextiva Control Center > Tools > System
Setup Wizard. For details, refer to the Nextiva Control Center online Help.
4. Configuring the PTZ settings in Nextiva Control Center: Select System Components > Devices, then select
the S2800e, then select the PTZ tab:
• Check Enable the Camera PTZ Control.
• Select the Vicon Surveyor 2000 protocol.
• Enter 1 as the PTZ address.
• Select the S2800e RS-232/RS-422 serial port.
For more information about camera integration with Nextiva version 5.1, refer to the TN_5.1_093 Integrating Third
Party PTZ Cameras technical note. This document is located on the Verint Video Intelligence Solutions extranet
(http://vvs.verint.com), under Community Links > Technical Notes - HotFixes - Rollups > Nextiva
Enterprise > Nextiva 5.1.
2 • Integrating the S2800e to Nextiva
Nextiva S2800e Series Programming Guide
Programming the S2800e Camera
Programming is performed through an on-screen menu that appears on top of the live view of the camera in
the Nextiva Review application. The menu contents vary depending on the camera model.
To access the on-screen menu:
1. Open Nextiva Review.
2. View live video for the camera.
3. Click the Show PTZ Toolbar
4. Click the Menu
button on the video window toolbar.
button.
5. Press the Enter key to select a menu. Instructions are available on the screen for almost all functions.
6. Use the up and down arrows on the computer keyboard to browse through a menu.
7. Use the left and right arrows on the computer keyboard to select values for a specific command.
8. To leave a menu without retaining the changes, press the Backspace key.
9. Click the Menu button to exit the main menu of the S2800e.
For more information, refer to the “Live and Recorded Video” chapter in the Nextiva Review Operator Guide.
You can also use a PTZ keyboard to control the camera. Ensure that the keyboard you connect is supported
by the Nextiva software.
The commands on the main menu are:
•
System Settings —Adjusts the speed of the pan and tilt axes. Solving preset positions is always done
at full speed. This menu also controls the Zoom Scalable Pan/Tilt, Compass, PTZ Timeout, and Flip
features.
•
Camera Controller —Adjusts the advanced video features available on the S2800e.
•
Alarm Handling — Configures the four alarm inputs of the S2800e.
•
Relay Driver — Adjusts and configures the output relay for control of external devices.
•
Source Titling — Programs and displays the various titles available to the S2800e.
Note: All titles are disabled from the factory and will not be displayed upon initial startup.
•
Preset/Tour Handler — Programs preset events into the camera dome. On the 23X/35X models, it
allows Motion Detection zone set up.
Nextiva S2800e Series Programming Guide
Programming the S2800e Camera • 3
•
Schedule/Time of Day —Provides a means of programming events to occur at specific times of the
day and programming of the time display format. It allows selection of daylight saving time, 12/24-hour
format, and actual setting of the time and date.
•
Language — Programs language format for titles and menus. Language choices are English,
Spanish, French, German, and Italian. The word “Language” will continuously change between the
five translated words (Language, Idioma, Langue, Sprache and Lingua), to alert an operator that this
prompt is related to changing the language. When selected, the menus will immediately display the
new language.
•
Install Defaults — Resets the S2800e to the factory default settings. All previously programmed titles
and settings are lost when you access this function, so keep a record of programmed settings. For the
list of the main default settings, see page 21. Some default settings are camera dependent; those are
not listed.
System Settings
The System Settings menu allows adjustment of the mechanical parameters of the camera.
The System Settings options are:
With the first two selections, Max. Manual Pan Speed and Max.
Manual Tilt Speed, the operator selects a maximum speed from a bar
graph display. The variable speed on the joystick will then range from 0
at the center position to the user defined maximum speed at full
deflection. For all camera models except the 22X, pan is continuously
variable from 0.1 to 360° per second, while the tilt range is from 0.2 to
150° per second. For the 22X models, maximum pan speed is
120º/sec, while maximum tilt speed is 90º/sec.
Note that the pan and tilt controls remain variable speed across the full
range of the joystick regardless of the maximum speed setting. This
feature allows the user to set the optimum speed for each individual
camera and to customize camera performance.
These menu settings do not affect the camera speed when acquiring a
preset target. Presets are solved at the fastest possible speed
regardless of the maximum manual speed selected. Default setting for
pan speed is 100° per second, while tilt speed is 90° per second.
The System Settings menu also allows to enable or disable Zoom
Scalable Pan/Tilt. When enabled, this feature adjusts the pan and tilt
speed relative to the amount of magnification provided. When the
camera is zoomed in on a subject, the speed is slowed down to
compensate for the size of the image. This allows a finer range of
motion when looking at close-up subjects. The default is Enabled.
4 • Programming the S2800e Camera
Nextiva S2800e Series Programming Guide
The zero compass feature provides a directional title display, a 0-360º
pan reading display and a -2.5º to 92.5º tilt reading display in the format
North 312/35. This feature allows an operator to program and use a
continuous absolute pan and tilt display reading.
To set true North position (Zero Compass):
1. At the camera dome, verify that the camera’s approximate North
position can be viewed and locally panned with a keypad.
2. Using a compass or any other positioning device as a reference,
position the camera of the dome until it is facing true North.
3. Press the Enter key to set this position.
4. The compass title should display N 360/X. N is North, 360º is the
true North setting and X is a fixed null tilt position.
On the 23X/35X (day/night) cameras, you can enable or disable a Flip
Image option. This is used when mounting the dome in an inverted
position. Be aware that certain functions are reversed to compensate
for the image flip.
The PTZ Timeout feature, when enabled, allows the unit to timeout if
manual pan, tilt or zoom is active for a programmable amount of time
from up to 255 seconds. This feature allows you to select an action,
Stop or Preset, when it occurs. When this occurs, a message displays
for two seconds. This will not occur if autopanning or any automatic
function is active.
The Address Setting allows overriding the DIP switch address. When
the address is changed, the dome will reset.
Note: Do not change this value; otherwise you will lose connection with
Nextiva Review.
Nextiva S2800e Series Programming Guide
Programming the S2800e Camera • 5
A Fan Speed Control menu allows control of air circulation. There are
two modes available, Auto or Defog. In Auto mode the fan speed is
proportional to the unit temperature. In Defog mode, the fan speed is
set to maximum speed to achieve maximum air circulation for fast
defogging.
The Privacy Mask Zoom Level option allows you to set the zoom level
of privacy masks. The zoom level is from 1.0X to the maximum optical
zoom of the camera, adjustable in 0.1 increments. With this feature, the
privacy mask will only display if the camera zoom level is greater than
or equal to the zoom level set for the privacy mask; this way, the mask
does not appear on screen to obscure the view if its zoom level is
lower. The default zoom level is 1.0X, which means it will always
display.
For more information about privacy masks, see page 11.
6 • Programming the S2800e Camera
Nextiva S2800e Series Programming Guide
Camera Controller
The next menu, Camera Controller, takes advantage of the Digital Signal Processor (DSP) in the camera to
adjust functions traditionally relegated to screw terminals or DIP switches.
The options in the Camera Controller menu are:
The S2800e uses fully- and semi-automatic iris control. When autoiris is
on, the Close Iris and Open Iris buttons on a keyboard select the
optimum video level the operator wishes the camera to maintain; in
Nextiva Review, these buttons do not work on some cameras. This is
called the Average Iris Level; it adjusts the iris based on the average
intensity of the entire picture. When autoiris is turned off on the
keyboard, the Close Iris and Open Iris buttons directly regulate the lens
aperture.
Selecting the Iris Levels menu displays a sub-menu allowing the user
to choose settings for Average Iris Level, Peak Iris Level or Keypad
Autoiris Adjust. Average Iris Level is described above and performs the
same setting that the Iris Open and Iris Close buttons do when the
dome is in autoiris mode. Peak Iris Level allows the autoiris to regulate
the iris opening based on the video level (or intensity) of the brightest
objects in the picture. The settings may be combined to optimize each
camera’s ability to react to its location. The Keypad Autoiris Adjust
feature prevents an operator from adjusting the Autoiris level from the
keypad, when disabled, which is the default setting.
Note: The S2800e allows the iris to be switched between auto and
manual in simplex. A temporary message (two seconds)
displays indicating auto or manual iris whenever the iris mode
is switched.
For the 23X or 35X models, the Night Mode Control menu will appear.
This menu allows configuration of the IR (infrared) lens. The IR lens is a
mechanically driven lens that is used to optimize the image at low light
levels or during night hours. When Mode “DISABLED” is chosen, the IR
capability is completely disabled. When one of the “AUTO” options is
selected, the lens senses when the IR filter is needed and will operate
at a low, medium, or high relative light level. When the “AUX6-Manual”
option is selected, the lens is only manually operated using the Auxiliary
6 function. Night Color options allow the image to be black-and-white or
color in low light conditions. When “DISABLED,” it will be in black-andwhite. There is also an option for tuning the IR Frequency Response
for specific IR lighting by choosing a setting of default (normal light),
850 nm or 950 nm. This is used to optimize the video intensity when IR
lighting is used.
Nextiva S2800e Series Programming Guide
Programming the S2800e Camera • 7
The Wide Dynamic Range menu offers a DISABLED or ENABLED
mode. When enabled, the camera will be able to view a wider
difference in light levels in the same scene, for example, if a shady area
and a bright light area are in the same scene.
Note: The S2800e must be set in an Auto Shutter mode in the Shutter
Speed menu for Wide Dynamic Range or any Auto Night Mode
levels to operate.
Wide Dynamic Range and Backlight Compensation cannot be
enabled at the same time.
The S2800e 35X model features image stabilization. The Image
Stabilization menu offers a DISABLED or ENABLED mode. When
enabled, the 35X camera eliminates shaking when zooming in on the
image.
Note: If image stabilization in ON, Motion Detection can not be enabled
and DSS (digital slow shutter) is not available.
Focus Mode allows the autofocus feature to be toggled AUTO or
MANUAL (default is AUTO). However, the most practical way to disable
autofocus is to press either of the Focus buttons on the keyboard. This
will temporarily disable focus until the camera is zoomed in or out
again. When the camera is locked on a subject, autofocus may be
disabled in this manner to prevent it from “hunting” when someone or
something temporarily moves in front of the subject. Hunting occurs
when autofocus is enabled and an object moves closer into the field-ofview, causing the focus to change from the current image to the new
object. Preset targets do not use autofocus for this reason. Therefore, if
a target is programmed out of focus, it will be out of focus each time
that preset is called.
For 23X/35X cameras in night mode, focus mode automatically
switches to AUTO when a preset is solved.
8 • Programming the S2800e Camera
Nextiva S2800e Series Programming Guide
The Shutter Speed menu is used to scroll through the various speed
options on the camera’s automatic shutter (default setting is automatic).
As with all electronic shutters, higher speeds reduce light sensitivity
without affecting the optical depth of field, as opposed to an iris
adjustment.
The shutter speed can be selected for auto-exposure with digital slow
shutter (DSS) or auto exposure with shutter priority. They function as
follows:
•
Auto-exposure with digital slow shutter: This mode will
automatically, and continuously, adjust the shutter speed down to
its slowest setting under low light conditions. The actual selected
setting will be prefixed with an AUTO. This setting is the minimum
digital slow shutter. The operator may select the slowest setting to
prevent the digital slow shutter from operating while still maintaining
auto-exposure. DSS is not available if Image Stabilization is ON.
•
Auto-exposure with shutter priority: This mode allows auto exposure
to operate under the fixed shutter settings selection. These settings
have no prefix. The following are the available speeds:
SHUTTER
TYPE
SHUTTER SPEEDS, 22XEX, 23X AND 35X CAMERAS (seconds)
DIGITAL
SLOW
SHUTTER
Auto-1/2
(Auto-1/1.5 PAL)
SHUTTER
PRIORITY
1/2
(1/1.5 PAL)
Auto- Auto- Auto- Auto- Auto1/4
1/8
1/15 1/30 1/60
1/4
1/8
1/15
1/30
1/60 1/120 1/180 1/250 1/500 1/1000 1/2000 1/4000 1/10000 1/30000
The Auto Gain Control sub-menu allows adjustment of Maximum AGC
Tuning Value, another sliding scale adjustment. This selects the relative
effect of the Automatic Gain Control (AGC). Higher settings increase
light sensitivity but boost noise as well.
The V Phase Adjust screen is designed to synchronize the vertical
phase of the camera (relative position in time when the camera starts to
scan the image) with other cameras in a system. When two cameras
are synchronized, there is no picture “roll” when switching from one
camera to another. This adjustment is also a sliding scale, from 0o to
360o. When set to 360o, the camera will be locked to an internal crystal.
Nextiva S2800e Series Programming Guide
Programming the S2800e Camera • 9
The Backlight Compensation menu allows adjustment of this setting.
Backlight compensation improves the contrast of a silhouetted image
when it is overshadowed by a lighting source coming from behind it.
This includes cameras in windowed rooms such as lobby areas, where
intense sunlight coming through the window renders features on a
silhouetted person unrecognizable.
Note: Wide Dynamic Range and Backlight Compensation cannot be
enabled at the same time.
The Aperture Adjust allows the user to set the edge quality of the total
picture. The default is automatic. However, when manual is selected,
the horizontal and vertical edge clarity can be finely adjusted.
The White Balance allows the user to override the automatic color
correction feature in the S2800e. To adjust the red and blue gain, white
balance mode must first be changed to Manual (default is automatic). In
manual mode, select either the Red Gain or Blue Gain menu and
adjust that parameter on the sliding scale. An adjustment for green is
not provided; it remains constant and the red and blue gains are
adjusted relative to the green setting.
10 • Programming the S2800e Camera
Nextiva S2800e Series Programming Guide
The Sector Censoring screen (on all camera models except the 22X)
is designed to disable the video in areas that do not require
surveillance. It is often used to keep traffic control cameras from looking
into the windows of adjacent apartment buildings, but this feature has
many other applications. Sector censoring goes one step further,
allowing the user to turn off the video for any or all of the 16 sectors. A
black screen with the words “Blank Sector” is displayed until the
camera moves out of that sector and into one where the video is
enabled. This function includes a tilt mask, where the top and bottom of
the mask is programmable for each pan sector. Only when the tilt
position is within the programmed mask will the video be disabled. The
default mask covers the entire area (full tilt up and down). The censored
sectors are programmed as follows:
1. In Nextiva Review, adjust the camera angle so that the area to be
masked is in the center of the screen.
2. From the menu, select Camera Controller > Sector Censoring.
3. Select the desired sector.
4. Tilt down (by pressing the down arrow key) to the bottom of the
area to be masked. Press Enter to set.
5. Pan right to the end of the sector, then press Enter to define.
6. In the Sector Censoring menu, enable or disable the masked
sector.
7. Repeat steps 1 to 6 for each desired sector.
Sector censoring offers sixteen privacy masks that block out selected
areas of a scene. The size and position of the block are adjustable
using the joystick and Enter key. The privacy mask provides a zoom
level feature that is set in the System Settings menu; for more
information, see page 6.
Note: Frame positioning and text size affect the privacy mask; for more
information, see page 17.
1. Select the desired sector (privacy mask).
2. Select the Pmask Number.
3. Using the joystick and the Enter key, define three corners of a
block.
When complete, the Configure Pmask screen displays to program
the next privacy mask.
4. When you exit the menu system, the privacy masks appear. The
privacy mask is zoom scalable. The default setting for video in all
sectors is Enabled, which permits video surveillance in all
16 sectors.
5. In the System Settings menu, select the Privacy Mask Zoom
Level. Select Pmask number and program the Zoom Level. The
default zoom level is 1.0X, which means it will always display.
Nextiva S2800e Series Programming Guide
Programming the S2800e Camera • 11
The Digital Zoom Mode screen allows the digital zoom feature on the
S2800e to be disabled (default setting is enabled). When the Zoom In
button is held, the lens magnifies the image to the limit of the 22:1, 23:1
or 35:1 optical zoom, depending on the camera type. Releasing the
button and pressing it will enable infinitely variable digital magnification
of the image.
With digital zoom, the user has the effect of a 264:1, 276:1 or 420:1
lens. Digital magnification, however, cannot add any resolution to the
picture. With each increase in the digital magnification, the picture gets
noisier and loses clarity. Disabling the digital zoom prevents the user
from going into a “digitally enhanced” mode in applications where it is
not desirable.
The Video Defaults menu sets all the camera video settings to the
default settings without affecting other functions, such as presets and
privacy masks. Setting the video defaults will cause the dome to reboot.
Alarm Handling
The S2800e holds the following alarm and relay signals:
•
Four local alarm signals available on the TB2 connector, on the main interface board
•
One local relay signal on the TB4 connector, on the main interface board
•
One Nextiva alarm and one Nextiva relay on the Verint mezzanine board
To use the Nextiva alarm into the Nextiva software, connect it to the relay on the TB4 connector. This way,
you will be able to use the IntelliFlow automated rule engine to create scenarios and responses based on the
state of these Nextiva signals. For the connection procedure, refer to the Nextiva S2800e Series User Guide.
To program the four local alarms located on the TB2 terminal block, use the Alarm Input Controller
programming menu. The S2800e can intelligently process and respond to these four alarms without the need
of an external CPU or controller. Many standalone applications can be built around this processing capability.
For example, a single camera could be placed in the vestibule of a building. A person walks into the vestibule
from the outside. A door contact on that door triggers the S2800e to take a picture of the person. At the same
time, a relay driver completes a circuit, which locks the inner door, preventing open exit. Once in the
vestibule, a motion detector connected to the dome senses that the person has moved over to the intercom
and turns a brighter light on in the vestibule. The dome moves over to a shot of the intercom, allowing us to
clearly see which call button is pressed.
12 • Programming the S2800e Camera
Nextiva S2800e Series Programming Guide
When the outside door is fully closed, the buzzer is enabled to allow passage from the vestibule into the
building. All activity has been sent to Nextiva, also triggered by the dome. In the event that a “panic button” is
pressed, an auto-dialer could also be connected to call the police. This illustrates how a single dome can do
the work of several systems in a standalone application.
The options in the Alarm Input Controller menu are:
The Enable/Disable Input option indicates whether the four alarms are
active. These alarms may all be turned on and off individually; this
feature is useful when a single alarm is malfunctioning, a door is
propped open, or an alarm event is only required on certain dates and
times.
Report Enable indicates whether the local alarms are processed and
resolved at the dome. If a local alarm is enabled, a message will be
displayed on the Review screen when it is triggered. If an alarm is
disabled, nothing will be displayed when it is triggered.
The Active Alarm State menu chooses how individual alarm inputs
respond when contact closures are made (high) or broken (low) (in
essence, normally open or normally closed). On 23X/35X models only,
the hardwired alarm input control can be replaced with motion alarm
detection. This capability allows a motion detection alarm to be reported
to an external CPU.
The Acknowledge Mode menu determines whether an alarm is
acknowledged manually by the operator, momentary so the alarm
remains active until the alarm state is eliminated, or automatically after
a predetermined period of time (up to 89 seconds).
Nextiva S2800e Series Programming Guide
Programming the S2800e Camera • 13
The next two menus program what happens during an alarm event.
Each alarm is actually two events, set and reset. In many cases, we
can have four alarm functions per dome. Set Actions occur when
alarms are triggered. In our example this occurs when the door is
opened. The Reset Actions occur when the alarm conditions are
removed, in this case when the door closes again. Since each action
may be programmed individually, we can handle many more functions
than are immediately apparent.
The Set Actions menu calls up a sub-menu for each of the four alarm
inputs. The Reset Actions menu calls up an identical sub-menu for the
reset actions. Choices for action upon triggering the alarm are as
follows:
•
No Action — Nothing happens on this alarm action.
•
Preset — Allows any one of the 79 dome presets to be called.
•
Turn On AUX — Allows the Relay Driver to be turned on.
•
Turn Off AUX — Allows the Relay Driver to be turned off.
Please note that a Set Action can turn on the driver, while the
corresponding Reset Action can turn off the driver.
•
Tour — The tours can only be programmed inside Nextiva.
Selecting this option to assign a tour will have no effect.
•
Autotour — The autotours can only be programmed inside
Nextiva. Selecting this option to assign an autotour will have no
effect.
The final menu choice available on the Alarm Input Controller menu is
to Program Alarm Titles. This function and sub-menu are also
available from the Source Titling menu; for more information, see
page 15.
14 • Programming the S2800e Camera
Nextiva S2800e Series Programming Guide
Relay Driver
The Relay Driver menu allows the setup of the power-up state (on or off) and output type (latching or
momentary) of the output relay. The purpose of the relay is to integrate the alarm located on the Verint board
with Nextiva, so that it can be programmed with the IntelliFlow rule engine. For that purpose, the relay must
be connected to the alarm input on the Verint encoder board. For the connection details, refer to the Nextiva
S2800e Series User Guide or see “Alarm Handling” on page 12.
The relay driver options are:
To integrate the S2800e with Nextiva, set the following values:
1. Set the Power On State to ON.
2. Set the Output Type to MOMENTARY.
Source Titling
When Source Titling is selected from the main programming menu, the following commands appear:
They control another powerful feature of the S2800e, the ability to overlay numerous titles on top of the video
image without the use of external devices.
By using internal titles, a camera can take advantage of descriptive text even when in standalone operation.
In addition, all advanced titling features, like sector titling and preset titling, are available to the operator even
when the dome is connected to devices that do not normally support these features.
The source titling options are:
The All Titles menu option allows enabling or disabling of all video
titles. This is a method of globally toggling all titles on or off. The factory
default is Disabled.
The Title Fade Control menu option on the Display Controller menu
allows selective title fading within a programmable time period. This
permits initial identification of the screen and eventual fading of the title
until it disappears. The maximum fade time is 99 seconds.
Nextiva S2800e Series Programming Guide
Programming the S2800e Camera • 15
The next option allows us to program the Camera Title. One line of
24 characters may be dedicated to the camera title. Character selection
is done with a series of two menus, the first of which contains onscreen instructions. Several graphics characters are also included and
may be used as well.
The Preset Titles, Sector Titles, and Alarm Titles options are
programmed in a similar manner. Each preset has a title that appears
on screen after the target is acquired and disappears when any key is
pressed on the keyboard controller (including operation of the joystick).
The Sector Titles feature allows the operator to divide the 360° radius
of the camera into up to 16 “slices,” each with a separate title. In this
manner, the title can reflect the orientation of the camera, even when
used in autopan mode. This is an invaluable feature to any money
handling areas (banks, casinos, racetracks, and bars) where a camera
can be used to also identify cash drawer names and locations.
The Enable Title Text menu functions similarly to the All Titles option.
It allows the user to individually turn off any of the titling functions,
including Camera Title, Alarm Titles, Preset Titles, and Sector Titles.
Two status titles, AUX Function Status and Lens Status, provide onscreen displays of the status of those sub-systems. Time, Date,
Compass and Azimuth display can also be enabled or disabled. The
Azimuth text displays the pan and tilt degrees.
Another menu, Configure Text Layout, allows the user to modify the
screen location and length of each title. This placement allows the titles
to be moved to a position where they will not obstruct significant or
essential portions of the video image.
16 • Programming the S2800e Camera
Nextiva S2800e Series Programming Guide
The next menu is used to Adjust Frame. This function moves the onscreen titling frame around the picture to compensate for monitors
which overscan the image. Coordinates for horizontal and vertical
position are displayed on the screen to simplify the uniform placement
of multiple S2800e cameras.
It is important to realize the power behind setting titles on a camera-bycamera basis. Regardless of the system size, it is rarely desirable for
the title to appear on the same portion of the screen. Not all cameras
require the same information, and an essential feature in one location
becomes a drawback in another.
Note: Changing the frame size from the defaults affects the privacy
mask coverage. If the frame is not centered, the focal point used
for the privacy mask is off and will shift when zooming in.
The Text Size menu allows selection of the title characters size for the
first two lines of text.
Note: Changing the text size from the defaults affects the privacy mask
coverage.
The Install Defaults option restores all camera titles and
characteristics to their default settings. For the list of the default
settings, see page 21.
Preset/Tour Handler
The Preset/Tour Handler menu covers four functions:
•
Presets — A preset is a configured camera view. This function defines and manages the 79 presets
resident in the S2800e. The presets are available to the operator through Nextiva Review.
•
Auto Home — The dome can be set to automatically go to a programmed preset number location after
a programmed time duration of no activity on the dome has occurred.
•
Tours —The eight tours available in the camera are defined only in Nextiva IntelliStream, in Nextiva
Control Center. A tour is composed of a list of cameras defined in a virtual matrix where each camera
is given a preset amount of time to play following a cycling program or sequence. Tours are launched
in Nextiva Review. Selecting this option to create a tour will have no effect.
•
Autotours — The two available autotours are programmable only with Nextiva Review. An autotour is
a sequence of camera movements. It is called a pattern in Nextiva Review. Selecting this option to
create an autotour will have no effect.
Note: The Nextiva S2800e 22X models do not support autotours.
Nextiva S2800e Series Programming Guide
Programming the S2800e Camera • 17
For information on defining and running tours and autotours, refer to the Nextiva documentation.
The options for programming presets and auto home are:
The Program Presets command helps you define a camera position.
Once the Preset Number is selected (1-79), you can:
•
Program Preset Position — Writes the current camera position
into the selected preset number’s memory. If a preset location is
called from the keyboard, and there is no preset position
associated with that memory location, the words “Preset Not
Stored” appear overlaid upon the video image and the camera
does not move.
•
Program Preset Title - Brings up the same menu as the
Display Controller/Preset Titles selection. See the Source
Titling section for a description.
•
Clear Preset - Removes any preset information from this
memory location.
•
Clear ALL Presets - Removes all preset information from all
memory locations.
•
Image Freeze – Freezes the image during preset solves,
especially useful when using digital recorders by eliminating the
preset solve motion. If time and date are enabled, time will also
freeze to match image. Function can be enabled or disabled.
Note: This mode should be used when a preset tour is run and the
video is being recorded.
18 • Programming the S2800e Camera
Nextiva S2800e Series Programming Guide
•
Motion Detection – The 23X/35X (day/night) cameras provide
motion detection capability. For each preset, there are six
programmable zones for motion detection with three sensitivity
levels. Programmable actions may be associated with each
detection zone, including calling another preset, turning a relay
on or off, and calling a tour or autotour. For motion detection to
operate, the preset must be solved.
Note: On 35X models, image stabilization (described on page 8) must
be disabled to use motion detection.
1. Go to the Relay Driver menu, then set the Power On State to ON
and the Output Type to MOMENTARY.
2. In Nextiva Control Center, configure the dry contact input of the
S2800e camera. For more information, refer to the “Devices”
chapter in the Nextiva Administrator Guide.
3. Select Motion Detection from the menu for the Preset number to
be set.
4. Enable the motion detection Mode.
5. Select the Motion Area to be programmed (1-6). Press Enter to
set the area. (Screen will revert back to menu.)
6. Select the desired Sensitivity Level (Low, Medium, High) (Off is
the same as Disabled).
7. Select Action then press the Enter key. Select TURN ON AUX,
then press the Enter key.
8. In the IntelliFlow workspace in Nextiva Control Center, create a
new scenario with the Triggers a response when an event
occurs template and the Digital Input Pin event.
When multiple zones are set up, each one is displayed. Those already
set are blue; the current zones to be programmed are red. After Motion
Detection is set for a particular preset position, whenever that preset is
solved and there is motion in that area, the camera dome will perform
the programmed Action. If different actions are set for the same preset
number, multiple actions will take place. For example, a preset can be
solved for Area 1 and an AUX can be turned on for Area 2
simultaneously. If the user attempts to move the camera while motion
detection is enabled and the preset solved, the dome will hesitate a
second to turn off motion detection before it moves.
Warning: Motion detection should not be enabled on a camera that
has physical vibration indicated on the video.
The Program Auto Home allows configuration of the auto home
function. The dome can be set to automatically go to a programmed
preset number location after a programmed time duration of no activity
on the dome has occurred. In addition, the dome can be set to go to its
home position upon power-up.
Nextiva S2800e Series Programming Guide
Programming the S2800e Camera • 19
Schedule/Time of Day
The Schedule/Time of Day sub-menu allows configuration of the S2800e time base and actions.
The options of the Schedule/Time of Day menu are:
The Time Controls option allows setup of the Daylight Saving Time
(manual or automatic), display format (12- or 24-hour time format and
MM/DD/YY, DD/MM/YY or YY/MM/DD date format) and actual entry of
time and date.
When Daylight Saving Time is Enabled, any scheduled event between
2:00 AM – 3:00 AM (inclusive) will not be executed when the time shift
occurs.
The Program Timed Events option allows the programming of an
action once or weekly on a selected day. The programmable actions
are preset, tour, autotour, alarm enable/disable and auxiliary on/off.
There are 64 timed events numbered 1 to 64.
Note:
20 • Programming the S2800e Camera
Events have priority over all other actions executed outside the
S2800e menu system. However, accessing the menu system
through Nextiva Review will take precedence over the
execution of a timed event.
Nextiva S2800e Series Programming Guide
Language
The Language feature allows the selection of one of five languages: English, Spanish (Espanol), French
(Français), German (Deutsch), and Italian (Italiano). The default is English. Selection of a new language will
immediately change all menus and titles.
Install Defaults
The Install Defaults option restores all S2800e settings to their factory defaults. This affects all programmed
functions. The table below shows the main default settings; some defaults are camera dependent. When
programming, keep a record of settings as a reference if for any reason the unit must return to factory
defaults.
Function
Max. Manual Pan Speed
Max. Manual Tilt Speed
Zoom Scalable Pan/Tilt
Focus Mode
Shutter Speed
Backlight Compensation
Aperture Adjust
White Balance
Enable/Disable Input (Alarms)
Enable Report to CPU (Alarms)
Active Alarm State
Acknowledge Mode
Set Actions
Nextiva S2800e Series Programming Guide
Default Setting
100°
90°
Enabled
Auto
Automatic
Enabled
Automatic
Automatic
No (Disabled)
No (Disabled)
Low
Manual
No Action
Programming the S2800e Camera • 21
Reset Actions
Sector Censoring
Digital Zoom Mode
All Titles
Title Fade Control
Enable Camera, Alarm, Preset, Lens Status Title
Text
Enable Sector, Aux Function, Time, Date, Compass
Azimuth Title Text
Text Size
Language
Relay Power On State
Output Type
Time Display Format
Daylight Saving Time
Date Format
Privacy Mask Zoom Level
22 • Programming the S2800e Camera
No Action
Enabled
Enabled
All Disabled
Disabled, 1 sec
Enabled
Disabled
NTSC: line 1-1X, line 2-2X; PAL: line 1-2X, line 2, 3X
English
Off
Latching
12 hour
Manual
MM/DD/YY
1.0X
Nextiva S2800e Series Programming Guide
Supported Protocols
The S2800e provides the ability to work with protocols from other manufacturers. This section briefly
describes the use of the onscreen menu system with these specific protocols. Before using these protocols,
DIP switch SW2 must be set to the appropriate protocol.
1.
2.
3.
4.
5.
Set switch 1 on DIP switch 2 (SW2) to the appropriate video mode (PAL/OFF or NTSC/ON).
Set switch 2 on DIP switch 2 (SW2) to the OFF position (SERIAL).
Set switch 3 on DIP switch 2 (SW2) to the appropriate communication mode (SIMPLEX or DUPLEX).
Set switch 4 on DIP switch 2 (SW2) to the appropriate communication protocol (RS-422 or RS-485).
Set switches 5-8 on DIP switch 2 (SW2) to the appropriate manufacturer protocol.
Supported Protocol Switches 5-8:
•
Pelco: Switch 5 is ON, switches 6-8 are OFF (set switch 3 to ON for 2400 baud keypad)
•
Sensormatic: Switch 6 is ON, switches 5, 7, 8 are OFF
•
Philips: Switch 7 is ON, switches 5, 6, 8 are OFF
•
Kalatel: Switches 6 and 7 are ON, switches 5 and 8 are OFF
•
Panasonic: Switches 5 and 8 are ON, switches 6 and 7 are OFF
•
NTCIP: The dome is specifically coded from the factory or flash upgraded. It cannot be switched to
other protocols without first flashing the firmware back to standard factory protocol. Switches 5-8 are
not used and switch 3 must be OFF for Duplex.
Nextiva S2800e Series Programming Guide
Supported Protocols • 23
Testing Conditions
Pelco:
Kalatel:
Panasonic:
Philips:
Tested with the MPT9500 Controller and Pelco D protocol. S2800e should function with any
Pelco keypad using Pelco D protocol.
Tested with KTD-404, which requires a protocol converter KTD-410 to convert Kalatel’s
Digiplex protocol to ASCII RS-232 protocol; an RS-232 to RS-422 converter (with external
power) is then required to connect the S2800e. The S2800e in Kalatel mode is simplex 9600,
n, 8, 1. S2800e should function with any Kalatel keypad using Digiplex protocol.
Tested with WV-CU161 keypad, which does not require any port adapters. For detailed
information refer to Panasonic keypad user manual connection diagram. Set keypad
communication protocol to RS-485: 9600 baud, duplex, data bit 8, parity NONE, and stop bit
1. S2800e should function with most Panasonic keypads that use Panasonic WV-CS850(A)
ver 3.0 protocol. (Version of the supported protocol: Panasonic WV-CS850(A) ver 3.0,
release date October 2001.)
Tested with LTC-5136 series keypad, which requires Bosch LTC 8557 series and Qlty ICC11 converters (both converters must be self powered) to resample the signal from RS-232 to
RS-422 protocol. For detailed information refer to Philips keypad user manual and converters
user manuals. To enable the Philips protocol, set S2800e SW2 DIP switch 7 to ON position.
Switches 2-6 and 8 must be set to OFF. Communication with the S2800e using Philips
protocol is supported at RS-422: 9600 baud, data bit 8, parity NONE, and stop bit is 1.
S2800e should function with most Philips keypads using Philips AutoDome TC8560/TC700
protocol. (Version of the supported protocol: Philips AutoDome TC8560/TC700 Series
Release Date: March 2000.)
Note: All companies make changes and improvements in their products. Because this product can interface
with equipment not manufactured by Vicon, there is a possibility that the interface protocols may have
changed since Vicon tested this product with the interfacing equipment. Vicon recommends purchasing
a single unit for bench testing prior to purchasing and installing this product in quantity.
The S2800e is designed to store PTZ preset locations on the internal memory. Certain manufacturers’
controllers are designed to store PTZ preset locations in the controller. Therefore preset functionality in the
S2800e dome will not work correctly with these types of controllers.
24 • Supported Protocols
Nextiva S2800e Series Programming Guide
Pelco
Function
Keypress
Function
Keypress
95, Preset Set (Program Label screen appears),
F2
Set Transmit Polarity
93, Preset Set (Program Label screen appears),
F2
Select/Store
IO (Iris Open)
Program Sectors
Backup/Abort/Exit
IC (Iris Close)
Reset Dome
96, Preset Set (Program Label screen appears),
F2 then press Pan Auto to set sectors, Aux 2 and
3 to set mask.
97, Preset Set (Program Label screen appears),
F2
Set AP limits
92, Preset Set (Program Label screen appears),
F2 then <2> Aux to set left limit and <3> Aux to
set right limit
Enter Menu
Iris Open
Iris Open- Controls Autoiris Levels
Iris Close
Iris Close - Controls Autoiris Levels
Set Pan limits
Focus Near
Focus Near
Diagnostic Screen
Focus Far
Focus Far
Debug Screen
90, Preset Set (Program Label screen appears),
F2 then <2> Aux to set left limit and <3> Aux to
set right limit
91, Preset Set (Program Label screen appears),
F2
99, Preset Set (Program Label screen appears),
F2
Preset Tours
The controller MPT9500 doesn't support Pelco
tours. Vicon's tours are accessible using presets
80-87 or the menu system. To store a tour, Enter
preset number, Preset Set , F2. To run tour use
Preset Go.
Pelco calls these patterns; there are multiple ways
of programming. The keypad has default shortcut
keys. This maps to our preset 88. It will not
access preset 89. Press <1>, F1 to start
programming. Press <2>, F1 to stop
programming. Press <3>, F1 to run the tour.
Programming using the Vicon way allows access
to autotours 88 and 89. To program tour 88 enter
<88>, Preset Set, F2 to start programming. A
prompt appears to press Aux 1 to start
programming. When the pattern is complete press
Aux 1 again to stop programming. Then press IO
to store or IC to abort. The tour can also be
programmed thru the menu system.
Zoom Out
Zoom Wide
Zoom In
Zoom Tele
Auto Tour
Camera Off
Camera Off
Night Mode- Manual
<6> Aux to engage. <6> F3 to disengage
Camera On
Camera On
Alarms
Programmed through the menu system.
Autopan
Pan Auto = On , Pan Man = Off
Autoiris
Lens Speed
No Control- Unit is always in autoiris.
Turbo Button
8, F1, enter 1 or 2 for low, 3 for med , 4 for high.
Zoom and focus speed are the same.
Flip (Turn 180 degrees) 5,F1
Auxs
Supports only a latching relay. Press <1>, Aux to Peel (Sensormatic
engage. Press <1> , F3 to disengage
Feature)
Presets
Pan and Tilt Lockout
Alarm Acknowledge
Turbo (Set speed to
full) - (Pelco Feature)
Enter any number from 1-9 and press "Alarm
Ack". The SurveyorVFT will acknowlede the
alarms in received order.
Preset Store - 1 to 32 , 35 to 79 - Enter Preset
Number, Preset Set (Program Label screen
appears), F2 - No preset label editing. Can be Camera Control
programmed through menu.
Including Adjust
Preset Recall - Enter Preset Number, Preset Go V-Phase
94, Preset Set (Program Label screen appears),
F2. Repeat to unlock.
Nextiva S2800e Series Programming Guide
Not Supported
Menu system
Supported Protocols • 25
Kalatel
Function
Keypress
Function
Keypress
Enter Menu
Press Set until "Enter Programming Code"
appears. Enter Access Code 951followed by
SEQ. Select 4 - Cyberdome. Enter three digit
camera number. Enter 1 when prompted
"Does The Monitor Display Site XXX".
Program the unit using the joystick.
Select/Store
Set key
Set Transmit Polarity Not Supported
Not Supported; privacy masks through the
Program Sectors
menu system is supported
Backup/Abort/Exit
"1st key" (backs up one menu) or "Hold SEQ
(3 sec) to Exit" (exits entire menu system)
Reset Dome
Not Supported
Iris Open
Iris Open - Controls autoiris setting (Dome
must be set for keypad, autoiris adjust
enabled)
Set AP limits
Set presets 62 (left) and 63 (right) using the
menu system
Iris Close
Focus Near
Focus Far
Zoom Out
Zoom In
Camera Off
Iris Close - Controls autoiris setting (Dome
must be set for keypad, autoiris adjust
enabled)
Set Pan limits
Focus Near (Auto Focus key sets dome back
to auto focus)
Diagnostic Screen
Focus Far (Auto Focus key sets dome back to
auto focus)
Debug Screen
Not Supported
Not Supported
Not Supported
Internal preset tours 80 and 81 mapped to tours
3 and 4. Tours are programmed using the menu
system. To execute a tour press "Set" followed
by "Auto". Enter 3 or 4.
Zoom Out
Preset Tours
Zoom In
Tested using a terminal program. The KTD404 does not support this command.
Internal dome auto tours 88-89 mapped to tours
1 and 2. Tours are programmed using the menu
system. To execute a tour press "Set" followed
Auto Tour
by "Auto". Enter 1 or 2
Tested using a terminal program. The KTD-404
Night Mode- Manual does not support this command.
Programmed through the menu system. Kalatel
keypads do not support alarms or alarm
acknowledge from a dome; alarms must be
acknowledge from within the dome.
Autopan
Tested using a terminal program. The KTD404 does not support this command.
Auto (AP limits set using presets 62 and 63
from menu system)
Autoiris
No Control - Unit is always in autoiris
Lens Speed
Not Supported
Turbo (Set speed to
full) - (Pelco Feature) Not Supported
Flip (Turn 180
Tested using a terminal program. The KTD-404
degrees)
does not support this command.
Auxs
Open button on the keypad turns AUX off.
Closed button turns AUX on. If set to
momentary pressing closed turns AUX on
releasing Close turns AUX off.
Peel (Sensormatic
Feature)
Not Supported
Presets
Presets 000-063. Preset 000 not supported.
Presets 1-063 programmed using menu
system. The VFT also supports preset store
but the KTD-404 does not support this
command. The store command was tested
using a terminal program.
Camera Control
Including Adjust
V-Phase
Menu system
Camera On
Alarms
Alarm Acknowledge Not Supported
Pan and Tilt Lockout Not Supported
26 • Supported Protocols
Nextiva S2800e Series Programming Guide
Panasonic
Function
Keypress
Function
Keypress
Enter Menu
Press and hold CAMERA SETUP button for 2
sec. Use SET button to select and save options.
Use ESC button to abort or leave options. Move
joystick up and down to select and highlight
SurveyorVFT preset 94 menu options. Use
button AUX 1 for Aux 1 and AUX 2 for Aux 2.
Panasonic keypad supports communication with
one dome at a time.
Set Transmit Polarity
Not supported
Select/Store
SET button when in SureyorVFT preset 94 menu Program Sectors
Not supported
Backup/Abort/Exit
Use ESC key to leave or abort any of the
SureyorVFT preset 94 submenus. To quit
SureyorVFT preset 94 main menu Press and
hold CAMERA SETUP button for 2 sec.
Reset Dome
Not supported
Iris Open
SHIFT key + IRIS OPEN key
Set AP limits
Not supported
Iris Close
SHIFT key + IRIS CLOSE key
Set Pan limits
Not supported
Focus Near
NEAR key
Diagnostic Screen
Not supported
Focus Far
FAR key
Debug Screen
Not supported
Zoom Out
WIDE key
Preset Tours
Internal dome tours are programmed using
SureyorVFT preset 94 menu system. The keypad
does not support recalling tours.
Zoom In
TELE Key. To zoom in using digital zoom, first
press and hold TELE key to reach the end of
optical zoom and then press TELE key again to
switch to digital zoom.
Auto Tour
Supports autotor 88 only. To call autotour press
PATROL PLAY.
Camera Off
Not supported
Night Mode- Manual
Not supported
Camera On
Not supported
Alarms
If the user wants to use the alarms they must be
acknowledged from within the dome. Panasonic
protocol uses separate communication interface
for alarms.
Autopan
Press AUTO button
Alarm Acknowledge
Not supported
Autoiris
Not supported
Flip (Turn 180 degrees) Not supported
Lens Speed
Not supported
Camera Control
Including Adjust
V-Phase
Auxs
Not supported
Presets
Presets 1-64 only are supported. Presets are
captured and configured using SureyorVFT
preset 94 menu. To call back a preset enter
preset number on keypad and hit PRESET
button.
Pan and Tilt Lockout
Not supported
Nextiva S2800e Series Programming Guide
Not supported
Home Button. Pressing this button moves the
dome to saved preset position.
Supported Protocols • 27
Philips
Function
Keypress
Function
Keypress
Use On-46-Enter shortcut to enter Dome menu.
Use Focus Far button to select and save options.
Use Iris Close button to abort or leave options.
Move joystick up and down to select and
highlight Dome menu options
(joystick does
not support "press and hold" navigation and
editing when in Dome menu). Use shortcut Set1021-ENTER for Aux 1, use Set-1022-ENTER
for Aux 2 and use Set-1023-ENTER for Aux3.
Note: In order for the shortcut to work, the
keypad must be unlocked. To unlock, use Off-90Enter unlock menu.
Enter Menu
Not Supported
Set Transmit Polarity
Supported. Use Dome menu to enable sector
blanking. Use On-86-Enter to assign sectors (use
Set-1022-Enter for Aux 2 and use Set-1023-Enter
for Aux3).
Focus Far button
Select/Store
Program Sectors
Backup/Abort/Exit
Iris Close button
Iris Open
Iris Open
Iris Close
Iris Close
Focus Near
Focus Near
Focus Far
Focus Far
Reset Dome
Set-97-Enter
Set AP limits
To set Left limit use Set-101-Enter and to set
Right limit use Set-102-Enter.
Set Pan limits
Not Supported
Diagnostic Screen
Not Supported
Debug Screen
Not Supported
To save tours use either Set-80-Enter through
Set-87-Enter shortcuts or Dome menu. To recall
presets use Shot-80-Enter through Shot-87Enter shortcuts. All 7 tours are supported.
Twist joystick CCW
Zoom Out
Preset Tours
Record auto tour 88 use On-100-Enter, Record
auto tour 89 use On-101-Enter, Playback 88 auto
tour On-51-Enter, Playback auto tour 89 On-53Enter, Continuous Playback auto tour 89 use On52-Enter and Continuous Playback auto tour 88
use On-50-Enter. Also, auto tours can be saved
using Dome menu.
Twist joystick CW. To zoom in using digital zoom
turn joystick CW again after reaching the end of
analog zoom spectrum.
Zoom In
Auto Tour
Camera Off
Not Supported
Night Mode- Manual
Not Supported
If the user wants to use the alarms they must be
acknowledged from within the dome (auto
acknowledge).
Not Supported
Camera On
Autopan
Autoiris
Alarms
Use On-2-Enter shortcut. To set Autopan Left
and Right limits use Set-101-Enter and Set-102Enter shortcuts respectively.
Alarm Acknowledge
Use On-3-Enter shortcut. Use Iris Open or Iris
Close buttons to switch back to manual iris
Not Supported
Lens Speed
Not Supported
Auxs
Presets
Not Supported
N/A
Turbo (Set speed to
full) - (Pelco Feature)
Flip (Turn 180 degrees)
Peel (Sensormatic
Feature)
To save presets use either Set-1-Enter through
Set-79-Enter shortcuts or Dome menu. To recall
Camera Control
presets use Shot-1-Enter to Shot-79-Enter
Including Adjust
shortcuts. All 79 presets are supported.
V-Phase
Pan and Tilt Lockout
Auto acknowledge is only supported
N/A
N/A
N/A
To call Factory Home Position use Set-110-Enter.
To save home position preset use Dome menu.
NOTE: Dome "PTZ timeout" menu feature is
not enabled due to Philips protocol PTZ
control delay limitation.
28 • Supported Protocols
Nextiva S2800e Series Programming Guide