1
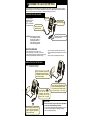
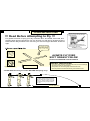
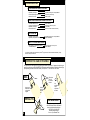
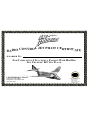
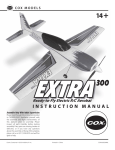
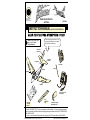
®
www.coxmodels.com
1295 H Street
Penrose, CO 81240
Radio Control Electric
Jet Plane
COX 5854
INSTRUCTION MANUAL KEEP FOR FUTURE REFERENCE
Here’s everything that comes in the
package. Use this picture to identify
the parts you will be using.
Before you get started, make
sure you have 6 'AAA'
Alkaline Batteries.
Vertical Fin
& Rudder
Horizontal
Stabilizer
Fin Retainer
Transmitter
Fuselage
Antenna
Right Wing
Left Wing
Power Charger with
Auto Adapter
Instruction
and Flight
Manual
Wing
Attachment
Tape
7.2 Volt Rechargeable
Flight Battery Pack
Your SKY CRUISERS ® R/C JET is easy to assemble and fly. But remember… this is a very technically advanced
product. It’s important you read these instructions thoroughly and pay close attention to the SAFETY PRECAUTIONS
AND HELPFUL HINTS.
If you do run into something difficult and need some help, just call COX ® Customer Service at 800-451-0339.
PRINTED IN CHINA © 2003 Estes-Cox Corp. All rights reserved.
#5854 Sky Cruisers ® R/C Jet Instructions
WARNING
Improper use of this product may result in personal injury or damage
to the product.
READ THE FOLLOWING INSTRUCTIONS CAREFULLY!
You are responsible for the safe operation of this product.
SAFETY PRECAUTIONS
IMPORTANT: USER INFORMATION
Changes or modifications®of any kind to your Sky Cruisers® transmitter not expressly approved by Estes-Cox Corp. will void the user's authority to
operate the Sky Cruisers transmitter.
Transmitter frequencies can only be changed and the associated electronic circuitry tuned by the Estes-Cox Service Center. Changing frequencies
by the consumer will void the warranty and is a violation of F.C.C. regulations.
Do not cut or shorten the length of the transmitter or receiver antenna. Doing so will greatly reduce the operational range of the Sky Cruisers® radio
system.
Please refer to the label on the transmitter for operation frequency. Do not fly more than one aircraft on the same frequency at a time. Operational
interference may occur.
BATTERY SAFETY
This product uses a sealed Nickel Metal Hydride (NiMH) rechargeable battery. To prevent possible damage to the battery or injury to you read and
follow these precautions.
• Do not charge batteries longer than specified in Instruction Manual.
• Use only the recommended charger to charge battery.
• Completely discharge battery before charging.
• Remove battery from plane before charging.
• Do not short circuit battery or battery charger.
• Do not open battery - may burst and release toxic liquids.
• Never store or transport battery in plane.
• If battery gets hot, makes a ‘popping’ sound, or leaks liquid during a charge,
disconnect from charger immediately.
• Dispose of battery properly - do not incinerate or burn.
MEDICAL WARNING
Keep away from small children. If swallowed, promptly seek medical attention.
Call National Battery Ingestion Hotline (202) 625-3333.
If battery ruptures, avoid inhalation - may cause respiratory irritation. If any battery liquid contacts skin, wash skin immediately with
soap and water. If skin irritation develops, seek medical attention. In case of eye contact, flush eye with water for at least 15 minutes
and seek medical attention at once.
DUCTED FAN SAFETY
1. DO NOT ALTER, MODIFY OR CUSTOMIZE THE DUCTED FAN UNIT.
Spinning Ducted Fan rotor can inflict injury to you and
others if handled carelessly.
2.KEEP YOUR FACE, FINGERS, CLOTHING AND ALL OTHER
OBJECTS AWAY FROM INLET OF DUCTED FAN.
A Ducted Fan Rotor which has been damaged with nicks, chips or cracks,
or altered in any way can break apart during operation and cause serious
injury to you and others.
3. INSPECT DUCTED FAN ROTOR BEFORE EACH FLIGHT.
Keep face, hands and clothing away from
Ducted Fan Inlet.
Have all spectators stand behind you when
launching.
2
4.DISCARD AND REPLACE NICKED, CHIPPED, CRACKED OR
ALTERED DUCTED FAN ROTOR.
Each Ducted Fan unit sold by COX® is carefully engineered and tested
for maximum reliable performance for only the plane and motor it was
designed for. If a Ducted Fan unit is altered or damaged in the
slightest degree, its aerodynamics and balance are jeopardized and you
have created a serious risk of the Ducted Fan unit flying apart and
causing injury to you and others.
5. PLAY IT SAFE — Replace Ducted Fan unit if you suspect any
damage.
Fly in open area. Never fly near power lines
or trees.
We recommend not to fly in wind over 5 mph.
1 CHARGING THE FLIGHT BATTERY PACK
You will need to have the Flight Battery Pack charged and the Sky Cruisers transmitter radio operating to complete
the final assembly of the R/C Jet. Follow the steps below to charge the Flight Battery Pack and put the transmitter into
operation. While the battery is being charged, you can begin assembly of your R/C Jet™
®
OPERATING THE POWER CHARGER
Timer Knob
The Power Charger™
operates from your car’s
battery. Follow the
SAFETY GUIDELINES
when using this charger.
LED indicator light
(Lights when charging)
This end plugs into the
Flight Battery Pack.
CAUTION: When charging, it is possible
This adapter plugs into the cigarette
lighter of your vehicle.
for the Flight Battery Pack and
Charger to get very warm. To
prevent any damage to the
model, yourself or your vehicle
follow these safety guidelines.
SAFETY GUIDELINES:
•
•
•
•
Never operate charger with car engine running.
Never operate charger or charge battery in your vehicle.
Always remove flight battery pack from airplane before charging.
Always discharge the flight battery pack before charging.
• Do not hold charger or flight battery pack while charging.
• Do not discharge/recharge the flight battery pack if hot. Allow
to cool.
• Unplug charger from cigarette lighter after each use.
CHARGING THE FLIGHT BATTERY PACK
NOTE: To discharge the Flight Battery,
run Ducted Fan until it stops.
Plug the Flight Battery connector into
the short lead connector of the Charger.
If Flight Battery is in plane, unplug and
remove before charging.
Turn the timer to the
and
note that the LED is
illuminated. When the timer
runs down to "0" your Flight
Battery Pack is charged.
When charging is complete, unplug
charger cable from the cigarette
lighter. Unplug the Flight Battery
Pack from the Charger.
Lay the Charger and Flight Battery Pack
on a smooth surface alongside your vehicle.
Plug the other end of the charger cord into
the cigarette lighter of your vehicle.
HELPFUL HINT:
• Before the first flight, charge and discharge the flight battery
pack 3 times for optimal battery performance.
• If a day or more goes by without charging the battery, or you are
not sure of how much charge is left, discharge the battery
pack, then recharge before flying.
3
2 THE SKY RANGERS® TRANSMITTER
Requires 6 "AAA" Alkaline batteries - Sold separately.
NOTE:
Insert six new 'AAA' alkaline
batteries into the battery case
as shown. Match the ' + ' and
' – ' symbols in the case with
each battery. Insert the battery
case back into the battery
compartment. Replace the
battery compartment cover and
reinstall the screw.
The Sky Rangers Transmitter does not have
an `on / off´ switch. The Transmitter turns `on´ automatically
when the Control Stick is moved left or right and is always
`off ´ when the Control Stick is centered.
®
+
–
–
Battery Case
+
–
Remove the screw and
battery compartment cover
from the back of the
transmitter case. Pull out
the battery case from the
batter y compar tment.
Battery
Compartment
Cover
CAUTION: Do not mix
old, new, or other battery
types. Use only ALKALINE
batter ies in the Sky
Rangers ® Transmitter.
Screw the antenna into the top of
the Transmitter. Tighten finger tight
- DO NOT over tighten.
This LED light (indicating power is
'on') will illuminate when the Control
Stick is moved left or right. If it fails
to light, DO NOT attempt to fly your
R/C Jet. Check the batteries for
correct polarity, replacing the
batteries if required. If the LED fails
to light after checking or replacing
the batteries call Cox® Customer
Ser vice at 1-800-451-0339.
HELPFUL HINT:
When operating the Transmitter, always have the antenna
extended. Be careful when the antenna is extended. DO
NOT bend or break. Keep away from faces and eyes.
When not in use, fully collapse the antenna.
4
This Control Stick
moves only left or right.
You will be using it to
control the flight path of
the R/C Jet while flying.
We will show you how
this control works later
in this manual.
3 ATTACHING THE HORIZONTAL STABILIZER
Carefully remove the
protective paper from
the double side tape
located on the tail
surface of the jet.
Carefully align and mount
the Horizontal Stabilizer
over the tail surface of the
jet as shown. Lightly press
the Horizontal Stabilizer in
place.
Fuselage
4 ATTACHING THE VERTICAL STABILIZER
NOTE: The Vertical Fin comes with the Rudder already
hinged and the control horn mounted. DO NOT CUT THE
RUDDER FREE FROM THE VERTICAL FIN.
Rudder
Vertical Fin
Control
Horn
Insert the Vertical Fin into
the Vertical Fin Mount while
at the same time inserting
the Torque Rod up through
the Control Horn.
Torque
Rod
Vertical Fin
Mount
Vertical Fin
Horizontal
Stabilizer
Be very careful not to bend the
Torque Rod when inserting it up
through the Control Horn.
Bending will cause the control
system to not operate properly.
Fin Retainer
Secure the Vertical Fin to
the Fin Mount by inserting
the Fin Retainer through
the mount and fin until it
'Clicks' in place on the
opposite side.
90˚
Align Vertical Fin 90˚ with
Horizontal Stabilizer.
5
5 ATTACHING THE WINGS
HELPFUL HINT:
Determining the left and right side of an airplane is always done as
if you were sitting in the pilot seat flying the airplane.
WING ATTACHMENT TAPE
Bottom Right Wing
Top Right Wing
Bottom Left Wing
Top Left Wing
Align the Left Wing tabs with
the left Fuselage tabs and
fully insert tabs together as
shown. Don't tape yet.
Align the Right Wing tabs with the right
Fuselage tabs and fully insert tabs
together as shown. Secure the joint with
one of the 'Top' attachment tapes.
RIGHT WING
WING TABS
TOP TAPE
Wrap
around
Front
LEFT WING
FUSELAGE
Eyeball the angle of the wings to the fuselage. If
necessary, adjust the Left Wing so it has the same
angle as the Right Wing as shown. (A equals A).
A
A
Secure the Left Wing
joint with the other
'Top' attachment tape.
Locate the two 'Bottom' tape
strips and apply them to the
bottom of wings as shown.
LEFT WING
TAPE
BOTTOM VIEW
6
Balance Points (for
use on step 6).
Wrap
around
Front
NOTE:
Plane color and
graphics may vary.
6 INSTALLING THE FLIGHT BATTERY PACK
Flight
Battery
Insert the Flight Battery
Pack into the middle of
t h e B a t t e r y Po cke t
molded into the fuselage.
Tuck the wire lead and
connector into the
Pocket.
First plug the
Flight Battery
Pack into the
connector
extending from
the bottom of
the fuselage.
NOTE:
To turn the Ducted Fan "OFF"
unplug the battery pack.
Battery
Pocket
BOTTOM VIEW
With the Flight Battery installed, balance
the jet on your fingertips at the Balance
Points under the wing noted step 5.
Slide the Flight
Battery forward or
backward in the
pocket to get your
jet to balance level.
You want to have your jet
balance LEVEL as shown for
the best flight performance.
LEVEL
LEVEL
7 CHECK OPERATION OF CONTROLS
NOTES:
1. Check Radio Operation with a newly charged Flight Battery.
2. Do Not press the Ducted Fan Start Button to check radio.
3. The rudder will operate without the Ducted Fan running.
With the Flight Battery Pack
installed in your plane, move
the Control Stick to the right.
The LED will light and
(looking from behind the
plane) the rudder will move
to the right.
RIGHT RUDDER
IMPORTANT:
LED
Light
Move the Control
Stick to the left. The
LED will light and
the r udder will
move to the left.
Ducted Fan
Start Button
LEFT RUDDER
1. Prior to any flight, check
the operation of the radio
system. If anything does
not work correctly, DO
NOT FLY!
2. The radio system has a
D u c t e d Fa n c u t o f f
feature. When the Flight
Battery drops to a preset voltage, the Ducted
Fan will automatically
turn off. Control of the
r udder will still be
possible to land the
plane.
7
8
FLYING INSTRUCTIONS
!!! Read Before Attempting to Fly !!!
Practice flying a Sky Cruisers® R/C
Plane on our On-line Sky Rangers®
Flight Simulator.
For greater success in flying your Sky Cruisers® R/C Jet, READ, FOLLOW, and
STUDY these flying instructions. You can access our web site to practice flying a
Plane like the Sky Cruisers® R/C Jet using our On-line Flight Simulator shown at
right.
Log onto www.estesrockets.com.
Go to Level 2. Click on Flight School
then type the password:
Find an area as large
as a football field. You
don’t want to fly near
people, streets, houses,
trees or power lines.
ALWAYS FLY OVER
SOFT GRASSY FIELDS!
NEVER FLY IN WINDS
OVER 5 MPH (8 KPH)
DO NOT FLY IN PARKING LOTS OR STREETS.
m)
DS
AR
0Y
10
91
RDS (
100 YA
1
(9
)
m
NOTE:
NEVER FLY NEAR OBSTACLES
FLYRC (Use all caps)
Soft grassy areas are best.
SAFETY PRECAUTIONS:
• Fly in open areas. Never fly near power lines, trees, houses or buildings.
• Do not fly in winds over 5 mph (8 kph).
• Keep hands, face and clothing away from Ducted Fan inlet.
• Have all spectators stand behind and away from Ducted Fan inlet.
2. PRACTICE launching as shown BEFORE attempting to fly:
Throw an empty soda can straight
and level. Throw it hard enough so
the can lands 10-12 feet (3-3.7 m)
from you. This is exactly how hard
you need to throw your Sky Cruisers®
R/C Jet.
10’-12’ (3-3.7m)
3. CYCLE MOTOR (First time out only)
For peak motor performance, cycle batteries in plane three times before flying. Do this by charging the plane as
per instructions. Turn motor ‘ON’ and run until it stops. Wait two minutes for the plane’s batteries to cool. Repeat
2 more times. NOTE: Hold plane securely and keep hands, fingers, and face away from ducted fan inlet.
4. PRE-LAUNCH CHECKLIST:
A. Extend Transmitter antenna.
B. Check Left & Right Rudder Control.
C. Face into the wind.
WRONG
5. LAUNCHING PLANE:
CORRECT!
Hold here.
A. Hold plane
under wing
as shown.
WRONG
B. Press "START
BUTTON". Hold
above shoulder
and level
with ground.
C. Throw plane
STRAIGHT
OUT from you.
6. DO NOT OVER CONTROL – 'PULSE' (PUSH &
RELEASE) TO MAKE TURNS.
To turn, push stick left or right and let it spring back
to the center. The faster you "PULSE" the controls the
more your plane turns.
D. Do not operate controls - let the plane fly
straight out for 3-5 seconds. Then make
your first turn.
PULSE
PULSE
AUTO SHUT-OFF FEATURE
To have control of plane throughout its flight,
the ducted fan is designed to cut off (stop)
when the Flight Battery drops to a pre-set
voltage. Don't panic. When the ducted fan
stops, simply turn the plane into the wind,
level the wings, and land. (See page 12 on
'Landing').
CONTROL TIP:
Faster the "PULSE" - tighter the turn.
Slower the "PULSE" - wider the turn.
Wide turns are better and more controllable.
9
10
TRIMMING YOUR R/C JET
2
If properly trimmed, your R/C Jet should fly
straight out in a slight climb (#1).
1
4
3
If your R/C Jet:
2 VEERS LEFT . . .
3 VEERS RIGHT . . .
HORIZONTAL STABILIZER
HORIZONTAL STABILIZER
UP
FLEX THIS
AREA "UP"
VERY LITTLE.
FLEX THIS
AREA "UP"
VERY LITTLE.
UP
4 DOES NOT CLIMB . . .
UP
UP
FLEX BOTH AREAS
"UP" VERY LITTLE AND
IN EQUAL AMOUNTS.
'PULSE'
Start a LEFT turn again by
'PULSING' the control stick
LEFT. Remember... slow
pulses for wide turns, fast
pulses for tight turns. Make
wide turns at first and
'pulse' the control stick only
when needed to continue
the turn.
FLIGHT PATTERN
'PULSE'
DO NOT let the wing
bank too steep. Move the
Control Stick as
necessary to maintain a
wide left turn flight path.
Finish the turn by
'PULSING' the
control stick to
the RIGHT just
enough to level
the wings. Make
any corrections
to the flight path
as necessary,
letting the plane
do the flying.
STRAIGHT FLIGHT PATH
Stick Centered • Wings Level
END OF TURN
• 'PULSE' Right Rudder
DOWNWIND FLIGHT PATH
LEFT TURN PATH
• 'PULSE' Left Rudder
2ND TURN
Concentrate on flying this type of course back and forth across your flying area several
times. Always remember to keep turning yourself in the direction your plane is traveling.
1ST TURN
BEGIN TURN
• 'PULSE' Left Rudder
END OF TURN
• 'PULSE' Right Rudder
'PULSE'
Finish the turn by 'PULSING'
the control stick to the
RIGHT just enough to level
the wings. Make any
corrections to the flight path
as necessary, letting the
plane do the flying.
11
UPWIND FLIGHT PATH
LET PLANE FLY BY ITSELF 3-5 SECONDS TO GAIN
ALTITUDE BEFORE MAKING THE 1ST TURN. USE
JUST ENOUGH CONTROL TO KEEP THE WINGS
LEVEL DURING THIS TIME.
START
1. Extend transmitter antenna.
2. Check Rudder by 'PULSING' Control Stick
left and right.
3. Get ready to fly.
4. Turn Motor Switch 'ON'
5. Hand launch your plane straight out into
the wind.
BEGINNERS!
Only fly on days when there is no wind.
Always fly over fields with tall soft grass!
Do not fly when wind is more than 5
mph (8 kph).
'PULSE'
'PULSE' the
control stick LEFT
to begin tur n.
R e m e m b e r. . .
slow pulses for
wide turns, fast
pulses for tight
turns. Make wide
turns at first, and
'pulse' the control
stick only when
needed
to
continue turning.
FLYING TIP:
FLYING TIME:
Typical flying time is 3 to 5 minutes. As your flying skill
improves, you'll be able to take advantage of 'thermals' (warm
air rising from the ground) to extend your flight time. Should
you catch a thermal, circle in it to gain altitude. If the ducted
fan stops, you can continue to fly within the thermal for as
long as you can. Once out of it, set up to land (See page 12
on 'Landing').
To fly straight, wings must
be level. When wings are
banked as in a turn, they
stay banked and the plane
will continue to turn until
you bring the wings back
to level.
12
Always fly an R/C Jet as if you were the pilot sitting in the plane. When you fly
the plane towards you and command it to turn right or left, it will turn to its right
or left... but it will appear to you to be turning in the opposite direction. Follow
the steps below when a plane is flying toward you.
FLYING TOWARD YOU (VERY TRICKY!)
As you make a left turn
and the plane is flying
toward you, it will appear
to be flying to your right.
To stop the turn (level the
wings), 'PULSE' the
control stick to the right to
level the wings.
'PULSE'
FLYING TIP:
Whenever the plane is flying
toward you 'PULSE' the control
stick toward the lower wing to
level the wings.
Wings level, plane
flies straight.
'PULSE'
Begin to set up for landing when you see the plane begin to lose altitude due to
the batteries losing their charge. Always try to land into the wind. If you cannot
set up for a landing in time, level the wings and let the plane land by itself.
LANDING
DOWNWIND LEG
BASE LEG
'PULSE'
'PULSE' the
Control Stick
LEFT to start
the Base Leg
turn into the
wind.
'PULSE'
'PULSE' the Control
Stick RIGHT to level the
wings and continue to
fly straight on the Final
Approach into the wind
until the plane touches
down.
FINAL APPROACH
5 Ft. (1.5 m)
2 Ft. (.6 m)
LANDING SPOT
ADDITIONAL FLIGHT PATTERNS
ONCE YOU ARE ABLE TO CONTROL YOUR SKY CRUISERS® R/C JET IN THE AIR, TRY FLYING THESE BASIC PATTERNS.
THE DOG BONE
This preliminary pattern requires a 360° turn at each end with a straight flight path between the two ends.
LAUNCH AND
LANDING SPOT
THE FIGURE EIGHT
LAUNCH AND
LANDING SPOT
13
This more advanced preliminary flight path requires a 270° left turn at one end and
270° right turn at the other end, with crossing straight flight paths between the ends.
TROUBLESHOOTING
DUCTED FAN DOES NOT RUN OR LOW POWER.
Motor switch not turned 'ON'.
Flight Battery not charged.
Fan Rotor jammed against fan housing.
Debris stuck in fan rotor.
Turn switch 'ON'.
Completely discharge, then recharge batteries.
Pull rotor away from housing.
Check and clean.
RUDDER DOES NOT MOVE WHEN TRANSMITTER PULSED.
Transmitter batteries worn out.
Control wire not engaged in rudder.
Flight Battery not charged.
Movement obstructed.
Replace batteries.
Carefully slip control wire in place.
Charge battery.
Make sure actuator and rudder move freely.
SHORT FLYING TIME
Flight Battery not fully charged.
Flight Battery damaged from over charging.
Completely discharge, then recharge batteries.
Replace Flight Battery.
ERRATIC, LITTLE OR NO RADIO CONTROL
Others operating on same frequency near by.
Transmitter battery low.
Move to new location or wait your turn.
Replace batteries.
If you still have problems call and talk with Sky Cruisers® Flying Instructors, Toll Free 1-800-451-0339 Monday - Friday.
8:00 am to 4:00 pm Mountain Time.
SERVICE YOU CAN DO YOURSELF
The high density EPP foam wings are very durable and can withstand rough landings. If damaged, the foam is easy to
repair and you can have your SKY CRUISERS ® R/C JET air worthy again in a short time. To glue foam, 5 Minute Epoxy
(sold separately) works best. NEVER USE INSTANT (SUPER) GLUE... IT WILL DESTROY THE FOAM.
WING
Apply epoxy to
broken area, then
put the pieces
together.
Wipe excess
glue off of
the external
surfaces.
EPOXY
Carefully
hold in place
until glue
sets.
VERTICAL FIN
FOR MORE HELP!
EPOXY
14
Use
cellophane
tape to
repair dents
and tears.
If you ever have any questions or problems,
call COX® Customer Service. We know all
about your airplane and can help you.
Call Toll-Free 1-800-451-0339
Weekdays except Holidays.
8 a.m. to 4 p.m. Mountain Time.
SKY CRUISERS R/C JET SPARE PARTS
®
4.
3.
1.
2.
5.
7.
6.
REF NO.
8.
9.
DESCRIPTION
1
Right Wing
2
Left Wing
3
Fuselage
4
Vertical Fin & Rudder
5
Horizontal Stabilizer
6
Antenna
7
Transmitter
8
Flight Battery Pack
10.
9
Die Cut Wing Attachment Tape
10
Instructions
11
15 Minute Charger
11.
COX LIMITED NINETY DAY WARRANTY
FOR 90 DAYS FROM THE DATE OF PURCHASE, COX WILL
REPAIR OR REPLACE ANY FACTORY DEFECTS WITHOUT
CHARGE. IF YOU FIND A DEFECT OR NEED REPLACEMENTS,
PLEASE CONTACT THE COX CUSTOMER SERVICE
DEPARTMENT.
If you wish to return a defective part, send only the affected part
along with proof of purchase to: Cox Customer Service, 1295 H
Street, Penrose CO 81240. Please do not send the entire model.
There may be an additional handling charge if you send the entire
model kit.
THIS WARRANTY APPLIES ONLY IF THE PRODUCT IS
OPERATED IN ACCORDANCE WITH THE ENCLOSED ASSEMBLY
AND OPERATING INSTRUCTIONS PROVIDED WITH EACH
MODEL. COX ASSUMES NO LIABILITY EXCEPT FOR THE
EXCLUSIVE REMEDY OF REPAIR OR REPLACEMENT OF PARTS
AS SPECIFIED ABOVE. COX SHALL NOT BE LIABLE FOR
CONSEQUENTIAL OR INCIDENTAL DAMAGES.
Some states do not allow the exclusion of consequential or incidental
damages so the above limitation may not apply to you. This warranty
gives you specific legal rights and you may also have other rights
which vary from state to state.
THE ABOVE WARRANTY EXCLUDES ALL GLOW HEADS USED
ON FUEL POWERED MODELS.
READ ENCLOSED INSTRUCTIONS AND SAFETY
INFORMATION BEFORE USING THIS PRODUCT.
15
®
ET PILOT CERTIFICAT
J
L
O
R
T
N
O
C
E
RADIO
AWARDED TO:
FOR COMPLETING 3 SUCCESSFUL FLIGHTS WITH HIS/HER
SKY CRUISERS R/C JET PLANE.
®
CERTIFIED
R/C PILOT
®
COX FLIGHT SCHOOL
PENROSE, COLORADO USA
(800) 451-0339
www.coxmodels.com
Estes-Cox Corp.
1295 H Street
Penrose, CO 81240
1-800-525-7561