1
HiPath 3000/4000/5000
optiClient 130 V5.0
Administrator Documentation and Operating
Instructions
*1PA31003-G2550-A100-6-76A9*
1P A31003-G2550-A100-6-76A9
The information provided in this document contains merely general descriptions or
characteristics of performance which in case of actual use do not always apply as
described or which may change as a result of further development of the products.
An obligation to provide the respective characteristics shall only exist if expressly
agreed in the terms of contract. The trademarks used are owned by Siemens AG or
their respective owners.
Siemens AG 2005
Siemens Communications,
Hofmannstraße 51, D-81359 München, Germany
Reference No.: A31003-G2550-A100-6-76A9
Subject to availability. Right of modification reserved.
●
Nur für den internen Gebrauch
optiClient5dTOC.fm
Contents
Contents
0
1 General Information . . . . . . . . . . . . . . . . . . . . . . . . . . . . . . . . . . . . . . . . . . . . . . . . . . .
1.1 Delivery Scope. . . . . . . . . . . . . . . . . . . . . . . . . . . . . . . . . . . . . . . . . . . . . . . . . . . . . . .
1.2 About these Operating Instructions . . . . . . . . . . . . . . . . . . . . . . . . . . . . . . . . . . . . . . .
1.3 Specifications and Requirements . . . . . . . . . . . . . . . . . . . . . . . . . . . . . . . . . . . . . . . .
1.4 Safety Information . . . . . . . . . . . . . . . . . . . . . . . . . . . . . . . . . . . . . . . . . . . . . . . . . . . .
1-1
1-2
1-3
1-4
1-6
2 Installing optiClient 130 . . . . . . . . . . . . . . . . . . . . . . . . . . . . . . . . . . . . . . . . . . . . . . . .
2.1 General Information . . . . . . . . . . . . . . . . . . . . . . . . . . . . . . . . . . . . . . . . . . . . . . . . . . .
2.2 Configuring/Installing Quality of Service . . . . . . . . . . . . . . . . . . . . . . . . . . . . . . . . . . .
2.3 Installing optiClient 130 . . . . . . . . . . . . . . . . . . . . . . . . . . . . . . . . . . . . . . . . . . . . . . . .
2-1
2-1
2-3
2-5
3 First Steps, Display Modes and General Operation . . . . . . . . . . . . . . . . . . . . . . . . . 3-1
3.1 Starting the Program, Logging On, Terminating the Program . . . . . . . . . . . . . . . . . . . 3-1
3.1.1 Starting optiClient 130 . . . . . . . . . . . . . . . . . . . . . . . . . . . . . . . . . . . . . . . . . . . . . . 3-1
3.1.2 Logging In . . . . . . . . . . . . . . . . . . . . . . . . . . . . . . . . . . . . . . . . . . . . . . . . . . . . . . . 3-1
3.1.3 Exiting optiClient 130 . . . . . . . . . . . . . . . . . . . . . . . . . . . . . . . . . . . . . . . . . . . . . . 3-5
3.2 The Representation of optiClient 130 Controls . . . . . . . . . . . . . . . . . . . . . . . . . . . . . . 3-6
3.2.1 Overview of Controls . . . . . . . . . . . . . . . . . . . . . . . . . . . . . . . . . . . . . . . . . . . . . . . 3-6
3.3 General optiClient 130 Operation . . . . . . . . . . . . . . . . . . . . . . . . . . . . . . . . . . . . . . . 3-12
3.3.1 The optiClient 130 Main Bar . . . . . . . . . . . . . . . . . . . . . . . . . . . . . . . . . . . . . . . . 3-12
3.3.1.1 The optiClient 130 Menu . . . . . . . . . . . . . . . . . . . . . . . . . . . . . . . . . . . . . . . 3-12
3.3.1.2 Main Bar Display Options . . . . . . . . . . . . . . . . . . . . . . . . . . . . . . . . . . . . . . . 3-13
3.3.1.3 The Audio Buttons and Volume Control on the Main Bar . . . . . . . . . . . . . . . 3-15
3.3.1.4 The optiClient 130 Forwarding menu . . . . . . . . . . . . . . . . . . . . . . . . . . . . . . 3-16
3.3.1.5 The Telephony Menu and Phone Buttons on the Main Bar . . . . . . . . . . . . . 3-18
3.3.1.6 optiClient 130 Fault Signaling on the Main Bar. . . . . . . . . . . . . . . . . . . . . . . 3-19
3.3.1.7 The optiClient 130 Module Menu . . . . . . . . . . . . . . . . . . . . . . . . . . . . . . . . . 3-19
3.3.2 The optiClient 130 Phone . . . . . . . . . . . . . . . . . . . . . . . . . . . . . . . . . . . . . . . . . . 3-21
3.3.3 The Extended Keypad. . . . . . . . . . . . . . . . . . . . . . . . . . . . . . . . . . . . . . . . . . . . . 3-23
3.3.4 Labeling/Programming Function Keys . . . . . . . . . . . . . . . . . . . . . . . . . . . . . . . . 3-24
3.3.5 Operating with the PC Keyboard. . . . . . . . . . . . . . . . . . . . . . . . . . . . . . . . . . . . . 3-25
3.3.6 Dialing Aids . . . . . . . . . . . . . . . . . . . . . . . . . . . . . . . . . . . . . . . . . . . . . . . . . . . . . 3-26
3.3.7 The optiClient 130 Screen Saver . . . . . . . . . . . . . . . . . . . . . . . . . . . . . . . . . . . . 3-27
3.3.8 Display Options for the optiClient 130 Module Window . . . . . . . . . . . . . . . . . . . 3-28
3.3.9 Online Help . . . . . . . . . . . . . . . . . . . . . . . . . . . . . . . . . . . . . . . . . . . . . . . . . . . . . 3-30
3.3.10 Program Information . . . . . . . . . . . . . . . . . . . . . . . . . . . . . . . . . . . . . . . . . . . . . 3-30
3.3.11 Updating the Program . . . . . . . . . . . . . . . . . . . . . . . . . . . . . . . . . . . . . . . . . . . . 3-31
4 Configuration and Settings . . . . . . . . . . . . . . . . . . . . . . . . . . . . . . . . . . . . . . . . . . . . .
4.1 General Remarks. . . . . . . . . . . . . . . . . . . . . . . . . . . . . . . . . . . . . . . . . . . . . . . . . . . . .
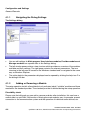
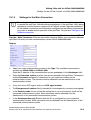
4.1.1 Navigating the Dialog Settings . . . . . . . . . . . . . . . . . . . . . . . . . . . . . . . . . . . . . . .
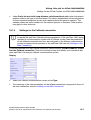
4.1.2 Adding or Removing a Module . . . . . . . . . . . . . . . . . . . . . . . . . . . . . . . . . . . . . . .
4-1
4-1
4-4
4-4
A31003-G2550-A100-6-76A9, 04/2005
optiClient 130 V5.0 , Administrator Documentation and Operating Instructions
0-1
optiClient5dTOC.fm
Contents
Nur für den internen Gebrauch
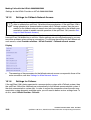
4.2 Settings for the Main Program . . . . . . . . . . . . . . . . . . . . . . . . . . . . . . . . . . . . . . . . . . . 4-6
4.2.1 General Settings. . . . . . . . . . . . . . . . . . . . . . . . . . . . . . . . . . . . . . . . . . . . . . . . . . . 4-6
4.2.1.1 Color Schemes . . . . . . . . . . . . . . . . . . . . . . . . . . . . . . . . . . . . . . . . . . . . . . . . 4-6
4.2.2 Settings for Starting the Program . . . . . . . . . . . . . . . . . . . . . . . . . . . . . . . . . . . . . . 4-7
4.2.3 Settings for Ending the Program . . . . . . . . . . . . . . . . . . . . . . . . . . . . . . . . . . . . . . 4-9
4.2.4 Settings for Display in the Info Area . . . . . . . . . . . . . . . . . . . . . . . . . . . . . . . . . . . 4-11
4.2.5 Settings for Changing the Connection Status. . . . . . . . . . . . . . . . . . . . . . . . . . . . 4-12
4.2.6 Settings for Program Updating . . . . . . . . . . . . . . . . . . . . . . . . . . . . . . . . . . . . . . . 4-14
4.2.7 Settings for Central Configuration . . . . . . . . . . . . . . . . . . . . . . . . . . . . . . . . . . . . 4-15
4.3 Settings for User Interface Modules . . . . . . . . . . . . . . . . . . . . . . . . . . . . . . . . . . . . . . 4-16
4.3.1 Settings for Audio Control. . . . . . . . . . . . . . . . . . . . . . . . . . . . . . . . . . . . . . . . . . . 4-16
4.3.1.1 Audio Schemes . . . . . . . . . . . . . . . . . . . . . . . . . . . . . . . . . . . . . . . . . . . . . . . 4-16
4.3.2 Settings for the Phone . . . . . . . . . . . . . . . . . . . . . . . . . . . . . . . . . . . . . . . . . . . . . 4-19
4.3.2.1 Integrated Phone . . . . . . . . . . . . . . . . . . . . . . . . . . . . . . . . . . . . . . . . . . . . . . 4-19
4.3.3 Settings for the Device State . . . . . . . . . . . . . . . . . . . . . . . . . . . . . . . . . . . . . . . . 4-19
4.3.4 Call List Settings. . . . . . . . . . . . . . . . . . . . . . . . . . . . . . . . . . . . . . . . . . . . . . . . . . 4-20
4.3.4.1 Call Types . . . . . . . . . . . . . . . . . . . . . . . . . . . . . . . . . . . . . . . . . . . . . . . . . . . 4-20
4.3.5 Settings for Directories/Address Books . . . . . . . . . . . . . . . . . . . . . . . . . . . . . . . . 4-21
4.3.5.1 General . . . . . . . . . . . . . . . . . . . . . . . . . . . . . . . . . . . . . . . . . . . . . . . . . . . . . 4-21
4.3.5.2 Column Selection. . . . . . . . . . . . . . . . . . . . . . . . . . . . . . . . . . . . . . . . . . . . . . 4-22
4.3.5.3 Directory Selection. . . . . . . . . . . . . . . . . . . . . . . . . . . . . . . . . . . . . . . . . . . . . 4-23
4.3.6 Settings for the easyCom Communication Circle . . . . . . . . . . . . . . . . . . . . . . . . . 4-25
4.3.6.1 Symbols . . . . . . . . . . . . . . . . . . . . . . . . . . . . . . . . . . . . . . . . . . . . . . . . . . . . . 4-26
4.3.6.2 Image . . . . . . . . . . . . . . . . . . . . . . . . . . . . . . . . . . . . . . . . . . . . . . . . . . . . . . . 4-27
4.3.7 Settings for Contact list and Contact directory . . . . . . . . . . . . . . . . . . . . . . . . . . . 4-27
4.3.8 Settings for the Webbrowser . . . . . . . . . . . . . . . . . . . . . . . . . . . . . . . . . . . . . . . . 4-27
4.3.8.1 Internet Pages . . . . . . . . . . . . . . . . . . . . . . . . . . . . . . . . . . . . . . . . . . . . . . . . 4-27
4.4 Settings for Provider Modules . . . . . . . . . . . . . . . . . . . . . . . . . . . . . . . . . . . . . . . . . . . 4-29
4.4.1 Settings for the Sendmail Provider . . . . . . . . . . . . . . . . . . . . . . . . . . . . . . . . . . . . 4-29
4.5 Settings for Manager Modules . . . . . . . . . . . . . . . . . . . . . . . . . . . . . . . . . . . . . . . . . . 4-31
4.5.1 Settings for the Keyboard Manager . . . . . . . . . . . . . . . . . . . . . . . . . . . . . . . . . . . 4-31
4.5.1.1 Key Assignments . . . . . . . . . . . . . . . . . . . . . . . . . . . . . . . . . . . . . . . . . . . . . . 4-31
4.5.2 Settings for the ScreenSaver Manager . . . . . . . . . . . . . . . . . . . . . . . . . . . . . . . . 4-32
4.5.2.1 Settings . . . . . . . . . . . . . . . . . . . . . . . . . . . . . . . . . . . . . . . . . . . . . . . . . . . . . 4-32
5 The optiClient 130 Directories . . . . . . . . . . . . . . . . . . . . . . . . . . . . . . . . . . . . . . . . . . .
5.1 General Information . . . . . . . . . . . . . . . . . . . . . . . . . . . . . . . . . . . . . . . . . . . . . . . . . . .
5.2 Working with the Contact Directory. . . . . . . . . . . . . . . . . . . . . . . . . . . . . . . . . . . . . . . .
5.2.1 Opening and Closing the Contact Directory . . . . . . . . . . . . . . . . . . . . . . . . . . . . . .
5.2.2 Editing Entries in the Contact Directory . . . . . . . . . . . . . . . . . . . . . . . . . . . . . . . . .
5.2.2.1 Adding a New Contact . . . . . . . . . . . . . . . . . . . . . . . . . . . . . . . . . . . . . . . . . . .
5.2.2.2 Creating a Contact in the Contact List . . . . . . . . . . . . . . . . . . . . . . . . . . . . . . .
5.2.2.3 Editing a Contact . . . . . . . . . . . . . . . . . . . . . . . . . . . . . . . . . . . . . . . . . . . . . . .
5.2.2.4 Deleting a Contact . . . . . . . . . . . . . . . . . . . . . . . . . . . . . . . . . . . . . . . . . . . . . .
5.2.3 Searching in the Contact Directory. . . . . . . . . . . . . . . . . . . . . . . . . . . . . . . . . . . . .
0-2
5-1
5-1
5-2
5-2
5-3
5-3
5-5
5-5
5-6
5-6
A31003-G2550-A100-6-76A9, 04/2005
optiClient 130 V5.0 , Administrator Documentation and Operating Instructions
optiClient5dTOC.fm
Nur für den internen Gebrauch
Contents
5.2.4 Direct Contact from the Contact Directory. . . . . . . . . . . . . . . . . . . . . . . . . . . . . . . 5-6
5.3 Working with Other Directories . . . . . . . . . . . . . . . . . . . . . . . . . . . . . . . . . . . . . . . . . . 5-7
5.3.1 Opening and Closing Directories. . . . . . . . . . . . . . . . . . . . . . . . . . . . . . . . . . . . . . 5-7
5.3.2 Searching the LDAP Directory . . . . . . . . . . . . . . . . . . . . . . . . . . . . . . . . . . . . . . . 5-8
5.3.3 Initiating Direct Contact from the Directory . . . . . . . . . . . . . . . . . . . . . . . . . . . . . 5-10
5.3.4 Displaying Detailed Subscriber Information . . . . . . . . . . . . . . . . . . . . . . . . . . . . 5-11
5.3.5 Refreshing a Directory. . . . . . . . . . . . . . . . . . . . . . . . . . . . . . . . . . . . . . . . . . . . . 5-11
6 The optiClient 130 Contact List . . . . . . . . . . . . . . . . . . . . . . . . . . . . . . . . . . . . . . . . . .
6.1 Opening/Closing the Contact List . . . . . . . . . . . . . . . . . . . . . . . . . . . . . . . . . . . . . . . .
6.2 Working with the Contact List . . . . . . . . . . . . . . . . . . . . . . . . . . . . . . . . . . . . . . . . . . .
6.2.1 Adding, Editing and Deleting Groups . . . . . . . . . . . . . . . . . . . . . . . . . . . . . . . . . .
6.2.2 Adding, Editing and Deleting Contacts . . . . . . . . . . . . . . . . . . . . . . . . . . . . . . . . .
6.2.3 Assigning Contacts to Groups. . . . . . . . . . . . . . . . . . . . . . . . . . . . . . . . . . . . . . . .
6.2.4 Display Options for Contact Lists . . . . . . . . . . . . . . . . . . . . . . . . . . . . . . . . . . . . .
6.2.5 Direct Contact from the Contact List (Telephone/Email) . . . . . . . . . . . . . . . . . . . .
6-1
6-1
6-2
6-2
6-2
6-4
6-4
6-5
7 The optiClient 130 Call Lists . . . . . . . . . . . . . . . . . . . . . . . . . . . . . . . . . . . . . . . . . . . .
7.1 General Information on optiClient 130 Call Lists . . . . . . . . . . . . . . . . . . . . . . . . . . . . .
7.2 Working with optiClient 130 Call Lists . . . . . . . . . . . . . . . . . . . . . . . . . . . . . . . . . . . . .
7.2.1 Opening and Closing Call Lists . . . . . . . . . . . . . . . . . . . . . . . . . . . . . . . . . . . . . . .
7.2.2 Establishing a Connection from Call List Administration . . . . . . . . . . . . . . . . . . . .
7.2.3 Deleting Call List Entries . . . . . . . . . . . . . . . . . . . . . . . . . . . . . . . . . . . . . . . . . . . .
7-1
7-1
7-2
7-2
7-3
7-3
8 The easyCom Communication Circle . . . . . . . . . . . . . . . . . . . . . . . . . . . . . . . . . . . . .
8.1 General Information . . . . . . . . . . . . . . . . . . . . . . . . . . . . . . . . . . . . . . . . . . . . . . . . . . .
8.2 Elements of the easyCom Window . . . . . . . . . . . . . . . . . . . . . . . . . . . . . . . . . . . . . . .
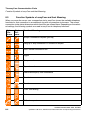
8.3 Function Symbols of easyCom and their Meaning . . . . . . . . . . . . . . . . . . . . . . . . . . .
8.4 Making Calls with the easyCom Communication Circle. . . . . . . . . . . . . . . . . . . . . . . .
8-1
8-1
8-1
8-4
8-5
9 The optiClient 130 Web Browser Window . . . . . . . . . . . . . . . . . . . . . . . . . . . . . . . . . 9-1
9.1 General Information . . . . . . . . . . . . . . . . . . . . . . . . . . . . . . . . . . . . . . . . . . . . . . . . . . . 9-1
10 Making Calls with the HiPath 3000/4000/5000 . . . . . . . . . . . . . . . . . . . . . . . . . . . . 10-1
10.1 Settings for the HiPath Provider on HiPath 3000/4000/5000. . . . . . . . . . . . . . . . . . 10-1
10.1.1 Device Settings . . . . . . . . . . . . . . . . . . . . . . . . . . . . . . . . . . . . . . . . . . . . . . . . . 10-2
10.1.2 Settings for the Main Connection . . . . . . . . . . . . . . . . . . . . . . . . . . . . . . . . . . . 10-5
10.1.3 Settings for Main Network Access. . . . . . . . . . . . . . . . . . . . . . . . . . . . . . . . . . . 10-6
10.1.4 Settings for the Fallback connection . . . . . . . . . . . . . . . . . . . . . . . . . . . . . . . . . 10-7
10.1.5 Settings for Fallback Network Access . . . . . . . . . . . . . . . . . . . . . . . . . . . . . . . . 10-8
10.1.6 Settings for Failover . . . . . . . . . . . . . . . . . . . . . . . . . . . . . . . . . . . . . . . . . . . . . 10-8
10.1.7 Settings for Bandwidth Reduction . . . . . . . . . . . . . . . . . . . . . . . . . . . . . . . . . . . 10-9
10.1.8 Port Restriction Settings . . . . . . . . . . . . . . . . . . . . . . . . . . . . . . . . . . . . . . . . . 10-10
10.1.9 Virtual Private Network (VPN) Settings . . . . . . . . . . . . . . . . . . . . . . . . . . . . . . 10-11
10.1.10 Quality of Service (QoS) Settings . . . . . . . . . . . . . . . . . . . . . . . . . . . . . . . . . 10-11
10.1.11 Settings for Licensing . . . . . . . . . . . . . . . . . . . . . . . . . . . . . . . . . . . . . . . . . . 10-12
10.1.12 Operation Settings . . . . . . . . . . . . . . . . . . . . . . . . . . . . . . . . . . . . . . . . . . . . 10-13
A31003-G2550-A100-6-76A9, 04/2005
optiClient 130 V5.0 , Administrator Documentation and Operating Instructions
0-3
optiClient5dTOC.fm
Contents
Nur für den internen Gebrauch
10.2 Settings for the CTI Provider on HiPath 3000/4000/5000 . . . . . . . . . . . . . . . . . . . .
10.2.1 Device Settings. . . . . . . . . . . . . . . . . . . . . . . . . . . . . . . . . . . . . . . . . . . . . . . . .
10.2.2 Settings for the Connection . . . . . . . . . . . . . . . . . . . . . . . . . . . . . . . . . . . . . . .
10.2.3 Network Access Settings . . . . . . . . . . . . . . . . . . . . . . . . . . . . . . . . . . . . . . . . .
10.3 Telephony functionsHiPath 4000 . . . . . . . . . . . . . . . . . . . . . . . . . . . . . . . . . . . . . .
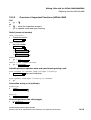
10.3.1 Telephony Icons Available for HiPath 4000 . . . . . . . . . . . . . . . . . . . . . . . . . . .
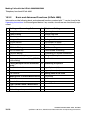
10.3.2 Basic and Advanced Functions (HiPath 4000) . . . . . . . . . . . . . . . . . . . . . . . . .
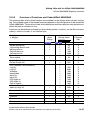
10.3.3 Overview of Important Functions (HiPath 4000 . . . . . . . . . . . . . . . . . . . . . . . .
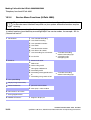
10.3.4 Service Menu Functions (HiPath 4000) . . . . . . . . . . . . . . . . . . . . . . . . . . . . . .
10.4 HiPath 3000/5000 Telephony functions . . . . . . . . . . . . . . . . . . . . . . . . . . . . . . . . .
10.4.1 Telephony Icons Available for HiPath 3000/5000. . . . . . . . . . . . . . . . . . . . . . .
10.4.2 Basic and Advanced Functions (HiPath 3000/5000) . . . . . . . . . . . . . . . . . . . .
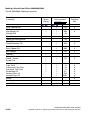
10.4.3 Overview of Functions and CodesHiPath 3000/5000. . . . . . . . . . . . . . . . . . . .
10-14
10-14
10-15
10-16
10-17
10-17
10-18
10-19
10-22
10-24
10-24
10-26
10-27
11 Administrator Notes, Tips & Tricks . . . . . . . . . . . . . . . . . . . . . . . . . . . . . . . . . . . . . 11-1
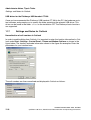
11.1 Administration of the Settings Folder . . . . . . . . . . . . . . . . . . . . . . . . . . . . . . . . . . . . 11-1
11.2 Transferring Data from the Previous Version (Migration) . . . . . . . . . . . . . . . . . . . . . 11-3
11.3 Overview of Port Settings for optiClient 130 . . . . . . . . . . . . . . . . . . . . . . . . . . . . . . . 11-5
11.4 Configuration on the HiPath 4000 (AMOs) . . . . . . . . . . . . . . . . . . . . . . . . . . . . . . . . 11-6
11.4.1 Configuring the HFA Client for optiClient 130 V5.0 on HiPath 4000 . . . . . . . . . 11-6
11.4.2 Configuring HiPath 4000 V2.0 . . . . . . . . . . . . . . . . . . . . . . . . . . . . . . . . . . . . . . 11-6
11.4.3 Configuration for usage of the headset at the USB handset . . . . . . . . . . . . . . . 11-7
11.5 Font Size in optiClient 130 . . . . . . . . . . . . . . . . . . . . . . . . . . . . . . . . . . . . . . . . . . . . 11-7
11.6 USB Driver . . . . . . . . . . . . . . . . . . . . . . . . . . . . . . . . . . . . . . . . . . . . . . . . . . . . . . . . 11-7
11.7 Settings and Notes for Outlook . . . . . . . . . . . . . . . . . . . . . . . . . . . . . . . . . . . . . . . . . 11-8
11.8 The optiClient 130 User and Location Concept . . . . . . . . . . . . . . . . . . . . . . . . . . . . 11-9
11.9 Starting optiClient 130 for the First Time with Active Central Configuration (DLS) . . 11-9
11.9.1 Information for Configuration in optiClient 130 . . . . . . . . . . . . . . . . . . . . . . . . . . 11-9
11.9.2 Functional Restrictions in optiClient 130 . . . . . . . . . . . . . . . . . . . . . . . . . . . . . 11-10
11.9.3 General Information . . . . . . . . . . . . . . . . . . . . . . . . . . . . . . . . . . . . . . . . . . . . . 11-10
12 Quick Reference Guide for optiClient 130 V5.0. . . . . . . . . . . . . . . . . . . . . . . . . . . . 12-1
Glossary . . . . . . . . . . . . . . . . . . . . . . . . . . . . . . . . . . . . . . . . . . . . . . . . . . . . . . . . . . . . . . . X-1
Index . . . . . . . . . . . . . . . . . . . . . . . . . . . . . . . . . . . . . . . . . . . . . . . . . . . . . . . . . . . . . . . . . . Z-1
0-4
A31003-G2550-A100-6-76A9, 04/2005
optiClient 130 V5.0 , Administrator Documentation and Operating Instructions
Nur für den internen Gebrauch
1
optiClient5d_Einleitung.fm
General Information
General Information
What is optiClient 130?
optiClient 130 is a PC-based multimedia application offering connection services from different
communication media via LAN (network). Voice connections can be administered and controlled by optiClient 130. optiClient 130 is operated like a phone on your PC.
Modular configuration
optiClient 130 is made up of modular functional elements which can be exchanged or used to
enhance the feature scope.
●
The basic module in optiClient 130 is the main bar. The main bar itself does not provide
communication functions. Instead, it acts as a central element which, together with the various modules, determines the communication functions available and the display mode
used for optiClient 130.
●
User interface modules are used for operating the various functions available in windows
and dialogs. User interface modules are, for example, phone windows, directories, Call List
Administration, etc.
●
Provider modules determine the communication systems or communication service providers to which optiClient 130 can be connected.
●
Manager modules work invisibly in the background. They perform general communication
control functions. Manager modules Manger modules include for example, the Keyboard
Manager and ScreenSaver Manager.
>
optiClient 130 comes with a specific set of modules on installation. Changing the
type or number of modules installed/configured may prevent optiClient 130 from
completing certain tasks correctly. Make sure you consult your administrator before
making any changes to the modules installed and configured.
Module expansions
●
As a user, you have access to all modules installed as software. For more information on
the modules installed, contact your system administrator.
●
You can add or delete modules installed for use on "your" optiClient 130. Please note that
not every module installed is used on a day-to-day basis. Deleting a necessary module can
limit your optiClient 130 or prevent it from working properly.
●
You cannot add or delete modules during live operation. You can only do this before you
log on.
A31003-G2550-A100-6-76A9, 04/2005
optiClient 130 V5.0 , Administrator Documentation and Operating Instructions
1-1
optiClient5d_Einleitung.fm
General Information
Delivery Scope
Nur für den internen Gebrauch
For more information on adding or deleting modules, see the section Navigating the Dialog Settings.
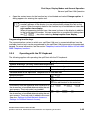
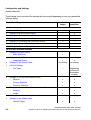
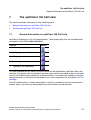
1.1
Delivery Scope
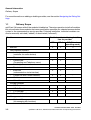
optiClient 130 comes with all the modules listed below. The setup operation installs all modules
but only activates those modules that were specified for operation at a selected communication
system or the communication service provider. Following installation, individual modules can
also be manually activated ("added") or deactivated ("removed").
Module
Module is activated during installation for provider
●
Main bar
●
User interface modules
●
●
HiPath
SIP (Stimulus
operating mode)
x
x
x
–
Audio control
(controller for audio devices)
x
x
x
–
Phone module
-
x
x
–
Device state
(Forwarding and Telephony menu)
x
x
-
–
Call list(s)
x
x
x
–
Directories/address books
x
x
x
–
easyCom
(communication circle interface)
x
x
-
–
Contact list and Contact directory
x
x
-
–
Webbrowser
x
x
-
–
Video Viewer
-
-
-
Provider modules
–
SIP Provider
-
-
x
–
HiPath Provider
-
x
-
–
CTI Provider
x
-
-
–
Sendmail Provider
x
x
x
x
x
x
Manager modules
–
1-2
CTI
Keyboard Manager
(for managing key functions)
A31003-G2550-A100-6-76A9, 04/2005
optiClient 130 V5.0 , Administrator Documentation and Operating Instructions
optiClient5d_Einleitung.fm
General Information
About these Operating Instructions
Nur für den internen Gebrauch
Module
–
1.2
Module is activated during installation for provider
CTI
HiPath
SIP (Stimulus
operating mode)
x
x
x
ScreenSaver Manager
(for managing screen-saver functions)
About these Operating Instructions
Target group
These operating instructions help you familiarize yourself with optiClient 130 and its functions.
The instructions contain important information on how to operate optiClient 130 securely and
correctly. Follow these instructions carefully to avoid incorrect operation and to use optiClient
130 to its full potential.
This operating instructions should be read and followed by every person involved in installing,
operating or configuring optiClient 130.
Operating instructions layout and use
The section General Information provides an introduction to optiClient 130 and its underlying
concept.
Information on software installation and recommended settings under Windows can be found
in the Installing optiClient 130 section.
The section First Steps, Display Modes and General Operation contains information that will
assist you when starting out with optiClient 130. It introduces and describes how to handle the
various optiClient 130 operating elements. You should read this section carefully if you are not
already familiar with optiClient 130.
The section Configuration and Settings provides support for setting the various parameters required for optiClient 130 operation. Read this section if you would like to customize the display
for "your" optiClient 130.
Information on using directories can be found in the section The optiClient 130 Directories.
The section The optiClient 130 Call Lists describes the call lists available and explains how to
use them.
In the section The optiClient 130 Contact List, you will find some notes on operating and using
the optiClient 130 contact list.
A31003-G2550-A100-6-76A9, 04/2005
optiClient 130 V5.0 , Administrator Documentation and Operating Instructions
1-3
optiClient5d_Einleitung.fm
General Information
Specifications and Requirements
Nur für den internen Gebrauch
Notes on operating and calling with the easyCom communication circle can be found in the section The easyCom Communication Circle.
The section Making Calls with the HiPath 3000/4000/5000 provides an overview of the telephony functions that can be used with optiClient 130 at the communication system connected. It
also explains the settings required for the connection to the communication system.
Additional information for administrators of optiClient 130 can be found in the section Administrator Notes, Tips & Tricks.
The section Quick Reference Guide for optiClient 130 V5.0 provides you with an initial and brief
overview of the main controls and functions of optiClient 130.
Reference documentation
The reference documentation listed here is relevant to the basic optiClient 130 delivery scope.
You may need to consult additional reference documentation when expanding the system to
include further modules and functions.
●
optiPoint Telephone Operating Instructions
The telephony functions of the optiClient 130 phone are mainly based on those of the Siemens optiPoint handset. This means you can use the display, control panel and function
keys of the optiClient 130 phone in exactly the same way as the corresponding controls
available in the Siemens optiPoint.
●
Communication system service documentation
Parameters must be configured on the communication system itself in order to use optiClient 130. Detailed information on this is provided for the administrator in the relevant documentation.
1.3
Specifications and Requirements
The specifications and requirements listed here for users, software and hardware apply to the
optiClient 130 basic delivery scope. Additional requirements for hardware and software in particular may apply in the event of expansion to include other functional modules.
●
●
optiClient 130 user requirements
–
Basic knowledge of Windows and the meaning of Windows-specific terminology, such
as "dialog", "window", "context menu", etc. is required.
–
Familiarity with the operation of a Siemens optiPoint would be advantageous for operating the optiClient 130 telephone. Basic functions for making calls are described in
the section Making Calls with the HiPath 3000/4000/5000.
Software requirements
–
1-4
optiClient 130 is installed and ready for operation on the user PC.
A31003-G2550-A100-6-76A9, 04/2005
optiClient 130 V5.0 , Administrator Documentation and Operating Instructions
optiClient5d_Einleitung.fm
Nur für den internen Gebrauch
●
General Information
Specifications and Requirements
–
The user PC is integrated in the IP network.
–
A working connection to the communication system exists.
–
optiClient 130 is licensed.
Hardware requirements
–
The user PC features the necessary audio hardware, for example, a Siemens optiPoint
handset (possibly with headset) or a sound card.
–
When using a sound card, the user PC must have a microphone and loudspeaker (and
possibly also a handset or headset).
>
Further HW and SW requirements can be found in the Readme file on the system CD.
Notational Conventions and Symbols Used
The following conventions apply:
Display
Meaning
Courier font
Examples of videotex, input or output are displayed in courier
font.
Boldface
Menus, menu items, dialog buttons and names of dialog fields,
buttons and index cards are indicated in boldface.
...
Buttons for selecting functions. Your buttons may differ from examples shown here depending on the color scheme selected.
This manual uses the following symbols:
>
“I” identifies useful information.
7
Safety Information
Hazard information. See Safety Information for details.
A31003-G2550-A100-6-76A9, 04/2005
optiClient 130 V5.0 , Administrator Documentation and Operating Instructions
1-5
optiClient5d_Einleitung.fm
General Information
Safety Information
1.4
Nur für den internen Gebrauch
Safety Information
Only service personnel and authorized specialists are permitted to work on the system. Observe the following information:
●
Read through all information on the equipment carefully and follow all safety information.
Make sure that you also know the emergency numbers.
●
Always contact your manager before starting any work where the necessary safety precautions do not appear to be in place.
Types of safety information
This manual uses three types of safety information:
7
Danger
Danger symbols call attention to a situation that could cause serious injury or death
to a person.
7
Warning
Warning symbols call attention to a situation that could cause serious injury to a person.
7
Caution
Hazards that can cause damage to the hardware and software and even destroy it.
Further symbols for defining the source of danger in greater detail1:
1
5
3
0
6
Electricity
Weight
Heat
Fire
Chemicals
4
2
ESD*
Laser
* Electrostatically sensitive device
1. These symbols are normally not used in the manual. They explain symbols that may be depicted on the
equipment.
1-6
A31003-G2550-A100-6-76A9, 04/2005
optiClient 130 V5.0 , Administrator Documentation and Operating Instructions
optiClient5d_Installation.fm
Installing optiClient 130
General Information
Nur für den internen Gebrauch
2
Installing optiClient 130
This section provides information on the following topics:
●
General Information
●
Configuring/Installing Quality of Service
●
Installing optiClient 130
2.1
General Information
The optiClient 130 installation routine not only installs the actual program on the client PC, but
also checks/revises various settings on the optiClient 130 PC and the connected system that
guarantee smooth operation. This includes:
●
Installing and configuring the QoS (Quality of Service) Packet Scheduler on the local optiClient 130 PC to ensure optimum voice quality in the network (see also Configuring/Installing Quality of Service).
●
For connections to HiPath 4000, some configuration parameters (AMOs) must be set on
the HiPath 4000. (see also Configuration on the HiPath 4000 (AMOs))
Installation Medium
A CD with the following title is supplied for installing optiClient 130:
optiClient 130 V5.0
System CD
P30152-P1149-A1-*
Licensing
The License Management tool is required for licensing software. This tool is used to apply for
a license over the Internet. This procedure must be completed within a certain grace period after purchase or product installation (for example, 30 days, product-specific). The product is fully
functional during this grace period but cannot be used once the grace period expires.
If no "License Management" Tool is installed network wide for your on-site installation, the appropriate documentation and installation files will be available on the optiClient 130 installation
CD. For more information on the licensing procedure, please refer to the License Management
documentation or online help.
See also:
Settings for Licensing
.
A31003-G2550-A100-6-76A9, 04/2005
optiClient 130 V5.0 , Administrator Documentation and Operating Instructions
2-1
optiClient5d_Installation.fm
Installing optiClient 130
General Information
Nur für den internen Gebrauch
Installation sequence
●
Define location information (Windows)
●
Install / Configure the QoS Packet Scheduler (Windows)
●
Install the License Management (if not yet available locally or network-wide)
●
Installing optiClient 130
2-2
A31003-G2550-A100-6-76A9, 04/2005
optiClient 130 V5.0 , Administrator Documentation and Operating Instructions
optiClient5d_Installation.fm
Nur für den internen Gebrauch
2.2
Installing optiClient 130
Configuring/Installing Quality of Service
Configuring/Installing Quality of Service
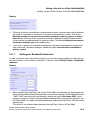
General
optiClient 130 can use the Windows QoS (Quality of Service) Packet Scheduler for controlling
network traffic to improve voice quality in the network. When using this service, telephony packets are given priority over "normal" data packets in the network. For Windows 2000/XP, the required QoS features are supported by the operating system. The necessary configuration steps
are described below.
If QoS is to be used, the service must be installed/configured on the optiClient 130 PC.
The following problems may arise during data transfer in an IP network:
●
Delays caused by large email attachments and Web surfing
●
Network blockages due to multiple requests for the same Web page
●
Reduced voice quality caused by
–
delays
–
jitter
–
packet loss
QoS methods
Quality of Service employs different methods to ensure specific transfer properties in packetoriented networks (IP).
This is why it is important for Voice over IP, for example, to ensure a minimum bandwidth for the
duration of the transfer operation. If several applications are running simultaneously over IP, the
bandwidth available for a transmission path (for example, an ISDN B channel, 64 Kbps) is divided. This can result in packet loss in a voice connection, which in turn results in reduced voice
quality.
Different types of traffic are transported via a single IP infrastructure in HiPath networks. Quality
of Service aims to satisfy the requirements of data and voice traffic.
Voice traffic must be assigned a high priority to avoid instances where data traffic suppresses
voice traffic. The specifications must also ensure that traffic with higher priority is transferred
before traffic with lower priority. These specifications are made on Layer 2 and 3 of the ISO-OSI
7 Layer model:
●
The three bits are used in the 802.1p field on Layer 2. This field is part of 802.1Q-Tag.
●
The six bits from the DiffServ Code Point (DSCP) field are used in the Type of Service (ToS)
byte in the IP header on Layer 3.
A31003-G2550-A100-6-76A9, 04/2005
optiClient 130 V5.0 , Administrator Documentation and Operating Instructions
2-3
optiClient5d_Installation.fm
Installing optiClient 130
Configuring/Installing Quality of Service
Nur für den internen Gebrauch
It is also important that there is sufficient bandwidth available within the QoS class used (code
point/IEEE802.1p User Priority).
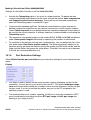
Activating QoS for optiClient 130
1.
QoS must be activated for use in the optiClient 130 settings.
2.
QoS must be provided, that is, installed and configured, on the client PCs concerned.
3.
Unused QoS services for managing network traffic must be deactivated on the optiClient
PCs.
Installing and configuring QoS on the client PC
>
For optimum network traffic control, QoS must be supported not only by the optiClient client PC with the installed network card, but also by all other components concerned, such as routers, switches, servers, etc.
1.
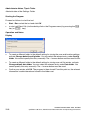
Open the My Network Places context menu on the desktop and select Properties.
2.
In the Network and Dial-up Connections dialog that appears, open the Local Area Connection context menu and select Properties.
3.
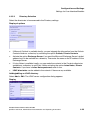
If the QoS Packet Scheduler entry is not yet available, install it. If the QoS Packet Scheduler is installed, ensure that it is activated.
Installing the QoS Packet Scheduler
–
In the Local Area Connection Properties dialog, select Install.
–
Select Service as the network component and click Add.
–
The service is installed and you are returned to the Local Area Connection Properties dialog where the QoS Packet Scheduler entry is now listed.
–
Activate the entry (checkmark).
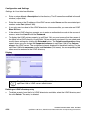
4.
To configure the connection now, select Configure. The properties dialog appears for the
network card installed. Now switch to the Advanced tab.
5.
Select Activate for the properties 802.1p support and flow control and then click OK.
6.
Back in the LAN connection properties dialog, confirm with OK.
7.
Close the Network and Dial-up Connections dialog.
This completes the installation/configuration of QoS on the optiClient 130PC.
2-4
A31003-G2550-A100-6-76A9, 04/2005
optiClient 130 V5.0 , Administrator Documentation and Operating Instructions
optiClient5d_Installation.fm
Installing optiClient 130
Installing optiClient 130
Nur für den internen Gebrauch
2.3
Installing optiClient 130
To install optiClient 130 on your client PC, you will require the installation CD with the following
title:
optiClient 130 V5.0
System CD
P30152-P1149-A1-*
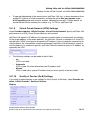
Installing optiClient 130:
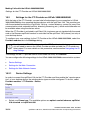
1.
Insert the installation CD into the CD-ROM. The installation program starts automatically.
If the CD does not automatically start when you insert it due to settings in the Control Panel, select Start -Run and then enter the initial letters of the installation program on the CD
drive (in example D:):
D:\setup.exe.
2.
Click Next in the welcome dialog.
3.
You can read the optiClient 130 licence contract in the license dialog. Installation is initiated
once you accept the agreement and click Next.
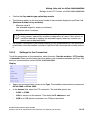
4.
To personalize the installation, enter your name and organization in the Full name and Organization fields in the User info dialog. Select the availability of optiClient 130 for All users for this PC or Only for me and confirm with Next.
5.
You can now edit the scope of features to be installed or accept the default recommendation without changes. All listed languages are generally installed for the user interface. The
target folder for the installation is displayed under Save in. The default path is:
C:\Program Files\Siemens\optiClient. Confirm your entries with Next.
6.
If you do not want to install the online help in all available languages, you can now remove
individual languages from the installation operation. Although optiClient 130 can still be operated in all languages, no online help is now available in the languages removed. The online help is installed in all listed languages by default. Confirm your entries with Next.
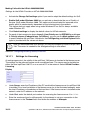
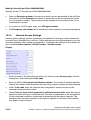
7.
Now specify the standard provider connected to the optiClient 130. The following options
are available:
–
CTI Provider
To operate desktop telephones (connected to a HiPath 3000/4000/5000) over optiClient 130.
–
HiPath Provider
To connect the optiClient 130 directly to the HiPath 3000/4000/5000.
–
SIP Provider
To connect the optiClient 130 directly to the HiPath 8000/Cisco proxy.
A31003-G2550-A100-6-76A9, 04/2005
optiClient 130 V5.0 , Administrator Documentation and Operating Instructions
2-5
optiClient5d_Installation.fm
Installing optiClient 130
Installing optiClient 130
Nur für den internen Gebrauch
If you want to use an available central configuration, select the option Use central configuration. You can then enter the server name or IP address of the central configuration
server (optional). Confirm your entries with Next.
8.
The system indicates it is ready to install. Select Next again to initiate the installation.
9.
The installation begins. If the Microsoft .NET Framework is not yet installed on your PC, it
will be automatically installed now. This may take some time. The optiClient 130 is installed. After all files have been installed, a final message appears, which you can confirm
by clicking Finish.
optiClient 130 is now installed.
Program group installed
The installation routine creates a new program group, Siemens, under Start - Program Files.
You will find optiClient 130 in this program group.
Shortcuts on the Desktop
A shortcut icon for optiClient 130 is installed on the desktop.
2-6
A31003-G2550-A100-6-76A9, 04/2005
optiClient 130 V5.0 , Administrator Documentation and Operating Instructions
Nur für den internen Gebrauch
3
optiClient5d_Anzeige.fm
First Steps, Display Modes and General Operation
Starting the Program, Logging On, Terminating the Program
First Steps, Display Modes and General Operation
This chapter provides you with information on the following topics:
●
Starting the Program, Logging On, Terminating the Program
●
The Representation of optiClient 130 Controls
●
General optiClient 130 Operation
3.1
Starting the Program, Logging On, Terminating the Program
This section provides information on the following topics:
●
Starting optiClient 130
●
Logging In
●
Exiting optiClient 130
3.1.1
Starting optiClient 130
The installation routine creates a program group and shortcut for optiClient 130 on the desktop.
To start optiClient 130
>
double-click the optiClient 130 shortcut icon on the desktop
or
>
select Start - Program Files - Siemens - optiClient.
The Logging In mask appears. If there is no password saved for the last user, logon is automatically performed with the last settings entered (user, language, location) when optiClient 130 is
started). If you want to force the logon mask to appear, for example, to enter another user, hold
the < / Ï button depressed when starting the optiClient 130 program.
>
3.1.2
Since the < / Ï key is used to select multiple items under Windows by default, make sure that only the entry for optiClient 130 is selected on the Desktop when
starting optiClient 130 before you hold down the < / Ï key and start the
program (mandatory Logon dialog).
Logging In
Log on to optiClient 130 as a user first when the program starts:
A31003-G2550-A100-6-76A9, 04/2005
optiClient 130 V5.0 , Administrator Documentation and Operating Instructions
3-1
optiClient5d_Anzeige.fm
First Steps, Display Modes and General Operation
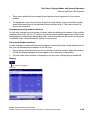
Starting the Program, Logging On, Terminating the Program
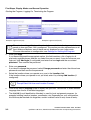
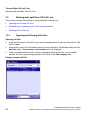
Example: Logon mask (full)
>
Nur für den internen Gebrauch
Example: Logon mask (basic)
The selection of input fields and function buttons available in the logon mask depends on how optiClient 130 is configured. This section provides explanations on all
input fields and buttons, even if these are not displayed on your logon mask.
For more information on configuration, see Settings for Starting the Program.
>
Enter your login.
If you have configured the appropriate option, this field contains a list of logins for all
previously registered users and lets you select the one you want. If you do not have a user
login yet, click Add login (if configured) and enter the new login and the associated
password. Then confirm the password.
>
Enter your password.
If you want to change the password, select Change password and enter the old and new
passwords and then confirm the password.
>
Select the location where you operate as a user in the Location field.
If the location where you operate is not yet listed, enter it by clicking Add location (if
configured).
>
More information on the User and Location concept can be found in the section
The optiClient 130 User and Location Concept.
>
Confirm the default language used to display the optiClient 130 controls or select another
language from the list of installed languages.
>
The field LIN (Local Identification Number) is used for local assignment purposes, for
example, building (section) number, coordinates, etc. Depending on your configuration,
this field may be masked out altogether, contain a default value or may force an entry.
3-2
A31003-G2550-A100-6-76A9, 04/2005
optiClient 130 V5.0 , Administrator Documentation and Operating Instructions
optiClient5d_Anzeige.fm
Nur für den internen Gebrauch
>
Different administration functions are available for managing the user or site information
and for switching to the configuration - depending on the settings currently configured.
Click Manage for this.
–
Settings
Opens the Settings dialog for configuring the optiClient 130 parameters. Once you
have finished editing your settings you are returned to the Logon dialog. The current
settings are applied when you log on.
For more information on the individual settings, see the section Configuration and Settings.
>
>
First Steps, Display Modes and General Operation
Starting the Program, Logging On, Terminating the Program
When you log on as a user for the first time, you will need to define various userspecific settings, e.g., to connect to the communication system and to identify
the optiClient 130 user. Without these settings, the optiClient 130 cannot be operated.
–
Add login lets you add a new user login and associated password.
Copy login copies the settings for the current user login to a new user login.
Change login lets you enter another user login for the current user (rename).
Delete login deletes the current user login.
–
Change password is used to define a new password.
–
Add location lets you enter a new location.
Copy location copies the settings for the current location to a new location.
Change location lets you enter another location name for the current location (rename).
Delete location deletes the current location.
Click OK to confirm logon.
The main bar and associated windows and components opens in accordance with your settings
and optiClient 130 functions are available for use.
>
Please refer to the section Starting optiClient 130 for the First Time with Active Central Configuration (DLS) for special information on using the central configuration for
configuring or logging on users for the first time.
A31003-G2550-A100-6-76A9, 04/2005
optiClient 130 V5.0 , Administrator Documentation and Operating Instructions
3-3
optiClient5d_Anzeige.fm
First Steps, Display Modes and General Operation
Starting the Program, Logging On, Terminating the Program
3-4
Nur für den internen Gebrauch
A31003-G2550-A100-6-76A9, 04/2005
optiClient 130 V5.0 , Administrator Documentation and Operating Instructions
optiClient5d_Anzeige.fm
Nur für den internen Gebrauch
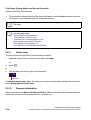
3.1.3
>
First Steps, Display Modes and General Operation
Starting the Program, Logging On, Terminating the Program
Exiting optiClient 130
Click the close icon on the optiClient 130 main bar
or
>
select Exit in the optiClient 130 menu
or
>
click h + D
>
Depending on the configuration set, if a connection is still active,
●
the program cannot be terminated or
●
an appropriate advisory appears and the program is terminated at the same
time as all active connections or
●
the program and all active connections are terminated without further warning.
For more information on setting the required behavior, see the section Settings for
Ending the Program.
A31003-G2550-A100-6-76A9, 04/2005
optiClient 130 V5.0 , Administrator Documentation and Operating Instructions
3-5
optiClient5d_Anzeige.fm
First Steps, Display Modes and General Operation
The Representation of optiClient 130 Controls
Nur für den internen Gebrauch
3.2
The Representation of optiClient 130 Controls
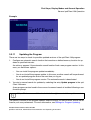
3.2.1
Overview of Controls
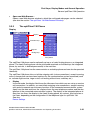
Different users can see different optiClient 130 layouts after they log on. Layouts vary depending on the modules installed and activated as well as the user preferences and window settings
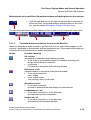
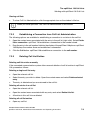
that were active when the program was last ended. The central element in optiClient 130 is the
main bar:
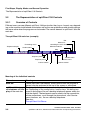
The optiClient 130 main bar (example)
Exit
Buttons for
controlling the main window
Forwarding menu
Telephone display
Minimize modules
Audio buttons
Help
Telephony buttons
Telephony menu
Call list buttons
Module menu
Volume menu
Volume control
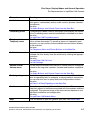
Meaning of the individual controls
Element
Meaning
Main bar
Central optiClient 130 element, always active once the program is
started, may be anchored at the top of the screen or minimized.
optiClient 130 integrat- The integrated telephone is represented by the display on the main
ed telephone with dis- bar. Depending on the configuration, function keys, the dialing keyplay on the main bar
board or dialog keys (like on a desktop telephone) appear when you
click the display. These elements can be used to set up connections,
initiate conferences, scroll through the phone book, start Service
menu functions, etc., like on a desktop telephone.
See also:
The optiClient 130 Phone.
3-6
A31003-G2550-A100-6-76A9, 04/2005
optiClient 130 V5.0 , Administrator Documentation and Operating Instructions
optiClient5d_Anzeige.fm
Nur für den internen Gebrauch
First Steps, Display Modes and General Operation
The Representation of optiClient 130 Controls
Element
Meaning
Audio buttons
The Audio buttons on the main bar are used to accept and disconnect
calls (green / red handset) and as audio controls (speaker, headset,
microphone).
See also:
The Audio Buttons and Volume Control on the Main Bar.
Forwarding menu
If forwarding has been currently configured, these details are shown
in the Forwarding menu and can be enabled or disabled from there.
See also:
The optiClient 130 Forwarding menu.
Telephony buttons
Telephony menu
The Telephony menu features telephony functions for the communication system connected. To speed up access to frequently used
functions, you can position the associated icons as buttons directly
on the main bar.
See also:
The Telephony Menu and Phone Buttons on the Main Bar
Call list buttons
Depending on your user preferences, you may be able to open all
available call lists directly from the main bar by clicking the appropriate button.
See also:
The optiClient 130 Call Lists
Call List Settings.
Volume control
Volume menu
You can use the volume control button or volume menu to change the
volume for the ring tone / speaker / handset and headset, respectively.
See also:
The Audio Buttons and Volume Control on the Main Bar
Fault signaling
The fault icon appears on the main bar as soon as optiClient 130 detects an operating fault, for example, a missing network connection.
You can click this icon to query faults and find possible solutions.
See also:
optiClient 130 Fault Signaling on the Main Bar
Module menu
This button opens the optiClient 130 Module menu. The menu provides fast access to functions associated with the modules installed/
configured. The type and scope of the menu entries depend on your
individual installation and configuration.
See also:
The optiClient 130 Module Menu.
Help
Click this button to open the general optiClient 130 Online Help.
A31003-G2550-A100-6-76A9, 04/2005
optiClient 130 V5.0 , Administrator Documentation and Operating Instructions
3-7
optiClient5d_Anzeige.fm
First Steps, Display Modes and General Operation
The Representation of optiClient 130 Controls
Nur für den internen Gebrauch
Element
Meaning
Minimize modules
button
By clicking this button you can minimize all active optiClient 130 module windows and dock them on the main bar.
See also:
Display Options for the optiClient 130 Module Window
Buttons for control- Click these buttons to minimize optiClient 130 or anchor the main bar
ling the main window at the top of the screen.
See also:
Settings for Display in the Info Area.
Exit
Click this button to close optiClient 130.
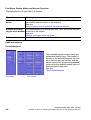
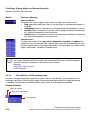
Additional controls
Extended keypad
The extended keypad contains freely programmable function keys. The number of
columns in the extended keypad, the number of function keys per column, and the
default function key programming depend
on which function and key module type you
have selected for operation.
See also:
The Extended Keypad
one column
3-8
three columns
A31003-G2550-A100-6-76A9, 04/2005
optiClient 130 V5.0 , Administrator Documentation and Operating Instructions
optiClient5d_Anzeige.fm
Nur für den internen Gebrauch
First Steps, Display Modes and General Operation
The Representation of optiClient 130 Controls
Directories/Address books
You can search for entries in the directories/address books
configured and initiate calls or send emails directly to contacts.
See also:
Settings for Directories/Address Books
The optiClient 130 Directories.
Call Lists
Calls are logged in the Call List Administration. Incoming/outgoing connections or connection requests are logged depending on the communication system connected. You can also
set up connections to logged call partners from the Call List
Administration.
See also:
Call List Settings
The optiClient 130 Call Lists.
A31003-G2550-A100-6-76A9, 04/2005
optiClient 130 V5.0 , Administrator Documentation and Operating Instructions
3-9
optiClient5d_Anzeige.fm
First Steps, Display Modes and General Operation
The Representation of optiClient 130 Controls
Nur für den internen Gebrauch
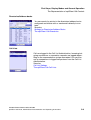
Contact list
In the contact list, you can import individual contacts from various directories and then group them there to suit your own
requirements. The groups / contacts in the contact list can be
displayed in various views of the contact list. Connections to
individual contacts can be set up directly from the contact list.
See also:
Settings for Contact list and Contact directory
The optiClient 130 Contact List.
Contact directory
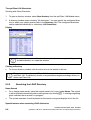
The contact directory can be used to
manage individual contacts independently of other directories. Contacts
from other directories can also be easily imported into the contact directory.
Connections to individual contacts can
also be set up directly from the contact
directory.
See also:
Settings for Contact list and Contact
directory
Working with the Contact Directory.
3-10
A31003-G2550-A100-6-76A9, 04/2005
optiClient 130 V5.0 , Administrator Documentation and Operating Instructions
optiClient5d_Anzeige.fm
Nur für den internen Gebrauch
First Steps, Display Modes and General Operation
The Representation of optiClient 130 Controls
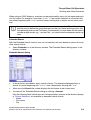
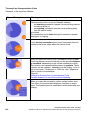
easyCom communication circle
The easyCom communication circle offers an alternative interface for using telephony functions. Connections
and connection states are represented here via an intuitive and convenient interface using graphic (colored)
circles.
See also:
Settings for the easyCom Communication Circle
The easyCom Communication Circle.
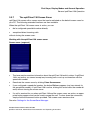
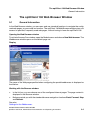
Web Browser window
optiClient 130 provides a Web Browser window
in which you can quickly open frequently used
Internet pages without having to exit optiClient
130. The optiClient 130 Web Browser window
offers basic functions for operation. The Internet
pages that can be activated are configured in¦
optiClient 130.
See also:
Settings for the Webbrowser
The optiClient 130 Web Browser Window.
>
The numerous layout and positioning options for optiClient 130 controls mean that
"your" optiClient 130 may differ in appearance from the figure shown here.
A31003-G2550-A100-6-76A9, 04/2005
optiClient 130 V5.0 , Administrator Documentation and Operating Instructions
3-11
optiClient5d_Anzeige.fm
First Steps, Display Modes and General Operation
General optiClient 130 Operation
3.3
Nur für den internen Gebrauch
General optiClient 130 Operation
This section provides an overview of how to operate the various optiClient 130 controls.
Equipped with this information, you can then customize your optiClient 130 layout to satisfy
your personal requirements and wishes:
●
The optiClient 130 Main Bar
●
The optiClient 130 Phone
●
The Extended Keypad
●
Labeling/Programming Function Keys
●
Operating with the PC Keyboard
●
Dialing Aids
●
The optiClient 130 Screen Saver
●
Display Options for the optiClient 130 Module Window
●
Online Help
●
Program Information
●
Updating the Program
3.3.1
The optiClient 130 Main Bar
The main bar is the central element in the optiClient 130 user interface and can be customized
to suit your individual needs. In addition, it also includes various menus and buttons:
●
The optiClient 130 Menu
●
Main Bar Display Options
●
The Audio Buttons and Volume Control on the Main Bar
●
The optiClient 130 Forwarding menu
●
The Telephony Menu and Phone Buttons on the Main Bar
●
optiClient 130 Fault Signaling on the Main Bar
●
The optiClient 130 Module Menu
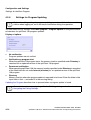
3.3.1.1
The optiClient 130 Menu
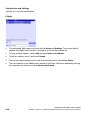
The main bar contains the optiClient 130 menu which can be opened by right-clicking an unassigned area.
3-12
A31003-G2550-A100-6-76A9, 04/2005
optiClient 130 V5.0 , Administrator Documentation and Operating Instructions
optiClient5d_Anzeige.fm
Nur für den internen Gebrauch
First Steps, Display Modes and General Operation
General optiClient 130 Operation
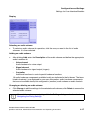
Display
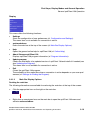
This menu offers the following functions:
●
Settings
Starts the configuration of user preferences (cf. Configuration and Settings).
This menu item is not available if a connection is active.
●
anchored above
Docks the main bar at the top of the screen (cf. Main Bar Display Options).
●
Help
Opens the general online help for optiClient 130 (cf. Online Help).
●
About Siemens optiClient 130
Displays optiClient 130 program information (cf. Program Information).
●
Update program
Checks the availability of an updated version of optiClient 130 and installs it if needed (see
also Updating the Program).
This menu item is not available if a connection is active.
●
Exit
Closes the optiClient 130 program.
The availability of this menu item when a connection is active depends on your user preferences (cf. Settings for Ending the Program).
3.3.1.2
Main Bar Display Options
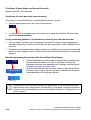
Docking the main bar
The following alternatives are available for anchoring the main bar at the top of the screen:
>
Click the appropriate icon on the right on the main bar.
>
Right-click an unassigned area on the main bar to open the optiClient 130 menu and
activate anchored above.
A31003-G2550-A100-6-76A9, 04/2005
optiClient 130 V5.0 , Administrator Documentation and Operating Instructions
3-13
optiClient5d_Anzeige.fm
First Steps, Display Modes and General Operation
General optiClient 130 Operation
Nur für den internen Gebrauch
Positioning the main bar freely (remove anchor)
If you want to choose the position of the anchored main bar, you can
>
click the appropriate icon on the right on the main bar
>
or right-click an unassigned area on the main bar to open the optiClient 130 menu and
deactivate anchored above.
Freely positioning optiClient 130 windows or anchoring then with the menu bar
>
You can anchor windows with the "magnetic" main bar. Do this by simply dragging the
activated window by its title bar near to the main bar; the window is now anchored to the
main bar.
>
To detach an anchored window, drag the window by its title bar away from the main bar and
away from the "magnetic" area. You can now position the window wherever you like on the
desktop.
Minimizing/restoring the main bar (with all optiClient 130 windows)
Taskbar
>
Click the indicated icon on the right on the main bar to minimize this
bar and all active windows. An icon for optiClient 130 may be
displayed in the info area depending your settings (see the section
Settings for Display in the Info Area).
>
To restore the main bar with all active windows, click the optiClient
130 entry in the taskbar. An icon may be provided for this in the info
area depending on the settings selected.
Info area
>
3-14
Depending on your individual settings, the appearance of the minimized/restored
main bar may vary in response to certain events, for example, incoming connection
requests or active connections (see also the section Settings for Changing the Connection Status).
A31003-G2550-A100-6-76A9, 04/2005
optiClient 130 V5.0 , Administrator Documentation and Operating Instructions
optiClient5d_Anzeige.fm
Nur für den internen Gebrauch
First Steps, Display Modes and General Operation
General optiClient 130 Operation
Minimizing all active optiClient 130 module windows and docking them on the main bar
>
Click the indicated icon on the right on the main bar to minimize all
active optiClient 130 module windows and dock them on this main
bar (see the section Settings for Display in the Info Area).
You can restore minimized module windows to their original size by clicking the restore icon:
3.3.1.3
The Audio Buttons and Volume Control on the Main Bar
When you integrate an audio module in optiClient 130, various audio buttons appear on the
main bar - depending on the hardware and user preferences set. These audio buttons help you
to activate the associated functions quickly and effectively:
Button
Function / Meaning
Lift receiver
(the handset or alternative audio device provided):
●
In the event of a connection request, for example, incoming call:
accept and establish a connection.
●
In idle state
lift (handset or alternative audio device provided).
Disconnect a Call
(replace handset or alternative audio device provided)
●
In an active connection:
call is ended.
●
In the system menu:
stop scrolling, return to idle state.
Microphone on/off
●
In an active connection:
activate or deactivate the mute feature for audio devices.
Loudspeaker on / off
In an active connection or in the idle state:
activate/deactivate the loudspeaker.
●
Headset on / off
In an active connection or in the idle state:
activate/deactivate headset operation.
●
A31003-G2550-A100-6-76A9, 04/2005
optiClient 130 V5.0 , Administrator Documentation and Operating Instructions
3-15
optiClient5d_Anzeige.fm
First Steps, Display Modes and General Operation
General optiClient 130 Operation
Button
Nur für den internen Gebrauch
Function / Meaning
Volume control:
Push the slider right (louder) or left (softer) to adjust the volume of the...
●
Ring tone when optiClient 130 is in an idle state or a connection request is
received.
●
loudspeaker when a connection is in progress and a loudspeaker is active.
●
handset when a connection is active, a call is being conducted via the handset, and the loudspeaker is not turned on.
●
headset when a connection is active, a call is being conducted via the headset, and the loudspeaker is not turned on.
Volume menu:
To adjust the volume of the ring tone, loudspeaker, handset or headset irrespective of your current optiClient 130 call state, open the Volume menu by clicking the volume button (to the right of the slider). You can adjust the volume of the
ringer, loudspeaker, handset or headset here.
>
3.3.1.4
The headset button and headset volume control will only be available to you if you
are using a Siemens optiPoint handset with a headset extension and if this audio device has also been configured in the active audio scheme.
See also:
Settings for Audio Control
Audio Schemes
The optiClient 130 Forwarding menu
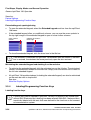
In order to forward connection requests at times when you are absent, you can define call forwarding in optiClient 130 for various types of forwarding and then enable or disable the feature
as needed. The provider connected defines which types of forwarding are available.
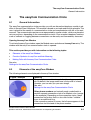
Display (example)
Forwarding Button
Open Forwarding Menu
Forwarding Menu
3-16
A31003-G2550-A100-6-76A9, 04/2005
optiClient 130 V5.0 , Administrator Documentation and Operating Instructions
optiClient5d_Anzeige.fm
Nur für den internen Gebrauch
First Steps, Display Modes and General Operation
General optiClient 130 Operation
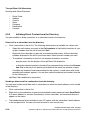
Add forwarding
>
Open the context menu on the Forwarding button and select Add.
>
You can now use the Type of Forwarding dialog to define the Destination (call number)
and a designation (Optional text). This defines the call forwarding.
The following types of forwarding are available for HiPath 3000/5000:
–
unconditional
–
external unconditional
–
internal unconditional
The following types of forwarding are available for HiPath 4000:
–
unconditional
–
external unconditional
–
internal unconditional
–
busy
–
no answer
–
on busy/no answer
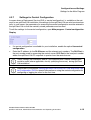
Change forwarding
>
Open the Forwarding menu
>
Open the context menu of the forwarding details you want to edit and select Change.
>
Change the settings as desired.
Deleting Forwarding
>
Open the Forwarding menu
>
Open the context menu of the forwarding details you want to delete and select Delete.
Enabling / Disabling Forwarding
>
Open the Forwarding menu The enabled call forwarding items are shaded in a dark color
(or bright, depending on your color scheme).
>
Clicking on an entry toggles the state between enabled and disabled (on and off).
>
Clicking the Forwarding Button will enable or disable all active call forwarding items.
A31003-G2550-A100-6-76A9, 04/2005
optiClient 130 V5.0 , Administrator Documentation and Operating Instructions
3-17
optiClient5d_Anzeige.fm
First Steps, Display Modes and General Operation
General optiClient 130 Operation
3.3.1.5
Nur für den internen Gebrauch
The Telephony Menu and Phone Buttons on the Main Bar
General
The communication system connected to the optiClient 130 basically specifies which telephony
functions are available. In optiClient 130, the available functions can be used for direct activation in the Telephony menu. You can program frequently used functions on buttons and store
them directly on the main bar.
An overview of the telephony functions available in optiClient 130 is provided in the section Telephony functionsHiPath 4000 or HiPath 3000/5000 Telephony functions.
Telephony menu (example)
Buttons for Telephony functions on the main bar
Telephony menu
Telephony functions
>
Functions that can be activated in the optiClient 130 (connection) status currently active
are shown in full color in the menu in the above example. Functions that cannot be
activated are gray (display depends on the color scheme selected).
Activating/deactivating telephony functions
>
Open the Telephony menu and select the relevant function
or
>
click the function button on the main bar
Depending on the function type, you may have to specify additional information to execute
the function (for example, enter the code for the Code key function).
Placing function buttons on the main bar
>
Open the Telephony menu.
>
Open the context menu of the desired telephony function and select Display function in
the main bar. The button icon is placed on the main bar.
3-18
A31003-G2550-A100-6-76A9, 04/2005
optiClient 130 V5.0 , Administrator Documentation and Operating Instructions
optiClient5d_Anzeige.fm
Nur für den internen Gebrauch
First Steps, Display Modes and General Operation
General optiClient 130 Operation
You can apply the same procedure to place buttons on the main bar for functions that cannot
be activated at present.
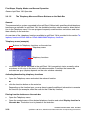
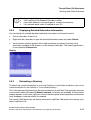
3.3.1.6
optiClient 130 Fault Signaling on the Main Bar
The intelligent optiClient 130 fault signaling function immediately signals problems that occur
during live operation. Fault signaling is activated in the following scenarios:
–
connection problems
–
sound card problem
–
license problems
Fault signaling on the main bar
A new fault has occurred,
but has not yet been queried.
A fault has occurred,
and has already been queried,
but has not yet been resolved.
Querying a fault
>
Click the fault icon on the main bar. A window appears with the error report that lists all
unresolved faults and includes information on possible solutions.
>
The appearance of the fault icon on the main bar changes as soon as you close the error
report with (new) faults.
The fault icon automatically disappears from the main bar as soon as all faults have been resolved.
3.3.1.7
The optiClient 130 Module Menu
The optiClient 130 Module menu, which can be opened via the Module Menu button in main
bar, contains all menu items and functions offered by the modules installed.
A31003-G2550-A100-6-76A9, 04/2005
optiClient 130 V5.0 , Administrator Documentation and Operating Instructions
3-19
optiClient5d_Anzeige.fm
First Steps, Display Modes and General Operation
General optiClient 130 Operation
Nur für den internen Gebrauch
Display
The scope of the optiClient 130 Module menu and the menu entry sequence depend on your
individual installation and configuration. Active modules are marked in the Module menu. The
following functions are available in the Module menu in a basic installation:
●
Integrated phone
Opens the optiClient 130 phone as a window whose display is integrated (docked) on the
main bar. The integrated phone’s display is always shown; , such as, dialing keys, dialog
keys, and function keys, can be displayed below it, although this is optional (see The optiClient 130 Phone).
●
Free phone
Opens the optiClient 130 phone as a freely positionable (floating) window. In the freely positionable phone, the display, dialing keys, dialog keys and even the function keys can be
displayed (see The optiClient 130 Phone).
●
Extended keypad
Opens the extended keypad (see the section The Extended Keypad).
●
Call lists
Opens the Call List Administration (see also the section The optiClient 130 Call Lists).
●
New directory
Opens an optiClient 130 directory window in which you can search for contacts (see also
the section The optiClient 130 Directories).
●
easyCom
Opens the easyCom window (see also the section The easyCom Communication Circle).
●
Contact directory
Opens your contact directory with your individual entries (see also the sectionWorking with
the Contact Directory).
●
Contact list
Opens your contact list in which contacts are grouped and shown as selected by you (see
also the section The optiClient 130 Contact List).
3-20
A31003-G2550-A100-6-76A9, 04/2005
optiClient 130 V5.0 , Administrator Documentation and Operating Instructions
optiClient5d_Anzeige.fm
First Steps, Display Modes and General Operation
General optiClient 130 Operation
Nur für den internen Gebrauch
●
Open new Web Browser...
Opens a new Web browser window in which the configured web pages can be selected
(see also the section The optiClient 130 Web Browser Window).
3.3.2
The optiClient 130 Phone
Display
Display
Function keys
Keypad
Dialog keys
Integrated phone
Free phone
The optiClient 130 phone can be optionally set up as a freely floating phone or an integrated
phone. The freely floating phone can be positioned anywhere on the desktop; the integrated
phone, by contrast, is docked permanently to the main bar.
The optiClient 130 phone has the same controls as a desktop phone and can also be operated
identically.
The optiClient 130 phone lets you initiate outgoing calls (voice connections), accept incoming
calls or else perform service menu functions for the communication system connected (such
as, activate night service, ringer cutoff, call waiting without tone, code key, etc.).
●
Display
In normal mode, the display field shows the idle menu from which you can set up or receive
call connections. In addition, you can initiate outgoing voice connections, accept incoming
calls and also execute service menu functions of the connected communication system.
Apart from the date and time, the display shows the own telephone number and the designation of the connected communication system. The display in the integrated phone always has two lines; the display in the freely floating phone, by contrast, may have two or
four lines, depending on the configuration of the telephone type for optiClient 130.
See also:
Device Settings
A31003-G2550-A100-6-76A9, 04/2005
optiClient 130 V5.0 , Administrator Documentation and Operating Instructions
3-21
optiClient5d_Anzeige.fm
First Steps, Display Modes and General Operation
General optiClient 130 Operation
●
Nur für den internen Gebrauch
Function keys
The optiClient 130 phone includes four or five freely programmable function keys, depending on the selected telephone type. Following startup, these keys are predefined with standard functions of the communication system (function + label).
See also:
Device Settings
Labeling/Programming Function Keys
>
If an automatic line seizure was configured on the connected HiPath 3000/5000
communication system, the function "Initiate an internal call" will be programmed
on the third function key. In this case, you need to manually change the key caption to Internal Calls.
●
Dialing keyboard
On the dialing keypad, you will see the digit keys d - m (also labeled with letters) and q
and r. Depending on the input mode set, you can enter normal and special characters at
the push of a button. To do this, simply press the digit key as often as needed until the desired character appears in the display. Typical examples for the input of letters includes the
labeling of programmed phone numbers (for telephone types with EKL).
See also:
Device Settings
●
Dialog keys
The three dialog keys are used to scroll forwards and backwards, to confirm functions and
in the Service menu.
Display options
●
The free and integrated phone can be opened simultaneously.
●
Clicking in any free area in the telephone opens a context menu that allows you to individually turn on or turn off the display of the function keys, the dialing keypad and the dialog
keys. In the free phone, you can also turn the display on or off by this method.
●
The display options of the free and integrated phone may differ. For example, you can show
only the display on the main bar for the integrated phone, while freely positioning the free
phone with the dialing keyboard, dialog keys and function keys anywhere on the desktop.
●
In idle state, the integrated phone only shows the display on the main bar. Simply click the
display to open the associated keypads set or the free phone. The required behavior can
be configured.
●
The display of the integrated phone always appears as a two-line display on the main bar.
3-22
A31003-G2550-A100-6-76A9, 04/2005
optiClient 130 V5.0 , Administrator Documentation and Operating Instructions
optiClient5d_Anzeige.fm
First Steps, Display Modes and General Operation
General optiClient 130 Operation
Nur für den internen Gebrauch
See also:
Integrated Phone
The optiClient 130 Module Menu
Device Settings
3.3.3
The Extended Keypad
The extended keypad provides you with multiple columns of freely programmable function keys.
You can program these keys with frequently dialed call numbers or telephony functions, for example, and then select them with a simple mouse click.
Number of columns
The number of columns available and the number of keys in the columns are determined by
your selection of the phone and key module type (see also section Device Settings).
Display
one column
multi-column
Following startup of the optiClient 130, these keys may be predefined with standard functions
of the communication system (function + label).
Key captions - Electronic Key Labeling
The selected phone or key module type also determines whether Electronic Key Labeling (EKL)
is available for the keys. With EKL, all keys that are programmed with a function (regardless of
whether by default or by manual programming) are automatically labeled with the "suitable"
function test that is defined in the communication system. It is not possible to enter a customized caption in optiClient 130.
If you have selected a phone or key module type without EKL, you can label the keys in optiClient 130 and also assign the destination numbers there.
A31003-G2550-A100-6-76A9, 04/2005
optiClient 130 V5.0 , Administrator Documentation and Operating Instructions
3-23
optiClient5d_Anzeige.fm
First Steps, Display Modes and General Operation
General optiClient 130 Operation
Nur für den internen Gebrauch
See also:
Device Settings
Labeling/Programming Function Keys
Extended keypad, opening/closing
>
To open the extended keypad, select the Extended keypad main bar from the optiClient
130 menu.
>
If the extended keypad offers you additional columns, you can use the arrow symbols in
the top right margin of the extended keypad to open or close further columns.
open another
column
>
collapse all columns
to the right
To close the extended keypad, click the close icon in the title bar.
>
If the main bar is minimized, all optiClient 130 windows open are closed. If the main
bar is restored, the windows that were previously open are also restored.
Minimizing the extended keypad and docking it on the main bar
>
To minimize the extended keypad, click the minimize icon on the title bar. The minimized
title bar is automatically docked on the main bar. Simply click the restore icon to revert to
the full-size extended keypad.
>
All optiClient 130 module windows (including the extended keypad) can also be minimized
on the main bar with a simple click.
See also:
Main Bar Display Options.
3.3.4
Labeling/Programming Function Keys
Labeling function keys
>
3-24
Function keys can be labeled in optiClient 130 only if a phone or key module type
without EKL (Electronic Key Labeling) has been selected. With EKL, the keys are automatically labeled with the texts that were defined for the functions on the connected communication system.
A31003-G2550-A100-6-76A9, 04/2005
optiClient 130 V5.0 , Administrator Documentation and Operating Instructions
optiClient5d_Anzeige.fm
Nur für den internen Gebrauch
>
First Steps, Display Modes and General Operation
General optiClient 130 Operation
Open the context menu for the function key to be labeled and select Change caption. A
dialog appears for entering the caption text.
>
If while programming function keys the required caption (for example, the call
number) appears in the display, you can automatically accept this text as the
caption. Open the context menu for the function key to be labeled and select Accept caption from display.
When programming function keys, the name is shown in the display in addition
to the associated call number. You can accept this as a caption by holding down
the < (Ï ) key when selecting Accept caption from display.
Programming function keys
The communication system to which your optiClient 130 user is connected defines how the
available function keys can be programmed on the optiClient 130 phone and on the extended
keypad. For more information, see the section Telephony functionsHiPath 4000 or HiPath 3000/
5000 Telephony functions.
3.3.5
Operating with the PC Keyboard
The following applies with operating the optiClient with the PC keyboard:
Action
Key/key combination
System-wide keys (at every cursor/mouse position)
Accept a connection request
Key can be configured
End connection (for example, replace the handset) Key can be configured
Cursor/mouse in the optiClient 130 phone or on the main bar
Browse functions
X or Z
Confirm function
=
Revert to idle state in the system menu
_ (This key corresponds to the button
with the red handset on the main bar)
Dial directly from the clipboard, with conversion of < + f
the characters to be dialed determined by the network access. The trunk code is not added.
(or Ï + í
)
Dial directly from the clipboard, with conversion of I + v (or Ì
the characters to be dialed determined by the network access. The trunk code is added in this case.
See also: Settings for Main Network Access or
Settings for Fallback Network Access).
A31003-G2550-A100-6-76A9, 04/2005
optiClient 130 V5.0 , Administrator Documentation and Operating Instructions
+ v)
3-25
optiClient5d_Anzeige.fm
First Steps, Display Modes and General Operation
General optiClient 130 Operation
Nur für den internen Gebrauch
optiClient 130 lets you perform direct dialing in all windows using the numerical keys and set
up a connection or scroll through the Service menu using the keys X and Z . The digits
dialed or the Service menu entries are shown on the telephone’s display. Direct dialing is not
possible, however, if the cursor is currently in an input field, for example.
>
Direct dialing/scrolling through the Service menu with the dialing keyboard is not
possible in the Webbrowser window.
For more information on the settings for keyboard operation, see the section Settings for the
Keyboard Manager.
3.3.6
Dialing Aids
You can use the following dialing aids to set up a connection in optiClient 130 to a call number
entered in another program, for example, a text processing application:
Dialing with copy & paste
●
Mark the call number in the program (for example, text processing application) and copy it
to the clipboard with I + c (or Ì + c) or with the menu functions provided by
the program).
●
Switch to optiClient 130. Paste the call number from the clipboard back into the phone’s
display field with
●
–
< +f
(or Ï + í ) without the trunk code
–
or with I + v (or Ì
+ v) with the trunk code
The call number appears in the display, and the connection is set up directly.
Dialing with drag & drop
●
Use the mouse to mark the number you want in the program (for example, text processing
application).
●
Drag the marked number to the optiClient 130 phone’s display and then release the mouse
button (in other words, drop the dragged number there).
●
The call number appears in the display, and the connection is set up directly.
3-26
A31003-G2550-A100-6-76A9, 04/2005
optiClient 130 V5.0 , Administrator Documentation and Operating Instructions
optiClient5d_Anzeige.fm
Nur für den internen Gebrauch
3.3.7
First Steps, Display Modes and General Operation
General optiClient 130 Operation
The optiClient 130 Screen Saver
optiClient 130 comes with a screen saver that can be activated as the default screen saver for
your PC. The following extended functions are then available.
When the optiClient 130 screen saver is active, you can
●
dial a configured speed-dial number directly.
●
accept/end direct incoming calls.
without closing the screen saver.
Working with the optiClient 130 screen saver
Screen saver (segment)
●
The lower section contains information about the optiClient 130 activity status. If optiClient
130 is not active, you cannot accept any incoming calls or set up a connection with the
speed-dial number.
●
Deactivate the screen saver by clicking Close Screensaver.
●
If you configured a speed-dial number, the button Dial xxx appears (xxx here stands for
the speed-dial number). If optiClient 130 is active, clicking this button dials the number directly without closing the screen saver.
●
If a call is received for you when optiClient 130 and the screen saver are active, an appropriate button appears and can be used to accept the call. To clear down the connection,
simply click the disconnect button provided. The screen saver remains active.
See also: Settings for the ScreenSaver Manager.
A31003-G2550-A100-6-76A9, 04/2005
optiClient 130 V5.0 , Administrator Documentation and Operating Instructions
3-27
optiClient5d_Anzeige.fm
First Steps, Display Modes and General Operation
General optiClient 130 Operation
3.3.8
Nur für den internen Gebrauch
Display Options for the optiClient 130 Module Window
The following (module) windows can be opened in optiClient 130:
●
Free phone
●
Extended keypad
●
Directories
●
Call Lists
●
easyCom communication circle
●
Webbrowser
●
Contact list
●
Contact directory
These windows offer various display and handling options, independently of their respective
contents and functions.
Docking windows at the main bar or positioning them freely
>
To dock a module window to the main bar, simply drag the window close to the "magnetic"
main bar The window is automatically anchored when it gets close enough.
>
To float the window (i.e., undock it) , simply drag it away from the main bar until it is far
enough to be released. You can then position it anywhere on the Desktop.
>
When optiClient 130 is minimized, the main bar including all open optiClient 130
windows (where applicable) is also minimized. If optiClient 130 is restored, the windows that were previously open are also restored.
Minimizing/restoring windows
>
To minimize or restore a module window, click the Minimize-Restore symbol in the title bar.
When minimized, only a window’s title bar is visible; this is then automatically anchored at
the main bar.
Changing the window size
>
To change the size of the window, drag the window edge or a window corner until it has the
desired size.
Changing the column order and column width
The following applies to module windows in which information is displayed in the form of columns (directories, contact directory, call lists):
3-28
A31003-G2550-A100-6-76A9, 04/2005
optiClient 130 V5.0 , Administrator Documentation and Operating Instructions
optiClient5d_Anzeige.fm
Nur für den internen Gebrauch
First Steps, Display Modes and General Operation
General optiClient 130 Operation
>
The column widths can be changed by moving the column separators in the column
headers.
>
To change the order to the columns, drag the column header to be moved while holding
down the mouse button to the desired location and then drop it. The column and all its
entries will be moved.
Changing the sorting order in columns
You can also change the sorting order of entries which are displayed in columns in the module
windows (directories, call lists). To do this, click in the column header; the entries will be sorted
and displayed in ascending or descending order. As an orientation aid, the current sorting order
is indicated in the column header by means of small arrows.
Tab view for Module windows
In order to display multiple opened module windows conveniently, while saving desktop real estate, you can cascade these windows in the Tab view:
>
Drag a window with the hand icon from the title bar to another window. When the windows
line up, the display changes and tabs appear in the lower part of the window.
>
You can select which window is displayed on top by simply clicking the associated tab.
Display
Hand icon for dragging
Tab view
A31003-G2550-A100-6-76A9, 04/2005
optiClient 130 V5.0 , Administrator Documentation and Operating Instructions
3-29
optiClient5d_Anzeige.fm
First Steps, Display Modes and General Operation
General optiClient 130 Operation
>
Nur für den internen Gebrauch
To disconnect a window from the Tab view, drag it away from the tabbed windows area; this
will cause it to be displayed again as a separate window.
>
The windows with the free phone and the extended keypad cannot be displayed in
Tab view.
>
More information on the functionality and operation of the individual module windows
can be found under
The optiClient 130 Directories
.The optiClient 130 Call Lists
The easyCom Communication Circle
Working with the Contact Directory
The optiClient 130 Contact List
The optiClient 130 Web Browser Window
3.3.9
Online Help
You can activate the optiClient 130 online help as follows:
>
open the context menu on the main bar and select Help
or
>
press A
or
>
click the help icon on the right on the main bar.
Help icon
The general online help opens. The help icon can also be accessed in dialogs. Here, this icon
opens dialog-specific online help.
3.3.10
Program Information
Select the menu entry About Siemens optiClient 130 from the menu bar’s context menu for
information on the current program version, copyright, etc.
3-30
A31003-G2550-A100-6-76A9, 04/2005
optiClient 130 V5.0 , Administrator Documentation and Operating Instructions
optiClient5d_Anzeige.fm
Nur für den internen Gebrauch
First Steps, Display Modes and General Operation
General optiClient 130 Operation
Example
3.3.11
Updating the Program
There are two ways to check for possible updated versions of the optiClient 130 program:
1.
Configure an automatic search function that searches a defined memory location for updates at specified intervals.
An advisory appears if the automatic search function finds a new program version. In this
case, you have three options:
2.
–
You can install the program update immediately.
–
You do not install the program update; in this case, another search will be performed
for an updated program version the next time you log on.
–
You do not install the program version. The automatic search is deactivated.
You start a manual search for updates by selecting the entry Update program in the optiClient 130 menu.
A new program version found in the course of a manual search is installed following a confirmation prompt.
>
Only a Windows user with local administration rights can install an update version.
The memory location for the program updates and the settings for the automatic search are defined in your user preferences. For more information, see Settings for Program Updating.
A31003-G2550-A100-6-76A9, 04/2005
optiClient 130 V5.0 , Administrator Documentation and Operating Instructions
3-31
optiClient5d_Anzeige.fm
First Steps, Display Modes and General Operation
General optiClient 130 Operation
3-32
Nur für den internen Gebrauch
A31003-G2550-A100-6-76A9, 04/2005
optiClient 130 V5.0 , Administrator Documentation and Operating Instructions
Nur für den internen Gebrauch
4
Configuration and Settings
4.1
General Remarks
optiClient5d_Konfiguration.fm
Configuration and Settings
General Remarks
To ensure the smooth operation of optiClient 130, different settings must be made for each individual user. The type and scope of the settings depend, for example, on the modules installed
and activated, basic network parameters, the audio hardware installed, etc.
Various settings such as the own call number at the communication system must be set before
logon; otherwise, the telephone will not work properly. You should switch to the mask for editing
settings as soon as you create a new user in the logon dialog.
Other settings, such as call list options, have no effect on the general operation of optiClient
130 and can be edited during live operation after you log on.
>
Please refer to the section Starting optiClient 130 for the First Time with Active Central Configuration (DLS) for special information on using the central configuration for
configuring or logging on users for the first time.
>
Operating settings are defined for your user in the course of installation and initial
user configuration and should not be modified. Reminders are provided in this document when describing the relevant settings.
>
Information on individual users are administered by optiClient 130 in the folder
C:\Documents and Settings\All Users\User Data\Siemens\optiClient
by default. The Settings Folders Tool is available to the optiClient 130 administrator
if you want to configure a different folder for storing user information (e.g., a central
folder on the network). For more information, see the section Administration of the
Settings Folder.
>
A migration tool is available to the optiClient 130 administrator if user data from a
previous version of optiClient 130 needs to be transferred. For more information, see
the section Transferring Data from the Previous Version (Migration).
The user preferences are edited in the Settings dialog. You can open this dialog both from the
Logon mask (that is, before operating parameters are loaded/read in) as well as during live operation after logging on from the optiClient 130 menu.
See also:
Logging In
The optiClient 130 Menu
A31003-G2550-A100-6-76A9, 04/2005
optiClient 130 V5.0 , Administrator Documentation and Operating Instructions
4-1
optiClient5d_Konfiguration.fm
Configuration and Settings
General Remarks
Nur für den internen Gebrauch
The following is an overview of the settings that you can edit depending on how you opened the
Settings dialog:
Available settings
via
Logon
during live
operation
for the main program
●
General Settings
x
x
●
Settings for Starting the Program
--
x
●
Settings for Ending the Program
x
--
●
Settings for Display in the Info Area
x
--
●
Settings for Changing the Connection Status
x
--
●
Settings for Program Updating
x
--
●
Settings for Central Configuration
x
--
x
--
no setting
no setting
x
x
no setting
no setting
--
(depending
on the communication
system)
for the user interface modules
●
Settings for Audio Control
–
●
Audio Schemes
Settings for the Phone
–
Integrated Phone
●
Settings for the Device State
●
Call List Settings
–
●
●
Call Types
Settings for Directories/Address Books
–
General
x
x
–
Column Selection
x
x
–
Directory Selection
x
x
Settings for the easyCom Communication Circle
–
Symbols
x
x
–
Image
x
x
no setting
no setting
x
x
●
Settings for Contact list and Contact directory
●
Settings for the Webbrowser
–
4-2
Internet Pages
A31003-G2550-A100-6-76A9, 04/2005
optiClient 130 V5.0 , Administrator Documentation and Operating Instructions
optiClient5d_Konfiguration.fm
Nur für den internen Gebrauch
Available settings
Configuration and Settings
General Remarks
via
Logon
during live
operation
for Provider modules
●
●
●
Settings for the HiPath Provider on HiPath 3000/4000/5000 if HiPath Provider is active
and connected to HiPath
3000/4000/5000
–
Device Settings
x
--
–
Settings for the Main Connection
x
--
–
Settings for Main Network Access
x
--
–
Settings for the Fallback connection
x
--
–
Settings for Fallback Network Access
x
--
–
Settings for Failover
x
--
–
Settings for Bandwidth Reduction
x
--
–
Port Restriction Settings
x
--
–
Virtual Private Network (VPN) Settings
x
--
–
Quality of Service (QoS) Settings
x
--
–
Settings for Licensing
x
--
–
Operation Settings
--
x
Settings for the CTI Provider on HiPath 3000/4000/5000
if CTI Provider is active and
connected to HiPath 3000/
4000/5000
–
Device Settings
x
--
–
Settings for the Connection
x
--
–
Network Access Settings
x
--
Settings for the Sendmail Provider
no setting
no setting
x
--
x
--
for Manager modules
●
Settings for the Keyboard Manager
–
●
Key Assignments
Settings for the ScreenSaver Manager
–
>
Settings
The type and scope of the possible user settings depends on the modules installed
and configured in optiClient 130. This overview applies to the standard installation
of optiClient 130 without expansions.
A31003-G2550-A100-6-76A9, 04/2005
optiClient 130 V5.0 , Administrator Documentation and Operating Instructions
4-3
optiClient5d_Konfiguration.fm
Configuration and Settings
General Remarks
4.1.1
Nur für den internen Gebrauch
Navigating the Dialog Settings
The Settings dialog
●
You can edit settings for Main program, User interface modules, Provider modules and
Manager modules on separate tabs in the Settings dialog.
●
The left window pane contains a tree structure which provides an overview of the modules
available and their settings. The right pane contains the relevant parameters. The tree
structure in the left pane is based on the Windows standard and is navigated in the same
way as Windows Explorer.
●
The online help for the parameters displayed can be opened by clicking the help icon ? in
the dialog’s title bar.
4.1.2
Adding or Removing a Module
The setup operation installs all modules but only activates (adds) "suitable" modules and those
needed for the standard provider. The standard provider is defined during the setup operation.
Plausibility check
Please note that although you can add or remove modules after installation, this can have a
radical effect on optiClient 130 functions. Missing/incorrect modules can, for example, prevent
connection to the communication system and the operation of individual audio devices, etc.
4-4
A31003-G2550-A100-6-76A9, 04/2005
optiClient 130 V5.0 , Administrator Documentation and Operating Instructions
optiClient5d_Konfiguration.fm
Nur für den internen Gebrauch
Configuration and Settings
General Remarks
Changing the module selection therefore prevents the plausibility check. If optiClient 130 is subject to functional restrictions as a result of missing modules, an appropriate advisory will be provided.
Adding/removing modules
Modules can only be added or removed if the Settings dialog was opened from the Logging in
mask. Proceed as follows:
>
To add (add-on) modules, click the appropriate button above the tree structure. Select the
required module/functionality for the list of installed and as yet uninstalled modules that
appears. The module added is then entered in the overview. You can now make the
associated settings.
>
To remove a module, select the required module and then click the Delete button above
the tree structure. The module functions are no longer available.
This form of deletion only removes your user access to the module and its functions. The
module itself remains installed and can be added once again for your user by clicking Add.
A31003-G2550-A100-6-76A9, 04/2005
optiClient 130 V5.0 , Administrator Documentation and Operating Instructions
4-5
optiClient5d_Konfiguration.fm
Configuration and Settings
Settings for the Main Program
4.2
Nur für den internen Gebrauch
Settings for the Main Program
You can modify settings in the following areas for the main program (main bar):
●
General Settings
●
Settings for Starting the Program
●
Settings for Ending the Program
●
Settings for Display in the Info Area
●
Settings for Changing the Connection Status
●
Settings for Program Updating
●
Settings for Central Configuration
4.2.1
General Settings
You can enter settings for the following under Main program - General Settings:
●
Color Schemes
4.2.1.1
Color Schemes
You can select predefined and coordinated color schemes to customize the color layout of your
optiClient 130. To select a color scheme, select Main program - General Settings - Color
Schemes.
Option
The following options are available:
●
Blue Ocean (Standard)
●
London Sky
●
Spring Time
●
Summer Time
4-6
A31003-G2550-A100-6-76A9, 04/2005
optiClient 130 V5.0 , Administrator Documentation and Operating Instructions
optiClient5d_Konfiguration.fm
Configuration and Settings
Settings for the Main Program
Nur für den internen Gebrauch
Color schemes
Blue Ocean
London Sky
Spring Time
Summer Time
The color scheme selected is implemented for all optiClient 130 windows and components including the optiClient 130 screen saver (if activated).
4.2.2
>
Settings for Starting the Program
Options for editing settings for program start are only available in the case of activation during live operation, not in the case of activation when logging on.
To edit options for starting the optiClient 130 program, select Main program - Program start.
Display of options
You can define the following optiClient 130 settings for starting the program:
A31003-G2550-A100-6-76A9, 04/2005
optiClient 130 V5.0 , Administrator Documentation and Operating Instructions
4-7
optiClient5d_Konfiguration.fm
Configuration and Settings
Settings for the Main Program
Nur für den internen Gebrauch
>
List login
Select this option if you want the Login field in the Logon window to feature a list of the last
user logins registered. This option is recommended to simplify login entry if different user
logins are used at the optiClient 130. If this option is not selected, the Login field is just an
input field.
>
Use Windows user names
Select this option if your optiClient 130 user name is identical to the Windows user or if you
want to use the Windows user name. The name of the Windows user logged on is then
entered by default as the user ID in the logon mask. If this option is not selected, the login
of the last user logged on appears by default in the logon mask.
>
Location to be selected
If you select this option, an additional field for selecting a location will appear in the logon
mask. If this option is not selected, there are no location-specific administration functions
available in the Logon dialog.
Activate this setting, for example, if you want to use the same user ID at different locations.
Location-specific parameters are therefore considered during logon.
>
Location-specific information is always necessary for user logon. Consequently, the
Location field may only be masked out in the Logon mask if only ONE location is
used. The field cannot be masked out unless this location is entered the first time a
user logs on.
>
Language to be selected
If you select this option, an additional field for selecting the mask language will appear in
the Logon mask. Select this setting, for example, if staff members with different native
languages operate optiClient 130 on one PC.
>
Configuration alternatives
Use this setting to define whether and which configuration alternatives are available to a
user when logging on to optiClient 130. The following options are available:
–
–
4-8
Accept settings and Location-/User management
The management functions appear in the Logon dialog when you click Manage:
–
Settings
–
Add/Copy/Delete/Change login
–
Change password
–
Add/Copy/Delete/Change location (provided Location to be selected is active)
only accept settings
The entries Settings and Change password only appear in the Logon dialog if you click
Manage. The other management functions are not available.
A31003-G2550-A100-6-76A9, 04/2005
optiClient 130 V5.0 , Administrator Documentation and Operating Instructions
optiClient5d_Konfiguration.fm
Nur für den internen Gebrauch
–
Configuration and Settings
Settings for the Main Program
Hide settings and Location-/User management
The entry Change password only appears in the Logon dialog if you click Manage. No
other functions are available.
See also:
Logging In
>
LIN mode
This option controls how an LIN (Local Identification Number) is entered in the logon mask.
The LIN is used - for example, to pinpoint emergency calls - for the local assignment of
buildings, building section numbers, etc. You can choose between:
–
suppressed (no entries)
The LIN field is omitted from the logon mask.
–
optional (empty entry field)
The LIN field appears blank in the logon mask and can remain blank for logon.
–
optional (display last entry)
The LIN field appears in the logon mask, the LIN from the last logon is set by default,
the field can be left blank for logon.
–
mandatory (empty entry field)
The LIN field appears blank in the logon mask and must be filled out for logon.
–
mandatory (display last entry)
The LIN field appears in the logon mask, the LIN from the last logon is set by default,
the field must be filled out for logon.
>
If no password has been stored for a user, optiClient 130 is started directly without
a login dialog. If you want to see the Login dialog in any case, but do not wish to assign a password, you may optionally select the LIN option (empty input field) here.
The Login dialog will then appear on starting the program.
>
General information on navigating within the Settings dialog can be found under
Navigating the Dialog Settings.
4.2.3
>
Settings for Ending the Program
Options for editing settings for program termination are only available in the case of
activation when logging on, not in the case of activation during live operation.
To edit options for ending the optiClient 130 program, select Main program - End of program.
A31003-G2550-A100-6-76A9, 04/2005
optiClient 130 V5.0 , Administrator Documentation and Operating Instructions
4-9
optiClient5d_Konfiguration.fm
Configuration and Settings
Settings for the Main Program
Nur für den internen Gebrauch
Display of options
You can define how the optiClient 130 behaves when the program is ended:
>
Prevention on active connections
This option prevents the termination of the optiClient 130 program if a connection is still
active.
>
Warning on active connections
If a connection, for example, a telephone call, is still active, a warning appears when the
optiClient 130 program is ended. If you persist with ending optiClient 130, the connection
is also ended.
>
Also possible with active connections
If a connection, for example, a telephone call, is still active, this connection is ended without
warning together with optiClient 130 when the optiClient 130 program is ended.
>
4-10
General information on navigating within the Settings dialog can be found under
Navigating the Dialog Settings.
A31003-G2550-A100-6-76A9, 04/2005
optiClient 130 V5.0 , Administrator Documentation and Operating Instructions
optiClient5d_Konfiguration.fm
Nur für den internen Gebrauch
4.2.4
Configuration and Settings
Settings for the Main Program
Settings for Display in the Info Area
>
Options for editing settings for the info area display mode are only available in the
case of activation when logging on, not in the case of activation during live operation.
To edit options that are relevant for the optiClient 130 icons in the info area, select Main program - Info area
Display of options
>
Depending on the current display mode set for the main bar in optiClient 130, you can set
whether an icon appears in the info area for optiClient 130 under Symbol in info area:
–
Anchored main bar
An entry is made if the main bar is anchored at the top of the screen.
–
Normal main bar
An entry is made if the main bar can be freely positioned and is not minimized.
–
Minimized main bar
An entry is made if the main bar is minimized.
For more information on main bar display options, see the section The optiClient 130 Main
Bar.
>
General information on navigating within the Settings dialog can be found under
Navigating the Dialog Settings.
A31003-G2550-A100-6-76A9, 04/2005
optiClient 130 V5.0 , Administrator Documentation and Operating Instructions
4-11
optiClient5d_Konfiguration.fm
Configuration and Settings
Settings for the Main Program
4.2.5
Nur für den internen Gebrauch
Settings for Changing the Connection Status
>
Options for editing settings for changing the connection status are only available in
the case of activation when logging on, not in the case of activation during live operation.
Depending on the display mode set for optiClient 130 in normal mode, you may want the display
mode to reflect a change of connection status. For example, if the main bar is minimized in connection-free status, you can enter a setting that places optiClient 130 back on top in the case
of incoming or outgoing calls.
To edit these options, select Main program - Change of connection status.
Display of options
>
You can define the optiClient 130 display mode for every connection status. The following
connection statuses exist:
–
Without connection
Connection-free status (no connection request, no connection setup, no active connection).
–
Connection setup
You set up a connection to another station, for example, a call connection, by dialing a
call number.
–
Active connection
A connection is active, for example, a call is in progress.
–
Connection request
You receive a connection request, for example, a caller is calling you.
4-12
A31003-G2550-A100-6-76A9, 04/2005
optiClient 130 V5.0 , Administrator Documentation and Operating Instructions
optiClient5d_Konfiguration.fm
Nur für den internen Gebrauch
>
>
Configuration and Settings
Settings for the Main Program
When changing the connection status, you can define how optiClient 130 displays each
individual connection status. The display mode can change to:
–
(no changes)
The current display is not modified.
–
normal/positioned
The main bar is displayed in the state which was valid before minimizing (either normal
or positioned). optiClient 130 is therefore always visible on the desktop again.
–
minimized/hidden
The main bar is minimized or hidden. The main bar is hidden if you did not select icon
display in the settings for the info area (cf. the section Settings for Display in the Info
Area).
The time entered after the to field specifies the number of seconds before the required
display mode should be complete following a change of connection status. This setting
ensures that optiClient 130 is automatically minimized/hidden again within a certain time
period after a connection has ended.
>
General information on navigating within the Settings dialog can be found under
Navigating the Dialog Settings.
A31003-G2550-A100-6-76A9, 04/2005
optiClient 130 V5.0 , Administrator Documentation and Operating Instructions
4-13
optiClient5d_Konfiguration.fm
Configuration and Settings
Settings for the Main Program
4.2.6
>
Nur für den internen Gebrauch
Settings for Program Updating
Options for editing settings for program updating are only available in the case of activation when logging on, not in the case of activation during live operation.
You can make various settings under Main program - Program update to configure automated searches for optiClient 130 program updates:
Display of options
>
No verification
Program updates are not verified.
>
Verification on program start
When the optiClient 130 program starts, the memory location specified under Directory is
searched for an updated version of the optiClient 130 program.
>
Permanent verification
When operating optiClient 130, the memory location specified under Directory is searched
at the fixed intervals set under Interval (minutes) for an updated version of the optiClient
130 program.
>
Directory
Memory location where the program update is expected to be found. Enter the folder in the
input field or click ... and select it in the ensuing dialog.
Updating the Program describes how to proceed when a program update is found.
>
4-14
General information on navigating within the Settings dialog can be found under
Navigating the Dialog Settings.
A31003-G2550-A100-6-76A9, 04/2005
optiClient 130 V5.0 , Administrator Documentation and Operating Instructions
optiClient5d_Konfiguration.fm
Nur für den internen Gebrauch
4.2.7
Configuration and Settings
Settings for the Main Program
Settings for Central Configuration
In cases where a Deployment Service (DLS or central configuration) is available on the network for an optiClient 130 installation, the settings for the optiClient 130 can also be stored centrally. In such cases, the parameters for accessing the central configuration must be entered in
the optiClient 130 so that the centrally stored parameters can be used.
To edit the settings for the central configuration, open Main program - Central configuration.
Display
>
If a central configuration is available for your installation, enable the option Use central
configuration.
>
Enter the IP address for the DLS Server and the relevant port numbers. The DLS Port is
the port number used for accessing the central server. DLC Port is the local port number
where the optiClient 130 PC responds to queries from the central server.
>
These settings are entered by default if you specified that a central configuration
would be used (where applicable, also by specifying the server) during optiClient
130 installation.
>
Please refer to the section Starting optiClient 130 for the First Time with Active Central Configuration (DLS) for special information on using the central configuration for
configuring or logging on users for the first time.
A31003-G2550-A100-6-76A9, 04/2005
optiClient 130 V5.0 , Administrator Documentation and Operating Instructions
4-15
optiClient5d_Konfiguration.fm
Configuration and Settings
Settings for User Interface Modules
4.3
Nur für den internen Gebrauch
Settings for User Interface Modules
>
The options described here for user interface modules apply to the standard installation of optiClient 130.
You can edit the following options for user interface modules:
●
Settings for Audio Control
●
Call List Settings
●
Settings for Directories/Address Books
●
Settings for the Phone
●
Settings for the easyCom Communication Circle
●
Settings for Contact list and Contact directory
●
Settings for the Webbrowser
4.3.1
>
Settings for Audio Control
Options for editing the general settings for Audio Manager are only available in the
case of activation when logging on as these settings must have been loaded during
user logon and changes are not possible during live operation without restarting optiClient 130 (see also Logging In).
Audio devices such as the Siemens optiPoint handset (and possibly headset) are provided for
conducting calls. Define the various basic settings to operate the available audio devices correctly. To edit these settings, select User interface modules - Audio Manager. You can edit
settings for the following:
●
Audio Schemes
4.3.1.1
Audio Schemes
The hardware settings, for example, for voice outputs or ringers are grouped together in audio
schemes. You can add, change or delete different audio schemes. You can therefore easily program different audio options (for example, at different locations) and then select the appropriate
scheme for operation. To edit/select audio schemes, select User interface modules - Audio
Manager - Audio Schemes:
4-16
A31003-G2550-A100-6-76A9, 04/2005
optiClient 130 V5.0 , Administrator Documentation and Operating Instructions
optiClient5d_Konfiguration.fm
Nur für den internen Gebrauch
Configuration and Settings
Settings for User Interface Modules
Display
Selecting an audio scheme
>
To select an audio scheme for operation, click the one you want in the list of audio
schemes. It is then selected.
Adding an audio scheme
>
After clicking Add, enter the Description of the audio scheme and define the appropriate
audio hardware for
–
Voice channel
Audio hardware for voice output
–
Signal channel
Audio hardware for signal output (ringers)
–
Controller
Additional functions to control special hardware functions
All audio hardware components available locally are indicated in the list boxes. The items
listed in brackets () are displayed for your own information: audio hardware components
that are not available locally but configured in (another) audio scheme or audio controls.
Changing or deleting an audio scheme
>
Click Change to edit the settings for the selected audio scheme, click Delete to remove the
selected audio scheme.
>
General information on navigating within the Settings dialog can be found under
Navigating the Dialog Settings.
A31003-G2550-A100-6-76A9, 04/2005
optiClient 130 V5.0 , Administrator Documentation and Operating Instructions
4-17
optiClient5d_Konfiguration.fm
Configuration and Settings
Settings for User Interface Modules
Nur für den internen Gebrauch
Audio scheme sequence
You can use the audio scheme sequence to influence the required/necessary audio hardware
selected. After user logon, optiClient 130 checks the audio hardware specified in the audio
schemes and processes the schemes one after the other from top to bottom. If all components
set for a scheme are available and ready for operation, this scheme is used for operating optiClient 130.
You can change the sequence of an audio scheme with the buttons up and down.
4-18
A31003-G2550-A100-6-76A9, 04/2005
optiClient 130 V5.0 , Administrator Documentation and Operating Instructions
optiClient5d_Konfiguration.fm
Nur für den internen Gebrauch
4.3.2
Configuration and Settings
Settings for User Interface Modules
Settings for the Phone
The phone module controls the integrated and free phone in optiClient 130. Select User interface modules - Phone. You can define settings for the following:
●
Integrated Phone
4.3.2.1
Integrated Phone
While the integrated phone’s display is part of the main bar, the associated function, dialing,
and dialog keys are not normally visible (depending on the individual setting). Under User interface modules - Phone - Integrated phone you can define which action should be performed when you click the display on the main bar.
Display
>
The selected option lets you control display behavior by clicking the integrated phone’s
display. The following options are available:
–
Display integrated phone as popup window
If you click the display, the function, dialing, and dialog keys appear on the display as
a popup window (as individually set). The keys can then be operated as usual in the
window. The popup window containing the keys disappears as soon as you click another window.
–
Display free phone
If you click the integrated phone’s display, the free phone opens (as individually set). If
the free phone is already open, you switch to this window.
–
Show and hide free phone
If you click the integrated phone’s display, the free phone opens (as individually set). If
the free phone is already open, it is now closed.
4.3.3
Settings for the Device State
The Device state module is responsible for the Telephony and Forwarding menu in the optiClient 130 main bar. If the module is present, no additional settings are needed, so no parameters
are offered for editing.
A31003-G2550-A100-6-76A9, 04/2005
optiClient 130 V5.0 , Administrator Documentation and Operating Instructions
4-19
optiClient5d_Konfiguration.fm
Configuration and Settings
Settings for User Interface Modules
4.3.4
>
Nur für den internen Gebrauch
Call List Settings
Options for editing settings for call lists are only available in the case of activation
during live operation, not in the case of activation when logging on. The scope of parameters available depends on the connected communication system.
To edit call list settings, select User interface modules - Call lists. You can define settings for
the following:
●
Call Types
4.3.4.1
Call Types
All call lists for incoming or outgoing connections or connection requests supplied by the communication system connected can be viewed in the Call List Administration in optiClient 130.
The Call List Administration can always be activated via the Module menu in optiClient 130 and
any call lists available here can be selected.
You can program buttons in the optiClient 130 main bar for fast access to the Call List Administration for specific call lists. Apart from the call list icon, these buttons also show the number
of calls in the relevant list. To configure the buttons, select User interface modules - Call lists
- Call types:
Display of options
Depending on general availability of call lists on the part of the communication system, the following types of call lists can be selected:
●
Incoming/outgoing - connected
●
Outgoing - connected
●
Outgoing - not reached
●
Incoming - connected
●
Incoming - not reached
>
4-20
You do not have to activate all options to access all call list types. You can switch between the individual call list types in the Call List Administration.
A31003-G2550-A100-6-76A9, 04/2005
optiClient 130 V5.0 , Administrator Documentation and Operating Instructions
optiClient5d_Konfiguration.fm
Nur für den internen Gebrauch
>
Configuration and Settings
Settings for User Interface Modules
General information on navigating within the Settings dialog can be found under
Navigating the Dialog Settings.
4.3.5
Settings for Directories/Address Books
A number of settings must be made for accessing central and local directories to work with directories and address books in optiClient 130. Access is basically possible from the following
directories/address books:
●
Outlook, Private Contacts
This directory contains all entries from the contacts folder associated with your local Microsoft Outlook installation (if installed). You can configure if the Outlook Contacts information should be available as a directory.
●
Exchange Server (global address book)
This directory contains all entries from the global address book associated with Microsoft
Exchange Server (if installed). You can configure the access information.
●
Lotus Notes, Private Contacts
This directory contains all contacts from the contacts folder associated with your local Lotus Notes installation (if installed). Here you can configure if the Lotus Notes contact information should be available as a directory in optiClient 130.
●
LDAP directories
You can configure access to random LDAP directories available in the network here.
To edit these settings, select User interface modules - Directories/address books. You can
define options for the following areas:
●
General
●
Column Selection
●
Directory Selection
4.3.5.1
General
For general settings for directories/address books, select User interface modules - Directories/address books - General.
>
All directories configured are listed.
A31003-G2550-A100-6-76A9, 04/2005
optiClient 130 V5.0 , Administrator Documentation and Operating Instructions
4-21
optiClient5d_Konfiguration.fm
Configuration and Settings
Settings for User Interface Modules
Nur für den internen Gebrauch
Display of options
>
Depending on how the connected communication system is configured, it may be
necessary to enter a specific call number prefix in order to dial directly from the directories.
This is entered in the Call number prefix field. This prefix is entered in front of call
numbers when dialing from all of the directories configured.
>
4.3.5.2
General information on navigating within the Settings dialog can be found under
Navigating the Dialog Settings.
Column Selection
Define the column information to be displayed in the optiClient 130 directory under Advanced
Settings. Select User interface modules Directories/address books - Column selection.
Display
You can change the sequence of the columns directly in the directory administration (cf. The
optiClient 130 Directories).
>
4-22
General information on navigating within the Settings dialog can be found under
Navigating the Dialog Settings.
A31003-G2550-A100-6-76A9, 04/2005
optiClient 130 V5.0 , Administrator Documentation and Operating Instructions
optiClient5d_Konfiguration.fm
Nur für den internen Gebrauch
4.3.5.3
Configuration and Settings
Settings for User Interface Modules
Directory Selection
Select the directories to be accessed in the Directory settings.
Display of options
>
If Microsoft Outlook is available locally, you can integrate the information from the Outlook
Contacts folder as a directory by activating the option Outlook, Private Contacts.
>
Activate the option Exchange Server if you want the Microsoft Exchange Server’s global
address book to be available as a directory. Then enter the name or the IP address of the
Exchange Server.
>
If Lotus Notes is available locally, you can make the contacts in the Contacts directories
available as a directory in optiClient 130 by activating the option Lotus Notes, Private
Contacts. If you have a Lotus Notes password, enter it now.
>
LDAP directories can be added to the network if there are any available.
Adding/editing an LDAP directory
Select Add or Edit. The LDAP server configuration dialog appears:
Display
A31003-G2550-A100-6-76A9, 04/2005
optiClient 130 V5.0 , Administrator Documentation and Operating Instructions
4-23
optiClient5d_Konfiguration.fm
Configuration and Settings
Settings for User Interface Modules
Nur für den internen Gebrauch
>
Enter a unique Id and a Description for the directory. The ID cannot be modified in the edit
window (output field).
>
Enter the name or the IP address of the LDAP server under Server and the associated port
number under Port (default 389).
>
If you only want a subset of the LDAP directories to be accessible, you can enter an LDAP
Base DN here.
>
If the relevant LDAP directory prompts you to enter an authentication code in the course of
access, enter the User ID and the Password.
>
To display the LDAP entries properly in optiClient 130, you must ensure that the names of
the fields in the LDAP directory in optiClient 130 are correctly assigned. You can check and
modify these settings by clicking the Extended button. The Column configuration dialog
opens where you can assign the Supported columns in optiClient 130 to the Column
name in the LDAP server. The assignment already displayed is the default setting. For the
optiClient 130 fields surename (name) and firstname (first name), the corresponding field
name must be entered in the LDAP directory.
Display
>
The LDAP field names and the optiClient 130 column names are known to the
optiClient 130 or LDAP server administrator.
Deleting an LDAP directory entry
>
To delete an entry from the list of LDAP directories available, select the LDAP directory and
the click Delete. The entry is deleted.
4-24
A31003-G2550-A100-6-76A9, 04/2005
optiClient 130 V5.0 , Administrator Documentation and Operating Instructions
optiClient5d_Konfiguration.fm
Nur für den internen Gebrauch
Configuration and Settings
Settings for User Interface Modules
Base DN for an LDAP directory
In the case of LDAP server configuration, you can set a specific base in the Base DN field as
the starting point when searching for/displaying optiClient 130 entries in this LDAP directory.
Two alternative formats are available for making the entry:
–
<Level name 3>=<Name>, <Level name 2>=<Name <Level name 1>=<Name>
or
–
<Level name 1>=<Name>/<Level name 2>=<Name>/<Level name 3>=<Name>
Example of an LDAP directory with the following elements:
–
Name Level 1: c (e.g., for "country“)
Name of an entry on this level: DE
–
Name Level 2: o (e.g., for „organization“)
Name of an entry on this level: SIEMENS
–
Name Level 3: ou (e.g., for „organization unit“)
Name of an entry on this level: ICN
Enter the following in the Base DN field to set this base as the search basis:
ou=ICN, o=Siemens, c=DE
or alternatively
c=DE/o=Siemens/ou=ICN
If no restrictive Base DN is defined, the complete LDAP directory is the Base DN.
>
General information on navigating within the Settings dialog can be found under
Navigating the Dialog Settings.
4.3.6
Settings for the easyCom Communication Circle
The easyCom communication circle provides an additional module which allows you to use the
telephony functions. It is based on an intuitive graphic communication circle, where you can
choose various options. Under User interface modules - easyCom you can change the settings for
●
Symbols
●
Image
A31003-G2550-A100-6-76A9, 04/2005
optiClient 130 V5.0 , Administrator Documentation and Operating Instructions
4-25
optiClient5d_Konfiguration.fm
Configuration and Settings
Settings for User Interface Modules
4.3.6.1
Nur für den internen Gebrauch
Symbols
Under User interface modules - easyCom - Symbols choose the symbols that you want to
use in the easyCom communication circle to show the call status:
Display of options
>
You can choose symbols in one of two styles: Telephony or Persons. The symbols shown
are only a few examples - not the complete range. The section Function Symbols of
easyCom and their Meaning provides a complete overview of the icons used by both
models.
4-26
A31003-G2550-A100-6-76A9, 04/2005
optiClient 130 V5.0 , Administrator Documentation and Operating Instructions
optiClient5d_Konfiguration.fm
Nur für den internen Gebrauch
4.3.6.2
Configuration and Settings
Settings for User Interface Modules
Image
Under User interface modules - easyCom - Image you can choose an image to represent
your central communication circle:
Display
>
You can click Select image and use the file browser to choose your own image file, which
optiClient 130 then uses instead of the standard image (a head, in profile).
>
If you want the selected image to be represented in colors that match the current color
scheme, enable the option Apply color scheme when drawing own images. If this option
is disabled, the image will appear in optiClient 130 in its original state.
4.3.7
Settings for Contact list and Contact directory
There are no setup options for the contact list and the contact directory.
4.3.8
Settings for the Webbrowser
In day-to-day operation you can open frequently-used internet pages quickly in the optiClient
130 Webbrowser window, without having to leave the optiClient 130. The selectable Web addresses are configured here and then offered as selections in the Webbrowser window. In the
settings for the Webbrowser under User interface modules - Webbrowser you can decide
which internet pages will be available for selection.
4.3.8.1
Internet Pages
Open User interface modules - Webbrowser - Internet pages.
A31003-G2550-A100-6-76A9, 04/2005
optiClient 130 V5.0 , Administrator Documentation and Operating Instructions
4-27
optiClient5d_Konfiguration.fm
Configuration and Settings
Settings for User Interface Modules
Nur für den internen Gebrauch
Display
>
The configured Web pages are listed with the Name and Address. The current default
page for the Webbrowser window is marked by a star on the extreme left.
>
To enter another address, select Add and enter Name and Address.
>
To edit an address, mark it and click Change.
>
You can also delete addresses. Do this by marking the entry and clicking Delete.
>
The start address for the Webbrowser window in optiClient 130 can be defined by marking
the required entry and then clicking Set as default page.
4-28
A31003-G2550-A100-6-76A9, 04/2005
optiClient 130 V5.0 , Administrator Documentation and Operating Instructions
optiClient5d_Konfiguration.fm
Nur für den internen Gebrauch
4.4
Configuration and Settings
Settings for Provider Modules
Settings for Provider Modules
Provider modules is the term used in optiClient 130 to designate the modules that enable optiClient 130 to communicate with a connected communication system, which in turn provides access to specific media services on the network. Communication systems typically enable you to
●
use telephony services (e.g., with PBX systems such as HiPath 3000/4000/5000)
●
send emails
●
operate desktop telephony devices with optiClient 130
Special settings must be configured to ensure smooth access to the communication system
and associated communication services. The type and scope of these settings depend on the
communication system.
The specific provider modules available in optiClient 130 depend on the prevailing situation on
site (Installation/Licensing, etc.), so not all of the settings for provider modules described here
may be relevant for "your" optiClient 130:
●
If the optiClient 130 is directly connected to the HiPath 3000/4000/5000, you will find a description of the settings for optiClient 130 in the section Settings for the HiPath Provider on
HiPath 3000/4000/5000.
●
If you are using desktop telephones (connected to a HiPath 3000/4000/5000) over optiClient 130, you will find a description of the settings for optiClient 130 in the section Settings
for the CTI Provider on HiPath 3000/4000/5000.
●
Settings for the Sendmail Provider
4.4.1
Settings for the Sendmail Provider
To send email directly to a contact from one of the directories or from the Contact list, you will
need the Sendmail Provider. This starts the mail client (e.g., Outlook) that is installed / configured on the PC and uses the email address of the contact as the recipient address for a new
email message.
The Sendmail Provider module is added by default after the optiClient 130 is started up and
can thus be used. At present, there are no further settings to configure for the Sendmail Provider. Therefore, when you choose Settings - Provider modules - Sendmail Provider, no
configuration parameters appear.
A31003-G2550-A100-6-76A9, 04/2005
optiClient 130 V5.0 , Administrator Documentation and Operating Instructions
4-29
optiClient5d_Konfiguration.fm
Configuration and Settings
Settings for Provider Modules
>
4-30
Nur für den internen Gebrauch
In order to send email directly for a contact from the optiClient 130, the following conditions must be satisfied:
●
A standard mail client (e.g., Outlook) is installed and configured on the optiClient
130 PC
●
The module for the Sendmail Provider has been added to the Provider modules.
●
The related contacts in the directory or contact list have an email address, which
is chosen for direct sending.
A31003-G2550-A100-6-76A9, 04/2005
optiClient 130 V5.0 , Administrator Documentation and Operating Instructions
optiClient5d_Konfiguration.fm
Nur für den internen Gebrauch
4.5
Configuration and Settings
Settings for Manager Modules
Settings for Manager Modules
The following settings should be edited for Manager modules:
●
Settings for the Keyboard Manager
●
Settings for the ScreenSaver Manager
4.5.1
Settings for the Keyboard Manager
You can edit the following parameters for optiClient 130 keyboard support:
Key Assignments
●
4.5.1.1
Key Assignments
>
Options for editing settings for key assignments are only available in the case of activation when logging on, not in the case of activation during live operation.
You can program hotkeys to accept connection requests or disconnect connections with key assignments in optiClient 130’s Keyboard Manager. Hotkeys can be useful, for example, if you use
your keyboard intensively and prefer to use specific keys for these functions. Select Manager
modules - Keyboard Manager - Key assignments:
Display
>
Define the keys or key combinations to Accept Audio Connection or Disconnect Audio
Connection under System-wide keyboard tokens (Hotkeys). Entries are made by
pressing the required keys in the input field, in this example, by pressing B or K .
>
>
System-wide in this case means that no other application that is running on your
PC at the same time as optiClient 130 will respond to these keys. Make sure that
you do not enter any keys or key combinations used by other programs or Windows for functions that you want to use (for example, the Space key).
Valid Keys / Key combinations are:
–
–
B to K ,
also in combination with the keys < (Ï ) or i (Ì
)
the alphabetical keys a - z and A - Z and the number keys 0 - 9,
also in combination with the keys i (Ì )
A31003-G2550-A100-6-76A9, 04/2005
optiClient 130 V5.0 , Administrator Documentation and Operating Instructions
4-31
optiClient5d_Konfiguration.fm
Configuration and Settings
Settings for Manager Modules
–
the key combination < + _
>
Nur für den internen Gebrauch
or Ï + _
General information on navigating within the Settings dialog can be found under
Navigating the Dialog Settings.
4.5.2
Settings for the ScreenSaver Manager
optiClient 130 comes with its own screen saver which can be activated as the default screen
saver for Windows. Incoming calls can be accepted and an individually-defined speed-dial
number can dialed when the optiClient 130 screen saver is active. You can edit the following
parameter for the optiClient 130 screen saver:
●
Settings
4.5.2.1
Settings
The following settings are possible for the optiClient 130 screen saver under Manager modules - ScreenSaver Manager - Settings:
Display
>
If you want to use the optiClient 130 screen saver as the default screen saver, activate
Activate as default screensaver.
>
To use the special features of the optiClient 130 screen saver (call acceptance,
speed-dial number), this screen saver must be activated here. Selecting the optiClient 130 screen saver in the Windows Display properties does not activate
these specific functions.
>
If you lock your computer at the same time as activating a screen saver, the screen saver
does not activate until a specified period of time elapses. If you activate the option Activate
if computer is locked, the optiClient 130 screen saver automatically activates 10 seconds
after you lock the computer. These settings let you at least dial the configured speed-dial
number when the screen saver is active.
>
Save the number to be dialed when the screen saver is active in the Speed-dial number
field.
4-32
A31003-G2550-A100-6-76A9, 04/2005
optiClient 130 V5.0 , Administrator Documentation and Operating Instructions
optiClient5d_Konfiguration.fm
Nur für den internen Gebrauch
>
Configuration and Settings
Settings for Manager Modules
For information on operating the screen saver, see the section The optiClient 130
Screen Saver.
General information on navigating within the Settings dialog can be found under
Navigating the Dialog Settings.
A31003-G2550-A100-6-76A9, 04/2005
optiClient 130 V5.0 , Administrator Documentation and Operating Instructions
4-33
optiClient5d_Konfiguration.fm
Configuration and Settings
Settings for Manager Modules
4-34
Nur für den internen Gebrauch
A31003-G2550-A100-6-76A9, 04/2005
optiClient 130 V5.0 , Administrator Documentation and Operating Instructions
Nur für den internen Gebrauch
5
optiClient5d_Telefonbuch.fm
The optiClient 130 Directories
General Information
The optiClient 130 Directories
This section describes how to use the optiClient 130 directories:
●
General Information
●
Working with the Contact Directory
●
Working with Other Directories
>
5.1
For more detailed information on general display options in the directory window,
please see the section Display Options for the optiClient 130 Module Window.
General Information
Contact directory
optiClient 130 maintains an internal and individual contact directory for every user. You can create and edit entries in the contact directory in optiClient 130. Section Working with the Contact
Directory explains how to work with them.
Other directories
In addition, depending on their availability on the network or on the local optiClient 130 PC, further central / local directories may be integrated in the optiClient 130 for users to view and
search. They can use them to search for contacts and make a direct connection to selected
contacts.
Depending on availability on the network or on the local PC, the optiClient 130 has further directories available for viewing, searching, and making connections. You cannot make changes
to these directories on the optiClient 130, since they are edited either centrally or with the help
of other applications. The following basic directories are available on the optiClient 130 :
●
Outlook, Private Contacts
This directory contains all entries from the contacts folder associated with a local Microsoft
Outlook installation. This directory only available if Outlook is installed or if this directory is
configured for your user.
●
Exchange Server
This directory contains all entries from the global address book associated with Microsoft
Exchange Server. This directory only available if Exchange Server is installed or if this directory is configured for your user.
A31003-G2550-A100-6-76A9, 04/2005
optiClient 130 V5.0 , Administrator Documentation and Operating Instructions
5-1
optiClient5d_Telefonbuch.fm
The optiClient 130 Directories
Working with the Contact Directory
Nur für den internen Gebrauch
●
Lotus Notes, Private Contacts
This directory contains contacts from a local Lotus Notes installation. If Lotus Notes is not
installed or if this directory is not configured for your user, this directory is not available.
●
LDAP directories
If LDAP directory services are generally available in the network and were configured in
the user settings, these directories are available under the configured name (for example,
"Siemens Corporate Directory"). You can also configure the application and use of several
LDAP directories here.
5.2
Working with the Contact Directory
This section provides detailed information on using the contact directory in optiClient 130:
●
Opening and Closing the Contact Directory
●
Editing Entries in the Contact Directory
●
Searching in the Contact Directory
●
Direct Contact from the Contact Directory
5.2.1
Opening and Closing the Contact Directory
Opening the contact directory
1.
To open the contact directory, select the menu item Contact directory from the optiClient
130 Module menu.
2.
A window opens, showing the contacts you entered.
5-2
A31003-G2550-A100-6-76A9, 04/2005
optiClient 130 V5.0 , Administrator Documentation and Operating Instructions
optiClient5d_Telefonbuch.fm
Nur für den internen Gebrauch
The optiClient 130 Directories
Working with the Contact Directory
Display
Closing the contact directory
>
To close the contact directory, click the corresponding symbol on the title bar of the window.
>
The current window status is saved on exiting optiClient 130. When the optiClient
130 restarts, the contact directory window is again opened / arranged as before.
5.2.2
Editing Entries in the Contact Directory
5.2.2.1
Adding a New Contact
Adding a contact manually to the contact directory
To add a new contact, do the following:
>
Open the context menu in the contact directory and then click Add.
A31003-G2550-A100-6-76A9, 04/2005
optiClient 130 V5.0 , Administrator Documentation and Operating Instructions
5-3
optiClient5d_Telefonbuch.fm
The optiClient 130 Directories
Working with the Contact Directory
Nur für den internen Gebrauch
Display
>
Enter the master data for the contact in the text boxes.
>
When you click the Select Image button, a file browser appears, where you can select the
appropriate image file to assign to the Contact.
Entering communication addresses
For every contact, you can enter any number of communication addresses (call numbers of
email addresses):
>
When adding a contact, choose the Call number tab, then choose Email , and then click
Add.
>
In the window that appears, type a Description e.g., "business“ or "office“, etc., together
with the actual Call number or Email address. The description helps you distinguish
between the various call numbers / email addresses for a contact, and appears in the
context menu for the contact.
>
Save with OK. You are returned to the window for entering contacts.
>
5-4
You can enter the Call number by using valid characters in any format, e.g., as an
internal extension number, with a local area code / external number or even in canonical format. Your number will be internally converted to canonical format, e.g., +49
(02302) 6671234 and saved accordingly, but will always be displayed in the format in
which it was entered by you. This ensures that you can always work in the same way
with "your“ contact directory, regardless of your location.
When you enter an Email address, its format is verified.
A31003-G2550-A100-6-76A9, 04/2005
optiClient 130 V5.0 , Administrator Documentation and Operating Instructions
optiClient5d_Telefonbuch.fm
Nur für den internen Gebrauch
The optiClient 130 Directories
Working with the Contact Directory
Importing a contact from other directories/call lists
You can import contacts from other optiClient 130 directories or from a call list directly into your
contact directory without having to type the individual entries manually.
>
To do this, ensure that the relevant source directory or call list and your contact directory
are open and visible on the desktop.
>
To use Drag & Drop, mark the entry to be imported in the directory/call list, drag it to the
contact directory window and release the mouse button.
Alternatively, open the context menu in the contact directory and then click Add to contact
directory.
>
optiClient 130 imports the available information of the entry into the Add contact window
of the contact directory. The existing contact addresses are also copied, and the
description of the communication address is set to the column title of the source directory/
call list.
Importing contacts from the current connection via Drag & Drop
You can also import contact data for the current call partner directly into the contract directory
without entering the available information by hand:
>
During the call, drag the contact data from the display to the contact directory and release
the mouse.
>
The contact is entered under the appropriate name in the contact directory (if available/
shown on the display). The current call number of the communication partner is saved as
the communication address.
>
5.2.2.2
A new manual entry in the contact list automatically generates a corresponding entry
in the contact directory.
Creating a Contact in the Contact List
When you create a new contact in the contact list, this contact is automatically stored in the
contact directory as well. Contacts created in this way can also be edited in the contact directory.
See also:
Working with the Contact List.
5.2.2.3
Editing a Contact
>
Open the context menu for the appropriate entry, and then click Edit contact.
>
Edit the master data for the contact in the window that appears.
A31003-G2550-A100-6-76A9, 04/2005
optiClient 130 V5.0 , Administrator Documentation and Operating Instructions
5-5
optiClient5d_Telefonbuch.fm
The optiClient 130 Directories
Working with the Contact Directory
>
Nur für den internen Gebrauch
You can click Delete Image to delete the associated image, or click Select Image to assign
a different image file.
Editing or deleting communication addresses
You can also edit the communication addresses (email addresses / call numbers) of a contact.
>
Click the Call number tab or the Email tab.
>
Select the desired entry and then click Edit contact to edit it. You can now change the
Description and the Call number or the Email address. The description helps you
distinguish between the different call numbers/email addresses for a contact, and appears
in the context menu for the contact. Click OK to save it. You return to the Contact window.
>
To delete an entry, click Delete contact. Following a confirmation prompt, the
communication address is deleted.
5.2.2.4
>
Deleting a Contact
To delete a contact together with all the associated media contact data, open the context
menu for the relevant entry and then click Delete contact. Following a confirmation
prompt, the contact is deleted.
>
5.2.3
If one or more entries are recorded in the contact list for the contact, these are
also deleted from the contact list.
Searching in the Contact Directory
For a name search, enter the search name in full or in part under Name. After every character
you enter, the cursor is positioned at the first matching entry in the contact directory.
5.2.4
Direct Contact from the Contact Directory
Once you find the desired name in the contact directory, you can call that party or send an email
(provided these communication addresses have been entered):
Direct call to a subscriber from the contact directory
To make a direct connection with the contact, you have the following options:
>
In the Call number list or the Email list, all existing call numbers / email addresses for the
contact are listed. Select the call number you want and then click Dial.
>
Open the context menu for the contact. Beside the telephone symbol, all existing call
numbers, with their associated descriptions, are shown. Select the call number you want.
5-6
A31003-G2550-A100-6-76A9, 04/2005
optiClient 130 V5.0 , Administrator Documentation and Operating Instructions
optiClient5d_Telefonbuch.fm
Nur für den internen Gebrauch
>
The optiClient 130 Directories
Working with Other Directories
To establish a connection to the first call number entered for a contact:
–
drag the entry into the display of the optiClient 130 telephone
–
or drag the selected contact to the easyCom communication circle or the Connection
field in the easyCom window (provided that the easyCom window is open).
If multiple call numbers have been entered for the contact, a small menu with all the recorded call numbers appears. You can then select the desired call number from the list by clicking on it.
optiClient 130 sets up the connection.
Sending a Direct Email to a contact from the contact directory
To send an email directly to a contact, you have the following options:
>
In the Email list or the Call number list, all existing email addresses / call numbers for the
contact are listed. Select the email address you want, and click Send.
>
Open the context menu for the contact. All existing email addresses appear in the lower
region. Select the one you want.
See also: Settings for the Sendmail Provider
optiClient 130 opens the standard mail client installed on the PC, using the selected email address as the recipient address.
5.3
Working with Other Directories
In addition to the contact directory, you can also use further directories, for example, LDAP directories, with contacts, depending on their availability (on the network/locally) and the directory configuration in optiClient 130. This section provides detailed information on using these directories in optiClient 130:
●
Opening and Closing Directories
●
Searching the LDAP Directory
●
Initiating Direct Contact from the Directory
●
Displaying Detailed Subscriber Information
See also:
Settings for Directories/Address Books
5.3.1
Opening and Closing Directories
Directory, opening
A31003-G2550-A100-6-76A9, 04/2005
optiClient 130 V5.0 , Administrator Documentation and Operating Instructions
5-7
optiClient5d_Telefonbuch.fm
The optiClient 130 Directories
Working with Other Directories
Nur für den internen Gebrauch
1.
To open a directory window, select New directory from the optiClient 130 Module menu.
2.
A directory window opens showing "All directories". You can specify the configured directory to which your search queries refer in the Directory field. The configured directories
can be selected individually or collectively (All Directories).
Display
>
You can also open more than one directory window, for example, to display each
available directory in a separate window.
Closing a directory
>
To close a directory window, click the close icon in the window’s title bar.
>
5.3.2
The current status of your optiClient 130 directory window is saved when you exit
optiClient 130. The directory window is reopened/rearranged accordingly when you
restart optiClient 130.
Searching the LDAP Directory
Name Search
>
For a simple name search, enter the search name in full or part under Name. The search
is either initiated automatically after a waiting time or by clicking = . A rotating magnifying
glass indicates that a search is in progress.
>
The system searches for entries based on the search string and displays hits in the list.
Special features when searching LDAP directories
5-8
A31003-G2550-A100-6-76A9, 04/2005
optiClient 130 V5.0 , Administrator Documentation and Operating Instructions
optiClient5d_Telefonbuch.fm
Nur für den internen Gebrauch
The optiClient 130 Directories
Working with Other Directories
When using an LDAP directory, searches can be performed for parts of a last name and parts
of a first name. For example, if you enter "schmi m" the system searches for all entries with
last names beginning with Schmi and first names starting with M (entries are not case-sensitive).
>
If a search term separated by a space character is entered, optiClient 130 will interpret the portion before the space character as the Last Name and the portion after
the space character as the First Name. Consequently, in cases where the last names
include multiple words, e.g., "van der Falk“, you should use the advances search options.
Extended Search
With the Extended Search function, you can run searches not only based on names, but also
other search criteria.
>
Select Extended >> in the directory window. The Extended Search dialog opens in the
directory window.
Extended Search dialog
>
A search field is provided for every search criterion. The example displayed shows a
search for names beginning with "schmi" from a department starting with "ICN".
>
When you click Search the system displays the hits below in the column view.
>
You can exit the Extended Search dialog by clicking <<Normal.
Only the following fields (which were also incorporated as columns in the directory display,
cf. Column Selection), are available as extended search criteria:
– Name
– First name
– City
A31003-G2550-A100-6-76A9, 04/2005
optiClient 130 V5.0 , Administrator Documentation and Operating Instructions
5-9
optiClient5d_Telefonbuch.fm
The optiClient 130 Directories
Working with Other Directories
–
–
–
–
–
–
–
Nur für den internen Gebrauch
Postal Code
Address
Country
State
Company
Department
Location
5.3.3
Initiating Direct Contact from the Directory
You can establish a direct connection to a subscriber found in the directory:
Direct call to a subscriber from the directory
>
Click a subscriber in the hit list. The following alternatives are available for a direct call:
–
Select the call number you want in the Call numbers list field which contains all subscriber numbers from the hit list and click Call.
–
Right-click the subscriber to open the associated context menu. All the subscriber
numbers displayed in the hit list are shown here. Select the call number you want.
–
To establish a connection to the first call number entered for a contact:
–
drag the entry into the display of the optiClient 130 telephone
–
or drag the selected contact to the easyCom communication circle or the Connection field in the easyCom window (provided that the easyCom window is open).
If multiple call numbers have been entered for the contact, a small menu with all the
recorded call numbers appears. You can then select the desired call number from the
list by clicking on it.
optiClient 130 establishes a connection.
Sending a direct email to a subscriber from the directory
You can send a direct email here only to subscribers for whom an email address is also stored
in the directory.
>
Click a subscriber in the hit list.
>
Right-click on the subscriber to open the associated context menu and select Send Email.
If no email address is stored in the directory for this subscriber, this command does not
appear on the menu.
>
The standard email client installed on your PC opens, with the subscriber’s email address
in the recipient field. You can now send an email in your normal way.
5-10
A31003-G2550-A100-6-76A9, 04/2005
optiClient 130 V5.0 , Administrator Documentation and Operating Instructions
optiClient5d_Telefonbuch.fm
Nur für den internen Gebrauch
>
5.3.4
The optiClient 130 Directories
Working with Other Directories
Sending email directly from the directory is only possible,
●
if the optiClient 130 Sendmail Provider is active,
●
if an email address for the participant is stored in the directory,
●
if a functional email client is installed on your PC.
Displaying Detailed Subscriber Information
You can display all available detailed subscriber information in the search results:
>
Click a subscriber in the hit list.
>
Right-click the subscriber to open the associated context menu and select Details.
>
An information window appears with a table containing a compact overview of the
information available in the directory on the relevant subscriber. The underlying directory
is also specified (Datasource).
Display
5.3.5
Refreshing a Directory
To refresh the contact information in your local Outlook or Lotus Notes installation, you can reload the contacts into the Outlook or Lotus Notes directory.
This is done by opening/switching to the relevant directory in optiClient 130, opening a free area
in the context menu and selecting Refresh contacts. All entries are reloaded. An information
window appears on the lower right part of the screen during the refresh operation and automatically disappears once the refresh is complete.
The central LDAP directories are directly accessed in optiClient 130 and are thus always up to
date in optiClient 130.
A31003-G2550-A100-6-76A9, 04/2005
optiClient 130 V5.0 , Administrator Documentation and Operating Instructions
5-11
optiClient5d_Telefonbuch.fm
The optiClient 130 Directories
Working with Other Directories
5-12
Nur für den internen Gebrauch
A31003-G2550-A100-6-76A9, 04/2005
optiClient 130 V5.0 , Administrator Documentation and Operating Instructions
Nur für den internen Gebrauch
6
optiClient5d_Kontaktliste.fm
The optiClient 130 Contact List
Opening/Closing the Contact List
The optiClient 130 Contact List
The entries in the directories and in the contact folder are displayed in fixed (alphabetical) order.
In your day-to-day work, however, it may be more appropriate to group contacts by task, by
project or by another category. You can do this with the optiClient 130 contact list.
In the contact list, you can
●
create any number of groups
●
create any number of contacts
●
assign any number of contacts to a group
●
assign any number of groups to a contact
This section provides information on the following topics:
●
Opening/Closing the Contact List
●
Working with the Contact List
6.1
Opening/Closing the Contact List
Opening the contact list
>
To open a contact list, select the Contact List entry from the optiClient 130 module menu.
The optiClient 130 contact list window opens.
Display
Closing the contact list
>
To close the contact list, click the appropriate icon on the title bar of the window.
A31003-G2550-A100-6-76A9, 04/2005
optiClient 130 V5.0 , Administrator Documentation and Operating Instructions
6-1
optiClient5d_Kontaktliste.fm
The optiClient 130 Contact List
Working with the Contact List
>
6.2
Nur für den internen Gebrauch
The current window status is saved on exiting optiClient 130. The contact list reopened/rearranged accordingly when you restart optiClient 130.
Working with the Contact List
This section provides information on the following topics:
●
Adding, Editing and Deleting Groups
●
Adding, Editing and Deleting Contacts
●
Assigning Contacts to Groups
●
Display Options for Contact Lists
●
Direct Contact from the Contact List (Telephone/Email)
6.2.1
Adding, Editing and Deleting Groups
Add a group
>
Open the context menu in the contact list and select Add Group.
>
Enter the Name of the group and confirm your entry with OK. The new group appears in
the contact list.
Changing a group name
>
Open the context menu of the group and click Edit group. You can the group name.
Removing a group
>
Open the context menu for the group and click Delete group. If there are still some
contacts assigned to the group, these assignments are canceled, and the group is deleted.
The contacts involved are retained without any changes.
6.2.2
Adding, Editing and Deleting Contacts
Adding a contact and entering media data
>
Open the context menu for the group to which you want to add a contact and then click Add
Contact.
>
You can now enter the following data in the dialog box:
6-2
A31003-G2550-A100-6-76A9, 04/2005
optiClient 130 V5.0 , Administrator Documentation and Operating Instructions
optiClient5d_Kontaktliste.fm
Nur für den internen Gebrauch
The optiClient 130 Contact List
Working with the Contact List
–
On the General tab, the Last Name and First Name for the contact. To add media
data for a contact, switch to the Phone number tab or the Email tab.
–
To add a new Phone number, on the Phone number tab, click Add and then enter the
Description and the Phone number. The entry appears in the list. To edit or delete an
existing Phone number, click Edit or Delete. You can enter any number of phone numbers for a contact.
>
–
You can enter the call number by using valid characters in any format, e.g., as an
internal extension number, with a local area code / external number or even in
canonical format. Your number will be internally converted to canonical format,
e.g., +49 (02302) 6671234 and saved accordingly, but will always be displayed
in the format in which it was entered by you. This ensures that you can always
work in the same way with "your“ contact list, regardless of your location.
To create a new email address, click Add on the Email tab, and then enter the new
Description and Email address. The entry appears in the list. To edit or delete an existing Email address, click Edit or Delete. You can enter any number of phone numbers for a contact.
>
When you enter an Email address, its format is verified.
>
A new contact list entry automatically generates a corresponding entry in the
contact directory (also called the contact folder). The Contact List is thus always
a subset of the contact directories.
The descriptions that you enter serve to differentiate the various phone numbers and email
addresses, and appear in the extended view of the contact list and in the context menu of
the contact in the Contact directory.
Edit contact data
>
Open the context menu for the contact and then click Edit contact.
>
Edit the general data under General or the media data under Call number or Email.
Removing a contact from the contact list
>
Open the context menu for the contact and then click Remove contact. The contact is
removed from the contact list.
>
Contacts that are deleted from the contact list remain unchanged in the contact
directory.
A31003-G2550-A100-6-76A9, 04/2005
optiClient 130 V5.0 , Administrator Documentation and Operating Instructions
6-3
optiClient5d_Kontaktliste.fm
The optiClient 130 Contact List
Working with the Contact List
6.2.3
Nur für den internen Gebrauch
Assigning Contacts to Groups
You can assign contacts in the contact list as follows:
>
Move Contact
Use „Drag & Drop“ to move a contact. You can create an (updated) assignment by dragging
a contact to a (different) group. If you drag a contact outside a group in the contact list, that
contact is not assigned to any group.
>
Create (another) link to the contact
If you hold down the I key (or Ì key) while you drag and drop, a new link is
created for the contact and assigned directly. You can assign an individual contact or its
links to different groups.
6.2.4
Display Options for Contact Lists
Normal view / extended view
For groups or for individual contacts, you can choose between normal view or extended view.
To do this, click the arrow symbol preceding the entry.
In Normal view the arrow points to the right, only group names are displayed for groups, and
only First and Last names are displayed for contacts.
In extended view, the arrow points downwards. In the extended view for groups, all assigned
contacts are displayed. The extended view for individual contacts lists all entered phone numbers and email addresses with additional information on the designation.
Displaying groups in a separate window
>
Drag a group designation from the contact list and drop it on the desktop or open the
context menu of the group and select Open Group. A separate contact list window is
automatically created for this group.
>
As with other module windows, you can position this window anywhere you want, or
integrate it in the Tab view.
>
Each group can only appear in one contact list window.
Dock / float contact list window at the edge of the screen
If you drag a contact list window to the right or left edge of the desktop, the window expands to
the height of the desktop, and docks on the right or left side of the desktop. This reduces the
remaining desktop area available to other applications.
To float a docked contact list window, drag its title bar in from the edge of the desktop. The contact list is then displayed as a normal optiClient 130 window again.
6-4
A31003-G2550-A100-6-76A9, 04/2005
optiClient 130 V5.0 , Administrator Documentation and Operating Instructions
optiClient5d_Kontaktliste.fm
Nur für den internen Gebrauch
6.2.5
The optiClient 130 Contact List
Working with the Contact List
Direct Contact from the Contact List (Telephone/Email)
Calling a contact directly from the contact list
>
Click on the contact in the extended view. You have the following options for a direct call:
–
All entered Phone numbers appear, with the corresponding descriptions, beside the
telephone symbol. Select the call number you want.
–
Drag the selected contact to the display of the optiClient 130 telephone.
–
or drag the selected contact to the easyCom communication circle or the Connection
field in the easyCom window (provided that the easyCom window is open).
optiClient 130 sets up the connection.
Emailing a contact directly from the contact list
>
Click on the contact in the extended view.
>
All entered email addresses appear, with the corresponding description and email address.
Select the desired email address.
optiClient 130 opens the mail client installed on the PC, with the selected email address as
the recipient address.
>
Sending email directly from the contact list is only possible
●
if an email address for the subscriber is stored in the directory,
●
if a standard mail client is installed and configured on your PC,
●
if the optiClient 130 Sendmail Provider is active.
A31003-G2550-A100-6-76A9, 04/2005
optiClient 130 V5.0 , Administrator Documentation and Operating Instructions
6-5
optiClient5d_Kontaktliste.fm
The optiClient 130 Contact List
Working with the Contact List
6-6
Nur für den internen Gebrauch
A31003-G2550-A100-6-76A9, 04/2005
optiClient 130 V5.0 , Administrator Documentation and Operating Instructions
optiClient5d_Ruflisten.fm
The optiClient 130 Call Lists
General Information on optiClient 130 Call Lists
Nur für den internen Gebrauch
7
The optiClient 130 Call Lists
This section provides information on the following topics:
●
General Information on optiClient 130 Call Lists
●
Working with optiClient 130 Call Lists
7.1
General Information on optiClient 130 Call Lists
optiClient 130 features a Call List Administration. The following calls lists are available when
connected to the HiPath 3000/4000/5000:
Call list
●
Incoming/outgoing - connected
●
Outgoing - connected
●
Outgoing - not connected
●
Incoming - connected
●
Incoming - not connected
Button
For each available call list, there is a button which can be displayed by optiClient 130 on the
main bar. At a glance, you can therefore see how many calls are recorded in the list and open
the Call List Administration directly by clicking the button. The necessary settings for incorporating the buttons on the main bar are made in your user configuration (cf. the section Call List
Settings).
Call List Administration is always accessible if a call list is available from the communication
system, even if you have not incorporated any call list buttons on the main bar.
A31003-G2550-A100-6-76A9, 04/2005
optiClient 130 V5.0 , Administrator Documentation and Operating Instructions
7-1
optiClient5d_Ruflisten.fm
The optiClient 130 Call Lists
Working with optiClient 130 Call Lists
7.2
Nur für den internen Gebrauch
Working with optiClient 130 Call Lists
This section provides information on using optiClient 130 call lists:
●
Opening and Closing Call Lists
●
Establishing a Connection from Call List Administration
●
Deleting Call List Entries
7.2.1
Opening and Closing Call Lists
Opening call lists
>
If the call list button for the call list you want is integrated on the main bar, then click it. The
call list opens.
>
Alternatively, open Call List Administration from the optiClient 130 Module menu with the
Call lists entry. The Incoming - not reached call list is displayed.
>
If the connected communication system manages additional call lists, you can select
another call list for processing purposes at any time in the Call category field.
Display (sample call list)
7-2
A31003-G2550-A100-6-76A9, 04/2005
optiClient 130 V5.0 , Administrator Documentation and Operating Instructions
optiClient5d_Ruflisten.fm
Nur für den internen Gebrauch
The optiClient 130 Call Lists
Working with optiClient 130 Call Lists
Closing call lists
>
To close Call List Administration, click the appropriate icon on the window’s title bar.
>
7.2.2
When you close optiClient 130, Call List Administration is also closed.
Establishing a Connection from Call List Administration
The following options are available for establishing a connection to a station in the call list:
1.
Open the context menu associated with the entry in the call list (right-click). Select Establish a connection. optiClient 130 establishes a connection to the number stored.
2.
Drag the entry in the call number field into the display of the optiClient 130 phone. optiClient
130 displays the number there and establishes a connection.
3.
Click the Call button. optiClient 130 establishes a connection to the call number.
7.2.3
Deleting Call List Entries
Deleting call list entries manually
If the connected communication system allows manual deletion of call list entries in optiClient
130, proceed as follows:
Deleting a single call list entry
>
Open the relevant call list.
>
Select the entry you wish to delete. Open the context menu and select Delete selected
entry.
>
The entry is deleted and you are returned to the call list.
Deleting all entries in a call list
>
Open the relevant call list.
>
Open the context menu associated with any entry and select Delete this list.
>
All entries in this call list are deleted.
Deleting all call list entries
>
Open any call list.
A31003-G2550-A100-6-76A9, 04/2005
optiClient 130 V5.0 , Administrator Documentation and Operating Instructions
7-3
optiClient5d_Ruflisten.fm
The optiClient 130 Call Lists
Working with optiClient 130 Call Lists
Nur für den internen Gebrauch
>
Open the context menu associated with any entry and select Delete all lists.
>
All entries in all call lists are deleted.
Deleting call list entries automatically
If you set up a callback connection to an entry in the Incoming - not connected call list and
the partner picks up the call and thus establishes the connection, the relevant entry is automatically deleted from this call list at the end of the call.
7-4
A31003-G2550-A100-6-76A9, 04/2005
optiClient 130 V5.0 , Administrator Documentation and Operating Instructions
optiClient5d_easyCom.fm
The easyCom Communication Circle
General Information
Nur für den internen Gebrauch
8
The easyCom Communication Circle
8.1
General Information
The easyCom communication circle provides you with an alternative telephony module in addition to the optiClient 130 phone. This module is based on a simple and intuitive principle. The
user is placed at the center of a communication circle and communicates with his or her environment. The communication partners are represented by smaller circles, which are placed at
various positions, depending on the communication status. Even complex telephony functions
such as callback or toggling between connections can be easily and conveniently accessed.
Opening the easyCom Window
To activate the easyCom window, open the Module menu and choose the easyCom entry. The
window with the easyCom communication circle is opened.
This section provides you with information on the following topics:
●
Elements of the easyCom Window
●
Function Symbols of easyCom and their Meaning
●
Making Calls with the easyCom Communication Circle
See also:
Settings for the easyCom Communication Circle.
8.2
Elements of the easyCom Window
The following elements are displayed in the easyCom window:
Figure / Example
Meaning
The own phone number is symbolized by a large central circle. By default, the image used here is the profile of a head.
However, you can also you your own image.
See also:
Settings for the easyCom Communication Circle
Other phone numbers are basically each symbolized in a
smaller separate connection circle of a different color (orange
in the example). Depending on the connection status, these
connection circles may flash or also offer further "suitable"
icons in an additional ring.
If the connection partner is known, the full name appears in the
connection circle instead of the phone number.
A31003-G2550-A100-6-76A9, 04/2005
optiClient 130 V5.0 , Administrator Documentation and Operating Instructions
8-1
optiClient5d_easyCom.fm
The easyCom Communication Circle
Elements of the easyCom Window
Figure / Example
Nur für den internen Gebrauch
Meaning
Connection circles with connection requests are shown outside the central circle. An arrow indicates whether
●
an incoming connection request (arrow pointing towards
the central circle) or
●
an outgoing connection request (arrow pointing away
from the central circle)
is involved.
The connection circles flash during the connection request
(analogous to ringing).
If a(n) (active) connection exists, easyCom places the connection circle at the edge, within the central circle.
When you place the cursor over a connection circle, an additional ring appears around it offering you the possible telephony functions (depending on the current connection status).
The functions are represented by means of symbols. These
symbols can be selected - depending on the setting - to be in
one of two types: "Telephone“ or "Persons“ (the "Telephone“
style is shown in the example).
See also:
Settings for the easyCom Communication Circle
Function Symbols of easyCom and their Meaning
When you open the connection circle’s context menu, easyCom offers you the possible telephony functions as menu
items. The symbols are also used here in accordance with your
settings.
8-2
A31003-G2550-A100-6-76A9, 04/2005
optiClient 130 V5.0 , Administrator Documentation and Operating Instructions
optiClient5d_easyCom.fm
The easyCom Communication Circle
Elements of the easyCom Window
Nur für den internen Gebrauch
Figure / Example
Meaning
In the lower area of the easyCom window you will find a Call
number field in which you can enter the destination number or
select an already dialed number for redialing from a list. You
can then initiate the connection request by clicking the Call button.
A31003-G2550-A100-6-76A9, 04/2005
optiClient 130 V5.0 , Administrator Documentation and Operating Instructions
8-3
optiClient5d_easyCom.fm
The easyCom Communication Circle
Function Symbols of easyCom and their Meaning
8.3
Nur für den internen Gebrauch
Function Symbols of easyCom and their Meaning
When you move the cursor over a connection circle, easyCom shows the available telephony
functions for that connection in an additional ring with a connection circle menu. The current
connection circle status determines which functions are offered there. Depending on the selected settings, the following symbols are used in easyCom for telephony functions:
Style
Telephone
Style
Persons
Function / Meaning
Accept a connection request (pick up)
Hang up or drop connection or connection request
Hold / Initiate consultation call
Toggle
Set up a conference
Expand a conference
Delete remote party from conference
Transfer to
Transfer
DTMF tone dialing
Park
Callback request
8-4
A31003-G2550-A100-6-76A9, 04/2005
optiClient 130 V5.0 , Administrator Documentation and Operating Instructions
optiClient5d_easyCom.fm
Nur für den internen Gebrauch
The easyCom Communication Circle
Making Calls with the easyCom Communication Circle
The same functions can also be selected via the context menu of the connection circle; the corresponding symbols appear next to the menu items.
For details on selecting symbols, see also:
Settings for the easyCom Communication Circle.
8.4
Making Calls with the easyCom Communication Circle
Setting up a connection
>
Enter the destination number under Connection and then click Call
>
Using the Drag & Drop technique: drag a destination call number (from the contact list or
a call list) and drop it on the easyCom window.
Canceling a call
>
Move the mouse pointer over the connection circle and click on the Hang Up symbol in the
connection circle menu that appears or select the Hang up menu item from the context
menu of the connection circle.
>
or click Hang Up Call button in the optiClient 130 main bar.
Redialing
Redialing the last number:
>
Click Call.
Redialing another dialed number:
>
Select the number from the Connection list box.
>
Click Call.
Hold / Initiate consultation call
>
Move the mouse pointer over the connection circle and click on the Hold symbol in the
connection circle menu that appears or select the Hold menu item from the context menu
of the connection circle.
Setting up a conference
>
Set up connection to station 1.
>
Set up connection to station 2.
>
Move the mouse pointer over the connection circle of station 2 and click on the Initiate
Conference symbol in the connection circle menu that appears or select the Initiate
Conference menu item from the context menu of the connection circle.
A31003-G2550-A100-6-76A9, 04/2005
optiClient 130 V5.0 , Administrator Documentation and Operating Instructions
8-5
optiClient5d_easyCom.fm
The easyCom Communication Circle
Making Calls with the easyCom Communication Circle
Nur für den internen Gebrauch
Transfer / Hand Over
Transfer (direct):
>
Enter the destination number under Connection .
>
Move the mouse pointer over the connection circle and click on the Hand Over symbol in
the connection circle menu that appears or select the Hand Over menu item from the
context menu of the connection circle.
Handing over station 1 to station 2:
>
Move the mouse pointer over the connection circle of station 1 or station 2 and click on the
Hand Over symbol in the connection circle menu that appears or select the Hand Over
menu item from the context menu of the connection circle.
Accepting a connection request
>
Move the mouse pointer over the incoming connection circle and click on the Answer
symbol in the connection circle menu that appears or select the Answer menu item from
the context menu of the connection circle
>
or drag and drop the incoming connection circle into the central circle.
Forwarding connection requests
>
Enter the destination number under Connection .
>
Move the mouse pointer over the connection circle and click on the Hand Over symbol in
the connection circle menu that appears or select the Hand Over menu item from the
context menu of the connection circle.
Ending a connection
>
Move the mouse pointer over the connection circle and click on the Hang Up symbol in the
connection circle menu that appears or select the Hang up menu item from the context
menu of the connection circle.
>
Or drag and drop the connection circle out of the central circle.
8-6
A31003-G2550-A100-6-76A9, 04/2005
optiClient 130 V5.0 , Administrator Documentation and Operating Instructions
Nur für den internen Gebrauch
optiClient5d_WebBrowser.fm
The optiClient 130 Web Browser Window
General Information
9
The optiClient 130 Web Browser Window
9.1
General Information
In the Web Browser window, you can open and use standard functions to navigate the configured web pages, as you would in a browser. The optiClient 130 Web Browser window gives you
access to specified, frequently used web pages, without having to leave the optiClient 130.
Opening the Web Browser window
To activate the easyCom window, open the Module menu and choose New Web browser. The
Webbrowser window opens on the default page set.
Display
The name of the Web page specified when configuring the possible addresses is displayed on
the title bar.
Working with the Browser window
>
In the list box, you can choose one of the configured internet pages. The page content is
displayed in the Browser window.
>
Buttons provide you with the standard browser navigation functions Back, Forward, Stop
and Refresh.
See also:
Settings for the Webbrowser.
A31003-G2550-A100-6-76A9, 04/2005
optiClient 130 V5.0 , Administrator Documentation and Operating Instructions
9-1
optiClient5d_WebBrowser.fm
The optiClient 130 Web Browser Window
General Information
9-2
Nur für den internen Gebrauch
A31003-G2550-A100-6-76A9, 04/2005
optiClient 130 V5.0 , Administrator Documentation and Operating Instructions
Nur für den internen Gebrauch
10
optiClient5d_TelefonieHp4.fm
Making Calls with the HiPath 3000/4000/5000
Settings for the HiPath Provider on HiPath 3000/4000/5000
Making Calls with the HiPath 3000/4000/5000
This section provides information on the following topics:
●
Settings for the HiPath Provider on HiPath 3000/4000/5000
●
Settings for the CTI Provider on HiPath 3000/4000/5000
●
Telephony functionsHiPath 4000
●
HiPath 3000/5000 Telephony functions
10.1
Settings for the HiPath Provider on HiPath 3000/4000/5000
To configure your user settings for the HiPath 3000/4000/5000 communication systems, select
the Provider modules tab in the Settings dialog. The settings for HiPath 3000/4000/5000 can
be found under the entry HiPath Provider.
>
The configuration of operation settings such as the ring tone (pitch) for the HiPath
provider can only be accessed on activating the dialog during live operation; the configuration of all other settings for the HiPath Provider is only available if accessed via
the Login dialog.
You can configure the following settings for the HiPath 3000/4000/5000 communication system:
●
Device Settings
●
Settings for the Main Connection
●
Settings for Main Network Access
●
Settings for the Fallback connection
●
Settings for Fallback Network Access
●
Settings for Failover
●
Settings for Bandwidth Reduction
●
Port Restriction Settings
●
Virtual Private Network (VPN) Settings
●
Quality of Service (QoS) Settings
●
Settings for Licensing
●
Operation Settings
A31003-G2550-A100-6-76A9, 04/2005
optiClient 130 V5.0 , Administrator Documentation and Operating Instructions
10-1
optiClient5d_TelefonieHp4.fm
Making Calls with the HiPath 3000/4000/5000
Settings for the HiPath Provider on HiPath 3000/4000/5000
10.1.1
Nur für den internen Gebrauch
Device Settings
The display mode of the optiClient 130 telephone resembles the appearance of various phone
types.
To display the optiClient 130 phone and the extended keypad, you can select among various
phone types for the phone and key module. The set phone and key module type for the optiClient 130 essentially corresponds to the display and layout of the corresponding desktop devices. Key modules are represented in the extended keypad of the optiClient 130 as columns.
To access the settings for the device tpes, select Provider Modules - HiPath Provider - Telephones.
Display
10-2
A31003-G2550-A100-6-76A9, 04/2005
optiClient 130 V5.0 , Administrator Documentation and Operating Instructions
optiClient5d_TelefonieHp4.fm
Nur für den internen Gebrauch
>
Making Calls with the HiPath 3000/4000/5000
Settings for the HiPath Provider on HiPath 3000/4000/5000
Select the desired Phone type. This determines
●
display lines will be shown in the freely positionable phone of the optiClient 130. In the
integrated phone on the main bar, by contrast, two display lines are always shown.
●
whether Electronic Key Labeling (EKL) is available for the optiClient 130 phone.
●
how many programmable function keys are available in the (free and integrated) optiClient 130 telephone.
●
how many programmable function keys are available in th first column of the extended
keypad in optiClient 130.
Device type
Display
lines
EKL
Num. of Keys Num. of Keys
Telephone
Column 1
●
optiPoint 410 standard
2
No
4
8
●
optiPoint 410 standard DA
2
No
4
8
DA (Direct Acccess) is only available with connections to HiPath 3000.
As for the device type optiPoint 410 standard, with additional and automatic direct
access to an external line.
●
optiPoint 410 advanced
4
No
4
15
●
optiPoint 420 standard
2
Yes
5
7
●
optiPoint 420 advanced
4
Yes
5
13
>
>
The following applies to the default function key programming / key assignments
in optiClient 130:
●
On starting up the optiClient 130, the function keys in the optiClient 130
phone (and possibly also in the extended keypad) are predefined with communication system-specific standard functions.
●
For devices with EKL, all keys programmed with a function are automatically
labeled with the "suitable" text by the connected communication system.
Changing the function and thus the labeling (key caption) is only possible
via the Service Menu prompts. This also applies if no function, but only a
call number, is programmed on a key.
●
For devices without EKL, the keys in the optiClient 130 phone are labeled
with texts of the communication system-dependent standard functions.
Changing the function can be accomplished via the Service menu prompts,
and changing the labeling (all function keys) as well as the assignments of
call numbers to keys can be performed directly in optiClient 130.
More details on the service menu prompts on your communication system can
be obtained from the Administrator of the communication system.
See also: Labeling/Programming Function Keys.
Select the desired key module type. It determines
A31003-G2550-A100-6-76A9, 04/2005
optiClient 130 V5.0 , Administrator Documentation and Operating Instructions
10-3
optiClient5d_TelefonieHp4.fm
Making Calls with the HiPath 3000/4000/5000
Settings for the HiPath Provider on HiPath 3000/4000/5000
●
whether Electronic Key Labeling (EKL) is available for the key module columns in the
extended keypad.
●
how many programmable function keys are available in the key module columns of the
extended keypad in optiClient 130.
Key module type:
>
Nur für den internen Gebrauch
EKL
Num. of Keys
as of column
2
●
optiPoint 410 key module
No
16
●
optiPoint 420 key module
Yes
13
The following applies to the Maximum number of key modules:
–
Minimum value 0:
the extended keypad is empty (no columns).
–
Maximum value: 4 columns (or the maximum number of key modules per user configured on the connected communication system).
>
On the communication system, there can still be a maximum number of concurrently present / opened key modules configured for all users. If this value is or
would be reached on opening the extended keypad, fewer key modules (columns) may be displayed there.
Key assignments
The following applies to the automatic function key programming / key assignments in optiClient
130:
●
On starting up the optiClient 130, the function keys in the optiClient 130 phone (and to
some extent also in the extended keypad) are predefined with communication system-specific standard functions.
●
For devices without EKL, optiClient 130 labels these keys with communication system-specific standard texts.
Changing the programming key function can be accomplished via the Service menu
prompts, and changing the labeling as well as the assignments of call numbers to keys can
be performed directly in optiClient 130 (see also Labeling/Programming Function Keys).
●
For devices with EKL, all keys programmed with a function are always labeled with the "suitable" text by the connected communication system. Changing the function and thus the
labeling (key caption) is only possible via the Service Menu prompts. The assignment of a
key with a call number and the entry of the associated label are likewise also performed
exclusively via the Service menu.
More details on the service menu prompts on your communication system can be obtained
from the Administrator of the communication system.
10-4
A31003-G2550-A100-6-76A9, 04/2005
optiClient 130 V5.0 , Administrator Documentation and Operating Instructions
optiClient5d_TelefonieHp4.fm
Nur für den internen Gebrauch
10.1.2
>
Making Calls with the HiPath 3000/4000/5000
Settings for the HiPath Provider on HiPath 3000/4000/5000
Settings for the Main Connection
The settings for the main connection must always be made, since it is not possible
to operate the optiClient 130 without these parameters. If the optiClient 130 is being
operated at a communication system with a Fallback system, then the parameters
for the fallback connection must likewise be configured on the fallback communication system to enable smooth operation of the optiClient 130 (see also Settings for the
Fallback connection).
To edit the parameters for the main connection, select the entry Provider modules - HiPath
Provider - Main Connection. Enter the information here that defines your connection between
optiClient 130 and your main communication system HiPath 3000/4000/5000:
Display
>
Select your main communication system as the Type. The available communication
systems are HiPath 3000 and HiPath 4000.
Enter the IP address of the communication system gatekeeper in the Gatekeeper field.
>
Enter the Extension number at which you can be reached in the optiClient 130 network
and the Password configured (if necessary) for your extension number on the
communication system. The password can be obtained from the administrator of the
communication system.
>
If you work as an ACD agent, enter your ACD agent number.
>
The Emergency call number field is intended for future expansion (currently unassigned).
>
In the Security mode list box, select the setting that is set as the security mode on the
connected communication system. More information can be obtained from the
Administrator of the connected communication system.
>
In the Gatekeeper Security ID field, enter the ID as configured on your connected
communication system. More information can be obtained from the Administrator of the
connected communication system.
A31003-G2550-A100-6-76A9, 04/2005
optiClient 130 V5.0 , Administrator Documentation and Operating Instructions
10-5
optiClient5d_TelefonieHp4.fm
Making Calls with the HiPath 3000/4000/5000
Settings for the HiPath Provider on HiPath 3000/4000/5000
>
Nur für den internen Gebrauch
For the IP connection of the optiClient 130, the Own IP address must be known. If the
optiClient 130 is connected to a network adapter to which a unique IP address has been
assigned, select the setting Specify automatically here. If multiple IP addresses have
been assigned to the network adapter, all such addresses will be shown in the list box, and
you can then select the one you want.
10.1.3
>
Settings for Main Network Access
The settings for the main network access must always be made, since it is not possible to operate the optiClient 130 without these parameters. If the optiClient 130 is
being operated at a communication system with a Fallback system, then the parameters for the fallback network access must also be configured on the fallback communication system to enable smooth operation of the optiClient 130 (see also Settings for Fallback Network Access).
Network access settings (location information) are needed for setting up a direct connection
from optiClient 130 directories or call lists. If these settings are not configured properly, you may
encounter problems when setting up connections. To configure the settings for the main network access, select Provider modules - HiPath Provider - Main network access.
Display
>
Enter the code for the international prefix for the location under Country code. Omit the
leading zero when entering the Area code.
>
Enter the HiPath 4000 system identification number. This system ID number identifies
internal call numbers in the directories that only set up internal connections when selected.
>
Under Trunk code, enter the code that was configured for network access on the
connected communication system.
10-6
A31003-G2550-A100-6-76A9, 04/2005
optiClient 130 V5.0 , Administrator Documentation and Operating Instructions
optiClient5d_TelefonieHp4.fm
Nur für den internen Gebrauch
>
Making Calls with the HiPath 3000/4000/5000
Settings for the HiPath Provider on HiPath 3000/4000/5000
Under Prefix for local calls/Long-distance calls/International calls, enter the network
operator code for the type of call concerned. This data is independent of the configuration
for the connected connection system and is determined by the network operator. The
example shows the prefix numbers for the network operator in Germany. Other prefixes
may apply in other countries.
10.1.4
>
Settings for the Fallback connection
The settings for the main connection must always be made, since it is not possible
to operate the optiClient 130 without these parameters. If the optiClient 130 is being
operated at a communication system with a Fallback system, then the parameters
for the fallback connection must also be configured on the fallback communication
system to enable smooth operation of the optiClient 130 (see also Settings for the
Main Connection).
To edit the parameters for the Fallback connection, select the entry Provider modules - HiPath
Provider Fallback connection. Enter the information here that defines your connection between optiClient 130 and your fallback communication system:
Display
>
Select your fallback communication system as the Type.
>
The meanings of the other parameters for the fallback connection correspond to those of
the main connection; see also Settings for the Main Connection.
A31003-G2550-A100-6-76A9, 04/2005
optiClient 130 V5.0 , Administrator Documentation and Operating Instructions
10-7
optiClient5d_TelefonieHp4.fm
Making Calls with the HiPath 3000/4000/5000
Settings for the HiPath Provider on HiPath 3000/4000/5000
10.1.5
>
Nur für den internen Gebrauch
Settings for Fallback Network Access
The settings for the main network access must always be made, since it is not possible to operate the optiClient 130 without these parameters. If the optiClient 130 is
being operated at a communication system with a Fallback system, then the parameters for the fallback network access must also be configured on the fallback communication system to enable smooth operation of the optiClient 130 (see also Settings for Main Network Access).
Network access settings (location information) are needed for setting up a direct connection
from optiClient 130 directories or call lists. If these settings are not configured properly, you may
encounter problems when setting up connections. To configure the settings for the Fallback network access, select Provider modules - HiPath Provider - Fallback network access.
Display
>
The meanings of the parameters for the fallback network access correspond to those of the
main connection; see also Settings for Main Network Access.
10.1.6
Settings for Failover
If the optiClient 130 is being operated at a communication system with a Fallback system, then
the optiClient 130 will be switched over automatically to the fallback communication system if
the main communication system fails. In order to restore the connection when the main communication system becomes available again, you will need to define various settings here: To
do this, select HiPath Provider - Failover:
10-8
A31003-G2550-A100-6-76A9, 04/2005
optiClient 130 V5.0 , Administrator Documentation and Operating Instructions
optiClient5d_TelefonieHp4.fm
Nur für den internen Gebrauch
Making Calls with the HiPath 3000/4000/5000
Settings for the HiPath Provider on HiPath 3000/4000/5000
Display
>
Following a failover to the fallback communication system, automatic and cyclical attempts
are made to reestablish a connection to the main communication system. The option
Minimum number of successful connection attempts to primary system to switch
back defines after how many successful connection attempts the main communication
system can be considered ready for operation again. The defined Waiting time between
connection attempts (sec.) also applies here.
>
If you want to prevent an automatic switchback to the main communication system even
after successful connection attempts, enable the option No automatic switchback to
primary system.
10.1.7
Settings for Bandwidth Reduction
In order to optimize voice transmission quality, you can make several settings to match the current environment of your network installation. To do this, select HiPath Provider - Bandwidth
reduction.
Display
>
When operating the optiClient 130 at the HiPath 4000, voice packets are exchanged over
the network by default directly between the communication partners (Direct Media Connect
- DMC). DMC can optionally be disabled by setting the option Shut down DMC. Voice
packets are then no longer exchanged directly between the communication partners, but
via HiPath 4000. This option may be enabled when operating the optiClient 130 from home
(teleworking).
This option is not relevant when operating the optiClient 130 at a HiPath 3000.
A31003-G2550-A100-6-76A9, 04/2005
optiClient 130 V5.0 , Administrator Documentation and Operating Instructions
10-9
optiClient5d_TelefonieHp4.fm
Making Calls with the HiPath 3000/4000/5000
Settings for the HiPath Provider on HiPath 3000/4000/5000
Nur für den internen Gebrauch
>
Activate the Teleworking option if you work at a teleworkstation. To reduce the data
volume or bandwidth requirements via the trunk, activate the options Voice compression
and Suppress cyclical control message. These options are activated automatically
when the Teleworking option is enabled at Logon.
>
Communication between optiClient 130 and the communication system is based on
defined compression algorithms for the network transmission of audio signals (codecs).
Under Codec sequence you can define the desired sequence sequence of the codecs to
be used for the voice connection. A different selection is made available on activating the
Teleworking option.
>
The respective voice packet lengths for the codecs G.711, G.723 and G.729 are defined
under Codec packet lengths individually by specifying the number of milliseconds.
>
To avoid jitter in the network (arising from variable delays), you can define the size of the
jitter buffer under Jitter-Buffer (packet number). The following generally applies for an
optimum setting: the better the network quality, the smaller the jitter buffer can be, and the
larger the jitter buffer, the greater the voice delays. The buffer size can be set to between
4 and 20; the recommended value is 6.
10.1.8
Port Restriction Settings
Select HiPath Provider port restrictions for port restriction settings for use in firewall environments.
Display
>
Port 4060 is used by default on the communication system gatekeeper for the CorNet
connection. You can specify a port area for the local PC. The option CorNet port range
from must be activated, and the port numbers from/to must be entered so that the set port
range is used. If you do not activate the option, any port on the PC assigned by the
operating system is used.
>
The communication ports used for signaling (H.245 ports) and voice connections (RTP
ports) are defined by activating the option RTP port range or H.245 port range and
entering a "port range from/to".
10-10
A31003-G2550-A100-6-76A9, 04/2005
optiClient 130 V5.0 , Administrator Documentation and Operating Instructions
optiClient5d_TelefonieHp4.fm
Nur für den internen Gebrauch
>
Making Calls with the HiPath 3000/4000/5000
Settings for the HiPath Provider on HiPath 3000/4000/5000
To operate Netmeeting at the same time as optiClient 130, e.g., to share documents from
another PC without an audio connection, activate the option Use port number under
H.225 signalling and enter the port number. Netmeeting uses port 1720 by default. ou
should therefore enter another port number, e.g., 11720, for optiClient 130.
10.1.9
Virtual Private Network (VPN) Settings
Under Provider modules - HiPath Provider - Virtual Private Network, specify optiClient 130
performance in a VPN (Virtual Private Network) environment.
optiClient 130 signals its IP address to its partner at certain times in a connection (for example,
for the target address of the audio packets). An optiClient 130 that is operated in a Virtual Private Network (VPN) is assigned a new external IP address. It can no longer be contacted at its
old IP address. No voice packets could be exchanged if optiClient 130 continued to signal its
old IP address to its connection partner. optiClient 130 must therefore know its IP address assigned by the VPN.
>
The following settings can be made in the list field:
– no
VPN is not used.
– Automatic
VPN is used, the client determines the IP address itself.
– Manual
VPN is used with a special IP address that you must specify in the entry field.
10.1.10
Quality of Service (QoS) Settings
If you want to make changes to the settings for QoS (Quality of Service), select Provider modules - HiPath Provider - Quality of Service.
Display
ur
A31003-G2550-A100-6-76A9, 04/2005
optiClient 130 V5.0 , Administrator Documentation and Operating Instructions
10-11
optiClient5d_TelefonieHp4.fm
Making Calls with the HiPath 3000/4000/5000
Settings for the HiPath Provider on HiPath 3000/4000/5000
Nur für den internen Gebrauch
>
Activate the Change QoS settings option if you want to adapt the default settings for QoS.
>
Enable QoS under Windows 2000 lets you activate or deactivate the use of Quality of
Service (QoS) under Windows 2000. This option must be activated for improved voice
quality which is predominantly dependent on the infrastructure in the network.
This option does not apply when using under Windows XP as QoS is always available
under Windows XP.
>
Click Default settings to display the default values for HiPath networks.
>
For each of the transmission layers Layer 2: User Priority acc. to IEEE802.1p and Layer
3: Priority classes (Codepoint acc. to DiffServ), you can use the Mark packets option
to specify whether the optiClient 130 data for the Call Signaling and Voice Payload traffic
types is provided with the values set above.
>
After you have edited the QoS settings, you may be prompted to restart the optiClient
130. The restart is needed for the changed settings to take effect.
See also: Configuring/Installing Quality of Service.
10.1.11
Settings for Licensing
At each program start, the validity of the optiClient 130 license is checked at the license server.
The settings for the relevant license server are defined here. The server may be installed on
either the local optiClient 130 PC or on a central PC in the network. Select HiPath Provider Licensing.
Display
>
Under Server, enter the IP address of the PC on which the license server for optiClient 130
is installed. For a local installation of the license server (as in the illustrated example), enter
the local IP address or the address of the local host. If the license server is installed on the
network, enter its IP address on the network.
>
Under Port, enter the default port number for accessing the license server. It is 61740.
>
Enter the maximum time (in milliseconds) for the attempt to set up a connection to the
license server in the Timeout field. Also define the number of Attempts.
10-12
A31003-G2550-A100-6-76A9, 04/2005
optiClient 130 V5.0 , Administrator Documentation and Operating Instructions
optiClient5d_TelefonieHp4.fm
Nur für den internen Gebrauch
>
Making Calls with the HiPath 3000/4000/5000
Settings for the HiPath Provider on HiPath 3000/4000/5000
If an access Password was defined on the license server, enter that password here as
well.
>
10.1.12
If no license server is configured or if optiClient 130 cannot establish a connection to
the license server due to invalid parameters, for example, a corresponding message
will appear on starting the optiClient 130 program.
Operation Settings
You can change the ring tone for optiClient 130 in the operation settings. Select HiPath Provider - Operation settings.
Display
>
To change the ring tone, click the Change ring tone button.
>
You hear the ring tone currently set. You can then set the ring tone as desired by using the
Brighter tone and Deeper tone buttons. You can exit the setting with Close. The selected
setting takes effect immediately.
A31003-G2550-A100-6-76A9, 04/2005
optiClient 130 V5.0 , Administrator Documentation and Operating Instructions
10-13
optiClient5d_TelefonieHp4.fm
Making Calls with the HiPath 3000/4000/5000
Settings for the CTI Provider on HiPath 3000/4000/5000
10.2
Nur für den internen Gebrauch
Settings for the CTI Provider on HiPath 3000/4000/5000
With the help of the CTI Provider, you can take full advantage of your connection to HiPath
3000/4000/5000 by also operating desktop devices with the optiClient 130. This provides you
with the extended functionality of optiClient 130 (e.g., contact directory, contact list, easyCom
communication circle, extended call lists, directory processing, etc.), which would otherwise not
be available when using the devices alone.
When the CTI Provider is activated in optiClient 130, ring tones are not signaled with the sound
card or the Siemens optiPoint handset or controlled via the optiClient 130 (volume), but only at
your desktop device.
To configure your user settings for the CTI Provider at the HiPath 3000/4000/5000, select the
Provider modules tab in the Settings dialog.
>
By default, the HiPath Provider and not the CTI Provider is added as a module, so
you will need to remove the HiPath Provider module and add the CTI Provider module instead. For more details on this procedure, see the section Navigating the Dialog Settings.
The settings for the CTI provider can be found under the entry CTI Provider.
You can configure the following settings for the HiPath 3000/4000/5000 communication system:
:
●
Device Settings
●
Settings for the Main Connection
●
Settings for Main Network Access
10.2.1
Device Settings
In order to connect the optiClient 130 via the CTI Provider and thus enable the "remote operation" of your desktop device, the existing device types must be configured. To do this, select
Provider modules - CTI Provider - Device:
Display
>
Select your Phone type. The available options are optiset comfort/advance, optiPoint
410 standard and optiPoint 600.
10-14
A31003-G2550-A100-6-76A9, 04/2005
optiClient 130 V5.0 , Administrator Documentation and Operating Instructions
optiClient5d_TelefonieHp4.fm
Nur für den internen Gebrauch
Making Calls with the HiPath 3000/4000/5000
Settings for the CTI Provider on HiPath 3000/4000/5000
>
Confirm the Key module type optiset key module.
>
The following applies to the maximum number of key modules diaplyed in optiClient 130
(Maximum number of key modules):
–
Minimum value 0:
the extended keypad is empty (no columns).
–
Maximum value: 2 columns.
>
>
On the communication system, there can still be a maximum number of concurrently present / opened key modules configured for all users. If this value is or
would be reached on opening the extended keypad, fewer key modules (columns) may be displayed there.
If a headset is connected to the headset adapter on your telephone device, this option must
be activated, since the headset controller in optiClient 130 cannot operate correctly without
it.
10.2.2
Settings for the Connection
To edit the parameters for the connection, select the entry: Provider modules - CTI Provider
- Connection Enter the information here that defines your connection between optiClient 130
and your communication system HiPath 3000/4000/5000:
Display
>
Select your communication system as the Type. The available communication systems are
HiPath 3000 or HiPath 4000.
>
In the Access field, select the CTI connection. The available options are:
–
COM1 to COM9
–
LAN for access via the network. Then enter the IP address as well.
–
USB for a USB device connected via a COM port emulation
A31003-G2550-A100-6-76A9, 04/2005
optiClient 130 V5.0 , Administrator Documentation and Operating Instructions
10-15
optiClient5d_TelefonieHp4.fm
Making Calls with the HiPath 3000/4000/5000
Settings for the CTI Provider on HiPath 3000/4000/5000
Nur für den internen Gebrauch
>
Enter the Extension number of the device at which you can be reached in the optiClient
130 network and the Password configured (if necessary) on the communication system
for your extension number. The password can be obtained from the administrator of the
communication system.
>
If you work as an ACD agent, enter your ACD agent number.
>
The Emergency call number field is intended for future expansion (currently unassigned).
10.2.3
Network Access Settings
Network access settings (location information) are needed for setting up a direct connection
from optiClient 130 directories or call lists. If these settings are not configured properly, you may
encounter problems when setting up connections. To configure the settings for the network access, select Provider modules - HiPath Provider - Network access.
Display
>
Enter the code for the international prefix for the location under Country code. Omit the
leading zero when entering the Area code.
>
Enter the HiPath 4000 system identification number. This system ID number identifies
internal call numbers in the directories that only set up internal connections when selected.
>
Under Trunk code, enter the code that was configured for network access on the
connected communication system.
>
Under Prefix for local calls/Long-distance calls/International calls, enter the network
operator code for the type of call concerned. This data is independent of the configuration
for the connected connection system and is determined by the network operator. The
example shows the prefix numbers for the network operator in Germany. Other prefixes
may apply in other countries.
10-16
A31003-G2550-A100-6-76A9, 04/2005
optiClient 130 V5.0 , Administrator Documentation and Operating Instructions
optiClient5d_TelefonieHp4.fm
Making Calls with the HiPath 3000/4000/5000
Telephony functionsHiPath 4000
Nur für den internen Gebrauch
10.3
Telephony functionsHiPath 4000
The HiPath 3000/4000/5000 offers an extensive range of basic and advanced telephony functions. The functions available in optiClient 130 are operated and work in the same way as on a
telephone (terminal); all functions are described in detail in the terminal documentation.
The following is an overview of:
●
Telephony Icons Available for HiPath 4000
●
Basic and Advanced Functions (HiPath 4000)
●
Overview of Important Functions (HiPath 4000
●
Service Menu Functions (HiPath 4000)
10.3.1
Telephony Icons Available for HiPath 4000
The following telephony functions are offered by the HiPath 4000 comunication system in the
optiClient 130 Telephony menu:
Telephony Function / Option
●
ACD-Logon
●
ACD post-processing
●
ACD not available
●
Do Not Disturb
●
Check received messages
●
Retrieve parked call
●
Take call from pickup group
●
Call pickup, directed
●
Caller ID suppression
●
COS
●
Hunting group
●
Waiting ACD calls
●
Second call allowed
Icon
A31003-G2550-A100-6-76A9, 04/2005
optiClient 130 V5.0 , Administrator Documentation and Operating Instructions
10-17
optiClient5d_TelefonieHp4.fm
Making Calls with the HiPath 3000/4000/5000
Telephony functionsHiPath 4000
10.3.2
Nur für den internen Gebrauch
Basic and Advanced Functions (HiPath 4000)
Information on the following basic and advanced functions marked with "*" can be found in the
Operating Instructions for the configured device / key module, since these are functionally equivalent.
1.
Making and Answering Calls
6.
* Accept the call
* Adjusting the volume
* Open listening
* Change ring tone
* Trunk key
* Lock telephone
* Using mailboxes
7.
* Do Not Disturb
2.
Call
* Individual speed-dial number
8.
* Fixed/variable forwarding
* On-hook dialing
* Forwarding for another connection
* Commandos via tone dialing (DTMF
suffix-dialing)
9.* Using another phone
* Identification
Calling Multiple Parties Simultane- 10. Relocating the phone
ously
* Consultation hold
* Log off phone (old)
* Conference
* Log on phone (new)
* Call transfer
5.
Call forwarding
* Dial via trunk key
* Station number sisplay suppression
4.
Saving a call number
* Call number for redial
* Off-Hook Dialing
3.
Telephone Settings
11.* Making calls in the team
Making calls to stored destinations
* Call pickup
* Redial
* Park
* Speed-dial numbers
* Hunting group
If you cannot reach a destination ...
* Callback
* Call waiting or busy override
10-18
A31003-G2550-A100-6-76A9, 04/2005
optiClient 130 V5.0 , Administrator Documentation and Operating Instructions
optiClient5d_TelefonieHp4.fm
Nur für den internen Gebrauch
10.3.3
Making Calls with the HiPath 3000/4000/5000
Telephony functionsHiPath 4000
Overview of Important Functions (HiPath 4000
Call
●
or
●
n
+ p
p
n
+ when the subscriber answers
or speaker mode and open listening.
Redial (saved call number)
Save (Variant1):
●
Connection exists:
Redial
Save (Variant2):
●
Any call number:
Service Menu
+ Redial
+ New entry?
+ p
+ Save?
Redial:
●
n +
Redial
Redial (last number dialed):
●
n + Dial last number
Switching between speaker mode and open listening during a call:
From handset to speaker mode and open listening:
Handsfree
●
press and hold down
+ t
From speaker mode/open listening to handset:
●
n
Information during a call (callback):
Rückfrage:
●
Callback?
+ second station p
Exiting
●
Exit and back?
Alternating between two calls (toggle)
●
Toggle/Connect?
A31003-G2550-A100-6-76A9, 04/2005
optiClient 130 V5.0 , Administrator Documentation and Operating Instructions
10-19
optiClient5d_TelefonieHp4.fm
Making Calls with the HiPath 3000/4000/5000
Telephony functionsHiPath 4000
Nur für den internen Gebrauch
Transferring a call
With notification:
●
Callback?
+p
+ signal call
+t
Without notification:
●
Initiate transfer?
+p
+t
Setting up a conference
●
First call
+ Start conference?
+p
+ Conference?
+ Add party?
+p
Saving/activating variable call forwarding
●
Variable forwarding?
+ p (destination)
+ Save?
Displaying the caller list
●
Service Menu
+
+
+
Destinations?
Call list?
Incoming calls?
or
Outgoing calls?
Ending Retrieval
●
Service Menu
Dialing a displayed call
●
Release?
Saving individual speed-dial numbers
●
Service Menu
+ Destinations?
+ Speed dialing?
+ p (0..9)
+ New entry?
+ p (destination)
+ Save?
10-20
A31003-G2550-A100-6-76A9, 04/2005
optiClient 130 V5.0 , Administrator Documentation and Operating Instructions
optiClient5d_TelefonieHp4.fm
Nur für den internen Gebrauch
Making Calls with the HiPath 3000/4000/5000
Telephony functionsHiPath 4000
Dialing with individual speed-dial numbers
●
Service Menu
+ Use speed dialing?
+ p (0..9)
Deactivating/reactivating phone for calls
●
Service Menu
+ PIN and class of service?
+ Change class of service?
+ p (PIN)
Saving/changing a call number programmed on a key for repertory dialing
●
Service Menu
+
+ New entry?
+ p (destination)
+ Save?
Save timed reminder
●
Service Menu
+ Appointment?
+ New appointment?
+ p (time 3- or 4-digit)
+ Save?
A31003-G2550-A100-6-76A9, 04/2005
optiClient 130 V5.0 , Administrator Documentation and Operating Instructions
10-21
optiClient5d_TelefonieHp4.fm
Making Calls with the HiPath 3000/4000/5000
Telephony functionsHiPath 4000
10.3.4
>
Nur für den internen Gebrauch
Service Menu Functions (HiPath 4000)
Please note that depending on how your system is configured, the codes listed here
for Service menu functions may differ on your system and entire functions may be
missing.
Press the Service menu key. Use the keys < : >
to select functions (provided they are configured)or use service codes, for example, 2 1 for
„Second call on/off“.
1 Destinations
2 Switches
1
2
3
4
5
6
7
save variable forwarding
save fixed forwarding
save speed dial number
save redial
save destination number
save direct call number
save forwarding for call number
> 1 variable forwarding
2 Other forwarding type
1 Incoming calls
2 Outgoing calls
8 use Call list
>
1
2
3
4
5
6
> 1 variable forwarding
7
Second call on/off
DND on/off
Voice calling on/off
Hunt group add/remove
Forwarding on/off
Forwarding interrogate/deactivate
Forwarding using switch on/off
2 Other forwarding type
3 Use speed dialing
3 Display Prog. Feature Key
5 Voice info Service
1 personal voice mailbox
2 other party’s voice mailbox
6 PIN and class of service
7 Saving Appointments
8 Additional Features
10-22
1 Suppress display on
A31003-G2550-A100-6-76A9, 04/2005
optiClient 130 V5.0 , Administrator Documentation and Operating Instructions
optiClient5d_TelefonieHp4.fm
Making Calls with the HiPath 3000/4000/5000
Telephony functionsHiPath 4000
Nur für den internen Gebrauch
9 Telephone test
1
2
3
4
5
6
7
Light Test (LED)
Screen test
Key Test
Acoustic Test
Telephone Identity (Id)
Software Version
Feeding range
1 Handsfree
2 Handset
>
3 Ringer volume
4 Ring tone
5 Alerting tone
6 Speakerphone mode
A31003-G2550-A100-6-76A9, 04/2005
optiClient 130 V5.0 , Administrator Documentation and Operating Instructions
10-23
optiClient5d_TelefonieHp4.fm
Making Calls with the HiPath 3000/4000/5000
HiPath 3000/5000 Telephony functions
10.4
Nur für den internen Gebrauch
HiPath 3000/5000 Telephony functions
The HiPath 3000/5000 offers an extensive range of basic and advanced telephony functions.
The functions available in optiClient 130 are operated and work in the same way as on a telephone (terminal); all functions are described in detail in the terminal documentation.
The following is an overview of:
●
Basic and Advanced Functions (HiPath 3000/5000)
●
Overview of Functions and CodesHiPath 3000/5000
10.4.1
Telephony Icons Available for HiPath 3000/5000
The following telephony functions are offered by the HiPath 3000/5000 comunication system in
the optiClient 130 Telephony menu:
Telephony Function / Option
●
ACD-Logon
●
ACD post-processing
●
ACD-Night service
●
ACD not available
●
Call waiting without tone
●
Do Not Disturb
●
Code key
●
Check received mes
●
Check sent messages
●
Retrieve parked call
●
Send messages
●
Night service
●
Take call from pickup group
●
Call pickup, directed
10-24
Icon
A31003-G2550-A100-6-76A9, 04/2005
optiClient 130 V5.0 , Administrator Documentation and Operating Instructions
optiClient5d_TelefonieHp4.fm
Nur für den internen Gebrauch
Telephony Function / Option
●
Caller number suppression
●
Do not disturb
●
Hunting group
●
Waiting ACD calls
●
Change class of service
Making Calls with the HiPath 3000/4000/5000
HiPath 3000/5000 Telephony functions
Icon
A31003-G2550-A100-6-76A9, 04/2005
optiClient 130 V5.0 , Administrator Documentation and Operating Instructions
10-25
optiClient5d_TelefonieHp4.fm
Making Calls with the HiPath 3000/4000/5000
HiPath 3000/5000 Telephony functions
10.4.2
Nur für den internen Gebrauch
Basic and Advanced Functions (HiPath 3000/5000)
Information on the following basic and advanced functions marked with "*" can be found in the
Operating Instructions for the configured device / key module, since these are functionally equivalent.
1.
Making and answering calls
3.
* Call forwarding
* Call pickup
* Night service
7.
Using Other Functions
* Ringer off
* Call charge display
* Mute/Mute off
* Busy signaling for speed-dialing keys
Call
* Code key
* Call number suppression
(Call number suppression)
* Messages
* Initiate Call
* Answer text
* Terminating calls
* Telephone Data Service
Calling multiple parties simultaneously
* DTMF transmission
DTMF Signaling (Changing over to DTMF
Tone Dialing)
* Consultation hold
* Hunting group
* Conference
* Resetting functions
* Toggle
4.
Call forwarding
* Answering calls
* Do Not Disturb
2.
6.
8.
ACD Functions
* Call transfer
* ACD Logon
* Hold
* ACD post-processing
* Park
* ACD Unavailability
Making Calls to Stored Destinations
* ACD Night service
* Redial
9.
Phone book
(see The optiClient 130 Directories)
* Caller List
10. Call lists
(see The optiClient 130 Call Lists)
Executive/Secretary Functions
5.
If You Cannot Reach a Destination ...
* Callback
* Call waiting
10-26
A31003-G2550-A100-6-76A9, 04/2005
optiClient 130 V5.0 , Administrator Documentation and Operating Instructions
optiClient5d_TelefonieHp4.fm
Nur für den internen Gebrauch
10.4.3
Making Calls with the HiPath 3000/4000/5000
HiPath 3000/5000 Telephony functions
Overview of Functions and CodesHiPath 3000/5000
The following table shows which functions are available on the display when correctly configured. The type and scope of the offered functions depends on the configuration of the connected
HiPath 3000/5000. The functions listed in the table below and their selection may therefore not
reflect the precise situation on site.
Functions can basically be activated in a direct dialog (select + confirm), via the Service menu
(select + confirm or code), or via function keys:
Functions
(= display)
... in the
direct
Dialog
... About the
Service menu
Service Menu
... about
Functionl
Key
Code
Accept waiting call
Call waiting without tone
Waiting tone on
Call wait.term.on
Call wait.trm.off
*55
*87
#87
*490
#490
X
X
X
X
X
Caller list
Save number
#82
*82
*97
#97
X
X
*401
#401
*402
#402
*403
#403
*404
#404
*405
*69
#69
X
X
X
X
X
X
X
X
X
*83
*67
X
Do Not Disturb On
Do Not Disturb Off
UCD (Uniform Call Distribution)
Log On
Log Off
Available
Unavailable
Work On
Work Off
UCD night on
UCD night off
Calls in queue
Advisory Msg. On
Advisory msg. off
Associated Services
Associated dialing
Override
X
X
X
X
X
Room monitor
*62
*88
X
Reset services
#0
X
A31003-G2550-A100-6-76A9, 04/2005
optiClient 130 V5.0 , Administrator Documentation and Operating Instructions
X
10-27
optiClient5d_TelefonieHp4.fm
Making Calls with the HiPath 3000/4000/5000
HiPath 3000/5000 Telephony functions
Functions
(= display)
... in the
direct
Dialog
Nur für den internen Gebrauch
... About the
Service menu
Service Menu
... about
Functionl
Key
Code
Speaker call
*80
*96
#96
HF answerback on
HF answerback off
X
X
X
DISA
Shift key
X
Relocate phone
Log Off
Log On
*9419
#9419
Telephone test
*940
*84
Trace call
Flex Call
*508
*85
#85
*85*
#85#
Join hunt group
Leave hunt group
Rejoin all groups
Leave all groups
X
X
X
X
X
X
Headset
Answer call
Hotline
Send a message
Sent messages
View messages
Mailbox
Conference
Set up a conference
Expand a conference
End conference
View conf. parties
Remove party
Drop last conf. party (only for U.S. with central office party)
*68
#68
#68
X
X
X
X
*3
X
#3
*491
Show call charges (own telephone)
View call charges (other party’s telephone)
*65
X
X
Use speed-dialing
Change speed-dial (station)
*7
*92
X
X
10-28
A31003-G2550-A100-6-76A9, 04/2005
optiClient 130 V5.0 , Administrator Documentation and Operating Instructions
optiClient5d_TelefonieHp4.fm
Nur für den internen Gebrauch
Making Calls with the HiPath 3000/4000/5000
HiPath 3000/5000 Telephony functions
Functions
(= display)
... in the
direct
Dialog
... About the
Service menu
Service Menu
... about
Functionl
Key
Code
Reserve trunk
Toggle
X
X
DTMF dialing
*2
*53
Mute off
Mute on
*52
#52
X
X
Monitoring
Night Answer On
Night Answer Off
*944
*44
#44
X
X
Park
Retrieve call
*56
#56
X
Page
Answer Page (not for U.S.)
*45
#45
X
X
Account Code
*60
X
Consultation hold
Back to waiting
Quit and return
Transfer/Accept
*0
*0
X
Callback
View/Delete callback
*58
#58
X
Suppress caller ID
Restore caller ID
*86
#86
X
X
Temporary MSN (not for U.S.)
X
Ring transfer: on
Ring transfer: off
*41
*502
#502
X
X
Ringing Group On
Ringing Group Off
*81
#81
X
X
Ringer cutoff on
Ringer cutoff off
*98
#98
X
X
Control relay on
Control relay off
*90
#90
X
X
Trunk flash
*51
*48
X
Select language
A31003-G2550-A100-6-76A9, 04/2005
optiClient 130 V5.0 , Administrator Documentation and Operating Instructions
10-29
optiClient5d_TelefonieHp4.fm
Making Calls with the HiPath 3000/4000/5000
HiPath 3000/5000 Telephony functions
Functions
(= display)
... in the
direct
Dialog
Nur für den internen Gebrauch
... About the
Service menu
Service Menu
... about
Functionl
Key
Code
Prog. Feature Key
Changeover On
Changeover Off
Change PIN
*91
*66
#66
*93
Phone book
Telephone Data Service
X
X
X
X
Timed Reminder On
Timed Reminder Off
*42
*46
#46
X
X
Door Opener On
Door Opener Off
*89
#89
X
X
door opener
*61
X
*59
*57
X
X
*1
*11
*12
*13
#1
501
*
#501
X
X
X
X
X
X
X
Transfer
Pickup - Directed
Pickup - Group
Accept Call
Forwarding On
1=All Calls
2=External Calls Only
3=Internal Calls Only
Forwarding Off
Forward Line: On
Forward Line: Off
Redial
Retrieve Line.
Lock All Phones
10-30
X
*63
*943
X
X
A31003-G2550-A100-6-76A9, 04/2005
optiClient 130 V5.0 , Administrator Documentation and Operating Instructions
Nur für den internen Gebrauch
11
optiClient5d_Administration.fm
Administrator Notes, Tips & Tricks
Administration of the Settings Folder
Administrator Notes, Tips & Tricks
This section provides information on the following topics:
●
Administration of the Settings Folder
●
Transferring Data from the Previous Version (Migration)
●
Overview of Port Settings for optiClient 130
●
Font Size in optiClient 130
●
USB Driver
●
Settings and Notes for Outlook
●
The optiClient 130 User and Location Concept
●
Starting optiClient 130 for the First Time with Active Central Configuration (DLS)
11.1
Administration of the Settings Folder
The Settings Folder Tool can be used to change the folder containing the configuration files (users, locations, etc.) for optiClient 130. By default, the configuration information is stored and administered in the folder
C:\Documents and Settings\All Users\Application Data\Siemens\optiClient
If this storage location cannot be accessed, you can store this information elsewhere. Following
the change, optiClient 130 will expect the configuration files in the specified folder and/or create
them there.
After installation, the Settings Folder tool is stored in the folder
–
<optiClient 130 Program Directory>\Client
–
under the name Siemens.OptiClient.SettingFoldersTool.exe
A link to this tool (Siemens.OptiClient.exe.SettingFoldersTool.lnk) can be found
in the <optiClient 130 Program Directory>\Tools folder.
Note that if the configuration folder of an already configured optiClient is changed, only the configuration files from the folder indicated above (and not the subfolders) must be copied to the
new folder. All other subfolders remain at their original location and must not be removed.
A31003-G2550-A100-6-76A9, 04/2005
optiClient 130 V5.0 , Administrator Documentation and Operating Instructions
11-1
optiClient5d_Administration.fm
Administrator Notes, Tips & Tricks
Administration of the Settings Folder
Nur für den internen Gebrauch
Starting the Program
Proceed as follows to start the tool:
●
●
Start - Run: select the tool and click OK
or start optiClient 130 (via the desktop link or the Programs menu) by pressing the i
key (or Ì key).
Operation and Notes
Display
>
To create a different folder to the default setting for storing the user and location settings,
activate Change default config folder. You can select the relevant entry under Config
folder. You cannot specify this entry manually. The ... browse button must be used for this.
>
To create a different folder to the default setting for storing user call list entries, activate
Change default data folder. You can select the relevant entry under Data folder. You
cannot specify this entry manually. The ... browse button must be used.
>
Confirm your entries with OK. The program is then closed. From this point on, the relevant
information is administered and stored in the folders set.
11-2
A31003-G2550-A100-6-76A9, 04/2005
optiClient 130 V5.0 , Administrator Documentation and Operating Instructions
optiClient5d_Administration.fm
Nur für den internen Gebrauch
11.2
Administrator Notes, Tips & Tricks
Transferring Data from the Previous Version (Migration)
Transferring Data from the Previous Version (Migration)
A migration tool is available for transferring data from the previous version of optiClient 130
(V2.5/4.0). During migration, the following data (if available) is transferred from the preceding
optiClient 130 Version V2.5 or 4.0 for optiClient 130 V5.0 users:
●
Key captions
●
Call number
●
Connectivity information (Gatekeeper)
●
Information about the LDAP connection
●
Optional: transfer of contacts into the Contacts folder
●
Optional: transfer of contacts to Outlook (if present)
Installation
The optiClient 130 Installation CD also includes the installation program for the migration tool.
You will find the installation program on the Installation CD under \Tools.
>
Insert the CD, select the installation program setup.exe and click OK.
>
The installation is performed without requiring any further input. To complete the
installation, click Finish.
The migration tool is now installed.
Starting the Program
After installation, the migration tool is stored under
–
<optiClient 130 Program Directory>\Client
–
and named Siemens.OptiClient.Migrationtool.exe
You will find a link (Siemens.OptiClient.exe.Migrationtool.lnk) to this tool in the
<optiClient 130 Program Directory>\Tools file.
Proceed as follows to start the tool:
●
Start - Run: select the tool and click OK.
>
When the migration tool is started, it first compares its own version with that of the
existing optiClient 130. If the two versions are not compatible (e.g., if an older tool
version is being used), a corresponding message appears, and the migration tool exits without transferring any data.
Operation and Notes
A31003-G2550-A100-6-76A9, 04/2005
optiClient 130 V5.0 , Administrator Documentation and Operating Instructions
11-3
optiClient5d_Administration.fm
Administrator Notes, Tips & Tricks
Transferring Data from the Previous Version (Migration)
Nur für den internen Gebrauch
Once the program is started, a dialog containing an empty log window is displayed.
>
Enabling the option Personal phonebook add to outlook contacts migrates the contacts
from the preceding version to Outlook (if present).
>
Enabling the option Personal phonebook add to contact directory migrates the contacts
from the preceding version to the contact directory.
Click Start to initiate startup. The data is transferred automatically. This process is logged in
the window.
Display
●
The tool searches for "old" configuration data from the previous version, converts it and
saves it to the defined folder.
●
The gatekeeper address for the location is created in the format xxx_xxx_xxx_xxx for
"new" optiClient 130 users. For example, the gatekeeper address 123.234.1.0 translates
into location 123_234_1_0.
●
If Outlook is installed, the contact directory for every "old" user found is transferred to an
individual directory called Telephonebook_xxxx in the Contacts folder in Outlook (xxxx
stands for the call number of the user).
●
The source data for migration is retained. Migration can only be performed once.
>
Before migrating you should note the call numbers and gatekeeper addresses stored
for all users in the previous version.
Click Exit to quit the Migration dialog.
11-4
A31003-G2550-A100-6-76A9, 04/2005
optiClient 130 V5.0 , Administrator Documentation and Operating Instructions
optiClient5d_Administration.fm
Administrator Notes, Tips & Tricks
Overview of Port Settings for optiClient 130
Nur für den internen Gebrauch
11.3
Overview of Port Settings for optiClient 130
The following is an overview of the default ports used in optiClient 130 for information on using
optiClient 130 in firewall environments. Values shown in italics can be set in optiClient 130 and
are default values:
Function
Direction
Protocol
Local port
Remote
port
Interface
Layer 7
Layer 4
from
to
Signaling (H.225)
softphone
->
H.225
TCP
>1023
-
1720
Softphone
<-> PBX
Signaling (H.225)
softphone
<-
H.225
TCP
1720
-
depending
on partner
conf.
PBX
<-> softphone
Media control
(H.245) softphone
->
H.245
TCP
12000
12100
depending
on partner
conf.
Softphone
<-> PBX
Feature protocol
->
CorNetTC
TCP
>1023
4060
Softphone
<-> PBX
VoIP payload
softphone (send/receive)
<->
RTP
UDP
29100
29131
depending
on partner
conf.
Softphone
<-> PBX/IP
phone/softphone
DLS connection
conf. data and SW
update deployment
->
HTTPS
TCP
>1023
-
18843
Softphone
<-> DLS
DLS "contact me"
command
<-
HTTP
TCP
8082
-
depending
on partner
conf.
DLS
<-> softphone
HLM HiPath License Management
->
TLS
TCP
>1023
-
61740
Softphone CLC
<-> CLA
CLM <-> CLA
HLM (CLM: CLA
autodetection)
->
broadcast
UDP
>1023
-
23232
CLM
Directory access
->
LDAP
TCP
> 1023
-
389
Softphone
<-> LDAP server
See also:
Settings for Central Configuration
Settings for Directories/Address Books (Directory Selection there)
Port Restriction Settings
Settings for Licensing
A31003-G2550-A100-6-76A9, 04/2005
optiClient 130 V5.0 , Administrator Documentation and Operating Instructions
11-5
optiClient5d_Administration.fm
Administrator Notes, Tips & Tricks
Configuration on the HiPath 4000 (AMOs)
Nur für den internen Gebrauch
11.4
Configuration on the HiPath 4000 (AMOs)
11.4.1
Configuring the HFA Client for optiClient 130 V5.0 on HiPath 4000
German AMOs for HiPath4000:
Every station configured as optiClient must set the following features:
apiclass=tsx and gerkon=optiip+api
Setting optiClient USER at STMI2 with TAPI
Display with: "ab-sbcsu:yyyy;"
Change with
EINRICHTEN-SBCSU:TLNNU=YYYY,ART=OPTI,ANSCHL=IP2,GERKON=OPTIIP&API,
APICLASS=TSX;" (where YYYY is the station number)
Example:
EINRICHTEN-SBCSU:TLNNU=YYYY,ART=OPTI,ANSCHL=IP2,GERKON=OPTIIP&API,
APICLASS=TSX,IPCODEC=G711PREF;
Activate DMC for user:
AEND-SDAT:RNR,MERKMAL,DMCERL;
11.4.2
Configuring HiPath 4000 V2.0
German AMOs for HiPath4000:
It is absolutely essential to use a HiPath 4000 V2 with STMI2. The following configuration must
be performed for this purpose:
Change DIMSU:
DIMSU: set number of STMIHFA2 hardware
EINRICHTEN-DIMSU:TYP=SYSTEM,STMIHFA2=X;
(where x=numbers of STMIHFA2)
Activate DMC system-wide
AENDERN-DIAGS:PROCID=CC,KOMP=CP2,S08=AUS;
STMI2 settings:
EINR-BCSU:PER,1,1,103,"Q2316-X ",3,0,,NEIN,300,700,300,A;
EINR-HFAB:MTYP=STMIHFA2,LTU=1,EBT=103,IPADR=192.168.1.1,
NETMASK=255.255.255.0,DEFRT=192.168.1.254;
11-6
A31003-G2550-A100-6-76A9, 04/2005
optiClient 130 V5.0 , Administrator Documentation and Operating Instructions
optiClient5d_Administration.fm
Nur für den internen Gebrauch
Administrator Notes, Tips & Tricks
Font Size in optiClient 130
Change APIMAX
AE-ZAND:TYP=CIT,APIMAX=XXXX;
Change WSPROT
einr-dimsu:typ=applikat,wsprot=xxx;
Apimax=XXX (zand) must b set: display with ab-zandTyp=cit;",
Change with "ae-zand:typ=cit,apimax=xxx;"
where xxx is the same number as WSPROT
WSPROT=xxx (where xxx is the number of optiClient stations (+stations
with Callbridge for other optiPoint400/500/600)). (dimsu) must be set:
Display with "ab-dimsu:typ=all,param=wsprot;",
Change with "einr-dimsu:typ=applikat,wsprot=xxx;"
11.4.3
Configuration for usage of the headset at the USB handset
To use the headset at the USB handset , the following parameters must be set for each call
number within the HiPath 4000 :
KOPFSG=MITIND (sbcsu)
11.5
Font Size in optiClient 130
For smooth operation and optimum display in optiClient 130, ensure that the setting Small
Fonts (normal size is 96 dpi) is entered in the Size field under Desktop Properties - Settings
- Advanced - General.
11.6
USB Driver
USB driver for terminal device control (CTI provider)
Once you have connected the phone to the PC, the hardware assistant activates and prompts
you to specify the folder containing the relevant USB driver. This driver can be found in the folder \Misc on the installation CD.
A31003-G2550-A100-6-76A9, 04/2005
optiClient 130 V5.0 , Administrator Documentation and Operating Instructions
11-7
optiClient5d_Administration.fm
Administrator Notes, Tips & Tricks
Settings and Notes for Outlook
Nur für den internen Gebrauch
USB driver for the Plathosys USB handset CT-180
Once you have connected the Plathosys USB handset CT-180 to the PC, the hardware assistant activates and prompts you to specify the folder containing the relevant USB driver. This
driver can be found in the folder \Misc on the installation CD. The Plathosys basic functions
are supported.
11.7
Settings and Notes for Outlook
Normalization of call numbers in Outlook
In order to enable dialing from Outlook, it is important to enter the location information for Outlook under Start - Settings - Control Panel - Phone and Modem Options as shown in the
figure below. The location and code information shown in the figure are examples. Enter the
parameters for your location here:
The call numbers are then normalized and displayed in Outlook as follows:
11-8
A31003-G2550-A100-6-76A9, 04/2005
optiClient 130 V5.0 , Administrator Documentation and Operating Instructions
optiClient5d_Administration.fm
Nur für den internen Gebrauch
Administrator Notes, Tips & Tricks
The optiClient 130 User and Location Concept
Updating Outlook contacts in optiClient 130
When personal contacts are added in Outlook, they must be updated in order to be visible in
optiClient 130. A note is therefore displayed in optiClient 130 to inform you about the status of
the update.
11.8
The optiClient 130 User and Location Concept
The underlying User and Location Concept in optiClient 130 provides for central management
of internal information about users (call number, display mode of the optiClient 130, etc.), the
local PC (audio devices, local hardware, etc.) and the location (communication system, network infrastructure, etc.). This enables users to:
●
log in from a fixed workplace at a fixed location,
●
log in from different workplaces or different users to log in from one workplace at a fixed
location (e.g., in a call center without fixed workplace assignments),
●
log in at different workplaces at different locations (e.g., from the office or when teleworking
from home),
while retaining their familiar and current settings.
11.9
Starting optiClient 130 for the First Time with Active Central
Configuration (DLS)
11.9.1
Information for Configuration in optiClient 130
If central configuration is active, the following points must be taken into account before the optiClient 130 program is started for the first time. In addition, specific settings must be taken into
account in the optiClient 130 user configuration:
●
Logon
It is mandatory to enter the terminal number as the Login when logging on to optiClient
130. A DLS connection is not possible if a user name is specified instead of the terminal
number.
An optional setting must also be entered under Location.
A password can be set.
See also:
Logging In
A31003-G2550-A100-6-76A9, 04/2005
optiClient 130 V5.0 , Administrator Documentation and Operating Instructions
11-9
optiClient5d_Administration.fm
Administrator Notes, Tips & Tricks
Nur für den internen Gebrauch
Starting optiClient 130 for the First Time with Active Central Configuration (DLS)
●
Parameters for central configuration
If the DSL socket (IP address with associated port) is not stored in the DHCP server or the
DNS in the current IT environment, the current DLS socket must be specified in the Central
configuration configuration dialog in optiClient 130.
If a "workpoint scan" with DLS socket distribution is scheduled at the DLS, this configuration can be skipped in optiClient 130.
See also:
Settings for Central Configuration
●
Audio profile
An audio profile must be configured in optiClient 130.
See also:
Settings for Audio Control
11.9.2
Functional Restrictions in optiClient 130
The following functional restrictions occur when using DLS V1.0:
●
Mobility functional restrictions
At present, DLS manages its terminal data on the basis of the MAC addresses. Consequently, the optiClient 130 cannot be used in turns in conjunction with the DLS by multiple
users with different user profiles if these user profiles also integrate the DLS. You can only
use a DLS-active user profile. In this case the user profile represents all configuration parameters symbolized by the login (here the call number), location, and the computer name.
●
Using different network cards
If optiClient 130 is operated with a DLS, it cannot be operated over different network call
types (LAN, WLAN, ISDN, VPN) because the DLS obtains its unique assignment over the
MAC address.
11.9.3
●
●
General Information
A optiClient "Plug & Play" (PnP) configuration at/within the DLS is only possible by using
the MAC address. We do not recommend PnP configuration based exclusively on the call
number because an optiClient profile is sometimes sent to the wrong client when the optiClient 130 logs on to the DLS for the first time (call numbers mixed up). A third-party call
number can then be used with this incorrect profile.
If the optiClient 130 is operated with a DLS, it is mandatory to use the terminal number as
the Login when logging on to the optiClient 130. A DLS connection is not possible if a user
name is specified instead of the terminal number.
11-10
A31003-G2550-A100-6-76A9, 04/2005
optiClient 130 V5.0 , Administrator Documentation and Operating Instructions
optiClient5d_Administration.fm
Administrator Notes, Tips & Tricks
Starting optiClient 130 for the First Time with Active Central Configuration (DLS)
Nur für den internen Gebrauch
●
If optiClient 130 is operated with a DLS, please ensure that there is only one optiClient profile that integrates the DLS. The user is responsible for this. Ignoring this can lead to local
profile data loss.
A31003-G2550-A100-6-76A9, 04/2005
optiClient 130 V5.0 , Administrator Documentation and Operating Instructions
11-11
optiClient5d_Administration.fm
Administrator Notes, Tips & Tricks
Nur für den internen Gebrauch
Starting optiClient 130 for the First Time with Active Central Configuration (DLS)
11-12
A31003-G2550-A100-6-76A9, 04/2005
optiClient 130 V5.0 , Administrator Documentation and Operating Instructions
Nur für den internen Gebrauch
12
optiClient5d_QuickRef.fm
Quick Reference Guide for optiClient 130 V5.0
Quick Reference Guide for optiClient 130 V5.0
For more detailed information, please refer to the Reference Manual or the online help for optiClient 130 V5.0. This section provides you with the all the information needed to start working
quickly with optiClient 130 V5.0. A fully installed and configured system is required for this purpose.
Starting the program
●
Via: Start - Programs - Siemens - optiClient
●
or by selecting the program shortcut installed on the desktop.
Login / Initial Login
●
In order to log on to optiClient 130 V5.0, you will need your logon and the associated password. Depending on your installation, you may also be able to select a Language and a
Location and enter a LIN (Local Identification Number). The location must always be entered when users log on for the very first time.
●
If configured in the user settings, you can switch from Logon directly into Settings with Management to edit program settings.
Program settings
In the Settings, you can define your individual preferences for various modules. Details are
available in the online help for the individual Settings dialogs.
●
Open the Settings dialog from the login screen with Settings or
●
open the Settings dialog during an ongoing session via Settings from the
optiClient 130 V5.0 menu (right-click an unassigned area on the main bar).
●
Note: The type and scope of settings available will vary, depending on how you open the
Settings dialog, since some parameters need to be loaded directly at login.
Display
The central element is the main bar. The Phone window as well as directories and call lists can
be docked to the main bar. The main bar and all associated windows can be minimized.
●
Integrated phone with display and, where applicable, other keys.
●
Audio Buttons on the main bar
provide basic functions such as "Lift Handset" (green) and "Replace Handset" (red) and
enable additional configured audio devices (speaker, headset, etc.) to be activated or deactivated).
●
Forwarding menu on the main bar
opens on clicking the menu icon and is used to set and activate call forwarding items.
●
Telephony Buttons / Telephony Menu on the main bar
open on clicking the Telephony menu button on the main bar and enable communication
system-specific telephony functions.
●
Volume control and Volume menu
A31003-G2550-A100-6-76A9, 04/2005
optiClient 130 V5.0 , Administrator Documentation and Operating Instructions
12-1
optiClient5d_QuickRef.fm
Quick Reference Guide for optiClient 130 V5.0
●
●
Nur für den internen Gebrauch
The Module menu on the main bar
opens on clicking the Module menu button on the main bar and enables functions from installed/configured components (modules)
The optiClient 130 V5.0 menu
is opened as a context menu of the main bar (right-click an unassigned area on the main
bar) and provides some general functions.
Using the phone
●
Available as integrated and/or free phone.
●
The Display is used in the dialog with the connected communication system (call displays,
menu prompts for the service menu).
●
The function, dialing, and dialog keys can be activated (optional) and operated like the keys
available on a desktop device.
Using the easyCom communication circle
●
The large central circle symbolizes you (your call number). Other participants are shown in
small connection circles.
●
Flashing circles indicate connection requests (incoming or outgoing)
●
If you position the cursor on a connection circle, a ring appears. You can activate telephony
functions in the ring and also in the context menu for the connection circle.
●
To establish a connection, enter the Call number and then click Call.
Accepting a connection request
A connection request can be accepted in various ways:
– Press the green “Lift Handset“ button
– Press the key on the PC keyboard that was configured system-wide for acceptance.
– If you have a configured terminal with a handset, pick up the handset.
– If the easyCom window is active, drag the flashing connection circle into the central
circle.
Disconnecting an active connection
An active connection can be disconnected in various ways:
– Press the red "Replace Handset“ button
– Press the key on the PC keyboard that was configured system-wide for disconnecting.
– If you have a configured terminal with a handset, replace the handset .
– If the easyCom window is active, click the "Disconnect" symbol on the ring for the connection circle or drag the connection circle out of the central circle.
Setting up a connection
You have various options here as well:
– Use the key field of the optiClient 130 V5.0 phone.
– Use the number keys on your PC keyboard
– Search for a contact from a directory and dial that contact directly from its context
menu (right-click).
12-2
A31003-G2550-A100-6-76A9, 04/2005
optiClient 130 V5.0 , Administrator Documentation and Operating Instructions
optiClient5d_QuickRef.fm
Nur für den internen Gebrauch
–
–
–
–
Quick Reference Guide for optiClient 130 V5.0
Drag the contact from the contact directory to the display.
Add a number to the display from the Windows clipboard. ("copy & paste").
Drag the number to the display ("Drag & Drop").
If the easyCom window is active, you can enter the phone number in a field (or use
"copy & paste" to add it) and then click the Call button.
Dialing with Copy & Paste
You can copy a highlighted extension number from any other program, such as a word-processing program, by using the i+c (or Ì +c) keyboard shortcut and then paste it into
the display field of the optiClient 130 V5.0 phone with < +f(or Ï + í (without
the trunk access code) or with i+ v (or Ì + v) (with the trunk access code). The
connection is established to the number.
Dialing with Drag & Drop
You can dial a highlighted extension number from any other program, such as a word-processing program, by dragging it with the mouse and then dropping it onto the display of the phone.
The connection is established to the number without the trunk code or with the trunk code (if
the i
(or Ì ) key is pressed simultaneously).
Contact directory
To open the contact directory, select Contact directory from the Module menu.
●
Use the input field to search for all or part of a name.
●
Set up a connection from the window from the context menu of a contact to a stored extension number.
●
For new contacts, in addition to the Last Name and First Name, enter media data (Phone
numbers with a description and Email addresses with a description).
●
Directories and Address Books
Open a new directory window with New Directory from the module Module menu and select a configured directory.
●
Search in the directory window by entering a name or part of a name.
●
Set up a connection from the Search Results window from the context menu of a contact
to a stored extension number.
●
Call lists
●
Open Call List Administration with a Call Lists button on the main bar of via Call Lists from
the Module menu.
●
If required, select the desired call list in the window.
●
Set up a connection from the context menu of the list entry (right-click) to a contact/caller.
●
From the context menu of an entry, delete the call list entry/the call list/all call lists.
Contact list
●
To open the Contact list, choose Contact list on the Module menu.
A31003-G2550-A100-6-76A9, 04/2005
optiClient 130 V5.0 , Administrator Documentation and Operating Instructions
12-3
optiClient5d_QuickRef.fm
Quick Reference Guide for optiClient 130 V5.0
●
●
●
●
Nur für den internen Gebrauch
Use the context menu in the Contact list to assign new Groups or Subscribers. You can
also use the Drag & Drop technique to drag contacts from directories or from the contact
directory to the contact list.
You can use Drag & Drop to assign contacts to groups in the contact list. If you hold down
the i or Ì key while doing so, another link to the contact is created.
Click the arrow symbol to the left of the group / contact to switch to and from the extended
view.
You can establish a connection in the extended view of a Contact by clicking the Phone
number.
Telephony Functions and Service Menu
All functions and features of the connected communication system are made available in the
display field and can be scrolled / confirmed by using telephone keys. You can program frequently used functions or the call numbers of frequently contacted partners on function keys
and then access them easily via a simple mouse click.
Extended keypad
●
Open the extended keypad from the module menu with Extended keypad.
Programming feature keys
Select the "Service Menu" key, scroll in the display field until the entry "Prog. Feature Key"
and confirm your selection.
●
Press the key to be programmed and confirm the "Change?" prompt.
●
Select one of the functions offered by the communication system and confirm the "new
function". Then "save" the selected function.
●
Key captions
●
Select “Change captions" from the context menu of the key and enter the text for the caption.
Documentation / Online Help
The documentation for optiClient 130 V5.0 is supplied in the form of a PDF file. To open the
Online Help for optiClient 130 V5.0, click the "?" on the main bar. You can obtain context-specific help for the window or dialog currently open by pressing F1 or clicking the "?" in the window’s title bar.
12-4
A31003-G2550-A100-6-76A9, 04/2005
optiClient 130 V5.0 , Administrator Documentation and Operating Instructions
Nur für den internen Gebrauch
Glossary
optiClient5dGlos.fm
Glossary
X
Central configuration
(also called DLS / DLC Deployment Service / Client). In a central configuration, the required configuration data is stored by applications in a central tool. The applications can
then retrieve the relevant parameters here.
Codec
Acronym that stands for Compression and Decompression. Codec refers to a software or
hardware function unit that converts audio or video signals in real time according to specified procedures. Codecs work with different compression algorithms that influence image
or sound quality and continuity of display and transfer. Defined codecs are used for communication between optiClient 130 and HiPath 3000/4000/5000.
Communication system
Communication service provider for voice connections, for example, the PBX system in the
network.HiPath 3000/4000/5000
Contact directory
Every user in optiClient 130 has a contact directory in which individual contacts can be entered and managed. Users can then set up a connection directly to the entered contacts.
Contact information from other directories can also be easily imported into the contact directory.
Dialog keys
Keys for navigating the Service menu, made available in the optiClient 130 display by the
communication system.
Directories
optiClient 130 provides The following basic directories are available: These directories may
be managed centrally (e.g., LDAP directories) or locally (in other applications). In optiClient
130, users can display and search for entries and also set up connections directly with individual contacts.
Display
optiClient 130 phone component; corresponds to the display on a telephone (desktop model). Used for interaction with the connected communication system (scrolling functions,
Service menu)
DLS / DLC
Deployment Service / Client (or also central configuration). In a central configuration, the
required configuration data is stored by applications in a central tool. The applications can
then retrieve the relevant parameters here.
A31003-G2550-A100-6-76A9, 04/2005
optiClient 130 V5.0 , Administrator Documentation and Operating Instructions
X-1
optiClient5dGlos.fm
Glossary
Nur für den internen Gebrauch
EKL
Electronic Key Labeling refers to the automatic labeling of a key on a device or in optiClient
that was programmed with a function with the appropriate text by the connected communication system.
Extended keypad
Optional keypad with one or more columns providing programmable function keys.
Function keys
Programmable keys in the optiClient 130 phone (partially preprogrammed by the communication system) and in the extended keypad.
Gatekeeper
A gatekeeper is a central control element in networks for routing signaling information and
for the conversion and translation of phone numbers and IP addresses. In addition, the
gatekeeper also provides bandwidth management within the framework of the QoS (Quality of Service).
Info area
Taskbar area (usually on the right-hand side of the taskbar) where a small optiClient 130
program icon can be created.
Key module
Extension for a device on which freely programmable function keys are available. In optiClient 130, existing key modules are displayed for a user as columns in the extended keypad and are operated and handled in accordance with the selected key module type.
Keypad
optiClient 130 phone component that contains the (preprogrammed) function keys, number
keys, and dialog keys.
LDAP
LDAP (Lightweight Directory Access Protocol) is a TCP/IP-based directory access protocol
that has established itself on the Internet and intranet as a default solution for accessing
the network directory service for databases, e-mail, memory areas, and other resources.
LIN
Local Identification Number
Module
optiClient 130 component that provides functions.
Quality of Service (QoS)
Quality of Service (QoS) refers to all procedures which influence data flow (audio data in
this case) in LANs and WANs in such a way that the recipient receives a fixed level of audio
service quality.
X-2
A31003-G2550-A100-6-76A9, 04/2005
optiClient 130 V5.0 , Administrator Documentation and Operating Instructions
optiClient5dGlos.fm
Nur für den internen Gebrauch
Glossary
Taskbar
Windows element which is usually located on the lower part of the desktop. Contains information on active applications (and facilitates changeover to these) and the information area.
Virtual Private Network (VPN)
A Virtual Private Network (VPN) generally refers to a closed, logical network that is established for a specific user group. A VPN always uses the public access transfer networks
where the connections are provided by a public carrier. Users build their private network
on these transmission paths. They can access to security mechanisms, such as identification and authentication of network stations to prevent unauthorized persons gaining access
to the VPN.
A31003-G2550-A100-6-76A9, 04/2005
optiClient 130 V5.0 , Administrator Documentation and Operating Instructions
X-3
optiClient5dGlos.fm
Glossary
X-4
Nur für den internen Gebrauch
A31003-G2550-A100-6-76A9, 04/2005
optiClient 130 V5.0 , Administrator Documentation and Operating Instructions
optiClient5dIX.fm
Index
Nur für den internen Gebrauch
Index
A
Accept Call 10-30
Accept caption from display 3-25
Accept waiting call 10-27
Account Code 10-29
ACD 10-5, 10-16
ACD agent number 10-5, 10-16
Activating QoS 2-4
Add forwarding 3-17
Add location 3-2
Adding a module 4-5
Advisory msg. off 10-27
Advisory Msg. On 10-27
Analog telephones 10-2, 10-14
Answer call 10-28
Answer Page (not for U.S.) 10-29
Area code 10-6, 10-16
Associated Dialing 10-27
Associated Services 10-27
Audio buttons 3-7, 3-15
Audio control 4-16
Audio devices 4-16
Audio scheme 4-16
Audio scheme, sequence 4-18
Automatically deleting a call list entry 7-4
B
Base DN (LDAP) 4-24
Basic installation 3-20
Browser navigation 9-1
C
Call category 7-2
Call list button 7-2
Call list settings 4-20
Call Lists 3-9
Call lists 7-1
Call number 4-20
Call number prefix 4-22
Call wait.term.on 10-27
Z
Call wait.trm.off 10-27
Call waiting without tone 10-27
Callback 10-29
Caller list 10-27
Calls in queue 10-27
Central circle 8-1
Central configuration 2-6, 3-3, 4-1, 4-15, 11-9
Change of connection status 4-12
Change of connection status display mode 412
Change password 3-2
Change PIN 10-30
Change speed-dial (station) 10-28
Changeover Off 10-30
Changeover On 10-30
Closing call lists 7-3
Codec X-1
Color layout 4-6
Column configuration (LDAP) 4-24
Column order 3-29
Column width 3-28
Conference 10-28
Configuration 4-1
Connection circle 8-1
Consultation
back to waiting 10-29
Consultation hold 10-29
Consultation hold transfer/accept 10-29
Contact directory 3-10, 5-2
Contact directory, closing 5-3
Contact directory, delete contact 5-6
Contact directory, direct call 5-6
Contact directory, direct email 5-7
Contact directory, edit contact 5-5
Contact directory, new contact 5-3
Contact directory, opening 5-2
Contact list 3-10, 5-5, 6-1
Contact list, adding a contact 6-2
Contact list, adding a group 6-2
Contact list, closing 6-1
A31003-G2550-A100-6-76A9, 04/2005
optiClient 130 V5.0 , Administrator Documentation and Operating Instructions
Z-1
optiClient5dIX.fm
Index
Nur für den internen Gebrauch
Contact list, deleting a contact 6-3
Contact list, direct email 6-5
Contact list, editing a group 6-2
Contact list, editing contact data 6-3
Contact list, media data 6-2
Contact list, opening 6-1
Contact list, removing a group 6-2
Control relay off 10-29
Control relay on 10-29
Controls (overview) 3-6
CorNet connection 10-10
Country code 10-6, 10-16
D
Data transfer 11-3
Default page 4-28, 9-1
Deleting a call list entry 7-3
Deleting call lists 7-3
Delivery scope 1-2
Device 10-18, 10-26
Dialog keys 3-22
Direct call from the directory 5-10
Direct call to a station from the call list 7-3
Directories/Address books 3-9
Directories/address books 4-21, 5-1
Directory column information 4-22
Directory name search 5-8
Directory, closing 5-8
Directory, opening 5-7
DISA 10-28
Disabling forwarding 3-17
Disconnecting a call 3-15
Display 3-6, 3-21
Display options for optiClient 130 Module window 3-28
Display, four-line 3-21
Display, two-line 3-21
Do Not Disturb Off 10-27
Do Not Disturb On 10-27
Docking the main bar 3-13
Docking windows at the main bar 3-28
Documentation conventions 1-5
door opener 10-30
Door Opener Off 10-30
Z-2
Door Opener On 10-30
Drag & Drop 5-5, 6-4, 8-5
Drop last conf. party (only for U.S.) 10-28
DTMF dialing 10-29
E
easyCom communication circle 3-11, 4-25,
8-1
easyCom symbols 8-2
Electronic Key Labeling 3-23
Email 5-10
Enabling forwarding 3-17
End conference 10-28
End of program 3-5, 3-13
End of program, settings 4-9
Exiting optiClient 130 3-5
Expand a conference 10-28
Extended directory search 5-9
Extended keypad 3-23, X-2
Extended keypad, minimizing 3-24
Extended keypad, opening/closing 3-24
Extension number 10-5, 10-16
F
Fallback network access 10-8
Fault icon 3-7
Fault signaling 3-7, 3-19
Fault, querying 3-19
Firewall 11-5
Flashing connection circle 8-2
Flex Call 10-28
Font size 11-7
Forward Line
Off 10-30
On 10-30
Forwarding 3-16
Forwarding menu 3-7
Forwarding Off 10-30
Forwarding On 10-30
Forwarding on 1=all calls 10-30
Forwarding on 2=only external calls 10-30
Forwarding on 3=only external calls 10-30
Function keys X-2
Function keys, labeling 3-24
A31003-G2550-A100-6-76A9, 04/2005
optiClient 130 V5.0 , Administrator Documentation and Operating Instructions
optiClient5dIX.fm
Index
Nur für den internen Gebrauch
G
Gatekeeper 10-5
H
Handset volume 3-16
Hardware requirements 1-5
Headset 10-28
Headset on / off 3-15
Headset volume 3-16
Help icon 3-30
HF answerback off 10-28
HF answerback on 10-28
Hotkeys 4-31
Hotline 10-28
I
Image file 5-4, 5-6
Image, deleting 5-6
Info area 4-11, X-2
Installation medium 2-1
Installing optiClient 130 2-5
Internet pages 4-27
J
Join hunt group 10-28
K
Key assignments 10-4
Key module 10-18, 10-26
Key module type
10-3, 10-15
Keyboard Manager 4-31
Keyboard operation 3-26
Keyboard support 4-31
Keypad 3-22
L
Labeling function keys 3-24
Language 3-2, 4-8
LDAP X-2
LDAP directory 4-21, 4-23, 5-2
LDAP directory, Base DN 4-24
Leave all groups 10-28
Leave hunt group 10-28
Licensing 1-5, 2-1
Lift receiver 3-15
LIN X-2
LIN (Local Identification Number) 3-2, 4-9
Location 3-2, 4-8
Location information 10-6, 10-8, 10-16, 11-8
Lock All Phones 10-30
Log Off 10-27
Logging in 3-1
Logon 3-1
Lotus Notes 4-23, 5-2
Loudspeaker on / off 3-15
M
Mailbox 10-28
Main bar 1-1, 3-12, 4-6
Main bar display options 3-13
Main bar, minimizing/restoring 3-14
Management 3-3
Management functions 3-3, 4-8
Manager modules 1-1, 4-4, 4-31
Microphone on/off 3-15
Microsoft Exchange Server 4-21, 4-23, 5-1
Microsoft Outlook 4-21, 4-23, 5-1
Minimize all modules 3-8
Minimizing all modules 3-15
Module menu 3-19
Module, adding 4-4
Module, removing 4-4
Modules installed, overview 1-2
Monitoring 10-29
Mute off 10-29
Mute on 10-29
N
Netmeeting 10-11
Network access settings (HiPath 4000) 10-6
Night Answer Off 10-29
Night Answer On 10-29
O
Online help 3-7, 3-30
Online help, languages 2-5
Opening call lists 7-2
Operating with the PC keyboard 3-25
Operation settings 10-13
A31003-G2550-A100-6-76A9, 04/2005
optiClient 130 V5.0 , Administrator Documentation and Operating Instructions
Z-3
optiClient5dIX.fm
Index
Nur für den internen Gebrauch
optiClient 130 menu 3-12, 4-1
optiClient 130 phone 3-21
optiClient 130, installing 2-1, 2-5
optiClient window, minimizing 3-28
optiClient window, restoring 3-28
Order of columns 3-28
Override 10-27
P
Page 10-29
Park 10-29
Password 10-5, 10-16
Phone book 10-30
Phone display options 3-22
Phone module 4-19
Phone type 10-3, 10-14
Pickup - Directed 10-30
Pickup - Group 10-30
Playback 4-17
Port restrictions 10-10
Port, default values 11-5
Ports, settings 11-5
Positioning the main bar freely 3-14
Preceding version 11-3
Prefix 10-7, 10-16
Prog. Feature Key 10-30
Program group 2-6
Program information 3-13, 3-30
Program start, settings 4-7
Programming function keys 3-25
Provider modules 1-1, 4-4, 4-29
Provider, standard 2-5
Q
QoS X-2
QoS (Quality of Service) 2-1, 2-3
QoS configuration 2-4
QoS installation 2-4
QoS methods 2-3
QoS settings 10-11
Quit and return 10-29
R
Redial 10-30
Reference documentation 1-4
Z-4
Rejoin all groups 10-28
Relocate phone 10-28
log off 10-28
log on 10-28
Remove party 10-28
Removing a module 4-5
Reserve trunk 10-29
Reset Services 10-27
Restore caller ID 10-29
Retrieve call 10-29
Retrieve Line 10-30
Ring tone 10-13
Ring tone volume 3-16
Ring transfer
off 10-29
on 10-29
Ringer cutoff off 10-29
Ringer cutoff on 10-29
Ringing Group Off 10-29
Ringing Group On 10-29
Room monitor 10-27
S
Safety information 1-6
Save number 10-27
Screen saver 4-32
ScreenSaver Manager 4-32
Select language 10-29
Send a message 10-28
Sendmail Provider 4-29
Sent messages 10-28
Service menu 10-22
Set up a conference 10-28
Settings 3-3, 4-1
Settings Folders Tool 4-1
Settings, provider-specific 10-1, 10-14
Shift key 10-28
Shortcut icon 2-6, 3-1
Show call charges (own telephone) 10-28
Signal channel 4-17
Signal output 4-17
Software requirements 1-4
Speaker call 10-28
Speaker volume 3-16
A31003-G2550-A100-6-76A9, 04/2005
optiClient 130 V5.0 , Administrator Documentation and Operating Instructions
optiClient5dIX.fm
Index
Nur für den internen Gebrauch
Speed-dial number 4-32
Standard Provider 2-5
Starting optiClient 130 3-1
Starting the program 3-1
Suppress caller ID 10-29
System identification number 10-6, 10-16
T
Tab view 3-29
Telephone 3-6
Telephone Data Service 10-30
Telephone test 10-28
Telephony buttons 3-7
Telephony functions 3-18, 10-17, 10-24
Telephony menu 3-18
Teleworking 10-9, 10-10
Temporary MSN (not for U.S.) 10-29
Terminating a program when a connection is
active 3-5, 4-10
Timed Reminder Off 10-30
Timed Reminder On 10-30
Toggle 10-29
Tool - Migration 4-1, 11-3
Tool - Settings Folders 4-1, 11-1
Trace call 10-28
Transfer 10-30
Trunk code 10-6, 10-16
Trunk flash 10-29
V
View call charges (other party’s telephone)
10-28
View conf. parties 10-28
View messages 10-28
View/Delete callback 10-29
Virtual Private Network 10-11
Voice channel 4-17
Volume control 3-16
Volume menu 3-16
VPN settings 10-11
W
Waiting tone on 10-27
Web Browser window 3-11, 9-1
Windows user names 4-8
Windows, anchoring 3-14
Windows, positioning freely 3-14
U
UCD (Uniform Call Distribution) 10-27
UCD available 10-27
UCD logon 10-27
UCD night off 10-27
UCD night on 10-27
UCD unavailable 10-27
UCD work off 10-27
UCD work on 10-27
Updating the program 3-13, 3-31, 4-14
USB driver 11-7
Use speed-dialing 10-28
User interface modules 1-1, 4-4, 4-16
User preferences 3-13
User requirements 1-4
A31003-G2550-A100-6-76A9, 04/2005
optiClient 130 V5.0 , Administrator Documentation and Operating Instructions
Z-5
optiClient5dIX.fm
Index
Z-6
Nur für den internen Gebrauch
A31003-G2550-A100-6-76A9, 04/2005
optiClient 130 V5.0 , Administrator Documentation and Operating Instructions